
CH16 - Turbo Cayuco: The Next Phase

I did not. Because I didn't know better. This tutorial on how to make a long panel doesn't mention glueing the edges together. The plans refer you to the Cheap Canoe instructions, but those use butt blocks, not FG splices, and there is no mention of glueing edges together. Then, there's the "Stitch and Glue 101" which I read several times. Again, no FG splice, just butt blocks without mentioning the edge glueing. Is there any other support material that mentions that FG splices should have the edges glued together?Did you put any mixed epoxy in the joints?
If the edges of the ply were simply butted together, you would have one big void and therefore a very weak joint.
I guess this means that I have to grind out, sand out, or mill out all 8 Fiber glass splices I've done, and redo the whole thing glueing the edges before puting the tape down. Ignorance is expensive, time consuming, and frustrating
I'll do so as soon as I get home from the office. Shortly after the thing cracked on me yesterday, I had some friends come in to my house for a barbecue and just didn't have the chance to further analyze and take pictures.Can you post a closeup of the splice that *cracked* and is now bending much more?
The tape was both on the inside and outside, just as the plans call for.First, was the tape on the outside or the inside? It should be on the outside.
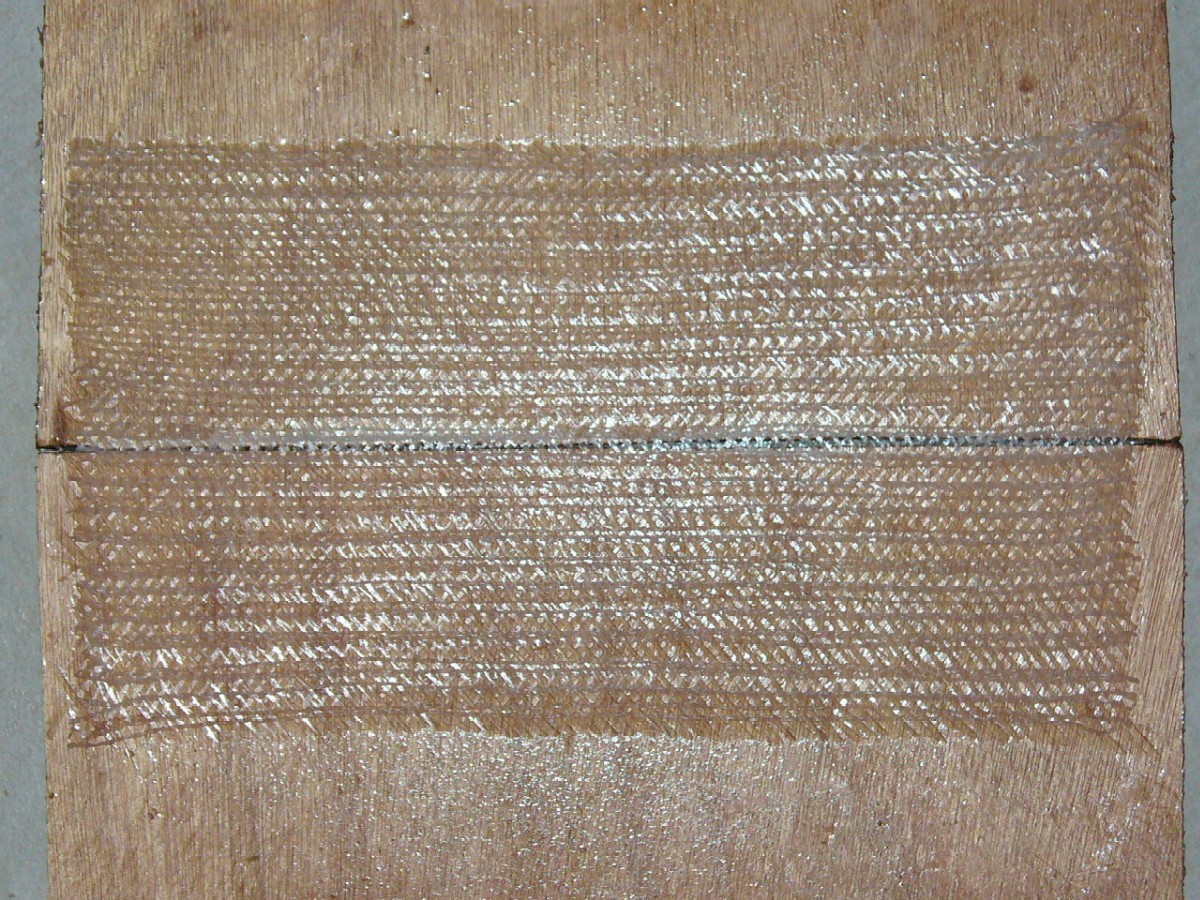
Was there a space between the panels. they should be tightly butted together.
There was a small space due to the uneveness of my cuts. See the enclosed picture and judge for yourself. Maybe it is way too much of a space.
The tape did not pull away at all. In fact, until a few moments ago, I was under the impression that none of the fibers had broken. However under closer examination I did find several fibers broken directly over the joint.Third, did the tape pull away from the panel?
Click here or on the picture to get a higher resolution version of this picture.
I guess it is better to find out at this stage that you splices will fail rather than have them fail while you're paddling in the middle of a lake.


I'll do that. The failed board is the one that had, by far, the largest gap. Is the glueing of the edges an absolute requirement? Can a splice with a minimal or no gap still be acceptable without glued edges?With that gap you set up a condition that is similar to a (very bad) void in plywood. You should be able to grind the tape off of the bad side, fill that gap with some putty and tape it again.
Guys, thanks for all the efforts to reduce my ignorance, for the educating and the insights.
-
ArizonaBuilder
- Very Active Poster

- Posts: 1192
- Joined: Wed Dec 31, 1969 7:00 pm
- Location: Phoenix, Arizona
No, you don't want any weak point in the spice. Fill all voids with epoxy/woodflour mix. The larger the gap the thicker the mix anywhere from a runny glue to a fillet consistency.Can a splice with a minimal or no gap still be acceptable without glued edges?
I will place one of the pieces down and put some duct tape under the joint to keep the fillet/glue material in the joint while the first side is curing. After the first board is down, slap some thickened epoxy on the joint and move the second board in place to close the joint and squeeze out the glue. The duck tape on the underside will keep the glue in the joint. FG and wait 24 hours.
Turn the board over and lightly sand to smooth out the area. You can also fill any voids in the joint with more glue and then fiberglass the second side.
You now have a solid, stronger than wood joint.
Beer is living proof that God loves us and wants us to be happy.
-- Benjamin Franklin
-- Benjamin Franklin
-
Jerry-rigged
- Very Active Poster
- Posts: 634
- Joined: Tue Oct 04, 2005 3:22 pm
- Location: Hopefully fishing Christmas Bay
I just double checked my CH14 building notes - there is no mention of glueing the joint, just the FG tape. I did add a glue to mine, not sure where I read it, maybe on one of the on-line tutorials?
A thought i had while reading about the break - you were opening the panel vertical - this addes lots-o-stress to the joint. After you stich the ends, stand the two panels up on edge, and open horizontal - should be a lot less stress.
One other thought - this is kinda proof of the "Hard spot" idea of gaps are good - but you gotta remember to fill the gaps with glue.
Don't sweat the break. Grind off the old glass (good excuse to get that nice RO sander with a built in dust collecter, if you don't have one yet ) and chalk the whole thing up as "experience" (which you only get AFTER you needed the experence in the first place). We all make screw-ups on our first boat - that is why Jaq & Co keep telling us to build a small boat befor jumping into our "dream boat". Look on the bright side, yours is easaly fixable. My canoe will probably never paddle a straight line, thanks to the crooked keel.
  Lessens learned, hopefully my power boat will be closer to right.
Jerry
A thought i had while reading about the break - you were opening the panel vertical - this addes lots-o-stress to the joint. After you stich the ends, stand the two panels up on edge, and open horizontal - should be a lot less stress.
One other thought - this is kinda proof of the "Hard spot" idea of gaps are good - but you gotta remember to fill the gaps with glue.
Don't sweat the break. Grind off the old glass (good excuse to get that nice RO sander with a built in dust collecter, if you don't have one yet
Jerry
Fishing from a paddle boat...
-
ks8
- * Bateau Builder *
- Posts: 8403
- Joined: Mon Nov 24, 2003 1:00 am
- Location: NC USA
- Location: Now a much longer sail to Tampa Florida! Back to NC, Youngsville FM05tw
Great closeup. Can we see another of the new splice?
The keel and chine seams, and rubrail, will add all sorts of strength to that hull structure. Long thin bubbles right on a seam line, are your enemy. Get enough epoxy and epoxy filler blend formed under/before the tape to make it easy to work such bubbles out from under the tape before the cure. Strength = glass fibers thoroughly bonded to a smooth and stable core surface. Good enough definition for this boat anyway. Significant air gaps under a thin glass lamination means no bond there to a core material, making the glass try to withstand all the compression forces alone. Thin fibers over an air gap are bonded only to themselves with a minimum of epoxy, which means they can and may bend up or down or side to side in that *free air space* til they crackle or til the epoxy binder holding them together cracks, particularly over a splice or in a corner seam. Once the splices are redone, with the tape fibers thoroughly bonded to a smooth and stable core surface (cured epoxy filler blend), this mishap will pale in comparison to how you see the hull gain strength with each new taping and the rubrail.
I guess you are now initiated! Welcome!
Who is online
Users browsing this forum: No registered users and 5 guests