Page 1 of 1
CH16 - Turbo Cayuco: The Next Phase
Posted: Mon Oct 16, 2006 8:35 pm
by gepineda
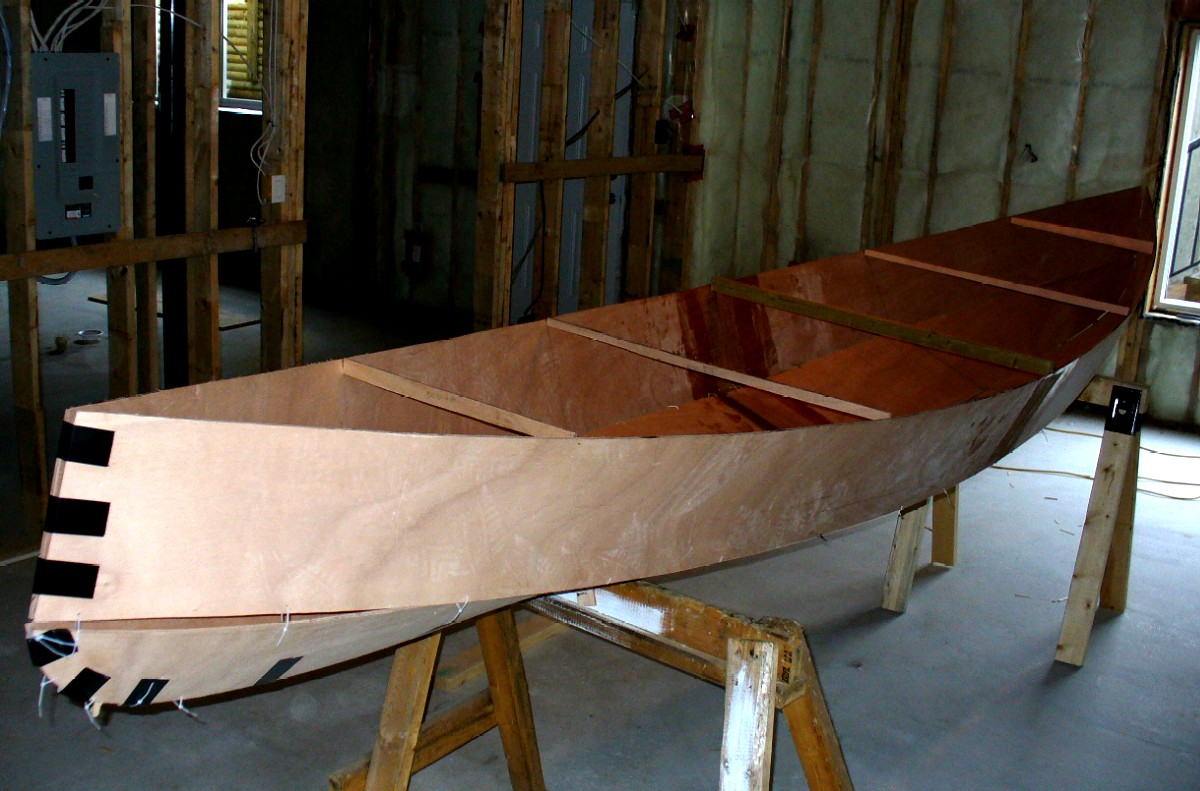
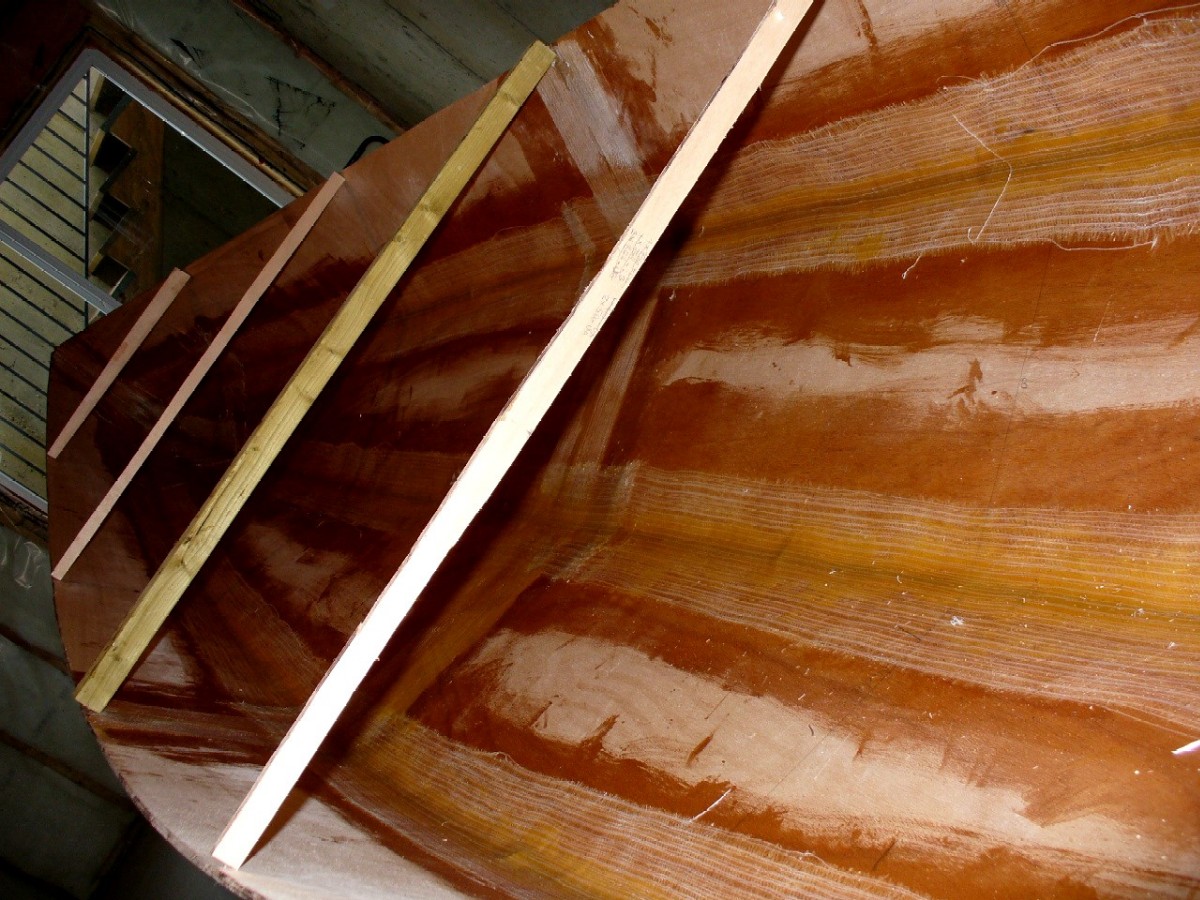
I finally started building it yesterday. TimF managed to get some plywood boards from the island into the Vancouver lower mainland.
The cutting went on without major problems. All of it with, the exception of the curved tips of the bottom panels, was done with a circular saw. It does fair lines considerable quicker than the jigsaw. For the tips I did use the jigsaw.
After I had cut all the pieces, I realized I forgot to mark the places where the forming batens or molds will go. So tonight I'll have to measure and mark those and then I'll do the fiberglass splicing.
Originally I was contemplating doing a NC16, but the CH16 is so much better looking. One of the things that I found attractive is that all the stitching on the NC16 can be done with duct tape. How feasable is it to do the stitching (or even a portion of it) on the CH16 with Duct tape? I bought a thick roll of the "Toughest Tape on the Planet": Gorilla tape. I'm thinking it may be good enough to stitch most parts, but I have my doubts on whether it'll be able to hold the bows together. Any thoughts?
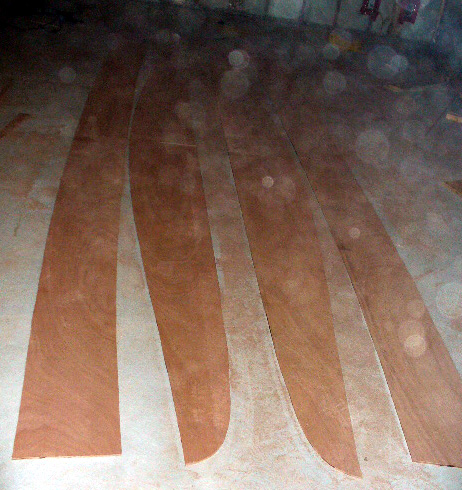
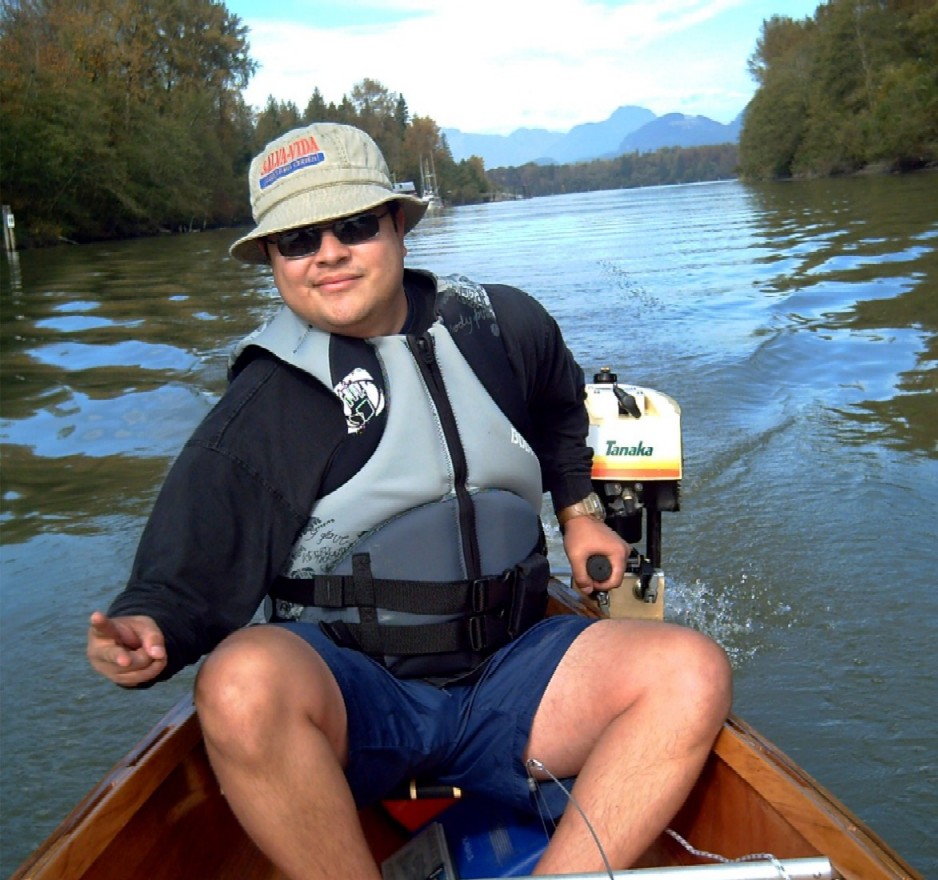
BTW, excuse the annoying specks on the picture. I think these are saw dust particles floating around in the air. I should have used a dust mask. I think there was no permanent damage becauses my sense of taste and smell are slowly coming back.
 Cayuco Gallery
Posted: Mon Oct 16, 2006 8:48 pm
by rudar
Lookin' good. Unfortunately I missed you at TimF's place. He suggested 10am, and rather than complain, I dragged myself out of bed at such an ungodly hour. Then found out he was going to be kicking his heels waiting for you for near an hour

. Should have complained and slept in...
I haven't started my CC yet. Customs is still delaying clearance on my epoxy order for reasons unknown

But I'll probably swing by the home despot on Wednesday anyway for a saw blade, and boat-yard tent materials. Get a start on that, and scribing/ cutting the wood, at least.
'course, all this waiting is making me wonder whether I should ditch the `get it ready by mid-october' part of the program (ha!) and order plans for a 12' Hiawatha instead...
Posted: Tue Oct 17, 2006 12:53 am
by gepineda
Lookin' good. Unfortunately I missed you at TimF's place. He suggested 10am, and rather than complain, I dragged myself out of bed at such an ungodly hour. Then found out he was going to be kicking his heels waiting for you for near an hour
. Should have complained and slept in...
Sorry about that. Tim was a kind enough to wait for me while I got there.
As to the customs ordeal, I set up a box with mailboxes international. They charge $10 per year and $2 per package, but the difference in shipping charges from Jaques' store more than made up for it. And to top it all the border guard allowed me to come back into Canada without paying any taxes. I just told him I'd gone over to the US to get some resin for a canoe I was building and he didn't even flinch, he just waved me in.
Mail Boxes International
1685 H Street Suite 330
Blaine, WA 98230
Bus: (360) 332-7678
Bus Fax: (360) 332-7679
Posted: Tue Oct 17, 2006 9:11 am
by tech_support
And to top it all the border guard allowed me to come back into Canada without paying any taxes. I just told him I'd gone over to the US to get some resin for a canoe I was building and he didn't even flinch, he just waved me in.
That is what I have heard from all the other guys who drove south to get ther materials. Free trade, imagine that

Posted: Tue Oct 17, 2006 10:30 am
by Evan_Gatehouse
Having done this a LOT over the past year (same mailboxes international). I think the $ value where you have to go and pay taxes is > $60 CDN or so.
Customs guy: "How much is that anchor worth?"
Evan: "Uh, $50" (33 lb. aluminum Spade)

Customs guy: "O.k. go ahead"
Posted: Tue Oct 17, 2006 2:21 pm
by Jerry-rigged
Congradulations on joining the Chenoa club!
I am still in mid-build, but let me offer a few observations -
1. - Don't use duct tape for stitching - I did and my keel is screw up. The tape made it near-impossable to double check the seam, and my panels overlaped for the last 2'-3' on one end. Use the tie-wraps for the stiches, they work well.
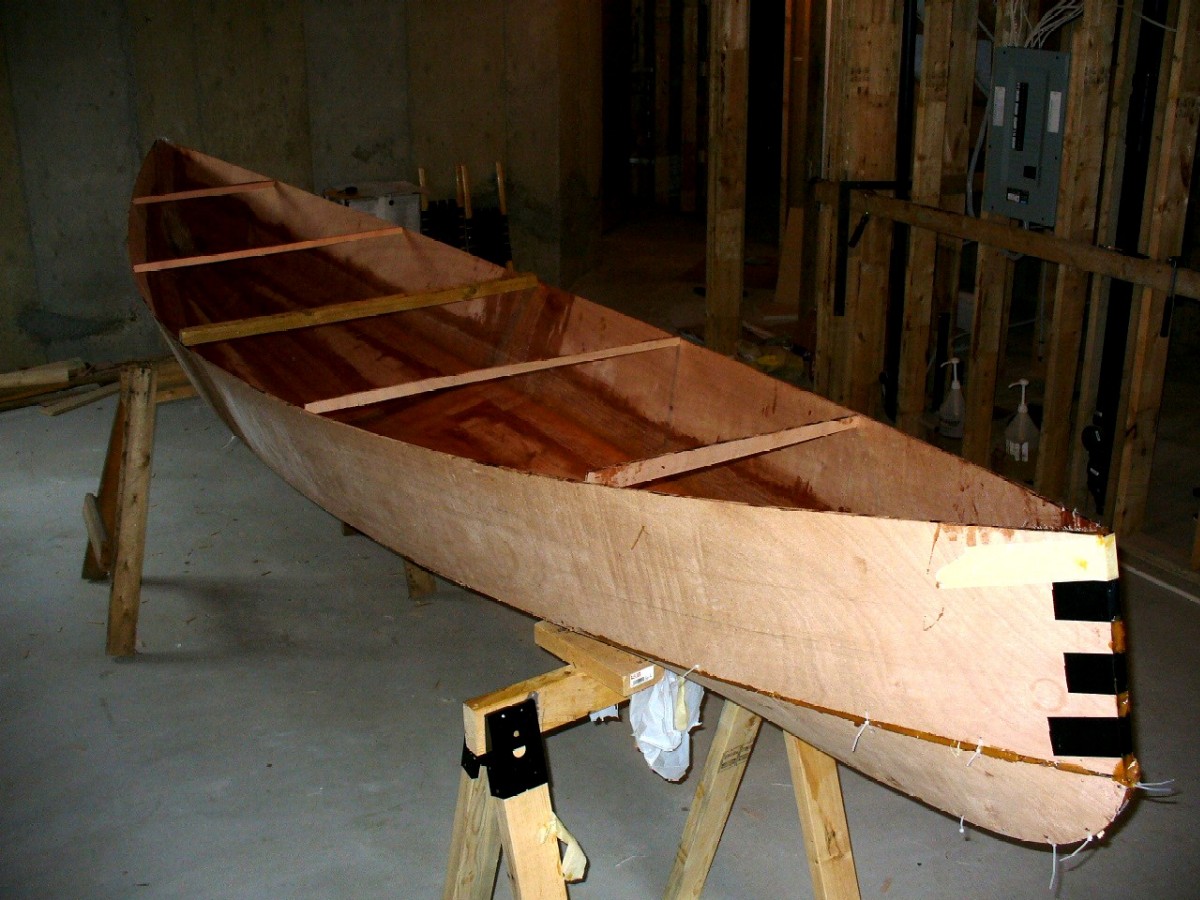
2. - Looking at your pic - your top panels are upside down - (makes for a better pic, just don't try to stitch it that way) The concave side goes up.
Good luck, and enjoy!
Jerry
Posted: Tue Oct 17, 2006 6:31 pm
by gepineda
2. - Looking at your pic - your top panels are upside down - (makes for a better pic, just don't try to stitch it that way) The concave side goes up.
I've been wondering which side goes up on those panels. The plans don't really tell you, and I just thought I'd figure it out when I got to that point. Thanks, that's one less thing I to worry about figuring out.
I see your point about it being difficulty to keep the appropriate gap when you stitch with tape.
Posted: Tue Oct 17, 2006 7:04 pm
by Lucky_Louis
Another plus for using ties instead of tape is adhesive residue. Most sticky tapes will leave some type of residue behind when you pull them off meaning an extra step to clean the areas with solvent before applying any epoxy. Especially if any amount of time goes by...
If us Northwest builders keep multiplying like this, Jacques will be opening up bateau.com NW division soon!
Posted: Wed Oct 18, 2006 4:15 pm
by gepineda
I was trying to avoid the extra step of drilling holes. Is the residual glue such a big problem for the epoxy? Wouldn't a light and quick sanding take care of the residue problem or would it just smear the glue more?
Posted: Wed Oct 18, 2006 4:29 pm
by jacquesmm
Acetone will take care of the glue.
Posted: Thu Oct 19, 2006 12:57 pm
by rudar
I thought we wanted to avoid using acetone as it can leave residues that interfere with the epoxy

I also thought one would put duct-tape on between the stitches to prevent the spot-welds from leaking through the seam, so using zipties wouldn't really avoid potential problems with glue residue anyway... If good quality duct-tape left in place for only a day or two would even leave any residue?
Wouldn't alcohol take care of duct-tape glue?
Posted: Thu Oct 19, 2006 1:10 pm
by jacquesmm
Acetone will quickly evaporate, no problem with it. Lacquer thiiner is good too.
Alcohol and some other paint thinners may leave residues.
Posted: Thu Oct 19, 2006 1:36 pm
by Jerry-rigged
I used "Monster" duct tape, left it on for several weeks, (maybe two months?), and didn't have any residue to deal with. Ofcorse, about 1/2 the tape had let go on it's own by then...

I didn't use any tape behind the spotwelds, and didn't have much of an issue with the glue dripping thru. But then, maybe my glue was too thick.
Jerry
Posted: Thu Oct 19, 2006 2:20 pm
by rudar
I'd assume it would also depend on how wide your gaps are. I'd hazard a guess that if they're close to the minimum 1-2mm, glue dripping won't be a problem; if they're closer to the maximum 10mm, perhaps the duct-tape backing would do some good. I guess I'll have to see how my sawing skills are, once I finally start building. Maybe I'll pick up some acetone just to be on the safe side.
Posted: Thu Oct 19, 2006 2:59 pm
by ks8
I had two cans of acetone with no residue problems. Then I had a third that left the wood slightly darker than an equivalent water wipe. I sanded, vacuumed well, and wiped it down with a barely damp paper towel (folded twice), frequently turning. Then sanded again and wiped clean. I have no problems with adhesion, and might not have with only the acetone wipe, but the slightly darker color spooked me a bit. I don't think alchohol will cut any tape residue as well as the acetone. Perhaps some acetone out there is slightly recycled? Don't know. But I did see one of three cans behave slightly differently.
I suppose a simple enough test would be pouring a couple of ounces of the acetone into a glass first to see if it is crystal clear, without smoking a cig at the same time.

I'll probably do that with my last batch when I get home (not the cig part), but it is probably fine.
If you do a water wipe and it is very wet, you may need to sand again after it thoroughly dries as softwood and hardwood swells differently when wet, and then stays that way after drying, exagerating grain patterns.
As said earlier, the ties allow you to see the seam positions clearly while laminating, where the duct tape may hide that something slipped into a strong overlap where you don't want one.
FG Splicing done
Posted: Fri Oct 20, 2006 11:12 pm
by gepineda
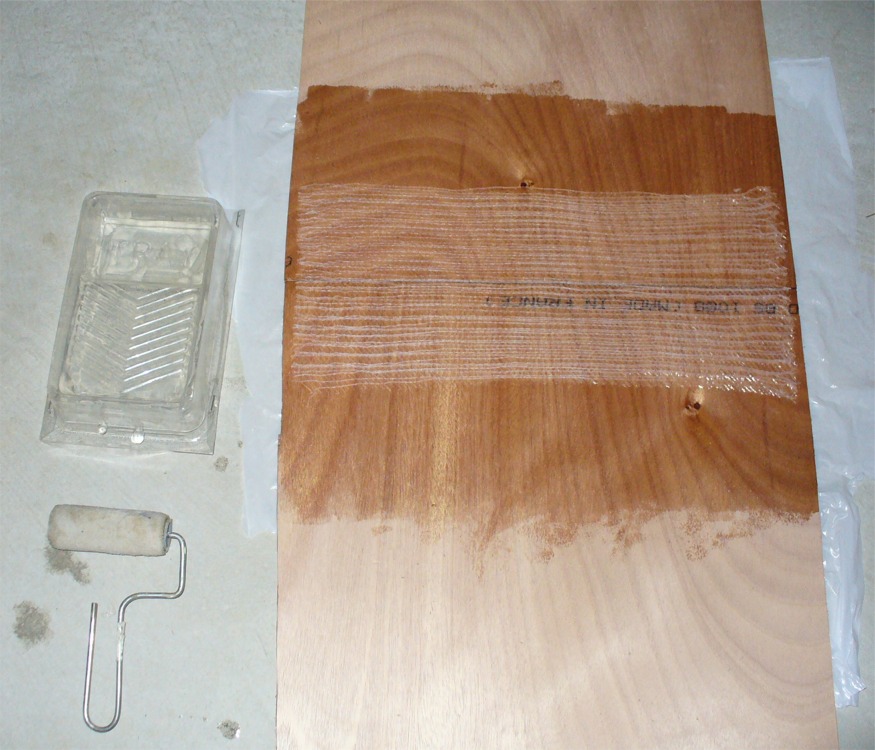
Both sides are now spliced. I am currently waiting to the second side to cure. I did all the applying of the epoxy with a small roller. I tried out a brush, but liked the roller better. It's hard to put too much resin with a roller, and it spreads the resin more evenly. On one of Shine's posts he mentions that it is very common for newbies to apply to much epoxy. I know that too much epoxy will weaken a fg seam, but is there such a thing as too little resin on the fiberglass? I made sure that all the glass appeared wet, and had no bubbles or raised areas. However, on the splicing of the second side of the panels I only used around 75ml of mixed resin for all four panels and that includes a precoat. Is this ok or I am being too sparse on the resin?
Gabe
Posted: Sat Oct 21, 2006 11:51 am
by gepineda
I think the insecurities about my fg splicing were unfounded after all. I went to the basement this morning to check out how the splices cured and everything looks and feels ok. Yesterday as I was flipping the panels, with just one side spliced, it was a very different feeling. The one splice seemed way too fragile and easy to bend

. I thought maybe I should have slattered on more resin to end up with a thicker splice that would seem more sturdy

. But luckily I resisted the temptation while splicing the second face of the panels.
Posted: Mon Oct 23, 2006 10:03 am
by Jerry-rigged
Are you using the new bi-ax tape? Your tape looks a little diffrent than mine.
B-O-D
Jerry
Splice failure
Posted: Mon Oct 23, 2006 6:59 pm
by gepineda
Are you using the new bi-ax tape? Your tape looks a little diffrent than mine.
Yes, I am. Six inch biaxial. Is your's the older tape?
Yesterday I had problems with one of the fiberglass splices. I'd finish stitching the upper panels at the bows. Even though the lower panels were also stitiched at the keel, I had not attached upper and lower panels together. I opened the stitched upper panels to put in the Mold C batten. I had already done that several times (at least 5) before with no ill effects. But that last time I did so, a crack sounded and the inner splice of the panel I had in my hands (see stick drawing) gave way. Instead of the nice curve I used to get when I opened the panels, now I had a very wide angle at the seam. The panel just above my feet was ok. The fiber in the inner splice that gave way was not broken or separated. It only seemed bent out of its rigid shape.

Given that these splices are supposed to be stronger that the wood all by itself, I was opening the panels vertically instead of horizontally. I never opened the panels beyond the lenght of the batten. Heck, I never got the chance to put the batten in.
Now I'm trying to figure how to repair this. I'm thinking of laying it flat again, spreading some epoxy on top of the failed splice and then fiberglassing it with 8" long strips laid lenghtwise or at 90 to the orientation of the original failed tape. This way I put to work the logitudinal fibers that hold the biaxial pattern together. I would also have one inch of fiberglass going beyond the width of the original tape in each of its two sides.
I'd have to repeat the same process on the opposing panel in order to keep the boat symmetrical. I was thinking of only sanding the epoxy coated area right beside the tape but not the fiber in itself. Will I have any problems if I do it that way? Or should I just sand out the fiber completely and try to start "fresh"? My concern with the latter option is that the opposing panel will have a different flexibility and I'd end up with an asymmetrical boat. The opposing panel is ok. Why should I sand the fiber out. I'd rather just lay more glass tape on top of the good fiber.
Jacques or Shine, why would this have happened?
I follwed the plan and the instructions without deviating, splice the panels together with one strip of fiberglass tape on each side of the panels. I just wanted to install the batten pulling the panels vertically. Once the batten was in place, but not secured, I would lay the panel opening horizontal to the ground and let the springing action make it symmetrical, and then I'd secure the batten in preparation to affix lower and upper panels together. While the opening was vertical, I never stepped on the panel, I only allowed gravity to pull it down as I pulled up. The wood never broke nor suffered any damage, but the splice, that's supposed to be stronger, failed.
Posted: Mon Oct 23, 2006 7:04 pm
by ArizonaBuilder
A good FG joint will also have some epoxy/wood flour mixture joining the edges together as well as the FG on each side.
Did you put any mixed epoxy in the joints?
If the edges of the ply were simply butted together, you would have one big void and therefore a very weak joint.
Posted: Mon Oct 23, 2006 8:07 pm
by ks8
Can you post a closeup of the splice that *cracked* and is now bending much more?
Posted: Mon Oct 23, 2006 8:14 pm
by gepineda
Did you put any mixed epoxy in the joints?
If the edges of the ply were simply butted together, you would have one big void and therefore a very weak joint.
I did not. Because I didn't know better. This
tutorial on how to make a long panel doesn't mention glueing the edges together. The plans refer you to the Cheap Canoe instructions, but those use butt blocks, not FG splices, and there is no mention of glueing edges together. Then, there's the "Stitch and Glue 101" which I read several times. Again, no FG splice, just butt blocks without mentioning the edge glueing. Is there any other support material that mentions that FG splices should have the edges glued together?
I guess this means that I have to grind out, sand out, or mill out all 8 Fiber glass splices I've done, and redo the whole thing glueing the edges before puting the tape down. Ignorance is expensive, time consuming, and frustrating

.
Posted: Mon Oct 23, 2006 8:18 pm
by gepineda
Can you post a closeup of the splice that *cracked* and is now bending much more?
I'll do so as soon as I get home from the office. Shortly after the thing cracked on me yesterday, I had some friends come in to my house for a barbecue and just didn't have the chance to further analyze and take pictures.
Posted: Mon Oct 23, 2006 8:31 pm
by chrisobee
Three questions.
First, was the tape on the outside or the inside? It should be on the outside.
Second, was there a space between the panels. they should be tightly butted together.
Third, did the tape pull away from the panel?
Posted: Mon Oct 23, 2006 10:07 pm
by gepineda
First, was the tape on the outside or the inside? It should be on the outside.
The tape was both on the inside
and outside, just as the plans call for.
Was there a space between the panels. they should be tightly butted together.
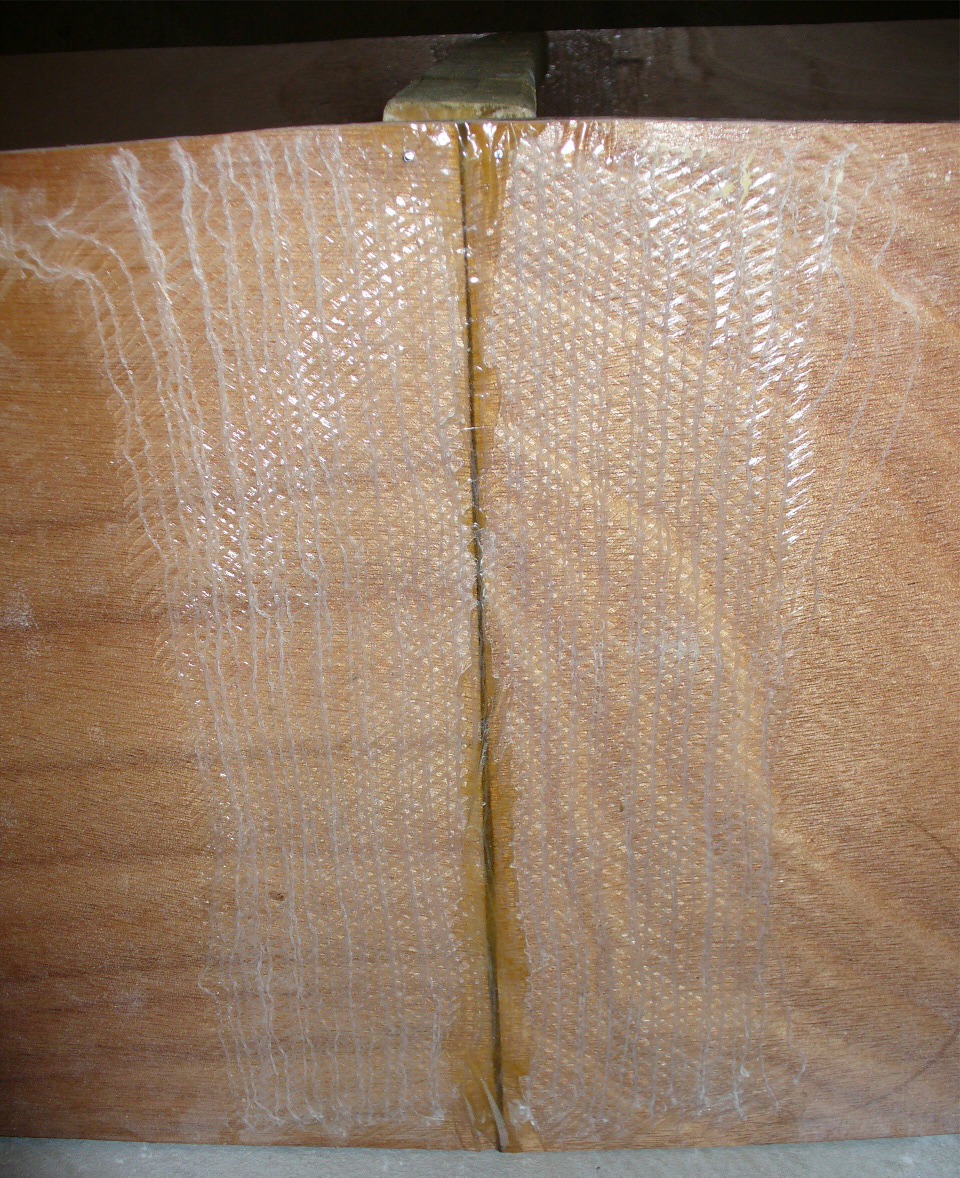
There was a small space due to the uneveness of my cuts. See the enclosed picture and judge for yourself. Maybe it is way too much of a space.
Third, did the tape pull away from the panel?
The tape did not pull away at all. In fact, until a few moments ago, I was under the impression that none of the fibers had broken. However under closer examination I did find several fibers broken directly over the joint.
Click here or on the picture to get a higher resolution version of this picture.
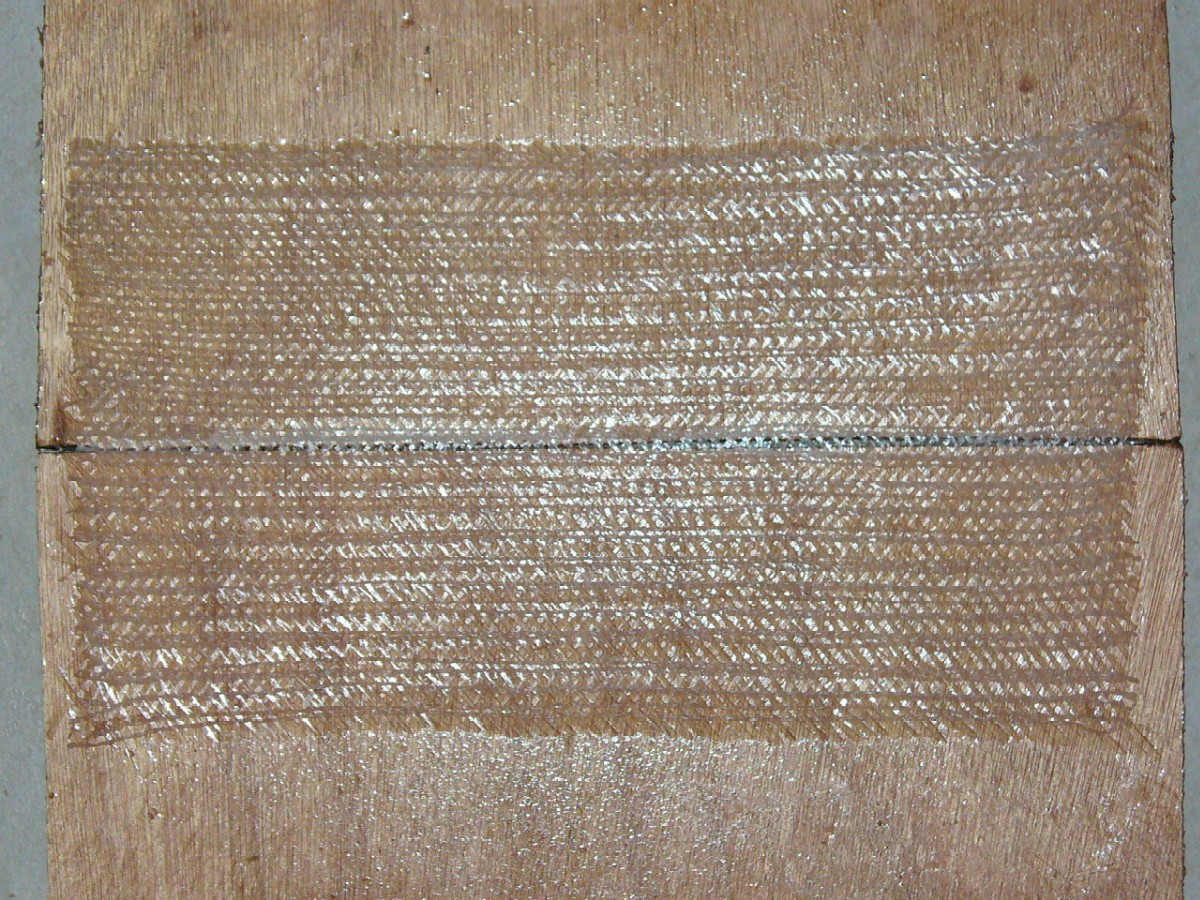
I guess it is better to find out at this stage that you splices will fail rather than have them fail while you're paddling in the middle of a lake.
Posted: Mon Oct 23, 2006 11:06 pm
by gk108
With that gap you set up a condition that is similar to a (very bad) void in plywood. You should be able to grind the tape off of the bad side, fill that gap with some putty and tape it again.
Posted: Mon Oct 23, 2006 11:43 pm
by gepineda
With that gap you set up a condition that is similar to a (very bad) void in plywood. You should be able to grind the tape off of the bad side, fill that gap with some putty and tape it again.
I'll do that. The failed board is the one that had, by far, the largest gap. Is the glueing of the edges an absolute requirement? Can a splice with a minimal or no gap still be acceptable without glued edges?
Guys, thanks for all the efforts to reduce my ignorance, for the educating and the insights.
Posted: Mon Oct 23, 2006 11:58 pm
by ArizonaBuilder
Can a splice with a minimal or no gap still be acceptable without glued edges?
No, you don't want any weak point in the spice. Fill all voids with epoxy/woodflour mix. The larger the gap the thicker the mix anywhere from a runny glue to a fillet consistency.
I will place one of the pieces down and put some duct tape under the joint to keep the fillet/glue material in the joint while the first side is curing. After the first board is down, slap some thickened epoxy on the joint and move the second board in place to close the joint and squeeze out the glue. The duck tape on the underside will keep the glue in the joint. FG and wait 24 hours.
Turn the board over and lightly sand to smooth out the area. You can also fill any voids in the joint with more glue and then fiberglass the second side.
You now have a solid, stronger than wood joint.
Posted: Tue Oct 24, 2006 11:11 am
by Jerry-rigged
I just double checked my CH14 building notes - there is no mention of glueing the joint, just the FG tape. I did add a glue to mine, not sure where I read it, maybe on one of the on-line tutorials?
A thought i had while reading about the break - you were opening the panel vertical - this addes lots-o-stress to the joint. After you stich the ends, stand the two panels up on edge, and open horizontal - should be a lot less stress.
One other thought - this is kinda proof of the "Hard spot" idea of gaps are good - but you gotta remember to fill the gaps with glue.
Don't sweat the break. Grind off the old glass (good excuse to get that nice RO sander with a built in dust collecter, if you don't have one yet
) and chalk the whole thing up as "experience" (which you only get AFTER you needed the experence in the first place). We all make screw-ups on our first boat - that is why Jaq & Co keep telling us to build a small boat befor jumping into our "dream boat". Look on the bright side, yours is easaly fixable. My canoe will probably never paddle a straight line, thanks to the crooked keel.

Lessens learned, hopefully my power boat will be closer to right.
Jerry
Posted: Tue Oct 24, 2006 1:12 pm
by ks8
Great closeup. Can we see another of the new splice?
The keel and chine seams, and rubrail, will add all sorts of strength to that hull structure. Long thin bubbles right on a seam line, are your enemy. Get enough epoxy and epoxy filler blend formed under/before the tape to make it easy to work such bubbles out from under the tape before the cure. Strength = glass fibers thoroughly bonded to a smooth and stable core surface. Good enough definition for this boat anyway. Significant air gaps under a thin glass lamination means no bond there to a core material, making the glass try to withstand all the compression forces alone. Thin fibers over an air gap are bonded only to themselves with a minimum of epoxy, which means they can and may bend up or down or side to side in that *free air space* til they crackle or til the epoxy binder holding them together cracks, particularly over a splice or in a corner seam. Once the splices are redone, with the tape fibers thoroughly bonded to a smooth and stable core surface (cured epoxy filler blend), this mishap will pale in comparison to how you see the hull gain strength with each new taping and the rubrail.
I guess you are now initiated! Welcome!
Posted: Tue Oct 24, 2006 1:26 pm
by gepineda
One other thought - this is kinda proof of the "Hard spot" idea of gaps are good - but you gotta remember to fill the gaps with glue.
Always happy to contribute empirical evidence that'll benefit the rest of mankind.
I knew that pulling them up vertically would add a lot of stress to the upper joint. Not only would it have to deal with the stress of the bending of its own panel, but it would then bend a little more because it has to support some of the weight of the lower panel. However, I didn't worry too much about it since I was assuming my splices were stronger than the wood, and the wood itself would've been able to take easily.
Well, AZ builder, this will probably add one more week to my project time, but I think it'll be well worth it, since it seems to be the only way to ensure that the thing won't split open on me while I'm in the middle of a cold lake.
Posted: Tue Oct 24, 2006 1:49 pm
by gepineda
Great closeup. Can we see another of the new splice?
Definitely. As soon as I get it repaired. I kept wondering if the two or three epoxy coats were going to make a water tight seal on all the pinholes that would go through the fiber and filter down through the splice seam. Now it's obvious that the glueing of the edges will take care of making it water tight.
Thanks again, guys.
Posted: Tue Oct 24, 2006 1:49 pm
by ArizonaBuilder
I just double checked my CH14 building notes - there is no mention of glueing the joint, just the FG tape. I did add a glue to mine, not sure where I read it, maybe on one of the on-line tutorials?
This maybe true, however if you re-read the tutorials you will notice one theme prevails.
"Gaps are good, only if finally filled with thickened epoxy."
This is why we duct tape seams and fill with epoxy before laying down the tape or we glue the edges of the frame to the hull and build fillets filling all voids before taping or use spacers around frames to create a gap that can be filled with epoxy.
The building notes assume that the builder knows the basics of S&G and I believe the notes also recommends that the builder get a good book on S&G.
This issue is such a tiny one when compared to other mistakes that can happen while learning this exciting hobby. I know I have made a couple of huge ones and the larger the boat the greater the cost of mistakes.
Enjoy the build process and ask lots of questions.
Posted: Tue Oct 24, 2006 1:58 pm
by ArizonaBuilder
Well, AZ builder, this will probably add one more week to my project time, but I think it'll be well worth it, since it seems to be the only way to ensure that the thing won't split open on me while I'm in the middle of a cold lake.
yes, sand one side of the joint and fill with thickened expoxy. The time will be
well spent.
This is really a very small issue. I will trade you yours for mine. I sprayed paint on the sides of my boat this weekend and had more runs than I know what to do with. This is going to take me many hours with a cabinet scrapper to level out the runs before I start wet sanding. Another setback, but it is part of the learning curve and I know my spraying session this weekend will go much better.
Posted: Tue Oct 24, 2006 4:01 pm
by gepineda
The building notes assume that the builder knows the basics of S&G and I believe the notes also recommends that the builder get a good book on S&G.
I've never before built a boat and I have very limited woodworking experience. My entire woodworking resume consists of two reloading benches. I sold the first one to an uncle along with a couple reloading presses and other equipment and then I built a second bigger one for myself. Both pretty sturdy but pretty simple as well. I don't even know what S&G stands for. Splicing and Glueing? Sanding and Grinding? Sodom and Gomorrah?
In any case it's not the end of the world, it is becoming a well received learning experience and now I'm even more convinced than ever that it's better to start on a small boat before you tackle the dream yatch project.
What's S&G?
20 mins later it dawns on me. Old Stitch and Glue, huh.
. The day you cease learning is the day you die.
Posted: Tue Oct 24, 2006 4:17 pm
by jacquesmm
Posted: Tue Oct 24, 2006 4:51 pm
by gepineda
Jacques,
I did so before I started. Read it over several times. And it does not mention any glueing of the edges before doing a fiberglass splice. In fact it does not address FG splicing at all. It just talks about butt blocks.
This how to file
http://bateau2.com/content/view/44/28/ does not mention glueing the edges of the panels before doing a FG splice. Is there anywhere in your websites where the glueing of the edges is mentioned?
Posted: Tue Oct 24, 2006 6:04 pm
by ArizonaBuilder
What's S&G? Doh!
You are correct Stitch & Glue.
Posted: Tue Oct 24, 2006 9:30 pm
by ks8
Is there anywhere in your websites where the glueing of the edges is mentioned?
If you search the message board with Panel AND Fiberglass AND Splice, and click the Search All Terms option, there will be quite a few message threads that include these details and other tips, though you've got to do a bit of reading to harvest the info (well worth it). Whether or not a HowTo or Tutorial states it, I don't know. Haven't reviewed them in awhile. By recommendation, I read the Sam Devlin book first (purchased), and the SystemThree guide (free), before starting the project, and if I recall right, both those sources mentioned this.
If the HowTos do not explicitly mention it, I suspect that in the future they will. And you will have already begun to change the world with your boat building project!
Posted: Mon Oct 30, 2006 1:33 am
by gepineda
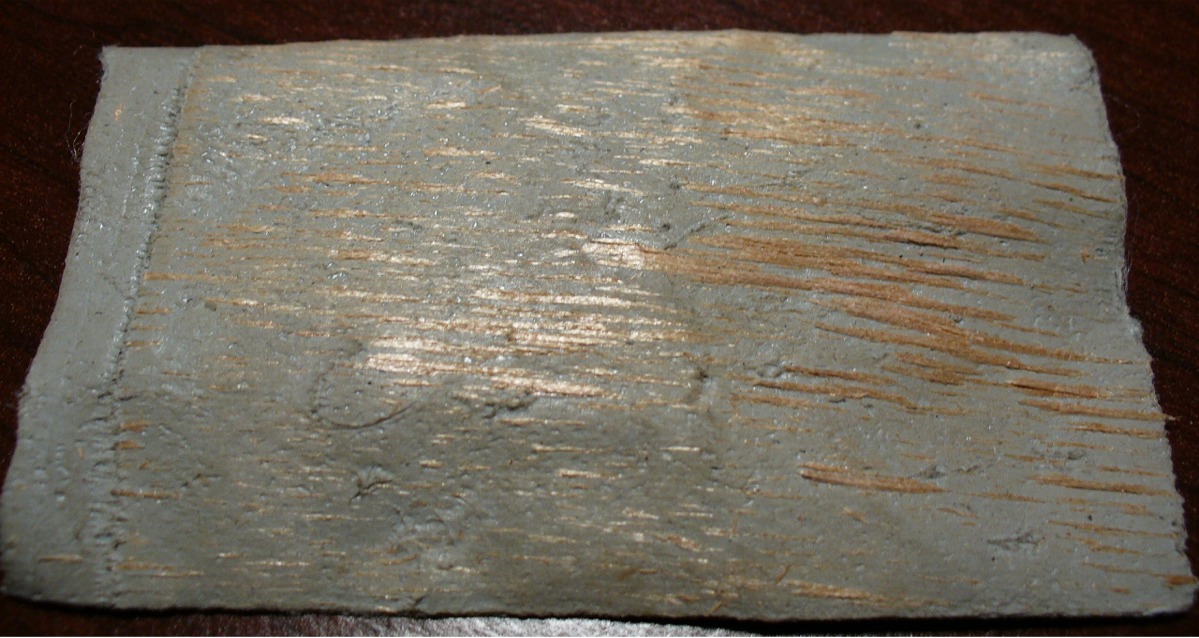
As promised... Behold! A repaired FG splice.
I also tried gorilla tape to do stitches. I taped perpendicularly to the seam to allow for easy visual verification of the filleted gap. Hopefully this will help avoid overlapped panels or pressure points.

After about a week I pulled out the tape stitches that I had originally installed when I broke the first fg splice. Gorilla tape left no sticky residue on the wood, but it lifted up a couple of wood fibers. For the upper panels, I think it'll be plenty strong. The lower panels may be a different story. During my first test on the lower panels, the tension on the sharp edge of the wood cut the first two pieces of tape on one of the bows. I retaped with a double layer of tape, and this time it would not break. However, Just to be on the safe side, I'll stitch the bows with zip ties.
Posted: Mon Oct 30, 2006 1:12 pm
by ks8
That splice looks good.
Pressure points or *hard spots* are mainly issues with powerboat hulls or high stress bearing hulls. The main idea is to have a uniform and consistent *material* at the bond of the joint, over which the FG tape is laminated, just like in the panel splices. Even if you have *hard spots* of plywood on a canoe, if the rest of the gap is thoroughly packed with fillet material, what I understand is that you will be fine. The real problem is with much higher stress bearing hulls and the stitching and install of frame panels or transoms such that you can't get the fillet material where it needs to be for that uniform and consistent *core*, and it is in those cases that you put spacers in, so that you can then force the fillet material into the larger and consistent gap that the spacers have created. imho.
It is easy to get consistent fillet material into a chine seam without playing the spacer game. If you can't get it from the inside, then you fill the remaining gap from the outside. Simple. Enjoy!
Posted: Mon Oct 30, 2006 1:14 pm
by rudar
Good to see you're back on track. I guess it's true what they say about there being no problems with stitch-and-glue that can't be fixed... Reassuring, that.
Myself, I haven't even gotten started yet. Decided to upgrade my boat from a CC to a Hiawatha, since I was still waiting for the epoxy anyway. So of course the epoxy arrives 12 hours after I order the Hiawatha plans, and I'm still waiting for the latter.
Oh, well. It just means I'll get to learn from *your* mistakes, rather than my own. So you just keep making them
Paint scheme
Posted: Sun Nov 05, 2006 7:02 pm
by gepineda
Well I finally stitched all 4 panels together. Next steps involve gap management and prepping for the glassing of the seams. I added a bunch of images to
my gallery.
I've been trying to figure out what should be the paint scheme for Turbo Cayuco. So I spent I little time playing on the computer and came up with this. I like it quite a bit, though I have my doubts about graphite coating the bottom and then having the Cayuco stand upside down in the summer sun absorbing all that heat. Is it a good idea to go graphite on the bottom? Could I get away with it if I'm mindful of not exposing the Cayuco to lenghty terms of hot sunlight?

Posted: Sun Mar 18, 2007 5:13 pm
by gepineda
Yesterday was another milestone in the building of Turbo Cayuco. All inside fiber glassing is now done.
I ran out of woodflour yesterday. Resin levels are pretty good. Somewhere around this webpages I read that, "wood flour is cheap... use too much". I guess I've been using pretty thick mixtures on my fillets, and perhaps my fillets have been larger than needed. In any case, as I was was mixing my last batch of putty, I overestimate the final amount of woodflour left and it resulted in a pretty thin putty. It wouldn't have been a major thing except for the fact that the only remaining fillets to make were the vertical bow portions. There was a time I was even considering mixing in real wheat flour just to thicken the stuff, but I held my impulses at bay. I wasn't too sure if it would work, and the bows are not the place where you'd want to have weak fillets.
So I slapped in thin putty vertical fillets and the things kept running down on me. For a while I was running from one end of the canoe to the other re-forming uniform fillets on runny putty until the putty started to gel enough to allow me to put in dry fiberglass over it. The FG sucked out a little bit of resin and finally, I ended up having stable uniform vertical fillets. I checked the seams this morning and they are looking quite good.
For this last inside fiberglassing session, I used resin pumps in my resin bottle. Until yesterday I had used 60cc syringes for measuring resin. Pumps are so much faster and uncomplicated. I came upon these pumps while I was looking for a place to buy powdered graphite around the Langley/Surrey area in BC. I did a quick search on the web looking for potential candidates to carry powdered graphite in their inventory. So I give this guys, "Industrial Plastics and Paint" a call, and they tell me they have one last can of a discontinued powdered graphite. This sounded a little strange to me because I was expecting generic graphite that's used as a dry lubricant.
So I ask the guy on the phone, if this would work mixed with epoxy resin and applied to the bottom of a boat and he simply says yes. I go to this industrial platics place half expecting to see big plastic tanks, o-rings, or molded injection parts. But the first thing that I see is a stand full of West System stuff for boat building. I tell the guy at the counter about the graphite, and he brings me a can of "West System 423 Graphite Powder". It turns out that it is not just pure graphite as I was expecting, but it has other stuff in it like crystalline sillica and it is formulated specifically for boat building.
It was past closing hours for this place so I quickly browse around the store. They also have System 3 products. There's fiberglass, carbon fiber, polyester,
WOODFLOUR and other fillers, colorants and additives. I, being the overly optimistic type about my own stock of woodflour, make a mental note to come buy woodflour in a week or two. At the time I'm feeling like a kid in a candy store. Apparently the clerk sees my enthusiasm and gives me a free epoxy resin user manual from West System and a boat building product catalog from System 3. The user manual is pretty neat with detailed instructions on techniques for filleting, barrier coating, gluing, fiberglassing, etc.
So in short, it's been an interesting, but good week.
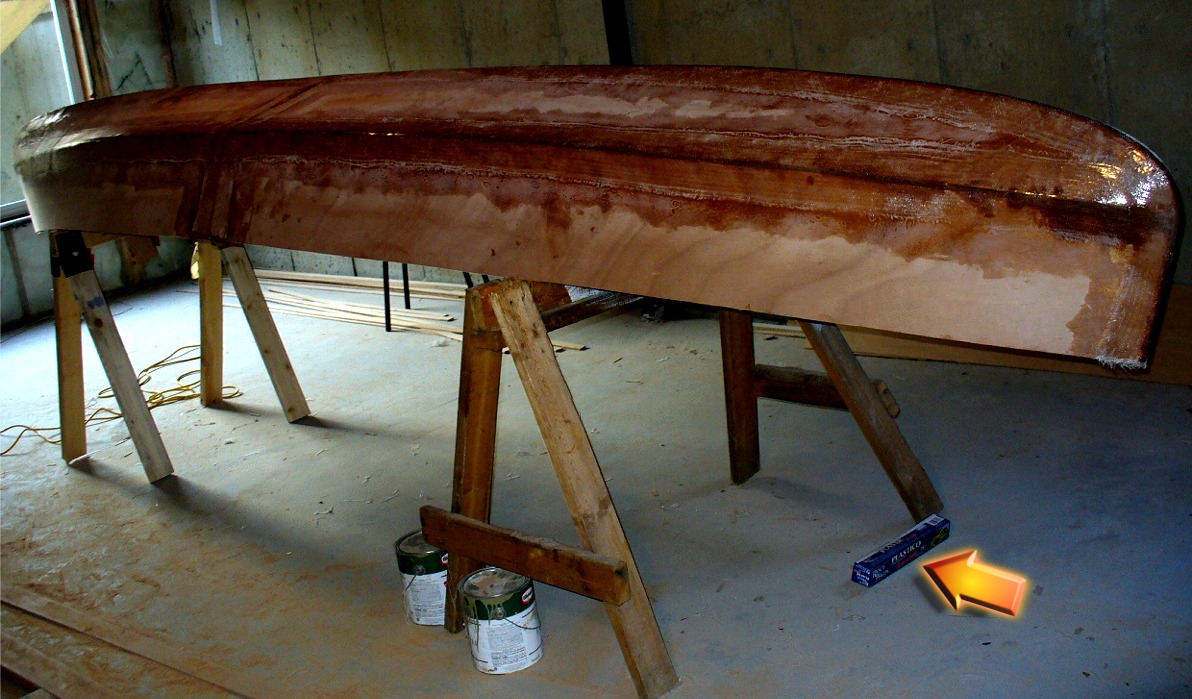
Flipped the boat and cut the rubrails
Posted: Sun Mar 25, 2007 2:24 am
by gepineda
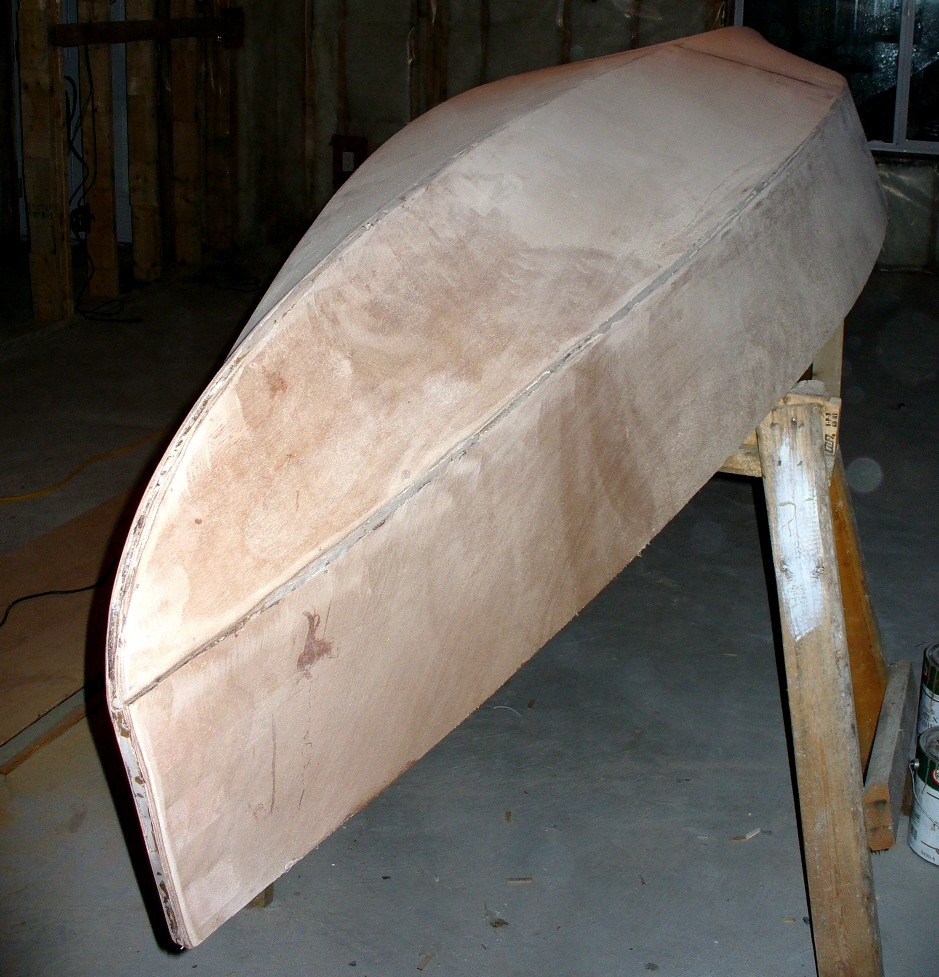
So I flipped the boat and sanded all the joint edges. Everything looks symmetrical and very nice. The curves are so graceful it makes me wonder why I didn't give it a feminine name. At times it did take some effort but I managed to get a gap of up to 10mm everywhere. Tack welds, popsicle sticks, cable ties, gorilla tape, scredrivers, copper wire, nylon thread all of these were witnesses to my frustrations and elations when I finally managed to get a particular section well aligned and ready to be filleted and fiberglassed. I know, I've been told... canoes will not go through the structural stress that high speed boats will, so it's not necessary to leave a gap everywhere. But for some reason unknown to me the notion got into my head, and
I HAD TO HAVE a gap in between every piece of plywood.
Last night I cut out 12 8ft long rubrails. This will be enough to do all 3 laminated layers for both sides of the Cayuco. Because the upper edge of the side panels of the canoe was an original curve cut, the rubrails cannot be cut straight. They have to match the curve of the original side panel. I managed to cut 12 curved rubrails with only 7 cuts and one pencil mark. You can see the pictures and read about it in
my gallery.
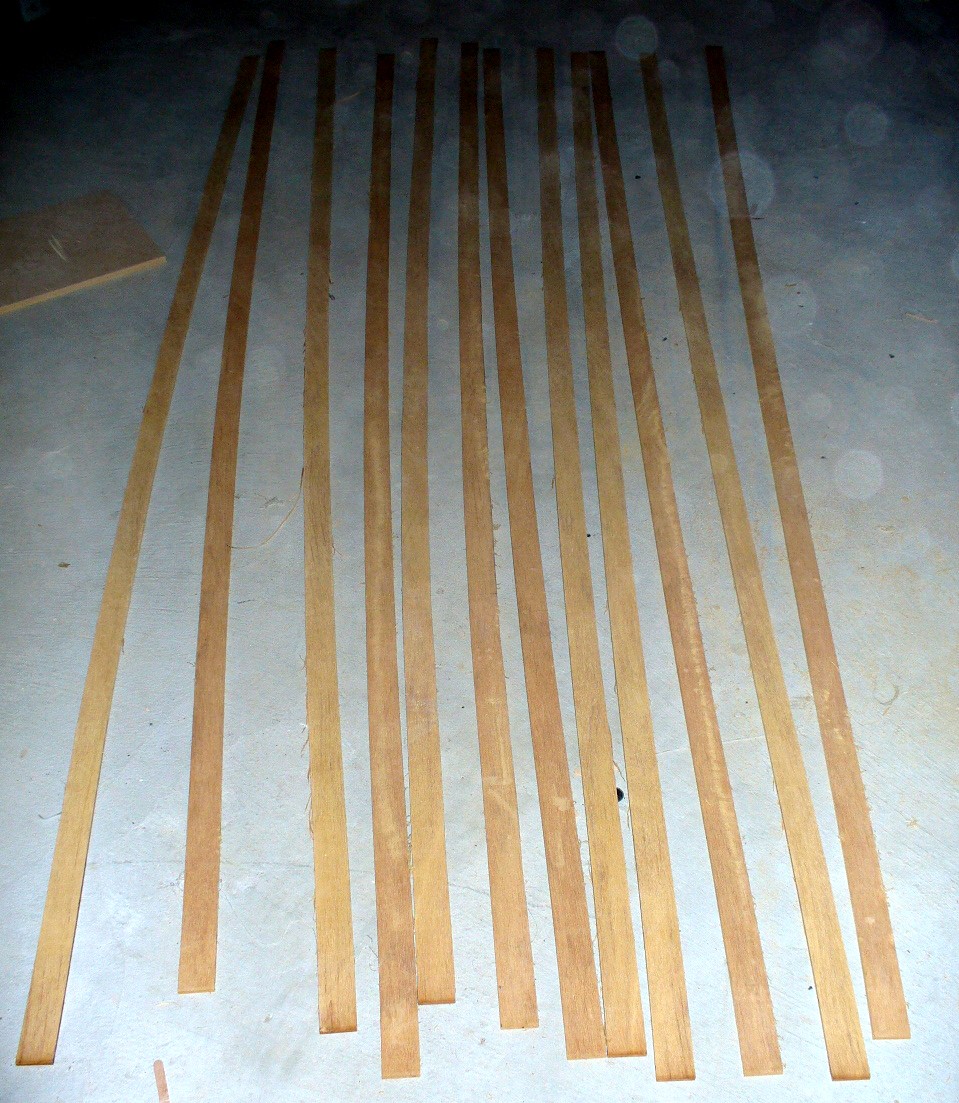
Now I have a left over pieces of plywood that are 345mm wide. This is not the expensive okume plywood I used for the panels. The 16 ft versions of the canoes do not leave much of the two plywood boards after you are done with the panels; which means I had to get another board for rubrails, inwales, and breasthooks. For these things I got the much less expensive exterior plywood with no voids. According to calculations made from the plans, I would need 380mm piece for the breasthooks. It looks like 345mm will work just as fine.
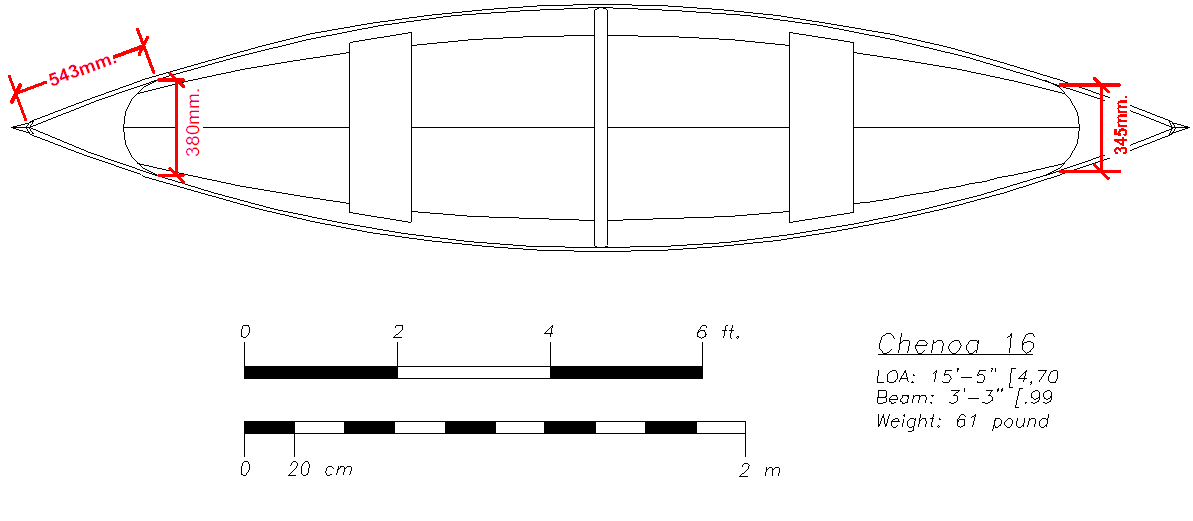
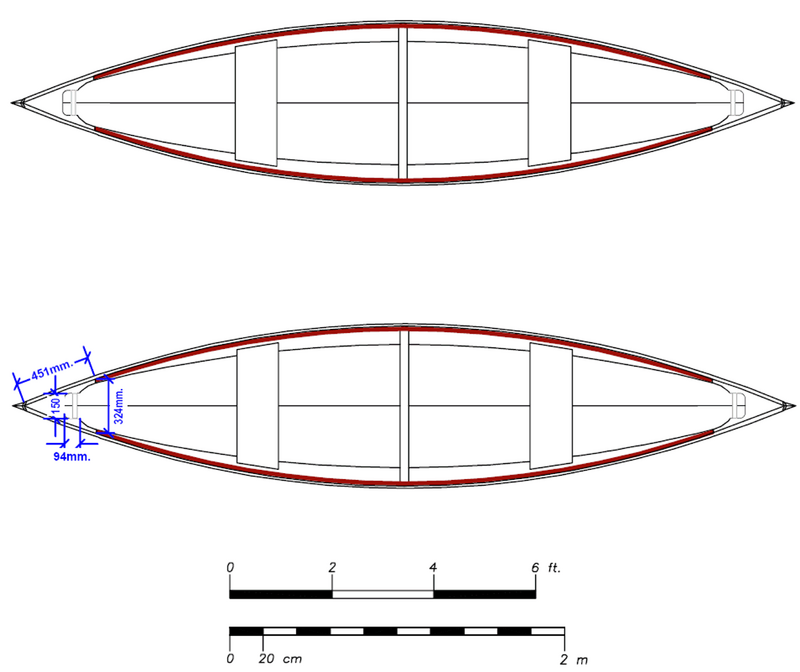
My concern is not whether a 345mm wide breasthook will work ok, but the lack of a breasthook dowel. Taking inspiration in some of the work done rudar I modified the original breashooks. The brown line on the inside of the canoe represents an inwale. The inwale is to fit flush with the inside curvature of the breasthook. The breasthook radius is then interrupted to make room for a 1" diameter dowel.
Question for Jacques
Posted: Tue Apr 03, 2007 5:49 pm
by gepineda
Soon I'll be done with all the fiberglassing. As I was thinking on the next steps - cutting and fitting the breasthooks, I realized it may be good to ask the designer if my changes to the breasthook are going to make a structurally sound boat before I find myself in the middle of a lake with the canoe falling apart on me.
Jacques, my assumptions were that since the breasthook dowels are going through the sidepanels (but not through any layer of the rubrail) like they are on rudar's Hiawatha, and since I plan to fit it with an inwale, I would be structurally ok to reduce the lenght of the breasthook from 543mm to 451mm (see graphics in previous post). Do you think this assumption is correct?
Posted: Fri Apr 06, 2007 9:08 am
by jacquesmm
What are breasthook dowels? We don't show anything like that. The breasthook is simply epoxy welded to the sides.
A small change in size doesn;t matter.
Posted: Fri Apr 06, 2007 2:31 pm
by gepineda
What are breasthook dowels?
I guess I am not using the correct term. By breasthook dowels I refer to short thwarts that I intend to put near the breasthook, in a similar way to what rudar did. This is his Hiawatha.
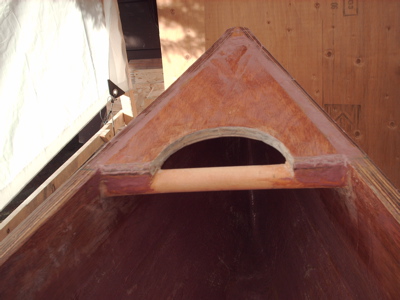
This short thwart should be very convenient for two person carrying, tying painter lines, towing, etc. Thanks.
Posted: Fri Apr 06, 2007 3:13 pm
by jacquesmm
Ok, I was confused because we do not show that on the plans.
You can install those, no problem but I would not have them go through any panel. To epoxy glue them under the breasthook is sufficient.
Whatever you do there, it is not going to change the structure of the boat.
Do what you like, what you feel is convenient.
Epoxy is a material that let you be very creative with those details.
Posted: Sat Apr 21, 2007 4:41 pm
by gepineda
Fiberglassing is now done. I wish I had used the food wrapping plastic when I did the fiberglass splices. The polished finish you get when using this poor mans peel ply is so much better.
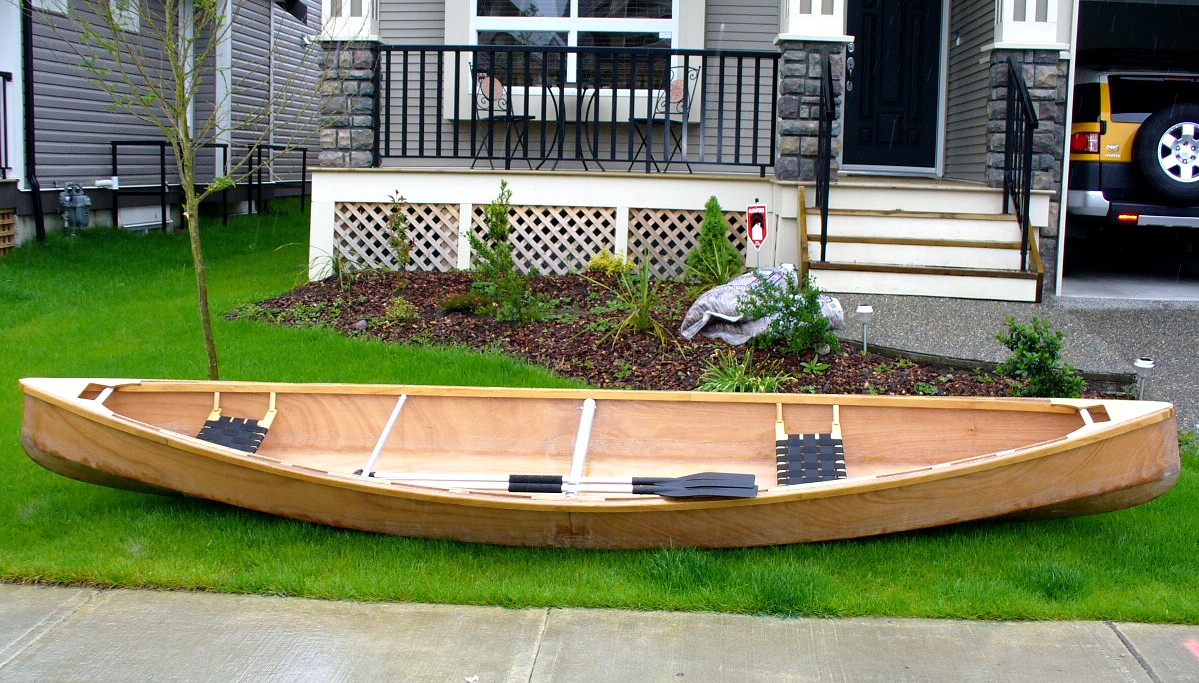
Splashed at last
Posted: Sun May 20, 2007 9:22 pm
by gepineda
I have not posted here for a while, but I've been periodically uploading pics of my progress. You can see them in
my album.
So I finally got to finish Turbo Cayuco (TC) enough to splash it. It is still not faired or painted or graphite coated in the bottom, yet it managed to tip the scale at 85 lbs. I guess my inwales and the 3 coats of epoxy inside and out ended up weighing a little more than expected.

It makes me wonder how much more weight is it going to put in with quick fair, and multiple coats of primer, paint, and graphite.
TC performed better than I thought it would. It had good initial stability while still being quite maneuverable. It was well acceptably fast. With this performance, I'm not sure I want to add 5 or more pounds of weight worth of fairing and finishing. I'm thinking of only graphite coating the bottom with a coat or two (no primer nor quickfair).
Does anybody know approximately how much more weigh would it add to properly fair and finish a CH16 using quickfair, S3 primer, and S3 LPU topcoat?
Took a lot more pics of TC's splash you can see these in
my album
Posted: Sun May 20, 2007 9:39 pm
by rudar
Congratulations! Looks excellent.
I went out to paint the insides of mine this morning, and found the rain was hitting a pipe at the edge of my tarp, bouncing *up* a clear 18 inches, and misting the insides of the canoe. So I guess paintwork is on hold until a sunny day.
Unfortunately, I can't answer your weight questions at all. I know I went out and bought an extra litre (about 2 pounds, give or take) of epoxy, and ran out of that before the barky was anywhere remotely close to a yacht finish, so I called it good enough and painted her. Looks fine from 15 yards away
I should beg/borrow/steal a scale from someone and see how much mine ended up weighing in at.
Posted: Sun May 20, 2007 9:53 pm
by gepineda
I weighed mine in a bathroom scale that I bought for 9 Canadian Tire dollars. I just place the center of the boat on the scale and asked my wife to keep it in balance while I scooched down to look at the dial. Not terribly accurate method, but it's the same we use to ensure our airplane luggage is not overweight and we usually manage to get within one lb of what the airport scale says.
My wife also noted the rain this morning, and tried to persuade me not to splash TC today, but I would have non of that. However, next time I go out in a rain like today's I'll try to remember to bring a bailer.
Posted: Mon May 21, 2007 11:32 am
by Lucky_Louis
Congrats on the splash! Looks like you'll be ready when the Fraser spills her banks. Of course it's raining, it's the May long weekend.... today's much nicer and looks like we've got a long stretch of decent weather coming except for showers on Wednesday.
I would still go with primer and paint, would be a shame to go so far and 'quit' within sight of the finish line

Posted: Mon May 21, 2007 3:13 pm
by Jerry-rigged
Intresting way to hang the seats - what advantages are there to doing it that way?
85lbs?!?
Those Canadian lbs, or US?
Even after you add a few lbs., you will still be ahead of my buddy, with his 115lb., plastic, Coleman canoe...
I haven't put my 14 on the scale yet, but I am guessing it sits at about 50 now, but I still need to add the seats bresthooks, and inwales, plus a bit more paint...
Nice job, so far.

Posted: Mon May 21, 2007 5:25 pm
by rudar
I agree you should prime and paint it. That can't possibly add that much weight, and it keeps the epoxy from falling apart from UV damage. And as mentioned, these are still light boats, even if you do add a couple of pounds of fairing.
Posted: Mon May 21, 2007 7:36 pm
by jaygee
That`s a beautiful boat, I`m tempted to build one of those too! Also, I like your handgrips- everyone has such good ideas!
Goodluck
jaygee
Posted: Tue May 22, 2007 3:16 pm
by gepineda
Thanks for the congrats and feedback.
I would still go with primer and paint, would be a shame to go so far and 'quit' within sight of the finish line
I agree you should prime and paint it.
Ok, Ok... Fine. I'm sold. I'll fair it and paint it. BUT I will not sacrifice any more nice summer weekends. Yesterday I took the wife, the dog and the canoe to Rolley Lake for a day of fishing/paddling and it was just too much fun. It sure beats spending the day sanding. BC just has way too many beautiful places to explore with a canoe.
Intresting way to hang the seats - what advantages are there to doing it that way?
1. Adjustable seat height. The vertical pieces of wood between the seat and the inwale are largely decorative. They are not glue or attached anywhere. They just cover the hanging bolt.
2. Easily detached seats and thwarts. TC has no screws, only nuts and bolts. Taking the seats or thwarts out is just a matter of unscrewing bolts. This will come in handy for fairing and painting the insides of the canoe.
3. Easily adjustable frontward or backward seat position. It is just a matter of drilling new holes and plugging the old ones with epoxy paste.
I decided to hang them like this partly because it's also the way that several commercial manufacturers hang the seats of canoes models with wooden inwales (slotted or not).
Even after you add a few lbs., you will still be ahead of my buddy, with his 115lb., plastic, Coleman canoe...
How long is the Coleman? I think I'll feel more comfortable with the weight when I manage to put TC on top of my head and do the tump strap portage by myself. I just didn't get the courage to try to do it yet because I cringe at the possibility of dropping it and see it bounce around on the hard ground. I'll go find a deserted little beach on Aloutte or Pitt Lake to avoid public embarrasment as I do my first attempts.
Also, I like your handgrips
The handgrips are made of walrus ivory...
They're really a 3/4" diam wooden dowel, coated with epoxy and then encased inside a 7/8" white pvc pipe. I sanded off the markings on the pipe to get the "walrus ivory" look. Before putting the rubrails in, I drilled holes on the hull and had the dowel go through the holes. The pvc casing did not go through the holes. The dowel was then epoxy-glued on the inside and outside. After curing, I ground off (angle grinder 30 grit sanding disk) the protruding portions of dowel on the outside. Finally, I laid the rubrail layers covering the dowel hole scars. You can see some dimensions for the breast hooks
here.
TC's new accesory
Posted: Tue Oct 09, 2007 11:17 pm
by gepineda
While planning my canoe outings this summer I encountered many places where distances made it unpractical for a paddling day trip. There were also situations where I wished I could get out of faster than my paddling arms were capable of. It's no fun when you still have 2 km to your intended campsite and chop is increasingly threatening to swamp you. So that got me looking for a small outboard. Ideally I would have liked a 1.2 hp, but the lowest I could find new was 2.5 hp (Suzuki). Prices here in Canada scared me, around $850. South of the border prices were slightly nicer, though still out of my comfort zone. So I started looking at used.
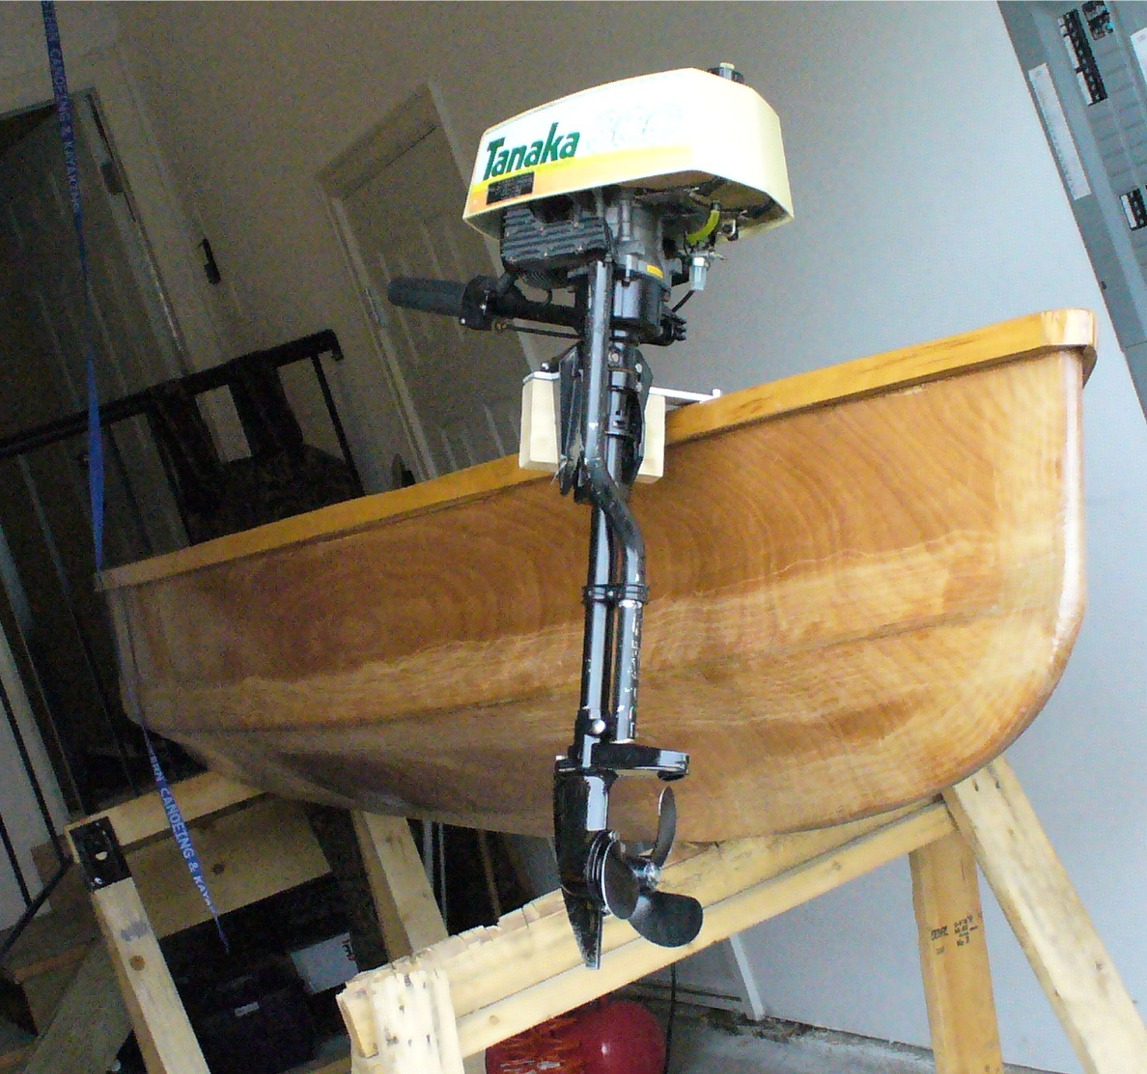
I found this baby in Craig's List in Bellingham, WA. It is air cooled, so no impeller or water lines to get plugged or rusted, or cause grief. It is a 3 hp; slightly more muscle than what I was looking for, but I think I can live with the extra umph. Seller was asking $180. When I got there and we tried to run it with the seller, we found out there was fuel leakage around the fuel shut off valve. So I offered $150, and he enthusiastically accepted. Came back home, changed the valve, replaced all fuel lines, changed gear oil and gave it a nice overall cleanup and lubing. Then I started it and adjusted the carburetor and now it easily starts with the first pull.
Then I started thinking about how should I affix it to TC.

I found this at a store. Again, the price scared me a bit $90. Besides, I didn't like the inwale clamp system. First, it was going to bite in and probably damage my inwale. Second, the motor would be pushing only against the friction of the clamps, not very secure. Third, if you put motor near the stern, the clamps will be pushed forward, where canoe gets wider. If the clamps were to move far enough forward they could suddenly be gripping air and I would end up with a drowned motor.
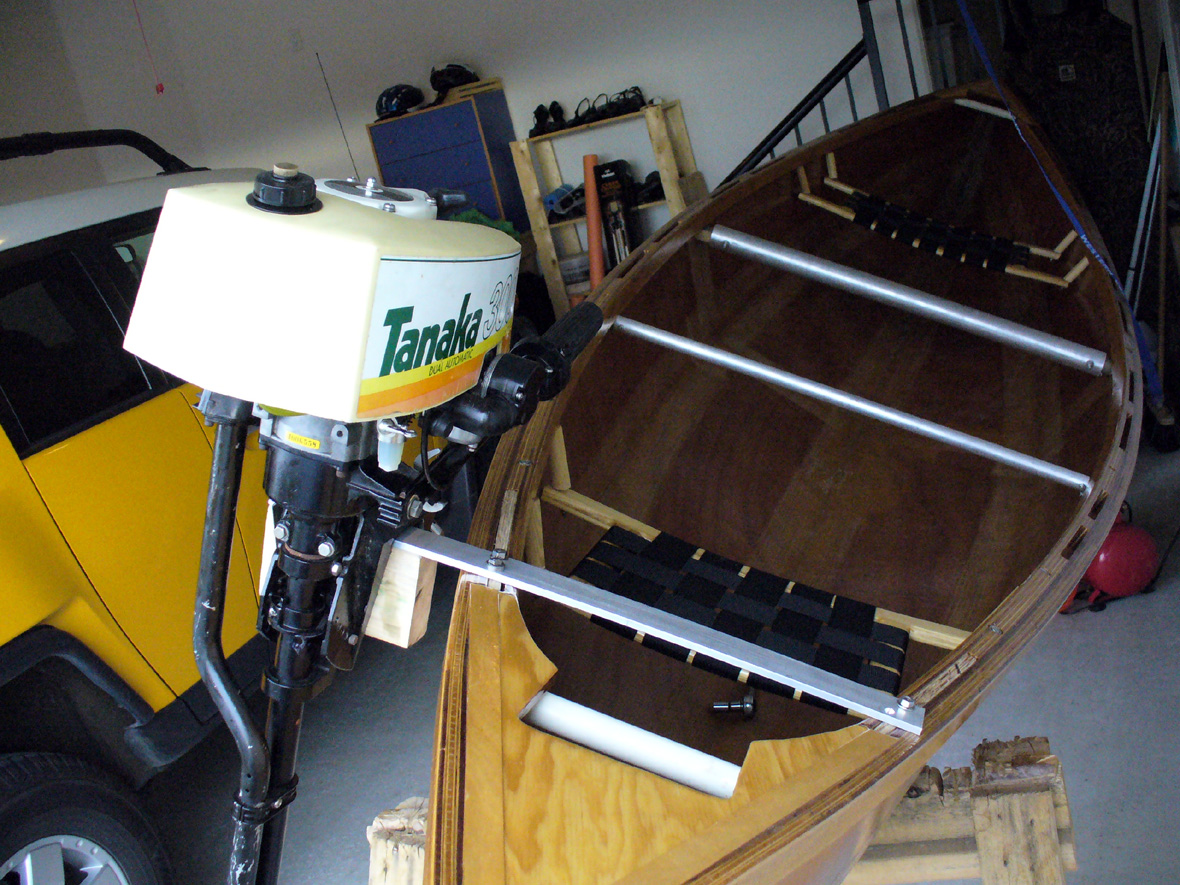
So I built my own, modifying the store's design to take advantage of my slotted inwales. It only cost me $24 in aluminum and stainless nuts, bolts and washers. The wooden parts came from scrap wood left over from TC's construction. I planned on testing it out this last Monday (Canadian Thanksgiving), the only sunny day in over a week of grim rainy days. However, much to my regret, I came down with a virus and spent the day at the doctor and then asleep. So I still have to try it out a see how it works. I'll update this post after I test it out. In the meantime, if you want to read more details on the bracket, click
here for
my gallery.
Posted: Wed Oct 10, 2007 9:21 am
by Jerry-rigged
Nice job with the homemake outboard bracket. My B-I-L had one come off with an electric motor - not fun. Once again we prove you can build something that is better, for less money, and only a little time.
BTW, your seats - what is the drop distance on you seats? is it enough? to much? I hope to hang my seats this weekend, bought some 4" SS lagbolts & hardware this weekend.
Jerry
No I-L in that B
Posted: Wed Oct 10, 2007 2:40 pm
by Tagged
Jerry,
Right about the B, wrong about the I-L. It was his canoe, alright, but I'm more the responsible party. And I second the "not fun."
This CH is looking great. Can't wait to see it under power!
Tag
Posted: Wed Oct 10, 2007 4:18 pm
by Jerry-rigged
OK, Brother-in-law's hardware, Brother trying to destroy it.
I gotta say, though, it was kinda fun (standing on the pier) to watch you wrestle the powercord as the motor ran circles under the boat...
[/hyjack]
Jerry
Posted: Wed Oct 10, 2007 7:43 pm
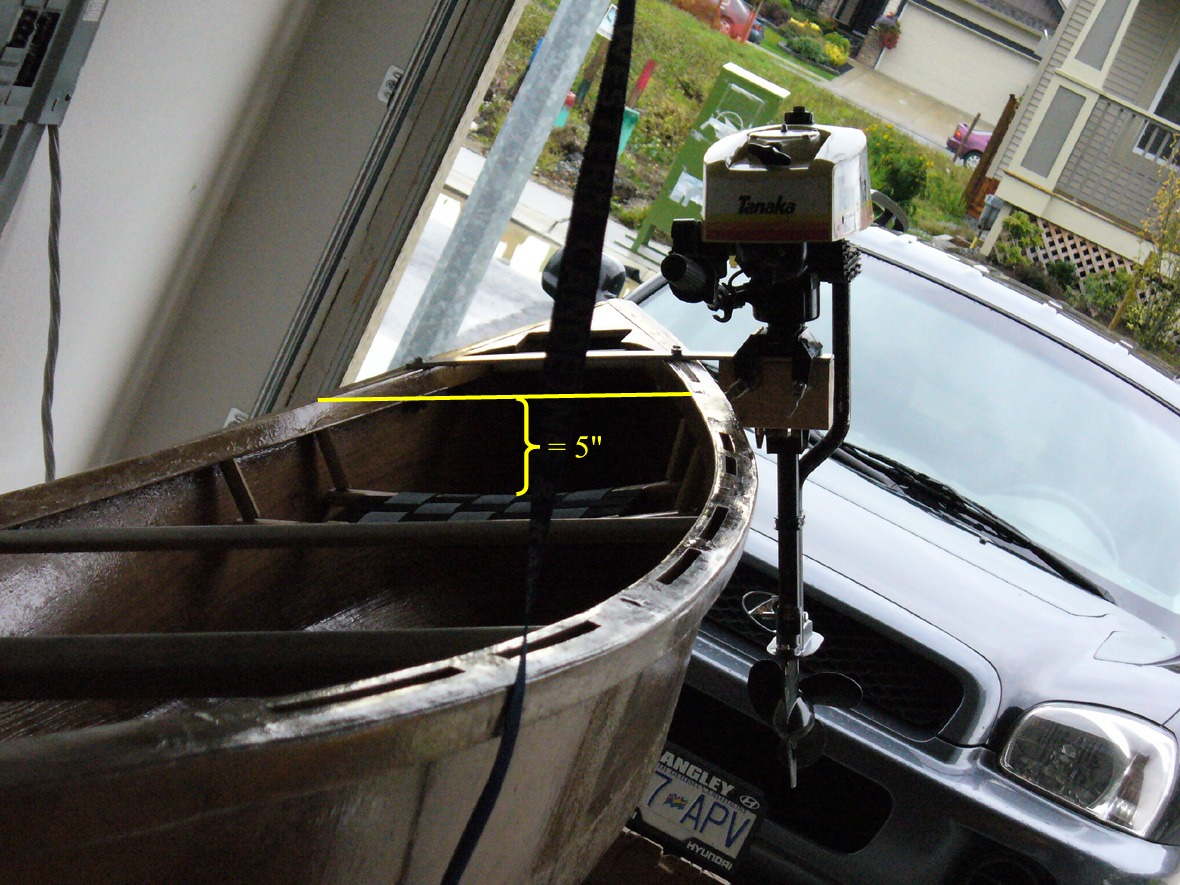
by gepineda
The drop distance is 5" for the rear seat and 5.5" for the front seat. I've been paddling on both of these and I see no reason to change the drop. I haven't had any feedback from the other paddlers/passengers that I've had on the canoe, so I guess this distance works for me.
Posted: Thu Oct 11, 2007 9:55 am
by Jerry-rigged
5"
I was thinking around 2" drop. Guess I need to go find new lagbolts. Where did you get yours?
Jerry
Posted: Thu Oct 11, 2007 12:24 pm
by gepineda
Just to clarify how I measured the drop distance. As you can see in the picture the seats are curved down. So 5" drop in the way I measured it may not necessarily be 5" of lagbolt. Lagbolt drop and length will vary depending on the angle through which you drill through your inwale. In my case I must confess that my drilling angles were not very consistent with each other. So I had to manually level all four sides of the seats by screwing the nuts on the lagbolts to varying distances.
I got my lagbolts from
here , a store in Abbotsford, BC Canada called Western Canoe and Kayak. They do have an online store and apparently ship to the US, though I do not know how cost effective it'll be to ship these from Canada when you may be able to find some other place closer to home.

Posted: Thu Oct 11, 2007 12:40 pm
by Jerry-rigged
OK, that makes sense - measuring that way my current bolts would give me a 3" drop.
Maybe I'll return my lag bolts and get the spacers. The place I orderd my seats from sells them, I'll probably get them there.
http://essexindustries.org/index.php?ma ... ucts_id=10
They also have these:

That would have a diffrent look, and possably stiffen up the seat a bit, and they come with up to a 3.5" drop (which would give me a 4.5" drop) They would coat a bit, though...
Jerry
Posted: Thu Oct 11, 2007 4:55 pm
by gepineda
Chenoas have a flared hull, which means you'll have to drill the seat hanging holes at an angle. Unless you can drill each pair of holes at exactly the same angle, those different looking spacers will give you grief. As far as stiffening the seats, the regular spacers do a perfect job at it. I haven't had any seat swinging at all.
Posted: Thu Oct 11, 2007 5:33 pm
by Jerry-rigged
yea, I could see that. I put them on order after my post, so We'll se how they work out when they come in.
Hopefully this weekend I will actually get a chance to work on the boat.
Jerry
Posted: Sun Oct 14, 2007 2:07 pm
by gepineda
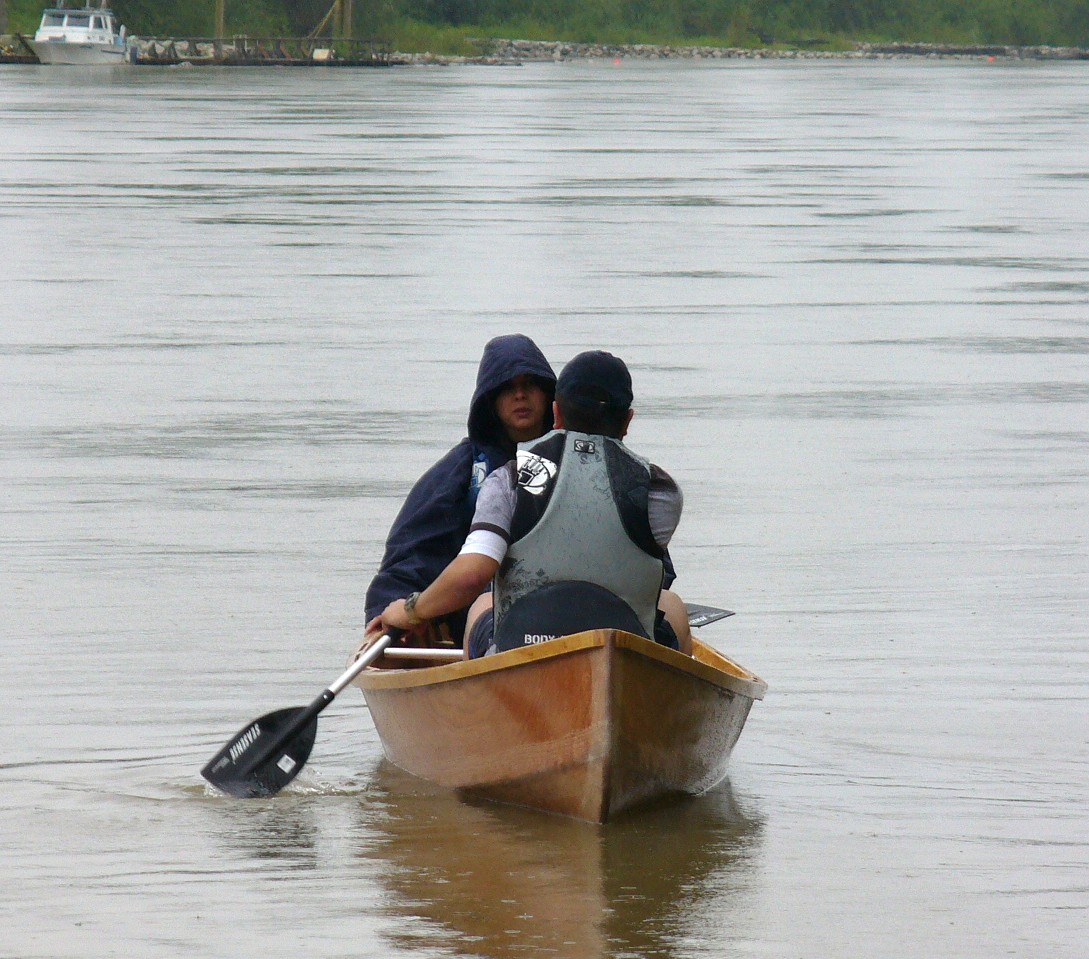
The motor and the bracket were tested out yesterday on a 10 km trip all around McMillan Island, BC. The motor worked very nicely, but it was a little noisy. The bracket always felt very securely attached. Its aluminum arm, though, at times felt like it had a slight torsional springy give, particularly when the motor was quickly accelerated. I thought about getting a thicker aluminum gauge, but in retrospect the thing never got deformed and when the motor was smoothly accelerated, you wouldn't notice any springiness.
Having a motor definitely allows you to travel distances faster and enables you to better move against the Fraser River currents during receding tides. It may be that I am a rookie when it comes to canoes with side mounted motors, but I felt a big difference in canoe stability when compared to just plain paddling. It just doesn't make me feel very confident for negotiating moderate chop or above. Is there anything short of adding an outrigger that would improve this situation? Hopefully as I gain more expertise my handling skills will improve enough to overcome this.
If the motor is to be used solo, I think I'll have to build bracket that will be closer to the midsection of the boat or use a tiller extension. Anyways, click
here to watch a video of a solo session in the motorized TC.

Posted: Sun Oct 14, 2007 4:17 pm
by sds
If you can trim the bow down to normal, you might get more stability. You would get more beam on the water, and also the front end would be pinned down instead of levering around up in the air.
Scott
Posted: Sun Oct 14, 2007 9:44 pm
by gepineda
The outboard trim is already at the extreme for bringing down the bow. I guess I could somehow angle the motor bracket to further increase propeller angle. That said, the raised bow is not nearly as high when I carry my wife and the dog. The vast majority of my paddling is done with other people in the canoe. In the case of the video, I wanted footage from an outsider's point of view, so my wife stayed on shore while I did a couple of laps for the camera. But even with the bow down and more beam on the water due to a better balanced load, it still feels fairly unstable when compared to just plain paddling without the outboard motor.
Fairing and painting
Posted: Tue Jan 22, 2008 12:37 pm
by gepineda
Yesterday I got some Quikfair to start the fairing process. I am now in the process of getting any tools and accesories required to do this. I have a question for Chenoa, Hiawatha and CC/NC builders:
Did you use a fairing board? I am thinking that because the Chenoa hull does not have big flat area with no compund curves like the FS or FL's, the actual usefulness of a fairing board may be limited. Then again this is my first boat and I'm the first to acknowledge my ignorance in boatbuilding.
Second question: Any adverse effects in working with Quikfair at temps between 4C (39F) to 7C (45F). I would expect longer curing and pot times . Longer pot life can be a plus for a newbie like me. I am more concerned about the thing never curing or curing with weak molecular bonding. What is the minimum temperature you'd recommend for working with Quikfair?
PS. I'm also contemplating adding flotation chambers in the bow and stern.
Posted: Mon Feb 18, 2008 4:35 pm
by littlesandy
the boat looks great. Thank you for the help the other day. tom (littlesandy)
Posted: Wed Feb 20, 2008 12:25 pm
by Jerry-rigged
Did you use a fairing board? I am thinking that because the Chenoa hull does not have big flat area with no compund curves like the FS or FL's, the actual usefulness of a fairing board may be limited. Then again this is my first boat and I'm the first to acknowledge my ignorance in boatbuilding.
On my ch14, I started to build me a long board, but in the end I thought the same thing you are - there is not enought "flat" on the hull to really work a 3'-4' longboard...
I used a 1/3 sheet hand block for about 50% of my hull sanding... another 30% with a 5" RO, and the rest with a "mini-block" - 1/6 sheet sanding block, about 2" wide and 6" - 8" long I used the mini block a lot on the inside near the ends... Also, when hand sanding, the 100 seemed to cut the blended filler fairing mix better/quicker than the 60 grit I used in the begining.
Posted: Tue Feb 26, 2008 6:58 pm
by gepineda
Tom, you're welcome. Jerry, got it. No long boards. Thanks.
I've been trying to coax myself into starting the sanding, but I've gotten delayed doing other things.

Another excuse is that the weather has been looking so good around here lately that I am hesitating to put TC out of commission. In weather like this it is more enticing to take out the canoe rather than stay in sanding.
Posted: Tue Apr 01, 2008 7:45 pm
by littlesandy
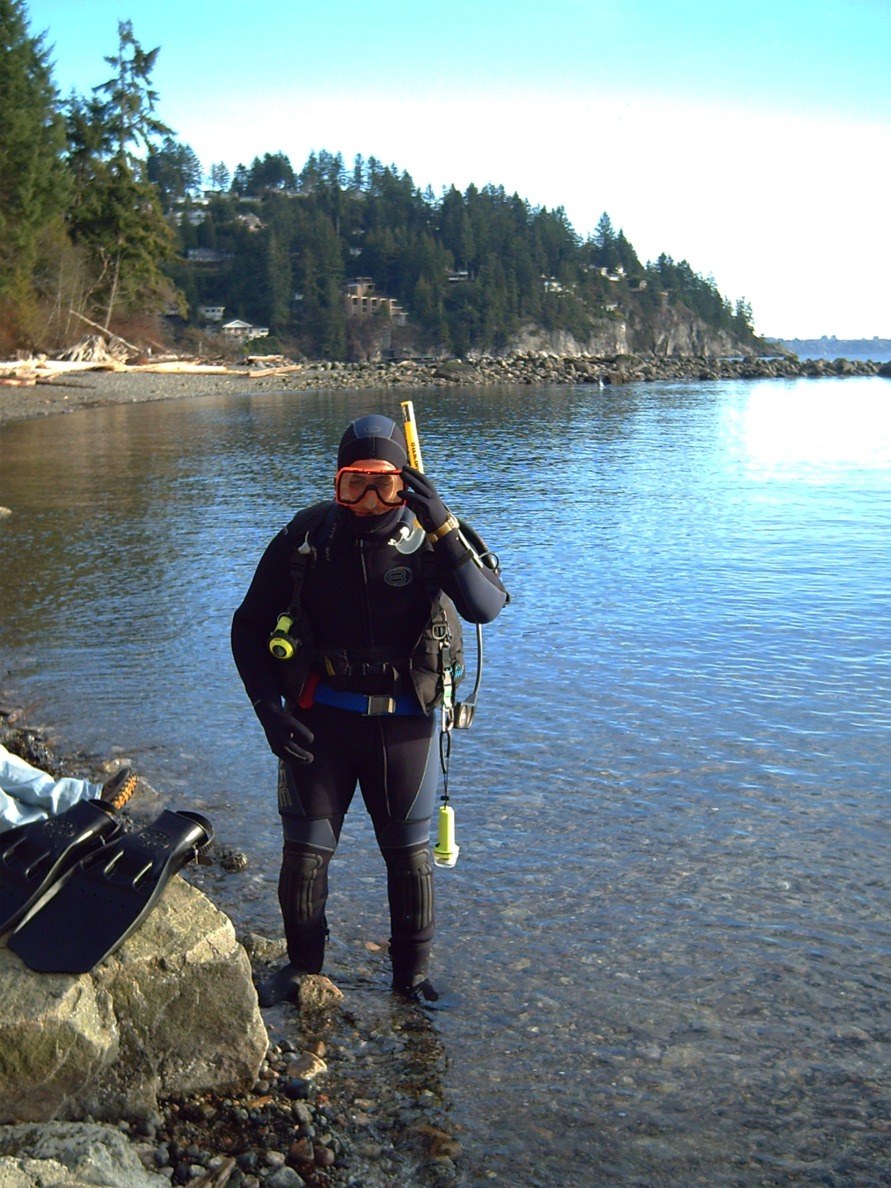
I hope you got the sanding finshed but I am with you I would be diving too. How was the vis that day look great. I hope to get out this month for some spear fishing. Thats a great spot were is it? and how cold was it. This sould be a scuba message board I don't work in my garage any more.
