Page 1 of 1
GK's V10
Posted: Sun Nov 25, 2007 9:12 pm
by gk108
I guess it's time to start a thread on this build. I'm building this V10 from 1994 vintage plans that Jacques' daughter sold on ebay last year. No sheets of build notes were included, but hopefully it will be a simple enough build that they won't be all that necessary.
This will be a rowing & sailing version with capability of adding an outboard. Since this is my first attempt at a sailboat, I'm going to tackle the mast, sprit and sail before building the hull. For various reasons, I've decided to use a Bolger 40 sq. ft. leg o' mutton sail plan. The original plan is for a 32 sq. ft. sprit sail and the newer versions list a 35 sq. ft. sail. Following the path of other V10 builders, I wanted to increase sail area, but still want to keep the capability of downsizing to the original plan if I decide I need to store the mast and sprit inside the boat when I win the big lottery and need a dinghy for the yacht.

With the sail plan I'm going to use, the CE will be within an inch or so of the original, giving me more area without having to worry about relocating the mast step and partner.
Here's a simplified sail plan. Obviously, the hull isn't drawn right, but the basic dimensions are to scale.
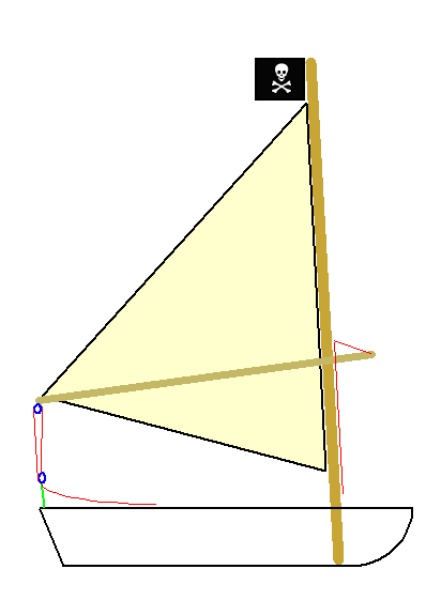
The mast will be a little tall initially to allow some adjustments if necessary. Mast is 13'5", sprit boom is going to be just short of 9' long.
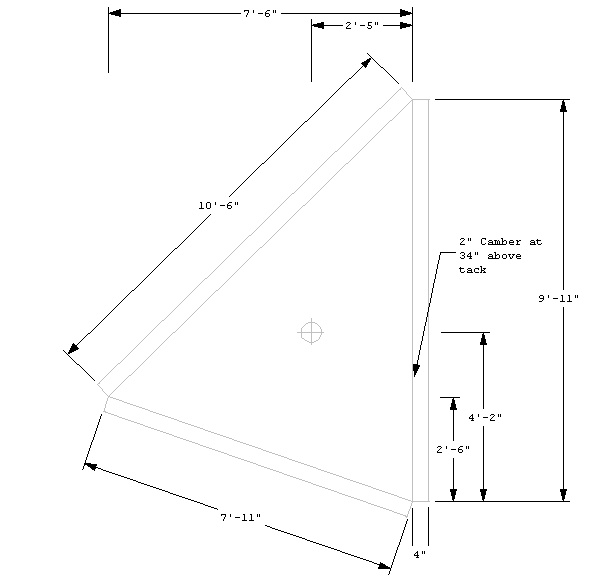
Here's the basic dimensions of the sail.
I'll make the first one from polytarp or tyvek and then make a dacron version based on how the starter sail works.
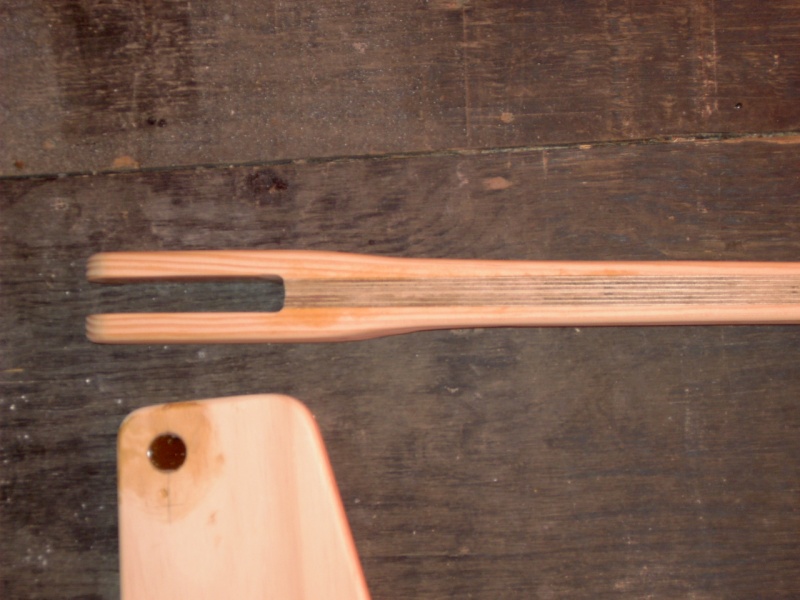
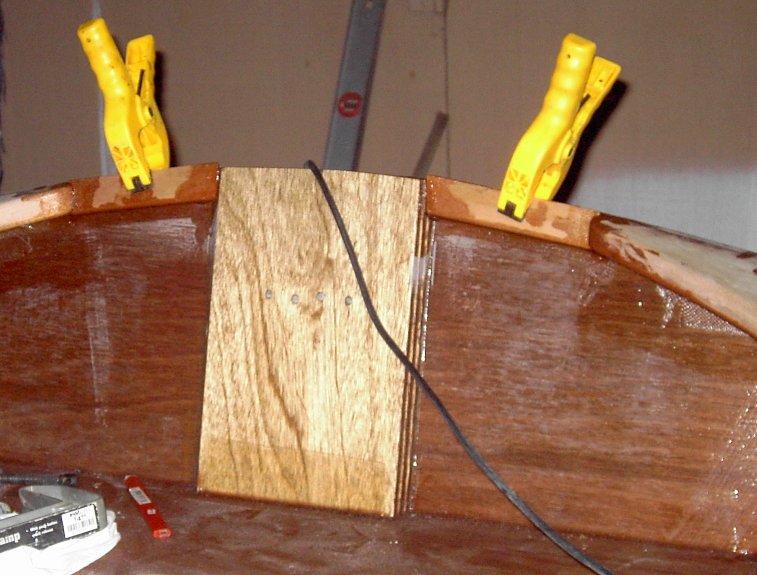
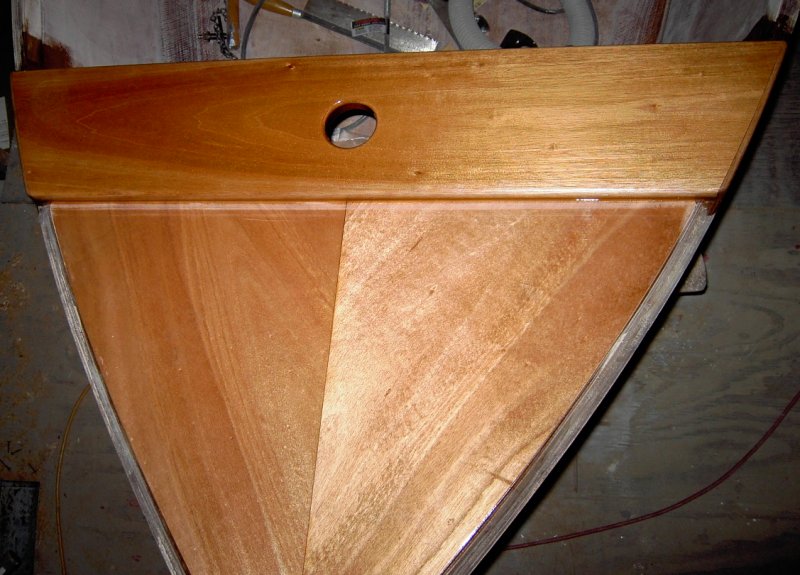
Now for the fun stuff. My mast is made from laminated fir. Finding long enough planks that were suitable was too much of a challenge, so I scarfed together what I could find.
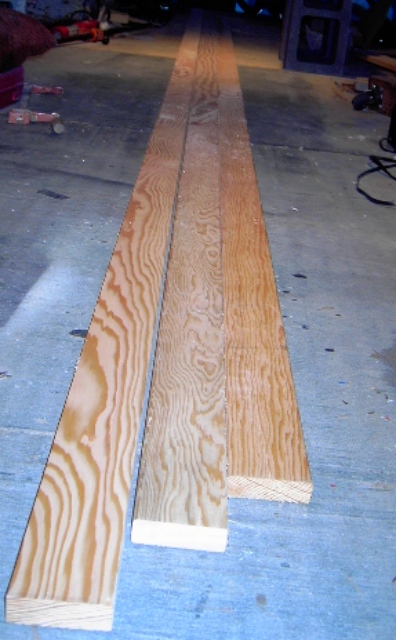
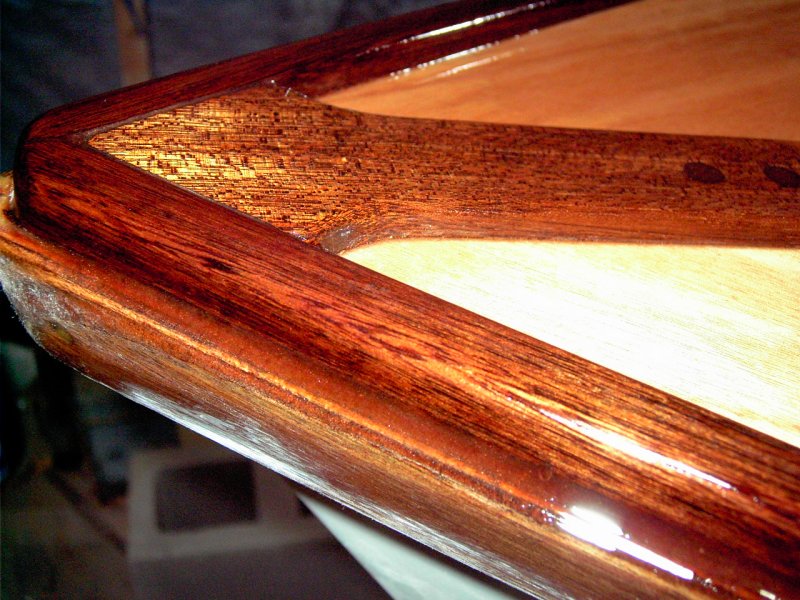
I used 10:1 scarf joints staggered about 2 feet apart.
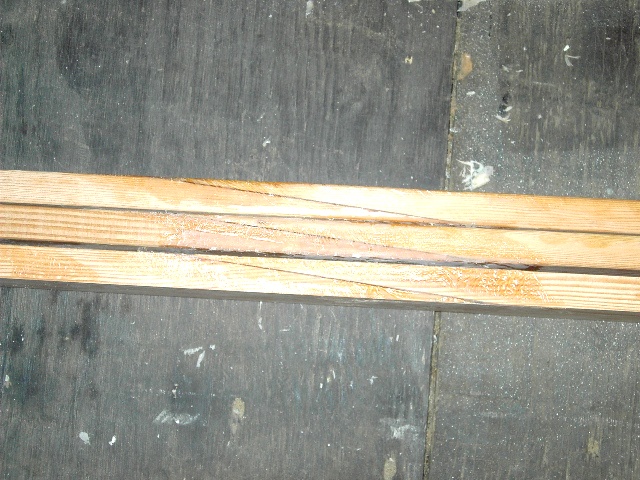
The scarf joint closest to the mast foot is located in the middle of the laminate. This is it after turning the mast round and 2 coats of epoxy.

Making the square blank into a round mast was fun. I can't think of anything I've ever made that created so much saw/sanding dust. I ripped the square into an octagon on the table saw and then hand planed it to 16 sides. When I made up the 3 layers of the mast, I cut the middle one a few inches shorter to form a clevis when it was all glued up. A hole through the clevis and an eyebolt chucked in my drill gave me a sort of universal joint drive to rotate the mast so I could cut the taper and finish rounding it off. Each end of the mast sat on rubber wheels for support.
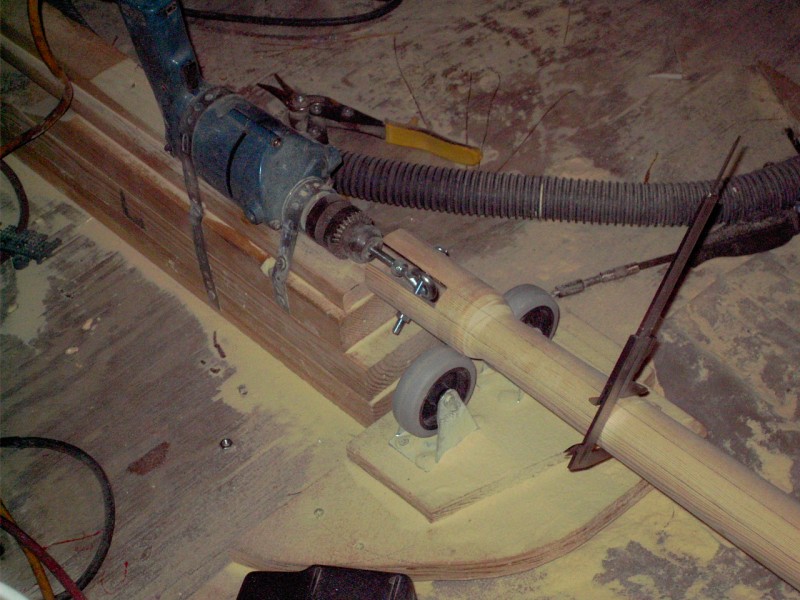
Most of the taper was cut with a 40 grit disc on my grinder, then finished off with the belt sander. Here is the last step of sanding while turning the mast. I used a sanding belt turned inside out. The green box on the left is a variac that I used to control the speed of the drill. Around 25 - 30 volts gave me about 50 rpm and that's about as fast as it needed to turn.
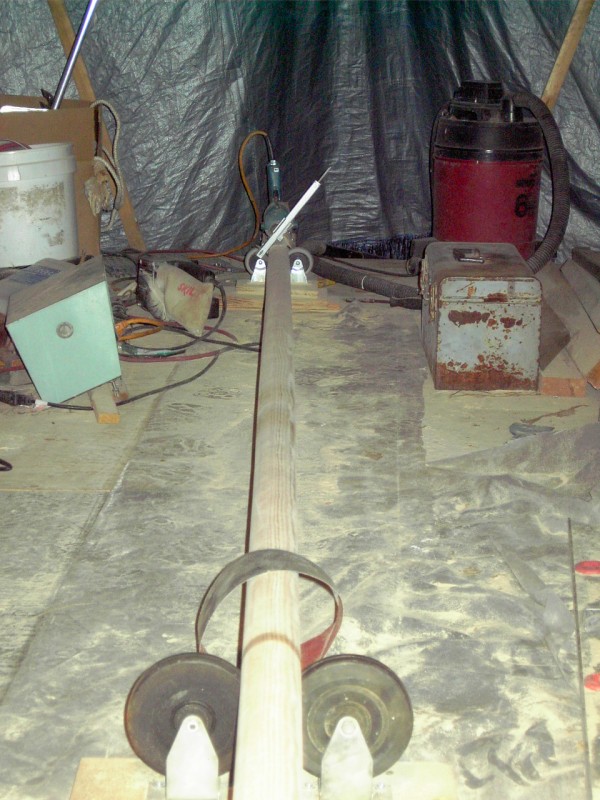
The end result is a not quite perfectly round, not quite perfectly straight, 2 3/16" X 13'5" mast that weighs 13 lbs. I'm quite happy with it.
Posted: Sun Nov 25, 2007 10:16 pm
by steve292
Clever............nicely done, I will watch this quite carefully, I am getting a hankering to build a sailing dinghy.............. if I ever finish the FS17
good luck,
Steve
Posted: Mon Nov 26, 2007 7:54 am
by Daniel Huckleberry
Excellent tutorial on your mast, GK. Great ingenuity, too! I am now hooked on your thread and I'm not even much of a sailor!
Huck
Posted: Mon Nov 26, 2007 8:42 am
by gk108
Thanks guys. I taught myself the basics of sailing in a BW Squall dinghy on Lake Huron about 30 years ago. That was tons of fun, but I've not been in a sailing dinghy since.
The next step is the sprit boom. I can't decide between a CF wishbone sprit or a straight one out of laminated fir. I guess I'll have to flip a coin to decide that soon.
Posted: Mon Nov 26, 2007 3:38 pm
by mecreature
This will be fun to watch.. After watching your D15 we are expecting quite a bit here... along with good tips...
I can already tell I am going to need a glossary of terms to keep up..
Posted: Mon Nov 26, 2007 6:32 pm
by gk108
mecreature wrote:I can already tell I am going to need a glossary of terms to keep up..
A rope is a rope, unless it's connected to something, then it's a line. Unless that line is a sheet or halyard or something.

I probably won't depart much from the plans on the hull. It's a small boat and I don't want to complicate it too much. With the wood mast, I'm committed to some bright finished woodwork, so I'll probably go for more of that.

RE:Mast build
Posted: Mon Nov 26, 2007 10:11 pm
by Mike Redmond
Awright,I realy like that drill with the eyebolt in it for a home made uni joint got a couple of old makita 1/2 drive drills sitting under the shelf in my garage; actuallity I am sorta scared to use them,they are quite powerfull and dont stop as fast as my old 3/8 drill ...sure know what to do with one of them 1/2rs now! wonderfull idea Thanks for the trick Mike R
Posted: Tue Nov 27, 2007 8:17 am
by gk108
I know what you mean about stopping that drill. It can be a wrist breaker when a large diameter bit hangs in the material you are drilling. I guess I'd better include this warning:
Anyone that wants to try this should firmly anchor the drill and run it slow!!! The little speed control knob on the trigger should be set to dead slow at the start and speed increased gradually. I am lucky to have a variac to do things like this. It gave me good speed control that was easy to adjust. Even then, I had this vision of the mast getting loose and flailing around beating me up. Fortunately, that never happened.
Posted: Wed Dec 12, 2007 12:45 am
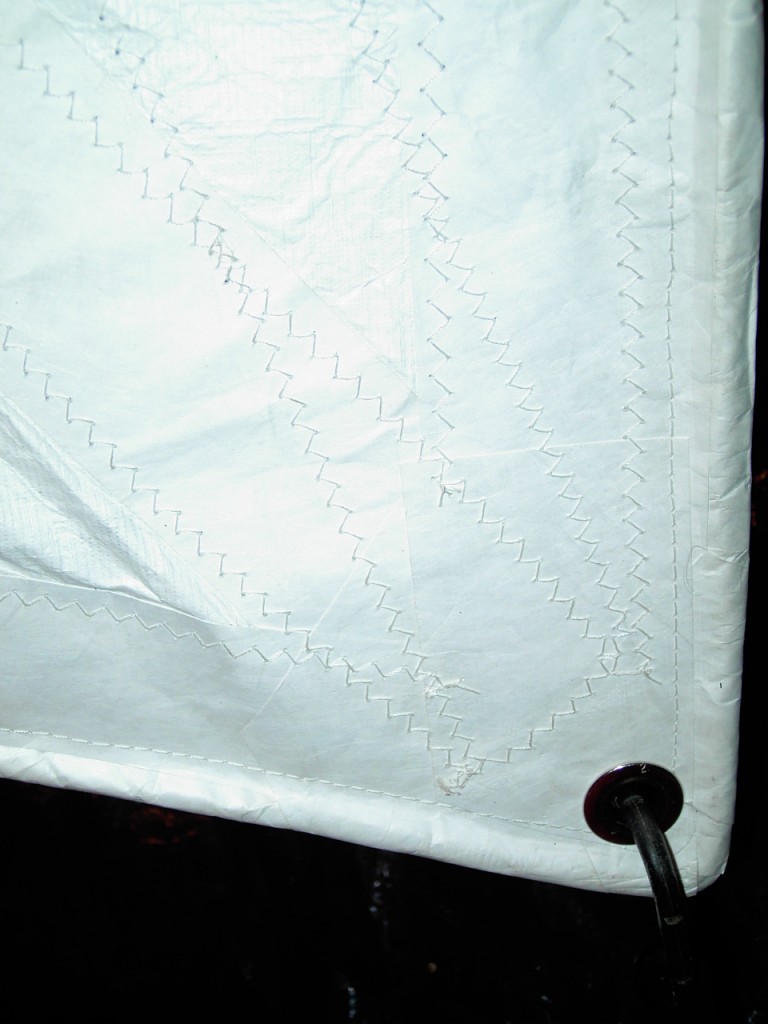
by gk108
OK, my sail is done. It's 100% tyvek cut in one piece from an 8'X10' plain white sheet. I used 2¼" tyvek tape and some outdoor grade polyester thread from WallyWorld on a home sewing machine.
Laying it out. I allowed 1½" to fold over on the edges.
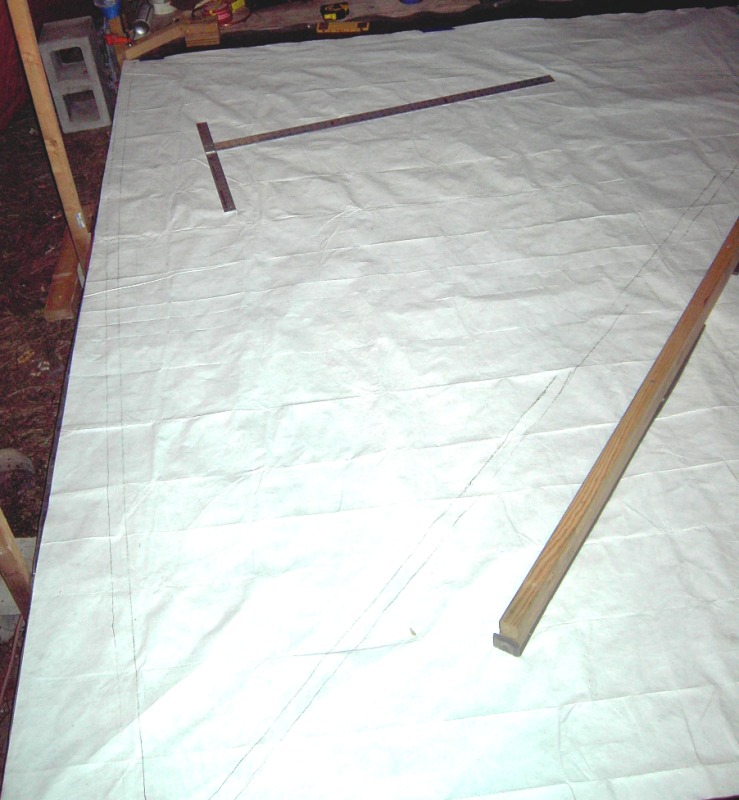
Cut along the line. ¼" nylon boltrope for the luff and double sided tape to hold it and tape the fold down on the edges.

The finished sail.
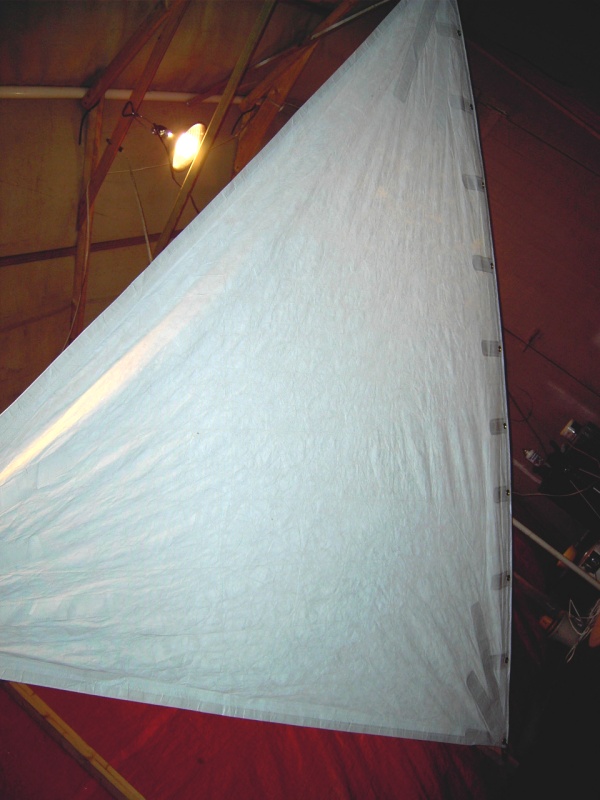
The head.
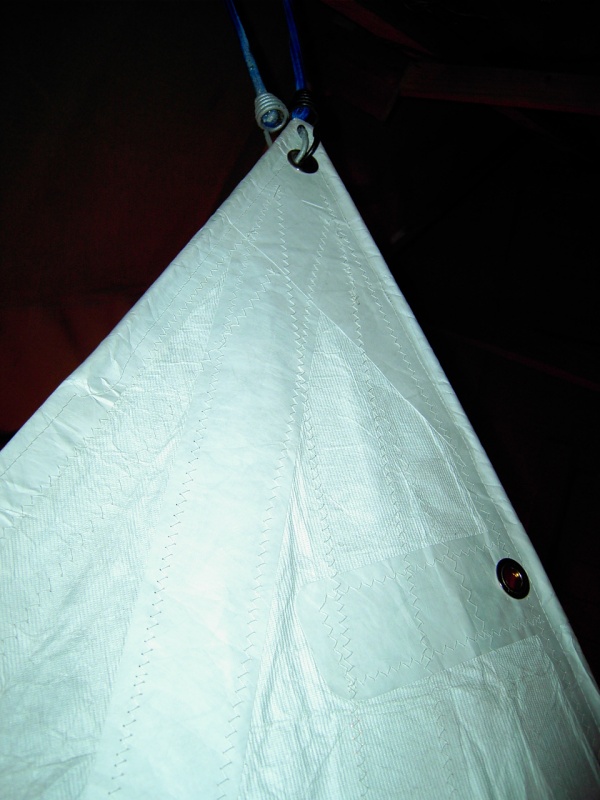
The tack.
Posted: Wed Dec 12, 2007 9:46 am
by mecreature
sounds like fun...
nice stitching..
Posted: Thu Jan 24, 2008 10:48 am
by gk108
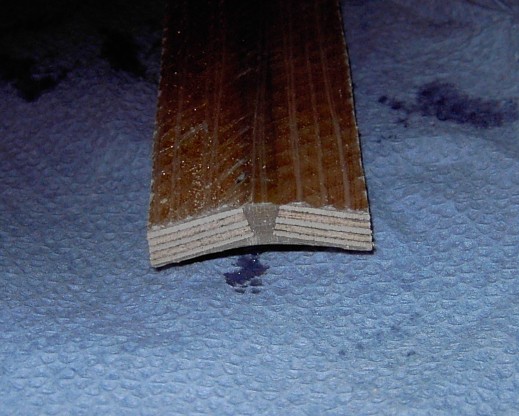
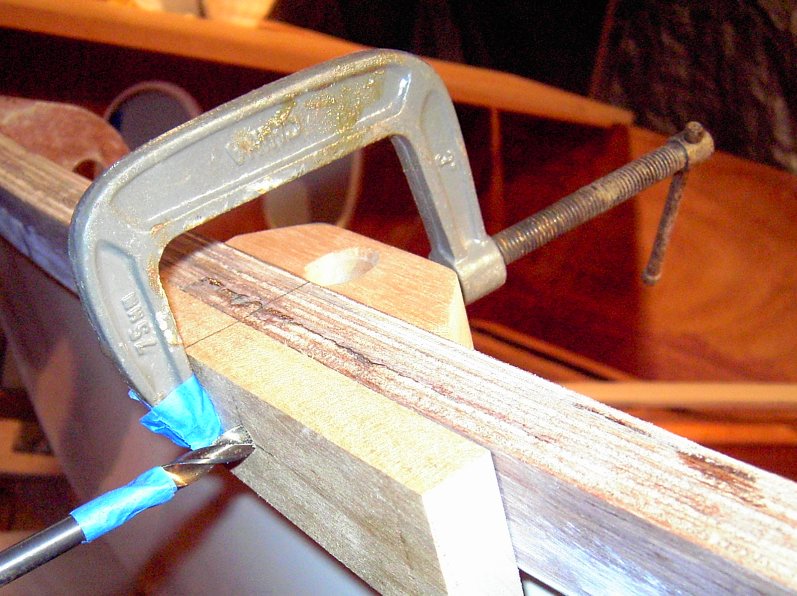
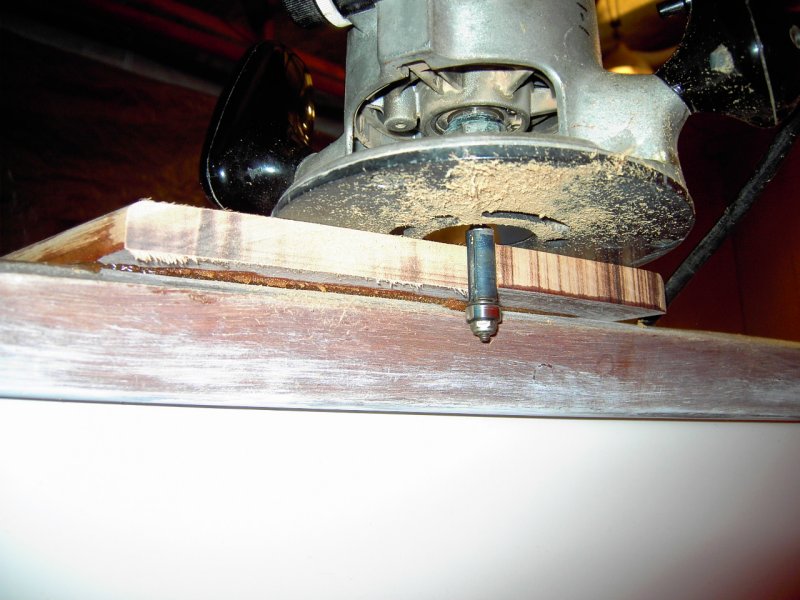
Some more info on the jig for the scarf joints in the mast.
While building my D15, I learned the hard way that I needed to improve my method of joining planks.
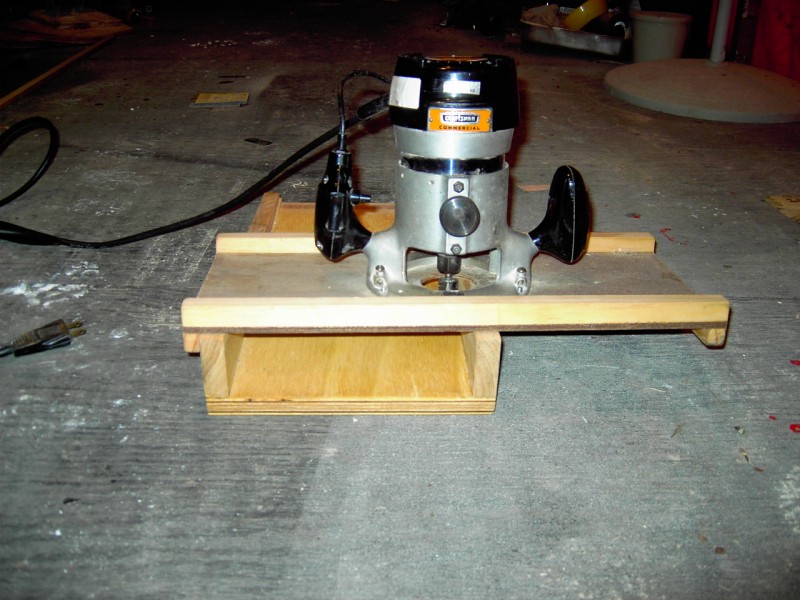
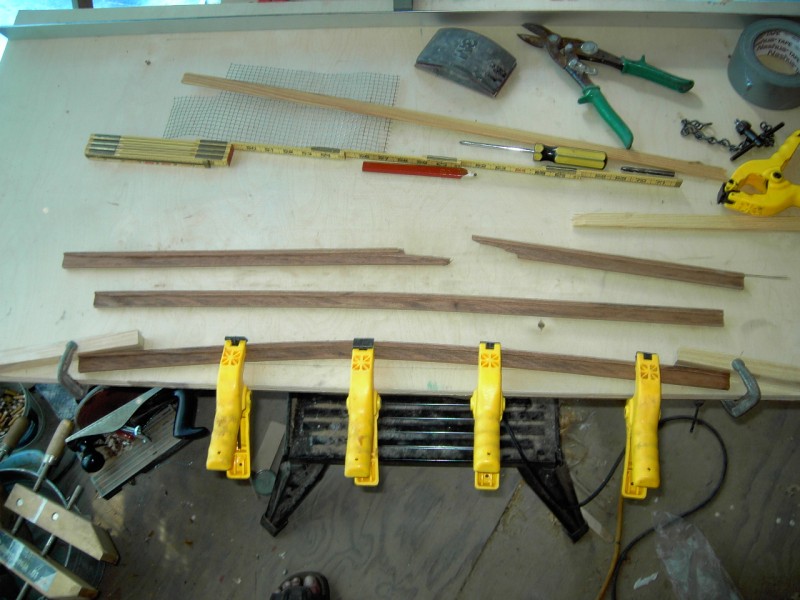
A scarfing jig for my router seemed like the best solution. Two parts were needed, a base to clamp to and a sled for the router to ride on.
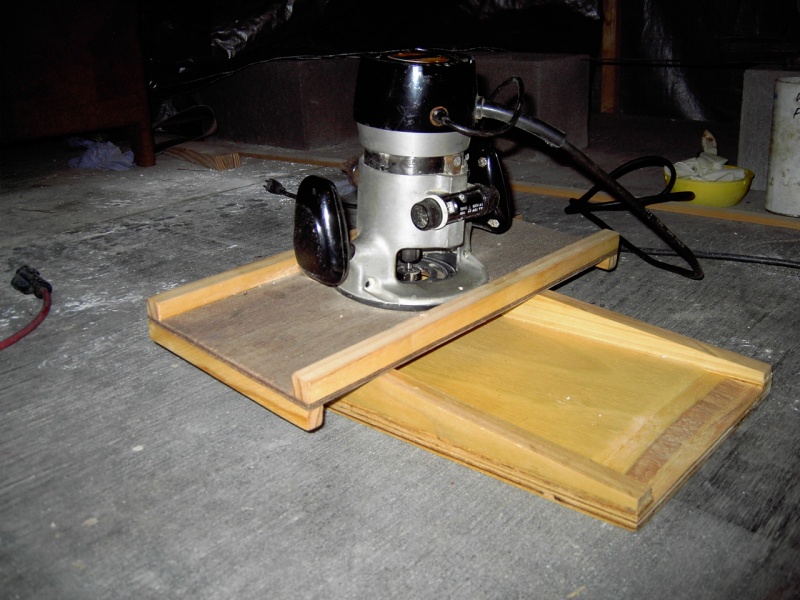
I used a taper jig for my table saw to cut side rails for the base. It's sized to fit up to a 1×6. I removed the plastic base plate of the router and replaced it with the sled which is simply leftover ¼" meranti with some stiffening cleats around the perimeter.
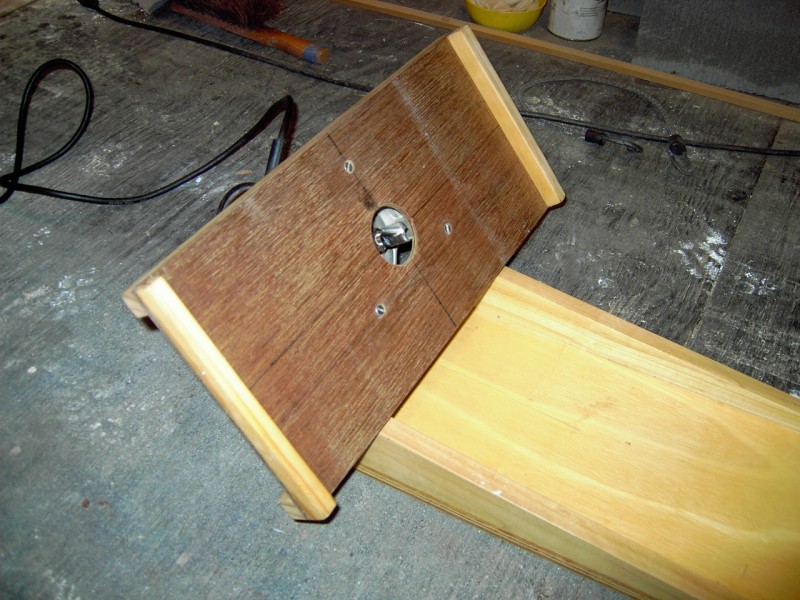
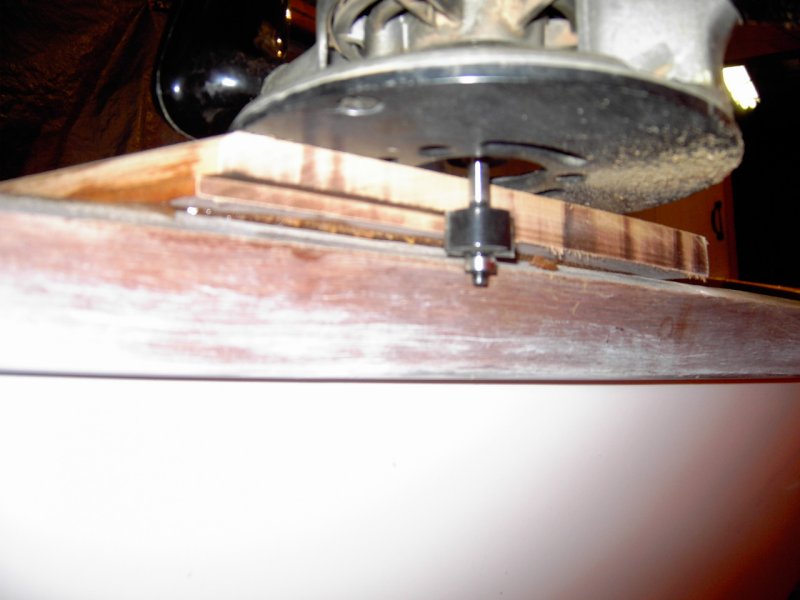
The end cleats are on the bottom to limit travel of the sled so that the ¾" router bit won't cut into the sides of the base. A few test cuts showed that some shims between the router and sled were needed to get things as square as possible. A couple thicknesses of paper card under one side did the trick.
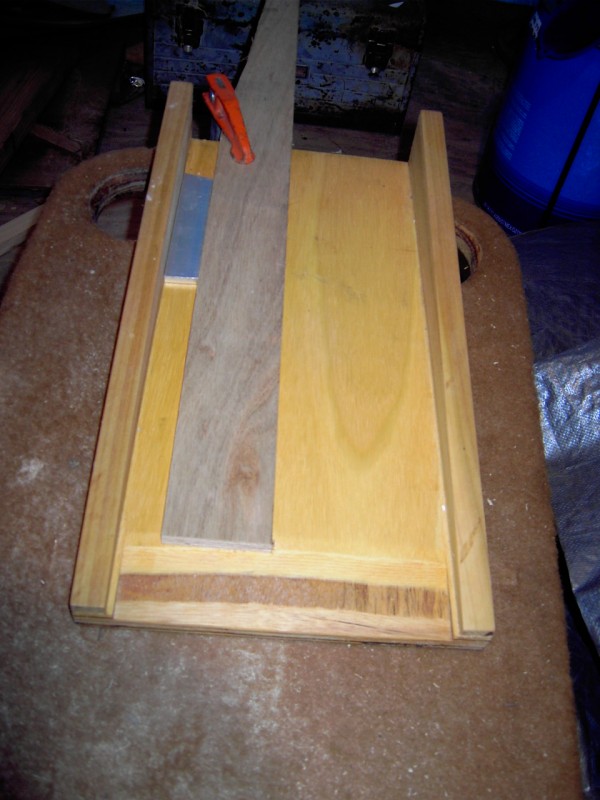
The end of the base has been relieved to keep the sled supported on the thin end of the cut. The metal spacer keeps the edge of the stock parallel to the tapered base sides. You could use a longer sacrificial wood strip instead of metal. Ordinarily, this would not be used for plywood, but for purposes of illustration this scrap of 9mm is used. In use, I just worked with the planks on sawhorses and clamped the base on each plank with 2 clamps.
Before cutting I set the bit depth to the level of the relieved portion of the base and zero it. Set the stock just to the edge of the relieved area to get a sharp point on the taper. Back the bit depth off and cut no more than an eighth inch depth at a pass and make successive passes until you get back to zero. If you hog the cut, the stock will vibrate too much and start to chip.

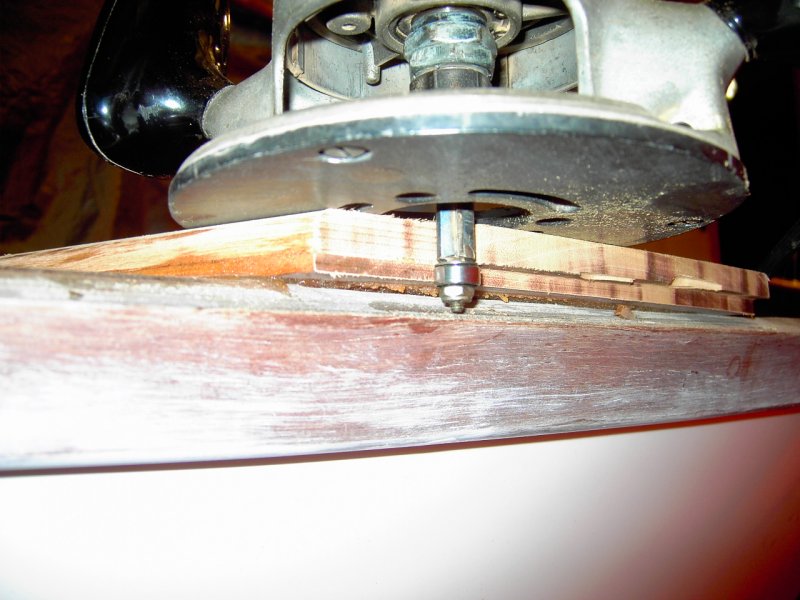
That last picture is good enough to show some details in hi-res:
http://gallery.bateau2.com/albums/userp ... rfjig5.jpg
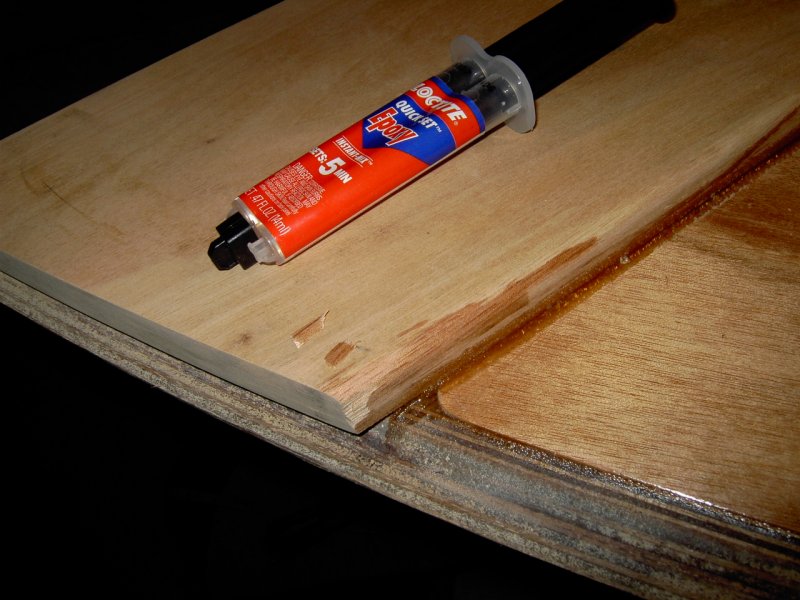
The results after laminating into a mast.
Posted: Thu Jan 24, 2008 6:34 pm
by Cracker Larry
Nice jig, GK and great explanation. I appreciate you posting that. I'll have to build one of those. I really need to start using my routers more. I have 3, a PC with 2 bases, fixed and plunge, an old Craftsman looks like yours that I keep mounted on a table, and a small trim router. For some reason it is always the last tool I turn to, when a lot of times it should be the first. I need to work on that.
That sail looks great. I've never tried making a sail, always relied on Hood and North for that.
A rope is a rope, unless it's connected to something, then it's a line. Unless that line is a sheet or halyard or something.
Not being picky but technically there are only 2 ropes on a sailboat. The rope sewn in the luff of a sail is called a luff rope. The pull cord on a ship's bell is called a bell rope. Anything else in loose lengths are called lines. When they are doing something then they become sheets, halyards, guys, rode or whatever specific to the task. Laying loose in the locker it is always a line.

Posted: Thu Jan 24, 2008 7:00 pm
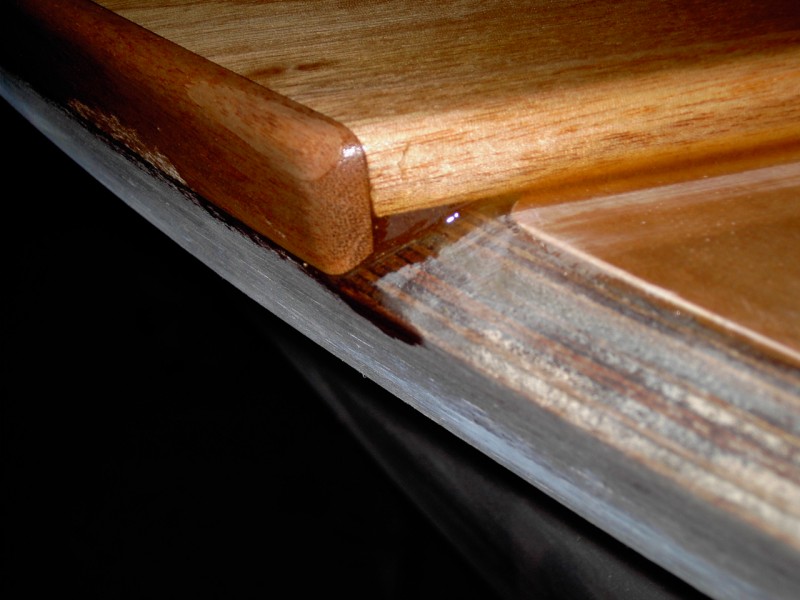
by Cracker Larry
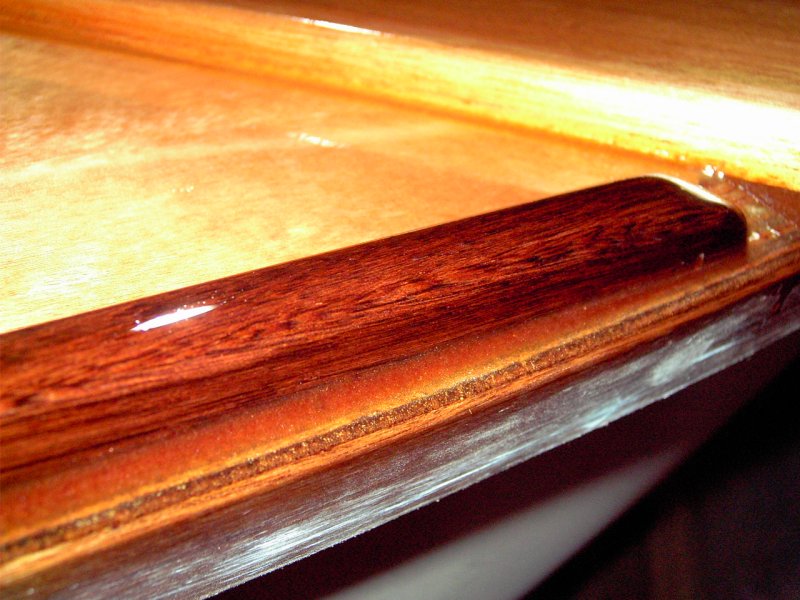
Also wanted to say that's a beautiful scarf joint above
Posted: Fri Jan 25, 2008 10:09 pm
by gk108
I've been working on appendages for the last few weeks. For right now, I've put the kick-up rudder plans on the shelf and made a rudder as drawn on the plans. I reasoned that if my rudder is dragging in a 10' dinghy, I'd just get out and walk. Daggerboard per plans as well. Both are made from a 1×12 radiata pine plank.
The tiller was a great exercise. It's 2 pieces of 9mm and 2 pieces of fir laminated. Both the plywood and the fir are tapered on the sides. The ply was tapered down to about 4mm with a belt sander, then the sanded faces were glued together so that the center plies successively taper to a point. Then I drilled dowel holes and glued 1×3 fir on each side. I roughed the shape on my bandsaw and finished with a lot of belt sanding. It should look interesting after it's bright finished.
I guess it's about time to get some plywood and build a boat for all of this.

Posted: Sat Jan 26, 2008 10:40 am
by Aripeka Angler
GK I showed your thread to a co-worker who is thinking about building. He liked your thread maybe he will get the build virus. Great job on your build

....Richard
Posted: Sun Jan 27, 2008 8:41 am
by gk108
Thanks Richard. I almost messed up my daggerboard. My dad came down from Indiana to see his new great-granddaughter last week. I put some parts in my van to show him what I've been doing and left the daggerboard in there all week. That 1×12 didn't like the humidity and it developed a nice warp. It's all dried out and straightened up now, though. The first suitable day that comes along, I'm going to get those parts sealed up. Maybe today.
Posted: Sun Jan 27, 2008 8:04 pm
by Aripeka Angler
Hope it warms up there soon. Where did you get that variac thing
Richard
Posted: Mon Jan 28, 2008 7:52 am
by gk108
That variac is some of the industrial surplus stuff that we get ahold of sometimes. I got that one and 2 others from vibratory feeders for a machine that inserted glass fuses in the fusebox for some Ford car. That particular variac was a little damaged, so I put it in the green box and added volt and amp meters and use it for bench work. It is handy for things like controlling the temp on my big soldering iron, slowing down the router, etc. Not so good for induction motors like the bandsaw and drill press, as it tends to overheat them.
Posted: Mon Jan 28, 2008 4:01 pm
by Aripeka Angler
Might have to get me one of them gizmos...
Posted: Tue Feb 05, 2008 5:23 pm
by gk108
I kinda thought the okoume BS1088 would look a little better than this.
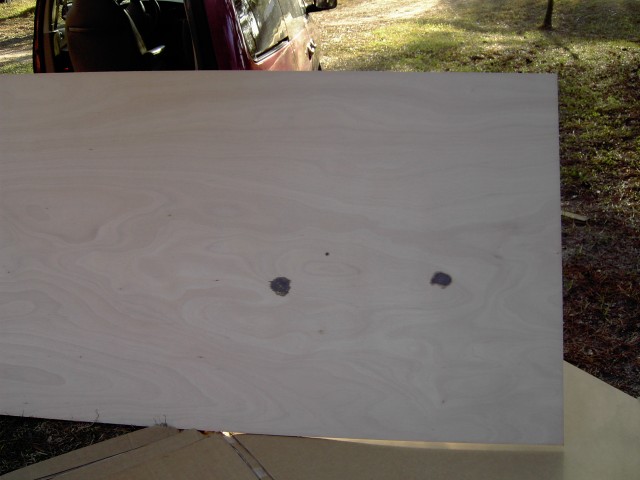
Maybe I can nest my way around it.

Posted: Wed Feb 06, 2008 4:39 pm
by mecreature
In your gallery one of the close ups almost had a look like some checking was going on.
Is this your first time working with Okoume? How do you like it so far..
Posted: Wed Feb 06, 2008 5:25 pm
by steve292
gk108 wrote:I kinda thought the okoume BS1088 would look a little better than this.
Maybe I can nest my way around it.
Where did you get it from? I had 8 sheets of 1/4, & there wasn't a blemish on them.Nice worksmanship on the Rudder BTW
Steve
Posted: Wed Feb 06, 2008 5:39 pm
by gk108
mecreature wrote:In your gallery one of the close ups almost had a look like some checking was going on.
Is this your first time working with Okoume? How do you like it so far..
Caveat emptor.
Posted: Thu Feb 07, 2008 2:42 am
by gk108
steve292 wrote:Where did you get it from? I had 8 sheets of 1/4, & there wasn't a blemish on them.Nice worksmanship on the Rudder BTW
Steve
Thanks, Steve. Plywood is Joubert from eboat. I played with nesting until I got crosseyed and can't come up with anything better than what the plans show. The cosmetics of it are not as serious as the strength and durability factors. V10 has some serious bends at the bow and that's right where one of the bad spots will end up. That gnarly grain turns a lot of open end grain up in the face and I worry about finish and decay resistance there.
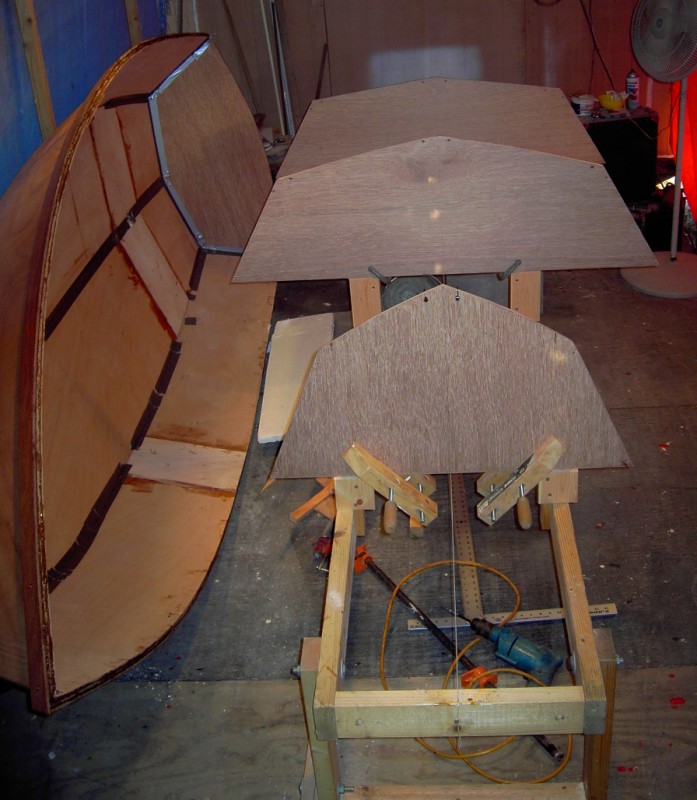
I cut the frames and transom today.
Posted: Thu Feb 07, 2008 11:19 pm
by gk108
Got it! I drew out half of the bottom and cut it out, then used it to trace the other side, but didn't cut it. Then I looked at the whole situation for the side panels again and decided I couldn't figure out the original nesting on the plans either. I looked at it a while, got out the full size patterns and put them away again. Then I lined the plywood up end to end and just drew a panel complete. Looked like I had enough room to do it again, so I drew a reference line offset from the long edge and drew another one. It didn't collide with anything I'd already done and the bad spots are now several inches away from anything I'll use. It's still going to be tight and I'm pretty sure the only way this worked is because of the little extra length of the metric plywood.
Posted: Sun Feb 10, 2008 2:41 pm
by gk108
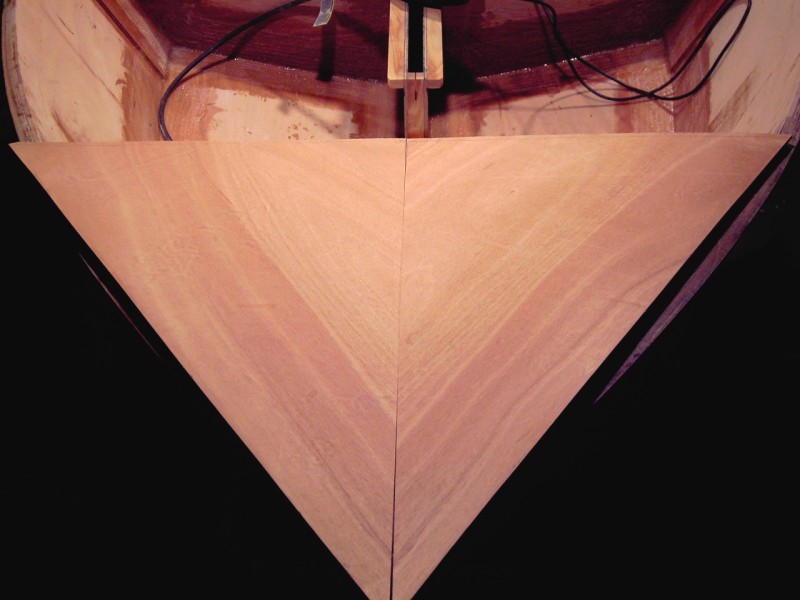
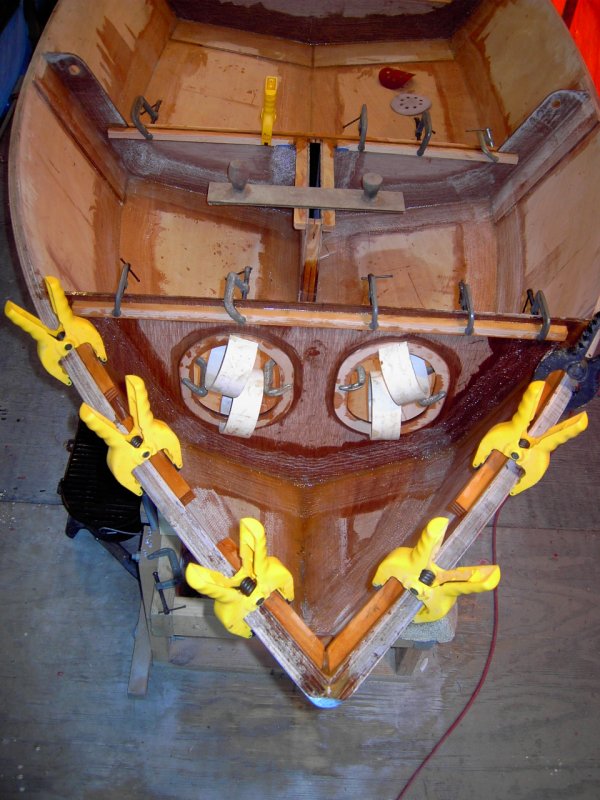
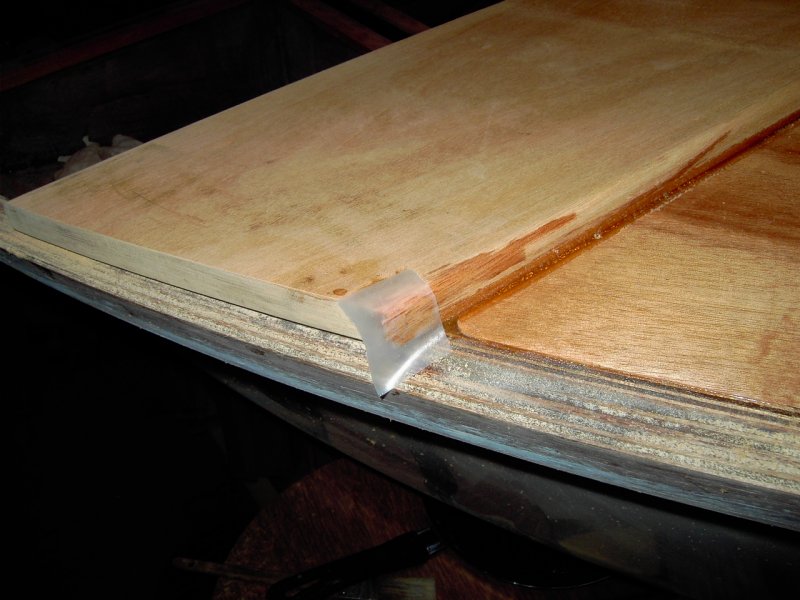
Stitched
This is why I bought the bendy stuff. It resisted my efforts for several hours, but I studied its movements and decided to put the screws to it. They just go into a 3" cleat hanging loose on the other side. I realized that most of the bend up in the bow is really twist. Tightening the screws provides twist in this area where there isn't much leverage. I left a ¼" gap rather than worry about drawing that little bit in.
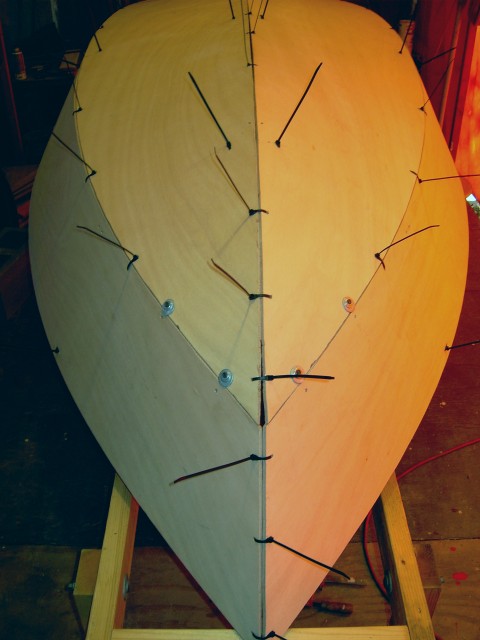
Tacked
In some places it's more like filleted with small gaps at stitches.
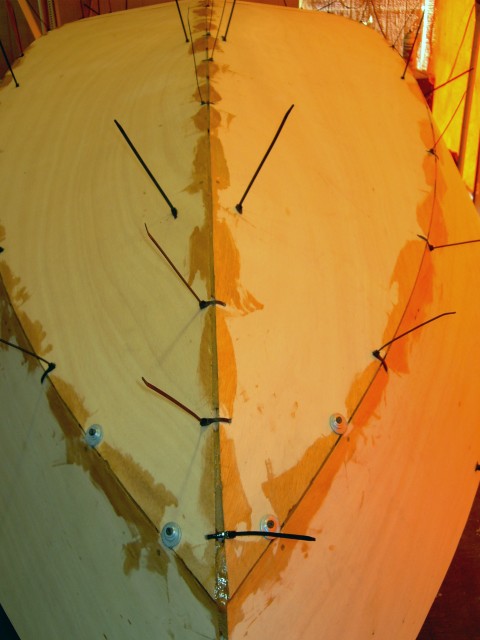
The plans show a small camber on the bottom of frames 1&2 and I was able to pull most of that in as well.
Posted: Sun Feb 10, 2008 5:05 pm
by ks8
Looking great! Now hold your breath as you snip.
On my CV16 bow transom, there was an area of such twist, that it would not stay without leaving a few pieces of the twisted stove wire embedded. I don't think anyone ever had that as a problem with a V10 or V12, so happy snipping!
Are you going to flip and fillet and glass the inside before shaping the chines and taping the outside? If so, maybe leave the stitches in until after the flip? Just a thought.

Keep those pictures coming!
Posted: Sun Feb 10, 2008 5:30 pm
by gk108
I got faith in the goop.
It took surprisingly little force from those screws to do the job and a whole lot of the stitches are not very tight. I'll put some lights under it for the chilly overnight and about this time tomorrow I'll cut away.
Posted: Sun Feb 10, 2008 7:02 pm
by topwater
Nice job
Keep the pic's coming.
Posted: Sun Feb 10, 2008 7:46 pm
by gk108
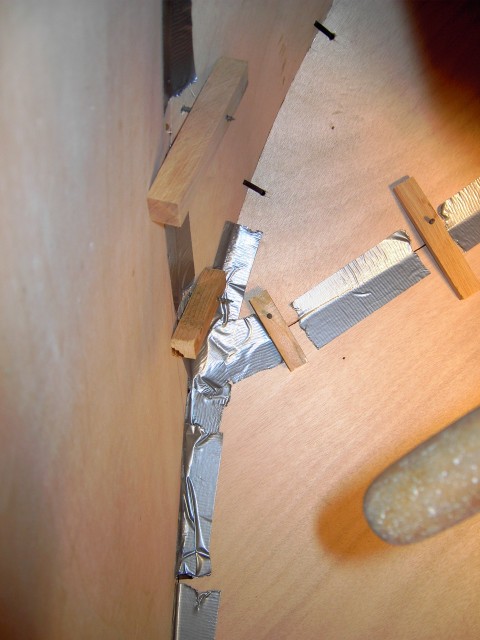
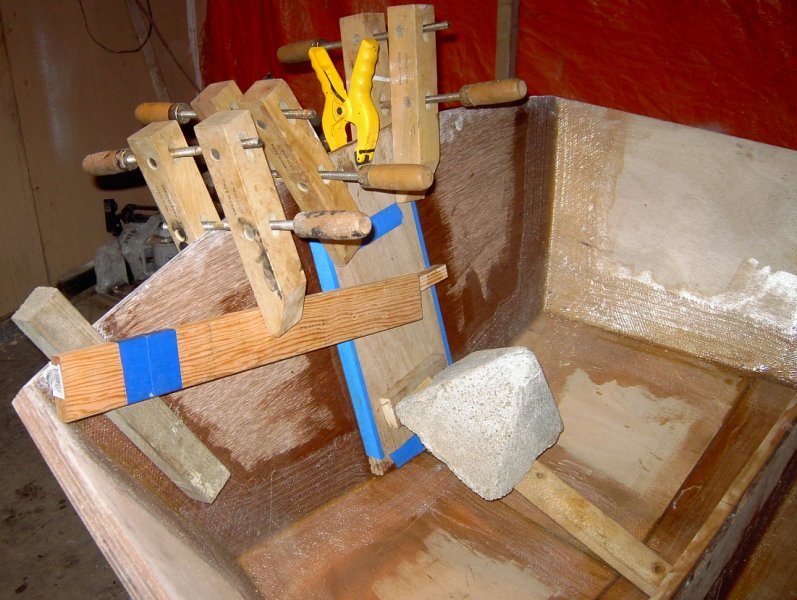
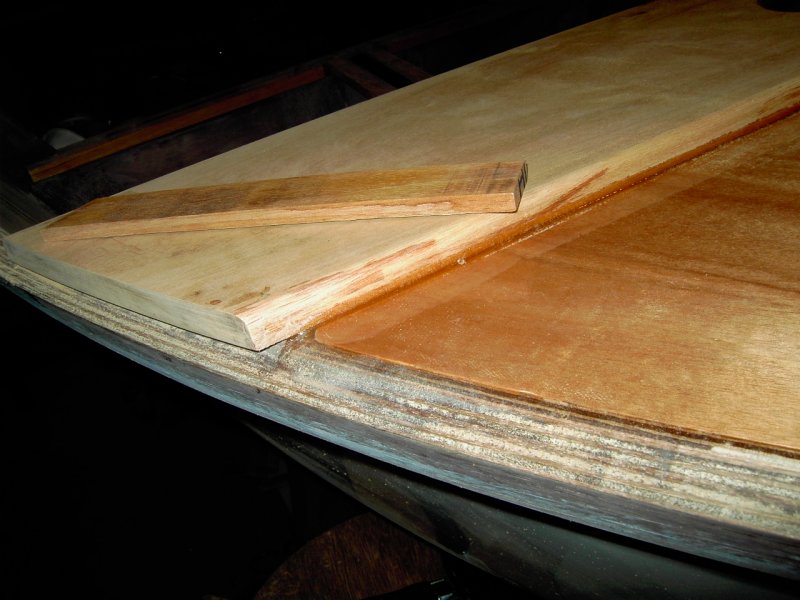
Here's another one. This is the bow area from the inside showing the screws and cleats used to draw the panels together.
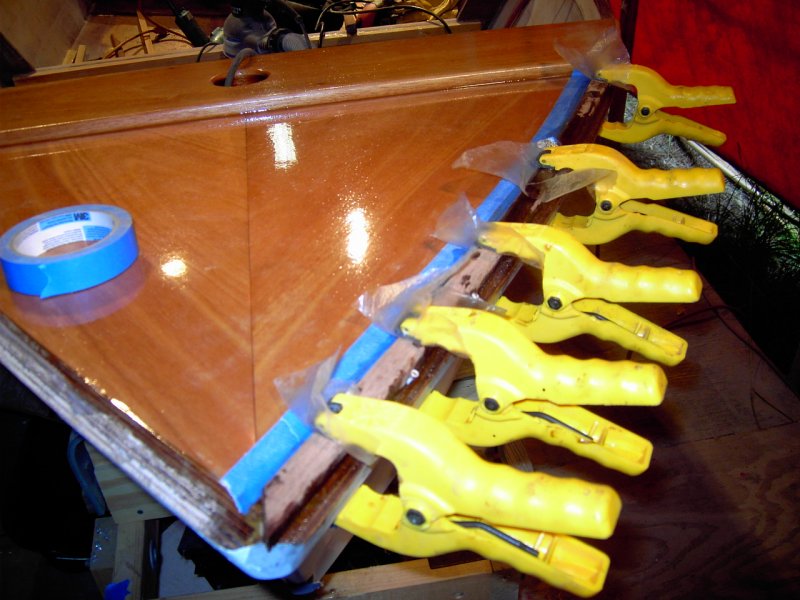
Posted: Fri Feb 15, 2008 9:10 am
by gk108
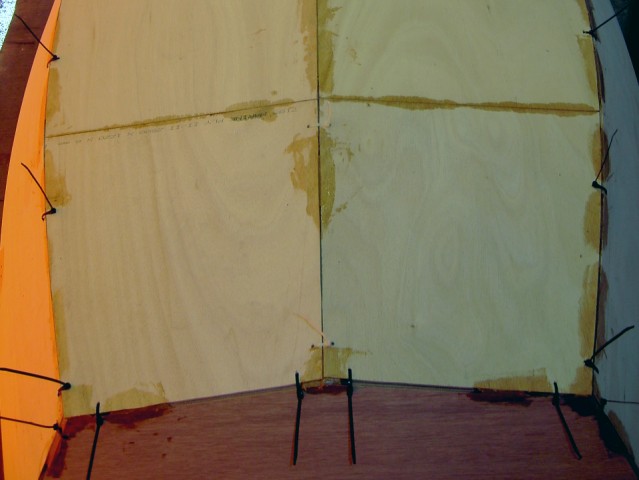
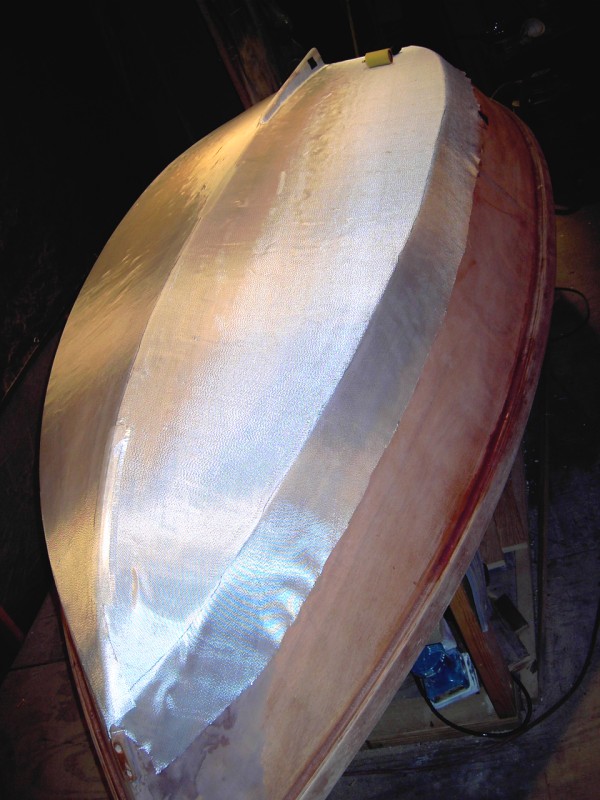
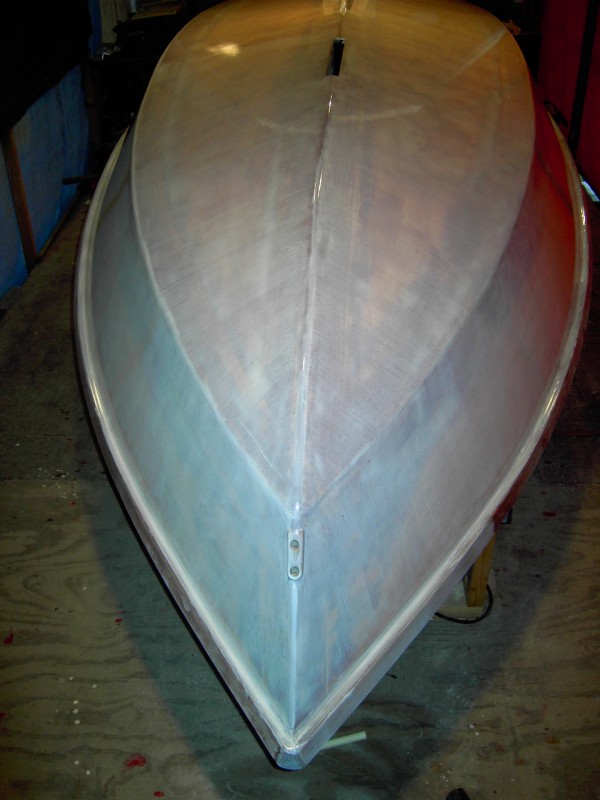
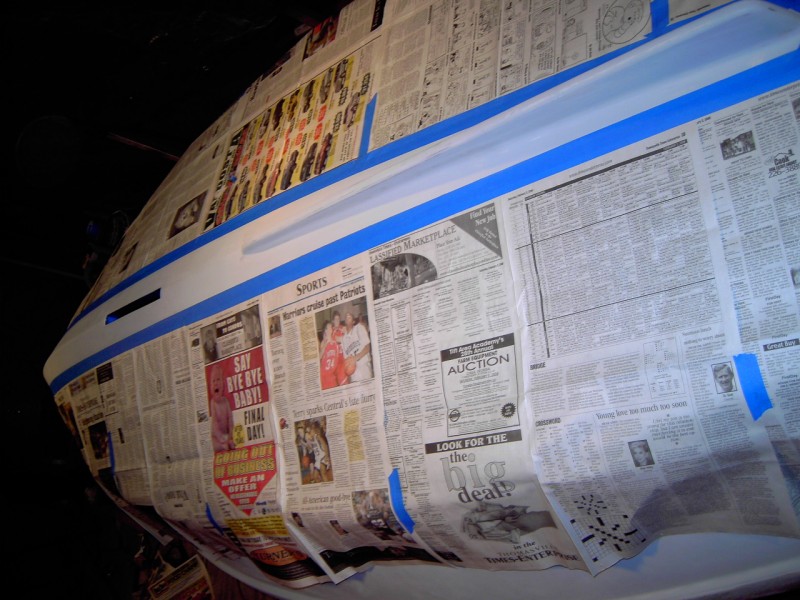
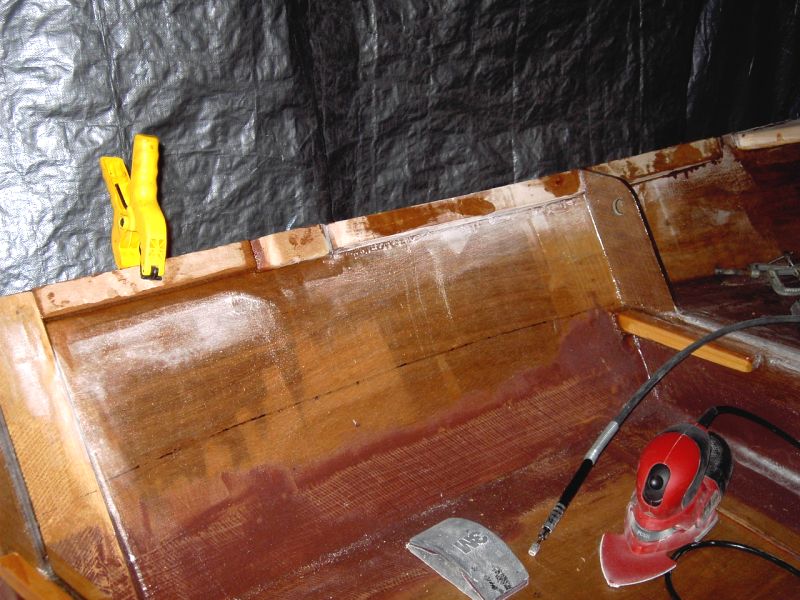
Outside seams taped.
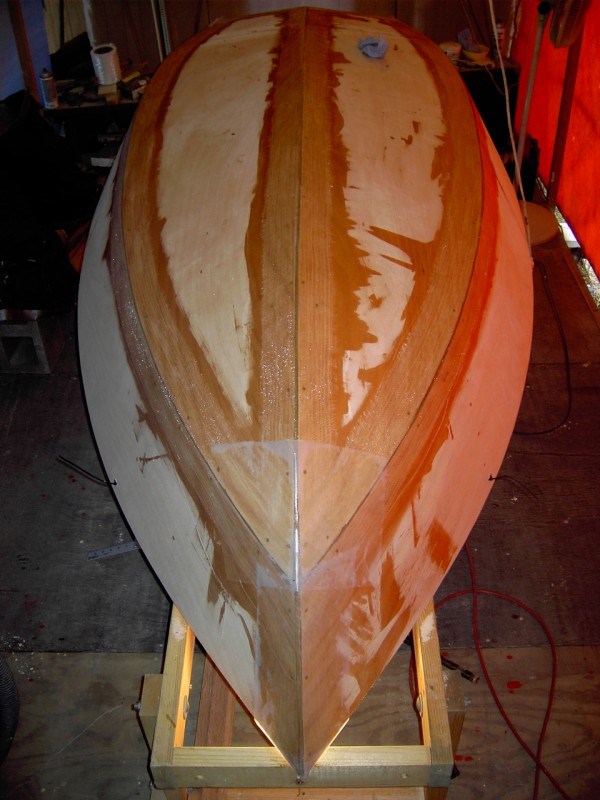
I used some small pieces of polyethylene poor mans peel ply on the bow and transom corners to tame some of the overlaps. What looks like a gap at the bow is really a reflection of the flash off the plastic. Temp was around 30°F last night, so I put some lights under the hull to keep things warm.
Posted: Fri Feb 15, 2008 10:18 am
by mecreature
Just as I figured.. a wonderful job..
let us know how that cheap peel works out for you.
Posted: Sat Feb 16, 2008 3:07 am
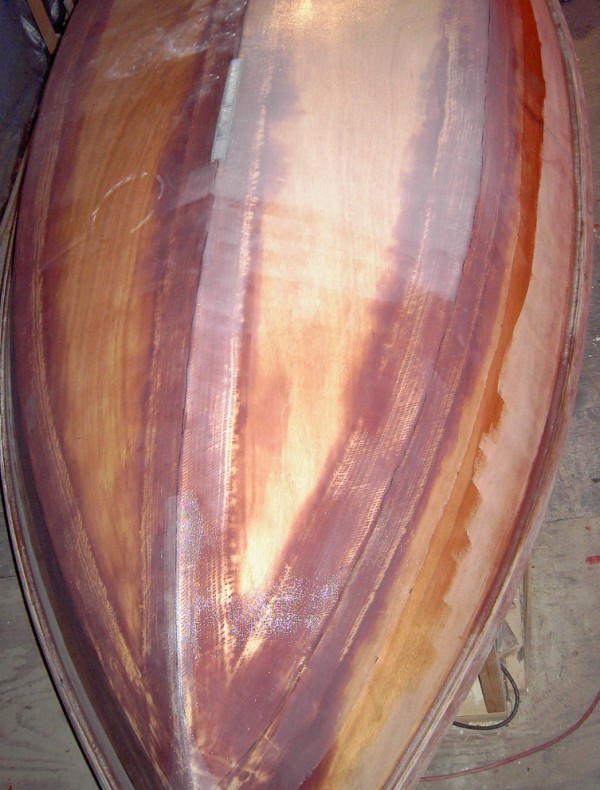
by gk108
The polyethylene worked good. Pretty much eliminated the need for fill coats where I used it.
I'm stuck big time now, though. I'm trying to use 2 layers of 3/8" ply for the rubrails, but there's a 1.5" camber in the sheer line and I am having trouble getting the plywood strips to bend in 2 different directions at once.
I gave up for the night and went to see my
ex second cousin in law's band. For a 16 year old, she can really tear it up.
Posted: Sat Feb 16, 2008 7:50 pm
by gk108
Brute force prevailed and I have 1 layer of rubrail on. The front half was the hardest part to form and the run from admidships back was pretty easy. Round 2 tomorrow.
Posted: Mon Feb 18, 2008 8:38 pm
by gk108
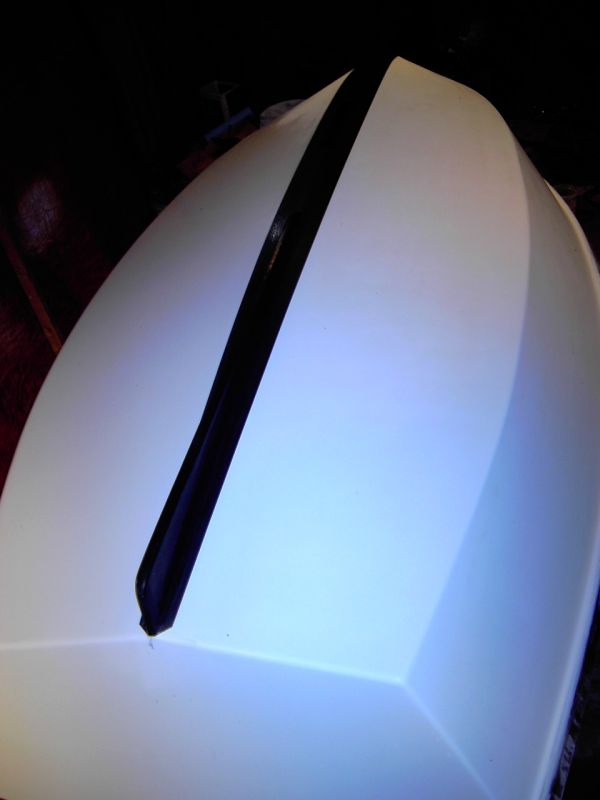
2 layers of rubrail on and a coat of epoxy overall.
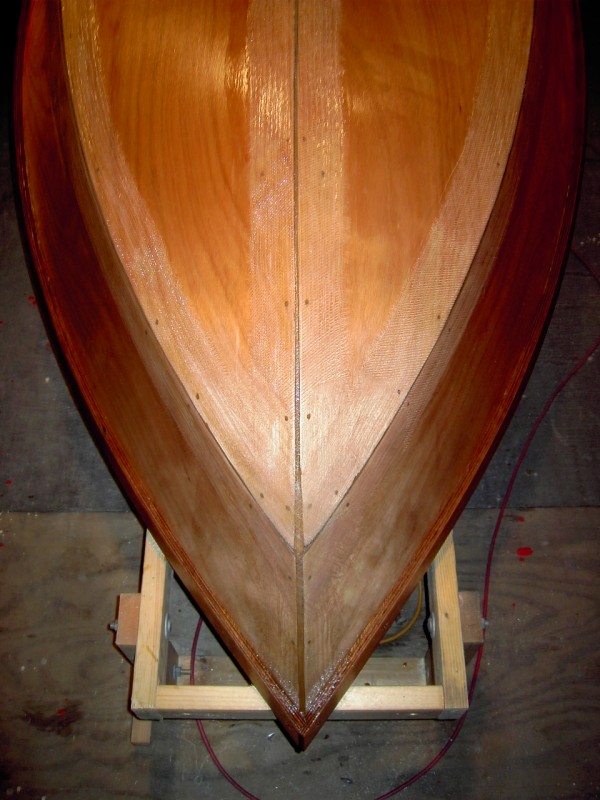
From the other end.
Shows why it is a VeeTen. In fact, I think I have a name for this one.
Vanguard
Posted: Tue Feb 19, 2008 9:21 am
by topwater
Very nice.
That boat has real nice looking lines to it.
Posted: Wed Feb 20, 2008 8:37 am
by gk108
Thanks. It's coming together fast now.
Yesterday I flipped it.
This shows the stand I'm building on. I set the top of the stand at baseline and elevated and spaced the frames referenced to that. After this picture was taken I stripped the stand and replaced the frames with a cradle to hold the hull level.
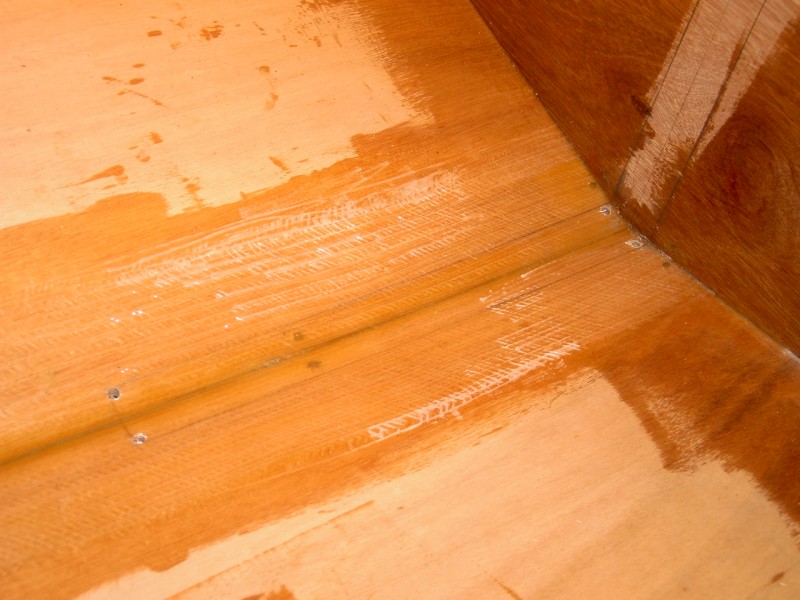
Then I filleted and taped the seams on the inside.
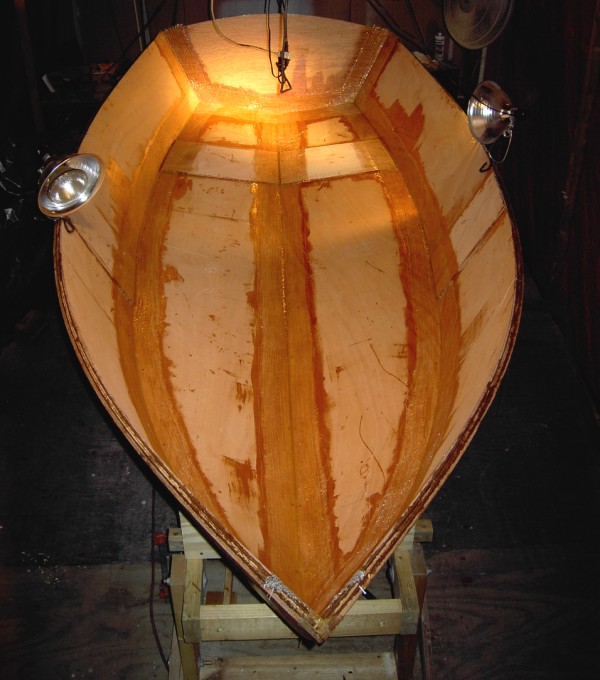
Today I'll finish cutting the frames and possibly tack them in place.
Posted: Thu Feb 21, 2008 8:20 pm
by gk108
Well, I got the middle frame and rear frame tacked in place today and started on the two halves of the daggerboard box. Then the wacky weather got in the way. The ground has been staying pretty wet here with the seasonal rain. Today it has rained hard and steady since 10AM. Basically, I'm now on an island. My V10 is on a neighboring island about 50 ft away. If this keeps up, I'll have to go out and drop the anchor on the D15 so it doesn't float away.

Posted: Thu Feb 21, 2008 10:17 pm
by Cracker Larry
Well GK, at least we're not worried about drinking water like we were a couple of months ago
The boat looks great
Posted: Fri Feb 22, 2008 12:14 am
by gk108
Yeah, it's sort of a relief. For me, it's the floating balls of fire ants that are the worst inconvenience right now. I live on one of those celebrated Georgia dirt roads. The county has neglected maintenance on it and one of the neighbors called the road commission and complained. They hauled in 50 truckloads of the finest Georgia red clay they had yesterday. The mush is so deep now that it almost swallowed a car in the middle of the road a while ago. I heard the tow truck and stepped out to see what the commotion was about and that's when I was reminded about the fire ants.

Rain gauge says a little under 4" for the day. The Ochlocknee river is over flood stage right now and won't peak until tomorrow night. I'd work from home tomorrow, but it's payday and I like to be present when the eagle flies. All I need is a good running start to make it to solid roadway, right?
Posted: Fri Feb 22, 2008 9:15 am
by mecreature
the boat is looking great..
good to hear about the rain.. at least I got gravel on my road.. I know how a fresh load and then a good steady rain can make for a nice mess..
BTW.. I was wondering if you are going to do any fancy bright work on that thing..
Posted: Fri Feb 22, 2008 3:56 pm
by Cracker Larry
Oh yeah, I know that Georgia red clay
Hope you have 4WD.
I live on a dirt road also, but I own it and have to maintain it myself. About a mile of it. Lots of fun in this weather, but I can't bitch at the county for not doing it right. Mine is a mess and it's all my fault, according to my wife, who does not like her car to even get dirty.
Posted: Mon Feb 25, 2008 9:05 am
by gk108
Things are getting back to normal now. The road is still a mess, but most of the water has run off.
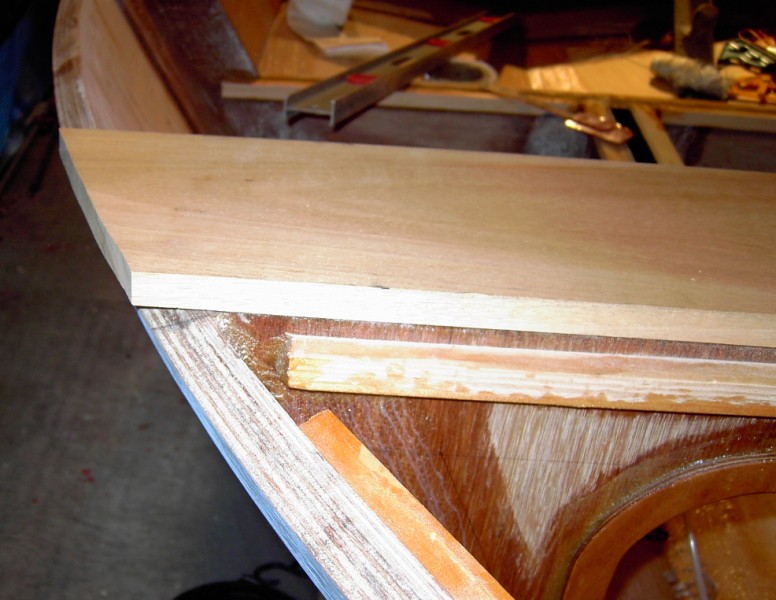
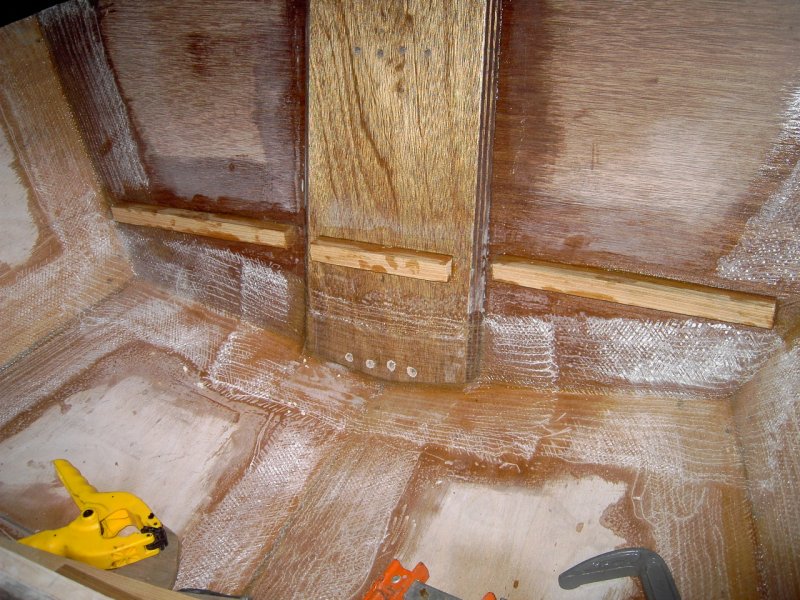
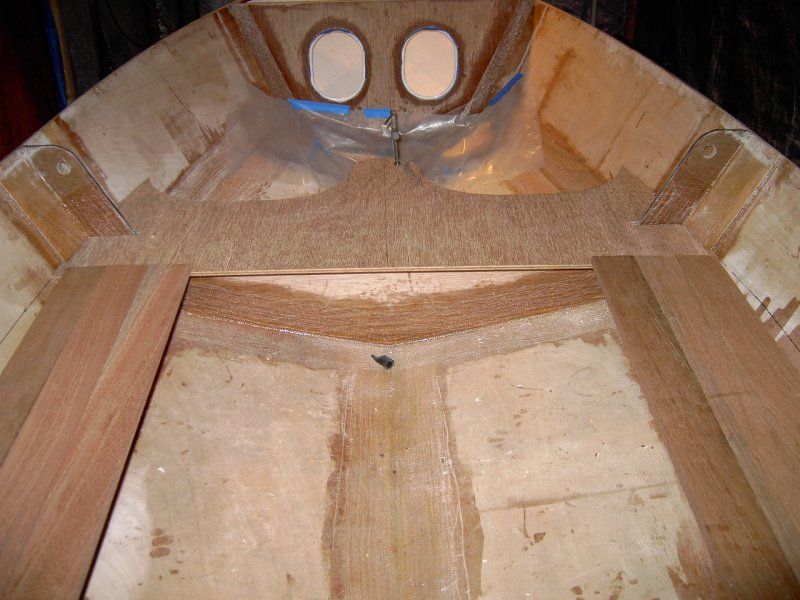
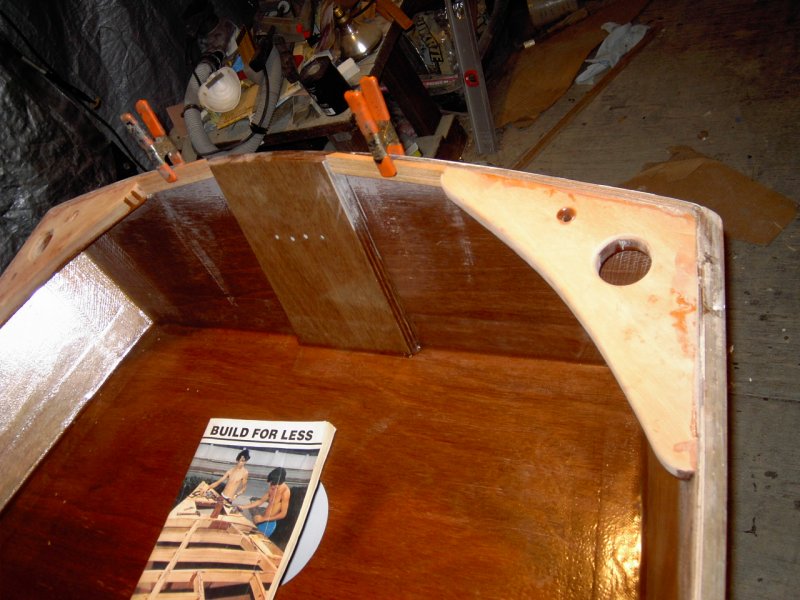
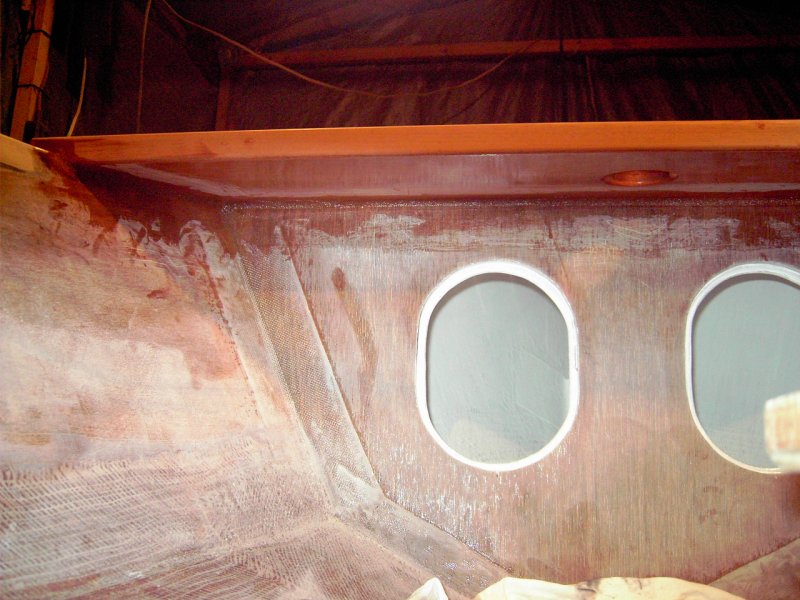
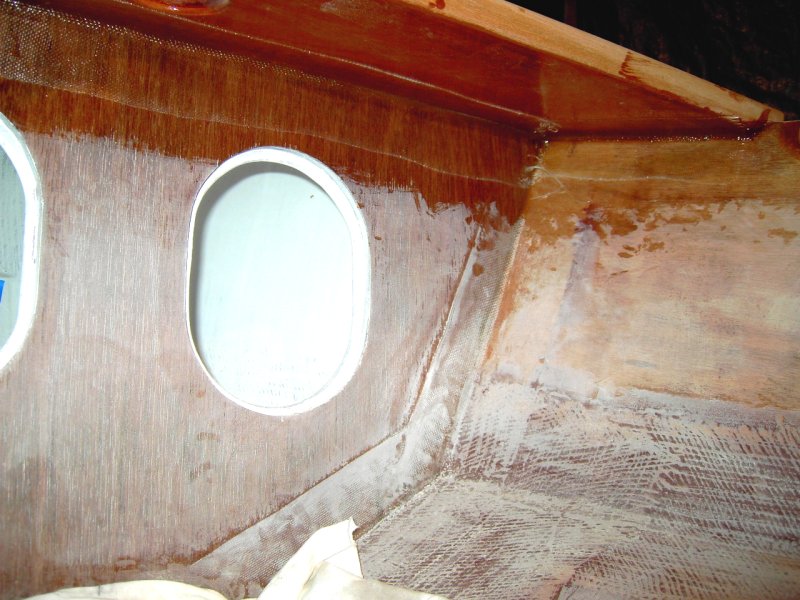
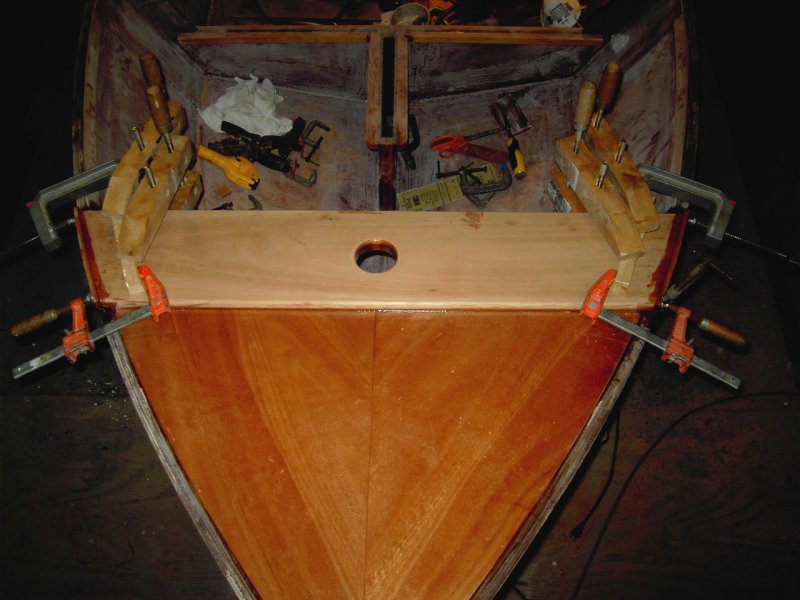
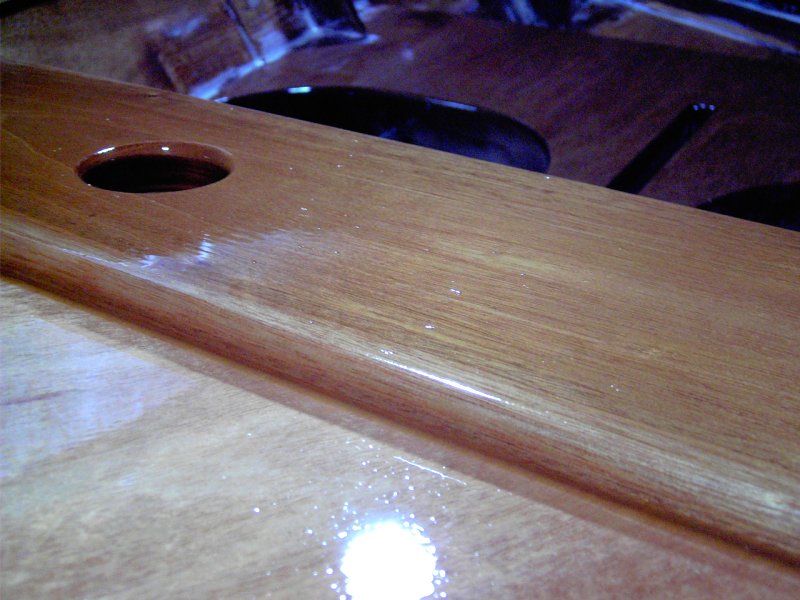
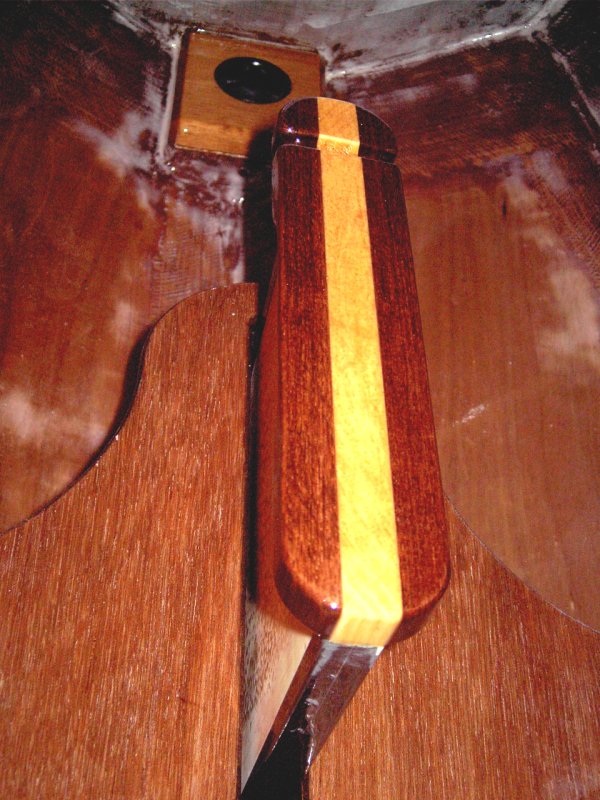
I worked on small stuff most of the weekend, including some of the components that will be bright finished. I roughed in the mast step which will have a solid mahogany cap on it.
The mast partner and transom knees will also be solid mahogany, bright finished.
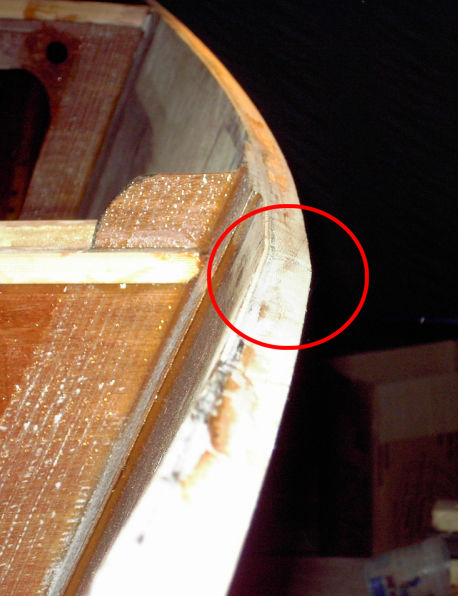
Here's the beginnings of the backing block for the bow eye.
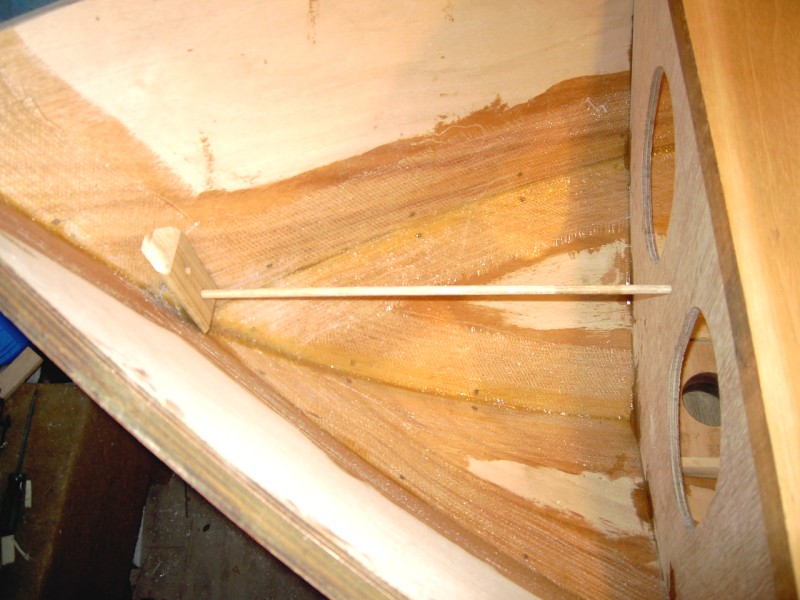
This shows the 2 pilot holes and a dowel to aid in alignment. When it's time to put it in place, I'll use a method described by Evan using epoxy putty and a couple of spots of hot glue. When it's all set up I should be able to just run my drill through the holes in the block and they should guide the bit straight out the front. At least that's how it worked on my D15.
Also cut the transom doubler.
Most of this is being done while the daggerboard box is getting prepared to install. This week I'll finish taping the frames and install the DB box before anything else gets glued in so it will still be relatively light for the next flip.
Posted: Mon Feb 25, 2008 9:38 am
by davekf
gk108... I hadn't thought of doing the transom doubler that way. Good idea. You boat is looking good!
-Dave
Posted: Wed Feb 27, 2008 10:50 am
by gk108
Thanks Dave. One more coat of graphite on the inside of the daggerboard box and I'll stick it together.
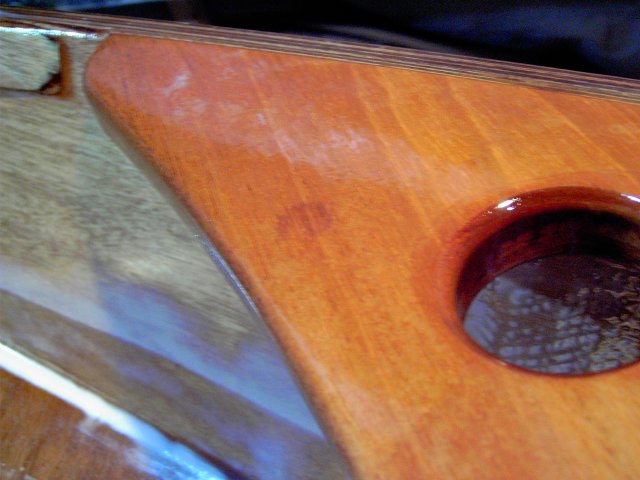
While I've been coating the DB box, I've also been putting graphite on a couple of other places like the mast step.
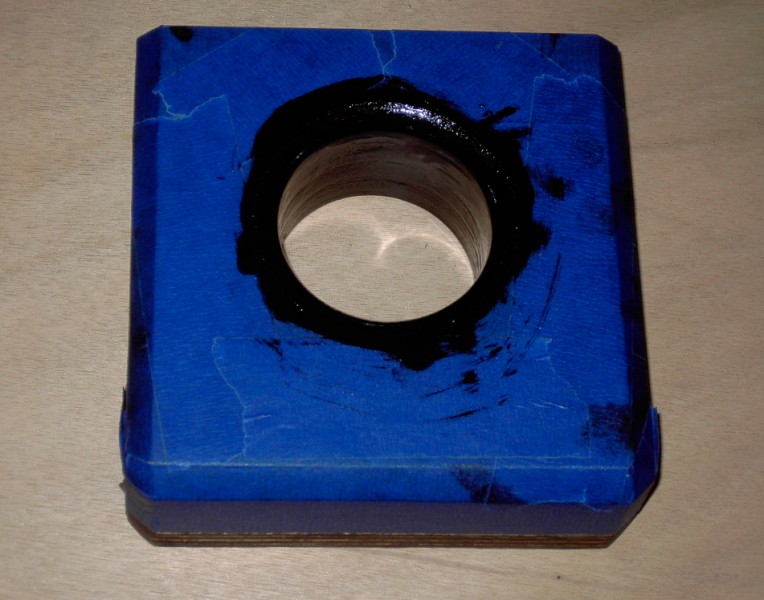
I gave the top of it a coat of neat resin, then masked the whole thing after that cured. I don't want messy black stuff complicating the bright finish. I took an x-acto knife and trimmed the masking tape around the hole, then routed a roundover on the edge of the hole. That also trimmed the masking tape so the graphite covers the radius in a neat fashion. At least that's what I hope will happen.
Posted: Thu Feb 28, 2008 9:53 pm
by gk108
More fun with graphite.
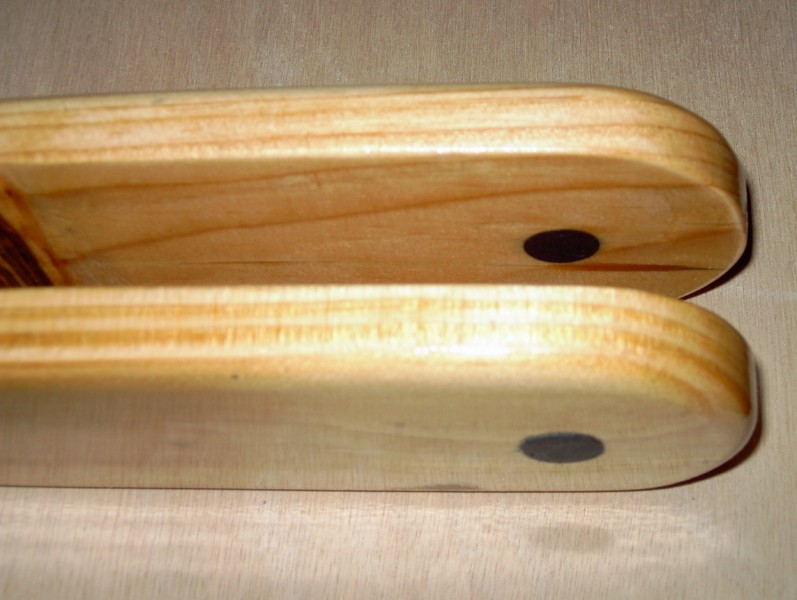
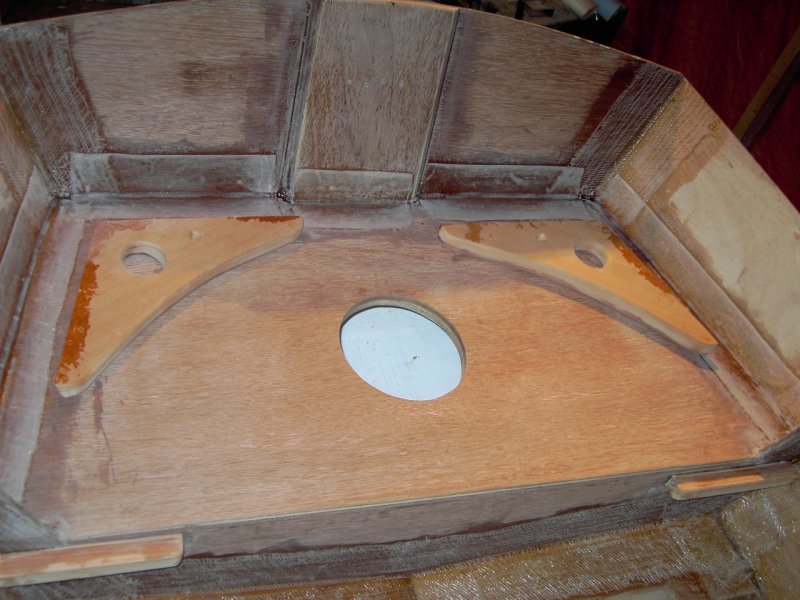
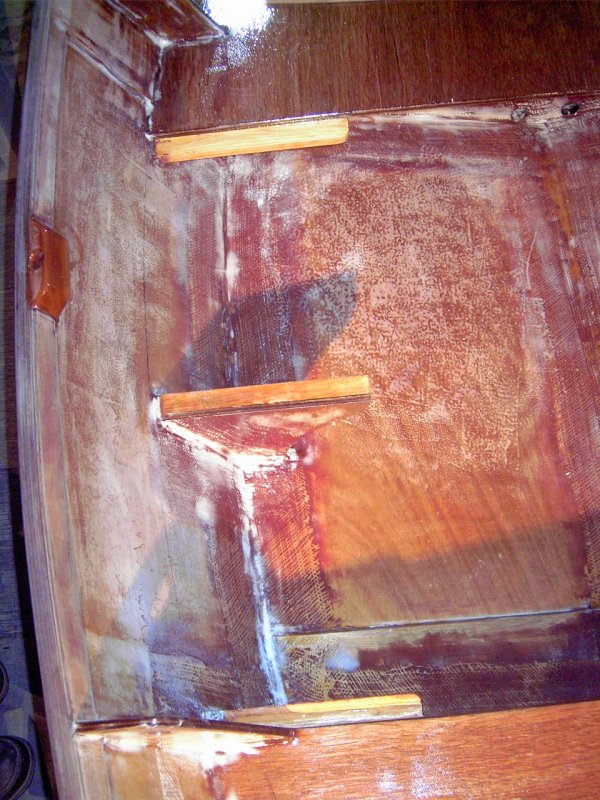
The pivot holes for the tiller were drilled oversize, masked and filled with fiberglass, graphite and epoxy. I did this by priming the hole with neat epoxy, then wrapping a strip of glass mat around a dowel and dipping it in graphite epoxy and stuffing it in the hole. The dowel slid back out, leaving the glass in the hole and I topped it off with graphite epoxy. After it cured, I filed most of it down flush, removed the masking along with the rest of the excess and this is the result. Now all I have to do is ring the center of the previous hole with my drill.
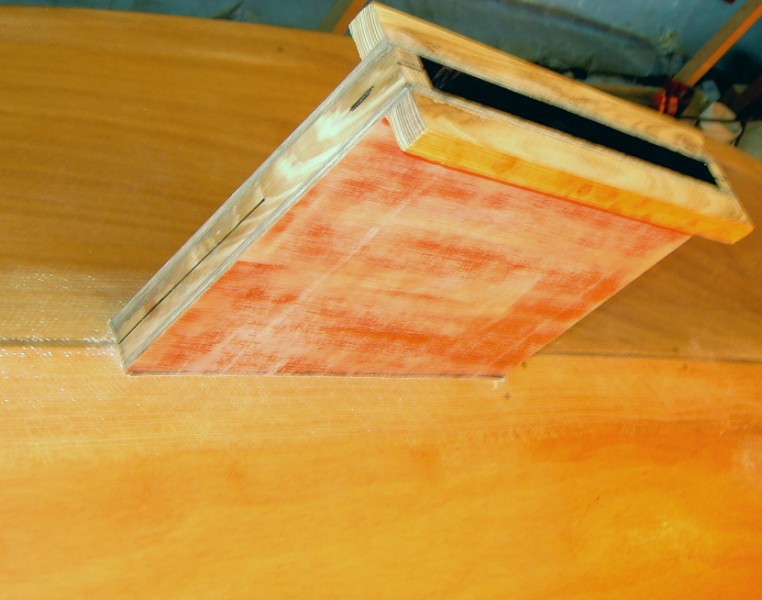
And the real reason for playing with graphite this early in the build.
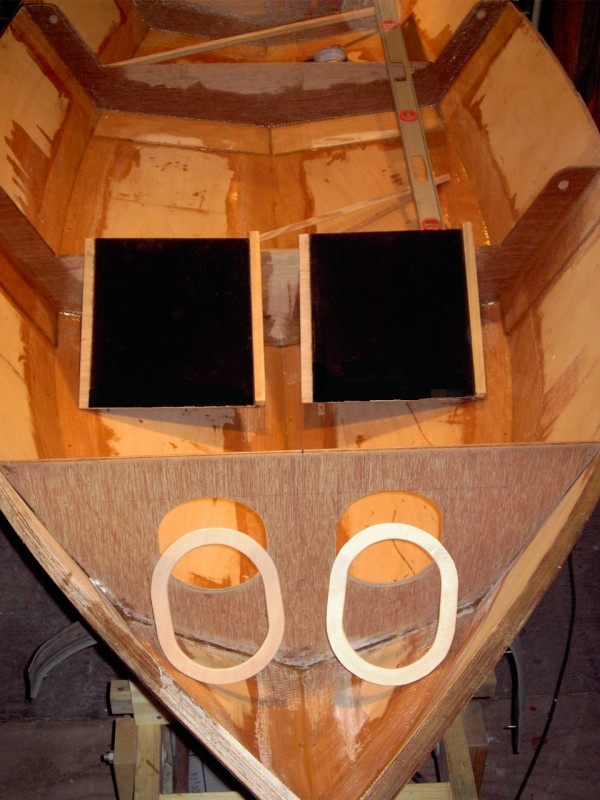
The insides of the daggerboard box are fully coated with graphite and the two halves are ready to glue together. I still have to wrap my head around the idea of cutting a big hole in the bottom of my boat, but I'm about to be ready for that.
Also shown are a couple of rings for the access hatches planned for the bulkhead.
Posted: Sun Mar 02, 2008 8:54 am
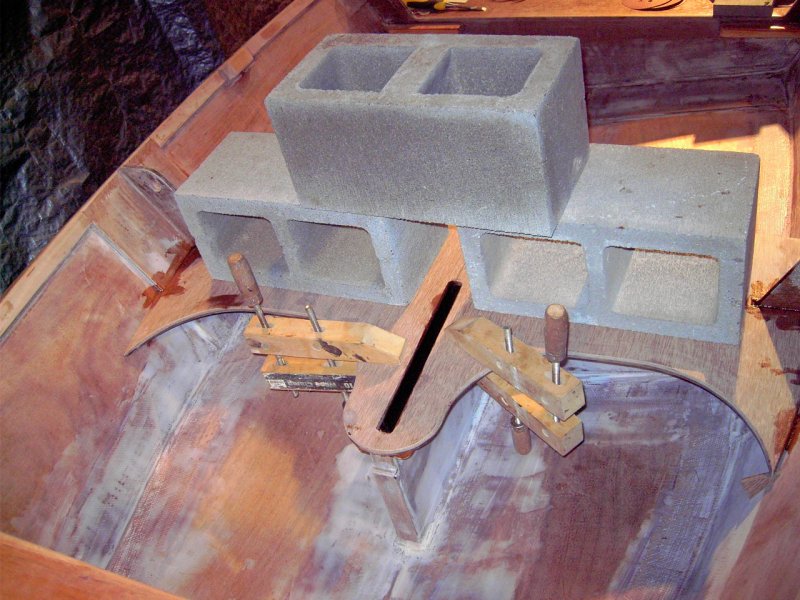
by gk108
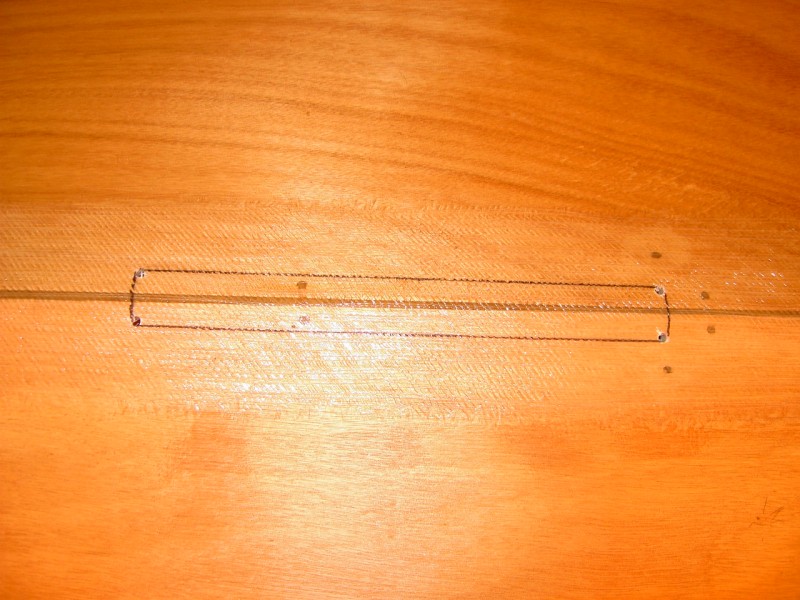
I put in a full day of it Saturday. I got the daggerboard box glued together and used it to mark the location of the hole in the hull. Then I drilled guide holes in the corners to transfer the lines to the other side of the hull.
Then I flipped the hull and connected the dots.
And cut a big hole in a perfectly good hull.
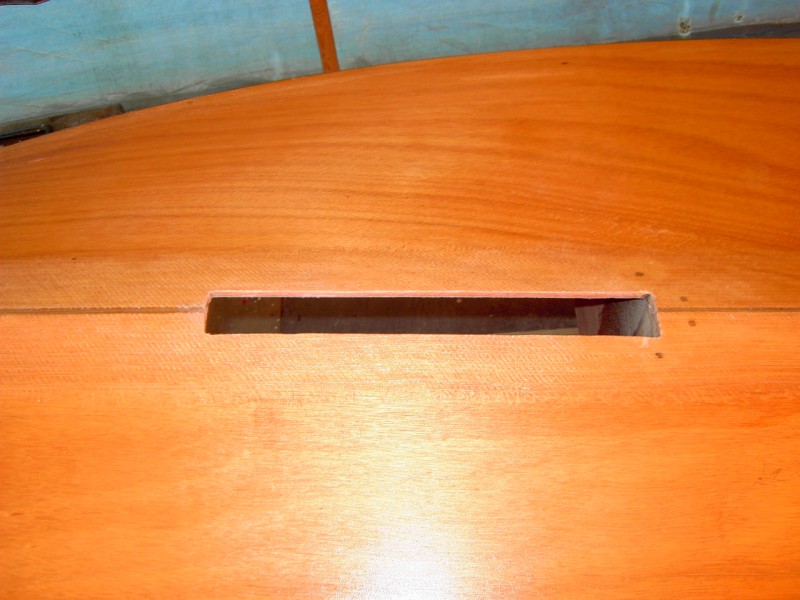
Then I cleaned up the hole with a rasp to make sure the box fit.
Then flipped the hull upright again and levelled it and aligned the box and glued and tabbed it in place.
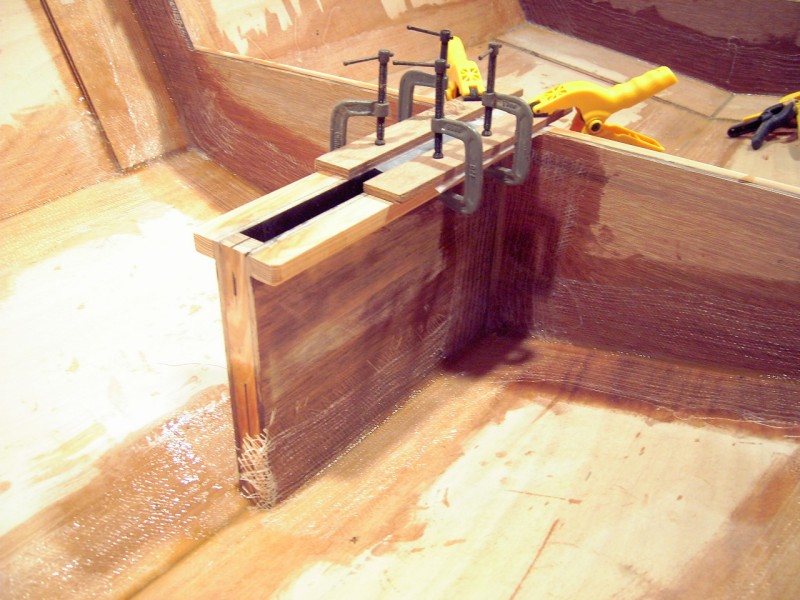
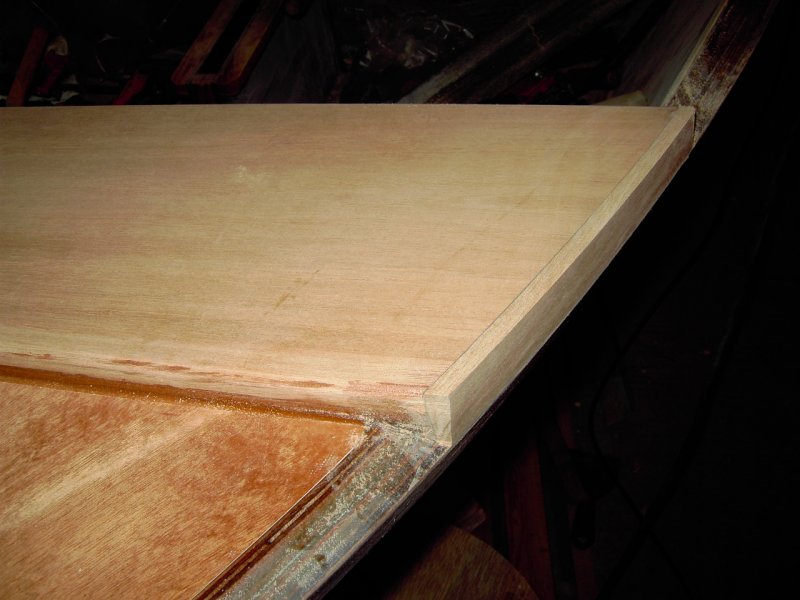
This much of the box hangs out of the bottom and must be trimmed flush with the hull.
And naturally, the best looking seam in the whole boat is the one I cut out.
I have a few more things to do while it's upright, but the next major step is flipping the hull again, trimming the excess box and fairing and painting the bottom.
Posted: Mon Mar 03, 2008 6:58 pm
by gk108
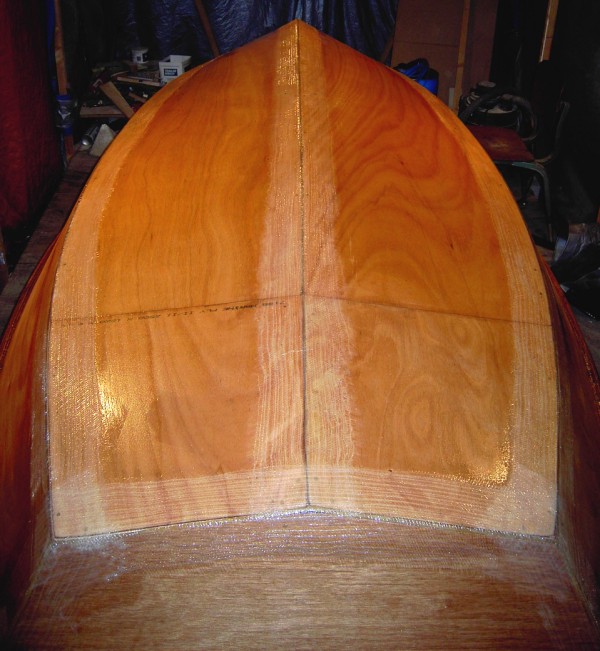
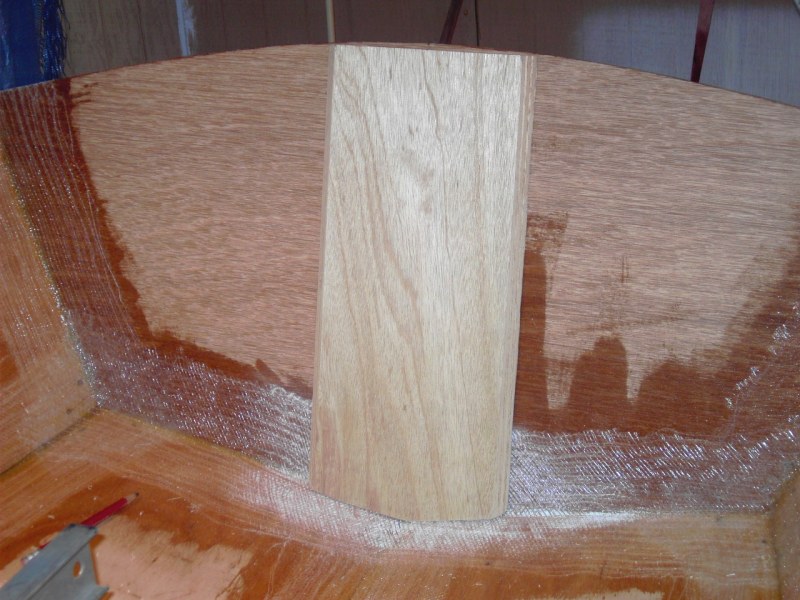
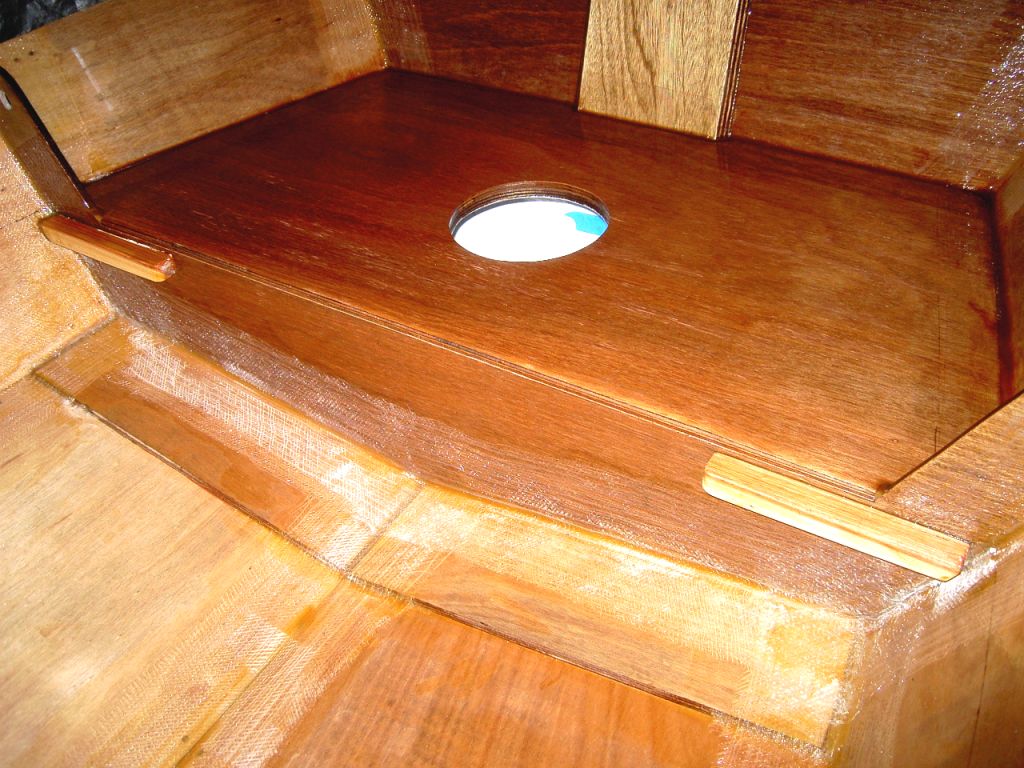
Looking into the future here.
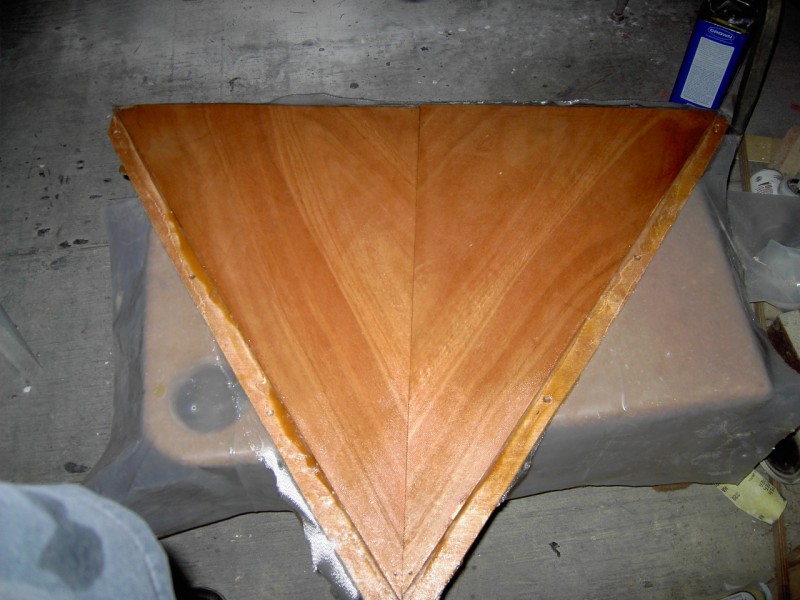
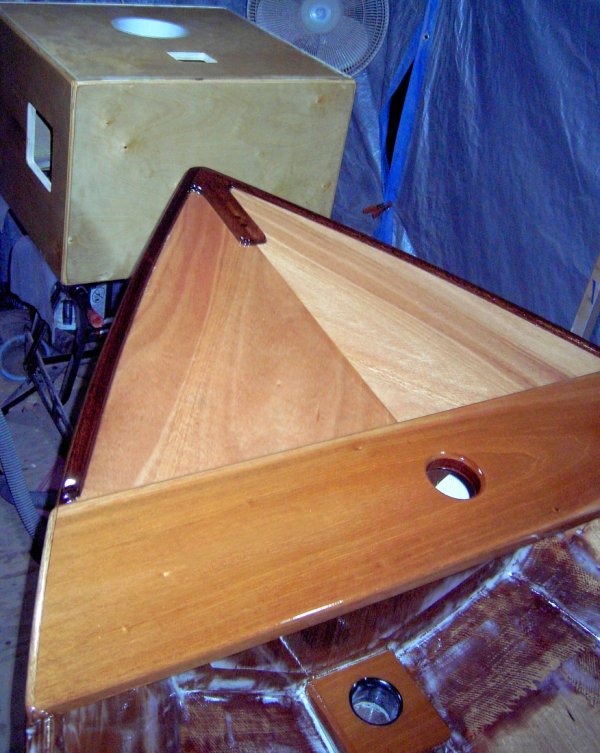
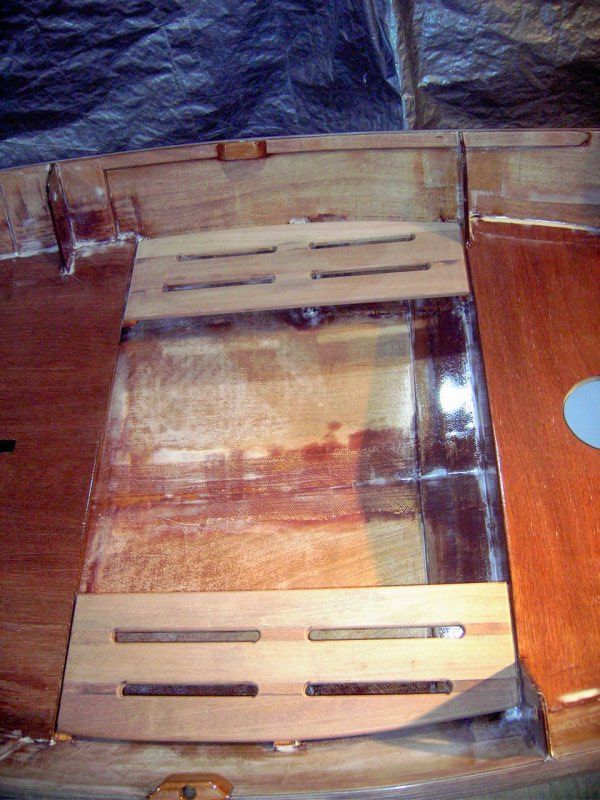
I hope to have a bright finished foredeck made from Chinese okoume. Right now, it looks like it could turn out about like I want.
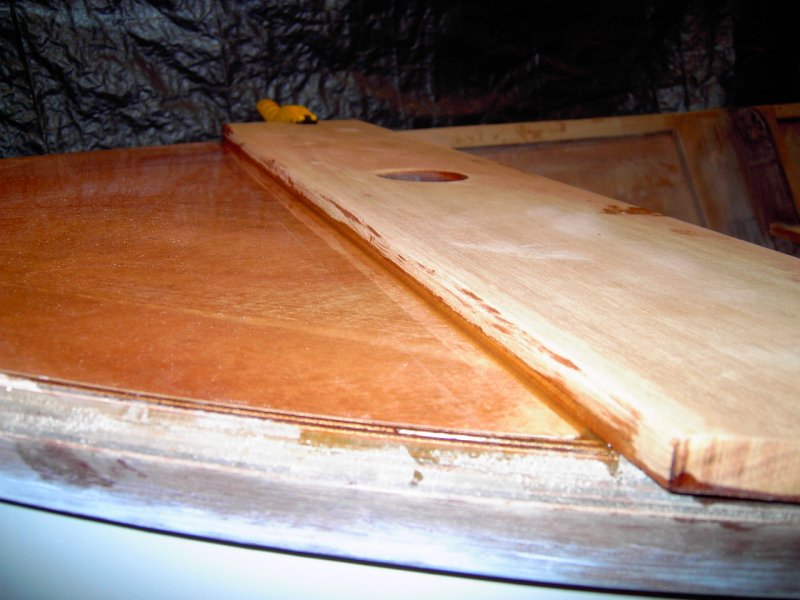
It's only 5mm thick, so I'll have to laminate it to something. I'll top it with some of the surfboard fiberglass. If my seam in the middle looks too bad I can always glue a strip of mahogany on top.
Posted: Tue Mar 04, 2008 2:35 am
by steve292
Looking good.
Steve
Posted: Tue Mar 04, 2008 10:25 am
by mecreature
Cool stuff.
Posted: Tue Mar 04, 2008 10:41 am
by TomW
Neat GK nice to follow the progression.
Tom
Posted: Mon Mar 10, 2008 11:09 am
by gk108
Between the spells of bad weather I got a little accomplished. I worked on the skeg and got it on and taped in place. The last long cuts I made with my bandsaw indicated that the blade guides needed some work, so I got that out of the way on a rainy night. Nothing really exciting about it, so no pics of it right now.
I knew I would have some leftover goop from gluing the skeg to the hull, so I decided to use it for a little pad on the outside of the bow eye. I needed some kind of mold to make the putty hold the desired shape while it cured. The angle where the side panels meet at the bow is close to 90° so I used some 45° cuts on styrofoam to make the mold. They were hot-glued in place and a strip of tape stuck across the bottom to hold the putty. Here it is with the putty in place.
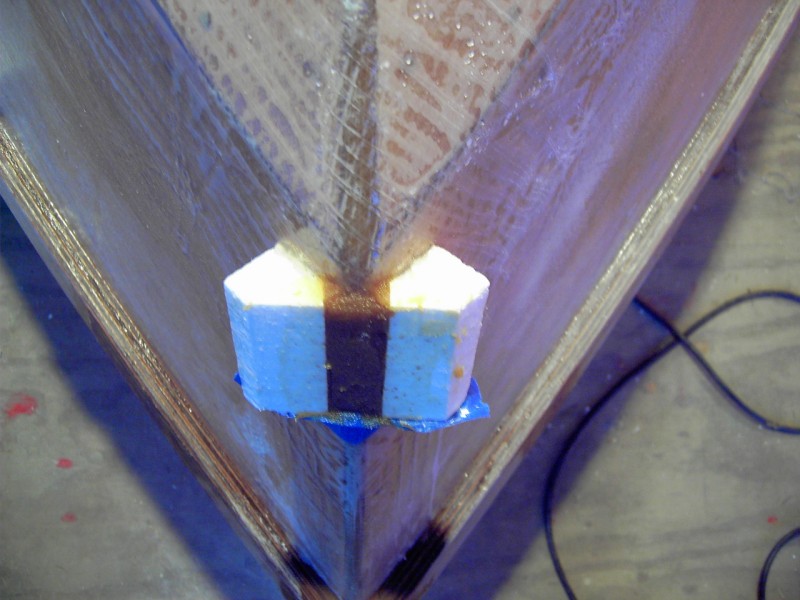
After that all cured, I broke the foam away and cleaned it up so it looked like this.
A little time with a rasp and sandpaper to get to the final shape and drill the holes the rest of the way through and this is the result.
As you can see, I also put a layer of blended filler down to fill the weave of the biax tape before I glass the bottom. Also barely visible in that last picture is the fillet on the underside of the rubrail.
So far, I've done nothing to the transom since it was taped on. I guess I'll spend some time on that this week.
Posted: Fri Mar 14, 2008 9:05 am
by gk108
After a couple of rounds of blended filler to fill the tape weave, I cut some 4 oz. woven fiberglass to cover the bottom and 5" up from the chines.
Then I used a foam roller to apply the resin. It worked great and according to my calculations, the glass to resin ratio is real close to 50/50.
This gives you an idea of how much work it was to fill the 6 oz. biax tape. You can also tell that I was playing with the white pigment last night.
Posted: Sun Mar 16, 2008 7:02 pm
by gk108
Fairing is done and a coat of slightly pigmented resin has been applied overall.
Time to order some primer and Orcas White topcoat.
Posted: Sun Mar 16, 2008 8:34 pm
by topwater
Gk you do nice work
Every time i look at youre hull it makes me
wish i was still sailing. When i was six years old i started sailing
bluejays with my dad, then it was lightnings,then crewing 30'
racing boats. had to give it up when i got married. that was
15 years ago.
Posted: Mon Mar 17, 2008 11:27 am
by gk108
Thanks. It took a little extra effort to fill the 6 oz biax, but feathering the edges was quite painless. Most of the filling was done with BBC blended filler and it is easier to work with than the WEST product. I bought the small size Quick Fair kit and when it came I thought I might have been too optimistic about how much I needed. I used some over the weekend, mostly for the short cycle time, because there's always a few spots that you miss somehow. Right now I've got the same situation as Larry, a guide coat of pine tree pollen on everything. No time to try painting anything.

Posted: Mon Mar 17, 2008 12:56 pm
by MadRus
Looking great GK!
Posted: Tue Mar 18, 2008 12:01 pm
by mecreature
gk108 wrote:Fairing is done and a coat of slightly pigmented resin has been applied overall.
Time to order some primer and Orcas White topcoat.
Are you using topside over all on this boat?
looking very nice.. and you are going pretty quick too.
Posted: Tue Mar 18, 2008 12:49 pm
by Biker B.O.B.
I love the detail of your report. I'll be watching this thread with interest, and probably re-reading it a few times to get all the details. Keep it coming.
I'm collecting materials and planning a build of the V12 in mid-April when my brother and father are coming down to help. We'll have four full days to make a great start. Then I'll be left alone to finish it.
Posted: Tue Mar 18, 2008 12:52 pm
by tech_support
the pigment in the last coat is good idea - it helps give contrast when sanding the primer.
Posted: Wed Mar 19, 2008 9:35 am
by gk108
Thanks.
Joel, that's sort of what I was hoping for. It should work well with the gray primer. The other benefit is that I could monitor coverage of that coat a lot better. Didn't miss any spots and had no runs.
Shaun, take your time stitching the bow and remember that it is as much of a twist in that part of the bottom panels as it is a bend.

mecreature, it will be S3 white on the outside, rear seat and mid seat. Hull inside will be light gray. I'm sure things will slow down when I flip it back over. Gotta be extra careful with all this brightwork I've gotten myself into.
I spent last night covering the daggerboard and rudder with some 3¼ oz woven cloth. Since both of those parts were made from a single plank of pine, I thought it would be a good idea to help control splitting and warping. If they keep looking good they will be mostly bright finished with graphite on the leading edges.
Posted: Sun Mar 23, 2008 6:01 am
by gk108
1 coat of primer applied with roller and sanded.

No drastic flaws or anything. It sanded really easily after 24 hrs. Before that, the paper loaded up and clogged. One thing I learned is that the blue paper shop towels are not the thing to use when wiping the hull down with alcohol before painting. They leave a lot of paper lint on the surface. I had to wipe it down a second time using an old T shirt.
Second coat of primer applied with roller.
It was a little warmer when this coat was applied so I thinned the primer about 10%. I'm happy with the results.
Posted: Tue Mar 25, 2008 4:23 pm
by mecreature
Is that the new S3 primer. the stuff I had looked mighty gray. its ok just alot darker then the older stuff was.
looking nice.
Posted: Tue Mar 25, 2008 7:44 pm
by gk108
That's the new Yacht Primer. It's really light gray. It's nice. I'll probably never use another primer for a boat.
It got too cold to do much last night, but the primer is sanded down the middle so I could layout and mask where the graphite goes.
Posted: Thu Mar 27, 2008 11:40 pm
by jay808
Gk you do some nice work! Can't wait to see it painted. Im planning on building the same boat on my next project. Looking at your tread makes me want to build one. I've never sailed before only powerboats but was always kinda curious to try it out. Figure a boat like this if i can't sail it my little 2hp honda will push it around
. Keep up the good work and nice tread very informative.
Posted: Fri Mar 28, 2008 6:04 pm
by gk108
Thanks Jay. For right now, I'm not planning on a motor. I'll build it to be capable in case a motor happens to jump in front of me, but I want to keep it unregistered at first.
Slow progress this week. I had to finish preparing the daggerboard and rudder so they could get some graphite on their leading edges at the same time I did the strip on the hull. I finally got two coats of graphite on today and will do the last one tomorrow. And touch up a few worn spots on the D15.
Then it's on to the white paint.
Posted: Wed Apr 16, 2008 1:53 pm
by Biker B.O.B.
How's it coming along, GK? Too busy sailing to report back?
I'm about ready to start mine, well my brothers. He and my father should arive tomorrow. Then we plan on working pretty hard on it through the weekend. Should be pretty quick work, but will take a while to finish as I'll be alone and back to my full time job.
Look for the thread I'll start soon; probabally tomorrow evening.
Posted: Wed Apr 16, 2008 7:00 pm
by gk108
I'm dragging a little. I put 5 coats of white on the bottom with an HVLP sprayer. There's a little wet sanding to do and maybe some S3 clear. Not sure about that yet.
Posted: Wed May 07, 2008 10:43 pm
by gk108
Back at it.
Wet sanded half of it with 320.
I'll follow this with a couple coats of S3 clear.
Posted: Thu May 08, 2008 9:21 am
by mecreature
How did the spraying go.
so far I have only roll and tipped.. which make tight spots kind of a pain. Seems spraying would help a ton and probably use less paint.
I cant wait to see how the clear goes.. should look sweet over that Orca white
Posted: Thu May 08, 2008 10:07 am
by gk108
It sprayed pretty easy. The last coat would have been a keeper, except I listened to the weather foreguesser. It rained continuously after I sprayed it on and I got a dull finish that took too long to set, so it sagged in a few places.
I'm going to go for roll and tip with the clear. I think I can do it if I can get my plan of action right and the weather cooperates. I'm more than ready to move on from this painting stuff for a while.
Posted: Thu May 08, 2008 12:27 pm
by ks8
Nice
Posted: Fri May 09, 2008 12:38 am
by gk108
sanding...
sanding...
sanding...

Posted: Fri May 09, 2008 1:54 pm
by mecreature
sanding is not too bad if you have several long back to back sessions... LOL
Posted: Sun May 11, 2008 12:20 am
by ks8
iu m tyup[infg wityh myu toers.// casn'
t lifgt a rm,s .../
Posted: Sun May 11, 2008 10:54 am
by gk108
ks8, that's not too far from reality. The small ridge at the edge of the graphite bothered me, so I have spent some time smoothing it down. Hopefully that will make the clear coat flow good along that boundary. Still some more sanding, but today should wrap that up, then the weather has to get right.
Posted: Mon May 12, 2008 9:35 am
by gk108
Rolling...
Tipping...
I love the smell of fresh WR-LPU in the morning.
Posted: Mon May 12, 2008 9:40 am
by Cracker Larry
You must be working inside? It's so windy here this morning it would blow the paint off the boat
Posted: Mon May 12, 2008 9:52 am
by gk108
Just a light breeze over here. 70° It must have kicked up a bit again last night. There was a 1½" pecan limb on my van this morning. Yesterday was quite windy. All that warm air from the gulf was feeding those storms.
'Tween coats now. Looking good so far. Round two starts soon.
Posted: Mon May 12, 2008 5:12 pm
by gk108
Bottom finished
The tools used:
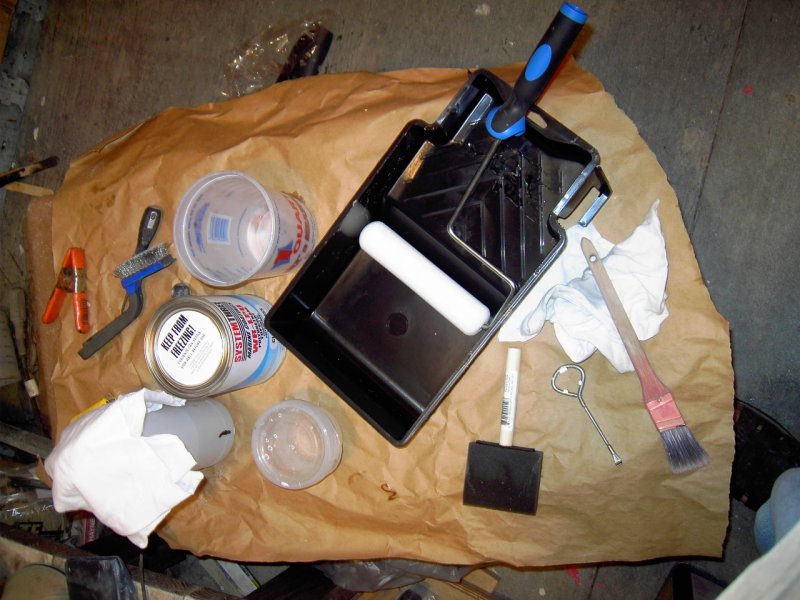
The resulting finish:

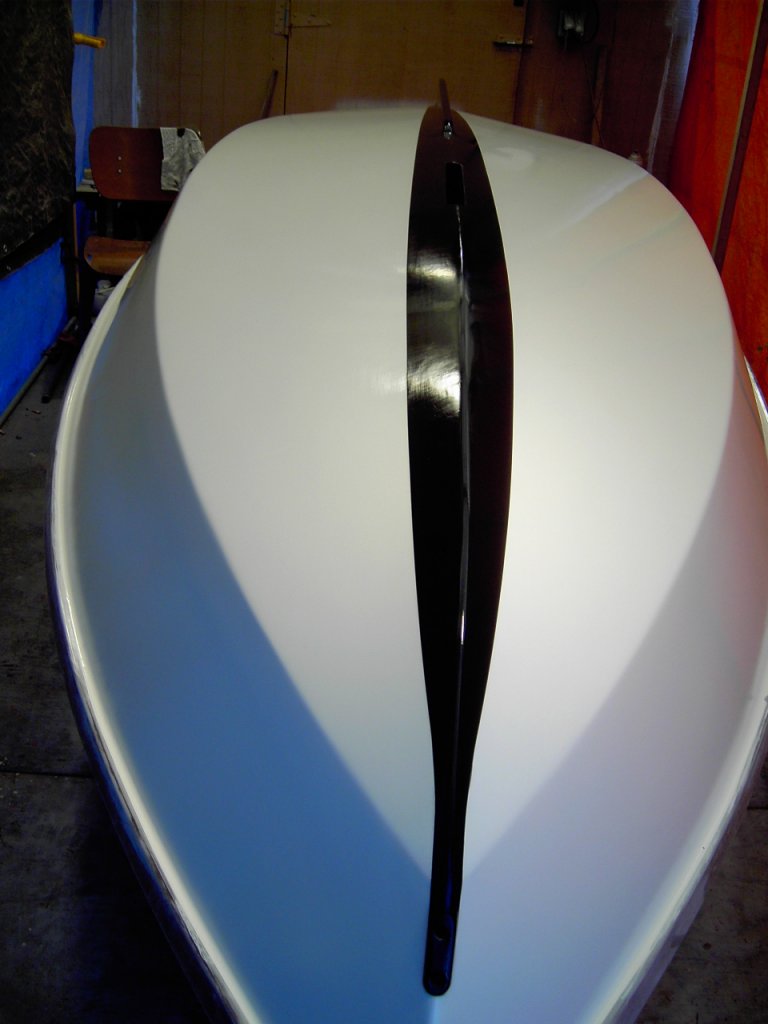
Güdnuff
Posted: Mon May 12, 2008 8:12 pm
by Cracker Larry
It kinda looks like it's winking at you
Looks real good!
Posted: Tue May 13, 2008 9:06 am
by gk108
Thanks, Larry. The S3 clear is pretty easy to work with. I tried to take all the tips on S3 and work them into my procedure. A while back TomW posted some info on the use of S3 clear that convinced me to try it. Had to go to Crystal River and let cottontop show me what is possible. Joel's advice on building up coats and sanding, then applying the final coat was the key to it all.
I just hope the orca white and graphite black on the hull and appendages doesn't look too much like a fat killer whale. Don't want any great whites getting any ideas.
Posted: Tue May 13, 2008 4:34 pm
by mecreature
Looks like a naughty picture to me... must be my artistic side...LOL
How hard is that clear... same as paint.. or harder..
Looks great.
Posted: Tue May 13, 2008 4:52 pm
by TomW
I must have pressed the wrong button yesterday, but that is one cool paint job.
mecreature the Clear is as hard as the colors. I'll be doing the Mirror Dingy after vacation in early June in C. red. See JimW's rowing skull for what you can really do with the S3, no disrespect to GK his is very good also, Jim just took his to another level that we probably would never consider on a boat..
Tom
Posted: Tue May 13, 2008 6:25 pm
by jbo_c
OK. I'd like to be on the record as shamelessly asking for a ride when you're ready to sail. Never been sailing and would like to give it a go sometime.
You say when and I'll do what I can to show up.
Jbo
(It'll also give me a chance to see your IRS)
Posted: Wed May 14, 2008 11:54 am
by gk108
I think JimW has a history of good finishes.
Over a neutral color, the clear doesn't have the same sense of depth that it does on something like he has. The real reason I bought the clear was for some bright finish adventures.
Jbo, we can make it happen. Sooner or later, I'm going to take the D15 up to Newton and do some exploring. I wouldn't mind getting a look at your Thompson, too.
Posted: Wed May 14, 2008 9:36 pm
by jbo_c
I could meet in Newton easy. Fishing the Flint from Warwick to Albany in my canoe Saturday, hope to catch my first shoalie(s).
I've got my old 18 on the Thompson right now while I look for a semi-period-correct motor in 35 or 40 horse model. If you see a good looking 35-40 horse "JohnsonRude" in the '65-74 year range for sale, let me know. It'll be a little under powered until, but I'll be patient.
Gotta figure out some way to get a windshield too. Nobody here wants to bother with it. Was gonna make my own, but I read the other thread about doing it on your own and wasn't very encouraged. It'll ride fine without it, but I'd really like to have one.
Sorry about the mini hi-jack.
Jbo
Posted: Wed May 14, 2008 10:38 pm
by gk108
Don't worry about any hijack. We'll hold this course for a while.
I still have the windshield from this:
But I don't think it would be a good match.
For both the windshield and the motor, I would check with Bellamy, too. There's no telling what he might have around there.
Posted: Thu May 15, 2008 8:51 pm
by Biker B.O.B.
GK - Your finish looks great. Mine will definately be a workboat finish in comparison.
Posted: Thu May 15, 2008 9:39 pm
by jbo_c
Bellamy said nothing doing on the motor unless I want to start a complete rebuild. I'm more along the line of new points, coils, wires, carb rebuild, impeller, crank, go. Think I have a good line on a '63 40 horse in north Georgia, just trying to figure out how to evaluate from here. Got a "guy" who'll do it for me, but if something gets missed, I'd rather it be me that made the bad call than him.
Bellamy said come pick a windshield for free, but be prepared to take the boat under it too. Got to find out what it costs to drop a boat at the dump.
- and the windshield won't be the "right" one. If I decide to repaint, it won't matter. I'll pick one, fill the original holes, and make it fit.
Jbo
PS What is that boat?
Posted: Thu May 15, 2008 10:52 pm
by gk108
That's an '82 Glastron that I hauled off for the trailer. Aside from a few bolts, the windshield and 3 aluminum corner castings are all that I saved. The rest of it was waaaay too far gone to consider a rebuild. I dismantled it and used a sawzall to cut it into parts small enough to fit in a dumpster. Hauled the pieces to the county dumpsters by the river for no charge.
The motor stuff sounds just like Bellamy. "It won't be cheap and you'll have to wait your turn" was the response to my inquiry about the 9.9 on my D15. I told him that's just what I wanted to hear. He went deeper into that motor than most people would and so far the results are great. It only took 5 months for my turn.
While I'm waiting for the paint to cure, I've been laminating a blank for my foredeck insert.
2 layers of 5mm Chinese Okoume topped with 4 oz woven cloth.
Posted: Fri May 16, 2008 9:38 am
by robbiro
WOW!! Nice bottom paint. I just hope that it doesn't make the fish think that there is a large creature with one huge eye checking them out for dinner
.Nice contrast and great use of materials for a beach bumper(

) Can't wait to see the totally finished version when the top is finished and that cap is put in place.
Keep on Buildin'
Robbie
Posted: Fri May 16, 2008 6:08 pm
by gk108
Thanks Robbie. Flipped the boat back right side up today. Looks like I have a lot left to do.
Posted: Fri May 16, 2008 8:05 pm
by TomW
Gary that cap is a work of art it will look beautiful on the boat.
Tom
Posted: Sun May 18, 2008 12:13 am
by gk108
I'm being extra careful, Tom. Decorative woodwork and bright finishes are unfamiliar territory for me.
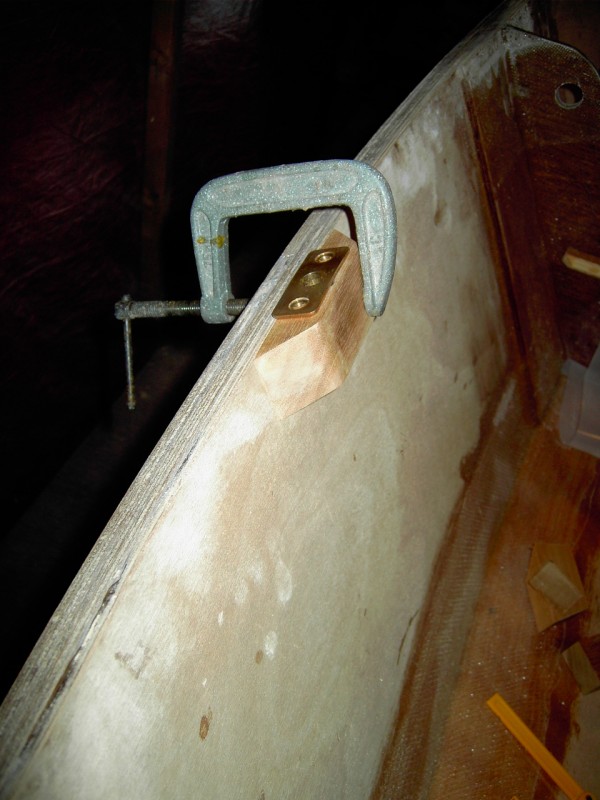
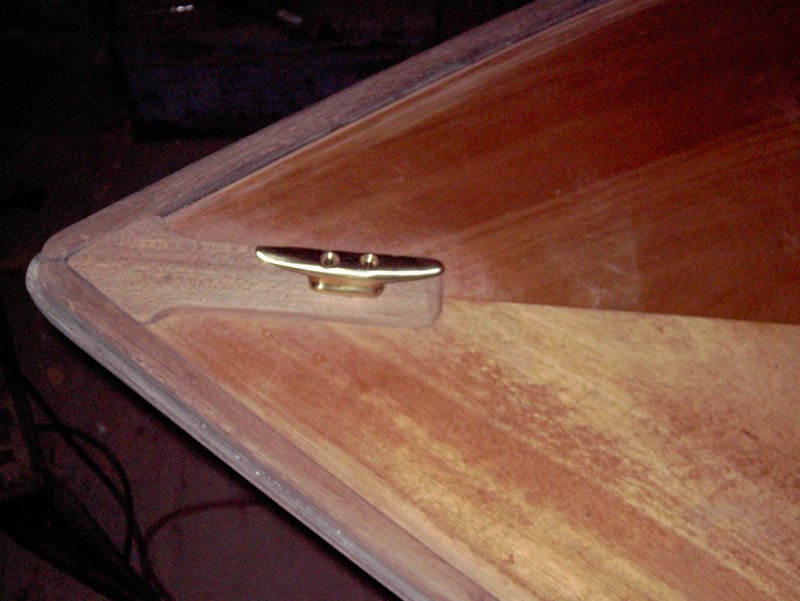
I finally had to use my longboard today to clean up the top of the rubrail. Then I made a bunch of cleats and glued them in along with the rings for the "hatches".
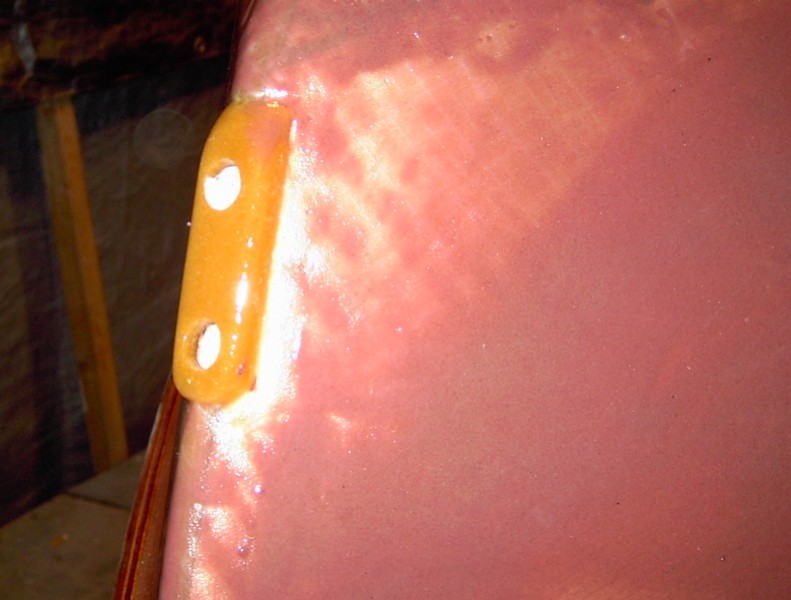
Then I laid out and drilled the holes for the gudgeons in the transom doubler and glued it in place.
Those holes will act as guide holes to drill on through the transom. I'm going to try some more bright finish back here, so a little masking tape to keep the glue off the edges and out of the holes for now.
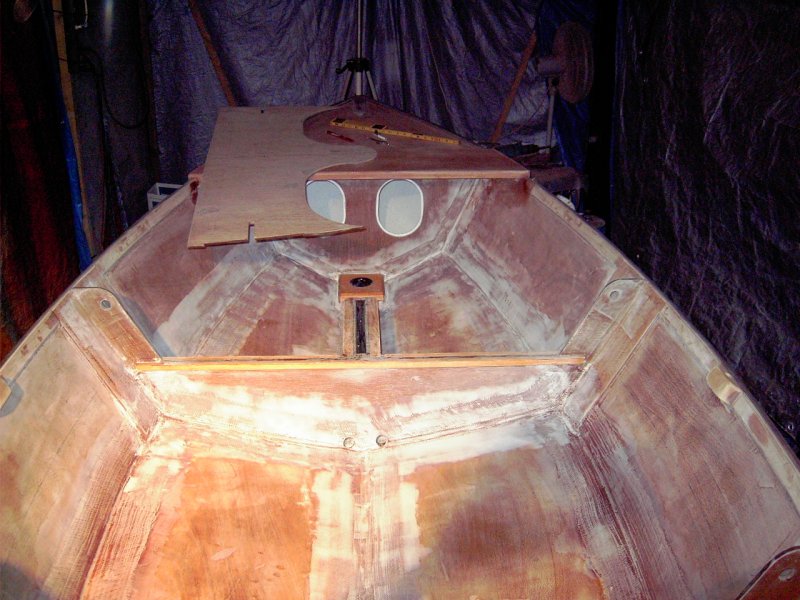
Then I spent the rest of the evening working on the final fit of the foredeck. It's not quite there yet, but real close.
Posted: Sun May 18, 2008 9:53 pm
by gk108
Lots of good progress today.
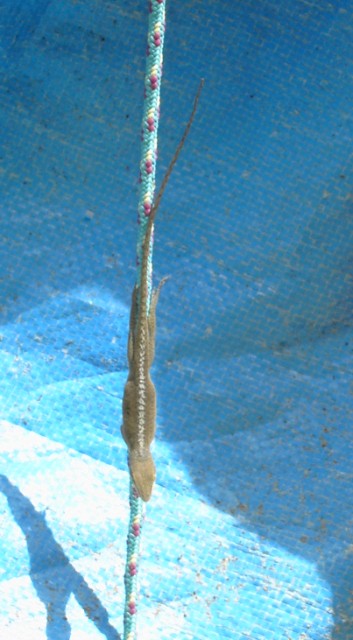
When I got on the job project security was already conducting some kind of covert operation. Not sure what it was all about but apparently it involved rapelling down a rope while looking like a rope.
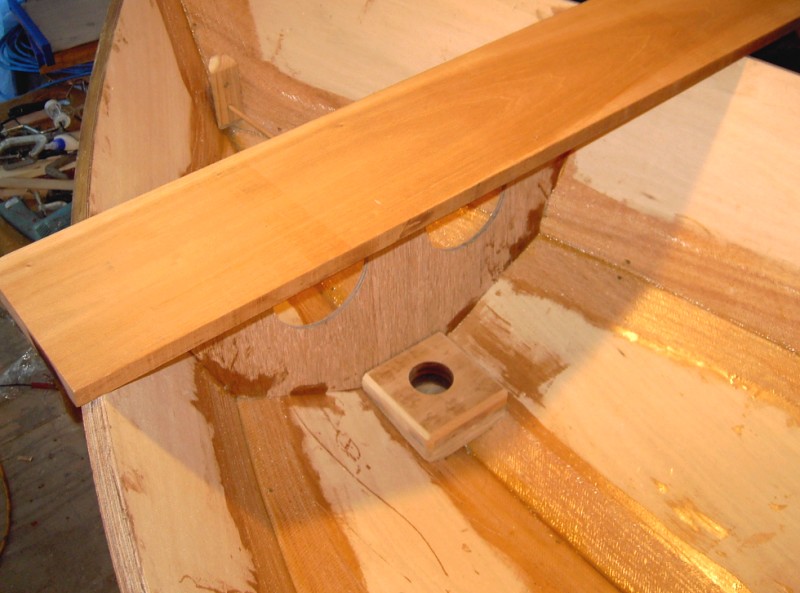
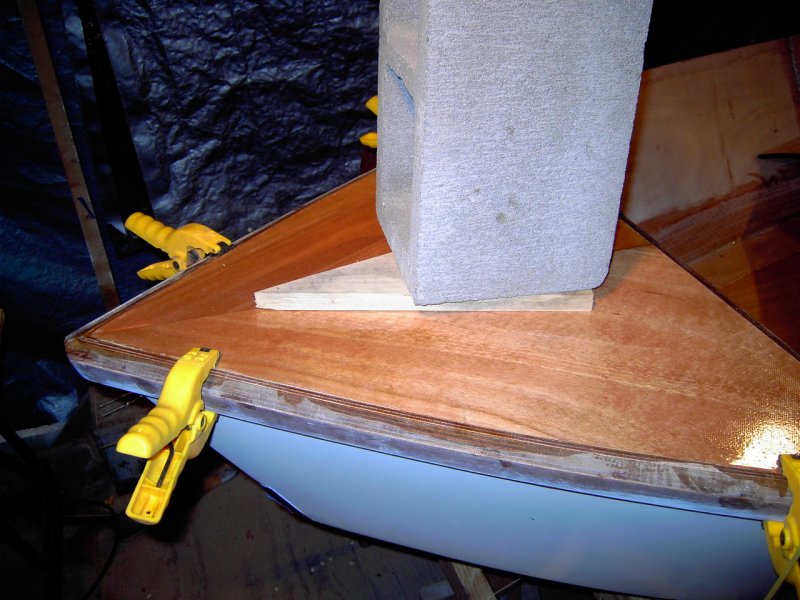
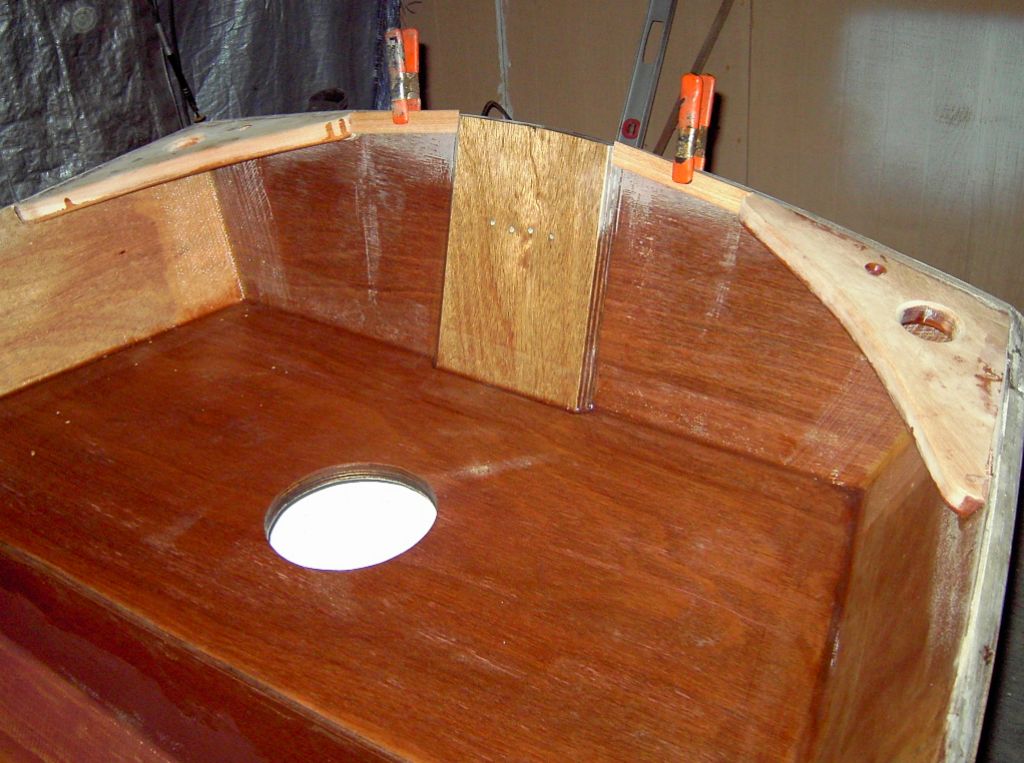
Next on the agenda is more stuff around the front frame. I wanted a drain in the mast step so I cut a groove in the bottom wide enough for some ¼" poly tubing.
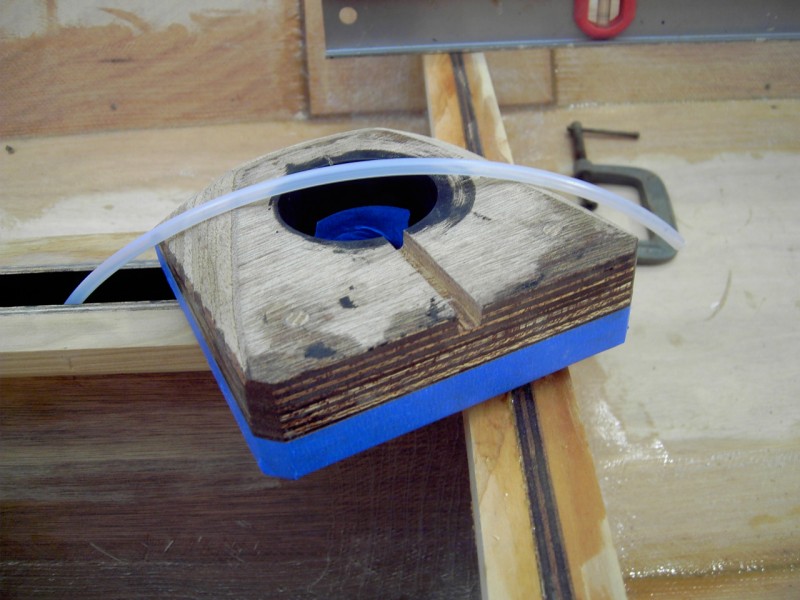
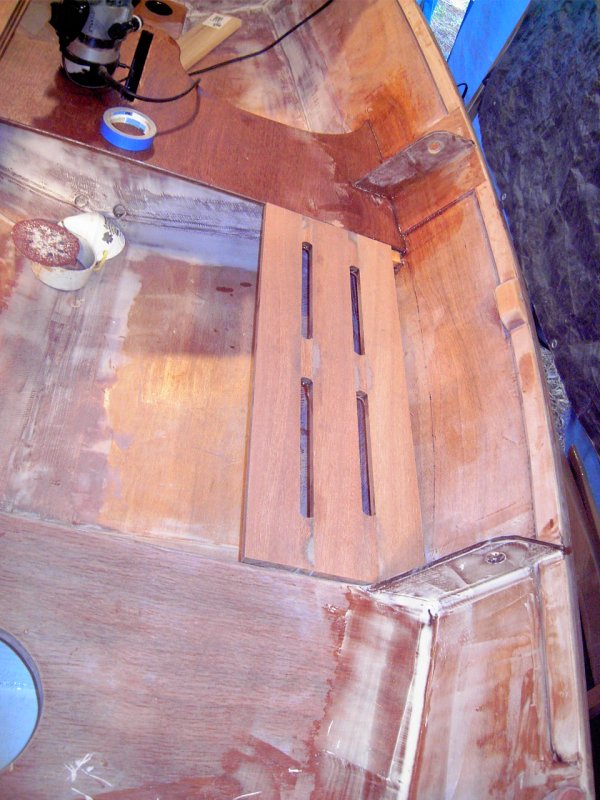
Next I filled the groove with putty and pressed the tubing into it and taped the end to hold it in place. Then I mixed up a big batch of goop and made the bed for the step. There are 2 smaller pieces not shown that are the bottom layer and a filler below it. I laid the filler piece in and built up level around it with putty, then laid a strip of biax across the top of it running from chine to chine. On top of that went the piece that is the actual bottom of the hole, then the assembly pictured above.
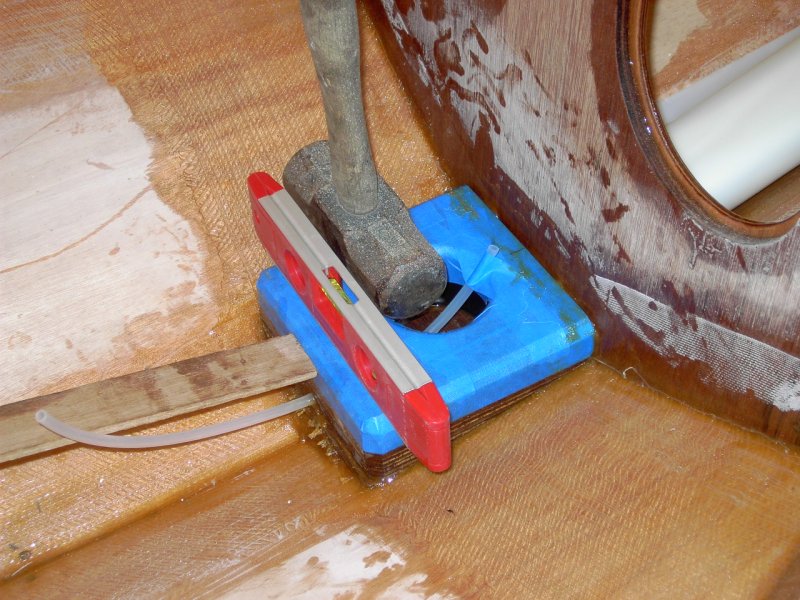
When it is cured I should be able to pull the tubing out and have a nice little drain.
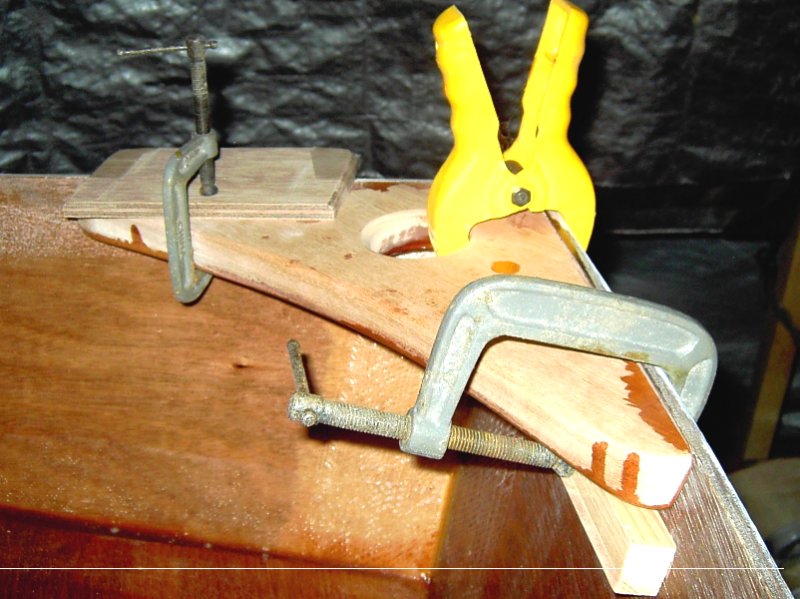
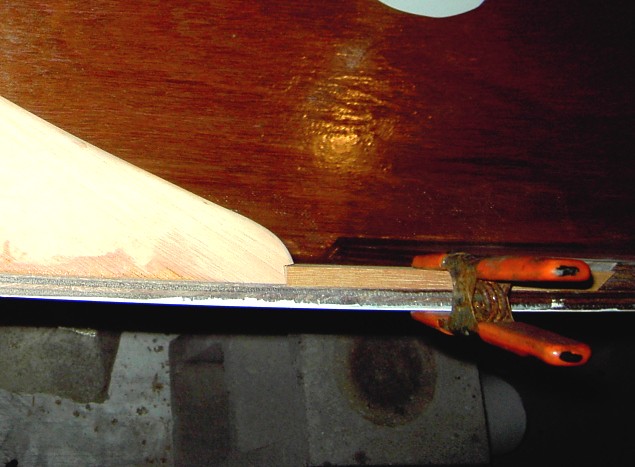
While that was curing, I moved to the mast partner. It is solid mahogany 1"X7¾". I cut it roughly to length on the band saw, then rabbetted the front edge with a dado so that it barely overlaps the seam where the foredeck meets the front frame. That meant I had to cut a rabbett on the sides as well. It's curved and on an angle. It was tedious, but now everything will lock together.
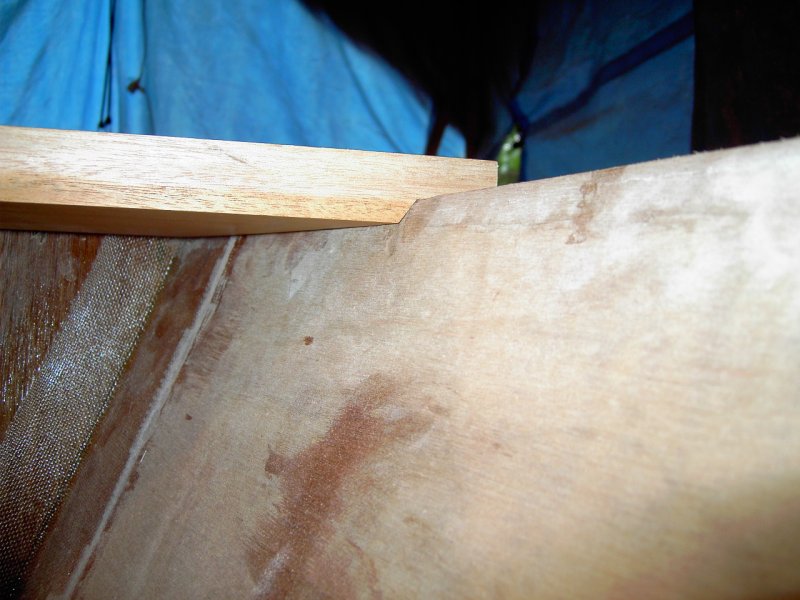
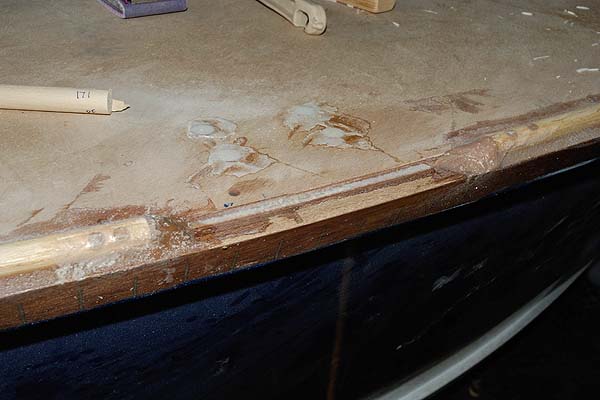
This is it from the front. Now I'm forced to figure out a pretty way of dealing with that gap at the edge of the rubrail.
Posted: Mon May 19, 2008 8:12 am
by Biker B.O.B.
Great work! Glad to see you making progress.
Posted: Mon May 19, 2008 10:18 am
by ks8
gk108 wrote:Now I'm forced to figure out a pretty way of dealing with that gap at the edge of the rubrail.
just lay plastic wrap over the rubrail, two layers, secure it with masking tape for a tight fit. Then blob on some wood flour blend and press the partner into it, and wipe reasonably clean. When it cures, simply pop it off the plastic wrap and clean it up. If you want it purdier than that, you could add a thin mahog veneer on the forward face of the partner, or some other bright finished wood.
Or, you could figure the angles and do some woodworking. One cost time, the other, materials. I'll be doing this (plastic wrap and blob) on the bottom of some of my removeable floors, to get a perfect fit to the changing shape of the bottom panels inside the cockpit.
Posted: Mon May 19, 2008 12:58 pm
by mecreature
Looking good GK.. those darn gaps... that is probably why I will always paint... LOL
good tip on the plastic wrap though.. .I will have to remember that.
Posted: Mon May 19, 2008 7:05 pm
by gk108
Hmmmm...
Something to ponder while I make some oarlock sockets.
Posted: Tue May 20, 2008 11:41 am
by Daniel Huckleberry
Looks really nice, GK. I am glad to see you working. You have great idea's and your execution is inspiring. I think I am ready to start building again!
Huck
Posted: Wed May 21, 2008 10:41 am
by gk108
Thanks Huck. Are you still thinking about the FL26?
I've made a little more progress. I have the oarlock sockets rough cut, Not sure which way to orient the grain.
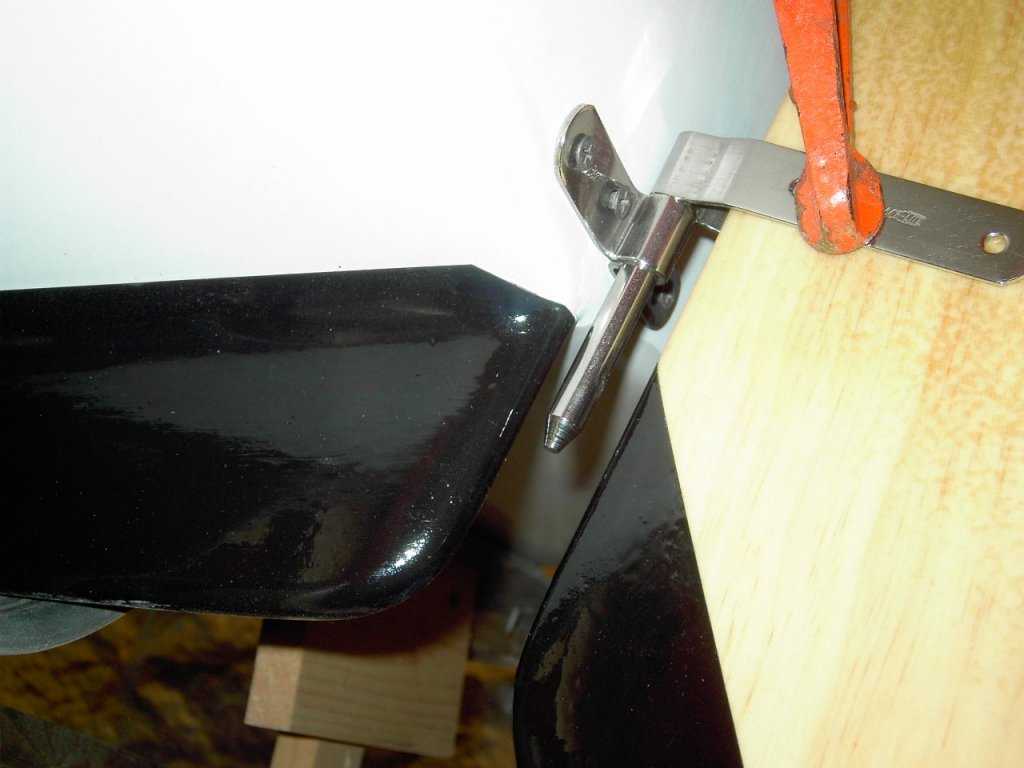
Then I moved to the transom. With guide holes drilled in the doubler, I still needed to fillet and tape the bottom without filling the holes back in. Before filleting, I rolled up some strips of poly and put them in the holes, then filleted and taped. While the epoxy was still green, I used a utility knife to cut the glass, then after full cure, opened up the holes and pulled out the poly.
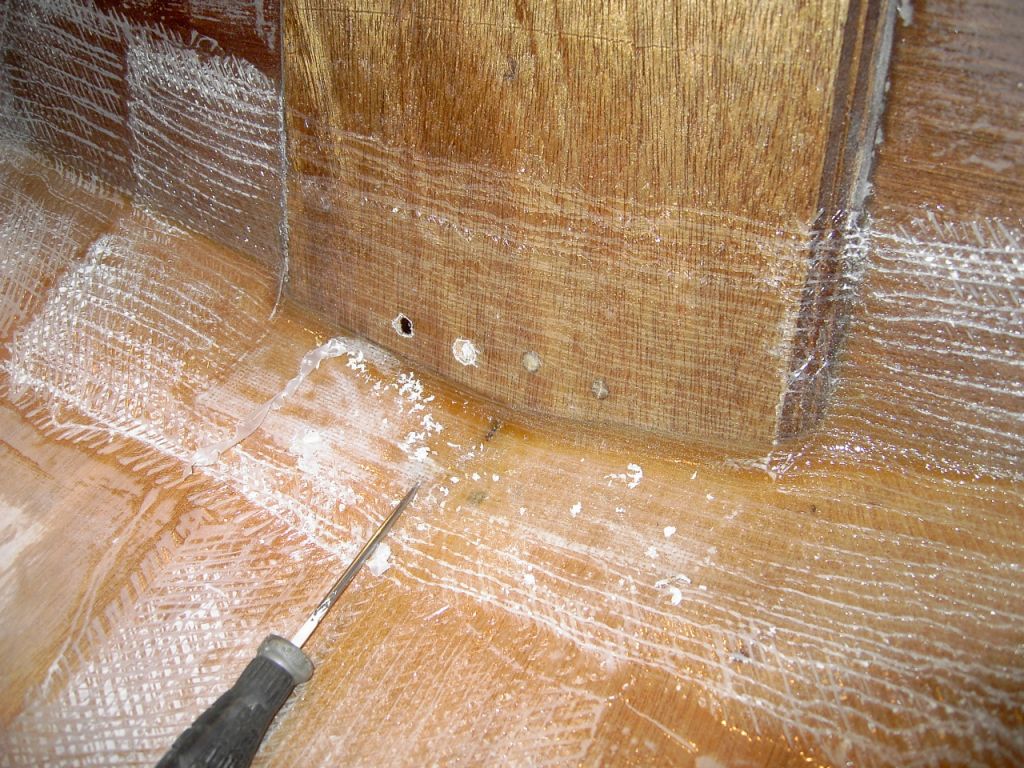
After looking at it, I started to worry that I had made the holes too close to the bottom, so a trial fit of the rudder was necessary.
About as close to the bottom as it can get, but right about where I wanted it.
Another look from below.
Since that fit OK, it's time to put some rear seat cleats in. These were cut on an angle to match the transom. That made alignment a lot easier, since the top of the cleat was level.
I still have to put some cleats on the sides, then It's time to measure for the seats.
Posted: Tue May 27, 2008 9:09 am
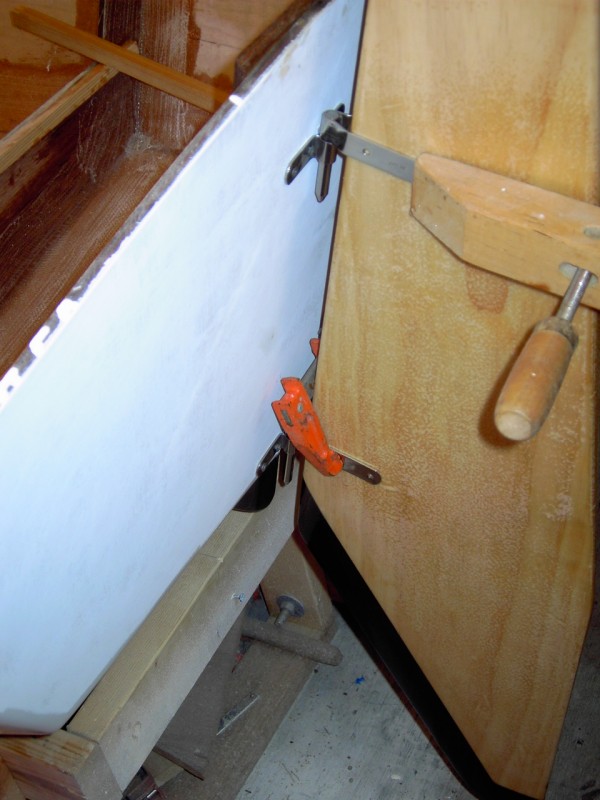
by gk108
Seat tops are cut out and dry fitted. I made cardboard templates first, then transferred that to plywood. Most of the pigmented resin has been applied to the inside of the front and rear compartments.
Solid mahogany slats for cockpit seating. It's going to be a while before they are finished and ready to install.
Posted: Tue May 27, 2008 9:53 am
by mecreature
pretty cool..
where did you get those slats. rip um down yourself?
Whats your feel on the tinted epoxy..
did it lay down well..
How well do you think it will deal with UV if it was exposed to Sun light.
Posted: Tue May 27, 2008 11:15 am
by gk108
I found some ¾" stock on ebay that was conveniently cut to the length that I wanted. I had those 6 pieces planed down to ½" to save a bit of weight. I have a few more for various bits of trim. I may have to steam bend something.
On the pigmented epoxy, it's not suitable for direct exposure to the sun. It's a nice alternative to plain coated interiors of compartments, but definitely not an aesthetic alternative to paint. On horizontal surfaces it looks decent, but as with all epoxy, it's hard to control runs on vertical surfaces. Especially in areas with features like cleats.
Posted: Tue May 27, 2008 11:17 am
by ks8
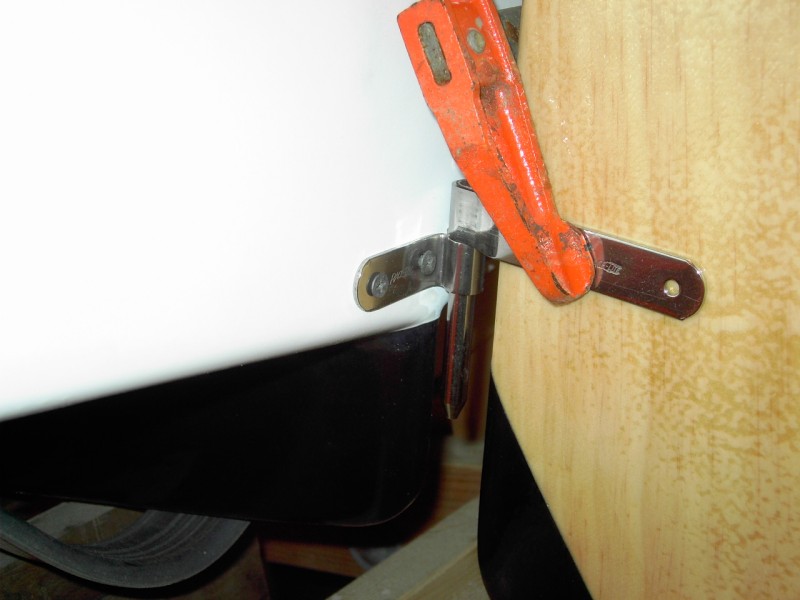
Wow, that is pretty low for that gudgeon. I did a few holes that close to a corner too. I had to grind away just a little of the final cosmetic fairing (fillet) to get the flat backing washer to fit. Looks like you may need to do the same if you fair a final fillet there.
edit - And there were a few washers I had to grind one edge of just a bit so a structural fillet would have right of way.
Looking good!
Posted: Tue May 27, 2008 10:27 pm
by Biker B.O.B.
gk108 wrote:
Solid mahogany slats for cockpit seating. It's going to be a while before they are finished and ready to install.
But it's going to look good!
I like this idea. May have to apply it to my SH14; when I get around to building it.
Posted: Wed May 28, 2008 11:40 am
by gk108
Little Gem provided plenty of inspiration for me. While the V10 is too small to do some things, swidm did get me thinking...
There will be some very strong similarities to his hatch system on my little oval holes in the front.
ks8, I'm on a scavenger hunt for a small scrap of SS to possibly use instead of washers for the gudgeons. While test fitting the rudder, it looked like there is enough flat spot to work with.
Posted: Wed Jun 04, 2008 9:51 am
by gk108
Progress!
The rear seat is in place and I spent Saturday making knees.
A coat of resin sure brings out some color. I made some flour from the offcuts of the knees. The fillets here have a 50/50 mix of pine and mahogany flour. A little dark, but not bad.
Note masking tape on the gudgeon holes to prevent mud daubers from building nests.
Both the transom and the doubler are meranti. The doubler is a left over piece of ½" from the D15. A nice range of colors for a bright finish.
The next step is to glue the knees and foredeck in place.
Posted: Wed Jun 04, 2008 11:28 am
by ks8
Nice.
Are you going to put any sort of face panel on the side benches to stiffen the front edge, and give a bit of hand grip? More mahogany? Curious.
Posted: Wed Jun 04, 2008 6:01 pm
by gk108
ks8 wrote:Nice.
Are you going to put any sort of face panel on the side benches to stiffen the front edge, and give a bit of hand grip? More mahogany? Curious.
I need to do something there. The plans call for a sweeping arc on the seat tops that provide stiffness to the sides in that area. What I'm going to try is a gusset that will hopefully do that and provide support for the middle of the seat as well. It's looking like those seats will be the last parts to be built.
Posted: Thu Jun 05, 2008 12:43 am
by gk108
Foredeck is on.
Still pondering the knees.
I guess they are ready to glue on.
Posted: Thu Jun 05, 2008 8:53 am
by donk
gk 108,
Your picture of the knees opened my eyes to possibilities for clamping my breasthook pattern. Ponder long enough and sometimes someone else comes up with a solution. Drilling a clamping hole is a real good idea, I've done it on other projects but not recently and sometimes I suffer from C.R.S. Also, clamping the piece of scrap ply to the rubrail will assure the proper angle. I like it, thanks again.
don
Posted: Thu Jun 05, 2008 9:37 am
by gk108
Glad I could help, Don. I was having the same kind of mental block about trimming the foredeck with something to cover the seams at the edges. Some sort of cap on the rubrail that is almost tall enough to call a toe rail. Then Wobblylegs posted pictures of his toe rail and I had a similar epiphany. We often need a catalyst to make things gel, just like the epoxy.
Posted: Thu Jun 05, 2008 10:36 am
by Cracker Larry
Looking good Gary
Posted: Thu Jun 05, 2008 12:48 pm
by mecreature
Looking good.. looking forward to see how this bright stuff works out for ya..
Posted: Sat Jun 07, 2008 1:36 am
by gk108
Thanks guys. I'm wondering how it will turn out, myself.
I glued the knees in last night. Tonight I worked on the little filler pieces between the knees and the doubler.
Looking down from the top, you can see the little notch cut in the knee to receive the filler. I figured I would get a better fit if I waited until they were glued on the make the notches.
I'll glue the fillers in later along with some plywood strips along the sides for inwales. I bought a Taco rubrail kit and I need another layer of ¼" to get enough thickness for the length of the screws. Meanwhile, I found this old comic book...
Posted: Wed Jun 11, 2008 11:22 am
by gk108
I had to back up a little bit before moving forward. Those fillers on the transom didn't look right somehow. I made another pair that are wider and glued them on. After everything sets up good, I'll blend them in to the knees and dress the tops flush.
Next I tackled the oarlock sockets. I made a jig from scrap wood to drill dowel holes and marked the drill bit for depth.
Then it was on to the strips to make the rubrail thicker.
These have a 45° bevel cut on the bottom edge. With the 45° bevel on the butt blocks it has a nice mitered look.

Posted: Thu Jun 12, 2008 7:24 pm
by colonialc19
GK, boat is looking great, really like all the litttle details
very interesting
Daniel
Posted: Mon Jun 16, 2008 10:27 am
by gk108
Yup. Those little details are what slows me down. I tabbed the knees on the bottom side and cut limber holes in the mid frame. Then, I did a lot of trimming and sanding. Somewhere along the line, the skies cleared enough for me to get outside and finish preparing the mast partner. It's about ready to glue on the boat. I have developed a plan to deal with those gaps where the partner meets the rubrail. It's a ridiculous, time consuming plan, but, it's a plan. With luck, there won't be any exposed end-grain on the partner.
After the partner is on, there's a round of QF to do on the inside, then glue the mid seat in and paint. Sounds simple, right?
Posted: Mon Jun 16, 2008 6:26 pm
by Biker B.O.B.
GK - those time consuming details are what's missing from my build. And they will look great. I'll probably progress slower and add deatils with each successive build. Once I've got something to sail, I won't be so worried about getting it build quickly.
Posted: Tue Jun 17, 2008 1:43 am
by gk108
Mast Partner Part 1 (of 4???)
Underside of partner precoated and sanded around the edges with 60 grit and glued in place with a pretty fillet.
Front edge of partner masked to protect deck finish and a very thin fillet applied.
After that set up for an hour, 9 oz woven tape was applied over the fillets on the underside.
I lightly brushed some neat epoxy over the small fillet before removing the masking tape.
Notice the ends are still rough cut. Part 2 will require some crazy router work.
Posted: Tue Jun 17, 2008 10:51 am
by gk108
Mast Partner Part 2a
Trimming the ends.
First, using a flush cutting router bit, the end is trimmed flush with the rubrail corner.
Then, using a rabbeting bit, a ¼" offset is cut along the bottom edge of the end.
Next, using the ¼" offset as a guide, the end is trimmed again with the flush cutting bit, leaving the end of the partner ¼" in from the edge of the rubrail corner.
Part 2 will be continued as soon as I fix the dead power switch in my router.
Posted: Tue Jun 17, 2008 11:16 am
by mecreature
Ahhh.. technical difficulties...
You are moving along at a good clip GK.. And it is looking sweet.
What kind of wood is that... its gonna take some pretty good stress isn't it?
Are you getting better or do you just have more time to work? LOL
Posted: Tue Jun 17, 2008 8:27 pm
by gk108
I guess it's more time to work, because there is certainly room for me to get better.
All of the intended brightwork is Honduran Mahogany. In fact, the only parts not made of mahogany are the cleats and DB box ends. Those are Cypress.
Partner Part 2b
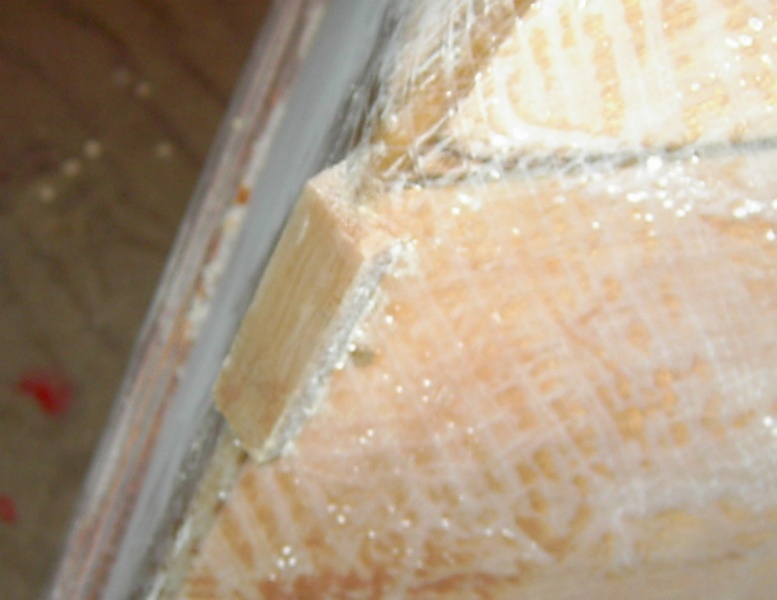
Here we see the reason why I need to get better. After fixing the router, I finished the cuts I was on and managed to break chips off of the corner where I didn't need to. The solution was easy enough, except for finding the chips in the pile.
A little plastic to hold it there while it cures.
And we're ready to go again. Components for part 3 are already slightly steam bent.
I'll have a nice, clean edge to work with.
Posted: Wed Jun 18, 2008 7:16 pm
by gk108
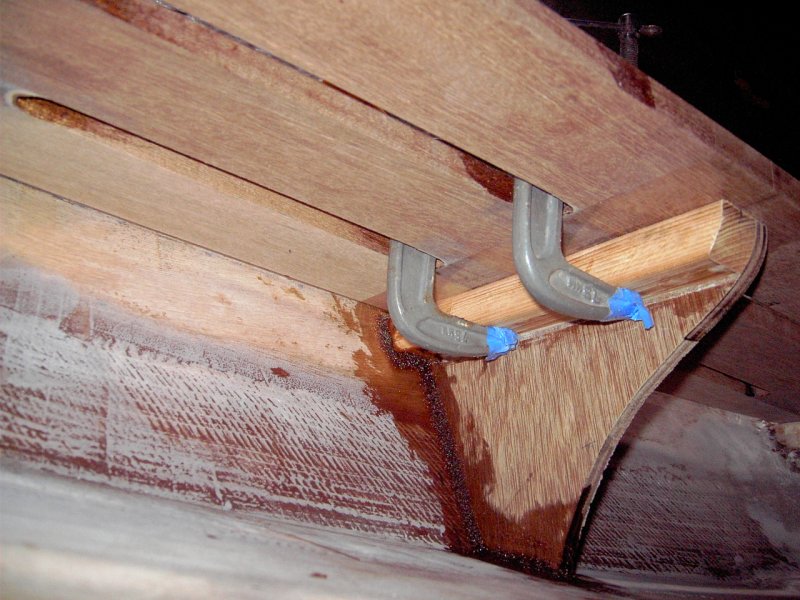
Mast Partner Part 3
I made the blanks for the end pieces a good bit oversize to start with so I had room to play. The bottom edges were beveled to match the angle of the rubrail, then the top was planed down to a height just above the partner. While doing this, I tried a few different clamping schemes.
After trimming, I settled on this method to clamp. Basically, I clamped cleats to the partner, then pulled against them. After filling the remaining gaps under the ends with putty, the pieces were glued on and left to cure.
When cured, the remaining excess height and thickness was planed down and sanded smooth. The ends were cut flush and cleaned up with a chisel.
A little router work and some sanding and all the sharp corners are gone.
Just a little more cleanup and it will be ready to seal and finish.
Posted: Wed Jun 18, 2008 10:20 pm
by TomW
Looking good Gary. Hows everything doing since CR. Looks like you have been very busy on the V10, you had time to take out the D15.
Tom
Posted: Wed Jun 18, 2008 10:26 pm
by Biker B.O.B.
Man, I'd better not let my brother see this thread. He might figure he's getting sub-standard quality.
That is some great work. The extra time spent now will pay off greatly once she's afloat. Keep it up.
Posted: Thu Jun 19, 2008 1:08 am
by gk108
Hey Tom. Things have been busy around here. My boss finally came by a few times and completed the rebuild we started about 3 years ago. I took the D15 as a chase boat and we got it wet in Lake Miccosukee.
We're girding our loins to do battle against the scallops this year. I have to stop working on the V10 long enough to come up with some kind of temp sunshade.
One Sunday afternoon, it was way too hot to do any boatbuilding, so I had to take her to go cool off in Wacissa. As is often the case, I wasn't the only one there with a homebuilt boat. Here's Elsie Mae, a cypress strip canoe.
These two said the boat works properly because they caught a 6 lb bass in it already.
Shaun, tell your brother that he will be happier that he didn't sacrifice speed for beauty. That applies to build time as well as on the water. I'm just guessing here, but your boat is probably going to weigh nearly the same as mine, even though it's 2 feet longer. With my leg o mutton sail, I might be able to sail closer to the wind, but that alone probably won't make up enough difference to win the race. I'd have to get some new-fangled keel designed in the Southern Hemisphere, I guess.
Posted: Thu Jun 19, 2008 7:47 am
by jbo_c
Where are Miccosukee and Wacissa?
Jbo
Posted: Thu Jun 19, 2008 9:28 am
by gk108
They are both south of here.
Miccosukee is a fair sized lake, but about 80% is too choked up with weeds to get to. Good fishing and duck hunting. It's about the closest place to put in any decent sized power boat. Take Metcalfe Rd south from T'ville. A few miles after you cross into FL, you get to the town of Miccosukee. Turn left at the store and follow the pavement to Reeves Landing and the fish camp.
Wacissa is further away in the same direction. Metcalfe Rd turns into SR59 in FL. SR59 hits US90 and jogs east a few miles, then breaks off south again, crossing I-10 and US27. After you get to the town of Wacissa, SR59 turns west, but if you continue straight for a mile, you hit the river. Some excellent canoe and kayak waters. The river has some problems with weeds choking it, but has enough traffic to keep most of it clean. The riverbed is peppered with spring vents and blue holes and the water is always as clear as the picture above. It's one of the few really natural places like it in the state. Highly recommended. The only disturbing thing down there is the airboat traffic, but high fuel prices seem to have made them reduce their running time.
Posted: Thu Jun 19, 2008 4:24 pm
by TomW
Wicassa is a pretty lake Gary. Take care of yourself in that heat and have fun scalloping.
Tom
Posted: Fri Jun 20, 2008 2:43 pm
by WobblyLegs
gk,
Not commented on your thread before (don't visit this section often) but have been watching occasionally. Very nice work, and "Mast Partner Part 2a" will be filed for future reference. Dunno what for, but it's a nice way of trimming ends. One day I'll let you know if I copied you
Tim.
Posted: Sat Jun 21, 2008 1:11 am
by gk108
Thanks, Tim. I pondered over this stage of the build for a long time. I've been a little nervous about the whole thing because I've never done much of this kind of stuff and it's an expensive piece of wood. Please copy away. Stay tuned and you'll see the trim that your toe rail inspired.
With a great sigh of relief...
Mast Partner Part 4
About the easiest step. Roll on some resin to seal it.
And if you look close, you can see where I glued those chips back in place. That seems to have been a good enough fix.
Pressing on.
Posted: Mon Jun 23, 2008 1:14 am
by gk108
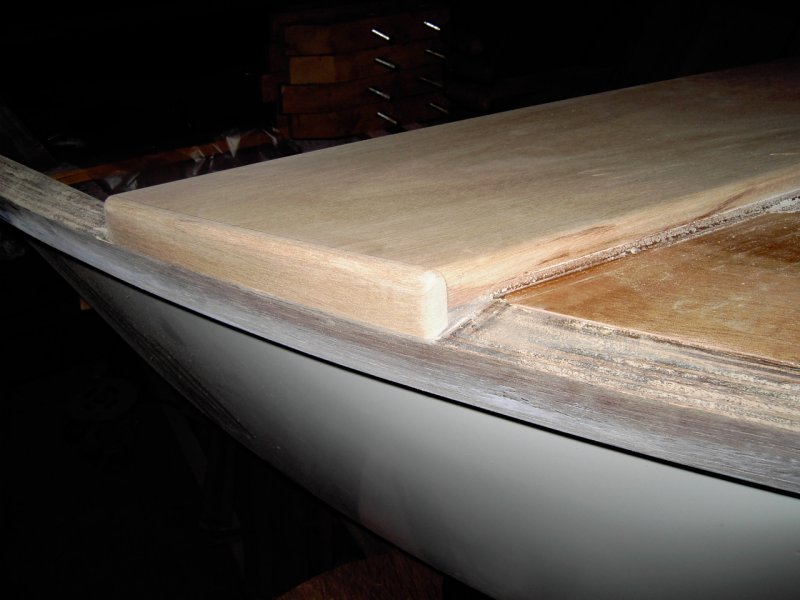
I worked on making trim to cover the seam where the foredeck meets the hull. I did a lot of pondering on this and no obviously simple solution came to mind. I was stuck on the idea that whatever I did had to cover the full width of the rubrail up there and something that wide would never bend to the contour of the hull. Then Wobblylegs posted this picture of his toe rail.
I had a

moment when I realized that it didn't need to cover the whole rubrail. I already had a rough idea for the cross-section of the pieces, so I cut out two of them. Somewhere in the background noise that little voice told me that I should cut an extra one since I don't know what I'm doing, but I ignored it.
I made a crude steam box using a wood fired camp stove and a 5 gal metal bucket with a lid.
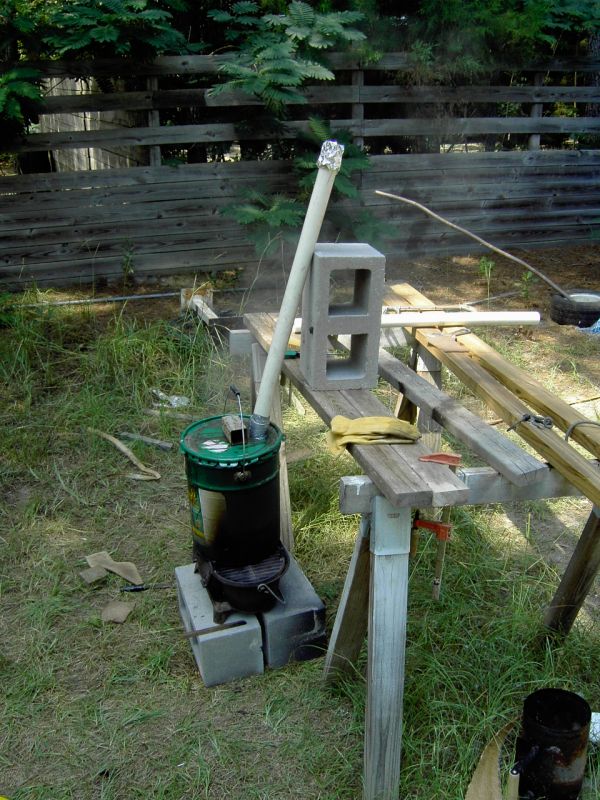
It worked pretty good and the first piece bent right to the lines. That filled me with too much confidence, I guess. I forced the second one too hard, too fast and it broke in two, so I went ahead and made that third piece.
Here's the broken one, a finished one and one cooling under the clamps.
The finished one barely looks bent compared to the one under the clamps. After they cooled, they still sprung back a good bit, but that was considered when I laid out the curves. They ended up pretty close to the right shape.
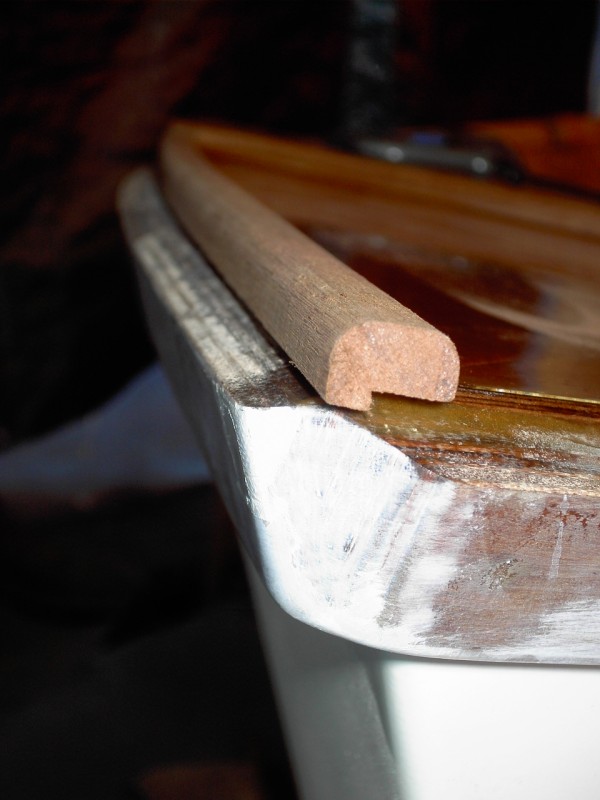
The idea is to overlap the seam and lay flush with the deck. A fillet will cover the gap on the outside. I drilled holes along the rubrail where I wanted the outside edge to land and inserted nails to locate against. Clamping pressure pulled it all into place.
The wood I'm using for these is from the same batch that my cockpit seats will be made from. It is very much darker than the deck, partner and knees.
Posted: Mon Jun 23, 2008 10:01 am
by mecreature
very nice gk...
the need to steam is catchy isn't it..
that toe rail is a good idea..
Posted: Mon Jun 23, 2008 10:36 am
by gk108
mecreature wrote:very nice gk...
the need to steam is catchy isn't it..
that toe rail is a good idea..
The one that hasn't been glued on yet has relaxed back to nearly straight during the overnight. I'm going to torture it on the rack for the day and try to get it glued on tonight.
I think maybe I'll try to avoid stem bending in the future. Those two little pieces of wood sure are going to consume a lot of time compared to other parts that size.
Posted: Fri Jun 27, 2008 11:17 am
by gk108
Not much progress the past few days because of weather and other things. The other strip of trim is in place. I ended up using a heat gun to get the final shape on it. After I cleaned up my sloppy glue job, I worked on the last detail for the bow. A pad for the cleat. It's not glued in yet and may be subject to minor changes.
Posted: Fri Jun 27, 2008 11:22 am
by WobblyLegs
N-i-c-e-!
Your toe rail is definitely a step up from mine!
Tim.
Posted: Mon Jun 30, 2008 1:34 pm
by mecreature
Nice mixture of grains. should look neat with a layer of epoxy on it..
Posted: Mon Jun 30, 2008 2:09 pm
by ks8
Excellent...
Posted: Mon Jun 30, 2008 9:35 pm
by Biker B.O.B.
Serves you right to have to wait so long to sail that boat. You're making me look bad.

JK
You're the kind of builder that inspires those like me to do better. Keep up the great work.
Posted: Tue Jul 01, 2008 11:52 am
by gk108
Thanks, guys. It does look good with a coat of resin on it. Very dark wood. No pictures yet, though. I glued that last piece on the bow and added a little more putty to the outside fillet and sanded to the profile I wanted. Then I drilled oversize holes for the bow cleat and filled them and coated the dark wood with resin to seal. It's all sanded now, ready for another coat of resin. I'll see if I can get a good picture of it after that.
Posted: Tue Jul 01, 2008 1:02 pm
by frazoo
Super job! WOW!
Posted: Tue Jul 01, 2008 3:03 pm
by gk108
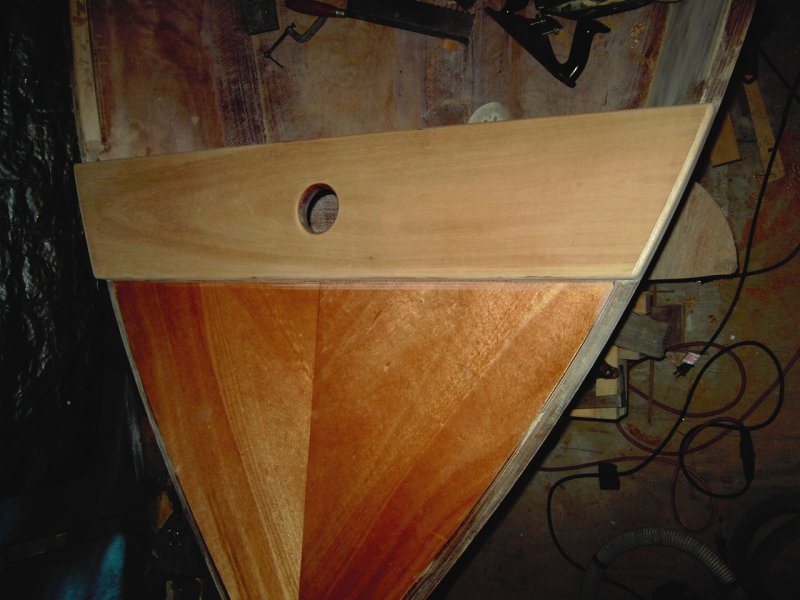
I guess I do have a picture. Deck and trim sealed and sanded.

I'm going to try one of these rollers for the next (2nd) coat of resin on the partner and knees.
Posted: Fri Jul 04, 2008 11:07 am
by gk108
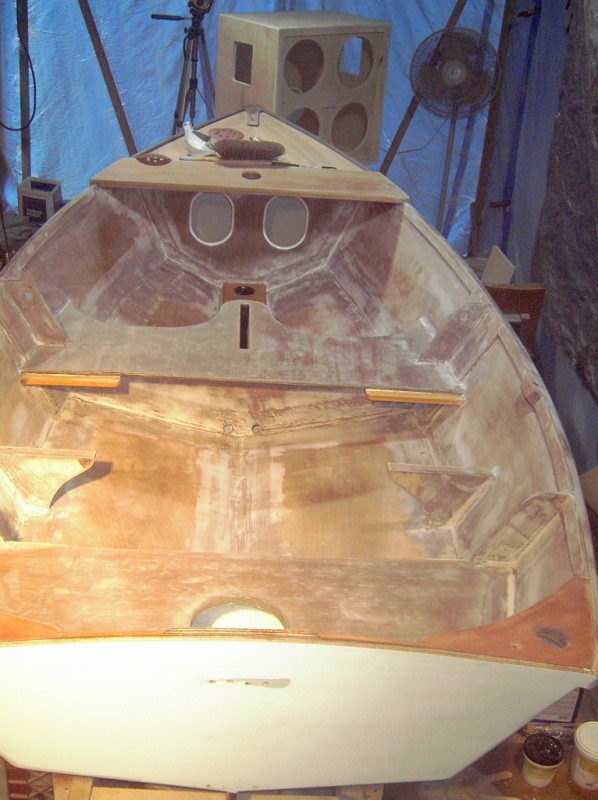
I've been working on the inside and middle seat this week. QF has been applied to the seams on the inside and sanded.
The middle seat is shaped and glued in. DB slot is rough cut.
Still more work to be done with the middle seat. The back edge needs some stuff glued on to mount the seat slats.
Posted: Sun Jul 06, 2008 1:25 pm
by dbldipper1
Have you used the adhesive roller yet and if so how did it work out?
Posted: Mon Jul 07, 2008 10:54 am
by gk108
I haven't made it there yet. I've been trying to get the rest of the boat up to the same point of finish as the front. Some parts don't even have the first coat of resin on them yet.
I have a blank made for the starboard cockpit seat. Here it is after a little cleanup.
It still needs the outside edge cut to the contour of the hull, then some support for the middle needs to be made.
While that was curing, I spread some QF around the rear seat area and sanded that down. Also finished tabbing the middle seat to the hull.
Posted: Mon Jul 07, 2008 4:05 pm
by TomW
Gary this finishing stuff seems to gone forever doesn't it. Looking good guy! You'll have something to be proud of when you get done.
Tom
Posted: Tue Jul 08, 2008 9:56 pm
by gk108
Yeah, Tom. It looks like I'm going to have to take a little break, anyway. I have a chance to go stay on the Wakulla River for the rest of the week.
Maybe I'll get to see how suitable the D15 is for scalloping.
I'm not absolutely sure, but I think I have the last parts glued to the hull. Here's the middle support for the starboard cockpit seat, viewed from below.
I wrapped each seat with a little packing tape in case it got sloppy under there, then clamped the support to the seat and hung it in place while the glue cures. These will also be tabbed to the hull with 9 oz woven.
Posted: Tue Jul 15, 2008 5:01 pm
by mecreature
Looking good...
How was you stay on the River. Have you beatin that D15 all up yet...
Posted: Tue Jul 15, 2008 7:14 pm
by gk108
A few scrapes on the paint. The dock really had no provisions for mooring a boat and we had 2 and an aluminum canoe. The daily storms tended to blow them around at the dock. It was a great place to stay in a steamy, early morning Tarzan movie set kind of way. The Florida jungle that I love. A little too far up the river for serious scalloping in small boats, though. 25 miles round trip and a bunch of it is manatee zone. We may make another run from the ramp at St. Marks on Thursday.
Posted: Fri Aug 01, 2008 7:58 pm
by gk108
Finished with the Quick Fair on the inside. Weather, scallop season and a side project have impeded progress. The side project is the 4X10" bass guitar speaker cabinet in the background.
Since the last rounds of sanding may have exposed some bare wood, I'm going to roll a coat of resin on the inside of the boat , then it's on to the primer.
I guess any kind of bright finish on my plywood seat tops is out of the question now. There was a good bit of open grain on the face veneeers and I filled it with QF to keep the wood from misbehaving. Notice all the white spots where the open grain is.
Still, this meranti is really a lot denser and somewhat heavier than what I got for the D15. Good qualities to have for frames and transoms and stuff.
Posted: Sat Aug 02, 2008 12:54 am
by TomW
Looking good Gary!
Tom
Posted: Sat Aug 02, 2008 3:53 am
by ks8
Yep... seal it up. Getting close! At least there won't be the severe checking problems associated with DFir. You might even be able to fill those sorts of openings with straight epoxy, just as it is getting cooler, to minimize air bubbles from wood venting (for the future)... and you could always put your own thin veneer on there for bright work, later, if you really like the idea. It wouldn't weigh that much on the seat tops only. If it doesn't get too hot, bright work could look very nice there. Pick a light colored species for a veneer?
Have you got any baffle or port system planned for the spkr cabinet?
Posted: Sun Aug 03, 2008 9:33 am
by gk108
It's sealed on the inside and the foredeck got its final coat of resin.
I'm really happy with the way the dark trim looks.
I rolled most of this coat on with a foam roller, but on the foredeck area, I switched to this fur roller:
It did a real nice job of laying down a smooth, thin coat with none of the bubbles that you get with a foam roller, but it shed a lot of fur and left bugs on the finish. You can see some on the partner in this picture:
Hopefully, they will sand off when I prep for the clear LPU.
And the speaker got a coat of resin on the outside to toughen it up. As you can see, it has a 6" X 6" round vent on the rear of the cabinet. It's a copy of a PV box that seems to be popular. I'll load it with Eminence BP102 drivers, so it should shake 'em up when it's done.
Posted: Sun Aug 03, 2008 12:54 pm
by frazoo
Very Nice!!
frazoo
Posted: Sun Aug 03, 2008 2:06 pm
by ks8
Well placed brightwork is a wonderful thing.
Those fuzz bugs will lessen after sanding, but they may not go completely away.
I've been thinking of trying the very short fiber nylon brushes, the flat pads, that some use for applying epoxy paint to a garage floor. I'm wondering if they would minimize bubbles, ridges, and fuzz bugs. Of course I'm running out of unfinished area... but that seems like a good thing!
What about a veneer on the seat tops of the same species that you have on the foredeck?
Cabinet is looking good too! Are you keeping its interior smooth and reflective for the highs, or padding it?
Posted: Sun Aug 03, 2008 5:58 pm
by peter-curacao
Beautiful!!!, question what are you putting over the epoxy coating on the foredeck?
Posted: Sun Aug 03, 2008 7:58 pm
by ks8
Hopefully, they will sand off when I prep for the clear LPU.
Posted: Sun Aug 03, 2008 9:19 pm
by Cracker Larry
Gary, have you tried a Thermacell to keep the bugs away? They work better than anything else I've seen. They even keep mosquitoes off my wife to her satisfaction. A lofty goal in the GA swamps
Posted: Sun Aug 03, 2008 10:27 pm
by gk108
Larry, I keep forgetting to pick one up. The boss's wife packed a small one on the Wakulla River trip, but we never needed it. She highly recommended it, too. I have to do something because insects that are drawn to the light really limit what I can do at this stage. Yesterday was a good example. I wanted the epoxy to be tack free by sundown, so anything that might land at night wouldn't leave marks. With this last coat, I wanted to make sure that anything sanded through to bare wood got covered again. Applying the resin too early meant that the plywood would still be heating up and outgassing and the bare spots made themselves quite evident by blowing bubbles in the fresh resin. That's when I took a break for a while before switching to the fur roller. After I did the foredeck in that second session, the areas that bubbled got another last coat. Finished right before sundown, killed the lights and hoped for the best.
I picked at the big fuzz bugs today and they sort of pulled out of the epoxy intact. They may not be too much of a problem. The idea is to have enough dried saltwater on there to hide that stuff, anyway. If that doesn't do it, I'll spec an extra long snotter and leave the excess laying up there to confuse the eye.
Never let anyone tell you that 'sweat equity' in your boat is not a tangible thing. It looks like this:
Another place for some extra line or something.
Posted: Tue Aug 12, 2008 11:59 am
by gk108
A little bit of progress.
I got this thing done and out of the way Saturday.

No power rating, just a warning; don't clip your 1000W amp. It got the full treatment, internal bracing between front & back, Penn hardware, Neutrik connectors and yes, stuffing, literally. I used surplus polyester batting from a local ladies undergarment factory that closed a few years ago.
Now for the important stuff.
I sanded the bugs off of the foredeck and partner and gave them another coat, this time with a good old foam roller. That turned out real nice, just needs a light pass with 320 grit before the S3 clear.
Right now I'm working on the cockpit seats. The mounting points are all in place.
The seats are shaped and the corners rounded.
I'm a bit undecided about the exact method of fastening these seats to the mounts. They need to be removable for easy refinishing, but they need to help provide resistance to oilcanning in that part of the hull. Those are inch thick cypress cleats on the mounts, so a wood screw will work, but would a machine screw with a nut & washer be better? Or a tee nut? Things to ponder while I sand all those little slots.
Posted: Mon Aug 18, 2008 9:49 am
by gk108
A little progress report, though progress might not be the right word, since I had to back up a bit.
I've been trying to make absolutely certain that all surfaces are well sealed. While doing that I noticed things like a little QF slopped on the mast step where it will have a bright finish. Got that scraped off, but exposed bare wood doing it. It got another pair of last coats.
Stood on my head while prepping the area under the mid seat for priming and noticed a couple of fillets that were defective, so they had to be done again.
The bottom panels just behind the mid frame are giving me a hard time as well. They have some areas that just kept sucking up resin and wouldn't seal. Those areas got their 5th coat last night and I think they are finally sealed. No telltale pock marks from the resin running back in the vents as the plywood cooled overnight.
The cockpit seats are sealed up and ready to move on to their next step. The daggerboard is finally completely sealed as well. The entire blade is covered with surfboard glass and sealed, but the end grain of the NZ pine plank got opened up when I cleaned up after gluing the mahogany stops on the top. I used my heat gun to warm the blade about 4" below the top, then brushed resin on the top and stops. At the same time I was coating the cockpit seats, so I could just turn around and brush more resin on that end grain as it soaked in. I know I hit it 5 times and it still looked dry when it cured. Here it is after the final coat of resin.
I'm getting real close to breaking out the primer. Gotta see what this weather is going to do.
Posted: Mon Aug 18, 2008 10:31 am
by mecreature
Lookin good gk.. It will be nice to see primer go on..
And nice speaker cabinet too.
Posted: Mon Aug 25, 2008 10:30 am
by Biker B.O.B.
GK - I can't wait to see those seats finished. Something like that is going into my next build, which will be strictly for sailing; a C12. Your detail work is incredible, and inspiring. Keep it coming.
Posted: Mon Aug 25, 2008 11:14 pm
by gk108
All it takes is 20+ inches of rain to get in the way of progress. Everything except my sandpaper stock seems to have survived intact. I hope I can get back at it in a few days.
Posted: Tue Aug 26, 2008 5:01 pm
by TomW
Gary glad you survived sandpaper can be replaced. Hope all else is well and you can finish that pretty boat. I imagine Fay may hurt the scalloping.
Tom
Posted: Tue Aug 26, 2008 9:39 pm
by gk108
Already restocked the sandpaper. I'm sure the scalloping is poor around St. Marks right now. My boss was making moves toward getting a houseboat that is (was?) tied up there, so we would have a base to operate from. He heard from the owner last Thursday and she said she removed her valuables and the shore power in preparation for the storm. My guess is that it either sank at its dock or broke loose. Either fate is OK by me. "You know who" wasn't looking forward to the prospect of dealing with the issues that a 39 yr old houseboat might have.
Posted: Wed Aug 27, 2008 1:32 am
by TomW
Tom
Posted: Fri Aug 29, 2008 10:46 pm
by gk108
TomW wrote:
Tom
Well, wouldn't you know, I guessed wrong. The houseboat made it through the storm OK, sort of. We rode down to St. Marks this afternoon and looked it over. Both batteries were dead and there was a foot of water in the bilge. A quick survey shows plenty of issues, but it might still be a real bargain at less than $100/ft.
Posted: Wed Sep 03, 2008 7:33 pm
by gk108
I haven't done a whole lot on this boat lately. It took a little while to get cleaned up and dried out from the 27" of rain that TS Fay dropped on us.
I bought a bunch of fine quality silicon bronze fasteners from boltdepot.com to mount hardware with. Lots of little holes to layout and drill. Here's one of my favorite tools, an adjustable drill/countersink for #10 wood screws. The collar will also adjust to drill deep enough for a plug over the screw head. It saves time, but the 18 holes for mounting the cockpit seats still took over 2 hours to complete.
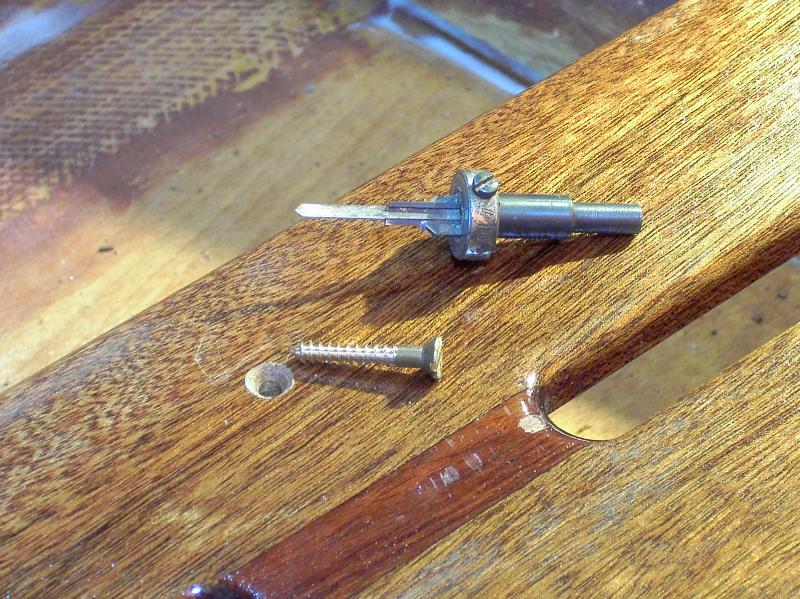
Posted: Wed Sep 17, 2008 7:02 pm
by gk108
I broke out the primer and started applying it on the insides. Painting the underside of the middle seat is not much fun.
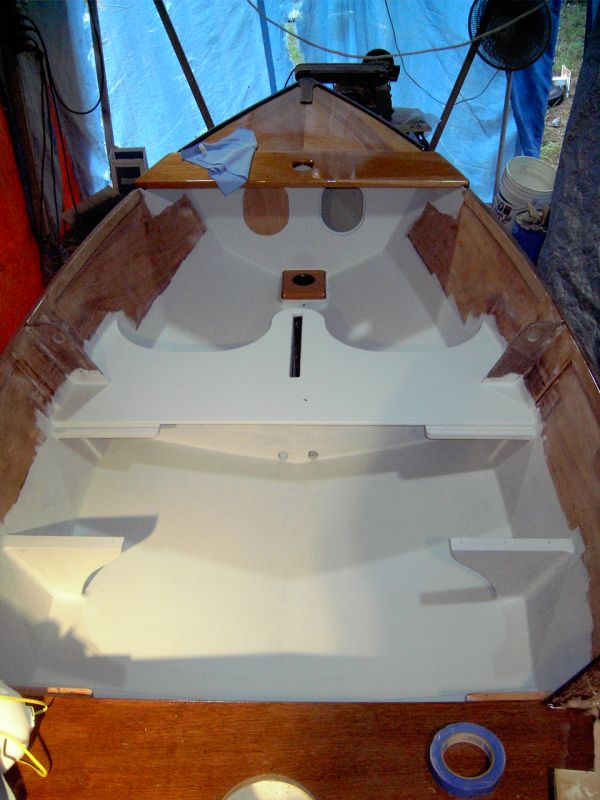
I set one hatch in the front bulkhead to see how it looks. It's the same 2 layers of laminated plywood as the foredeck.
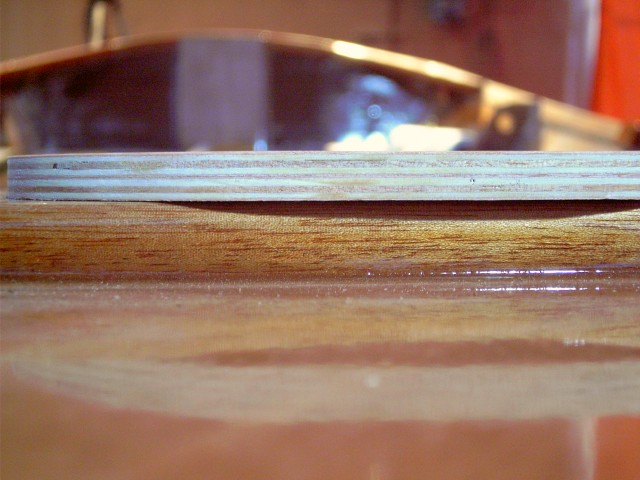
Posted: Mon Sep 22, 2008 2:35 pm
by mecreature
Looks good gk.. You sure have alot of stuff to paint around.
Posted: Mon Sep 22, 2008 3:23 pm
by flatpicker
mecreature wrote:Looks good gk.. You sure have alot of stuff to paint around.
What he said
Posted: Mon Sep 22, 2008 7:03 pm
by gk108
Yeah, I have the posture of a question mark for about 2 hours after I get through painting under the seats.
I applied two coats of primer to everything inside and the rubrails in a series of 6 - 5 oz batches. That took a whole quart.
There are a couple of places on the brightwork that need another last coat of resin, so I'll get that in a day or two, then sand the primer and probably use up the last of my QF before applying the last coats of primer.

If it was an old GM product, I'd probably just leave it primer gray.
Posted: Thu Sep 25, 2008 9:56 pm
by gk108
Fun and games.
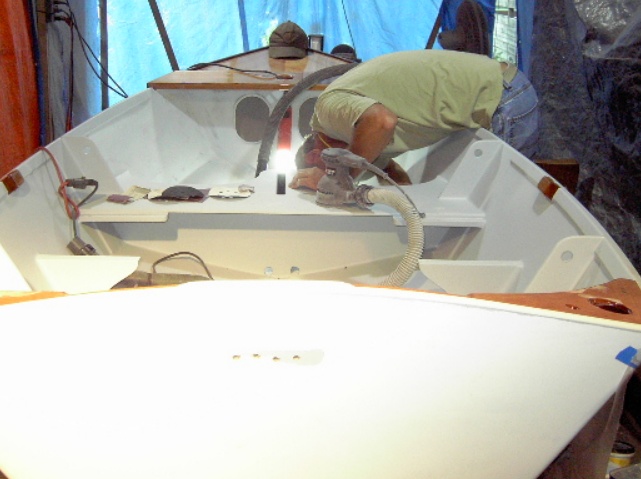
Sanding the primer on the underside of the middle seat.
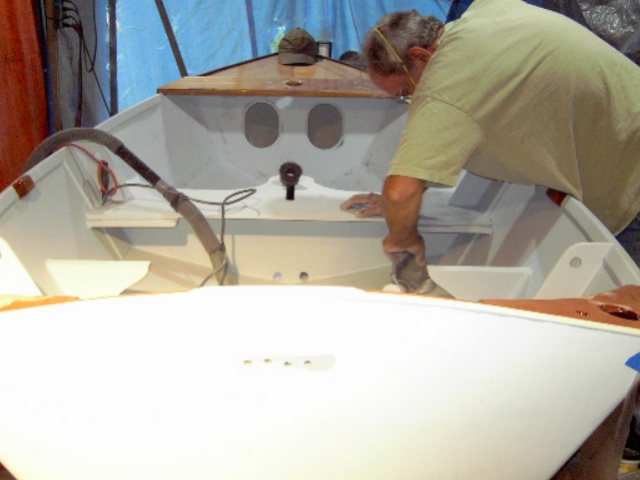
Sanding the primer on the bottom.
Posted: Tue Sep 30, 2008 10:16 am
by gk108
This round of sanding is over. There were several rough spots that needed some more QF to fill.
This picture shows the high spots really well. Note the slightly different colored QF along the lower frame fillet.
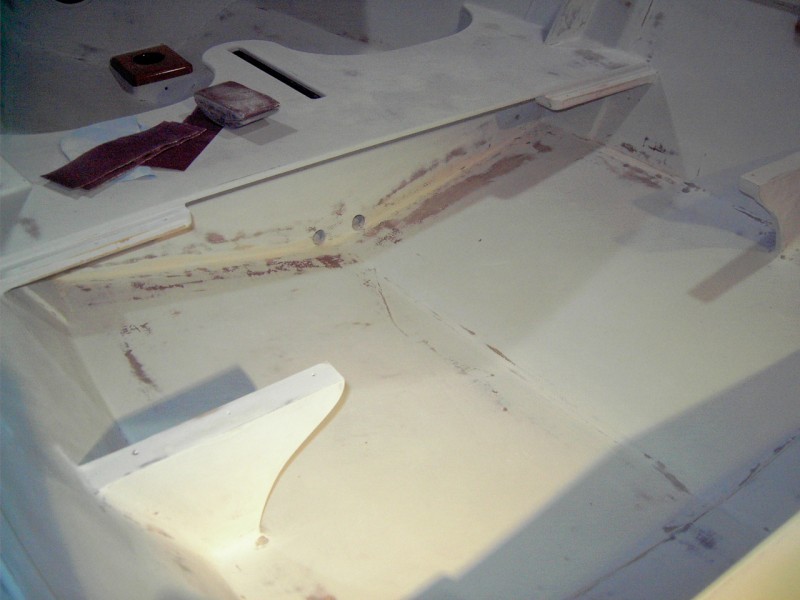
This area at the rear frame still looks bad. One more application of QF should do the trick.
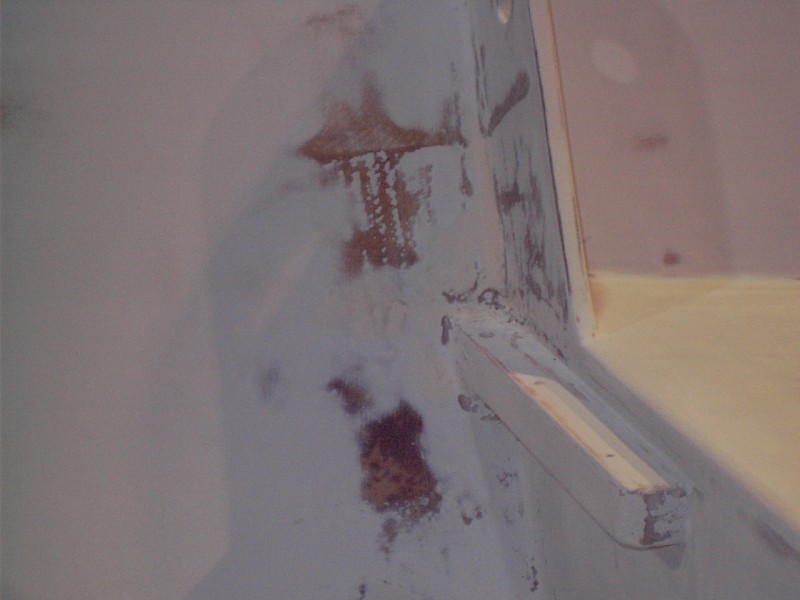
This area of the chine seam is looking good after a little layer of QF over the primer.
I've decided the final pattern for the two colors that I'm going to use for the topcoat. The gray Kiwi Grip is very close to Bainbridge White, so I'm going to stick with factory colors and not try to add any tint to the Bainbridge White to darken it.
Posted: Tue Sep 30, 2008 11:32 am
by TomW
Gary looking good guy!
Tom
Posted: Tue Sep 30, 2008 4:34 pm
by mecreature
It is looking good..
amazing the spots that sander can find.
Posted: Tue Sep 30, 2008 9:00 pm
by gk108
mecreature wrote:amazing the spots that sander can find.
Turns any primed hull into a topographical map.
Mixed up about a tablespoon of QF and hit the bad spots again. They are done, it's done, no more sanding for fairing purposes. One more good coating of primer and the topcoats to go. Gotta move forward.
Time to do a little trailer shopping, or is that shopping for a little trailer?
Posted: Tue Oct 07, 2008 10:27 am
by gk108
Top coats under way. At around 11PM I started with the rubrail in Orcas White. It's masked on the outside at the bottom of the rubrail, but I didn't mask most of the inside where the Bainbridge White will go. Two coats are brushed on so far. The first coat went on OK, looked like crap, but it was only the first coat. This is the second coat applied around dawn this morning.
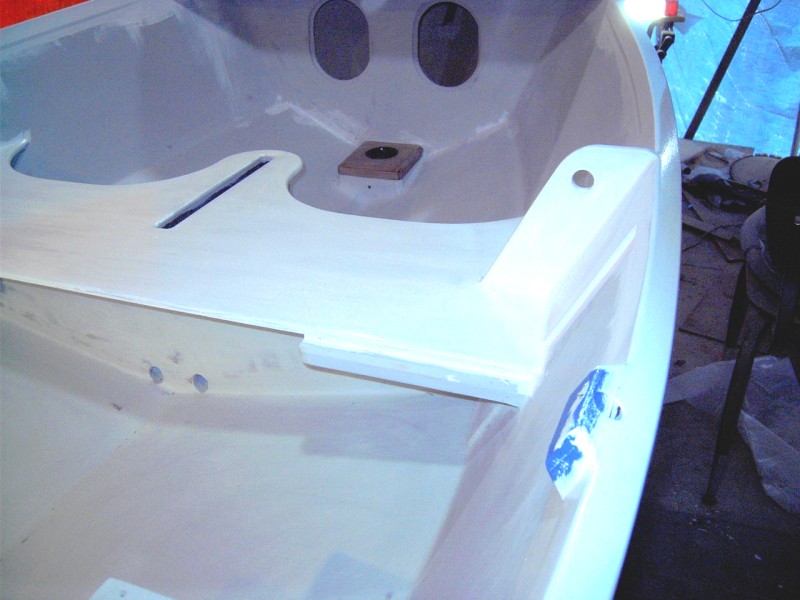
One or two more coats and then I'll sand on it some more.
Posted: Tue Oct 07, 2008 10:33 am
by Cracker Larry
The first coat went on OK, looked like crap,
It takes about 4 coats before it starts to look good
You'll get there. The worst is over
Posted: Wed Oct 08, 2008 12:47 am
by gk108
Thanks for the encouragement, Larry. The third coat has really gone on nice. I switched to the whizz roller and foam brush for the rest of the way. I brushed the first two coats because I'm cheap and whizz rollers aren't. I've been using crosslinker on every coat so far and getting them done within 8 hours of the previous coat.
Posted: Wed Oct 08, 2008 7:14 am
by Laszlo
gk108 wrote:...Painting the underside of the middle seat is not much fun....
Agreed. So why do it? Who's going to see it? The fish you pull aboard? Drunken passengers? People with eyes on their toes?
The boat looks real nice, BTW.
Laszlo
Posted: Thu Oct 09, 2008 10:01 am
by gk108
Laszlo wrote: So why do it?
Well, the paint won't do any good if I leave it in the can, so I might as well put it on the boat.
Heavy rain yesterday prevented progress, but I got the fourth coat on the rubrails this morning. With a 24 hour interval between coats, I had to scuff the surface with a scotchbright pad. One more coat should do it. Hopefully, I can get that put on this evening. I have a 5 band rock show to produce on Saturday, so the rest of my week is about shot. By the time I get back to it, the paint should be cured enough to allow masking for the next color.
Posted: Thu Oct 09, 2008 11:29 am
by tech_support
Gary, for the s3 paint i use the same roller many times over - at least six times. You can only get a few uses with the primer though.
Posted: Thu Oct 09, 2008 11:56 am
by Cracker Larry
Yes, I found the same thing. The whizz rollers are easy to clean and you can reuse them many times with S3 paint.
Posted: Mon Oct 13, 2008 10:15 am
by gk108
Rubrails are painted, seat tops need another coat or two. I never have been good at guesstimating the amount of paint I need. Rubrails on this boat require enough paint to cover ~4 square feet. Guess who is out of white paint because he didn't consider that 4 square feet?
Brightwork is prepped for clear coat. Rubrails will get a little careful wet sanding, then after the Bainbridge White is done on the interior, the brightwork and rubrails get clear coat.
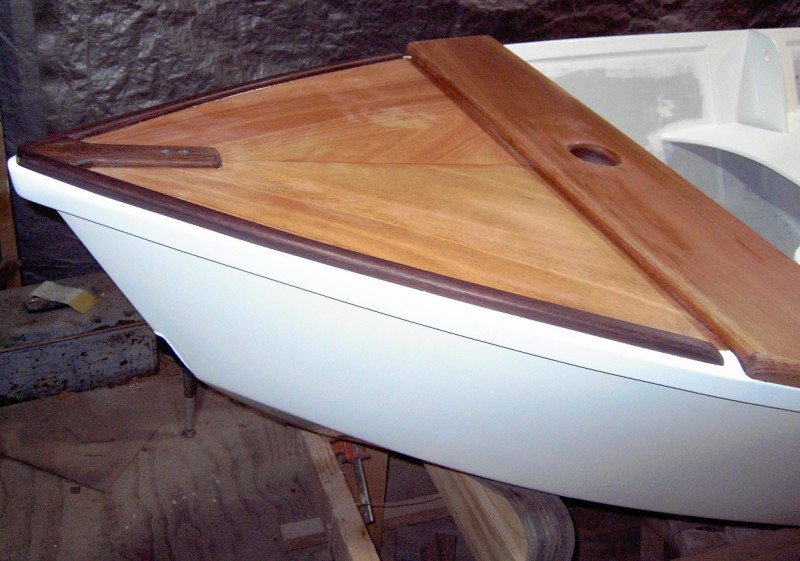
I only masked one time and used an X-acto knife to cut the tape/paint interface, similar to the way ks8 did his.
Posted: Mon Oct 13, 2008 11:01 am
by MadRus
That looks beautiful gk.
Posted: Mon Oct 13, 2008 2:09 pm
by ks8
Nice. Clean treatment of the deck drain groove.
Posted: Mon Oct 13, 2008 8:38 pm
by gk108
Thanks guys. I am still getting accustomed to the way the S3 paint makes me ask myself 'What the heck am I doing here?" for a bunch of coats before I get to the "Dang, now that's what I'm talking about!" coat.
ks, that little bit of paint in that gutter was the subject of much pondering. I had a hard time deciding just how to end it on the inside edge. I ended up cutting a strip of white paper with various angles and concave curves to lay in there and get an idea. The K.I.S.S. version prevailed, so it's parallel to the centerline.
Here's some pics of the transom and knees.
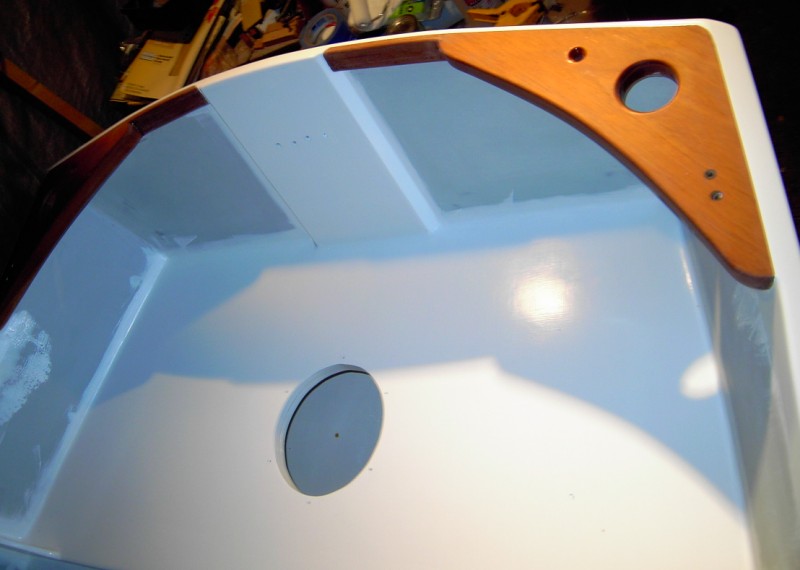
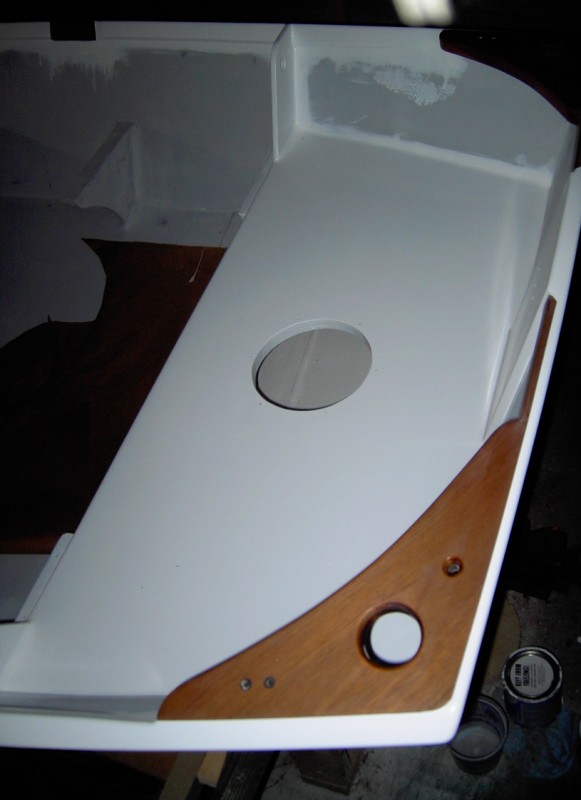
I'm a little iffy on my treatment of the top edge. It is what it is, but now I wonder if I should have capped it with some of the dark mahogany.
Posted: Mon Oct 13, 2008 9:31 pm
by flatpicker
Wow Gary, sure would like to come by and see her sometime. Looking awesome.
Marty
Posted: Tue Oct 14, 2008 11:32 am
by gk108
flatpicker wrote:Wow Gary, sure would like to come by and see her sometime. Looking awesome.
Marty
How about Thursday? That's about the only evening I'll be home before 10PM this week. There's an actual paying gig on the horizon for our little band and I want to change the setup the rehearsal room.
Posted: Tue Oct 14, 2008 12:37 pm
by Cracker Larry
That's really looking good, Gary
Very nice!
Posted: Tue Oct 14, 2008 4:41 pm
by topwater
love the clear woodwork really ads a touch of class
Posted: Tue Oct 14, 2008 5:10 pm
by TomW
Gary she's coming right along and really like the woodwork. Hope you are feeling good about her also. When's the launch date now. Know you always have other things going on.
Tom
Posted: Wed Oct 15, 2008 11:12 am
by gk108
Launch date? Well, I'm pretty much still on schedule for a 2008 launch date. Like most ships, she'll have to spend some time at the yard fitting her out after she rolls down the ways, but she'll be able to make way under her own power.
Posted: Wed Oct 15, 2008 12:24 pm
by TomW
gk108 wrote: she'll be able to make way under her own power.
Didn't know you had equipped her with fins!

Tom
Posted: Wed Oct 15, 2008 7:51 pm
by ks8
I hope she isn't going to be named Christine... like the car...
Posted: Thu Oct 16, 2008 11:33 am
by gk108
Well, Ive done some painting on the inside and I think I'll need to repaint some of the lines at the edges. I'm trying for a shadow box effect here and I used the angle at the rubrail for the break. I didn't mark it in any way, just ran the tape where I thought it should go. My lines didn't come out very pretty.
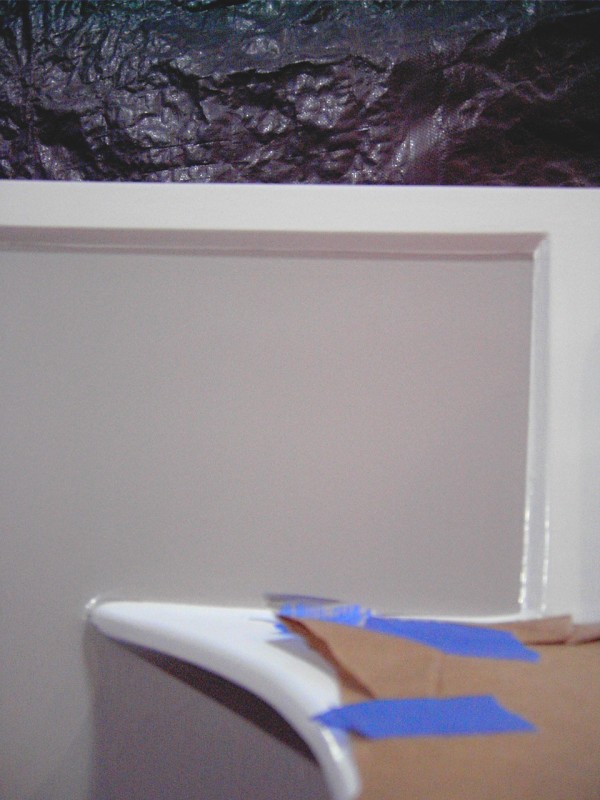
For the next section, I marked the line with a pencil before taping. We'll see if that gives me a better line.
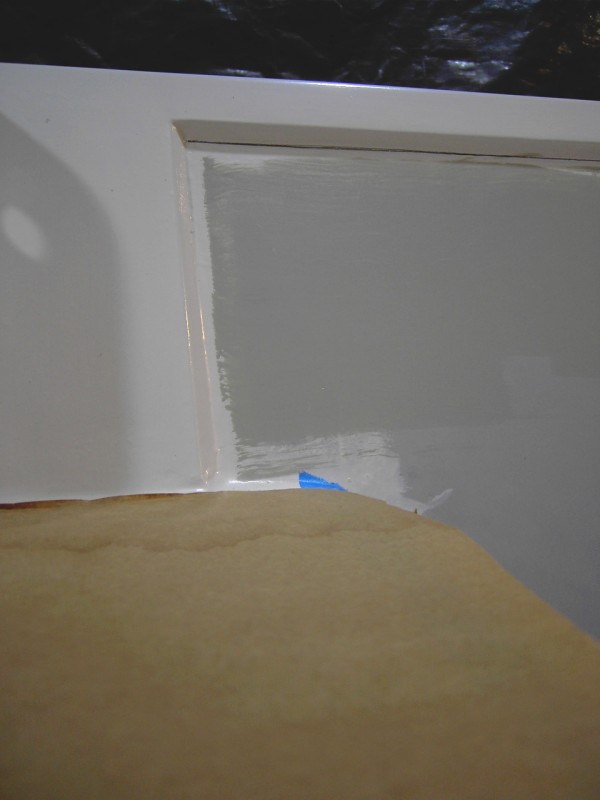
Posted: Thu Oct 16, 2008 12:21 pm
by TomW
It's going to look sharp Gary. Like the shadow box idea, neat!
Tom
Posted: Thu Oct 16, 2008 1:06 pm
by Biker B.O.B.
I was wondering what you had in mind when I saw the other photos. Two different colors. Lots of masking involved in that.
But now I'm wondering, what "didn't come out very pretty." ?
? It looks very good to me.
When you say that it doesn't look pretty, you are refering to the top pic; right?
Posted: Thu Oct 16, 2008 1:20 pm
by ks8
Man... you're worse than me!
Are you giving me a chance to finish up before you?
Posted: Fri Oct 17, 2008 11:47 am
by gk108
Yes, Shawn, lots of masking and lots of tape. I just started on the second roll of 3M delicate surface tape for this boat. I like the standard blue tape, too, but I don't use it for edges. This is really a simplified paint scheme compared to the original one that I conjured up. Glad I changed my mind about that one.
ks, it's your window of opportunity.
Posted: Fri Oct 17, 2008 12:04 pm
by ks8
I'm sanding...
Posted: Mon Oct 20, 2008 1:20 am
by gk108
I worked on the rest of the inside paint this weekend.
First, lets back up a few frames:
See those big splotches of white just in front of the knees? I thought I sanded them down enough before I proceeded with the gray paint, but they not only showed through after two coats, they generated runs.
You can see it showing up on the starboard side in this picture after two coats.

I sanded it down again until it looked a whole lot like the top picture, except a slightly different shade of gray. A few more coats and it all disappeared.
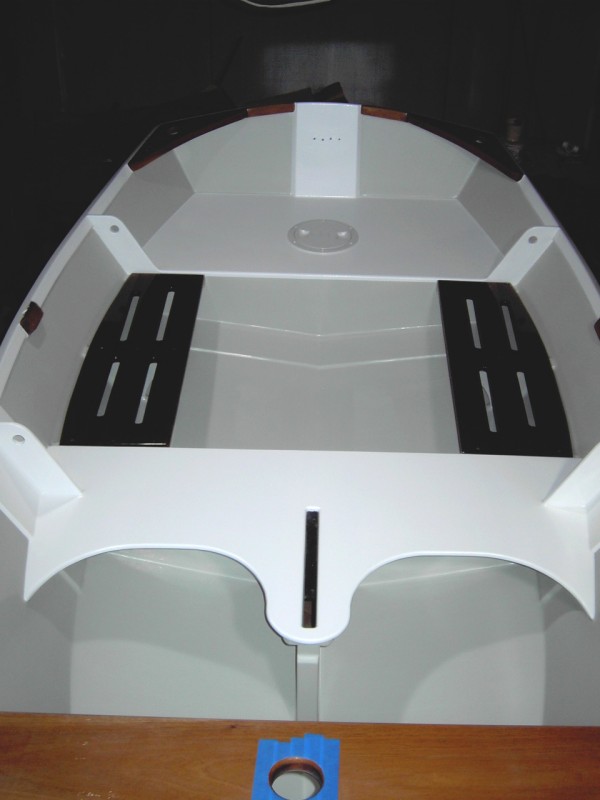
After the gray dried, I masked for the white seat tops and gave them two more crosslinked coats. By some stroke of luck, I got a really nice line around the edges of the seats. Also touched up the frame ears where the paint somehow jumped across the masking tape.
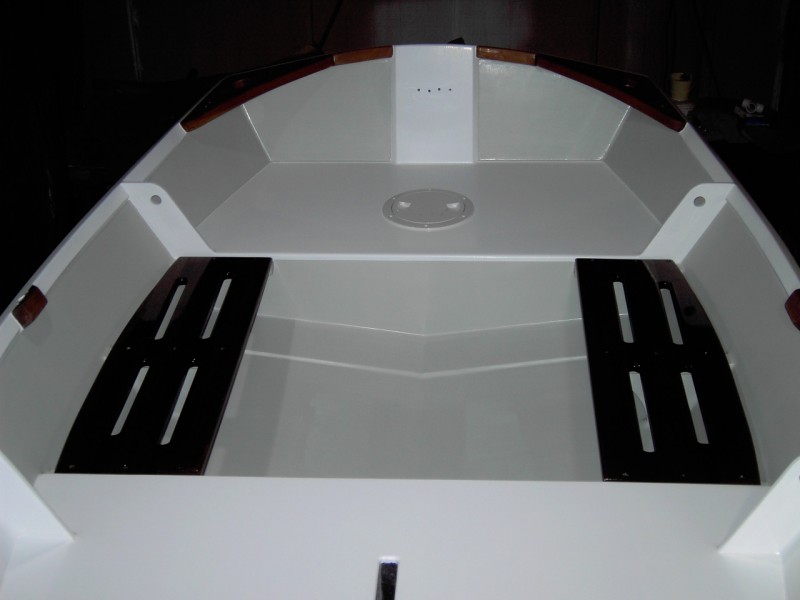
In between applying gray and white paint, I got after the cockpit seats. They had a few coats of epoxy on them that had to be sanded fair. Sanding those slots is a pain, but they sure do look good after 3 coats of S3 clear.
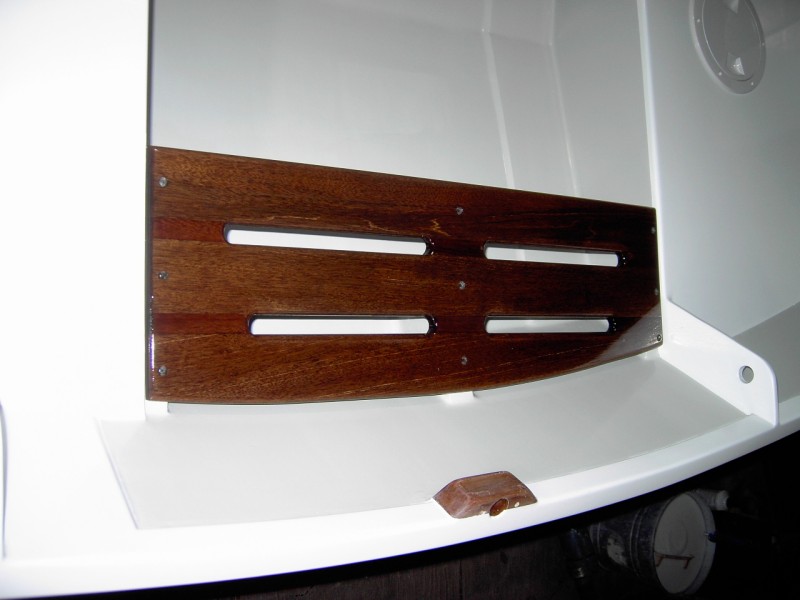
Posted: Mon Oct 20, 2008 8:53 am
by flatpicker
Man Gary, that looks nice. Love the clear coat on the seats. Is that mahagony?
Posted: Mon Oct 20, 2008 9:04 am
by Cracker Larry
Beautiful Gary
Posted: Mon Oct 20, 2008 9:08 am
by steve292
Really nice GK. I am going to be to embarrassed to post pictures before long
.
Steve
Posted: Mon Oct 20, 2008 10:28 am
by gk108
Yep, that's mahogany. I got it on ebay.
It came from a dealer that seemed to specialize in luthier stock. There are a few little worm holes, so I think it was rejected for guitars, but perfect for boat seats.
Steve, keep posting away. Remember a few coats of paint, especially neutral colors, can hide a bunch of stuff. When I started, I had a picture in my mind, but after going to Crystal River, it changed somewhat. The old picture tube must be getting weak, because it looks better than I imagined. Also, credit must be given to the designer. His "No ugly boats" philosophy is definitely working here.
Posted: Mon Oct 20, 2008 11:15 am
by ks8
Excellent.
Posted: Wed Oct 22, 2008 12:21 pm
by gk108
I took care of a couple of details before moving on to clear coating the brightwork. The holes in the mast partner and step needed some more graphite/epoxy. The plans call for a 3° rake to the mast, so I also raked the step to the same angle. I wanted a graphite bearing surface in the bottom of the step, so first, I raised the stern to level the step, then stuck my poly tubing back in the drain hole to seal it off.
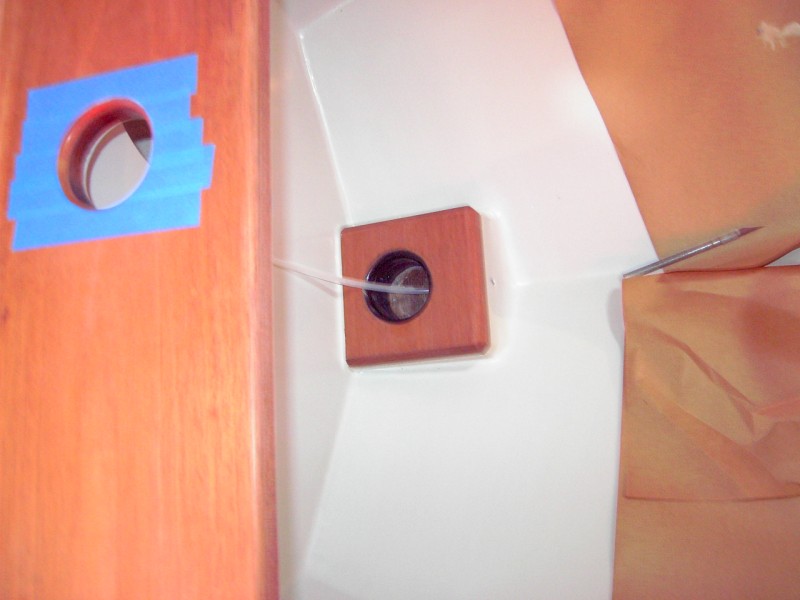
Then I mixed a small batch of resin with graphite and poured about an eighth inch in the bottom. Also coated the hole in the partner.
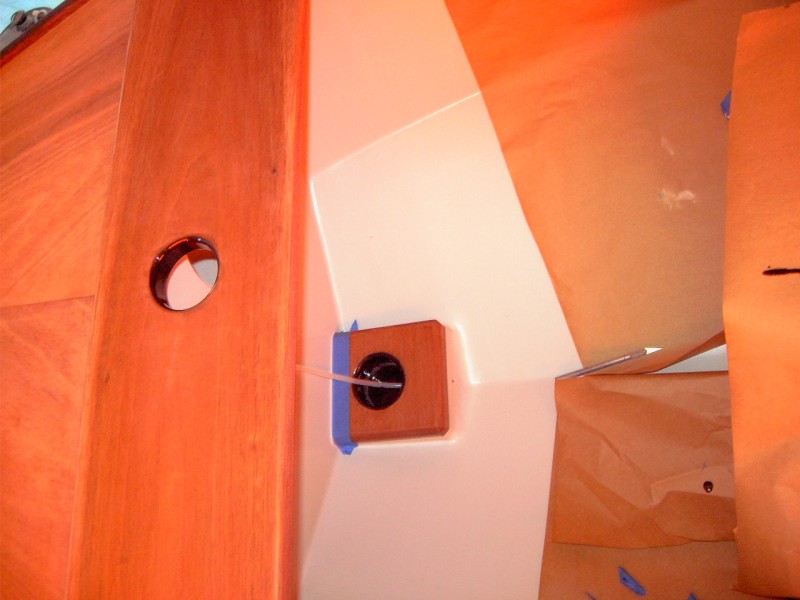
When this cures, I'll pull the tubing out and it's a step in the right direction.
Posted: Wed Oct 22, 2008 1:33 pm
by TomW
Nice Gary, cool idea on the graphite.
Coat the bottom of the mast also, super slick.
Nothing wrong with wormy mahagony, it adds character. I have several hundred board feet of 100 year old wormy walnut, some of which will go into the C17 which I got the Epoxy kit and fiberglass last week.
Now if I can just finish the dang Mirror. I'm starting to get frustrated. It was supposed to be painted and flipped last week until other things took precedence.
Tom
Posted: Wed Oct 22, 2008 2:49 pm
by gk108
I know what you mean abut other things getting in the way of boatbuilding. We've recently had a substantial increase in our business at work and with that, smaller problems are magnified to an extent that they require more attention. That's why I spent last night re-hashing an old problem instead of mixing resin. The boss has gone off to a music festival for the rest of the week, so maybe a little more progress can be made. On the boat, of course.
I'm picking up the trailer this afternoon.
Posted: Wed Oct 22, 2008 3:15 pm
by Cracker Larry
Looking awesome Gary
Love your wood work. The clear coat sure brings it out nice. I wonder how that would hold up on an oily wood like teak
I had a picture in my mind, but after going to Crystal River, it changed somewhat.
That's exactly what happened to me. This is all Stickystuff, Muddlers, Cottontops, and Aripekas fault that we have to work so hard
Can't wait to see the new boats this year.
Posted: Wed Oct 22, 2008 5:34 pm
by gk108
Larry, I'm not sure about teak. I put some regular varnish on the O'Day's companionway slat guides and it's looking OK after 2 years. They were about dried out as they could be, though. I have a few scraps of teak that is a little more fresh, so maybe it's time for a test.
This is all Stickystuff, Muddlers, Cottontops, and Aripekas fault that we have to work so hard
Can't wait to see the new boats this year.
I really hope to see more of the small boat crowd. I know they are out there and King's Bay is a fine place for any canoe, kayak, dinghy, etc.
Posted: Sat Oct 25, 2008 10:39 pm
by gk108
After fussing with the transom for a few days, I think I got it looking good. Here it is with the partially finished DB leaning on it for something to reflect on.
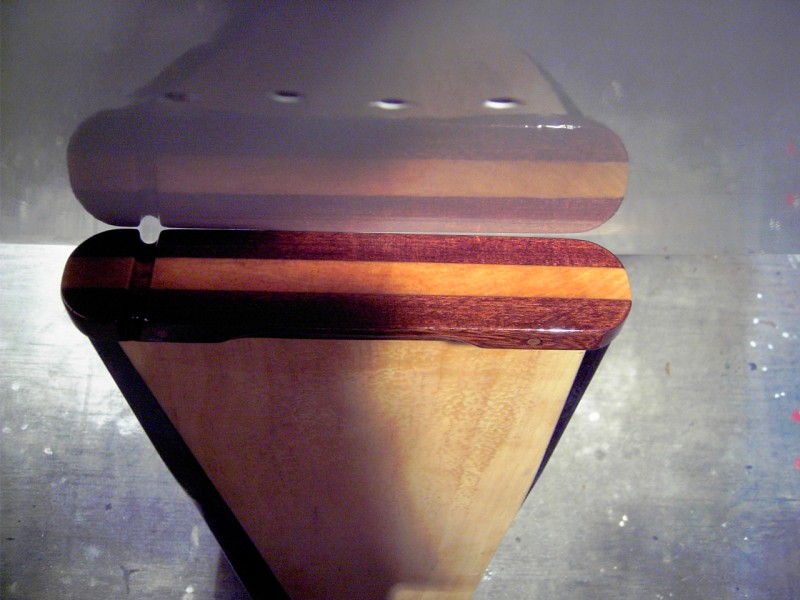
I created problems for myself in the sequence that I used on the transom. When the boat was inverted getting the coats on the bottom, I only put two coats on the full transom because I realized I would be dealing with the top edge and gudgeon holes later. Most of those first two coats got sanded away and the top edge required a couple of coats of its own with a touch-up brush before the rest of the transom was wet sanded and finish coated.
Also got five coats of S3 clear on the foredeck and mast partner today. I need to work on lighting for that job because every coat had small flaws from missed areas.
Posted: Sat Oct 25, 2008 10:51 pm
by Biker B.O.B.
Posted: Sat Oct 25, 2008 11:01 pm
by gk108
I'm a little surprised about it, myself.
I need to mention that the top of the DB has just the finish coat of epoxy on it. I used a heat gun on low to make the resin flow out so smooth. It just took a few passes from about 8" away.
Posted: Sat Oct 25, 2008 11:07 pm
by Cracker Larry
I really hope to see more of the small boat crowd. I know they are out there and King's Bay is a fine place for any canoe, kayak, dinghy, etc.
That is for sure. I didn't mean to leave anyone out. Your 15 is sweet
as were others I failed to mention
The location is perfect for the smallest to the largest craft. An 8' pram or a canoe would be a blast at Crystal River. Snorkle with the manatee in the springs, anything that floats is safe there. Fantastic spot. It will be fun to have some blow boats this year.
I'll be glad to tow any sailboats out to open water where they can catch a breeze, as long as they let me sail their boat once
Posted: Sun Oct 26, 2008 9:19 pm
by gk108
Cracker Larry wrote:I'll be glad to tow any sailboats out to open water where they can catch a breeze, as long as they let me sail their boat once
You got a deal
More clear coating today. Knees and oarlock mounts are pretty much done. There's a sag back there on one of the little filler pieces that needs sanding down. Foredeck and dark trim is done. The partner would be, but it also developed a sag. I'll probably raise the stern again before I give it another shot. I have been using just a foam brush to apply the clear coat. So far, the best looking section I've done is the second coat on the underside of the cockpit seats.
Posted: Mon Oct 27, 2008 10:18 am
by gk108
Did I say the knees are done?
This may be due to inadequate surface prep, but I can't say for sure.
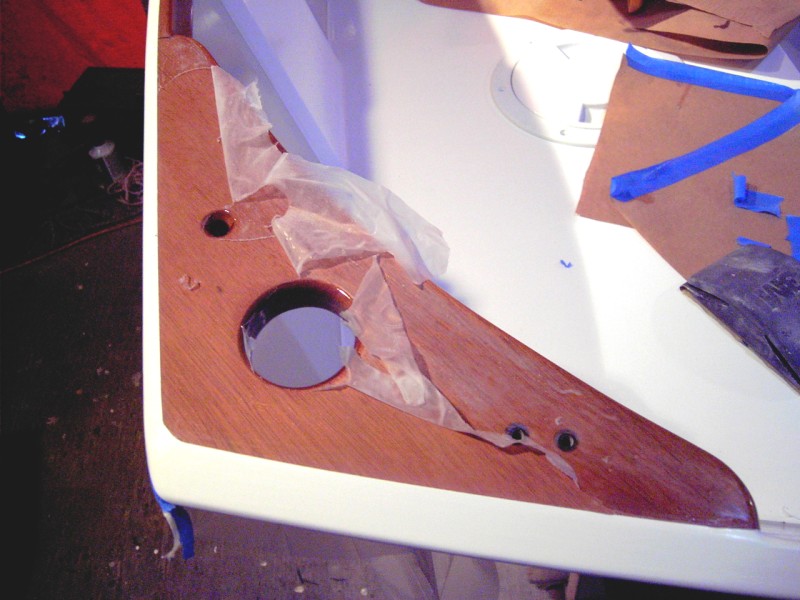
It just peeled right off.

Posted: Mon Oct 27, 2008 10:20 am
by Cracker Larry
Is that S3 clear coat?
Posted: Mon Oct 27, 2008 10:23 am
by gk108
Yes. All 4 coats peeled down to the epoxy. To top that, it looks like the dew settled on what I did last night and most of that coat is ruined, too.
Posted: Mon Oct 27, 2008 10:37 am
by Cracker Larry
Bummer
Posted: Mon Oct 27, 2008 10:58 am
by gk108
Unlike this example, I will be taking corrective action.

Posted: Mon Oct 27, 2008 12:43 pm
by ks8
How did you prep it? What was the weather?
S3 has something they call Clear Coat, and they have Clear LPU... two different products. Which did you use?
That transom finish is amazing.
Posted: Mon Oct 27, 2008 2:21 pm
by TomW
Gary after you answer the coating question, I have to ask what you used to wipe down the mahogany down with prior to coating it. That is definatley not a good thing to have happen, sorry it happened to such a good guy. Keep the chin up.
Tom
Posted: Mon Oct 27, 2008 2:34 pm
by gk108
I think it's residue from the masking tape that I put on there when I did the white paint. That's about all I can think of. It's only the area that was masked off. At the same time I did the clear over the mahogany, I hit the top edge of the transom and it has an excellent bond. The other knee is fine and the holes in this one are OK, so I guess I missed this one. I know that I remember seeing residue lines before I went to work on these. Guess I didn't double-check myself.
Ususally, I just hit it with scotchbrite pad, microfiber tack cloth, isopropyl, then paint. I may try using mineral spirits before the isopropyl.
Posted: Mon Oct 27, 2008 2:45 pm
by Cracker Larry
Hmmm...all I've used for S3 prep is a scotchbrite pad, then water. No alcohol, no MS, no tack cloth.
A problem I've had is all my friends who come over like to touch, and most of them are mechanics and welders and longshoremen who always have greasy hands. I hate to tell them not to rub on it, so I have to degrease when they leave. I use Simple Green for degreasing.
Posted: Mon Oct 27, 2008 4:00 pm
by TomW
Gary, I have always used mineral spirits prior to any finishing, both latex and non-latex finishes and have never had a problem. I use a two rag system one wet and one dry. This is the trick, you want to leave it moist from the first rag, to have the second cloth wipe it dry. It has worked great for the System 3 primer and I'll use it for the WR-LPU also. I use some finishes in my woodworking as expensive as the System 3's so would not want to ruin it or them by using something that doesn't work. Alcohol evaoprates to fast for me, and water and bare wood don't mix.
This is something that goes back to my dad teaching me 40 years ago and something I'm sure he learned from cabinet makers before that.
Also see Dougsters post last Wed or Thur. when he asked the same question. Shine responded to that one.
Tom
Posted: Mon Oct 27, 2008 4:46 pm
by gk108
I did what I had to at work and left early to give it another try. The rest of the clear is still holding fast and looking functional. I read the post about mineral spirits and that's what made me want to try that. It's always been SOP for me to wipe down with it for other paints. I used two rags for both mineral spirits and alcohol. Also added a bottle of Bass ale to the prep process. Things often go smoother that way.
Posted: Mon Oct 27, 2008 6:12 pm
by TomW
gk108 wrote: Also added a bottle of Bass ale to the prep process. Things often go smoother that way.
I knew I was forgetting a step in there somewhere.
Tom
Posted: Mon Oct 27, 2008 7:43 pm
by gk108
I used it on the transom, too. I think I might be on to something here.
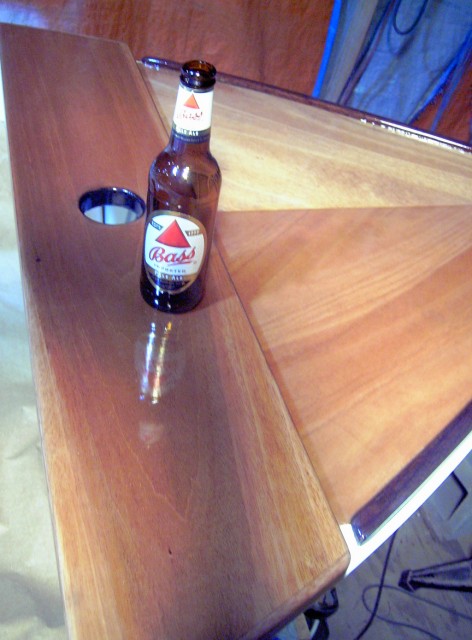
Done with the front
I raised the stern to level the partner a bit more and had no runs or flaws on two more last coats.
Posted: Mon Oct 27, 2008 8:29 pm
by BoH
Wow
Posted: Tue Oct 28, 2008 10:05 am
by gk108
Thanks, Bo.
I didn't take any chances with the cool weather last night. I left a fan blowing on low and two 100W light bulbs in the boat. No condensation or any other funny stuff this morning. Maybe I can grab some time during the warm part of the day to get a couple more coats on the bad knee.
The Taco rubrail kit is going on after the finish is done, but I realized that I need to get the boat on the trailer to install the rubber. Stretching that rubber would pull the little thing right off the stand, so it needs to be held by the bow eye.
Posted: Tue Oct 28, 2008 10:35 am
by Aripeka Angler
Wow
I am embarassed to say I haven't checked on you in a while
Gary the boat looks fantastic
Hope to see this one and Larry's fine rig in the spring....
Richard
Posted: Tue Oct 28, 2008 11:27 am
by gk108
Thanks Richard. Hopefully, we'll see another large crowd of boats. I'd like to see Joel's low rider side by side with a Phantom just to compare.
ks, I didn't forget your question:
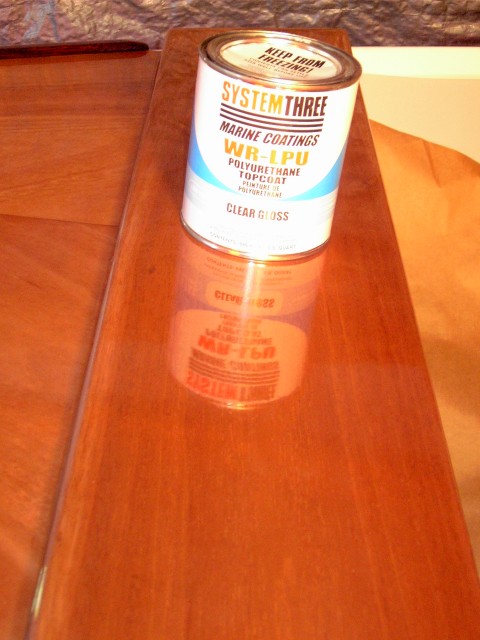
Posted: Tue Oct 28, 2008 12:49 pm
by ks8
Thanks Gary.
I use an acetone wipe on bright finish epoxy sealed wood first... then after it dries, a 70% iso wipe mixed with 50% filtered water. Let dry. Then a 91% iso wipe. But if there is adjacent LPU in the area, you need to be careful with the straight 91% iso as it can soften cured LPU. I haven't had an adhesion problem yet, and I sand prep for LPU with 150 or, sometimes even 220. 320 concerns me about how much tooth it provides. I don't know the equivalent of grit for the various scotch brites.
The V10 is looking fine.
Posted: Tue Oct 28, 2008 6:28 pm
by gk108
I've been sanding epoxy to 220 grit and any paint to 320 grit. It usually takes 2 coats of paint to cover the scratches from 320 grit. The Scotchbrite pads I have are green and brown. The green is more coarse than the brown. Their packaging indicates that the brown is for between coats, but I think that may be for softer paints than the S3 LPU. Comparatively speaking, it cuts about the same as #0000 steel wool on 1 part polyurethane varnish. I've been comfortable with what the green pads give me between coats. They do a good job of removing the sheen and 1 coat covers the scratches pretty well.
No progress today, too cold.
Posted: Tue Oct 28, 2008 7:27 pm
by ks8
So, why then did the clear LPU delaminate/peel? I wonder if it was a combination of the scotchbrite being not quite enough tooth and remnants of Simple Green? In general, water base coating will not have the same bite and grip as solvent based, hence even more care in degreasing and scratching the substrate enough. Let us now how the redo holds up, and what if anything you did differently.
Posted: Tue Oct 28, 2008 9:03 pm
by gk108
I have spent some time looking at the skin that peeled off and I believe I see enough evidence to suggest that it was masking tape residue from the white paint step. They were completely wrapped like this oarlock socket during that stage.
The tape stretched across the holes in the knee and left no residue, hence the clear adhered well inside them. It also adhered to the spacer between the knee and the doubler along with a small area on the adjacent edge of the knee. Most likely, I got distracted and forgot to clean that one knee. The boat wouldn't allow that, though. I'm somewhat amazed at the immediate and dramatic rejection. She already seems to be developing a personality.
Posted: Tue Oct 28, 2008 9:47 pm
by ks8
Posted: Sun Nov 02, 2008 5:07 pm
by gk108
Whew! I'm calling the brightwork complete. I'm glad I got all of that out of my system on a small boat.
Time to move on to the Kiwi Grip. Here's the patches I put in the cockpit area.
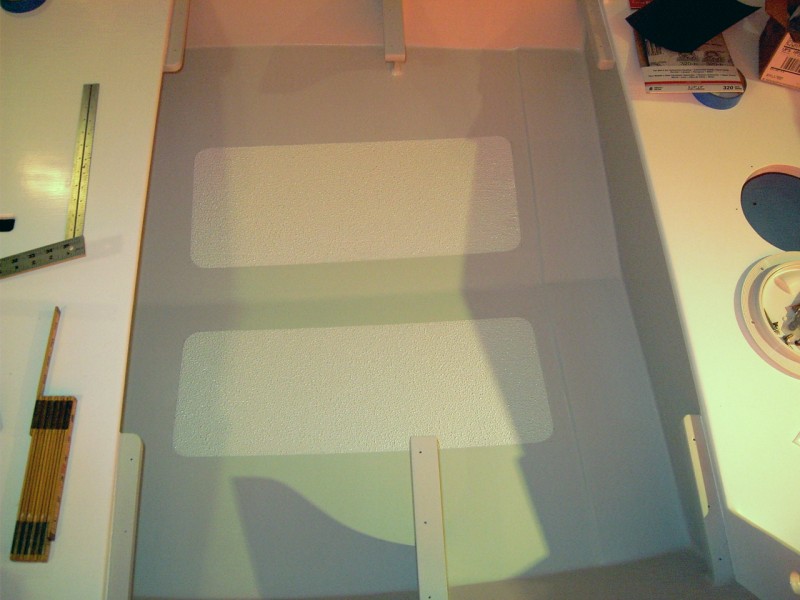
I left a 5" wide gap in the middle for ease of bailing.
Here's the masking for the rest of it.
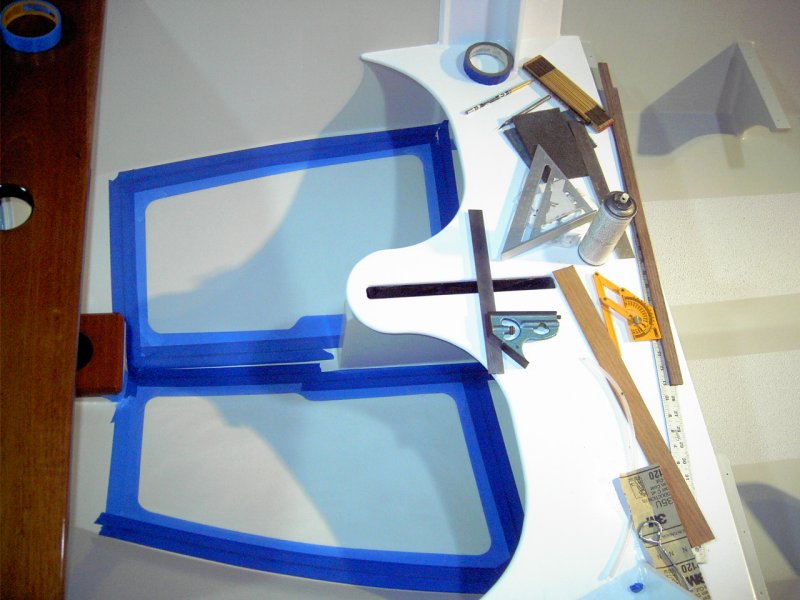
I'm running out of masking tape at about the right time.
And this is what it looks like now.
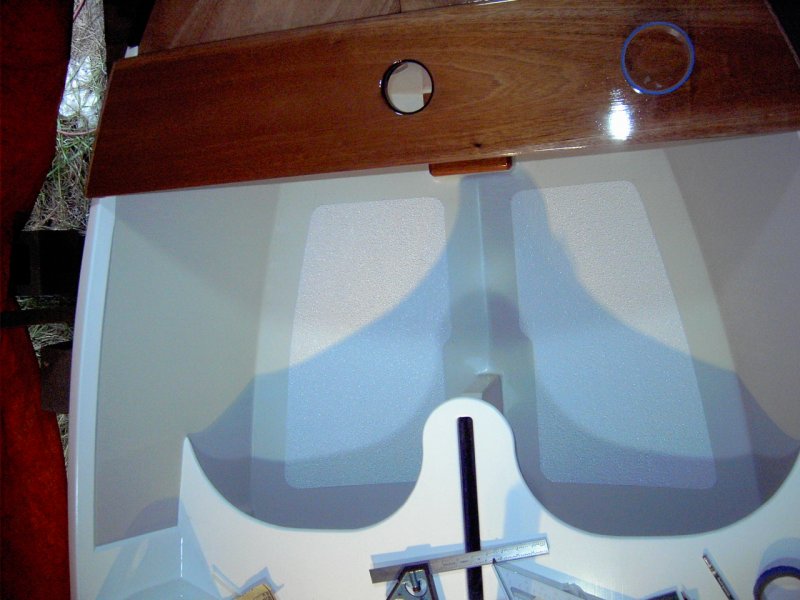
That should give me enough traction to scoot around in the boat. Time to start mounting some hardware.
Posted: Mon Nov 03, 2008 12:09 am
by TomW
Looking good Gary. Can't wait to see her finished
Tom
Posted: Mon Nov 03, 2008 8:56 am
by Cracker Larry
Very nice GK
Posted: Mon Nov 03, 2008 9:12 am
by gk108
Thanks, Tom and Larry. I had a good teacher on the Kiwi Grip.
Now for a question. When I seal/bed the cockpit seats, should I use 4200 or silicone?
Posted: Mon Nov 03, 2008 9:18 am
by flatpicker
Very Nice Gary
Posted: Mon Nov 03, 2008 9:49 am
by Cracker Larry
I've never liked silicone sealer for boats, it just doesn't seem to hold up well. I'd use 4200.
Posted: Mon Nov 03, 2008 9:55 am
by TomW
Yep use the 4200, only time I use silicon is bedding windshields/glass.
Tom
Posted: Mon Nov 03, 2008 10:08 am
by Biker B.O.B.
I see only one problem, I'm no longer amazed. I've now come to expect this level of quality in your build. Every following detail us just the next logical step in this high quality build.
However, it does give me some high standards to shoot for...
... and likely fall short of.
Posted: Tue Nov 04, 2008 8:51 am
by gk108
OK, I polished up the screw heads and installed the cockpit seats with a little dab of 4200 over each of the screw holes under the seats.
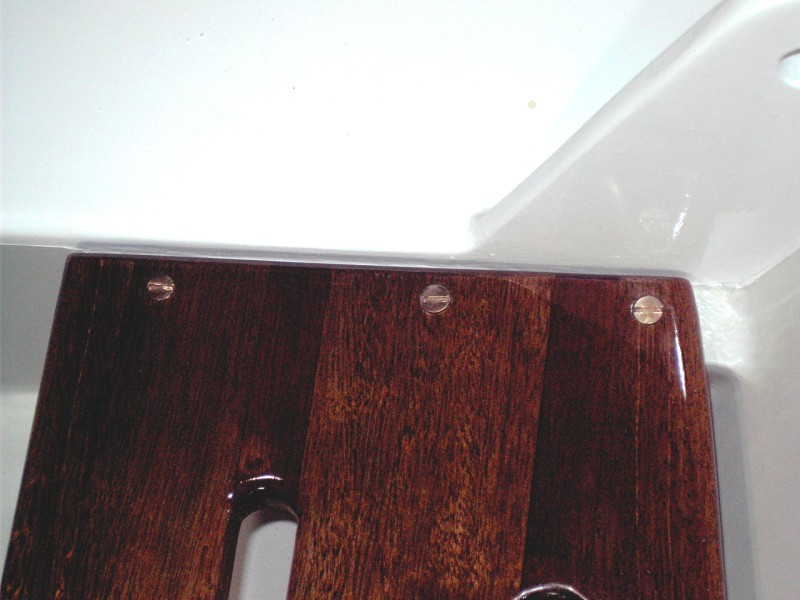
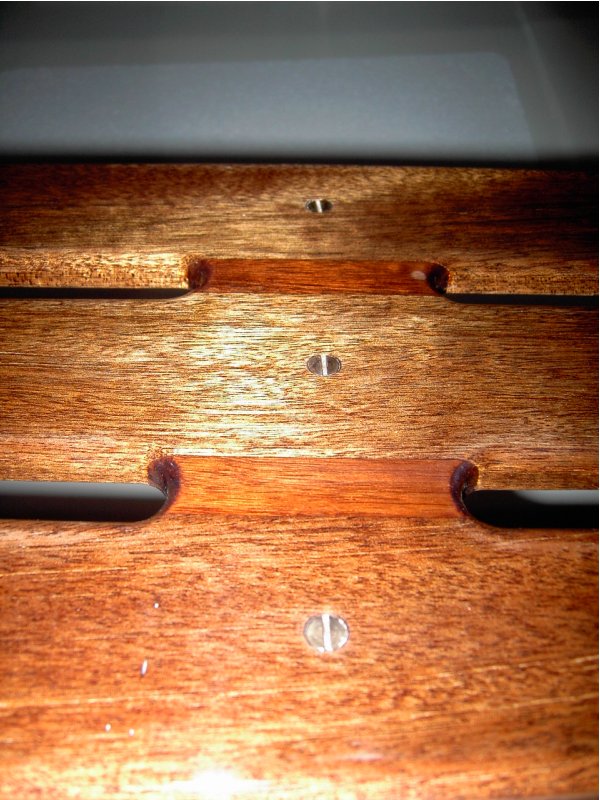
All the slotted screws finish with their slots running athwartships.
Then I drilled screw holes in the rudder and fastened the gudgeons and pintles loosely. After that, I put a little 4200 on the back side of each gudgeon, hung the rudder and pulled all the screws down snug to position everything where the rudder swings freely. Then I removed the rudder and pulled one gudgeon screw at a time, applied 4200 and replaced it.
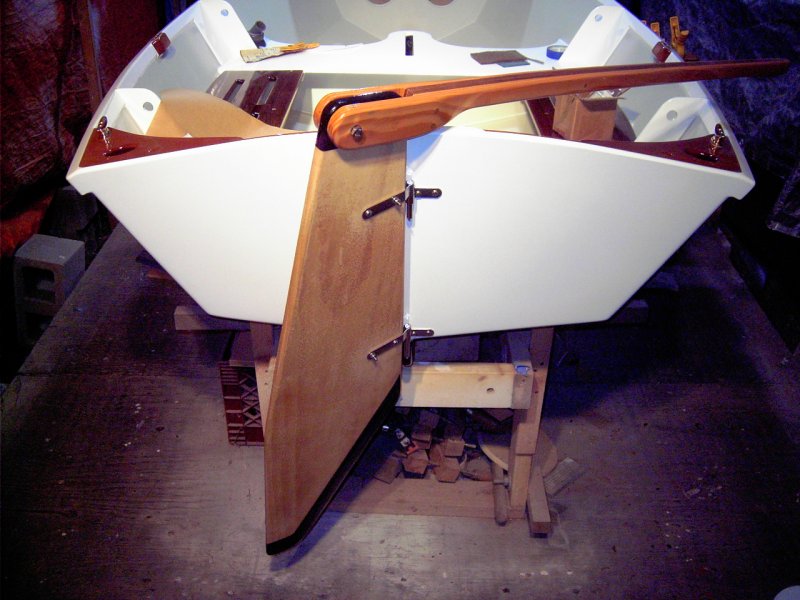
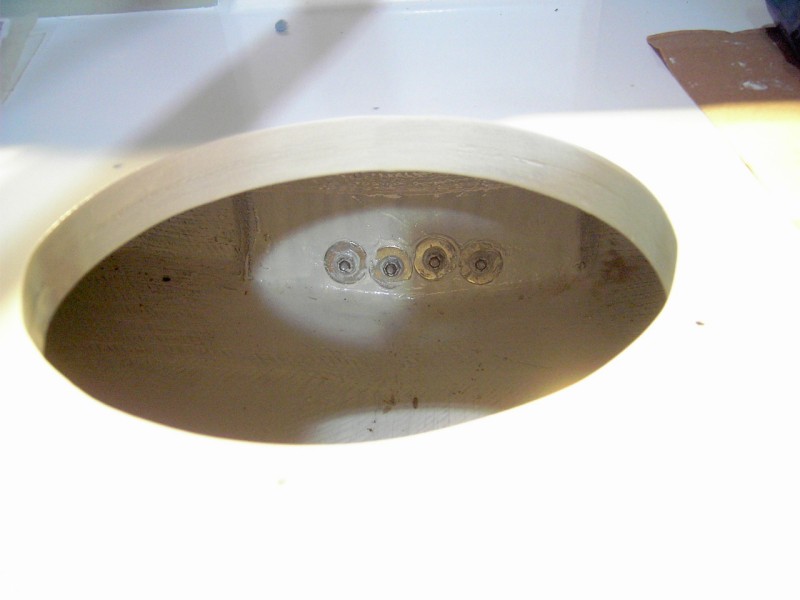
Also installed the rear mooring cleats.
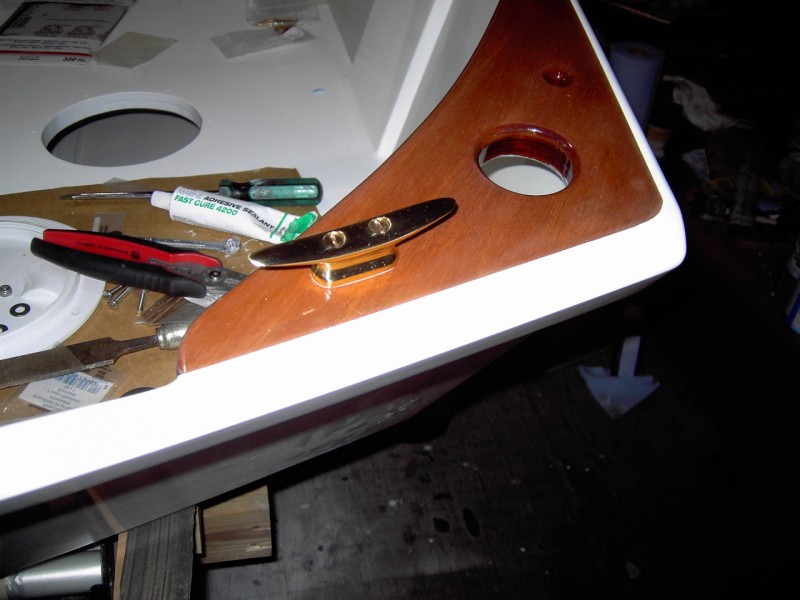
The red handled wire strippers also have a screw cutter built in to them. I cut the excess length from the screws on the cleats and upper gudgeons and filed the burr off.
Getting closer. With the gudgeons mounted, she could float right now.
Posted: Tue Nov 04, 2008 9:38 am
by Cracker Larry
Polishing screw heads
Dang GK, kicking it up another notch
Beautiful work Gary, I love it
Posted: Tue Nov 04, 2008 10:10 am
by davekf
That wood finish is BEAUTIFUL! I can't wait to see this baby on the water!
Posted: Tue Nov 04, 2008 3:59 pm
by TomW
Yea what is this polishing screw heads, you showing us all up again and raising the bar again. Arghhhh!!!!!!!!!!!
Tom
Posted: Tue Nov 04, 2008 5:59 pm
by topwater
Gk the boat looks awsome....
Lets see maybe i could polish my aluminum trailer to a chrome
like finnish................
you guys are killing me
Posted: Tue Nov 04, 2008 6:36 pm
by donk
GK , that sure is one snazzy little boat.
The last time I lined up screw heads was in freshman shop class and then it was required. Nice touch. I can't remember the last time I used slotted screw heads, prefer the squar drive myself.
don
Posted: Tue Nov 04, 2008 7:37 pm
by Cracker Larry
I did line up all my screwheads, but I forgot to polish them
Posted: Tue Nov 04, 2008 11:07 pm
by ks8
I made sure the grain on the dowels in the rubrail trim didn't line up... so they would show. Does that count?
Great job Gary! I was debating about cleats where you've got 'em... minimal chafe... easy accessibility... but I put them under the knees instead and run the dock line up through the hole in the transom knees. I wanted to be able to lean or sit on the knee, and climb over the transom from the ladder, but now I have the chafe issue to watch through the hole.
Your cleats are a nice detail there and very accessible. Shiney! Great finish on the knees too (glad to see the LPU stuck this time
). Real nice all around. How and where are you going to fly the flag?
Got the Hull ID yet? Splash date?
Posted: Wed Nov 05, 2008 5:43 pm
by gk108
Thanks everyone. I wasn't trying to raise the bar. Really, I'd rate it at about a 7½' finish. You guys that fish spinner baits understand how distracting a few bits of shiny metal can be.
I just want it to age in a uniform manner. Polished cleats, rough cast oarlock sockets and mill finish screws just didn't match, but now it all does.
I pondered hard and long about the rear cleats. I finally decided that accessibility trumps everything else. I want to be able to lasso those things if I need to.
I still have the Taco rubrail to put on it and some other minor things, but she should be floating within a fortnight.
On the trailer today.
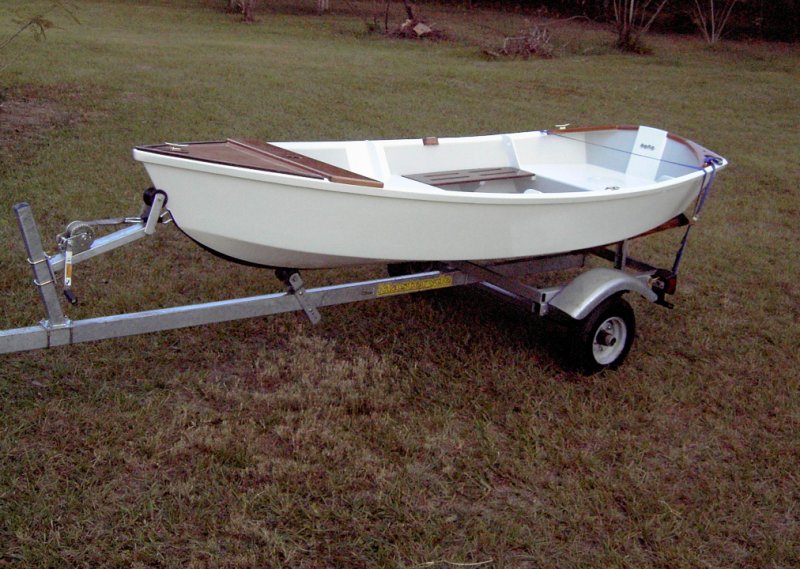
Posted: Wed Nov 05, 2008 7:35 pm
by ks8
gk108 wrote:I pondered hard and long about the rear cleats. I finally decided that accessibility trumps everything else. I want to be able to lasso those things if I need to.
I know what you mean. I do have the transom towing ubolts if I need to very quickly run a line through... else they will be used for the water skiiers...
Do we get to see another picture with the spar and sail rigged, soon?
I still need to clear LPU the transom and get the drain tube and bow hook bedded with 4200, so you should have no trouble beating me to the water... I'm doing dentistry on one of the bow eye holes now...
You've got one neat little package there.
Posted: Wed Nov 05, 2008 9:00 pm
by Cracker Larry
I pondered hard and long about the rear cleats. I finally decided that accessibility trumps everything else. I want to be able to lasso those things if I need to.
Excellent thinking. I'm looking forward to seeing her sail, and hopefully even sailing her
KS, it's not that far from Raleigh down to Crystal River, you should come down and join us in April. If Tom ever finishes his wife's Mirror
, he's bringing it and yall can have a 3 blow boat regatta.
Oh, I made sure the grain on my screw plugs didn't line up either, seemed a lot easier that way
Posted: Wed Nov 05, 2008 10:16 pm
by gk108
I tried to cross the grain with the dowels on my tiller. They are some kind of dark oak dowels and the end grain is funny looking, so it's hard to be sure about them.
Both mast and boom are still in raw form and need to be cut to length, finished and fittings attached. Crutches need to be designed and fabricated. Appendages need clear coating and other details. Lots of work.
I'd like to see Measure Of Faith in CR, too. I'm not sure how I'd do in the regatta. Those two boats could probably gang up and blanket my wind from the other side of the course.
Larry, you can sail her any time. After I get a little time in her, I'm going to try and get jbo to find the right place on Chehaw to put her in, then see if we can get him thinking about camp cruising in an AD14 with a tabernacle. And I guess flatpicker and I will just take her down to Miccosukee some time.
Posted: Thu Nov 06, 2008 9:07 am
by flatpicker
gk108 wrote: And I guess flatpicker and I will just take her down to Miccosukee some time.
Sounds good to me. I'll bring the cold beer!!. I wonder if she'll fit in a duck blind
Posted: Thu Nov 06, 2008 9:46 am
by TomW
Gary she looks nice on that trailer. Larry took time out to clean and insulate the garage so Mirror delayed, back to work on her today. Final QF patches to sand, then rub rails then final primer.
Tom
Posted: Mon Nov 10, 2008 11:12 am
by gk108
flatpicker wrote:I wonder if she'll fit in a duck blind
Funny that you should mention that. They just outlawed and removed the permanent duck blinds in N.Fla. lakes. According to the paper, most of them were removed from Miccosukee last week.
Posted: Mon Nov 10, 2008 11:57 am
by flatpicker
That's what I hear. I've hunted both Miccosukee and Iamonia most of my life, and they have been trying to pass this law since I can remember. Sounds like it has finally happened.
I'll be doing a lot more fishing this time of year than normal.
Posted: Mon Nov 10, 2008 4:31 pm
by mecreature
Lookin pretty sweet gk...
Posted: Tue Nov 11, 2008 2:49 pm
by gk108
Starting to work out the rigging.
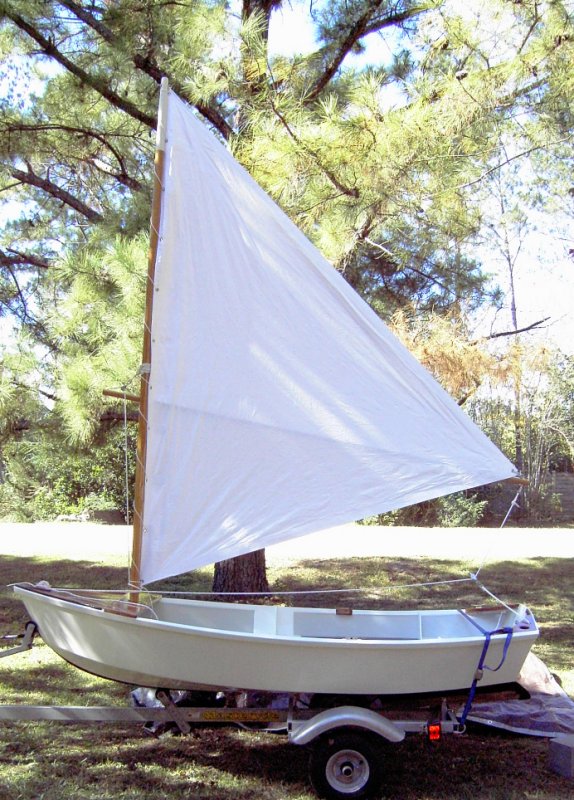
Posted: Tue Nov 11, 2008 7:10 pm
by jbo_c
I'm all for a trip on Chehaw(still Lake Worth to me), but it may be boring. There isn't really enough lake there. If you haven't ever been, it's really only river channel and stump-filled flats, no real lake. But maybe you know something I don't.
Blackshear should be good, but they just drained it, so you've got a month or two to finish.
Otherwise, you tell me where and when and I'll try to get there for a ride. I'd love it.
Jbo
Posted: Tue Nov 11, 2008 8:50 pm
by gk108
Probably be best to wait for Blackshear. She's about ready to splash under oar power, but the sailing attachments still need finish work. Cool weather is getting in the way of that kind of stuff.
Posted: Sun Nov 23, 2008 7:47 pm
by gk108
The Taco rubrail is finally on, mostly.
It wasn't too much trouble, I just had to make a plan and it all fell into place. Here's what it looked like after I soaked it in hot water and stretched it out along the port side.
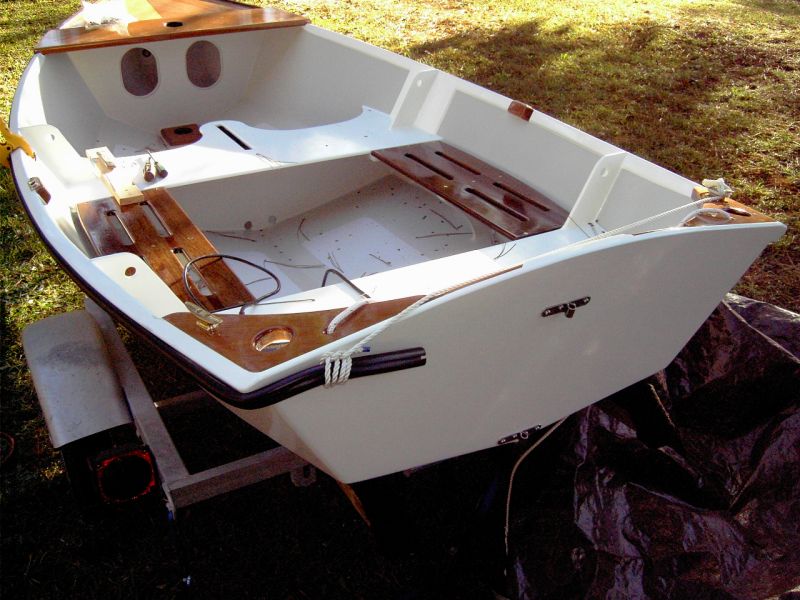
The bow was contoured and rounded a little to allow the rubber to bend easily. I bought the Taco kit months ago while the boat was unpainted, so I could get an idea of what I had to work with.
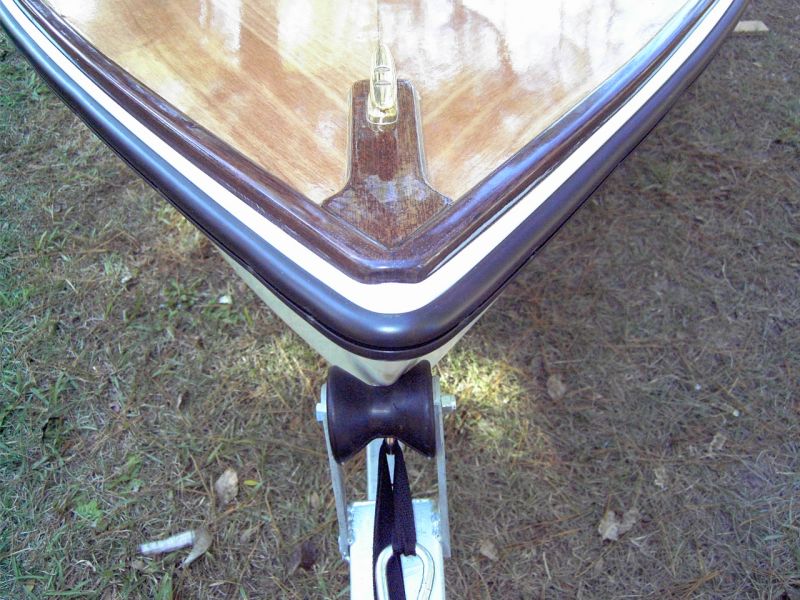
The transom corners are not all that rounded, but the heat gun and a couple of screws did the trick.
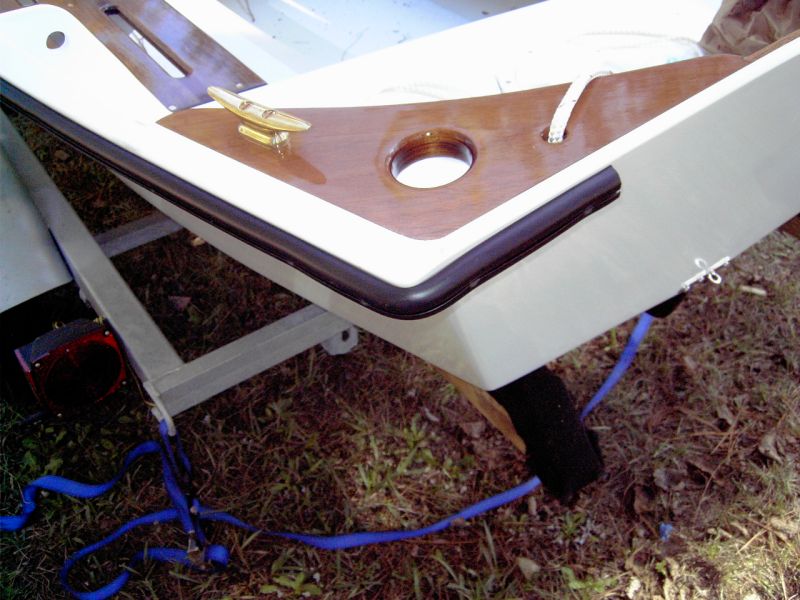
I opted for the black insert because all of the white ones I've ever seen get really nasty looking as they age. I still haven't put the insert in because the end caps use a smaller screw than what is supplied. It's not real pretty, the screw heads boogered up the rubber almost every time. This is the smallest size rubrail and the screw heads are a good bit bigger than the outer edge of the slot. I tried soapy water and all that, but it still left marks. The black insert should help hide some of it.
Posted: Mon Nov 24, 2008 8:37 am
by Cracker Larry
Looks great GK
I wish I could have got my bow as nice as yours, but we know how for next time. That's first class
My rubrail was the largest size, but I had the same trouble as you with the screw heads. The screws provided had a head much larger than the slot. I put 3 of them in my pattern pieces and buggered up the rail with each of them. I could see this wouldn't work out, so I went to the hardware store and bought 200 #12 panheads that would just clear the slot. Much better results
Those end caps they supplied really suck, don't they?
Posted: Mon Nov 24, 2008 9:04 am
by gk108
Cracker Larry wrote:Those end caps they supplied really suck, don't they?
You must have read my mind. Right now, I'm wondering if I should spend the winter whittling some caps out of mahogany. I'm really happy about the fact that I didn't drill all the way through the laminated wood for any of the screws. There were a couple of areas where I had to get 1" long screws to accomplish that. Even though their heads were smaller, they still left their mark on the rubber. I guess I'll have to run into some docks and stuff to make all the bad spots look natural.
Posted: Mon Nov 24, 2008 9:14 am
by Cracker Larry
I'm really happy about the fact that I didn't drill all the way through the laminated wood for any of the screws. There were a couple of areas where I had to get 1" long screws to accomplish that
That was the other problem with the factory supplied screws, they were 2 1/2" long and my rail is only 1 1/4" thick
And I sure didn't want 200 screw points sticking through
I've also thought of either whittling or maybe casting some decent end caps. I was thinking maybe a mold and cast them with graphite/epoxy mix.
Posted: Mon Nov 24, 2008 9:24 am
by gk108
Posted: Mon Nov 24, 2008 10:08 am
by Cracker Larry
I can help you there
I've got some powdered copper, just as fine as the graphite. It will cast to a bronze finish. I'd be glad to send you some.
Posted: Mon Nov 24, 2008 10:39 am
by ks8
Just saw the pictures Gary. Looks good!
Posted: Mon Nov 24, 2008 9:20 pm
by gk108
Larry, I think I'll go for it. I'll email you with an address. I have a small kit of hobbycast silicone for the mold on the way. I just need to work out the mold pattern.
ks, are you going to put a rubber bumper on the CV16?
Posted: Mon Nov 24, 2008 9:50 pm
by Cracker Larry
You've got it GK. I think I have your address from your card. 623 spammer St.?
Posted: Mon Nov 24, 2008 10:11 pm
by gk108
That's the one.
Making another batch of those cards is on my list of things to do this week.
Posted: Tue Nov 25, 2008 1:42 am
by ks8
No rubber bumper gk. Just the wood and some fenders when needed. That's why I added the rubrail trim. I've added enough weight.
Posted: Tue Nov 25, 2008 9:11 am
by Cracker Larry
Gary, what's your last name?
Posted: Tue Nov 25, 2008 10:05 am
by gk108
Send it to Gary Keller.
I've been looking at what I can use for a pattern. I'd like to use a pattern that will work for both sides, so I don't have to make two molds. Either a five point star or an eight point compass rose seem like good choices so far.
Posted: Tue Nov 25, 2008 10:07 am
by Cracker Larry
I'll get it out today Gary. I've always been partial to compass roses
Posted: Tue Nov 25, 2008 11:18 am
by ks8
Pictures please...
Posted: Tue Nov 25, 2008 11:32 am
by gk108
Cool.
I think a compass rose might be the easiest shape to obtain and build into the pattern. This small rubrail limits what I can use. I'm off to the hardware store to tool up.
Posted: Tue Nov 25, 2008 11:36 am
by gk108
ks8 wrote:Pictures please...
Of course
Posted: Tue Nov 25, 2008 1:37 pm
by Cracker Larry
Package is in the mail
Posted: Sun Nov 30, 2008 2:28 pm
by gk108
Well, it's looking more and more like the S3 paint isn't the product for my boat. All it took was a little bit of rain water standing in it overnight for the finish to bubble up. It won't last long like that.
Posted: Sun Nov 30, 2008 2:32 pm
by topwater
Wow that doesn't sound good
I would have thought it would last longer than that.
Posted: Sun Nov 30, 2008 2:40 pm
by gk108
Fortunately, it's a small boat. I'm going to let it wear as it will and see what happens.
Posted: Sun Nov 30, 2008 2:52 pm
by TomW
Gary out of curiosity, how long had it been on before it got wet? I'm using it on the Mirror so you cause me some concern now.
Tom
Posted: Sun Nov 30, 2008 3:55 pm
by flatpicker
Sorry to hear that Gary. Sort of curious like TowW about how long it had to cure?
Still sanding here

Posted: Sun Nov 30, 2008 4:02 pm
by frazoo
WOW!
What a beautiful boat!!
frazoo
Posted: Sun Nov 30, 2008 4:14 pm
by gk108
It's been over a month. Plenty of time to cure. Right now, it's just tiny little blisters that feel more like a light sprinkling of non-skid grit. It's still firmly stuck to the boat, no peeling, and I tried. The most troublesome thing is that the exposure to water didn't amount to any more time than a weekend at the beach would have given.
Posted: Mon Dec 01, 2008 12:50 am
by TomW
This is a bummer Gary. Well I have the paint to put on this week so we'll see what happens. I also have the clear coat to go over that so maybe it will halp.
Tom
Posted: Mon Dec 01, 2008 9:42 am
by gk108
When I sanded for the Kiwi Grip, I saw just how much paint buildup I had. It's plenty thick enough. I'm wondering if this is because I thinned the last coat too much or something. I guess the best remedy for now is to get a tarp that doesn't leak.
Cyber Monday calls....We set another new record for sales on Saturday and the order fulfillment dept went to Cancun for a few days. There's a backlog of around 700 orders to ship and it's steadily growing. It has to be caught up by Wed., so you know who has to wear a different hat today.
Posted: Mon Dec 01, 2008 10:15 am
by Cracker Larry
Business sounds great
You've got me concerned about the S3 paint also. Mine hasn't been wet except for a few hosings. It has had water standing overnight a couple of times. No problems yet but she's got to move outside this week. You'd sure think marine paint would be waterproof
I wish I hadn't used it at all. 5 coats of topcoat and it still looks like primer compared to the Sterling. No more for me.
Posted: Mon Dec 01, 2008 12:25 pm
by ks8
So far it has held up well in the garage...
With reports from others of two weeks in the water with no problems, this sounds odd. Sounds like S3 definitely needs some way of keeping the cockpit overall dry.
You thinned with only water, right? Was it distilled or filtered water? Or from the tap? What was used for surface prep wipedown? Just covering the basic questions. I don't like cleaning up with soap and water unless I get OCD about rinsing every bit of soap out of containers and brushes.
Have a *fulfilling* week Gary. What are you fulfilling?
Posted: Mon Dec 01, 2008 5:09 pm
by mecreature
I have left my D15 out for weeks it drains out the back but some sit till its sponged... not a problem I can see.. Its up for the winter covered in the garage now though..
bummer GK... that sure is one nice V10..
Posted: Mon Dec 01, 2008 6:25 pm
by gk108
Larry, I got the copper powder today. That stuff should look good! I owe you one, or maybe two.
Still working on a pattern. Someone suggested a few other possibilities like sand dollar, scallop shell or starfish. It may take a trip to the coast to find something suitable.
ks, I used filtered well water to thin. A little high in dissolved calcium carbonate, but otherwise quite pure. On these areas, I cleaned with a water/alcohol mix most of the time. No soap because I don't think I could adequately rinse it away. No mineral spirits, but maybe I should have??? I always sanded and cleaned right before painting to minimize any exposure.
I don't know what to think now. Some of the places have dried out and smoothed back out like nothing happened. I already know of a few "good for me" boat paints, so I thought I'd try this on a little boat and see what it is all about. The data is still incomplete. I can tolerate what I have. The data will be complete when it gets to the point that I decide it's time to repaint.
I may look into installing an autobailer just for a drain while sitting. I'm not sure if a V10 goes fast enough for an autobailer to actually auto bail.
What are you fulfilling?
We're down in this little niche.
http://www.newremotecontrol.com/index.htm
The travellers made it back this evening. I'm glad. They are, too. The Gulf was rough riding this weekend, even on a cruise ship.
Posted: Wed Dec 03, 2008 9:31 am
by Cracker Larry
Larry, I got the copper powder today. That stuff should look good! I owe you one, or maybe two.
Glad you got it OK. That's exactly what I had it for was to try some inlays, but haven't got to it yet.
I like being owed
Posted: Wed Dec 03, 2008 11:06 am
by gk108
Inlays! That would work quite well. I have to work up some turn buttons for the oval hatches in the front. Now I know how I'll dress them up.
Posted: Fri Dec 12, 2008 10:14 am
by Cracker Larry
Any progress report on that casting GK
Posted: Fri Dec 12, 2008 6:43 pm
by gk108
I'm just about tooled up for it. The instructions for the silicone product just barely mentions bubbles and suggests restraint while mixing and brushing on a coat before pouring the rest over the pattern to prevent them. From past experience, I know that this won't work. Mixing the two parts will require something on the end of a drill. A viscous product like uncured liquid silicone rubber will trap a LOT of air that way.
In the factory, we used a lab grade vacuum pump and bell jar to pull a vacuum on the liquid after it is poured directly on the pattern. Divers know about Boyle's Law: For a fixed amount of an ideal gas kept at a fixed temperature, P [pressure] and V [volume] are inversely proportional (while one increases, the other decreases). Drawing a substantial vacuum on the uncured liquid silicone will cause even the smallest bubbles to expand the the point that Archimedes Principle forces them to the top, away from the actual mold cavity.
Instead of the heavy duty vacuum apparatus, I ordered a small hand operated vacuum pump from Harbor Freight and it just got here. Now, I have to fabricate a suitable vacuum chamber, probably a modified Rubbermaid product.
At the factory, we normally poured the epoxy casting compound and just let it cure. For some of the abnormal projects that I used it on, I would also subject the filled mold to a vacuum. That always seemed to make a denser part with excellent details.
I've consulted my dad, who is the expert on pattern making for this process, and he advised that anything from the original part that could be incorporated into the new pattern would really cut down on the pattern making time.
Time is a big factor for me right now. I need an extra day in the week, especially this week.
Somebody went and published TWO new boat designs that I
had to study.
Pattern making should commence next week.
Posted: Sat Dec 13, 2008 12:44 am
by ks8
I've also seen where the mixed rubber is put under the vaccum first, before the pour, to bring all the bubbles out before the pour. But I'm by no means the mold master. Take pictures during the project, of course.
That is... when you can pull yourself away from the study plans...
This may help... look at the sheet count on the GS. Surely worth it, but wow, it adds up fast as the boats get longer!
Posted: Sat Dec 13, 2008 10:28 am
by gk108
The GS28 looks to me like it would be the one to build if you wanted a six pack charter fishing boat on the Gulf. One captain that I know spent the summer operating at mostly break-even level just to keep the business going during the $4/gallon gas prices. I can see where the GS would give him a break because of its lighter weight and lower HP requirements. It's not the boat for me, though.
The MM21 looks interesting and it's definitely closer to what I'd want. The way Ross built his HMD18 really helped keep it at the top of my list, too. I'll give myself a year or so to make the decision.
No promises, but if the weather is nice tomorrow, I may splash this boat.
Posted: Sat Dec 13, 2008 10:56 am
by Cracker Larry
No promises, but if the weather is nice tomorrow, I may splash this boat
Are you whispering in hopes the weather gods won't hear
Should be OK, but I'd try to avoid a capsize without a wetsuit
Hope it goes well.
Interesting stuff about the mold making, I've got no experience at all in that, but I'm pretty good at molding epoxy in the shape of plastic cups.
Posted: Sat Dec 13, 2008 12:05 pm
by TomW
Good luck Gary!
Tom
Posted: Sat Dec 13, 2008 1:01 pm
by ks8
Don't forget the camera.
Posted: Sat Dec 13, 2008 6:57 pm
by topwater
Easy KS
Posted: Sat Dec 13, 2008 8:55 pm
by ks8
ok.
Posted: Sat Dec 13, 2008 8:59 pm
by gk108

Camera
Posted: Sun Dec 14, 2008 8:36 pm
by gk108
OK. I'm trying to find the reset button. All the various dieties and devils conspired to get in my way today.
Posted: Sat Dec 20, 2008 5:19 pm
by gk108
I love it when a plan falls in place.
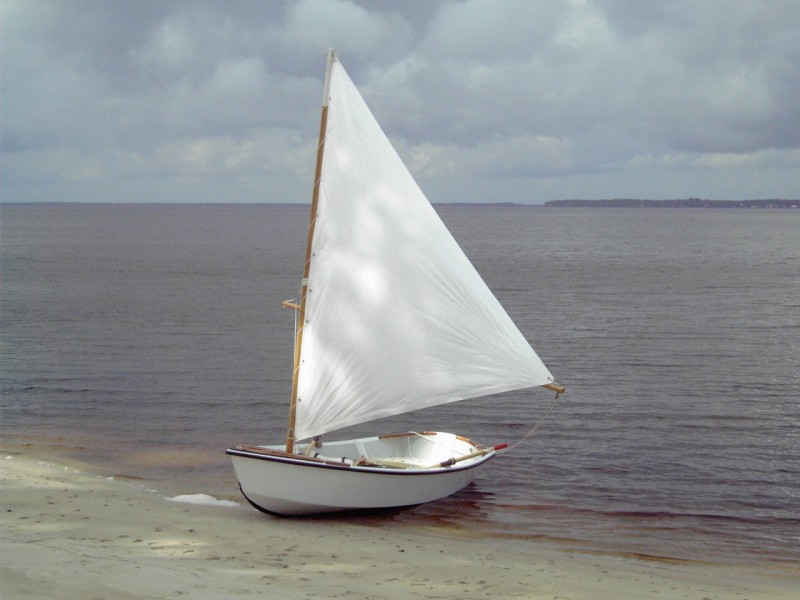
I took her down to the Ochlocknee Bay and enjoyed a perfect day for splashing a little boat.
She'll pinch up to about 35° off the wind, run downwind like she's on rails and top out at 4.8 mph on a broad reach. The tyvek sail performs much better than I thought it would. Balance isn't perfect, but not far from it. I crossed the bay 4 times while giving her a good test. Plenty of spray over the bow and green (brown) water over the side a couple of times.
Best of all, she gave me an afternoon of 100% fun. What a fine boat the V10 is
Posted: Sat Dec 20, 2008 5:48 pm
by ks8
Looks like she's grinning in that picture too! Beautiful!
Posted: Sun Dec 21, 2008 8:25 am
by cape man
She'll pinch up to about 35° off the wind
Good performance for a 10' boat! Ochloknee Bay... If it's the same bay below the border in Florida, fished there 30 years ago while going to school. Nice place for a boat like this. She's a beauty! Congrats on the launch.
Posted: Sun Dec 21, 2008 9:25 am
by gk108
Thanks, ks and Craig. I'm still smiling about it, myself.
Craig, that's the place. You may remember the landing on the West side of the bridge. It never really has been maintained, so it's more like a beach launch. The bridge has been replaced since the '70s. It's in the same place as the old one, only with a hump in the middle. I stayed inside of the bridge because I didn't want to find out what the wind was doing as it went through the pilings.
Not much forward progress at 35° off the wind, but even at 2 mph, it's enough to allow me to maneuver. Sailing the O'Day has made me a little lazy and I don't get real concerned about sailing directly to a mark. Each trip across the bay, I was able to sail the V10 right back to the landing without any trouble.
The only major adjustment that I can see is lowering the attachment point for the snotter. No problem, since it is a temporary lashing right now. Once I find the right spot, I'll do something more permanent.
Posted: Sun Dec 21, 2008 12:13 pm
by topwater
Gk looks awesome
you have to get some in action pic's.
Posted: Sun Dec 21, 2008 4:20 pm
by Cracker Larry
Congratulations on a happy launch, GK. She looks real good on the water
Posted: Mon Dec 22, 2008 12:59 am
by TomW
Gary she looks good guy. Quite a nice boat you have and a pretty place to sail her also.
Tom
Posted: Mon Dec 22, 2008 9:31 am
by Biker B.O.B.
Wonderful job, Gary. All you efforts really show now. And seeing your completed boat compared to my first completed boat, I can really see the benefits of taking more time to do everything right. Can't wait to see some "action" shots.
Thanks for all your inspiration.
Posted: Mon Dec 22, 2008 10:44 am
by gk108
Thanks, guys. We'll have some pictures soon enough. All it takes is another weather/work window.
Most of my inspiration came from folks that hang out in this forum, so anything that helps is only paying back. There's still a lot to be finished on this boat. I've been doing some preliminary stuff with the epoxy casting to test my method. Nothing to show yet, but slow progress is being made.
Posted: Mon Dec 22, 2008 10:45 am
by steve292
Nice boat GK, just great
Posted: Mon Dec 22, 2008 11:11 am
by Dimitris
Very nice. Post more photos please.
Posted: Mon Dec 22, 2008 11:29 am
by donk
GK, you done good. It looks real nice on the water.
Posted: Mon Dec 22, 2008 4:25 pm
by mecreature
very nice GK.. she does look like fun..
Posted: Tue Dec 23, 2008 11:47 am
by flatpicker
Nice Gary. She sure looks good!
Posted: Tue Dec 23, 2008 12:09 pm
by ks8
Did you do anything when constructing the sail, in order to put some shape in it? Maybe start another thread just to show the sail construction?
Posted: Tue Dec 23, 2008 4:46 pm
by jbo_c
How about that? I must've been out when you called to see if I wanted to ride.
Jbo
Posted: Wed Dec 24, 2008 12:49 am
by gk108
jbo, I sure didn't want to subject you to this unproven rig.
ks, check out page 1 of this thread.
It's just a flat sheet of tyvek with some camber in the luff. The sail did stretch some body into itself as I used it. The tape around the edges is heavy enough that it has no stretch. The overall effect in a 10 mph breeze made the sail look like it had a very tight leech line with more fullness aft than what is best in 10 mph wind. Instead of spilling wind, it just tends to make the boat heel more. Lowering the sprit should make it have less tension on the leech and more on the foot, so maybe it will cup less and spill more.
Posted: Wed Dec 24, 2008 3:08 am
by ks8
Forgot about page 1. That was awhile ago. ... ok... not as long ago as my page 1.
Obviously, the hull isn't drawn right, but the basic dimensions are to scale.
That would be great if the camber moves forward or if you can flatten it more for close hauled. And then see how long it can last in the sun and wind. Please let us know how it shapes when you reposition the sprit. Excellent that she sails well with it as is.
Total cost for the sail?
Posted: Wed Dec 24, 2008 10:18 am
by gk108
Total cost for the sail?
Right around $60 for materials for the whole thing. I'd say cost is comparable to a polytarp sail. 1 lb 3 oz is all that it weighs and most of that is around the edges.
Posted: Sat Jan 03, 2009 10:48 pm
by gk108
I made some crutches for the spars, since the mast is too long to fit in the boat.
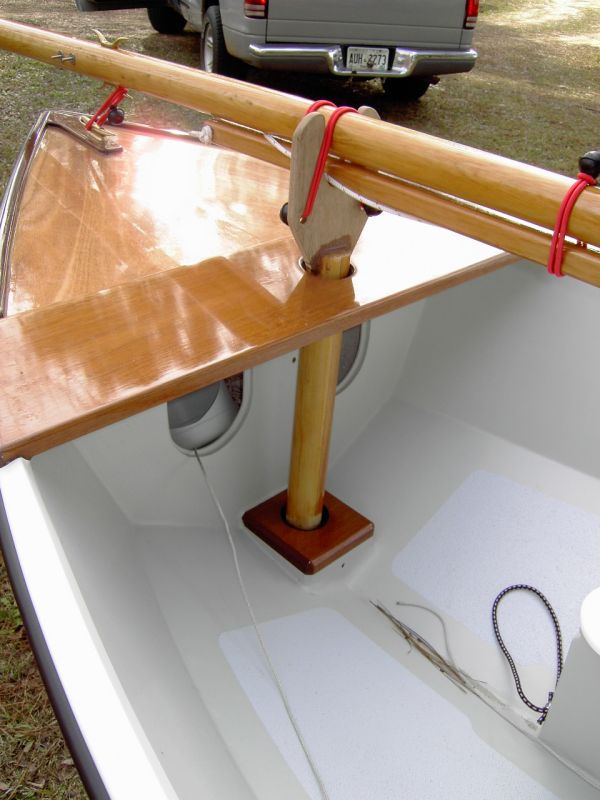
This one is made from the extra length cut off of the mast.
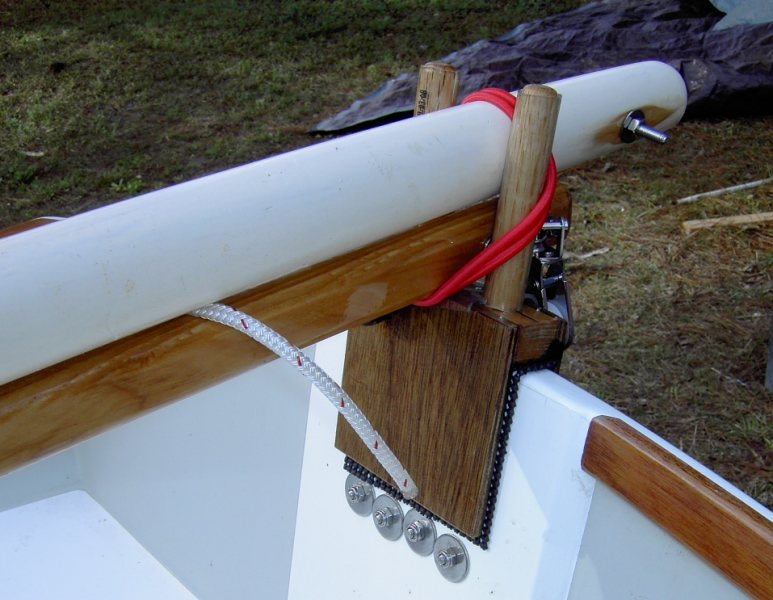
This one is made from the extra length cut off of the daggerboard trunk. It has clear vinyl tubing over the dowels. Rolling the snotter around the sprit provides enough cushion between the sprit and mast to prevent chafing.
Posted: Sun Jan 04, 2009 1:13 am
by ks8
Nice! That first picture is the best I've seen that shows the great job you did on the finish, out in the light of day.
Posted: Sun Jan 04, 2009 5:32 pm
by gk108
Just to make sure all aspects of finishing are done wiht unfamiliar products, I've switched to Minwax Helmsman spar varnish in a
spray can. The transom crutch is varnished in the pictures and now the other one is, too. This practice helps develop a scheme for varnishing the spars. It looks like I'll hang the mast horizontally and spray the whole thing at once.
Yesterday, when I sealed the front crutch with epoxy, I mixed graphite with the leftover resin and coated the foot of the mast and the area where it contacts the partner.
Do you think Mjöllnir would be too much of a name for a little V10 to live up to?
Posted: Mon Jan 05, 2009 6:37 pm
by jbo_c
Looks great. Still hoping to get my first ride in a sailboat from you when this frigid January weather breaks.
Jbo
Posted: Mon Jan 05, 2009 7:22 pm
by ks8
gk108 wrote:Do you think Mjöllnir would be too much of a name for a little V10 to live up to?
Sounds dangerous. Let's see... Glen Ford and John Wayne both were in movies where their previous reputation as fast guns drew an endless string of young upstarts to fight and try to claim the title of the one who killed the bested the best. A name like Mjöllnir sounds like it might attract or invite challenges at an entirely different level, especially if you are in the habit of whistling while you sail. That, and not many will even know how to pronounce it.
Posted: Mon Jan 05, 2009 7:36 pm
by D2Maine
nm
Posted: Mon Jan 05, 2009 8:00 pm
by gk108
Looks great. Still hoping to get my first ride in a sailboat from you when this frigid January weather breaks.
Yeah, the weather has been almost intolerable.
Naturally, the best looking days are the ones that I have to spend at work. Yesterday was perfect, but I had to deal with a recording session that turned out to be more of a rehearsal than anything else. I can record over the tape, but there's no recycling of the lost time. Something to do while the varnish dried, anyway.
A name like Mjöllnir sounds like it might attract or invite challenges at an entirely different level
It's that part about always being true, never failing and never getting so far out of hand that it won't find it's own way back. It's already small. Besides, I don't really have to worry about teaching someone to respect Thor's hammer. He'll take care of that, himself.
Posted: Mon Jan 05, 2009 8:56 pm
by TomW
Gary your surname sounds Nordic and you obviously know your Nordic history so go for it. Deb and I are going to name the big boat Carondelet as her dad was a bid Civil War historian and picked name after a Mississipe River gunboat. All hes boats were so named.
Tom
Posted: Tue Jan 06, 2009 11:54 pm
by gk108
Some details on my temporary snotter rigging. This is a loop of rope made by short splicing the bitter ends together. It's long enough to wrap around the mast 3 times plus a little extra.
Here it is in place. It's wrapped around 3 times with a tuck under the top turn. The lower end of the loop with a block for the snotter is pulled through the upper end of the loop. Tension on the block pulls the loop tighter from both ends and the tuck holds it in place, yet allows adjustment.
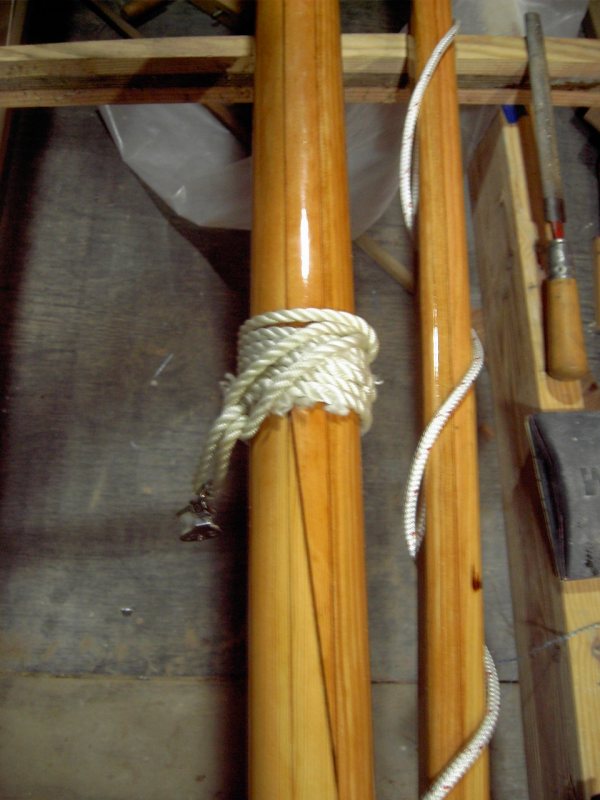
When I find the best place for the sprit boom to ride, I'll use a shorter loop or grommet and a thumb cleat or strap to hold it in place.
Posted: Sun Feb 08, 2009 10:20 am
by gk108
I finally have some pictures of the beginning of the rubrail end cap casting. Lately my boatbuilding time has been split between this project and making a custom cover for this boat. More on that later.
Here's the completed pattern:
I used one of the original caps to start from so that the contours would match. Some plastic was removed from the tip just to make things fall in place better. The plastic star was then attached and faired in with modeling clay. A slight draft angle was included and overhangs that might catch a line were eliminated.
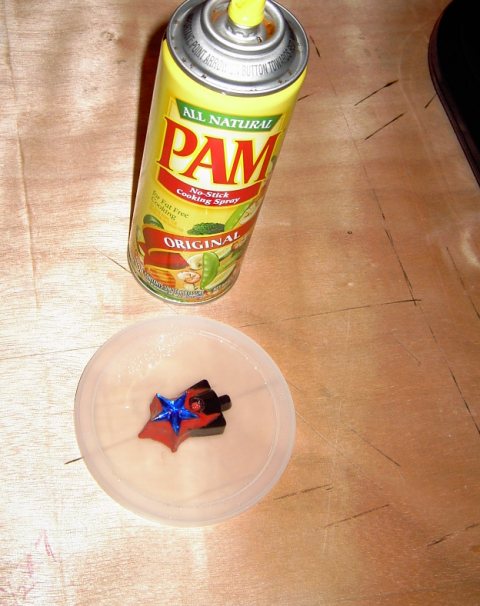
This simple shape will be cast in an open mold, so the pattern was stuck to a coffee can lid with a dab of modeling clay and a light mist of vegetable oil was applied as a mold release.
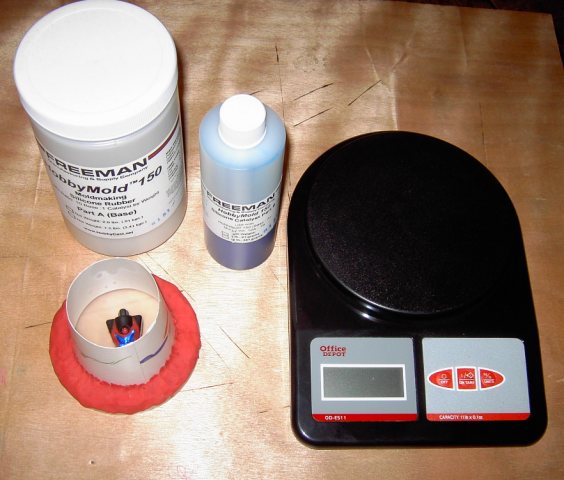
A bottomless paper cup serves as the side of the mold flask. It's sealed to the coffee can lid with more modeling clay. The liquid rubber ratio is 10:1 by weight, so a good scale is necessary. For this mold, 100 grams of the white part and 10 grams of the blue part made just the right amount to cover the pattern in the flask.

Mixing the two components for the rubber introduces a lot of air bubbles into the compound. Subjecting the liquid to a vacuum is the best way to de-gas the rubber. For a vacuum chamber, I found a locking food container with a good rubber lid seal at Wallyworld. Here, the rubber has been mixed and poured into the mold flask and the vacuum is being applied. The little hand pump achieved 22" of vacuum and it was held for 20 minutes. At that low pressure, the bubbles tripled in size and floated easily to the top (bottom of the finished mold), away from the pattern.
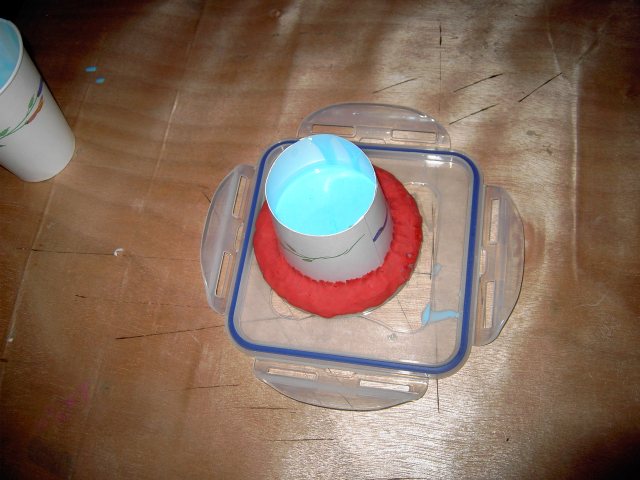
Vacuum removed, waiting for overnight cure of the rubber.
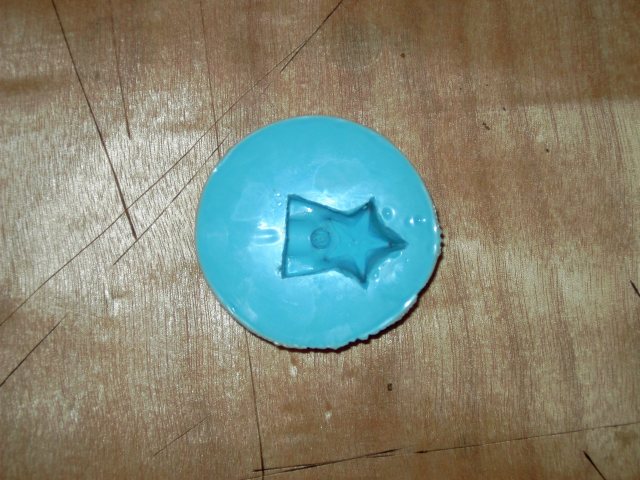
The finished mold, ready to cast epoxy.
Stay tuned for part two.
Posted: Sun Feb 08, 2009 2:15 pm
by ks8
I can't watch this. I've got 20 more ideas now, and I'll never get launched...
Pictures of that cover when done, of course.
Posted: Wed Feb 11, 2009 9:55 am
by gk108
No pictures yet, but I cast one piece last night and the results are less than satisfactory. I wanted a small amount of silica in the resin, along with the copper. My ratio was way wrong. Way too much silica and not enough copper powder. The resin was too thick and I ended up with bubbles that didn't rise to the top. The next try will be with practically no silica in the mix and double the amount of copper powder. What I have now looks very promising, though. Just needs more debugging.
Posted: Wed Feb 11, 2009 9:59 am
by Murry
I can't wait to see it gk. I've been wating to see this ever since I read about Larry sending that powder to you. This is cool.
Daniel
Posted: Wed Feb 11, 2009 10:13 am
by flatpicker
Really cool stuff. Waiting for the pics
Posted: Wed Feb 11, 2009 10:23 am
by cape man
Too cool. Love the vacuum!
Posted: Wed Feb 11, 2009 10:46 am
by gk108
The copper powder kind of surprised me when I added it to the resin. In the can, it looks like it is rather coarse, but when it hits the resin, it becomes apparent that it is very fine particles. The little bit that I added worked more like adding pigment to the resin than adding filler.
BTW, the plastic container imploded during another attempt this morning. Another part is curing, though.
Posted: Wed Feb 11, 2009 11:08 am
by Cracker Larry
Posted: Wed Feb 11, 2009 12:43 pm
by gk108
Here's a scan of the first attempt.
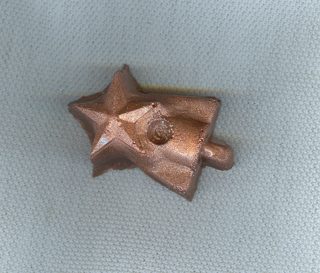
Results are encouraging.
Posted: Wed Feb 11, 2009 3:05 pm
by mecreature
cool stuff gk..
Posted: Thu Feb 12, 2009 12:45 pm
by gk108
Here's the second try.
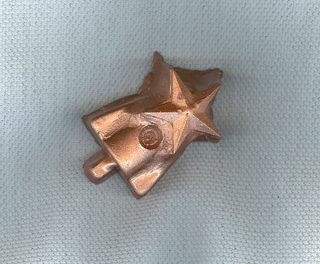
Much more like what I was looking for. This should clean up nicely.
Posted: Thu Feb 12, 2009 12:56 pm
by TomW
Very nice Gary.
Tom
Posted: Thu Feb 12, 2009 1:00 pm
by Cracker Larry
That's fabulous Gary. You do good work
Glad the powder worked out for you.
Posted: Thu Feb 12, 2009 8:50 pm
by gk108
Thanks guys. I never would have tried this if you hadn't suggested it, Larry. I made a few changes for the next one to accomodate a serious overkill vacuum chamber.
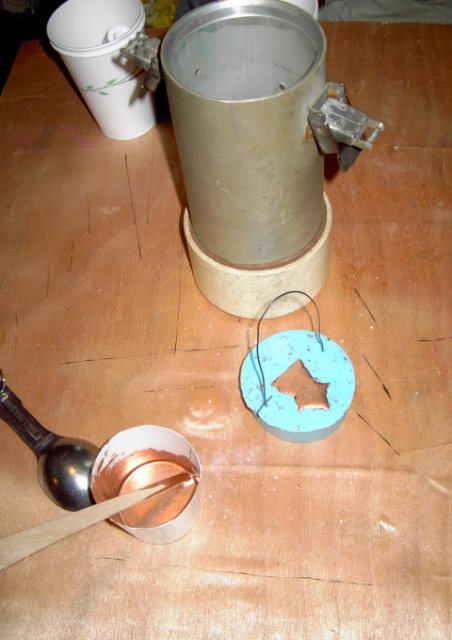
I used the battery case from an old cave diving light. Tried and true and tested to 240 ft. depth. It won't implode from a little vacuum.
I had to make a haywire lifting bail for the mold, so I could get it in and out of the housing.
In the can, under 22" of vacuum for 20 minutes.
The mold conveniently holds 9ml, so the material breakdown is 9ml of mixed resin and 1.5ml of copper powder per part. It wouldn't take much more copper powder to make the resin too thick to flow well enough. That's the drawback of using a general purpose laminating resin instead of a resin formulated specifically for casting parts like this. Of course, casting resin only comes in gallon kits and that's a lot of small parts.
Posted: Fri Feb 13, 2009 12:01 am
by ks8
Can't wait to see where and how they will be placed, but I guess I'll have to.
Posted: Fri Feb 13, 2009 6:10 am
by cape man
The mold conveniently holds 9ml, so the material breakdown is 9ml of mixed resin and 1.5ml of copper powder per part.
Is that 7.5 ml resin and 1.5 ml copper powder or a 5:1 ratio?
Posted: Fri Feb 13, 2009 8:31 am
by peter-curacao
I'm following this now for quite a while and all is very impressive but I have no idea what you are making
Did I mis something
Posted: Fri Feb 13, 2009 8:55 am
by gk108
Peter, several months ago I bought a Taco rubrail kit. The plastic end caps supplied in the kit were plain little black pieces of plastic. With a little encouragement, I decided to try doing something a bit more decorative.
Craig, that was 6ml resin, 3ml hardener and 1.5ml of copper. I filled the mold to the top, which left some dregs in the resin cup. After vacuuming it, the level in the mold is a bit lower because of the removal of air bubbles. I added enough of the remaining resin to fill the mold again and let it cure. There was a little bit left in the mixing cup, better than not having enough.
I'll let these cure good, then clean them up and drill the holes. I suppose a few coaats of clear LPU will help them stay nice looking. I also need to round up some suitable screws.
Posted: Fri Feb 13, 2009 9:10 am
by peter-curacao
Jeez my hat is of to you

, putting so much time in such little details
Posted: Fri Feb 13, 2009 10:03 am
by gk108
peter-curacao wrote:putting so much time in such little details
Long term effects of BBV.
Posted: Fri Feb 13, 2009 11:04 am
by peter-curacao
gk108 wrote:Long term effects of BBV.
Reaching for my pills
Posted: Mon Feb 23, 2009 6:15 pm
by gk108
More little details are getting finished up. The hatches in the front frame use simple turnbuttons to hold them in place. Well, simple with a couple of twists.
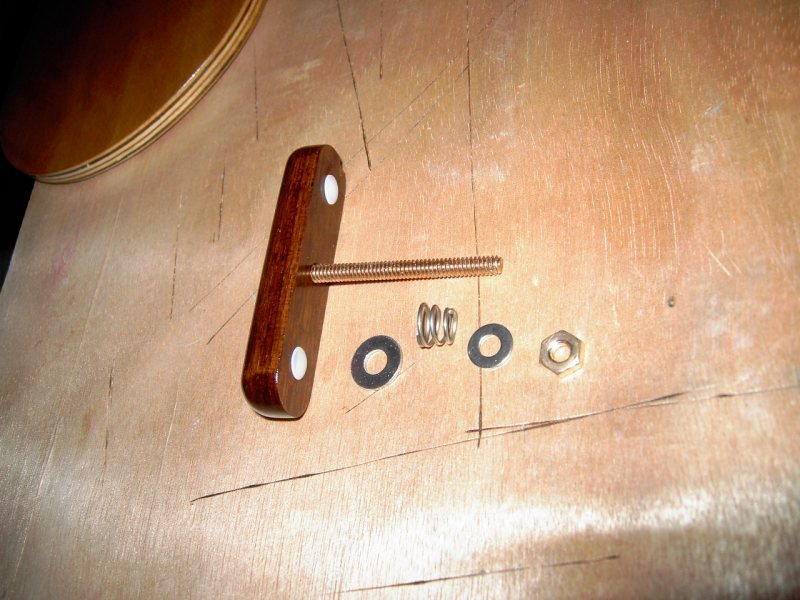
Mahogany handles with 2 convex plastic hole plugs for bearing surfaces. Conical spring from a Delta faucet repair kit. The hex nut will be replaced with a self-locking nut.
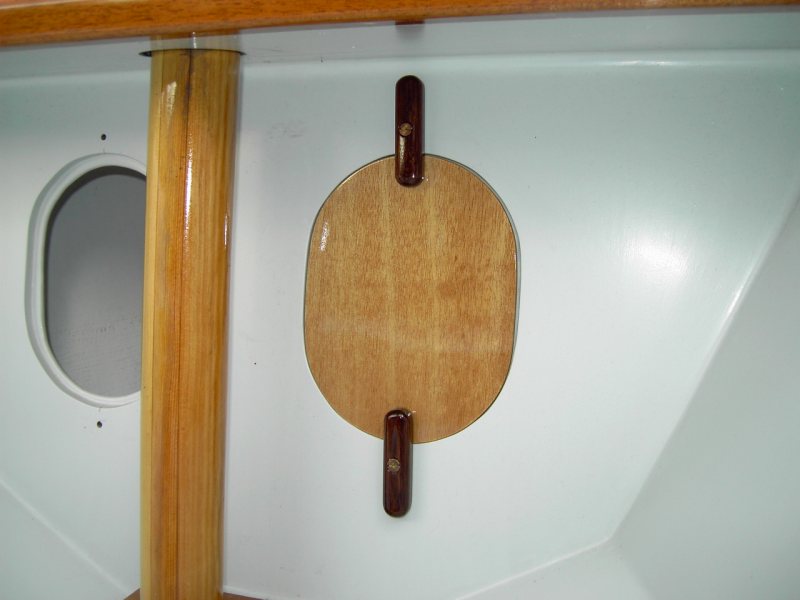
Dry fit. Handle for the hatch will be a very small bronze horn cleat. If I do anything for a gasket on the hatches, it will probably be canvas and 5200.
Posted: Tue Feb 24, 2009 8:08 am
by Cracker Larry
Showoff
Fantastic work Gary
Posted: Tue Feb 24, 2009 10:28 am
by gk108
Thanks, Larry. It's almost there. I need to get 2 or 3 things going at one time to have a place to use even the smallest batches of epoxy. The little holes in the frame haven't been sealed yet. I want to make a small change in the mast hardware and I'm waiting for parts before mixing a 3ml batch to seal some holes. I'm using syringes to measure those tiny amounts.
Meanwhile, the cover is coming along.
It's made from Surlast fabric. Strong stuff. Lots of finish work left to be done, but it fits the boat.
Posted: Tue Feb 24, 2009 11:01 am
by ks8
Looks good! I thought I was bad looking for just the right size SS tubing for the tiller cheek pivot bolt in the rudder head. Guess I'm normal after all. That's scary.
Posted: Tue Feb 24, 2009 11:01 am
by Cracker Larry
That's what I need, a cover.
Posted: Tue Feb 24, 2009 8:59 pm
by gk108
ks8 wrote:Looks good! I thought I was bad looking for just the right size SS tubing for the tiller cheek pivot bolt in the rudder head. Guess I'm normal after all. That's scary.
My first idea was to just put a very short piece of rubber hose on the screw and call that a spring. I couldn't find anything soft enough, but I think the back of my mind was insisting on a conical spring, anyway. I had a
moment right there in Lowe's.
Larry, the cover has been quite a challenge for me. Much more complicated than the sail, even though I'm trying to make it as simple as possible. With your T-top, a full cover would be quite a project. A worthwhile project, though. I was quoted $500 for a custom cover like I wanted.
Posted: Tue Feb 24, 2009 9:59 pm
by Biker B.O.B.
Cracker Larry wrote:Showoff
Fantastic work Gary
Larry, you said it.
Great work Gary.
Posted: Tue Feb 24, 2009 10:00 pm
by Cracker Larry
I was quoted $500 for a custom cover like I wanted.
I could build a shed for that. Think I'll shop Ebay and find a semi-custom-almost fits-goodnuf- mostly works sort of cover
Posted: Wed Feb 25, 2009 10:29 am
by gk108
I could build a shed for that.
That's on my list, too. One big enough to rebuild a 20' O'Day under.
Posted: Wed Feb 25, 2009 10:08 pm
by Biker B.O.B.
gk108 wrote:That's on my list, too. One big enough to rebuild a 20' O'Day under.
That should keep you busy for a while. And will probably look better then when originally launched. You'll have to let us know where to keep up with that project.
Posted: Wed Feb 25, 2009 11:19 pm
by gk108
I know it will look a little different, anyway. It has some rhomboid shaped cabin windows that won't stop leaking, no matter how much sealant I put on them. They will most likely be replaced with a couple of 5" round ports on each side. Other, more serious problems than that, though. At least I have something to sail around in during the rebuild.
Posted: Tue Mar 24, 2009 11:41 pm
by gk108
A little more progress to report. I've managed to find a couple of opportunities to sail with the tyvek sail. While it performed quite well, I just didn't like the excessive cup in the leech. In light winds, it is fine on all points, but as soon as you get enough breeze to really heel the boat, the sail wouldn't spill wind. Instead, it seemed to move the CE out towards the leech.
I ordered a kit for a custom variant of a Bolger Nymph sail from Sailrite and put it together Saturday. It's dimensions are the same as the sailplan on the first page of this thread, except that it's vertical cut and has a hollowed leech and some round to the foot.
I only have a few pictures of the assembly.
My work area for this and the cover, which is 90% finished.
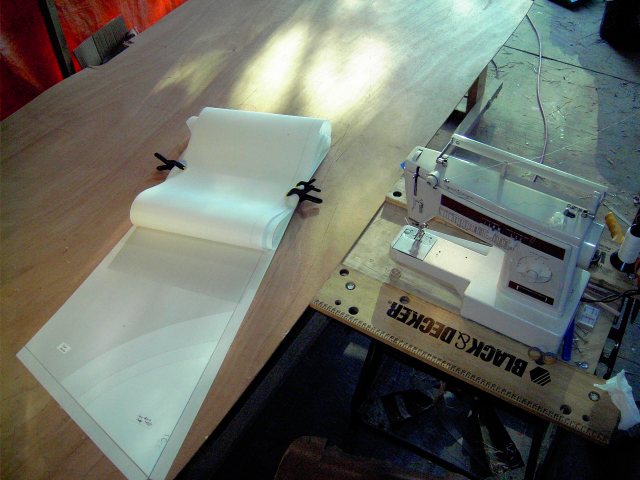
Setting up to sew the inside edges of the clew patches. Spray glue hold them in place for stitching. The foot and leech have a double folded hem that covers the outside edges.
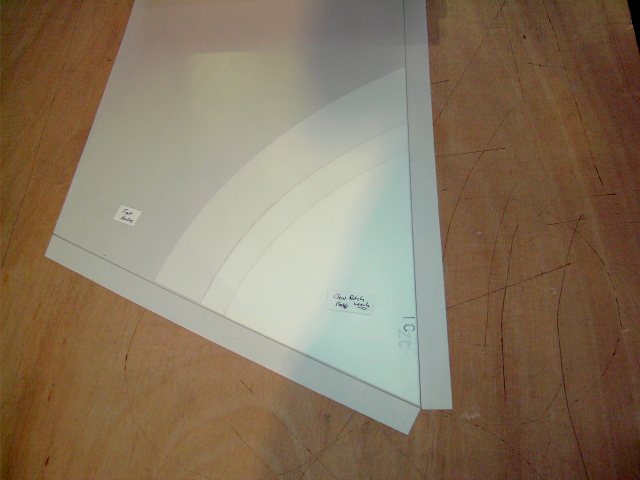
This shows one of the middle panels before sewing. The shiny stuff on the seam allowance is backing for 2 sided tape used to hold the panels before stitching them. The curved seam gives body to that portion of the sail. The rest of the sail is rolled up on pool noodles. I tried other things but the flexibility of the noodles worked better for me than a cardboard tube.
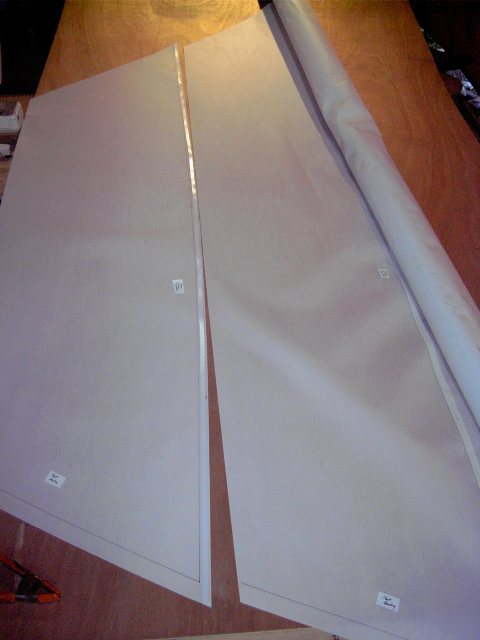
I tried it out at a local lake for a couple of hours on a puffy afternoon. No pictures, but I like it.
Re: GK's V10
Posted: Wed Mar 25, 2009 2:59 pm
by gk108
finding my way back from the digital void...
Re: GK's V10
Posted: Sun Apr 05, 2009 9:07 am
by gk108
After my last little venture to check out the new sail, I was inspired to rig a jack line to douse the sail. It's the blue line in this 441 X 600 image:
http://www.gk108.ersweb.com/images/V10/V10sailplanb.jpg
It's made fast to the mast about 22" above the partner, runs aft to a fairlead 18" from the aft end of the boom, runs forward along the boom to a fairlead 12" from the front of the boom, up the mast and through a fairlead back down to a clamcleat. Easing the snotter and heaving the jack line pulls the forward end of the boom upward while pulling the aft end up to the mast, dousing the sail. Most of the way, the aft end of the boom is supported by the leech of the sail, but as you pull the last couple of inches, the weight of the boom is taken off the sail and supported by the jack line. Once it's all pulled up, a sail tie or two holds it all in place.
Re: GK's V10
Posted: Sun Nov 08, 2009 10:38 pm
by gk108
After a bad first try, I'm making some good progress on a carbon fiber boom. The first attempt was a failure due to the carbon fiber not being fully wet out. That was solved on the second try by wetting each layer of the laminate before the next one went on. Sliding dry sleeve over wet sleeve wasn't as difficult as I thought it would be. I used a foam pipe insulation core and heat-shrink tubing. The heat-shrink tubing was a lot more difficult to slide over the wet layup. After that, it's been a breeze.
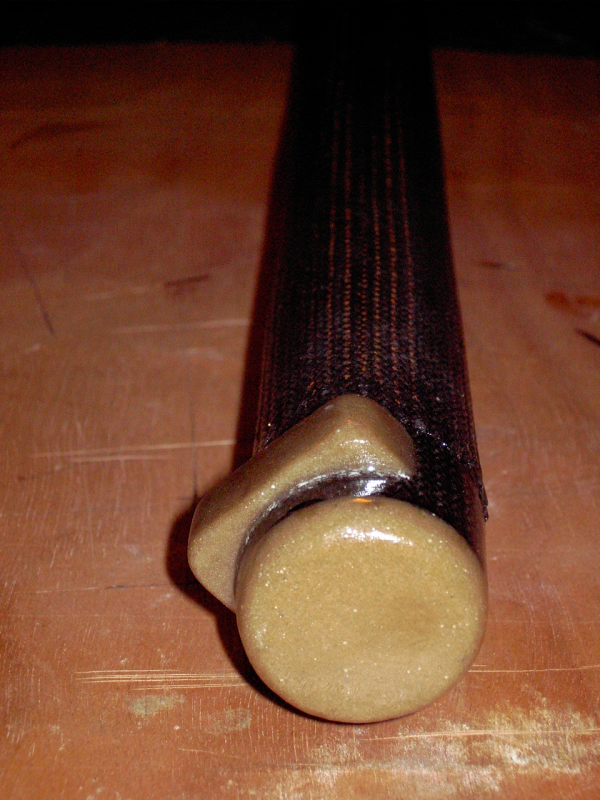
Forward end of boom showing mounting saddle for a fairlead and composite end cap. There is a 5" long aspen wood plug in the end, hollowed out for 2.5" on the inside. Directly behind the saddle a hole will be drilled to attach the snotter. Also, there's an extra layer of glass added for a couple of feet where the boom will be in contact withthe mast.
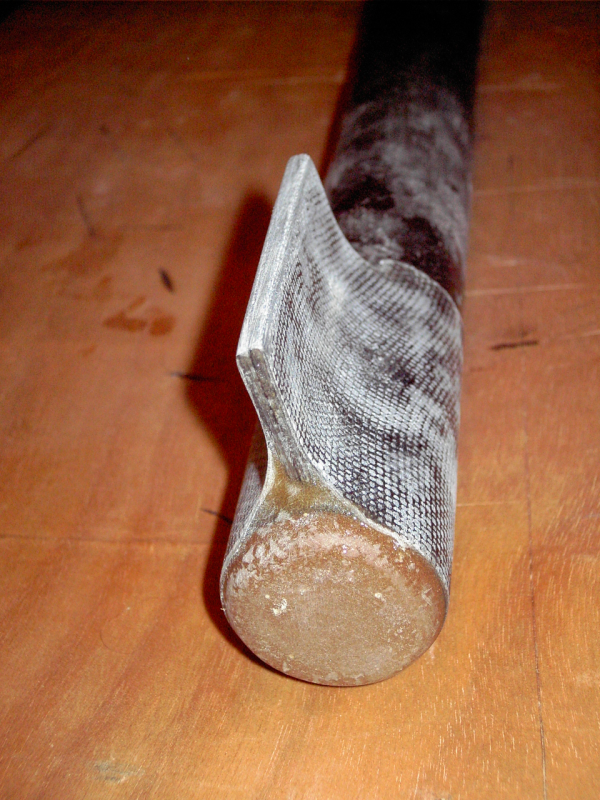
Aft end of boom showing sheet attachment point and end cap. Same type of wood plug on this end. I prefabbed some skeleton material out of glass and epoxy that is 1/16" thick. I laminated a strip 1" CF uni tape lengthwise between two strips and stuck that to the tube with a dab of 5 minute epoxy. Next came a fillet on each side to make a teardrop shape. On top of that, I wrapped it with CF uni tape and a layer of 9 oz fiberglass tape.
Right now, it looks like it will be about half the 4 lb 7 oz solid wood boom weight.
Re: GK's V10
Posted: Mon Nov 09, 2009 8:17 am
by Cracker Larry
That's very cool Gary
I need to play with that stuff a little and make a push pole.
Re: GK's V10
Posted: Mon Nov 09, 2009 8:38 am
by flatpicker
Nice Gary. Glad you've made progress. Can't wait to check it out!
Re: GK's V10
Posted: Mon Nov 09, 2009 10:30 am
by TomW
That's neat Gary
Thinking of making my T-top of that stuff. Have a design just need to get the console size firmed up after the flip and SWMBO's go ahead. She has never used one I believe.
Tom
Re: GK's V10
Posted: Mon Nov 09, 2009 11:03 am
by gk108
One thing for sure, mistakes with CF are expensive! Right now, my weight savings is costing me $80 a pound if I count the materials used in the failed attempt. I expect that figure to change radically when I replace the 13 pound solid wood mast.
Some specs on the CF tube based on the offcut from the ends:
Wall thickness - .045"
Weight - .2 oz (5.3 g) per inch
Gimme some time and I'll calculate modulus of flexibility if I can.
Re: GK's V10
Posted: Tue Nov 10, 2009 7:15 am
by Laszlo
Gary,
Good job with the CF spars. I think you'll like them a lot. I used them on my V12 and have been very happy. It's really nice not having to worry about rot, glue joints, knots, grain, etc.
The mast was made from the kit Jacques sells and turned out very well. It weighed about 2 lbs before painting. The sprit is one I tried on my own that ended up useable. but not as nice as the mast. The 2 big problems I had were trying to use a metal mandrel and trying to wet out all the layers at once while consolidating them with heatshrink. A foot-long test piece worked beautifully, but scaling up to 9 feet didn't work as well as I'd hoped. It's plenty strong, but between one thing and another, the sprit ended up slightly heavier than the mast.
Next time it's back to the foam mandrel and wetting out 1 layer at a time. I'll give the heatshrink one more chance, but it didn't really seem to make that much difference over doing it by hand.
To finish up, I plugged the knee of the sprit with a wood plug, just as you did on yours, and drilled a hole for the snotter. The nose is a shaped dowel. The top of the mast is plugged with glass, epoxy & woodflour putty. There's a SS eyebolt up there to lash the throat to. Speaking of lashings, everything is lashed together. The block for the snotter is held to the mast with a prusik knot and the downhaul, snotter (and eventually the brailing line) go down to a wooden collar (glued to the mast) which has 1/2" pins like fixed belaying pins for the lines. The collar & pins worked out really well -light, strong, cheap and allows the mast to rotate unimpeded.
Here's a couple of shots from last month when the boat made its debut as a sailboat at the Mid-Atlantic Small Craft Festival in St. Michaels MD.
Have fun with yours,
Laszlo
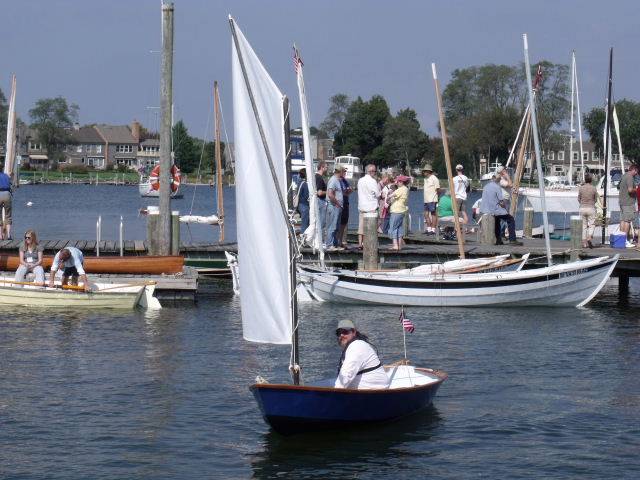

Re: GK's V10
Posted: Tue Nov 10, 2009 9:51 am
by gk108
Thanks, Laszlo. Yours looks great. I've been using a similar lashing for my snotter block on the wooden mast. I never seem to be able to locate it in a consistent position, even though I drew a line on the mast. I may just mold a couple of little bumps on the side of the CF mast to help me with that. I like the collar and belaying pins. I may try something like that, but my mast will need to be taller. Right now, I'm using clamcleats for snotter, downhaul and furling line. I had planned on making the new mast at least 6 inches taller to give me more room around there. If I add 10 or 12 inches, that would give me room for belaying pins.
I may very well try the mast without using heat-shrink tubing. I just need to devise a method to keep it all straight while the resin cures. For the boom, I used a copper pipe through the insulation and it fit loosely. It was stiff enough to make handling easy. After heat-shrink, I laid the assembly in a cradle made of two pipes pushed together side by side. That made it nice and straight with no flat side from laying on the floor. If I do the mast without heat-shrink, I'm thinking of using the same loose mandrel with a rope or wire running through the center. After the wetout, I can stretch that between two trees or something to hold it straight while it cures. I'll have to do a dry run and see if that (or something else) might work.
Re: GK's V10
Posted: Tue Nov 10, 2009 12:53 pm
by Laszlo
Wes,
Thanks. I put reinforcing glass under the CF at the top, bottom and where the mast fit against the partner, as well as where the snotter attaches. The result was a very slight narrowing of the mast at each spot. This makes it very easy to find the right spot to lash the snotter block.
When I did the sprit, I tried supporting it on a very tightly stretched horizontal line (3/4" nylon stretched tight enough with a come-along to twang like a guitar string). It still sagged. What really worked well was hanging it vertically from the garage ceiling (10 feet high) with a weight at the bottom. In your case you might have to build a frame outdoors.
You might be able to do the stretched line if you let each layer cure hard before you put on the next one. As it gets heavier, it'll also be getting stiffer. If you're lucky, it'll be getting stiffer faster than it'll getting heavier. All depends on your lamination schedule. But from a theoretical standpoint, only vertical will get it perfectly straight. Horizontal will always be a caternary, but if you're lucky it'll be close enough to straight that no one will notice.
Have fun,
Laszlo
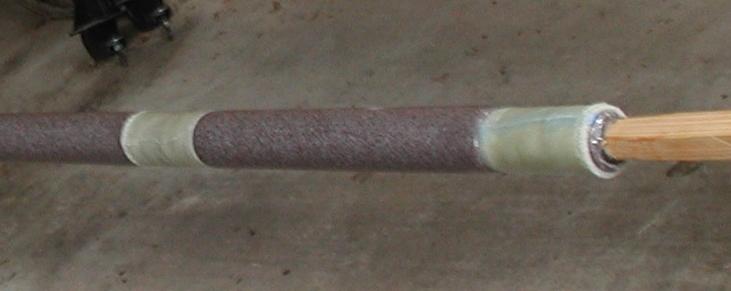
Re: GK's V10
Posted: Fri May 14, 2010 11:25 pm
by gk108
I finally constructed an oven to post-cure my spars. I used 2 sheets of foil backed foam insulating board and made a 1 ft. X 1 ft. X 16 ft box.
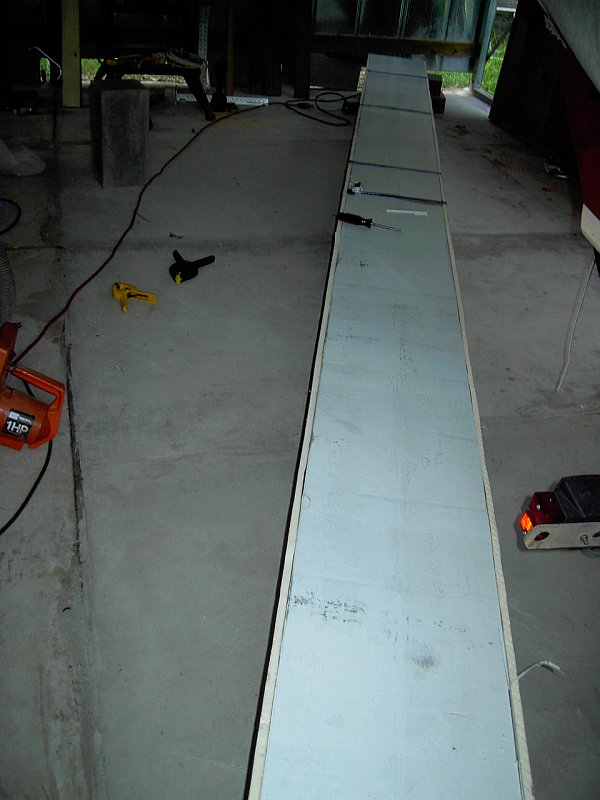
Powered by a heat gun set on low and blowing into a short pipe. There's an exhaust vent at the bottom of the opposite end.
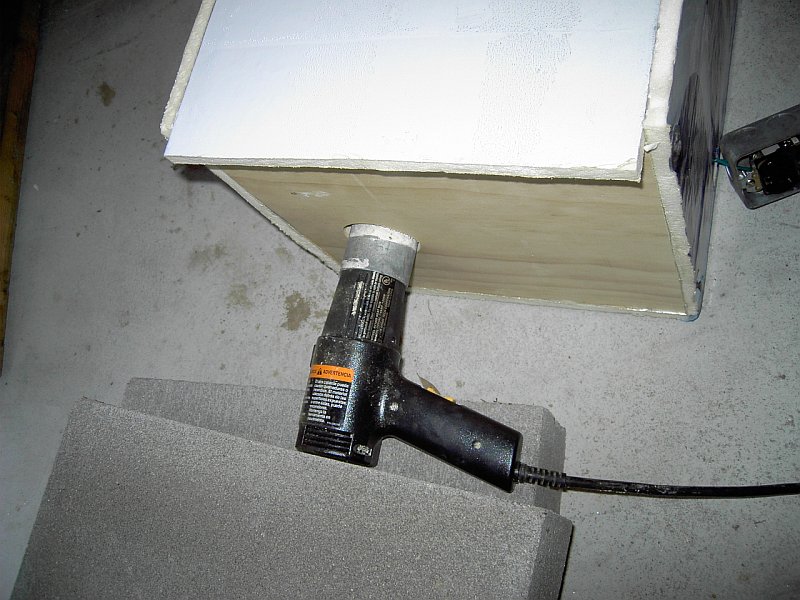
Temperature somewhat regulated by a water heater thermostat fastened to an aluminum heat sink. Boom has been coated with white pigmented Silver Tip.
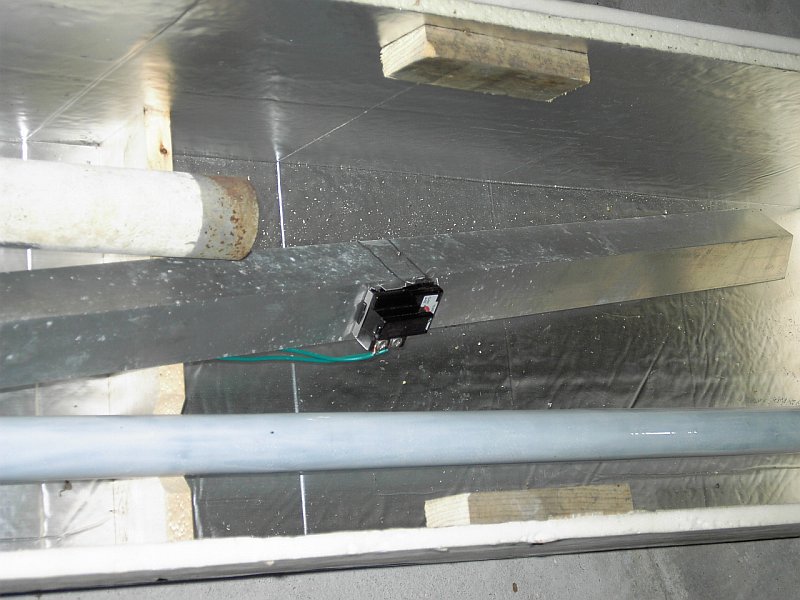
Baked 4 hours at 140°F average and it's ready for sea trials. Spars lay in V cuts while baking.
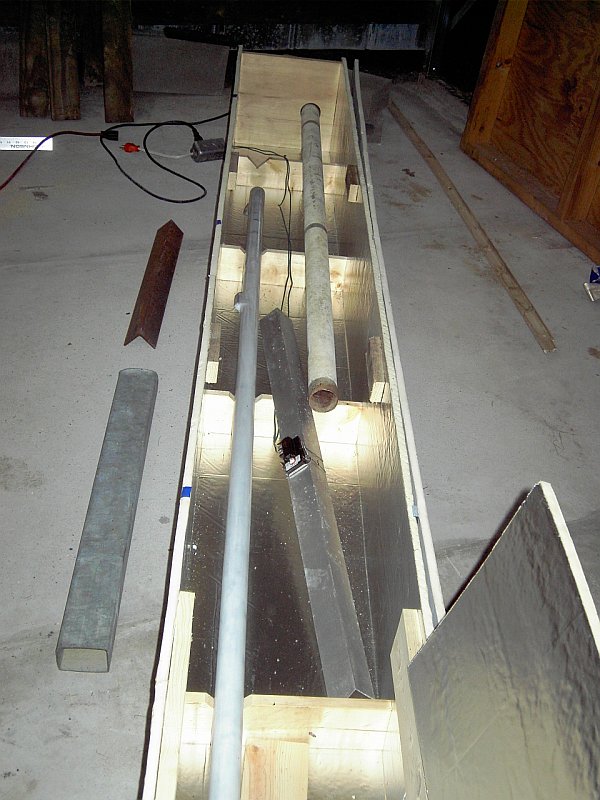
This seemed to work well and the boom seems to be slightly stiffer. I guess I'll be ready to move on to the CF mast soon.
Re: GK's V10
Posted: Sat May 15, 2010 12:35 am
by TomW
Neat looking curing tunnel Gary.
I'm impressed. You should be able to do a lot of different things in that.
Tom
Re: GK's V10
Posted: Sat May 15, 2010 7:33 am
by tech_support
very nice. Some good ideas there for anyone wanting to build an "oven" for post curing. Pipe injecting heat to the middle is good. Ideally you could find some cheap thermometers to put through the foam in different areas to see how well the heat spreads.
Re: GK's V10
Posted: Sat May 15, 2010 9:52 am
by gk108
I used a cheap digital meat thermometer to monitor temps. That allowed me to check different areas by just poking a hole about anywhere on the box.
The pipe was really the key to uniform temps. Initially, I was worried about the heat being concentrated wherever the heat gun blew in, but there seemed to be plenty of radiant heat from the pipe near the heat gun end of it. During operation, temps were always within 5° no matter where I put the thermometer. That really surprised me. Eventually, I just left the thermometer in the middle joint of the top.
Now that I'm ready to try it out, there's not a breath of wind around here today.
Re: GK's V10
Posted: Sun May 23, 2010 7:15 pm
by gk108
CF boom has passed sea trials. Soon it will be time to start on a mast.
Gotta love this electronic age. This is better than any logbook.
http://connect.garmin.com/activity/34323392
Re: GK's V10
Posted: Sun May 23, 2010 11:29 pm
by Cracker Larry
That is really neat stuff Gary
Great work on the CF.
Gotta love this electronic age. This is better than any logbook.
That's cool stuff too. Anything is possible today, the imagination is the limit. Which is why I wonder about the much publicized plane ride
Re: GK's V10
Posted: Sun May 23, 2010 11:47 pm
by gk108
Yep anything is possible:
Min Elevation: -21 ft
Max Elevation: 25 ft
Usually, only double naught spies get the flying submarines.
Re: GK's V10
Posted: Sun May 23, 2010 11:57 pm
by Cracker Larry
And I just thought it was high seas
Re: GK's V10
Posted: Mon May 31, 2010 8:30 pm
by gk108
With the success of the boom, it's time to start getting prepared for making the CF mast. I need some extra thickness built up in the area of the partner and a little bit above for hardware mounting. Rather than compress the 2" O.D. foam that will be the core of the rest of the mast, I thought I'd try wrapping the next size smaller foam with the layup and then using stretch wrap. Ultimately, I should end up with a wall thickness of about 3/16" once this part is done.
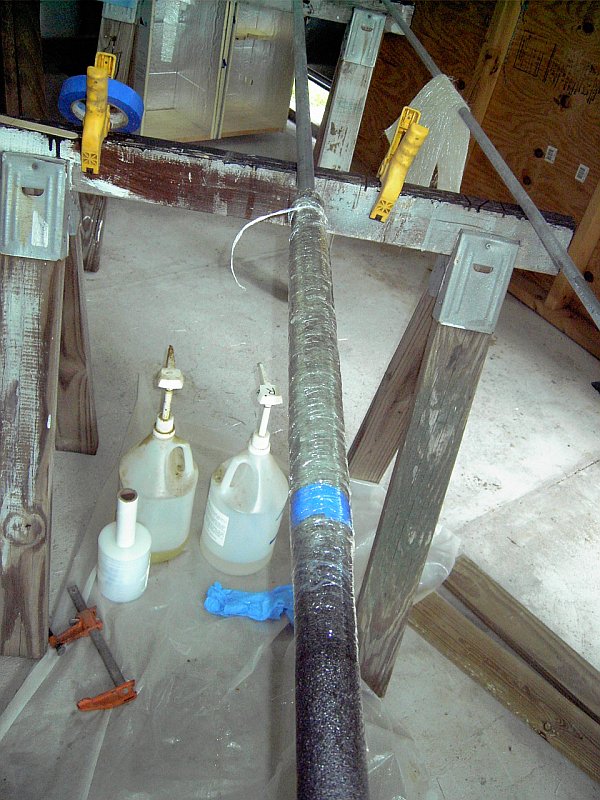
After the stretch wrap is on, I punched a whole lot of holes in it to allow excess resin to run out. It was a warm day and by the time I got to the stretch wrap, resin was starting to get warm. I'm going to take that as a sign that it is about thick enough.
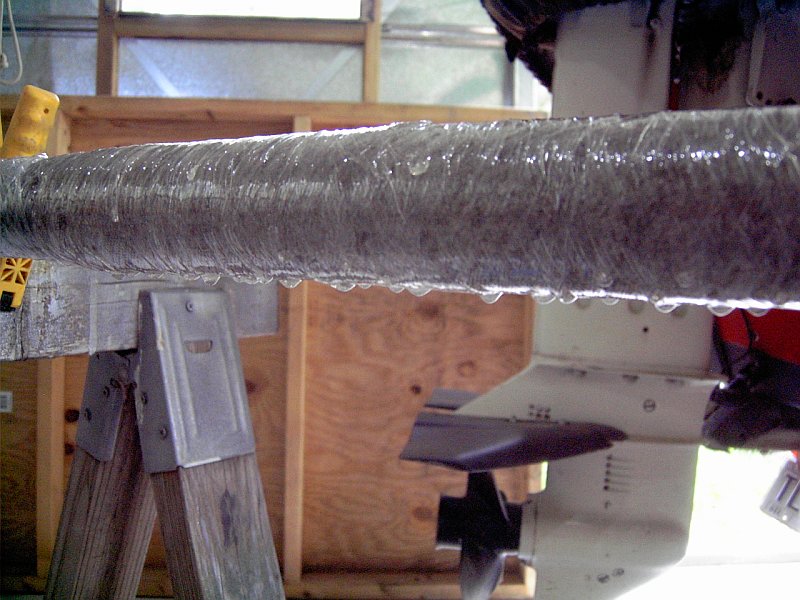
I'll probably need a little more diameter on this part and once all of the adjustments are made, it will be stacked on the mandrel between pieces of 2" O.D. foam. I had been wondering about using stretch wrap for stuff like this and Duckworks posted a helpful video link the other day. I don't know if it is going to be the best way for the whole mast, though. I really liked the results using heat-shrink tubing on the boom, but getting that stuff on the mandrel was tough. That was only 8 ft. and I'm worried that twice that length might be more than twice as difficult to handle. Since I let the stretch wrap run past the bulk of the layup, I'll get an idea of what it will look like with that over thinner layup like the majority of the mast will have. I hope.
Re: GK's V10
Posted: Tue Aug 10, 2010 1:13 pm
by Doc_Dyer
TTT
how did your mast come out?
Re: GK's V10
Posted: Tue Aug 10, 2010 6:50 pm
by gk108
Waiting for the August heat to subside. That botched first attempt on the boom has me a little gun shy, so I'm waiting on cooler weather to maximize working time. In the meantime I'm cutting odd shaped pieces of plywood and tacking them in place on my rebuild project. I should get to a place where I will be slinging epoxy at both projects soon. At least that's the plan.
Re: GK's V10
Posted: Wed Aug 11, 2010 6:02 am
by topwater
GK i must have missed some thing, what happen to the boom
Re: GK's V10
Posted: Wed Aug 11, 2010 7:34 am
by Laszlo
Wes,
Your oven beats the heck out of my post-cure arrangement of black plastic garbage bags out in the sun. Very nice.
I used shrink wrap on my CF mast and what it ended up looking like was a whole lot of sanding. It's good stuff, but leaves lots of wrinkles. It's also flimsy enough that if it gets stuck in an epoxy glob it tears. Bet you had fun getting that layer with all the holes and drips off
Laszlo
Re: GK's V10
Posted: Wed Aug 11, 2010 9:35 am
by gk108
Topwater, the very first try on the boom was a flop because I didn't have time to vigorously work the resin into the CF. Even after wrapping it, the resin didn't saturate the layup very well at all. The result was a tube that was about as stiff as a pool noodle wrapped with duct tape. On the second try, I had cooler temps and more working time, so I was able to wet an inner layer of glass, then slide the CF over that and wet it and work the resin into both layers by hand before sliding the heat shrink tubing over it. Getting the heat shrink on was the cumbersome part of that. I don't think I will be able to easily work with heat shrink to wrap the mast, due to length, so I gave the stretch wrap a try.
The wrinkles weren't too bad on the little section that I made and the pinholes in the wrap didn't even show. I didn't know what to expect when I took the wrap off of it, but it was about the same as cutting that much shrink wrap without any resin involved. There were a couple of wrinkles that had wrap stuck in them, but either a small wire brush or a dental pick got them loose enough to pull off.
One day last month, it was perfect for sailing on Lake Seminole, so I dropped everything and went sailing. Steady 15 mph winds and a 2' chop made for a good test of the new boom. Downwind was a hoot, new speed record of 6.2 mph. Upwind was a soaker, but the spray was welcome on such a hot day. The only thing I'll change on the boom is the way I fasten the clew, rope instead of a SS hook.
Re: GK's V10
Posted: Thu Aug 12, 2010 8:23 am
by topwater
Gk thanks for the info, take lots of pic's when you build the mast i find this
very interesting. My next boat will be a sail boat.
Re: GK's V10
Posted: Sun Oct 24, 2010 1:31 pm
by gk108
I'm finally getting started on the mandrel for the mast.
I'm using a combination of ½" conduit and ¾" PVC pipe for the core. That should be enough to make the assembly easy to handle.
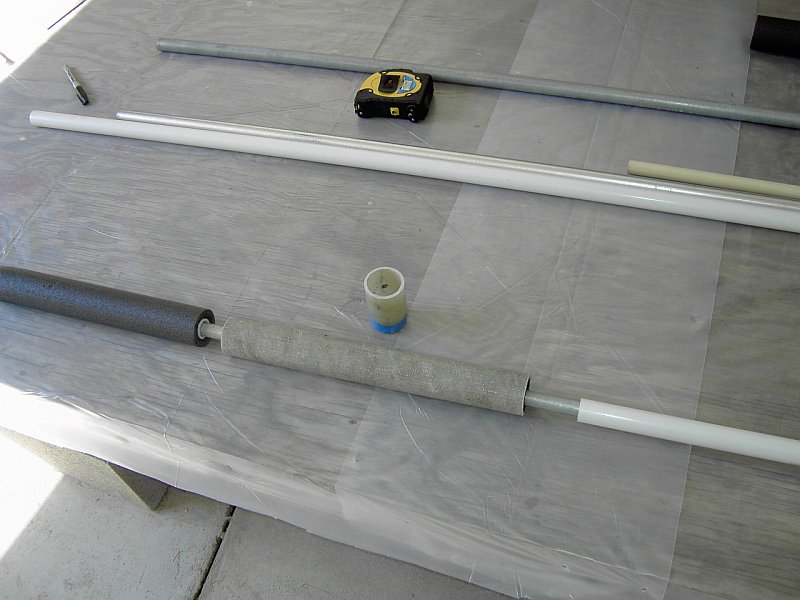
The built up section is about 3/16" thick, as shown by the offcut. It will float on the conduit and hopefully will be centered by the CF and fiberglass sleeves.
A few turns of electrical tape helps center the PVC on the conduit. Not a snug fit, about 1 wrap of tape less than snug.
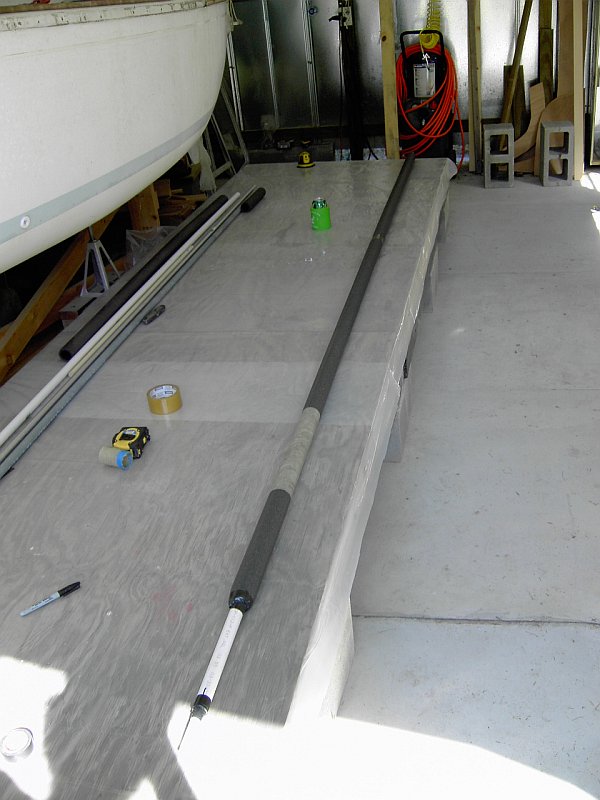
Mandrel assembled. There's about 3" of PVC extending beyond the far end of the foam. Near end of the foam and PVC taped to help the sleeves slide on easier.
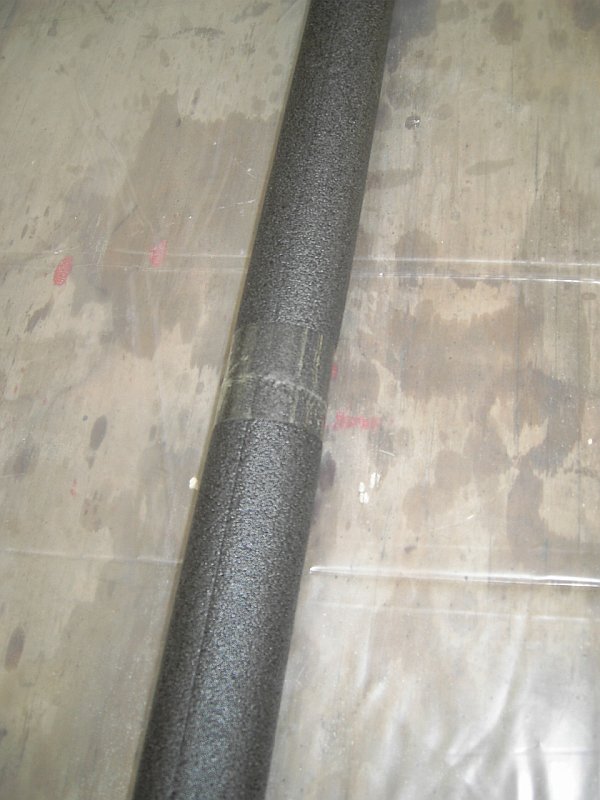
Foam spliced with packaging tape.
The PVC is in two pieces. After the layup cures, I'll be able to pull the short PVC piece and the conduit out from the bottom and the other PVC piece will pull out from the top. At least that's the plan for now.
Re: GK's V10
Posted: Tue Oct 26, 2010 12:59 am
by gk108
I made a wicked looking 12 point pounce wheel to perforate the stretch wrap.
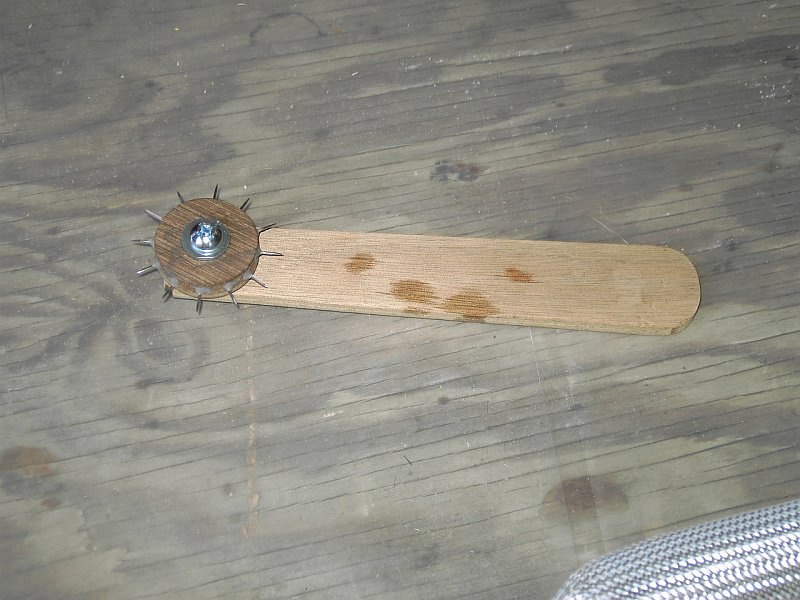
Then moved on to dry fitting the sleeves.
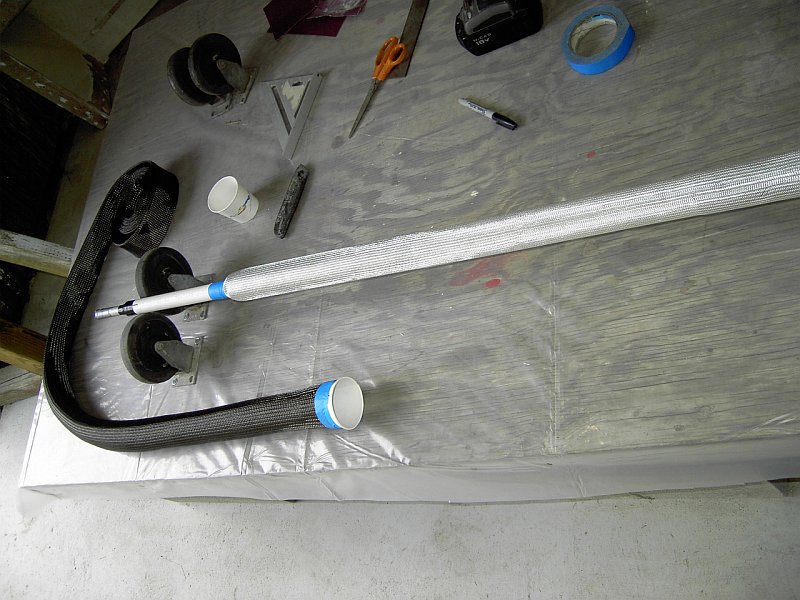
Re: GK's V10
Posted: Tue Oct 26, 2010 1:07 am
by gstanfield
Looking good, lots of work though. I'm curious as to the weight savings between this and an aluminum mast? The cool factor of building your own carbon mast is definately there, but what other benefits are there?
George
Re: GK's V10
Posted: Tue Oct 26, 2010 9:20 am
by topwater
Very cool GK, i like the the cup idea to pull on the sleeve. That section you put at the lower end is that
where the mast will meet the deck?
Re: GK's V10
Posted: Tue Oct 26, 2010 12:07 pm
by gk108
Materials and all cost a little less than an aluminum mast, weight will be about half of the current wooden mast. Some hardware fittings can be replaced with composite parts, so there's a few ounces less weight there, too. Less weight aloft means less heeling force made by the weight of the mast. In a small boat, every little thing makes a big difference. Even though the prep time is longer, the total time to make a CF mast is a lot less than what it took to make a wooden mast. When I started mixing resin, the whole process of assembly and lamination took about 2 hours. (Yep, it's done-pictures later this evening) Compare that to the week or so it took to make the blank wooden mast...and the 2 gallon bucket full of saw/sanding dust.
The reinforcement sleeve goes from 4" below the mast partner to about 10" above it. There's a couple of cleats that mount there and that insert provides some extra meat for the screws. Jacques mentioned the importance of providing a break point in the mast so it will snap before storing up too much potential energy. The top of the insert should make enough of a hard spot to snap it there. I hope I don't have to find that out the hard way.
Re: GK's V10
Posted: Tue Oct 26, 2010 10:46 pm
by gk108
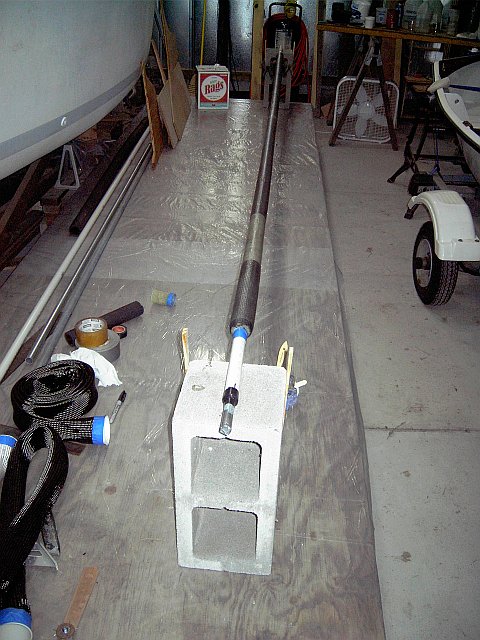
First layer of fiberglass sleeve is wet out.
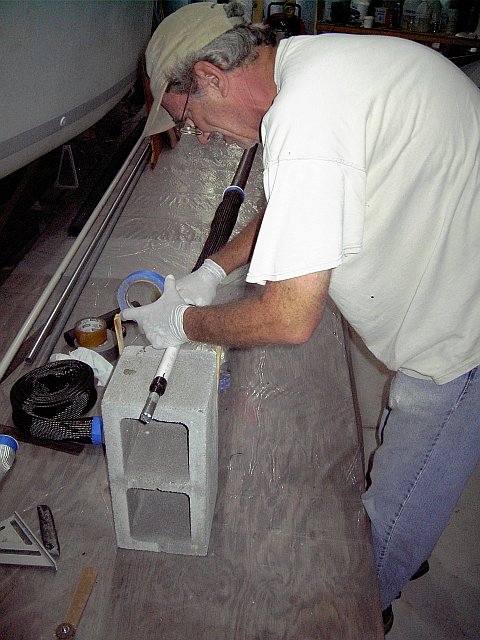
First layer of carbon fiber sleeve pulled on the bottom 4 ft of the mandrel and secured with masking tape.
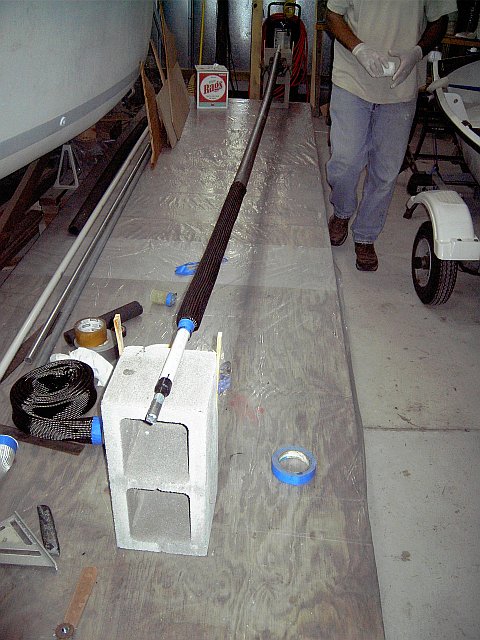
Bottomless paper cup guide is removed from the first carbon fiber layer.
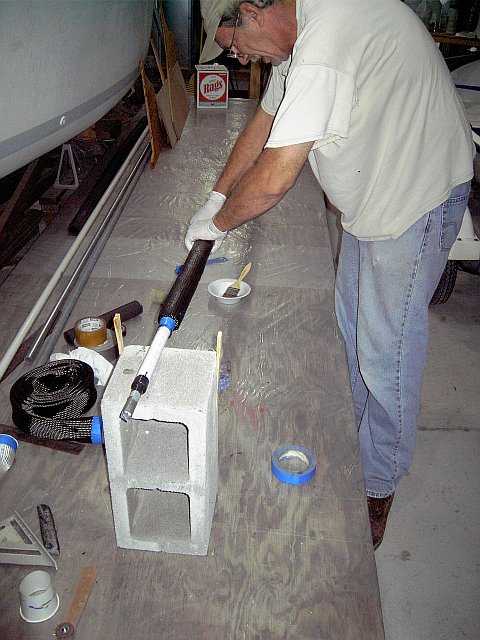
Wetting out the first carbon fiber layer and working the resin into it by hand. You need to purposefully force the resin into carbon fiber because it doesn't seem to wick it up like good quality fiberglass will. That's why infusion is a common method used in carbon fiber production.
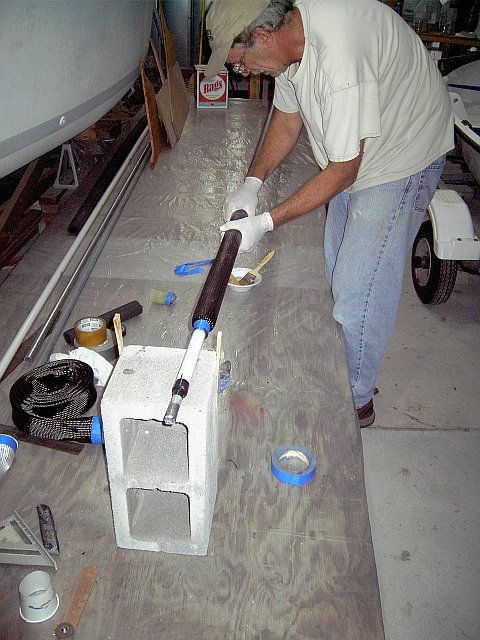
Smoothing that layer out and getting it ready for the next.
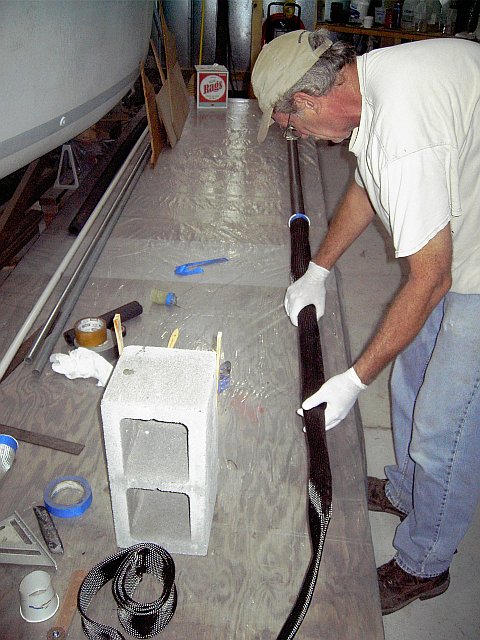
Pulling the second carbon fiber layer on the mandrel. This one goes full length.

Wetting out the second carbon fiber layer.
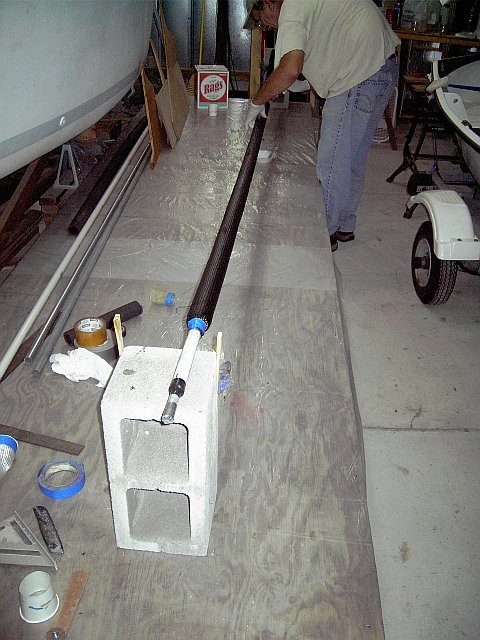
Still wetting out the second carbon fiber layer, working the resin in and smoothing it as I go.
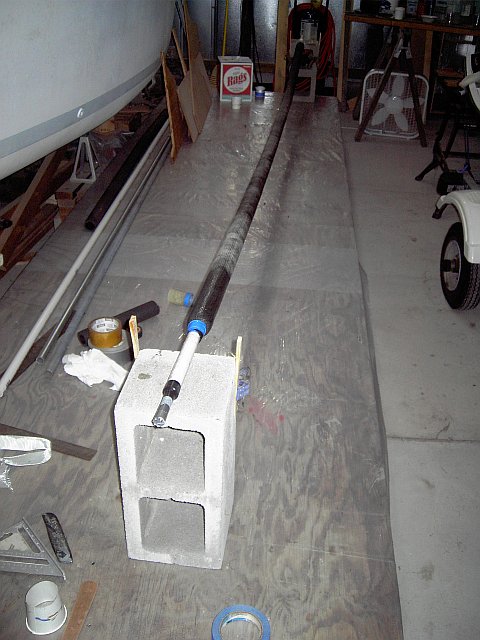
Second (outer) layer of fiberglass sleeve is pulled on. By this time, the whole assembly was about saturated with resin, which transferred to this sleeve while I was pulling it on. That made it the most difficult one to put on the mandrel, but still no big deal, just smooth it out and keep going.
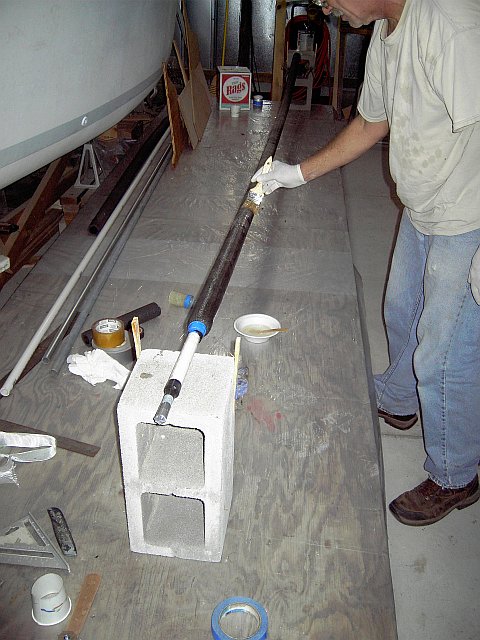
Wetting the last layer.
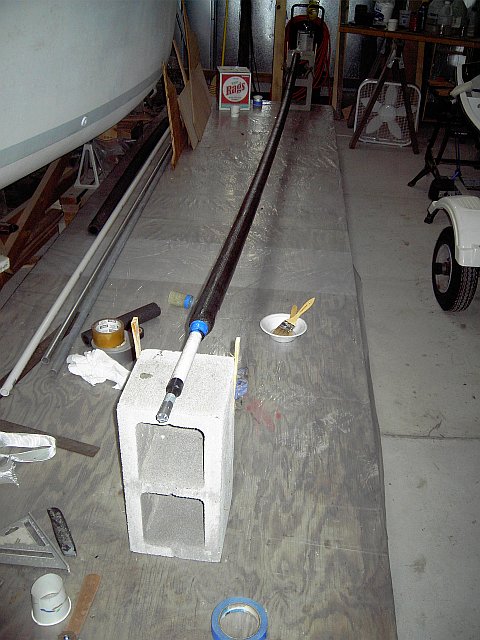
Everything well wet out, dripping in some places, ready for spiral wrapping with stretch wrap.
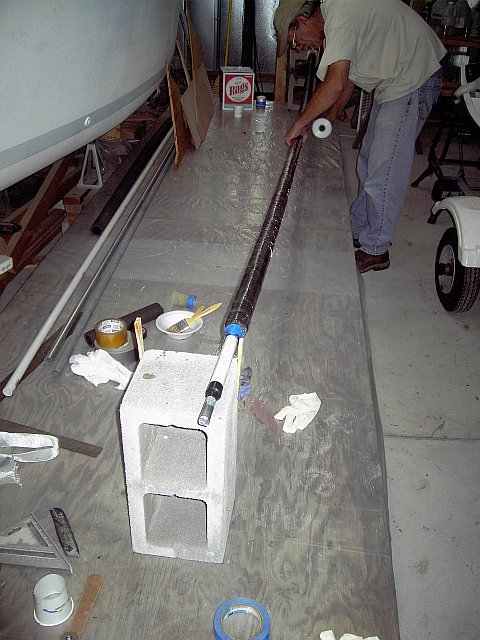
Wrapping with stretch wrap to the end...
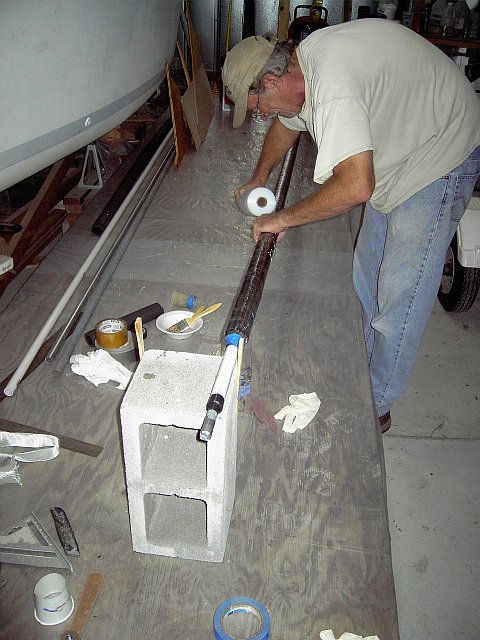
And back.
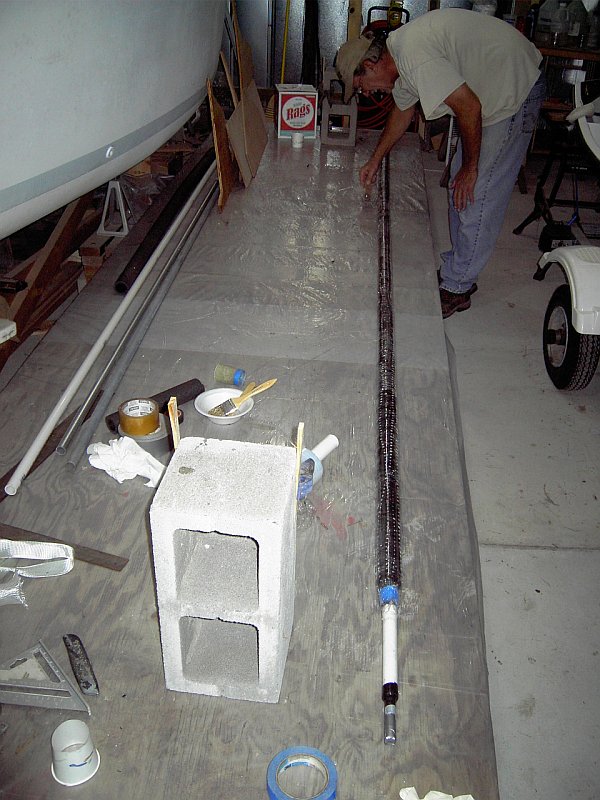
After the stretch wrap is on, it gets perforated with the pounce wheel and most of that excess resin oozes out as waste. This picture is bigger so you can see the lines of resin droplets.
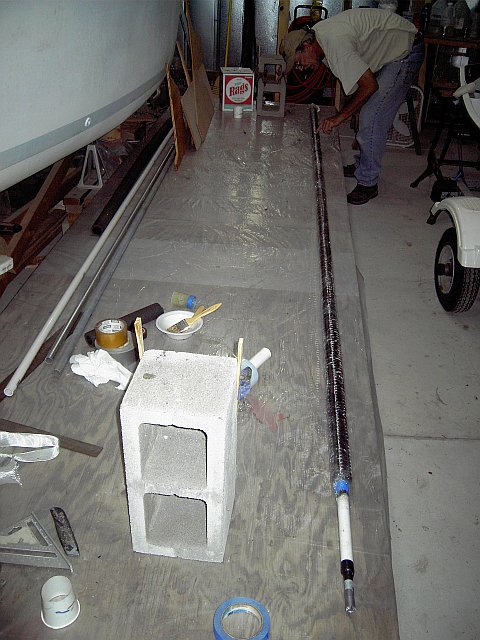
Inspecting a minor cosmetic flaw.
Right now, with 24 hours of cure time on the slow S3 resin, I'm happy with what I see. The mast blank, with mandrel removed weighs 4 lbs. 3 oz. Compare that to the 12 lb wooden blank that weighs 14+ lbs. rigged. It will make a noticeable difference. I'll probably miss the inertia but not the weight, if that makes sense.
First list of things I'd do different:
1. Triple overlap the stretch wrap on the first pass. I have spiral lumps. Not too bad and certainly not any weakness from them. The heat shrink tubing method that I used on the boom left some lumps, too. They have no interesting form to them, though.
2. As a preliminary step, I should have used a fiberglass sleeve to glue the reinforcement insert to the foam on either side of it. I don't have a smooth transition from insert to foam, especially at the top. The good news is that I definitely have a place where the mast will snap before it stores up too much potetial energy.
3. Since everything in the mandrel is hollow tubing, it might be worth stringing the whole shebang on a taut wire rope for some of the final steps including cure.
Re: GK's V10
Posted: Thu Oct 28, 2010 12:22 pm
by bondo
Wow, I just found your thread. I skimmed through and saw some really beautiful work. Really nice looking boat. I bet it's fun. Now I have lots to read (this thread) and learn. The cf work is of special interest. Thankyou for posting your experience. It is valuable and appreciated. Good work.
Re: GK's V10
Posted: Fri Oct 29, 2010 1:16 am
by gk108
Thanks, bondo. You are right, this boat is 100% fun. Carbon fiber is an interesting material. I think that I need more practice with it. I guess a whisker pole for the big boat will be a project down the road.
ks8 wrote:Peel Ply!
I've experimented with dry runs of peel ply under stretch wrap. With a soft foam mandrel you slightly compress the foam as you stretch the wrap and that reduction in circumference creates wrinkles in the liner fabric that looked to me like they would cause more problems than they would solve. The stretch wrap makes wrinkles, too, but they are shallow and easily filled. The peel ply wrinkles looked like they would starve the layup of resin by either trapping air or spot pinching it dry.
Re: GK's V10
Posted: Fri Oct 29, 2010 2:23 am
by ks8
ks8 wrote:Peel Ply!
What I meant by that was that you were, in effect, making your own more customized version of peel ply.
Nice documentation. Looking forward to pictures of the cured spar.
Re: GK's V10
Posted: Fri Oct 29, 2010 9:32 am
by TomW
Gary looking real good guy. Can't wait to see it on the boat!
Tom
Re: GK's V10
Posted: Fri Oct 29, 2010 10:19 am
by gk108
Part of the reason for experimenting with the peel ply was to just get an idea about how an arrangement like that would go together because at one time I was considering a layer of fake woodgrain Chromaveil fabric under the outer fiberglass layer. When that didn't work, I was discussing it with the boss at lunch one day and his comment, "Let me get this straight, you want it to look like wood, so you're going to glue a picture of wood to it?" kinda made me decide to paint it instead.
I guess the next step is to start working on size, shape and layout of attachments.
Re: GK's V10
Posted: Fri Oct 29, 2010 10:37 am
by Cracker Larry
"Let me get this straight, you want it to look like wood, so you're going to glue a picture of wood to it?"
LMAO
Maybe that's why he's the boss
Really cool project Gary
Re: GK's V10
Posted: Sun Oct 31, 2010 5:26 pm
by gk108
I put some filler on it to cover the low spots and wrinkles.
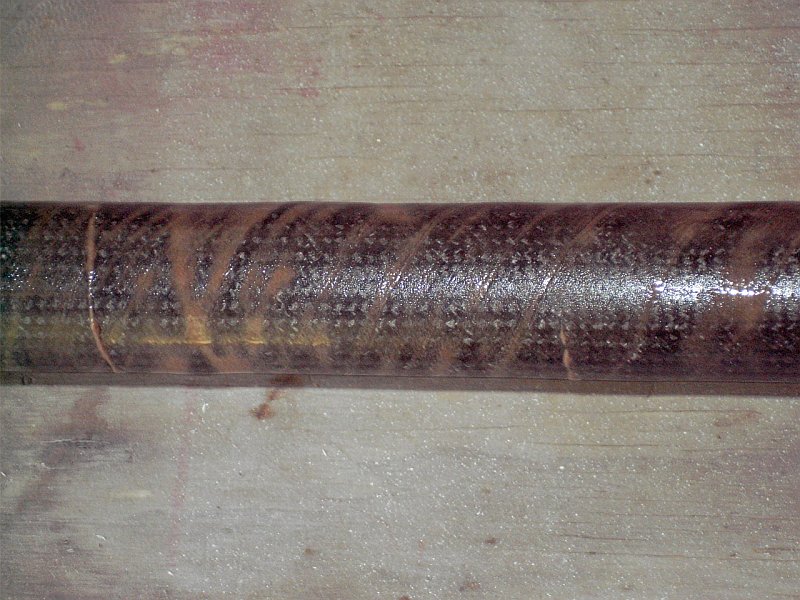
Here's the narrowed area where the insert (almost) meets the foam.
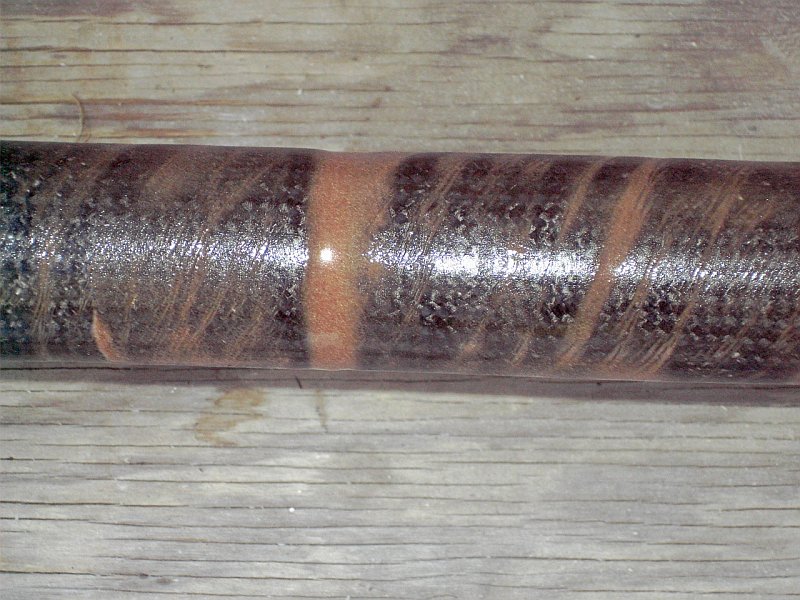
It looks like it will still have some "texture" but I'm not going to get too carried away with fairing it. Looking like bark might be as close as it gets to looking like wood.
Re: GK's V10
Posted: Tue Nov 02, 2010 1:55 am
by gk108
Added a 6 RPM gearmotor drive to roll the tube while finish coats cure.
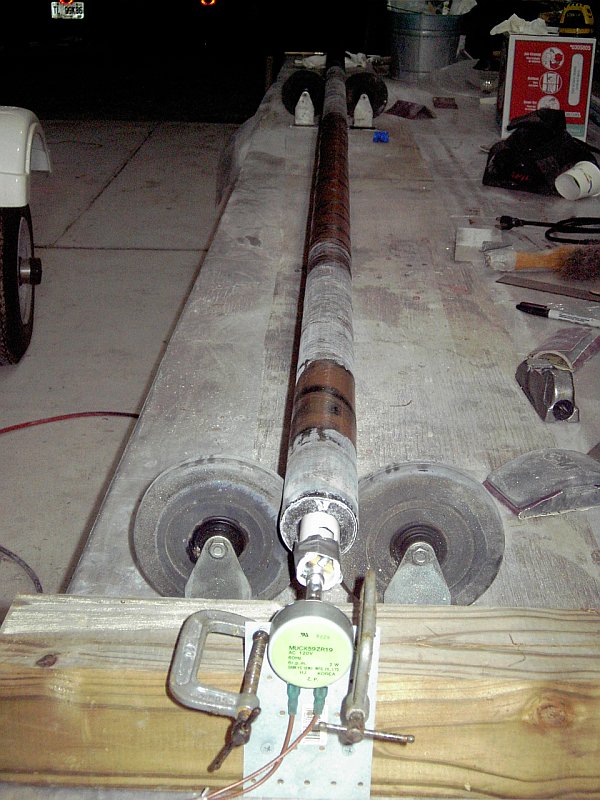
Re: GK's V10
Posted: Fri Nov 12, 2010 11:28 pm
by gk108
Here's a drawing detailing the way I'm going to make the masthead. I'll make a similar fitting for the downhaul.
Re: GK's V10
Posted: Sat Nov 13, 2010 4:29 am
by TomW
Looks good to me GK, the one inch tape around the mast and the filet should anchor it well. What's the total thickness of the masthead i count 5 layers which is less than 1/8" if my math is right. If not ignore me.
You might want to go a little thicker if it is less than an 1/8. Don't know.
Hard to compare to aluminum?
Tom
Re: GK's V10
Posted: Sat Nov 13, 2010 9:46 am
by gk108
The pre-fabbed fiberglass spine is 1/16" thick, so with what is on the drawing, it should end up about 1/8". I'll probably glue a couple of bits of the spine material on the outsides to get the protruding tab up to around ¼" thick total when finished. Then I'll overdrill the hole and fill it with silica/epoxy and re-drill for whatever shackle I use.
Re: GK's V10
Posted: Sun Nov 28, 2010 4:39 pm
by gk108
I plugged the ends of the tube. Here's the hollowed out wood plug for the foot. The hollow end goes inside.
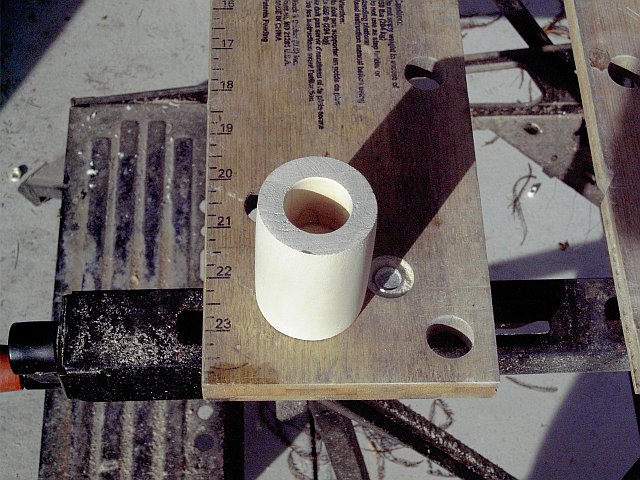
While that was soaking up some resin, I prepared the tube with a stop to hold the plug in place and a tape cofferdam to make a composite cap to protect the end of the tube.
Then I buttered up the hole and the plug with thickened epoxy and pushed it in to the stop and poured the remaining thickened epoxy up to the top of the cofferdam.
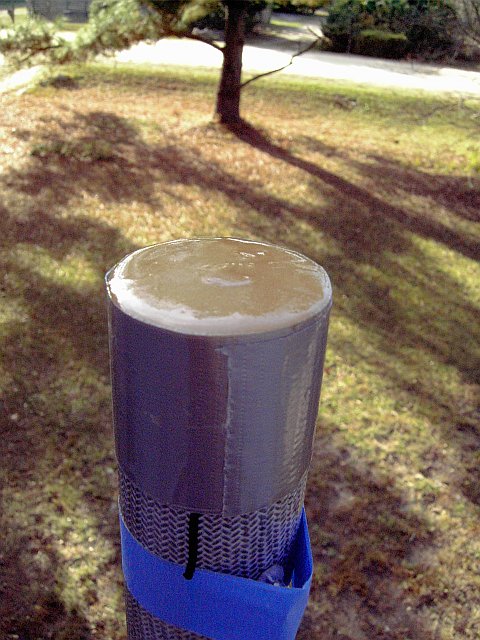
Re: GK's V10
Posted: Mon Nov 29, 2010 11:37 am
by gk108
Current weight of the mast is 5 lbs. 0.9 oz. with a CG at 60" from the foot. I'll probably add another pound of fittings, either molded in or screwed on and I don't expect CG to move too much from them. That's a pretty big difference from the 14 lbs. / 72" CG of the wooden mast.
Re: GK's V10
Posted: Mon Nov 29, 2010 1:39 pm
by ks8
Re: GK's V10
Posted: Mon Nov 29, 2010 7:21 pm
by TomW
That's great!
Re: GK's V10
Posted: Mon Dec 13, 2010 6:43 pm
by gk108
Initial form of the masthead is done.
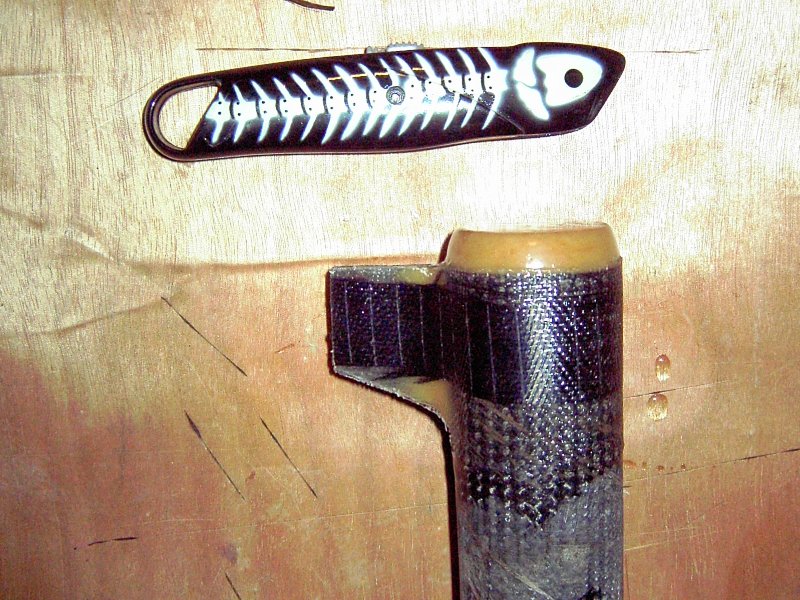
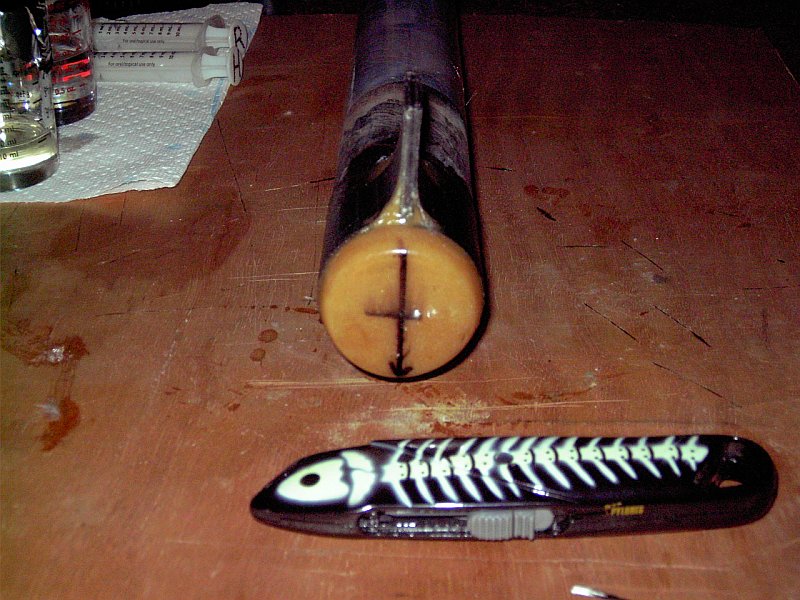
I'll add some more thickness on the tang to provide a fair lead for the lashing line.
Re: GK's V10
Posted: Mon Dec 13, 2010 7:34 pm
by Cracker Larry
That really looks great Gary, nice work
Re: GK's V10
Posted: Tue Dec 14, 2010 12:41 am
by TomW
Gary that really looks nice!
Re: GK's V10
Posted: Tue Dec 14, 2010 9:18 am
by gk108
Thanks, guys. Here's the downhaul all wrapped up waiting to cure.
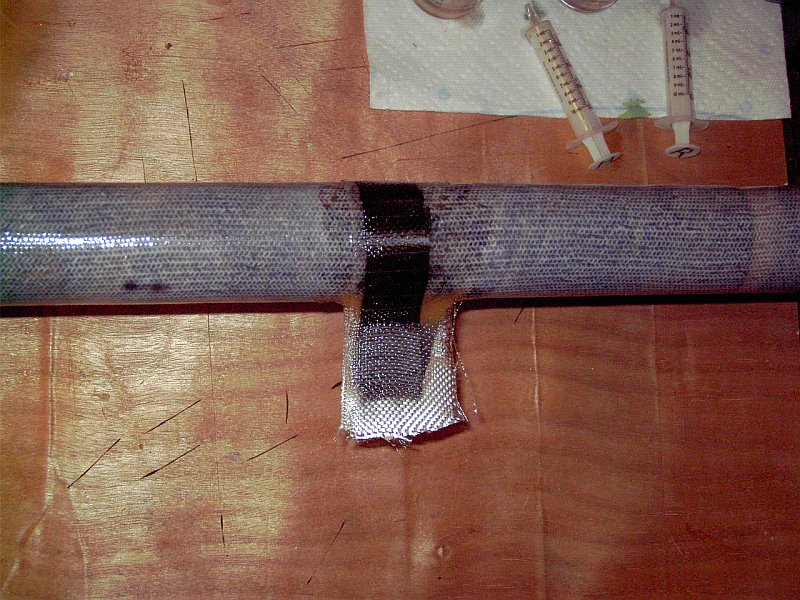
Later today, while the epoxy is still green, I'll trim the excess glass and carbon from the edges of the tang. Right now, that extra material serves to wick up excess resin.
Re: GK's V10
Posted: Tue Dec 14, 2010 2:08 pm
by TomW
Your making good progress GK must have someplace nice and warm to work in.
Re: GK's V10
Posted: Tue Dec 14, 2010 4:37 pm
by Cracker Larry
I think if you put a big reel seat on it and a handle, it would make a great jewfish rod
Re: GK's V10
Posted: Tue Dec 14, 2010 5:56 pm
by gk108
Yeah, Tom, now is the time for long skinny indoor projects that can live in a hallway.
it would make a great jewfish rod
We're gonna need a bigger boat!
Re: GK's V10
Posted: Wed Dec 22, 2010 10:02 am
by gk108
I thought I'd learn a little more marlinspike seamanship while waiting for some parts for the mast.
I bought some 12 strand single braid from Duckworks a while back. Closeout stuff that they don't carry any more, so the lines that were cut for the wooden mast are a bit too short for the new mast and I can't buy more rope.
First try was a mobius brummel eyesplice. I didn't need an eye spliced in anything, but it was what the Riggers Apprentice showed. It's mostly designed for a splice where the standing part is really long or not accessible at all.
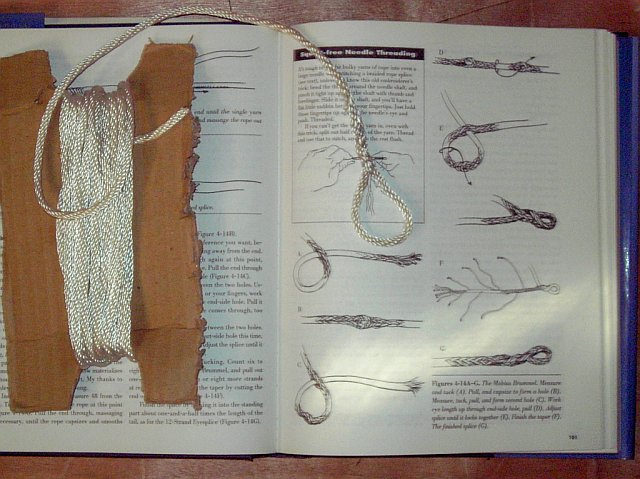
Next was a simpler brummel splice to add length. Using a marlinspike, open a hole through the braid 24X the diameter away from the bitter end of each half. Pull the standing part of each half through the hole of the other half.
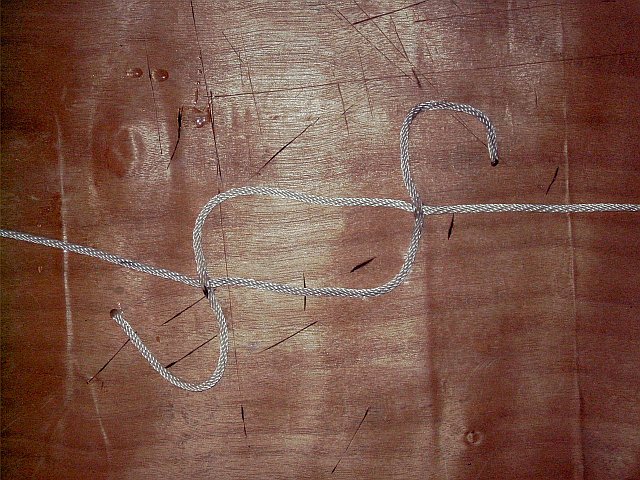
Closeup of that step.
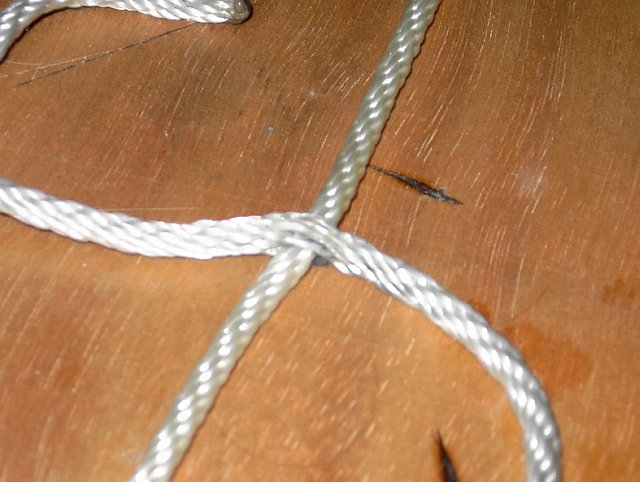
The standing parts are pulled up to where the eyes meet, each tail is tapered and tucked inside the standing part of the other half, leaving out one long strand.
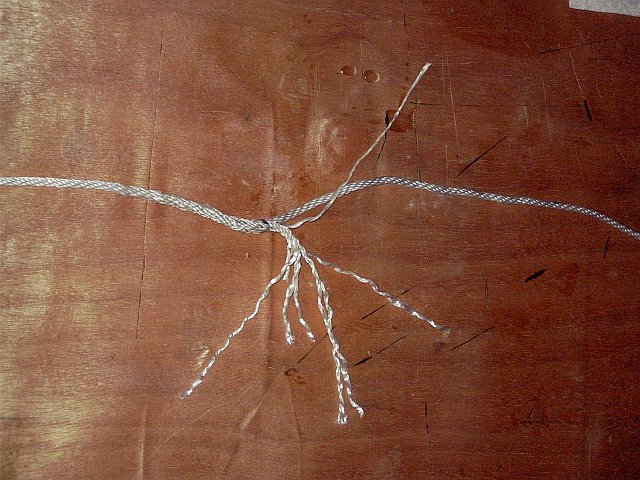
To prevent the splice from working loose while not under strain, the tails are stitched in place with the remaining strand.
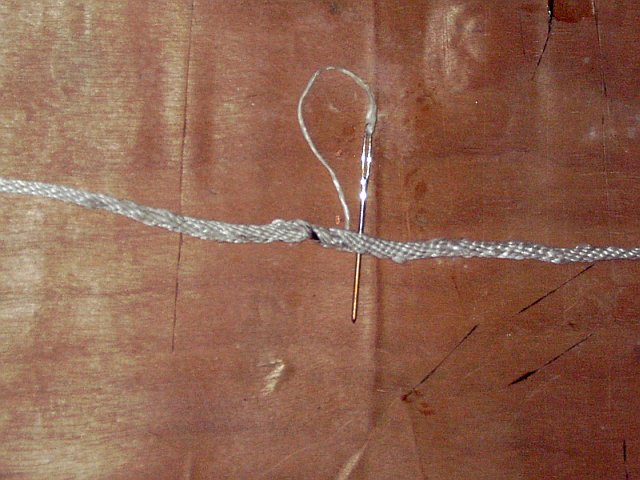
That's good enough to pass through fairleads and grip in a cam cleat and strong enough that I can't pull it apart. Should work fine for a furling line.
Re: GK's V10
Posted: Wed Dec 22, 2010 12:36 pm
by Cracker Larry
I can't buy more rope.
Is the electronics business that bad
Nice splicing
Re: GK's V10
Posted: Wed Dec 22, 2010 3:43 pm
by TomW
Yea, that's some nice spliceing, I hate doing it. You have to be really bored to want to do that kind of stuff1
Re: GK's V10
Posted: Wed Dec 22, 2010 11:00 pm
by ks8
Nice.
Re: GK's V10
Posted: Fri Dec 24, 2010 9:21 am
by gk108
Cracker Larry wrote:Is the electronics business that bad
I just like that particular rope for the application. Single braid polyester, limp yet strong. Business has held in there, down slightly for the year, but still shipping a thousand or so orders each week.
My personal electronics are a different matter. I have a half dozen worn out PA drivers to replace and I'm re-coning them myself, something I've never tried before. Expensive learning curve, $70. wasted already.
Thought I'd use my old Crown DC300 amp to test the re-cones, but the bridge rectifier in it decided to short after 35 years. I'll fix it and retire it, to be replaced with a new Crown amp with switching power supply. If I have a busy enough schedule in the next year, all 3 front-of-house amps will be replaced with new Crowns. That will make the amp rack weigh 120 lbs. less, since the big transformer in each amp is eliminated by the switching power supply.
Bad channels in my 100 ft. audio snake, too. The stage box got soaked in a rain shower a couple of years ago and the effects are really showing now. That should be cheap to fix, panel connectors on order.
Lotsa work to do, but it sure makes for big fun when it is all working right.

Re: GK's V10
Posted: Fri Dec 24, 2010 12:23 pm
by ks8
A suggestion... before you close up the stage box, after soldering on the new XLRs, give 'em a good wigglin' on the lead wires from the snake up to the xlr or 1/4 inch conns, with a mic plugged in each xlr, one at a time, maybe even a phantom power condenser, to make sure no water found its way in to the insulation to cause trouble. Keep the main amp low and crank the pre-amps, sliders, whatever you've got, just short of distortion. Listen on the phones. Depending on your output, and how much the talent likes to stomp around, some vibration and *damp conductor* might cause some background crackling under vibration, you know, one of those annoying *now what?*'s.
On the 1/4 inch lines, that's not quite as fair a test, depending on how well shielded the runs are in that snake. I'd test the 1/4 inch runs with and without a direct box on each end, with ground lifted and without, but its hard to evaluate any damp conductor issues if you hadn't done the same sort of tests on the 1/4 inch lines when the snake was new and dry. Isn't this fun?
Man, I hate uninvited *Rice Krispies*. But I like knowing the snake is clean, so if I get noise, I know to hunt it down elsewhere.
Things that make you look up and realize 10 hours just flew by.
I've got a dry 50 footer in a bag, in case its ever needed. Had another, but donated to a church. Having a spare 100 footer is a bit too pricey for me right now, and I haven't gigged in quite a few years. Your post just got me to flip a few latches. The old Mackie is whining for attention. Just picked up (2) XLRf to TRS wires for the output of my nephew's Behringer (to two venerable Yam 202's), and it brought back memories, but not as to price! $25 each for 6 foot cables, and not the top end either! Cost doubled in 10 years?! Sales rep says *Price of copper*. Well, good memories anyway...
Hoping new connectors will be the end of the problems on that snake.
Have you done any test stepping of the CF mast yet?
Re: GK's V10
Posted: Fri Dec 24, 2010 1:43 pm
by gk108
If the snake gives me too much trouble, I'll toss it all and go with a digital snake into a Presonus 24 ch. digital desk.
My current 16 ch. rig in the rehearsal room:

Re: GK's V10
Posted: Fri Dec 24, 2010 5:23 pm
by ks8
I just might need to gather and reassemble neglected stuff since the move. Some people might tell me that last posting is a bad influence on me.
Get out of something for ten or fifteen years and the whole world changes! And stays the same...
My old Kustom II Lead still works, tubes still glowing.
Re: GK's V10
Posted: Mon Dec 27, 2010 9:34 am
by gk108
Kustom! The drivers I'm re-coning go in a pair of Kustom "Sugar Scoop" bass horns that were distributed to theaters with the original Earthquake movie in 1975.
Back to the subject of the single braid dacron rope... One other thing I forgot to mention is that the strands of this rope, when unlaid, make an excellent thread for stitching the leathering on sail corners. And, being 12 strand single braid, it's much easier to unlay the strands compared to double braid. I have several pieces in my sail repair kit, waxed and ready to go.
Re: GK's V10
Posted: Thu Jan 13, 2011 10:42 am
by gk108
Well, most of my PA maintenance issues are solved. Drivers re-coned and Sandy Claws brought me a new Crown amp. It's still too cold for me outside, but I have more bits glued to the mast.
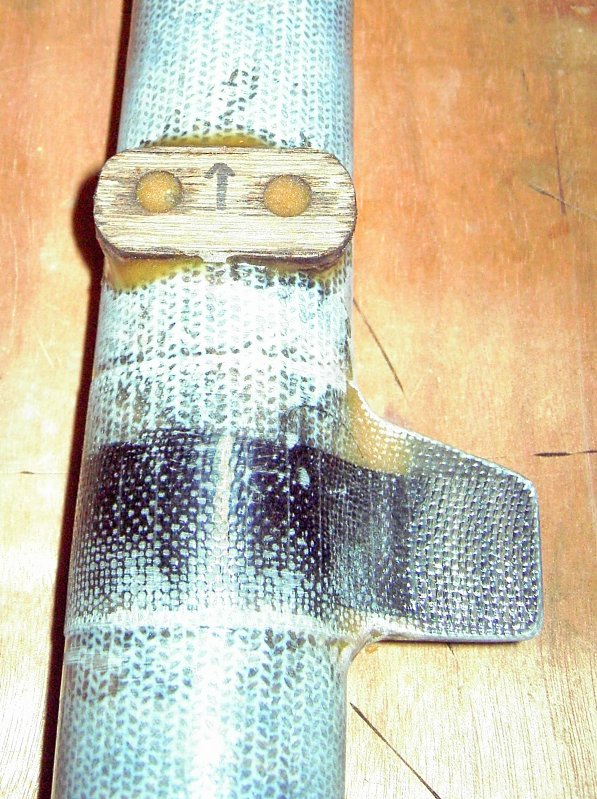
These are mounts for Harken 471 cam cleats with 424 top fairleads. On the wooden mast, I used clam cleats with fairleads and they always gave me trouble when I wanted the lines to run free. Hopefully, cam cleats won't grab the line until I want them to. I made the saddles from 10mm Meranti and drilled the oversized holes before gluing. When I glued them on, I covered the outer face with masking tape, filled the oversize holes, gooped the rest of it up and clamped them in place. Peel the masking tape when it's cured and there's an easy to work with flat mounting area.
Re: GK's V10
Posted: Sat Feb 05, 2011 7:18 pm
by gk108
The mast is now faired (somewhat) and sealed.
The eyes in the downhaul and masthead were drilled oversized and countersunk on both sides, then filled with thick epoxy/silica. When that cured, they were drilled, slightly countersunk and rounded over to make a nice hardened fairlead.
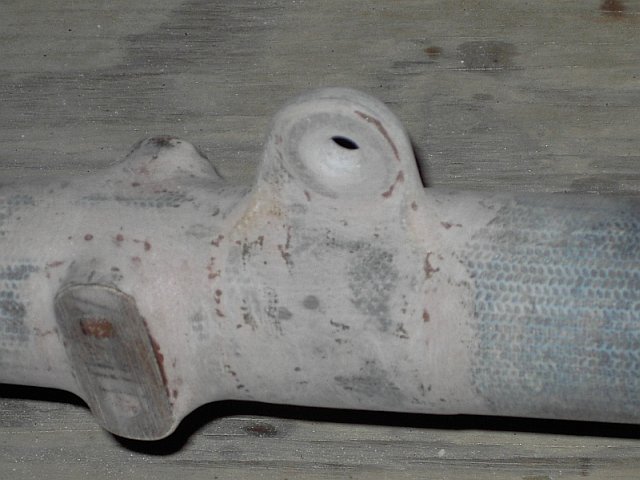
A coat of white pigmented epoxy hides some ugliness.
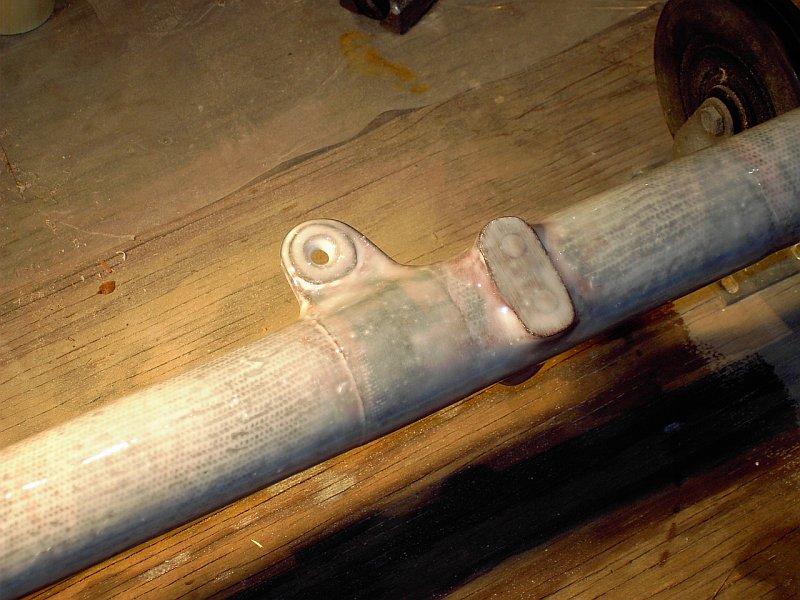
Masthead and turning gear. Slowly rolling the mast while the resin cures is the best way to prevent runs.
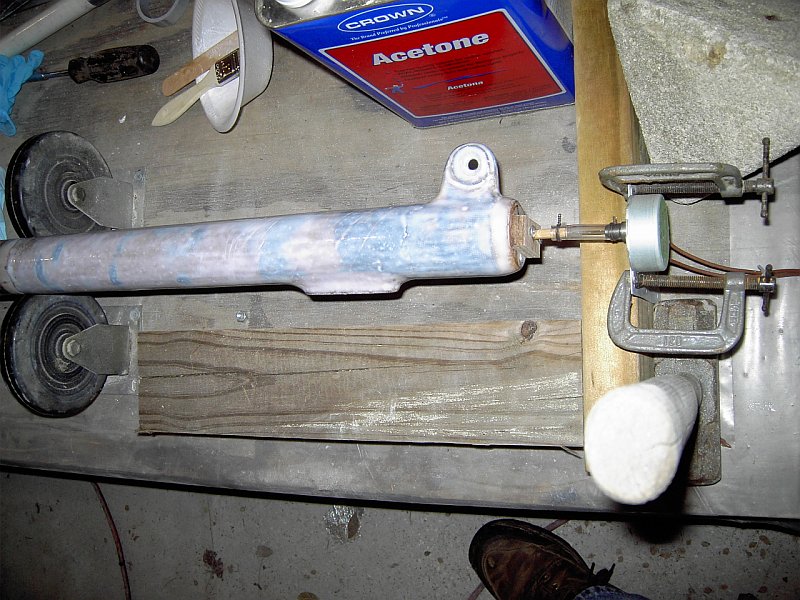
Re: GK's V10
Posted: Sun Feb 06, 2011 9:58 am
by topwater
Looking good GK keep it up, i am learning something new .
Re: GK's V10
Posted: Sun Feb 06, 2011 11:08 am
by wegcagle
Nice Work
That mast looks great. Any clue how much she'll weigh?
Will
Re: GK's V10
Posted: Sun Feb 06, 2011 1:14 pm
by cape man
Like making a BIG fishing rod.
You going to make any neat butt wraps with colored thread?
Re: GK's V10
Posted: Sun Feb 06, 2011 1:23 pm
by wegcagle
Like making a BIG fishing rod.
That's one expensive fishing rod
You going to make any neat butt wraps with colored thread?
How about using the snakeskin inlays that mudhole sales?
(PS: I'm actually gonna try this on my first rod, pray for me)
Will
Re: GK's V10
Posted: Sun Feb 06, 2011 1:53 pm
by gk108
The current weight should be right at 5½ lbs. I'm going to sail it a while before doing anything permanent about the snotter block location on the mast. After that is attached and paint is done, it should still come in under 6 lbs. I'm confident that it will be strong enough for the sail area and then some.
I'm afraid some of the weight savings will be offset by an upgrade in ground tackle for this boat. The 1.5 lb. folding anchor doesn't seem to have enough holding power.
Capeman,
decorative weaves are available.
Re: GK's V10
Posted: Sun Feb 06, 2011 2:09 pm
by Cracker Larry
Great link GK, thanks for that
Great work too, but I've said that before. Very cool project
Re: GK's V10
Posted: Sun Feb 06, 2011 2:32 pm
by gk108
Yep. A CF whisker pole for the O'Day is already tagged on the end of the rebuild. I guess I'll have to crawl back into the bilge of that thing after I bake this mast.
Re: GK's V10
Posted: Sun Feb 06, 2011 3:45 pm
by ks8
I'm thinking a whisker pole might be my first CF project. Will you be documenting that project?
Re: GK's V10
Posted: Mon Feb 07, 2011 8:37 am
by topwater
Very cool project
If i had a small sail boat i would have to have one of these
Re: GK's V10
Posted: Mon Feb 07, 2011 9:13 am
by gk108
topwater wrote:Very cool project
If i had a small sail boat i would have to have one of these
The way it all seems to add up to me, I think a CF mast is a little faster and easier than a wooden one. If I had used Jacques sail plan, there would not have been much need for me to make the wooden mast to try out my sail plan. I'm glad I did make the wooden spars, though. There's a few extra holes in them where I moved some of the hardware around, etc. and I sure am glad that those extra holes aren't in the CF mast.
And, the other good thing is that there's always a good excuse for me to go sailing now. "Testing the carbon fiber mast" could take several years.
ks, you know I'll document the O'Day whisker pole, but there's several pages of rebuild thread to write before I get to it.
Re: GK's V10
Posted: Mon Feb 07, 2011 10:41 am
by ks8
You'll have it written before I get to buying any CF sleeves.
Re: GK's V10
Posted: Mon Feb 07, 2011 11:06 am
by gk108
Here we go, all sealed up and ready to bake...
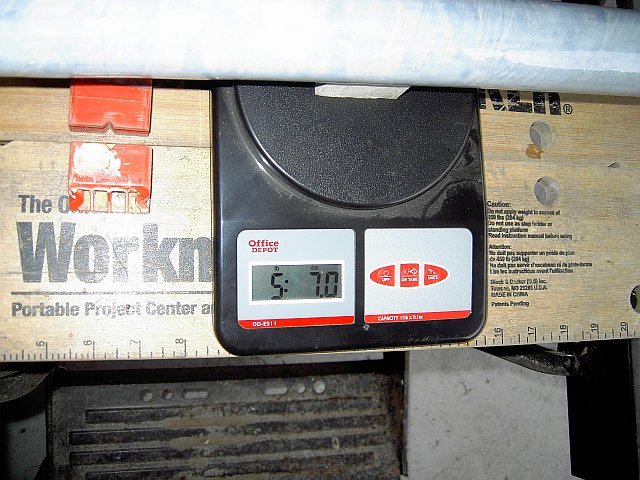
Re: GK's V10
Posted: Mon Feb 07, 2011 12:05 pm
by ks8
If I could get my mast down to 10 pounds, that is some serious incentive!
Re: GK's V10
Posted: Mon Feb 07, 2011 7:59 pm
by gk108
That's the incentive that's driven me on this project. The weight of the wooden mast as it affects displacement is of little consequence compared to the momentum of that weight. With the force of the momentum centered 5 ft. above hull CG, the mast helps rock the boat and contributes to heeling force. Reducing that weight by half and lowering the mast CG should make a noticeable difference. With that difference and, hopefully, improved sail shaping abilities, it might be like having a different boat without the trade-in penalties.
Re: GK's V10
Posted: Mon Feb 07, 2011 9:38 pm
by ks8
Looking forward to hearing the report of the sea trials.
Re: GK's V10
Posted: Mon Feb 14, 2011 5:50 pm
by gk108
There's not much left to do on the mast.
I embedded a ¼-20 nylon stud in the bottom...
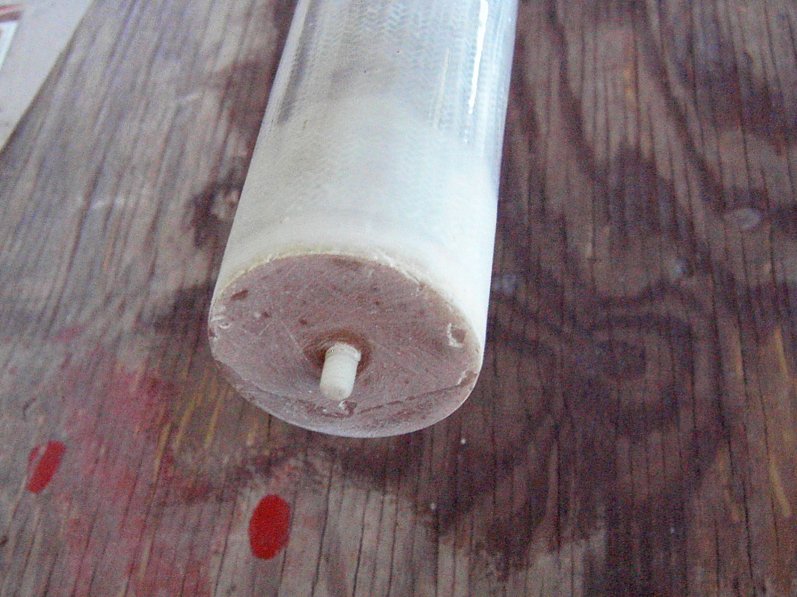
To hold this custom made spherical convex Delrin bearing...
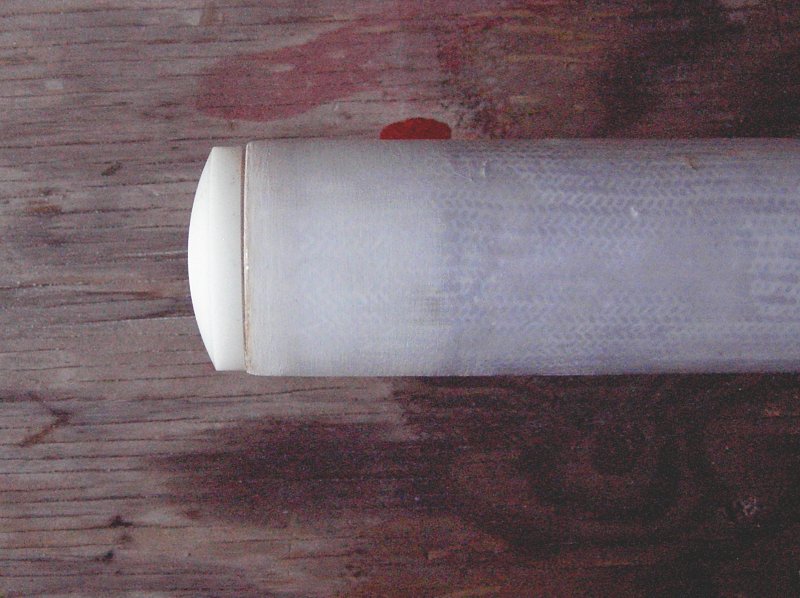
In about a week, it will be ready for post-curing, then sea trials before paint.
Re: GK's V10
Posted: Thu Feb 17, 2011 8:25 pm
by Aripeka Angler
You do some fine work Gary
I have to tell you that you kind of inspired me to take the plunge into this carbon fiber stuff. My sleeves are on the way from Soller as well as the heat shrink tubing. I have a question for you, where did you get the intel on the post curing? I would like to do some reading on that procedure. I am not sure it is required for a small 1" shaft. Jon over at Soller said that I need to use 4 layers of sleeves and didn't mention post curing. I am probably going to send him another email about post curing but I would like to do some reading before I send it.Thanks in advance
Re: GK's V10
Posted: Fri Feb 18, 2011 12:38 am
by gk108
Thanks, Richard. Soller might not have much on post-curing because he sells WEST resin and their formulation, while it can benefit from it, isn't really specific about post-cure like Silvertip is. I had to round up my info from some posts here and some from S3. In January, 2010, they posted a whole lesson on post-curing on their site:
http://www.systemthree.com/sys3news/?p=218
4 layers should make for a stiff paddle. Using a higher performance resin like Silvertip and post-curing, you might be able to get by with 3 layers. I may be wrong, though. The thicker wall may be necessary for maintaining stiffness on a hot summer day. Most of the variables associated with the layup can be calculated within a certain range, but radiant heat from sunshine is difficult to convert into a constant. Better safe than sorry, especially since it's your fingers wrapped around the paddle when it breaks.
Re: GK's V10
Posted: Fri Feb 18, 2011 9:12 am
by Aripeka Angler
Thanks for the link Gary, I have bought the Silvertip as well. I am going to build the shafts one at a time, to minimize the pain and suffering if I screw up. I was also surprised that it would require 4 layers, but that is what they told me without hesitation. If I did build one with three layers, could I add a fourth one later?
Re: GK's V10
Posted: Fri Feb 18, 2011 11:10 am
by gk108
One at a time is the best way to go. There's too much to do at once to be trying it twice.
About the only downside I can see with adding a fourth layer later is loss of wet on wet benefits for that layer. Let it cure for at least 4 days before you decide. That way, you won't be judging flexibility on resin that isn't fully cured.
Like rope, reinforcing fabrics are great in tension but poor in compression. It is the epoxy resin that must take the compression load. So, the first requirement of the epoxy here is that it be very stiff so that it does not buckle in compression.
Considering the tension/compression dynamic, 3 layers of CF should be plenty for the tension side, but may not have enough resin content for the compression side.
Re: GK's V10
Posted: Fri Feb 18, 2011 11:23 am
by Aripeka Angler
I read information in the blog post you linked to...three times. It is a very interesting read, I think I "get it" now. Thanks again and I will post something in my thread when I have something worth sharing. Sorry for the threadjack, but you have been very helpful indeed
Re: GK's V10
Posted: Fri Feb 18, 2011 11:52 am
by gk108
No hijack, just loading the forum with more CF information. Obviously, there's a lot of curiousity about it, so while I'm satisfying mine...
I read information in the blog post you linked to...three times.
Hey, I'm so nerdy I got out the graph paper and made S curves.
Re: GK's V10
Posted: Sat Feb 19, 2011 9:50 am
by topwater
Gk i have also read the artical and have been going over this in my head and have a question.
If i was to post cure my nv23 hull , cover the hull with plastic use a couple of heaters, get it up to temp
for two hours, wouldnt the outside glass on the outside of the hull be much cooler
Would you still
get the same effect on the outside glass
I would think the wood in the hull would act as an insulation
lowering outside skin temps.
Re: GK's V10
Posted: Sat Feb 19, 2011 3:34 pm
by TomW
TW, System 3 had a 3 part lesson on post curing instead ot that one page article before they changed there format. You have to get the surface of the hull being post cured to the tempurature required for it to be post cured. Also post curing isn't as effective with some epoxies as with others. For example Silver Tip is very good for post curing, System 3 and Marinepoxy don't benefit as much. I have it printed out somewhere and thought I had it saved here on the computer but can't find it right now. But basically the summary they did is about what they said without the charts and technical jargon.
Re: GK's V10
Posted: Sun Feb 20, 2011 3:46 am
by gk108
Topwater, I think they want you to have airspace between the top of the plastic tent and the surface of the hull so circulation heats the outside as well.
For larger parts you can rig some black polyethylene sheeting on some ropes over than hull set out in the sun. ... If you’re inside the barn, tent with clear polyethylene and use a couple of space heaters.
Re: GK's V10
Posted: Sun Feb 20, 2011 9:17 am
by topwater
Thanks GK , Tom i am useing silver tip. Its more of a mental exersize, just thinking of how it would all work.
Re: GK's V10
Posted: Sun Feb 20, 2011 1:32 pm
by TomW
TW, Gary is right on you want an airspace between the plastic tenting material and the hull. Don't know how many you would need for a hull as big as yours.
Re: GK's V10
Posted: Sun Mar 13, 2011 1:33 pm
by gk108
One of my cousins has accumulated a South Bend lathe and a Bridgeport vertical milling machine in his garage workshop, so I asked him if he could make some bushings and he said he'd love to make boat parts. I sent him drawings and this stock I bought from McMaster-Carr.
He sent these back to me.
They fit perfectly.
The setscrews at the partner will get trimmed and the foot bushing gets a pair of flathead screws near the top, countersunk below flush.
I think I'll put a coat of primer on it before sea trials.
Re: GK's V10
Posted: Sun Mar 13, 2011 2:43 pm
by bondo
That Bridgeport end-mill is a great old machine. You are producing some really high end work here gk108. Custom machined mast components. Very cool.
Re: GK's V10
Posted: Sun Mar 13, 2011 11:04 pm
by gk108
Thanks bondo. I'm glad he got the Bridgeport. It's about too big for the garage, plus it has a 3 phase motor, so there's a rotary 3 phase generator that goes with it. Just the thing for single phase suburbia. The South Bend lathe looks like it's about 10" X 36" and it's old with a 1½" flat leather drive belt. It did a damn fine job on my bushings.
Since my Dad made his career in automotive tool & die and prototype work, custom machine work ain't nothin' but a thing to me. Since he retired, my access has been limited. My cousin, Dennis worked in the powerhouse machine shops for the two big Generals, Electric and Motors, until he took an early retirement a couple of years ago. He can make a lot of stuff with that lathe and mill and he's looking for more work, so anyone who needs bushings, shafts, sheaves, slots or any of this type of custom machine work, just hit my email button and I'll put you in touch with him. Reasonable rates, no CNC setup fees.
Re: GK's V10
Posted: Mon Mar 14, 2011 8:31 am
by topwater
GK those bushings are slick " pun intended "
Re: GK's V10
Posted: Mon Mar 14, 2011 12:24 pm
by gk108
topwater wrote:GK those bushings are slick " pun intended "
I don't know how to state the difference between the old wooden mast with graphite on graphite and this new one other than to say "you're correct". It doesn't just rotate, it spins!
Re: GK's V10
Posted: Mon Mar 21, 2011 4:40 am
by gk108
Here's some action video from the sea trial. I think it's too floppy, needs another layer of carbon fiber.
http://www.youtube.com/watch?v=rr-Mupu1PKQ
Re: GK's V10
Posted: Mon Mar 21, 2011 12:05 pm
by Brettitt41
Looks like it works fine. It does look like it has some bow in it and with only light wind, I would put another layer or two on. Really depends on your use though, for a light wind every ounce counts to win mast it looked perfect. If you want it as your every condition mast I would beef it up some more. Great looking work though.
Re: GK's V10
Posted: Mon Mar 21, 2011 12:49 pm
by gk108
I've been thinking about it and one thing that sticks is the way Joel solved a similar problem with his poling platform supports.
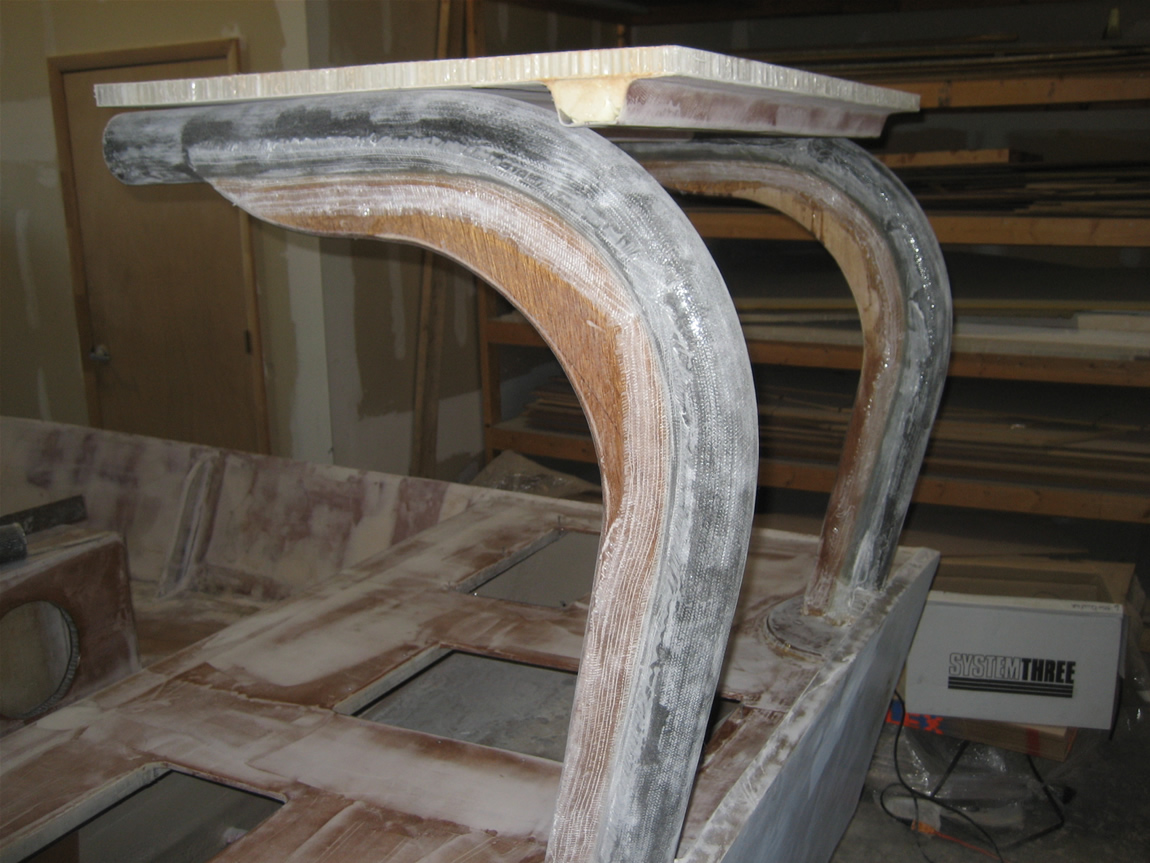
I think the trailing side of the mast needs more resistance to compression, just like the inside of the curve on his supports. Right now, I'm thinking about a piece of cove molding bonded on to make a teardrop shape.
Re: GK's V10
Posted: Mon Mar 21, 2011 8:24 pm
by gk108
Here's some setup scrap that shows what I'm thinking about adding. The cove radius was cut on a table saw, something I've always wanted to try.
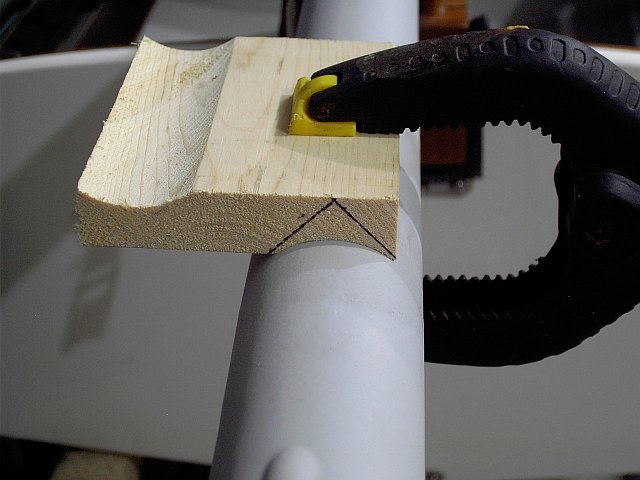
I have a little bit of nice quarter sawn Douglas Fir that should be perfect for the job.
Re: GK's V10
Posted: Mon Mar 21, 2011 9:25 pm
by Cracker Larry
Re: GK's V10
Posted: Tue Mar 22, 2011 12:14 am
by gk108
After drawing it on paper to get the width and depth of cut, I used the calculator from here to set up the saw:
http://woodgears.ca/cove/index.html
I think I'll hold off on the wing mast for now. Wing sails interest me, though. Here's
something that caught my eye the other day.
Re: GK's V10
Posted: Tue Mar 22, 2011 9:05 am
by topwater
GK if you look on the web a lot of the racing dinghys have quite alot of bend in the mast ,
granted its in alot heavyer air. If you wanted to stiffen it up some more couldnt you just
lay some more carbon tape down the back side of the mast
Just a thought.
Re: GK's V10
Posted: Tue Mar 22, 2011 12:04 pm
by gk108
TW, I considered that, but it would take a lot of material to achieve the necessary resistance to compression.
I keep going back to this statement on the S3 site:
Like rope, reinforcing fabrics are great in tension but poor in compression. It is the epoxy resin that must take the compression load. So, the first requirement of the epoxy here is that it be very stiff so that it does not buckle in compression.
Bending a tube will create tension on the outside of the bend and compression on the inside of it. Since we know that the CF has practically no stretch under tension, it stands to reason that the inside of the bend, where the compression occurs, is where most of the slight deformation that allows bending occurs. Wood is highly resistant to compression applied in the same direction as the grain, but not so good with tension. If I can apply that quality (and weight) only where it is needed and get the slight benefit of the little teardrop tail at the same time, I'll be satisfied. It'll be like one stave of a hollow wooden mast.
Re: GK's V10
Posted: Mon Mar 28, 2011 10:01 am
by gk108
Here we go.
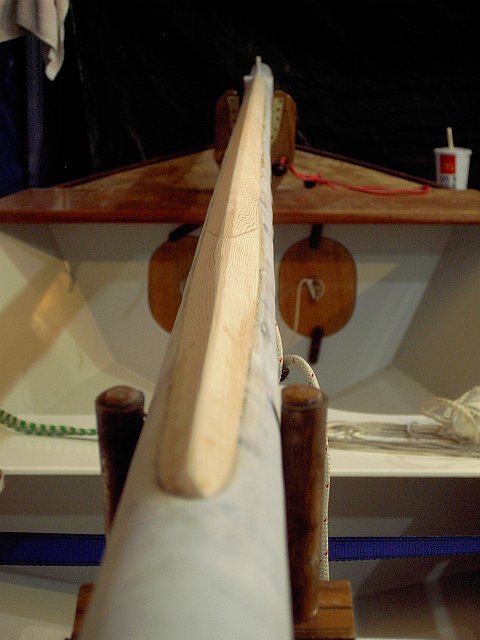
It looks like this will do just what I wanted. It takes more tha 50 lbs. of force to deflect the mast 2" in the middle.
Now I'm working on thumb cleats for the snotter block. I like this shape. Hope I can duplicate it 2 or 3 more times.
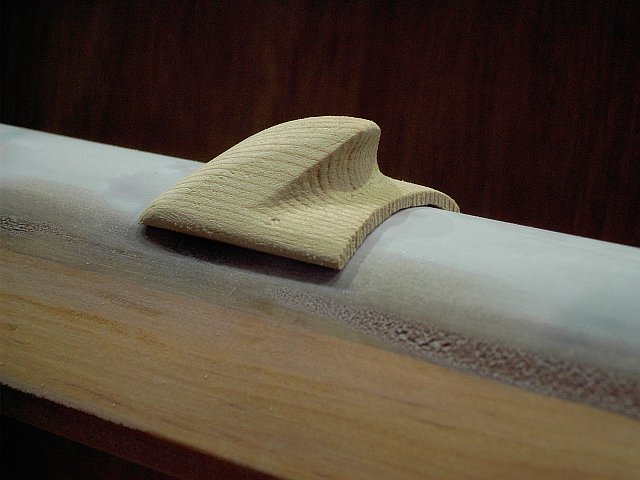
Re: GK's V10
Posted: Mon Mar 28, 2011 12:18 pm
by Brettitt41
gk108 wrote:Here we go.
Now I'm working on thumb cleats for the snotter block. I like this shape. Hope I can duplicate it 2 or 3 more times.
Make a mold out of that piece and use some CF to make all you need. Looking good.
Re: GK's V10
Posted: Tue Mar 29, 2011 8:45 am
by topwater
Make a mold out of that piece and use some CF to make all you need
Thats a real good idea
Re: GK's V10
Posted: Tue Mar 29, 2011 9:57 am
by gk108
I dunno. It looks cool, but somehow seems impractical to me. There's no flat surface, so making an open top mold like the one for the rubrail end caps can't be done. In order to get all of the thin areas filled, a closed mold would require casting capabilities that I don't have. All in all, they would amount to some relatively bulky stuff sticking out from the side of the mast.
I've been looking at some other possibilities. These
lacing knobs from Sailrite are looking good to me right now. For one thing, they can be moved easily if I misjudge the adjustment range I need. A piece of small stuff siezed to the rope grommet could act as a buttonhole and keep the grommet from jumping to another knob while tension is off, if that's a problem.
Re: GK's V10
Posted: Sun Apr 10, 2011 11:43 pm
by gk108
Mast is painted. 4 coats of white Interlux Brightside.
Just in time for the Spring molting.
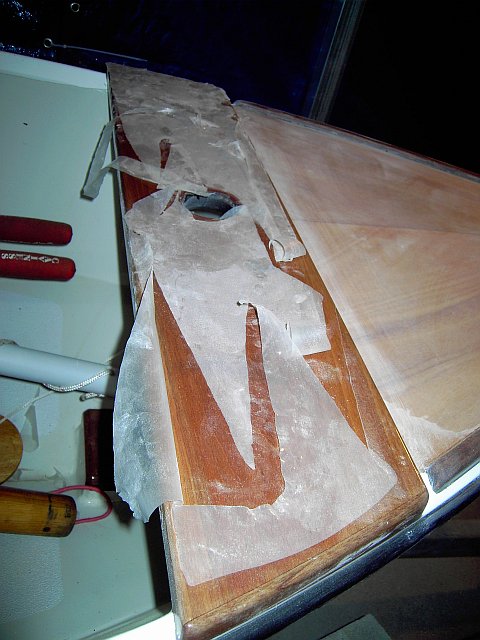
Re: GK's V10
Posted: Mon Apr 11, 2011 7:14 pm
by gk108
I guess I need help making up my mind about what to use for refinishing my brightwork. For obvious reasons, I'm hesitant to try something new, so Helmsman 1 part polyurethane would keep me in my comfort zone. I don't want to refinish very often, so maybe Perfection Plus is better for that, but I've never used it. Practical Sailor gives good ratings on it. My own experience with Helmsman is good. PS doesn't appear to have ever given any tests or ratings on the S3 paint, which should have told me something.
Right now, I'm only going to try to get the brightwork done, but it's a certainty that the rest of the paint system will experience failure by the end of this boating season. I'll be using Brightsides for the rest of the boat, just to stay in my comfort zone.
Re: GK's V10
Posted: Mon Apr 18, 2011 10:02 pm
by gk108
We'll see how this works.
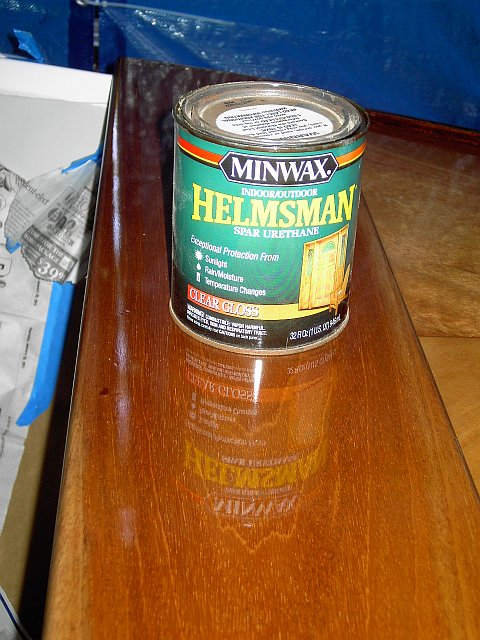
I realized that I had already been been testing this product on the O'Day and it was good for 5 years of basically full exposure. Pampered little V10 won't ever experience that kind of exposure, so maybe it will still look like this in 5 years.
And we'll see how this works, too.
I'm not sure that I fully understand the effect, but I'm led to believe that these stripes increase speed.
They also hide the previously unpainted area where the mast rested on the rollers.
Re: GK's V10
Posted: Mon Apr 18, 2011 10:08 pm
by Cracker Larry
Heck yeah, stripes make everything faster. If you call them racing stripes they will go faster yet
Nice work GK. When do we get to see you and Bradley match racing? You aren't coming to Boca Grande this year?
Re: GK's V10
Posted: Mon Apr 18, 2011 10:13 pm
by gstanfield
I like it
Re: GK's V10
Posted: Mon Apr 18, 2011 11:01 pm
by Doc_Dyer
Cracker Larry wrote:Heck yeah, stripes make everything faster. If you call them racing stripes they will go faster yet
Nice work GK. When do we get to see you and Bradley match racing? You aren't coming to Boca Grande this year?
If I can tote it to Boca, I can take it Ga anytime
Sounds fun...... Except I'm no sailor
But it would be nice to compare
Bradley
Re: GK's V10
Posted: Mon Apr 18, 2011 11:19 pm
by gk108
Cracker Larry wrote:When do we get to see you and Bradley match racing? You aren't coming to Boca Grande this year?
Wish I could but within the next couple of weeks I'm finally going to buy my little slice of paradise. Depending on how the extra fees hit my bank account, I may have to endure a couple more months of my self-imposed austerity. By the time I know the total bill, it may be too late to find a room anywhere near. I'm going to make a day trip down to the Cedar Key Messabout, if nothing else.
Sounds fun...... Except I'm no sailor
From time to time, I wonder about my own sailing skills.
But it would be nice to compare
Will you still be on St. Joe Bay the Friday after Boca?
Re: GK's V10
Posted: Mon Apr 18, 2011 11:26 pm
by Cracker Larry
If I can tote it to Boca, I can take it Ga anytime
GK has been to Crystal River a couple of times for past meets, the first time I met him he was heading down Crystal River in his D15 and I was heading up in my GF16. We recognized each other right away
Boca Grande is only a couple 3 hours more than that. 500 miles one way for me, but I'll be there
Must be 7 or 8 hundred for you and Andy. Come on and join us Gary
Sounds fun...... Except I'm no sailor
Heck Doc, I'll sail her in your place and swap you the keys to No Excuse. It don't matter if I lose, does it? Come get me if I get blown offshore towards Cuba, they don't like me there
Edit:
I'm finally going to buy my little slice of paradise.
Tell us more about your piece of paradise, that sounds great
Re: GK's V10
Posted: Tue Apr 19, 2011 1:31 pm
by TomW
GK yes tell us more of your little slice of paradise. Larry has his and I have my two. Can't happen to a better man!
Best wishes!
Tom
Re: GK's V10
Posted: Mon May 02, 2011 12:47 pm
by ks8
Re: GK's V10
Posted: Mon May 09, 2011 9:26 am
by gk108
More testing of the new spars. I think they are matched up with the rest of the rig now. With the teardrop shape of the mast, I changed from spiral lacing the sail to robands. Jacques is right on the money when he recommends robands as the most controllable method of bending a sail on the mast.
http://connect.garmin.com/activity/84423075
Lots of puffs and lulls, breeze curling around points of land and gator wakes which rhymes with freighter wakes. I spent most of the afternoon working my way upwind so I could make a nice downwind run with the boom swung out past 90° for some downwind lift. Dunno why I'm the only one I ever see sailing a boat on Lake Seminole.
Some video on the way, as soon as I edit it.
Re: GK's V10
Posted: Tue May 10, 2011 6:55 pm
by gk108
Some stills from the tillercam video:

It was a sunny day.
Note the wrinkle in the sail at the first grommet below the head. I tied the roband at the head too tight. Not only did it make the wrinkle, it also made the leech cup more than normal, even though it's hollow cut to prevent cupping. Next time, no roband at the head.
Here's the video. Pretty boring, a few tacks and most of a furling at the end.
Re: GK's V10
Posted: Thu May 19, 2011 4:14 pm
by mecreature
Always fun to see your work gk..
took me a while to catch up on this thread..

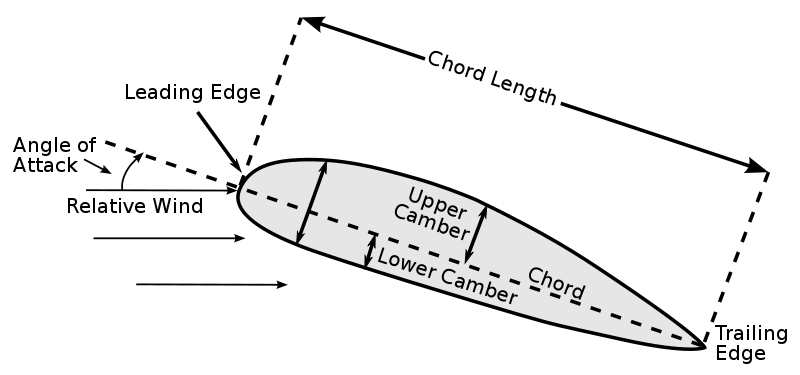
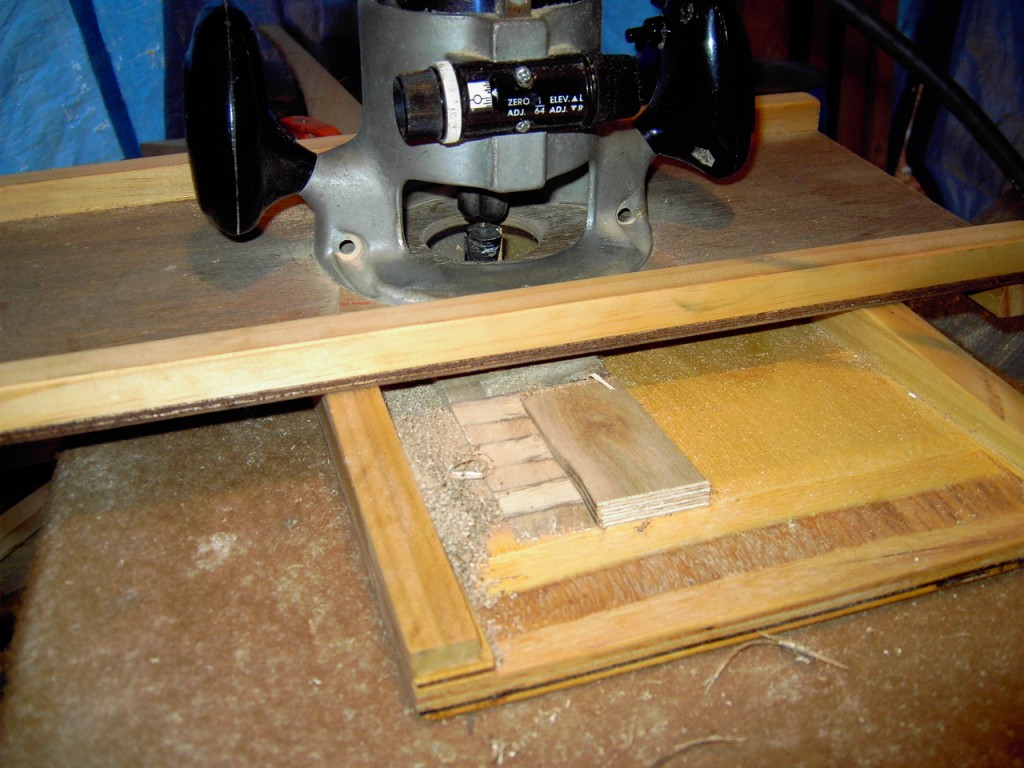