
Next pics I'll scale 'em down.
Ross, I live in Hales Corners and work in Waukesha. Wouldn't mind some help with the sanding when I get that far.
It's nasty out here too. Got about 5" of snow mixed with freezing rain sitting in the driveway waiting for me.
Fred in Wisc
Little Hickman Sea Sled
-
Fred in Wisc
- * Bateau Builder *

- Posts: 972
- Joined: Tue May 02, 2006 8:54 pm
- Location: SE WI
- Location: Milwaukee WI
-
Fred in Wisc
- * Bateau Builder *
- Posts: 972
- Joined: Tue May 02, 2006 8:54 pm
- Location: SE WI
- Location: Milwaukee WI
It's the Sea Sled. The inverted V at the back is only a coule of degrees, I think it came out to 3/8" or so at the center.
You can just barely see it in the pic.
I should have pics of the hull plywood zip tied out soon, I've been playing with getting it fair and the gaps pretty uniform. Found a math/cutting error, but nothing I can't fix with a scrap of ply and some epoxy.
Fred in Wisc
You can just barely see it in the pic.
I should have pics of the hull plywood zip tied out soon, I've been playing with getting it fair and the gaps pretty uniform. Found a math/cutting error, but nothing I can't fix with a scrap of ply and some epoxy.
Fred in Wisc
-
Mike Redmond
- Frequent Poster

- Posts: 163
- Joined: Sun Jan 14, 2007 9:23 pm
RE Sea sled
HI,nice work keep up with the pics...Did you figure out how much it will weigh ,the weight of a boat is a constant preocupation with me ...getting older not stronger...11 you lucky little d...il minus 23C yesterday morning in Edmonton Brrrrrrr winter is not officially started and I cant hardly wait for spring to show up...So have a nice build you seam to have a good start on the project Mike R
I ordered plans for the gv11 want to gather as muc
-
Daniel Huckleberry
- Very Active Poster
- Posts: 862
- Joined: Mon Jun 19, 2006 12:40 pm
- Location: Fairhope, Alabama
Fred, I checked your pics at home! They look really good and bring back great memories! I am itching for another build to start already. Scaling that Sea Sled might just be the ticket. I have several offers on the TX sled already! I won't be without a bateau again, though. I love these designs. Next one will have to be finished before I let her go.
Best of luck and keep posting pics!
Huck
Best of luck and keep posting pics!
Huck
-
Fred in Wisc
- * Bateau Builder *
- Posts: 972
- Joined: Tue May 02, 2006 8:54 pm
- Location: SE WI
- Location: Milwaukee WI
Again, thank you for the kind words. Especially Huck, that means a lot coming from you, your workmanship is excellent.
Mike, I see that you need a boat you can fit out out of the basement. I'm in exactly the same situation. This will just barely make it up the stairs, at least in my house. I suppose all you Canadians have metric stairwells. Sorry couldn't resist.
If you are interested in the little sled, I'll be glad to share my dimensions and sketches. The TX plans from JM are superbly detailed, but he included the Sea Sled plans with less detail (just as stated in the plan description) so there was more to figure out. You'll still need to buy the TX plans of course, but I'll be glad to share the extra stuff I developed with anyone here.
The weight, I'm not really sure yet, I always end up heavier than I plan to. The skeleton is really light, maybe 20 pounds or so for all the stringers and frames. The rest is about 2 sheets of 6mm, 2 sheets of 4mm, and 2/3 sheet of 12mm for the transom. Probably 4 gallons of epoxy if I can control myself there. Then some foam, but that's light.
I'm guessing it will be kinda hard to load alone, but not too bad with my 9 year old neighbor kid helping.
Fred in Wisc
Last edited by Fred in Wisc on Wed May 28, 2008 12:20 am, edited 1 time in total.
-
Daniel Huckleberry
- Very Active Poster
- Posts: 862
- Joined: Mon Jun 19, 2006 12:40 pm
- Location: Fairhope, Alabama
Hey Fred, Thanks. But I can tell you that my pics look a little better than in person. I got real tired of sanding! Decided it was good 'nuff! Now that it's got river mud, salt and little bits of grass on it, you can't tell at all!
Good luck and great building. I gotta check this at home again to see your new pics.
Huck
Good luck and great building. I gotta check this at home again to see your new pics.
Huck
-
Fred in Wisc
- * Bateau Builder *
- Posts: 972
- Joined: Tue May 02, 2006 8:54 pm
- Location: SE WI
- Location: Milwaukee WI
Finally had a bit of time to work on the boat. It got cold out so we have been buried in remote start installations at work. Well can't complain, it pays the bills.
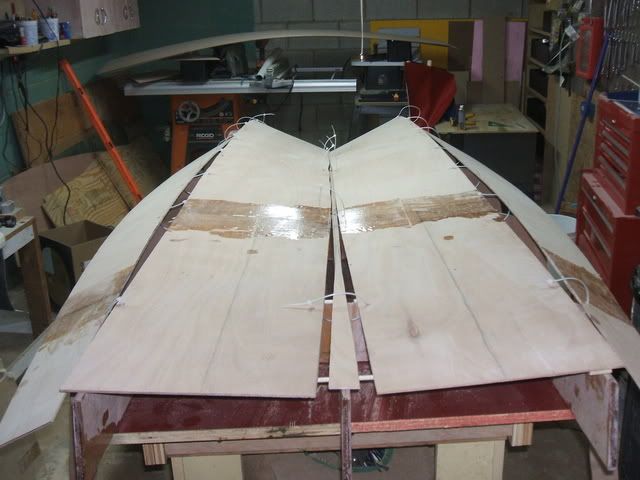
Anyway, I got the bottom panels and chines cut out and am working on getting them lined up before tacking them together. Gotta do a couple fiberglass splices in the sides panels and they will be redy to go too. You can see where I had a couple of calculation / layout/ cutting errors. The bow was not extended far enough when I raised the sheer, had to glass on a coule more inches of ply. And when I seamed the bottom panels together, for some reason the ends of my ply were not square so I ended up with a gap in the center. I think my miter gauge on the table saw was not right at 90 degrees. It's not a catastrophe, I'll just put that little traingel shaped filler in at the stern. There are a lot of layers of tape over it by the end of the build, so it will be plenty strong.
This is just layed on top, loosely fastened, I don't want to do the final zip tying until I have all the panels and have the table leveled carefully so I can check everything for level and square assembly.
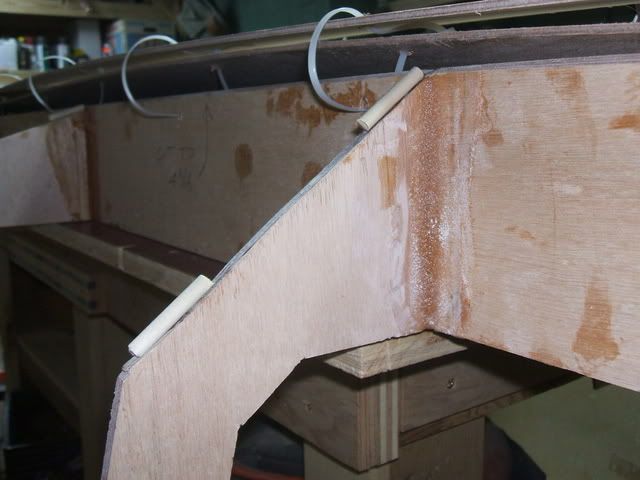
I also was having trouble seeing how I could maintain gaps between the frames and ply, since there are some fairily complex angles and bends in the boat. I came up with the solution of gluing little bits of dowels to the frames to maintain gaps. I used just a tiny dot of superglue on each, so they will snap off with a good tap, then the glue can be sanded off with just a couple strokes with the sandpaper. I zipped a few panels down to test it and it works real well.
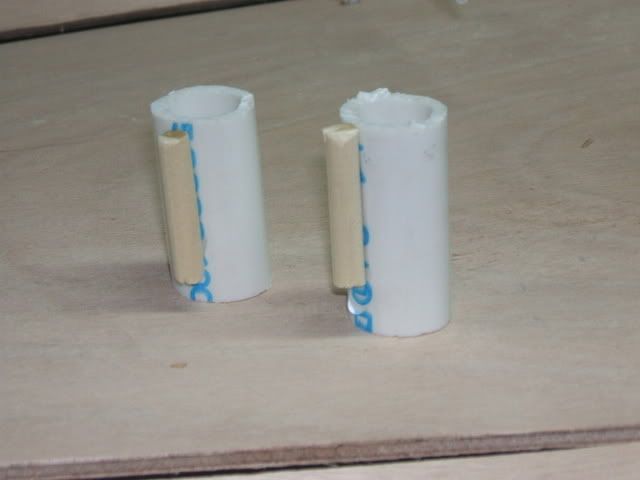
Also tried to use the little pieces of pvc pipe trick to get the center seam to line up nice, but it kept pulling the gap shut, so I made these to maintain the gaps and panel alignment. Works pretty slick.
Once I get the panels all zipped down and aligned nice, I will post more pics. That process is kind of trying my (admittedly limited) patience, but I know it will be way more work later to fix anything that's not laid out correctly now.
Fred in Wisc
Anyway, I got the bottom panels and chines cut out and am working on getting them lined up before tacking them together. Gotta do a couple fiberglass splices in the sides panels and they will be redy to go too. You can see where I had a couple of calculation / layout/ cutting errors. The bow was not extended far enough when I raised the sheer, had to glass on a coule more inches of ply. And when I seamed the bottom panels together, for some reason the ends of my ply were not square so I ended up with a gap in the center. I think my miter gauge on the table saw was not right at 90 degrees. It's not a catastrophe, I'll just put that little traingel shaped filler in at the stern. There are a lot of layers of tape over it by the end of the build, so it will be plenty strong.
This is just layed on top, loosely fastened, I don't want to do the final zip tying until I have all the panels and have the table leveled carefully so I can check everything for level and square assembly.
I also was having trouble seeing how I could maintain gaps between the frames and ply, since there are some fairily complex angles and bends in the boat. I came up with the solution of gluing little bits of dowels to the frames to maintain gaps. I used just a tiny dot of superglue on each, so they will snap off with a good tap, then the glue can be sanded off with just a couple strokes with the sandpaper. I zipped a few panels down to test it and it works real well.
Also tried to use the little pieces of pvc pipe trick to get the center seam to line up nice, but it kept pulling the gap shut, so I made these to maintain the gaps and panel alignment. Works pretty slick.
Once I get the panels all zipped down and aligned nice, I will post more pics. That process is kind of trying my (admittedly limited) patience, but I know it will be way more work later to fix anything that's not laid out correctly now.
Fred in Wisc
Last edited by Fred in Wisc on Wed Dec 12, 2007 5:21 pm, edited 1 time in total.

There is something wrong with the bottom panels.
Are those our panels but scaled down?
If you did not make any other changes, they should fit.
Did you try to flip them? I mean turn them over, try the other edge for the center keel.
Don't worry about the gaps, keep it simple.
Are those our panels but scaled down?
If you did not make any other changes, they should fit.
Did you try to flip them? I mean turn them over, try the other edge for the center keel.
Don't worry about the gaps, keep it simple.
Jacques Mertens - Designer
http://boatbuildercentral.com
http://boatbuildercentral.com
Who is online
Users browsing this forum: Amazon [Bot], Google [Bot] and 8 guests