
Yeah, there is something wrong, but it's my fault. When I glued up the splices in the bottom panels, I did not notice that theplywood was not cut quite square. They were actually angled out a bit. So they ended up not fitting at the transom.
It wasn't a big enough error that I felt compelled to redo the panels. I just cut a little filler piece and went with it.
Should I redo the panels? It did not seem like that little change at the end of the inverted V would make a difference, but if you think it will, I'll do 'em over.
Or I could splice in a piece on each side to maintain the sharp meeting point at the inverted V. Actually, I think that's what I'll do, it's no more work than the one filler piece. I'll post pics when it's fixed.
Fred in Wisc
Little Hickman Sea Sled
-
Fred in Wisc
- * Bateau Builder *

- Posts: 972
- Joined: Tue May 02, 2006 8:54 pm
- Location: SE WI
- Location: Milwaukee WI

-
Fred in Wisc
- * Bateau Builder *
- Posts: 972
- Joined: Tue May 02, 2006 8:54 pm
- Location: SE WI
- Location: Milwaukee WI
Thanks for checking in on it. I have been making some progress, but just a little at a time. Business has been good so I'm at the store a lot and I have a toddler, which really limits my late night power tool use (momma would kill me if I wake baby).
Since I need to do some sanding before the next step, I've been at a standstill for a while. Tried hand sanding, but that is surprisingly loud on a thin plywood hull. Plus power tools are way more fun.
Got a 7" random orbital, I think it was Dougster that suggested that. It's really fast and my new favorite sander. Gotta run it on low speed and watch out, though. I nearly cut throught the 4mm ply in one spot with it. Nothin' a little wood flour putty and an extra piece of biax tape didn't fix....
I actually have the hull assembled, taped on the outside, filleted, taped, and biaxed on the inside.
I found that I had 2 math errors in scaling. Both resulted in the ends of the panels not quite touching at the centerline of the boat. Grrr.... Anyway, I just had to splice in some narrow little triangles, do a little sanding, and all is well again. Guys, if you are scaling anything, double check your math when you calculate and when you measure. I spent several frustrating hours trying to bend this into shape before I realized what I had done. And it was no fun at all.
It's flipped upright now so it looks like a boat. Flipping was super easy with 2 guys, the hull weighs probably 40 or 50 pounds.
I extended the sheer up higher, the sheer line is real ugly right now. Gonna cut it down to a pleasing shape once I get the frame / stringer assembly installed.
I'll see if I can get some pics up in the next couple days.
I did find that the biax cloth is wonderful around curvy hull sections, but wow does it eat up the epoxy. Seems like it uses way more than the woven did on my last project. I'll have to order up another batch soon.
Fred in Wisc
-
Fred in Wisc
- * Bateau Builder *
- Posts: 972
- Joined: Tue May 02, 2006 8:54 pm
- Location: SE WI
- Location: Milwaukee WI
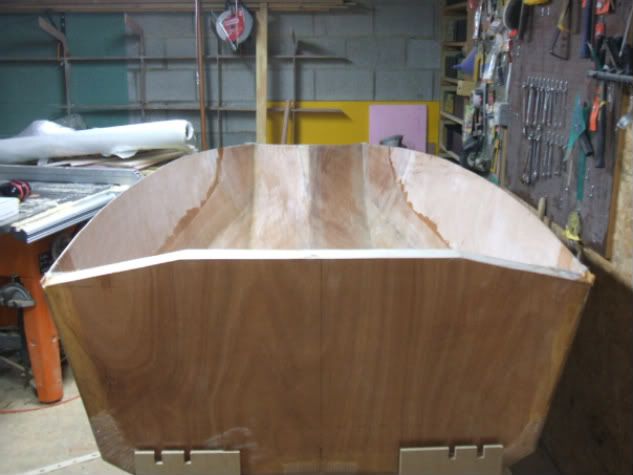
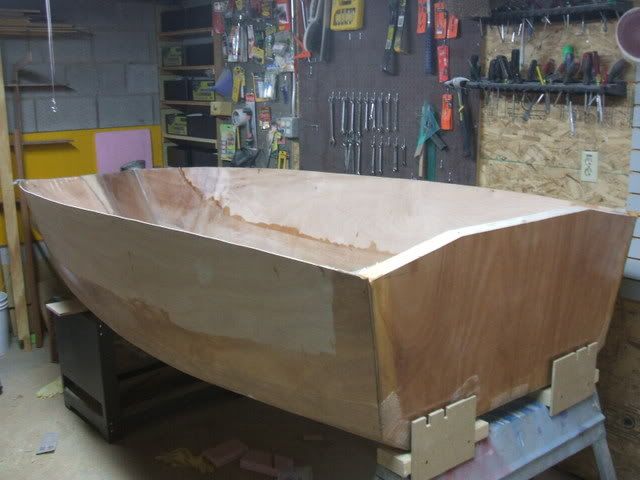
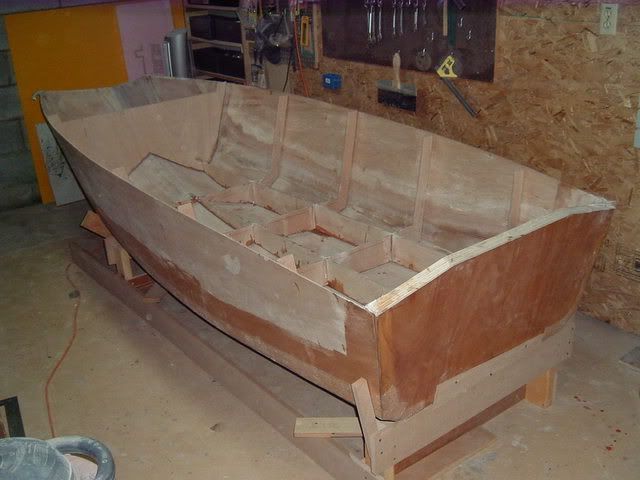
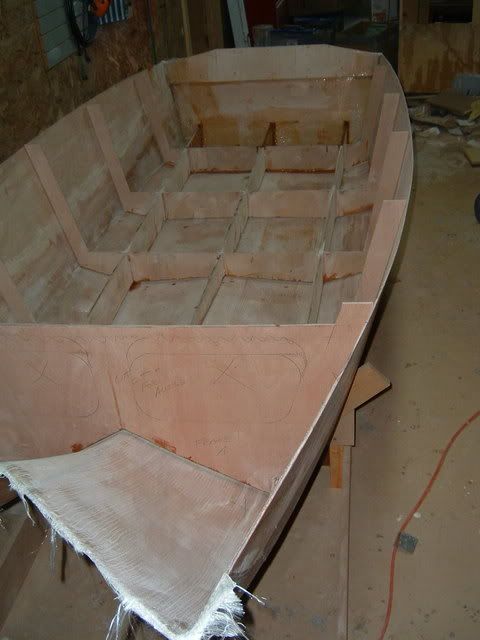
As promised, new pics. It looks like a boat now. That part is exciting.
Here you can see the inside is glassed with 12oz biax. I had a little but not much excess resin pool up in the low spots. I did the tape and biax wet on wet, but ran out of time to do the sides in 6oz woven. Gotta sand and come back to them.
Figured some light woven cloth o the upper hull panels wpould be good, I am kind of hard on boats and the hull is only 4mm okume.
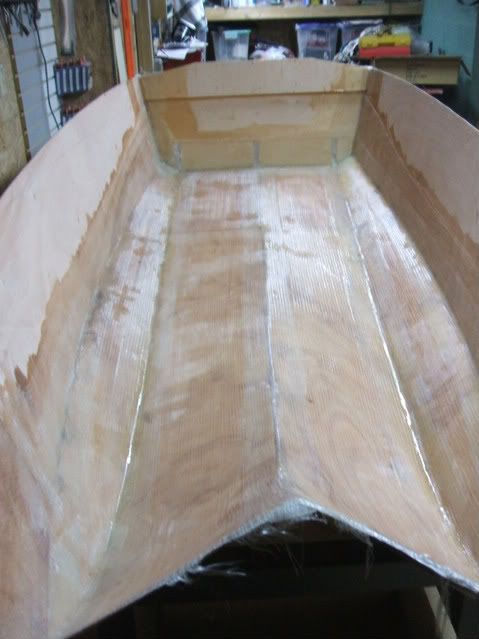
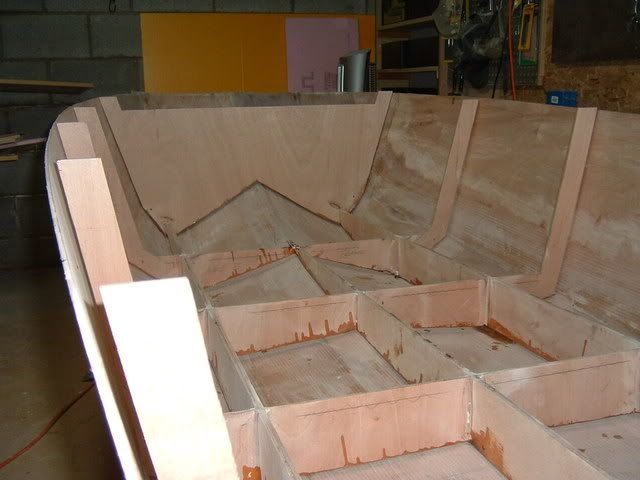
Here you can see the notches in the transom into which the stringers will fit. Need to dremel them out first.
the transom is 6mm okume backed with 1 layer 12mm Baltic Birch and then 2 more layers Baltic Birch as a claming board up top. The birch was obtained locally and has a few voids. those will be epoxy filled with a glue syringe. It should be plenty strong for the 8hp 2 stroke Johnson outboard that will power this boat.
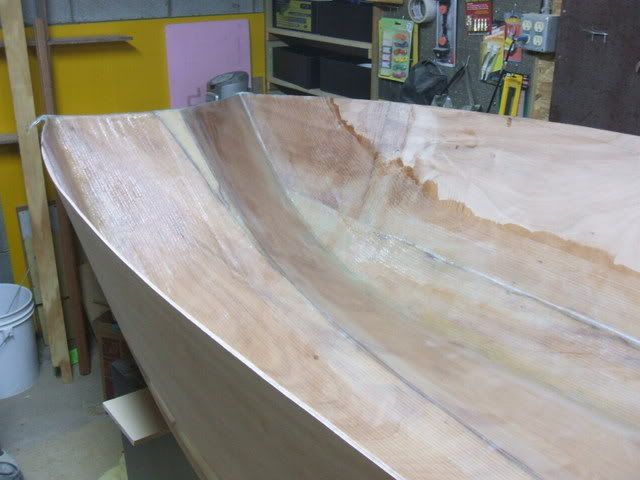
If you look carefully you can see where I sanded almost through the ply and had to fill it in. You can also see where I had to splice in 2 thin triangles to get the bow to meet up correctly. That was a layout error on my part. Be really careful when you are scaling stuff. It would be way easier to buy a plan that is the size you want. I just never seem to do things the easy way.....
This one you can see how nasty the sheer looks prior to being trimmed. That will be elegant and pretty later on, don't judge now. I was not quite sure how high I would need it, so I made it pretty high. Figured it would be way easier to trim it off than to add it on.
I'm booked solid at work until May 15th or so and then going on a little cruise with the family, so not likely to make much progress until the end of May. Plus it's finally getting warm enough to go fishing here and the neighbor kids are starting to ask me about catching some bluegills.
As a wise man once said "Build on Dudes"!
Fred in Wisc
Here you can see the inside is glassed with 12oz biax. I had a little but not much excess resin pool up in the low spots. I did the tape and biax wet on wet, but ran out of time to do the sides in 6oz woven. Gotta sand and come back to them.
Figured some light woven cloth o the upper hull panels wpould be good, I am kind of hard on boats and the hull is only 4mm okume.
Here you can see the notches in the transom into which the stringers will fit. Need to dremel them out first.
the transom is 6mm okume backed with 1 layer 12mm Baltic Birch and then 2 more layers Baltic Birch as a claming board up top. The birch was obtained locally and has a few voids. those will be epoxy filled with a glue syringe. It should be plenty strong for the 8hp 2 stroke Johnson outboard that will power this boat.
If you look carefully you can see where I sanded almost through the ply and had to fill it in. You can also see where I had to splice in 2 thin triangles to get the bow to meet up correctly. That was a layout error on my part. Be really careful when you are scaling stuff. It would be way easier to buy a plan that is the size you want. I just never seem to do things the easy way.....
This one you can see how nasty the sheer looks prior to being trimmed. That will be elegant and pretty later on, don't judge now. I was not quite sure how high I would need it, so I made it pretty high. Figured it would be way easier to trim it off than to add it on.
I'm booked solid at work until May 15th or so and then going on a little cruise with the family, so not likely to make much progress until the end of May. Plus it's finally getting warm enough to go fishing here and the neighbor kids are starting to ask me about catching some bluegills.
As a wise man once said "Build on Dudes"!
Fred in Wisc
-
Fred in Wisc
- * Bateau Builder *
- Posts: 972
- Joined: Tue May 02, 2006 8:54 pm
- Location: SE WI
- Location: Milwaukee WI
Finally got some time to work on the boat again. Got back from vacation yesterday, my wife and daughters stayed to visit Disney and hang out a the beach a bit.
Hadn't been to Baja Cali before. It's beautiful, love the area around Ensenada. And I got the best tamales I have had in a long time from a roadside stand for a buck. I'd like to head back for a while, spend some time fishing. My cousin Andy caught a real nice marlin at Cabo a couple years ago, so he's ahead of me there. I've only hooked one once, a white marlin off Cancun, lost after a brief fight. Ran towards me and I just couldn't get the slack out of the line.
How can you guys out there stand the sea lions? The ORK-ORK-ORK sound they make is cute for about 15 minutes, then it's maddening. It's like having 800 pound seagulls hanging out at the dock or something.....
Anyway, on the topic of boat building.
Spent a couple hours sanding last night. Got a big cheap 7" sander at Harbor Freight that makes it go real fast. Need to set it on the lowest speed and be careful, though, it removes a lot of material fast. I dremeled the stringer notches out of the transom and chiseled out the epoxy that soaked into them. Set the stringer/frame assembly in place, marked the areas I need to sand to tape the stringers down. Why sand it all if it's not needed?
I remember now why sanding sucks. Messy and itchy. Thinking about a HEPA filter for my Ridgid vac. Has anyone tried them? I hate to spend $30-40 on a shop vac filter without some preliminary information.
Got most of the bottom and one side sanded. Hoping to finish the sanding tomorrow between church and picking up my family at the airport. I can epoxy anytime, it's quiet. traying to get the loud parts done before they get home.
I'll have to get the little RO sander out to do some of the details and areas where the panels meet, the 7" is too hard to control and tends to cut through the glass with the edge of the disc if you touch the next panel over.
Then I'll need to modify the front of the stringers a little, they are hitting the inside curve of the hull and making the shole stringer assembly ride up so the space between it and the hull is about 1/8" at the back increasing to about 5/8 at the front. I don't want to use that much putty so I'll get the plane out and shave down the front 12" or so of the stringers a bit.
I'll post pics when there is something interestng to see.
Fred in Wisc
-
Fred in Wisc
- * Bateau Builder *
- Posts: 972
- Joined: Tue May 02, 2006 8:54 pm
- Location: SE WI
- Location: Milwaukee WI
Well, here are the pics of the last few days' progress on the boat.
I sanded down the whole interior with 80 grit on the 7" sander. Did some detail areas where it did not fit with the 5" and 60 grit (it's faster, I'm not very patient with sanding. Swept and vacuumed it out.
Sanded all the old epoxy drips and smears off the frame and stringer assembly, it's been months since that went together so I'd rather bond to fresh wood than old epoxy. Also sanded down all the fillets, they were not real smooth and would have either used a ton of putty to cover or given me bumpy tape seams. That seems like it would give you all kinds of stress risers so I want it smooth. Trimmed the aft ends of the stringers about 1/8" to get a gap for epoxy behind them. Sanding this only took about 20 minutes with the big orbital.
Then I built a strongback of sorts to hold the boat level so it gets assembled straight. I set it up so the stringers and frames are level front to rear and side to side. This will greatly simplify getting the rest of the assembly straight.
Then I fit up the frame and stringer assembly to the hull, making the gaps between the hull and supporting members as even as possible. This took some time and patience. Lots of planing and sanding. The strong curve near the bow required a lot of work the rest was pretty good, just a little trim way in back where multiple layers of 12oz on the hull made the gap too big. After this, the front to rear adjustment on the strongback needed a little fine tuning. Now I'm quite happy with it, very close to actually being level.
Here you can see that the gap between the frames and hull is prettty even on the sides. I had to plane down the frame nearest the transom just slightly to get this right. The aft gaps are a bit bigger than those farther forward, but putting a little weight on the bow makes it flex just a touch and adjusts that nicely. When I get to that part, I'll weight it down a bit and then glue it.
I pulled the frame back out and coated the bottom edges in epoxy (wow I am excited to be using that stuff again.) Put it back in the hull and set up a couple spacers to avoid hard spots.
Taped in the first couple sections. Precoat, fillets, then 12oz wet on wet. I figured on using 12oz right near the transom and then 6 oz for the remainder of the boat. That should be plent strong for the lightweight materials here. I figure if I do a couple sections every 2-3 days I will still get chemical bonding, so that's the plan.

I'm using way too much epoxy with the brush. Next work session, I'll get the roller out and wet out the tape on the bench. That should save a lot of resin. Ordered another batch today, along with wood flour and quickfair.
Even a cursory examination of the taped seams will reveal I am no Cracker Larry or ks8. Don't laugh, you probably aren't either. Once the sole is down nobody will ever know.
A ballpark calculation says I can get about 6-8 cubic feet of foam under the sole. Approx 7 feet x 3 feet x 3 1/2 inches. That should supply plenty of buoyancy in case of emergency. Plus I'll stick a little more up in the bow once I work out how the front deck is being configured.
There will be some 6oz woven on the hull sides , it will slip right in between the hull and frames and the whole sheathing, fillet, tape deal will go in wet on wet. That's the plan at least. I don't see why it won't work. Certainly possible that a reason will be revealed later, but I hope not.
Gotta go, I have a pizza ready, the family should be home any time.
Fred in Wisc
I sanded down the whole interior with 80 grit on the 7" sander. Did some detail areas where it did not fit with the 5" and 60 grit (it's faster, I'm not very patient with sanding. Swept and vacuumed it out.
Sanded all the old epoxy drips and smears off the frame and stringer assembly, it's been months since that went together so I'd rather bond to fresh wood than old epoxy. Also sanded down all the fillets, they were not real smooth and would have either used a ton of putty to cover or given me bumpy tape seams. That seems like it would give you all kinds of stress risers so I want it smooth. Trimmed the aft ends of the stringers about 1/8" to get a gap for epoxy behind them. Sanding this only took about 20 minutes with the big orbital.
Then I built a strongback of sorts to hold the boat level so it gets assembled straight. I set it up so the stringers and frames are level front to rear and side to side. This will greatly simplify getting the rest of the assembly straight.
Then I fit up the frame and stringer assembly to the hull, making the gaps between the hull and supporting members as even as possible. This took some time and patience. Lots of planing and sanding. The strong curve near the bow required a lot of work the rest was pretty good, just a little trim way in back where multiple layers of 12oz on the hull made the gap too big. After this, the front to rear adjustment on the strongback needed a little fine tuning. Now I'm quite happy with it, very close to actually being level.
Here you can see that the gap between the frames and hull is prettty even on the sides. I had to plane down the frame nearest the transom just slightly to get this right. The aft gaps are a bit bigger than those farther forward, but putting a little weight on the bow makes it flex just a touch and adjusts that nicely. When I get to that part, I'll weight it down a bit and then glue it.
I pulled the frame back out and coated the bottom edges in epoxy (wow I am excited to be using that stuff again.) Put it back in the hull and set up a couple spacers to avoid hard spots.
Taped in the first couple sections. Precoat, fillets, then 12oz wet on wet. I figured on using 12oz right near the transom and then 6 oz for the remainder of the boat. That should be plent strong for the lightweight materials here. I figure if I do a couple sections every 2-3 days I will still get chemical bonding, so that's the plan.
I'm using way too much epoxy with the brush. Next work session, I'll get the roller out and wet out the tape on the bench. That should save a lot of resin. Ordered another batch today, along with wood flour and quickfair.
Even a cursory examination of the taped seams will reveal I am no Cracker Larry or ks8. Don't laugh, you probably aren't either. Once the sole is down nobody will ever know.
A ballpark calculation says I can get about 6-8 cubic feet of foam under the sole. Approx 7 feet x 3 feet x 3 1/2 inches. That should supply plenty of buoyancy in case of emergency. Plus I'll stick a little more up in the bow once I work out how the front deck is being configured.
There will be some 6oz woven on the hull sides , it will slip right in between the hull and frames and the whole sheathing, fillet, tape deal will go in wet on wet. That's the plan at least. I don't see why it won't work. Certainly possible that a reason will be revealed later, but I hope not.
Gotta go, I have a pizza ready, the family should be home any time.
Fred in Wisc
Who is online
Users browsing this forum: No registered users and 10 guests