

Hey Fred,
Your boat is coming along nicely! You're doing a fine job on it. How deep is your boat? I'm talking about the distance from the top of the stringers (or sole) to the top of the gunwales. It looks like about 20 to 24 inches to me.
Keep up the great work you doing on the boat!
Little Hickman Sea Sled
-
Fred in Wisc
- * Bateau Builder *

- Posts: 972
- Joined: Tue May 02, 2006 8:54 pm
- Location: SE WI
- Location: Milwaukee WI
It looks really deep but the whole thing is really quite small, since it's only 10' long and just under 4' wide.
The depth from the top of the stringers is 13 to 16 inches depending upon where you measure. That maygo down a little when I trim the sheer, but only an inch max. I'll just be trimming off the stuff that looks too high.
The depth of the stringers is 4 9/16, plus gaps and the hull bottom, so the transom at the center is about 19" high on the outside. Had to raise it a little to accomodate my 20" shaft motor.
Thanks for checking it out.
Fred in Wisc
-
Fred in Wisc
- * Bateau Builder *
- Posts: 972
- Joined: Tue May 02, 2006 8:54 pm
- Location: SE WI
- Location: Milwaukee WI
Got a little more done this morning. Filleted and taped several more compartments until I ran low on wood flour. Ordered some on Tuesday so it may arrive today, otherwise Monday. A lot of my gaps are around 3/8 on and it really uses a lot of wood flour to fill them in. I'm making the fillets small, but the gaps really eat a lot of putty.
Used a little roller to wet out the cloth today, much faster than the brush, and it uses less epoxy. Then I go back with the brush to make sure all the corners are wet out completely and stuck to the fillets. If you have not tried rolling resin, you need to. I got 5 compartments done today in about the same time as doing 2 with the brush a few days ago.
Precoated the sides where the 6oz cloth will be installed, I have materials for that, so it may turn into this evening's project. I could get a layer of biax on the inside of the transom also.
Took some pics but they turned out really poorly. Sorry. Not much new to see, just another 25 or so feet of fillet and tape.
Seeking some opinions on interior layout. I've been pondering this a lot, but I may well have missed something. 2 basic options:
1. Flat sole as far up as I can get it (about 6 1/2 feet from transom). Minimal furniture, maybe a couple of removable pedastal seats with extra bases so I can accomodate different numbers of anglers. (Sometimes fish alone, sometimes with one or 2 others- max load 2 adults and a kid.) I like the light weight and simplicity of this option.
2. Mini bass boat setup with front and rear casting decks. Probably not raised all the way to the sheer, might be tippy, and I like a little ledge when I'm fishing with kids. Set up the rear deck like the SC16 where it also functions as the rear seat. I like the storage space (nets, tackle, PFDs and such can tuck under the decks out of the way but in easy reach) and the better position for sight fishing with this option.
Either way, I will probably set up a front clamping board for a bow mount troller (hand controls) with a real small battery. ( I have a 20 amp-hour gel cel that weighs about 15 pounds, perfect for a short trip in a little boat.)On my little Minn Kota motor, you can just take out one bolt that holds the control head to the shaft, turn the head around, and put the bolt back in. Instant bow mount.
Any input on advantages/ disadvantages? Thanks.
Fred in Wisc
-
Fred in Wisc
- * Bateau Builder *
- Posts: 972
- Joined: Tue May 02, 2006 8:54 pm
- Location: SE WI
- Location: Milwaukee WI
Made somemore progress after work today. Got the inside top panels glassed with light woven fabric. Turns out I had 4oz, not 6, but it worked out just fine. Very easy to set out after working with all the 12oz biax. Running the cloth between the hull and frames was pretty easy. I just lightly sanded the cured precoated hull to get rid of points where the cloth would catch and fed it in at each frame.
I was able to bend each frame far enough fore and aft to roll epoxy underneath the frames.
It also finished out with a really nice smooth surface that should require very little filling and fairing to make it look nice. The Okume looks so good under that light cloth that I would consider bright finishing just for fun if I didn't need to tape in all those frames.
Also found some coast guard foam left over from my last boat, so I poured one compartment of that. Mostly just because it's fun watchin' it rise like some nuclear mutant bread dough.
I wish I was a better planner, almost out of 6oz biax tape and need more foam. Gotta order again next week. Should have got it all at once.
I see a few folks are following this thread, any input on the interior layout gentlemen? I'm going to be at that point pretty soon.
Sorry no pics tonight, I'll probably have a chance to do that tomorrow.
Fred in Wisc
Last edited by Fred in Wisc on Sun Jun 08, 2008 4:09 pm, edited 1 time in total.
-
Fred in Wisc
- * Bateau Builder *
- Posts: 972
- Joined: Tue May 02, 2006 8:54 pm
- Location: SE WI
- Location: Milwaukee WI
The DHL van brought me some more wood flour and epoxy today. Yee ha!
Finished filleting and taping in the stringers and frames up to the chines. doing the pointy ends at the bow took a lot of patience and wood flour putty. Then several small (6x6) pieces of biax over the tips to make sure they will stay put. Seems like an area that will take a lot of stress if (well probably when) I hit something at speed or beach the boat under power. Access here was difficult, had to use the paintbrush to apply resin. The stringers end in some very sharp V shaped portions of the hull., especially on the outside edge of the stringer. The chine panel is nearly vertical there and only and inch or so from the stringer. It was hard to reach the sides of the stringers. Hard to see them even. Ended up using too much resin to make sure everything was well bonded. I'll take an extra 4 oz of weight to make sure my stringers are bonded to the hull well.
I'm debating whether to just fillet and tape the frames up to the sole or all the way up. I'd like to do it all in one shot wet on wet, but I don't think I can get the rear deck in if the frames are taped all the way up. I'm going to do the casting decks front and rear. The problem is the transom is 3/4, but the clamping board on top of it is 1 3/4", so there is an overhang of about an inch I'll need to tuck the rer deck under. The frames easily flex 1", so it would be easy to insert the deck with them loose. Access to the underdeck will not be very fun since the deck is only about 10" off the sole. Good thing those stringers will be hidden below, I can't see that being my neatest work in such a small space. Probably the best bet is to leave the aft 2 or 3 frames loose, and tape the rest all the way up. This should stiffen the boat up a lot, give me easy access for nice neat fillets, and let me put most of them in wet on wet.
For the casting decks I am going to laminate up some balsa core panels. The only 3/8 or 1/2 marine ply I can find locally is fir, which is really heavy. I just can't justify shipping one piece of okume 3/8. The initial plan did not include casting decks, so I didn't order enough plywood. Anyway, 3/8" balsa core comes in 24x48 sheets and one of our regular shop suppliers has it not too far away, so that's the winner. I'm thinking laminating that with 12oz biax both sides should be strong enough. I'll probably put a small vertical beam at the edge of each deck to reduce flex. Then I'll make sure the edges are well sealed and protected to prevent water intrusion. I got 4 sheets, enough for 2 casting decks 30 to 36 inches long and about 40-44 wide, plus one for cutting errors. PS- compared to okume 1088, balsa core is really expensive- about $100 before shipping for the equivalent of a 4x8 sheet. I'll report back on how that works.
For the sole I am using 6mm okume 1088 with 9 oz glass on each side. The frames and stringers cut the floor into sections about 24x16 or so. It sound like most boats use about 1/2" with 6 or 9oz on the top only, but I'm doing top and bottom since the 6mm is pretty thin. Also a little paranoia, my aluminum boat floor was coated on top and rotted out from the bottom. I feel better knowing it's got fabric on , not just resin. Then I know I have not missed a spot.
Sorry for all the words and no pics today again. The camera is being freaky. takes pics with big pink/ red smears appearing randomly acroll the picture. I have another at work, so I'll get some pics up pretty soon.
Fred in Wisc
-
Fred in Wisc
- * Bateau Builder *
- Posts: 972
- Joined: Tue May 02, 2006 8:54 pm
- Location: SE WI
- Location: Milwaukee WI
Got some pics guys.
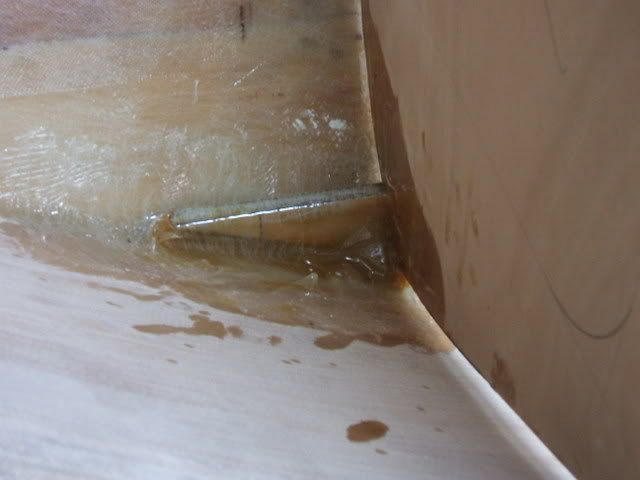
Here is a stringer point glassed in. I wrapped the tape up around the top of the stringer, you can see where there is a little air gap under some of it. I'll have to drill a little hole there and inject some epoxy with a syringe. On both sides, unfortunately. I even covered these with plastic and put some small lead weights on them to try keeping the fabric pushed down but it didn't work so well. A little vacuum bag setup would have been so slick for doing this. Or even pouring a bag of lead shot over the plastic covered lamination. Unfortunately I was not prepared for either, so this is what I have to work with.
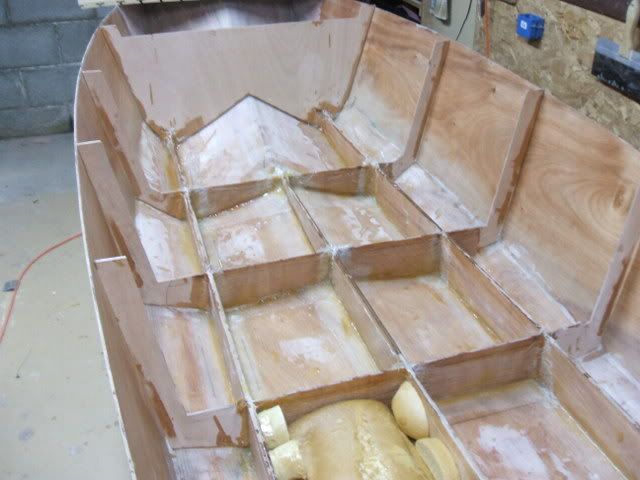
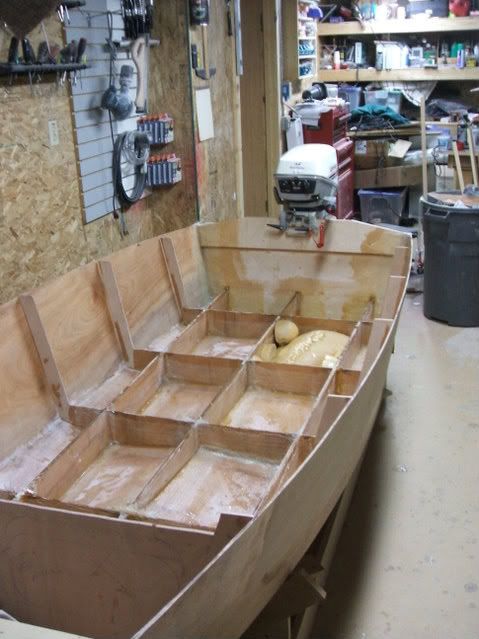
Here is a shot of the whole assembly, stringers and bottom frames all taped in. The front one is not done yet, the plywood is slightly warped and I am pondering how to best clamp it straight before making it permanent.
You can see the one compartment where I poured some flotation foam. Found it in the shop and could not resist playing with it a bit.
You can just see the board and storage bin on the bow. The hull sides are bowed out just a touch and putting a little weight on the bow (only about 30 pounds) draws them in nicely closer to the stringers. And the sides stay very fair this way, so I think it's better than just pulling the sides in towards each stringer. I could see getting wavy hull sides from that, and a lot more fairing.
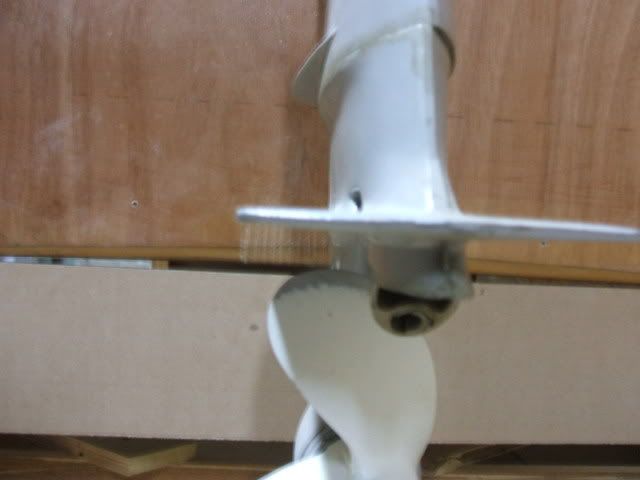
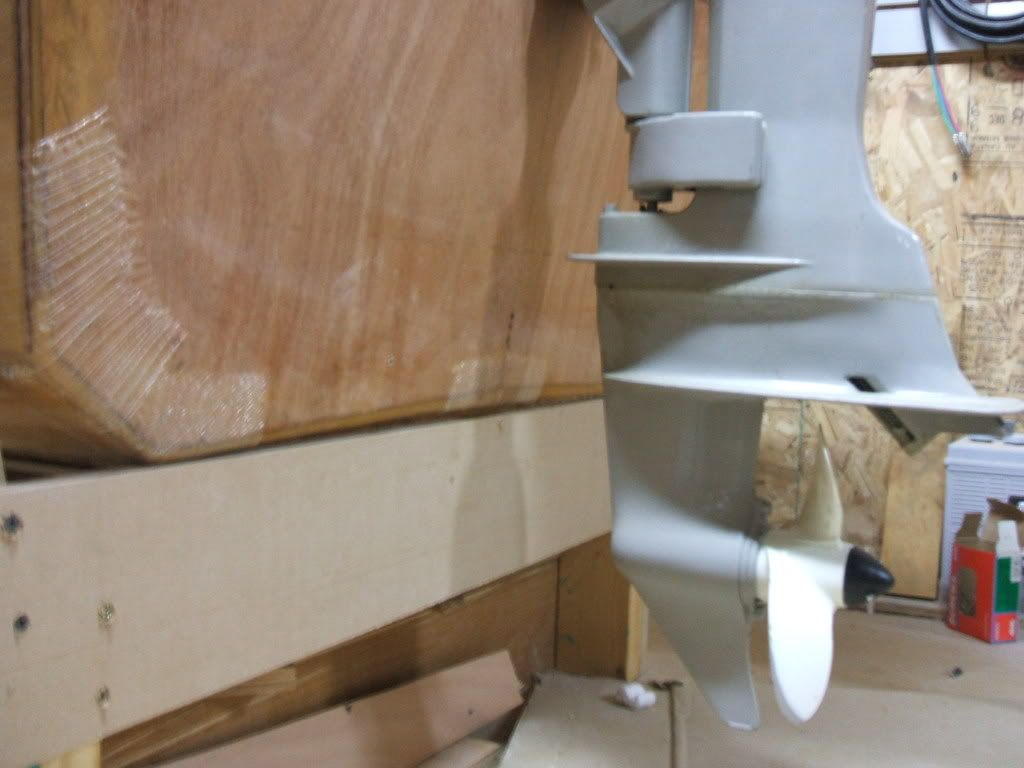
Figured this is the best time to adjust transom height if I need to so I clamped the motor on the back. I can also use this to determine how long to make the rear deck so I have room to sit and steer.
It looks to me like the transom is about an inch too high. I am thinking the anti-cavitation plate should be right even with the bottom of the hull. The inverted V is only about 3/8".
Opinions are wanted here: Should the plate be even with the point of the inverted V or just a touch lower, even with the outside corners of the hull? It's not a big difference, but easy to adjust now and quite difficult later. I'm leaning towards a little lower, I would prefer the prop to bite a little more rather than mazimize speed by raising the prop.
My balsa core came today. Rolled up in a little 10x10x24 box. That was surprising. I'll document that process when it gets started. First, more taping, a transom trim, and a sole.
Fred in Wisc
Here is a stringer point glassed in. I wrapped the tape up around the top of the stringer, you can see where there is a little air gap under some of it. I'll have to drill a little hole there and inject some epoxy with a syringe. On both sides, unfortunately. I even covered these with plastic and put some small lead weights on them to try keeping the fabric pushed down but it didn't work so well. A little vacuum bag setup would have been so slick for doing this. Or even pouring a bag of lead shot over the plastic covered lamination. Unfortunately I was not prepared for either, so this is what I have to work with.
Here is a shot of the whole assembly, stringers and bottom frames all taped in. The front one is not done yet, the plywood is slightly warped and I am pondering how to best clamp it straight before making it permanent.
You can see the one compartment where I poured some flotation foam. Found it in the shop and could not resist playing with it a bit.
You can just see the board and storage bin on the bow. The hull sides are bowed out just a touch and putting a little weight on the bow (only about 30 pounds) draws them in nicely closer to the stringers. And the sides stay very fair this way, so I think it's better than just pulling the sides in towards each stringer. I could see getting wavy hull sides from that, and a lot more fairing.
Figured this is the best time to adjust transom height if I need to so I clamped the motor on the back. I can also use this to determine how long to make the rear deck so I have room to sit and steer.
It looks to me like the transom is about an inch too high. I am thinking the anti-cavitation plate should be right even with the bottom of the hull. The inverted V is only about 3/8".
Opinions are wanted here: Should the plate be even with the point of the inverted V or just a touch lower, even with the outside corners of the hull? It's not a big difference, but easy to adjust now and quite difficult later. I'm leaning towards a little lower, I would prefer the prop to bite a little more rather than mazimize speed by raising the prop.
My balsa core came today. Rolled up in a little 10x10x24 box. That was surprising. I'll document that process when it gets started. First, more taping, a transom trim, and a sole.
Fred in Wisc
-
Daniel Huckleberry
- Very Active Poster
- Posts: 862
- Joined: Mon Jun 19, 2006 12:40 pm
- Location: Fairhope, Alabama
Nice work. I have enjoyed watching this little build.
I built the TX18 and have some info for you on my engine. I am about an inch below the bottom of the hull. I would make sure your engine can get down below the hull. You can always adjust it up. You would hate to find all this out after you paint. If you plan for it, it will look natural now.
That is my opinion. Jacques even mentioned this in the study plans.
Good luck. I hope she turns out well and handles as well as my boat. The design is excellent.
Huck
-
Cracker Larry

- * Bateau Builder - Expert *

- Posts: 22491
- Joined: Fri Mar 11, 2005 3:39 pm
- Location: Savannah, GA
-
Fred in Wisc
- * Bateau Builder *
- Posts: 972
- Joined: Tue May 02, 2006 8:54 pm
- Location: SE WI
- Location: Milwaukee WI
I think it would be unwise to disagree with the voices of experience, Daniel and Cracker Larry. Back to the cutting guide and the circular saw. I'll cut the transom about 1 1/2" lower. That will put the anti cavitation plate about 1/2" below the hull bottom.
I feel pretty smart right now, I was on the right track with the engine height deal. Somehow it makes me feel a lot better to have some consenting opinions before sawing a chunk off the boat.
Spent some more relatively unproductive time pondering about how to insert the sole and decks. The clamping board on the transom extends 1" inboard, so if I tape all the frames in solid, I can't insert the sole without cutting extra big slots for the frames or putting it in in 2 parts, left and right, with a seam down the middle. But I'd really like to do the sole in one big piece. On the full size boat, the frames are made in sections. I thought it was for efficient use of material. It seems that it's also for sole installation.
I filleted and glassed the frame nearest the bow in this evening. The plywood was slightly warped from being stored, so it needed just a little persuading to be straight and level again.
Nothing exciting that needs pics today.
Fred in Wisc
-
Fred in Wisc
- * Bateau Builder *
- Posts: 972
- Joined: Tue May 02, 2006 8:54 pm
- Location: SE WI
- Location: Milwaukee WI
Short day at work on Saturday, so I planned on getting a lot done on the little boat this evening. Unfortunately we had weather that made me consider if any stitch and glue ark plans were available. Today our area got 2-4" of rain in about 3 hours.
Yesterday we had severe thunderstorms and tornado warnings, but beautiful weather once they passed. I was fishing with the neighbor kids an hour after the tornado warnings ended. Clear skies, in the 80's. Unfortunately real windy 20+ mph so rowing the canoe was no fun at all. Only one fish in 2 hours, but the kids were excited because it was a "predator". Sometimes I forget that even a little northern pike is exciting when you are 6.
Spent a couple hours today shop vac'ing water out of my basement and pumping about 5" of water out of my neighbor's basement. That really cuts into boat building time.
I did get a little time work on the boat. Cut the transom down about 2". This will put the cavitaion plate about an inch below the hull bottom. I was thinking about going a little higher, but there really aren't any high perfomance triple cup anti cavitating stainless props avaliable for 8hp OMC engines, so I decided a little more water over the top would not hurt. Best to be on the safe side there.
Also had time to fillet and tape the left side frames. Had a little epoxy left so I did the first right side frame too. Did these with woven tape for ease of fairing, since most of it will be exposed. I can see my fillets are definitely more consistent and neater than when I started. I am still no Cracker Larry or ks8, though. I am however, pretty sore from rowing yesterday. Feelin' pretty old right now....
The frame taping ponderiong is over now. The solution: The rear set of frames will be cut down and only extend up to the casting deck. That's only about 3" below the sheer. It will allow me to insert the rear deck under the clamping board, rotate it down on top of the rear frames, and then it will end just before the second frame. That makes the deck about 32" front to rear.
I'm wondering if I should cut the front edge of the deck flat or slightly concave. I'll usually sit off enter to the right to steer and I like that I can rotate farther to the left with a curved deck. Got some lower back issues, so I want to make sure I end up with a comfortable driving position. That is probably best answered by cutting a scrap wood deck once the sole is in.
I'll try to get some new pics up tomorrow. It's late, the camera is in the van outside, and it's thunderstorming.
Fred in Wisc
Last edited by Fred in Wisc on Mon Jun 09, 2008 12:41 am, edited 2 times in total.
Who is online
Users browsing this forum: Google [Bot], Yandex [Bot] and 1 guest