Page 1 of 1
BassMunn's PH16 - SPLASHED!!!!
Posted: Mon Oct 13, 2008 5:28 pm
by BassMunn
Hi Everyone
I've posted a few questions in the power boat forums, but I suppose it's time to start my own build thread. Partly to let others see what I'm doing and mostly because I'll be needing a lot of

I got my plans 2 weeks ago and by day 3 had all my marine ply (BS 1088) and epoxy resin, biax tape and cloth and filler.
Jumped straight into drawing the plans out. I don't have a nice big flat table to draw on so I had to draw on the floor. Well after 3 days of drawing my knees started screaming as soon as they saw ply wood sheets

Cut most of my parts out using a circular saw, only used a jigsaw for small cuts as me, a jigsaw and straight lines are not friends.
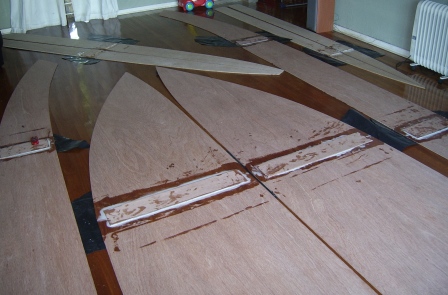
On Saturday I turned my lounge floor into a butt block laminating area as it's the only area bigger enough with a flat floor to handle the big sheets (My wife was very impressed)
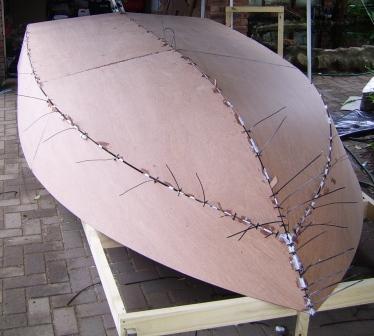
Yesterday I built a basic jig on wheels with the intention of building the normal stich and glue way (hull right way up). Once I was finished it was time to start stiching the bottom panels.
After 2 hours of fighting with the panels, trying to get them to bend and still keep the gaps between them I finally got them together.
And then I looked at the aft section of the bottom

I haven't got a clue how some of the guys manage to build such nice boats using this method

So after an hour of sulking and head scratching I cut all the tie wraps out and went to bed.
This afternoon I redesigned my jig into a not so simple jig and will be building the boat using the traditional jig method (hull upside down).
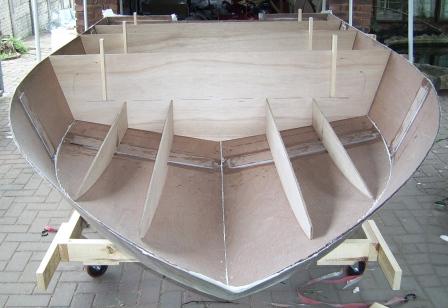
Transom is mounted (and yes it's at the right angle), I quickly test fitted all the bulkheads and it looks right this time.
Tomorrow I'll fit all the bulkheads and stringers, make sure everything lines up properly and then start fitting the panels.
I'll start posting some pics tomorrow once I have a few that are interesting
There's a boat somewhere in that pile of ply wood.
Shannon
Posted: Mon Oct 13, 2008 6:27 pm
by Dougster
I didn't know the PH16 was built right side up. My LB22 is built upside down, and yeah, getting the panels to take the curves was a major trial for me. It took a lot of patience and several weeks. All I can advise is make sure the stations are just right: spacing, parallel, perpendicular; I mean right on. Then take your time coaxing the panels. Beware screws and tight zip ties. Fool with it and then walk away and think. When it's right, sleep on it and look at it fresh with a critical eye. I wish I could have dragged mine out of the shop to see it at a good enough distance to get perspective. Your eye is good and will see even small asymmetries. I'm glad to see you've started a thread. Post some pics soon.
Remembers fighting those dang panels Dougster
Posted: Mon Oct 13, 2008 6:37 pm
by BassMunn
Hi Dougster
The PH16 plans give you both building options, I thought that would be the easier quicker way - NOT
Thanks for the advice, my father always used to tell me to sleep on it and until recently I never really listened, but a project of this size definately teaches you to do this sort of thing and I'm sure I will have many of these nights

My building space is very limited, I only have a single garage, so I put up a temp carport in front of the garage and built my jig on wheels so that I can move it in and out of the garage. It's going to take me a little while each time to level it, but I need the working space.
I'll get some pics up as soon as I can
Shannon
Posted: Mon Oct 13, 2008 7:58 pm
by chicagoross
Like Dougster said - no hurry on the panels! I stitched them all on loosely (1 1/2" gaps all around) and left them like that overnight. I think it gives the panels a little time to adjust to their new shapes. Then the next day, go around the boat tightening a little at a time - 1/4" or so. Maybe this is being obsessive, but before when I tightened too much I ended up having to cut and re-do ties; done the 1/4" at a time, for me at least, everyting lined up perfectly when we finally got down to almost no gaps! Have fun, that's my favorite part of the project, seeing the hull shape for the first time!
Posted: Tue Oct 14, 2008 2:22 am
by BassMunn
Chicagoross I think that was my problem the first time, I made my gaps too tight to start with, by the time I got to the bow the two panels were locking together so badly I couldn't wedge anything between them.
I'll use your method of just a little at a time, thanks
Posted: Tue Oct 14, 2008 5:54 pm
by BassMunn
OK let's see if I can get this picture thing right
First one of the large panels lying in my lounge waiting for the butt blocks to dry
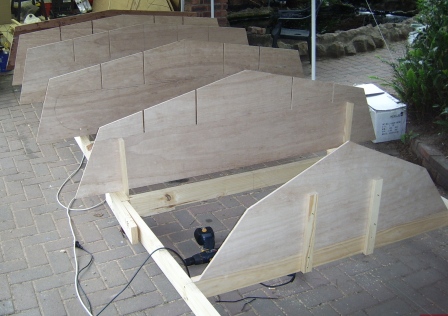
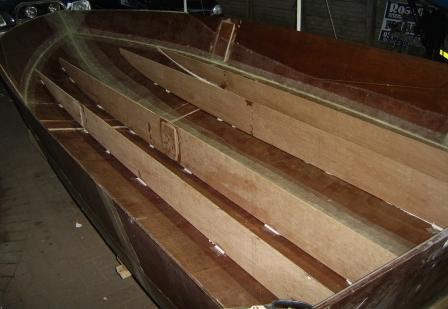
Bulkheads fitted to the building jig
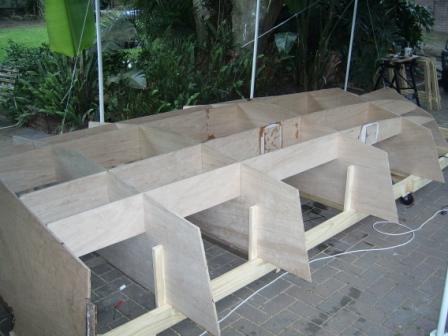
Stringers test fitted
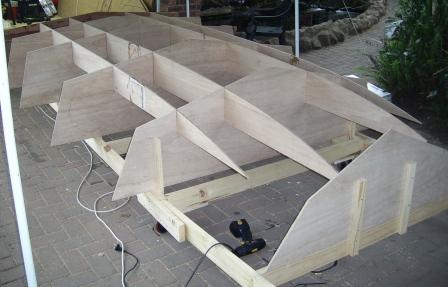
Another angle
For people that have built this boat you might notice that my butt blocks for the inner stringer do not coincide with the bulkhead. I would like to say that I planned it that way, but it was actually a plan reading mistake

luckily I picked it up before I cut the second part of the stringers so just had to adjust the size of the second part. I quite liked the idea that it meant that I didn't have to re-cut my stringer slots in that bulkhead

Posted: Tue Oct 14, 2008 6:00 pm
by Cracker Larry
Posted: Tue Oct 14, 2008 6:03 pm
by BassMunn
The stringers and bulkheads all fitted together really nicely (I actually got it straight

), just a little bit of sanding to take out one or two little cutting errors and the fit will be perfect.
BUT, I couldn't resist the temptation to lay the hull panels on the jig just to see how it looks and that was when I noticed that I made a really stupid mistake
When I glued the hull parts together I rather ingeniously glued the rear section of the hull sides on upside down
](./images/smilies/eusa_wall.gif "Brick wall")
Luckily it is a small section so I will have to recut the section and redo the butt block
Posted: Tue Oct 14, 2008 6:09 pm
by jeremy
Haha, you're a brave man, epoxying on a finished floor...
Posted: Tue Oct 14, 2008 6:10 pm
by BassMunn
When she got home she figured out why I had said to her "Sure honey go shopping and visit your parents for a while too". On top of that I made her help me carry them out
But I made sure there wasn't a drop of epoxy on that floor or my power tools might have disappeared
Posted: Tue Oct 14, 2008 6:19 pm
by Gramps
Looking good Bassmunn! Hopefully one day my work will be that clean.
Posted: Tue Oct 14, 2008 6:27 pm
by BassMunn
Thanks Gramps.
And I did have plastic sheets under the butt blocks otherwise my wife would have epoxied me to the gate post outside
Posted: Tue Oct 14, 2008 9:41 pm
by Dougster
My wife would kill me
If she didn't kill me, Shirley would have died herself. I say God bless 'em, we are a trial. I'm not always sure what they see in us, but Lord knows, I'm grateful
You're work is very clean; looks so much better than mine. I see the craftsman in you. And of course the great courage on the living room floor. That goes without saying. We lesser men salute you! You are a beacon, a watershed, a clear testimony; a guiding light to what can be. You are crazy. You are reckless. You are a deaf man on the tracks, with your back to the train. You are clearly a great man!
Salutes you Dougster
Posted: Tue Oct 14, 2008 9:49 pm
by steve292
Posted: Wed Oct 15, 2008 11:22 am
by BassMunn
Thanks Dougster, I hope you're right about the craftsman

We'll see in a few weeks time what she looks like.
It's starting to look like a boat so now I'm really getting excited.
I didn't get much done today, just sorted out the laminating mistake I made. We have cold rainy weather today so my epoxy won't set quickly enough.
The weather is looking better tomorrow, so I'll spend some time notching up family points tonight and get stuck into the boat tomorrow.
A question - If I wanted to extend the front deck back towards the console, would I need to put in an extra full size bulkead or could I get away with using a bulkhead that just sits on top of the sole?
Shannon
Posted: Wed Oct 15, 2008 12:30 pm
by TomW
Shannon the new rear bulkhead can sit on the sole. Many people like the larger casting deck that this will give you.
Tom
Posted: Thu Oct 16, 2008 6:55 pm
by BassMunn
Thanks for the clarification Tom. I would rather have a larger casting deck and sacrifice some cockpit space. The only time I will be in the cockpit is when I'm behind the wheel, so it really doesn't need to be very big. And I get more hatch space
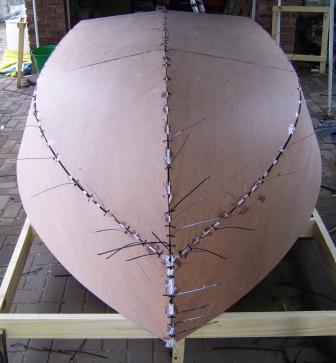
I have another question - I have fitted all the hull panels and got it to as near as perfect as I am capable. I have small gaps in all areas as the plans state I must have with none exceeding 9mm (most of my gaps are about 6mm). What would be the best method to now secure the panels so that I can remove the cable ties.
Could I build epoxy seems in the gaps, let them dry and then remove the cable ties and then complete the seems in the gaps left. Or must I use small pieces of glass to tab the parts together. If I can I would prefer to use fillets as I think the fillets will help keep the shape better.
What do you experienced guys think?
Thanks
Shannon
Posted: Thu Oct 16, 2008 7:38 pm
by Aripeka Angler
Bassmunn, welcome

Spot weld the hull panels together with a mix of epoxy and wood flour. No tape required yet. Keep your tacks small and flat and it will reduce sanding when you remove the zip ties and build real fillets....
Richard
Posted: Thu Oct 16, 2008 7:42 pm
by BassMunn
Thanks Richard, I was hoping I could do that. I take it that I will still need to brush epoxy on to the area first to seal the wood?
Posted: Thu Oct 16, 2008 7:55 pm
by Aripeka Angler
BassMunn wrote:Thanks Richard, I was hoping I could do that. I take it that I will still need to brush epoxy on to the area first to seal the wood?
No. It's not necessary.
The size of the spot welds is a matter of personal preference. Some people build them right up to the zip ties. Others just tack at 6 or so inch intervals. What you are looking for is a nice radius in your finished fillet so the tape conforms and has no dry spots.
Richard
Posted: Thu Oct 16, 2008 8:05 pm
by TomW
What you want now is just to hold the wood together. You will follow up with a full size filet and glass tape that is rounded to give the fiber glass cloth a clean radius to curve around.
Tom
Posted: Thu Oct 16, 2008 8:22 pm
by BassMunn
OK got it.
Thanks Tom and Richard
Posted: Thu Oct 16, 2008 10:16 pm
by Jimmiller
BassMunn
You should put tape on inside to keep the spot welds
from dripping on to the floor.
JIM
Posted: Thu Oct 16, 2008 10:44 pm
by chicagoross
Posted: Fri Oct 17, 2008 2:36 pm
by BassMunn
Hehehe, I've already started my epoxy coated driveway
Got the panels on last night and tack welded them today with a filleting paste. Now if the weather would be nice to me I could have actually started glassing tonight but it's still too cold, so I'll have to leave it till the morning. (so much for living in a sub tropical climate, OK so in 3 months I'll be complaining about how it never cools down, where never happy are we?)
I got my first batch of epoxy kick on me while still in a cup, this stuff gets hot
and even smokes a little, luckily wasn't much.
Here's some updated pics
Posted: Fri Oct 17, 2008 4:53 pm
by chicagoross
Posted: Fri Oct 17, 2008 4:58 pm
by BassMunn
Posted: Sat Oct 18, 2008 6:47 pm
by BassMunn
Update and a whole lot of questions for the experienced
Did all the filleting of the seems today, in the morning I'll sand the edges round and start the fibreglass seems. Did I ever say that waiting for epoxy to dry is very frustrating? Oh well suppose it gives you a chance to think up better ideas

OK, I have a whole bunch of questions
1. When adding strakes do you run the strake all the way to the end of the transom - I seem to remember reading somewhere on here that they need to end sooner?
2. Is it worth putting a pad into the back of the keel?
3. I can't decide if I need to completely finish the outer hull all the way to final paint before I flip it over. Should I flip after the high build primer or the fairing? It seems simpler to finish it completely first, but I'm concerned about getting slight warp in the hull when I flip and glass the stringers and bulkheads in. I don't want to spend all the time finishing the hull only to find that I have a hook or rocker once I finish the insides.
4. I want my hatches to have a completely flush fit, what do you guys do to seal a hatch like this. I was thinking of ordering some hatch lids from some one like BassPro, but with our exchange rate just dropping off the planet in this last week, if I order all the hatch lids I want they are going to cost me as much as all the Marine ply did for the boat

OK get typing already
Thanks
Shannon
Posted: Sat Oct 18, 2008 7:05 pm
by stickystuff
If your epoxy is kicking to fast for you go with a slow hardner. One important thing is you can't rush it. By this I mean wait until your fillets are dry enough on all seams before you take all zip ties loose. You do not want it to spring open on you. After all seams are hard, sand smooth then precoat all area with epoxy mix first. This will allow epoxy to penetrate the wood and seal it, also giving you a better base for your taping..I now have my PH 16 up for sale and is sitting on a local car dealer on consignment. With the economy the way it is I hope it will go fast.You will get plenty of help when you need it from all the board members. Good luck it is a great hull. By the way you don't need a pad. I did it because I thought it would make it run faster. I really don't think it makes any diff. A lot of extra work and material. Material is money. ??? Your call.
Posted: Sat Oct 18, 2008 7:27 pm
by BassMunn
Thanks for the advice Ken. I was thinking about putting in a pad but was also wondering about the effects of it. I know they use pads on the bass boats but they have a deeper vee hull. The Phantom has such a flat hull I wasn't sure if it would have made much of a difference.
Hope you sell your boat soon. What's next on the build list?
Posted: Sun Oct 19, 2008 7:05 am
by stickystuff
Kind of weird. Certain water conditions make the hull act in diff. ways. In small choppy conditions the hull gets on top and runs out fairly smooth. Then at other times depending on which direction you are running into the wind or behind it the hull has a tendancy to get just a little squirrely. Only in the stern area. You can feel it. Other tnan that it runs out great. My pad is not a raised pad. All I did was come off each side from center approx 4" ea. wayCut 1x3 clear fir from 3/4 to 0 on edge. This worked out that the side edges were the same hight as the keel. .So no draft was affected depth wise.
Posted: Sun Oct 19, 2008 6:37 pm
by BassMunn
Thanks for the details Ken, I still think I might put one on.
Posted: Sun Oct 19, 2008 6:50 pm
by BassMunn
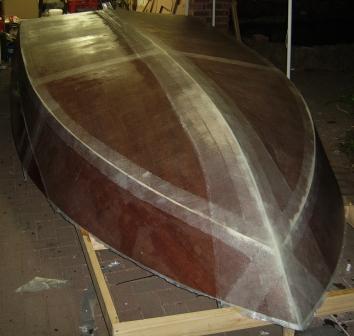
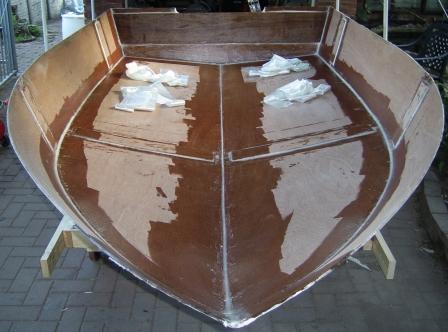
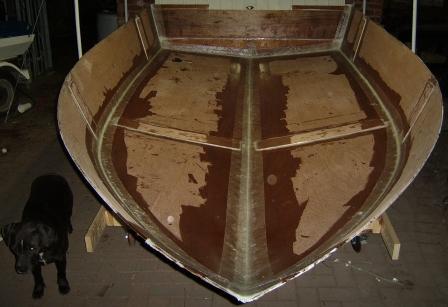
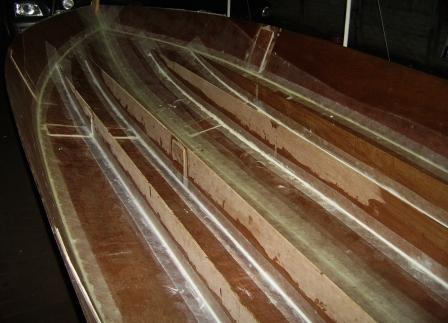
Phew, what a long day, but I do believe I have a boat that will actually float now
Taping all the joints with Biax tape and epoxy resin
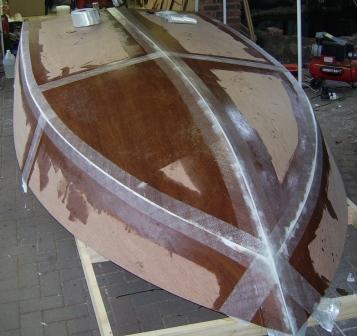
Ply epoxy coated.
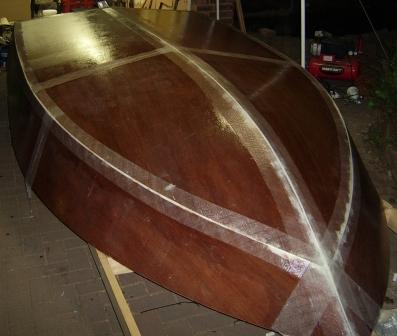
Ready for glass cloth
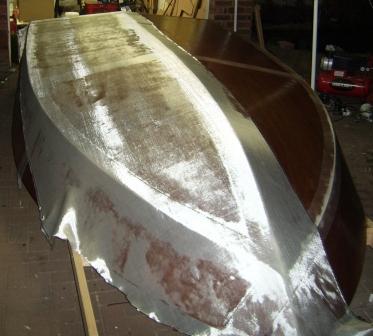
Glassing complete, well almost, still have to do the sides. No energy left
Posted: Sun Oct 19, 2008 7:05 pm
by stickystuff
Look at the pictures on my PH 16 for sale post. You will se how I did my strakes and pad. Nice job on the tapeing.
Posted: Sun Oct 19, 2008 7:20 pm
by BassMunn
Thanks Ken. The tapeing came out really well. I battled a bit with the cloth lines (they're a bit scew), but they cover all the areas that they need to. Did you glass your hull sides all the way to the top
I like the way you did your strakes and pad, I think I'm gonna steal your idea
Shannon
Posted: Sun Oct 19, 2008 7:26 pm
by Aripeka Angler
Great progress
Your going to be done before I finish typing this
Glass the entire hull on the outside...
Richard
Posted: Sun Oct 19, 2008 7:35 pm
by BassMunn
Aripeka Angler wrote:Great progress
Your going to be done before I finish typing this
Glass the entire hull on the outside...
Richard
I'm trying
I thought so, after working 12 hours flat out one tends to try find short cuts
. When I wake up tomorrow I probably won't even consider not doing it.
What size overlap do I need for the cloth on the side - 2"?
Posted: Sun Oct 19, 2008 8:40 pm
by Aripeka Angler
Shannon, I overlapped 4 inches on my cloth. I am pretty sure this is ok for your your boat, but others will comment. I used two layers of cloth on my boat so it quite different....
Richard
Posted: Mon Oct 20, 2008 3:32 am
by stickystuff
Send me your address and I will send you pictures on my strakes and pad.. Minimum overlap is 2" Four is better.
Posted: Mon Oct 20, 2008 4:24 am
by BassMunn
Thanks Richard
Ken, yes please send me some more pics
Thanks
Posted: Mon Oct 20, 2008 4:47 am
by stickystuff
I have to snail mail these to you. Send me your mailing address.
Posted: Mon Oct 20, 2008 5:07 am
by BassMunn
Shame Ken you don't have to send me your printed photos, but if you want to
send to:
Umm could you rather send me a mail so that I can get your email address, I don't really want to post all my details on the net. I would send you a pm but it seems that my messaging service on here doesn't work (I don't think my account has ever been activated properly)(did you get the pm I sent earlier?)
Thanks
Posted: Mon Oct 20, 2008 9:05 am
by steve292
Nice glasswork, very neat & clean. I overlap by 4 or 5" if possible. 2" is a bare minimum really, you need the overlaps for strength.
Steve
Posted: Mon Oct 20, 2008 11:35 am
by BassMunn
Thanks Steve, I'm gonna use a full panel sized sheet down the sides so it will give me about 5" of overlap. Should do the trick
Posted: Tue Oct 21, 2008 7:54 am
by Chalk
Nice looking build - did you add some to the sheer? On my Ph16 there was only enough room for two - three wire ties at the bow. Looks good
Posted: Tue Oct 21, 2008 11:30 am
by BassMunn
Chalk wrote:Nice looking build - did you add some to the sheer? On my Ph16 there was only enough room for two - three wire ties at the bow. Looks good
Thanks Chalk. No I cut the parts as per the plans. I've obviously got the odd slight cutting error here and there, but so far I haven't found anything that a slight sanding can't sort out.
I did have my cable ties very close together on the bow, I tried 3 at first, but they snapped twice so I put more in, the holes were about 1 1/2" apart.
Posted: Tue Oct 21, 2008 1:23 pm
by Chalk
Seems like more area there than mine - here's a pic of my bow

Posted: Tue Oct 21, 2008 2:00 pm
by BassMunn
GeeWiz I see what you mean! Now you've got me worried.
Maybe the plans have been changed slightly, here are the drawings of the bow panel
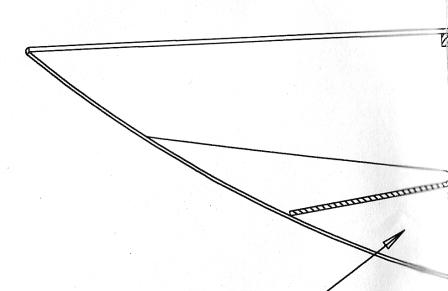
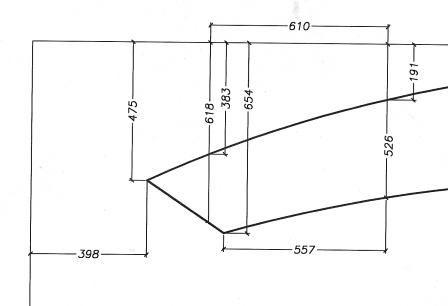
I don't look too far off, but I'm going to go measure again just to make sure
Posted: Tue Oct 21, 2008 5:16 pm
by BassMunn
Chalk, I've just checked everything out and my measurements are correct.
But there definately seems to be a plan change somewhere along the line.
If I look at the PH16's built by Doug Skogman, Casey Jones and your picture and John Pelligrino's PH18, they all have the smaller (more tapered) hull side points.
But if I look at mine and Gordons (Not sure his surname) they have the larger less tapered points. Here is the link to Gordons build site. You can clearly see there is a difference.
http://desertphantom.blogspot.com/
The latter seems to be the newer plan
Do you have a build log by the way, I like to see each builders work to see if i can pick up some new ideas.
Thanks
Posted: Tue Oct 21, 2008 5:23 pm
by Chalk
I actually like it - was thinking of doing another one but with a lower sheer...Build on

Posted: Tue Oct 21, 2008 5:34 pm
by BassMunn
Me too
Just 1 side left to glass and then I can flip it over to start the inside. The rain kinda halted me in my tracks today - that and the stiff joints and muscles (must be getting old)
Posted: Fri Oct 24, 2008 5:52 pm
by BassMunn
After working myslef to a frazzle last Sunday, the boat building was halted due to work (don't you hate it when it interferes with fishing and boat building
) and a lot of rain. My boat sits just covered from the rain, but it's not fun every time you bend down you get a nice cold trickle off the roof down your pants

I guess that's what happens when you have limited space and rain season just started.
Got the hull fliped today and spent an hour or two making sure the hull was sitting nice and level. I'm very worried about introducing a hook or rocker now.
I test fitted the bulkheads and stringers again just to make sure everything is right, looks pretty good although I will have a bit of altering to do to the bulkheads once the glass is done on the inside.
Got the grinder out and started to work on cleaning up the seems. 20 minutes and I looked like I was doing early preperation for Halloween.
One thing I am a little worried about. I raised the height of the hull on the jig so that it is easier to work with, my knees can't take much more kneeling down.
But there is no way in creation that I can reach the middle seem without getting into the hull. I've tried to support the hull as best as I can, but I'm a bit worried about putting my 220lb a@s on 1/4" ply with only one side glassed. What did you guys do to overcome this, besides loosing weight
Thanks
Shannon
Posted: Fri Oct 24, 2008 6:11 pm
by Cracker Larry
Stretch a few boards across the sheer and lay on them

Got sore knees myself
Of course KS would spend about a year designing and building an elaborate jig that raises, lowers and rotates like a pig on a spit, but I just stretch out across a few boards
Posted: Fri Oct 24, 2008 6:16 pm
by BassMunn
That sounds like a good idea Larry thanks.
This way I can lie down on the job too
For once I wish I had Mr Gadget arms
Posted: Fri Oct 24, 2008 6:29 pm
by Cracker Larry
You could also lay some planks across the stringers and stand on them. That would distribute your weight
That is a wide boat.
Posted: Fri Oct 24, 2008 6:48 pm
by BassMunn
Cracker Larry wrote:You could also lay some planks across the stringers and stand on them. That would distribute your weight
That is a wide boat.
Thanks Larry, but I still need to fillet and glass the bare hull before the stringers and bulkheads go in.
For your first suggestion would the sheer have enough strength to hold my weight considering there are no bulkheads in place to give them support?
Posted: Fri Oct 24, 2008 6:53 pm
by stickystuff
If you have the outside glassed it will def. hold you on the inside. The glass is amazeing the strength it has. You should be ok. Still need to get the pictures to you. I haven't forgot.
Posted: Fri Oct 24, 2008 7:01 pm
by BassMunn
stickystuff wrote:If you have the outside glassed it will def. hold you on the inside. The glass is amazeing the strength it has. You should be ok. Still need to get the pictures to you. I haven't forgot.
Thanks Ken, Yes the outside is completely glassed. I'll give it a shot in the morning (before I have breakfast
)
Posted: Fri Oct 24, 2008 9:26 pm
by Aripeka Angler
BassMunn wrote:
Shannon
Shannon you are doing great.The boat looks nice
Do you need a drain in the forward bulkhead to allow water to drain aft in the event of a forward bilge flood?
Richard
Posted: Fri Oct 24, 2008 9:36 pm
by BassMunn
Thanks Richard.
Yes I'm going to put drain holes into all of the bulkheads before I glass them. Thanks for the heads up
Posted: Mon Oct 27, 2008 8:40 pm
by BassMunn
Slow going this weekend - life interfered
Did all the seems on the inside and coated with epoxy ready for tape.
Notice the neat bundles of pre-cut tape, hehehe
I made a rather painful mistake today, when I glassed the outside I didn't get a single airbubble in the tape (only the large sheets, that I had to work out), because this was the inside and is going to be out of sight I didn't spend anywhere near as much time sanding the fillets - BIG mistake, I have so many air bubbles after doing the inside taping, that I am going to have to spend the next 3 days sanding it all out, Grrrrr
Do it right the first time, next time
Posted: Tue Oct 28, 2008 8:10 am
by JimW
B Munn,
Working wet on wet over the fillets will prevent you from having to sand fillets. Form the fillets about ten feet at a time and then apply thin resin and tape over the fillets while they are still kicking off. The resin brushed on the fillets will "smooth" them so you get no bubbles. Very little resin is required on top of the glass tape in the middle after placing the tape. Just a bit to hold the edges down. This tip will save you DAYS!
Posted: Tue Oct 28, 2008 8:32 pm
by BassMunn
JimW wrote:B Munn,
Working wet on wet over the fillets will prevent you from having to sand fillets. Form the fillets about ten feet at a time and then apply thin resin and tape over the fillets while they are still kicking off. The resin brushed on the fillets will "smooth" them so you get no bubbles. Very little resin is required on top of the glass tape in the middle after placing the tape. Just a bit to hold the edges down. This tip will save you DAYS!
JimW, Thanks for the tips.
I didn't really think about doing the inside differently to the outside, I had to let the outside fillets setup so that I could sand to get the correct camber.
I automatically did the same on the inside without thinking.
I am now finished the inside hull glassing, PHEW, hard work (wish my arms were 6" longer).
Tomorrow I start installing the stringers and bulkheads. I will definately be using the wet on wet approach for all these parts.
JimW I like your method of brushing the fillet before laying the tape, gonna try that tomorrow.
Thanks
Shannon
Posted: Tue Oct 28, 2008 8:45 pm
by BassMunn
Well after muttering and grumbling last night about all my air bubbles, I thought I was in for a full day of sanding just to try get things right.
When I had a good look in daylight there weren't as many as I thought, some were just high spots that were solid underneath, so I sanded those lower and patched them where I sanded through the glass.
I had a total of 5 true air bubbles, all on the edges where the glass goes over the butt blocks, I used a syringe to inject epoxy into the gaps and they filled in nicely. (they were all pretty small).
Spent the rest of the night glassing in the cloth sheets.
Tomorrow I start on the Stringers and Bulkheads
Posted: Tue Oct 28, 2008 8:56 pm
by BassMunn
Question - So far I have glassed the inside and the outside of the hull completely, but still have to do all the stringers, bulkheads and so on.
I have already used about 2/3 of my epoxy resin, does this sound about right?
I thought I was doing pretty well with my glassing as I can see the glass weave in all areas and have waisted very little, but it seems that I may run out of resin
Posted: Tue Oct 28, 2008 9:18 pm
by Aripeka Angler
BassMunn wrote:Question - So far I have glassed the inside and the outside of the hull completely, but still have to do all the stringers, bulkheads and so on.
I have already used about 2/3 of my epoxy resin, does this sound about right?
Ahem
I am trying to figure how to say this in a PC way
Order another 10-15 gallons and you should be good to go
My build was listed at 11.5 gallons and I used 28. Of course I added a few features. I was a pig with the sticky stuff
You waste a ton as a newby and the specs are a little bit on the conservative side in IMHO
Good luck
Richard
Posted: Tue Oct 28, 2008 9:29 pm
by BassMunn
Thanks Richard. I did glass the sides all the way to the top which the plans don't call for and I am going to glass the deck which is also not included, so I suppose I better order some more
Posted: Tue Oct 28, 2008 11:25 pm
by chicagoross
My HMD called for 15 gallons. I used extra for glassing the sides, sole, decks, and cabin front; also used a bit for 3 coats of graphite on the bottom. My finished tally was 30 gallons, double the BOM. Don't feel bad, especially if you're adding "extras" above the basic build, as you are!
Posted: Wed Oct 29, 2008 4:35 am
by BassMunn
Cool thanks Chicagoross
Posted: Wed Oct 29, 2008 8:38 am
by ericsil
I second the comment from Chicago. The P19 BOM also lists 15 gal of epoxy. If you calculate the weights, this is about the amount you need to lay the fiberglass with some waste factor. You also need filets, coating of bare wood, fairing material and non hull issues like the consols. I was very careful not to add excess weight and ended up using about 27 gallons when all was done.
Posted: Wed Oct 29, 2008 11:32 am
by BassMunn
ericsil wrote:I second the comment from Chicago. The P19 BOM also lists 15 gal of epoxy. If you calculate the weights, this is about the amount you need to lay the fiberglass with some waste factor. You also need filets, coating of bare wood, fairing material and non hull issues like the consols. I was very careful not to add excess weight and ended up using about 27 gallons when all was done.
OK this sounds like the norm, guess I'll be ordering some more epoxy soon.
Another question - When do you guys put the holes in the transom for the drain and livewell fittings? Do yu do it before fairing the outside or after?
Posted: Sat Nov 01, 2008 8:02 am
by BassMunn
OK, got a bit more done last night.
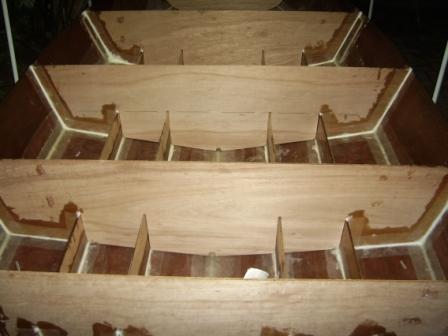
Test fitting the stringers and bulkheads, I then tack welded the stringers in place with an epoxy slurry.
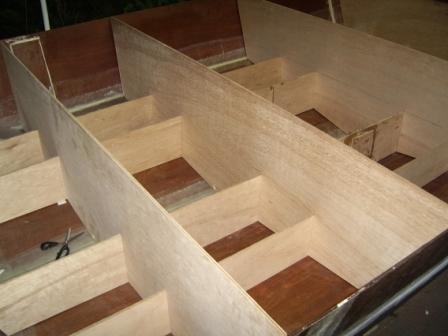
Stringers shown with tack welds, ready to be filleted and glassed.
Stringers now glassed in place, I still need to glass the rest of the bare wood on the stringers as per the plans.
All the joints were done wet on wet. Finished at 3am in the morning
I started off really neatly but I seem to be getting a lot messier as I go along, maybe I'm trying to do too much at once.
Before I put the bulkheads in place, I still need to glass the open hull sides, the tops of the stringers and I need to spend some time cleaning up some of the nasty areas.
Posted: Sat Nov 01, 2008 8:35 am
by chicagoross
Yup, that's the process, looks good. Still a few more filets to go before you start laying them in visible places.
You're not using wood flour for the peanut butter for filets - what blend are you using?
Posted: Sat Nov 01, 2008 8:42 am
by BassMunn
chicagoross wrote:Yup, that's the process, looks good. Still a few more filets to go before you start laying them in visible places.
You're not using wood flour for the peanut butter for filets - what blend are you using?
I'm using a mixture of microballoons and silica, I couldn't find wood flour
Posted: Sat Nov 01, 2008 8:51 am
by Aripeka Angler
BassMunn wrote:chicagoross wrote:Yup, that's the process, looks good. Still a few more filets to go before you start laying them in visible places.
You're not using wood flour for the peanut butter for filets - what blend are you using?
I'm using a mixture of microballoons and silica, I couldn't find wood flour
Shannon, they sell the wood flour here in the online store.
Posted: Sat Nov 01, 2008 9:02 am
by BassMunn
Yes I know, but getting it to South Africa costs more than what I can buy the other materials here for.
I hate mixing microballoons into epoxy, but it's what I can get easily.
The Biax tape I am using is also not the same as required, but it's all I could get., the plans call for 6" 12oz biax, I'm using 5" 18oz biax, I figure it should be fine......I hope
Posted: Sat Nov 01, 2008 9:23 am
by Aripeka Angler
Shannon I had no idea you were across the pond

There used to be an address bar on each signature but they took it away for some reason
You could make your own wood flour with a dust bag belt sander and some kiln dried pine or mahogany lumber. Saw dust or planer shavings would be too course. The fillers you have available should be OK but I am sure others will comment.
The workmanship of your build looks great
Continued good luck....
Richard
Posted: Sat Nov 01, 2008 9:37 am
by BassMunn
Thanks Richard, I actually tried to add the address but also couldn't find it, yet some people do have their locations shown
If I remember correctly I read somewhere in the FAQ's that the Micro/Silica combination is actually stronger than the wood flour but more expensive, I might be wrong though. Micro on it's own wasn't strong enough and silica on it's own was too brittle, but together they work well. I'll try find the article or post.
When you guys glass the tops of your stringers, do you take the glass to the edge and stop or are you trying to fold the glass over the top. There's no way I'll be able to get it to do that without huge airbubbles.
Posted: Sat Nov 01, 2008 9:41 am
by BassMunn
BassMunn wrote:
Notice how tight my gaps are where the stringers go through the bulkheads, obviously once glassed these won't even fit in. What do you guys do or use to open the gap? (apart from using a handfile....I'm tired
)
Posted: Sat Nov 01, 2008 9:48 am
by Aripeka Angler
Shannon, use a jigsaw to open up the slots in the bulkheads. Should work fine
Just run the tape to the top of the stringers. You would have to fully radius the top the stringers to wrap them. In any case it is not required to wrap them. Be sure to saturate the top open grain of the stringers with epoxy...
Richard
Posted: Sat Nov 01, 2008 9:58 am
by BassMunn
Thanks Richard.
Oh I just found the article on mixing the putty fillets.
Quote:Putty can be made with wood flour but the ideal filler is a mix of microballoons and silica. Microballoons are microscopic bubbles of glass or plastic (phenolic). Silica is some kind of chemically pure sand.
http://bateau2.com/content/view/99/28/
Phew, I did remember correctly
I think it's also time to find a resin mixer
Posted: Sat Nov 01, 2008 9:58 am
by Dougster
I didn't glass the stringers first, and didn't glass over the top of stringers. I glued the frames in just like in your dry fit picture, then glassed each individual "cell". Kinda tedious, but working wet on wet you can do one cell at a time and it seemed quite strong.
But then what does he know Dougster
Posted: Sat Nov 01, 2008 5:01 pm
by BassMunn
Dougster wrote:I didn't glass the stringers first, and didn't glass over the top of stringers. I glued the frames in just like in your dry fit picture, then glassed each individual "cell". Kinda tedious, but working wet on wet you can do one cell at a time and it seemed quite strong.
But then what does he know Dougster
Dougster after doing the stringers the way that I did, I think your idea might have been a better prospect.
Posted: Sat Nov 01, 2008 5:49 pm
by chicagoross
Bassmun, I went compartment by compartment also - that's how I manage to build a boat about 2 hours a day. You'll still be doing that as you glue and tape in the frames. Working til 3AM is optional at this point!
No problem for you now that your stringers are in, but I was terrified of being in the boat when it had no internal structure yet; working compartment by compartment let me kneel in an area next to the one I reinforced the previous day; only worried about dropping out the bottom for the first compartment!
Posted: Sat Nov 01, 2008 6:27 pm
by stickystuff
Richard, the guyis in S. Africa. Maybe he can find some gaboon powder. (NOT)I used microbaloons on my PH when Ibuilt it. did not have wood flour at the time I built it.
Posted: Sat Nov 01, 2008 7:22 pm
by BassMunn
chicagoross wrote:Bassmun, I went compartment by compartment also - that's how I manage to build a boat about 2 hours a day. You'll still be doing that as you glue and tape in the frames. Working til 3AM is optional at this point!
No problem for you now that your stringers are in, but I was terrified of being in the boat when it had no internal structure yet; working compartment by compartment let me kneel in an area next to the one I reinforced the previous day; only worried about dropping out the bottom for the first compartment!
.
The biggest mistake I made is that I filleted all the stringers first and then realised that I had 8 full pieces of tape to glass in
and that was at 12 at night.....Duh??? You live and learn, atleast I will have huge calf and hamstring muscles by the end of this
I was also very worried about the strength of the bottom, but before I glassed the inside of the hull I put extra supports under it and only crawled on my hands and knees keeping to the centre. Once the inside glass had cured the bottom was much stronger, but I stayed on my hands and knees. Needless to say I can't stand up straight today.
I'm going to start installing the bulkheads tomorrow and will finish the stringer glassing bit by bit as I do each compartment. Your's and Dougster's method is far more conducive to less back and knee pain
and getting to bed before 3am
Posted: Sat Nov 01, 2008 7:27 pm
by BassMunn
stickystuff wrote:Richard, the guyis in S. Africa. Maybe he can find some gaboon powder. (NOT)I used microbaloons on my PH when Ibuilt it. did not have wood flour at the time I built it.
Uuuuhhhh........I think I'll stick to microballons and silica
Might make a good anti theft device though
Posted: Sat Nov 01, 2008 8:33 pm
by Aripeka Angler
You did your stringers the right way for a small, high powered skiff. Continious lamination of the stringers is better and stronger for a high speed planing hull. I don't know about displacement hulls such as Chicagoross's and Doug's
In the end I think you will be happy with your stringer lamination.....
Richard
Posted: Sat Nov 01, 2008 8:46 pm
by BassMunn
Aripeka Angler wrote:You did your stringers the right way for a small, high powered skiff. Continious lamination of the stringers is better and stronger for a high speed planing hull. I don't know about displacement hulls such as Chicagoross's and Doug's
In the end I think you will be happy with your stringer lamination.....
Richard
I think you're right Richard, the plans call for it to be done that way, so I did it that way. Atleast it's done now and I can start on the bulkheads tomorrow morning
I must say this boat building thing really tests your resolve, last night (this morning) I wanted to kick myself for even thinking about building a boat myself. Right now I'm all excited about doing more on it tomorrow
What I am enjoying is seeing and feeling it become stronger and more ready to hit the water each day
Posted: Sun Nov 02, 2008 2:40 pm
by steve292
It is better to do the stringers on the planing hulls in one full length.
It is easier from here, because you can(or I did anyway), fillet & tape one bulkhead, & while that was curing set up another one at the other end
Steve
Posted: Sun Nov 02, 2008 3:39 pm
by BassMunn
Thanks Steve, now that it's over I'm glad I did it that way.
I spent the day today altering the bulkheads so that they fit properly now that I have done all the glassing on the stringers. I had to open up the stringer slots a bit and angle the corners to allow space for the fillets on the stringers. After I got all the gaps right, spacing correct and level I tacked them all in place. Tomorrow night I can start filleting and glassing the individual boxes....1 at a time
Although it was nice to see the hull take shape, I am really starting to enjoy this part of the build.
I'm just not sure how far to go once I have finished the bulkheads before I flip it again to do the fairing and painting.
What do all you experts say?
Do I flip it as soon as the bulkheads are done or do I install all the cleats, the sole and sheer clamps and then flip it, or finish the deck and then flip???
Decisions, Decisions
Posted: Mon Nov 03, 2008 12:21 am
by TomW
I'd keep it as light as I could. frames and stringers and fiberglass on both sides will maintain the bottom and sides shape and the shear clamp and rub rail if it calls for one the upper sides shape. So I guess I'm saying only add the shear clamp and rub rail if a rub rail is caller for.
Tom
Posted: Mon Nov 03, 2008 3:52 pm
by chicagoross
Tom's right. Keep it as light as possible. At this point you'll still be able to flip it with just a few friends and neighbors and beers.
Posted: Mon Nov 03, 2008 4:21 pm
by BassMunn
Thanks for the answers TomW and chicagoross. OK I'll finish the bulkheads, install the sheer clamps and then she goes over to make her look pretty
OK I've got another question - Do you install the skeg and strakes before you fair the hull or after. I'm thinking before you fair will be stronger (I think), but the hull might not be fair enough until it is faired??
My glassing on the outside came out really well, but I think I am going to have a slight rocker that I will need to fix.
Posted: Mon Nov 03, 2008 4:23 pm
by BassMunn
chicagoross wrote:Tom's right. Keep it as light as possible. At this point you'll still be able to flip it with just a few friends and neighbors and beers.
I better not forget the beers or I might have a strike on my hands
Posted: Mon Nov 03, 2008 4:26 pm
by Cracker Larry
Do you install the skeg and strakes before you fair the hull or after.
Before. They should be glued and glassed to the solid glass of the hull. Then you can fair up to it. You don't want to make a structural attachment over fairing compound, it may not hold the stress.
Posted: Mon Nov 03, 2008 4:42 pm
by TomW
Agree with Larry any attachments should be made epoxy to epoxy not to fairing compound. Like he says fairing compound can be structurally weak. Don't forget to sand the current epoxy good since it has been a while since you put it down so you get a good mechanical bond.
Tom
Posted: Mon Nov 03, 2008 5:10 pm
by BassMunn
Thanks Larry and Tom, I thought that might be the case as the fairing compound should be weaker to allow easier sanding.
When I install the strakes and skeg, is it necessary to screw them down to the hull while the epoxy dries? Can I get away with just using a bit of weight or do they slide around too much?
Thanks
Shannon
Posted: Mon Nov 03, 2008 5:36 pm
by Cracker Larry
No screws. I didn't even use extra weight, just the weight of the skeg was enough.
Posted: Mon Nov 03, 2008 6:38 pm
by BassMunn
Cool, thanks Larry
Posted: Mon Nov 03, 2008 6:39 pm
by topwater
duct tape
Posted: Mon Nov 03, 2008 7:02 pm
by BassMunn
topwater wrote:duct tape
Love the stuff
More questions
For the outside of the hull - I still have a large amount of the weave from the glass cloth showing. Do I put fairing compound straight over this or do I roll extra clean epoxy resin on first to fill in the weave and then put down the fairing compound?
Thanks
Shannon
Posted: Mon Nov 03, 2008 7:06 pm
by Aripeka Angler
Use fairing compound.....
Posted: Mon Nov 03, 2008 7:21 pm
by Cracker Larry
Yes, it's much lighter and more cost effective. And a lot easier to sand
Posted: Mon Nov 03, 2008 7:26 pm
by BassMunn
I was hoping that would be the answer
OK I'm pushing my luck here, but I've got another question
As you all now know I live in South Africa and although all the paint brands sound great that you guys deal with, we don't get them here.
In the FAQ's, it states that the best paint to use is a 2 part polyurethane paint, but I'm battling to figure out what to use based on these details I have been given:
2K Polyurethane (Metalux 2 by Chemspec) (acrylic) - used in the automotive industry - 2:1 mix ratio, 10 to 20 percent thinners.
They also do a high build primer.
Or
Chemthane - Which is also supposedly a Polyurethane, but the mix ratio only uses a 5% hardener. The guy said it is much stronger than the other 2k but doesn't have quite the same finish and it's much cheaper.
Any ideas
Posted: Mon Nov 03, 2008 7:38 pm
by Aripeka Angler
BassMunn wrote:I was hoping that would be the answer
OK I'm pushing my luck here, but I've got another question
As you all now know I live in South Africa and although all the paint brands sound great that you guys deal with, we don't get them here.
In the FAQ's, it states that the best paint to use is a 2 part polyurethane paint, but I'm battling to figure out what to use based on these details I have been given:
2K Polyurethane (Metalux 2 by Chemspec) (acrylic) - used in the automotive industry - 2:1 mix ratio, 10 to 20 percent thinners.
They also do a high build primer.
Or
Chemthane - Which is also supposedly a Polyurethane, but the mix ratio only uses a 5% hardener. The guy said it is much stronger than the other 2k but doesn't have quite the same finish and it's much cheaper.
Any ideas
I have no clue on South African paint
My gut would be use the stuff that will catch on fire if you drop a match a match in the can. I did not like the water based topcoat.....
Richard
Posted: Mon Nov 03, 2008 8:12 pm
by TomW
BassMunn International Paints or Interlux as we know it here has a distributer in Durban South Africa. Several of the guys have used the Perfection brand from Interlux and been very satisfied with it. Here is the link
http://www.yachtpaint.com/Holding_pages ... africa.htm
It is the only paint I know of that may have distributers around the world. Awlgrip may also but I wouldn't know enough about them to help you there.
Tom
Posted: Mon Nov 03, 2008 8:17 pm
by BassMunn
TomW wrote:BassMunn International Paints or Interlux as we know it here has a distributer in Durban South Africa. Several of the guys have used the Perfection brand from Interlux and been very satisfied with it. Here is the link
http://www.yachtpaint.com/Holding_pages ... africa.htm
Tom
Thanks Tom.
When I did a search on google it didn't come up with anything, guess I did it wrong
Cool I live in Durban
Will phone them in the morning
Posted: Mon Nov 03, 2008 8:52 pm
by Aripeka Angler
Shannon, I would see if you could find some Sterling if you are looking for a fine boat finish. Based on the quality of your build I am thinking you are looking for something a little better than a work boat finish. Awlgrip and the other stuff that Tom our boat and paint expert posted about will work great also. Slow down or you will be done before Thanksgiving
I like solvent based paint better myself....
Richard
Posted: Mon Nov 03, 2008 9:00 pm
by BassMunn
Thanks Richard, I will see if I can find out about these other brands.
I would like to paint with a solvent based paint, or should I say spray. For the boat building I'm a newbie, but I know my way around a spray gun
These new Glitter covered marvels that are arriving here from the US are gonna have some competition
Posted: Tue Nov 04, 2008 12:12 am
by TomW
Shannon, the brands to look for in boat paint would be the International either Perfection or they have one better grade Interthane Plus, Awlgrip, Sterling and Imron. Imron and Awlgrip are pretty international in there uses don't know how wide spread Sterling is. All will give you an outstanding finish, none are cheap.
Here is the Awlgrip he is in Somerset West
http://www.awlgrip.com/awlgrip_pages/di ... r_emea.htm You can also review the product there on the left hand side.
Imron is made by Dupont I could not find a S. African source for it.
If you are going to spray all will require rebreathing(forced air) apparatus, they are that toxic.
Tom
Posted: Tue Nov 04, 2008 8:04 pm
by BassMunn
Thanks Tom, I got hold of the Perfection agents today and they have in stock but geewiz it's expensive
, They have an alternative that is way cheaper and it is also the right kind of stuff (epoxy high build primer and Polyurethane topcoat paint, both 2 part, specifically for boats).
I'll do a test run using the roll and tip method, before I dig my heels in about the spraying option. If I can get a good finish with that method, I'll use it. I'll leave the spraying for when I do some graphics on the sides.
Update on the boat:
Did 19 bulkhead joints tonight, 25 left to go. All done wet on wet. My filleting and glassing is coming out really nicely now
Working on smaller areas really helps a lot.
Posted: Wed Nov 05, 2008 4:25 pm
by BassMunn
OK I posted this in the paint section, but thought I'll post it here as well, just incase someone misses it
Trying to figure out what to do about the paint story
Hi Guys
I will be getting ready to paint my hull within the next week or so, but I really can't decide on what paint to use
My Problem - I live in South Africa, so products like Interlux Perfection are stupid expensive
.
For the price of just 2 quartz of Perfection I can buy all my paint requirements, from primer, topcoat, clear coat, hardeners and thinners.
These are local brands - 2 part polyurethane automotove paint.
Could anyone that has used an automotive paint like this, please give me some feedback as to the suitability and longevity of the paint.
Thanks
Shannon
Posted: Wed Nov 05, 2008 4:39 pm
by Aripeka Angler
Shannon can you get this stuff there
http://www.sikkens.net/
Ken repainted his boat with this paint.

Maybe he will see this post and respond. The boat looked great
Richard
Added: I just spoke with Ken on his cell and he said Sikkens was indeed the paint he used....
Posted: Wed Nov 05, 2008 5:28 pm
by BassMunn
Richard do you know if he painted the underside of the hull with it?
Curious to know if it will handle the punishment that area takes.
Thanks
Posted: Wed Nov 05, 2008 5:30 pm
by Aripeka Angler
BassMunn wrote:Richard do you know if he painted the underside of the hull with it?
Thanks
No, he used graphite epoxy below the water line....
Posted: Wed Nov 05, 2008 5:56 pm
by BassMunn
Thanks for the feedback Richard.
I've got some of this
to do now
For those that are not painting system challenged like me
Would an epoxy based or polyurethane based high build primer be better?
Posted: Wed Nov 05, 2008 6:08 pm
by Cracker Larry
I'd go with an epoxy based primer. High build if you can get it.
Posted: Wed Nov 05, 2008 6:09 pm
by BassMunn
Cracker Larry wrote:I'd go with an epoxy based primer. High build if you can get it.
Larry if you don't mind me asking, what's your reasoning for it. Is it stronger?
Posted: Wed Nov 05, 2008 6:11 pm
by chicagoross
Bassmun, don't ask me, I'm strictly a work-boat finish kind of guy..."A man's got to know his limitations...". The builders here seem to prefer the high-build epoxy primer as a general rule.
I do have two recomendations: First of all, graphite the bottom of your hull; it's cheaper than painting, more durable, and looks good (the only really shiny part of my boat is the bottom of the hull
). You are safe to graphite at this point.
Second, primer only on the hull sides at this time; you will be drilling holes for scuppers, through-hulls, bow and stern-eyes, fuel tank vents, etc. You will still need to re-prime and sand hull sides after finishing the entire interior of the boat! IMHO this is the time for fairing and a prime coat only...
Posted: Wed Nov 05, 2008 6:21 pm
by BassMunn
Thanks Chicagoross.
About the Graphite bottom - What, where, who
Sorry I've seen the build threads where it is used, but don't have a clue about it.
Posted: Wed Nov 05, 2008 6:21 pm
by TomW
You can save some money by using a 25% graqhite to epoxy mix on the bottom as in the picture that Richard showed of Ken's boat. This gives a very hard bottom and is used by the guys here that have close contact with the oyster bars. Graphite is sold here or by West. Use it as your bottom paint so take it up to the waterline. Then if you keep your boat in the water and still want to bottom paint you can sand the graphite and put on a good bottome paint. If not you have a good looking bottom with the graqhite.
As far as primer goes, the epoxy hi-build primers seem to be able to work on most of all the paints, while the poly primers are paint designated.
You are right about the cost of the yacht paints even here they come to about $400 or more a gallon, once you get all the additives for them, but they are longer lasting, easier to apply, shinier and just a better overall product.
Tom
Posted: Wed Nov 05, 2008 6:24 pm
by BassMunn
OK, Thanks TomW.
So the graphite bottom is just graphite powder mixed with epoxy resin?
Where do I find this stuff and what am I looking for in particular?
Sorry for the Newb questions
Posted: Wed Nov 05, 2008 6:26 pm
by BassMunn
Sorry didn't read properly, just found it here on BBC.
Thanks
Posted: Wed Nov 05, 2008 6:30 pm
by Cracker Larry
I'd go with an epoxy based primer. High build if you can get it.
Larry if you don't mind me asking, what's your reasoning for it. Is it stronger?
No probably no stronger, but the epoxy primer is compatable to the epoxy resin, and like Tom said, it is generically compatable for most paints. It is also somewhat gap filling and will help in fairing the hull.
Posted: Thu Nov 06, 2008 4:56 pm
by BassMunn
Haven't done much building since Tuesday, but thought I would pop a pic in to show how far I am.
19 done 25 to go
I managed to find a local supplier of Graphite powder today, so she is going to get a black underside
And I bought myself a new spray gun - Oh boy!! New Toys!!
I will graphite coat the underside of the hull but the balance of the boat will be sprayed. One of the main reasons for this is that I am going to be doing some sort of pattern on the sides with a full glitter flake and this can only be sprayed.
Posted: Thu Nov 06, 2008 5:55 pm
by chicagoross
Should be feeling pretty solid by now! I remember getting about half way, as you are, on the inside filet-and-tapes, and no longer worrying about whether I was going to be falling through the bottom!
Posted: Thu Nov 06, 2008 6:09 pm
by BassMunn
Yes you can see that I did all the outside joints first because I was worried about that. It's really starting to get nice and rigid now. I've let it dry for 2 days so they are nice and strong. Now just to figure out how not to glass myself into the centre compartments
Posted: Sat Nov 08, 2008 8:12 am
by BassMunn
Finally......., Bulkheads all fibreglassed in place
I'm going to install the sheer clamps now and then she is ready to be flipped.
This seems like a lot like work
Posted: Sat Nov 08, 2008 2:05 pm
by chicagoross
No, this is the fun stuff...the "lot of work" is sanding and painting!
Posted: Sat Nov 08, 2008 2:17 pm
by BassMunn
I can't complain it's been fun so far.
I was having a good look at my hull today and it looks like I am going to have a love hate relationship with my orbital sander.
Posted: Sat Nov 08, 2008 3:48 pm
by TomW
You'll also need to build or buy fairing boards, two of them 1 a 1/4" for no-flat areas and 1 a 3/4" for flat areas or you'll never get her fair. Shine sells them in the store here if you want to see what they look like. But you can make your own easy enough.
Tom
Posted: Sat Nov 08, 2008 4:11 pm
by BassMunn
TomW, when you say 1/4" and 3/4" is that the thickness of the board.
If so is that for a flexible and rigid system?
What sort of total dimensions are the fairing boards?
Thanks for the tips
I have another question - On my plans it calls for a sheer clamp using solid wood 1" x 2", but I've seen most guys use ply laminated together. Does it matter which I use or must I stick to the plans?
Thanks
Shannon
Posted: Sat Nov 08, 2008 4:16 pm
by Cracker Larry
Does not matter with the clamp, Shawn
Fairing boards are usually about 4-6" wide and 24-36" long with a couple of handles on top. The larger they are, the more a man it takes to push them around
Posted: Sat Nov 08, 2008 4:34 pm
by BassMunn
Cracker Larry wrote:The larger they are, the more a man it takes to push them around
So in other words mine should be about 6" long
Thanks for the help Larry, your boat looks amazing by the way
If I make them myself, what do I use to keep the sanding paper attached?
Posted: Sat Nov 08, 2008 10:10 pm
by Daddy
I used a spray on adhesive on mine, worked like a charm.
Daddy
Posted: Sat Nov 08, 2008 10:39 pm
by Cracker Larry
Yes, same thing. You size it for standard belt sander belts, cut them to length and use 3M spray adhesive to stick them on.
Posted: Sun Nov 09, 2008 8:37 am
by TomW
Yep flexible and rigid boards, for the different areas on the boat. The 4" sanding belts work well with the temporary type spray glue.
Shoulders be wider after fairing!
Tom
Posted: Sun Nov 09, 2008 11:37 am
by BassMunn
Thanks guys, all these tips really help a lot
.
Decided to take a day off boat building today and went bass fishing instead, got a 3 pounder and a few 2 1/2's, nothing huge but it was fun to put a bend in my rods
Posted: Thu Nov 13, 2008 5:45 pm
by BassMunn
Been a slow week building wise, on Monday night I glassed the top parts of the stringers. When I put the stringers in I just did the corner glassing and then installed the bulkheads, so I had to finish glassing the balance of them. I did large overlaps onto the bulkheads so that below the sole level there is no wood left without glass on it. It did however take a lot more glass and resin as opposed to doing it the plans way. Oh well should be stronger.
Went to the lumber yard on Tuesday and stocked up on Meranti strips for the cleats and sheer clamps. I'm going to use solid meranti on the straight sheer clamps and use layers of ply in the bow section.
Cut the sheer clamps out tonight and will fit them tomorrow night.
Now I need some help and suggestions.......PLEASE
Once the sheer clamps have set I need to flip the hull to start fairing, but it's a lot heavier now and I haven't got a clue how to tackle this
I am thinking along the lines of building some sort of jig to be able to lift it up, pull the building jig out from under it, remove the hull supports, flip the hull and then drop it down onto the flat building jig.
The reason I am looking at a jig is that I don't have rafters above the boat to attach hoists.
What suggestions do you guys have?
If I install the bow eye and stern eyes now and put in the necessary support can these hold the hulls weight?
Posted: Thu Nov 13, 2008 6:28 pm
by gk108
You should have no problem lifting your hull from the eyes.
Posted: Thu Nov 13, 2008 7:03 pm
by TomW
Putting in the backing plate on the bow eye now is a good idea anyway. Once that is in no problem lifting from the bow and stern eyes. This is what marina's use all the time to put boats in and out of the water. The stern eyes don't really need a backing plate since they are going through 3/4" or larger transom just make sure you use big enough washers or metal backing plate.
Tom
Posted: Fri Nov 14, 2008 5:53 pm
by BassMunn
Thanks GK108 and TomW.
TomW for the bow eye backing plate I am thinking about using a piece of Meranti 2" wide 1" thick and 6" long, I will epoxy putty this in place and then glass it over. on top of that I will put a stainless plate. Does this sound workable?
I was also thinking about using the outboard mounting holes to fit a bracket and use this to swivel the boat on. From what I have read on the internet it sounds like most outboards use the same mounting template.
I don't have a motor yet so I'm not sure if this is a wise decision to drill those holes now. What do you guys think?
Thanks
Shannon
Posted: Fri Nov 14, 2008 6:19 pm
by TomW
The bow eye sounds great, nice and strong.
One thing we have found over here is that never drill your motor bracket holes till you have the template every motor or bracket seems to be a little different. What would be best is to put your stern tow eyes on and use them to lift and turn the boat from. Then you'll have them all set just need to epoxy, redrill and they're ready to go.
Tom
Posted: Fri Nov 14, 2008 6:24 pm
by BassMunn
Thanks Tom, I'll go with the stern eyes as originally planned.
Posted: Fri Nov 14, 2008 6:30 pm
by BassMunn
OK I've got more questions
What do you guys think about drilling all the thru hull holes before I start the fairing, Drain, bilgepump outlet, livewell inlet and outlet?
I'm thinking drill (holesaw) oversize, fill with epoxy and redrill to correct size so that I don't have to drill through my nice paint job once I actually get there.
Or am I putting the cart before the horse
Posted: Fri Nov 14, 2008 6:54 pm
by Fonda@kauai
That sounds right. If you know where the hardware is gonna be any way might as well do it before hand. I was planning on doing that for my stern and bow eyes. Over drill it, fill it, then glass over it. that way you have glass right to the edge of the right sized hole. you can drill a small pilot hole through the center of the plug so you know exactly where it is after it's painted
Posted: Fri Nov 14, 2008 8:43 pm
by TomW
You don't have to do them before fairing but yes at least before any painting. The reason I say not before fairing is you'll just have to keep cleaning the fairing out of the holes if you do them before fairing.
Tom
Posted: Sat Nov 15, 2008 12:24 am
by BassMunn
That makes sense, Thanks
Posted: Sat Nov 15, 2008 5:27 pm
by Fonda@kauai
Ahh, you see far TomW-san
Posted: Sun Nov 16, 2008 6:39 pm
by BassMunn
Got a few things done this weekend.
Started installing the sheer clamps

Installed the bow eye backing plate. You'll notice that I have used a huge fillet. I intially put a normal size fillet but landed up having extra putty and I wanted the angles to be as slight as possible, so I came back and slapped it on there
. I then put 2 layers of overlapping Biax tape on top of it. When the bow eyes goes in it will also have a nice stainless plate to lock up against.
In this picture you can also see where I was testing a white pigment in the epoxy which I will use at a later stage to recoat the complete inside of the hull.....Guess I need more pigment
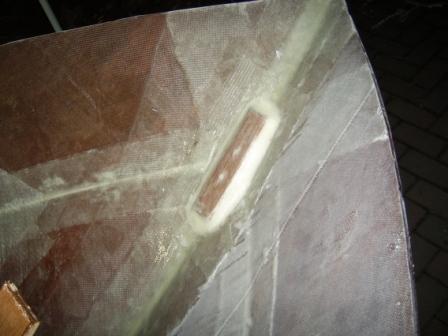
I also lined up and drilled the stern eye holes and sanded down the transom, ready for fairing compound. Should finish the sheer clamps tomorrow night, by Wednesday she should be ready to flip for fairing
Posted: Mon Nov 17, 2008 9:07 pm
by BassMunn
OK I'm thinking way ahead of myself here, but as you guys say it's always better to sit and ponder before I start anything
When I install my livewell the bottom of the well will need to sit lower than the tops of the stringers. What's the best way to support the base?
Can I install "mini" stringers in that compartment and mount the livewell on top of them or do I need to stay away from putting any excess pressure on the hull bottom and rather suspend the livewell. Doing it this way I will have to put extra cleats on the sides of the centre stringers and the bulkheads. Or can I do both?
Thanks
Shannon
I must also just say that this site and the forum members on here are great, your help has been priceless so far and I wouldn't know what to do half the time if it weren't for all of you, Thanks
Once I've got a bit more experience, I'll try to chime in from time to time on other threads, but for now I'll watch and learn
Posted: Tue Nov 18, 2008 12:32 am
by TomW
I'd put down cleats foam up to them for insulation, and then glue down your bottom to the cleats and fiberglass tape it to your sides.
Tom
Posted: Wed Nov 19, 2008 6:03 pm
by BassMunn
Thanks for the advice Tom, I didn't think of using foam for added support. Gonna be some heavy fish being carried around in that livewell
I've come to the conclusion that I don't have any where near enough clamps. For the straight sheer clamps the PVC clamp rings work great, but for the bends they just don't have enough pressure to hold the bits in place, so I've only been able to do 2 sections at a time. Just got the bow pieces left to do.
I never seem to be ready to flip for fairing (I think secretly I am actually trying to prolong this part to avoid the fairing
)
More questions
When I start laying down the fairing compound is it best to cover the entire hull in one go (basically wet on wet), or can you do it in sections?
I would imagine doing it all at one time is best?
Don't be shy with the tips here
Posted: Wed Nov 19, 2008 6:28 pm
by Cracker Larry
You can do it either way, depending on how much working time you have. Notice Joel on his FS17 thread did the entire inside at one time.
If you have time to sand it all in the next couple of days, that's the way to go. But if you have to wait a week to sand it, the fairing will be hard as a rock. It sands best when it's 8 hours to a day old, the longer you wait the harder it gets. So it's easier if you plan a session to be as much as you have time to sand in a day or so.
Posted: Wed Nov 19, 2008 6:35 pm
by BassMunn
Thanks Larry, I forgot about the fact that it gets harder as it gets older. I think I will do a few smaller sections until I get the hang of the fairing board
Posted: Wed Nov 19, 2008 6:40 pm
by Aripeka Angler
When I start laying down the fairing compound is it best to cover the entire hull in one go (basically wet on wet)
You should fill in the weave while the layed up cloth is still wet. This will save time later.
can you do it in sections
Yes. Remember that once the layed up cloth is dry for longer than a day you will have to sand and prep to get a good bond with your fairing compound.
I would imagine doing it all at one time is best?
You would be very good if you pulled that off
Don't be shy with the tips
I am sure there are a bunch of good ones coming....
Richard
Edit.. Larry types much faster than me
Posted: Thu Nov 20, 2008 6:11 pm
by BassMunn
Thanks Richard.
I glassed the outside of the hull before I flipped it the first time, so I am going to have to sand it to prepare for the fairing paste.
Once the fairing compound is ready for sanding, do I start with the fairing board straight away or do I go over it with an orbital sander first
Just finished with the last of the sheer clamps and spent the rest of the evening building "contraptions" to assist me in lifting and flipping the hull.
So looks like tomorrow she will be going upside down to start making her look pretty - WhooHoo
Posted: Thu Nov 20, 2008 6:52 pm
by TomW
You can use the sander to knock off any lumps but that's about it. Go to the fairing boards then.
Tom
Posted: Sat Nov 22, 2008 6:17 pm
by BassMunn
Thanks for the answer TomW.
OK got my big girl flipped over today, I was expecting to quickly flip her and then start the fairing. Got her hoisted up in the air pretty easily, but when it came time to turn her over the fun started. The brackets I made to hold her bow and stern up weren't exactly very well engineered
And my welding sucks!
Luckily my brother came by the house to lend a helping hand, if it weren't for him I would probably have some damage to fix, so after lots of huffing and puffing we got her upside down and ready to start the fairing, without any damages PHEW!
When she gets flipped for the last time, I'm going with manpower and lots of thick grass.
I posted this questions in the power boat section - sorry if I'm not supposed to duplicate questions
When I install the strakes and skeg do I just glue them down, coat well with epoxy and then fair or do I need to glass them over?
Thanks
Shannon
Posted: Sat Nov 22, 2008 9:16 pm
by cape man
When I install the strakes and skeg do I just glue them down, coat well with epoxy and then fair or do I need to glass them over?
I glassed my skeg down and then put an alluminum shoe on it after watching other builds and thinking about it. Tried to copy Larry's skeg (got the basics okay, just aint as purdy). Figure it is designed not only to keep the boat tracking in a turn, but also will be the first thing to hit if I run aground. The PITA is you need to round over the edges to get the glass to adhere properly, and then build up a sharp edge afterwards. Added several days to the job, but glad I did. Depending on where you fish it may not be an issue, but never want to replace my skeg, and know I'll be hitting it on something, sometime. This puppy is definitely on there and strong.

Lots of others say don't glass skegs or strakes, and the plans don't call for it, so it's really up to you.
Posted: Sat Nov 22, 2008 9:32 pm
by Aripeka Angler
cape man wrote:When I install the strakes and skeg do I just glue them down, coat well with epoxy and then fair or do I need to glass them over?
I glassed my skeg down and then put an alluminum shoe on it after watching other builds and thinking about it.
Lots of others say don't glass skegs or strakes, and the plans don't call for it, so it's really up to you.
If you want the skeg to be part of the boat, glass it in. Otherwise it will be stuck on like a bandaid....IMHO
Richard
Posted: Sat Nov 22, 2008 9:36 pm
by cape man
If you want the skeg to be part of the boat, glass it in. Otherwise it will be stuck on like a bandaid....IMHO
Richard
This is the same response you gave me back in June
Shannon, see the kinda preasure we get from these guys!! Like I said, I'm happy I took their advice and glassed mine down.
Posted: Sun Nov 23, 2008 1:22 am
by TomW
It's always best to glass them down if you can. There have been occassions when they have let loose with only epoxy. It's more work but better safe than sorry.
Tom
Posted: Sun Nov 23, 2008 1:37 pm
by BassMunn
Thanks for the reply guys. OK Glassing it is.
Posted: Sun Nov 23, 2008 1:40 pm
by BassMunn
[quote="cape man
Shannon, see the kinda preasure we get from these guys!! Like I said, I'm happy I took their advice and glassed mine down.[/quote]
They won't let us take a single short cut
At this rate my boat will look better than a bought one when I'm finished
You build is looking nice by the way
Posted: Mon Nov 24, 2008 6:05 am
by cape man
At this rate my boat will look better than a bought one when I'm finished
Of course it will! Add to that the fact that as we ride around, we will know every inch of these babies and have the confidence that it was all built right. Saw your other thread on sharpening the edges - if you put a shoe on the skeg, just fill to the edges of it, otherwise use some kind of a dam to get a sharp edge. I used just a putty knife on my transom, and cut the filler from both directions and it came out nice, but the dam idea will probably be easier in the end.
Posted: Mon Nov 24, 2008 6:12 pm
by BassMunn
Very True Cape Man, I love the fact that I know every little piece of this boat.
I think the dam option is going to be the best bet.
OK now for those who are not wood working challenged, I have a question (for a change
)
I want to install a spray rail similar to Doug Skogman's PH16, but I don't have a clue how to get the wood to bend to be able to follow the curve of the bow
Do you soak the wood to get it to bend or do I cut small slots in the wood to assist the bending? (Is this what is known as Kerfing?)
Installed 3 strakes today, will do the last one and the skeg tomorrow.
Shannon
Posted: Mon Nov 24, 2008 6:19 pm
by Cracker Larry
Soaking wood won't help it bend. It will need to be kerfed or steamed if you need to make a serious bend.
Can you post a picture or a link to what you are describing? Most spray rails can be bent without steaming or kerfing (yes, right word) as long as the grain runs straight.
Posted: Mon Nov 24, 2008 6:52 pm
by BassMunn
Thanks Larry
If you look at this
http://dskogman.tripod.com/Spray_Rails.htm
it gives you an idea of what I'm wanting to do. I can't see any cuts in the wood, but my wood certainly doesn't seem happy to bend that much. The strip I am going to use is a bit wider (nearly 2" and about 1" thick at it's thickest point).
Thanks
Posted: Mon Nov 24, 2008 7:58 pm
by D2Maine
nm
Posted: Mon Nov 24, 2008 8:25 pm
by TomW
BassMunn that spray rail just follows the curve of the boat and does really not need any fancy techniques. Just the curve will dictate will determine where the rail will go. Don't sweat it. It will follow the chine without much trouble.
Tom
Posted: Tue Nov 25, 2008 5:58 pm
by BassMunn
Thanks for the tips.
The problem I have is that I want to mount the spray rail on the underneath of the chine and not the side, resulting in me trying to bend the wood edge on. I think if I get a narrower piece of wood it should bend fine.
Thanks
Shannon
Posted: Tue Nov 25, 2008 8:52 pm
by Aripeka Angler
If you want to bend some lumber in a curve, I would kerf it. Why would you want to steam or soak a perfectly dry piece of wood and then try to get a good bond to your hull with epoxy? That is one of the reasons why wet pressure treated lumber is not a good idea.
If you want to steam your wood, make sure that you let it dry before you try to glue it to anything. We steam and soak trim from time to time in our shop. Let the wood dry on a curved jig if you decide to go that route, IMHO
Posted: Tue Nov 25, 2008 9:37 pm
by Cracker Larry
I agree with Richard and Tom, steaming is a last resort and that piece of wood doesn't need it. It probably doesn't even need kerfing.
The problem I have is that I want to mount the spray rail on the underneath of the chine and not the side, resulting in me trying to bend the wood edge on. I think if I get a narrower piece of wood it should bend fine.
The rail in the picture is about the same size on all 3 triangular sides. I don't see any problem making it bend to the boat without kerfs. The 2/1 ratio that you have will be tougher to bend for sure. If you use temporary drywall screws and bend it a little at a time, you might can get it to conform. Making it narrower will certainly help. Nothing wrong with kerfs either if that's what it takes to achieve what you want. It will all get filled with epoxy and covered with glass anyway.
Posted: Wed Nov 26, 2008 7:19 pm
by BassMunn
Thanks for the advice everyone. I'll pop into the lumber shop tomorrow to pick up some smaller triangular strips. I think it's time to invest in a table saw, so that I can just cut stuff like this myself
(any excuse for more power tools, hehehe)
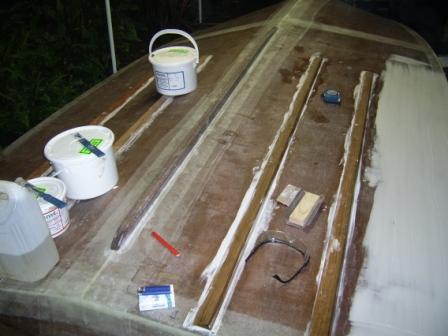
Got a bit more done tonight, glued and glassed my skeg in place. Strakes are glued down. I will shape them properly tomorrow and then glass them over. I know it's not wet on wet, but my neighbour would complain if I fired up the sander now
Also tried a small batch of fairing compound as you can see below - I need to get a wider spreader to prevent all the lines. Am I putting this stuff on too thick or does this look about right?
Posted: Thu Nov 27, 2008 7:43 pm
by BassMunn
Got my spray rail sorted out today
Went to the wood shop and got a nice small triangular piece with a concaved face.
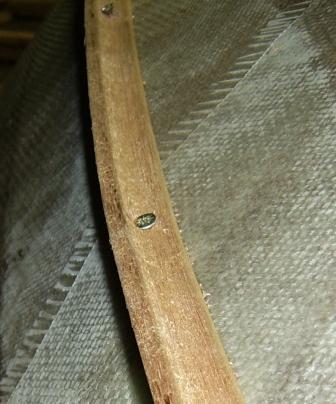
Fitted them to the hull with temporary screws
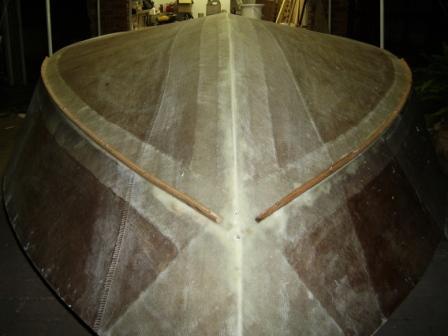
Then glued them in place with an epoxy resin, micro balloons and silica mix. The glueing surfaces were precoated with epoxy resin.
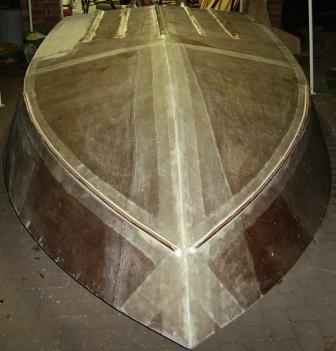
Got a bit more sanding and shaping to do on the strakes and by tomorrow night I'll shape the spray rail after removing the screws and filling the holes.
A little more sanding just to knock down some really rough areas and then it's time for fairing.
Can't wait. The little area that I did as a test run for the fairing compound came out pretty well, hit it with my newly built fairing board (Idea courtesy of the very helpful members on this forum
) and it's looking pretty darn good.
Methinks I am going to have pretty stiff shoulders by Monday morning
Posted: Thu Nov 27, 2008 7:59 pm
by chicagoross
Looking good, Bassmun!
time for fairing. Can't wait
Methinks I am going to have pretty stiff shoulders by Monday morning
And Tuesday, and Wednesday, and Thursday...
Posted: Thu Nov 27, 2008 8:06 pm
by BassMunn
Thanks Ross
My muscles are already getting all stiff just thinking about stretching to sand the keel area - This boat pretty wide
Posted: Fri Nov 28, 2008 3:21 am
by chicagoross
you're going to need a small scaffold to stand on while your working on those areas.
Posted: Fri Nov 28, 2008 5:08 am
by stickystuff
You need to extend thespray rails back some more. I would go another 8 ft. on each side. Believe me. You won't be sorry. I wish I had done that on mine. Makes all the diff from getting wet.
Posted: Fri Nov 28, 2008 3:04 pm
by TomW
Ken good catch. I would extend it all the way to the transom if you haven't already Buss. If you don't water will be coming off it at the point you stop it.
Tom
Posted: Fri Nov 28, 2008 3:11 pm
by BassMunn
All the way to the transom
, so basically you will have a small reverse chine on the boat??
Posted: Fri Nov 28, 2008 8:44 pm
by stickystuff
egsactly. or however you spell that. The curvature of the trim will cause the water to turn down instead of going out. Will also give you some lift. Check out this.
www.smartrails.com. I had them on the front of my ph16. They were free. Just wish I had enough to go all the way back, They are very proud of their prices.
Posted: Fri Nov 28, 2008 8:47 pm
by stickystuff
Posted: Fri Nov 28, 2008 8:49 pm
by stickystuff
What the hell was that? Maybe first one was correct.
Posted: Fri Nov 28, 2008 8:49 pm
by D2Maine
nm
Posted: Fri Nov 28, 2008 8:52 pm
by stickystuff
Posted: Fri Nov 28, 2008 8:57 pm
by D2Maine
nm
Posted: Fri Nov 28, 2008 11:19 pm
by gk108
I think Ken used the $589 kit on his boat.
Posted: Sat Nov 29, 2008 2:43 am
by TomW
Yes Bussman a nice reverse chine that will throw the water down, provide some additional control and some addition lift. You win all the way around.
Tom
Posted: Sat Nov 29, 2008 6:26 am
by stickystuff
Best part of my kit was it was free. Ol Woody is gone now.The new owner really loves it. Gonna miss it.
Posted: Sat Nov 29, 2008 6:15 pm
by BassMunn
Thanks Ken and Tom.
I'm in the process of installing a full length reverse chine, as soon as it's done I'll take some pics and post them.
Glad you guys helped me catch this before it was too late to change.
Posted: Sun Nov 30, 2008 6:44 pm
by BassMunn
Spent most of yesterday just looking at the boat and thinking about what, where, who and how much and because it was 80 degrees with incredibly high humidity I was feeling lazy
, OK I did do a bit of sanding.
Jumped up this morning ready to do the reverse chine and then get really stuck into the fairing. Went outside and walked into 60 degree temps, raining and blowing like mad, Huh??
So I got the reverse chines fitted, but because it was cool today my epoxy has taken ages to harden, so I couldn't remove the locating screws to sand or glass the chines over.
My fairing compound (Amfill) states that I must not mix if the temp is 59 or lower so I decided to not take the chance.
Spent the last 3 hours cleaning my garage (I've had enough of triping over things
)
OK here are the pics of the reverse chine, still to be sanded and glassed over. I got them to line up near perfectly to the angle of the hull sides.
What do you guys think of the inside angle (hull bottom)? Too much or does it look right?
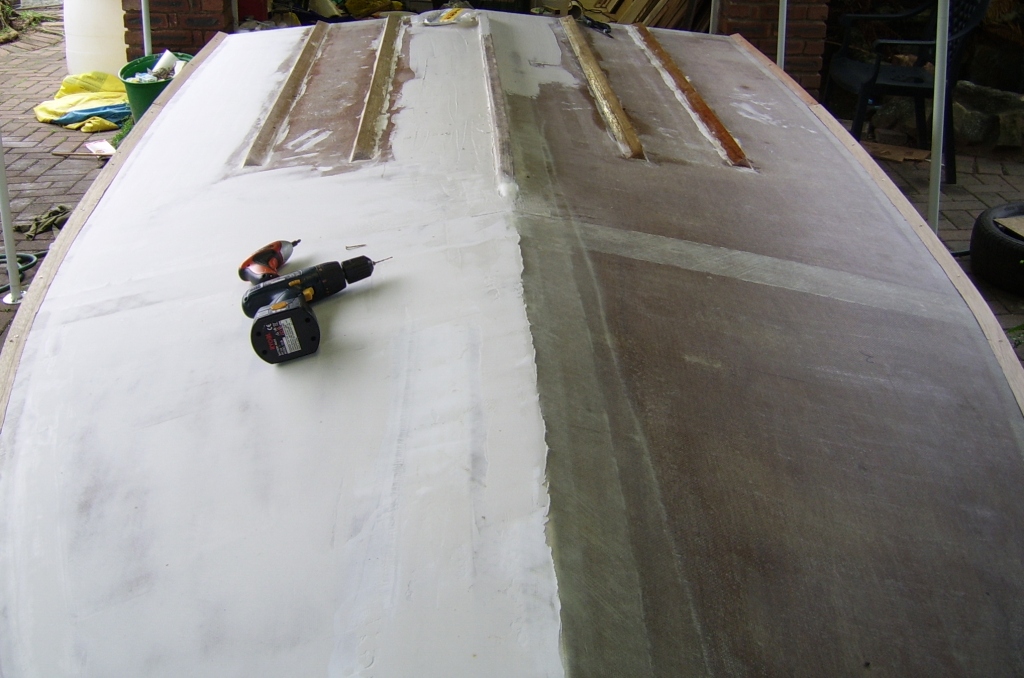
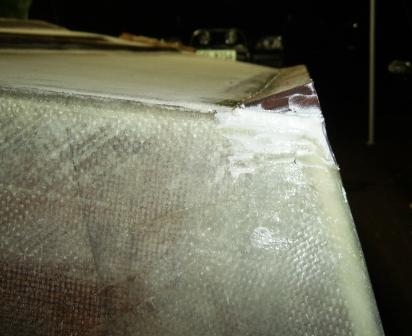
Posted: Mon Dec 01, 2008 8:32 am
by Cracker Larry
Sure looks good to me. Nice work
Posted: Mon Dec 01, 2008 10:12 am
by TomW
Yep, looks good to me also!
Tom
Posted: Mon Dec 01, 2008 5:29 pm
by stickystuff
The inside chine should be around four ft. The secondary about 3'. I would have put a back cut at 45 degree angle from the high side back 45 deg. This allows a smooth transition and makes it easier to fair out. Kind of late right now. I am still looking for the pictures to send you.
Posted: Mon Dec 01, 2008 5:46 pm
by tobolamr
So is this the same style of spray rail that I should use for my PH22?
And no, that's not meant as a thread hijack
Posted: Mon Dec 01, 2008 7:18 pm
by BassMunn
Larry and TomW, Thanks for the comments
It's quite a boost coming from boat builders such as yourselves.
Ken, I wasn't sure what length to make the strakes and 6ft looked OK.
The inside ones are 6ft and the outer ones are 5 1/2ft, I wish I had made the outer ones 5ft, but as you say it's a bit late now.
Why should they be shorter? If it's to limit hull slap I'm not too worried about it as this will be more of a bass boat than flats boat and I think my reverse Chine will cause more slap the way I have installed it now than the strakes?
The angle you are talking about on the strakes, I'm not sure if I get what you mean, but if you are talking about the sharp angle the strakes take down to the hull they are not 90 degrees. They are the same as the reverse chine and follow the same angle as the hull sides. I do still have to glass them over and then fair them so I will probably loose some of the angle.
Didn't do much tonight, removed the screws holding the chine in place while the glue was drying, overdrilled and filled the holes with epoxy slurry.
Also did the transom edge using some polystyrene sheets I had as a dam to build up the edge. I had to use a bit of packing tape to keep the sheets straight as they were flexing a bit too much. Seemed to work OK, but I'll find out in the morning when I take them off.
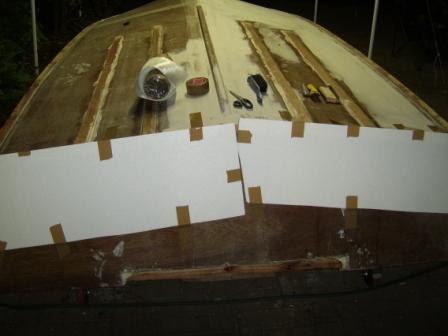
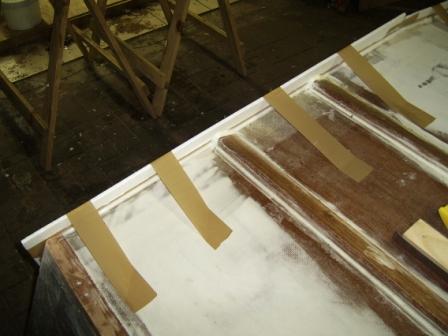
I will glass the strakes and chine over tomorrow and then I can finally get back to the fairing
Posted: Mon Dec 01, 2008 7:33 pm
by BassMunn
tobolamr wrote:So is this the same style of spray rail that I should use for my PH22?
And no, that's not meant as a thread hijack
Not sure if you should be asking me, this is my first boat.
But after Ken made the suggestion to do this I did a bit of scratching around. I found that all 3 of the major US Bass boats (Tri...; Ran...; Ske....) all have reverse chines as do some of their flats and bay boats.
I also contacted the guy that built my old bass boat as we are on good terms (probably because he is trying to sell me a Suzuki
). He also agreed that I should put it on, he said that apart from limiting the spray, it would increase lift and improve handling as Ken and TomW stated above.
The other added bonus he said is that it will help to decrease chine walking (if you're going that fast).
I can't seem to find any Phantom that has it on though, so we will have to wait and see.
Now that it's on, I'm very happy that it was suggested and that I did it, It just looks right
Posted: Mon Dec 01, 2008 7:36 pm
by Cracker Larry
I can't seem to find any Phantom that has it on though, so we will have to wait and see.
Ken's does. Well, it did, he sold it.
Posted: Tue Dec 02, 2008 4:17 pm
by stickystuff
If you go from the forward edge on the high side draw a line back towards the low side approx 2". Then sand the edge at a bevel back from high to low. Basically a reverse cut. This gives you a smooth transition for forward water flow. Kind of like a sharp knife edge cut. Hard to describe. Will try and dig up the pictures.
Posted: Tue Dec 02, 2008 4:50 pm
by TomW
Bussman you have you molding on you want to fill it in to get a smooth laminar flow. Big word for smooth water flow. here is the OB15's fill in, it is sort of straight across which is okay but a little negative chine to me is better.
http://gallery.bateau2.com/displayimage ... at=0&pos=5
I'd fill it all the way to the waterline or as far as you think it looks good I actually like it all the way to the bow, switching from negative to straight off the boat at a 90 degree angle so you still have a good spray rail.
Tom
Posted: Tue Dec 02, 2008 6:14 pm
by BassMunn
OK Ken I understand now. I actually spent some time last night shaping the points of the strakes as they were way to blunt. Looks much better now
Thanks Tom I get what you are saying, The chine on the OB15 looks nice, but I'm gonna try the reverse chine. I'm just not sure if I have too much reverse chine
Hope not because I just glassed them over, but nothing a grinder can't sort out.
My Transom edge attempt came out pretty well as far as the dam thing goes. I'll post a pic once I have shaped it properly.
Well tonight I officially finished the last of the outer hull glassing, Phew
I'm actually busy laying down fairing compound at the moment (just came inside to get a bite).
Remember on Sunday I was complaining about it getting too cold (60f), well today I went to a nearby city on business and it was 105F at midday and I was in my wifes black car
, Thank goodness for aircons
Posted: Wed Dec 03, 2008 6:56 pm
by BassMunn
Finished my transom edge shaping tonight and have to say I'm pretty chuffed
You could cut yourself on it. Will probably have to take the edge down slightly for paint
I think?
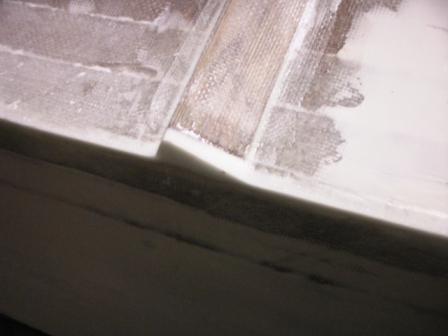
Also got a bit more fairing compound down on the transom and one side of the bow. Incase you are wondering why I left the strakes minus fairing compound, it's because I still had to glass them over, which is now done, but my fairing compound states that all surfaces have to be completely cured first, so I can cover them up tomorrow.
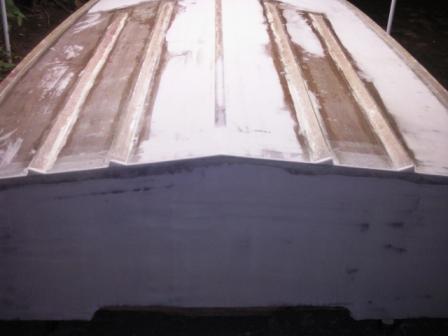
This fairing compound I am using is really nice from the point of view that from 24hrs to 72 hours it sands really well, it's full cure is after 7 days, BUT don't even try touch it with sanding paper before 24hrs
Posted: Wed Dec 03, 2008 7:30 pm
by stickystuff
Looks good. Now you will be starting to cuss. Your arm and hands won't ever be the same. Have fun. LET THE FARING BEGAN!!!
Posted: Wed Dec 03, 2008 7:50 pm
by Fonda@kauai
you're really movin bassmunn. Transom edge looks super clean, I hope mine comes out as nice
Summer in S.A. sounds hot. High 70's where i'm at and it's supposed to be winter
Summer is when the YFT action is good down there, yeah?
Posted: Thu Dec 04, 2008 8:29 pm
by BassMunn
Thanks Ken and Fonda
Ken I have already started to cuss about just mixing the fairing compound, AAHHH!
Got the complete bottom hull panels covered tonight, so will break out the fairing board tomorrow
Gotta start making her look Purdy
Fonda the temp yesterday was unusual, in summer we are normally around 85F daytime, today we were back down to 70's and rain again.
Even in winter it is very seldom that we drop below 50F at night, gotta love the sub tropical weather.
YFT? - Yellow Fin Tuna? Not sure, we get them here but we normally have to run very far offshore to get them. Here in Durban we are spoilt with being able to go less than 1 mile offshore and pick up good size King Mackeral (I think you guys call them Kingfish), 40 to 50lb fish are pretty common.
The YFT are more common in the Cape (eastern Cape and off Cape Town), but the guys are doing 40 to 50 mile runs to get to them.
But During the Sardine run in June/July YFT have been caught off rocky points next to the beach 30 miles down the coast from me.
Posted: Thu Dec 04, 2008 8:50 pm
by Fonda@kauai
YFT = yellow fin tuna. They only come within a few miles here, but we get some good size ones, 200+ lbs.
Posted: Thu Dec 04, 2008 9:00 pm
by Aripeka Angler
BassMunn wrote: Here in Durban we are spoilt with being able to go less than 1 mile offshore and pick up good size King Mackeral (I think you guys call them Kingfish), 40 to 50lb fish are pretty common.
Shannon we call 'em Kingfish or Kings here. I don't like to eat 'em that much, but I love to catch 'em. Forty pounders are common here as well. I had a friend that hooked a real hog this Summer about 80 miles offshore and it was chopped in half by a big shark seconds after it was hooked. The head probably weighed 8-10 lbs
The fairing part you are working on now is the hardest part of the build. If that is easy for you then you have the boat whipped
Continued good luck on your build...
Richard
Posted: Thu Dec 04, 2008 9:10 pm
by Cracker Larry
I had a friend that hooked a real hog this Summer about 80 miles offshore and it was chopped in half by a big shark seconds after it was hooked. The head probably weighed 8-10 lbs
He ain't kidding, I saw it happen
I think there was 10 pounds of meat on the head.
The fairing and painting process is by far the hardest part of the build to me and the least enjoyable. Fair, sand, fair, sand, fair, sand, prime, sand, prime, sand, prime, sand, topcoat, sand, topcoat, sand, topcoat, sand, topcoat, screw it, good nuff
Posted: Thu Dec 04, 2008 10:10 pm
by Dog Fish
That's funny Larry, but that's the way it is. Sand sand sand.
Posted: Fri Dec 05, 2008 10:41 am
by Doug
I'm a little late on this but for others it is much easier to fair the bottom before you add strakes, spray rails, skegs. The long board which you become intimately attached to works better on big flat areas. The strakes and stuff make it harder to get a flat planning area.
Posted: Fri Dec 05, 2008 5:35 pm
by BassMunn
Fonda, 200lb will keep you busy for a while
The guys in the Cape get that sort of size pretty often, I actually watched a fishing programme a while ago where the guy tackles a 200lb on spinning tackle
and he got it out.
Richard you gotta love that first run a King makes
I can relate to the shark story, the Bull sharks here absolutely love the Kings.
So Larry what you are saying is that I might get pretty good at sanding
Or maybe wish that I had an orbital sander that was 2 ft long
Doug, I actually asked the question about this earlier because I was concerned about having to sand around the strakes, but the general feedback was rather glue the strakes down to a better surface.
If I was using a normal epoxy slurry it would have been fine as that stuff is hard as nails, but the fairing compound isn't as hard so I think my method although it will give me more headaches in fairing is the stronger method. But I still agree with you regarding the fairing, already I am battling trying to get the fairing compound down nicely on the strakes without having to sand for hours to clean it up.
My fairing compound still hasn't set properly so no sanding tonight and I'm off to a fishing comp tomorrow, so sanding will have to wait for Sunday.
Posted: Mon Dec 08, 2008 5:53 pm
by BassMunn
GeeWiz
You guys weren't kidding about the sanding!! I'm gonna have arms like Arnold when I'm finished with the fairing.
I must say that I see the reason you guys suggested the fairing board. To start I am using an orbital sander (the rectangular one not a Random Orbital sander, not sure what else you call this type of sander), I figured this might help because of it's bigger sheet size, it helps to take down the really high spots that I left all over the boat from fairing, but once it looks all nice and flat I hit it with the fairing board and this shows that the sander doesn't get anywhere near as perfect a surface as the fairing board can. Still haven't figured out how to use the fairing board on the sides without standing on my head, My boat is obviously too low because I just can't get the good 45 degree angle sweeps and put enough pressure on it at the same time (without pulling something
)
Anyway my boat is feeling shy at the moment because she ain't looking too pretty yet. She says I'm not allowed to post any of her latest pictures until I get her all prettied up........Women
Posted: Tue Dec 09, 2008 5:05 pm
by BassMunn
OK whether she likes it or not, I'm taking photos
Got the first layer of fairing compound down and started sanding and sanding and sanding (Maybe I should have built a 10ft boat), it still looks real nasty, but it's getting better each day. Thank goodness my fairing compound sands ok for a few days. Decided to take tomorrow off work and spend the whole day sanding otherwise the fairing compound is going to get too hard.
I made a few bad mistakes laying down the fairing compound too thick in certain areas and I have bad lines in those areas as well, so I really gave myself extra sanding work. Oh well nothing a bit of sand paper and a lot of sweat can't sort out.
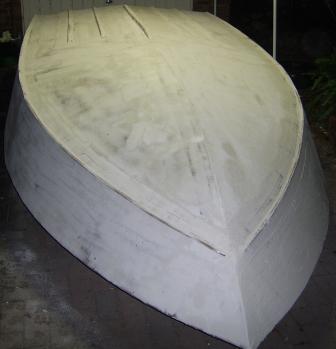
Posted: Wed Dec 10, 2008 5:06 pm
by BassMunn
Guys I need some help
I've pretty much completed the first sanding pass of the bottom hull panels, I now need to fill in the low spots and sand again and obvioulsy finish the fairing on the strakes and skeg (I'm avoiding those
)
I've just checked out the rear 6ft of my planning surface and I have some wobblies
If you look at the picture below, all the areas marked with the letter "A" are slight low spots. I can understand why they are there, the extra glass on the transom joint obviously build this area up and makes a high spot.
But I also have a high spot indicated by the letter "B", it's in the area of bulkhead E and only occurs in these outer areas as indicated. I'm already getting down to the glass in these areas so I can't sand it any lower.
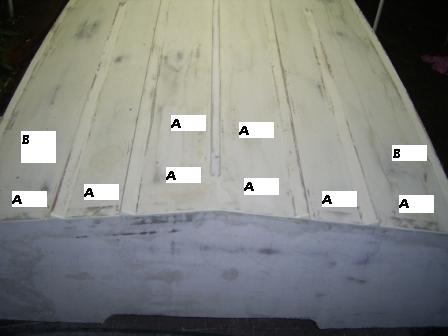
When putting a straight edge down the biggest gap I have is about 1 to 1.5mm. Maybe around 1/16"
What's the best way to fix this without having to redo it over and over again?
Thanks
Shannon
Posted: Wed Dec 10, 2008 6:33 pm
by Aripeka Angler
When putting a straight edge down the biggest gap I have is about 1 to 1.5mm. Maybe around 1/16"
That is nothing. I have seen paint runs bigger than that
Put a little more fairing compound on and feather them out.
What's the best way to fix this without having to redo it over and over again?
Quit and scrap the boat
Just kidding

Fairing is supposed to take time. Use a straight edge and scree out the fairing compound over the low spots and feather out the high spots. If you have ever done any concrete or plaster work you use the same techniques.
Fair on would be my suggestion...
Richard
Posted: Wed Dec 10, 2008 7:02 pm
by BassMunn
Aripeka Angler wrote:Quit and scrap the boat
Richard
Even if this boat can only go in circles, porpoising the whole time, it's goin fishin
Thanks Richard, the screeding thing sounds like the right deal.
I really hate my fairing board
I'm seriously thinking about attaching it to my orbital sander
Posted: Wed Dec 10, 2008 7:05 pm
by tech_support
the best way to fair those areas is with a large dry wall spreader (we use one about 24" long) and a loose fairing mix. You dont have much to fix, 1.5mm is pretty small
Posted: Wed Dec 10, 2008 7:14 pm
by BassMunn
shine wrote:the best way to fair those areas is with a large dry wall spreader (we use one about 24" long) and a loose fairing mix. You dont have much to fix, 1.5mm is pretty small
Thanks Joel, I'll give that a bash tomorrow
Posted: Sat Dec 13, 2008 3:57 pm
by BassMunn
Hi Everyone
I built up the planning area so that it is nice and even, Thanks Richard and Joel your method was pretty easy and worked well.
I spent most of the day today, reshaping my skeg. After looking at it for the last 2 weeks and thinking about how the water would flow over it, I just had to fix it - Now it looks right
Got another question - For a change
I should have just one more fairing pass to do to fill in the last of the small low spots, A little more fairing on the strakes and skeg and she should be ready for a bottom coating
I will be finishing the bottom with a Graphite epoxy mix, but I'm not sure if I should just coat with the epoxy graphite straigt away or paint it with a primer first.
I know that I can go straight to the graphite, but I'm worried about missing imperfections and then having to sand the graphite down to try fix it.
In Shine's FS17 Low sheer thread he states that the primer really shows imperfections well, so I am thinking about primer first and then graphite.
What are you general feelings and experience with this?
I will be using an epoxy high build primer, does the graphite epoxy mix hold to this OK?
Thanks
Shannon
Posted: Sat Dec 13, 2008 5:39 pm
by Dougster
I was where you are a few weeks ago and opted to prime first. I used the S3 high build primer Bateau sells. It was easy for me (no painter at all) to work with and the graphite goes on it well. It's not necessary I guess, but it doesn't use much primer and does show areas that may need more fairing. I was glad I did it, as it showed two spots I touched up. Quickfair goes over it well too. I just primed the whole hull in one go; put on two coats.
Wishin' you good luck with the graphite Dougster
Posted: Sat Dec 13, 2008 5:48 pm
by BassMunn
Thanks Dougster, that's what I wanted to know, it does show up the imperfections better
Lets hope that I can learn from your initial problems with "Scobbies" when I put down the Graphite. I almost canned the idea when I saw how you battled, but I see it's coming along better now
You've done some really nice work so far, can't imagine fairing a hull any longer than the one I'm doing.....16ft is big enough when it comes to fairing
Posted: Sat Dec 13, 2008 5:55 pm
by Cracker Larry
I did the same as Dougster. Primed first then graphite, for the same reasons. It's not necessary but it sure is easier just to prime the entire outsde in one shot and it will show you where you need a little more filler, while doing some filling of it's own.
Posted: Sat Dec 13, 2008 6:03 pm
by BassMunn
Thanks Larry. OK it's settled, she'll get primer first then Graphite
Posted: Sun Dec 14, 2008 9:28 am
by BassMunn
OK so as to not takeover Cracker Larry's thread and lead it off at a tangent, I'll repost my discussion here.
Richard and anyone else that could chime in, I want some more opinions on outboard motors (I like living on the edge, hehehe)
Richard what you say about the extra weight is very valid, I am going to finish my boat as a Bass Boat, where draft is not really a problem, but then again I couldn't reach fish busting baitfish last week for exactly this reason. I would also like to do a little saltwater estuary fishing, we have one large river nearby that cannot be navigated because of the depth, my Phantom might just do the trick (If I don't hang a big heavy motor on it).
My personal thoughts on motors are (I'm talking 90-115hp),
Yamaha 2s - very reliable and very light, but very boring in performance and looks and they are damn expensive here. Extremely expensive if you consider the technology
Mercury - 2s Carb - Reliable, better performance, better looking, lighter on fuel and way cheaper
Merc Opti - They don't bring in the 90hp here, only the 115hp, Lovely motor, but heavy and damn expensive.
Suzuki DF90 2nd gen - Looks really good, 4 stroke good points but also the bad points (although they are getting less), Haven't heard one bad story about a Suzuki yet and a lot of our new big offshore boats are getting the Suzzi treatment.
Evinrude ETEC's 90 and 115 - I like the DFI technology and the 3 year no service story, but they are heavier than the older 2 strokes and there is not an ETEC agent on every corner. I also have very little experience with the brand
These are the motors that I am considering and the prices (converted into $) that I can get these motors for.
Mercury 90hp 2s Carb - $5500
Yamaha - 90hp 2s Carb - $6900
Suzuki - DF90 - 4s - $7600
Evinrude ETEC 90hp - 2s DFi - $6800
Evinrude ETEC 115hp - 2s DFi - $7400 (comes with Stainless prop, pitch of my choice).
Both ETEC's can still be negotiated lower, the rest are rock bottom prices that I have been able to find.
because of our smaller calm waters here I can do most of my driving at WOT or close to it, so fuel efficiency in the 3500rpm range doesn't mean much to me.
IMHO, 4 strokes sound nice but their major selling point is fuel efficiency which doesn't really effect me much because I don't troll or ride around at half throttle much, the extra weight, extra parts.
I love the sound of a 2 stroke howling at WOT and the low down kick they produce. Emissions are a concern for me, but the DFi's are actually cleaner than 4 strokes.
OK let me have it
Posted: Sun Dec 14, 2008 9:39 am
by Cracker Larry
I wish I could still buy a new 2 stroke 90 Merc here, that's what I'd go with given your choices and prices.
Posted: Sun Dec 14, 2008 1:25 pm
by TomW
Larry, Ed's has them for $5500, but you have probably drilled the holes for the Yammi.
Have them ship one to your dealer if he can't get one. If you haven't drilled the holes. Merc is still selling a very few 2St's in a limited HP range here. Don't know how long it will last.
Just a thought. Probably one of my bad ones.

Tom
Posted: Sun Dec 14, 2008 2:55 pm
by Cracker Larry
Just a thought. Probably one of my bad ones.
Not at all
Quite the contrary, an interesting thought. I didn't know there were any available at all. The Mercury website hasn't listed them in over a year and Bass Pro Shops ran out over a year ago too. They are the largest Mercury dealer in the world.
Just checked and also see Ed's now has the Yamaha 2 stroke 90 for $5,000
I had looked there 2 weeks ago and they were 5,500. Prices are falling
And I haven't drilled any holes yet
I'm hesitant to use Ed's in case I have warranty or service problems. I know warranties are honored everywhere, but I think you get preferred treatment if you buy from a local dealer. What are your thoughts on that?
This doesn't help Bass Munn any, he's on another continent, sorry
Answer in my thread if you want, I'm curious about experiences with Ed's.
Posted: Sun Dec 14, 2008 3:27 pm
by cape man
Larry don't know about Merc dealers, but have had my Yamaha in to two shops in two years for warranty issues (control cable not sealed well at cowling, and the other time it turned out to be water in the gas). Niether shop was where I bought it, and had absolutely no issues with the warrantee being honored and them doing the work timely. I found a place in Lake Placid that had the best deals around at the time. Drove an hour and saved $350.
Given the price difference, I'd go with the Merc as well. After that I'd take the boring Yamaha. Boring can be nice sometimes
Posted: Sun Dec 14, 2008 6:05 pm
by BassMunn
Cool, so there are still a few floating around over there too.
No problem, with the Ed's questions, I like hearing all these company names that have internet sites. I've imported a lot of fishing tackle and so on from the US. An outboard might be a problem though
Guys what are your thoughts on the ETEC's, we don't see them much here, so can't ask questions at the boat ramps much. They sound all impressive but that could just be marketing hype?
Posted: Sun Dec 14, 2008 6:12 pm
by BassMunn
Hey I just checked out Ed's.
Holy Smoke they are selling the Suzuki DF90 for $5500
The Evinrude and Carb Merc are about the same as I can get here, but the Suzuki's and the Optimax are way cheaper
Posted: Sun Dec 14, 2008 6:46 pm
by Aripeka Angler
TomW wrote:Larry, Ed's has them for $5500, but you have probably drilled the holes for the Yammi.
Tom
I think the hole pattern is the same for Mercury and Yamaha. I didn't know there were carburated Mercury engines still available. Anyone know how much they weigh
If they are light and you are comfortable with them you should buy one. It might not be a bad idea to ask what year they were built....
Yamaha 2s - very reliable and very light, but very boring in performance and looks
I personally don't buy for looks. If I did I would buy one of them fancy black or white motors with the fancy batmobile cowls. I really think it's the whale tail on the cowling that makes the difference.
Richard
Posted: Sun Dec 14, 2008 7:04 pm
by BassMunn
The 90 Merc Carb weighs 304lbs, still 34lbs heavier than the Yammie, but it is a bigger block 1386cc versus the Yammies 1140cc, that extra 240cc is what gives it the extra torque.
Don't get me wrong there is nothing wrong with the Yamaha's, quite the contrary, they are very well proven motors. I just tend to prefer the "Batmobile" type styling
Yamaha's are very well known here for their ability to stand up to saltwater corrosion.
Posted: Sun Dec 14, 2008 7:18 pm
by Aripeka Angler
Shannon, this is all in good fun
We have this sort of discussion here frequently with our automobiles as well. I guess by now you have figured out that I sort like Yamaha outboards
Posted: Sun Dec 14, 2008 7:24 pm
by Cracker Larry
Yammies and Mercs both have a good reputation here. Both are well proven. The Mercs are beefier in weight and CC, but 240 extra CC in the motorcycle world equals 25 horsepower, a substantial amount. That may add some longetivity to the merc over the Yamaha and certainly some torque. The 25 merc on my GF16 gave me 4 trouble free years before I sold it. I've had other mercs too that were trouble free and really don't have much preference to one over the other, other than price and dealer reliability.
I'm glad to know they are still available, I'll shop around some more
Posted: Sun Dec 14, 2008 7:32 pm
by BassMunn
I know Richard, I thought I might get a few responses from my "Boring" comment, I'm just stirring the pot, hehehe.
If the Yammie was closer in price to the Merc over here, it would come down to dealer options to make my choice, but it isn't.
I'm looking at the most bang for my buck so to speak, that's why I've narrowed it down to the Merc 90 Carb or the ETEC 115.
The ETEC is $2000 more expensive, but it's stronger, comes with a Stainless prop and iCommand gauges and is a DFi motor, but it's 64lbs heavier and dealers are limited to say the least.
You can see I didn't do any work on the boat today, I've got too much time on my hands now.
I'm on leave now until the New Year, so there will be much boat building in the next 3 weeks - YEEHAA!!!
Posted: Sun Dec 14, 2008 7:47 pm
by BassMunn
Cracker Larry wrote:Yammies and Mercs both have a good reputation here. Both are well proven. The Mercs are beefier in weight and CC, but 240 extra CC in the motorcycle world equals 25 horsepower, a substantial amount. That may add some longetivity to the merc over the Yamaha and certainly some torque. The 25 merc on my GF16 gave me 4 trouble free years before I sold it. I've had other mercs too that were trouble free and really don't have much preference to one over the other, other than price and dealer reliability.
I'm glad to know they are still available, I'll shop around some more
I didn't think about the fact that the larger motor could be less stressed and therefore should theoretically last longer.
"No Excuse" would look nice with a Merc, GeeWiz I sound like a salesman
Posted: Sun Dec 14, 2008 7:48 pm
by colonialc19
Ed's is about a 50 minute ride from me, however I've never made a purchase from them. I know a handfull of people who have and yes they get a great price on the product, but nothing but problems with the rigging and service.
My .02
Posted: Sun Dec 14, 2008 7:58 pm
by Aripeka Angler
The ETEC is $2000 more expensive, but it's stronger, comes with a Stainless prop and iCommand gauges and is a DFi motor, but it's 64lbs heavier and dealers are limited to say the least.
Shannon, I am not convinced yet that the ETEC is stronger. They run lean on oil and fuel. I am going to wait to see how long they last. I would buy a four stroke (boring) before I bought an ETEC.
I have a pair of Yamaha F200'S on my offshore boat. I have absolutely hammered them. I bought them new over 4 years ago. I run them WOT for hours at a time. I have not spent a penny on repairs
I also have a few more Yamaha motors now that are working great.
I'm on leave now until the New Year, so there will be much boat building in the next 3 weeks - YEEHAA!!!
Have fun
We are getting ready for some time off as well....
Richard
Posted: Sun Dec 14, 2008 8:16 pm
by BassMunn
Richard what I meant by the "Stronger" comment was about the 90hp versus 115hp (I Know I'm comparing apples with oranges). The strength or longevity of the motor is what I am concerned about with the ETEC's because I have no knowledge of them.
4 stroke is still a consideration with the Suzuki DF90, again Yamaha's here are ludicrously priced. And the Suzuki looks Bling Bling
I spoke to the owner of one of our biggest boat manufacturers last week and his comment was that there really aren't any bad motors on the market anymore (major brands).
Posted: Sun Dec 14, 2008 9:20 pm
by cape man
I spoke to the owner of one of our biggest boat manufacturers last week and his comment was that there really aren't any bad motors on the market anymore (major brands).
And there you have it. Price, weight, and preference. Outboard purchases are not simply based on engineering and performance.
Posted: Mon Dec 15, 2008 9:16 am
by tech_support
I agree with above, i do the primer coat mainly so I can see imperfections that need to be fixed before the grahite
You could accomplish the same thing by rolling on heavy a coat of pigmented epoxy, but that would be much more difficult to sand vs. the primer. It would probably cost more in weight an money also
Posted: Wed Dec 17, 2008 9:26 pm
by BassMunn
Thanks for the confirmation Shine.
Been doing a whole lot of fairing and sanding and some more sanding and then a bit more sanding
I've actually popped in here for a question and would like some input from all you boat builders
As you've seen in earlier pics I have installed strakes and a Skeg. I was originally going to go with strakes and a pad, like stickstuffs boat.
Now I'm not sure that adding the skeg is such a wise choice, I'll explain. I understand that the skeg will give me more directional stability, but I'm not after racing car cornering. I always tap off when cornering, something about riding boats in a following sea has taught me about the funny things a hull can do in water
.
What I am worried about is that the skeg will negatively affect my hull performance. When I hit the lake when it's nice and smooth I want to be able to trim my motor out and the hull must lift up out of the water properly (lifting the bow). I remember on my old Bass boat this was the only way to really get the hull moving along nicely. Obviously I will be running a surfacing stainless prop, but I am worried that the skeg will somehow interfere with this.
What can you guys tell me about your experiences with this?
I would rather remove my skeg now if I need to as I will remove it even after the boat is finished if it keeps my bow down when trying to trim out.
Thanks
Shannon
Posted: Thu Dec 18, 2008 12:21 am
by TomW
Since you stopped the skeg well short of the transom you won't have any problems. The water flow will be back together by the time it gets to the prop.
Tom
Posted: Thu Dec 18, 2008 1:56 pm
by BassMunn
Thanks TomW, I've never had a boat with a skeg so I'm not sure what to expect. I appreciate the advice - really didn't feel like taking that skeg off
I'm busy with my final sanding before primer, by Saturday she should have her first coat of primer
And then we'll see how good my sanding was
- That's off course if the weather plays along.
Posted: Thu Dec 18, 2008 7:26 pm
by Doug
but I'm not after racing car cornering
Believe me, a Phantom is a Loooong way from a race car. Turning one w/o any strakes or skeg is more like driving on ice.[/url]
Posted: Fri Dec 19, 2008 3:16 pm
by BassMunn
Thanks Doug - I listened and left it on
Well finally - PAINT - Yeehaa, Yippee, Woohoo
Just finished spraying the first coat of primer, it's very thin so there are still some darker areas showing through.
In the pics, you can see there are areas where paint has dried and some areas where it hasn't yet (I just sprayed it). They are NOT low spots, I checked
I'm glad to say that there is not that much more fairing to be done (PHEW!), just a few little spots and one little ridge I missed and then she is ready for her Graphite bottom.
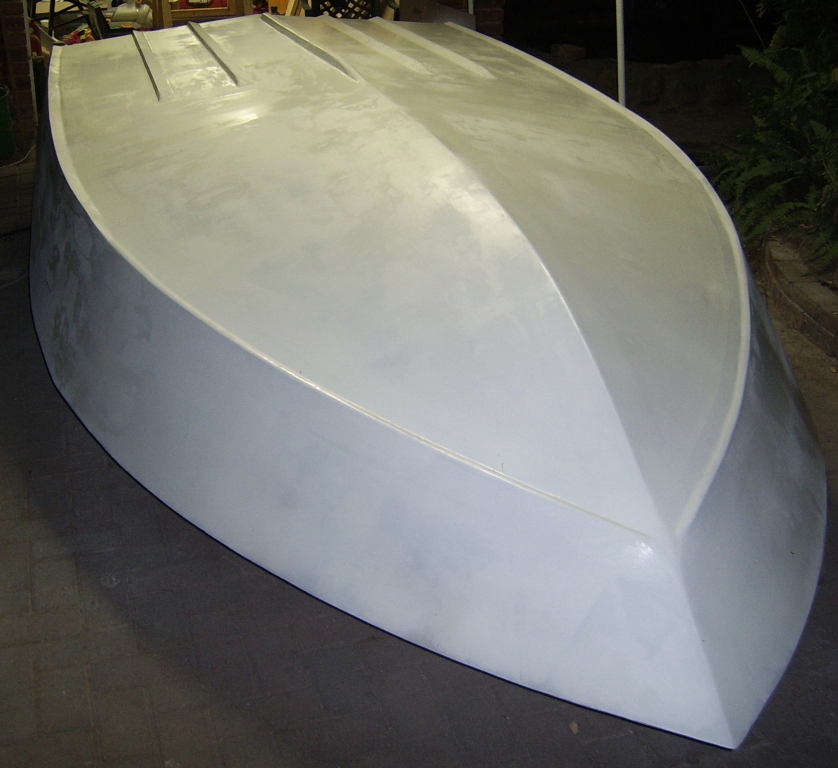
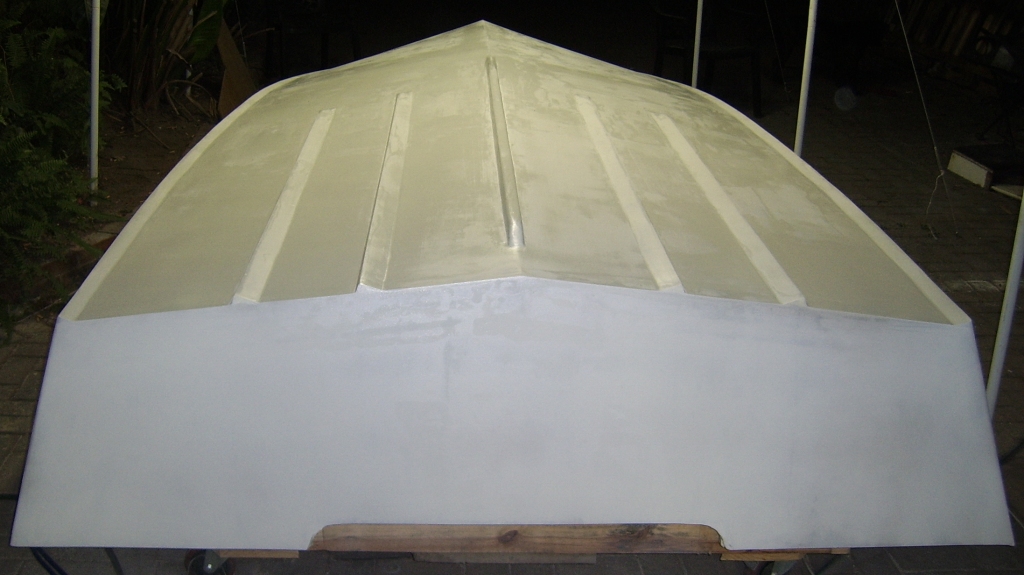
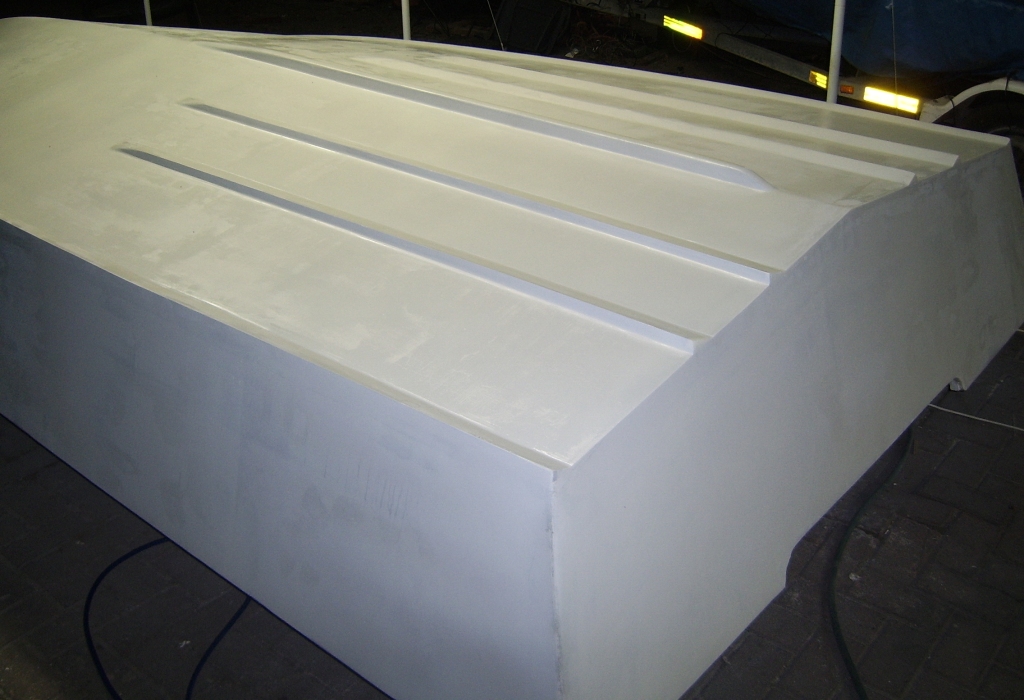
I'll post one or two more pics tomorrow once I've finished spraying the primer, it will be daytime as well so the pics will come out better.
Posted: Fri Dec 19, 2008 4:05 pm
by ks8
That is a nice hull. After all that work, check all those other threads about issues others had when applying the epoxy graphite mix. Sifting, etc. Hope your temperatures are good for that. She will look good with that graphite on there! Have you picked a color for the topsides yet?
Posted: Fri Dec 19, 2008 6:47 pm
by BassMunn
ks8 wrote:That is a nice hull. After all that work, check all those other threads about issues others had when applying the epoxy graphite mix. Sifting, etc. Hope your temperatures are good for that. She will look good with that graphite on there! Have you picked a color for the topsides yet?
Thanks ks8. I'm still a little nervous about the Graphite, if I can't get it right I'll sand it smooth and spray with paint (hope not though).
Temps will be fine, we're just starting our hot summer weather now (sub-tropical
)
I'm gonna finish this boat like a bass boat, so the deck will get carpets, but for the sides, they will be white with some sort of design (stripe) that will be sprayed with a Saphire blue glitter flake. Gonna give those big bass boats a run for their money in the sparkle department
Posted: Sat Dec 20, 2008 7:25 am
by cape man
Don't sweat the graphite. Yeah you need to be careful to sift and mix as well as possible, but it actually goes on real easy and looks great when done. My problem was I didn't fair as well as I should and had to fill a couple of nasty low areas with the last coat, which meant sanding. Now that sucked! After I did it, saw a post where they wet sanded and it looked like it went a lot better. Use a slow hardner to give max time for mixing, and use the roller to help mix any pieces that show up (they'll be there from the start). I tipped it with a foam brush and it looks great. I did tape it and pulled the tape as soon as possible for each of 4 coats.
Posted: Sat Dec 20, 2008 10:36 am
by colonialc19
BassMun, the hull looks great!
The only problem I had with the graphite was I mixed too much at one time and worked too slow,( it was 80f ).
By the looks of your hull though, I think you've done your homework on that, I'm sure you won't have any problems.
Posted: Sat Dec 20, 2008 11:37 am
by TomW
If you want to be sure before you do any painting or graphiting. Do a guide coat layer like Shine did on his FS17. It is just puting a very light layer of spray of paint on the primer and then a light sanding, but it sure shows any final highs or lows.
Here I brough a picture of his side forward.
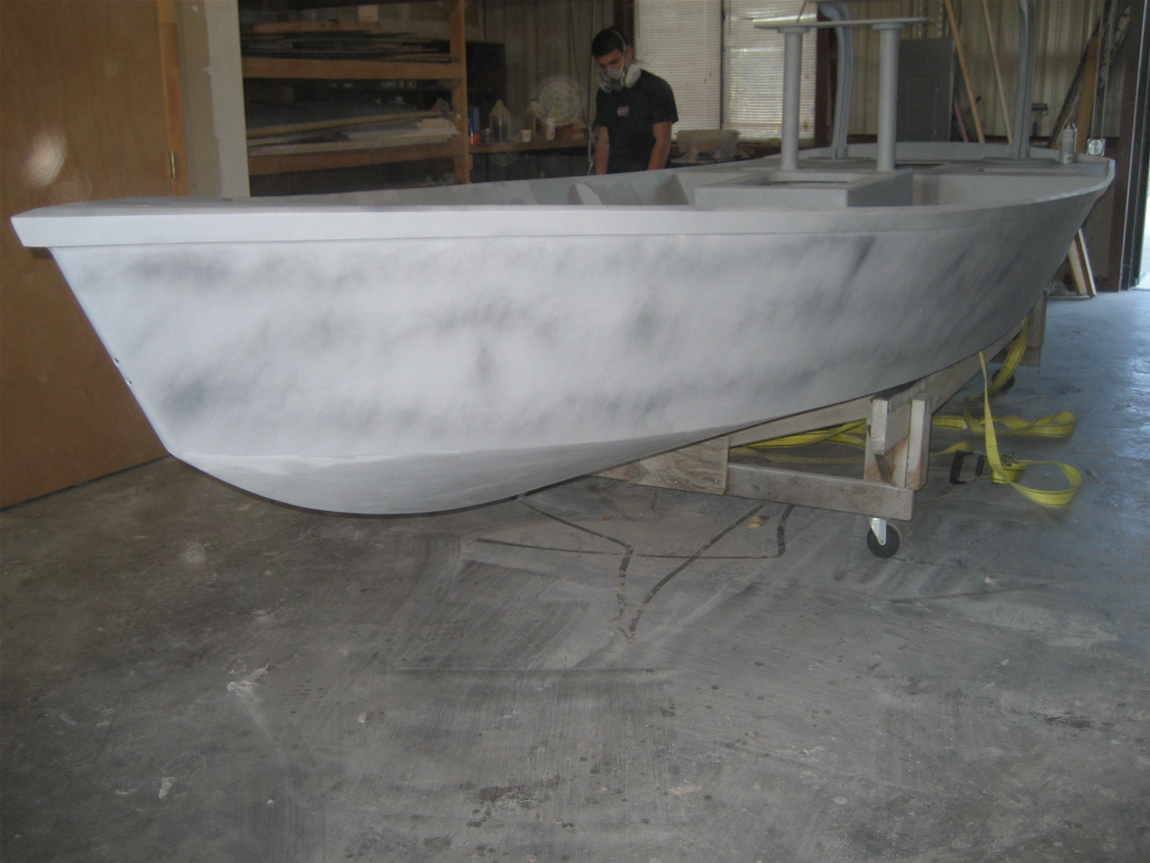
It is the step that will give you that really smooth final finish and bottom.
Tom
Posted: Sat Dec 20, 2008 3:07 pm
by BassMunn
Thanks for the tips Guys, they sure will come in handy over the next few days.
What grit do I sand the primer with before laying down the graphite?
TomW - The guide coat is a good option thanks, went and got some black paint today for it.
I decided not to spray the next primer coats today - Too windy
Seeing it in the daylight really helped me to see the areas that I had missed, no major areas but a lot of small little holes and dents that needed filling. So those were filled and will be sanded as soon as it dries. If the weather behaves tomorrow I should finish spraying, and then I think Wednesday sounds like graphite day
Posted: Sat Dec 20, 2008 3:41 pm
by cape man
I used 120 grit before the graphite.
Posted: Sat Dec 20, 2008 4:11 pm
by BassMunn
Thanks Cape Man
Posted: Sun Dec 21, 2008 2:51 am
by TomW
T, I didn't mention do the guide coat just before the last primer coat. Then any fixes and the guide coat will be covered.
Good luck.
Tom
Posted: Sun Dec 21, 2008 3:02 pm
by BassMunn
Yesterday I filled all the holes that I could see and today I sprayed a second heavier coat of primer down.
It came out shiny
I thought primer was supposed to be a matt finish, anyway what it did do was highlight all of my imperfections.......There are a lot of them

, Mostly on the hull bottom, the sides look pretty good.
I'll spray a guide coat tomorrow (Thanks TomW) and sand AGAIN on Tuesday, fair what needs to be faired and will spray the final primer on Wednesday. And after that I am going to steal Dougster's saying of "Good nuf". I am so sick and tired of sanding I want to throw my sanding board at something. OK so I'm throwing my toys out the cot
Here's what it looks like today.
If you look you can see that I flattened the area where the bow eye goes, I had it almost perfect, but one edge wasn't perfectly lined up, so I sanded it slightly more and managed to dig a big dent in it
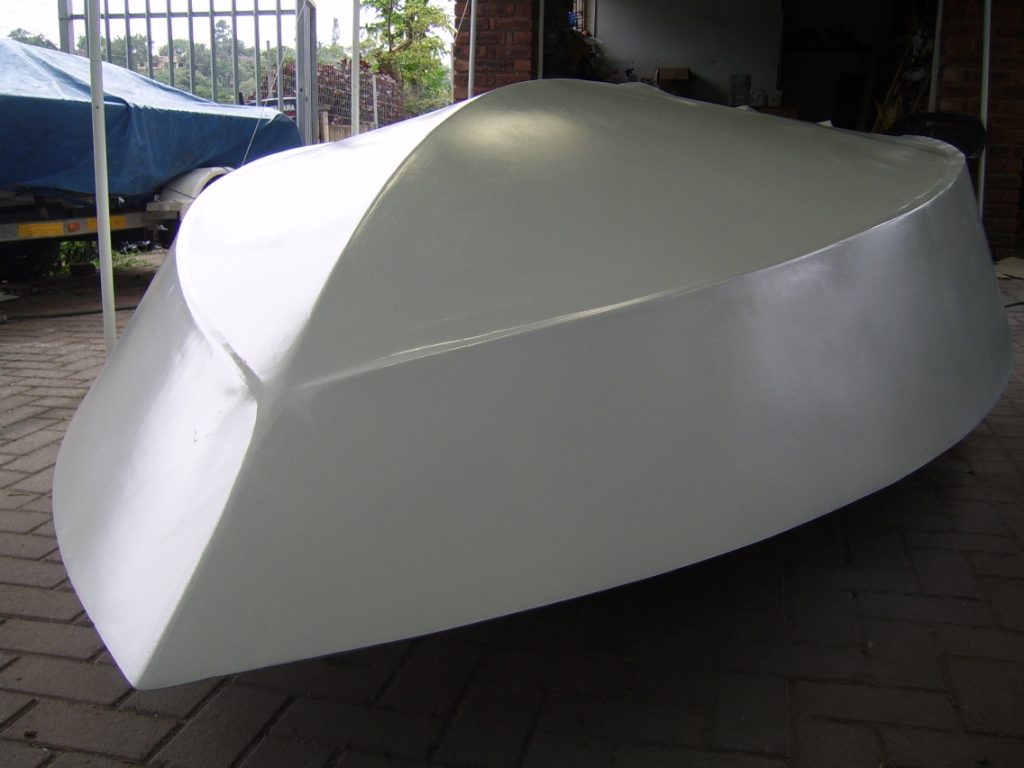
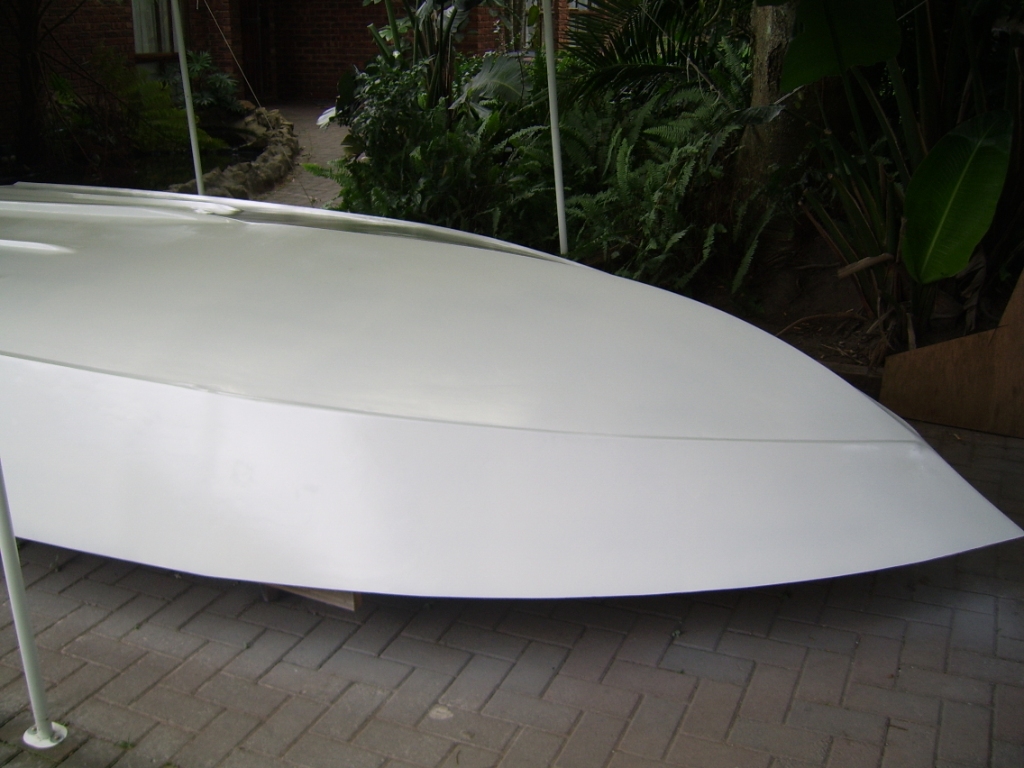
I'm pretty chuffed with how I got the top part of the bow to flare out towards the spray rail, it's just flared near the front, as it goes back along the hull it flattens out. I like it anyway
but you can't see it too well in the pic.
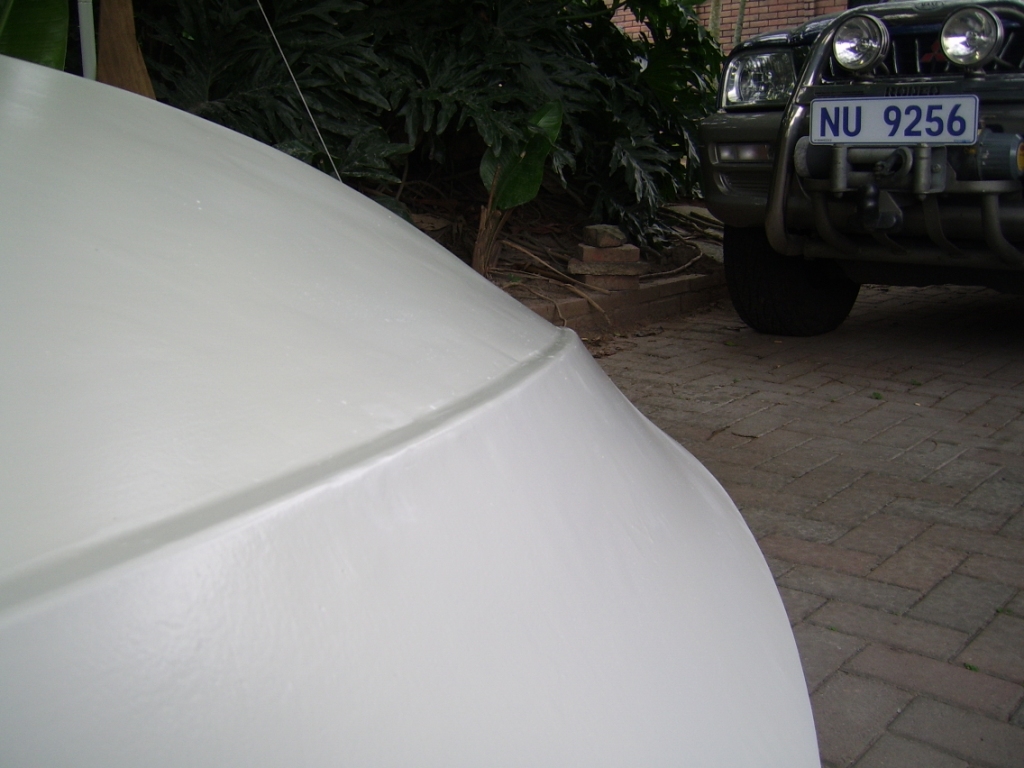
Posted: Sun Dec 21, 2008 6:21 pm
by Chalk
Looking good
Posted: Sun Dec 21, 2008 6:53 pm
by Dougster
Heck, I'd be so chuffed up one little pin would take out the county.
Sees you got it goin' on Dougster
Posted: Sun Dec 21, 2008 7:24 pm
by BassMunn
Thanks
Talking about pins - If I have any pin holes left after laying down the final primer, does the graphite/epoxy mix fill these in? How much filling in does it do?
Thanks
Posted: Mon Dec 22, 2008 12:53 am
by TomW
The graphite/epoxy should fill any pin holes do to its viscosity. You'll definately not have any after the second coat.
Tom
Posted: Mon Dec 22, 2008 1:33 am
by Fonda@kauai
Like the bow flare
How'd you do that? Was that on the plans? Lookin pretty sick, and you're movin along pretty fast, only 2 months into the build!
Posted: Mon Dec 22, 2008 5:17 pm
by BassMunn
Thanks TomW. How many coats are the guys laying down? Or is it just a case of do it until the color is solid?
Thanks Fonda, the spray rail is in the plans, but not the way I did mine, I prefered the way Doug Skogman did his spray rails, they looked more production hull like.
I wanted the spray rail to look like it was part of the hull and not added on, so when I faired the hull I laid the fairing compound down thick in that area, used a spreader to smoothen it down and then sanded the concave shape into it when it was dry (orbital sander, you can't get the fairing board to follow that curve).
Did no building today, was 95F so spent the day in the pool
Posted: Mon Dec 22, 2008 5:36 pm
by chicagoross
3 coats seems the standard from what I've read. That's what I did on mine.
Posted: Mon Dec 22, 2008 5:51 pm
by BassMunn
Thanks Ross.
Can someone please tell me what a foam brush is, when I asked for one at the HS, the guy looked at me like I was nuts
I can only find foam rollers
Posted: Mon Dec 22, 2008 6:14 pm
by colonialc19
Foam brush

They come in various widths
Posted: Mon Dec 22, 2008 7:45 pm
by BassMunn
Thanks ColonialC19 - OK never seen one of those here, Could probably make one myself, Thanks
Posted: Sun Dec 28, 2008 3:40 pm
by BassMunn
OK I'm officially sick of sanding
Sprayed a guide coat down earlier this week
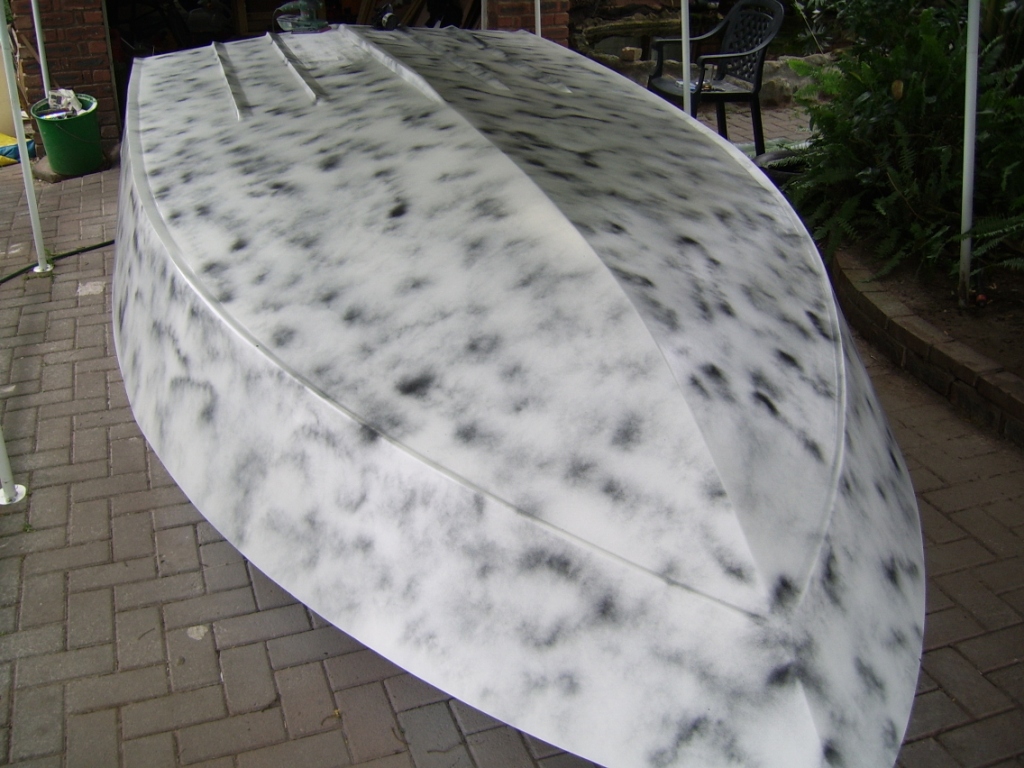
And then sanded and sanded some more - The primer I used is WAY tougher to sand than the fairing compound
Took me 2 full days to sand properly - Phew very tired and stiff.
Filled the last few low spots, sanded them down yesterday and sprayed the last primer coat today - And it looks good - Well "Good Nuff" anyway.
Didn't take another photo - Looks the same as the previous ones.
I would like to try the Graphite tomorrow, but wasn't sure how long you normally need to wait for the primer to cure properly - What did you guys do?
Shannon
Posted: Sun Dec 28, 2008 4:13 pm
by Cracker Larry
I think I'd wait a few days Shannon. The primer is water based(correction, the S3 primer I use is water based, not sure what you used?) and you want to make sure the moisture has escaped completely before you graphite.
The hull is looking sweet
Those extra days of sanding will be worth it.
Posted: Sun Dec 28, 2008 4:33 pm
by BassMunn
Thanks Larry - My primer is a 2 part Epoxy that is Thinners based, I sprayed it on. Any idea how long this would take to dry properly? It's also really humid here. It's touch dry after 30 minutes but it's got no strength yet.
I would love to start tomorrow but am worried that if I do it all falls off
With the Graphite layers - What's the best method?
Sift graphite, mix really well, pour it on the hull and then spread it out.
Can I spready with a foam roller and tip with a foam brush or is it better to spread it with a spreader?
Thanks
Posted: Sun Dec 28, 2008 5:23 pm
by Cracker Larry
Sorry, I've got no idea about that primer.
For graphite, I pour it on the hull and use a foam roller and foam brush. I've had real good results with it.
Posted: Sun Dec 28, 2008 5:41 pm
by wegcagle
She's lookin' awesome
Shannon. I love the reverse spray rails. How did you cut the rails to that specific angle??
Will
Posted: Sun Dec 28, 2008 5:42 pm
by BassMunn
Thanks Larry
Posted: Sun Dec 28, 2008 5:49 pm
by BassMunn
wegcagle wrote:She's lookin' awesome
Shannon. I love the reverse spray rails. How did you cut the rails to that specific angle??
Will
Thanks Will
I used strips of Meranti 2" x 1" cut diagonally across from point to point for my strakes, the left over pieces I used for the reverse chines. They are slightly narrower than the strakes because of the material cut away by the saw. They just happened to line up with the hull sides really well so I used them.
Posted: Tue Dec 30, 2008 3:29 pm
by BassMunn
Graphite = AAAARRRRGGGGHHHH!!!!
My first and probably last attempt at a graphite coating went horrible to say the least.
I don't know how any of you guys get the type of finish that you do with this stuff.
I did all the steps - sift, mix well, pour it on, use a foam roller and tip with foam brush.
And all I managed to get was a finish like this (looks like hammerite)
(Can't believe how grey it looks under a flash, it looks really black under normal lighting
)
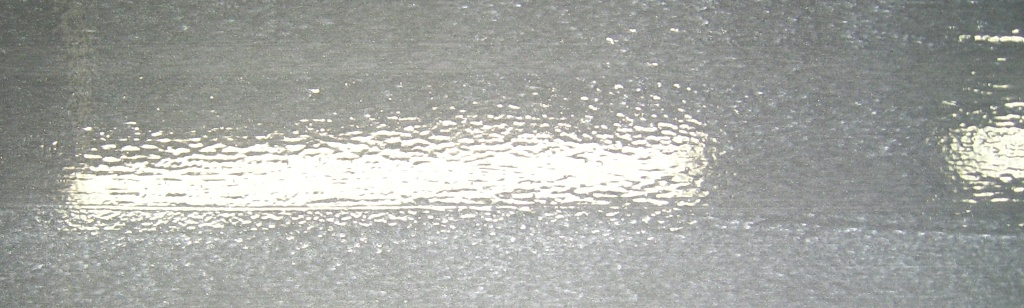
I also got plenty of high and low spots even after tipping. After spending so much time getting the hull surface near perfect, I feel like crying
when I look at it now.
I only did one batch of epoxy graphite, using slow hardener and a 20% graphite content.
Only did one side of the hull and stopped right there.
Does anyone know what could have caused this? I think it's from the roller lifting the stuff as it goes over, too little resin on the roller?
Right now I'm thinking sand it off tomorrow, spray another coat of primer and then spray a black paint on instead (I like a black hull).
All I can say is
Posted: Tue Dec 30, 2008 3:48 pm
by Cracker Larry
Don't despair, it takes a few coats for it to level out. It's not paint. I'd give it 3 thin coats before making any decisions.
Posted: Tue Dec 30, 2008 3:51 pm
by BassMunn
Cracker Larry wrote:Don't despair, it takes a few coats for it to level out. It's not paint. I'd give it 3 thin coats before making any decisions.
OK so it might fill in.
When do you lay the second coat down? does it still need to be tacky?
Thanks
Shannon
Posted: Tue Dec 30, 2008 4:38 pm
by chicagoross
It's an epoxy coat, so re-coat like epoxy! if it is still green(depends on your climate) you don't need to sand. If it has fully cured, then scuff coat it first.
It looks kind of orange-peel to me; did you tip it after rolling? Personally the roll and tip method worked better for me on the graphite bottom than on the paint! Follow each section completed with the roller with a light once over with a brush, first horizontal (to smooth out air bubbles etc.) then vertical (to prevent runs). Only other tip is I was using a very fine 6" foam roller to lay down and spread the epoxy graphite...and it really doesn't look like much after only the first coat...keep trying!
Posted: Tue Dec 30, 2008 5:04 pm
by Cracker Larry
does it still need to be tacky?
No, you don't want it tacky. That will just tear up the roller and make a mess. Drier than tacky but not fully cured. Smooth but not hard. One coat a day, maybe 2 if it's warm.
It will fill in smooth with several thin coats. Just like Ross, I found it flows out better than some paints. Roll about 3 square feet at a time, tip it both ways, then another 3 feet...don't overwork it and don't go backwards.
Posted: Tue Dec 30, 2008 5:12 pm
by BassMunn
Thanks Larry and Ross.
OK I know what I did wrong
I coated the entire one side of the hull and then went back to tip it. Right near the end I left little bits of my foam brush behind because the epoxy was setting up already. - Small bites
Thanks for the help
Posted: Tue Dec 30, 2008 5:52 pm
by Dougster
I laid on 5 coats, sanded after coats 3, 4, and 5. Had what Eric calls "scobies" every time. They are little bits of undissolved graphite and I hate 'em. They scrape right off but then you have a mottled grey look from removing them. I finally gave up and decided to live with scobies. I mean, it is just the bottom. Some guys seem to avoid them but I dunno how. I didn't get that orange peel look you have, but then I did the first three coats wet on wet, coats 2 and 3 going on right after it stopped being tacky. I agree with the sand it (scuff it that is, if it's fully cured) and give it a couple more coats advice. I used 25% graphite, maybe the 20% helps with the scobies. If you sand, wet sanding makes the less mess. Fill a spray water bottle with water and damp the area you're sanding. Don't give up.
Knows about sanding graphite Dougster
Posted: Tue Dec 30, 2008 6:52 pm
by BassMunn
OK I just tried another small batch over an already coated area to see what my new found ideas could do.
One area I used the foam roller only. I managed to get it down without the need for tipping the roller edges but it has that orange peel effect and doesn't seem to be lying down.
The other area I rolled and tipped in both directions, no orange peel - I now have lines
I don't have a proper foam brush so just used a small sponge, I suppose the sponge is probably causing the lines. The lines do seem to be lying down somewhat, so I'll leave it until morning to see what happens.
Dougster I have 'Scobies' too, whether I just roll or roll and tip I have them.
I'm really not sure what to do next, I can see why the guys use this for the bottom it is as hard as stone and really smooth (in the one or two areas that I got smooth, only problem is in those areas the epoxy was too thick and has run).
I want as near perfect finish as I can get and it just seems that the only way I will get this will be by spraying with paint (Which I can do pretty well). Maybe some Interlux Perfection is in order
Posted: Tue Dec 30, 2008 10:31 pm
by chicagoross
BassMunn, I just used the cheap chip brushes for the tipping on the graphite, just "barely" dragged the bristle tips through it, and it seemed to work fine. No idea of % graphite, I'm not that precise. Even doing about 3' square at a time, as Larry suggested, the chip brush lasted until I was done with the whole coat. Godd luck!
Posted: Wed Dec 31, 2008 4:36 pm
by BassMunn
I checked my extra patches this morning and they still look horrible, not sure what I'm doing wrong
The other thing that I noticed is that once the epoxy graphite dries it loses a lot of it's shine, I know it's on the bottom, but certain parts of the hull will still be visible, so I've decided to take it off and paint instead.
Went and got myself some Interlux Perfection in Jet Black today, it's not cheap
, will be spraying it on once I sand and reprime and sand again.
Sanded most of the graphite off today (looked like a coal miner when I was done), came off pretty easily it had only been on for 24 hrs so although dry wasn't very strong. It was actually much easier to sand than my epoxy primer is
.
Will finish sanding tomorrow and reprime, weather permitting I'll spray the black down on Saturday
.
Happy New Year to all
Have a good one!!!!
Posted: Tue Jan 06, 2009 1:18 pm
by BassMunn
Well after sanding all the graphite off, I resprayed 2 new coats of primer and sanded them down with 180 grit and then sprayed my first coat of Interlux perfection.
The paint has a lovely finish, really shiny, but it highlights fairing mistakes like a spot light. Let's just say that I suck at fairing
But hey it still looks pretty good.
I did get a couple of bad runs near the bow, so I will wet sand with 1200 grit tomorrow and spray the final coat. I also need to get rid of all the dust that got blown on to it, by the wind that started 5 minutes after I sprayed and was not predicted by the weather bureau
I also made a hash job of the edges, I taped with masking tape as required and made sure I rubbed it down properly, but with the rough finish of the primer on the sides it didn't seal properly. So I will have to cover that edge with the paint I lay down on the sides, which will be right near the end of the build.
Anyway here are some pics (OK I got click happy
)
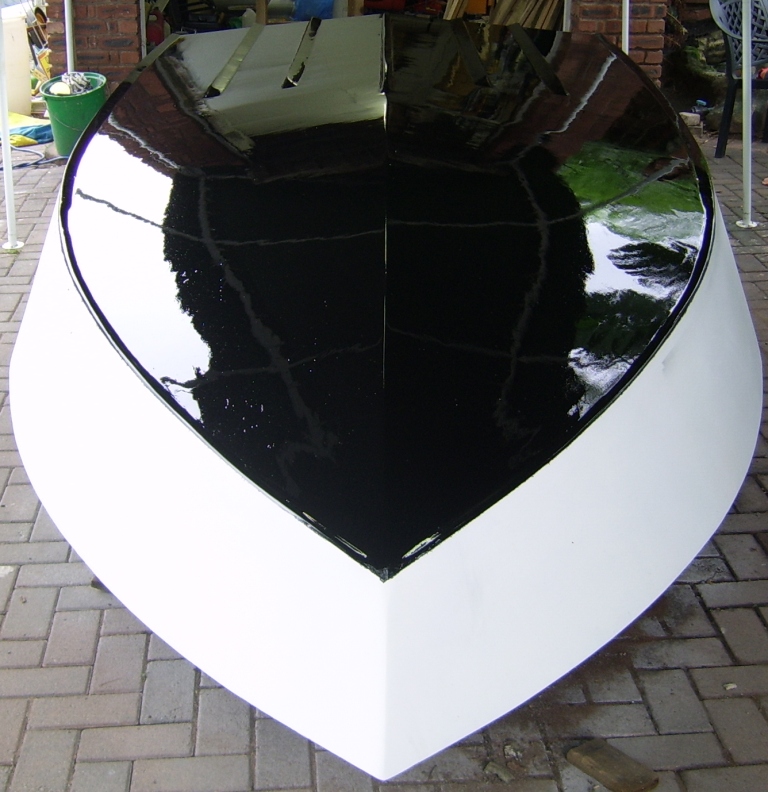
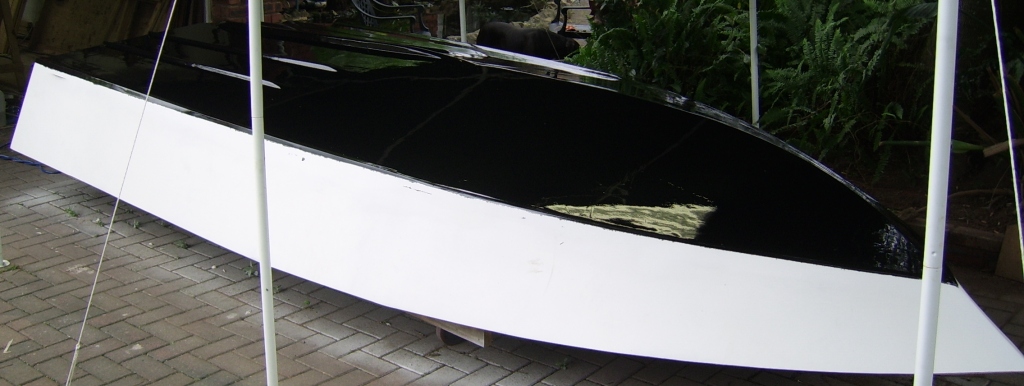
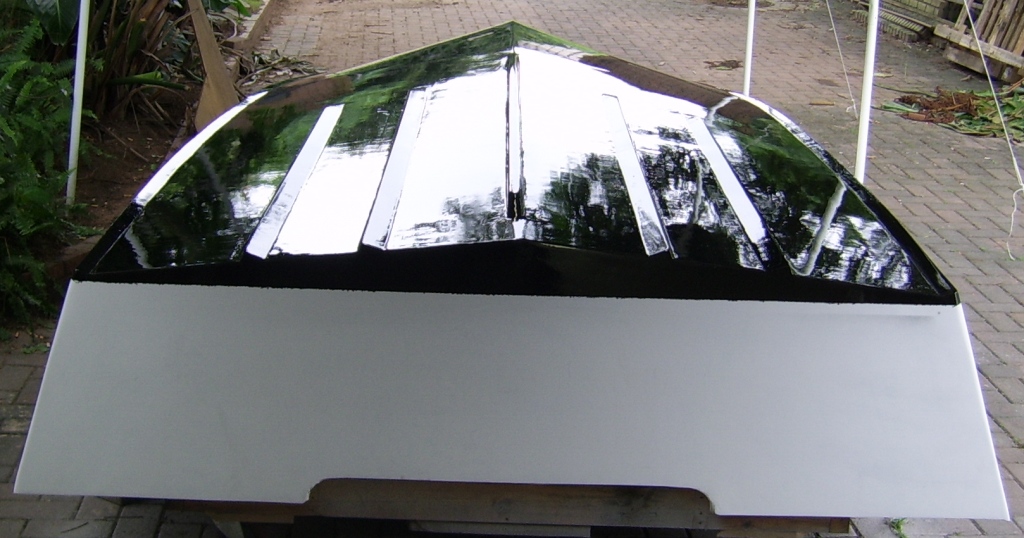
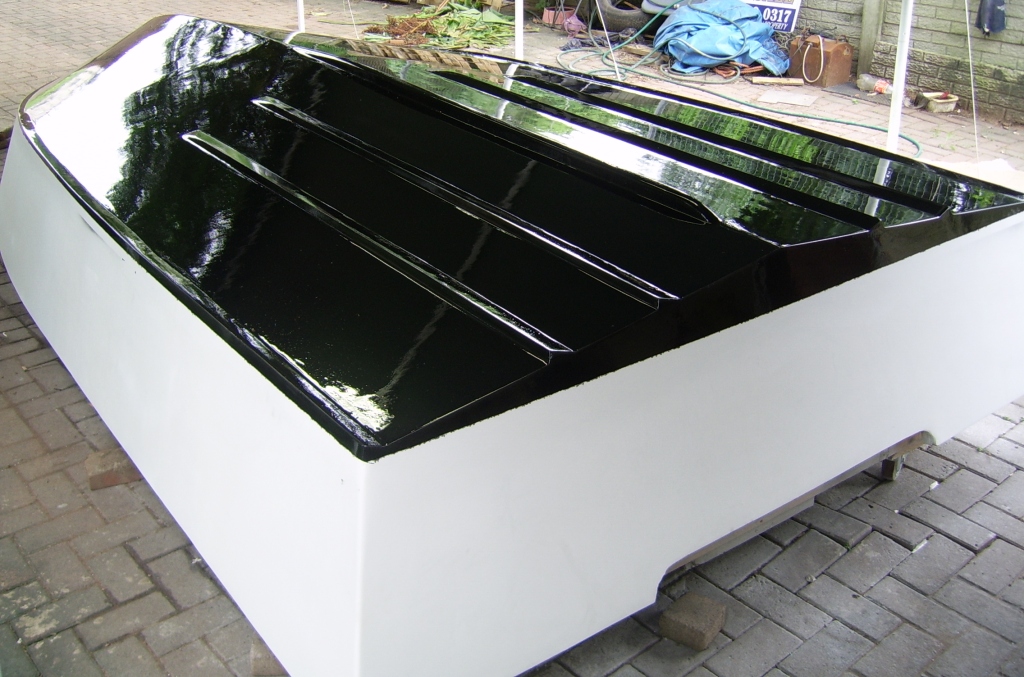
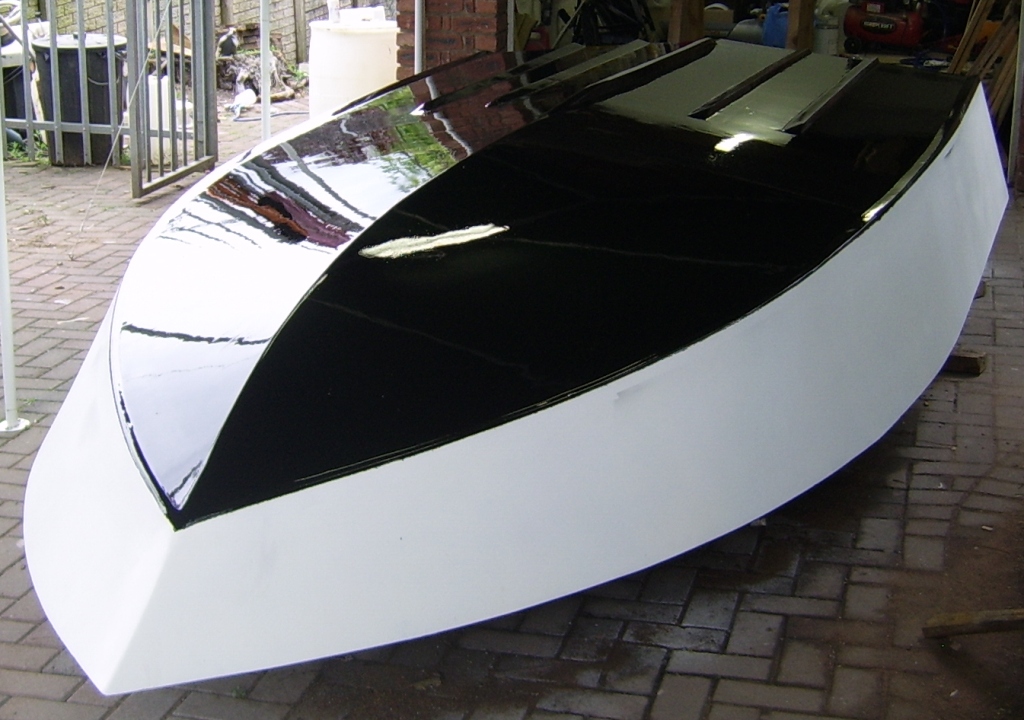
So what Ya'll think????
Posted: Tue Jan 06, 2009 1:27 pm
by Daddy
WOW !!!
Daddy
Posted: Tue Jan 06, 2009 1:33 pm
by topwater
I think it looks better much much better than the graphite.
some pepole dont seem to have any problems applying
graphite, some do. the boat is looking great. I will be
interested to see what youre boat weighs when done and rigged.
i'll bet it will be close to half of what my 19' triton weighs.
Posted: Tue Jan 06, 2009 1:54 pm
by tobolamr
She looks great!
What was your spraying setup? What respirator did you use?
Keep up the awesome work!
Posted: Tue Jan 06, 2009 4:38 pm
by BassMunn
Hey Guys thanks for the comments
I tried the Graphite thing but just couldn't figure out what I was doing wrong, it looked horrible, nothing like what some guys on this site have managed. The plus side of doing the graphite is that it actually aided in fairing my hull slightly more, so I can't complain about doing the exercise.
I see why the guys on this site suggested a paint like the Interlux Perfection, it has an amazing finish, it has completely dried and still looks wet it is so shiny. I sprayed it 9 hours ago and already I can't scratch the paint with a fingernail (and I tried hard
)
I'm either going to have bass try to eat their reflection or it's going to chase every fish in the vicinity away
Topwater - Probably will weigh half of what your Triton does, but they are beautiful boats. If I had the money I would probably have one, but over here they cost double what you guys pay for them.
Tobolamr - I'm using a small DIY compressor 6.34 gallon (24 liters), a fairly cheap HVLP spray gun with a 1.4mm nozzle (used a 2mm nozzle for primer), running 4 bar average from regulator, don't know what the pressure at the gun is. My compressor can't keep up so my pressure fluctuates a lot, as soon as it drops down to 3 bar I have to stop and wait for it to build up again.
I'm not using a forced air respirator, although it is the best option, just not realistic for me to get one. I managed to find filter cartridges that absorb the isocynates and I am spraying outdoors and stay upwind wherever possible. I'm also an ex spearfisherman so hold my breath really well
Posted: Wed Jan 07, 2009 5:33 pm
by Fonda@kauai
Lookin really sweet bassmunn! I like the black
Tommy Botha shoots some nice Tunny's down your way. Pretty sure he just uses a pipe gun too
Posted: Wed Jan 07, 2009 5:45 pm
by BassMunn
Thanks Fonda!
Tommy Botha is half man half Marine Mammal, that guy has a breath hold of something like 7 minutes, most of us would be dead 2 minutes earlier
My brother did it for years, dives to 110ft
. He got an 82kg (180lb) Black Marlin last year. I started getting pretty into spearing, got my depth down to about 55ft and then a Bull shark tried to eat me, so I decided to trade my speargun in on some rods and reels
Posted: Wed Jan 07, 2009 6:11 pm
by chicagoross
South Africa is kinda famous for sharks, isn't it? Oh well, rod and reel's fun too!
Posted: Wed Jan 07, 2009 6:17 pm
by Dog Fish
so I decided to trade my speargun in on some rods and reels
[/quote]
BassMunn I think you made a wise trade
Posted: Wed Jan 07, 2009 6:55 pm
by Fonda@kauai
Playing with sharks is half the fun! Got chased literally onto dry land by an 8 foot galopogos a few weekends ago. His dorsal fin and entire back were out of the water
Had a big shadow pass over me one time laying in the sand at 75 feet, turned out to also be a galapogos, made my heart jump from 30 bpm to 45
Posted: Wed Jan 07, 2009 10:11 pm
by Murry
That looks very good Bassmunn. You did a great job with the strakes and the reverse chine looks sharp. Very nice work.
Daniel
Posted: Thu Jan 08, 2009 9:03 am
by wegcagle
GREAT job Bassmun, I agree with Murry those reverse chines/strakes are GOOOD lookin' I'm thinkin' it's getting close to flipping time
Will
Posted: Thu Jan 08, 2009 9:10 am
by tech_support
Fonda@kauai wrote: made my heart jump from 30 bpm to 45
thats pretty incredible.
I started doing a little free diving this past summer on the reeks off our beach. there are only a few days a month (SUMMER MONTHS) where the visibility is over 5+ but its a lot of fun. It only 20' deep max and I use a pole spear - hardly the same thing you are doing but still fun. We have bull sharks, but I have not seen any on the reef, but I have been scared while wade fishing in the lagoon when the bull shows up.
In vero, I would rank wade fishing in the lagoon during the mullet run at least or more dangerous than diving off the beach
Posted: Thu Jan 08, 2009 9:54 am
by BassMunn
Thanks Murry and Wegcagle
, Lets hope that they work as good as they look
I've seen plenty sharks during my diving, but that one that day meant business
. I also suffer from occasional sea sickness. Had a deepsea boat for 5 years and used it whenever the weather permitted, but could never get over my green gills.
I love fishing calm skinny water, but we don't have anything like the flats and bays that Florida has to offer, so I took up bass fishing 5 years ago and got really good at it.
I've been watching a lot of fishing videos online and it blows my mind to see the type of fish you guys catch in Florida in 1 to 2ft of water.
One of these days I'm going to do a trip over there and see if I can pull off an inshore slam. I also want to go catch a peacock bass
Pity I'm not building my Phantom in Florida where it was designed for
Posted: Thu Jan 08, 2009 11:58 am
by BassMunn
Phew hull bottom finished (well almost)
Sanded yesterday with 320 grit (not 1200 like I said in an earlier post) and sprayed another 2 final coats of perfection today.
Much more even and only one small run
I still managed to get a few tiny bubbles and a bit of dust on the surface, so I will do a fine sanding and rubbing compound to finish it off.
And then it's time to flip her for the last time
Posted: Thu Jan 08, 2009 7:00 pm
by Fonda@kauai
Slow down man! You're movin
BTW there's a small lake 1/4 mile from my house FULL of big Tucanares ( peacock bass) if you ever make it to the garden isle.
It only 20' deep max and I use a pole spear
I still use a pole spear some times, keeps my stalking skills sharp
Posted: Mon Jan 12, 2009 12:50 pm
by BassMunn
Just a quick update.
After having a good look at my paint once completely dry I am not happy with the finish I got, I have a lot of tiny little bumps something that I didn't have after the first spray.
After a bit of research I realised that it was my spraying technique that caused the problem, I am used to spraying with a conventional spray gun which needs a spraying distance of about 12", but I just changed over to an HVLP gun (HVLP = High Volume Low Pressure) which needs a spraying distance of around 6". So I effectively sprayed the surface "Dry" whuch meant that the drops of paint were already drying when they hit the surface, therefore not giving the paint time to lay down.
I tried to sand, buff and polish the surface in a small area but you just can't get the same glossy finish back as a new spray job.
So I'm sanding again and gonna spray one more coat, a little extra paint thickness can't hurt on the bottom of the hull.
I can't wait to get this girl flipped
Posted: Fri Jan 16, 2009 2:38 pm
by BassMunn
Everyone is obviously working too hard, I can't believe how the building forums have slowed down. Unless you've all been sanding like me
Anyway, I sprayed what I thought was going to be my last coat and really duffed it up with the worst runs I have got since starting
So out came the sand paper again, it's been a bit wet here lately so I had to wait for a gap. Got some really nice calm weather yesterday afternoon, so flew outside and started taping everything up and fired up the compressor. Did a decent job, nothing great but was acceptable.
Did a light sanding today just to scuff up the paint and get rid of 2 small runs I got yesterday and sprayed the bottom hull panels for the last time
.
YEEHAA, WHOOHOO - Done at last
.
Just one tiny run that I'm acting like I don't see
Now I have to sit and wait for a couple of days for the paint to dry properly before I flip her over - What to do for the next few days?????
One thing boat building does teach you is how to sit and watch something dry
Oh well think I'll go and make a few lures and maybe go catch a fish or 3
Oh I didn't post any new pics, because it looks the same as the first spray, actually the first spray looked better minus the runs
Posted: Fri Jan 16, 2009 3:08 pm
by tech_support
your making good progress. Building is slow in North America right now, there are not many places epoxy will cure at current temperatures.
Posted: Fri Jan 16, 2009 3:18 pm
by colonialc19
Bassmun, Your making some excellent progress
I finally have some time to work on the boat but, can't get my garage warm enough to cure epoxy, as Shine posted, we have a bit of cold snap going on right now brrrrrrrrr its cold
Posted: Fri Jan 16, 2009 4:44 pm
by BassMunn
Oh i forgot that you are in Winter, just read about guys talking about their lakes being frozen over. I would never get out of bed if it ever got that cold here.
It's nearly midnight here and my house is a cool 76F inside right now and it's currently raining.
Got to love it
Posted: Sat Jan 17, 2009 12:16 am
by Bowmovement
BassMunn wrote:Oh i forgot that you are in Winter, just read about guys talking about their lakes being frozen over. I would never get out of bed if it ever got that cold here.
It's nearly midnight here and my house is a cool 76F inside right now and it's currently raining.
Got to love it
San Diego is still nice. 75 degrees here today. Cools down at night though. Now if I can get this wedding over I can start building.
Posted: Thu Jan 22, 2009 8:37 am
by CMP
What weight glass cloth are you folks using and how many layers? Thanks...
CMP
Posted: Thu Jan 22, 2009 8:59 am
by tech_support
CMP wrote:What weight glass cloth are you folks using and how many layers? Thanks...
CMP
depends on what the plans call for. Mostly its 12 oz. Biaxial cloth, multiple layers, multiple overlaps.
please do not try to use adapt a lamination schedule from one boat to fit to another, you could have serious failure. Use whatever is called for on your particular plans
Posted: Thu Jan 22, 2009 9:37 am
by BassMunn
What Shine said
I used slightly different weight glass just because I couldn't get what was required - For instance the Phantom plans call for 12oz 6" wide Biax tape, I used 5" wide ( I couldn't get 6"), but I increased the weight to 16oz, the 12oz is easier to work with, the 16 oz doesn't like going around corners much.
I also used glass woven cloth instead of biax cloth for the same supply reasons, but again the material I used was more difficult to deal with than the material on the spec sheet - Follow the plans as closely as possible, it makes life easier and there is no guess work
Posted: Thu Jan 22, 2009 11:02 am
by CMP
Was planning to use plan call-out, but the plans are at home and I'm in the office
. Plywood is delivered, I already had the epoxy and need to order the glass. Have fun...
CMP
Posted: Thu Jan 22, 2009 11:12 am
by tech_support
which boat? we can tell you what weights/amounts of glass
Posted: Thu Jan 22, 2009 11:28 am
by CMP
PH 18. Finally finished my second Bertram and have room now. Been sitting on these plans for 3 years...
CMP
Posted: Thu Jan 22, 2009 1:18 pm
by tech_support
CMP wrote:PH 18. Finally finished my second Bertram and have room now. Been sitting on these plans for 3 years...
CMP
After 2 bertrams, the PH18 will be fun
Its 12 oz biaxial tape and 12 oz wide biaxial cloth
3 rolls (150 yards) of this
http://boatbuildercentral.com/proddetai ... 2oz_6in_50
and 30 yards of this
http://boatbuildercentral.com/proddetai ... _50_10yds.
Posted: Thu Jan 22, 2009 1:30 pm
by CMP
Thanks much! The PH is for a Keys house yet to be purchased and the 25 Bert will live there as well. Looking forward to it...
CMP
Posted: Fri Jan 23, 2009 3:04 pm
by BassMunn
OK finally my hull has been flipped over and the final stretch begins.
I have a question about drilling thru hull holes.
By how much do you oversize your holes?
For instance I need to have holes that are 25mm in diameter (1"), What sort of epoxy wall thickness do I need? I have a holes saws in 32mm and 40mm. The 32mm would give me a final wall thickness of 3.5mm, is this enough?
Thanks
Shannon
Posted: Fri Jan 23, 2009 3:14 pm
by Fonda@kauai
The gougeon brothers book says at least a 1/4" all around the fastener or fitting, but let's see what the experts say
Posted: Fri Jan 23, 2009 3:44 pm
by BassMunn
So that would mean for a 25mm hole I'll need to use a 40mm hole saw, give me a 7.5mm wall, just over a 1/4"
Thanks Fonda
Posted: Fri Jan 23, 2009 4:22 pm
by BassMunn
What about bolt holes? does this still apply, for instance for a 1/2" bolt hole I have to cut a 1" hole and fill before drilling the 1/2" hole?
Posted: Fri Jan 23, 2009 4:42 pm
by TomW
Buss, the most you need if you can drill accurately is an 1/8" around the hole. 1/2" = 3/4" , this gives you plenty of leeway if your sightly off. I'll be using one of these, I bought mine years and years ago, but they are invaluable for accurate drilling on slopes. This one can handle a bit up to 3 1/2"
http://woodworker.com/cgi-bin/FULLPRES. ... 3&smode=10 Check your woodworking stores they will probably have something similar. Have seen them as low as $30 US.
Tom
Posted: Fri Jan 23, 2009 5:44 pm
by Fonda@kauai
There you go
I'm probably gonna do the 1/4" just to give myself a margin of error. But it is probably a little excessive.
Posted: Fri Jan 23, 2009 5:49 pm
by BassMunn
Thanks Tom, that looks like a neat little tool, gonna scratch around and see if I can find one
Posted: Sat Jan 24, 2009 4:13 pm
by BassMunn
No building today (Wife's Birthday), but doing some building tomorrow and have a few questions
1. Because I will be installing a side console I have to put electrical piping through both stringers on the Starboard side - Do I need to reinforce these holes?
2. I will be foam filling all the side boxes before the sole gets glued down. Do I seal and forget or do I need to put small drain holes in each box incase I get water intrusion into one of the boxes?
Thanks
Shannon
Posted: Sun Jan 25, 2009 8:32 pm
by BassMunn
Well worked for 14 hours straight and got a couple things done.
First had to sand the inside of the boat to roughen things up.
Oh look I'm sanding for a change

Cleaned the inside out nicely and then cut a whole lot of wood for cleats
Installed all the longitudinal cleats
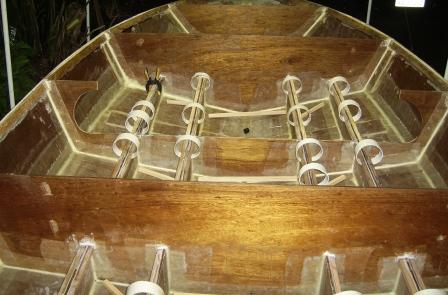
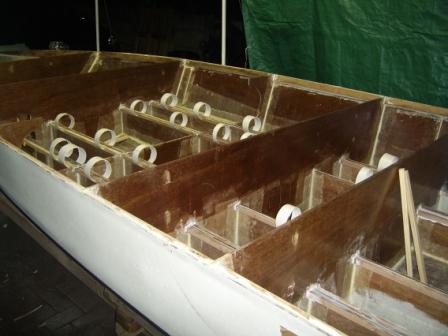
Ran out of steam and clamps, so will do all the cross members tomorrow night.
I also drilled, cut and filled all thru hull fixture locations.
A few steps closer
Posted: Sun Jan 25, 2009 8:43 pm
by chicagoross
Great progress, BassMunn! Fun to be finally looking at the other side of the boat!
Posted: Sun Jan 25, 2009 8:47 pm
by BassMunn
Thanks Ross! You have no idea how happy I am to see it the right way around. Fairing definately tests your boat building resolve
Posted: Mon Jan 26, 2009 7:12 am
by Murry
Your cleat install looks great Shannon, and I know your ready to start having fun on the interior.
Don't you just love those pvc clamps.
Good Luck
Posted: Mon Jan 26, 2009 8:32 am
by BassMunn
Murry wrote:Your cleat install looks great Shannon, and I know your ready to start having fun on the interior.
Don't you just love those pvc clamps.
Good Luck
You looked like you were having far too much fun by yourself working on the interior, I had to join you
The PVC clamps were one of the best tips I've ever got on this site, along with a whole bunch of other great ideas
I see you've also been pretty busy this past weekend
Posted: Mon Jan 26, 2009 9:44 am
by Biker B.O.B.
BassMunn wrote:Oh look I'm sanding for a change
Where is the beating on the table, laughing so hard he's crying smilie?
My first boat was only 12 feet long, so I can imagine how much sanding you've done on your boat. Just concentrate on getting the topside built. Don't think about all the fiaring and sanding to be done once the construction is done.
Keep up the good work.
Shaun
Posted: Mon Jan 26, 2009 10:43 am
by TomW
Shannon since your building a side console, why not run your controls under the gunnels instead of under the sole. This is how the bass boats do it. Much easier and uses less cable.
Tom
Posted: Mon Jan 26, 2009 2:36 pm
by jbridges
Hey Shannon,
Jerry Bridges here. Im also building the PH16 in League City(outside houston). I completed most all of my topside build before I flipped to paint. Im currently waiting for a break in the weather to apply sterling. I made the mistake of asking about draining the stringer boxes when I was at that stage and there were a lot of different opinions on the subject. My thinking is that you cant be 100% sure that water wont get into the boxes so you need to have some way of draining or at least airing the compartments out after each run. What I ended up doing was to install limber holes in the back,lower corner of each box(where the water would gather). Then using vasoline coated 1/2" pvc I made a communicating tunnel thru the limber holes fom the bilge and up each back corner of each box.I put the coated pipes in place,poured the foam and then removed the pipes after the foam was set. This way when you take out your bilge plug you get air up into each compartment, hopefully drying out any moisture if there is any. Just another way of doing it, some guys dont bother with all the fuss and just seal them up !
Posted: Mon Jan 26, 2009 3:08 pm
by BassMunn
Shaun Thanks, luckily I've done the bottom already just the top side fairing to be done and most of that is getting carpets (couldn't stand to face that much more fairing
)
TomW - Thanks, after thinking about it for a while, I put my brain back in and thought I had this cunning plan to run the wires under the gunnel because my steering cable has to go that way anyway
Sometimes I read the plans too closely (which really doesn't help when I am deviating from the plans on purpose)
I think I better lie down before I hurt myself
Jerry - Thanks for the response. I like your idea with the PVC pipe.
I'm in 2 minds what to do about this story - on the one hand if you leave it sealed you run the risk of having water sitting trapped in a compartment (if it ever gets in).
But on the other hand if they are opened, you risk introducing water into a compartment that would have otherwise been dry.
Posted: Wed Jan 28, 2009 5:00 pm
by BassMunn
Finished installing the cleats for the sole, One step closer
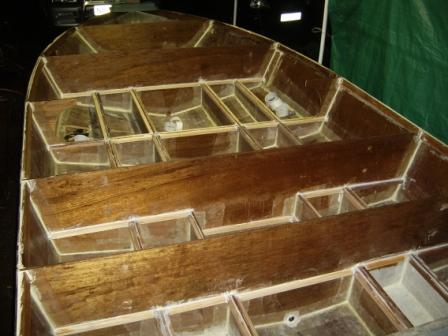
Just need to sand the top edges smooth before I coat the cleats with epoxy.
I will then recoat all the interior surfaces again and can then start pouring foam. Got my foam today.
It's been raining for the last 36 hours and cold (well cold for here anyway), so I probably won't do much until the weekend.
Posted: Thu Jan 29, 2009 7:05 am
by Murry
Looks Great.
Your rolling, I need to pick up my pace.
Posted: Thu Jan 29, 2009 1:39 pm
by wegcagle
Lookin' good Shannon. One more check box finished
Will
PS Your 4yo may not like sanding, but I bet he'll LOVE crusing in daddy's new boat
Posted: Thu Jan 29, 2009 8:29 pm
by BassMunn
Thanks Murry I'm trying
Will I can't wait to take him fishing, he's already practicing on my Koi
Posted: Thu Jan 29, 2009 8:37 pm
by BassMunn
Today I got a lot done, sanded the tops of the cleats smooth and then coated them with epoxy.
I then recoated all the boxes that are going to be closed up by the sole with a pigmented epoxy, I used the pigment to make sure I got everything. I have a habit of missing areas, this way there is no worrying about possible slip ups (I hope)
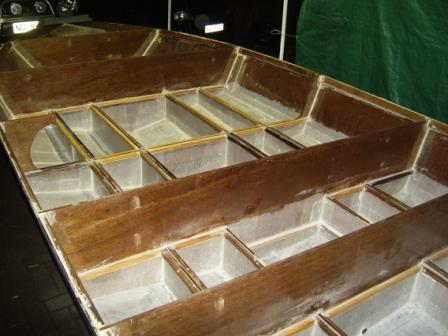
Going to foam the hull tomorrow and then it's time to start cutting out the sole panels
Posted: Thu Jan 29, 2009 10:57 pm
by Cracka
"got a lot done" mate you're flying, the boat looks great.
Mick
Posted: Fri Jan 30, 2009 2:52 pm
by lagwagon
Lookin nice bassmunn....im living vicariously through your build untill i can start mine
Posted: Fri Jan 30, 2009 8:19 pm
by BassMunn
Thanks Mick and Lagwagon
Foamed the compartments tonight. Ran out of foam (thought I had enough), so I couldn't get the foam all the way to the top of all the compartments. Not sure if I need to fill them all the way to the top
What do you experts say? I've got 30 liters (nearly 8 Gallons), that expands to 600 liters (158 Gallons) in there already?
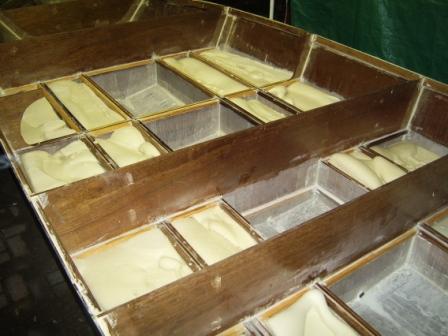
Posted: Sat Jan 31, 2009 12:49 am
by chicagoross
You have more than enough foam to float the motor. You're covered from that end. Some like the foam to the top to make the deck more solid; looking at the multi-compartment eggcrate structure you have there, with a cleat every 12" or so, that sole is going to be solid as a rock anyway. If you foam to the top you'll have to cut the muffin tops off with a saw, which is a bit of a pain. Most of those are just about topped off anyhow. I think you're good. Nice clean looking build, BassMunn!
Posted: Sat Jan 31, 2009 1:04 am
by TomW
You done got enough. It looks like its equally dispersed and that's whats important. Good job and go on to the next step.
Tom
Posted: Sat Jan 31, 2009 3:47 am
by BassMunn
Thanks Ross and Tom - That's what I wanted to hear
Time to start measuring up for the sole panels
Posted: Sun Feb 01, 2009 6:19 pm
by BassMunn
My Wife declared Saturday as family day, so I only got to work on the boat today.
Cut all the sole panels out and test fitted them. Even the kids are starting to recognise this as a boat now. I couldn't get them out
Common Dad where the fishing rods?

Put a heavy coat of epoxy resin on the underneath of the sole panels.
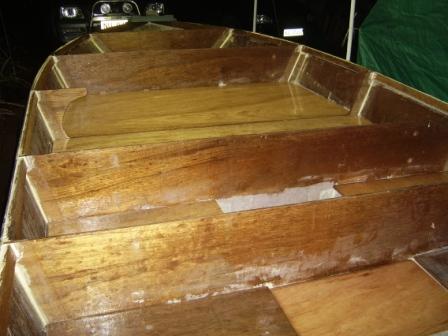
I'm almost out of resin (have about a pint left), so if I get a chance to get more tomorrow I'll start glueing down the sole panels tomorrow night.
This is really getting fun now, seeing the decks take shape is really exciting for me
And I just found out that my Jack Plate arrived in the country on Friday, so should be here by Tuesday
Posted: Mon Feb 02, 2009 11:25 am
by Murry
You are rolling Shannon, Keep up the great work, it's looking fantastic.
Daniel
Posted: Mon Feb 02, 2009 4:12 pm
by BassMunn
Thanks Daniel.
I'll be honest the batteries are a bit flat tonight, think I'll just look at it a while and plan my hatch layout
Posted: Thu Feb 05, 2009 7:27 pm
by BassMunn
Hi Guys
Not a whole lot of building going on at the moment, just did a little last night and tonight by glueing down and glassing in the sole panels for the rear 2 sections of the hull.
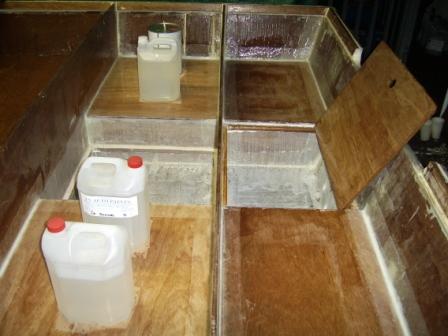
The loose hatch cover laying up against the transom is just a drop in hatch lid to cover the pump area, once the transom supports are in, it might not work, but I'll decide when it's all done.
For some reason I am all of a sudden getting a huge problem with Amine Blush on the coats I did on the underneath of the sole panels, so I am having to spend a fair amount of time cleaning them up properly before laying on another coat and glueing them down while it's still wet.
Posted: Fri Feb 06, 2009 1:41 am
by chicagoross
Looking very nice, Shannon! By the time you're getting to this point, you already know that each bit and piece glued in place is making the boat stiffer and stiffer, and that sole is the biggy! No worries about walking around in there now, and it's really nice to be able work in there without stepping over and kneeling on stringers and frames! I remember after foaming and laying the sole being glad I was done looking at all of those little compartments!
What kind of epoxy (and speed of hardener) are you using that's having the blush problems?
Posted: Fri Feb 06, 2009 2:59 am
by BassMunn
Thanks Ross, yes you're right I am also very glad to not be looking at stringers anymore, now the designing fun begins
The resin is a local brand called LR20 - Hardener is LH281 (Slow), It's their brand although I'm sure it's made by someone else and just repackaged. The companies name is AMT Composites.
I've experienced a bit of blushing with it from the start, but this time it's really bad, it might be either because I am needing to work with the area sooner than previous coated parts or it could also be because we have had pretty cool weather here the last few days and I've just got used to the resin setting up much faster
Posted: Sun Feb 08, 2009 4:49 pm
by BassMunn
Finished installing the sole panels today. 1 more step complete
Laying the glass after filleting
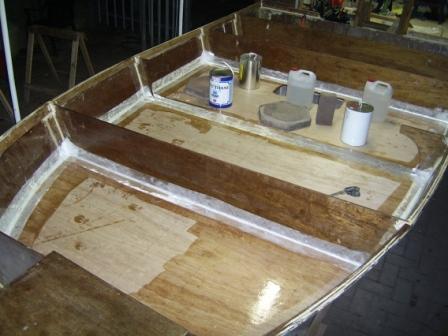
Glass tape wet out and panels resin coated
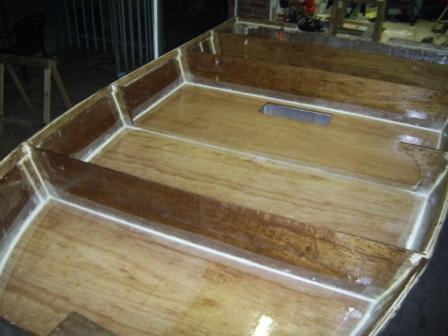
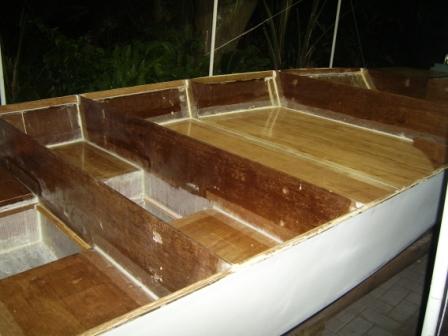
Got my jack plate this week and it looks really nice.
It's an EZ Lift Jack Plate from Hydro Dynamics, bought from pitstopmarinedotcom
It has a 5" Set back and has 6" of travel if I remember correctly.
The unit cost $186 which seems to be about $100 cheaper than most other brands of a similar type and everything I read about it was good.
Took the unit under 3 weeks to get to me, which is not bad considering it went half way around the world.
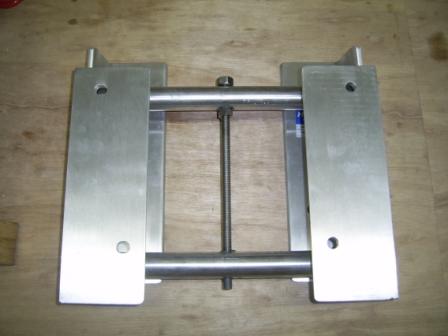
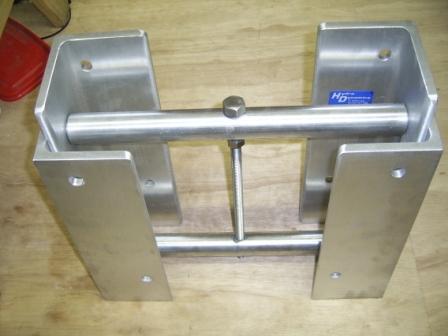
Now I have to sit and plan my deck and hatch layout
Posted: Sat Feb 14, 2009 8:46 am
by lagwagon
Bassmunn must be working hard on that boat. Havent heard anything about the build in about a week now. Cant wait to start building mine.
Posted: Sat Feb 14, 2009 1:46 pm
by BassMunn
Am I teasing you Lagwagon
, thanks for checking up
I've haven't done much building over the last week, just a lot of sitting in my thinking chair looking at the boat, will be doing a bit more work on the boat tomorrow, I'll post some updated pics tomorrow night.
Shannon
Posted: Sat Feb 14, 2009 2:22 pm
by hwsiii
Shannon, it looks strong enough to run over one of those crocs and just keep on ticking.
H
Posted: Sat Feb 14, 2009 4:54 pm
by BassMunn
hwsiii wrote:Shannon, it looks strong enough to run over one of those crocs and just keep on ticking.
H
That's why I wanted such a flat hull - so it'll skip nicely
Posted: Sat Feb 14, 2009 6:54 pm
by hwsiii
LMAOOOOO
H
Posted: Sat Feb 14, 2009 6:59 pm
by chicagoross
Yeah, Shannon, up to now it's pretty much been per the plan. Figuring out how to make thd layout perfect for your own use (and doable) requires
lots of time in the thinking chair! Some of us find that a few adult beverages provide valuable lubrication for the thinking process! Can't offer much other useful suggestions at this point - from here on in it's pretty much your call on what cool ideas you can steal from previous builders and what innovations you can offer the rest of us for our next build!
Got your storage needs sorted out?
The fishing here in Guam is different than anything else I've done (mostly Mexico) - here the string is always 100# plus, 10 or 12/0 reels. Try to store a few dozen of those! I do keep a couple of the biggest spinners on the boat spooled with 50# string (my wife likes to catch grouper and that's the oply kind of reel she enjoys) but most of the hookups have the same result as catching a coral head. But every now and then you get lucky.
Posted: Sun Feb 15, 2009 6:37 am
by lagwagon
so bassmunn....i was watching a fishing show called Spanish Fly on ESPN and they were fishing a chain of islands off the coast of Africa called the Seychelles (i think thats how its spelled). This place had some seriously good fly fishing on the flats. You ever heard of this place or fished it?
Posted: Mon Feb 16, 2009 6:04 pm
by BassMunn
chicagoross wrote:Yeah, Shannon, up to now it's pretty much been per the plan. Figuring out how to make thd layout perfect for your own use (and doable) requires
lots of time in the thinking chair! Some of us find that a few adult beverages provide valuable lubrication for the thinking process! Can't offer much other useful suggestions at this point - from here on in it's pretty much your call on what cool ideas you can steal from previous builders and what innovations you can offer the rest of us for our next build!
Got your storage needs sorted out?
The fishing here in Guam is different than anything else I've done (mostly Mexico) - here the string is always 100# plus, 10 or 12/0 reels. Try to store a few dozen of those! I do keep a couple of the biggest spinners on the boat spooled with 50# string (my wife likes to catch grouper and that's the oply kind of reel she enjoys) but most of the hookups have the same result as catching a coral head. But every now and then you get lucky.
Ross, yes I've done a lot of this
the last few days, with a bit of lubrication included
I've got my hatch layout sorted now, have a look at the pics below.
Might battle to fit a few of those rigs in my hatches
, it sounds like you are dealing with steam trains over there.
Posted: Mon Feb 16, 2009 6:20 pm
by BassMunn
lagwagon wrote:so bassmunn....i was watching a fishing show called Spanish Fly on ESPN and they were fishing a chain of islands off the coast of Africa called the Seychelles (i think thats how its spelled). This place had some seriously good fly fishing on the flats. You ever heard of this place or fished it?
I saw that episode (can't miss ESPN fishing
)
Seychelles is a 5 hour flight from South Africa, I've only stopped over there on my way to the Maldives.
The Seychelles is renowned as one of the best places in the world to break a world record, currently the world records for Bonefish, Giant Trevally and Dogtooth Tuna come from the Seychelles. Plus a whole host of other records.
If you ever plan on going there you must stay on one of the outer islands if fishing is your main reason for visiting.
Posted: Mon Feb 16, 2009 6:28 pm
by BassMunn
Installed my false bulkhead to extend my front deck, also started to install my rod hatches. I still have quite a bit to do to finish them, but you get the idea. I ran out of Biax tape again so have to get some more tomorrow before I can glass the hatch walls in place.
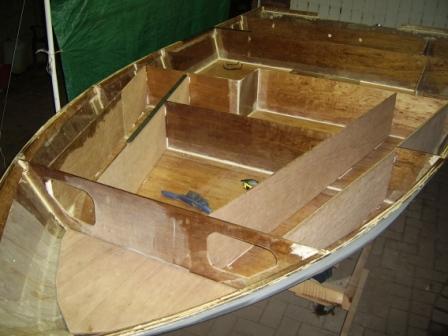
Posted: Tue Feb 17, 2009 5:14 am
by lagwagon
one of these days ill make it over there, it sounds like a good place to take the PH16 once im finished with it. I guess i need to start on it first. haha
Posted: Tue Feb 17, 2009 1:30 pm
by Fonda@kauai
Rod hatches look good
should make the deck nice and clean. Tripping over rods is no fun.
Posted: Thu Mar 05, 2009 6:19 am
by wegcagle
Over 2 weeks since an update
Throw a junky a bone here Shannon
You're getting worse than I am about updating
Just wondering how the phantom's coming along.
Will
Posted: Thu Mar 05, 2009 2:52 pm
by BassMunn
wegcagle wrote: Throw a junky a bone here Shannon
Not gonna get much of a fix here Will, sorry
I've only done about 5hrs of work on the boat for the last 2 weeks. Our Bass tournament season has started and I spent the previous weekend practicing and last weekend fishing the tournament. Not a great result, finished 14th, but the points all add up for the final qualifying.
All I've done is install the motorwell supports, the livewell sides and finished glassing in the rod hatch sides, I've still got 3 more hatch sides to glass in and then I need to install the seat bench support and cooler box. Once that's done I can start installing the cleats for the deck panels, get the deck on and then build the console and hatch lids, phew so much still to do.
Here's a shot of the Motorwell side supports installed.
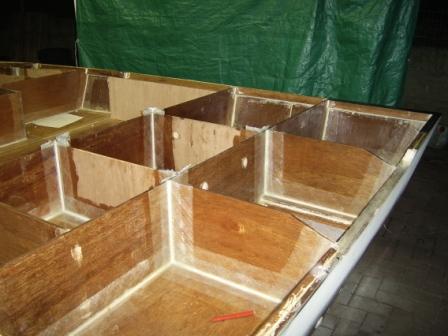
I'll do a bit more on the boat tomorrow night and the whole of Sunday so should get a bit further.
Posted: Thu Mar 05, 2009 5:41 pm
by wegcagle
I'll do a bit more on the boat tomorrow night and the whole of Sunday so should get a bit further.
I'm with ya on that. This is going to be my first free weekend off work in a month and a half. I've been preparing the ole wife that I'm gonna spend the majority of it on the boat.
She said that's fine since I've built the new baby's room, and did 2 pages of honey-do's.
Between that and the flowers she got today, I think I got her where I want her
Good luck on the bass trail and keep us updated.
Will
Posted: Fri Mar 13, 2009 7:56 pm
by BassMunn
You guys have been busy haven't you
Got a bit more done since last week
Finished all my hatch compartment sidewalls
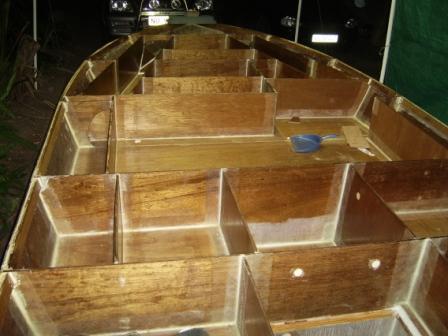
Supports for seat bench base fitted and cooler box location cut out to correct size.
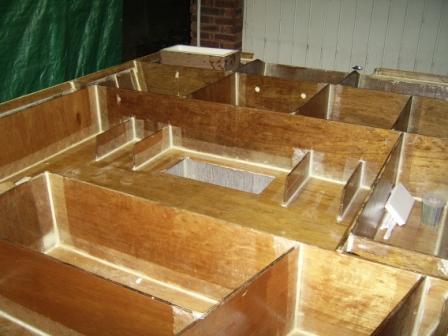
My cooler box
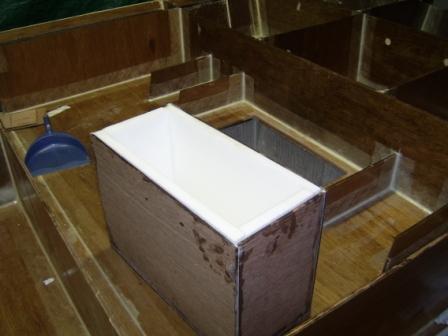
The box is glassed on the inside and then the styrene sheets were fitted, still need to glass over the styrene and take the edges down on the outside and then glass and seal with resin.
The cooler will suspend in the sole cut out, so I will fit cleats to the sides at the right location and then will glass it to the sole. The top of the cooler will be glassed to the seat bench as well. Got to keep them frosty
Tomorrow is building day - WHOOHOO!!!
Posted: Sat Mar 14, 2009 6:40 pm
by Murry
I really like your rod storage layout Shannon and I'm loking forward to seeing your cooler installed as well.
Looking very clean and well thought out. You'll be fishing with style in no time.
Posted: Sat Mar 14, 2009 7:12 pm
by wegcagle
I agree. I'm pretty sure that's gonna be one bass slayin' machine
If it's not, I know you can't blame the boat.
Will
Posted: Sun Mar 15, 2009 7:46 pm
by tobolamr
Are you making this a Center Dual Console style? Or just a standard center console or side console? Looking good! Keep it up!
Posted: Sun Mar 15, 2009 7:48 pm
by BassMunn
Thanks Daniel and Will. I've been spending a lot of time doing this
the last 3 weeks. That's why not much building has been done, but I think I've got all the bases covered now.
I finished my cooler box today, will be able to mount it tomorrow once everything is dry. Also cut my deck panels out for the front deck, I need the off cuts to finish my seat bench (but it was also nice to lay them on the boat to see what it looks like
)
It's also finally time to start installing the deck cleats and then it's time to start making hatch lids - Horrors
I'll post some pics tomorrow of the cooler once it's fitted.
Have fun!
Posted: Sun Mar 15, 2009 7:55 pm
by BassMunn
tobolamr wrote:Are you making this a Center Dual Console style? Or just a standard center console or side console? Looking good! Keep it up!
Thanks Tobolamr, I'm making it a single side console, like a normal bass boat. For me the dual console bass boat versions waste too much deck space and they also then limit the size of the Port side rod locker. My Port side rod locker can take an 8ft rod max, but comfourtable for 7'6". If I put a console there I loose 12" of rod locker space.
The down side - whoever sits in that seat always has a rather wind blown look to them
Posted: Tue Mar 17, 2009 3:23 pm
by colonialc19
Posted: Tue Mar 17, 2009 3:35 pm
by Murry
Posted: Tue Mar 17, 2009 3:54 pm
by BassMunn
Hehehe, that's the look
Classic photo
Posted: Thu Mar 19, 2009 9:15 am
by sideslippa
Hey Bassmunn...very nice fillets
. I like your build and I like this boat. I am already thinking of next boat and I've only justed started on OB17! At this stage your boat would be my next choice.
I have a goal set to have the OB17 in the water by January 2nd 2009. How long do you think it will be before your Phantom is afloat?
regards Slippa.
Posted: Thu Mar 19, 2009 6:02 pm
by BassMunn
Thanks Slippa, your fillets aren't looking too bad either
Your goal sounds realistic. I started on the 3rd Oct 2008 and I was shooting for the end of Dec 2008 - Yeah Right
Although my boat looks pretty far along, there is still a ton of work to be done on it and it's taking much longer to do than the main hull part. The fact that I'm doing such a drastic redesign to the decks doesn't help much either, there is just so much more to do. If I had built it standard I would have the decks on by now. But when it's done it will be one luxurious Bass fishing machine - I hope
It might also sink because it weighs too much
Posted: Thu Mar 19, 2009 6:12 pm
by BassMunn
Update
Installed the cooler box tonight, doesn't look like much yet, but it all gets hidden and made pretty once the bench panels are installed.
Sorry about the pic quality, had to use my cellphone as my son stole the batteries out of my camera to use in his torch and now I can't find the torch
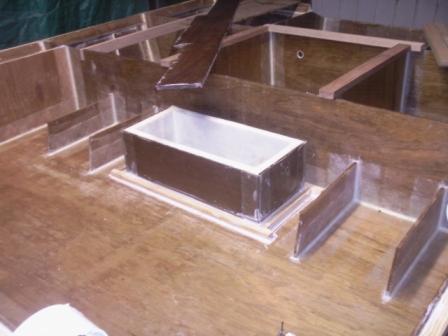
Also started installing the deck cleats, there are so many of them, EEEK!
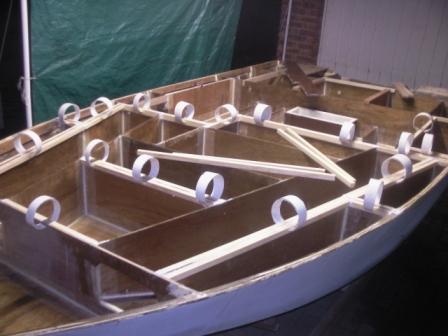
Figured that's enough for tonight, it's freezing cold and raining here, well freezing for us anyway
Posted: Thu Mar 19, 2009 6:15 pm
by wegcagle
Shannon,
You've been busy. That installed cooler box looks REALLY good, and I'm sure will be able to hold plenty of cold.....beverages
Not to mention fish. I also like the use of those PVC clamps. You'll have the deck on in no time at this speed.
Will
Posted: Thu Mar 19, 2009 6:21 pm
by BassMunn
I have a few questions if someone could give me some advice.
I need to install insulation into my livewell. The best stuff I can find is Extruded Polystyrene (much stronger than expanded, similar to Depron foam), what I'm not sure about is how many layers of glass cloth do I need to lay over the stryrene to give it enough strength to withstand the water pressure?
The sheets will be glued to the inside of the existing livewell walls and I will fillet the corners as normal, so the sheets won't be able to bend under pressure the glass just needs to be rigid enoug so as to not allow dents to form in the styrene.
Posted: Thu Mar 19, 2009 6:27 pm
by BassMunn
wegcagle wrote:Shannon,
You've been busy. That installed cooler box looks REALLY good, and I'm sure will be able to hold plenty of cold.....beverages
Not to mention fish. I also like the use of those PVC clamps. You'll have the deck on in no time at this speed.
Will
Thanks Will
I'll be honest I lost a bit of momentum recently, but after laying my deck panels on the hull just to have a look, I got my inspiration back.
Those PVC clamps work really nicely as they don't put too much pressure on the parts, just enough to hold the part in place (and they're cheap
)
Posted: Thu Mar 19, 2009 6:27 pm
by Cracker Larry
I used about the same type of foam, then lined the inside of the baitwell with 1/8" ply. Fileted and 12 oz. tape on the seams, and a layer of 12 oz. biax on the sides. I didn't want to trust the glass alone to protect the soft foam.
Posted: Thu Mar 19, 2009 6:35 pm
by BassMunn
Thanks Larry - That sounds like a better idea, I was feeling a little uneasy about the glass directly on the foam. I've got to get another sheet of ply next week so I'll pick up a 1/8 at the same time.
Thanks
Posted: Thu Mar 19, 2009 8:47 pm
by peter-curacao
Your building a great looking boat and I know you won’t see it later but I really like the color of the wood you used
Posted: Thu Mar 19, 2009 9:24 pm
by wegcagle
Yea Shannon,
I'm with C.L. on this. My plans are to do the same thing. I will use 1/8" ply to line the inside of my livewell, with foam around it. and I will use fiberglass tape and whatever cloth I have left to do the inside. It's an extra step, but in the world of boat building what's one more thing to do
Will
Posted: Fri Mar 20, 2009 6:44 pm
by BassMunn
Thanks Peter, yeah that wood looks really nice, it's funny my 6mm sheets and 12mm sheets looked the same but the 9mm sheets were much lighter in color. They are all Meranti Marine Ply,I actually fought with the wood shop about it thinking that they had supplied me something else, but I have since learnt that you get a fair variation in colour of the Meranti, even in the solid wood pieces.
Will you're right what's one more process in this boat building thing, besides that compartment is the most important in the boat - That's the money box
Re: BassMunn's PH16
Posted: Wed Mar 25, 2009 11:06 am
by D2Maine
nm
Re: BassMunn's PH16
Posted: Wed Mar 25, 2009 1:05 pm
by BassMunn
ttt?
Re: BassMunn's PH16
Posted: Wed Mar 25, 2009 1:14 pm
by D2Maine
nm
Re: BassMunn's PH16
Posted: Wed Mar 25, 2009 1:24 pm
by BassMunn
Sorry just read about what you were doing, Thanks
Re: BassMunn's PH16
Posted: Mon Mar 30, 2009 7:19 pm
by BassMunn
Trying to figure out what to do with photos, so thought i would try photo bucket and see if it works.
Deck cleats complete, still need to glue down the seat base tops

Cooler box is in but still needs to be completed and lid completed, but you get the idea

Common dad, get this things finished already so that we can go and catch 1 or 2
My son stands in the boat and casts into my Koi pond, at 4 years old I'm really impresses with his ability to put a bait where it needs to be. Can't wait to take him fishing in this boat.

A different angle

I've also been playing around with some soft plastic baits, got 2 molds (Fluke and Senko) and plastisol from the US and made a few baits for myself. The frog mold I made myself. Great fun especially when you smack the fish on them
These baits where my first attempt, I've been making my own jigs, spinnerbaits and buzzbaits for about 3 years but this was my first shot at soft plastics (actually a lot easier and quicker than the lead baits)

I've got a tournament on this weekend and I'm having to spend a lot of time doing normal work, so I'll update when I've done something new.
Cheers
Shannon
Re: BassMunn's PH16
Posted: Mon Mar 30, 2009 7:53 pm
by TomW
Nice looking baits Shannon. As good as some of the store baits. Good luck in the tournament. This time of year is probably prime time down there. We are about a month or so away.
Our trout season starts nexts week I fish ultra-light for them 1/8 oz. spinners 2-4lb line.
Tom
Re: BassMunn's PH16
Posted: Mon Mar 30, 2009 8:02 pm
by BassMunn
Thanks Tom, they also work just as well as the best on the market so I'm really chuffed.
We are just starting to go into our autumn pattern, so the bass are up shallow chasing baitfish and there is a good topwater bite - My kinda fishing
2-4lb line - now that's sport, gotta love the light stuff
Re: BassMunn's PH16
Posted: Mon Mar 30, 2009 8:24 pm
by colonialc19
Shannon,
The boat is lookn' great and those baits as well, the color of those baits would work sweet around here, kinda watermellon, I've caught some nice striped bass on the fluke and frog in the saltwater, especially at night. You sure know how to keep busy
.
Keep up the good work,
Daniel
Re: BassMunn's PH16
Posted: Mon Mar 30, 2009 9:43 pm
by Fonda@kauai
Looks good Shannon
That's a lot of cleats
Re: BassMunn's PH16
Posted: Mon Mar 30, 2009 10:01 pm
by wegcagle
Hey Shannon,
Boats looking incredible. Also that's a professional job on the soft plastics. Do they last longer than the store bought
I'm personally a big fan of superflukes. Over this way in farm ponds they are tough to beat, and alot of fun to work. Tell your boy if he will pick up the sander for a little bit it will put some meat on his bones.
Will
Re: BassMunn's PH16
Posted: Tue Mar 31, 2009 1:15 am
by chicagoross
Re: BassMunn's PH16
Posted: Tue Mar 31, 2009 1:27 am
by TomW
Shannon I haven't used anything over 6lb line in over 30 years. I broke protecal when I fished at CR last year and went to 12 lb line for salt water but that was the only time. Never again, just didn't feel right. Rod to big, reel to big, etc. I couldn't cast were I wanted to. Nothing felt right. I'm going down this year ready with what I'm comfortable with.
During that period I have caught 6-8 lb bass, 6-12lb catfish, a 19 lb northern pike and numerous others inbetween. It just takes longer.
A guide came in to the tackle store I frequent today with pictures of a rainbow trout that he caught on 2lb line took him 45 min to land and release 25" 7-1/2lbs. That's my kind of fishing.
Tom
Re: BassMunn's PH16
Posted: Tue Mar 31, 2009 10:12 pm
by BassMunn
colonialc19 wrote:Shannon,
The boat is lookn' great and those baits as well, the color of those baits would work sweet around here, kinda watermellon, I've caught some nice striped bass on the fluke and frog in the saltwater, especially at night. You sure know how to keep busy
.
Thanks Daniel, it was my first attempt at Watermelon with Purple and Gold flake (like Zoom Mardi Gras), but the flake was too small so it didn't come out exactly the same, but the fish don't seem to mind. For me it's any color as long as it's Watermelon
Fonda@kauai wrote:Looks good Shannon
That's a lot of cleats
Thanks Fonda, Tell me about and I've still got to sand and coat them
wegcagle wrote:Boats looking incredible. Also that's a professional job on the soft plastics. Do they last longer than the store bought
I'm personally a big fan of superflukes. Over this way in farm ponds they are tough to beat, and alot of fun to work. Tell your boy if he will pick up the sander for a little bit it will put some meat on his bones.
Thanks Will
I love the Super Fluke, by far my most productive soft bait.
Will I tried, he just looks and me and says "No it's alright I'll carry on fishing" - Go figure
Thanks Ross.
I could have made it less intricate, but I'm only going to build this once, so it's getting all the little goodies and as you say it makes it stronger too.
And you're right, now I definately can't ask why I used more resin
I hope I haven't over built it and made it a barge, but I think it should be OK. The shallow water ability isn't really that important to me, so an extra inch or two of draft won't worry me, I might just need to get a bigger motor
If my son had to fish where you are he would probably get pulled over board
But I think one day I wanna come and get me some of that action
TomW wrote:Shannon I haven't used anything over 6lb line in over 30 years. I broke protecal when I fished at CR last year and went to 12 lb line for salt water but that was the only time. Never again, just didn't feel right. Rod to big, reel to big, etc. I couldn't cast were I wanted to. Nothing felt right. I'm going down this year ready with what I'm comfortable with.
During that period I have caught 6-8 lb bass, 6-12lb catfish, a 19 lb northern pike and numerous others inbetween. It just takes longer.
A guide came in to the tackle store I frequent today with pictures of a rainbow trout that he caught on 2lb line took him 45 min to land and release 25" 7-1/2lbs. That's my kind of fishing.
Tom
Tom I have to take my hat off to you, fishing with 2-4lb line takes a lot of angler skill to land those size fish - 19lb Pike
, 8lb Bass
. Light line is wonderful for casting and working a lure though.
With tournament bass fishing we generally use much heavier line, but I enjoy taking a knife to a gun fight so to speak
I remember going down to our harbour a few years ago, heavy tackle in tow and sitting watching a guy proceed to smash the fish out from under my nose with ultra light tackle. I pulled him aside that day and asked him to teach me, which he did.
After that every time I went down there all the other anglers would chuckle and make comments about my 6ft rod with a 1000 series spinning reel and 4lb line, that was right up until my first 7-8lb Springer (I think you call them Ladyfish) would explode out of the water, that kept them quiet for a while
I catch and release almost all of my fish so all I am there for is the fight, ligt line just makes it that much more memorable.
Obviously if you're fighting reef donkeys like ChicagoRoss it's time for the big stuff, but we'll still try
Re: BassMunn's PH16
Posted: Thu Apr 02, 2009 5:38 am
by BassMunn
Hey how'd I get down to page 2? More funny date things happening
Re: BassMunn's PH16
Posted: Mon Apr 06, 2009 3:08 pm
by BassMunn
Well I've officially run out of steam and have done almost nothing on the boat for the last week.
Just popped the deck panels on the boat to see what it looks like. The back deck is not ply I still need to get the last sheet.
You'll notice that the gunwale on the starboard side is narrower than the port side, I've done this for 2 reasons - The starboard side needs the extra clearance for the engine controls and I wanted the Port side nice and thick, so that rods can be layed on it for the angler fishing off the rear deck.
The plastic chair is just there to give an idea of size, it will not be used on the boat.


I still have a fair amount of work to do inside the hatches before I start on the hatch lids.
SWMBO has given me permission to work the Easter Weekend on the boat
I wrote a list out the other night of what I still need to do on the boat and it's still huge
, I now understand why guys take 2 to 3 years to build their boats
Re: BassMunn's PH16
Posted: Mon Apr 06, 2009 7:07 pm
by chicagoross
I wrote a list out the other night of what I still need to do on the boat and it's still huge
Oh yeah...the funny thing is as you start checking things off that list, you will also keep adding to it. Lots of little things become evident as the boat nears completion. Fitting the boat out is a lot of detail work - and you've set some pretty high standards on how this boat is to be customized! Oh well, after a week off you should be ready to bet back to it.
Looking good!
Re: BassMunn's PH16
Posted: Tue Apr 07, 2009 3:04 am
by BassMunn
chicagoross wrote:I wrote a list out the other night of what I still need to do on the boat and it's still huge
Oh yeah...the funny thing is as you start checking things off that list, you will also keep adding to it. Lots of little things become evident as the boat nears completion. Fitting the boat out is a lot of detail work - and you've set some pretty high standards on how this boat is to be customized! Oh well, after a week off you should be ready to bet back to it.
Looking good!
You ain't kidding, everytime I spend more than 5 minutes looking at the boat I think of something else to add to the list and each thing I add will take from a full day to maybe a full week to finish
and that doesn't include the fairing
Re: BassMunn's PH16
Posted: Tue Apr 07, 2009 6:58 am
by Murry
You'll make it Shannon!
Re: BassMunn's PH16
Posted: Tue Apr 07, 2009 8:28 am
by wegcagle
She's looking great Shannon. You'll be cruising with the family and a boat full of fish before you know it. Besides there are plenty of us out there who would kill to be at your stage right now.
Will
Re: BassMunn's PH16
Posted: Tue Apr 07, 2009 10:55 am
by BassMunn
Thanks for the encouragement guys
I think I need to do a bit of building tonight to make myself feel better
Re: BassMunn's PH16
Posted: Tue Apr 07, 2009 1:18 pm
by Fonda@kauai
Baby steps, baby steps...
Looks killer Shannon, you're in the home stretch. If all else fails, take a week off and come back with a fresh eye.
Re: BassMunn's PH16
Posted: Tue Apr 07, 2009 7:58 pm
by Jimmiller
I been working on my for 4 years my is phantom18 I like your work look clean and nice deck too.
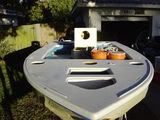
JIM
Re: BassMunn's PH16
Posted: Tue Apr 07, 2009 9:53 pm
by Doug
You are half way there
Re: BassMunn's PH16
Posted: Wed Apr 08, 2009 2:04 pm
by Jimmiller
I'm over half way a little sanding and i can put paint on the deck.
JIM
Re: BassMunn's PH16
Posted: Wed Apr 08, 2009 6:28 pm
by BassMunn
Thanks Fonda, Jimmiller and Doug.
4 years, Ok now I don't feel so bad
Doug I thought I was about 75% into the build until I wrote down everything that I still need to do, half way sounds about right.
Spent 4 hours last night cleaning my garage out, I couldn't find anything anymore
Tonight I finally glued my seat base tops down, cut all the holes for my chase tubes, and cut out the last pieces needed to complete my bow compartment. Not a whole lot but I've got the rythym going again
Re: BassMunn's PH16
Posted: Wed Apr 08, 2009 8:26 pm
by captj13
Your build brings back lots of memorys bassmunn .... keep at it! You are almost there!
Re: BassMunn's PH16
Posted: Sun Apr 12, 2009 12:18 am
by BassMunn
Thanks captj13
After getting my butt kicked at last weekends tournament, I decided it's time to put a little more practice in for my tournament fishing, hit the water yesterday and managed a 25lb 5 fish bag, my best for the day a 7 pounder

Did a little boat building on Thursday night by installing the cleats in the bow area and just doing little things here and there on the boat. Will work a little more on Monday.
Re: BassMunn's PH16
Posted: Sun Apr 12, 2009 12:49 am
by peter-curacao
Nice catch seems you deserve your nickname
Re: BassMunn's PH16
Posted: Sun Apr 12, 2009 2:17 am
by TomW
Nice fish under any circumstances!
Tom
Re: BassMunn's PH16
Posted: Sun Apr 12, 2009 5:55 pm
by BassMunn
Thanks Peter and Tom, let's just hope I can do that again in the next tournament. It's always more difficult to find those bigger fish when there are a hundred boats on the water. Our resevoirs are small in comparison to what you guys have over there so fishing pressure is becoming a pretty big problem during tournaments.
Re: BassMunn's PH16
Posted: Sun Apr 12, 2009 8:08 pm
by wegcagle
25 lbs on 5 fish??? That's goods numbers even on the Bassmaster tourneys. Keep kicking butt, and remember when you get done with the phantom; that poundage will continue to increase
congrat,
Will
Re: BassMunn's PH16
Posted: Mon Apr 13, 2009 9:19 am
by cape man
I was originally all bummed out when I didn't finish my boat for Christmas and my annual 1st week of January trip, but am now in a different groove all together... boat building is fun! That's why we are doing it! When you're done building, sure you will have a boat you built, but you will be done building. Take your time and enjoy it while it lasts. Been just over a year on mine and I think I have at least two more months at the pace I'm going. Getting real close, but not going to hurry at this point.
P.S. nice bass and good creel for the day.
Re: BassMunn's PH16
Posted: Mon Apr 13, 2009 5:26 pm
by BassMunn
Thanks Will and Cape Man.
Cape Man I think you're right once I'm finished I think I will feel a little lost because I won't have this burning desire to finish something on the boat. Although I have already had hints thrown at me about building a Pirate ship jungle gym and a boat bed, so I don't think I'm gonna have much free time so to speak
Apparently the family now thinks that I am a carpenter
Spent the day today doing a whole lot of sanding, firstly just cleaning up chase tube holes and the like, but then spent the rest of the afternoon sanding and cleaning every single panel left open to the air, getting them ready for their final seal coat of epoxy before the hatches get their primer coat. I've got serious fibreglass Itch tonight
Re: BassMunn's PH16
Posted: Mon Apr 13, 2009 9:42 pm
by wegcagle
I will say that as a man I hate all lotions with a passion, but as a man who has had his fair share of fiberglass itch, since starting this project, a thick dose of Aveeno lotion to the itchy areas right before bed feels a little like heaven.
Will
Re: BassMunn's PH16
Posted: Fri Apr 17, 2009 6:52 pm
by BassMunn
Snuck in a few hours of work on the boat this week
Finished giving all the hatches a roughen up sanding and then did the final epoxy coating to every single nook and cranny I could find. Laid 2 more layers of cloth in the livewell, just to make sure it's strong enough
and finished glassing my seat base plates in place. Used my last 1.5 Gallons of resin, so it's off to the shops next week again.
I'll leave the resin to cure properly until next weekend, then wash all the horrible amine blush off, give it a light sanding and then spray primer and paint into all the hatches. Oh and fair the inside of my livewell before painting, that should be fun
(I've got some nasty edges that need to be taken care of)
I guess in this next week I'm gonna have to start figuring out how to do this hatch lid story, I'll start first by just trying to get the hatch cutouts in the right place - I can see me having a hatch lid that spans halfway over two hatch compartments
Gonna have to measure 4 times and cut once as so many people suggest here.
Re: BassMunn's PH16
Posted: Sun Apr 19, 2009 7:40 pm
by wegcagle
Although I have already had hints thrown at me about building a Pirate ship jungle gym and a boat bed, so I don't think I'm gonna have much free time so to speak Apparently the family now thinks that I am a carpenter
In the middle of my project I had an "emergency" request from my Brother in law for a weather proof "boat" that will be used as a sandbox. He only gave my 1-2 week notice before my nephew's birthday. I just couldn't bring myself to do a crappy job. So I built an 8ft boat similar in shape to the FS 12 with exterior ply and epoxy, stitch and glue style. I tested it's seaworthyness in my Father-in-law's pool. My wife and I were able to paddle around the pool pretty good. That was around 300lbs. Not too shabby for a non engineer I thought.
I can see me having a hatch lid that spans halfway over two hatch compartments Gonna have to measure 4 times and cut once as so many people suggest here.
As quality as your work's been so far, I'm sure they'll turn out great. The good news is if you screw up you can still glue the plywood back together with epoxy/ fiberglass, give it a day to dry and recut. Ask me how I know that
Will
Re: BassMunn's PH16
Posted: Tue Apr 21, 2009 3:52 pm
by BassMunn
wegcagle wrote:
As quality as your work's been so far, I'm sure they'll turn out great. The good news is if you screw up you can still glue the plywood back together with epoxy/ fiberglass, give it a day to dry and recut. Ask me how I know that
Will
Thanks Will, Yip you're right there ain't much that we can't stick back together
Epoxy is wonderful stuff.
We're having such horrible weather here at the moment that every time I go outside to start some work, I look at the boat for 5 minutes and go back inside. I have to wash all the amine blush off and I don't feel like getting wet in this cold
Tomorrow is our big voting day, so I'll do the voting thing and then rush back and start some work on the boat seeing as though we have the day off
Re: BassMunn's PH16
Posted: Wed Apr 22, 2009 6:45 pm
by BassMunn
Too cold and windy to do any work today - OK I was feeling lazy too
Been thinking about what still needs to be done on the boat and I have a question - When I glue down the deck panels, do I glass over the edges? I figure I would have to or atleast should but I don't remember reading it anywhere.
The other problem I have is that my sides have already been faired and primered, I take it that I would have to sand all the primer and fairing compound off that area to lay the biax tape?
What's the consensus?
Thanks
Re: BassMunn's PH16
Posted: Wed Apr 22, 2009 7:35 pm
by chicagoross
I rounded them over and glassed them as do many; apparently it's an option left to the builder. May be different on the phantom. Paint should be sanded off before epoxying to it. Shannon, did you add rubrails? (or are you going to?)
Re: BassMunn's PH16
Posted: Wed Apr 22, 2009 8:00 pm
by BassMunn
chicagoross wrote:I rounded them over and glassed them as do many; apparently it's an option left to the builder. May be different on the phantom. Paint should be sanded off before epoxying to it. Shannon, did you add rubrails? (or are you going to?)
Not yet, I was planning on installing one of those aluminum rubrails (I think they're aluminum), the black ones
I think it's gonna get glassed, don't trust just the glue to hold the deck down - what's one more week of sanding
I will have to fair that area anyway once I have installed the gunwale strips (I think that's what you call em), so it just means me fairing a little down the sides.
Re: BassMunn's PH16
Posted: Wed Apr 22, 2009 10:12 pm
by wegcagle
I took a look at my plans Shannon, and they recommend using 4inch weaved tape on filets at the edges. Sorry
Just remember when you are hauling tail at mach 1 across the lake, you don't want your deck flying off
The one repeated statement on this website is that people only regret the "shortcuts" they made. I know I am still regretting mine.
Will
Re: BassMunn's PH16
Posted: Thu Apr 23, 2009 7:08 am
by Murry
I'd tape em' up.
Re: BassMunn's PH16
Posted: Thu Apr 23, 2009 8:21 pm
by BassMunn
wegcagle wrote:I took a look at my plans Shannon, and they recommend using 4inch weaved tape on filets at the edges. Sorry
Just remember when you are hauling tail at mach 1 across the lake, you don't want your deck flying off
The one repeated statement on this website is that people only regret the "shortcuts" they made. I know I am still regretting mine.
Will
Very true, no shortcuts allowed. Don't want no airbrakes
Re: BassMunn's PH16
Posted: Thu Apr 23, 2009 8:33 pm
by BassMunn
One piece of advice that I can give any boat builder out there is to make sure that the epoxy that you buy does not blush.
Geezz I just spent 4 hours trying to clean the amine blush out of all of my hatches, it's horrible stuff and just gives you extra work.
But atleast it's done now, I was just going to do a light sanding and then spray the hatches, but I'm finding too many sharp edges so those are going to get sanded down first. I also need to fair the livewell and the cooler box, so painting is being put off for a while.
Going to collect my last piece of ply and some more epoxy tomorrow and Monday is a public holiday here so guess what I'm gonna be doin
Re: BassMunn's PH16
Posted: Thu Apr 30, 2009 8:03 pm
by BassMunn
Been doing a fair bit of work on and off this last week - My virus is back (BBV)
Drew and cut all my hatch lids out this week.
I made a right stuff up when I designed my front hatch layout as I didn't take into account how much smaller the lid openings would be once the water drains had been installed
So I landed up having to cut the openings right up against the cleats to allow for big enough openings. After cutting it dawned on me that I now have no deck piece to glue my lips onto
I feel like a right twit and have called myself every name that I could think of. I have 2 ideas to fix this, 1 easier, 1 stronger - guess I'll be doing more work, I don't like the idea of falling through my deck.
Atleast I got my back deck right - wonders never cease
Here's how it looks now

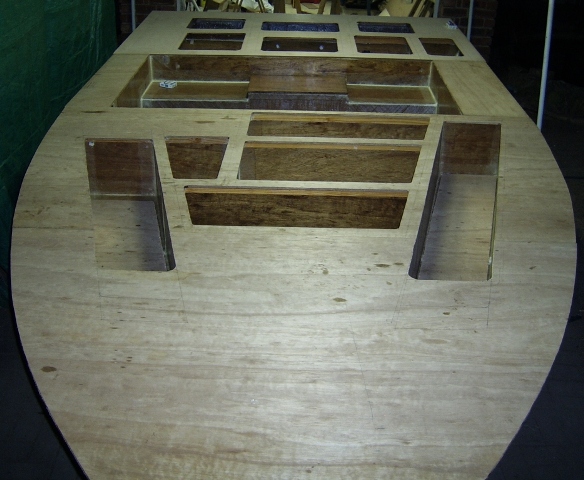
Re: BassMunn's PH16
Posted: Thu Apr 30, 2009 10:49 pm
by wegcagle
Wow Shannon.
That is one HUGE deck. I think seeing my boat turn out that way would bring back the BBV pretty intensely too
She looks incredible. Are you putting in factory hatches or did you cut your own??
She's coming together nicely,
Will
Re: BassMunn's PH16
Posted: Fri May 01, 2009 6:30 am
by cape man
I didn't take into account how much smaller the lid openings would be once the water drains had been installed
I spent at least three days glueing a small stiffener on the underside of my hatch lids, sanding, epoxying, and painting...they looked great, were laying flat, and I was proud. Then I tried to dry fit them in the openings... 3 out of 4 would not fit! The stiffeners were not measured to take into account the lips making the opening smaller!
The seat opening on the forward part of the console was JUST barely large enough to get my batteries into as well. Yeah... sometimes it is very hard to think in advance when you are working without the plans. When you are done you will have a very custom look and it will all be worth it. Perhaps we can establish a thread that is devoted to building your own hatches and drains.
Boat looks awesome!
PS I taped the snot out of my decks and laid glass on top as well. Will be spending a lot of time up there, my kids drop the anchor a lot, and the flex of the sides while pounding through the waves made me go the extra step. Took a lot more material (glass and epoxy) than I wanted, but doesn't it all. Only want to build this boat once.
Re: BassMunn's PH16
Posted: Fri May 01, 2009 12:03 pm
by Murry
The decks look amazing Shannon
. Sorry to hear about the misshap on the hatch/support figuring.
Maybe you coud glue the hatch supports to the frames instead of the decks. It's all going to be the same structure once glued anyway. Just make them large enough so that you can shape the supports once you've glued the decks down.
That would certaintly give you the widest opening although faring and designing drains would be more difficult. That option may not even work for you, but it may give you some additional ideas to help you make a good decision.
I'm sure you'll come up with a good plan and it will look and work great when you finish. Good Luck.
Daniel
Re: BassMunn's PH16
Posted: Sat May 02, 2009 5:51 pm
by BassMunn
Thanks Will, Cape Man and Daniel.
Sorry for the slow reply from me, just finished a tournament today and I'm kinda burnt out. Lost 3 x 5 pounders today
. You just can't come back from that many misses, landed up finishing with a 13lb bag, kinda dismal when it should have been over 20
Oh well get em next time
For fixing my hatch mistake, I'm tossing around the idea of:
1. just glueing extra strips to the sides of the cleats with channeling in them, my concern over this is that I'm not sure if that joint will be able to hold the extra stress and weight. Or
2. to remove the cleats already installed, cut the hatch walls down by 18mm (double 9mm ply ), reinstall the cleats at the lower level and then glue down hatch supports made of ply strips that would span across the hatch walls (these would have the water channeling already built in) and then just glueing the deck down on top of these. Maybe I need to do a drawing to explain myself (tomorrow, too tired now). This would be much stronger and would look like a production bass boat hatches where all the hatch channels could be interlinked to drain water easily into the cockpit, but it is way more work. I'm thinking the extra work would be worth the effort?
What you guys think, or do I need to sketch that picture?
Cheers
Shannon
Re: BassMunn's PH16
Posted: Sat May 02, 2009 9:35 pm
by chicagoross
It's your baby, Shannon - do it the way you really want it. At this point in the build, there's a bit of you that wants to rush the boat into the water. Don't listen - you'll be going into boatbuilding withdrawal soon after the launch anyway. Fitting out takes a lot of time and thought anyway, might as well do it the way you want it - better than a production boat. Seems like you're fishing, anyway, so the boatbuilding isn't keeping you off the water!
Re: BassMunn's PH16
Posted: Sat May 02, 2009 10:29 pm
by wegcagle
It's your baby, Shannon - do it the way you really want it.
I agree with this completely. BUT I will say that if you glue strips to your already existing cleats the epoxy putty/glue will be stronger than the wood around it...so Joel says. I gotta admit that I didn't believe this statement at first, so I set up an experiment. I made a sanding block out of 3/4" oak ply puttied to 2 2x2" pieces of scrap white pine for handles. Extra pieces laying around the house, but I figured I would either find out the true strength of epoxy or I was out $3-4 in crap....I mean scrap wood
I didn't even precoat with epoxy, I just used some extra System 3 putty while I was puttying in my frames. I gave it about 3-4days of hardeneing time. I checked it today. I'm a short but reasonably stong guy who works out regularly and can bench press around 225 lbs. and I pulled and tugged on that sanding block today until I thought I was going to blow an aneurysm to break that wood. Finally, one of the 2x2" arms broke.....and not at the epoxy
It was in the middle of the arm. I'll try to download some pics of it tomorrow. Needless to say I was impressed.
I just say this to let you know that this epoxy stuff is dang impressive.
Re: BassMunn's PH16
Posted: Sun May 03, 2009 10:34 am
by cape man
the epoxy putty/glue will be stronger than the wood around it...so Joel says.
Shannon,
It's not just Joel and Wegcagle. The epoxy wood flour mix is NOT coming loose. The wood will break first. I like your first idea as you could fairly easily build those with drain channels and a groove for a gasket that would also match up with lips put in underneath where you don't have the issue. With the size of your hatches, you will have a large surface area to apply the glue. Do it right and no one will know except you (and everyone who reads this
). If the cleats are glued properly, and the deck glued down to them, the lips will hold fine. Removing the cleats sounds like an uneaded step.
With all that said, also agree to do what you want and make sure you are happy with the solution. Long time ago I realized this project is more about the process, and cutting any corners is prohibitted. The end product will only be as good as you make it, and rebuilding or repairing afterwards will be a lot harder than doing everything right from the beginning.
Sorry about losing the bass, but at least you're fishing!
Re: BassMunn's PH16
Posted: Sun May 03, 2009 1:59 pm
by Jonny
BassMunn, Looking really great! It inspires me to forge on. Tipping one up in ur honor.
Jonny
Re: BassMunn's PH16
Posted: Sun May 03, 2009 7:52 pm
by BassMunn
Guys thanks for the comments and suggestions
I am aware of the strength of the epoxy glue, before I started building my boat I did a trial test on 2 pieces of 9mm external ply. I wanted to practice my fillets so I stuck the 2 pieces together at a 90 degree angle, filleted and taped them. The next day which is obviously not anywhere near full strength for the epoxy, I tested the piece for strength, put it at a 45 degree angle and jumped on it. I weigh 220lb and apart from almost breaking my ankle, I had to jump on that piece about 8 times before the ply eventually de-laminated, the epoxy joint showed absolutely no sign of failure.
What my concern was is that I am going to be extending my cleats so to speak, causing a leverage action to take place and I'm concerned that the wood will split. What I had forgotten about was that the cleat will also be glued to the deck panel, giving it extra strength.
I've thought about doing my No.2 option and it does sound like overkill and will also possibly cause other problems that I haven't thought about.
Here is a drawing of my suggestion No.1
(Black is existing, Red is the plan or lack thereof
)
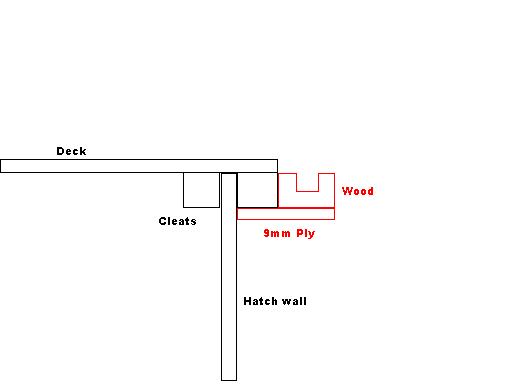
As you can see I have no deck panel that will be holding the hatch lip, so I thought of just adding a piece of ply underneath it to help with support.
Do you guys think this will work?
For my back hatches, I'm using this method.
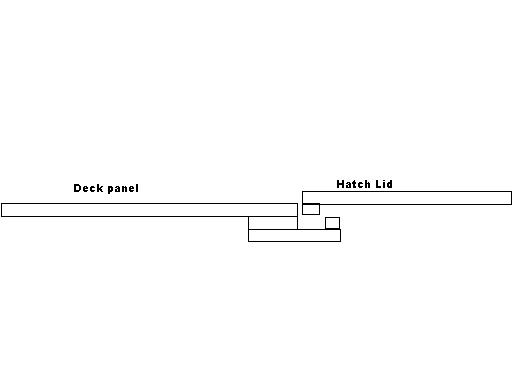
It's all 9mm Ply.
I don't have a router or much lumber left, but I have plenty offcuts of ply, I also prefer using ply where I can for weight and strength.
It is the simplest solution that I can come up with, the water channel might be a bit shallow (9mm), but it should work.
I will obviously take the edges off and make it look pretty once it's all glued up.
I've nearly finished the hatch lips on the back deck already, I'll finish it off tomorrow after work and post some pics
Re: BassMunn's PH16
Posted: Sun May 03, 2009 9:37 pm
by cape man
Wish you had posted this months ago!!!
Love the simplicity of the drain channels and 9mm is almost 2X deeper than my drain channels. The strip of 9mm hanging on the edge will also serve as a drip line, something I didn't do. Hoping my gaskets will hold the water back.
Also can not find anything weak with your plan for where the cleats are too close. Laminated like that it is as strong or stronger than if you glued a lip under the deck.
Re: BassMunn's PH16
Posted: Mon May 04, 2009 1:32 pm
by BassMunn
cape man wrote:Wish you had posted this months ago!!!
Love the simplicity of the drain channels and 9mm is almost 2X deeper than my drain channels. The strip of 9mm hanging on the edge will also serve as a drip line, something I didn't do. Hoping my gaskets will hold the water back.
Thanks Cape Man
, I thought it was quite an ingenious plan
, but I wasn't sure if someone had thought of it already, so I kept quiet
It is really easy to make them like this as well, I've almost finished my back deck hatches after 2 days of work on it.
I will still put drain pipes in them like you did.
cape man wrote:
Also can not find anything weak with your plan for where the cleats are too close. Laminated like that it is as strong or stronger than if you glued a lip under the deck.
OK Cool
that will make life easier. Back to it
Re: BassMunn's PH16
Posted: Mon May 04, 2009 3:45 pm
by Murry
Looks good to me too.
Keep in mind who I am though, not a professional.
Re: BassMunn's PH16
Posted: Tue May 05, 2009 6:12 am
by cape man
Keep in mind who I am though, not a professional.
We are all professionals. Maybe just not professional boat builders
Re: BassMunn's PH16
Posted: Mon May 11, 2009 8:23 pm
by BassMunn
OK the hatch lips take a lot longer to make than I thought
All the hatch lip frames are installed on the back deck, I still need to install the lips on them and then start on the front hatches.
We had a massive storm on Thursday last week that lasted the whole of about 10 minutes, but the wind blew so hard that even though my boat is covered under a temp carport it drenched the boat. The problem is that I had all of my deck and hatch panels set up on the boat and none of them have been coated yet. Needless to say I spent a frantic hour after the storm trying to dry as much water as I could off the wood. So for 2 days I didn't touch any of that wood just to make sure it has dried out properly (and it's packed nice and snug back in my garage).
Spent yesterday doing a final sanding in all the hatches, just to knock down any points and rough edges, didn't really need it as most of it gets carpeted, but I'll know it's there (funny I never used to be like this).
Spent some time tonight fitting a few more cleats (the last ones), I hadn't fitted them yet because I needed to sort my hatch lip story out first, just wanted to make sure everything fitted properly.
I also laid down fairing compound in the livewell and cooler box and started on the seat bench.
I'll get back to it tomorrow night.
I have a question for all you boat builders/designers.
I'm thinking ahead again.
I want to install a Inwale/Gunwale (not sure what the correct term is) once my deck is down, bass boat style.
Like this
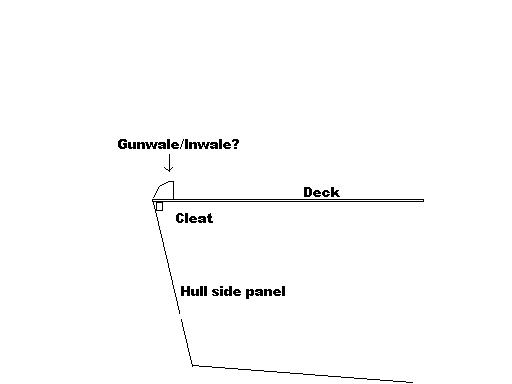
But I'm not sure how to tackle this part of the build.
Do I just purchase some lumber, bend it to fit and then shape it?
Or use strips of ply built up around a series of small supports?
The lumber sounds like the easier method initially but might be too heavy? and the shaping could be a nightmare
What suggestions do you guys have?
Thanks
Shannon
Re: BassMunn's PH16
Posted: Mon May 11, 2009 11:56 pm
by TomW
Shannon my only question is if you put that there all the water will drain into the boat instead of off the decks and you have BIG decks.
If you want to do it I'd do it of built up ply, it is more flexible and you could use a plane to shape it after you have it on.
Tom
Re: BassMunn's PH16
Posted: Tue May 12, 2009 6:02 pm
by BassMunn
Thanks Tom. Water on the decks isn't really a problem here, we fish fairly small waters that are very seldom over 1' chop.
I'm gonna be carpeting my deck which will look odd without the inwale and I'm more concerned about kicking 1 of my rods off the boat than anything else.
I also want to use the inwale to give the boat a bit more shape, there are just too many straight lines on this boat for my liking, time to give it it's "Batmobile" Look
Re: BassMunn's PH16
Posted: Tue May 12, 2009 6:11 pm
by TomW
Gotcha, I can see those rising up to 6" at the transom!
Tom
Re: BassMunn's PH16
Posted: Tue May 12, 2009 7:22 pm
by BassMunn
And don't forget the after burner
Re: BassMunn's PH16
Posted: Tue May 12, 2009 8:24 pm
by chicagoross
Easiest that I can think of that would look like your drawing would be glue down quarter round trim at the edge of the deck. No shaping required at all! But consider using half round, then you could run glass or a length of tape all the way over it easily, making a very strong gunnel, and easier to paint without the sharp edge.
Re: BassMunn's PH16
Posted: Tue May 12, 2009 8:25 pm
by chicagoross
I think that's called a toe-rail.
Re: BassMunn's PH16
Posted: Tue May 12, 2009 8:40 pm
by cape man
If you keep the wood 1" or less you should able to easily bend and clamp it to the sheer using the rub rail. I am building my gunwales with lumber in 1" strips. Cut enough to see if it would bend and clamp along the starboard side before going much further, and it worked fine. Took a LOT of clamps to get it down and shaped right, but it is going to work fine. Using the preformed stuff will save you some time.
didn't really need it as most of it gets carpeted, but I'll know it's there (funny I never used to be like this).
Aint that the truth!!!
Re: BassMunn's PH16
Posted: Tue May 12, 2009 8:46 pm
by BassMunn
Now you guys are making sense
I like the preformed strips idea, I might need to use one or two 1" strips to get the right height and spacing and then cap it with a preformed piece to save the shaping work and then just glass over the whole thing. I'm sure that extra little bit of weight won't be that much. Maybe I'll just have to put on a 150hp to get it on plane
Thank You
Re: BassMunn's PH16
Posted: Fri May 15, 2009 3:28 pm
by cape man
Maybe I'll just have to put on a 150hp to get it on plane
There's always a solution to every problem.
Re: BassMunn's PH16
Posted: Tue May 19, 2009 11:57 am
by Jonny
Hey BassMunn, How about a pool noodle cut in half length wise as a form to glass over for the inwale ? Cheap and less filling !
Jonny
Re: BassMunn's PH16
Posted: Tue May 19, 2009 4:29 pm
by BassMunn
Jonny that's a pretty good idea, that might just work on my boat - Thanks
Re: BassMunn's PH16
Posted: Mon Jun 08, 2009 6:42 pm
by BassMunn
Wow almost down to the bottom of page 2
Obviously not building fast enough.
It feels like I've got almost no where after the past couple of weeks, but my hatch drain channels have been an absolute nightmare to try complete. In hindsight it would have been much easier just to glue a strip of solid wood and route it than to stick all those nasty little pieces of ply wood together. Well at least they're done now, well almost I can only really finish them once the deck gets glued down.
The positive side is that they certainly aren't going anywhere.
Here's a shot of one of the centre channels with hatches on both sides
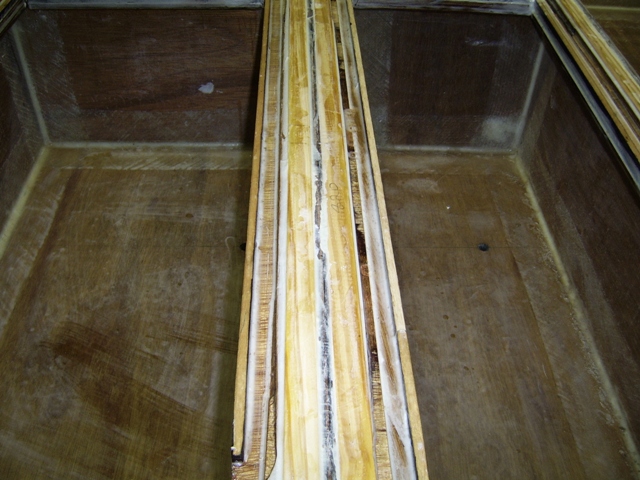
Also finally finished fairing my seat bench and cooler box
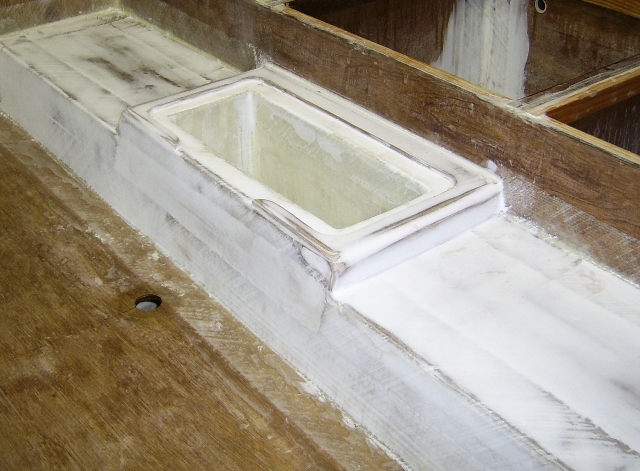
I spent a bit of time sanding some rough edges off the cleats and then had to recoat them with epoxy (I seem to like giving myself extra work - do it right the first time
), so I need to give it another 2 or 3 days to cure properly and then finally I can paint the inside of all the hatches. After that I can run all the chase tubes, wiring and install all the pumps and plumbing and then finally the decks can go down (with a whole lot of epoxy coating in between).
I've also started trying to fabricate my console - trying being the operative word. I'm shooting for a look similar to the Ranger Comanche consoles, but trying to bend 1/4" ply like that is fun to say the least. I can just see me loosing a tooth or two from a recoiling ply panel
I'll post some more pics as soon as the hatch painting is done and when I have something resembling a console.
Re: BassMunn's PH16
Posted: Mon Jun 08, 2009 9:47 pm
by wegcagle
Good to hear from ya Shannon. I know what you mean about trying to bend plywood. The best method I've seen is to cut parallel lines in the plywood horizontally along the areas of the greatest bend, then fill with epoxy putty and fair on top of that. For the 1/4" ply I would say set your circular saw at 1/8". Just a thought. I know some others have actually heated the ply up with steam, melting the glue, bending it to its shape. Then let it dry, followed by epoxying.
Will
Re: BassMunn's PH16
Posted: Tue Jun 09, 2009 8:50 pm
by Murry
I know your glad to have those hatch supports mostly done. Looking good Shannon
and good luck with the console.
Re: BassMunn's PH16
Posted: Wed Jun 10, 2009 8:04 am
by Jonny
BassMunn, the hatch lids look really good and your glassing of the stringers and bulk,s look really clean. I'm glad I lost my camera to the Tarpon. I've been looking for pumps and the likes lately so I'll be keepin a close eye on what you pick out. Its funny...I've had 4 or 5 different "Scout " boats and a few jon boats and have never paid much attention to the different types of baitwell and bilge pumps before. I just replaced as needed and usually with the same type. Now that I'm building my own boat I want the best for it.
Jonny
Re: BassMunn's PH16
Posted: Wed Jun 10, 2009 5:28 pm
by BassMunn
Will, thanks for the idea on the semi cuts. I have seen it used before but wondered how effective it would be. Well after using it last night I have to say that it really works well. I think it's called "kerfing"
Murry you have no idea how happy I am to be finished with those
Thanks Jonny, the glassing on my top deck looks way better than the ones underneath the sole, they're strong but untidy. After using 20 gallons of resin and over 200 yards of tape on this boat I could do it in my sleep now and be tidy.
(Well fairly)
The glue on the other hand is a whole different story. You won't beleive how many times I've stuck my shirt sleeve to the underneath of my arm
I'll post some pics once I've rigged and plumbed everything, but for now this is what I will be using.
Livewell filler pump - 750gph Attwood rigged to a T&H timer
Recirculating pump - 500gph Attwood
Bilge Pump - 500gph Attwood - manual switch
OK so I started building my console yesterday and I'm pretty happy with how it looks so far.
Bear in mind it is no where near finished. I was very sloppy with the glue, but it will still have to be sanded so much that it is off little concern at the moment, for now it just needs to hold everything together.
I started by drawing the shape on an old piece of exterior ply, plotted points along it where it curves and knocked small nails on these points so that I could bend the side panels around them to keep the shape I wanted. Also glued the 2 face panels in. The top face panel is canted slightly more than the bottom one to have a better angle for clocks and a sounder.
The top panel is large enough to fit a 5" diagonal screen sounder in the centre (like the Lowrance HDS-5) and 2 standard size clocks (tach and speed) and 2 small ones (trim and water pressure)
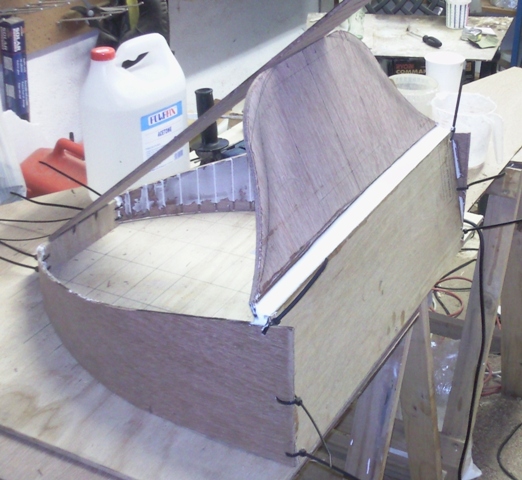
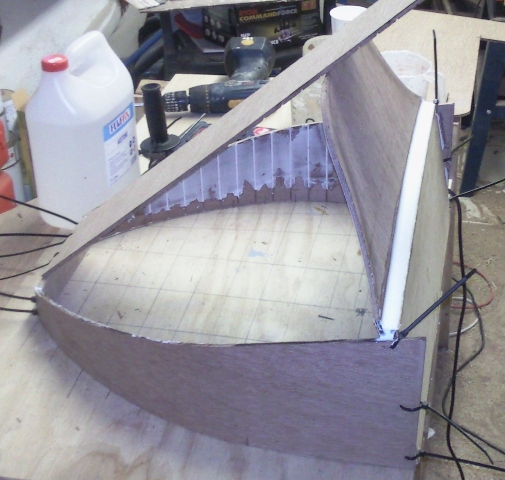
Once I had the basic structure in place and the glue had dried I started laying strip panels down to get the basic shape of the console, like so

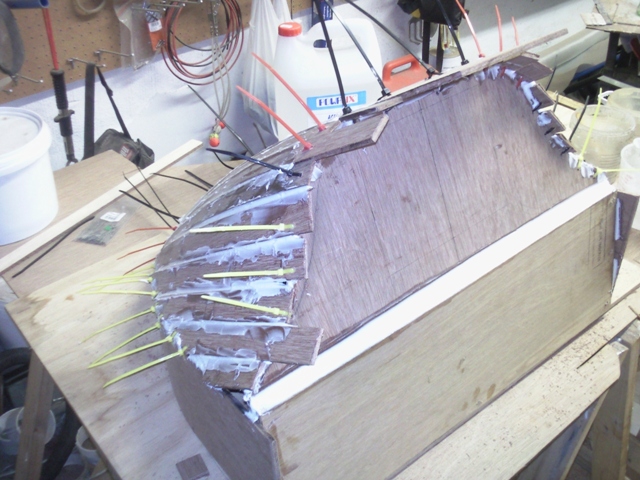
Obviously lots of cutting, sanding and shaping still to be done, but it's looking like I envisioned it. I can't wait for the glue to dry
Re: BassMunn's PH16
Posted: Wed Jun 10, 2009 6:47 pm
by wegcagle
Shannon,
The console looks like it's coming together GREAT
I will say that I have done a TON of research on depthfinder/gps units. The consensus that I've read says that the HD-5/7 units aren't "there" yet. They have some issues that require updateing the software. They seem to be hit or miss, meaning the reviews are great or terrible. Most of the terrible reviews say get a Hummingbird sideview. I'm currently looking at the 798c with side imaging
Will
Re: BassMunn's PH16
Posted: Wed Jun 10, 2009 7:16 pm
by BassMunn
Will, I won't be buying an HDS anytime soon. I still have to buy an engine - OUCH! Trailer, steering, trolling motor and batteries
That being said the HDS don't have side imaging yet but they are able to do side imaging (they call it structure view), the structure view transducers will be launched next month. I haven't heard anything about teething problems on them but they have only just been launched here and we wait to see what the structure view will bring.
On my last boat I had 2 x LMS 332 linked via NMEA and they were incredible (but were well tested in the market).
I like the 798c and might still go that way, but I have dealer rights for Lowrance/Eagle so I can get them a lot cheaper (so now I can get them for what you pay at BassPro - it's a joke isn't it). We also can't order Humminbird products online from the US as the local importers tied that up properly, so I would be looking at nearly $1800 for a 798c, you can get them for $999.
For now my wallet says I'll be using a lure as my fishfinder
I might land up putting something like the Eagle 640c in there instead
Re: BassMunn's PH16
Posted: Wed Jun 10, 2009 7:19 pm
by BassMunn
Guys a question.
What thickness ply do I need to mount my steering helm in?
I have 9mm (3/8") there at the moment, do I need to beef it up?
Thanks
Re: BassMunn's PH16
Posted: Wed Jun 10, 2009 7:48 pm
by wegcagle
I don't how legal it would be Shannon, but I would be more than willing to buy the unit for you here if it is legal. You could send the money to me and I could ship it to you. It might save you a little that way. Just a thought.
Will
or better yet, pack up, come to Augusta for a vacation and we can tear up Clarks HIll Lake. We could probably even get C.L. and Tuck involved in a trip like this
Re: BassMunn's PH16
Posted: Wed Jun 10, 2009 7:50 pm
by TomW
As I recall 3/8 is fine. No need to beef it up. As far as us shipping to you it's a matter of your customs costs, we'll be glad to ship UPS or FedEX to you what ever you want. There are even some other suppliers that are cheaper than BassPro that will ship overseas.
Tom
Re: BassMunn's PH16
Posted: Wed Jun 10, 2009 8:11 pm
by BassMunn
Hey thanks Will and Tom, I didn't even think of that.
I might just take you up on that offer. It's perfectly legal, the only time it becomes a problem is if I have a warranty claim, the local agents won't touch it so I will have to ship it back over for repairs, but for the price difference it would still be worth it even if I have a warranty claim on it.
Will a trip over there sounds like the best deal yet
I can't wait to do a trip over there, but I need to fatten the little piggy bank up first (if I could find it
)
Tom thanks I thought the 9mm should be ok.
Re: BassMunn's PH16
Posted: Thu Jun 11, 2009 3:17 am
by Fonda@kauai
Cool console Shannon, looks good. Good to see you back at it
Re: BassMunn's PH16
Posted: Thu Jun 11, 2009 8:55 am
by Jonny
Hey Bass, More questions. Was that a center cockpit drain I saw in an earlier pic ? Also, How many gallons were you able to get when u built your livewell ?
Thanks Jonny
Re: BassMunn's PH16
Posted: Thu Jun 11, 2009 9:22 am
by Cracker Larry
What thickness ply do I need to mount my steering helm in?
I have 9mm (3/8") there at the moment, do I need to beef it up?
Nice work on the console Shannon! I haven't tackled any curves yet, that's interesting.
I would definately back up the helm, I used a piece of 3/4 ply about 12" square glued to the back of the 3/8 console. Consider that when you are running, the wheel and throttle are your only handholds, so they need to be mounted as if they were hand holds. Holding the outside of the wheel while being tossed around applies a lot of leverage to the hub. Back it up, it won't cost anything
You can see my backing plate in this photo...throttle is done the same way.

Re: BassMunn's PH16
Posted: Thu Jun 11, 2009 7:27 pm
by BassMunn
Thanks Fonda
Jonny, yes that will be the location for a cockpit drain you see on the floor of the cockpit, it drains into the bilge where the bilge pump will take care of it. But bear in mind that the boat will be used on small lakes (well small in comparison to what you have over there). I am not using any type of "wet deck" drainage but it is for fairly small calm waters. If I were building for saltwater use or use in bigger lakes like you have over there I would install self draining decks (draining out the transom I mean).
For the livewell I used bulkhead D and E for the front and back panel and then fitted extra walls up against the inner stringers for the side walls. I did drop the bottom panel to about 3" off the hull panels to give me extra depth and keep the weight of the water sitting a bit lower in the boat. I glasses the entire inside of the well for extra strength.
I'm using a stand pipe for my overflow level so I can adjust my water level by changing stand pipes. It also serves as the main drain by just unscrewing the stand pipe.
Dimensions are 23" x 23 1/2" - depth will be around 12" for a Bass limit, but I'll drop it down to about 6" for livebait or shrimp (I still need to test these depth levels though to see how well they work) Total depth of the well is about 16"
So water volume at 12" is about 27 Gallons if my maths is correct
I'll take some pics to show you what I've done with the stand pipe.
Re: BassMunn's PH16
Posted: Thu Jun 11, 2009 7:36 pm
by BassMunn
Cracker Larry wrote:What thickness ply do I need to mount my steering helm in?
I have 9mm (3/8") there at the moment, do I need to beef it up?
Nice work on the console Shannon! I haven't tackled any curves yet, that's interesting.
I would definately back up the helm, I used a piece of 3/4 ply about 12" square glued to the back of the 3/8 console. Consider that when you are running, the wheel and throttle are your only handholds, so they need to be mounted as if they were hand holds. Holding the outside of the wheel while being tossed around applies a lot of leverage to the hub. Back it up, it won't cost anything
You can see my backing plate in this photo...throttle is done the same way.
Thanks CL, I think it's going to look really sweet once it's finished.
You make a lot of sense with the backing plate for the steering, I was concerned with the strength that's why I asked. I know I hang on to the steering wheel very hard in rough water and I also tend to hang onto to it when I get up or sit down. And it will only take 10 minutes to install
P.S. Looking at your wiring in this photo I think you need to come and wire my console up for me
Re: BassMunn's PH16
Posted: Fri Jun 12, 2009 7:59 am
by Cracker Larry
Send me a plane ticket
Re: BassMunn's PH16
Posted: Fri Jun 12, 2009 9:42 am
by Murry
Shannon I won't lie
Your console is looking really good. I like that a lot.
Nice work
Re: BassMunn's PH16
Posted: Fri Jun 12, 2009 11:22 am
by tobolamr
BassMunn wrote:P.S. Looking at your wiring in this photo I think you need to come and wire my console up for me
Dude, all of us with a High-C personality are looking at that and 1) drooling 2) going into analysis paralysis over how to achieve similar results...
Re: BassMunn's PH16
Posted: Sat Jun 13, 2009 1:24 pm
by BassMunn
Cracker Larry wrote:Send me a plane ticket
You know if you had to bring 2 HDS-5 sounders with, the savings I would make would probably nearly pay for your flight.
But I think I'll come over there rather
Re: BassMunn's PH16
Posted: Sat Jun 13, 2009 1:28 pm
by BassMunn
Murry wrote:
Your console is looking really good. I like that a lot.
Nice work
Thanks Murry
It's gonna take a huge amount of sanding and fairing to get it nice and smooth but it will be worth it
tobolamr wrote:
Dude, all of us with a High-C personality are looking at that and 1) drooling 2) going into analysis paralysis over how to achieve similar results...
Ain't that the truth
Re: BassMunn's PH16
Posted: Sat Jun 13, 2009 1:40 pm
by BassMunn
Cut all the overlapping edges off and started to sand and shape the console. Still a long way to go (not to easy to shape something with that many curves and still keep it even on bot sides)
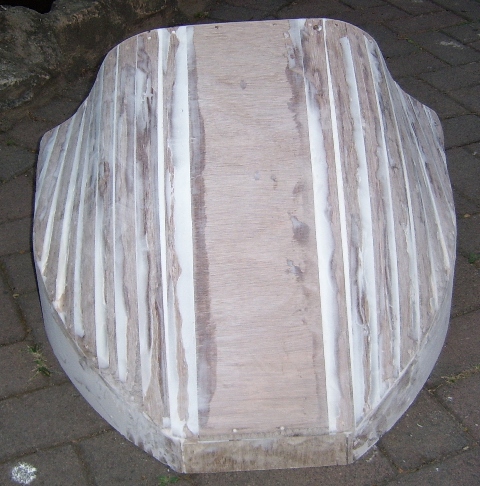
Started to spray my hatches today, was coming along really nicely right up until I ran out of paint (Epoxy Primer)
Nearly a full gallon of paint in there and still not done.
You can't see it too easily but all the tops of the cleats and sheer clamps are taped closed, I'll remove it once the painting is finished. (can't put paint on those as the decks get glued to them)
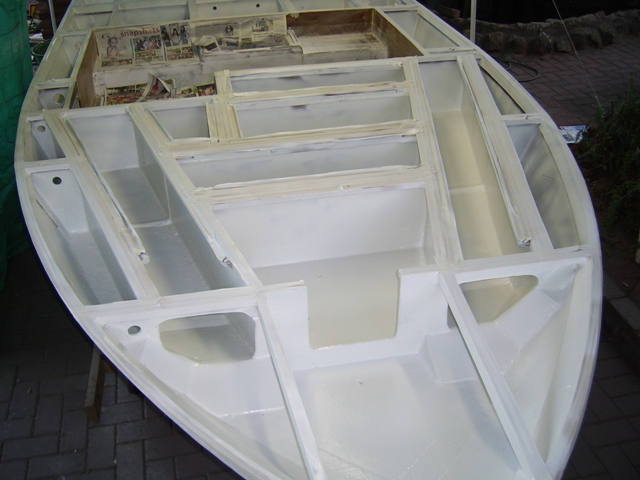
Re: BassMunn's PH16
Posted: Sat Jun 13, 2009 4:41 pm
by chicagoross
Shannon, the compartments look fantastic - plenty of storage and a very solid boat! I can't wait to see that "labor of love" console on the boat. You are definitely one of those culprits responsible for raising the bar here!
Re: BassMunn's PH16
Posted: Sat Jun 13, 2009 5:58 pm
by BassMunn
Thanks Ross, I would feel honoured to be classed in the same class as some of those other Culprits
Re: BassMunn's PH16
Posted: Mon Jun 15, 2009 7:51 am
by Jonny
Damn ! that looks good. I feel like I'm lagging behind as you post pics of your progress. I now see why you were complainiing about the hatch supports. Dude, you have some serious stamina. Keep up the great work, cause i'm holdin on to ur coat tails.
Jonny
Re: BassMunn's PH16
Posted: Mon Jun 22, 2009 6:38 pm
by BassMunn
Been busy
Livewell plumbing done.
First pic with stand pipe fitted (I'll probably cut this down, it looks a little high to me), I'll also carry a spare one that is shorter for when I am using the well for livebait and not bass.

Stand pipe removed. I had to fit another drain hole as the stand pipe thread kept nearly 1" of water in the well
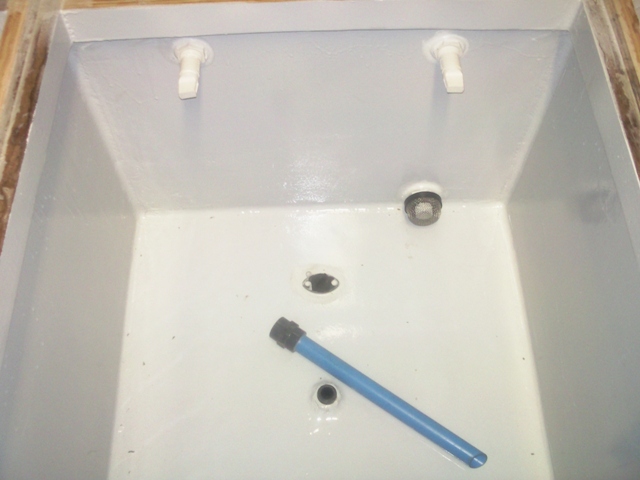
Pump well - yes, yes I know I need to do something better with the wiring
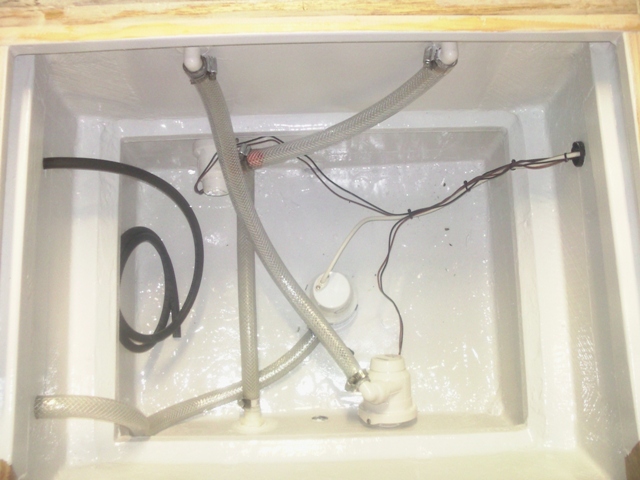
Thru hull fittings
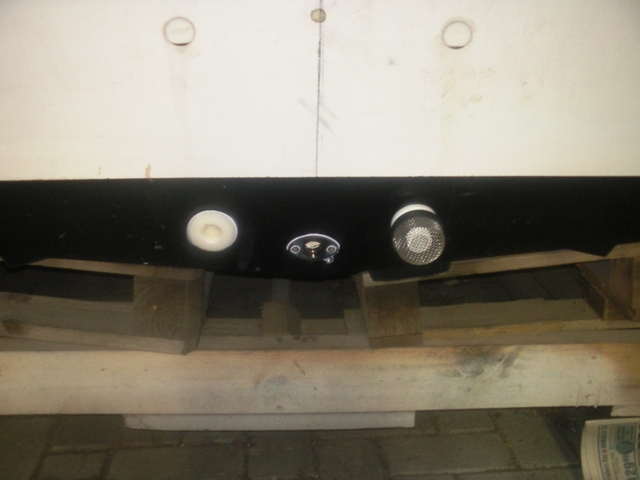
Fuel tanks in their new home. I used portable tanks because I picked them up brand new for like $8 each, but they are staying there forever so I made up a nice shut off valve set for them. When I need to switch tanks I just open the hatch, open 1 valve and close the other.
AND finally I glued my first deck panel down today - YEEHAAA!!!!!
The hole in the middle is for a trolling motor foot control recess.
I'll tackle the second deck panel tomorrow
Re: BassMunn's PH16
Posted: Tue Jun 23, 2009 9:58 am
by JimW
WARNING! those tanks are designed for open air, not in a compartment. They are an explosion hazard as you have them installed right now if you cover the compartments. If one side of the compartment will be left open to air circulation you'll be fine. If you want to use them as we see in the picyures I recommend cutting about 6 inch diameter hole in the compartment "wall" to open them to the cockpit for air circulation.
Re: BassMunn's PH16
Posted: Tue Jun 23, 2009 10:14 am
by tech_support
Jim is correct, those are not made for under deck use. You will have to cut very large holes through the frame for venting.
Re: BassMunn's PH16
Posted: Tue Jun 23, 2009 10:25 am
by wegcagle
Looking Great Shannon
Jim is correct, those are not made for under deck use. You will have to cut very large holes through the frame for venting.
I found this out the hard way on a previous rebuild. These are designed to be portable and therefore sit out in the open. You may be able to cut the large ventilation holes and cover them with something like these:

Of course this one is bronze and therefore expensive
But I have seen them made in plastic in all colors, or knowing you, you could just make them, by cutting the ventilation plate and then drilling multiple holes or vertical stripes in the plate you cut.
Will
Then again you could just use those for fresh water washdown and get yourself another tank for gas
Re: BassMunn's PH16
Posted: Tue Jun 23, 2009 10:27 am
by Daddy
Scary what might happen to us amateur builders if we did not have this forum to catch our mistakes. There is a big difference between above deck and below deck tanks that are to be installed "forever". Pleas take heed of the WARNING. Be a shame to loose a builder and a boat on the same day.
Daddy
Re: BassMunn's PH16
Posted: Tue Jun 23, 2009 11:02 am
by tech_support
Ideally you would have large open holes like you see in this picture.

At a minimum I would have the biggest louvered vents with the biggest holes I could fine.
Something like these....
Re: BassMunn's PH16
Posted: Tue Jun 23, 2009 12:03 pm
by Daddy
There is a reg. on the number of sq. in. reqd. for venting an area with an above deck tank, sorry, I dont know what it is, better find out what it is rather than using a SWAG. I believe it is a percentage of the area the tank is stored in.
Daddy
Re: BassMunn's PH16
Posted: Tue Jun 23, 2009 12:40 pm
by TomW
Shannon, definately provide ventilation. For plastic approved below deck tanks the minimum is 3 sq inches of both inlet and outlet air flow. For above deck tanks converted to below deck tanks I would triiple that to 9 square inches. They are not made to be as impervious to outgassing.
When I say square inches that is clear openings no bars in the way for blockage on any kind. So for 9 sq In you will need something like a 12 in or some combination of both intake and outlet grills.
Just want to keep you safe and your boat in one peice!
You other guys installing plastic tanks don't forget your ventilation also.
Tom
Re: BassMunn's PH16
Posted: Tue Jun 23, 2009 6:09 pm
by BassMunn
Ummm
I guess I should check the forum more often
Because my decks are glued down already
Our law here states that provided the Fuel tanks are kept seperate from any source of electrical power I can do this, but just because the law states this doesn't help me if I get blown up now does it
, my last boat had 2 of these tanks and a battery in a battery box in the same hatch so I didn't even think of it.
My tanks are completely isolated in hatches that do not have a single electrical wire in them.
I've laid it out like this
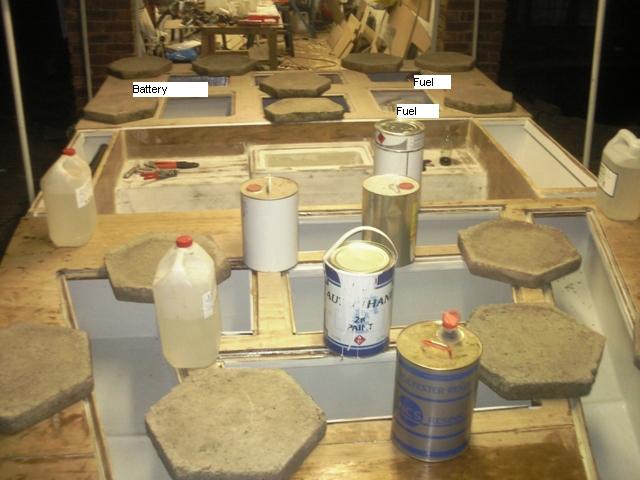
Now my concern with venting these fuel hatches is this - The front fuel hatch I can vent behind the seat (through Bulkhead D) and then into the back fuel hatch, but the back fuel hatch will then have to be vented into the motor well hatch which has 3 electrical pumps in it and is open to the battery compartment. To me this would be more dangerous and I don't have any where else to vent the air.
Ahhh Shucks!!!! What now???
Re: BassMunn's PH16
Posted: Tue Jun 23, 2009 6:21 pm
by TomW
Live and learn and hope for the best on this boat. Post a no smoking rule also.
Tom
Re: BassMunn's PH16
Posted: Tue Jun 23, 2009 6:23 pm
by wegcagle
Cut the vent between the front fuel hatch like you said, but then just open up the area between the front fuel hatch and the back fuel hatch so that they are essentially one hatch. That may work
Will
Re: BassMunn's PH16
Posted: Tue Jun 23, 2009 6:43 pm
by BassMunn
TomW wrote:Live and learn and hope for the best on this boat. Post a no smoking rule also.
Tom
But that means that I'll have to get off the boat every half hour
Looks like I'll be giving up smoking
Re: BassMunn's PH16
Posted: Tue Jun 23, 2009 6:49 pm
by BassMunn
wegcagle wrote:Cut the vent between the front fuel hatch like you said, but then just open up the area between the front fuel hatch and the back fuel hatch so that they are essentially one hatch. That may work
Will
That might help a bit. What I could also do is open up small holes in the hatch lips so that the air coming in from the front has somewhere to get out. It will mean water will get into those hatches when it rains, but that's not a big issue unless it's really coming down in buckets which is normally when I call it a day.
Re: BassMunn's PH16
Posted: Wed Jun 24, 2009 12:10 am
by TomW
Shannon, I wouldn't cut holes in your hatches. What you could do is since gas fumes sink is do cut out between the two spaces and then put two vents in one high and one low so that you have fresh air entering high and the gas fumes exhausting lower down. That would be ok also. That way air would be forced in the upper vent as your moving and out the lower vent. I'd offset the upper from the lower so you get max ciruclation also. Use 3" or 4" vents and you should be ok.
Tom
Re: BassMunn's PH16
Posted: Wed Jun 24, 2009 1:56 pm
by Jonny
Wow, I need to start paying attention!
I'm gad your leading the way BassMunn, The boat looks great by the way.
Jonny
Re: BassMunn's PH16
Posted: Wed Jun 24, 2009 2:13 pm
by BassMunn
Thanks TomW, that sounds like a good idea and is workable in my build as well. I can hide the vents behind the passenger seat so it won't be that visible, but will get good airflow.
Thanks Jonny
Re: BassMunn's PH16
Posted: Wed Jun 24, 2009 5:16 pm
by cape man
What about a small blower, or better yet some way to vent the gas caps out of the lockers with a hose and standard fuel vent? You should be able to still unscrew the caps if the vent tubes are long enough to make a couple of turns before binding up. Just an idea...
The fumes are going to come out of those vented caps as soon as the temps start rising, so even with the lockers vented you are going to build up some fumes inside while sitting still if all you have is passive ventilation. Hopefully someone else has done the same thing and will have a proven solution. I love boating, but gas has always scared the crap out of me, especially from portable tanks as you can always smell it when it gets hot. Good luck, but more important, make it safe.
Glad I read this myself as my vents for the fuel locker are too small, even though I have a permanent tank and there should never be fumes inside the locker. Easy enough to fix, and it has been weeks since I spent any money on the boat.
Re: BassMunn's PH16
Posted: Wed Jun 24, 2009 6:23 pm
by BassMunn
Aha! - Cape Man you just solved my problem - Thank You
I just checked the air vent on the lid of my portable tanks and there is enough flange to be able to push a pipe over it and clamp it tight. I'll run a pipe from each tank to a T piece and then to an external tank vent.
Like you say I will have to keep the pipes pretty long so that I can turn the lids off without them binding up, but that's not a huge issue.
Cool problem solved
Re: BassMunn's PH16
Posted: Wed Jun 24, 2009 6:47 pm
by tech_support
unless you can get a very good seal on the vent, fumes will escape. If it were me, I would still vent the compartments
Re: BassMunn's PH16
Posted: Wed Jun 24, 2009 7:04 pm
by BassMunn
I'll test it tomorrow, if it's questionable I'll put the vents in as well.
Re: BassMunn's PH16
Posted: Wed Jun 24, 2009 7:31 pm
by Daddy
I agree with Joel, not a good idea, go with venting the compartments. Every time you fill up you will risk loosening those fittings. Go with venting the compartments.
Daddy
Re: BassMunn's PH16
Posted: Wed Jun 24, 2009 9:14 pm
by TomW
Shannon it is best to also vent the compartments because the plastic tanks especially the above board tanks do outgas fumes. That is why any one installing plastic tanks here still has to vent the compartments even though they have a 5/8" tank vent to the outside of the boat.
Tom
Re: BassMunn's PH16
Posted: Fri Jun 26, 2009 8:15 am
by cape man
Shannon,
As Tom points out, I have a permanent tank that should never leak or off gas within the compartment, but am still venting the compartment. I would do both (vent tubes and and vented compartments).
I too would be concerned that the hose could come off if you rig a flange and clamp system that goes directly over the vent of the cap. May work, but test the hell out of it before assuming you are safe.
Instead of making a flange over the cap's vent, can you find a fitting that will screw down into the vent on the cap and then clamp to the vent hose? You may have to use two fittings to get the right male adapter and hose barb to go from the cap's vent to the hose, but it would be easier to insure you had a good seal. On the down side, I looked at an old portable tank I have and am concerned you don't really have enough diameter in the vent opening to get a male adapter in there that still will allow off-gassing. What if you drilled and tapped a larger opening in the cap?
Another idea (probably not a good one
) would be to install a separate vent in the top of the tanks that is not associated with the fill cap using a small bulkhead fitting with a hose barb on the outside. Don't know if you can easily work inside the hatches or through the tanks fill opening to hold the bulkhead fitting from the inside while tightening it.
Re: BassMunn's PH16
Posted: Fri Jun 26, 2009 9:35 am
by TomW
Here is a bulkhead fitting you could adapt it would require a 5/8" hole in the cap. Then run the hose to an outboard vent.
http://www.iboats.com/Seasense_Bulkhead ... w_id.56642 I would use 1/2" hose if you can find the fitting in that size. I'm using this for bringing my 3/8 fuel hose to the motorwell. No water to leak in.
Just to clarify Shannon the Coast Guard regs here requires compartment venting for plastic tanks when they are sealed in a compartment.
Tom
Re: BassMunn's PH16
Posted: Fri Jun 26, 2009 10:08 am
by Daddy
BassMunn wrote:I'll test it tomorrow, if it's questionable I'll put the vents in as well.
Not to put too fine a point on it, the consensus seems to be that the vents are not optional as far as safety is concerned. Save time and trouble, vent the compartments.
Daddy
Re: BassMunn's PH16
Posted: Sat Jun 27, 2009 7:26 pm
by BassMunn
So what you guys are saying is that MAYBE I should put in an air vent...???? HEHEHE, OK OK I get the point
.
No seriously guys thanks for all the input
I've actually carried on doing other things on the boat and will tackle the vent issue once I have my seats, as the main air vent will be behind the passenger seat and I just want to check the fit of the seat before I start hacking holes in my bulkhead.
It's gonna be fun trying to cut the hole in the bulkhead to fit a vent plate, as I only have about 2 1/2" clearance between my bulkhead and the fuel tank when it is pushed as far away as possible. Not gonna be very funny if I put a hole through my tank.
Putting a new fitting into the tank cap won't work as the air gap is cut into the thread (vertical slot) not through the screw, It's also plastic so I can't really drill it out without seriously weakening the wall. With the existing cap I can only put a pipe over the whole vent pipe and clamp it. It stands up about 3/8", so would hold a pipe clamp, but is a bit touch and go for size and I don't think it will take too much strength either.
I'll have a look around to see if I can't find another solid cap that I could put a fitting through like what Tom suggested.
Today I glued down my last 2 deck pieces, the small deck panels that sit on either side of the cockpit, also filled the last missed spots along the deck/hull joint that weren't perfectly level. Sanded it all down nicely and then also glass taped the joints between deck panels and the edges where deck meets cockpit sidewalls. I'll glass the deck/hull joints tomorrow after I finish rounding the edges.
Another question
I'm not sure yet if I will be able to afford one, but I am looking at fitting an ETEC 115hp motor on the back, this motor will run an external oil tank which I will install in the same compartment as my cranking battery. I've actually never really paid any attention to how these are fitted normally.
How do these tanks get bolted or strapped down?
And has any body got any idea of their size (dimensions)?
Thanks
Shannon
Re: BassMunn's PH16
Posted: Sun Jun 28, 2009 1:09 pm
by TomW
Shannon on the oil tanks, they come in two sizes(don't have dimensions), I don't know which would be good for a 115 they can be bulkhead mounted and they have there own oil pump that sits on top of it and require there own piping. The smaller one holds as I recall 3-4 liters or there about and with the 100:1 ratio should last quite a while. I tried to go into Evinrude parts catalog to get the size but they don't list the tank just all the other components. I'd call the dealer.
Tom
Re: BassMunn's PH16
Posted: Sun Jun 28, 2009 5:45 pm
by BassMunn
Thanks Tom, I actually managed to find a pic on some odd site of the 2 tanks they do, 1 is 1.8 gallon and the other is a 3 gallon.
I got a bit worried that I wouldn't be able to fit it through the hatch opening, but I'm OK
It's a bit frustrating trying to finish the boat when I don't have all the parts and dimensions, but it's all that I can do at the moment.
I think I should plan for a set of oars just incase
Didn't do anything on the boat today, we had a mad cold front pull through today with really high winds and the temp dropped substantially (bear in mind we are in the middle of winter) and I just couldn't bear the thought of trying to get my epoxy to dry in that temp, Brrrrrr. On Monday and Tuesday it was a balmy 80F, today it was 55F in the middle of the day with high winds and rain.
I know, I know, some of you could show me what a really cold day is, but for me that's cold
Re: BassMunn's PH16
Posted: Thu Jul 02, 2009 12:12 pm
by cape man
Shannon,
Use a dremmel type tool to cut the holes for the vent in the bulkhead if you are concenred about a blade going through and hitting the tank. You can make a fairly nice cut if you go slow, and you are going to dress the outside with a vent cover anyway.
Re: BassMunn's PH16
Posted: Thu Jul 02, 2009 5:44 pm
by BassMunn
Thanks Cape Man, I don't have a Dremmel but have been thinking of getting one to make the final shaping of my hatch lips easier.
Now I have another reason to buy a new Power tool
Got my carpets on Monday
It only finally warmed up today but rain is forecast for tomorrow and Sat again
I also started a new job yesterday, so I'll leave the building for the weekend
Re: BassMunn's PH16
Posted: Fri Jul 03, 2009 11:43 pm
by cape man
Now I have another reason to buy a new Power tool
When I'm done I think I'll take a pic of all the cool tools I got with this project
I already had a dremmel, but learned how to use it during the build. NICE tool!
Re: BassMunn's PH16
Posted: Sat Jul 04, 2009 1:36 am
by gk108
If you go shopping for a Dremel, consider getting the flexible shaft attachment, too. I have the full kit with a little router attachment and rotary saw attachment. The rotary saw isn't much good. The router does have some uses, but the motor lacks the power for real routing, unless you use 1/16" or 3/32" bits. The flexible shaft will really make it easier to do most of the detail sanding and shaping, since you don't have the bulk of the motor getting in the way. There is a strange looking carbide carving bit (#801) that I found to be very useful, though it is about the most expensive Dremel bit sold.
Re: BassMunn's PH16
Posted: Sun Jul 12, 2009 7:42 pm
by BassMunn
Greetings Earthlings
Thanks for the tips on the Dremmels GK108. I'll probably get myself one in the next week or two.
Got 2 full days of boat building this weekend
I've been scratching my head about how to build my gunwales on my boat, I wanted a nice rounded shape to the gunwales, but really wanted to steer clear of using solid wood as my boat is starting to get pretty heavy and shaping the wood would have taken ages and with my woodworking skills would never look right.
So I managed to find nice strips of shaped masonite (Aaahhhhh Masonite!!!!! I know, bear with me).
Obviously the masonite is useless for boat building but it gave me the shape I needed. So basically the masonite is there as a mold and will be glassed over several times to gain the correct strength.
I coated the inside of the pieces liberally with resin and will obviously coat the outside well before laying the glass down.
The glass will run from the hull sides over the gunwale onto the deck.
Haven't finished fitting and sealing it all but here's what it looks like now
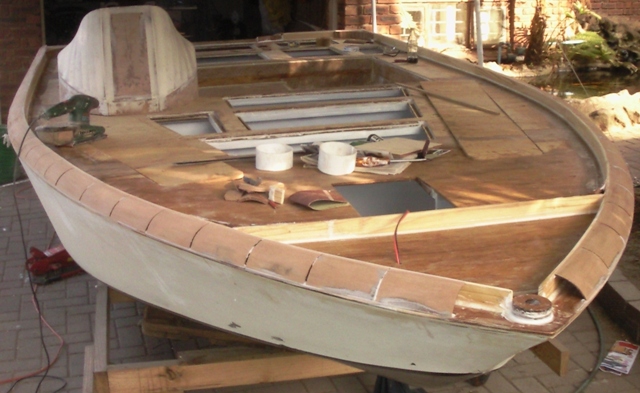
Once this is complete I can go back to finishing the console and finally install it.
So what da ya think
Re: BassMunn's PH16
Posted: Sun Jul 12, 2009 7:45 pm
by Daddy
Very interesting, should work, totally encapsulated and all.
Daddy
Re: BassMunn's PH16
Posted: Sun Jul 12, 2009 11:47 pm
by Fonda@kauai
I think it will work as long as it's totally encaplsulated with resin and glass. With just resin you run the risk of scratching through the resin and once water gets in there, no good. Also masonite might not have a lot of strength, tensile or compression, so your strength would need to come from the glass. It looks cool. The console looks good too
Like a batmobile console.
Re: BassMunn's PH16
Posted: Mon Jul 13, 2009 10:08 am
by peter-curacao
Fonda@kauai wrote: The console looks good too
Like a batmobile console.
I agree that console looks very cool
Re: BassMunn's PH16
Posted: Mon Jul 13, 2009 8:08 pm
by wegcagle
She's really coming along Shannon
Looks just like a ranger.....only better in ever way
She'll definitely turn some heads at your bass tournys
Will
Re: BassMunn's PH16
Posted: Mon Jul 13, 2009 10:00 pm
by BassMunn
Hey thanks Guys, I'm very chuffed with my console
, now just to finish it.
The masonite will get completely glassed and sealed.
How many layers of glass do you think I would need, I was thinking 2 layers of Biax with 1 layer of cloth inbetween the Biax (Different strand direction)?
Re: BassMunn's PH16
Posted: Mon Jul 13, 2009 10:01 pm
by BassMunn
wegcagle wrote:She's really coming along Shannon
Looks just like a ranger.....only better in ever way
She'll definitely turn some heads at your bass tournys
Will
OK you just made my day
Thanks Will
Re: BassMunn's PH16
Posted: Tue Jul 14, 2009 5:33 am
by TomW
Bass Mun, I love what your doing. However if someone steps on your pretty rounded side gunnel 2 layers won't be enough. Put at least 4 layers and make it as storng as possible with brace under it as you see fit.
Tom
Re: BassMunn's PH16
Posted: Tue Jul 14, 2009 10:07 am
by gk108
Very stylish, there. It's going to look great. I sort of agree with Tom, heavier laminations on that gunwale will probably be best in the long run. Treat the masonite as a lost mold and don't consider its strength as part of the final product. It's not just someone stepping on it, it's docks and pilings and such. No matter how careful you are about maneuvering, there is always going to be a possibility that an impish puff of wind or odd current will alter your course, usually right towards the most destructive object in sight.
Re: BassMunn's PH16
Posted: Tue Jul 14, 2009 7:20 pm
by BassMunn
Thanks TomW and GK108, I figured I might need to go heavier with the glass laminations.
Like you say I am treating the masonite as a throw away mold in a way, it will be coated in resin but if any water gets into it, it will turn to mush. It's basically just like thick cardboard.
It's freezing here tonight, we've just had a really nasty cold front go over us with snow fall predicted for inland, Brrrr
So can't do any work on the boat because I'm worried about resin not curing and I'm chicken
What temps can resin go down to before curing becomes a problem?
Re: BassMunn's PH16
Posted: Tue Jul 14, 2009 7:57 pm
by TomW
Shannon as long as the epoxy starts out at 60 or 70 the temp can drop down to 40F and still cure in 24hrs, with slow cure no problem with fast or medium.
Tom
Re: BassMunn's PH16
Posted: Tue Jul 14, 2009 8:23 pm
by BassMunn
OK so as long as I keep the resin in a warmed environment I will be OK. It never gets below 40F here so I'm good to go.
It's amazing how temperature affects this stuff, in summer I could sand filleting material within 5 or 6 hours of laying it down, now I have to wait more than 24 hours. The resin on it's own is even worse.
Re: BassMunn's PH16
Posted: Thu Jul 16, 2009 10:56 pm
by Murry
Your doing a great job Shannon.
That last photo sure did show off some impressive work there buddy. Very nice!
Daniel
Re: BassMunn's PH16
Posted: Fri Jul 17, 2009 6:59 am
by cape man
Shannon, that is some very nice custom work! The console and gunwales are awesome. She will definitely be a one of a kind PH18, and your posts will give inspiration to others. Nice job man! Are you going to install the fins as well
(just kidding)
http://www.javelinamx.com/batmobile/batboat.jpg
Re: BassMunn's PH16
Posted: Fri Jul 17, 2009 3:55 pm
by BassMunn
Murry and Cape Man - Thanks for the comments
I must say I'm starting to get really excited with the way it is all coming together.
Cape Man, I think I'll leave the fin out
That's a classic photo
Re: BassMunn's PH16
Posted: Wed Jul 29, 2009 6:00 pm
by BassMunn
Well I just never seem to get enough time to work on the boat these days, but here's an update.
Backing Plate for troling motor
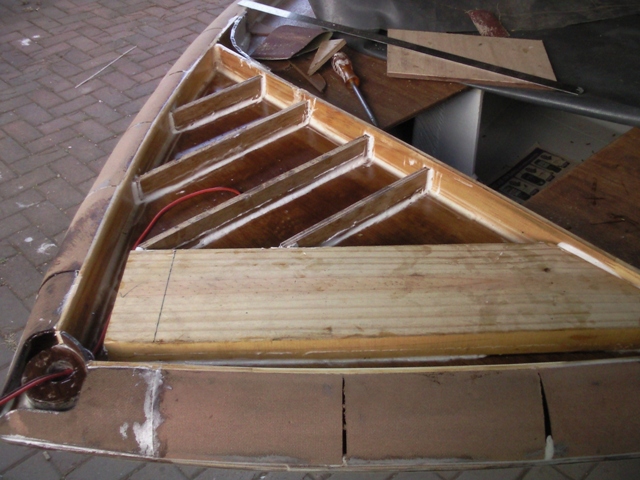
Gunwales, glassed over (I'm still gonna put another layer on, with putting so many layers down the top layer ran a bit dry in places
), transom gunwales installed in a fashion (still tons of shaping to do).
Console partially fitted, I still need to beef up the supports for it and once I'm completely happy with the shape I'm gonna put a layer of glass cloth over the whole thing.
Also finished with the bow plate, I ran out of big pieces of wood so had to put a whole lot of supports underneath and lay smaller pieces down to cover it all. The area where the trolling motor bolts on is a solid 2" thick.
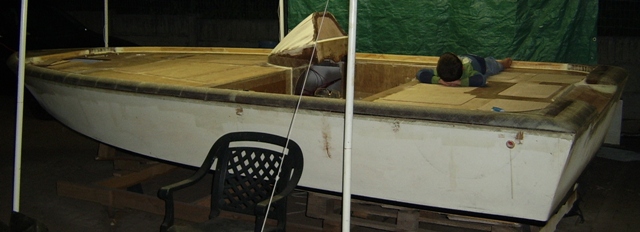
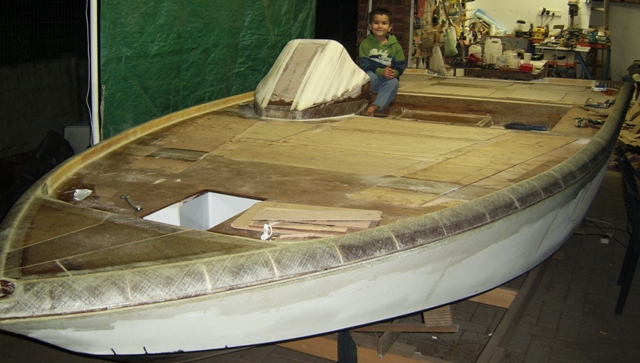
That's a pretty wide boat right there
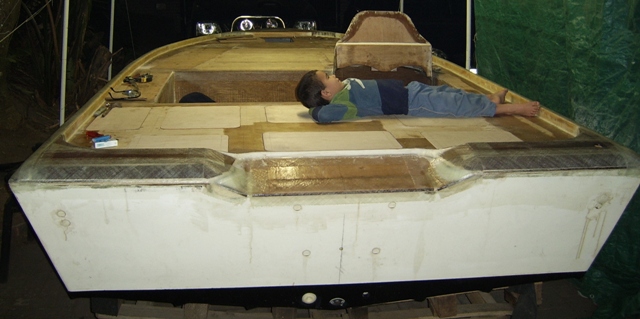
Re: BassMunn's PH16
Posted: Thu Jul 30, 2009 1:07 pm
by wegcagle
Shannon you've done one hell of a good job on that boat. She's beautiful. Not too far left to go now
Will
Re: BassMunn's PH16
Posted: Thu Jul 30, 2009 6:28 pm
by BassMunn
wegcagle wrote:Shannon you've done one hell of a good job on that boat. She's beautiful. Not too far left to go now
Will
Thanks Will, I'm pretty happy with the way it's looking so far
I have however given myself a serious amount of extra fairing to do with those gunwales, they are going to be enough trouble on their own, but I messed so much resin down the sides of the boat that I'm gonna have to refair the top half of the hull again. Oh well live and learn. I never was totally happy with my fairing job, guess I get to try again
Re: BassMunn's PH16
Posted: Fri Jul 31, 2009 7:28 am
by cape man
Masking tape and a curtain (I used plastic garbage bags) allows you to be real messy when working over something that is all faired and ready. Glad you weren't happy with the first fairing
.
REALLY like what you've done here. That will be your PH16, not ever to be confused with another. Looking great!
Re: BassMunn's PH16
Posted: Fri Jul 31, 2009 2:15 pm
by tobolamr
For cheap, large masking material stop by a bedding retailer and see if they have any old bed bags around. Most places wrap the new beds in a nice plastic bag that they toss after delivery. I know I'm amassing bags from our bedding sales already... Most times we give ours away when someone asks. Just a thought...
Re: BassMunn's PH16
Posted: Fri Jul 31, 2009 6:59 pm
by BassMunn
Thanks Cape and Tobo, I actually had drop sheets in the garage and remembered them after I had put the resin on
It's Ok I love fairing - Ok not really
But I did do a pretty shoddy job on the sides the first time so I needed to do one more pass anyway.
No pictures to post (nothing worth looking at), I was going to get myself a dremel to finish my hatch lips as I didn't feel like sanding all of those by hand and then I remembered that I had an Air Die grinder which does pretty much the same thing as the Dremel. The Dremel bits fit in the small collet so I dashed outside tonight and stirred up a nice dust storm. My compressor has a really small tank so I have to work a bit and then wait a bit to let the air pressure build back up, but it's pretty much all done now.
We have 3" of rain predicted for tomorrow so the boats all covered up now, as soon as it passes, it's time to hit the decks with the sander, lay some glass cloth down and then get the last of the resin coatings down.
I basically have about 5 small pieces of ply to glue down, glass the decks and the console, finish sanding and fitting the hatch lids and then it's time for final fairing
Been at it for 10 months now, probably another 2 months and she'll be done and ready for rigging
Re: BassMunn's PH16
Posted: Fri Jul 31, 2009 9:28 pm
by cape man
2 months and she'll be done and ready for rigging
Just in time for Spring!
Re: BassMunn's PH16
Posted: Mon Aug 03, 2009 6:57 pm
by BassMunn
cape man wrote:2 months and she'll be done and ready for rigging
Just in time for Spring!
Maybe next Spring
It's gonna drive me nuts but once I finish the building part it's gonna be a while before I can afford to rig it the way I want to. I just noticed that Mercury has released a 115hp Pro XS
Re: BassMunn's PH16
Posted: Mon Aug 03, 2009 7:14 pm
by BassMunn
The weather man was right for a change and we had some very welcome rain over the weekend, but steady rain means I can't work on the boat, so I decided to start tackling my console bits.
After spending a fairly long time planning how to lay out all the electrical goodies, I got some thin Aluminium plate (1.5mm) and started designing my switch panels.
These 2 shown here go on either side of the steering wheel, the top one starboard, bottom one port
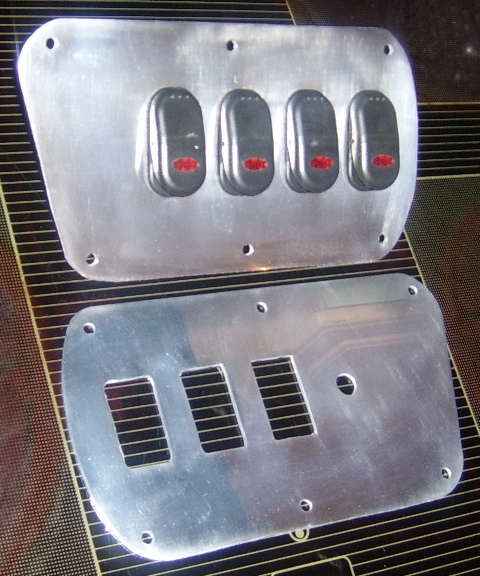
I've got halfway through buffing them to a mirror shine and now can't decide if I want to have a mirror finish on them or if I should rather brush a pattern into them to give them a satin finish
The 10mm hole in the bottom plate is for the aerator timer control adjustment, I bought a T & H Marine timer that comes on the little mounting plate, but it's got an ugly switch and the mounting plate just doesn't fit into the look I'm going for, so it's getting modified
I tested it last night before making the final change and it works perfectly
Re: BassMunn's PH16
Posted: Mon Aug 03, 2009 8:36 pm
by gk108
I made the switch panel for my D15 from aluminum and worried about oxidation, so I sprayed it with several coats of hammertone aluminum paint.
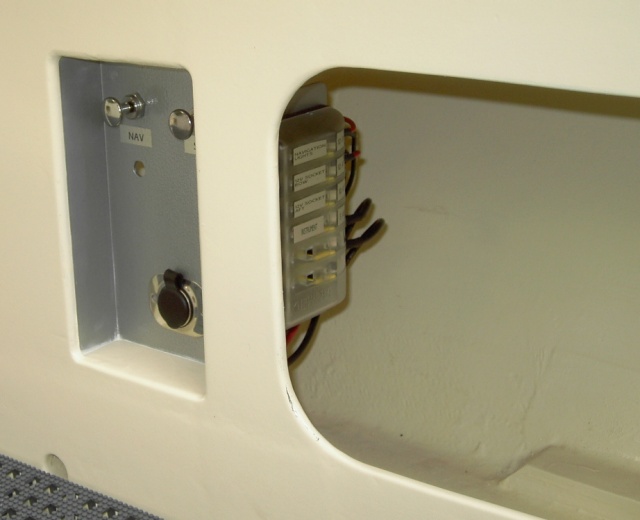
Yours are looking good. Like the rest of the boat, they convey a sense of high speed motion, even while stationary.
Whatever finish you decide on, you'll need to seal it with something to stop oxidation.
Re: BassMunn's PH16
Posted: Mon Aug 03, 2009 8:56 pm
by BassMunn
Thanks GK108, I like the stationary speed comment
I was thinking of spraying them with an automotive clear coat, that should work - I think
Re: BassMunn's PH16
Posted: Tue Aug 04, 2009 9:16 am
by cape man
Boat building quote of the week...
they convey a sense of high speed motion, even while stationary
Re: BassMunn's PH16
Posted: Mon Aug 10, 2009 8:08 pm
by BassMunn
Just a bit of tinkering this weekend.
Put a layer of glass down on the cockpit floor to stiffen it up, it had a bit of flex between the 2 centre stringers that I didn't like.
Put the first full coat of resin on the whole deck, patched up a few small spots on my hatch lips that I had missed with filler, once I've finished sanding all the lips to their final shape I'll put another coat of resin on the whole deck and coat the lips at the same time. And then had to wash all the amine blush off once the resin had dried
Aaarrggghhhh I hate the stuff - Get resin that doesn't blush
I decided my console face looked a bit too flat and boring so I added a frame lip (I think that's what you could call it), haven't finished with it yet, still need to build up and then sand down the transitions between the different levels but it's looking better.
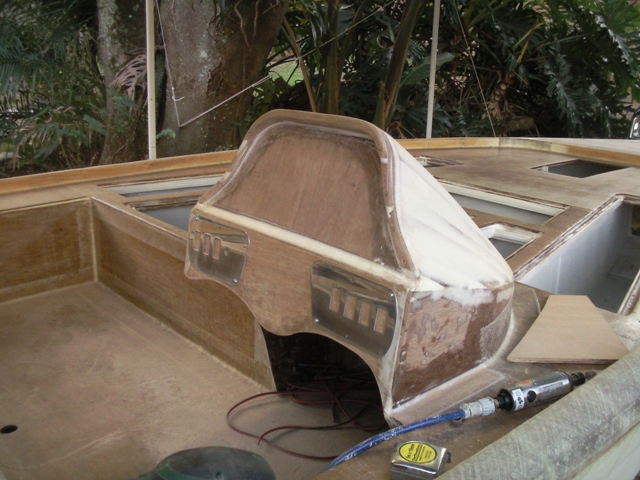
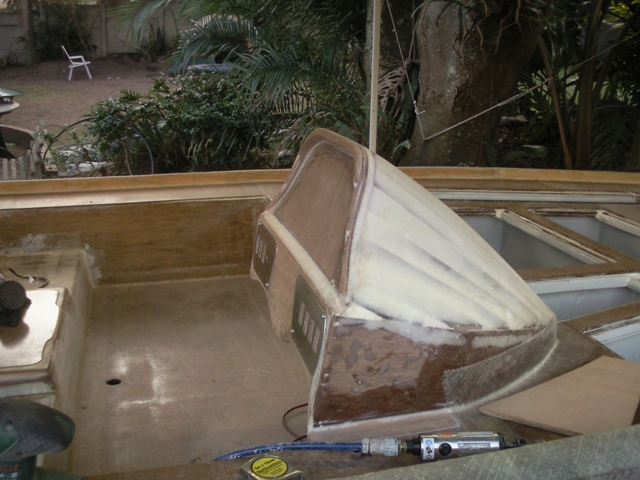
I'm going to put another aluminium plate in the recessed area, most of it will be cut out for sounder and clocks but it should give a nice background finish to the panel
Re: BassMunn's PH16
Posted: Mon Aug 10, 2009 8:23 pm
by Bowmovement
Looks great
Re: BassMunn's PH16
Posted: Mon Aug 10, 2009 9:23 pm
by cape man
Love the frame you added. Nice work man!
Re: BassMunn's PH16
Posted: Mon Aug 10, 2009 9:41 pm
by peter-curacao
cape man wrote:Love the frame you added. Nice work man!
I agree that cockpit looks hot
Re: BassMunn's PH16
Posted: Wed Aug 12, 2009 6:13 pm
by BassMunn
Hey Thanks Guys
I want this girl to be proud and puff herself up when a Ranger pulls up next to her
Looks like boat building is on hold for the next 2 weeks, got a work project that is demanding all my attention, but hey it just adds to the boat fund
Re: BassMunn's PH16
Posted: Wed Aug 12, 2009 9:31 pm
by Murry
Great job Shannon
The lip on your console really finshes it off nice.
Re: BassMunn's PH16
Posted: Thu Aug 13, 2009 6:14 am
by cape man
She won't have to puff up...the Ranger will wilt...
Re: BassMunn's PH16
Posted: Fri Aug 14, 2009 2:04 am
by chicagoross
Really looks sweet, Shannon! Those Rangers are going to be embarrassed to be seen at the same dock!
Re: BassMunn's PH16
Posted: Fri Aug 21, 2009 4:40 pm
by Topdawg
First I have got to say that is a great looking boat and it's exactly what I want to do to the ph 18 but I have a ? did that deck plan and console design come with the plans or is that your own design any info would be apreciated greatly. You can contact me directly at my email if you wish my email is
k.moody69@yahoo.com again I would really appreciate any help with this as I want to make my boat look even better than any ranger or bullet on the water thanks Kevin
y
Re: BassMunn's PH16
Posted: Fri Aug 21, 2009 5:50 pm
by BassMunn
Hi Kevin, thanks for the comments.
If you don't mind I would prefer to answer your questions on this forum, that way we could possibly help others as well.
For my decks, the back deck is very close to the plans, the only major difference is that I did away with the outboard splash well in favour of a larger deck area, but you can only do this if you are planning on running a jackplate on the boat. If you plan on mounting the outboard directly onto the transom you need the splash well for clearance when you tilt the motor up. I must also clarify at this stage that the deck part of the splashwell was removed but not the reinforcing plates that tie the transom to bulkhead E that lie underneath the deck, I actually beefed mine up considerably because the jackplate with larger motor will put more stress on the transom
The front deck I extended almost 3ft back, using the same height as the plans. The hatch configuration was also my design, but is pretty simple to do. I actually made a mistake in sizes when I did my centre tackle hatches and if I were to do it again I would put 2 larger ones instead of the 3 smaller ones, with the extra 2ft on your boat you could do 3 larger ones
The console, seat bench (seats still to be fitted) with cooler box and the gunwale strip are all my add-ons
The console is the trickiest part to do, but I figured out a way that made it pretty easy to build, but it is difficult to get it symmetrical.
Have a look through my thread if you haven't already to get an idea of how I built it. If you need a more detailed explanation of how I did it, just shout and I will go into more detail.
The plans for the PH16/18 show a shorter front deck with a large cockpit area, centre console, you sit on the back deck when driving and it has no gunwale strip.
P.S. rather change you email address and replace the . with "dot" or you're gonna get flooded with junk emails
Re: BassMunn's PH16
Posted: Fri Aug 21, 2009 5:56 pm
by BassMunn
Daniel, Craig and Ross - Thanks for the comments
Re: BassMunn's PH16
Posted: Fri Aug 21, 2009 7:58 pm
by stickystuff
In answer to a previous post a couple of days ago concerning what to coat aluminum with. I work with aluminum every day and we coat it with Sikens or Dupont clear coat. Most of the time we paint it with Sikens paint. first we use a solution called, if I can spell it correctly , Allodine. It seals the aluminum to keep the corrosion down. Then add a primer coat and then paint with Sikens. We manufacture Fire Trucks and corrosion has been a big problem over the years. The allodine seems to work very well.The clear coat and I would give it two or three coats looks great and has a UV retaeder in it. This will keep it shining for years.We swirrel coat some of the finishes, or just sand the aluminum with a orbital sander called a palm sander. Use 180 grit to start then finish up with 320. If you want a really smooth finish so to polish, go with a 400 grit and then finish up with 600 or even 1500. After 1500 you can buffit out with some 3M aluminum polish. Clean it with denatured alcohol and then clear coat it. Reg alcohol from the drug store works great. Just get the 70% alcohol.
Your5 boat looks fantastic. Makes my ol Woody look like a beginners model. Good job.
Re: BassMunn's PH16
Posted: Fri Aug 21, 2009 8:09 pm
by peter-curacao
Thanks Ken,
For sharing that, don't know if you saw? I'm working on a aluminum chair but with this post from you I'm sure now I'm gone spray paint the aluminum (metallic blue same as graphics on hull)
Peter
Re: BassMunn's PH16
Posted: Fri Aug 21, 2009 8:23 pm
by Topdawg
For my 18 to turn out as nice as yours is there anyway for you to mail me a deck plan like yours this is the first boat I've ever built and the first project of it's kind I've ever tried and I really want it to turn out super nice and yours is awesome it's exactly what I want but I don't know what all your talking about with these boat parts to be totally honest this is going to be the first boat I've ever owned thanks Kevin
Re: BassMunn's PH16
Posted: Sat Aug 22, 2009 4:30 am
by BassMunn
Thanks for the tips on the Aluminium Ken, that's what I needed to know.
Kevin, sure I will do that for you, give me a day or two to do some drawings and find the right pictures to add into it.
Unfortunately I'm working on a construction site the whole weekend, so will have to try fit it in, but I will do it.
Re: BassMunn's PH16
Posted: Sun Aug 23, 2009 4:08 pm
by BassMunn
stickystuff wrote:
Your boat looks fantastic. Makes my ol Woody look like a beginners model. Good job.
Thanks Ken, Although we'll have to see if mine holds up as well as yours did. Your boat was one of the boats that inspired me to take on this project
Re: BassMunn's PH16
Posted: Sun Aug 23, 2009 4:28 pm
by BassMunn
Topdawg wrote:For my 18 to turn out as nice as yours is there anyway for you to mail me a deck plan like yours this is the first boat I've ever built and the first project of it's kind I've ever tried and I really want it to turn out super nice and yours is awesome it's exactly what I want but I don't know what all your talking about with these boat parts to be totally honest this is going to be the first boat I've ever owned thanks Kevin
Kevin, I haven't had a chance to do the drawings yet, but you musn't wait for me to get started. The customization part of my build only started to happen about 6 months into the build. Order your plans if you haven't already and get stuck in. The changes I made are all above Sole level (floor level) and you have a long way to go before getting there. My build up to the Sole level was all as per the plans.
In hindsight I wish I had built the PH18 and not the PH16, but my building space was limited as was the budget. The PH18 will actually be slightly easier to do the front deck layout than the PH16 because your bulkhead C can act as the rear face of the front deck, on the PH16 it made the cockpit too small so I had to cut it flush with the sole and put an additional plate in further forward (the spacing between bulkheads B,C and D are different on the 2 models if I remember correctly).
I'm happy to give you a hand through the process, but there are many other very good builders on this forum that can also help you along the way (I learnt from them too
and still am
)
Re: BassMunn's PH16
Posted: Tue Sep 01, 2009 5:06 pm
by Topdawg
Hey bassmunn just wondering how those plans are going I have ordered my plans and they should be here anyday now. I was wondering though just how much wider is that boat compared to say the ranger or one of the other boats I can't wait to get started on my boat and thanks again for your help
I can't wait to see yours finished awesome work
Re: BassMunn's PH16
Posted: Tue Sep 01, 2009 5:42 pm
by BassMunn
Kevin I haven't had a chance yet, been hectic the last few days as I started a new job today with Hilti
(Guess who's got new power tools to play with
)
Shoot me another message once you have the plans as I need to check the spacing between the bulkheads on the PH18 (I only have the PH16 plans).
The PH has a beam of 88 1/2" without rubrail so it will be about 90" with rubrail, the 188VX has a beam of 94", the 178VS is 91 1/2", 170VS is 86", 177TR is 85"
Re: BassMunn's PH16
Posted: Wed Sep 16, 2009 10:24 pm
by tobolamr
Wow - Looking really good! Makes me wonder what you would have accomplished with a PH18!
Question on your console: Is all of the access going to be through the bottom? Or is the console built to hinge up in some way? Your console is inspiring!
Are you going to transom-mount or thru-hull mount your transducer for your console depth finder?
Our last tournament in our little bass club, we were thrilled to have 5 fish in the boat on a lake that typically lands most people 1 or 0 fish. We had 12.68 Lbs total... 1st place had 13.68, 2nd had 13.44, biggest fish of the day was 3.68.
Only 3 boats had 5 fish. The rest had 3 or less. Last year, we had nothing on that lake, so I'm guessing we improved!
Re: BassMunn's PH16
Posted: Thu Sep 17, 2009 4:23 pm
by BassMunn
tobolamr wrote:
Question on your console: Is all of the access going to be through the bottom? Or is the console built to hinge up in some way? Your console is inspiring!
Are you going to transom-mount or thru-hull mount your transducer for your console depth finder?
Thanks Tobolamr - the console is glassed in place, all access is from underneath, although my switch panels will be removable making it easier to change switches if one of them goes dicky.
I'm going with transom mount - I intend on fitting a Lowrance HDS unit in the console with the add on Structure scan feature. This setup requires 2 transducers, 1 for normal sounding and 1 for structure scan (side imaging). The structure scan transducer has to be mounted on the transom to work. It also allows me to change units easily if I want to.
Re: BassMunn's PH16
Posted: Thu Sep 17, 2009 4:34 pm
by BassMunn
Update - I've had very little time over the last few weeks to work on the boat.
On Sunday I put another layer of glass over my gunwales after sanding them smooth, just to make sure they're strong enough.
Also spent a few more hours sanding and shaping my hatch lips (these things never seem to get done).
I seem so close but yet still so far away from final paint
I'm out of town for the next 3 weeks on business, so my boat and myself are feeling really sulky
Re: BassMunn's PH16
Posted: Sun Oct 18, 2009 7:04 pm
by BassMunn
Greetings fellow boat builders
, phew it's been a while hasn't it?
I recently joined Hilti and have been out of town on product training for the last 3 weeks, but it's all done now and I now have my weekends back to myself. My boat was very happy to see daylight after being under covers for the last 4 weeks.
After working on my wife's car, fixing the pool pump and doing a couple of other Honey Do's I didn't get much boat time in, but atleast I got a bit dusty
I'm at the stage now where I have a handful of little jobs to do, mostly final sanding and fitting of the hatch lids and I need to glass the console. After that it's time to sand the gunwales smoother and then the final fairing starts. The sanding is my favourite part - NOT!!!
I started building my boat on the 3rd of October 2008, so I've passed the 1 year mark (and here I thought I would be done by Dec 2008 - Yeah right
)
Re: BassMunn's PH16
Posted: Sun Oct 18, 2009 8:21 pm
by cape man
Good to see your back. Now get to it!
Re: BassMunn's PH16
Posted: Sun Oct 18, 2009 9:19 pm
by Murry
Diddo what Craig said Shannon.
Looking forward to seeing your progress.
Re: BassMunn's PH16
Posted: Mon Oct 19, 2009 12:06 am
by TomW
Good to see you back Shannon.
Now that spring is here for you and the fish should be biting you need to get that boat finished so you can use her.
Tom
Re: BassMunn's PH16
Posted: Mon Oct 19, 2009 7:40 am
by renierw
Hi Shannon,
I also bought some plans (FS14) from this site and this would also be my first try at boat building. I'm from Pretoria and would like to know if you could maybe post a summary on here what your time and cost (if you have this) is at this moment for this boat as well as some of the suppliers you used...
I would appreciate it, anyway I like your boat and progress and keep up the good work…
Renier
Re: BassMunn's PH16
Posted: Tue Oct 20, 2009 5:22 pm
by BassMunn
Thanks Craig and Daniel, I think I just might get stuck right in
TomW - You have no idea how much I am chomping at the bit to get on the water, our Large Mouth record has been unofficially broken twice in the last month and I can't get within casting distance of any Big Mamma's
But it will come
Renier, welcome to the forum and good luck on your first project.
Marine Ply should be available from many suppliers up there, Bison Board makes a nice Marine Ply.
Epoxy resin and glass you can get from AMT, there is a branch in JHB.
I'm feeling far too lazy to type out all my expenses and time for the build now, but if you read through this thread
http://www.bassing.co.za/bassingforum/b ... -ride.html
I wrote a pretty extensive list of costs that I have incurred for the build. I have never kept a time log, I've been building for just over a year now and I spent far too many hours working on the boat when I should have been sleeping or working
Now that I have a normal 8 to 5 job my building time is a lot more limited.
But be warned BBV lurks
(BBV stands for Boat Building Virus if you didn't know - The only way to cure it is to build more boats
)
Re: BassMunn's PH16
Posted: Tue Oct 20, 2009 5:56 pm
by TomW
Bass record broken twice, there's your incentive!
Get busy guy.
You are getting close maybe a couple of months or so and then you'll have it. I know you haven't had andy disruptions in your life.
I think you are doing a wonderfut job just plug away and it will happen.
Best to you, your wife and new family!
Oh I forgot to mention good luck on the new job!
Tom
Re: BassMunn's PH16
Posted: Wed Oct 21, 2009 3:06 am
by renierw
Thanks for the info, will have a look...
I read all your progress reports here and I must say that I'm scared now
...
This is a LOT of work especially if you only have a couple of hours here and there...
I guess that if you do a bit here and there it will get finished
Re: BassMunn's PH16
Posted: Wed Oct 21, 2009 10:26 am
by cape man
I read all your progress reports here and I must say that I'm scared now ...
This is a LOT of work especially if you only have a couple of hours here and there...
I guess that if you do a bit here and there it will get finished
Don't be afraid. It is easier than you think, and LOTS of fun with a huge reward at the end. There are some boats here that have taken over 7 years to hit the water, and others that have taken months. It all depends on what you want (especially the fairing and extras), but tackle it one step at a time and she'll become a boat. I just finished after 19 months and can't remember being prouder of something I made with my hands. I was nervous as a long tail cat in a room full of rocking chairs initially, but quickly learned that the plans and support here are all you need to make it through (and a certain amount of stubborn determination). I will say that the time estimates on the plans and web site are extremely optimistic, and assume you are building a basic hull with tiller steering and maybe a bench or two. At some point you will forget about the time and start enjoying the process, almost not wanting to finish...check out KS8's project if you don't believe me!
Re: BassMunn's PH16
Posted: Wed Oct 21, 2009 11:05 am
by gk108
Hilti? Don't they make fasteners for ferro-cement boats?
Glad to see you back at it.
Re: BassMunn's PH16
Posted: Wed Oct 21, 2009 5:52 pm
by BassMunn
Thanks Tom, I can't wait for the weekend SWMBO has given me full permission to spend the whole weekend building
Renier as Craig says, don't be scared of the project. Yes it's a lot of work but is the most fulfilling thing I have ever done in my life.
When I get frustrated I just go and look through all my photos and still can't believe that I did it all on my own, every inch of it. People already think I am telling tales when I tell them that I built it from scratch
The most common response is "But you can't do that" - watch me!
Start a build thread here when you get started, the help you get along the way from all the members is outstanding and it helps to be among like minded people who share your enthusiasm.
GK108 - Thanks for the welcome back. Yip we make some awesome tools, my cordless screwdrivers, circular saws and sanders are gonna get a good testing, but I think I'll steer clear of the concrete nail guns and hammer drills unless I want a submarine
Re: BassMunn's PH16
Posted: Thu Oct 22, 2009 1:44 am
by chicagoross
"two hours here and there" Could be a long time. But I built my HMD19 two hours a day in about 8 months. First it's great anti stress therapy, something to look forward to. I just made sure I got to it almost every day, so the momentum may have been slow, but never stopped. You glue or glass a few pieces, then the next day it's all cured and ready for the next spot. There are a few longer days like glassing the outer hull, that will be long days that need to be planned.
Wow! A job at a good tool company, with employee discount, could be dangerous for us builder types! We might take home our whole paycheck in tools!
Re: BassMunn's PH16
Posted: Fri Oct 23, 2009 5:52 pm
by BassMunn
chicagoross wrote:
Wow! A job at a good tool company, with employee discount, could be dangerous for us builder types! We might take home our whole paycheck in tools!
That's no kidding, but I have a pickup filled to the brim with demo tools that we are allowed to test
Gotta make sure they do what they say
Re: BassMunn's PH16
Posted: Fri Oct 23, 2009 6:04 pm
by wegcagle
Good to hear from you again Shannon. How's the bass fishing circuit going? By the way we need new pics. My junky habit needs to be fed.
Will
Re: BassMunn's PH16
Posted: Fri Oct 23, 2009 6:20 pm
by BassMunn
Hey Will, thanks for the welcome back.
I haven't looked at a Bass rod for 3 months, getting serious withdrawals
I'm planning on a whole weekend of boat building so I can take some pictures (I'll blame it on you
)
Re: BassMunn's PH16
Posted: Sun Oct 25, 2009 5:43 pm
by BassMunn
Had a good boat building weekend this weekend and got a whole bunch of the little things done.
Finally finished sanding the hatch lips and coated them.
Installed a backing plate into the console to strengthen it for the steering system.
Glassed the whole console
And finished most of the sanding in preperation for fairing compound (and got serious fibreglass itch
)
I gave myself a huge amount of extra sanding work by not protecting my hull sides from resin run when I glassed the gunwales, it's been on there for 2 months now so is as hard as stone
This is what the whole boat looked like
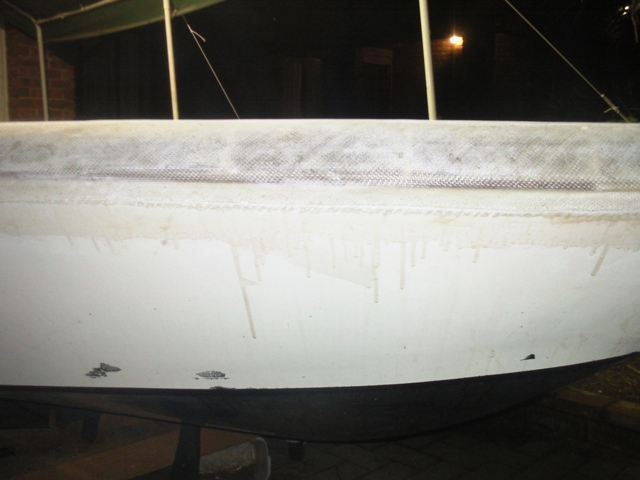
After some pretty hard sanding, ready for fairing compound
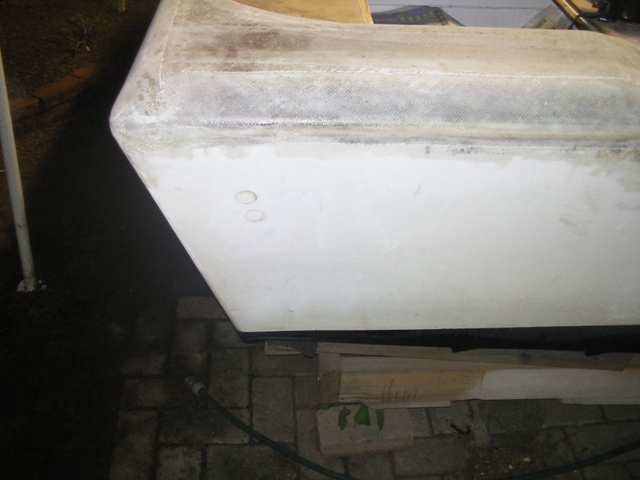
Still looks pretty much the same as the last pics ( but I promised Will pics
)
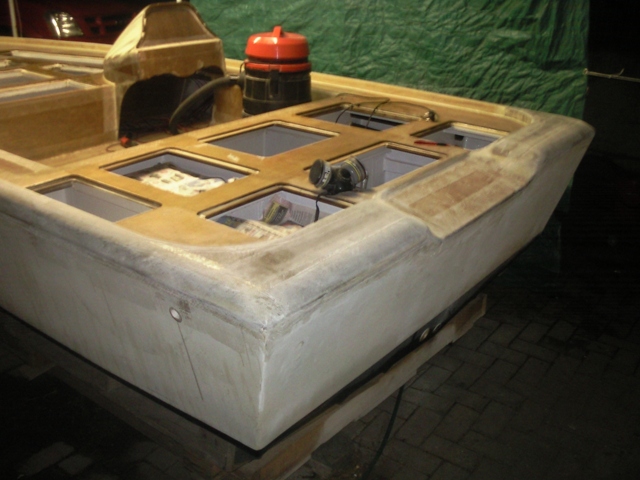
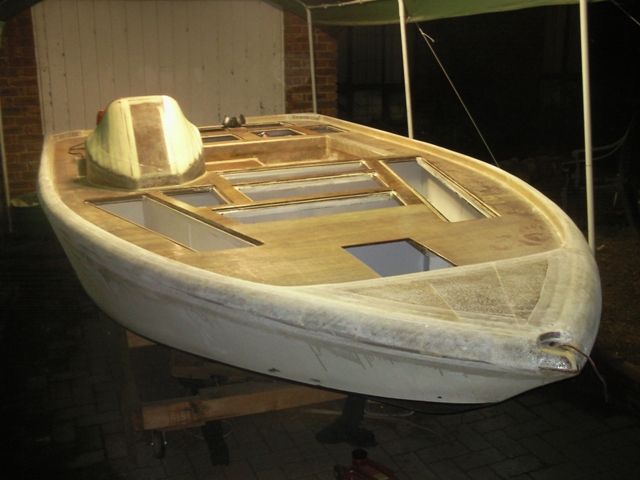
I love my therapy, I even had fun sanding this weekend
Re: BassMunn's PH16
Posted: Sun Oct 25, 2009 5:58 pm
by BassMunn
OK I need some ideas
What could I use to do the fairing on my gunwales, a fairing board won't bend far enough and will cause flat spots. I suppose I could try by hand, but I don't think I will be able to exert an even pressure consistently over the area (and my finger joints won't hold up too long either)
Re: BassMunn's PH16
Posted: Sun Oct 25, 2009 6:20 pm
by fishin'
what about a piece of large diameter pvc split in half down its length. I can't tell from the pictures exactly what that curve is like, maybe it isn't that round?
Re: BassMunn's PH16
Posted: Sun Oct 25, 2009 9:13 pm
by Murry
Not sure on the fairing tool, I would have to look at it for awhile until something came to me.
Man, they look good though Shannon, I like everything you've done to make her your own.
Fantastic job
Re: BassMunn's PH16
Posted: Sun Oct 25, 2009 9:21 pm
by Dougster
Maybe a stiff piece of leather...put the the sandpaper on that and bend it with your hand? You'd need pretty thick leather I guess. It's sure worth getting right, 'cuz the build looks great this far.
Like he knows anything Dougster
Re: BassMunn's PH16
Posted: Sun Oct 25, 2009 9:42 pm
by D2Maine
nm
Re: BassMunn's PH16
Posted: Sun Oct 25, 2009 10:45 pm
by peter-curacao
D2Maine wrote:wrap some plastic over the shape you want tape down some cardboard soaked with epoxy and enough glass for stiffness. use the gunwale as a male mold.
maybe a sponge soaked in epoxy?
Re: BassMunn's PH16
Posted: Sun Oct 25, 2009 10:57 pm
by Murry
peter-curacao wrote:D2Maine wrote:wrap some plastic over the shape you want tape down some cardboard soaked with epoxy and enough glass for stiffness. use the gunwale as a male mold.
maybe a sponge soaked in epoxy?
I like the sound of that Peter. That would work for any shape.
I wonder how long it would keep its shape.
I'm going to try that one day.
Re: BassMunn's PH16
Posted: Sun Oct 25, 2009 11:23 pm
by cape man
I wonder how long it would keep its shape.
It'll be an artifact for the next species ruling earth to find..." Wow. Check this out. A fairing tool for the gunwales of a custom boat that was built by those humans."
Re: BassMunn's PH16
Posted: Mon Oct 26, 2009 4:19 pm
by BassMunn
Hey guys thanks for the imput and comments, some nice ideas there. Still have to get more fairing compound so have a few days to ponder over it and try make something up:doh:
Thanks
Shannon
Re: BassMunn's PH16
Posted: Mon Oct 26, 2009 5:47 pm
by wegcagle
Thanks for the pics, Shannon. She's lookin' pretty slick
If I were you I think I would buy some sanding sponges, and use those to fair. I appreciate the pics.
Will
Re: BassMunn's PH16
Posted: Tue Oct 27, 2009 3:11 am
by renierw
Hi Shannon,
What fairing compound do you use? Also from AMT.
Thanks,
Renier
Re: BassMunn's PH16
Posted: Tue Oct 27, 2009 4:14 pm
by BassMunn
Thanks Will, you know I went into our local DIY shop yesterday to see if I could find something like that, landed up getting so side tracked with all the other nice toys I spotted that I only realised that I hadn't even looked for sanding block/sponges after I left
RenierW - Yes AMT makes a fairing compound called Amfill, it takes like 2 days to dry enough to sand, but it sands really nicely.
You can also make your own fairing compound by mixing lots of microballons with resin and then just adding a little silica to stop it running. It works well but is still harder to sand than amfill
Re: BassMunn's PH16
Posted: Tue Nov 03, 2009 5:29 pm
by BassMunn
Got more fairing compound today and just couldn't resist starting
First I needed to drill out my jack plate mounting holes while I could still see the epoxy plugs and just make sure everything goes where it should.
All good
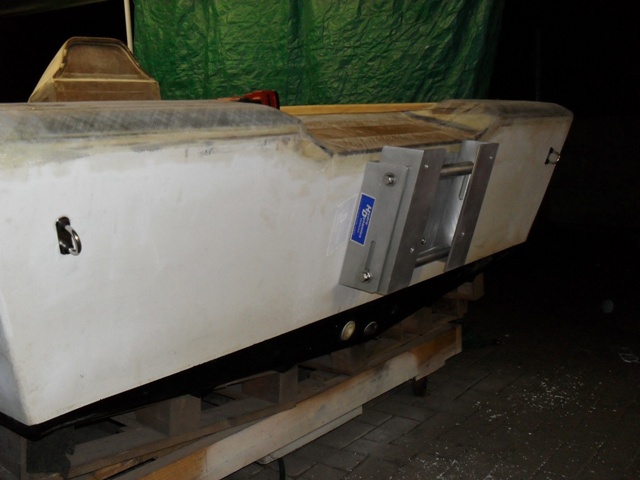
Then just tested it's travel - you think it's high enough
I could probably run an UL shaft with amount of height
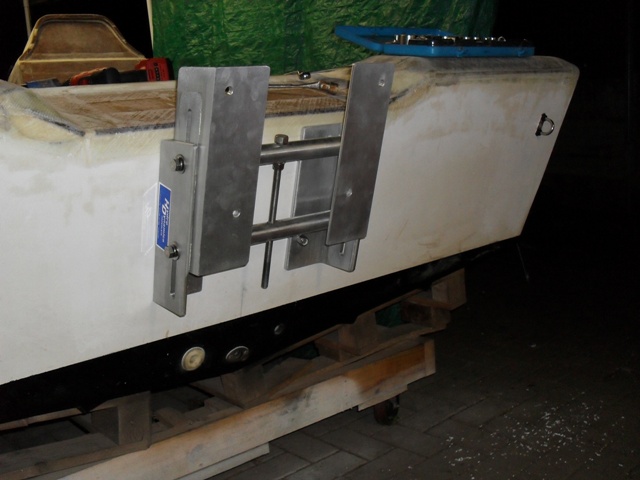
Then removed it all and started laying down the fairing compound, didn't get too much down, it's a bit late here.
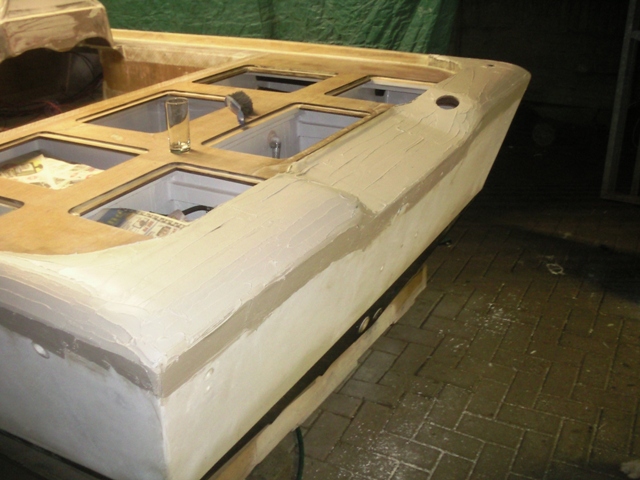
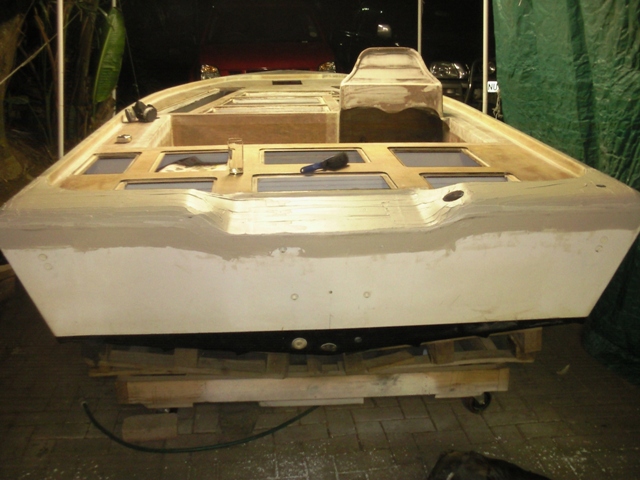
I can't wait to sand this smooth to see how it comes out.
Re: BassMunn's PH16
Posted: Tue Nov 03, 2009 5:32 pm
by cape man
SWEET! Getting closer....
Re: BassMunn's PH16
Posted: Wed Nov 04, 2009 2:26 am
by TomW
Nice!
Tom
Re: BassMunn's PH16
Posted: Wed Nov 04, 2009 4:35 pm
by MarkOrge
Nice work, almost there eh?
Say, how much inside height will you have left after placing the seat cushion in on those supports? I understand the PH line has less interior depth then a typical bass boat?
The reason I ask is that the seats I am looking at are 6" thick and will need to be on a 6" riser. At least I assume so to keep from feeling like you are driving a go cart?
Mark
Re: BassMunn's PH16
Posted: Wed Nov 04, 2009 4:57 pm
by BassMunn
Mark the height from deck to sole is 12". My seat bases are 5" and the seats uncompressed will be 4". I will sit pretty high but my previous bass boat was the same so I am used to it and feel pretty comfourtable
Not a great pic, but here you can see the seat height I am talking about
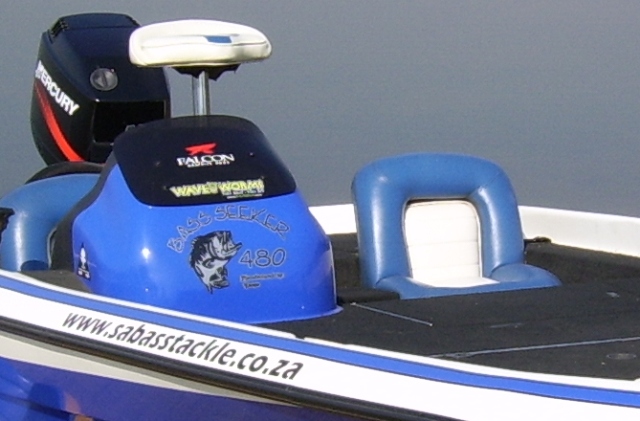
Bigger boats like the Rangers have a deeper sole in the cockpit allowing a lower seat height with thicker seats
Re: BassMunn's PH16
Posted: Wed Nov 04, 2009 5:02 pm
by peter-curacao
BassMunn wrote:
Familiar looking console, only yours looks way better

Re: BassMunn's PH16
Posted: Wed Nov 04, 2009 5:19 pm
by BassMunn
Re: BassMunn's PH16
Posted: Thu Nov 05, 2009 10:44 am
by wegcagle
Lookin' good Shannon. The end is approaching quickly
Bass beware
Will
Re: BassMunn's PH16
Posted: Thu Nov 05, 2009 11:10 am
by MarkOrge
Thanks Shannon. I'll have to lower the seat base by the sounds of things. I had posted a query on lowring the sole but that gets into altering the engineering and complicates matters from the feedback I got.
I may have missed it, but how/were did you decide to go with skeg instead of pad?
Did you go with the Evinrude 115? I have one and love it, great on gas, never has given me a spec of trouble in 4 years now.
You are likely tired of hearing it, but that console rocks.
Re: BassMunn's PH16
Posted: Thu Nov 05, 2009 1:42 pm
by Steven
Hey Bass. I think this tool will work for fairing your gunnells. It's very flexible. It's a dense nerf type foam with a very thin spring still plate on the bottom. It's very flexible. It's 12 bucks at Harbor Freight Tools.
http://www.harborfreight.com/cpi/ctaf/d ... mber=98167

Re: BassMunn's PH16
Posted: Thu Nov 05, 2009 4:28 pm
by BassMunn
Thanks Will
Steve that's just what I've been looking for but can't find one here. But
I have some nice high density foam that's like 2" thick, that I think will do the trick. I'll try it out on the weekend.
Mark, John Pellegrini lowered his sole in his PH18 just in the cockpit area, he added a lot of extra pieces to strengthen it up, but there was a post made on this forum somewhere with a link to a boat surveyors site. The surveyor stated that cutting pieces out of stringers like what you would need to do here was one of the major contributors to hull failure. I wouldn't chance it.
I wanted to install a pad instead of the skeg, but got too worried about the boat sliding in turns too much so I installed the skeg instead. In all honesty I've got a feeling that I might cut it off one day. I might be wrong but if I were to build it again I would leave the skeg off and not put a pad in either, just run on the Vee. I had a chat to a racing boat designer and he said that because of the shallow vee a pad would make a minimal performance change of maybe 1-2 mph if I got it perfect, but if I got it wrong it would have far more profound negative affects on the handling.
I haven't bought a motor yet and probably won't be able to for some time, but I've narrowed it down to the 115 ETEC and the 115 Opti. I actually had a look at both of them yesterday and they are brute looking motors
.
It's nice to get some feedback from 4 years experience, thanks. I've read lots of forums about them and they seem pretty awesome. I've never owned a Rude but have owned a Merc 90 Carb which was brilliant, but I've read a few forum posts about guys blowing the Opti's or popping injectors. I think my final decision will be based on price as I have a very good dealer 5 minutes away that sells and services both.
Re: BassMunn's PH16
Posted: Thu Nov 05, 2009 4:42 pm
by peter-curacao
BassMunn wrote:
I haven't bought a motor yet and probably won't be able to for some time, but I've narrowed it down to the 115 ETEC and the 115 Opti. I actually had a look at both of them yesterday and
they are brute looking motors .
I know exactly what you mean

last Miami boat show I was looking at the 250's and 300's ETEC's, I thought those things where gonna sink my little boat, men those things are huge, almost bigger as I am, turned me on in a weird kind of way dough

Re: BassMunn's PH16
Posted: Thu Nov 05, 2009 5:06 pm
by BassMunn
So you also found yourself standing a little too close wanting to hug them
Re: BassMunn's PH16
Posted: Thu Nov 05, 2009 5:14 pm
by peter-curacao
BassMunn wrote:So you also found yourself standing a little too close wanting to hug them
Almost did hug them until I slipped

over my own drool

Re: BassMunn's PH16
Posted: Thu Nov 05, 2009 5:20 pm
by BassMunn
Re: BassMunn's PH16
Posted: Thu Nov 05, 2009 6:30 pm
by stickystuff
I ran an 90 HP Mariner on my PH`16. Carb. model. weighed 315 lbs. More than sufficient HP. Withmy mediocre pad design and strakes, with jack plate and Stainless 19" prop it would run out at around 42 MPH. All the PH designs will slide even with the pad. and strakes. It stopped the slideing about 25% against the bare hull with center keel as designed. I wouldn't go crazy with all the hull bottom designs like adding pads etc. Not worth the extra performance. You will get the same speed +- a few mph. Lots of extra work and time doing this. To me if I were to do it again I would leaved them off and just go witth the cennter keel.
Re: BassMunn's PH16
Posted: Thu Nov 05, 2009 6:39 pm
by Cracker Larry
Re: BassMunn's PH16
Posted: Fri Nov 06, 2009 9:10 am
by BassMunn
stickystuff wrote: To me if I were to do it again I would leaved them off and just go with the center keel.
BassMunn wrote:
I might be wrong but if I were to build it again I would leave the skeg off and not put a pad in either, just run on the Vee.
Mark, Ken (sticky stuff) built his with a pad and I built mine with a skeg, but you'll notice that we both agree on what we should have done.
I still love those pics of "Ol Woody", you must miss her Ken
Re: BassMunn's PH16
Posted: Sat Nov 07, 2009 1:28 pm
by MarkOrge
Some more dumb questions for the day from the rookie field:
1/ Can I install the fuel tankbelow deck between the stringers? Has any one done this? he reason I would like this is it maximizes the storage under top deck and one can keep the center of gravity where it should be. Moeller makes a 30 gallon one about 16" X 70" tha is 30 U.S. gallons.
2/ Do you just epoxy the strakes to the almost finished hull and they will stay on? I recall seeing somewhere a concern that these may "let go" and one should consider putting them in then glassing overtop, albeit this makes th fairing job even more PITA.
3/ Sticky stuff I think reccomended a deeper pad - are we all in agreement to just leave the vee and go with steering strakes or are there mixed opinions on pad vs no pad? No pad would be another option to keep it simpler, fairing easier, and like you said the risk vs reward may not make for a strong case in favour of pad, but I would like to hear it from one of the guys that went with one if that is OK.
4/ When we move the cockpit up for a bass boat and add the trolling motor and two deep cycle batteries up front, does this mess up the center of gravity?
5/ How does the Phantom ride with one person? I ask because my current boat leans to one side, then becuase I put the fuel tank in a side to side mounting fashion of course the 1/2 tank sloshes to one side and you are heading down the lake on one side of the hull.
6/ I think I noticed Ken went with the cool Minn Kota trolling motors on the trim tabs - what is hte opinion/ cost benefit of the tabs? That would be the answer to my running down the lake listing to one side....
Re: BassMunn's PH16
Posted: Sat Nov 07, 2009 3:43 pm
by fishin'
I'll answer what I can
3- As in the post above yours, sticky stuff says he would not do the pad again. Seems like a lot of work for not much gain to me.
5. I am assuming it will ride like any other small boat if one person sits off center, it will lean. If you sit in the center things should be fine.
6. After having tabs on my current flats boat I can't imagine not having them on a future boat. They work incredibly well. You can adjust them to compensate for listing caused by all kinds of things. They also help to keep the more steep v of the bow down into a chop so the ride is MUCH smoother.
good luck, hope this helps
Re: BassMunn's PH16
Posted: Sat Nov 07, 2009 4:12 pm
by BassMunn
Mark I'll answer what I can
1. Yes you can install the tank under the sole, but there is no place in the hull that will accomodate that size tank under the sole, the longest is 36", Your stringers will eliminate the idea of installing a tank transversely under the sole as they are only 12" apart on either side and 24" apart in the centre and come all the way up to sole level.
2. Glue the strakes onto the glass of the hull, glass over them and then fair them.
3. No Sticky Stuff recommended leaving the pad out.
4. Yes it would, that's why my fuel tanks are at the back, to compensate for the batteries and trolling motor up front, and I will be running a larger heavier motor. If it's still nose heavy I will move the trolling motor batteries to the back, but I doubt I'll need to.
5. Will tell you once I've splashed her
, but my previous bass boat which dimensions were almost identical to this boat except for a deeper vee, would list at idle speed but would straighten herself up as soon as you got on plane. Obviously it would lean slightly but not to the point that you really noticed it. A narrower deeper vee will list more. Install your tank longitudinally
6. Never used them so can't comment
Re: BassMunn's PH16
Posted: Sun Nov 08, 2009 4:09 pm
by BassMunn
Well I stirred up a dust storm today
Console Fairing, still not finished but getting there
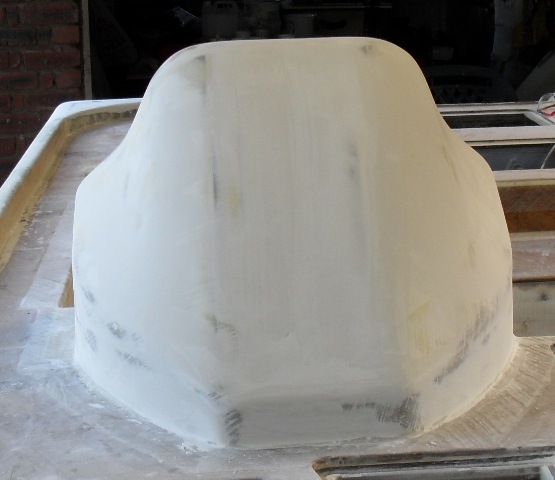
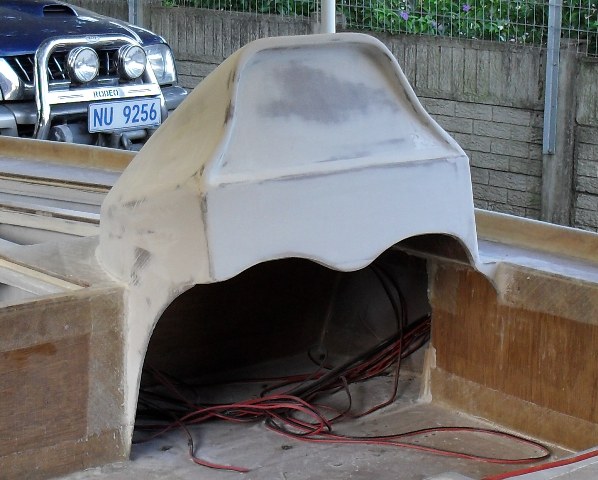
First round of sanding finished on the transom gunwale, one more layer of fairing compound should do it
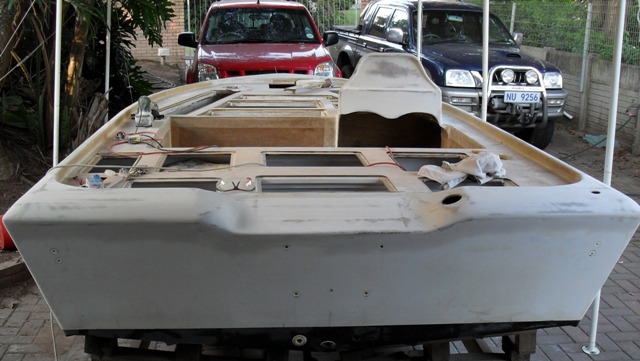
Spent the rest of the day sanding off my resin runs down the sides and called myself all sorts of names for letting it happen in the process, but it's done now, so tomorrow night I'll lay the fairing compound over those areas and get to making this girl all nice and smooth.
Re: BassMunn's PH16
Posted: Mon Nov 09, 2009 6:50 pm
by chicagoross
That's gonna be about the prettiest console we've seen on an amateur build! Very nice work! It does add "just a bit" of extra fairing and sanding, doesn't it!
Re: BassMunn's PH16
Posted: Tue Nov 10, 2009 3:42 pm
by BassMunn
Thanks Ross
I must say it's not the easiest to get into those little corners and everytime I think I got the outside nice and smooth, I look at it from another angle and see a new little ridge
But it's getting there. I can see me sanding off the paint 3 or 4 times as some of the areas are just so hard to check for errors without them shining.
Re: BassMunn's PH16
Posted: Fri Nov 13, 2009 11:31 am
by tobolamr
Fantastic work! Keep it up! I can't wait to see you finish her up!
Re: BassMunn's PH16
Posted: Fri Nov 13, 2009 12:33 pm
by wegcagle
She's looking incredible Shannon
How long has it been since you've been in a production boat? I just went out fishing in the St. George Is Bay yesterday, and realized that we are all putting ourselves at a TOTALLY different standard than most production boats. For example I was looking at a bass boat and noticed how much shotty fiberglass work was covered by carpet. Also all of the livewells had plastic liners. Wondered what it looks like under the plastic
Looking good almost there now
Will
Re: BassMunn's PH16
Posted: Sat Nov 14, 2009 4:22 pm
by BassMunn
Thanks Tobolamr
Thanks Will, it's been about 4 months since my last fishing trip, pretty hectic for a person who used to fish atleast once a week.
I was actually supposed to go fishing last weekend, but decided sanding sounded like more fun
I know what you are talking about with production boats, hell some of the boats here don't even have the carpeting to hide the eyesores.
Re: BassMunn's PH16
Posted: Sat Nov 14, 2009 4:35 pm
by BassMunn
Update
Laid fairing compound over the rest of the gunwales, second coat of compound over the already sanded areas at the transom, bow and console.
And put some leftover fairing compound onto some areas of the deck where there are tape ridges, I'm not going to over do the fairing on the deck as it get's covered in carpet
Have to wait for 2 days before I can sand, so tomorrow I'm gonna play with some paint on a scrap hatch I purposely kept for this reason.
Re: BassMunn's PH16
Posted: Sun Nov 15, 2009 5:23 am
by chopperman
She's looking real good BassMunn! I really like the contour of your upper transom and motor well
Re: BassMunn's PH16
Posted: Sun Nov 15, 2009 6:40 am
by stickystuff
Getting back to the pad design. What I did was to take two 1 X 3's and ripped them down from 0 to 3/4. Did this edge wise which gave you 3 1/4" wide. then leveled across from center of keel outwards on each side. this gives you approx. 8" wide pad. This way you still have your depth as designed. Not really enough pad height to be sufficient for running height. You should have at least 2" to be able to tell if you have any lift and run on a pad. Also by doing this you are sacrificing more of your shallow water running. 2 " more sticking below the hull means more scraping in shallower water. Not only running but poling or running on trolling motor. We all learn from trial and error. Can be costly in the end.That is why I suggested leaving the pad off. This hull performs great as designed and you won't find a more stable platform to fish off of for this design. Your hull looks fntastic. I can appreciate the time and effort you have put into it. It really amazes me what builders do to customize their hulls. Great Job. Can't wait to see the finished product. Thumbs up to you my friend.
Re: BassMunn's PH16
Posted: Mon Nov 16, 2009 6:13 pm
by MarkOrge
Ditto - she is coming together really nice, can't wait to see her with paint....you will have to take lots of pix, I bet this is the most popular project on the go right now!
Another question; the splash well is great looking too - I'll be running an 8" hydraulic jack plate but no raised sides. Bass boat cockpit but the decks will be flat - did you do a calculation of some kind for how deep/wide/angle the splash well needed to be? Could I do similiar even though I do not have raised sides?
What would be everyone's opinion of my PH18 just running with just reversed chines and NO steering strakes? It would make the bottom fairing a lot simpler without the strakes in the way to have to work around....do the strakes make a huge difference or something like just say 10% tighter corner ability?
My current boat has no strakes and a mild reverse chine and I am OK with it, just need to drive accordingly. I don't notice a lot of sliding when cornering too tight, cavitation for sure though.
Re: BassMunn's PH16
Posted: Tue Nov 17, 2009 1:42 am
by TomW
Mark if you don't do the strakes do the 1x1 skeg. Stop it a 8" to a foot short of the transom and run it as far forward as you can tapering it at the forward end. The reverse chines will also help but the skeg will help more and won't interfere with your fairing. You can put it on after the fairing and add a layer of fiberglass over it then fair that in. The fairing compound is epoxy based.
2nd I would recommend against an 8" set back jack plate, a 4" plate would be better. You want to keep the motor as close as possible to where it was designed to go. Otherwise you will need to make some weight adjustments to make up for that weight forward of the CG.
3rd you mentioned cavitation on your current prop. That sounds like your either running it to high or your running a prop with not enough pitch/rake or cup. To much cavitation is not good for your engine.
Tom
Re: BassMunn's PH16
Posted: Tue Nov 17, 2009 5:43 pm
by BassMunn
Thanks for the nice comments Ken
Mark if it were me I would install the strakes and leave the skeg off, the strakes don't add to your draft as they sit higher than your keel and there is no way they will interfere with the water flow to your motor. I ended my skeg 8" from the transom, but at 50mph+ I'm sure it will not rise back up in time to not affect your motor height (Hope I'm wrong and it doesn't or mines coming off).
Your prop cavitating as Tom says can cause problems, running too high can cause it and at the same time running too high you risk loosing water pressure and cooking your motor.
Props can cause it as well, if you are running high you need to be running a surfacing prop designed to deal with more air in the water. A lot of guys say a 3 blade prop is faster, it is if you have no cavitating. I tested 6 props on my old boat and eventually settled on a 22" High Five, gave me the best top end, best handling and the best motor height. I will choose a 4 or 5 blade prop over a 3 blade anyday. (but that's just my opinion)
Re: BassMunn's PH16
Posted: Thu Nov 19, 2009 8:02 pm
by MarkOrge
Thanks Shannon. Sorry if I seem to be high jacking your forum, but as you can tell the popularity is a testament to your success and inovative thinking and attention to detail ! Once I get my plans and get started I'll start mine. As of tonight the heat in the garage is hooked up and stoking away as we speak so I am ready for lay ups!
Can you tell me how much HP you needed to swing a 22? I am not sure if my 115 would do much over 19....even on the PH18...
As for cavitation, it is usually when I am trimmed right up and cranking the corner just a little too much, I trim down and back off and all is fine
So short version is mostly my fault.....and of course we run a lot of aluminum up here especially on new water as the rocks ar like a inefield....that is likely a factor too.
Any opinion on a starting point for my 115 on the 800 pound PH18? Where are you planning to swing on yours?
Also, I hope you are OK with my copying your console X 2 ? Free beer next time you are in Southern Ontario
Re: BassMunn's PH16
Posted: Mon Nov 23, 2009 6:06 pm
by BassMunn
Mark no problem, I don't see no thread hijacking - Just boat talk
I was swinging that 22" on a 90hp Merc Carb, but bear in mind that the 90 Merc has a gear ratio of 2.38:1, your ETEC 115 has a ratio of 2.0:1. My old setup could do 46mph (GPS), 1 up, but I was over reving slightly
and it was a dog on pull off.
The Evinrude site shows a test with a Stratos 186XT, running a 20" on the 115HO, you have 15HP less than this model but this boat weighs 1450lb dry W/O motor
Stainless makes a huge difference in your ability to trim as opposed to Aluminium, Ali looses it's bite very easily. The Ali props are also generally not shaped for high performance, they are more generalist props.
No problem on copying the console, there are lots of things I copied from others on here
Re: BassMunn's PH16
Posted: Mon Nov 23, 2009 11:50 pm
by TomW
Mark if your going to run aluminum run a 4 blade. Solas makes a good one with some cup and rake for about $100. The ideal would be a SS of course properly cupped and raked for your 115. I can give you a discount site in Michigan where most of the SS are in the $250-300 range and then you can find a good prop shop to fix it, usually $50 or so. There should be several in the Detroit area with all the boats and all. I know about those rocks of yours up there, they can be nasty. When your ready I have some formulas I have used to help others here to prop there boats. There was another guy that also did it and we did it jointly but he has disappeared so I am doing it myself. Let me know and I'll let you know what I need it get's pretty complex.
Tom
Re: BassMunn's PH16
Posted: Tue Nov 24, 2009 5:41 pm
by BassMunn
Just a quick update, been sanding my butt off. I think one more coat of fairing compound should be good enough to spray a primer with a guide coat, probably one more touch up fairing needed after that and then she should be good to go.
I can't believe how difficult those round gunwales are to fair
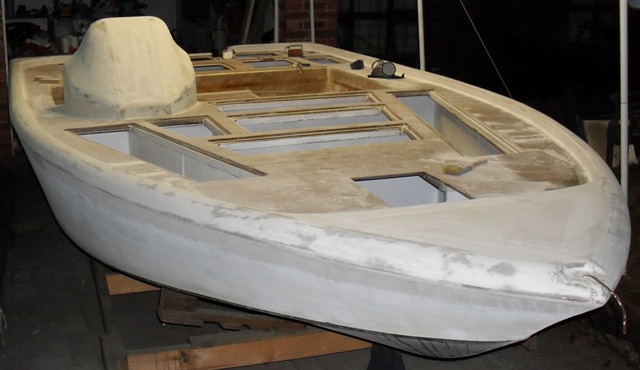
Re: BassMunn's PH16
Posted: Tue Nov 24, 2009 7:16 pm
by MarkOrge
She is going to be one sweet ride !
How long a rod can you put in those lockers? Planning on doing some "moose horns" for holders or just toss 'em in? Tubes?
Mark
Toronto
Re: BassMunn's PH16
Posted: Tue Nov 24, 2009 8:12 pm
by wegcagle
Lookin' really good Shannon.
Will
Re: BassMunn's PH16
Posted: Tue Nov 24, 2009 8:15 pm
by cottontop
Re: BassMunn's PH16
Posted: Wed Nov 25, 2009 6:36 am
by cape man
I recently purchased the PH 18 plans after watching and reading about your build.
John, can't wait to see you build another. I have some non-skid and wood flour left over I'll give you (sorry I used all the primer).
(sorry for the hijack but John's OD was the green light I needed to start mine and he sent me a gallon of primer, some wood flour and non-skid for the build).
For your PH18 to inspire him to build another is a huge compliment.
Re: BassMunn's PH16
Posted: Wed Nov 25, 2009 7:46 am
by Murry
That sanding is going to pay off Shannon
You really are doing a fantastic job. Every feature you built in her sure is impressive work and I'm
looking forward to seeing her in primer.
Daniel
Re: BassMunn's PH16
Posted: Wed Nov 25, 2009 9:03 am
by Bowmovement
Thats going to be the prettiest bass boat on the water
Matt
Re: BassMunn's PH16
Posted: Wed Nov 25, 2009 3:07 pm
by BassMunn
OK now I feel all Bashfull
Thanks for all the nice comments guys
Mark , port side takes 8ft, starboard 7ft, both with 6" to spare for movement. I was going to install rod tubes but it limits the amount of rods too much. I carry all my rods in custom made full size individual rod bags, so they all slide in really nicely. I'll be able to carry atleast 10 rods per hatch
(Yes I do fish with a floating tackle store
)
Cottontop, I would love to see you build a PH18 in a bass boat layout, use as many ideas as you like.
I generally don't name my boats, but it will have a small signature airbrushed on the side of the console reading something like "Phantom 16 Hand Crafted by Shannon Munn"
Re: BassMunn's PH16
Posted: Sat Dec 12, 2009 2:53 pm
by tobolamr
BassMunn wrote:(Yes I do fish with a floating tackle store
You're not the only one... My family think I'm nuts for having 8 rods ready to go. Flipping/pitching rod, worm rod, crankbait rod, buzzbait, 2 spinnerbaits, topwater & weedless popper. I really a couple more...
Your build looks great! Keep up the great work!
Re: BassMunn's PH16
Posted: Sat Dec 12, 2009 3:05 pm
by ks8
Love that last picture. I have an idea what has gone into bringing her to this point.
Good on the eyes.
Re: BassMunn's PH16
Posted: Thu Dec 17, 2009 6:05 pm
by BassMunn
Thanks Tobolamr and KS8
Sorry for the lack of posts lately, been working my butt off and haven't really had the time or the energy to work on the boat much.
BUT I have been on leave since yesterday
So guess who's gonna be doing some serious boat building for the next 2 weeks.
I sanded, cleaned and then put my final epoxy coat down on the whole deck and sole yesterday, tonight I did a final sealing on all my hatch lips and glassed on a Carbon fibre sheet to my console face. I'll take a pic of it once I've trimmed the edges (it looks too ugly now).
I've got one more round of fairing to do on the gunwales and then it will be paint time (Well after atleast a week of curing that is).
Re: BassMunn's PH16
Posted: Fri Dec 18, 2009 8:34 am
by BassMunn
OK I've trimmed the excess off the carbon fibre so it looks a bit better now.
I still have to give it a few more coats of resin to bury the cloth properly and I need to fair the edges into the rest of the console to make a clean line. It looks a bit odd now but once the Aluminium switch panels and all the other goodies are fitted it will look correct.
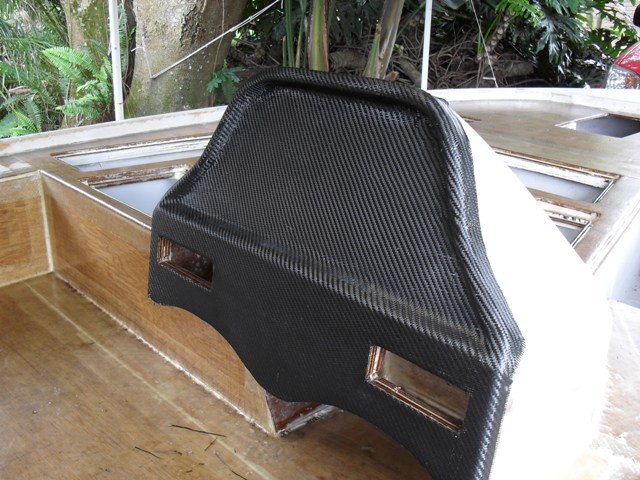
Re: BassMunn's PH16
Posted: Fri Dec 18, 2009 9:40 am
by Cracker Larry
That is awesome
Re: BassMunn's PH16
Posted: Fri Dec 18, 2009 9:53 am
by Murry
I'm with CL on this one
If I said it once I've said it a hundred times. BEAUTIFUL WORK SHANNON
That's going to look amazing. The paint and gauge trim it really going to set that off.
Re: BassMunn's PH16
Posted: Fri Dec 18, 2009 11:10 am
by wegcagle
Incredible work Shannon. That damn boat is gonna be too pretty to catch any fish
Will
Re: BassMunn's PH16
Posted: Fri Dec 18, 2009 2:35 pm
by BassMunn
Thanks CL, Daniel and Will
Glad I have some positive feedback, my wife looked at it and said "but it's black"
To which my response was "Uumm, but you have to see the bigger picture"
Re: BassMunn's PH16
Posted: Sat Dec 19, 2009 4:28 pm
by chicagoross
One more vote for "awesome", Shannon! Can't wait to see this beauty with a little paint on her!
Re: BassMunn's PH16
Posted: Sat Dec 19, 2009 8:30 pm
by Bowmovement
Thats going to look bitchin when all finished. Looks awesome now, but bitchin when done
Matt
Re: BassMunn's PH16
Posted: Sun Dec 20, 2009 2:59 am
by TomW
Agree with all above!
Tom
Re: BassMunn's PH16
Posted: Mon Dec 21, 2009 8:00 am
by cape man
Way too cool! Your wife will hopefull come around when she sees it finished. Mine didn't "see" the boat until after I painted it, and then she liked it.
Re: BassMunn's PH16
Posted: Fri Dec 25, 2009 5:57 pm
by BassMunn
Merry Christmas everyone! Hope you all had a blessed day.
Guys thanks for all the nice comments.
Been out of town for a few days on a trip to see my folks, while I was there I picked up my custom made boat seats
Got home on Wednesday and the first thing I did was test fit them to see how they fitted. Perfect fit and they look great, but then I jumped into the boat to sit on the drivers seat and realised that I have built my console too low
The console stays, so I now have to decide if I cut my seat bases lower (which is going to be a mission of note) or live with it.
Leg clearance is OK but could be better, but the steering wheel position and angle is a little too low as is the mounting position for the control box. As it stands now when I sit in the seat, even with a small windscreen my head height will be way above the console, so it will give no wind protection. If I cut the seat bases down it's gonna feel like I'm driving a go-cart, but the positioning of the steering and the cotrols will be better as well as the wind protection (I often fish tournaments in rain and it's not fun being smacked in the face by rain drops at 50mph).
Re: BassMunn's PH16
Posted: Sat Jan 02, 2010 6:19 pm
by BassMunn
I came up with another plan for my seat height problem
After sitting in the boat for hours I decided that the seat height is fine, the problem I had was that I had made the bottom part of my console too vertical meaning that my steering wheel was to level with the deck.
I considered getting a 20 degree bezel for my steering but that angle was a little too much, so I made up an extra plate for the steering to mount onto at a 14 degree angle.
The problem I had now was that I had already covered the console with a sheet of carbon fibre, I tried to cover the new plate as best I could without it being too noticeable and then recoated the rest of the console face to bury the cloth, BUT I put too much resin on and had some runs, no worry just tip it out while it sets. I don't know if all the other resins do this but wherever I tipped the resin it turned it a milky color
So this morning I tried to sand it out and landed up sanding half the cloth off, so I had to lay another layer of carbon fibre over the whole console face and try again. After the first coat had dried to tacky I laid the second coat down and sat for an hour with my wifes hairdryer keeping the resin nice and warm and making the runs go uphill
Apart from helping the resin to gel quicker and flatten the runs it also got rid of all the tinny bubbles caused by the foam roller.
I'll put one last coat of resin on it tomorrow to make it smoother, but it looks pretty good now
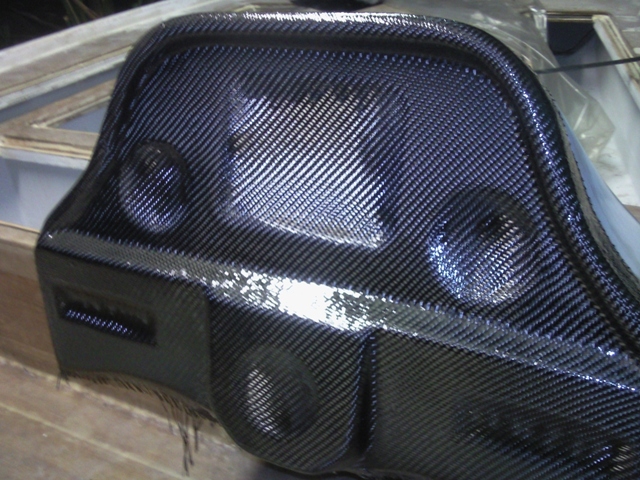
I've also finished all my hatch drain plumbing and have just a final touch up sanding to do and then I can paint her - Finally
Re: BassMunn's PH16
Posted: Sat Jan 02, 2010 6:25 pm
by chicagoross
Beautiful, Shannon! I just hope that with only two layers of carbon fiber the console face will be strong enough. Maybe a few layers of kevlar to really make it bulletproof?
Re: BassMunn's PH16
Posted: Sat Jan 02, 2010 7:05 pm
by BassMunn
Bulletproof isn't a bad thing here in good ole South Africa
(I've actually been shot at twice while fishing on my local lake and it wasn't for trespassing on private property, they just do it for fun and they're not warning shots
)
But, yes I know it's overkill, I just couldn't bear the thought of painting over that, it's there for cosmetics after all - Bling, Bling
Re: BassMunn's PH16
Posted: Sat Jan 02, 2010 7:13 pm
by hooter
question on that carbon fiber (or fibre...).
What radius do you need to have that sheet conform to the curve? I guess what I am asking is will it bend pretty easy to conform or does it tend to bounce back and trap air underneath?
Thanks.
hOOter
Re: BassMunn's PH16
Posted: Sat Jan 02, 2010 7:29 pm
by BassMunn
Hooter not sure of the bend radius required, it's a pretty light cloth I've got, but it bends and stays around corners better than the fibreglass I've used. I had read that Carbon fibre tends to float and is difficult to wet out, so I would coat the area first and leave it for 20 minutes or so to start getting tacky and then lay the cloth on it and wet it out. I really didn't think the cloth would handle all those curves without lifting or bunching up, but to my pleasant suprise it worked really well.
Re: BassMunn's PH16
Posted: Sat Jan 02, 2010 11:51 pm
by Cooper
That looks really nice! FYI: I've had luck in the past getting rid of all the little bubbles and smoothing out resin with a propane torch. I just go over with a quick swipe and everything levels and the bubbles go away.
Re: BassMunn's PH16
Posted: Sun Jan 03, 2010 5:52 am
by BassMunn
OK the hairdryer was a bad idea, came out this morning to look at my nice shiny console and it's got a matt finish
I've just put another coat over the top which has made it shiny again, but I am pretty disappointed at how it came out, you can still see a lot of the dull finish underneath.
Once it's dry I'm gonna wet sand it lightly to flatten it and try one more resin coat to see if I can get it right, if not it's getting faired and painted.
I've posted a question down in the paint forum, can you guys take a look and gie me some suggestions.
Thanks
Shannon
Re: BassMunn's PH16
Posted: Mon Jan 04, 2010 2:55 pm
by BassMunn
Re: BassMunn's PH16
Posted: Mon Jan 04, 2010 3:52 pm
by BassMunn
Just popped my seats in the boat to get a feel for the look. The rear of the seats will be slightly lower (I can't push them down hard now or I'll take the paint off).
What Ya think?
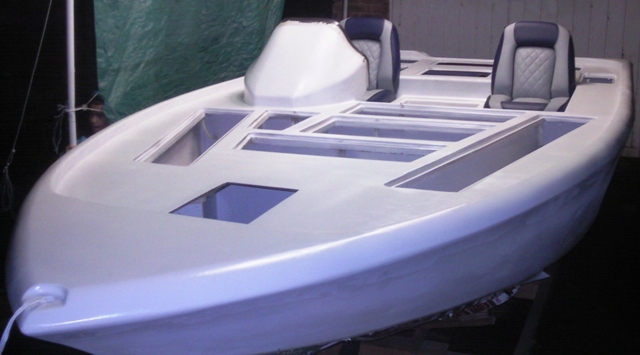
Re: BassMunn's PH16
Posted: Mon Jan 04, 2010 3:55 pm
by JamesT
Wow! Youre actually going to fish out of that thing? Should put it in a museum of home built boats!
Great work, and with your attention to detail, i bet it will really be one of the nicest boats around after paint.
Re: BassMunn's PH16
Posted: Mon Jan 04, 2010 4:22 pm
by BassMunn
Thanks James.
I'm gonna be swinging those Large Mouth onto the decks as soon as I can
Re: BassMunn's PH16
Posted: Mon Jan 04, 2010 4:48 pm
by kdog
Wow that looks fantastic! I had a tough time spraying the primer, just couldn't get a good even coat. Plus I had too many runs so I switched to roll and tip. Your results look much better, you're getting very close.
Re: BassMunn's PH16
Posted: Mon Jan 04, 2010 5:08 pm
by Aripeka Angler
Very, very nice
Your boat looks, well, fantastic
You are quite a craftsman. I can't wait to see pictures of the finished boat.
Richard
Re: BassMunn's PH16
Posted: Mon Jan 04, 2010 5:26 pm
by steve292
Thats fantastic. Beautifull boat beautifully built
.
Steve
Re: BassMunn's PH16
Posted: Mon Jan 04, 2010 6:11 pm
by BassMunn
Re: BassMunn's PH16
Posted: Mon Jan 04, 2010 6:23 pm
by cottontop
Yours is one fine boat. Great detail. If you keep going, everyone you meet is going to want you to build one for them. Very fine work and attention to detail. John
Re: BassMunn's PH16
Posted: Mon Jan 04, 2010 6:26 pm
by stickystuff
Goholee, ya better reach back and give yourself a big atta boy. Very nice. I as well as others are envious. Great job. You will love the hull.
Re: BassMunn's PH16
Posted: Mon Jan 04, 2010 6:47 pm
by BassMunn
Thanks John and Ken
I've still got to pinch myself and go and touch the boat just to make sure it's real, I'm actually pretty shocked that I managed to build that.
I wanna jump up and down I'm so excited
Re: BassMunn's PH16
Posted: Mon Jan 04, 2010 6:51 pm
by Joe H
Man, or should I say Bassmun, you should be excited, your boat looks GREAT!
Joe H
Re: BassMunn's PH16
Posted: Mon Jan 04, 2010 6:59 pm
by gk108
Beautiful blend of form and function. Every bass in the lake is going to be dying for a ride in your boat.
Re: BassMunn's PH16
Posted: Mon Jan 04, 2010 7:04 pm
by BassMunn
Thanks Joe H
gk108 wrote:Beautiful blend of form and function. Every bass in the lake is going to be dying for a ride in your boat.
Ooohh I hope so
- Thanks
Re: BassMunn's PH16
Posted: Mon Jan 04, 2010 7:35 pm
by chicagoross
Sweet, Shannon! Just keeps looking better and better!
Re: BassMunn's PH16
Posted: Mon Jan 04, 2010 9:14 pm
by peter-curacao

Wow that's amazing very very nice custom work,
all I can do is take a deep bow and my take hat off for you,that's a real nice head turner
Re: BassMunn's PH16
Posted: Tue Jan 05, 2010 12:35 am
by TomW
Out standing work. Can't wait to see her finished. You can really be proud of her.
Tom
Re: BassMunn's PH16
Posted: Tue Jan 05, 2010 4:18 am
by sideslippa
Very very nice, not too far now before the final finish goes on, I'll bet you are looking foward to getting that done and stepping back for a look. That will be a great moment I rekon.
Cheers Re. slippa.
Re: BassMunn's PH16
Posted: Tue Jan 05, 2010 9:01 am
by topwater
There goes the bar again
Re: BassMunn's PH16
Posted: Tue Jan 05, 2010 1:03 pm
by BassMunn
Ross, Peter, Tom, Slippa and Topwater - Thanks for the nice comments guys
I didn't do anymore boat building today, just went outside and looked at it about 40 times
Tomorrow I'll carry on with the console and try to get the resin over the carbon nice and smooth and shiny, it still looks kinda shoddy - What's the best way to shiny up resin? I was thinking of wet sanding it with like 200 grit to get all the bumps out and then taking it up to 400 to 600 to smoothen it out really nicely before I spray a clear coat over it. Do you think the clear coat will bring back the proper shine?
Re: BassMunn's PH16
Posted: Tue Jan 05, 2010 1:38 pm
by Lon
High gloss exterior polyurethane?
Re: BassMunn's PH16
Posted: Tue Jan 05, 2010 1:47 pm
by BassMunn
Thanks Lon, I should have clarified "Clear Coat". I'm gonna spray a 2 Part Polyurethane automotive paint over it (2K).
What I'm not sure of is that when you sand epoxy it obviously dulls the finish like paint sanded would, I'm just not sure if the paint will bring back the shine and hide the sanding marks (they'll be very fine, I'll even go as far as 1500 grit if I need to).
I know the top coat will be shiny, but for the carbon fibre to look correct it needs to be completely transparent all the way to the cloth fibres
Thanks
Re: BassMunn's PH16
Posted: Tue Jan 05, 2010 2:12 pm
by D2Maine
nm
Re: BassMunn's PH16
Posted: Tue Jan 05, 2010 2:14 pm
by BassMunn
I suppose that would be the correct way to do it, didn't think of that
Re: BassMunn's PH16
Posted: Tue Jan 05, 2010 5:14 pm
by sideslippa
BassMunn wrote:I'm just not sure if the paint will bring back the shine and hide the sanding marks (they'll be very fine, I'll even go as far as 1500 grit if I need to).
Rub your CF with 600-800 grit wet and when you spray on the clear it will be perfect. Have been down that road...
re. Slippa.
Re: BassMunn's PH16
Posted: Tue Jan 05, 2010 5:47 pm
by BassMunn
Thanks Slippa, I've actually just come back inside from a sanding round. I obviously haven't sprayed anything on yet but when I wet it down with water it looked right and the paint will have the same effect
Thanks to your confirmation it seems that I'm on the right track, I'll tackle the sanding again in the morning - Thanks
Re: BassMunn's PH16
Posted: Tue Jan 05, 2010 6:34 pm
by TomW
Bassmunn, the finer you go the better it will look. I can't find it right now but I'd show you some mantels I made using a hand rubbed finish. Go as far as you want as low as you want 1500 is not to fine. 9600 would be outstanding.
since it is just a small area. Good luck however you go!
Tom
Re: BassMunn's PH16
Posted: Tue Jan 05, 2010 6:43 pm
by BassMunn
9600 - Holy smoke I didn't know you could get that fine, I got excited when I found 2000
- that would sure shine things up
Thanks Tom I need all the help I can get on this part, this console has become a labour of love and I gotta get it right
Re: BassMunn's PH16
Posted: Tue Jan 05, 2010 7:58 pm
by TomW
I was being conservative they actually go through 12000 grit. They are called Super Fine Micro-Mesh Abrasive Disc's and are available in 5 and 6" sizes. But like I said what ever you do your going to do it right and it will look super. 2000 will if you work up to it at 200-300 at a time look outstanding. Then do your varnish and 3-4 coats of it and you can do a hand rubbed polish on it. Put it on with a solid rag as if you were hand rubbing it on. You may want to reduce it some with the thinner recommended. A hand rubbed finish is one of love and can't be beat. Good luck.
Tom
Re: BassMunn's PH16
Posted: Tue Jan 05, 2010 11:22 pm
by sideslippa
Beware, any finer than 800 grit and your lovely two pack clear finish will delaminate in time. Wet rub the epoxy on your carbon with a block (where possible) and 600 grit. Then put on 3 medium wet coats of 2 pack clear with appropriate flash off times. That will leave a good finish. If you want a mirror finish wet rub the cured two pack with 2000 grit untill it is flat ( knock of the top of the peel) then polish. Beautifull.
Re. slippa.
Re: BassMunn's PH16
Posted: Wed Jan 06, 2010 1:33 am
by TomW
Correct Slippa I'd say even less and don't go finer than 400-600 between coats of varnish. The final finish is where you get the depth of finish and beauty. That is where the the hand rubbing and sanding comes into being. In all reality 2000 is as far as you need to go and then use a super polish or wax. Going to 12000 is for museum peices and custom peices that won't ever see the light of day.
Tom
Re: BassMunn's PH16
Posted: Thu Jan 07, 2010 6:08 pm
by BassMunn
Thanks for the tips Slippa and Tom.
Got a few more things done today.
Laid fairing compound over the edges of the carbon fibre to blend it into the console - I'll sand it tomorrow.
Started wet sanding my primer on the gunwales and have lots more to do
And started making a mold for my trolling motor foot pedal recess - I know it would be easier to just make the darn thing and be done with it, but I want to play a little with pulling a part off a mold so we'll see how that goes. I've made the mold, tomorrow I'll sand it into a better shape and then coat it with epoxy, once that's dry I'll fair and paint it ready for pulling the part. I want the part black so I'll use polyester gelcoat and resin to make it (and just because I want to play
)
I will also be starting to finish my hatch lids soon and have a question - What have you guys used as supports on the underneath of the lids to strengthen them, I was thinking to just use a few strips of ply or 1" x 1" pieces of wood, what do you think?
Re: BassMunn's PH16
Posted: Thu Jan 07, 2010 9:59 pm
by TomW
1x1's wiil be fine especially if you do a cross peice and lap them with 3/8 over each other.
Tom
Re: BassMunn's PH16
Posted: Fri Jan 08, 2010 6:41 pm
by BassMunn
Tom I'm not sure if I understand you correctly?
The cross piece I get, basically one piece from corner to corner diagonally across the lid and then a second piece across the other 2 corners.
When you refer to "lap" them do you mean to cut a notch in each one so that they hook together where they cross?
Thanks
Re: BassMunn's PH16
Posted: Fri Jan 08, 2010 7:25 pm
by TomW
You have the lapping correct. By cross peices I meant 2 long outside ones and 2 long inside ones that you lap and however many short ones to provide good support so it looks like a square lattice work. No diagonals. You could lap the outside ones to make it stronger if you want. Glueing the laps together make a unit body support and makes it stronger.
Hope that makes sense now.
Tom
Re: BassMunn's PH16
Posted: Fri Jan 08, 2010 7:32 pm
by BassMunn
OK cool got it, thanks Tom.
Re: BassMunn's PH16
Posted: Mon Jan 11, 2010 4:38 pm
by cape man
I've still got to pinch myself and go and touch the boat just to make sure it's real, I'm actually pretty shocked that I managed to build that.
My friends that camped with me this past week got sick of me just looking at the boat and saying things like, "Hey guys. Did I tell you I built her?" One of the most rewarding experiences of my life, and yours will make mine look like a commercial fishing scow.
Re: BassMunn's PH16
Posted: Tue Jan 12, 2010 4:22 pm
by BassMunn
Thanks Craig, but you ain't got nothing to be shy of with that boat of yours. Your boat is lovely.
I have to agree with you, this has been one of the most rewarding experiences of my life.
I've just come back from 2 days at our head office, showed a few cell phone pics to some of the guys that know I'm building a boat.
The response was "No ways, that's a computer generated pic"
Gotta love it
Re: BassMunn's PH16
Posted: Sat Jan 16, 2010 12:56 pm
by tobolamr
Bassmunn - LOOKS AMAZING!!!!
Love how your console is turning out! Can't wait to see more pictures!
Re: BassMunn's PH16
Posted: Sun Jan 31, 2010 3:06 pm
by BassMunn
Thanks Tobolamr - sorry missed that last post.
Geez 2 weeks and I'm down to the bottom of page 2
Been plodding along with the build, sanded the primer down and sprayed another coat and ran out of primer half way through
Still have tons of pin holes in my primer, so I need more before I can continue with paint.
Installed reinforcing on the underneath of my hatch lids to prevent flexing, still need to sand them smooth and coat them.
I've also been playing with a mold to pull a gelcoat/polyester part for my trolling motor foot pedal recess, took a while to make it and prepare it for the glassing, but it was finally ready last night so I did the layup and pulled the part off this morning. It's actually quite fun to see a part materialise so quickly
Already faired and painted (well not really but you know what I mean) I made 2 just because I could.
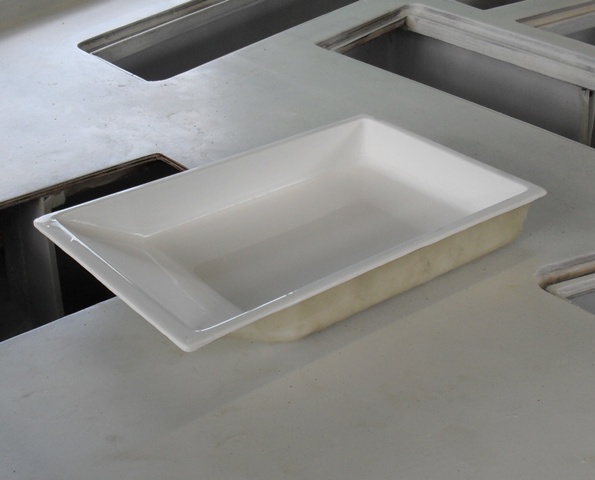
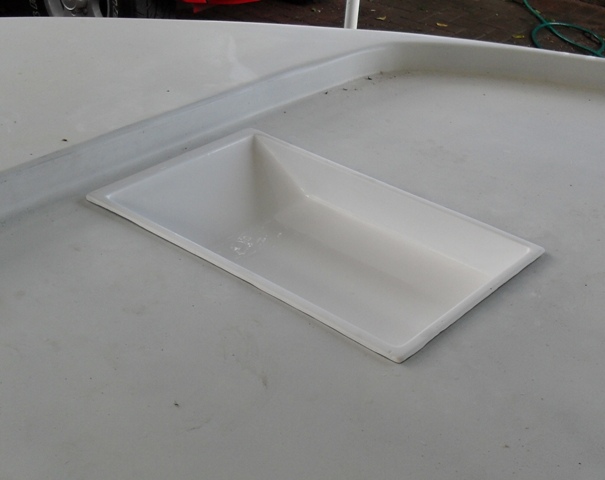
Re: BassMunn's PH16
Posted: Sun Jan 31, 2010 3:22 pm
by topwater
Nice work
Re: BassMunn's PH16
Posted: Sun Jan 31, 2010 4:32 pm
by TomW
Very nice Shaun!
Tom
Re: BassMunn's PH16
Posted: Sun Jan 31, 2010 6:32 pm
by cottontop
Your work is so good you may want to choose a new profession. John
Re: BassMunn's PH16
Posted: Mon Feb 01, 2010 1:07 pm
by cape man
Too Sweet!!! Love it! Did you take any pics of the molding process?
Re: BassMunn's PH16
Posted: Mon Feb 01, 2010 3:06 pm
by BassMunn
Thanks Topwater and TomW
Cottontop, maybe one day when I'm big
Craig I actually forgot to, it's a pretty simple process, but getting a really good finish on the gelcoat still eludes me. I had to sand my part and will probably paint or buff it to bring back the shine. I know what I did wrong now so should be good next time - I think
This is what the mold looked like after I pulled the part off.
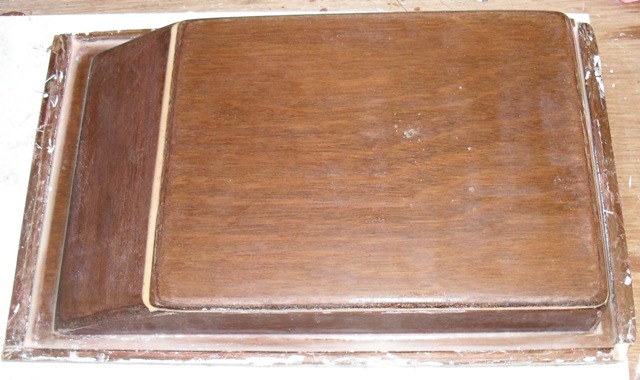
If you want details of the process just shout and I'll give you the run down
Re: BassMunn's PH16
Posted: Mon Feb 01, 2010 5:35 pm
by wegcagle
Beautiful
Thank God you finally posted some pics. I was starting to get DTs
Will
Re: BassMunn's PH16
Posted: Mon Feb 01, 2010 5:55 pm
by peter-curacao
Very nice! just a couple of questions though, if I understood correctly this is to place the your "gas" paddle for your electric motor? If so shouldn't there be a water drain in there? if so aren't you scared you're breaking the gelcoat doing this afterwards ? just trying to understand what you are doing.

Re: BassMunn's PH16
Posted: Mon Feb 01, 2010 6:19 pm
by BassMunn
Glad I could help Will
Peter - yes there will be holes through the plate, one for the power wires (batteries sit underneath) and the other for drainage. The part is pure fibreglass (no wood) so water isn't really off any concern. The hatch underneath contains drain holes for the water to run through to the bilge pump at the rear.
Re: BassMunn's PH16
Posted: Sun Feb 14, 2010 6:42 pm
by BassMunn
OK it's official - I hate sanding
I've lost count how many times I've sanded this whole boat - and I'm still not done
After having a good look over my primered hull, I wasn't happy with all the pinholes and other little nasties that I was seeing, so I did another light fairing of the whole hull sides, gunwales and console. Once that was done I sprayed another coat of primer.
Like so:
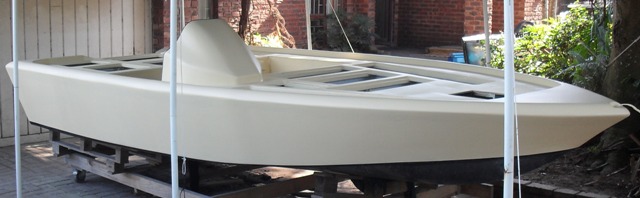
Then touched up the last few areas with liquid spot putty
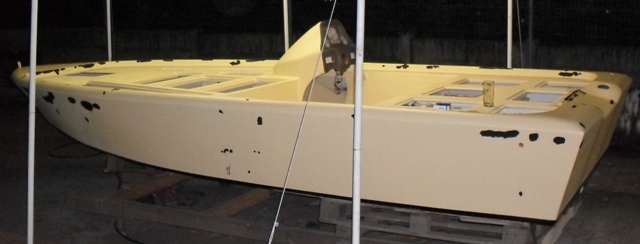
Sanded it again and preped it for the topcoat
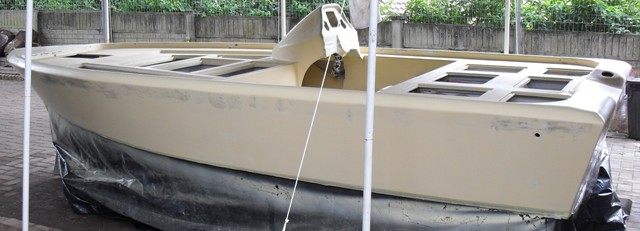
And here it is so far
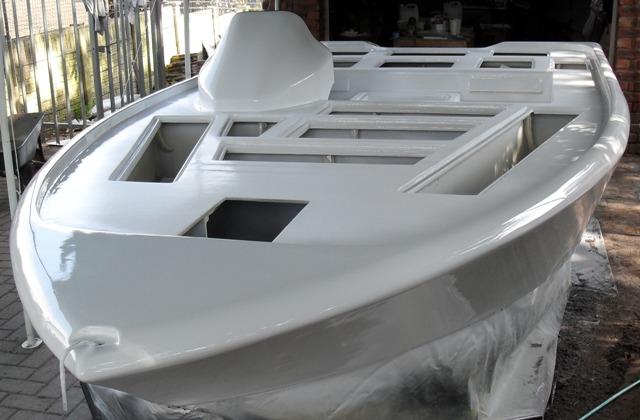
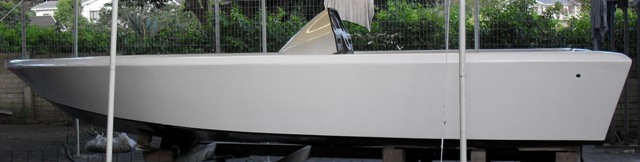
Now to start with the graphics, I expect to take another 2 weekends to finish the paint and then I can sand and buff this girl to a real shine
Re: BassMunn's PH16
Posted: Sun Feb 14, 2010 6:45 pm
by Larry B
BassMunn, that is a fine work of art. You have really done a great job, and the paint is looking great.
Re: BassMunn's PH16
Posted: Sun Feb 14, 2010 6:48 pm
by peter-curacao
Absolute drop dead gorgeous WOW

words are short
Re: BassMunn's PH16
Posted: Sun Feb 14, 2010 6:51 pm
by steve292
Thats fabulous!
Up goes the bar again
Steve
Re: BassMunn's PH16
Posted: Sun Feb 14, 2010 6:58 pm
by cape man
Re: BassMunn's PH16
Posted: Sun Feb 14, 2010 7:20 pm
by BassMunn
Re: BassMunn's PH16
Posted: Sun Feb 14, 2010 7:24 pm
by peter-curacao
BassMunn wrote:Now if I could just decide on my graphics layout
Are we allowed to think with you? if so give us a hint!
Re: BassMunn's PH16
Posted: Sun Feb 14, 2010 7:44 pm
by BassMunn
Peter Ideas and opinions welcome
I'm going to be laying down some glitter flake in Blue and Silver, I was originally going to do graphics very similar to the Ranger like this

But I'm now thinking of maybe doing something more like this (just obviously without the Nitro name)

The console will be both silver and blue as well which is unusual for boats as every boat I have ever seen always has a single color console
Still can't decide what to do
Re: BassMunn's PH16
Posted: Sun Feb 14, 2010 7:55 pm
by peter-curacao
Remember the graphics I wanna put on my little boat? do a Google search on for instance tribal car graphics etc.
Re: BassMunn's PH16
Posted: Mon Feb 15, 2010 12:22 am
by Fonda@kauai
Wow
Absolutely beautiful Shannon
Re: BassMunn's PH16
Posted: Mon Feb 15, 2010 1:13 am
by Cracker Larry
BM, (sorry, those initials don't really work
) BassMunn, boat master, build master, that is one fine job of boat building right there
You've set a bar that I'll never be crossing, sort of like some bars I've seen set on the Winter Games tonight, I ain't making it that far up that hill
I can't wait to see her rigged out, even if you put an Etec on her she's gonna be sweet
Re: BassMunn's PH16
Posted: Mon Feb 15, 2010 2:56 am
by BassMunn
Wow, thanks for those nice words, considering the boats I've watched some of you build, I'm honoured - thank you
CL you don't like them ETEC's do you
To be honest why the ETEC has taken my fancy is firstly it looks cool, but the main reason is that because they are trying to gain a foothold in our market they have been pricing them very competitively. I could pick up a 115 ETEC for cheaper than a 115 carb Yammie
. But they seem to be edging their prices higher now, so when the time comes I'll see who has the best deals.
I've owned 3 Yammies and 1 Merc all bought new or just about new and they have all been good motors.
Yamaha has dominated our market for years and up until 15 years ago had a 90% market share and at that stage for good reason, the problem is over here is that they are riding on their past success and they want us to pay for it. Where you can get a Yammie carb for $1000 less than an ETEC or Opti, over here they are $1000 to $2000 more expensive
My girl would like a nice blue ETEC to match the clothes she's getting, but she ain't fussy (as long as it's shiny
)
Re: BassMunn's PH16
Posted: Mon Feb 15, 2010 5:55 am
by cape man
My girl would like a nice blue ETEC to match the clothes she's getting, but she ain't fussy (as long as it's shiny )
You won't go wrong with that as a deal maker.
I'm going to steal this quote for the arguments that pop up here all the time over which motor to get.
Re: BassMunn's PH16
Posted: Mon Feb 15, 2010 10:29 am
by Cracker Larry
CL you don't like them ETEC's do you
It's not that, Build Master, the Etec may be a fine engine. I don't like BS statements such as "you can winterize it with one push of a button", "No maintenance required for 3 years", "better power to weight ration than a Yamaha"....let's keep it real
Seriously, I don't think there is a "bad" engine on the market today. I like Yamaha and Merc because they are proven to hold up the best in my area. I did warranty work on 4 different brands, so I know which ones lasts the longest. And I'm a little leery of new technology that hasn't had time to prove itself. Remember when oil injection first came out and was advertised as the greatest thing ever? Then OMC had to replace about 40,000 powerheads over a 3 year period and all the dealers were disconnecting the oil injection and telling customers to pre-mix fuel. It takes a few years to get the bugs out of any new product, ask microsoft
I'm sure the Etec will serve you well, and if it matches the wife's clothes that's a bonus. Mrs Cracker won't leave the house if her panties don't match her shoes, so I know how that goes
Where you can get a Yammie carb for $1000 less than an ETEC or Opti, over here they are $1000 to $2000 more expensive
Another very valid reason
Here, I can get a carbed 115 Yamaha 2 stroke for $6400, about $2K less than an Etec.
Great build man
Re: BassMunn's PH16
Posted: Mon Feb 15, 2010 4:27 pm
by stickystuff
Looks fantastic. One thing I will tell ya is the PH 16 hull design will not run on top like the Rangers.Unless you have a major pad design.It will run more on the flat 1/3 of the hull bottom. It will also have a tendancy to poirpous unless you have enough weight forward. You will still be very happy with the hull. Very stable and a beautiful fishing platform.
Re: BassMunn's PH16
Posted: Mon Feb 15, 2010 5:09 pm
by cottontop
Shannon, She is one pretty build. Looking forward to seeing her completelydressed out. Did you spray her like you thought you might? If so what kind of paint? Keep up the outstanding work. No one is going to believe she's all your build. cottontop
Re: BassMunn's PH16
Posted: Tue Feb 16, 2010 5:35 am
by BassMunn
Cracker Larry wrote:
It's not that, Build Master, the Etec may be a fine engine. I don't like BS statements such as "you can winterize it with one push of a button", "No maintenance required for 3 years", "better power to weight ration than a Yamaha"....let's keep it real
I hear what you are saying. The winterizing doesn't mean much to me as I never have to do it
I just carry on fishing
No Maintenance for 3 years - also makes me a bit edgy, I gaurentee I will have it in after 1 year to check or change the impellor and gear case oil at least.
Better power to weight than a Yamaha - yes if comparing to 4 stroke Yammie. The only true comparison is the Optimax, on the 90's the ETEC wins hands down but on the 115 they are identical except for the fact that the ETEC runs a remote oil filler which the Opti doesn't so it's actually heavier than the Opti.
I agree that there really aren't any bad motors out there, the Yammies still win the saltwater corrosion test and the 3 cylinder motors are very well proven. The 115 2 stroke carb though drinks like a bar fly at happy hour. I was fishing off a 16ft Raker (old Ranger hull) last year with a 130 Yam and it used to use almost twice the amount of fuel that my 90 Carb Merc did
and ony did 3 mph more. (My old boat was setup really well though, the Raker wasn't).
My top choices are an ETEC 115 HO or a Opti 115 Pro XS
If I don't win the lotto it will probably be a 90 Merc Carb if I can still get one.
Re: BassMunn's PH16
Posted: Tue Feb 16, 2010 5:47 am
by BassMunn
stickystuff wrote:Looks fantastic. One thing I will tell ya is the PH 16 hull design will not run on top like the Rangers.Unless you have a major pad design.It will run more on the flat 1/3 of the hull bottom. It will also have a tendancy to poirpous unless you have enough weight forward. You will still be very happy with the hull. Very stable and a beautiful fishing platform.
Thanks Ken - I noticed in that video of the Yellow PH16 that was built in Europe somewhere as a speed boat that it rides very low and flat in the water.
I'm actually concerned that I will have too much weight forward with my extra large front deck and the 2 large trolling motor batteries and trolling motor upfront, that's why I put my fuel tanks at the back and will be running a slightly heavier motor on a manual jack plate. I must say that I'm nervous for it's first trial run but at the same time can't wait to feel it under me.
But I definately know that it is going to be an awesome fishing platform
cottontop wrote:Shannon, She is one pretty build. Looking forward to seeing her completelydressed out. Did you spray her like you thought you might? If so what kind of paint? Keep up the outstanding work. No one is going to believe she's all your build. cottontop
Thanks cottontop
The main primer is a 2 part epoxy primer, I then did the last spot fairing and sprayed a high build 2 part MS primer (auto primer) and the topcoat was a 2 part Urethane auto paint (commonly know as 2K). It doesn't need a clear coat but with all the glitter graphics I'm putting on it will need a clear over it anyway. It will also give the paint better depth with the extra clear coats and better scratch resistance.
Re: BassMunn's PH16
Posted: Tue Feb 16, 2010 5:48 am
by BassMunn
peter-curacao wrote:Remember the graphics I wanna put on my little boat? do a Google search on for instance tribal car graphics etc.
Can't find your one but I had a look at the tribal themes and I think I am going to do a simple type tribal theme on the boat, not to busy but plenty shiny - BLING BLING
Re: BassMunn's PH16
Posted: Tue Feb 16, 2010 10:17 am
by wegcagle
It's official....I'm gonna have to stop posting pictures and checking the website. You people are making me depressed. Damn she looks good Shannon. What's gonna be the next build??
Will
Re: BassMunn's PH16
Posted: Wed Feb 17, 2010 2:49 am
by BassMunn
wegcagle wrote:It's official....I'm gonna have to stop posting pictures and checking the website. You people are making me depressed. Damn she looks good Shannon. What's gonna be the next build??
Will
No need to be shy or depressed here Will, but thanks for the comment
I think a dog kennel is the next build, maybe with some epoxy glass for good measure.
My shop dog ate his last one

We had a massive storm here yesterday and my house got a direct lightening strike and then 2 minutes later it hit my electric gates. Obviously fried my gate motors and a few other things in my house (laptops and TV were al unplugged), but luckily after much praying it missed the massive tree that stands over my boat. The two lightening strikes were on either side of the tree and the tree is higher than anything else so someone was definately listening
Phew that was a close one.
Re: BassMunn's PH16
Posted: Thu Feb 18, 2010 9:21 pm
by peter-curacao
BassMunn wrote:peter-curacao wrote:Remember the graphics I wanna put on my little boat? do a Google search on for instance tribal car graphics etc.
Can't find your one but I had a look at the tribal themes and I think I am going to do a simple type tribal theme on the boat, not to busy but plenty shiny - BLING BLING
Here you have some they even have pirates

 http://www.decaldesigners.com/search.asp?item=tribal
and here
http://www.makeadecal.com/
And there are many more.
What you do is ( if you don't already know)search one you like open it so you have the biggest available preview on your screen from that site, then save it and open it in paint or something then choose to print but before you do set the measurements you want in print or page setup, after that tape all the papers together so you have a big print out, this will have probably very blocky lines like an old video game
therefore you have to trace it over (a roll of) tracing paper after that perforate the lines you traced and then tape it on your boat, after that take a old cloth and put some charcoal in it smack

the heck out of the charcoal so that it is coming through the cloth now go over your perforated lines, take the tracing paper off and use pin striping tape to mark the coal lines, ready for paint!


Above was old school you can also buy, borrow or steel a overhead projector!

Re: BassMunn's PH16
Posted: Thu Feb 18, 2010 10:32 pm
by BassMunn
Thanks Peter, Geez you think those websites have enough to choose from
OK I've got a projector, that other method seems like way too much work
and I'm feeling lazy
Re: BassMunn's PH16
Posted: Fri Feb 19, 2010 6:43 am
by MarkOrge
Shannon, back to the console height concern that you addressed with the steering mount angle change - would you do that for your next one or something different? I have taken measurements from the Nitro's over at BPS and they do seem a little higher, likely due to the higher sole in the PH series. I was thinking of just copying what you did but wondered if you had any other advice?
Mark
Re: BassMunn's PH16
Posted: Fri Feb 19, 2010 7:38 pm
by BassMunn
Mark I would make some changes, firstly my console face is too vertical I would swing it away from the driver a bit more, this would improve the steering wheel angle and give you a little more leg clearance. I would also drop my seat base mounts by about 2", I didn't realise how thick my seats were going to be, dropping another 2" in height would be fine.
Re: BassMunn's PH16
Posted: Mon Feb 22, 2010 9:08 am
by Murry
Beautiful job Shannon
Re: BassMunn's PH16
Posted: Tue Mar 09, 2010 4:53 pm
by BassMunn
Thanks Daniel
Sorry I've been so quite lately, I've experienced 2 problems the last few weeks
Firstly my first attempt at spraying glitter flake even after countless trial runs came out horrible
. The console and gunwale stripe came out nice but the band on the side of the boat looked so flat and lifeless and the lines weren't straight. So this past weekend I sanded it all off and tried again, but this time with more knowledge (and patience
)
Happy to say it came out awesome, looks exactly how I wanted it to look, so I'm pretty
The 2nd problem I've had is that my laptop's USB ports decided to stop working, after 3 days of reloading drivers and trying all sorts of other remedies I discovered that my USB controller on the motherboard fried itself
So unfortunately I can't download any pics until I get a new laptop sorted out. (I haven't finished the paint yet anyway, so you'll just have to wait
, no just kidding wish I could post a few pics)
I have a question too:
The rubrail that I have purchased is of the aluminium type with the rubber insert. It has no holes pre-drilled, what sort of spacing should I use for holes for the rubrail installation?
Thanks
Shannon
Re: BassMunn's PH16
Posted: Tue Mar 09, 2010 5:09 pm
by steve292
Shannon..
If you have the photo files sized to post email them to me.
stephen at palmer292 dot freeserve dot co dot uk
I'll put them up for you as i'm here at work all night
steve
Re: BassMunn's PH16
Posted: Tue Mar 09, 2010 5:10 pm
by Cracker Larry
About 6" on the rubrail holes
Re: BassMunn's PH16
Posted: Tue Mar 09, 2010 5:37 pm
by BassMunn
Thanks Steve, my problem is that I can't get them from my camera to the Laptop. Don't worry I'll work a way around the problem in the next few days, but thanks for the offer
Thanks CL
Re: BassMunn's PH16
Posted: Tue Mar 09, 2010 6:03 pm
by BassMunn
OK found another way of getting the pics.
This is just a teazer, I'll post more pics once the paint is done
The glitter makes the surface very lumpy, so I still need to lay a few more coats of clear on and sand it off, lay it on, sand it off, you get my meaning. Gonna have arthritis in my hands by the time I'm finished with this paint job

Re: BassMunn's PH16
Posted: Tue Mar 09, 2010 6:10 pm
by Larry B
Dang, you are really setting the Bar WAY UP THERE
That really looks nice
Re: BassMunn's PH16
Posted: Tue Mar 09, 2010 6:27 pm
by Joe H
Very nice Shannon, teazer is right! Looking forward to the next set of pictures.
Joe H
Re: BassMunn's PH16
Posted: Tue Mar 09, 2010 6:43 pm
by Cracker Larry
Re: BassMunn's PH16
Posted: Tue Mar 09, 2010 7:16 pm
by Dog Fish
Nice

Re: BassMunn's PH16
Posted: Tue Mar 09, 2010 7:22 pm
by TomW
Re: BassMunn's PH16
Posted: Tue Mar 09, 2010 7:33 pm
by MarkOrge
Unbelievable.
Absoltely georgeous.
Re: BassMunn's PH16
Posted: Tue Mar 09, 2010 7:34 pm
by wegcagle
Re: BassMunn's PH16
Posted: Tue Mar 09, 2010 10:05 pm
by cape man
ouch
Re: BassMunn's PH16
Posted: Wed Mar 10, 2010 7:27 am
by Murry
Wow Shannon
Looking forward to seeing the rest of your fine work.
Re: BassMunn's PH16
Posted: Wed Mar 10, 2010 7:43 am
by cape man
You know I mean ouch in a good way! Was tired and didn't want to post a long response... that is absolutely gorgeous!!!! You have got to share how you got there.
Re: BassMunn's PH16
Posted: Thu Mar 11, 2010 11:53 am
by tobolamr
Shannon, can I ship you up here for a 2 week working vacation when it's time to paint MY boat???? Fantastic job! Keep the pics coming!
Re: BassMunn's PH16
Posted: Fri Mar 12, 2010 3:50 am
by BassMunn
Hey Thanks Guys
cape man wrote:You know I mean ouch in a good way! Was tired and didn't want to post a long response... that is absolutely gorgeous!!!! You have got to share how you got there.
I figured you meant, Ouch that hurts my eyes it's so shiny
I'll make another post tonight when I've got more time and show some pics of the steps it took to get there, it's been quite a learning curve but I've got it right now
tobolamr wrote:Shannon, can I ship you up here for a 2 week working vacation when it's time to paint MY boat???? Fantastic job! Keep the pics coming!
As long as I can bring my fishing rods
OK it's not finished, but I can't resist posting more pics
The bands on the side are done, but the gunwale strip I think needs to be redone as it is a slightly different color (my first attempt) and isn't nearly as shiny (and it's a bit squiggly)
The white looks flat as it's been sanded and still needs another clear coat before buffing.
Out of the sun
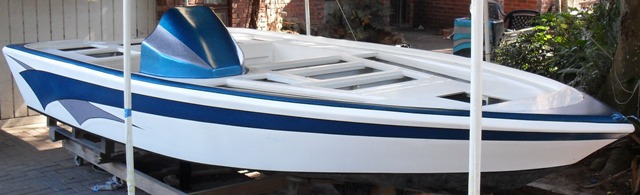
A bit of sun catching some of the glitter, pictures just don't do it justice
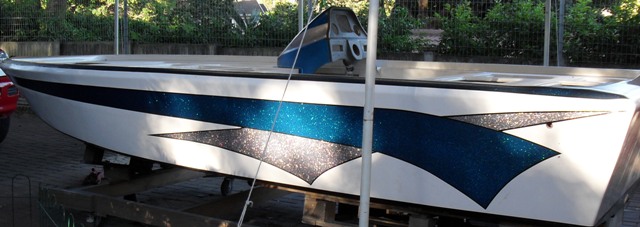
I can't wait to see what it's gonna look like standing in the water with the sun catching it properly
Re: BassMunn's PH16
Posted: Fri Mar 12, 2010 8:06 am
by cape man
Wow!!!! THAT is awesome!!!!
My ouch is still there!
Re: BassMunn's PH16
Posted: Fri Mar 12, 2010 8:44 am
by Larry B
WOW, don't have the words to express how nice that looks. Only thing is now I won't be able to post pictures of my boat when painted
That is some very nice work
I agree it will look great on the water, the other bass fishermen will have to leave the lake
Re: BassMunn's PH16
Posted: Fri Mar 12, 2010 9:03 am
by gstanfield
Well, keep in mind that I made a lot of money as a profession painter on high end restoraton and street rod cars. With that in mind I must be brutally honest and say that your work is.... top notch!
Just goin by the pictures your boat looks great, you should be proud as it cetainly doesn't look "home made"
George
Re: BassMunn's PH16
Posted: Fri Mar 12, 2010 1:18 pm
by steve292
I wish people wouldn't keep lifting that damn bar up
Thats tremendous Shannon
Steve
Re: BassMunn's PH16
Posted: Fri Mar 12, 2010 1:24 pm
by Dog Fish
Sweet


Re: BassMunn's PH16
Posted: Fri Mar 12, 2010 2:25 pm
by tobolamr
Wow!!! That looks AWESOME!
PS Yes, you can bring your fishing rods. We have 4 nice bass fisheries within 30 minutes' drive from my house. While I've got a production boat now, it still kinda floats and lets you catch fish... I'll price out the tickets...
Re: BassMunn's PH16
Posted: Fri Mar 12, 2010 2:37 pm
by icelikkilinc
Fabulous paint job.. Absolutely amazing...
Re: BassMunn's PH16
Posted: Fri Mar 12, 2010 2:46 pm
by TomW
That is Outrageously Outstanding!
Will never match that!
Tom
Re: BassMunn's PH16
Posted: Fri Mar 12, 2010 5:54 pm
by BassMunn
Well I feel like a guy that just got his first date with the hottest girl in town
Thanks for all the nice comments, considering who they come from, they mean a lot to me
If I think back a year and a half ago, after finding this site, I jumped into this build with half my mind screaming at me "what are you doing fool, you don't know how to build a boat!"
I'm glad to say that half is keeping very quite now
In all honesty, it would have been impossible without the support from all the valuable members of this forum and JM's designs.
So to all of you I have to say Thank You!
Now I just have to figure out how to get a motor and trailer
Re: BassMunn's PH16
Posted: Fri Mar 12, 2010 5:59 pm
by gstanfield
I don't know how things are over there, but around here you can pick up old run down boats for almost free. You just throw the boat away and have an engine and trailer on the cheap.
George
Re: BassMunn's PH16
Posted: Fri Mar 12, 2010 6:03 pm
by wegcagle
WOW Shannon. First class job all the way around
Will
Re: BassMunn's PH16
Posted: Fri Mar 12, 2010 6:08 pm
by chicagoross
Truly awesome, Shannon - it just keeps getting better and better! I remember at one point you didn't want to be embarrassed parking next to a ranger, but you don't seem worried that they may be embarrased parking next to this beauty!
Re: BassMunn's PH16
Posted: Fri Mar 12, 2010 6:09 pm
by Fonda@kauai
AMAZING
Re: BassMunn's PH16
Posted: Fri Mar 12, 2010 6:20 pm
by BassMunn
Thanks Will and Fonda
Ross - Not worried in the slightest
gstanfield wrote:I don't know how things are over there, but around here you can pick up old run down boats for almost free. You just throw the boat away and have an engine and trailer on the cheap.
George
George, I'm gonna keep an eye on our junkmail (I suppose it's like your Craigslist) to see if something comes up.
Anything boat related is really expensive over here. And we have a few dodgy boat places that buy those old boats and then respray the motors and fit new pirate stickers and try sell them as newer motors.
I wanted to fit a new ETEC 115 HO on her and sit her on a new trailer, but right now it's just way out of my league.
A ETEC 115 HO will cost me the equivalent of $15 400 and a mild steel galvanized trailer another $2200
I actually contacted ED's and I can buy one from them and import it with all shipping and customs duties and land it here for $11 000 but I then have no warranty backup
I'll just have to be patient and keep my eyes peeled
Re: BassMunn's PH16
Posted: Fri Mar 12, 2010 6:25 pm
by Larry B
BassMunn wrote:I actually contacted ED's and I can buy one from them and import it with all shipping and customs duties and land it here for $11 000 but I then have no warranty backup
Are you saying there is no warranty if you mount it yourself?? I think it's like a dealer thing, they don't like to do warranty work if they didn't sell the motor, but I believe in there dealer agreement they are obligated to do the warranty work. I know I bought my truck out of state and get my warranty work done locally.
Re: BassMunn's PH16
Posted: Fri Mar 12, 2010 6:37 pm
by BassMunn
Larry B wrote:
Are you saying there is no warranty if you mount it yourself?? I think it's like a dealer thing, they don't like to do warranty work if they didn't sell the motor, but I believe in there dealer agreement they are obligated to do the warranty work. I know I bought my truck out of state and get my warranty work done locally.
No Larry, because I'm in South Africa if I don't buy the motor through the local Bombardier agents I have no warranty backup locally.
I would still have a warranty in the US, but I would have to take the motor over there to get sorted out if I ever have any problems.
Kinda stuck between a rock and a hard place
Re: BassMunn's PH16
Posted: Fri Mar 12, 2010 6:39 pm
by Larry B
BassMunn wrote:Larry B wrote:
Are you saying there is no warranty if you mount it yourself?? I think it's like a dealer thing, they don't like to do warranty work if they didn't sell the motor, but I believe in there dealer agreement they are obligated to do the warranty work. I know I bought my truck out of state and get my warranty work done locally.
No Larry, because I'm in South Africa if I don't buy the motor through the local Bombardier agents I have no warranty backup locally.
I would still have a warranty in the US, but I would have to take the motor over there to get sorted out if I ever have any problems.
Kinda stuck between a rock and a hard place
My Bad, I forgot your location
Re: BassMunn's PH16
Posted: Fri Mar 12, 2010 7:20 pm
by gstanfield
Well that sucks, I wonder if you can purchase an extended warranty through your local dealer? I know with motorcycles you can buy the bike and then later buy an extended warranty that is sold through a thrid party (usually the dealership) If you could get the motor cheaper and then buy the warranty local you might still be able to save a couple thousand dollars.
Just an idea,
George
Re: BassMunn's PH16
Posted: Sat Apr 03, 2010 8:52 pm
by BassMunn
Well after nearly 2 months of sanding, painting, sanding, painting, etc, etc! I am finally done with the paint
I'm gonna leave it for a few weeks before I do the final 1500 grit sanding and buffing, there are countless layers of paint on there and I wanna leave it to cure properly before I seal it with wax.
It has the odd bump or blemish here and there, but I've got to the point where it's "Good Nuff" as Dougster says.
Console catching some rays
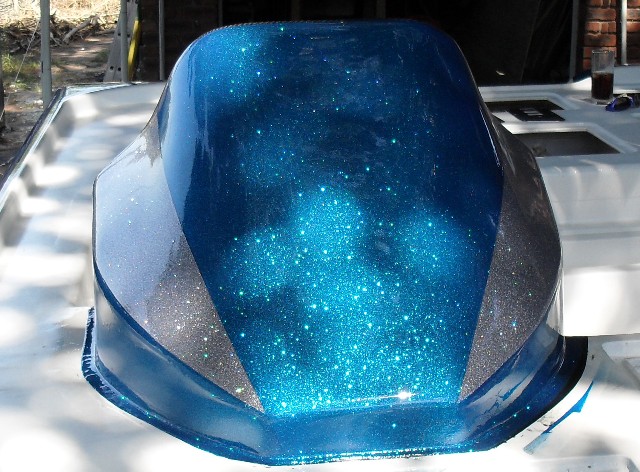
Carbon fibre now coated with clear coat to protect the resin, very happy at how it came back to life.
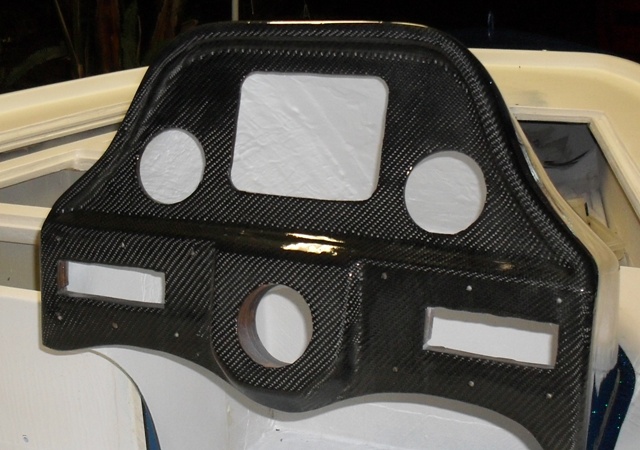
Wheeled it out from under the carport to get a clean profile view without poles in the way.
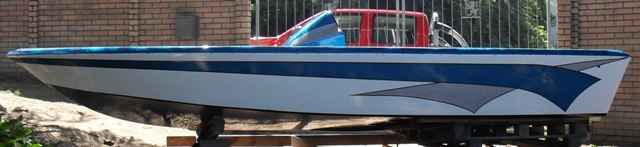
You might notice that I increased the blue area on the gunwales. After I fitted the rubrail there were just too many different color lines that were too thin (and not very straight
). So now the blue ends underneath the rubrail. All the holes are ready for the rubrail just waiting for a few days for the paint to cure properly before I put them back on.
I think it's time to start finishing my hatch lids and then it's time to lay some carpets and connect some wires
Re: BassMunn's PH16
Posted: Sat Apr 03, 2010 9:02 pm
by gstanfield
Looking sharp, the CF was a nice touch as well.
George
Re: BassMunn's PH16
Posted: Sat Apr 03, 2010 9:09 pm
by Joe H
"Good Nuff" is a bit of an understatement, very nice!
Joe H
Re: BassMunn's PH16
Posted: Sat Apr 03, 2010 10:09 pm
by wegcagle
Damn Shannon. I'll bet Ranger will be calling you pretty soon for a job
Will
Re: BassMunn's PH16
Posted: Sat Apr 03, 2010 10:38 pm
by colonialc19
Shannon, looks better than my skeeter!
love the paint, great work!
Re: BassMunn's PH16
Posted: Sat Apr 03, 2010 11:47 pm
by Dougster
"Good Nuff" heck, I can't imagine pulling that off. Lord-a-mighty what folks can do! That is really something to me, for one guy to do on his own.
Got hisself all worked up Dougster
Re: BassMunn's PH16
Posted: Sun Apr 04, 2010 1:31 am
by cape man
Need to stop posting pics like that! My key board can't take all this drool! Beautiful.
Re: BassMunn's PH16
Posted: Sun Apr 04, 2010 4:04 am
by steve292
Thats fantastic...no other way to describe it ,just fantastic
Steve
Re: BassMunn's PH16
Posted: Sun Apr 04, 2010 9:08 am
by sideslippa
Coming up a treat! looks very very nice...You must be pleased with yourself, or you should be
slippa / steve.
Re: BassMunn's PH16
Posted: Sun Apr 04, 2010 1:52 pm
by TomW
The fish are going to see you coming and run!
Very Nice!
Tom
Re: BassMunn's PH16
Posted: Sun Apr 04, 2010 3:47 pm
by BassMunn
Wow guys thanks for all the nice comments
Still can't believe I built that myself, definately a life changing experience.
Feeling kinda boat building burnt out, but I'm sure that will only last a day or two (I nearly installed my rubrails today, but decided against it as my paint is still a little soft).
Gonna build a new dog kennel tomorrow and then I'll get back to my hatches.
Re: BassMunn's PH16
Posted: Mon Apr 05, 2010 6:06 pm
by tobolamr
Fantastic finish job on the paint!
Re: BassMunn's PH16
Posted: Wed May 05, 2010 4:30 pm
by JamesT
Bassmun, i hope this post finds you and your family doing well......its been a month!! Surely your already fishing out of your boat??
Re: BassMunn's PH16
Posted: Wed May 05, 2010 5:30 pm
by sitandfish
I know it's actually on the truck in the background but, the cool thing about this shot is that you can imagine that the boat has a roll bar. That's a bad looking boat. And of course by bad, I mean good!
Re: BassMunn's PH16
Posted: Wed May 05, 2010 5:40 pm
by TomW
Okay Shaun when's lauch date!
Tom
Re: BassMunn's PH16
Posted: Wed May 05, 2010 5:58 pm
by BassMunn
James, thanks for asking. We are all well thank you. BUT no where near splashing yet
Things are very tight at the moment and I just can't afford the motor or trailer right now. If I had them I would have been pulling all nighters to get her on the water, but for now I'm just putting along.
Sitandfish, you know I've actually never noticed that, but always thought that pic just looked good, now I know why - good thing is that the seats sit in that position so they will give it a similar look.
TomW - Ummmm???? wish I knew
OK I admit I've been a bit lazy lately, 2 months worth of sanding and painting took it out of me and the family, so I took a few days off, went away to see my folks 2 weeks ago and then this last weekend started getting back to it.
Started by getting my hatch hinges cut out, drilled and placement fitting done. I've had to do a bit more hatch shaping on my rod hatches as they didn't fit nicely. It's pretty difficult to get the fitting right because I have to take into account the thickness of the carpets that will be folding over all of the edges, we'll find out how accurate I was when they get carpets.
Also had to coat the hatches with resin as they were still raw wood. Still have to do another coating to cover up my sanded areas and then I'll paint them and then carpet them.
Test fitting hatches
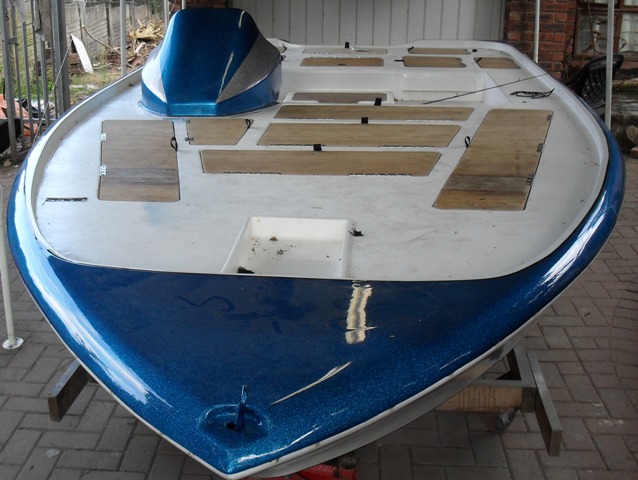
Temp fitting of the switch panels and steering to see how they look (the steering is just shoved in the hole, I still need to get the steering kit)
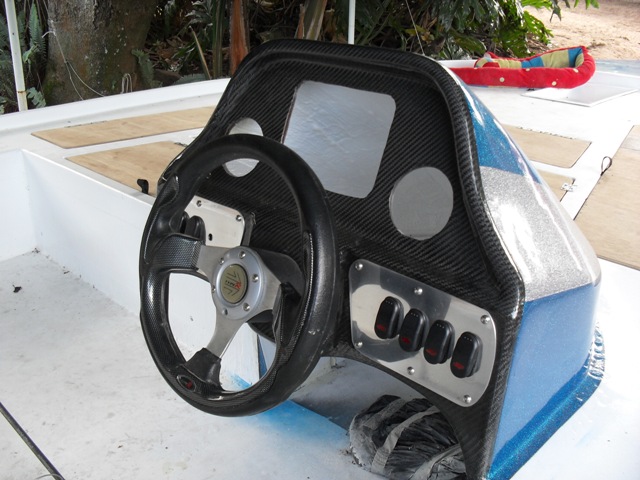
Fitting rubrails 1st part
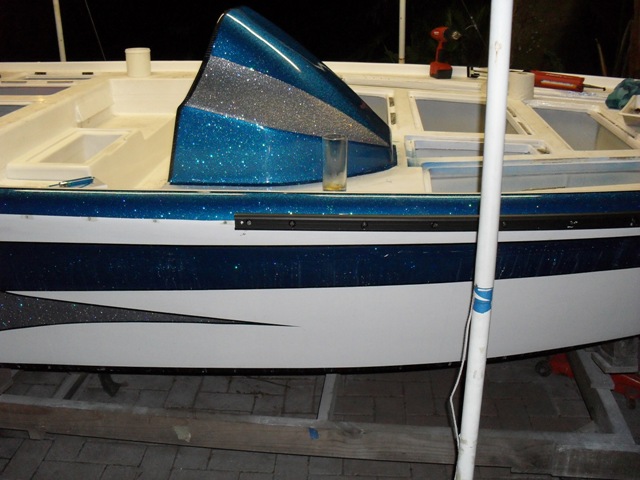
Second part fitted
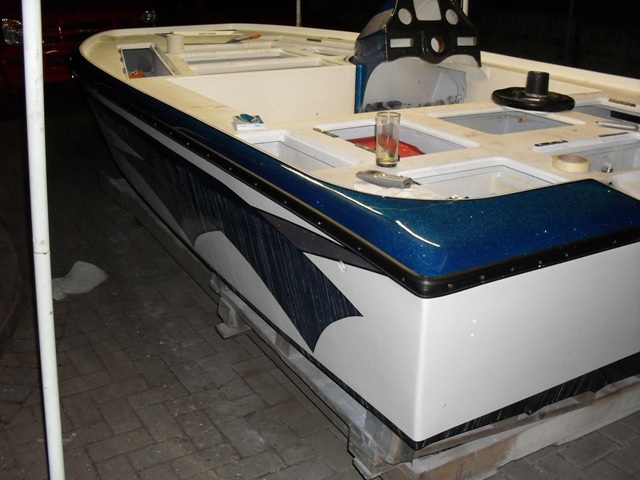
Rubrail insert fitted
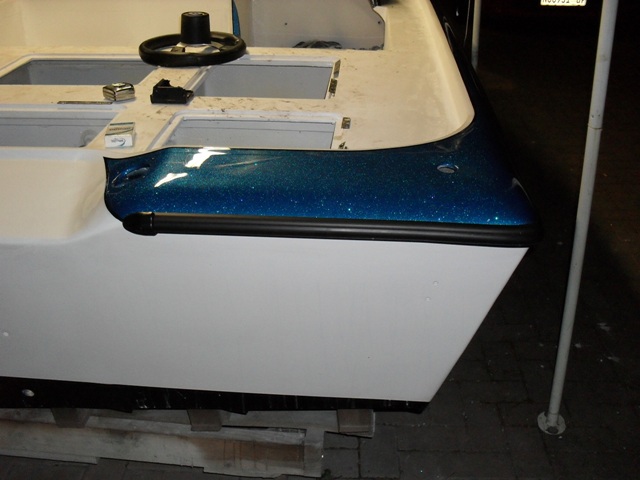

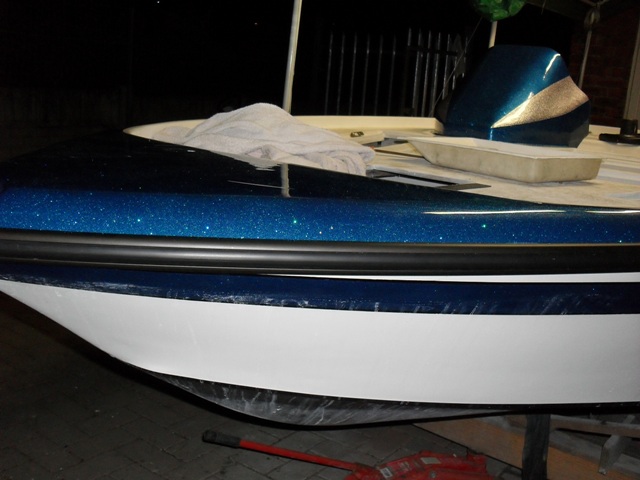
Before I fitted the rubrails I had to wetsand the area with 1500 grit and then buff it up as I can't do it once the rubrail is on.
I also had to flip the rubrail upside down because I didn't take into account the shape of it. It's got a pretty nasty gap on the underside that I will just fill with silicone and call it an extra spray deflector
Doesn't seem like much but I've been working my butt off for the last 5 days.
Cheers
Shannon
Re: BassMunn's PH16
Posted: Wed May 05, 2010 6:21 pm
by TomW
Okay Shannon you still have a few month's till spring down your way. We'll let you get away with it till then.
I saw that glass that of refreshment. Good for you.
Your boat is one beauty!
Tom
Re: BassMunn's PH16
Posted: Wed May 05, 2010 7:38 pm
by JamesT
thanks for the update! Those pics should last us at least a few days
I can totally understand how things can get tight and in a hurry, lol. Again, best wishes, and that is one awesome A$$ boat!
Re: BassMunn's PH16
Posted: Thu May 06, 2010 6:36 pm
by BassMunn
Thanks TomW, I'll take that gap. Don't you hate it when work interferes with boat building
Everynight I come home and think that I could get a few things done, but by the time I've done all the family and work stuff it's midnight
Thanks JamesT, I'll try not hold back too much on the photos
Re: BassMunn's PH16
Posted: Sun May 09, 2010 7:00 am
by sideslippa
It is coming along very nicely Shannon, it seems the closing stages of the build soak up alot of time and it is hard to see the progress, the fiddley stuff takes forever.
Your attention to detail is what makes the difference between a good boat and a great boat. Keep it up Mate, it is inspiring.
What are you going to hang on the transom...90 HP perhaps
Steve.
Re: BassMunn's PH16
Posted: Sun May 09, 2010 8:20 pm
by cape man
The stuff at the end takes twice as long as you thought! Take your time. Appreciate the tediousness at this point, but it is real important to get it done right even though she looks like she's begging for the water. As always, your boat is inspirational!
Re: BassMunn's PH16
Posted: Mon May 10, 2010 4:13 pm
by BassMunn
Craig and Slippa, thanks and yes I agree with the time it takes to get these last things done, but the jewerely is the fun stuff
Slippa, I would like a 115, but will grab a 90 if I find a nice one. I've decided to settle for an old 2nd hand motor for now, It will take another year if I wait for a new motor. I'll repower when I can afford it.
So in light of that I will probably go for a Yammie, Spares are easy to find and a lot cheaper than other brands and they're easy to work on. The older 115 seem to sell for about the same as the 90's, the 115 is very heavy on fuel so I guess not that popular, but I don't run much, so the fuel bill isn't a concern really, plus it's an extra 25hp
OK update time
Spent the whole of Sunday wiring things up, don't look nice and neat like CL's boat, I've still got to tidy things up a bit, but it all works perfectly, no shorts, no funny things happening.
Switch panel with livewell timer control installed, I've still got to figure out how to label the switches nicely without having a big fat ugly sticker under each switch. Switches from the left are, Livewell Aerator, Livewell Filler Manual, Livewell Filler Auto, Livewell Filler timer adjustment.
On the right (not shown) from the right, Bilge pump, Nav Lights, Sonar power, Spare.
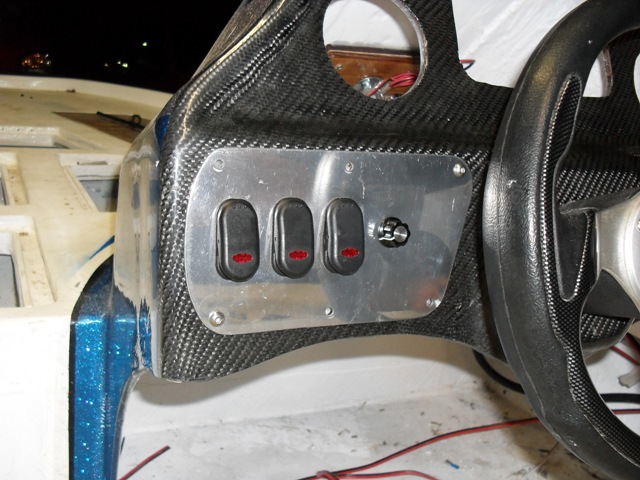
I made up a little panel to mount the fuse box and negative pole onto, mounting pads secure it to the console. 4 Stainless screws hold it onto the mounting pads (thought it might be an idea to make it easily removable incase I ever need to work on it)
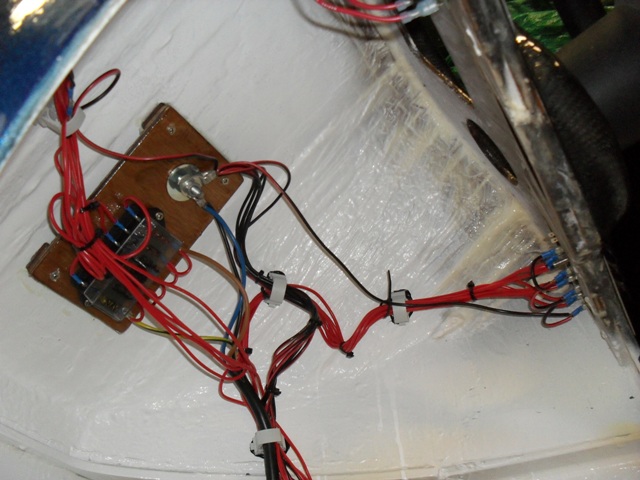
Bow light and Bow Eye installed
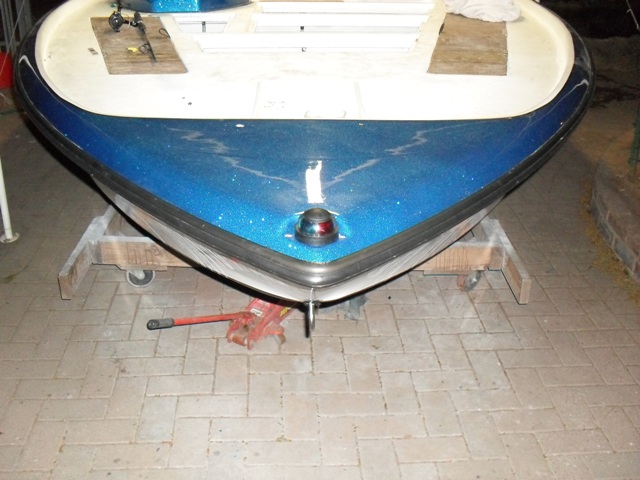
Stern Light Mounting
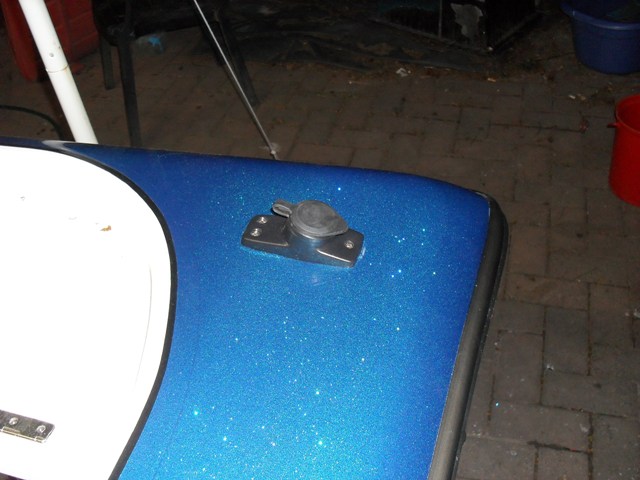
Stern Light fitted in mounting
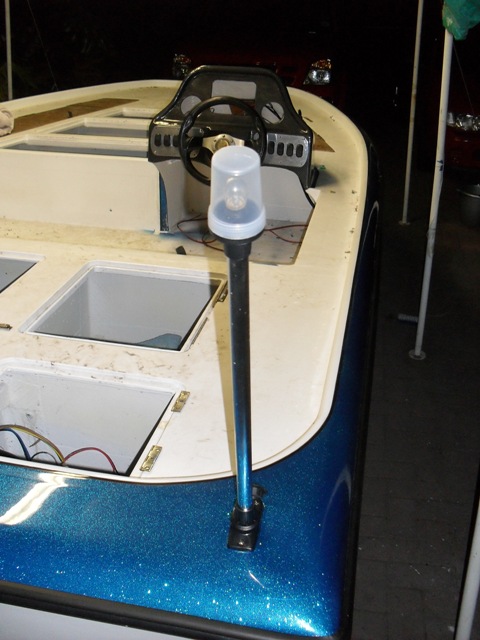
Bilge Pump outlet
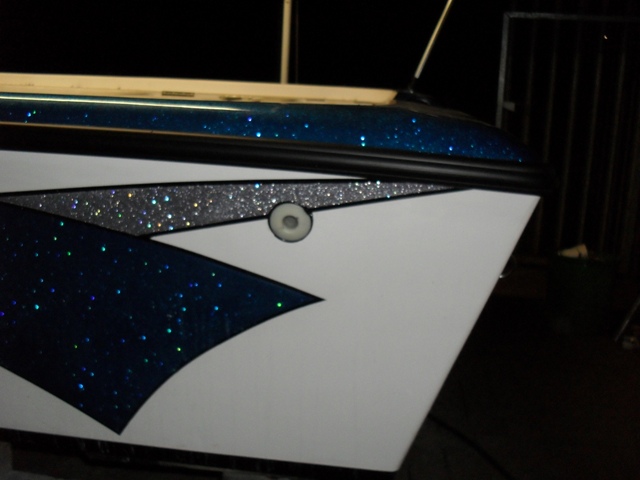
Also installed Stern Eyes and then forgot to clean off the excess silicone from around all the thru hull fittings
So guess who's going to be spending a full day trying clean it off without damaging my paint
Re: BassMunn's PH16
Posted: Tue May 11, 2010 8:47 am
by topwater
BassMunn how about having your stainless panel engraved under each switch and
then paint and wipe off.
Re: BassMunn's PH16
Posted: Tue May 11, 2010 8:53 am
by sideslippa
topwater wrote:BassMunn how about having your stainless panel engraved under each switch and
then paint and wipe off.
Great Idea!
slippa
Re: BassMunn's PH16
Posted: Tue May 11, 2010 2:06 pm
by tobolamr
Not to hijack - but what would you use to do the engraving? Or would you have it done at a professional shop?
Re: BassMunn's PH16
Posted: Tue May 11, 2010 2:30 pm
by wegcagle
Amazing as always Shannon.
Can't wait to see it hauling booty on the water
Will
Re: BassMunn's PH16
Posted: Tue May 11, 2010 2:55 pm
by BassMunn
topwater wrote:BassMunn how about having your stainless panel engraved under each switch and
then paint and wipe off.
I didn't think of that, that's actually a pretty good idea. When you say paint and wipe off, do you mean to lightly paint the area with say black and then wipe the area clean leaving the engraved area with the paint still in it to show up the lettering?
Engraving I would get done by someone, my wife can't even read my hand writing
Thanks Will
Re: BassMunn's PH16
Posted: Tue May 11, 2010 6:42 pm
by TJS Redchaser
BassMunn,
Beautiful boat. Definitely an inspiration to the rest of us
Yes you would paint over the engraved letters and then wipe the paint off the surface, this leaves paint in the depressions but not on the panel surface. I don't know if you have them over there but I had the VIN of another boat engraved onto a piece of aluminum at a Trophy/Awards store before and it worked nice.
Re: BassMunn's PH16
Posted: Sun May 23, 2010 5:40 pm
by BassMunn
Hey Guys.
Not too much going on with the build, just a bit of tinkering here and there.
Decided that I need a third seat for my small size deckhands, I only had the 2 main seats made for me when I ordered them, so I thought that I've managed to build every single thing on this boat except the seats, so I might as well have a shot at the seat too.
Cut out some Ply to shape, sealed it up with resin, cut some high density foam to size and covered it with marine grade vinyl. As much as I was tempted to start getting fancy with colors, I decided against it as my sewing would probably look like a road map for the Rockies
The seat back needed to fold flat so that I can access my cooler box underneath, so I made up a set of hinges using 1 1/2" Stainless angle iron, got the first set wrong but got it right the second time.
Not too shabby for a first attempt
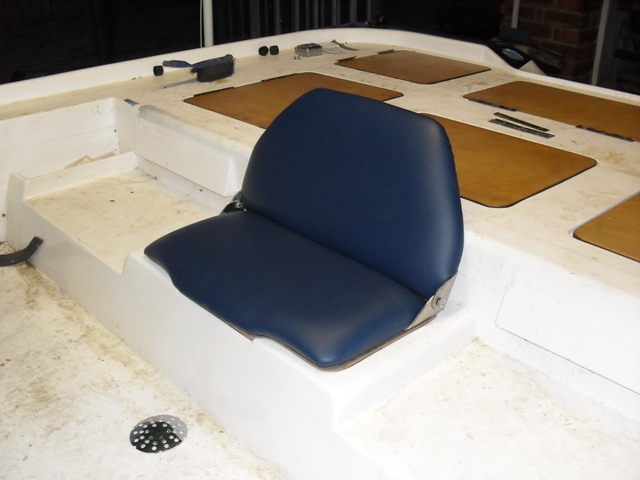
With the other seats in place to get a perspective, bear in mind nothing is fitted yet so there are still gaps where there shouldn't be.
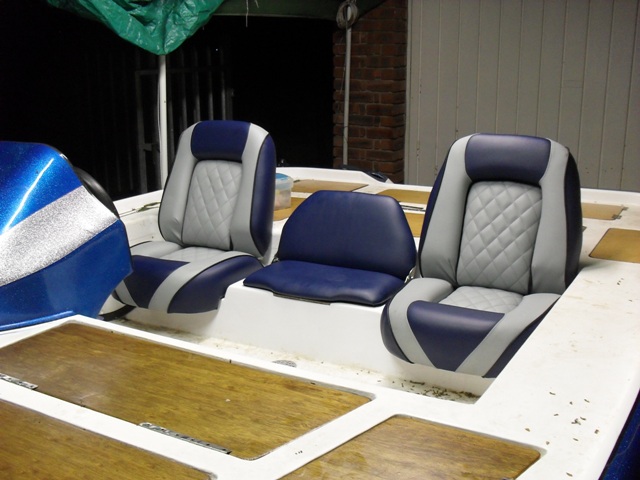
I made the seat pretty wide, here's the reason.

So what you think? Is it too ugly?
Re: BassMunn's PH16
Posted: Sun May 23, 2010 6:01 pm
by RickW
Yes, it's too ugly, it's horrible, get rid of it.
pffft, Yeah right!!!! Like everything else on the boat, it looks great! Really enjoying seeing this thing come together, and really enjoy seeing things made from scratch like that, especially when they turn out so well. Beautiful job so far.
Re: BassMunn's PH16
Posted: Sun May 23, 2010 7:06 pm
by Joe H
I made the seat pretty wide, here's the reason
The best reason in the world, the seat looks great as does the crew!
Joe H
Re: BassMunn's PH16
Posted: Sun May 23, 2010 7:08 pm
by cottontop
Shaun, What a beautiful family you have. That boy looks like he already has the fever. If you haven't taken the girl out, take my advuce and do so. My daughter is 31 and still loves to fish. I started her and my son out at the age of your 2. By the way, the boat looks great. I like the idea and looks of the additional seat. John
Re: BassMunn's PH16
Posted: Thu May 27, 2010 6:03 pm
by BassMunn
Hey Guys thanks for the nice comments
Sorry it took me so long to respond, been a really hectic week at work.
Cottontop, she hasn't gone fishing yet but she will, she loves the boat already. My son has the bug in a huge way, he's always in my tackle boxes sneaking plastic baits out when I'm not looking. And my Koi are very afraid of him
Re: BassMunn's PH16
Posted: Sun May 30, 2010 4:52 pm
by BassMunn
Re: BassMunn's PH16
Posted: Sun May 30, 2010 9:28 pm
by wegcagle
Awesome Shannon,
I think you are going to beat me to the finish....and the finish
Congrats.
Will
Re: BassMunn's PH16
Posted: Wed Jun 02, 2010 10:07 pm
by Murry
Getting there indeed Shannon.
What a beautiful boat you have there man.
Wow
, you've done a fantastic job. My words can't do it any justice so I won't try.
Daniel
Re: BassMunn's PH16
Posted: Thu Jun 03, 2010 10:16 am
by peter-curacao
Shannon it was a while since I visited your thread,I'm in shock
man she is sick!!

Very very veryyyy beautiful boat ! something to be really proud off, if mine come out half as nice as yours I would be a happy man!
Re: BassMunn's PH16
Posted: Wed Jun 09, 2010 4:53 pm
by icelikkilinc
You are doing an amazing job but in my personal opinion, the stern light does not fit the lines nor the perfect paint scheme that you created.. it is to vertical.. maybe customize that to match your lines better??? also it looks to weak to take the bounce and the vibrations.. had a very similar one on my 14'' and it got broken from the screw several times after which I took another route and built a much rigid one..
BassMunn wrote:
Stern Light fitted in mounting
Re: BassMunn's PH16
Posted: Wed Jun 09, 2010 9:49 pm
by BassMunn
Hey Guys, sorry I didn't realise that you had made a few posts - Thanks for the nice comments
Icelikkilinc - I have to agree with you that the light just doesn't fit with the rest of the sleek racy look I've tried to achieve, but it is a removable one and will spend 95% of it's life in it's special clips under the rod hatch lid. It only gets fitted for very early starts and then gets taken down as soon as the suns up. But I'll think about redesiging it
Re: BassMunn's PH16
Posted: Wed Jun 09, 2010 9:58 pm
by gstanfield
I personally wouldn't worry about the light. I kinda see those as a necessary evil, they serve a purpose, but that purpose is not to look good. Now, if you were building a craft like Icelikkilin built then you would go through the trouble to make everything blend, but if the light will be stowed 99% of the time and only get used in the dark then who care what it looks like. You can't see it all that well in the dark
But that's just my opinion. I spent the money of fancy flush mount SS bow lights and just have a removable pole in the rear. That's because the front ones can be seen all the time and the rear will only be seen when in use
it's your boat though and whatever makes you happy is 100% the right choice as your boat only has to please you (and meet regulations of course)
George
Re: BassMunn's PH16
Posted: Sun Jun 13, 2010 5:49 pm
by BassMunn
Thanks George, yip the light stays for now, it's very seldom that it actually gets used anyway.
Update:
I can't believe how dirty a boat can get when it is open to the wind and dust, in preperation for carpeting I had to spend the whole of yesterday cleaning
But today I started carpeting
Can't believe how long it takes to carpet a boat
After 12 hours at it I'm beat, so the finished pics will have to wait a few days, but for now here's a teazer
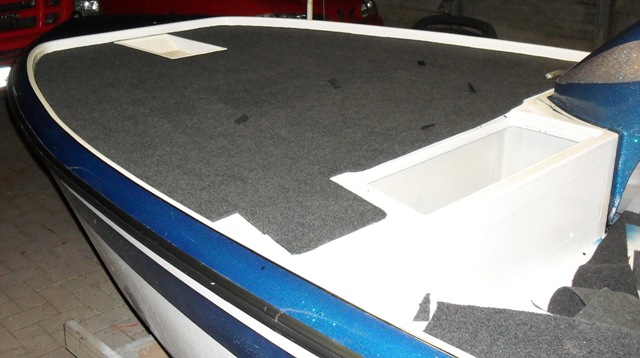
Re: BassMunn's PH16
Posted: Sun Jun 13, 2010 6:34 pm
by gstanfield
Looks good so far. I know what you're going through there. A long time ago in a world far far away I owned an automotive/boat/aviation upholstery shop and some of the worst boats to redo were the large bass boats that had all the hatches in it. Hatches use up lots of extra carpet which adds up quick when you're using good stuff.
Well, as usual your work looks top notch so keep up the good work and you'll be posting pics of fish caught in no time
George
Re: BassMunn's PH16
Posted: Sun Jun 13, 2010 10:27 pm
by Cracker Larry
Just wondering
How do you wash that carpet when it's covered in fish blood, fish guts, scales, dried shrimp, dried squid juice, squid ink, other assorted bait and fish parts
Re: BassMunn's PH16
Posted: Sun Jun 13, 2010 10:41 pm
by gstanfield
Bass fishing you don't
usually deal with as much of that. It tends to be a little ""cleaner" due to mostly using artificial bait. That and you usually net them alongside and remove the hoook as you're putting them in the livewell if you're tournament fishing. When blood or guts would get on my carpet I just hit it with the pressure washer at the carwash on the way home when I was washing off my boat
I'm not sure if that's the right thing to do, but that's what 99% of the bass boat guys I fished with in GA would do.
George
Re: BassMunn's PH16
Posted: Sun Jun 13, 2010 10:48 pm
by peter-curacao
Yeah but still I don't think carpet belongs on/in a boat! especially not a suburb boat like the one Bassmunn did build! doesn't factory build boat's use carpet to hide things?
bassmunn's don't need that IMHO
Re: BassMunn's PH16
Posted: Sun Jun 13, 2010 10:49 pm
by gstanfield
Then again, I grew up with a rod in my hand and the first "nice" boat that I ever saw that did not have carpet in it was when we went down fishing in tidal areas around Savanah when I was about 12 or so. Even out here in WY most fishing boats have carpet, must jsut be an inshore fishing thing I guess. Here's the three main types that tracker marine sell just as an example.
Deep V boats like everyone has out here:

Inland bass boats:

Salt water series:

Then again, you probably knew all this and was just expressing a point.
Re: BassMunn's PH16
Posted: Mon Jun 14, 2010 7:48 am
by cape man
THe carpet looks great, and is almost obligatory on a bass boat. She is going to be awesome and you'll be the envy of the fleet at the first tournament. On the anchor light...I just hate those posts as they always seem to fail on me, and I'm fumbling around in the dark trying to get legal. I fish in the brine almost exclusively and those connections in the mount always seem to get green on me. Hard to see in this picture but I mounted a permanent light on top of the outboard's cowling. You have to drill a hole to install, but it's no scarier than any of the thru hulls you've made. Feed the power in next to the controls and run the wire along side of the engine. Just an idea. The post will do fine, looks fine to me, and as you said it will seldom be needed.
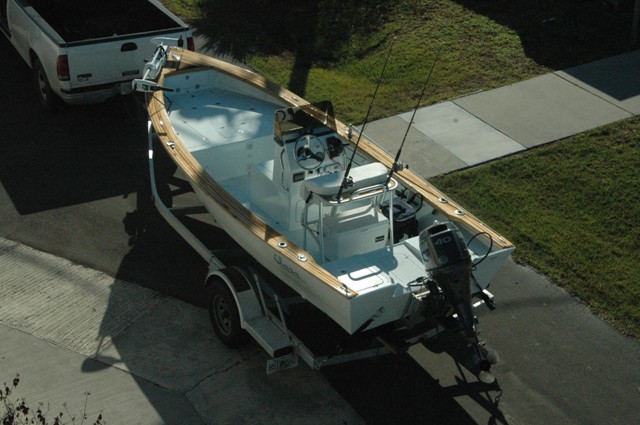
Re: BassMunn's PH16
Posted: Mon Jun 14, 2010 7:51 am
by cape man
Knew I had a better pic in the gallery...
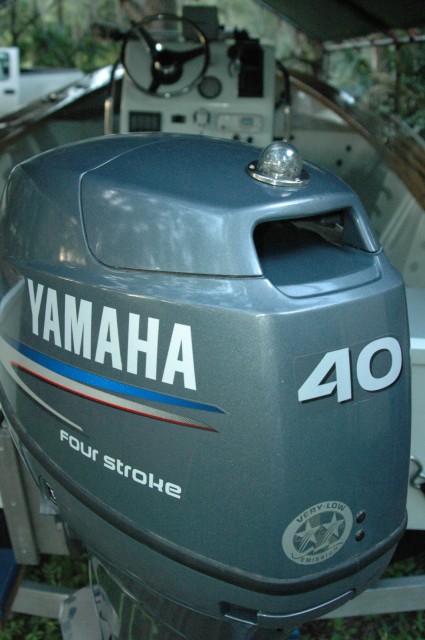
Re: BassMunn's PH16
Posted: Mon Jun 14, 2010 9:39 pm
by peter-curacao
cape man wrote:THe carpet looks great, and is almost obligatory on a bass boat
Okay well maybe/probably I don't know what I'm talking about, it just seems so wrong to me to have carpet on the deck outside now a days, again I do know nothing about bass boats it was just my feeling speaking
Re: BassMunn's PH16
Posted: Mon Jun 14, 2010 9:54 pm
by Cracker Larry
FWIW, I'm with you Peter
Cape Man is right about the stern light too. Those pole lamps are a constant nuisance.
Re: BassMunn's PH16
Posted: Tue Jun 15, 2010 9:11 pm
by BassMunn
Hehehe, you boys have got too much salt in your veins
If I were building the Phantom as a flats boat for the brine it wouldn't have carpets, but as a dedicated bass boat it's gotta have carpets, both on the deck and in all the rod and tackle hatches. As far as smaller boats go, bass boats are the Rolls Royce's of boats with regards to fit and finish. Compare a Skeeter or Ranger Bay to a bass boat from the same manufacturer and you will see what I mean. They need plush carpets to fit the bill, a bass boat without carpets would be worth half as much as one with.
I always intended on carpeting my boat, firstly because it's just not a bass boat without them, secondly because it is much more comfourtable to fish off, when you stand on the deck for 9 hours straight casting you learn to appreciate that little bit of cushioning they give. It's quieter when you are stalking fish in calm shallow water and when you have $3000 worth of rods and reels strapped to the deck or laying in the hatches they need every bit of pampering they can get.
It's also much softer if you trip and fall
and you never slip
If I didn't carpet I wouldn't have built the gunwales up either (and I would have actually faired the deck
)
Re: BassMunn's PH16
Posted: Tue Jun 15, 2010 9:36 pm
by BassMunn
Craig that's a novel idea with the light fitting.
That removable light I have stays permanently fitted into it's clips on the underneath of the starboard rod locker and only comes out to play when I launch in the dark for a tournament which happens very seldom, or if the fish are going nuts and I stay too long meaning a run back in the dark. As soon as it gets light it gets removed as it is like a homing beacon for all stray casts
I'm sure saltwater would eat it just like it eats everything else, but that's not much of a problem for me.
The only saltwater close to me that my boat is capable of handling is our harbour, I'll certainly pop it in there a few times a year but it will mostly be freshwater.
I've used them in the past with great results and for $15 I can change it once a year if need be. It sure beats having to patch up the hole it's in and respray the whole boat.
Thanks for all the nice comments guys
Re: BassMunn's PH16
Posted: Tue Jun 15, 2010 9:41 pm
by peter-curacao
Re: BassMunn's PH16
Posted: Tue Jun 15, 2010 10:12 pm
by sitandfish
BassMunn wrote:Hehehe, you boys have got too much salt in your veins
...a bass boat without carpets would be worth half as much as one with.
...It's quieter when you are stalking fish in calm shallow water and when you have $3000 worth of rods and reels strapped to the deck or laying in the hatches they need every bit of pampering they can get.
It's also much softer if you trip and fall
and you never slip
I was surprised to here that people didn't get what you were doing.
Then again... the first time we took the saltwater version of a flats boat (a saltwater bass boat) to the backcountry, we got a lot of funny looks from the freshwater bass boys. We finally gave up trying to explain to them what a polling platform was. It just became a raised fish cleaning station to them. Of course, the ladies thought it was a "dandy pick-nick table".
The stow away light is a smart move. All the good freshwater bass boats have them.
Re: BassMunn's PH16
Posted: Tue Jun 15, 2010 11:02 pm
by TJS Redchaser
yep,
If your'e building a Bass Boat the rear lamp and the carpet fit right in. That's exactly how all the ones around here are set up. And like you said that includes $40,000 Rangers, Skeeters and Champion Bass Boats. The boat looks amazing.
Re: BassMunn's PH16
Posted: Wed Jun 16, 2010 7:38 am
by cape man
Hope you didn't take my post as a crticism of the post light (Hey...get it? post about post light...
), just a suggestion for an alternative since it was being discussed. The post looks fine to me, and in your case will work great.
Re: BassMunn's PH16
Posted: Wed Jun 16, 2010 8:17 pm
by peter-curacao
I still don't get it sorry!
please understand I do get what you are doing with the boat and paint etc etc except for the carpet!
Okay some here says that's how a bass boat is and should look like! but why? are you catching more Bass because of the carpet?
personally I don't think so! so what's the reason of putting in carpet ? to look the same as a US$ 40.000,- piece of shit boat like a Ranger? if so I think that's strange because your boat looks a 1000% better without carpet, after all you don't need to hide small or huge imperfections! like the big boys! What I saw in the pics your boat don't have them!Again this is just my idea (without thinking as usually!)
Edit: IMHO your decks never will be dry as without carpet! it can feel dry at your feet and hands but I don't think it is! result paint rot and after that plywood rot please don't let that happen, your boat is waaay to nice for that!
leave that to the big boys like the ranger etc and let them rot in swamp hell! after all they have to live of it
Re: BassMunn's PH16
Posted: Wed Jun 16, 2010 8:23 pm
by gstanfield
erased out of respect to bassmun
Re: BassMunn's PH16
Posted: Wed Jun 16, 2010 8:50 pm
by peter-curacao
me yesterday

Re: BassMunn's PH16
Posted: Wed Jun 16, 2010 9:05 pm
by gstanfield
erased out of respect to bassmun
Re: BassMunn's PH16
Posted: Wed Jun 16, 2010 9:22 pm
by peter-curacao
me yesterday
Re: BassMunn's PH16
Posted: Wed Jun 16, 2010 9:30 pm
by gstanfield
erased out of respect to bassmun
Re: BassMunn's PH16
Posted: Wed Jun 16, 2010 9:45 pm
by peter-curacao
me yesterday
Re: BassMunn's PH16
Posted: Wed Jun 16, 2010 9:50 pm
by gstanfield
You win, I'll leave you to telling people their boats are wrong
Re: BassMunn's PH16
Posted: Wed Jun 16, 2010 9:56 pm
by peter-curacao
gstanfield wrote:You win, I'll leave you to telling people their boats are wrong
Again I have to say I never did this!
gstanfield wrote:You win,
Also I don't think this site is about winning is it?
Re: BassMunn's PH16
Posted: Wed Jun 16, 2010 11:12 pm
by cape man
Both of you. Go fishing! Right now! This thread is all about a beautiful boat build.
Re: BassMunn's PH16
Posted: Wed Jun 16, 2010 11:49 pm
by Cracker Larry
And remember that everyone is not from Wyoming. There is a language barrier
In my opinion, I wouldn't carpet it either. Peter is saying that cheap boats do that to hide the cheap, and blood and squid guts is real hard to wash out of carpet. That's all. That boat is built like a Rybovitch, and I've never seen one with carpet
Nothing to hide and lots of blood expected.
Jackie Gleason, Smoky and the Bandit? "What we have here is a failure to communicate"
Re: BassMunn's PH16
Posted: Wed Jun 16, 2010 11:53 pm
by sitandfish
Cracker Larry wrote:And remember that everyone is not from Wyoming. There is a language barrier
Smoky and the Bandit
"What we have here is a failure to communicate"
"What we have here is a failure to communicate" - Cool Hand Luke
I know my Strother Martin quotes.
Re: BassMunn's PH16
Posted: Wed Jun 16, 2010 11:54 pm
by Cracker Larry
Didn't Jackie Gleason say that too? Nope, a quick google search proves me feeble of memory
Cool Hand Luke. Shakin the bushes boss.
Re: BassMunn's PH16
Posted: Wed Jun 16, 2010 11:57 pm
by sitandfish
Cracker Larry wrote:You're right
but didn't Jackie Gleason say that too?
The first guy always gets the quote in my book.
Jackie Gleason is one of my favorite actors. Though, I think most people just remember his comedy.
Re: BassMunn's PH16
Posted: Thu Jun 17, 2010 12:24 am
by Cracker Larry
Amazing what you can find with a google search
Not an original line evidently. Jackie Gleason did say that, just not in Smoky and the Bandit
(Jackie Gleason)/The Honeymooners · "Har, har, hardy, har, har. ... "What we've got here is failure to communicate."
In contemporary usage the line is usually an illustrative mockery of the principle behind it; the allocation of blame or fault for refusal to agree with or accept a powerful nemesis. The phrase is often articulated with a Southern American drawl in imitation of the character who first delivered the line. Rock band Guns N' Roses used this line twice: first in the 1990 song Civil War and again in 2008 in the song "Madagascar" from Chinese Democracy[1].
The phrase is #11 on the American Film Institute list, AFI's 100 Years... 100 Movie Quotes.[2]
In Rob Zombie's 2007 remake of Halloween, the truck driver (Ken Foree) uses the line to Michael Myers (Tyler Mane).
In the film Waterworld, the Deacon (Dennis Hopper) uses this line to the Mariner (Kevin Costner) towards the end of the film.
In The Cleveland Show, Cleveland uses this line when coaching children.
DangerDoom quotes this line in their song El Chupa Nibre.
In the 1995 film Major Payne, Major Benson Winifred Payne (portrayed by Damon Wayans) uses this line when speaking to his cadets.
David Duchovny uses this line in season 2 episode 11 Californication while firing a shotgun into the celing at a party in order to break up a catfight.
No matter, it's a fantastic boat build, and it ain't mine to wash the carpet. I'm sure it will look great with carpet or without
Re: BassMunn's PH16
Posted: Thu Jun 17, 2010 1:22 am
by sitandfish
Cracker Larry wrote:Amazing what you can find with a google search
Not an original line evidently. Jackie Gleason did say that, just not in Smoky and the Bandit
In contemporary usage the line is usually an illustrative mockery of the principle behind it; the allocation of blame or fault for refusal to agree with or accept a powerful nemesis. The phrase is often articulated with a Southern American drawl in imitation of the character who first delivered the line. Rock band Guns N' Roses used this line twice: first in the 1990 song Civil War and again in 2008 in the song "Madagascar" from Chinese Democracy[1].
The phrase is #11 on the American Film Institute list, AFI's 100 Years... 100 Movie Quotes.[2]
(Jackie Gleason)/The Honeymooners · "Har, har, hardy, har, har. ... "What we've got here is failure to communicate."
In Rob Zombie's 2007 remake of Halloween, the truck driver (Ken Foree) uses the line to Michael Myers (Tyler Mane).
In the film Waterworld, the Deacon (Dennis Hopper) uses this line to the Mariner (Kevin Costner) towards the end of the film.
In The Cleveland Show, Cleveland uses this line when coaching children.
DangerDoom quotes this line in their song El Chupa Nibre.
In the 1995 film Major Payne, Major Benson Winifred Payne (portrayed by Damon Wayans) uses this line when speaking to his cadets.
David Duchovny uses this line in season 2 episode 11 Californication while firing a shotgun into the celing at a party in order to break up a catfight.
No matter, it's a fantastic boat build, and it ain't mine to wash the carpet. I'm sure it will look great with carpet or without
I think you may have an errant copy and paste here (in the bold text above). It probably should be the following text without the extra line about Jackie Gleason:
The phrase is #11 on the American Film Institute list, AFI's 100 Years... 100 Movie Quotes.[2]
In Rob Zombie's 2007 remake of Halloween, the truck driver (Ken Foree) uses the line to Michael Myers (Tyler Mane).
You may have just hit copy/paste twice or something?
Re: BassMunn's PH16
Posted: Thu Jun 17, 2010 1:47 am
by Cracker Larry
Yep, that must be what happened
what we have here is a total lack of respect for the law
I'm the world's worst when it comes to TV and movie facts
I can remember some lines, but not often who said them
Anyway, I think we had a failure to communicate
Shakin' the bushes here boss.
Re: BassMunn's PH16
Posted: Thu Jun 17, 2010 4:52 pm
by BassMunn
OK I've gotta watch my thread more closely, all I read is edit, edit, edit
guess it got a bit heated in here.
Guys I appreciate the opinions and the defenders, thank you.
I considered building the phantom in the standard flats suite, but when I decided to do the full bass boat conversion the carpets are part of the package out of personal choice. I agree that a saltwater boat is better off without carpets because of it's ability to easily wash down. I have owned 4 offshore boats (1 with Flotex Marine carpets) and 1 bass boat prior to this boat and although a clean deck is easier to wash off, I find carpets far more pleasing. I have fished off 8 different types of bass boats (Ranger, Skeeter and Triton included) and none of them would have been as nice if they didn't have carpets. Not saying that a boat can't be really nice without carpets, Ranger actually makes saltwater versions of the 188VS and the Z21 known as the Intracoastal series which have no carpets.
From 2003 to 2008 apart from serious practice time I fished 42 Money tournaments, winning 9 of them and finishing in the top 5 a total of 18 times, apart from driving time I spent upwards of 9 hours a day standing on the front deck making up to 2500 casts per day, so yes I do know what makes a bass boat work and most importantly what works for me.
The only squid that appears on my boat are of the Gulp variety and the catch merely gets to go boating for a day
My girl is getting/has got carpets and after 5 litres (1.2 gallons) of contact adhesive and counting they ain't coming off either.
It's been freezing here for the last 3 days and I've got Flu so the carpets will probably only get finished on the weekend
Re: BassMunn's PH16
Posted: Thu Jun 17, 2010 5:01 pm
by sitandfish
BassMunn, you didn't miss much. Larry and I were talking about old movies we like while you were gone. That's about it.
Sorry about the flu. That is never a quick recovery. Can't wait til the next update.
Re: BassMunn's PH16
Posted: Thu Jun 17, 2010 5:12 pm
by Cracker Larry
Larry and I were talking about old movies we like while you were gone.
And Mark obviously knows them better than I do! Good luck kicking that flu
Re: BassMunn's PH16
Posted: Thu Jun 17, 2010 5:13 pm
by peter-curacao
Sorry about that
get well soon !
this always helps me very good

Re: BassMunn's PH16
Posted: Thu Jun 17, 2010 5:28 pm
by BassMunn
It's funny I used to know movies and TV pretty well, but ever since building boats I can't actually remember when last I watched TV.
Thanks for the "get well's"
OK I need some ideas:
I still have to design and shape my console screen. Now I need to have a mold of some sorts to be able to drap the perspex/lexan over and put it in the oven, let it soften and take the shape of the mold.
Now like a doofus I forgot to take a mold of the console before I painted it. I really don't want to go anywhere near my paint with gelcoat for a mold, so I was wondering if there is something that I can use to seperate the gelcoat from the paint, something that won't melt or dissolve from the gelcoat. Or something else instead of gelcoat. It doesn't need a perfect finish just the shape needs to be right.
Any ideas?
Re: BassMunn's PH16
Posted: Thu Jun 17, 2010 5:37 pm
by sitandfish
peter-curacao wrote:Sorry about that
get well soon !
this always helps me very good
I use this.

Re: BassMunn's PH16
Posted: Thu Jun 17, 2010 5:44 pm
by gstanfield
Yummm, Jameson
I'd have to say that Jameson is without doubt my favorit out of all the hard stuff, not that I've tried it all, but man that stuff is good
Re: BassMunn's PH16
Posted: Fri Jun 18, 2010 1:12 pm
by cape man
Re: BassMunn's PH16
Posted: Fri Jun 18, 2010 1:16 pm
by cape man
How do you want the windshield/screen to attach and transition on the console? Can you draw something rough?
Re: BassMunn's PH16
Posted: Fri Jun 18, 2010 6:36 pm
by BassMunn
Craig you want me to draw??? Oh No!
ROFL
OK Let's try this
This is an attempt at a pc drawing I did when I was trying to decide on a color scheme.
It give's a basic idea of what I am wanting to do as far as shape (minus the jagged edges).
The screen will be held on with 4 screws into the console, with foam discs underneath each screw to prevent the screen actually touching the console and give it a bit of suspension so to speak. The screw heads will sit in those little plastic caps that fold over and clip close.
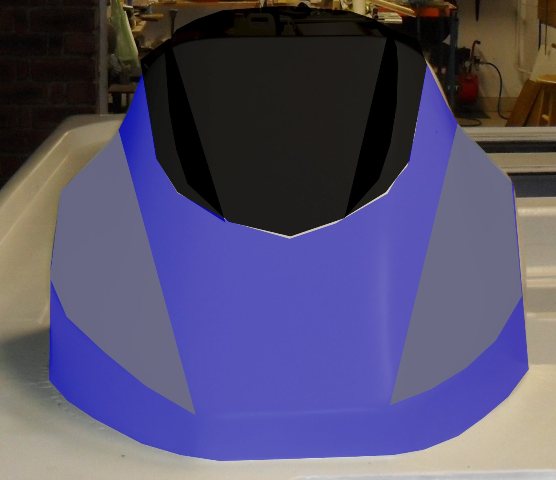
Looking straight at the console from the bow, the side edges of the screen need to follow the curves off each side and I want to put a small "flick" at the trailing edge of the screen just to kick the air off it better.
I'm sure we have it here under another name, but what is Starboard?
Thanks
Shannon
Re: BassMunn's PH16
Posted: Fri Jun 18, 2010 7:10 pm
by gstanfield
It's too bad that this discussion didn't come up much earlier (or maybe it did) I think you can build one, but the easiest way would have been to buy a windshield for a sport bike and build the console so that the bike shield fit it. Then you would have had access to replacement shields quick and easy and you could even go with shorter and taller ones and different colors easily
But I know you want to make it yourself, and I'm sure it will turn out great
Re: BassMunn's PH16
Posted: Fri Jun 18, 2010 9:42 pm
by colonialc19
Here's a pic of the windshield on my production boat if it helps, please excuse the dust
Your boat is looking great

Re: BassMunn's PH16
Posted: Mon Jun 21, 2010 7:08 pm
by cape man
The Florida Redneck way. Build an oven out of rigid insulation, and throw a small space heater in...
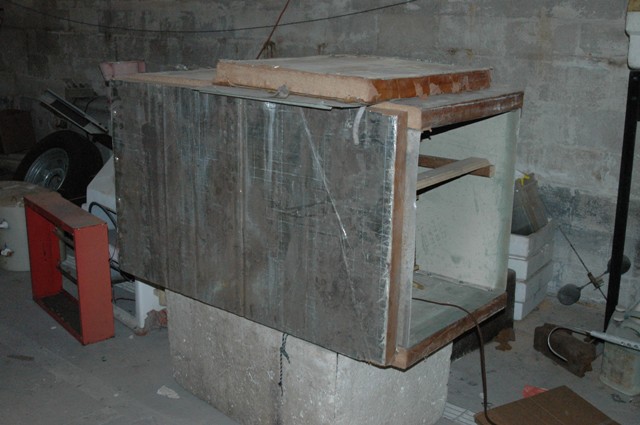
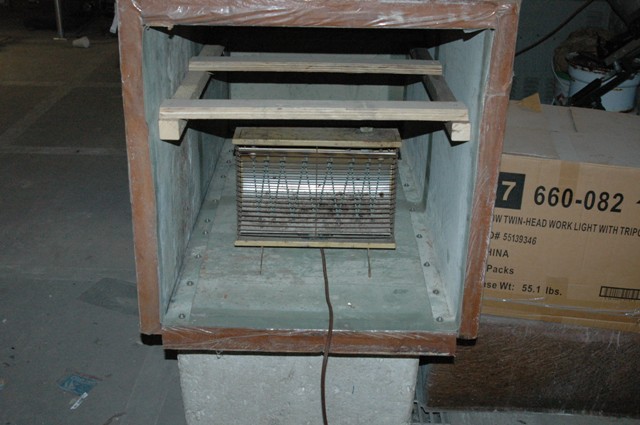
Put the plexi in and shut the door.
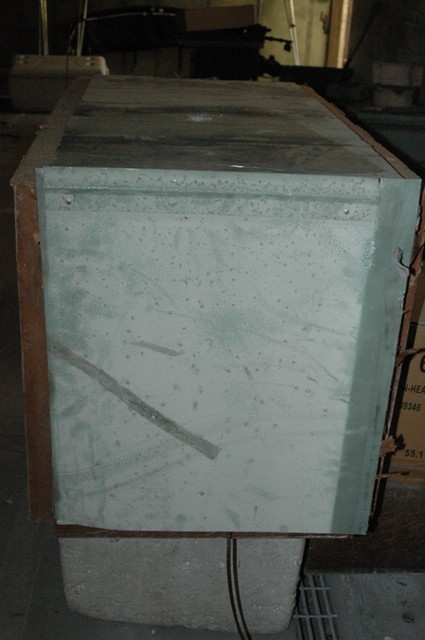
When the plexiu gets soft and pliable, clamp it down on your console until cool.
That's the easy part!!! You are going to have to figure out the shape before hand (Use a piece of cardborad or poster paper) and how you are going to kick the top up. He recommends taping the console before you clamp it down to protect the paint.
So you know I had to drink 3 beers and tell 4 stories to get that from my buddy...
Re: BassMunn's PH16
Posted: Mon Jun 21, 2010 7:25 pm
by Cracker Larry
That is really cool. Worth your 3 beers anyway Craig
I've never tried bending plexiglass or lexan but I think I could benefit from a windshield that wraps the T-top legs. I'm going to give that a try, on not nearly such grandiose scale and styling as BM
Keep on building, I'm learning something here
Re: BassMunn's PH16
Posted: Mon Jun 21, 2010 9:58 pm
by cape man
Re: BassMunn's PH16
Posted: Wed Jun 23, 2010 5:09 pm
by BassMunn
Hey Thanks Craig. Never thought of putting a little bar heater in a make shift box/oven
My wife just so happens to have bought a little one just this week
Can get that past her easier than using her oven
You can apparently use a heat gun to do spot bends as well, but you have to pay attention as you run the risk of blistering the perspex if you heat it too much.
Gonna play with some ideas this weekend
Re: BassMunn's PH16
Posted: Wed Jun 23, 2010 5:26 pm
by BassMunn
cape man wrote:
PS Shannon your boat was a hit with the guys at the marine fab shop. He said he would come build the windshield if you flew him down
Cool
I really appreciate comments from guys that work with boats all the time. But considering our weather at the moment I think I'll come over there - maybe get a tarpon while I'm at it
I've finished the carpets on the deck, but ran out of carpet for the inside of the hatches so yesterday I shot down to a local boat builder to get some more. While I was there I had a sneak peak through their factory. Now these guys make one of the best range of power cats available locally (Cobra Cat range). It was an eye opener to see the insides of their boats, GRP hull and top cap but all the bulkheads, stringers, sole and hatches are all ply. And all sealed in polyester resin
And these boats are not cheap.
Hit a bit of a snag with my hatches, after carpeting the whole deck I fitted the hatches and to my joy found 3 hatches that now won't close because of the carpet
. So the sander gets one last go at the boat and then I have to try recoat and repaint those edges without getting resin and paint all over my carpets. (that's gonna be fun).
Seats are in permanently now.
I'll take some nice pics once I've sorted the misbehaving hatches out.
And I received the steel for the trailer yesterday and the axle arrives on Monday
Re: BassMunn's PH16
Posted: Sun Jul 04, 2010 2:55 pm
by BassMunn
Re: BassMunn's PH16
Posted: Sun Jul 04, 2010 2:56 pm
by Aripeka Angler
Wow
Very nice Shannon
Re: BassMunn's PH16
Posted: Sun Jul 04, 2010 2:57 pm
by wegcagle
Looks beautiful Shannon, Nice job on the carpet
What kind of seats are those? My only question is how well the plywood on the back of them will hold up
Will
Re: BassMunn's PH16
Posted: Sun Jul 04, 2010 3:07 pm
by TomW
That is one sharp looking boat guy. To bad you finished in winter!
I'm sure that won't stop you though. Have you decided on power.
Tom
Re: BassMunn's PH16
Posted: Sun Jul 04, 2010 5:27 pm
by BassMunn
wegcagle wrote:What kind of seats are those? My only question is how well the plywood on the back of them will hold up
Custom made Will.
The ply will hold up just like the rest of our boats - the only ? is that the staples will let in a little water, but the vinyl will give up long before the ply does, when it does I'll just make new seats
But bear in mind I still have to make backing plates with vinyl covering them to cover those areas, they're not done yet.
Re: BassMunn's PH16
Posted: Sun Jul 04, 2010 5:38 pm
by BassMunn
Thanks Richard
Thanks Tom - Winter's not a problem here, was 78F here today and our local resevoirs never drop below 57F in winter
but I would put ice skates on if I had to
For power I'm going to try and find a decent 2nd hand 115hp Yam or Merc 2 stroke, would love an ETEC but just can't afford one now. I'll repower her later with a big bad DI motor, maybe a nice 150HO ETEC
YeeHaa!
Re: BassMunn's PH16
Posted: Sun Jul 04, 2010 7:22 pm
by cape man
Shannon,
That is just plain awesome dude! Wow!
Re: BassMunn's PH16
Posted: Sun Jul 04, 2010 8:52 pm
by topwater
That boat is wicked cool
By the way that means realy nice in the northeast.
Re: BassMunn's PH16
Posted: Mon Jul 05, 2010 8:19 am
by wegcagle
You BUILT those seats
Damn they look amazing
I should've figured you were on top of it. I built a VERY simple and not so pretty bench on my last boat using foam and vinyl over plywood. The staples rusted and broke before there was any plywood rot on mine. It lasted 6 years before I sold the boat, and who knows how much longer for the guy who bought it from me.
Great job, she is certainly one of a kind,
Will
Re: BassMunn's PH16
Posted: Mon Jul 05, 2010 4:18 pm
by BassMunn
Thanks Craig and Topwater
Will wish I could but I can't claim those seats to be my work, I had them made for me by the guy that built my last bass boat. He just forgot to send me the backing plates, so I have to make my own.
Staples are all stainless so no rusting problem there, the ply in my seats is the only ply on the boat that has polyester resin instead of epoxy and it's exterior ply instead of marine ply. Guess that's what happens when you don't do it yourself, but it will be interesting to see how they hold up against the rest of the boat, his theory is that you are putting holes in them with the staples so what's the point of using epoxy. Cost me $120 so I can't complain too much.
Picked up my axle, steel and other trailer parts today, so for the next while I'll be trailer building instead of boat building, I'll post pics as I go.
Thanks for watching
Re: BassMunn's PH16
Posted: Mon Jul 05, 2010 7:54 pm
by cape man
The seats should last a long time using stainless staples. That's where cheap seat upholstery fails. Duh
Can't believe some use anything else.
Polyester seals just as well as epoxy, just doesn't have the same strength. I've got some bright work brest hooks on my canoe that are just sealed with varnish and 11 yeaqrs later they look like new.
Re: BassMunn's PH16
Posted: Tue Jul 06, 2010 5:12 pm
by sideslippa
Nice going there Shannon...It does look great!
Steve.
Re: BassMunn's PH16
Posted: Wed Jul 07, 2010 6:50 pm
by chicagoross
Every step of this build has been outstanding, Shannon! I continue to be amazed each time I check your progress. Can't wait to hear the stories after you splash it and start giving the locals a chance to drool over it!
Re: BassMunn's PH16
Posted: Wed Jul 07, 2010 7:20 pm
by ks8
Though we shall all enjoy your splash pictures and sea trial report and first blood, I'm pretty sure none of us will enjoy it nearly as you. Nice work!
Re: BassMunn's PH16
Posted: Fri Jul 09, 2010 11:38 am
by tobolamr
BassMunn, You're definitely hitting the levels of finish that I desire when I build my Phantom 18. Fantastic job on the custom built seat! Any idea how you're going to get your wind screen for your console formed yet?
Re: BassMunn's PH16
Posted: Fri Jul 09, 2010 5:18 pm
by BassMunn
Re: BassMunn's PH16
Posted: Mon Jul 19, 2010 9:13 am
by BassMunn
Been spending the last 2 weekends building my trailer, nowhere near finished yet, but I thought I'll give you all an update.
Once all the cutting, welding, grinding and drilling is done, she'll go for Hot Dip Galvanizing to protect her against the elements.
And then she will get a custom set of wheel guards to match the boat
This is how she looks now
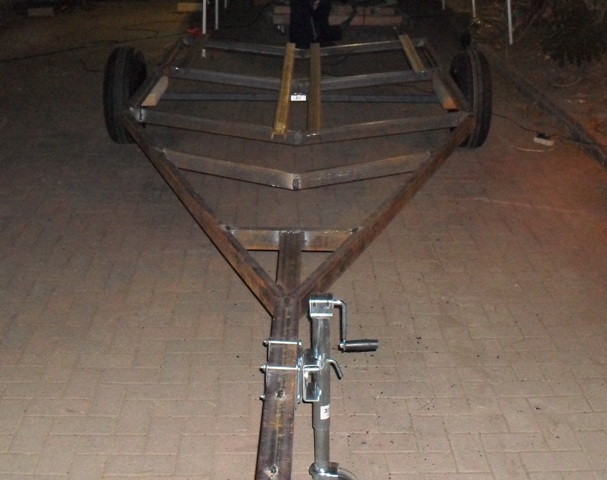
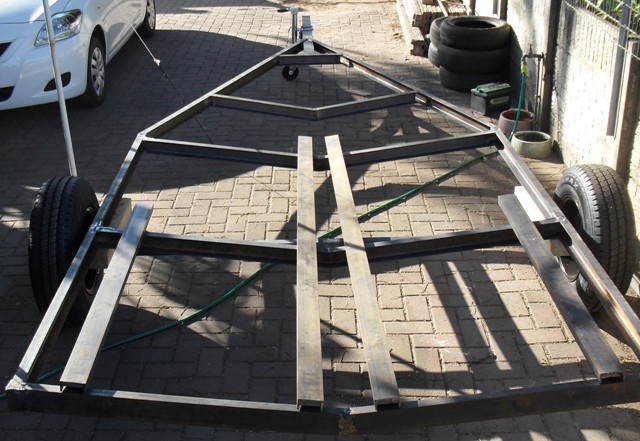
To maintain her Bling Bling Status
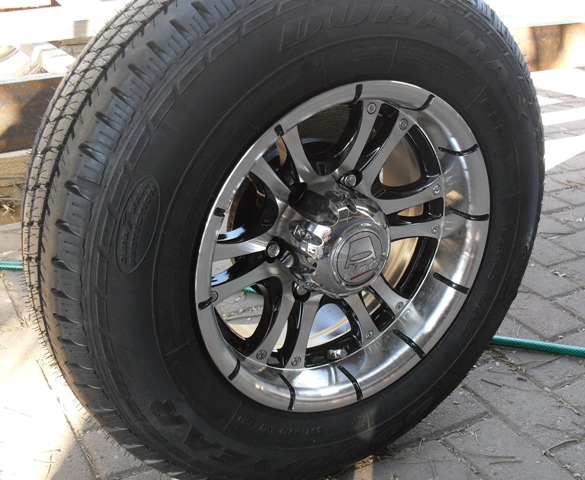
Re: BassMunn's PH16
Posted: Mon Jul 19, 2010 9:59 am
by Larry B
Very nice job on the trailer
I'm building my own trailer also for my OD18 only using aluminum. Your trailer won't rust with the hot dip galvanizing. btw, whats it cost to get a trailer hot dipped? I haven't got my aluminum yet and this would still be a option for me. I do have the galvanized torsion axle.
Man thats going to look nice with your beautiful boat on her. Are you going to paint it or just leave it galvanized?
Re: BassMunn's PH16
Posted: Mon Jul 19, 2010 12:00 pm
by TomW
Looks great! With the galvanizing that should last you a long time!
Tom
Re: BassMunn's PH16
Posted: Mon Jul 19, 2010 4:51 pm
by BassMunn
Thanks Larry and Tom.
The Galvanizing works really well on fighting off the elements, the key is to make sure that you don't have to drill or cut anything afterwards because it just exposes raw metal and then the rust eats it from inside.
Larry the dipping will cost me roughly $170 after converting Rands to US$, probably doesn't mean much after all the conversions.
To be honest I would love an Ali trailer, but because no one builds trailers out of Ali here there are no parts or correct size beams to do it with. My trailer frame alone will weigh 440lb's, not sure how that compares to an Ali trailer, obviously Aluminium is lighter but has to be beefed up to be strong enough. Aluminium also costs a fortune here.
I'm going to leave the trailer frame silver as trying prepare a galvanized trailer for paint is a nightmare and you still have a chance of it peeling off (or so I'm told). The fenders will get a good dose of ply, glass and glitter paint
Re: BassMunn's PH16
Posted: Mon Jul 19, 2010 5:43 pm
by Larry B
BassMunn, thanks for the info. I keep forgetting your in South Africa
So the cost of galvanizing don't mean much except I'm thinking it would be more here.
Re: BassMunn's PH16
Posted: Sat Jul 24, 2010 4:32 pm
by icelikkilinc
There is a Us made paint, %99 galva zinc.. you can use it after when you need to drill holes..
If is a bit pricey but works like charm..dont remember the brand name but a kg was around 100 USD (of course export price here would be less in Us)
Re: BassMunn's PH16
Posted: Sat Jul 24, 2010 4:47 pm
by cape man
Are those spinner rims? BLING BLING!!!!!
Re: BassMunn's PH16
Posted: Sun Jul 25, 2010 5:49 pm
by lagwagon
BassMunn, this may be too late but you could always use a vaccum bag and some heat to shape your windscreen to your mold. Ive never done this with a windscreen before but im very accustomed to building many race car parts this way.
Re: BassMunn's PH16
Posted: Sun Jul 25, 2010 7:28 pm
by BassMunn
cape man wrote:Are those spinner rims? BLING BLING!!!!!
Noooo, I'm not that bad
Re: BassMunn's PH16
Posted: Sun Jul 25, 2010 7:39 pm
by BassMunn
Thanks Ice, I know the stuff you are talking about, still better to try avoid drilling after it's dipped if you can. I've still seen that galv paint rust pretty quick.
Thanks Lagwagon - that's another idea to play with.
But first I've gotta get this trailer finished, phew it's pretty tough work dragging a 440lb frame around
Test fitting the boat on the trailer to make sure she sits where she needs to before I lock up all the bunks and such, pretty chuffed with myself, the centre bunks are perfect and don't need any shimming
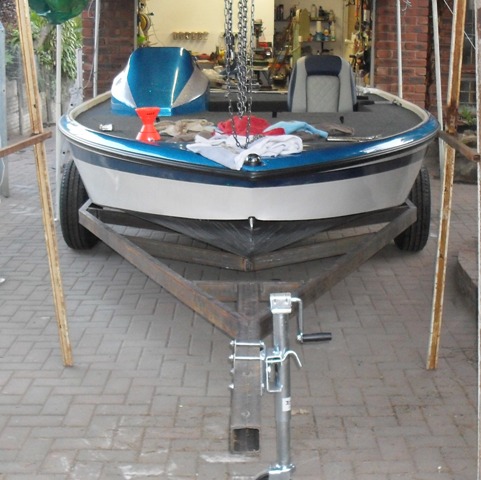
After this pic was taken I tack welded the winch and bow stop structure in place and spent the rest of the day altering my gantry crane (hoist frame). It's an old frame that used to pick up my racing cars engine, but it's way to narrow to allow the trailer through, so it's getting a stretching.
Still got tons of welding and cutting to do to get her finished, but she's getting closer
Re: BassMunn's PH16
Posted: Sun Jul 25, 2010 9:26 pm
by JamesT
She's looking really good! Must be very satisfying to build the boat and the trailer...
Re: BassMunn's PH16
Posted: Mon Jul 26, 2010 8:16 am
by macs
Awesome Job!
Re: BassMunn's PH16
Posted: Tue Jul 27, 2010 5:31 pm
by BassMunn
Thanks Macs and JamesT
Re: BassMunn's PH16
Posted: Tue Aug 24, 2010 5:34 pm
by BassMunn
Just to update - Some might be wondering what's happened to me and the boat.
The last 2 months have been a bit of a rollercoaster. We had a huge down turn in the building sector here and Hilti had to cut back on employees, so unfortunately Last in First out principle prevailed and I got retrenched.
The good Lord blessed me though and I found a filler job within a week and 2 weeks ago I started a New job with a Packaging company. I have 14 years of experience in the packaging industry so I landed with my butt in the butter so to speak and now have the best paying job of my entire career.
The Lord provides for those who are patient and obedient to him and his ways.
Oh and Hilti offered me my job back 2 weeks ago
Anyway back to boats. Having this turmoil in life obviously slowed down things a bit, but I have been slowly tinkering away on my trailer and it will be going in for it's galvanizing next week. I'll take some pics over the weekend to show what I've done so far.
I'm pretty surprised at how much work is involved in building a good trailer. 14lb's of welding rods so far
It's also pretty difficult to move around now unless it has wheels on it.
Now it's time to start working on getting that outboard.
Re: BassMunn's PH16
Posted: Wed Aug 25, 2010 10:17 am
by Bowmovement
Congrats on the new job.
Matt
Re: BassMunn's PH16
Posted: Wed Aug 25, 2010 1:50 pm
by wegcagle
Awesome! More money for more boats
Will
Re: BassMunn's PH16
Posted: Wed Aug 25, 2010 5:55 pm
by TomW
Congrats on the new job and all that goes with it. You may even be able to afford the motor you want
now! Good luck and God bless!
Re: BassMunn's PH16
Posted: Thu Aug 26, 2010 6:44 pm
by tobolamr
Congrats on the job! Good to hear you're grateful to the right person!
Keep us posted as things progress! I've really enjoyed seeing your fit and finish on this project. I can only hope to get a little bit close when my time comes...
Re: BassMunn's PH16
Posted: Mon Aug 30, 2010 12:29 am
by flyfishingmonk
BassMunn wrote:The Lord provides for those who are patient and obedient to him and his ways.
Thanks for this BassMunn.
And thanks for the thread.
Re: BassMunn's PH16
Posted: Mon Aug 30, 2010 6:16 pm
by BassMunn
Thanks for the Well Wishes guys
Trailer is all done, galvanizers pick it up tomorrow for it's dip. Should be back by Friday all nice and shiny and ready for final fitting
Re: BassMunn's PH16
Posted: Wed Sep 01, 2010 7:27 pm
by BassMunn
Well I got me a Shiny trailer
Trailer frame fresh out of the galvanizing tank today
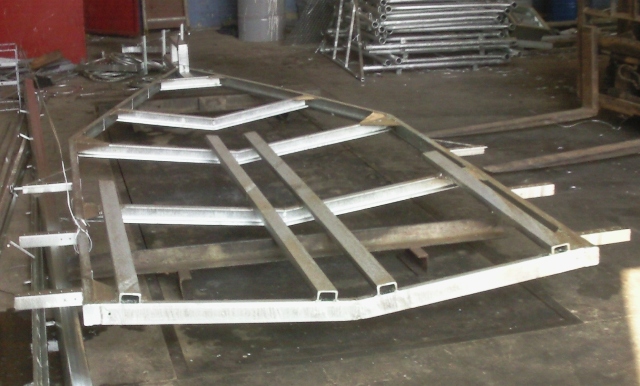
Tonight I fitted the axle, winch, bow roller, tow hitch and installed the felt on the bunks.
Tomorrow the boat goes on it and she won't be coming off until she see's water.
Now it's time to start building the fenders
Sorry for horrible pic, had to use my cell as my wife is hiding the camera
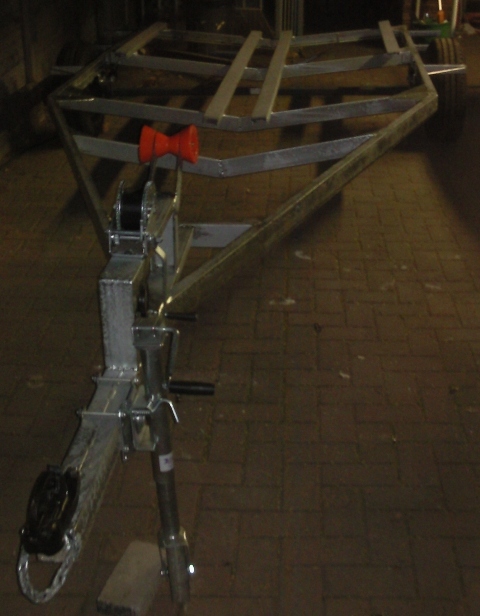
Re: BassMunn's PH16
Posted: Wed Sep 01, 2010 8:12 pm
by gstanfield
Very nice
Re: BassMunn's PH16
Posted: Wed Sep 01, 2010 8:31 pm
by wegcagle
NICE
Will
Re: BassMunn's PH16
Posted: Thu Sep 02, 2010 6:40 pm
by tobolamr
Outstanding!
Re: BassMunn's PH16
Posted: Fri Sep 03, 2010 3:26 pm
by BassMunn
Thanks Guys
Ready to Roll
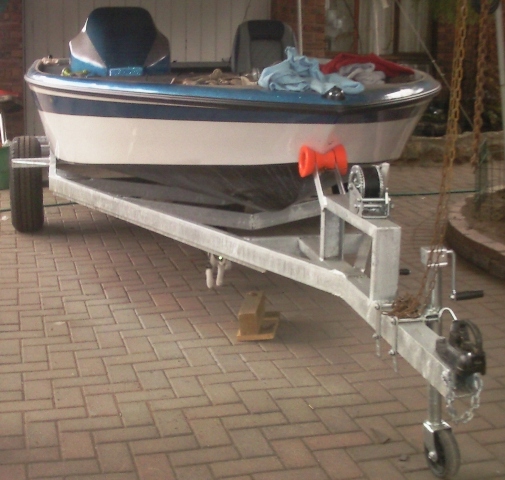
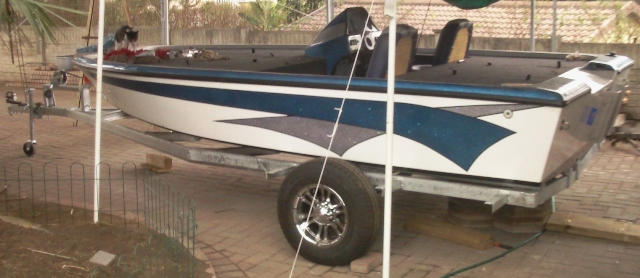
Now just have to make the fenders and install the electrics and the trailer is done
Re: BassMunn's PH16
Posted: Fri Sep 03, 2010 4:41 pm
by sitandfish
Wow... that's a bad looking set up!
And of course by bad, I mean good.
Re: BassMunn's PH16
Posted: Fri Sep 03, 2010 4:55 pm
by cottontop
Shannon, Great Job!! John
Re: BassMunn's PH16
Posted: Fri Sep 03, 2010 5:24 pm
by gstanfield
Fenders?
I'd hate to see that beautiful paint job ruined by rocks and gravel pelting the side of the hull as they slig off the tires. A set of fenders for the trailer would be cheap and easy to add and would really help to protect the boat.
Re: BassMunn's PH16
Posted: Fri Sep 03, 2010 5:28 pm
by Cracker Larry
Fenders for sure
That's beautiful Shannon, you've done a mighty fine job. Raised our bar a few more notches too
Re: BassMunn's PH16
Posted: Fri Sep 03, 2010 5:36 pm
by colonialc19
Man talk about DIY, you've done it all, fancy paint, snazzy console, and the trailer, and done a great job of it.
very cool.
Re: BassMunn's PH16
Posted: Fri Sep 03, 2010 6:04 pm
by TomW
You have done such a super job it would be a shame to be ruined by not having fenders on that rig.
Fenders please
Re: BassMunn's PH16
Posted: Fri Sep 03, 2010 6:33 pm
by Larry B
Looking very nice there bassmunn, hope my trailer comes out half as nice as yours.
btw folks he said he was going to make fenders,
Now just have to make the fenders and install the electrics and the trailer is done
Re: BassMunn's PH16
Posted: Fri Sep 03, 2010 6:38 pm
by macs
Very nice. Speaking of consoles. When I saw yours under construction, way back then, I was impressed. It took my thoughts in new directions.
If you can imagine it, you can build it with wood and the sticky stuff
Macs
Re: BassMunn's PH16
Posted: Fri Sep 03, 2010 8:27 pm
by gstanfield
All I saw were pictures, never read the words where he said he was going to add fenders. I did notice the fender struts in the picture though so I assumed he was going to add them
Re: BassMunn's PH16
Posted: Sat Sep 04, 2010 2:43 pm
by cottontop
Shannon, I had a piece of advice given to me that I thought was useful when I was nearing the finish line. Hope it may help you. Three of the fellas I work with are avid fishermen. They suggested I put something towards the boat side under the fenders to keep rocks from kicking up and mud slinging up. I took a piece of 1/4 inch ply cut in an arch to fit just in that area, coverded it in 6 ounce cloth, and epoxied with a couple of coats. I bolted it with a couple of stainless bolts to hold it on. It is still in good shape and no scratches or chips from rocks kicking through that area. Just another idea. John
Re: BassMunn's PH16
Posted: Wed Sep 15, 2010 4:55 pm
by BassMunn
Hey everyone
. Firstly I must apologise for taking so long to respond to everyones input - sorry.
Thanks for all the valuable input and positive comments
I haven't had much chance to do anything more on the trailer fenders, I spent a few hours on the weekend playing around with ideas and couldn't come up with any good ones so I put everything down and went inside
I want my fenders to not ony cover the wheels but also run all the way back to the rear of the trailer to incorporate the lights, a stepping pad and most importantly they need to act as guides to assist in driving the boat onto the trailer.
I know I could make it out of Ply like the boat, but for some reason I've got it in my head that I need to play and make a plug, pull a mold and then pull a part out of that x 2 (for each side).
Come to think of it, ply is starting to sound better
I managed to get a little work in tonight, not sure if you remember, but the back of my seats have been exposed wood ever since I put them in, you can see it here.
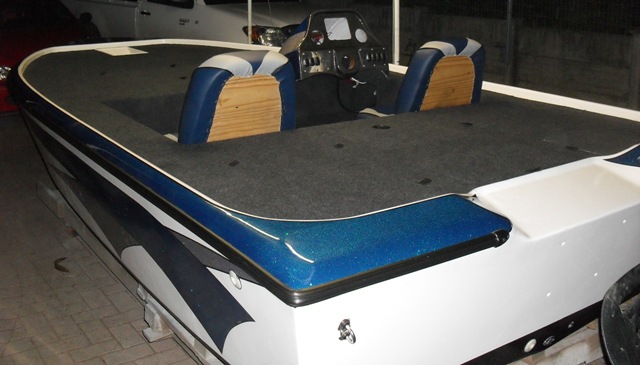
Well I finally got around to finishing them off.
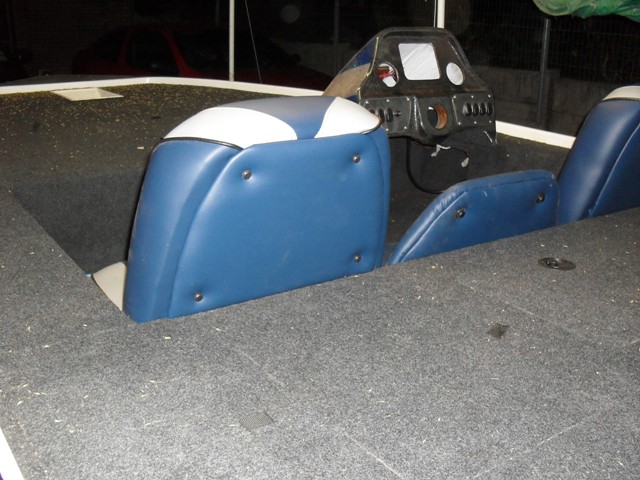
Can't believe how dirty my boat is
At least this little bit of work got the bug biting again
Re: BassMunn's PH16
Posted: Wed Sep 15, 2010 5:00 pm
by gstanfield
Looking good my friend
Re: BassMunn's PH16
Posted: Wed Sep 15, 2010 5:12 pm
by wegcagle
Great work Shannon. Now onto engine mounting and splashing that puppy
Will
Re: BassMunn's PH16
Posted: Wed Sep 15, 2010 5:54 pm
by BassMunn
Thanks Gstanfield
Thanks Will - I still need one of those engine things. I'm chomping at the bit like you won't believe
Re: BassMunn's PH16
Posted: Fri Sep 17, 2010 5:18 am
by MkhondoR
BassMunn
Thanks so much for clearing that up for me, so now it’s time to start assembling the jig, so that my project/dream can commence at last.
My thoughts about fuel tank placement were quite similar since I was also considering hanging a trolling motor over its nose and a set of batteries in close proximity. It makes sense with the weight placement especially getting the boat on plane with a heavy load of cells in its nose plus the weight of the fuel tanks. I am also thinking of a similar seating and console arrangement as the one you have done to your boat, was it necessary to move the console forward to allow for leg space. This would also obviously affect the weight distribution.
The wife is has also brought up a question, that now has me in two minds regarding the deck construction and layout, we would also like to drag this boat North and launch it on the Cahora Bassa where we go for unreal tigerfish action every second year and put it on some of those Mozambique estuaries, for such large lake work I am now wondering if the bass boat deck is such a good option, the Cahora can get pretty worked up when the wind starts picking up over its surface.
My train of thought regarding this is that a freak wave/swell on the Cahora may wash over a flat bass boat deck not leaving to much water in the cockpit area that can be easily bailed out or drained away, yet the second thought is that the cockpit as originally designed seems to be well drained allowing for such a event should it take place. Either way the gunwales with the original flats boat or bass boat deck are basically going to end up being the same height regardless when finished and loaded, maybe just raised a few inches by finishing with the same kind of gunwale that you have built around your deck.
Cheers
Oliver
Re: BassMunn's PH16
Posted: Fri Sep 17, 2010 7:07 am
by stickystuff
Just a heads up on the over bow wash. Yes in a rough sea water will go over the bow. I have had my PH 16 off shore in grouper grounds where I live. Actually in Central florida you can find some big grouper in 12 ft. of water. Last time I went out for grouper it was rough with 2 to 3 ft waves with a lot of wind. With a fast outgoing tide heading back in to shallower areas I had numerous waves crashing over the bow. I was not concerned with boat sinking at all. Two floor drains and a hull full of flotation made it very comfortable to not worry. Heck, I ran two miles or more with a stump sticking out of the bottom of my hull.
The main thing I am bringing up is the Ph 16 is like any other flats boat. If its low profile and relatively flat bottom you will get wet.
Re: BassMunn's PH16
Posted: Fri Sep 17, 2010 2:40 pm
by MkhondoR
Hi there stickystuff
I am still a newbie here, yet chomping at the bit to get going with my PH18, will be cutting and sides and stringers and doing some butt block laminating over the weekend. And hopefully setting up the jig as they dry.
Thanks for that it has been a concern for me since the Cahora Bassa in Mozambique is quite a large inland lake full of some big nasty critter crocks (and hippo’s) and no rescue service up there in the rural backwoods.
Though I doubt that I will be using the vessel for any serious offshore work here except on some of our estuaries, but knowing that it will be able to handle a 2 to 3 foot chop and a few waves washing over the bow settles a few more questions that I had regarding the design and safety.
I'm willing to get wet as long as the fishing is worth it though I will be sure to get an earful from the missus about it
, will just have to install spray rails to minimize the drenching and earache when possible
Thanks for the info
Oliver
Re: BassMunn's PH16
Posted: Sat Sep 18, 2010 10:56 am
by sideslippa
Hey Shannon your phantom looks great. I think it is crying out for an engine and water! Any plans for a engine soon?
slippa
Re: BassMunn's PH16
Posted: Sun Sep 19, 2010 6:58 pm
by BassMunn
Thanks Slippa, working on it, but nothing buttoned down yet.
MkhondoR, glad to see you here on this site, much better place to be when you need to ask questions. Once you get started open you own build thread here. There is a lot of knowledge floating around here and it's a lot of fun to boot.
The PH18 will be fine for Cahora and Jozini unless a really nasty wind picks up, the Phantoms are designed to handle smaller swells that run closely together (the type that you get on small bodies of water). I certainly wouldn't try take it offshore in SA or Moz though, unless you have very nice weather.
Re: BassMunn's PH16
Posted: Sun Sep 19, 2010 7:46 pm
by BassMunn
Ok all the seating is finally done.
Cooler box lid now in place with folding chair attached
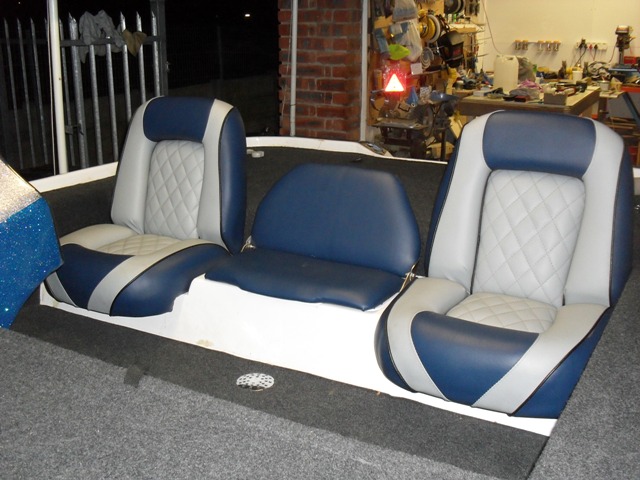
And hiding underneath a nice fully insulated cooler box

Re: BassMunn's PH16
Posted: Sun Sep 19, 2010 8:21 pm
by hooter
That's it....
I quit. Fire up the chainsaw and hack mine to bits.
Awesome job...
Re: BassMunn's PH16
Posted: Tue Sep 21, 2010 12:54 pm
by tobolamr
Like I said... How much do you charge to come to Wisconsin in the USA to help with final finish on a boat?
You've set a standard for which I hope to strive for when I build! Keep up the great work!
OH! How far back from the bow did you put the bow pedestal mount?
Re: BassMunn's PH16
Posted: Tue Sep 21, 2010 2:52 pm
by BassMunn
hooter wrote:That's it....
I quit. Fire up the chainsaw and hack mine to bits.
Awesome job...
hOOter - Thanks but you ain't got nothing to be sad about, your boat is looking excellent, I am actually a bit green about how nice your hatch lips turned out. Keep building man.
tobolamr wrote:Like I said... How much do you charge to come to Wisconsin in the USA to help with final finish on a boat?
You've set a standard for which I hope to strive for when I build! Keep up the great work!
OH! How far back from the bow did you put the bow pedestal mount?
Thanks Tobo - I work for boat parts and sheets of plywood
Umm I've actually never got around to do that, I can only get the mounting plate that takes the large 2" tubes locally. I wanted to use the system that has the thin screw in type mounts from Basspro or one of those but just never got around to getting one.
I actually don't sit very often when I fish, so for those lazy days I'll just take a fold up deck chair along, until I can get setup with the correct stuff.
One more small thing done - installed the mounting clips to hold my stern light in a safe place for daytime fishing (which is most of the time)
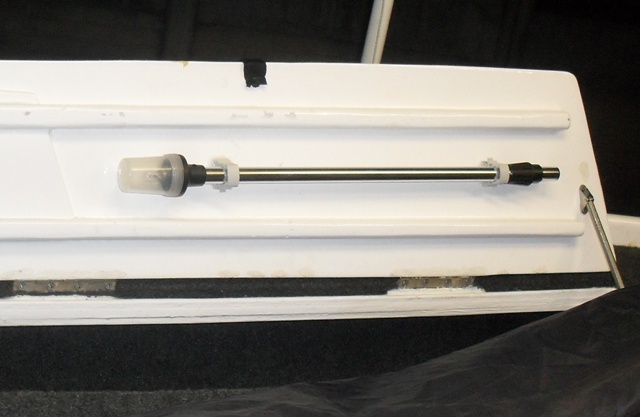
Re: BassMunn's PH16
Posted: Tue Sep 21, 2010 6:03 pm
by tobolamr
I have bad arches, so after a while I need to take the load off my feet. My pedestal base - the Kingpin style that you mention above - mounted right at the back edge of the bow casting deck, just before you step down into the cockpit. I was asking just to get a frame of reference...
My only complaint about setting the bow seat that far back is twofold: If you have to right-hand cast sidearm (for say skipping a pig n jig or tube under hanging cover) you nearly hit the front fisherman. And second, when I do the same in the front, I end up not missing my trolling motor. But if you're too far forward, wake/wave action can really toss you around...
Keep up the great work! I can't wait to see how/where you plan to put that bow seat....
Re: BassMunn's PH16
Posted: Tue Sep 21, 2010 7:36 pm
by macs
Excellent use of storage space. It keeps it secure and out of the way. I was going to use the "plug and play" type lights (pun intended), because we will hardly ever be out in her after dark, but decided to go with the fixed mount type instead.
Had to go check the biscuits in the oven, they were old and been in the freezer for a while, I think I just reinvented the "Hard Tack"
Great idea!
Macs
Re: BassMunn's PH16
Posted: Thu Dec 02, 2010 5:12 pm
by BassMunn
Page 3, shucks I better get a move on. Well I passed the 2 year mark in October so this is starting to drag on a little.
Got a little wind in my sails recently and started getting some boat parts.
First was my steering system, an NFB Teleflex setup, I'll take photos when it stops raining.
Then installed my trolling motor
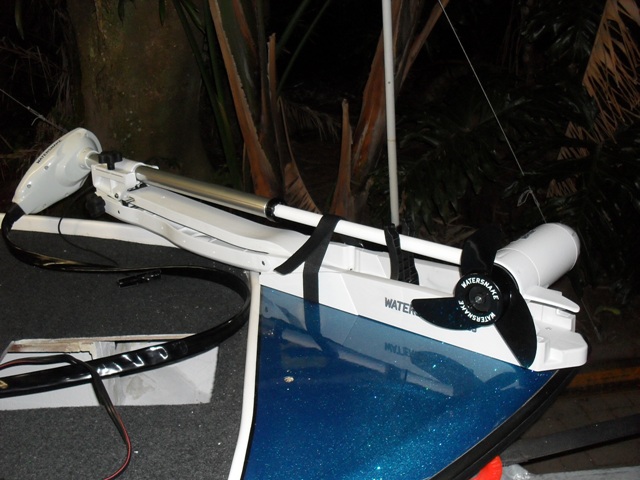
It's a Jarvis Walker 54lb Saltwater Cable steer version, as much as I like Minn Kota for a third of the price here I like the Watersnake more
Still need to install the sounder on the front and get the trolling motor batteries.
Also got a nice shiny flush mount control box from Teleflex with Xtreme control cables and the outboard wiring loom.
Gonna install those over the weekend and shoot some pics.
Then I need to finish my trailer fenders (still haven't done those) AND then it's time to hang a motor.
First tournament is at the end of Jan 2011 and I'm fishing it on my boat so best I get this girl all wet already
Re: BassMunn's PH16
Posted: Thu Dec 02, 2010 5:39 pm
by sitandfish
BassMunn, I never thought of myself as a metalflake guy but, your boat sure makes it look good!
Re: BassMunn's PH16
Posted: Thu Dec 02, 2010 5:59 pm
by wegcagle
Can't promise a victory, but I'm sure she'll be the best looking boat at the event.
Good luck,
Will
Re: BassMunn's PH16
Posted: Thu Dec 02, 2010 6:15 pm
by TomW
Slightly less than 2 months to go and then you can go scare some fish. Didn't say catch them!
Not with that shiny hull.
Tom
Re: BassMunn's PH16
Posted: Thu Dec 02, 2010 6:37 pm
by BassMunn
Thanks Sitandfish and Will
, I can't wait to get her out in the sun on the water to see how she sparkles.
Tom you never know those large mouth fellows have shown a liking to shiny flashy things
Re: BassMunn's PH16
Posted: Thu Dec 02, 2010 6:38 pm
by sitandfish
TomW wrote:Slightly less than 2 months to go and then you can go
scare some fish. Didn't say catch them!
Not with that shiny hull.
Tom
Yes, remember... bass are afraid of shiney blue things!

Re: BassMunn's PH16
Posted: Thu Dec 02, 2010 7:51 pm
by TomW
Yep one of my favorite crank baits is dark blue, bright blue with an orange gill pattern!
That one took the whole thing S&F didn't it.
Tom
Re: BassMunn's PH16
Posted: Fri Dec 03, 2010 1:33 am
by flyfishingmonk
Sweet!
Re: BassMunn's PH16
Posted: Fri Dec 03, 2010 7:17 am
by cape man
Wide shots showing all her lines! Need boat porn!
Re: BassMunn's PH16
Posted: Fri Dec 03, 2010 10:44 am
by flyfishingmonk
That was funny
Re: BassMunn's PH16
Posted: Fri Dec 03, 2010 5:02 pm
by BassMunn
Re: BassMunn's PH16
Posted: Fri Dec 10, 2010 2:03 pm
by tobolamr
Need... Boat.... and fishing... pooooooorn... Dude, that PH16 is amazingly done!
Like I've said before - how much do you want to come up to Wisconsin (in the dead of winter) to help me finish a PH18??? Or an MG20??? Keep it up - and lots of pictures!
Re: BassMunn's PH16
Posted: Sun Dec 19, 2010 3:20 pm
by BassMunn
Thanks Tobo. Dead of winter, uummm I don't do cold
Update: Nearly there.
Installed 2 Rod buckles (Straps) to keep all them expensive rods from flying off the deck
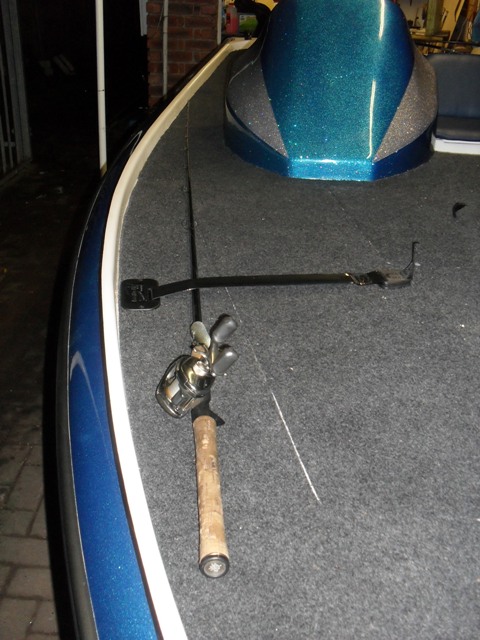
And finished installing the steering, Control box, engine wiring loom and control cables - It is now ready to hang a motor
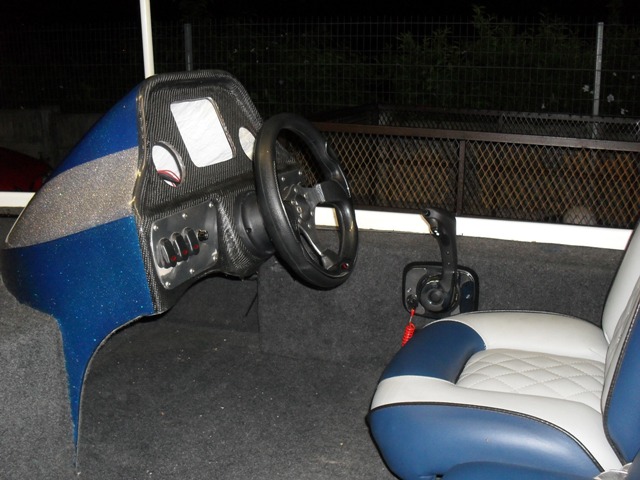
I still need to build my trailer fenders, buy and fit batteries and hang the motor (Oh and go fishing
)
I go on leave on Wednesday for 2 weeks so things are looking good.
Re: BassMunn's PH16
Posted: Sun Dec 19, 2010 3:29 pm
by sitandfish
BassMunn wrote:...And finished installing the steering, Control box, engine wiring loom and control cables -
It is now ready to hang a motor.
She looks fast even without the motor.
Re: BassMunn's PH16
Posted: Mon Dec 20, 2010 10:47 am
by flyfishingmonk
looking great! I like the color combination you went with.
Re: BassMunn's PH16
Posted: Tue Dec 21, 2010 1:13 pm
by tobolamr
Man, nicely done. I need to find a smiley face that does nothing but drool a huge puddle... Gorgeous! Keep up the great work! I really want to see pics on how you finish this all out. Did you use "standard" cheap indoor outdoor carpet, or did you get the marine rubber backed carpet?
Dead of winter? That's late next month.
Winter officially begins today here in Wisconsin. And it's a balmy 31F! We even got another 7 inches of snow last night - making for a grand accumulation of 21" in the last 2 weeks. No problem!
Re: BassMunn's PH16
Posted: Tue Dec 21, 2010 3:47 pm
by BassMunn
Thanks for the comments guys
Tobo - 31F, phew glad I'm here, that's way too cold for me. We are just going into proper summer here, but luckily we've been having lot's of rain so it's staying cool, awesome fishing weather, overcast, light breeze, average temp around 75F, too nice
. Watch the day I splash my boat the sun will probably come out blazing 100F+
Last day of work tomorrow then 2 weeks of leave - I'm getting a splashy feeling
Re: BassMunn's PH16
Posted: Wed Dec 22, 2010 12:27 pm
by Uncle D
Sounds like So. Texas summers. So what do you have left cause it looks like just details your doing.
Don
Re: BassMunn's PH16
Posted: Sun Dec 26, 2010 7:14 pm
by BassMunn
Don the main thing I have left to do is build my trailer fenders, I'm doing a plug, mold, part thing with them so it's taking a while, just finishing up the port side plug, still have to start the starboard side.
Then wire the trailer up for lights, fit batteries and hang the motor and connect the wires for the motor and fire it up. Almost there.
Re: BassMunn's PH16
Posted: Mon Feb 07, 2011 11:23 am
by timmydafool
Bassmunn you going to install a Hotfoot and trim controls on steering wheel !?!? there is so many pages to this tread It would take me a year to read all the post to see if you mentioned anything about this...
Man this is a great build!
Re: BassMunn's PH16
Posted: Mon Feb 07, 2011 12:47 pm
by cottontop
Shannon, She sure looks great. By now you should have won the 1st tournament. I've never seen what motor you ended up with? John
Re: BassMunn's PH16
Posted: Tue Feb 08, 2011 2:31 pm
by BassMunn
Thanks Timmy, no, no foot control or trim levers, too many other more critical parts. It would have been nice though.
John, I still don't have a motor
The last year has been tough so I've just got to be patient.
A friend of mine is going to lend me his outboard in the next few weeks just so I can get it splashed and give it a test run. So I'm hoping to get it in the water in the next month or so.
Thanks for the interest
Re: BassMunn's PH16
Posted: Tue Feb 08, 2011 2:43 pm
by sitandfish
BassMunn wrote:...The last year has been tough so I've just got to be patient...
You'll get there. You have lots of us pulling for you.
Re: BassMunn's PH16
Posted: Tue Feb 08, 2011 3:26 pm
by tobolamr
Splash pictures! And video!!!
Re: BassMunn's PH16
Posted: Tue Feb 08, 2011 4:43 pm
by BassMunn
Thanks S & F
Tobo I promise there will be lots of pics and videos, I can't wait
I've actually been tied up for the last 2 months building my brother a utility trailer, finally finished it tonight - YeeHaa!
That's the last time I build a trailer
In between building the trailer I've been building Plugs to make molds for my trailer fenders, I was just going to build a set out of ply and be done with it, but I can use this mold for other builds too (Future ones
)
The idea behind them is that they act as a guide for the boat when you drive it onto the trailer, once mounted there is a 1/2" gap on either side of the boat after carpeting has been fitted, so the boat don't have much place to go except forward.
Should be ready to mold by the weekend if I get my wife’s car fixed in time
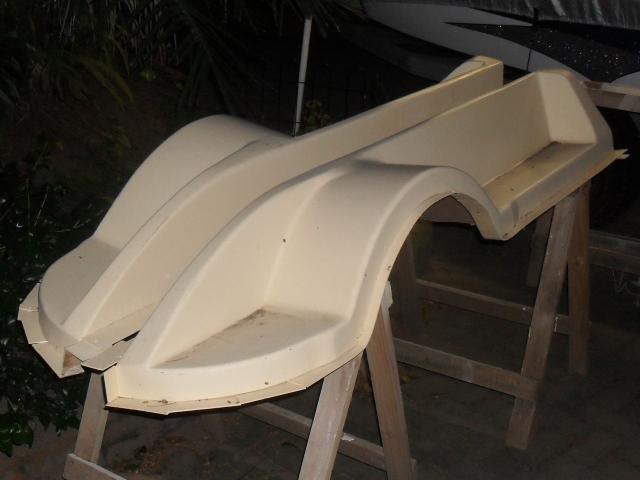
Ignore the funny flange around the edges, that's just there to help demolding.
They should look pretty good once they're all blue and sparkly
Re: BassMunn's PH16
Posted: Tue Feb 08, 2011 5:45 pm
by tobolamr
NICE! So, trailers aren't fun to build, huh?
I really liked your paint scheme on this Phantom. Nicely done...
Re: BassMunn's PH16
Posted: Mon Mar 07, 2011 7:33 pm
by MarkOrge
Shannon, can you give us an idea around the extent of mold prep that was required? For example, what you used to seal the mold material, how fine you sanded/polished/waxed or at what point you can ally the PVA?
I'll be using MDF for the parts I am going to mold and am curious how we know when it is 'ready'
Mark
Re: BassMunn's PH16
Posted: Tue Mar 08, 2011 5:08 am
by BassMunn
Hey Mark, sure no problem.
Be prepared for a lot of finishing and sanding.
OK first you make your plug, it needs to built strong enough to be able to move it around but you don't have to build it boat tough.
I used epoxy fillets to hold mine together, but no glass is required.
You then need to fair it just like anything else and sand it to perfection or until it's "Good Nuff".
Then paint it, most mold builders use MS primer which is what I did too. The plugs above have been primered already.
Then I sanded 400, then 800 then 1200 grit and then buff polished it.
The finish your plug has will be the best finish you can hope for on the final part so this is where all the work happens, any imperfections here will be carried all the way through to your part.
Once you are happy with the plug it's then time to wax it with a mold release wax. I found 4 times was fine, wax it, let it dry a bit and buff it off by hand, then repeat cycle, give it an hour break before waxing the last coat.
Once you've finished waxing you can apply the PVA release agent. I found it worked better by mixing about 5% water into the PVA to help it to lay down better. Use a sponge, try to wipe in one direction only and don't go over areas that have been drying for a while. You must let it dry properly 1 to 2 hrs, if any area looks wet wait longer (this was a critical mistake I was making at first and it really messes up everything if it's still wet).
Once it's completely dry you are ready to start laying down your gelcoat. Lay 1 coat and let it pass the finger test (sticky but nothing stuck to your finger) before laying your 2nd gelcoat layer. Leave it 2 or 3 hrs and then put 1 layer of glass down and then leave that overnight. You don't want to put multiple layers yet as the extra heat distorts the mold. The next day you can finish the layup and de-mold the day after.
Something I must stress is that the PVA doesn't give you a perfect surface, you will still see fine lines from the PVA itself. The only answer to this is to use wax only, but I was too scared to try this. Also try to keep the area as dust free as possible while the PVA is drying as it traps everything and it all shows in the mold.
Once you de-mold just wash the PVA off with water and then repeat the whole waxing preparation of the mold before making the part.
Here is 1 fender freshly molded and the other 1 still in the mold. The edges still need to be cleaned off and I am going to paint them to match the boat. I was going to try molding the parts with the glitter flake in a clear gelcoat but I chickened out and decided I would be able to match color easier using the same process of painting.
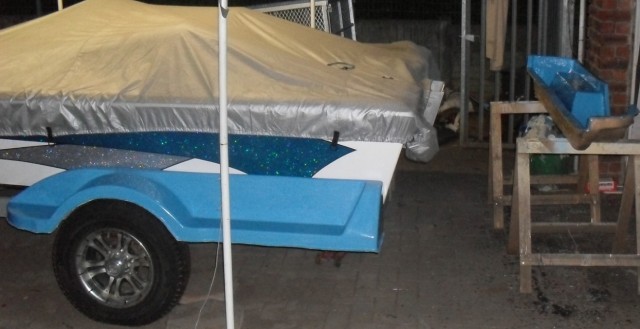
The other thing I can't get over is how expensive this whole plug, mold, part thing became
I was using this is a trial run because I was thinking of making my next boat fibreglass instead of ply, but after working now with both I think I'll stick to ply, it's much more forgiving and you can still go back and fix things, GRP is far less forgiving and if it's wrong you thrown it away and start again.
Chasing launch day
Re: BassMunn's PH16
Posted: Tue Mar 08, 2011 10:31 am
by timmydafool
Wow they look fantastic! how hard do you think it have been to make those fenders with ply?
Maybe you can recoup your cost by making and selling fenders now that you have the mold done you should be able to slam some out and sell as custom/replacements. just a thought.
Re: BassMunn's PH16
Posted: Tue Mar 08, 2011 2:15 pm
by tobolamr
I think doing it in ply would have been easier, faster... maybe not! LOL What do I know! Either way, that was a VERY helpful explanation above, Bassmunn. And the fenders look VERY nice indeed! Can't wait to see them PAINTED! How much more expensive do you think it was building the plug and such? Just curious...
Any line on a motor yet?
Re: BassMunn's PH16
Posted: Tue Mar 08, 2011 3:41 pm
by BassMunn
timmydafool wrote:Wow they look fantastic! how hard do you think it have been to make those fenders with ply?
Maybe you can recoup your cost by making and selling fenders now that you have the mold done you should be able to slam some out and sell as custom/replacements. just a thought.
Thanks Timmy, Building them out of ply would have been the same amount of work as building the plug, just with some glass seems added in. The round arch would have had to be changed to a more rectangular style but would have still worked.
I thought of selling a few but after this last week I have a love hate relationship with GRP, it loves getting stuck in me and I hate the stuff
The polyester resin was actually burning my skin through my latex gloves and I was changing gloves every 2nd cup of resin, it's nasty stuff.
Re: BassMunn's PH16
Posted: Tue Mar 08, 2011 3:52 pm
by BassMunn
tobolamr wrote:I think doing it in ply would have been easier, faster... maybe not! LOL What do I know! Either way, that was a VERY helpful explanation above, Bassmunn. And the fenders look VERY nice indeed! Can't wait to see them PAINTED! How much more expensive do you think it was building the plug and such? Just curious...
Any line on a motor yet?
Yip you are right. Ply would have definitely been faster, building the plug is basically the same as building the part out of ply, you just use better material.
Thanks for the comments
It cost at least double, 1 sheet of supawood, I was very slack with my resin use but I used 2 gallons of Gelcoat, 6 gallons of resin and 50lbs of glass. not to mention 24 brushes, a gallon of acetone, 100 pairs of latex gloves, 5 shirts, 2 pairs of pants and a pair of shoes.
Just add some ply and I could have built an entire boat with the same amount of stuff (obviously Epoxy and not polyester though).
No motor yet, but my wife might be getting a much better job soon, which will speed things up a bit, so we are doing a lot of praying right now.
Re: BassMunn's PH16
Posted: Sun Mar 20, 2011 5:32 pm
by BassMunn
Time to update my thread............. I have a surprise today
Finally finished my trailer fenders
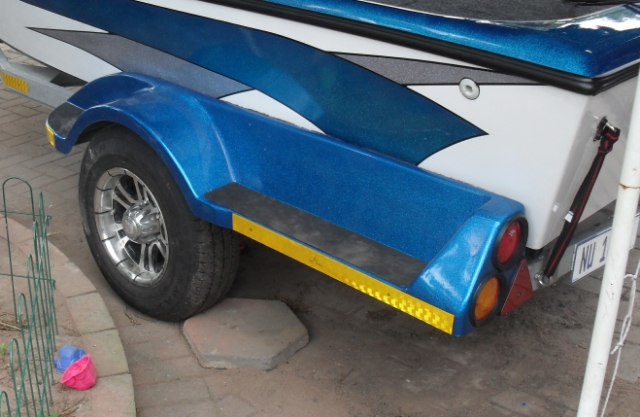
And look what's hanging on the back
It's not mine but a friend graciously lent me the motor to test my boat
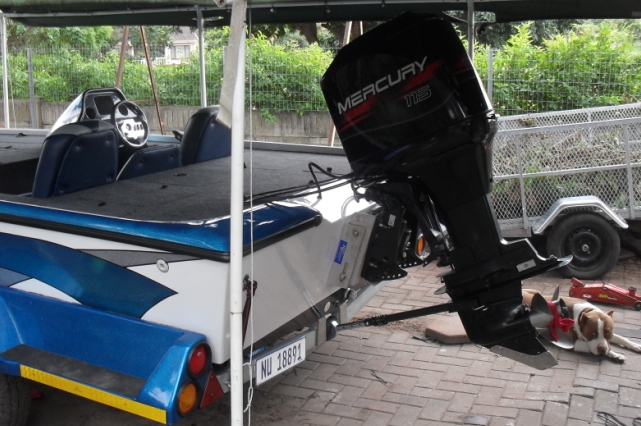
Last minute checks and time to fill those fuel tanks for the first time. Again another friend lending a hand by towing the boat for me to the lake
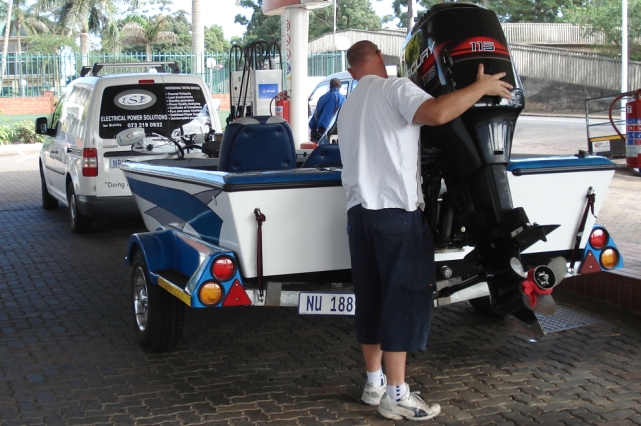
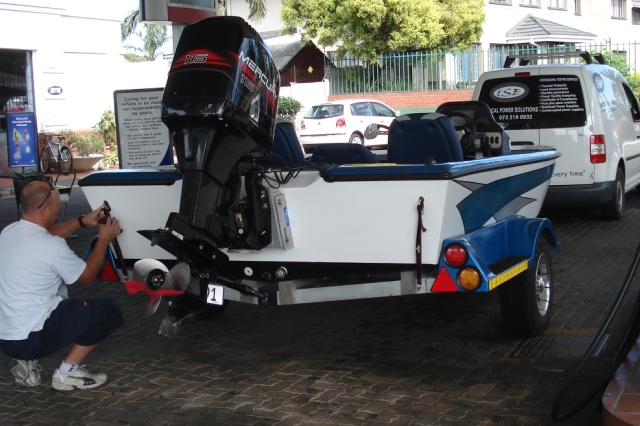
A nice shot of my trailer to see how it came out, (Notice no boat..????)
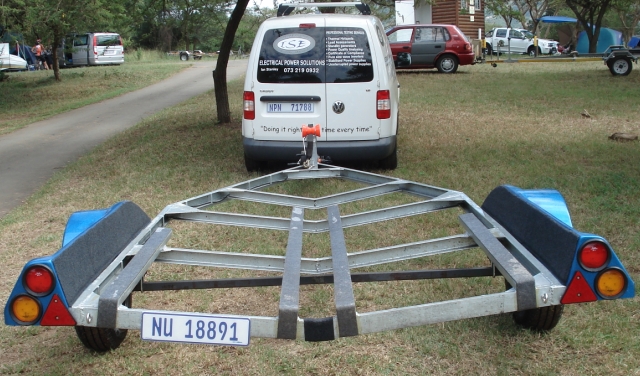
Re: BassMunn's PH16
Posted: Sun Mar 20, 2011 5:38 pm
by JamesT
SWEET! No we just need to see some action shots. Looks great. I bet most people dont believe you when you tell them you made it all your self.
BassMunn's PH16 - Splashed!!
Posted: Sun Mar 20, 2011 5:45 pm
by BassMunn
Is it gonna float ?

OK it floats
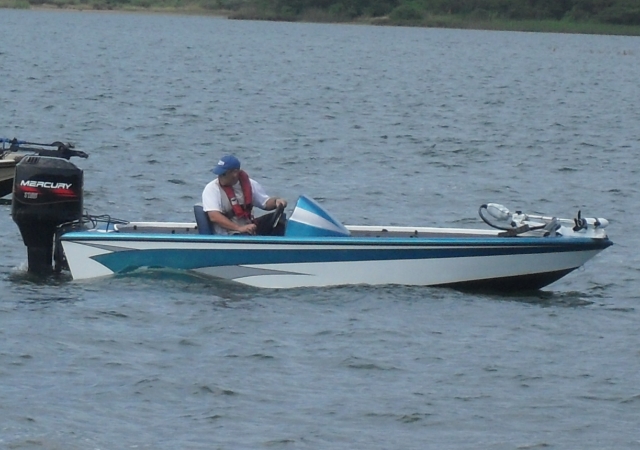
It's go time
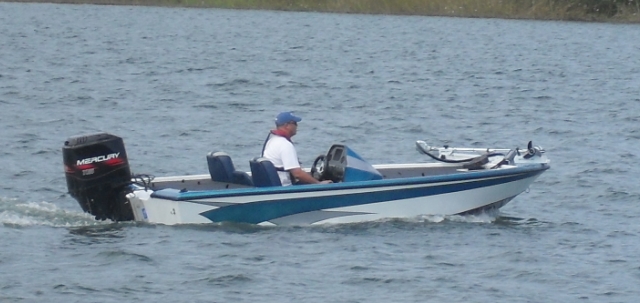
Oh yeah!!!!!!

That is one seriously stressed out and relieved skipper right there, time to fetch the family
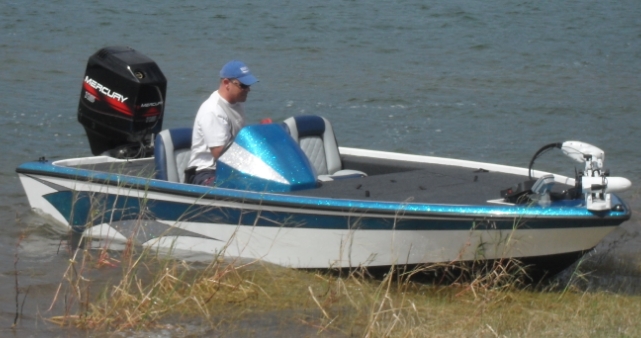
Re: BassMunn's PH16 - SPLASHED!!!!
Posted: Sun Mar 20, 2011 5:51 pm
by Cracker Larry
Fantastic
Dammit man, you did a fine job on that boat
And trailer
Re: BassMunn's PH16 - SPLASHED!!!!
Posted: Sun Mar 20, 2011 5:57 pm
by BassMunn
Re: BassMunn's PH16 - SPLASHED!!!!
Posted: Sun Mar 20, 2011 6:04 pm
by BassMunn
Re: BassMunn's PH16 - SPLASHED!!!!
Posted: Sun Mar 20, 2011 6:09 pm
by BassMunn
Re: BassMunn's PH16 - SPLASHED!!!!
Posted: Sun Mar 20, 2011 6:21 pm
by BassMunn
Cracker Larry wrote:Fantastic
Dammit man, you did a fine job on that boat
And trailer
Thanks Larry, I'm so happy about the way it came out
(actually a little shocked) . Appreciate the comment
JamesT wrote:SWEET! No we just need to see some action shots. Looks great. I bet most people dont believe you when you tell them you made it all your self.
Thanks James - they give me this "Yeah Right" look
Re: BassMunn's PH16 - SPLASHED!!!!
Posted: Sun Mar 20, 2011 6:42 pm
by BassMunn
OK a few things about today
Firstly to Jacques, Thank You for an incredible design. I'll be honest at times I had my doubts about how well it would ride considering the very shallow vee (2 and a half years gives one time to worry, a lot of it).
This hull is an incredible design feet, although it has the shallow vee, it doesn't pound your teeth out in a chop, it's incredibly smooth. It's not any wetter than any other bass boat I've been.
People talk about it sliding badly in corners, well mine doesn't, nowhere near.
It jumps up on plane in a few yards and takes off like a scalded cat and it drafts much shallower than I expected considering I built mine heavy.
At rest it's as stable as a barge and I have more hatch space than I have fishing tackle (and I have a lot of fishing tackle)
Thank you to all the other members that have helped, contributed, encouraged or just had a nice word to say, this journey wouldn't have been possible without all of you to spur me on.
Oh and I have some video too, it was very windy so you don't hear much but you see the action. As soon as I have you tube figured out I'll post the link
Re: BassMunn's PH16 - SPLASHED!!!!
Posted: Sun Mar 20, 2011 6:54 pm
by sitandfish
This shot shows it all. You, your two kids, your wife and your "mistress".

Can't wait to see the video. That's one "bad" looking boat!
Re: BassMunn's PH16 - SPLASHED!!!!
Posted: Sun Mar 20, 2011 7:44 pm
by wegcagle
Absolutely AWESOME Shannon.
That's one excited looking family. Beautiful boat, beautiful trailer. What can I say GREAT job. In the grand scheme of things 2 1/2 years isn't that bad look at the end result
So when are you going to start the next boat
Will
Re: BassMunn's PH16 - SPLASHED!!!!
Posted: Sun Mar 20, 2011 8:14 pm
by TomW
Outstanding Shannon what a great looking final result on the boat and trailer.
Good looking family to.
Re: BassMunn's PH16 - SPLASHED!!!!
Posted: Sun Mar 20, 2011 8:46 pm
by Doc_Dyer
BassMunn wrote:
Lighting the After burners

This is my favorite picture man that looks fast any top speed numbers?
Re: BassMunn's PH16 - SPLASHED!!!!
Posted: Sun Mar 20, 2011 8:47 pm
by TRC886
BassMunn wrote:JamesT wrote:SWEET! No we just need to see some action shots. Looks great. I bet most people dont believe you when you tell them you made it all your self.
Thanks James - they give me this "Yeah Right" look
"Yeah Right" is understandable. The boat looks like it was built by a
professional boat builder, not an amatuer
It looks great on the water too
That 115 is a good match for it.
trc
Re: BassMunn's PH16 - SPLASHED!!!!
Posted: Sun Mar 20, 2011 9:40 pm
by Brettitt41
Congratulations on the splash. Boat looks awesome and great job on the trailer I really like your fender-guides.
Re: BassMunn's PH16 - SPLASHED!!!!
Posted: Sun Mar 20, 2011 9:55 pm
by BassMunn
Guys thanks for the comments, I'll answer them properly in the morning, it's 4am and I haven't been to bed yet (since yesterday)
But in the meantime here is a short video of the launch. Very crude video but it gives an idea of what happened.
http://www.youtube.com/watch?v=H4oWUs7dLRw
Re: BassMunn's PH16 - SPLASHED!!!!
Posted: Sun Mar 20, 2011 10:09 pm
by hooter
Awesome build and congrats on the launch!
hOOter
Re: BassMunn's PH16 - SPLASHED!!!!
Posted: Sun Mar 20, 2011 10:15 pm
by kdog
Woooooohooo!!! Congrats BassMunn on the launch, boat looks fantastic. Love the paint scheme!
Re: BassMunn's PH16 - SPLASHED!!!!
Posted: Sun Mar 20, 2011 10:56 pm
by Steven
Wow!!!!! What a beautiful boat. It came up on plane so flat. No sky pointing at all. Most impressive job. Great work.
Re: BassMunn's PH16 - SPLASHED!!!!
Posted: Sun Mar 20, 2011 11:09 pm
by SmokyMountain
Excellent!!! She's a beauty, I know your proud.
Love the video, she holds the 115 quite well.
Re: BassMunn's PH16 - SPLASHED!!!!
Posted: Mon Mar 21, 2011 12:16 am
by chicagoross
Re: BassMunn's PH16 - SPLASHED!!!!
Posted: Mon Mar 21, 2011 4:42 am
by Fonda@kauai
Re: BassMunn's PH16 - SPLASHED!!!!
Posted: Mon Mar 21, 2011 6:54 am
by Joe H
Very cool! Awesome job, you must be very proud.
The smiles on yours and the families face's say's it all.
Joe H
Re: BassMunn's PH16 - SPLASHED!!!!
Posted: Mon Mar 21, 2011 7:42 am
by topwater
Late to the party and what can i say that hasnt already been said , OUTSTANDING
That boat just jumps out of the hole
That paint sure dose pop in the sun.
Re: BassMunn's PH16 - SPLASHED!!!!
Posted: Mon Mar 21, 2011 8:21 am
by cape man
Shannon, know that day was a long time coming! She's gorgeous man! Just gorgeous!
Re: BassMunn's PH16 - SPLASHED!!!!
Posted: Mon Mar 21, 2011 8:33 am
by stickystuff
Fantastic. I know how you felt when you showered down on the throttle for the first time. I almost creamed in my pants when I showered down on my PH16. (Sport 'N A woody) Its an awsome feeling isn't it . Congratulations from one PH16 builderto another. I sure miss mine. I sold it after having it for 9 yrs. An awsome fishing platform. You won't find another as stable to fish off of than the 16. Good job. Favorite shot is the afterburner. One question.Did you have any problems with porpoising?? I had to add extra weight in the bow to keep mine from doing it. Other than that.
Well done>
Re: BassMunn's PH16 - SPLASHED!!!!
Posted: Mon Mar 21, 2011 8:43 am
by sideslippa
Hey Shannon, Great to see you made it to the boat ramp, and it looks great, so does the trailer, you must be feeling really chuffed to look at it now and think, "gees I built that and it works great" Very well done!!! and it is personally so good to see another boat that I have been following whilst I built mine boat make it to the splash.
Love ya work Mate...Enjoy
Best regards, Slippa.
Re: BassMunn's PH16 - SPLASHED!!!!
Posted: Mon Mar 21, 2011 8:45 am
by Larry B
WOW, thats BEAUTIFUL
You got to be proud. You Done Real Good
Re: BassMunn's PH16 - SPLASHED!!!!
Posted: Mon Mar 21, 2011 8:51 am
by gk108
She looks great on the water. I guess the next thing is to see how many tons of fish she'll haul.
Re: BassMunn's PH16 - SPLASHED!!!!
Posted: Mon Mar 21, 2011 9:34 am
by BassMunn
Wow guys, thanks for all the nice comments
It still all feels a little surreal to me. I can't wipe the grin off my face and have no intention to try
This boat turned out to be everything I had hoped for and so much more.
The boat rides really nicely with the 115hp on it but it would be pretty happy with a 70hp. I was running a 17pitch prop which is way too low for the boat, with that 115 I could probably run up to a 23/24 pitch but then it would be scary fast. The hull would do it, it's a quick boat, but might not be too safe
I was only getting about 40mph, but that's prop setup. I could reach rev limiter in less than 30 seconds from pull off.
Ken I definitely got something in my eye when I pulled off for the first time. It's hard to explain the feeling of driving your hand built boat for the first time, especially when it performs flawlessly
Mine did porpoise as well when I trimmed her out, prop setup and weight distribution should sort that out, but I'll play with that once I get my own motor.
I have to thank God for the abilities he gave me to complete this project and for riding shotgun on the maiden voyage. I pray you'll be there every trip
Thanks everyone, you guys are great
Re: BassMunn's PH16 - SPLASHED!!!!
Posted: Mon Mar 21, 2011 9:41 am
by tech_support
I missed this thread until just now
The boat looks great, the running shots sure are nice. Trim level is perfect. One of the things I liked the most about my ph16 was how quick you could get her on plane (and that was only with a 40hp
)
Congratulations!
Re: BassMunn's PH16 - SPLASHED!!!!
Posted: Mon Mar 21, 2011 10:20 am
by Bowmovement
She's Awesome
Congrats on the launch
Matt
Re: BassMunn's PH16 - SPLASHED!!!!
Posted: Mon Mar 21, 2011 11:08 am
by Uncle D
I'm a little late to the party too, but all I can say is that is FANTASTIC!!! Love the way she jumps on plane. I'm grinning with you man.
You make all of us boat builders proud and especially us PH builders. Congratulation, Shannon. She's a beauty and so is your family. Thanks for sharing, Don
Re: BassMunn's PH16 - SPLASHED!!!!
Posted: Mon Mar 21, 2011 12:48 pm
by macs
Awesome!!!! She looks great, congratulations!!!!!!!
Re: BassMunn's PH16 - SPLASHED!!!!
Posted: Mon Mar 21, 2011 11:50 pm
by TRC886
The video has confirmed what I thought I was seeing in the still photos
What I couldn't see was how stable your boat was in comparison to the "plastic boat" during your launch. I was amazed at how steady your boat stayed even as "his" was pitching and rocking and rolling
It really gives meaning to what you wrote about well Jacques designed it, and it also shows just how faithfully you built it the
right way...without rushing and/or cutting a lot of corners
You did a great job
trc
Re: BassMunn's PH16 - SPLASHED!!!!
Posted: Tue Mar 22, 2011 7:22 am
by cottontop
Shannon, Boy am I late. Haven't been on this site since last week and look how much I missed. She is beautiful and you certainly have a family that surpasses the boat. Enjoy. John
Re: BassMunn's PH16 - SPLASHED!!!!
Posted: Tue Mar 22, 2011 8:52 am
by colonialc19
Thats one top notch set up man
, great job!
Re: BassMunn's PH16 - SPLASHED!!!!
Posted: Tue Mar 22, 2011 4:13 pm
by tobolamr
Shannon,
AWESOME!!!!!!! Fantastic video! I'm jealous!
The boat looks fantastic on the water! Your pics of the kids look great, too! I think you have set a new level of "fit and finish" for those looking at the Phantoms with this one! Keep the pictures and videos coming! Give us fishing reports!
Re: BassMunn's PH16 - SPLASHED!!!!
Posted: Tue Mar 22, 2011 10:49 pm
by flyfishingmonk
That video was great! I am inspired to stay up all night working on my boat.
Re: BassMunn's PH16 - SPLASHED!!!!
Posted: Wed Mar 23, 2011 5:44 am
by stickystuff
I ran a 90HP Mariner on mine. Manual jack plate and 19 pitch stainless prop. standard prop nothing fancy. After I installed jack plate I picked up another 5 MPH +-. If I remember right it ran out about 47mph, Plenty fast. Great hull design. You can play with other props and designs. The 21 caused it to lug down to much on takeoff. 19 is perfect. At full throttle and trimmed out right it ran about 5600 RPM> Trim out more and it would pick up another 100. I don;t like to run over 5500 as engine is designed. I ran the engine for almost 9 years and never had a problem. Wellll one time I did. I changed oil in lower unit and got distracted and i think I forgot to put oil in it. wiped out forward and pinion gear. Absolutely no teeth left on the gears. Had to go about 5 miles back to ramp on trolling motor against an outgoing tide. started at 8:30 AM and crawled back to ramp at 2:00 Pm. Thank God for three batteries.Stupid and costly mistake. fortunately I am able to fix my own motors.
Re: BassMunn's PH16 - SPLASHED!!!!
Posted: Wed Mar 23, 2011 7:44 pm
by BassMunn
WOW guys thanks for all the attention, I'm honoured by all the great comments. I couldn't have done it without the support from this forum and all it's valuable members.
I doubled checked the prop that I was running and it was a 18 pitch not a 17 like I said. A friend of mine is lending me a 22 Laser 2 to test this weekend before I take the motor off.
Ken I've owned one of those 90hp before and I loved it so will probably end up with one again for this boat, now that I've finished spending money on the boat I can save up for the motor, but I think I'm in for one the most demanding "patience lessons" I will ever experience. At least I know it is a thing worth waiting for
Re: BassMunn's PH16 - SPLASHED!!!!
Posted: Thu Mar 24, 2011 8:46 am
by gk108
I think I'm in for one the most demanding "patience lessons" I will ever experience
With the patience it took to do the custom work that you've already done, you should probably be giving those lessons!
Re: BassMunn's PH16 - SPLASHED!!!!
Posted: Fri Apr 22, 2011 2:56 pm
by flyfishingmonk
BassMunn,
Can you give us some feedback regarding how wet the boat is in a chop? What are your thoughts? I've built a reverse chine into my hull to reduce spray and have been tossing around the idea of adding a spray rail that hangs just under the deck, and just inside of the rubrail. As of right now I'm leaning toward skipping it and adding it if later if necessary.
Thanks,
Casey
Re: BassMunn's PH16 - SPLASHED!!!!
Posted: Sun Apr 24, 2011 5:32 pm
by BassMunn
Casey I also installed a reverse chine on my boat and it works perfectly, look I wasn't dealing with a large chop that causes the bow to plough into the water. The only time I got a little wind blown splash was when coming off plane and quartering into the wind, but every boat I've ever owned has done that and some of them a lot worse.
These are the best 2 pics I can find showing the reverse chine at work, it throws the water low and far from the boat.


If you really stuff the bow into a wave it's gonna peel off the side into your face if you are quartering into the wind, but I was pleasantly surprised by how high out of the water the bow stays most of the time. As soon as you get up on plane properly it doesn't matter where the wind is coming from, the spray doesn't come near the boat.
Your boat is looking nice, keep it going
Re: BassMunn's PH16 - SPLASHED!!!!
Posted: Sun Apr 24, 2011 9:43 pm
by flyfishingmonk
Man that paint job is fantastic! Thank you for the input. The pics help a lot. The reverse chine I'm currently building is pretty aggressive. It comes down past the designed chine a distance about 2 inches right where the spray seems to be the worst. It then goes back up toward the hull at a distance of about 4 1/2 inches.
Re: BassMunn's PH16 - SPLASHED!!!!
Posted: Tue Apr 26, 2011 12:51 pm
by Uncle D
BM, didn't realize you had installed reverse chines during the build. Glad to know how well they are working. Mine aren't as aggressive as Casey's. I went with 1.5 inches on average.
Don
Re: BassMunn's PH16 - SPLASHED!!!!
Posted: Tue Apr 26, 2011 4:32 pm
by tobolamr
Need.... Moooore... piiiiiictuuuuuuures....
Re: BassMunn's PH16 - SPLASHED!!!!
Posted: Wed Apr 27, 2011 8:49 am
by BassMunn
Thanks Guys
Uncle D, I also have a small reverse chine, only about 1" at the bow and then widens to about 2" towards the rear.
You can see it here

I've had a look at a lot of production boats and they generally have a pretty aggressive lip at the bow and then widen but flatten out towards the transom.
Tobo - let me see what I can scratch up.
Re: BassMunn's PH16 - SPLASHED!!!!
Posted: Wed Apr 27, 2011 9:27 am
by BassMunn
Re: BassMunn's PH16 - SPLASHED!!!!
Posted: Wed Apr 27, 2011 9:38 am
by BassMunn
Re: BassMunn's PH16 - SPLASHED!!!!
Posted: Wed Apr 27, 2011 11:00 am
by TomW
Wow, what a difference. Great series!
Re: BassMunn's PH16 - SPLASHED!!!!
Posted: Wed Apr 27, 2011 12:35 pm
by Uncle D
Thanks Shannon for the pics of your hull. I see you use reverse strakes. Hope you get that engine soon.
Don
Re: BassMunn's PH16 - SPLASHED!!!!
Posted: Wed Apr 27, 2011 3:01 pm
by ks8
I just saw this thread again. I'm not the only one who has been busy!
Excellent! Congrats on the splash!
Re: BassMunn's PH16 - SPLASHED!!!!
Posted: Wed Apr 27, 2011 3:12 pm
by tobolamr
Re: BassMunn's PH16 - SPLASHED!!!!
Posted: Tue Jul 05, 2011 11:09 am
by mrbaseballny
Looks amazing!! I think we can all hope to have a boat turn out this well after putting so much hard work into them!!
Re: BassMunn's PH16 - SPLASHED!!!!
Posted: Fri Nov 25, 2011 4:34 am
by Flea
I know its been a while since this thread has had a post, but i must say..... What a beautiful boat bassmun! I have read every word in this thread and studied every picture. I have plans for the ph16 myself and everytime i have a question, i always find myself coming back here for an answer. I want to build mine similar, but more flyfishing orientated. I have had my plans for probably nine months now and still waiting for another 6months before i can start my build. (house has nowhere where i can build, and will be moving as soon as the lease runs out in 6 months time). I hope you will still be hanging around by the time i get mine started, as i would love to have some of your input mate!. And once again (STUNNING BOAT).... you do give hope to a newbie at boat building. Cheers, Leigh.
Re: BassMunn's PH16 - SPLASHED!!!!
Posted: Mon Nov 28, 2011 7:25 am
by BassMunn
Thanks for the nice comments Leigh. Yes I will still be around, I'm actually doing a rebuild of a small boat here on this thread
http://forums.bateau2.com/viewtopic.php?f=10&t=18124
My suggestion would be for you to start your own build thread when you start building, there are many excellent boat builders on this site and they are all happy to help, when I started this boat I also didn't have a clue and I would have made many mistakes (or a lot more) if it wasn't for this forum and it's members.
Good luck and remember to take lots of pics
(Pics are crucial for our survival)
Re: BassMunn's PH16 - SPLASHED!!!!
Posted: Tue May 15, 2012 6:40 pm
by BassMunn
Well the day has finally arrived, my big girl has her ponies
I was going to be putting a Mercury engine on but after doing a lot of checking and scratching I just didn't get a warm fuzzy feeling about the engine I was looking at, I really like Mercs but the one I was looking at just didn't sound right and although it's compression was even on all cylinders, the Merc manual says anything under 120PSi shows excessive wear on an engine this one had 116PSi and the 2 + 2 system had been messed around with on the motor and wasn't right.
So after much cross examination and scrutinering I chose a 2006 Johnson 115hp V4 with 150hrs on the clock.
I requested that the boat shop just merely bolt the motor on and let me do the rest of the rigging, so I have a full weekend planned


To say that I am bouncing off the walls is an understatement
Re: BassMunn's PH16 - SPLASHED!!!!
Posted: Tue May 15, 2012 6:50 pm
by flyfishingmonk
That will be Awsome.
Re: BassMunn's PH16 - SPLASHED!!!!
Posted: Tue May 15, 2012 6:57 pm
by Flea
shannon, the amount of effort and time you have put into that boat has been amazing. i know you have had to wait a long time to put an outboard on her, so finally your day has come. im so happy for you right now. Now go out and chase some BASS!
Re: BassMunn's PH16 - SPLASHED!!!!
Posted: Tue May 15, 2012 7:08 pm
by BassMunn
Thanks Flyfishingmonk and Flea, it's been an amazing journey and where just getting started
Re: BassMunn's PH16 - SPLASHED!!!!
Posted: Wed May 16, 2012 6:46 am
by wegcagle
There are a bunch of fish with something to worry about now
glad to see her with the muscle strapped on.
Looks great
Will
Re: BassMunn's PH16 - SPLASHED!!!!
Posted: Wed May 16, 2012 10:38 am
by Uncle D
That girl is gonna scoot. You got about the right prop with it??
Don
Re: BassMunn's PH16 - SPLASHED!!!!
Posted: Wed May 16, 2012 11:22 am
by MarkOrge
That is the identical engine I own that is going on my PH18 (except the color)
I CAN'T WAIT to see how she runs !!
Choose a prop or two to start with yet ?
Re: BassMunn's PH16 - SPLASHED!!!!
Posted: Wed May 16, 2012 1:02 pm
by BassMunn
Thanks Guys
The motor comes off a water ski-ing boat so is proped too low with a 13 3/8 x 17 pitch, it's a stainless prop (although I thought it was ali as it was painted, but it is SS)
For now it's going to have to do - I spent all my money on the motor, so props have to wait.
The problem we have here is I can't do what you guys do and go down to a boat shop buy a prop to test and exchange it if it is wrong.
So I'll have to try to borrow a few props here and there until I find something close to what I need.
I'm thinking a SS 4 blade 13 x 21 pitch, something like a Solas or Powertech prop. I'm going to have to buy one from the US as I can buy 2 and land them here for the same as what 1 of the same props would cost here.
I'll give you an idea I can get a BRP Rogue from boats.net for $400 plus shipping and tax when it lands here. That same prop from BRP SA costs just over $1000, guess who's getting ripped.
Re: BassMunn's PH16 - SPLASHED!!!!
Posted: Wed May 16, 2012 2:32 pm
by Flea
Gee thats a lot of difference in price shannon, hopefully you can find someone to loan a few to try before you buy.
Re: BassMunn's PH16 - SPLASHED!!!!
Posted: Sun May 27, 2012 5:17 am
by BassMunn
After spending last weekend rigging the engine properly, yesterday was the official (I own it all) launch day.
Engine ran very well although just as I suspected the prop pitch is way too low.
I'm hitting Max rpm at 3/4 throttle, 5500 rpm and 45mph, according to my calculations that means I am getting zero % prop slip
I also can't get much bow lift with this prop.
She planes nicely at 25mph and 3000rpm, 4000 rpm brings about 32mph
We had some pretty nasty cold weather yesterday and got to test the boat in some pretty choppy water, at 4000rpm she was banging hard, but drop it down to 3000rpm and she handled it nicely.
Here's a short video of the boat
http://www.youtube.com/watch?v=eVynmMjBxVI
And here's a video of what my new boat can catch
http://www.youtube.com/watch?v=rHntWXpsutY
Re: BassMunn's PH16 - SPLASHED!!!!
Posted: Sun May 27, 2012 10:01 am
by TRC886
Johnson looks good hanging off the back
Wow, ni-i-ice bass
Re: BassMunn's PH16 - SPLASHED!!!!
Posted: Sun May 27, 2012 12:34 pm
by gstanfield
Looking good!
Re: BassMunn's PH16 - SPLASHED!!!!
Posted: Sun May 27, 2012 12:46 pm
by Seadation
Hey BassMunn,
NICE boat, fish, and videos. Thanks for posting them. Regular still pics are neat, but it's neat to see the boats actually m o v i n g !
Fair Winds
/david
Re: BassMunn's PH16 - SPLASHED!!!!
Posted: Sun May 27, 2012 1:03 pm
by flyfishingmonk
Looking great!
Re: BassMunn's PH16 - SPLASHED!!!!
Posted: Sun May 27, 2012 3:03 pm
by wegcagle
Great work, Great boat, and awesome fish
I see many fish will fall victim to that boat
Will
Re: BassMunn's PH16 - SPLASHED!!!!
Posted: Mon May 28, 2012 2:45 pm
by tobolamr
Congrats! More to come in the pics and videos department, right?
Re: BassMunn's PH16 - SPLASHED!!!!
Posted: Tue May 29, 2012 1:33 pm
by BassMunn
Thanks for all the nice comments guys, it definately was a cool way to start my boats bucket list, 1 x 10lb Bass...Check
Weather forecast for this Sat looks good, so we're going fishin
It's so nice to finally be able to plan fishing trips again.
Tobo, I'll try to take as many pics and videos as I can of the boat.
I ordered some new gauges from a place in Florida last week, I had gauges but I need a special check system gauge for the Johnson motor and a new trim gauge, The ones the motor came with are ugly. Also need to get a fish finder for the console, but that will have to wait a while. As soon as they get here I'll fit them and take a pic or two of my completed console.
Re: BassMunn's PH16 - SPLASHED!!!!
Posted: Sun Jun 03, 2012 7:34 pm
by BassMunn
Had to get the boat weighed this week as part of the Certificate of Fitness required here, so finally got some numbers.
Total Rig weight 2728lb
Trailer weight 792lb
Total boat weight 1936lb
Engine 334lb
Fuel 110lb
Batteries 132lb
Oil Tank 11lb
Trolling Motor 55lb
Jack Plate 44lb
Fishing Tackle 22lb
Full safety gear (Anchor, chain, rope, tools, spares, lifejackets etc) 110lb
Basic hull weight = 1118lb
This hull weight includes cable steering, 3 pumps, 66lb of Floatation foam and all wiring.
So a little on the heavy side but she rides good.
A 54lb 12v Jarvis Walker Bow mount foot control trolling motor pushes her along at a max speed of 2.6mph in calm water with the outboard trimmed down. 2 Adults and 2 children onboard and full livewell.
Re: BassMunn's PH16 - SPLASHED!!!!
Posted: Mon Jun 04, 2012 5:14 pm
by tobolamr
Really? You got that much speed out of a 54lb thrust? But your weight is waaaay down, too... huh... Coolness!
Re: BassMunn's PH16 - SPLASHED!!!!
Posted: Tue Jun 05, 2012 2:28 am
by MarkOrge
Thanks so much on the breakdown!
once again, you have raised the bar.....
Inspired by this I plan to weight my trailer, bare hull, add ons, etc.
Thanks BassMunn !!
PS: REALLy can't wait for the data on that 21 pitch 4 blade - we have the same motor so your experiance shared is what we in Canada call a 2-4 favour. Few pints for sure...
Re: BassMunn's PH16 - SPLASHED!!!!
Posted: Thu Jun 07, 2012 5:51 pm
by BassMunn
Thanks Tobo, yeah the trolling motor does alright, used it last week in pretty heavy wind and it held it's own so I was pretty chuffed.
Thanks Mark, I'm so happy I chose this motor it's in such good condition and I love the sound it makes, that V4 sounds angry
. Have to wait a while for the new prop but will definately post some figures once I get to test it.
Got my new gauges today and have already fitted them
Decided to take a days leave tomorrow and go fishing.......I love having a boat
Re: BassMunn's PH16 - SPLASHED!!!!
Posted: Thu Jun 07, 2012 10:29 pm
by MarkOrge
You are going to love that motor. I have a friend that worked for Evinride and the engineers all agree the V4 115 is one of the best motors they have ever built. For mine, yes if you pin it back and forth all over on tournemnt day you will go through gas - but maybe 20 or 25 gallons? The guys with the V6's are going though hundreds. Also, on a normal camping/cottageing weekend I can cruise arounf for hours, pull tubes 1/2 the day. and opn the way back top up the tank with as little as $26 dollars?
Take a lok at the boat tests and find the lightweight one or a bass boat, for efficiency you want to be in the right range. For the oily calm morning with the mist coming off the water, maybe tournement day, have her propped so when you pin it and got the afterburners going you want to be at NO LOWER than 5700 RPM. 5850 is the redline - do not be afraid of the redlne - the manufacturer has not said it's a dangerous number, just don't go over (she has protection anyway)
I am REALLY xcited to hear how a 21P 4 blade will do - if you can top out at around even 5650 that will be amazing - the boat guys will tell you the 115 will not swing a 21P.
They havent talked to Jacques Mertens !!!!
PS: I am blocks away from my Evinrude dealer, if you want a prop, can I not just go buy it and mail it to you?
PPS: I have a 3 blade 19P aluminum if you want to try it, up here we often run aluminum on purpose just to save a lower leg due to all the rocks - granite that may be within literally 10' of 60 FOW - it's what make sit cool and fun to boat the east side of Georgia Bay, AKA Archepeligo. Here is the deal - arond here - if you are not ue of where you are, you arew about to hit a rock - despite the fact you have 30 - 100 FOW waer under you....three can be a "shoal" of rock hard granite as little as 30' away...good fishing !
Re: BassMunn's PH16 - SPLASHED!!!!
Posted: Fri Jun 08, 2012 3:59 pm
by BassMunn
Hey Mark, thanks so much for the offer. It still amazes me how awesome the people on this site can be!
I've done some scratching around and managed to find the local agents for Solas props and they are prepared to sell directly to me. The price will work out about the same as opposed to me importing one from the US. They have the HR Titan 4 blade 13" x 21" in stock
but I can't afford it yet
It's a nice to have not a need to have right now, I'm just happy to be able to go fishing right now.
I took the day off today and my son and I went to our local lake and spent 8 hrs on the water, the fishing was good, we got around 30 fish, most of them weighers, nothing big but lots of visual surface takes.
I'm starting to get used to the boat now and how she handles at speed, make no mistake this hull is quick, but you better make sure you slow down for the corners. It's actually pretty fun when you get used to it, it's like drifting.
I absolutely love my boat, it's the best fishing platform I have ever fished off.
The only thing I would do differently if I had to do it again would be to put epoxy graphite on the bottom, my hull bottom paint is already taking a beating
Re: BassMunn's PH16 - SPLASHED!!!!
Posted: Mon Jun 11, 2012 10:26 am
by Uncle D
BassMunn wrote:The only thing I would do differently if I had to do it again would be to put epoxy graphite on the bottom, my hull bottom paint is already taking a beating
Shannon, that's an easy fix!!
Re: BassMunn's PH16 - SPLASHED!!!!
Posted: Fri Dec 28, 2012 4:29 am
by BassMunn
Wow it's been so long since I've posted anything on this site I couldn't remember my password
I'll give a quick run down what's been happening, just before I got my engine my wife started a new job and along with that came a nice company car (which was my tow vehicle as well), 2 months after she started with them the company went belly up
So no tow vehicle and not very much money available either. So needless to say boating and fishing came to a screaching halt.
Wife has now managed to get a great new job
In the meantime I finally finished my console. I had cut a huge hole in my dash when I built the boat for a bigger sonar unit, but I decided to fit a standard sonar unit to the front of the boat and move my small sonar/gps unit to the console, (It had nothing to do with the fact that I couldn't see the display when I was standing up
)
I used some perspex as a backing plate to cover the hole up and act as a mounting plate for the sonar/gps unit
I also finished fitting and rigging all the gauges, so it is now a complete working console

Santa got a little lost but he arrives next wednesday with this

Re: BassMunn's PH16 - SPLASHED!!!!
Posted: Fri Dec 28, 2012 4:46 am
by Flea
I know what you mean with the lack of money Shannon. 2012 was not one of the years that was not very favourable to me. I keep saying I will start my Ph in a few months, think that was a year ago. Without jinxing myself I'm hoping on a start before easter. Few little things to take care of first. Mind you I hear some folk here have sat on plans for many years befor starting. Anyway I like your dash, and you are spoilt by having another sounder up front. That's the bass coming out of you I think. Good to see you are still popping in on the forum every so often. I've been going over your build again and its stirring me up to get a move on. By the way nice job on that other little boat you restored. Good to see Santa will eventually arrive to. To nice of a boat to be just sitting under the carport collecting dust!
Cheers, Leigh.
Re: BassMunn's PH16 - SPLASHED!!!!
Posted: Fri Dec 28, 2012 5:14 am
by TRC886
Great looking console, and that perspex adds class it
Santa got a little lost but he arrives next wednesday with this
You must have left him
cheese instead of milk and cookies
Re: BassMunn's PH16 - SPLASHED!!!!
Posted: Fri Dec 28, 2012 7:10 am
by BassMunn
TRC886 wrote:
You must have left him
cheese instead of milk and cookies
Hehehe, traded in a few elves
Flea, when it's time it will happen, keep planning that's 90% of the fun
Re: BassMunn's PH16 - SPLASHED!!!!
Posted: Fri Dec 28, 2012 9:59 am
by pee wee
BassMunn wrote:
Santa got a little lost but he arrives next wednesday with this
That looks like the Ford Ranger that we can't get in the U.S., ostensibly because we wouldn't buy it ( everybody in this country wants only a full size pickup according to Ford marketing). Nice looking truck.
Re: BassMunn's PH16 - SPLASHED!!!!
Posted: Fri Dec 28, 2012 11:15 am
by BassMunn
pee wee wrote:
That looks like the Ford Ranger that we can't get in the U.S., ostensibly because we wouldn't buy it ( everybody in this country wants only a full size pickup according to Ford marketing). Nice looking truck.
Yip this is the new Ford Ranger, this is just the entry level version without all the bling bling on it but it still has the higher powered 2.2 Turbo Diesel with 6 speed manual transmission, you also get a 3.2 Turbo Diesel in manual and auto.
It's a lot bigger than the old Ranger but it's not as big as the F-150, I also can't figure out why a car built by what is essentially an American company will sell it in 180 countries except the US and Canada
Atleast for once I am on the positive side of this discussion
I spent half my life wishing I could buy a true muscle car
Here's another shot of my car which is waiting patiently at the dealer for it's 2013 reg

Re: BassMunn's PH16 - SPLASHED!!!!
Posted: Fri Dec 28, 2012 11:23 am
by AtTheBrink
I wish they would sell cars and small trucks with those small diesel engines here in this country. Lots more power and better fuel mileage, they just make sense...
Re: BassMunn's PH16 - SPLASHED!!!!
Posted: Fri Dec 28, 2012 12:18 pm
by Cracker Larry
Welcome back! That dash looks great! Nice truck too!
Re: BassMunn's PH16 - SPLASHED!!!!
Posted: Fri Dec 28, 2012 12:19 pm
by Bowmovement
AtTheBrink wrote:I wish they would sell cars and small trucks with those small diesel engines here in this country. Lots more power and better fuel mileage, they just make sense...
Give it a few years. With the Audis and VWs having an option of the "Clean Burning Diesels" it will catch on with more automakers in the US.
Matt
Re: BassMunn's PH16 - SPLASHED!!!!
Posted: Sat Dec 29, 2012 10:34 am
by tobolamr
flea wrote:I know what you mean with the lack of money Shannon. 2012 was not one of the years that was not very favourable to me. I keep saying I will start my Ph in a few months, think that was a year ago.
Flea - Please don't feel bad. I've been in a similar situation since I bought my plans. In 2003!
The latest was the phone call a couple weeks ago "Yeah, hubby? The 2nd story tub is draining through the kitchen ceiling and into the kitchen."
You WILL start soon, and you will have an AWESOME build!
Shannon - Awesome to hear from you! I think your dash looks great! Nice job with the perspex - that looks slick. I totally understand what you mean about being able to see the fish finder from the front deck, too... When I got my Humminbird 798 SI HD Combo, I put it on a RAM mount. So I just swivel it around so I can see it from the front while I'm on the front deck, and swivel it back when running. It functions for now...
The Ranger looks slick! A 2.2L Diesel, huh? Sounds like that should have NO problem towing the Phantom for you!
Re: BassMunn's PH16 - SPLASHED!!!!
Posted: Sat Dec 29, 2012 11:25 am
by Swamp Skiff
I wish they would sell the new Ranger here period. It drives me crazy that the people are begging for better fuel economy and the auto makers just say "Too bad, here is a full sized truck".
Anyhoo, as always you continue to inspire with your build.
Swamp
Re: BassMunn's PH16 - SPLASHED!!!!
Posted: Wed Jan 16, 2013 4:10 pm
by BassMunn
Hey Guys thanks for all the comments
I love my new truck, the ride is awesome and with 375nm of torque it's got plenty towing power for my PH16 and returning 24 mpg
, that's combined driving with towing included.
Getting ready to go

Just a couple pics of the boat floating in our harbour


My son has become a real mad little fisherman, I can't believe how well he can work a lure already. He caught, fought and landed this little GT all on his own.

Re: BassMunn's PH16 - SPLASHED!!!!
Posted: Wed Jan 16, 2013 4:13 pm
by Uncle D
Great picture, and boat looks fast just sitting there!!
Don
Re: BassMunn's PH16 - SPLASHED!!!!
Posted: Wed Jan 16, 2013 4:13 pm
by BassMunn
Thanks Uncle D
Re: BassMunn's PH16 - SPLASHED!!!!
Posted: Wed Jan 16, 2013 4:43 pm
by jacquesmm
Congratulations, the boat looks fantastic.
Re: BassMunn's PH16 - SPLASHED!!!!
Posted: Wed Jan 16, 2013 4:50 pm
by AtTheBrink
Looks great! Great pic of your boy and the little GT! Ever catch any big trevally over ther?
Re: BassMunn's PH16 - SPLASHED!!!!
Posted: Wed Jan 16, 2013 5:11 pm
by BassMunn
Thanks Jacques
I love my boat
@ AtTheBrink, we get GT's over 100lb's here
. I haven't caught one like that yet though.
I hooked one 2 weeks ago in the harbour that was probably 30 to 40lb's, fought it for an hour and followed it for nearly 2 miles before it dragged me right into the main shipping channel right infront of a huge container ship. That'll teach me for fishing with 10lb line
Never thought I would hook something that big in the harbour.
Re: BassMunn's PH16 - SPLASHED!!!!
Posted: Thu Jan 17, 2013 8:44 am
by jorgepease
Looks great!
Re: BassMunn's PH16 - SPLASHED!!!!
Posted: Thu Jan 17, 2013 9:55 am
by cape man
The picture of the boy fishing says it all! Looking really good!
Re: BassMunn's PH16 - SPLASHED!!!!
Posted: Thu Jan 17, 2013 10:28 am
by wegcagle
Just awesome Shannon. Nothing better than family on the water. Looks like the PH16 is perfect for you guys; not too big or too small.
I like the Ranger as well. I am looking for trucks now, and I wish we had those over here. The Toyota Tacoma seems to have the market on midsized trucks. The price is so high that I might as well buy a full sized truck.
Will
Re: BassMunn's PH16 - SPLASHED!!!!
Posted: Mon Jan 21, 2013 8:05 pm
by JMMGeorgia
BassMunn,
I am 3 months into a OB17 build. You and the other builders on this site keep me inspired. You certainly have an amazing build there. Hope you and the family enjoy for many years.
JMMGeorgia
Re: BassMunn's PH16 - SPLASHED!!!!
Posted: Tue Jan 22, 2013 6:41 pm
by pee wee
JMMGeorgia wrote:
I am 3 months into a OB17 build. You and the other builders on this site keep me inspired. You certainly have an amazing build there. Hope you and the family enjoy for many years.
JMMGeorgia
What part of Georgia are you in? That is a boat I'm very interested in building, I'd love to see some pictures or the real thing if you wouldn't mind a visit when it suits you.
Re: BassMunn's PH16 - SPLASHED!!!!
Posted: Tue Jan 22, 2013 7:52 pm
by JMMGeorgia
Hank,
Paulding County. Made several mistakes, but enjoying build.
Re: BassMunn's PH16 - SPLASHED!!!!
Posted: Fri Feb 01, 2013 2:44 am
by Kevin.G
Hey Mate,
been going thru your build, boat looks supurb
. Could you tell me what primer and paint you used. Thanks Kevin
Re: BassMunn's PH16 - SPLASHED!!!!
Posted: Mon Feb 04, 2013 12:43 pm
by BassMunn
Kevin.G wrote:Hey Mate,
been going thru your build, boat looks supurb
. Could you tell me what primer and paint you used. Thanks Kevin
Hi Kevin, I used an Epoxy high build primer I got from SeaPort Supplies in Durban. I then used a normal 2K automotive paint for the top coat. The epoxy primer is nice and strong but I'm finding the 2K too soft for the boat, it scratches very easily.
If you are going to roll and tip I would suggest looking at International Perfection, it's expensive but it's lovely paint (Just doesn't spray too well). An old paint that has been used on boats for years here is called Glatex 8, I've never used it but it is apparently the paint to use on boats.
I would also strongly suggest you do the bottom of the boat in Epoxy Graphite, I didn't and regret it.
Re: BassMunn's PH16 - SPLASHED!!!!
Posted: Wed Feb 06, 2013 10:20 am
by JayJayMuller
Hi Bassmunn,
Thanks for posting your great build, you build was the final decision for me to start this project as well. I'm building an OB19.
Being a fallow South African maybe you can give me some advise. I'm battling to source the epoxy's the builders are talking about on this forum, mainly because a lot of products is not available in SA (I Think)
.
So I have two suppliers, the one sells SP 106 and the other west systems (very expensive), both suppliers is giving me sales man talk to so i'm confused which is the best. Not one of these two sells Biax tape, and the Biax cloth in the size that I need.
Can you please tell me what Epoxy system you used and who your supplier was. I can arrange for it to be collected in Durban or maybe they will have a branch in Cape Town.
Thanks,
JJ.
Re: BassMunn's PH16 - SPLASHED!!!!
Posted: Wed Feb 06, 2013 11:01 am
by ks8
Hello JJ,
This area of the forums may not be seen right away by technical staff. I do not know how often Bassmunn visits here. Try reposting this to the *Materials* section. It is checked more often by support staff. They may know where Bassmunn got his materials.
Welcome to the group!
Re: BassMunn's PH16 - SPLASHED!!!!
Posted: Wed Feb 06, 2013 12:27 pm
by cassiel
Hi JJ,
I used Bassmun's advice when I did my fibreglass/wood rebuild and went with AMT Composites SP106 resin. Simple to use, and not that expensive. I probably used about 75kG of the stuff! They don't have micro balloons, but a bit of silica and cotton fibre worked well for fillets. They really have everything you need and are very helpfull.
AMT has got a branch in CT.
I have to agree on the comment about 2K being too soft. It chips and scratches like crazy. Seeing as this is the finishing touch on your project, I'd say go overboard and get the best you can afford.
Cheers!
Re: BassMunn's PH16 - SPLASHED!!!!
Posted: Wed Feb 06, 2013 12:57 pm
by JayJayMuller
Thanks Cassiel,
AMT Composites are one of the suppliers I mentioned.
The branch in Cape Town doesn't cell biax tape though.
What did you build?
Re: BassMunn's PH16 - SPLASHED!!!!
Posted: Wed Feb 06, 2013 2:36 pm
by JayJayMuller
Bassmunn,
I have just came across the topic you have posted in the material section of the forum.
No need to answer my question anymore, thanks.
JJ.
Re: BassMunn's PH16 - SPLASHED!!!!
Posted: Fri Feb 08, 2013 9:29 am
by Kevin.G
Hi,
Thanks for the advice, defenately gonna use it! Have made contact with AMTComposites already and everyone is very helpful.
STILL waiting for package
. Although its mayby a blessing in disguise cause i started renovations and repair on my house after a bad hail storm last year so I am anyway busy for next bout 6 weeks.
Chat soon
Kevin


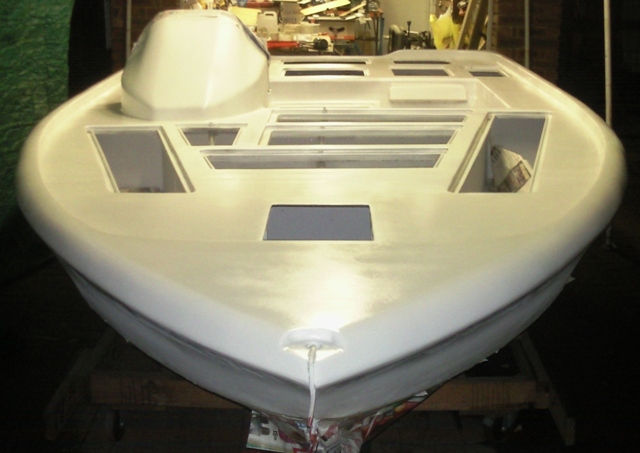
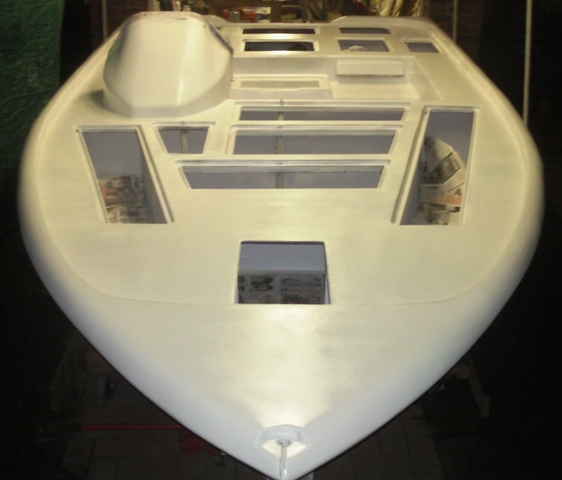
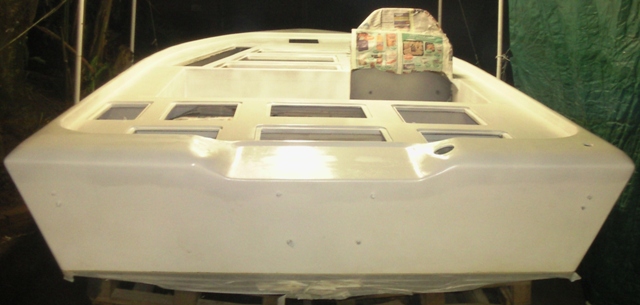
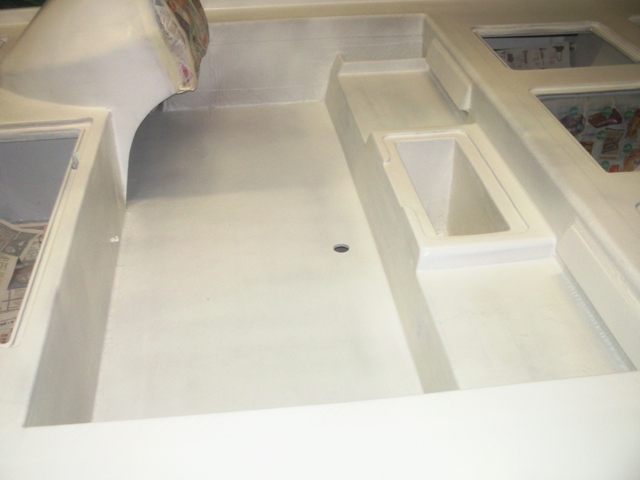
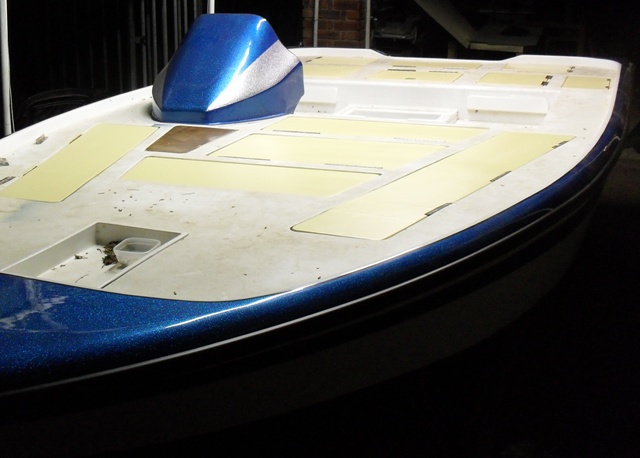
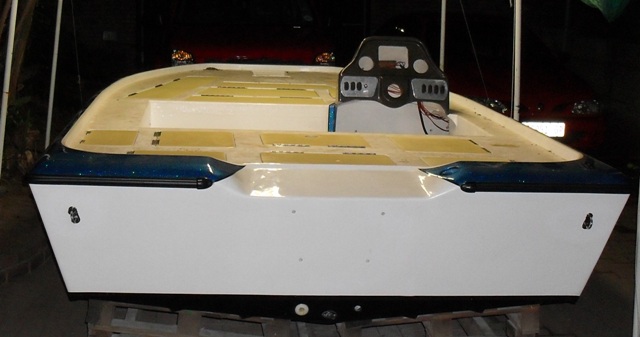
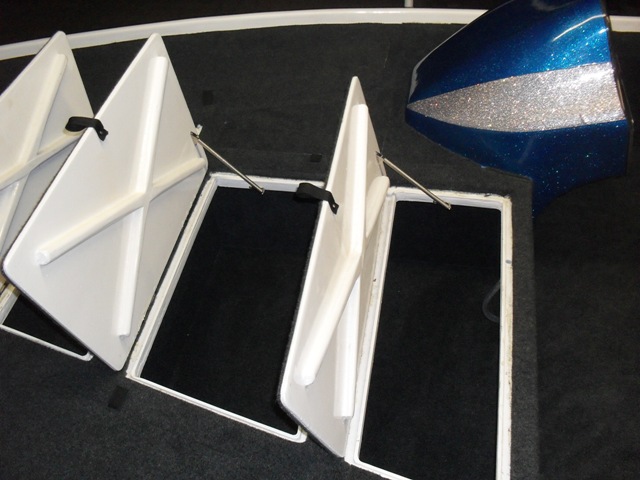
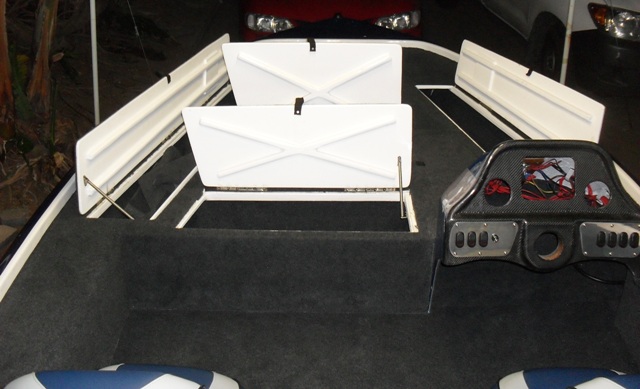
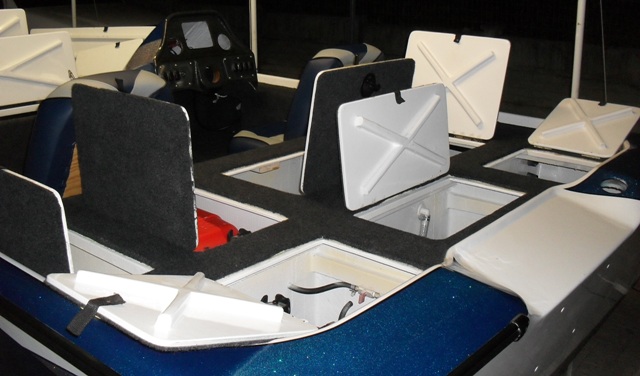

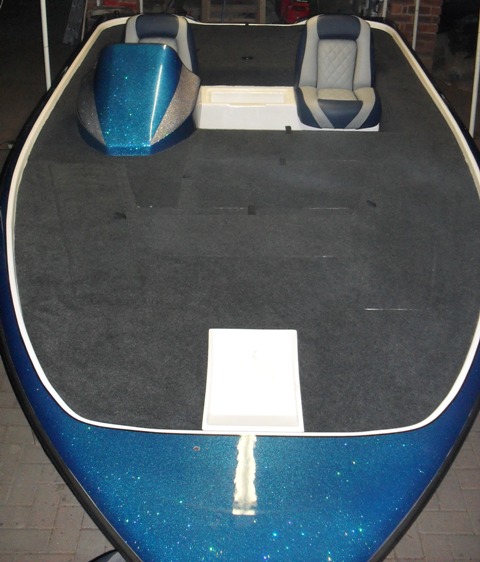
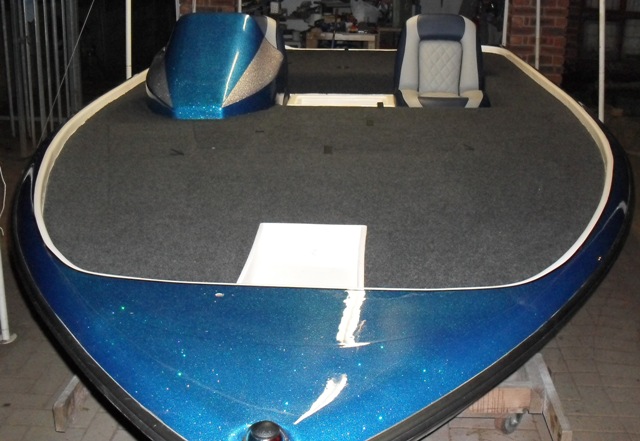
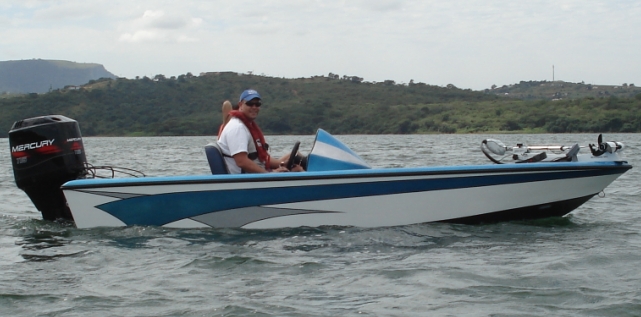
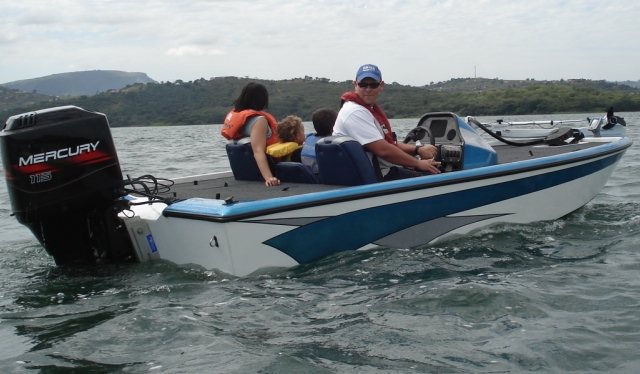

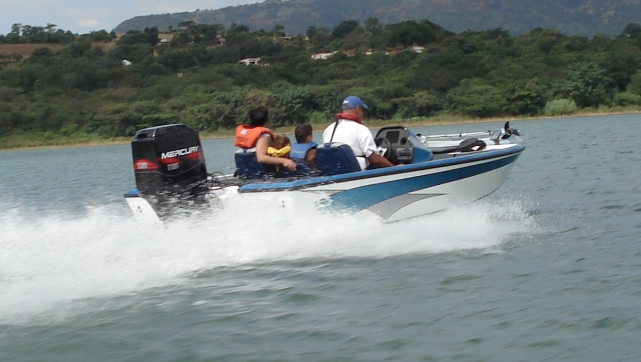
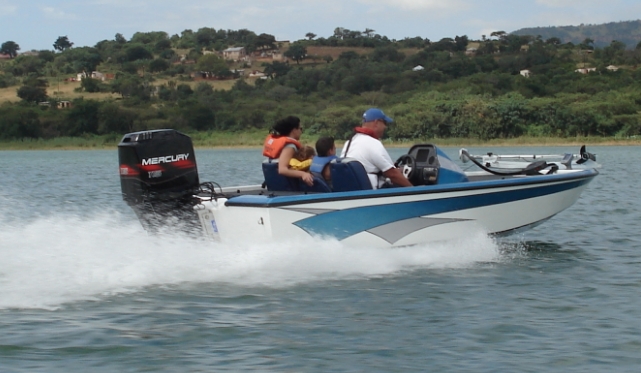
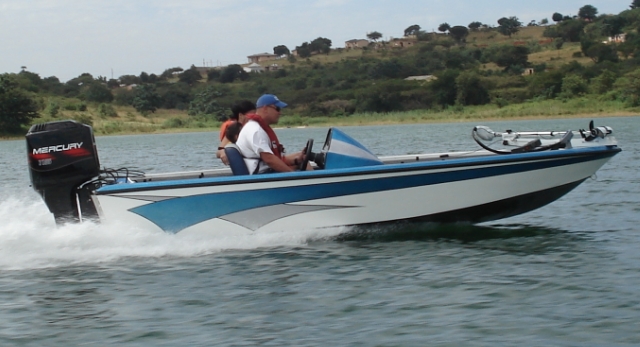
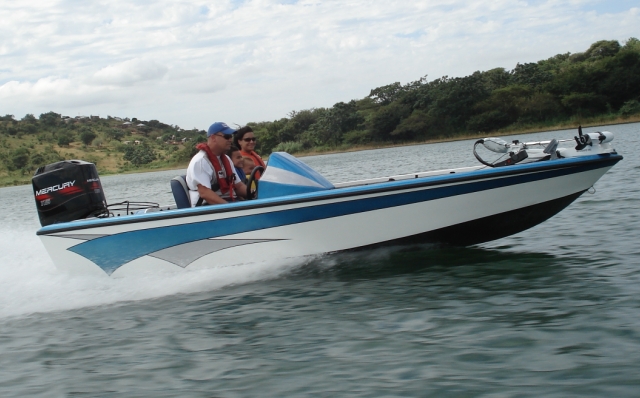
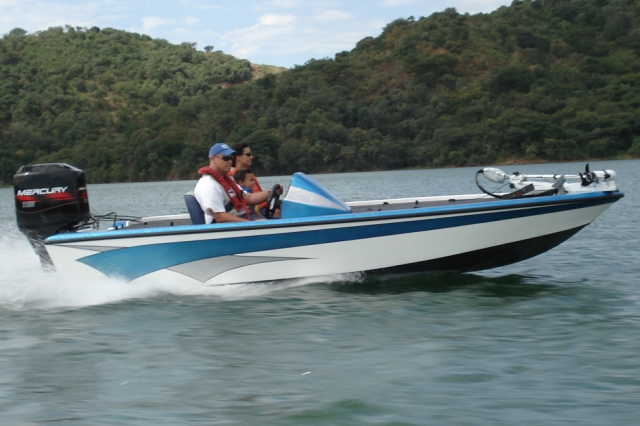

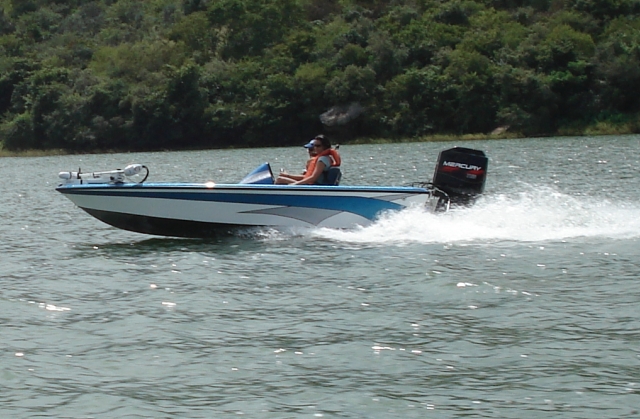

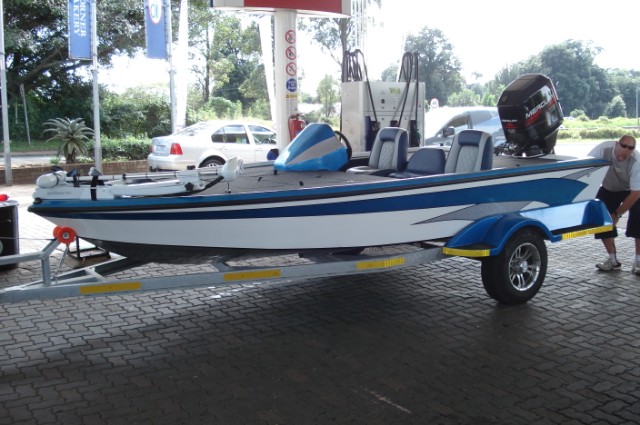
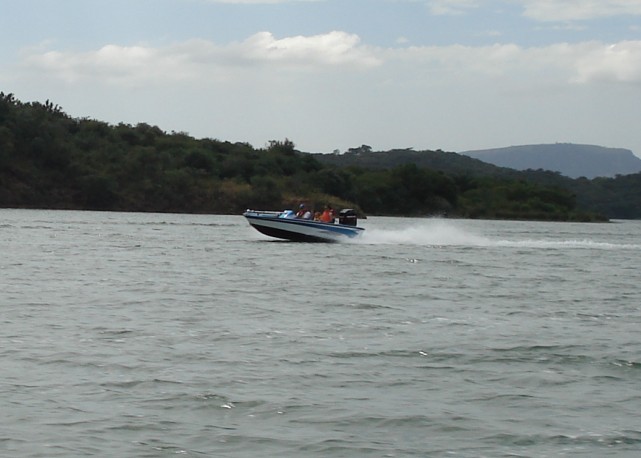
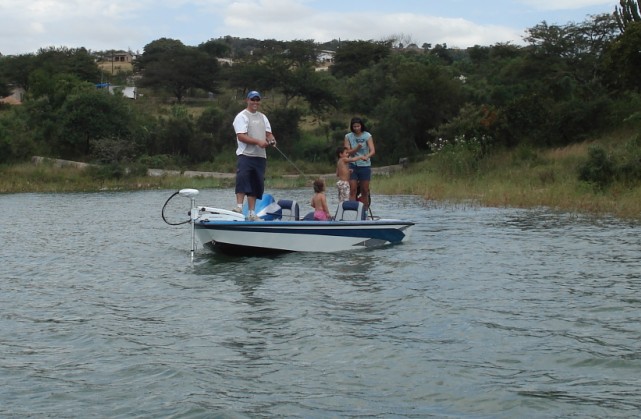
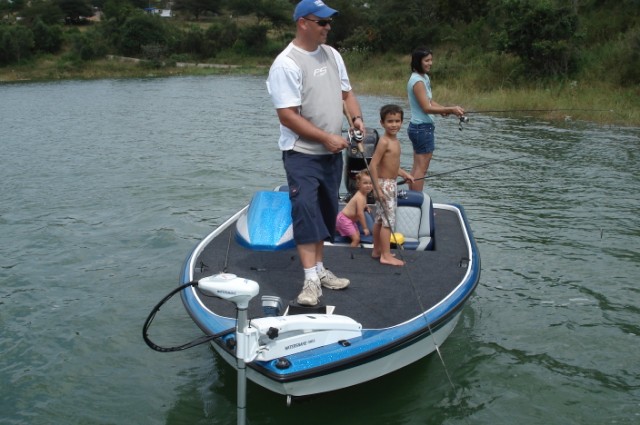
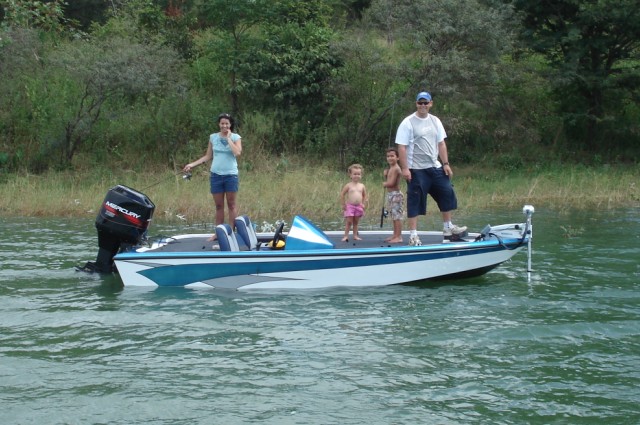


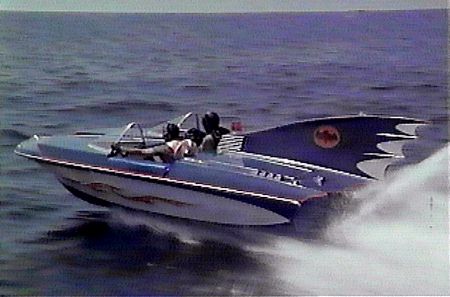