

Will
wegcagle's GV-15
I became a little more anal retentive today (no big suprise if you know me  ) and put a long 2x4 across the keel and across the hull to check the lines. I noticed that there was a pretty big rocker in the hull between motorwell frame and frame 2. I would guess maybe 1/4" deep. After an hour of scratching my head and consuming a couple of bottles of brain juice I realized that the problem was at the bow bend I didn't secure it tight enough at frame 1 and bow mold. So I cussed alittle, broke a few zip ties cussed some more. Climbed under the boat and on top of it a couple of times, until I finally got it right (as good as I can do anyway
  ) Now the gap is somewhere around 1/8"-1/16" deep. I hope this is acceptable???? All ideas are greatly appreciated (and much needed
  )Checked my diagonal measurements which were still good, and I started puttying the seams. I tried a couple of methods and I gotta say, the caulk gun method seams like it would be great, but it sucks trying to get the putty into the gun
  . I probably did something stupid. So on the next batch I used Joel's ziplock freezer bag method. MUCH BETTER. You just put in the putty/hardener and mix it around in the bag with your hands, cut a corner and go
  No pictures because I broke the camera after my last set of pictures, but I will post some after the next big step.
Will
Will
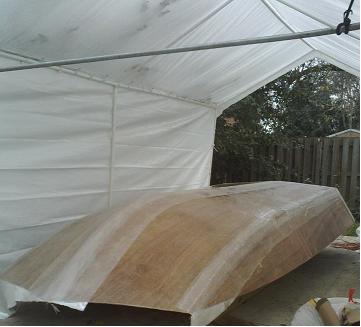
Worked like a beast yesterday from sunup to sundown. My goal was to work wet on wet, but so far it's only a one man show. I got all the seams double taped and finished laying down all of the fiberglass sheets on the hull  , but ran out of time and energy before the New's Years bash to fiberglass the sides More pics to come in the near future. Just waiting for the new camera to arrive. The coolest thing is that it looks like a REAL boat now. I love this part everyday is instant satisfaction. My wife keeps telling me how suprised she is at how fast I've been working. I just keep telling her that the easy parts over now I will become one with the fairing block.
By the way I did notice 4 areas that had small air bubbles at the corner of the hull and the transom. Just wondering what everyone does about air bubbles (besides avoiding them completely) I grinded them out, painted with epoxy, filled with putty and then layed a small amount of 12oz biax. Is this good enough???
Will
By the way I did notice 4 areas that had small air bubbles at the corner of the hull and the transom.
Will
-
tech_support

- Very Active Poster

- Posts: 12318
- Joined: Wed Dec 31, 1969 7:00 pm
- Location: Vero Beach, FL
- Contact:
It depends how big and where they are located. If they are small and not right on the joint, I will normally just cut or grind them out and fill the hole flush with a woodflour/epoxt mixwegcagle wrote:W Just wondering what everyone does about air bubbles (besides avoiding them completely) I grinded them out, painted with epoxy, filled with putty and then layed a small amount of 12oz biax. Is this good enough???
Will
post a picture of the air bubbles when you get the camera
What you really want to avoid is air voids right one the joint, you loose a lot of strength if so
I can't take a picture since I fill them inIt depends how big and where they are located. If they are small and not right on the joint, I will normally just cut or grind them out and fill the hole flush with a woodflour/epoxt mix
post a picture of the air bubbles when you get the camera
Will
-
DaveHawkins
- New Poster

- Posts: 6
- Joined: Sat Nov 01, 2008 5:04 pm
Dave,
Sometimes I act like I'm related to him , but the truth is I have no proof. I will say that after a few months of dating me, my now wife came up to me and said, "I was looking on the internet... Were you this crazy SOB I googled about???" At the time I wanted nothing more than to impress her, so I said...."Yes, Yes I am."
Will
Sometimes I act like I'm related to him
Will

-
BassMunn
I appreciate the compliment Bassmun. Now if I can just fix the new problem with my hull hook, maybe I can speed back up. I hope to be where your's is by the end of next month. (Although that may be a little overzealousA bit of plywood and fibreglass= Instant Boat
It's fun to see it come together so quickly.
Looking cool
Will
-
BassMunn
At this stage in my build I flipped the hull to glass the inside and install the stringers and bulkheads then flipped it back over to do the fairing, but most other builders start their fairing now. If you start fairing now you could finish by end Feb. I read about your problems with the hook, it's nasty to get it but it's fixable 
Who is online
Users browsing this forum: No registered users and 0 guests