Page 1 of 1
FOSTER'S XF20
Posted: Sun May 15, 2011 10:51 pm
by FOSTER
I bought the plans and had a few question before I go purchase the wood. How hard is it for someone that's only wood working experience is building things like decks? I really want to do this build it looks fun, but I’m thinking this may be over my head.
Re: FOSTER'S XF20
Posted: Sun May 15, 2011 11:36 pm
by nc_robbie
Foster, anyone can build this type of boat the stitch and glue is easy and anyone can do it. As far as support and advise you have all you could ever want in this forum there are many experienced builders that will provide many helpful tips…go for it you will not be sorry that you did…

Rob
Re: FOSTER'S XF20
Posted: Sun May 15, 2011 11:45 pm
by Prarie Dog
There are several well documented XF20 builds on the forum. With a few exceptions the guys on here have basic woodworking skills and the ability to follow directions. There is also a huge amount of help on this forum and countless years of building and boating experience to draw on. If you would like to see a finished boat the Texas Builders Meet is the last weekend of July in Port O Conner at Clarks.
Majorgator, is almost finished with his XF and Aripeka Angler finished his 3(?) years ago. AA's boat is called Red Alert and is very nice, he is also a frquent poster as is Majorgator. There is another XF20 builder in Corpus Christie that is fairly close to finish on his build. I doubt you would have a question they couldn't answer. The XF is an awsome flats fishing weapon, it will get up in 8" and float in 4. Those numbers are independently confirmed by a lot of guys.
Re: FOSTER'S XF20
Posted: Sun May 15, 2011 11:51 pm
by FOSTER
Sounds good I think I will buy some wood tomorrow and start my XF project. I have a feeling I will need lots of help.
Re: FOSTER'S XF20
Posted: Sun May 15, 2011 11:55 pm
by Prarie Dog
Foster, I think there is a place in Houston that sells Meranti 1088, I believe the name is Houston Hardwoods. Or, do you have another source for this kind of ply?
Re: FOSTER'S XF20
Posted: Sun May 15, 2011 11:58 pm
by nc_robbie
That sounds good I am a new builder to this type of boat building (stitch and glue) but I would recommend that you spend a little more money and go for marine ply in the end you will not be sorry…stitch and glue or traditional building marine ply is worth the investment in my mind…
Rob
Re: FOSTER'S XF20
Posted: Mon May 16, 2011 12:00 am
by gstanfield
Re: FOSTER'S XF20
Posted: Mon May 16, 2011 9:16 am
by FOSTER
I was going to buy it at Kemah Hardware they say it is marine plywood for 3/8" its $50.75 a sheet. i will have to call the place in Houston and see what there price is.
Re: FOSTER'S XF20
Posted: Mon May 16, 2011 9:48 am
by FOSTER
AB fir marine plywood is that good plywood or do I need to stick with something like Hydrotek?
Re: FOSTER'S XF20
Posted: Mon May 16, 2011 1:54 pm
by majorgator
AB fir marine plywood is that good plywood or do I need to stick with something like Hydrotek?
All advice on here from the designers to others who have built this (and other) boats is to stick with the higher grades of plywood. I bought all my Meranti 1088 and 6566 from the e-boat guys for a reasonable price. I know its reasonable because I bought a couple of sheets of AB Marine Fir from local place to do some misc. work, and the price was the same. Go with the Meranti or Okume, you won't be sorry...and you won't be worried about fixing it later.
seth
Re: FOSTER'S XF20
Posted: Mon May 16, 2011 2:17 pm
by Prarie Dog
Foster, Houston Hardwoods has Aquatec ply at reasonable prices. Their price is about the same as BBC but if you pick it up in Houston you will save the freight. Their number is 713 686-6176.
Re: FOSTER'S XF20
Posted: Mon May 16, 2011 3:25 pm
by Uncle D
Defiantly buy the Aquatec for the hull and sides. You'll be sorry if you don't. Ask me how I know

You can use the marine ply for stringers, bulkheads, sole and decks if you want. I'm going that way but I'll cover everything (marine ply) in lightweight cloth and epoxy before I install.
Oh, and welcome to the forum. Looking forward to lots of pics. Don
Re: FOSTER'S XF20
Posted: Mon May 16, 2011 7:40 pm
by FOSTER
I ended up buying hydrotek 1088 plywood from Houston Hardwood Inc. (thanks to y'all for the info) 14 sheets of 3/8" and 1 sheet of 1/2". What kind of wood do y'all use for framing? Where can I buy system 3 magicgel epoxy glue, fiberglass tape and resin in the Houston area and what glue do y'all recommend?
Re: FOSTER'S XF20
Posted: Mon May 16, 2011 8:51 pm
by Prarie Dog
You would have to look long and hard to find a better deal than the kit from Bateau. If you aren't price sensitive use silvertip and quick filet.
Re: FOSTER'S XF20
Posted: Mon May 16, 2011 10:22 pm
by FOSTER
That will probably be the easiest is just buy it from here I just thought the shipping would be expensive. Is the quick filet the glue?
Re: FOSTER'S XF20
Posted: Mon May 16, 2011 11:58 pm
by Prarie Dog
The glue is thickened epoxy. The epoxy is usually mixed with wood flour, to make glue, the consistency is about like ketchup. The wood flour will be included in the kit. Fillets are made with the same material mixed thicker. Fillets are built on inner corners so there is a nice radius for the biaxial tape to lay in. Quick fillet is a two part material that makes nice fillets because the thickener is mixed in a vacum so it is dense and lays out well, there is no air in it. Some forum members don't think it's worth the money others do. I've used both and like the quick fillet very much, you don't have to worry about it kicking while you're mixing in the woodflour. When you order your kit ask Joel what he thinks of it or start a thread in the materials section. You will get a lot of feedback. Another good thing to use is the refillable caulk tubes, they are very nice for laying out nice fillets. I think there are several builders in the Houston area that may offer to help you get going on mixing epoxy and building fillets, working wet on wet, etc.. All the info is on this site but sometimes one demonstration is worth a couple thousand words. After you work with the materials awhile it will be so easy you will wonder why you ever thought there was anything to it. It's a real simple process. No one here will think any question is a bad one, we've all been there.
Re: FOSTER'S XF20
Posted: Tue May 17, 2011 7:14 am
by cottontop
Welcome to this site Foster. You will find it very helpful to read up on the building techniques of this process(fillets, glue,wetting out cloth, etc). You can build this boat. I built an OD18 6 years ago. Had only the type of experience building you said you have. Follow the guides and advice given on this site and you will be very pleased. looking forward to some pics. John
Re: FOSTER'S XF20
Posted: Fri May 27, 2011 5:04 am
by FOSTER
Re: FOSTER'S XF20
Posted: Fri May 27, 2011 7:22 am
by majorgator
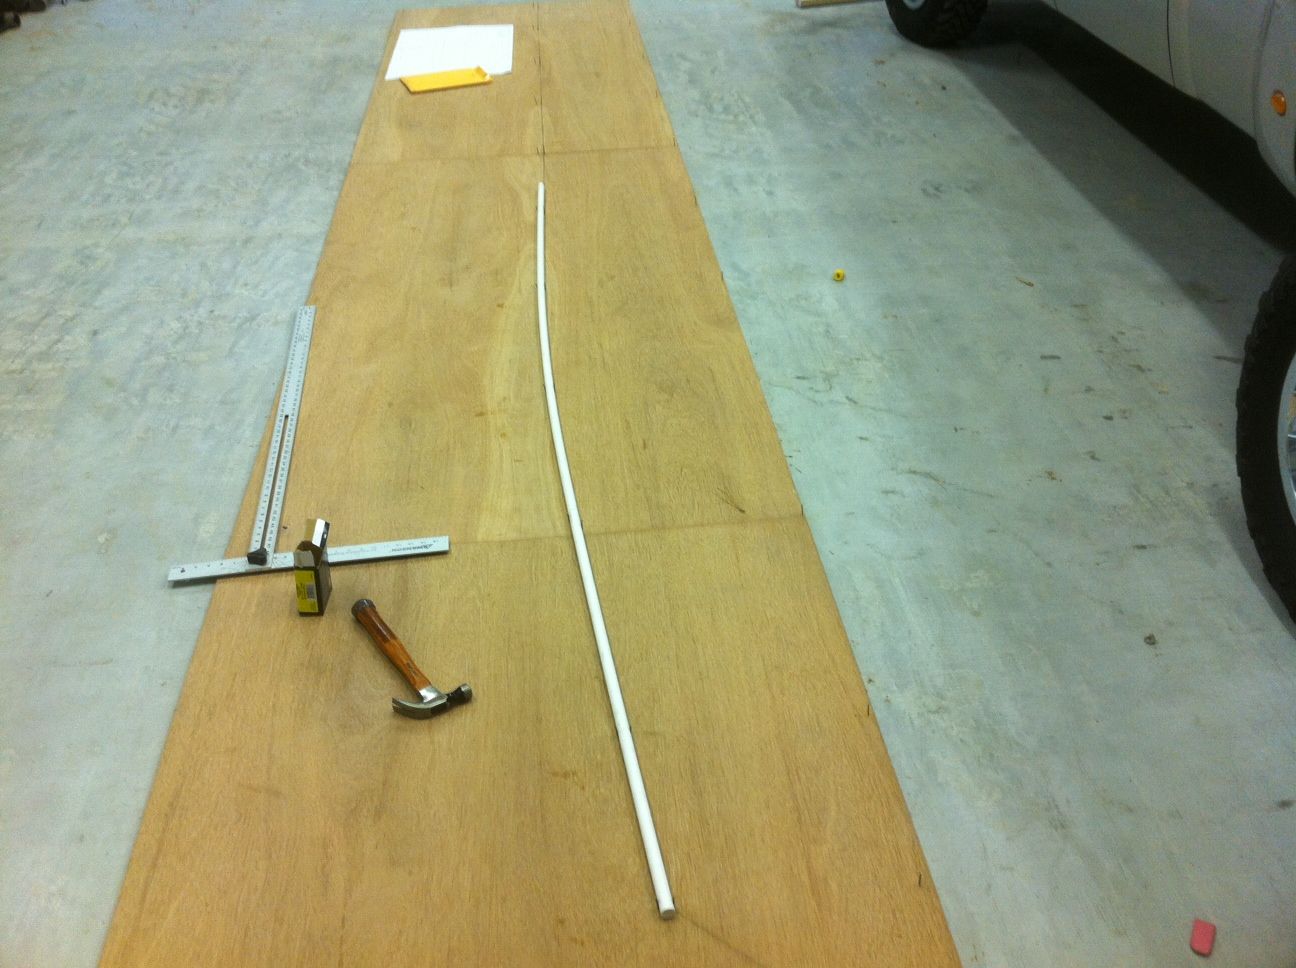
For the side panels, you need top and bottom marks, both of which have curvature. I did one sheet at a time, made the marks every 2 feet or so, then laid a nice piece of PVC pipe along the bends, which was held in place by small trim nails. These panels took some work to get right. I don't have a picture, and its kind of hard to explain via typing. Call me if you'd like 352-745-six nine five zero.
seth
Re: FOSTER'S XF20
Posted: Fri May 27, 2011 9:29 am
by jacquesmm
Re: FOSTER'S XF20
Posted: Fri May 27, 2011 11:02 am
by SmokyMountain
Foster
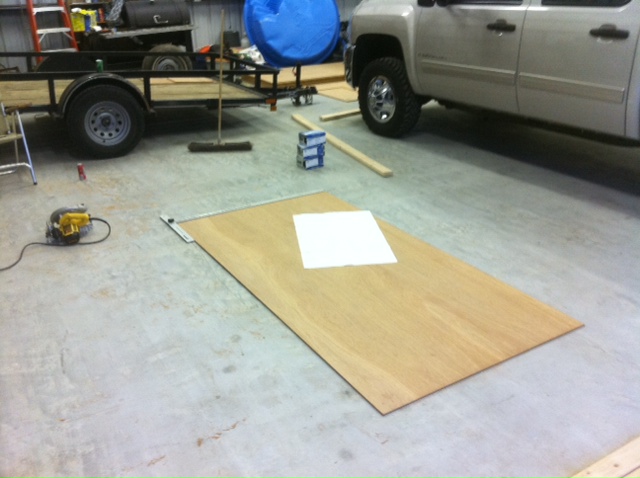
I had a layout table with 2 saw horses holding the table and 2 more sawhorses, one on each end of plywood that way I could get 2 pieces of plywood together to draw and cut. Here's a pic ... not the best example. Also, it gets you up off the ground making it more comfortable to measure / draw and cut. Measure twice, draw / redraw re-measure cut once!!!
Good luck!!
Andrew
Re: FOSTER'S XF20
Posted: Fri May 27, 2011 11:11 am
by ks8
Nice wood. Nice *shed*.

Re: FOSTER'S XF20
Posted: Fri May 27, 2011 2:46 pm
by Prarie Dog
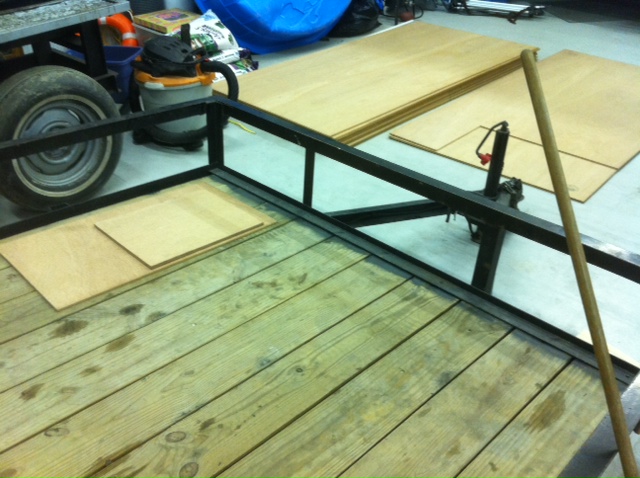
Foster, looks like your moving now. Below is a pic of the table I built to build my GF on. It's 16 x4 and has casters on one end. On the other end there is a cross member that I roll a floor jack under then jack up to move the table. It will roll very easily and is real handy when you want to move the build and clean up or if you want to move it outside to wash or wipe it down. We layed the long panels out on this table and spliced and made all the cuts on it before we assembled the boat on it. It is two feet high which makes sanding and fairing at a pretty agreeable height. We kept the hull appx. a foot forward of the back of the table to have a shelf to step on from a step stool. Made getting in and out of the build real easy. Structural guys on the forum will see I left one diagnol brace out of the middle of the table.
Re: FOSTER'S XF20
Posted: Fri May 27, 2011 8:55 pm
by FOSTER
Yeah I need to find a better way to cut the wood I have been using 2X4's to lie under the plywood. Nice table you got there Prairie Dog, I need to build a table or something like that. Seth when I get off I'm going to give you a holler I'm working nights right now and have 5 more to go I really like the way your boat turned out.
I told my self when I start I'm going to work on it all the time, but now summer is coming and it's vacation time.
Re: FOSTER'S XF20
Posted: Mon May 30, 2011 9:24 pm
by FOSTER
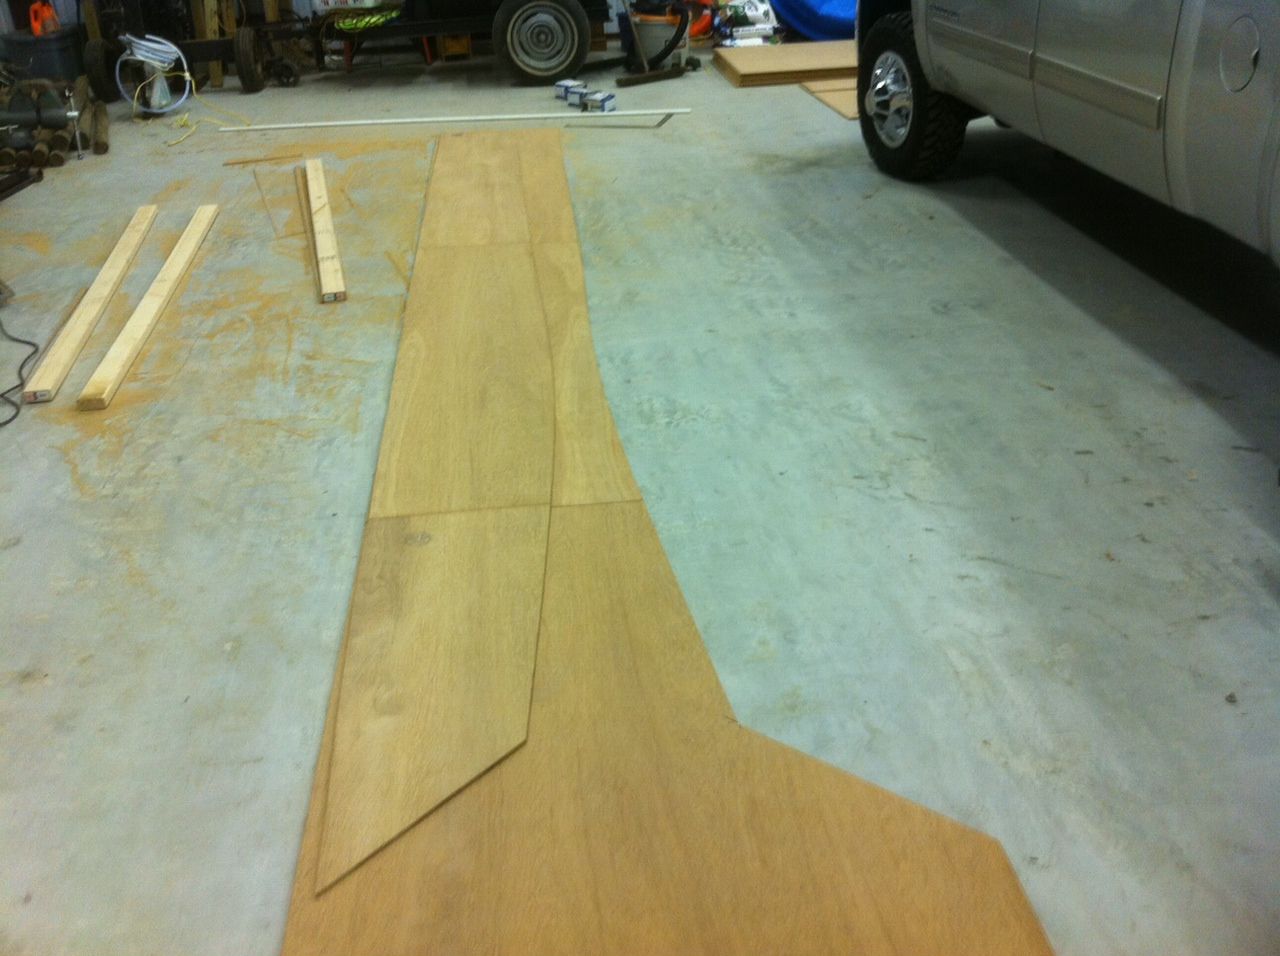
I worked on the boat when I got off this morning and managed to cut both side panels out.
Re: FOSTER'S XF20
Posted: Wed Jun 01, 2011 4:34 am
by FOSTER
Cut out the bottom of the hull yeasterday morning.
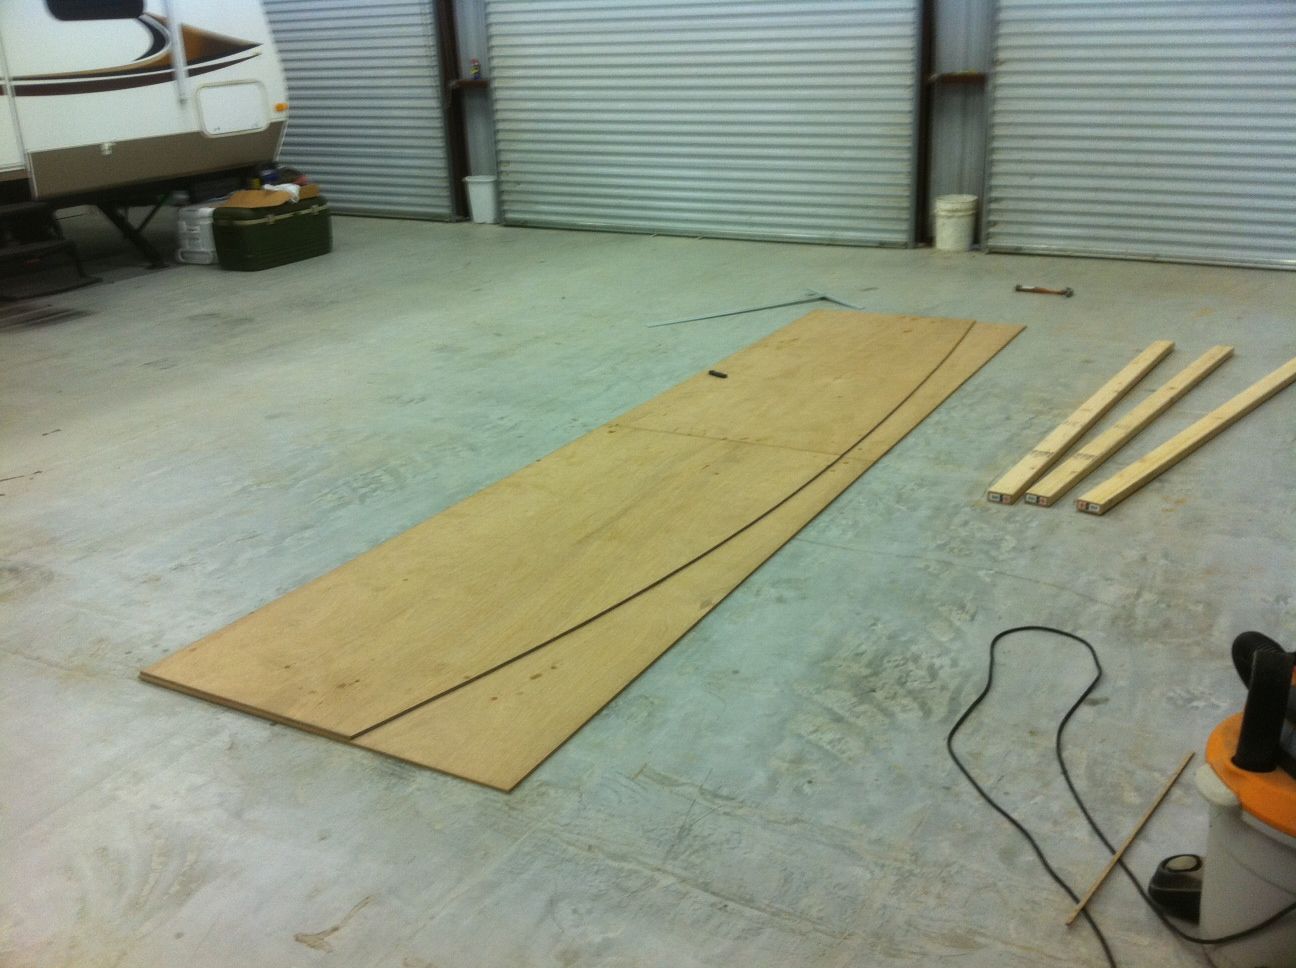
I am going to try and cut out the stringers when I get off at 5 a.m.
Re: FOSTER'S XF20
Posted: Fri Jun 03, 2011 2:18 pm
by FOSTER
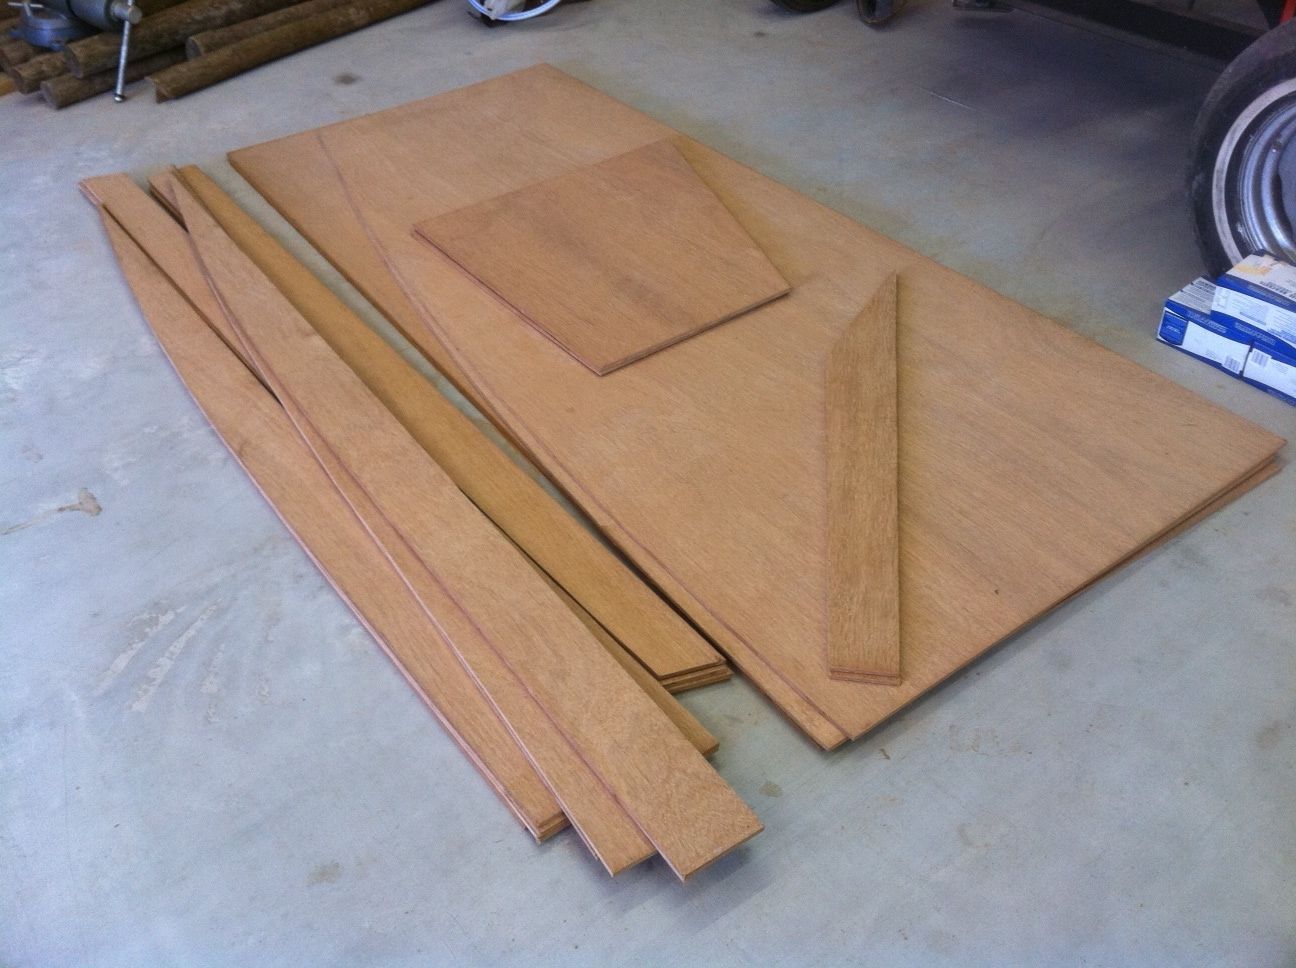
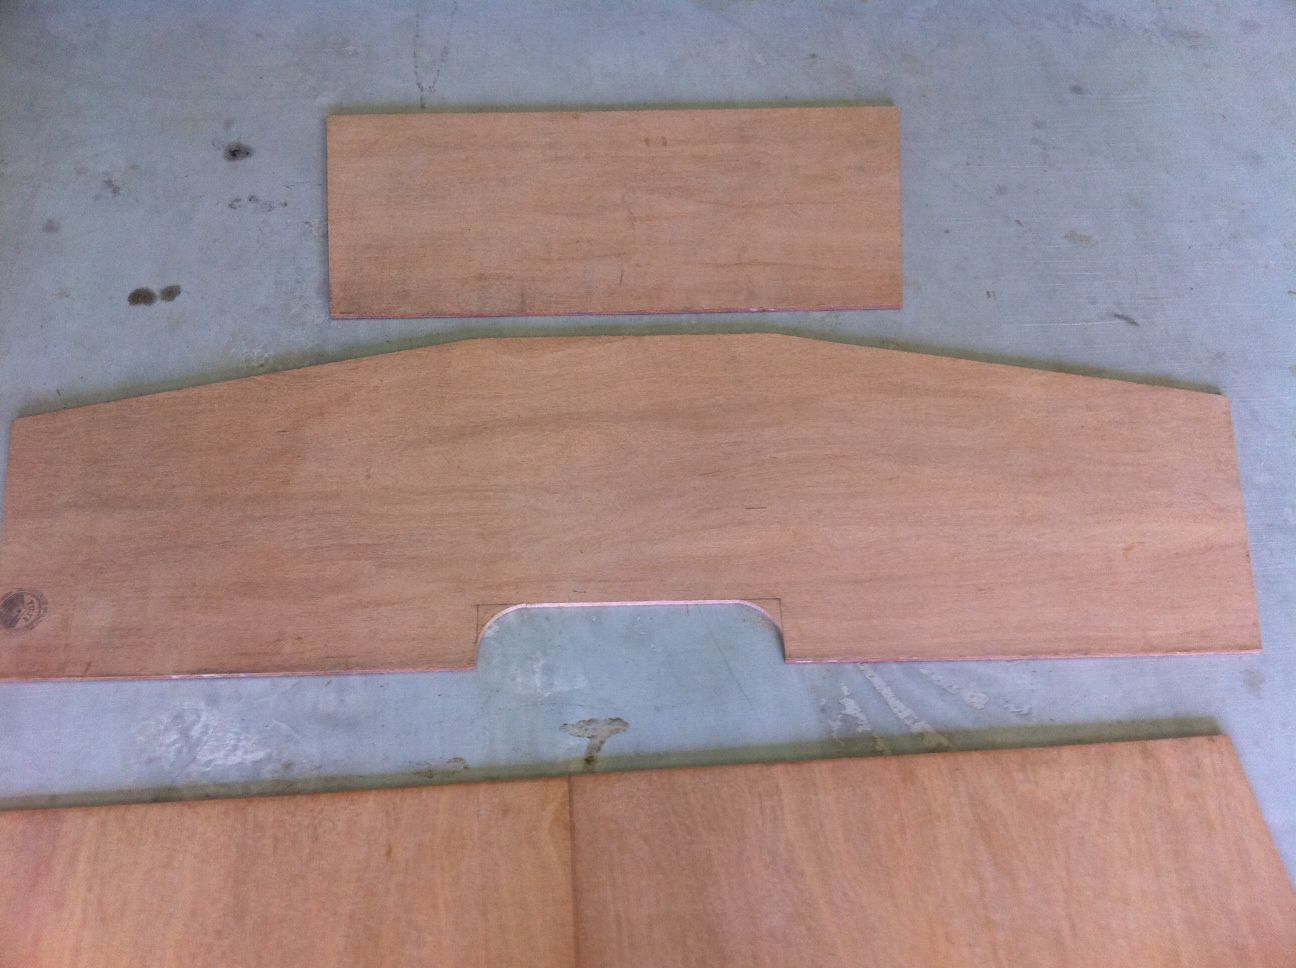
Stringers and tunnel are cut all I need now is to cut the bow and transom. Then I can start to assemble the hull.
Re: FOSTER'S XF20
Posted: Fri Jun 03, 2011 2:29 pm
by Prarie Dog
Looking good Foster. You got some nice curves on those panels, I'll try pvc the next time.
Re: FOSTER'S XF20
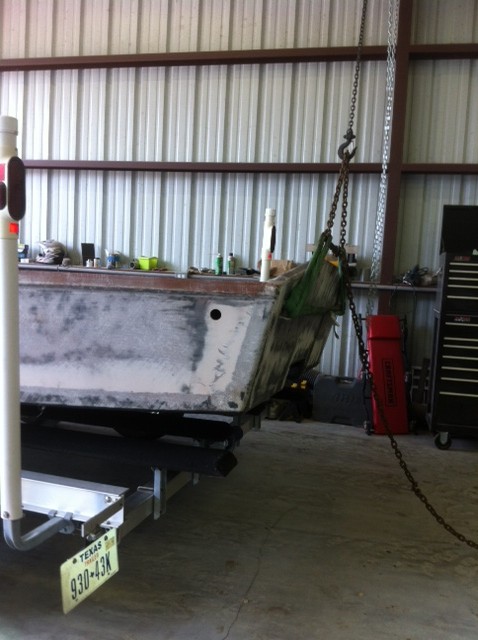
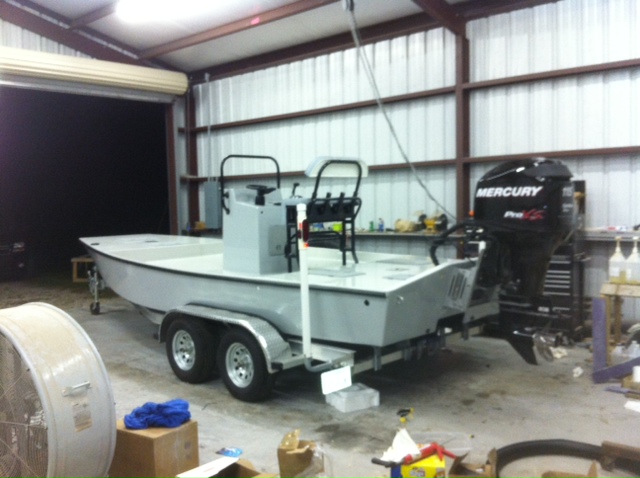
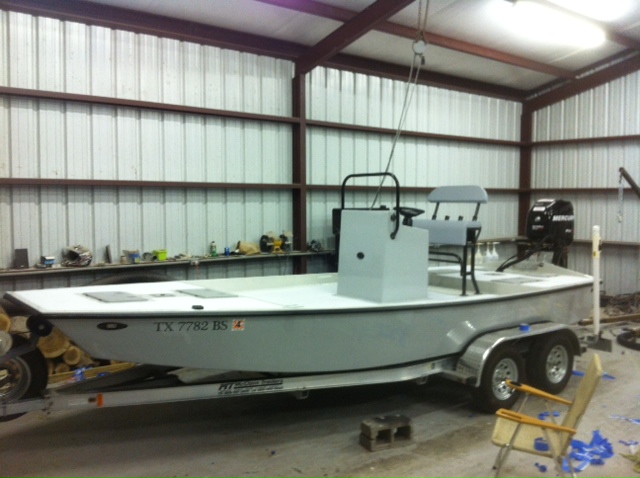
Posted: Sat Jun 11, 2011 8:14 pm
by FOSTER
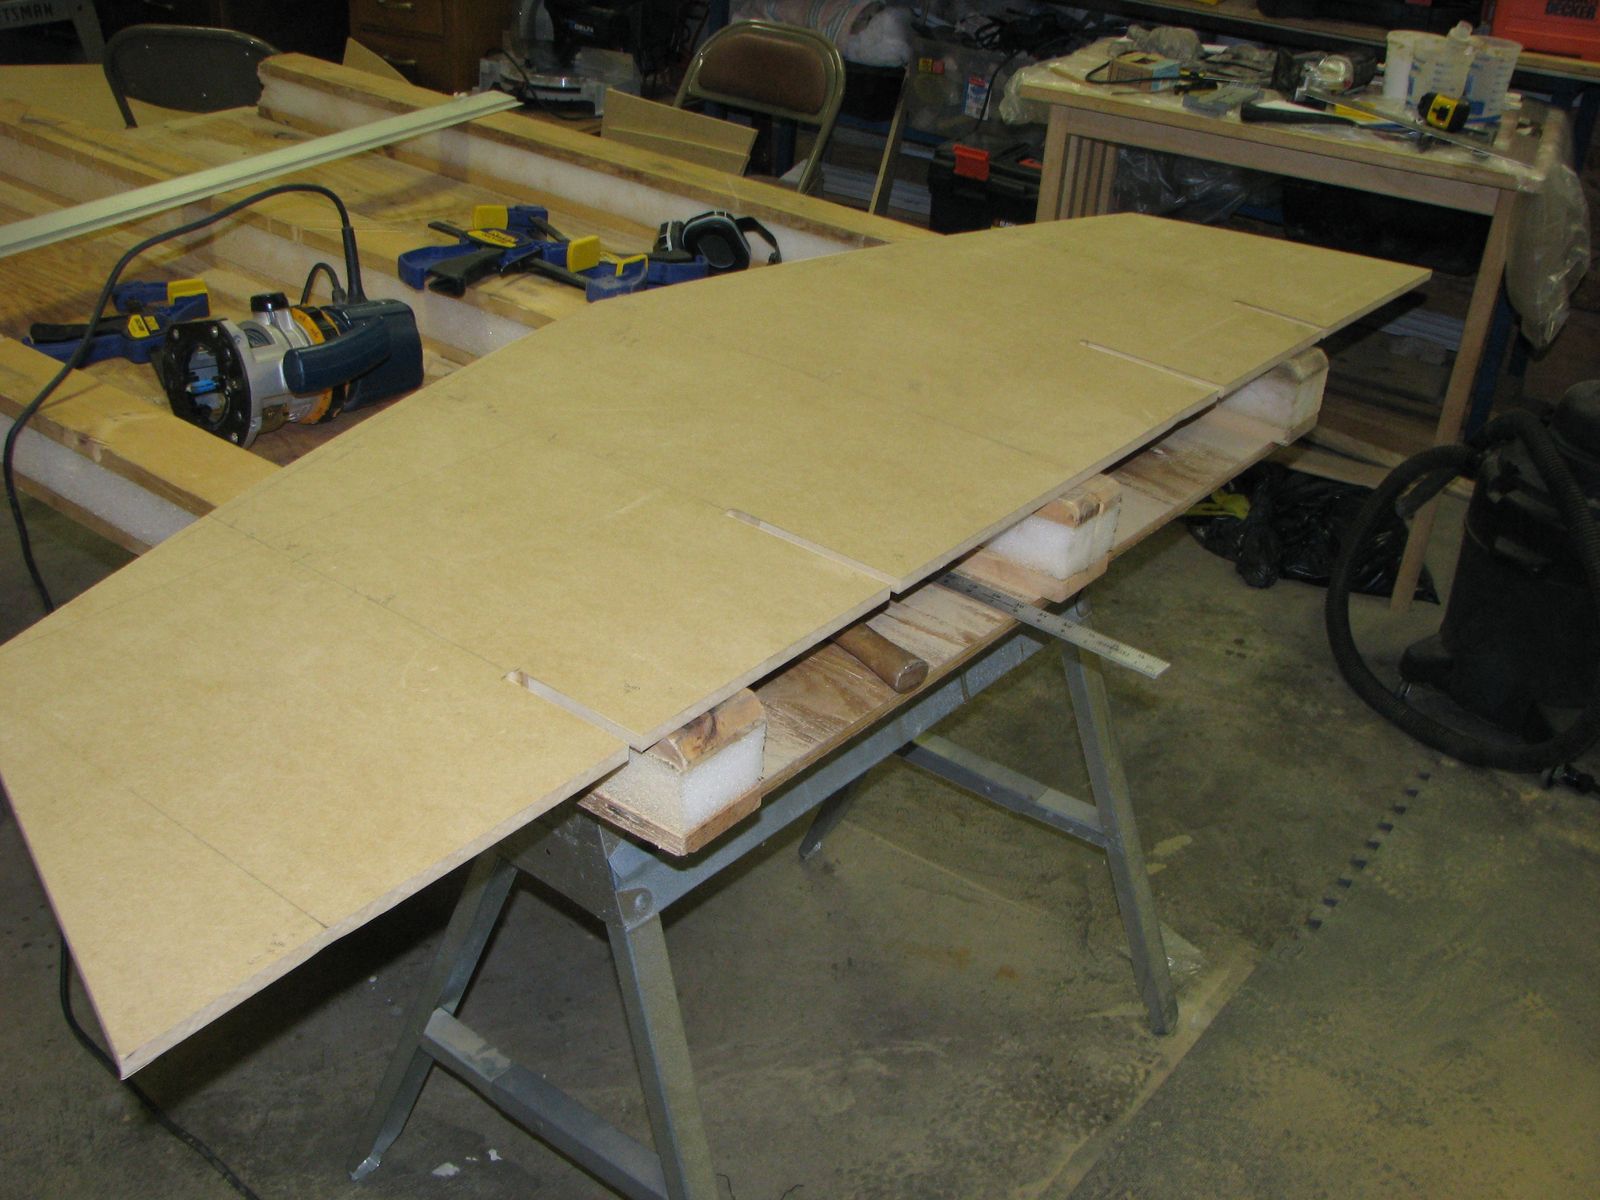
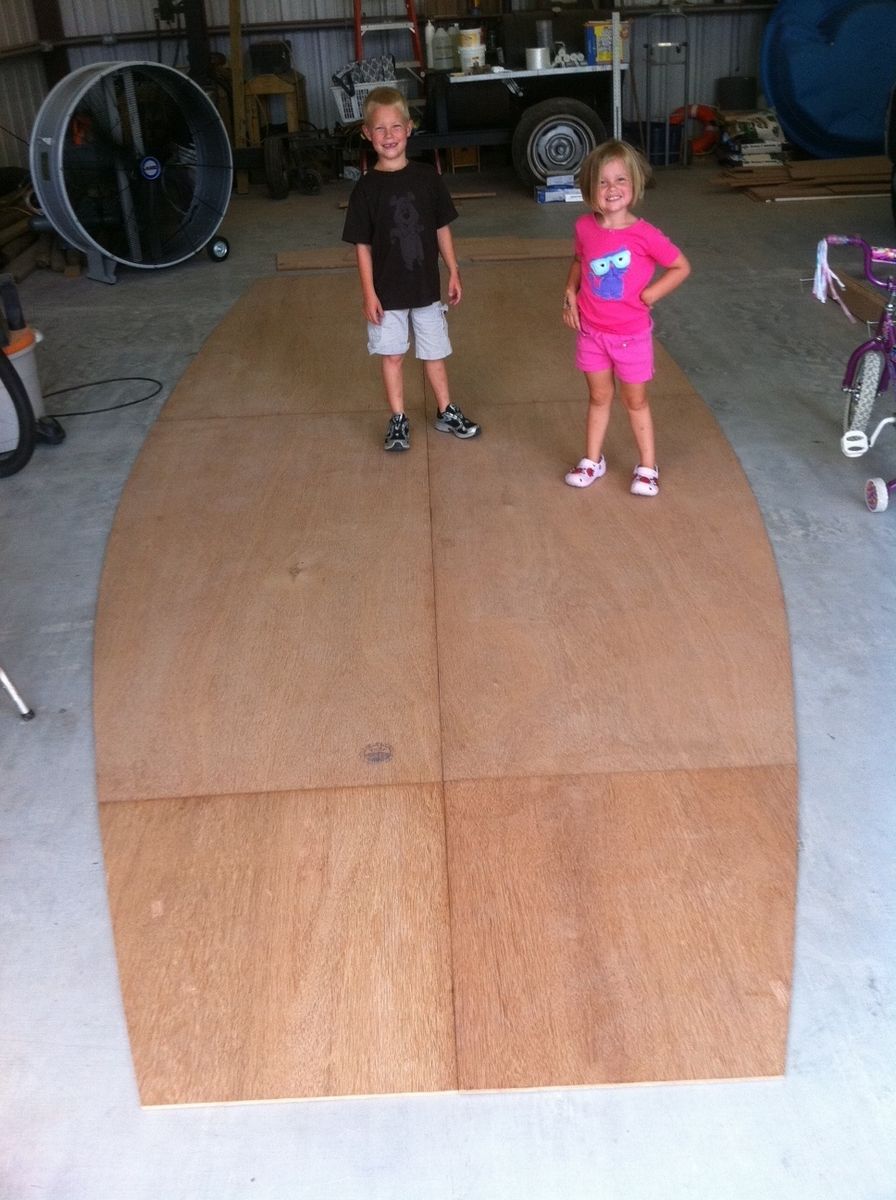
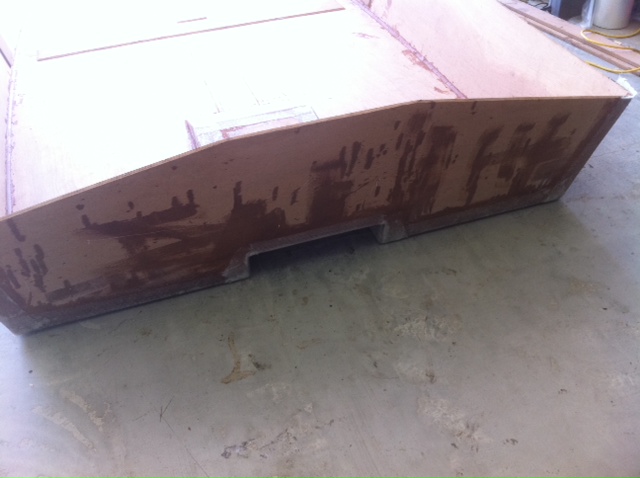
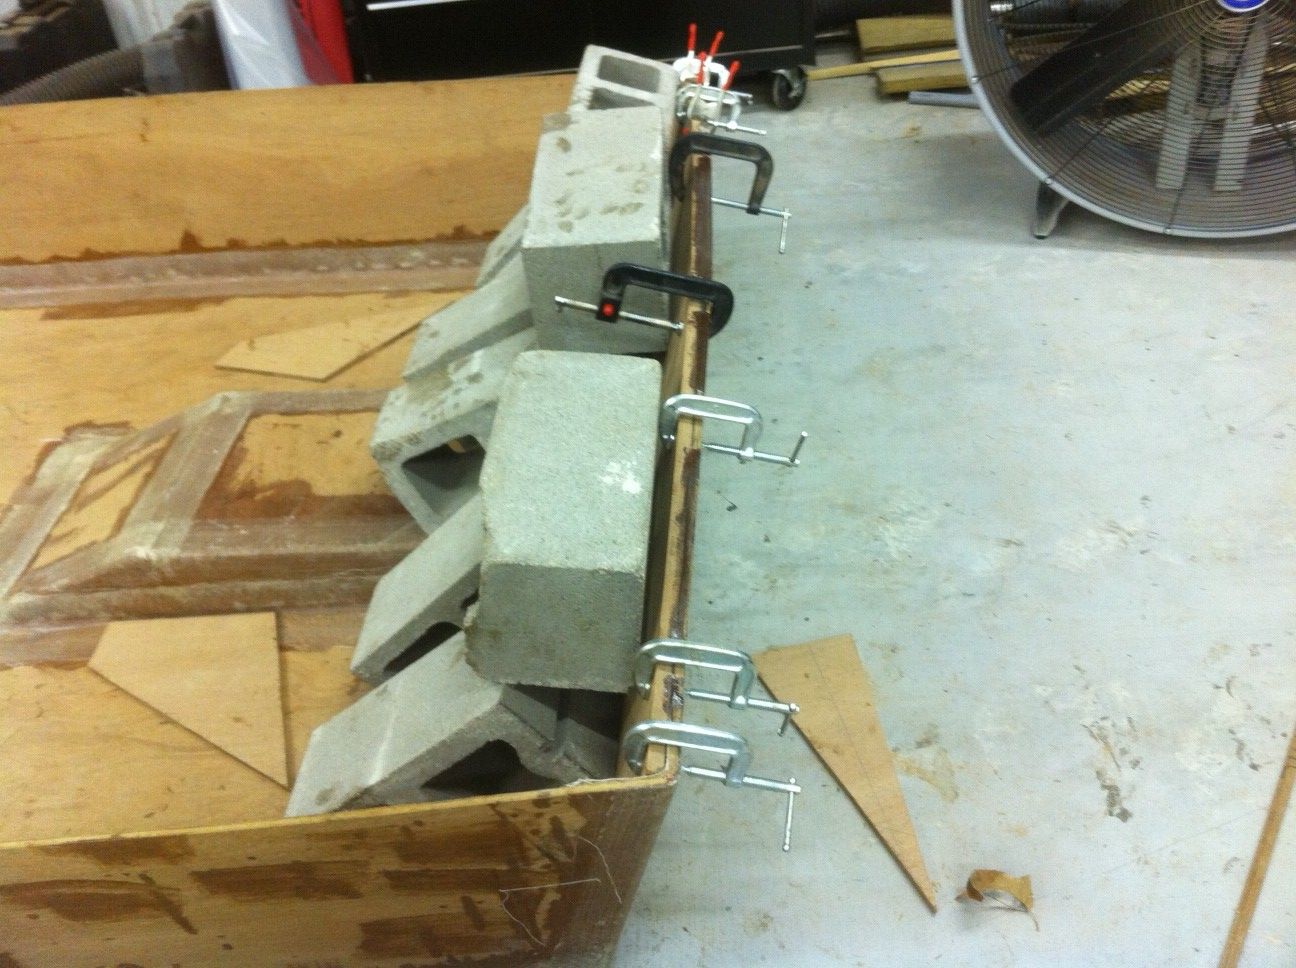
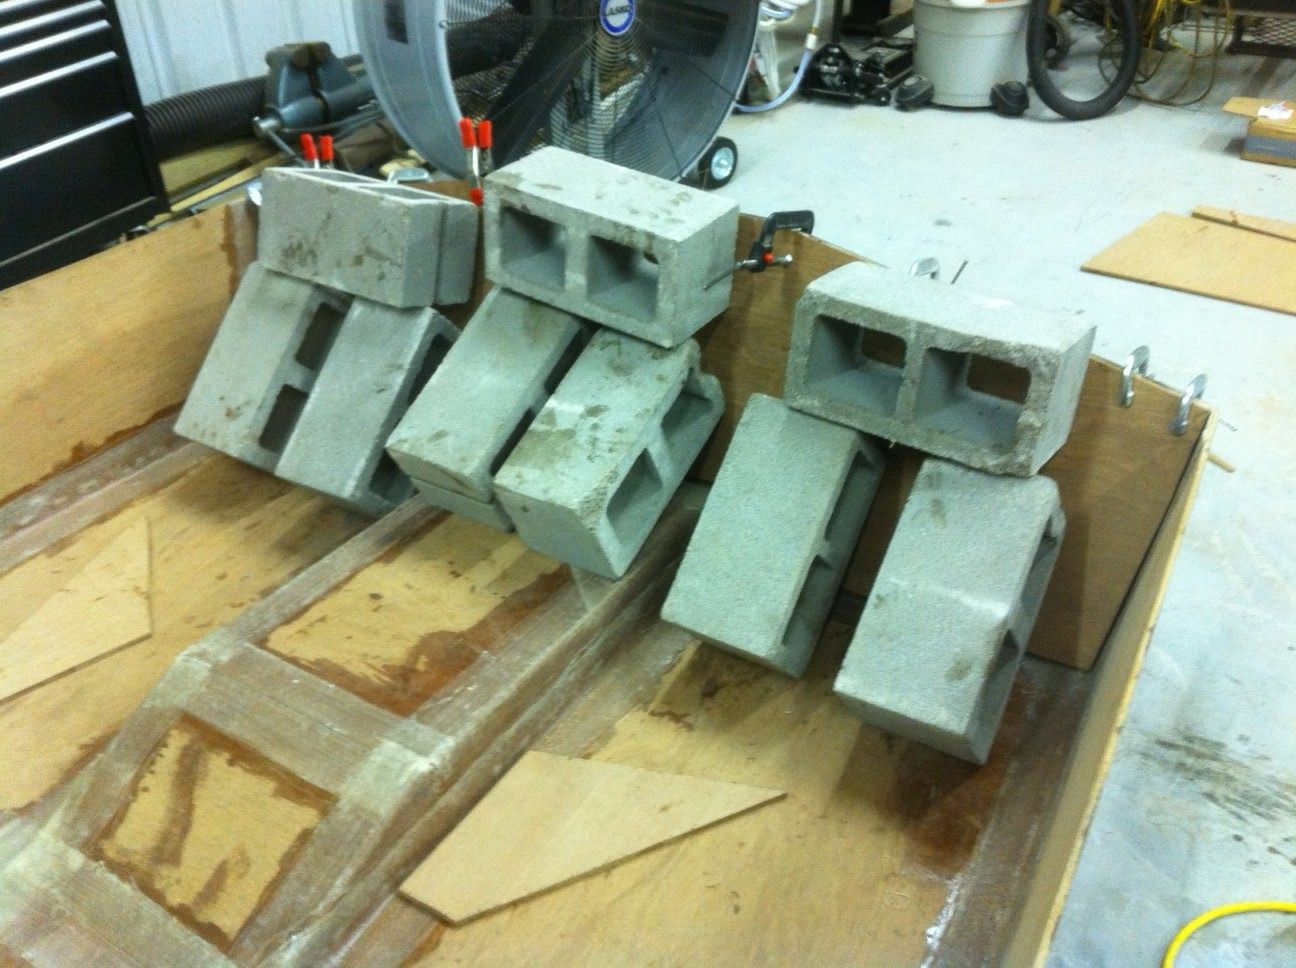
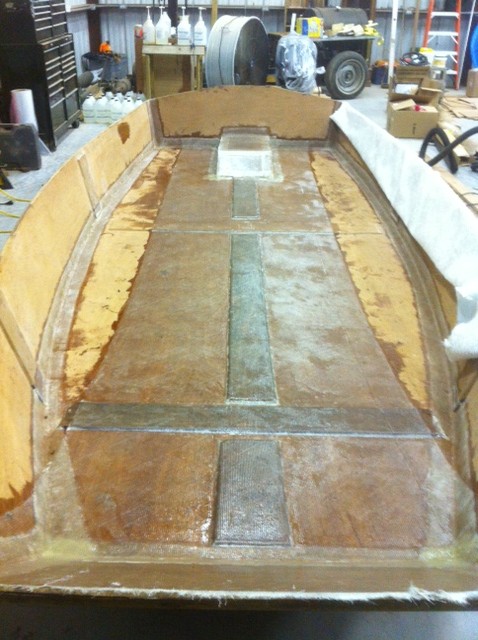
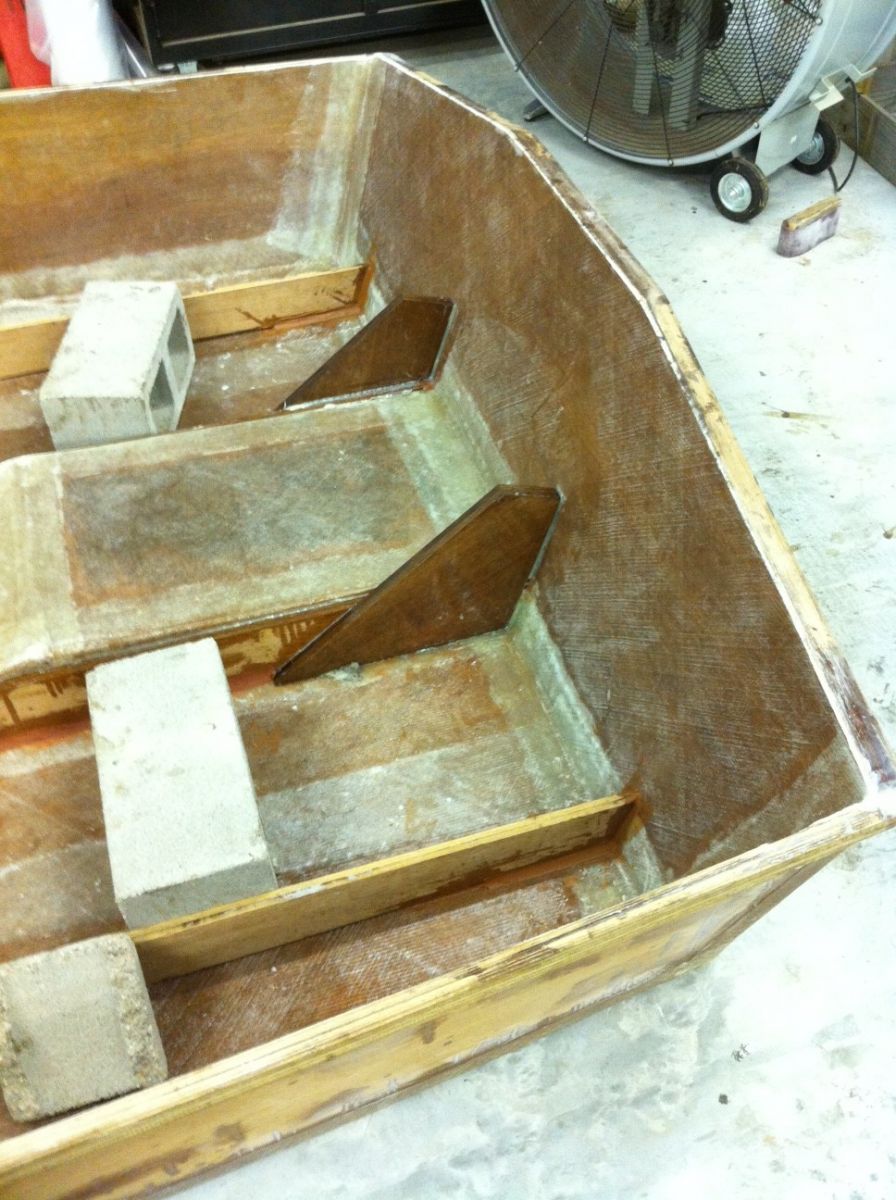
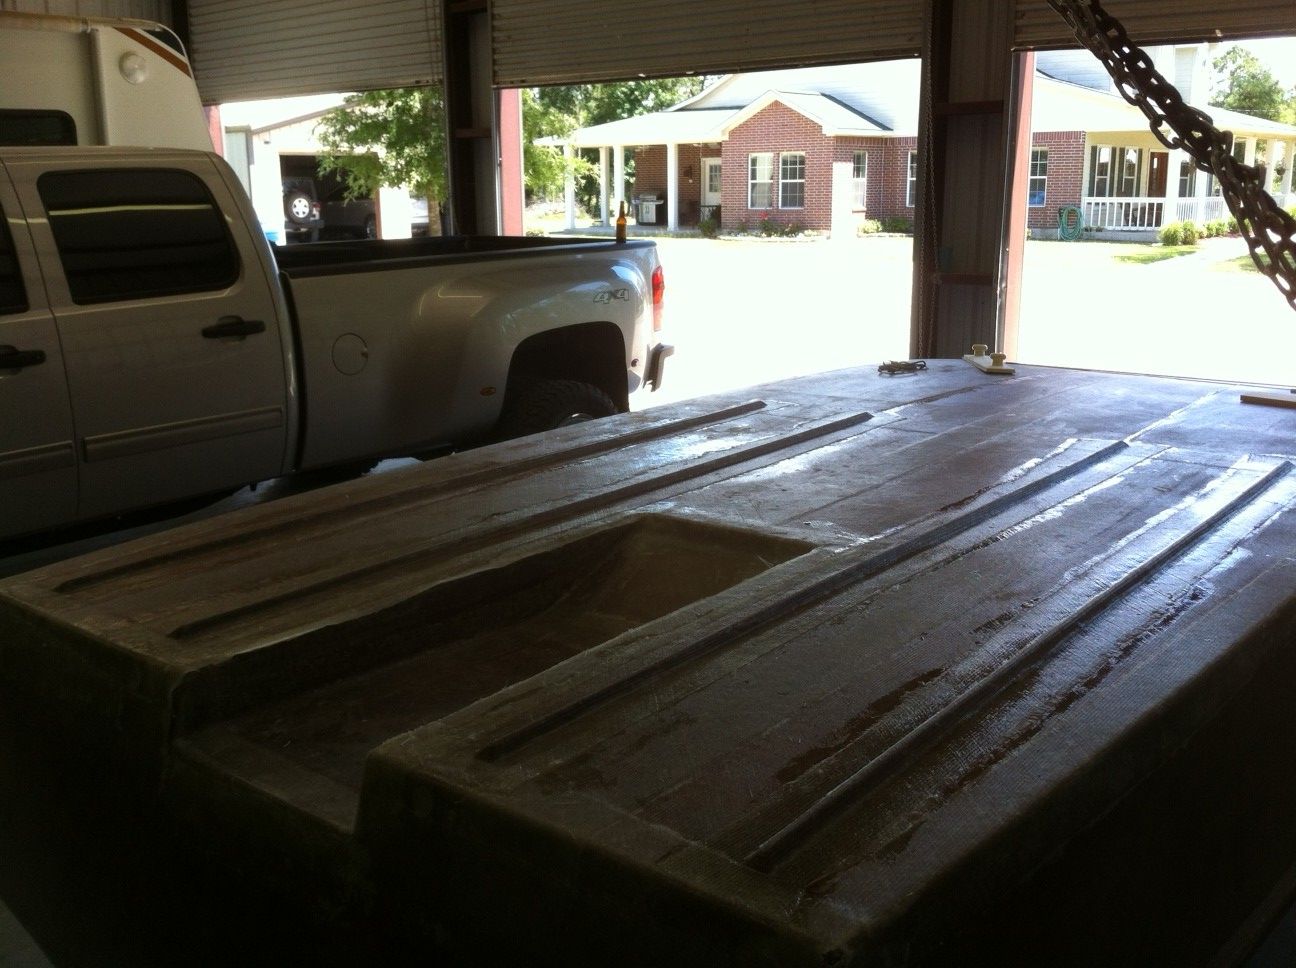
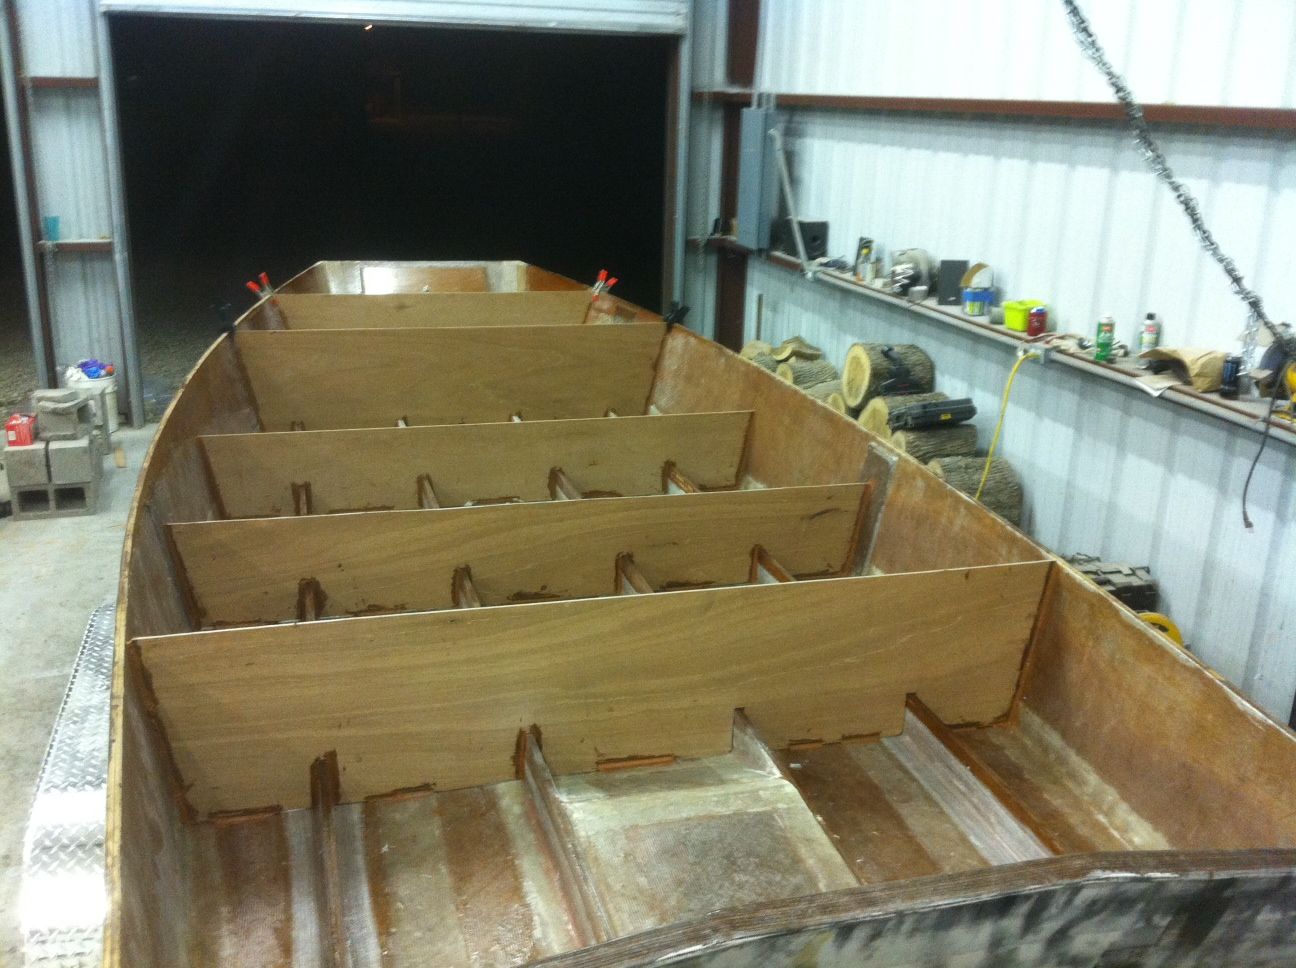
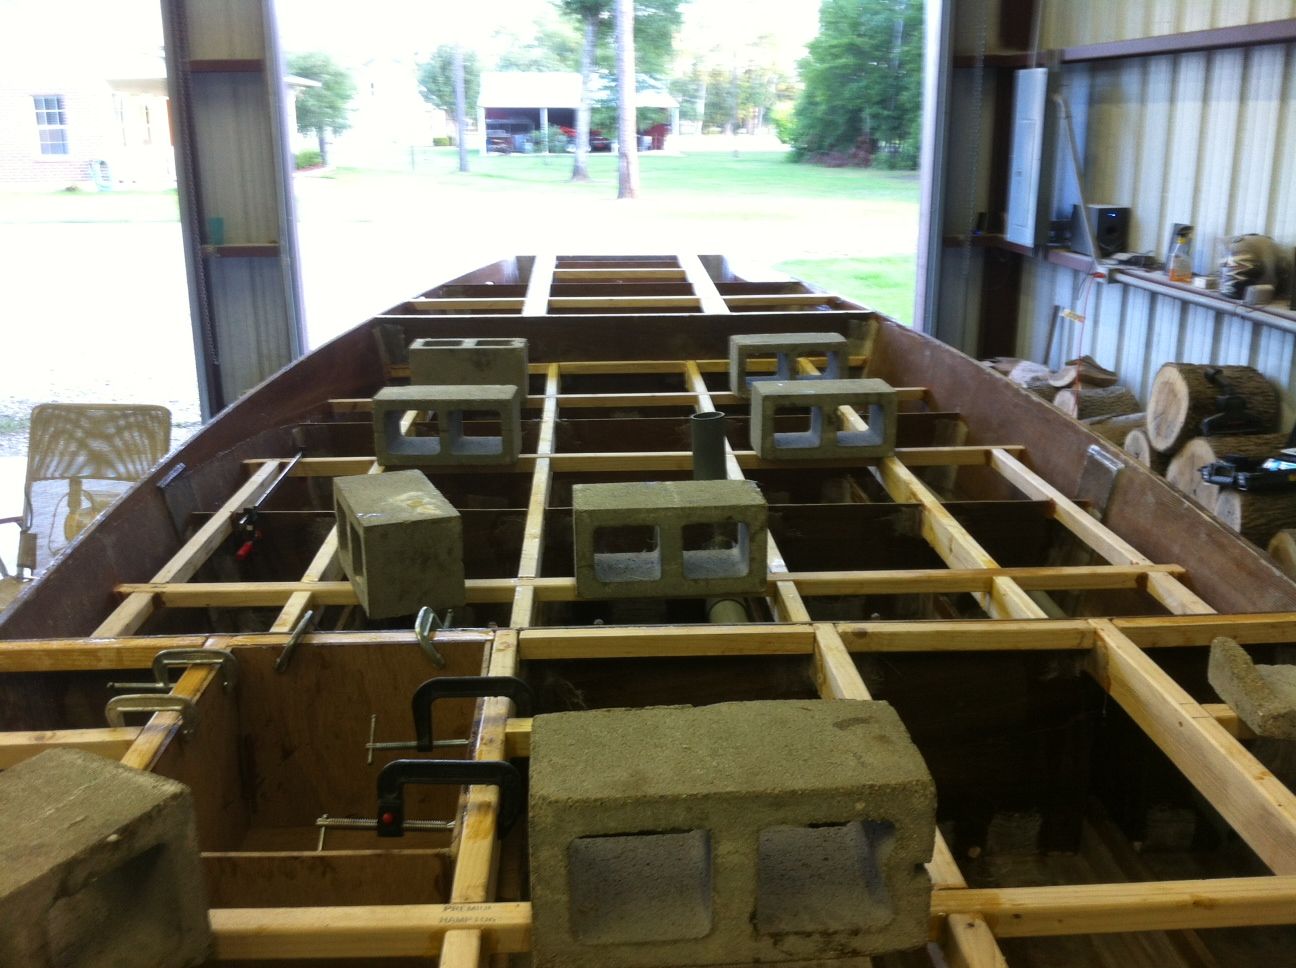
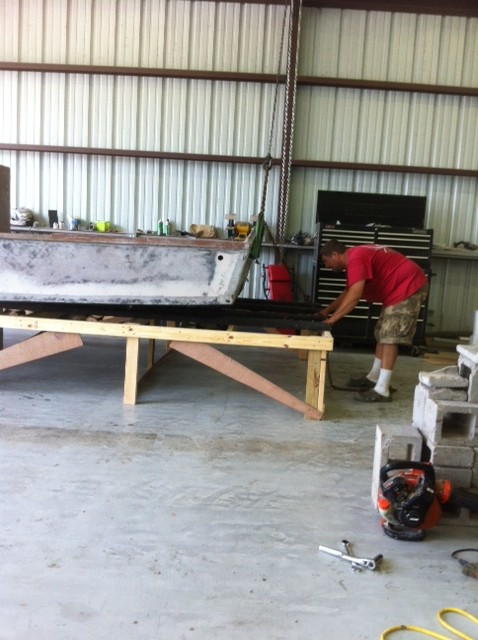
I laid out the bottom of the hull to measure for butt blocks along with the help of my two assistants.
All the butt blocks were cut and laid down on the plywood to make sure they fit with the help of my wife who gave her support while drinking a cold beer while I worked. Take notice where the fan was pointing on her and not me.
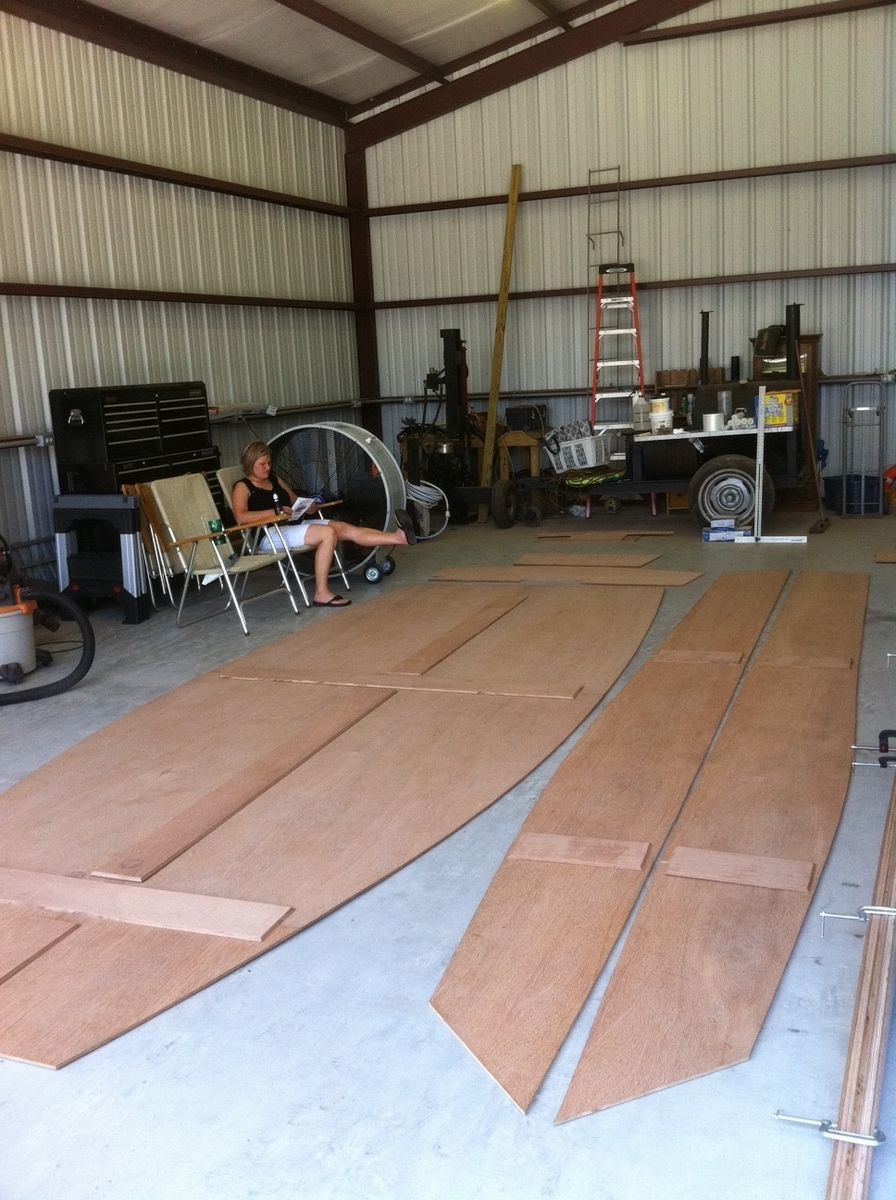
I cut the transom and the bow
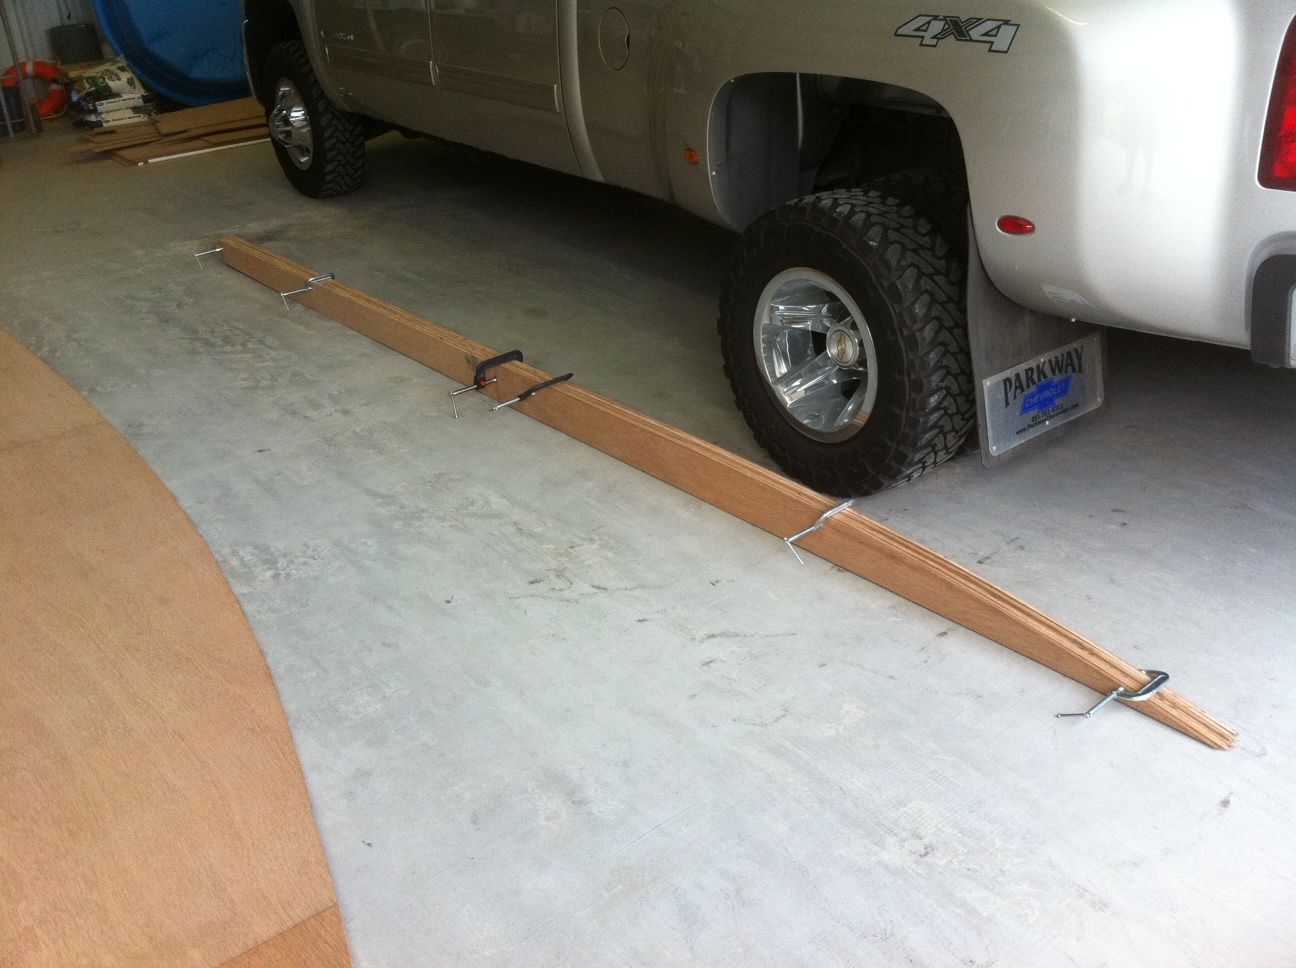
I put all the stringers together to prepare for sanding until they are all the same size. Anyone have any suggestions on the best way to do this?
Re: FOSTER'S XF20
Posted: Sat Jun 11, 2011 8:16 pm
by FOSTER
When using GelMagic to glue down the butt blocks do you need to put epoxy on the wood first or can I just put GelMagic on both pieces of wood and glue them together without additional epoxy?
Re: FOSTER'S XF20
Posted: Sat Jun 11, 2011 8:42 pm
by peter-curacao
FOSTER wrote:When using GelMagic to glue down the butt blocks do you need to put epoxy on the wood first or can I just put GelMagic on both pieces of wood and glue them together without additional epoxy?
As far as I know, no need to wet the wood before gel magic.
Re: FOSTER'S XF20
Posted: Sun Jun 12, 2011 5:33 pm
by topwater
NO need to prewet with gel magic.
Re: FOSTER'S XF20
Posted: Mon Jun 13, 2011 3:24 am
by FOSTER
OK, thanks Peter-Curacao and Topwater.
Re: FOSTER'S XF20
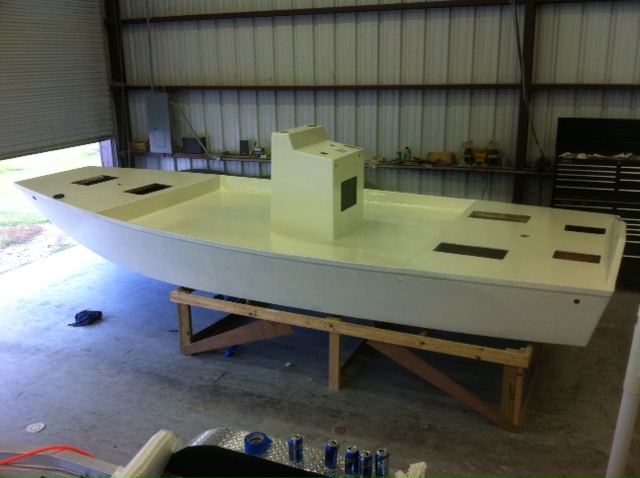
Posted: Sun Jul 03, 2011 4:20 am
by FOSTER
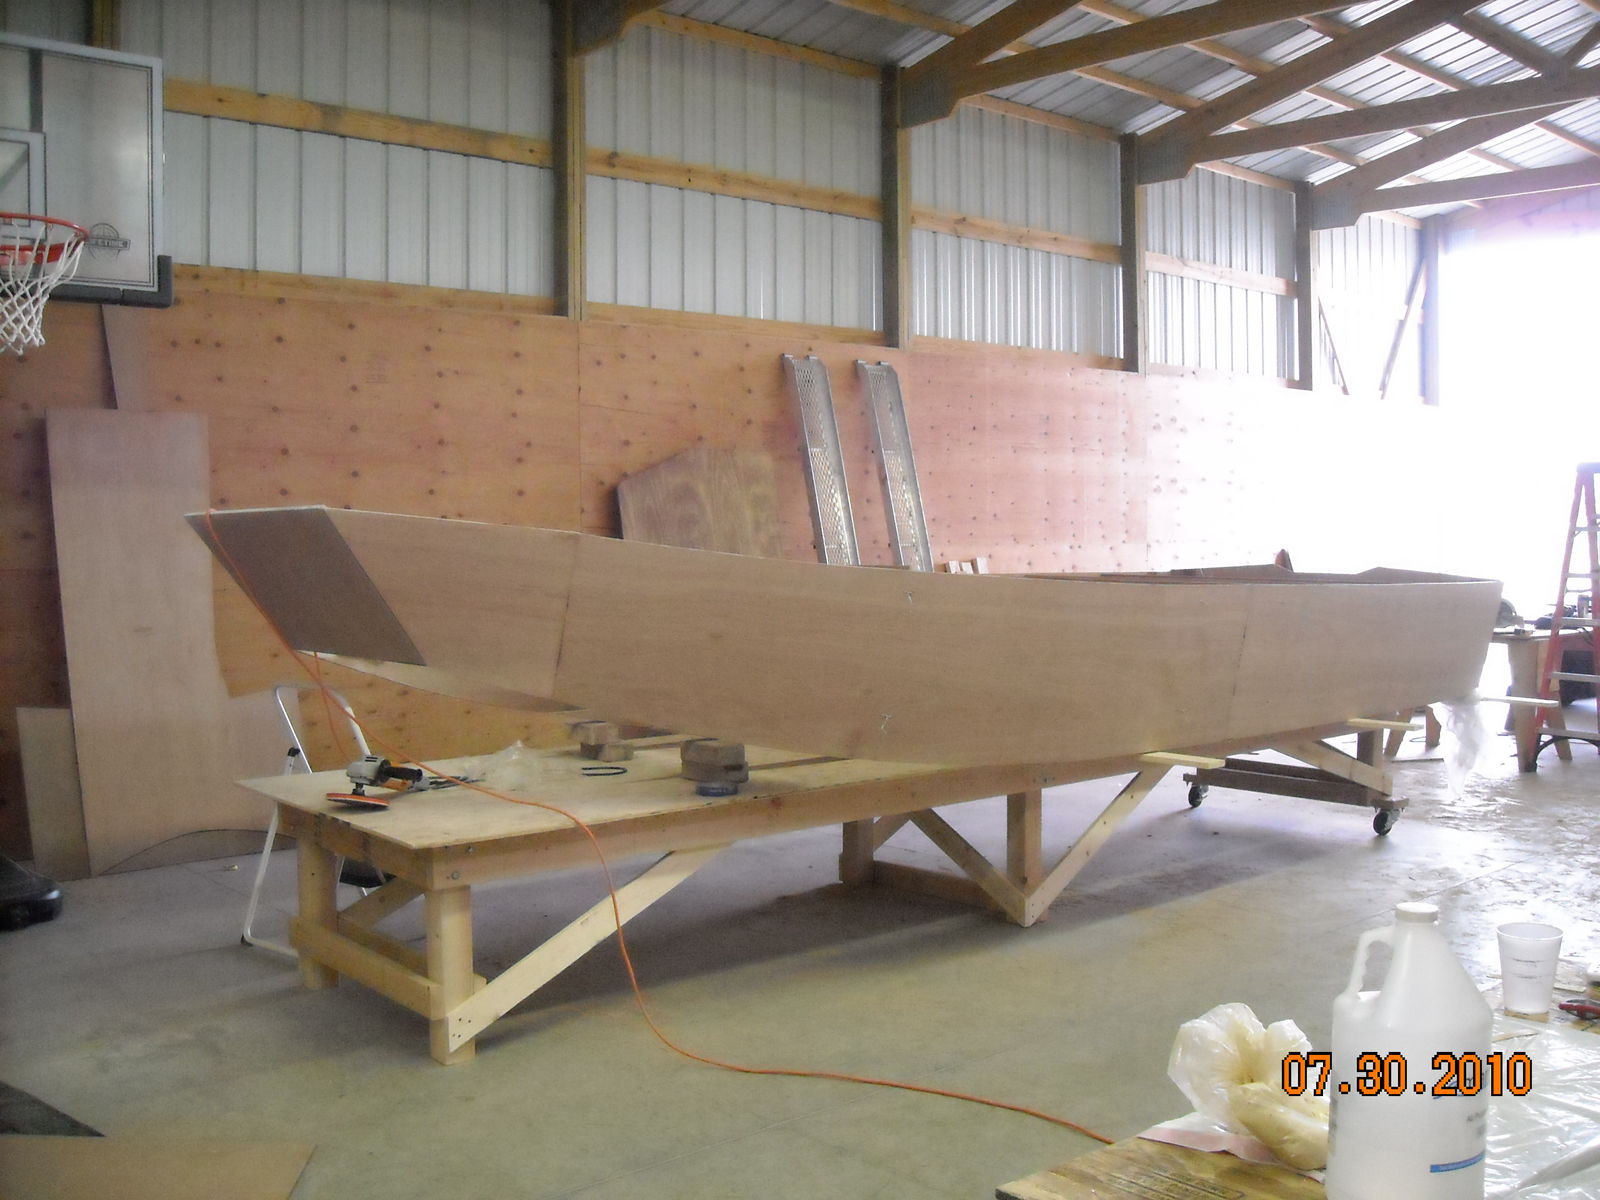
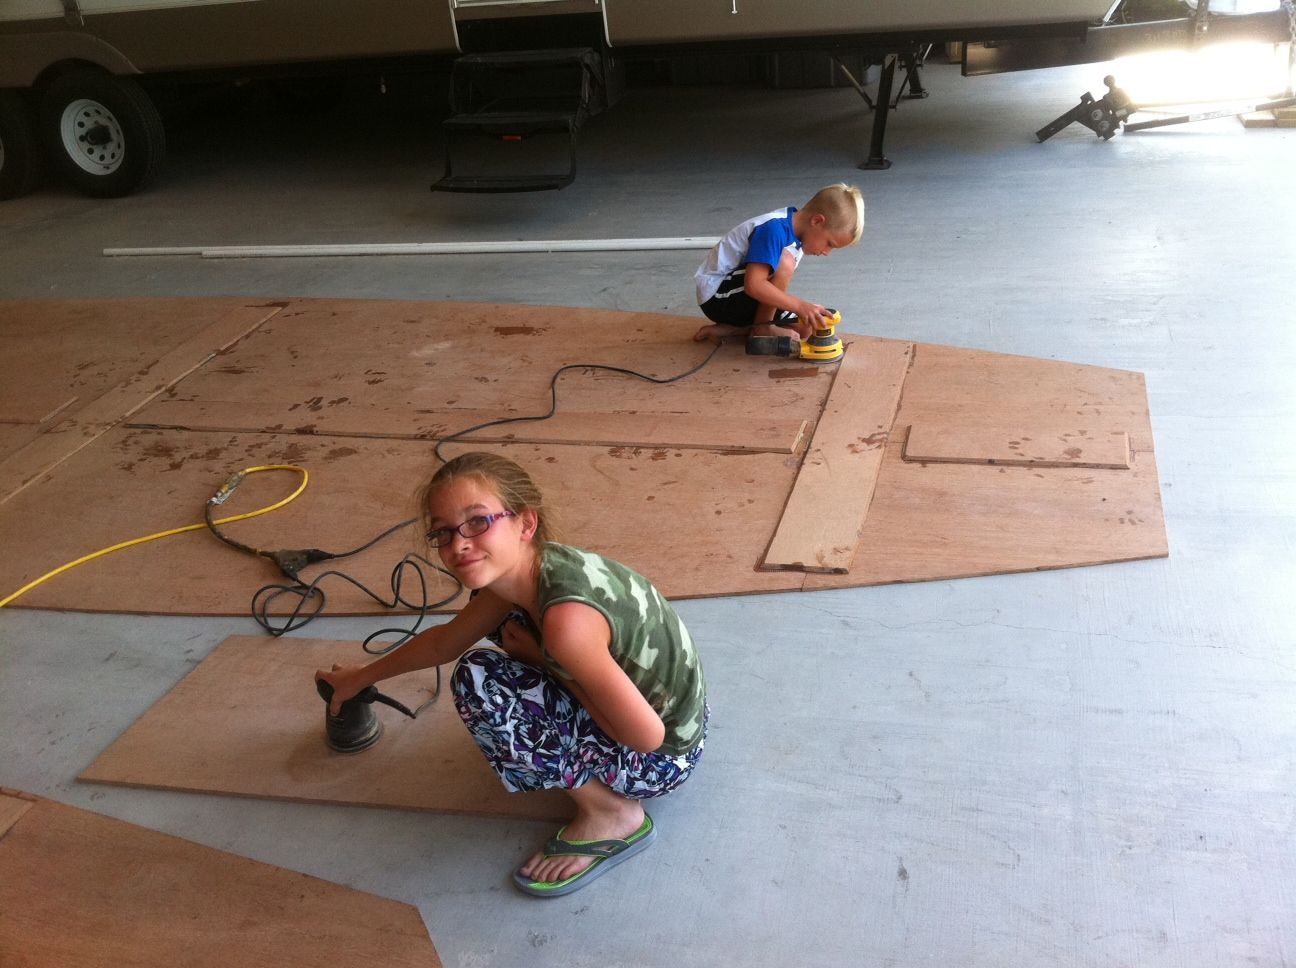
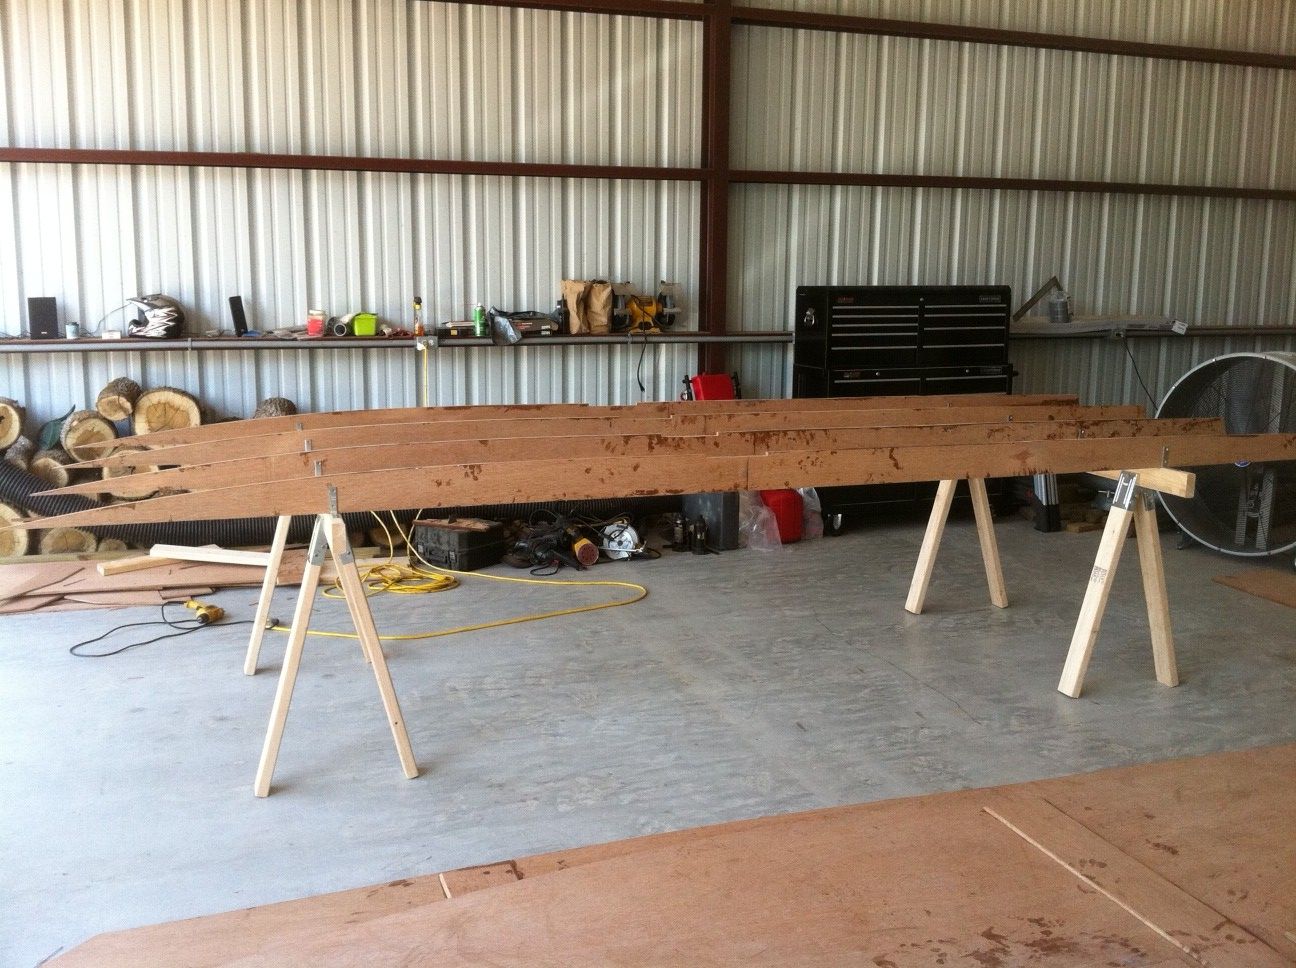
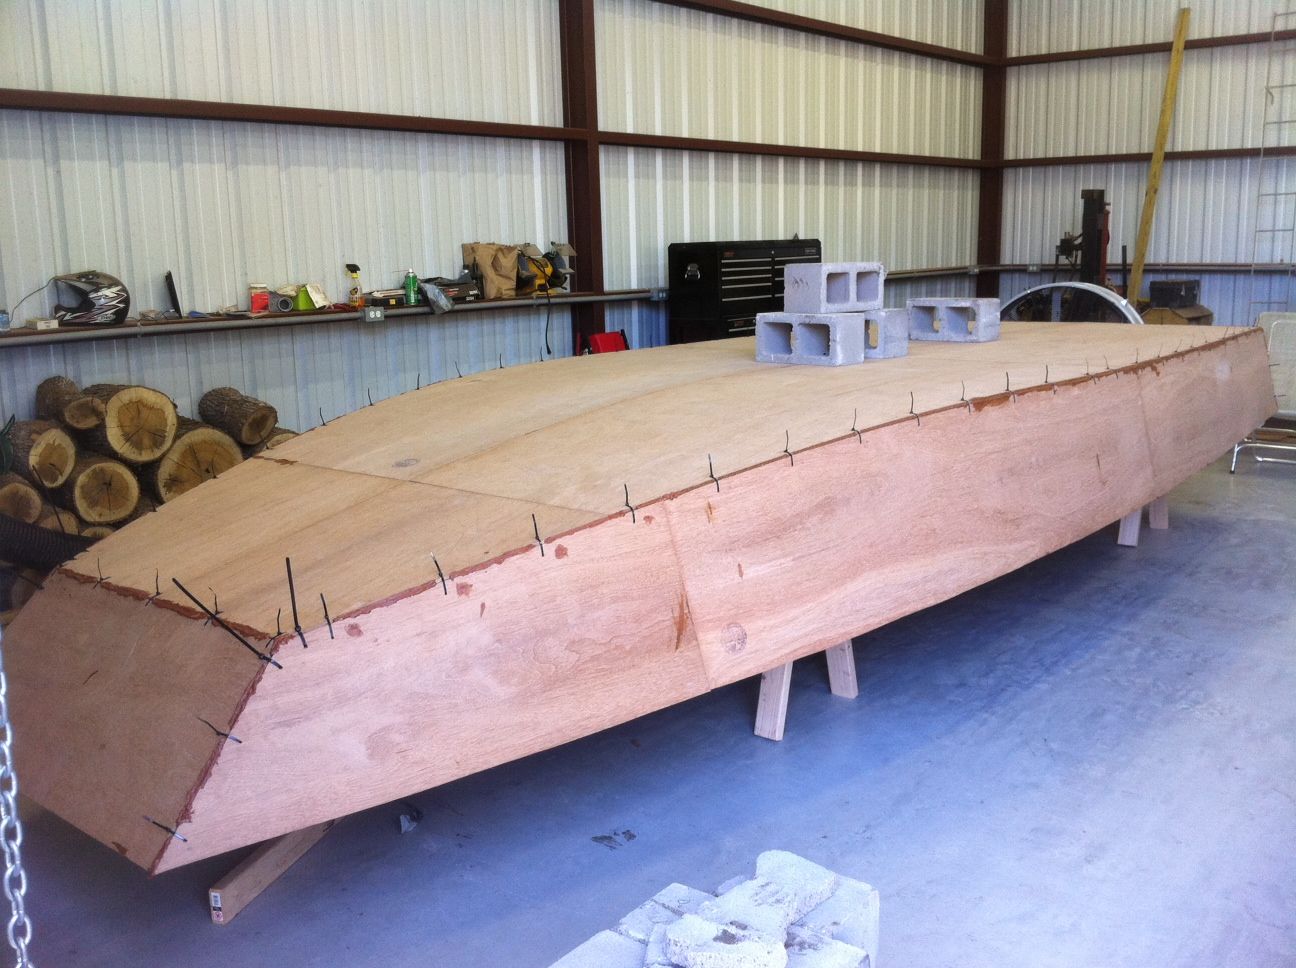
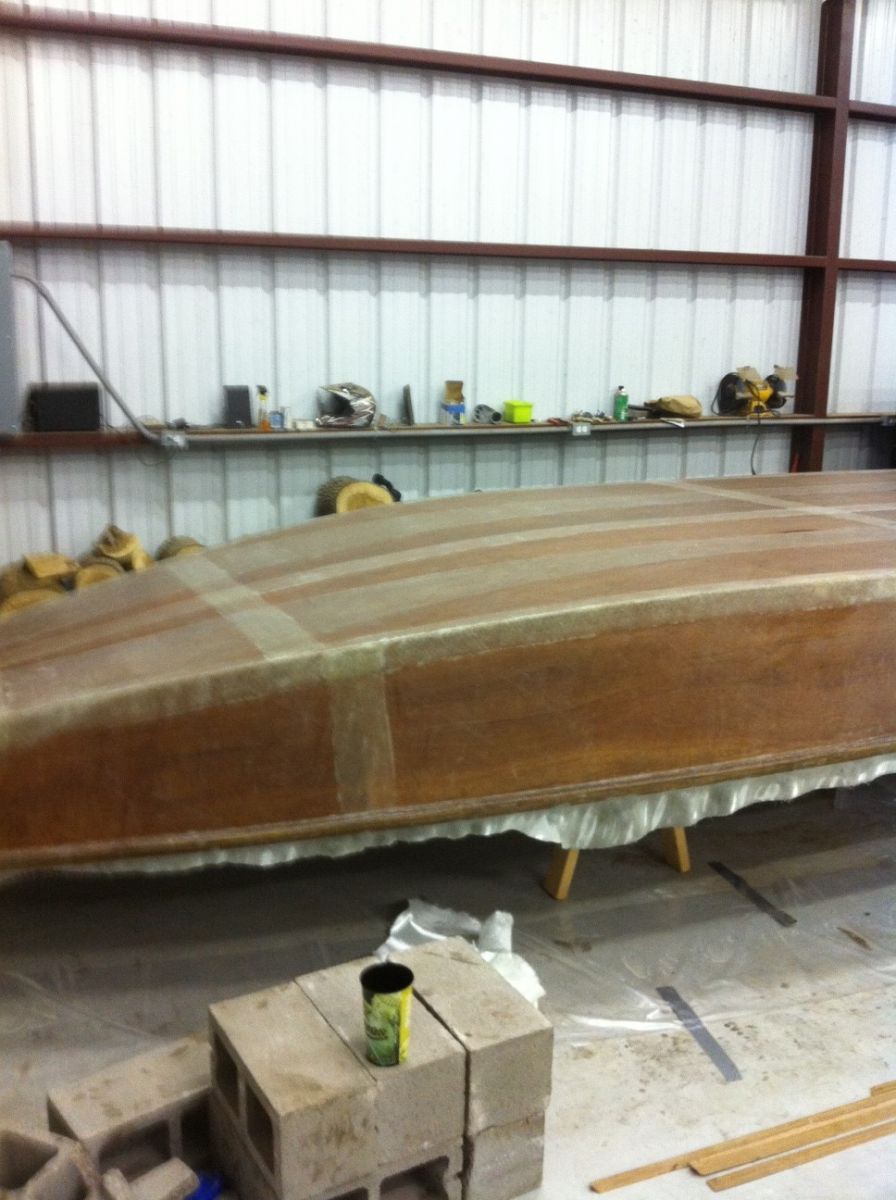
We went on vacation so I didn’t have much time to work on the boat. Here are some updated pictures of the progress.
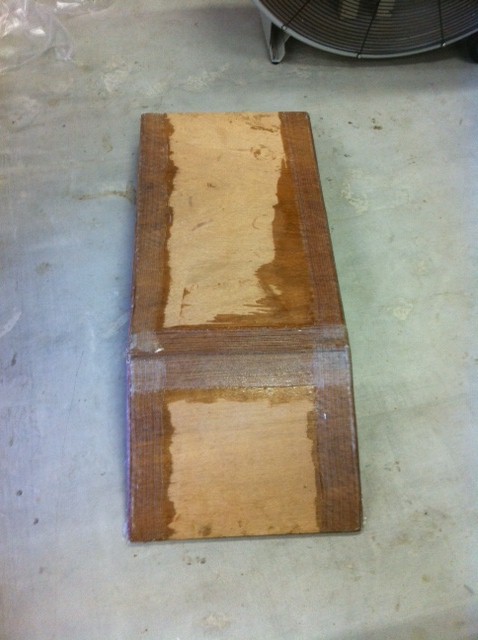
Butt blocks glued down
Luke helping sand the stringers
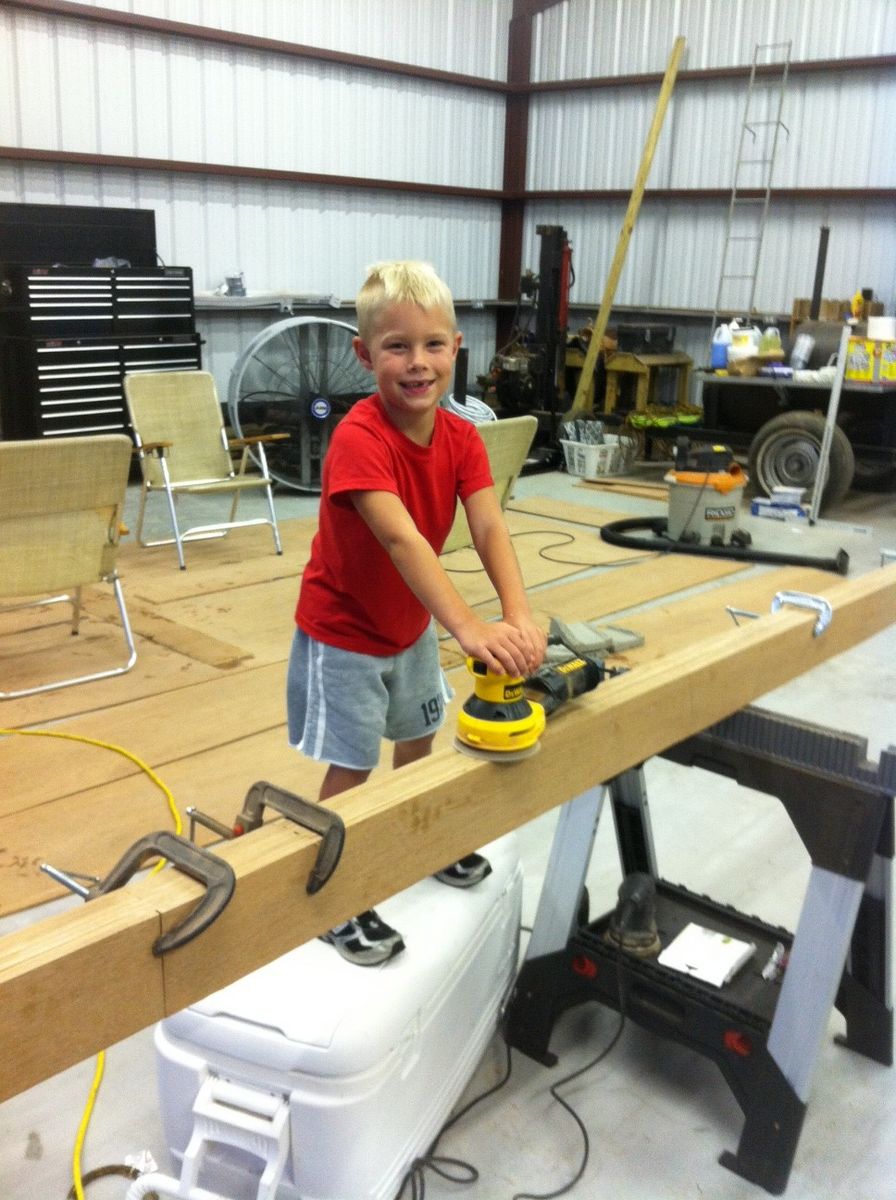
Hailey and Luke cleaning up Dad's messy glue job
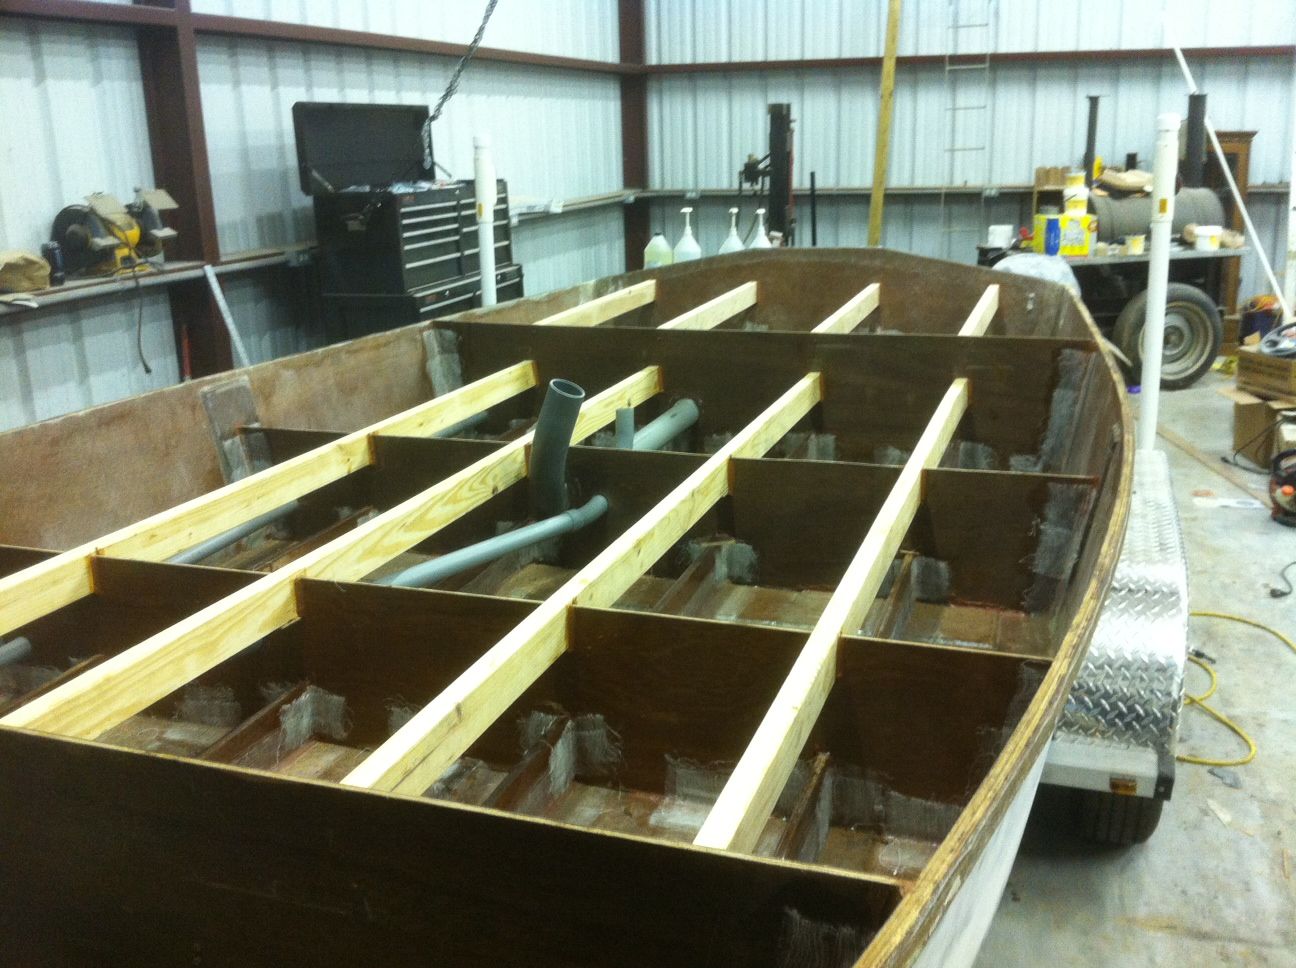
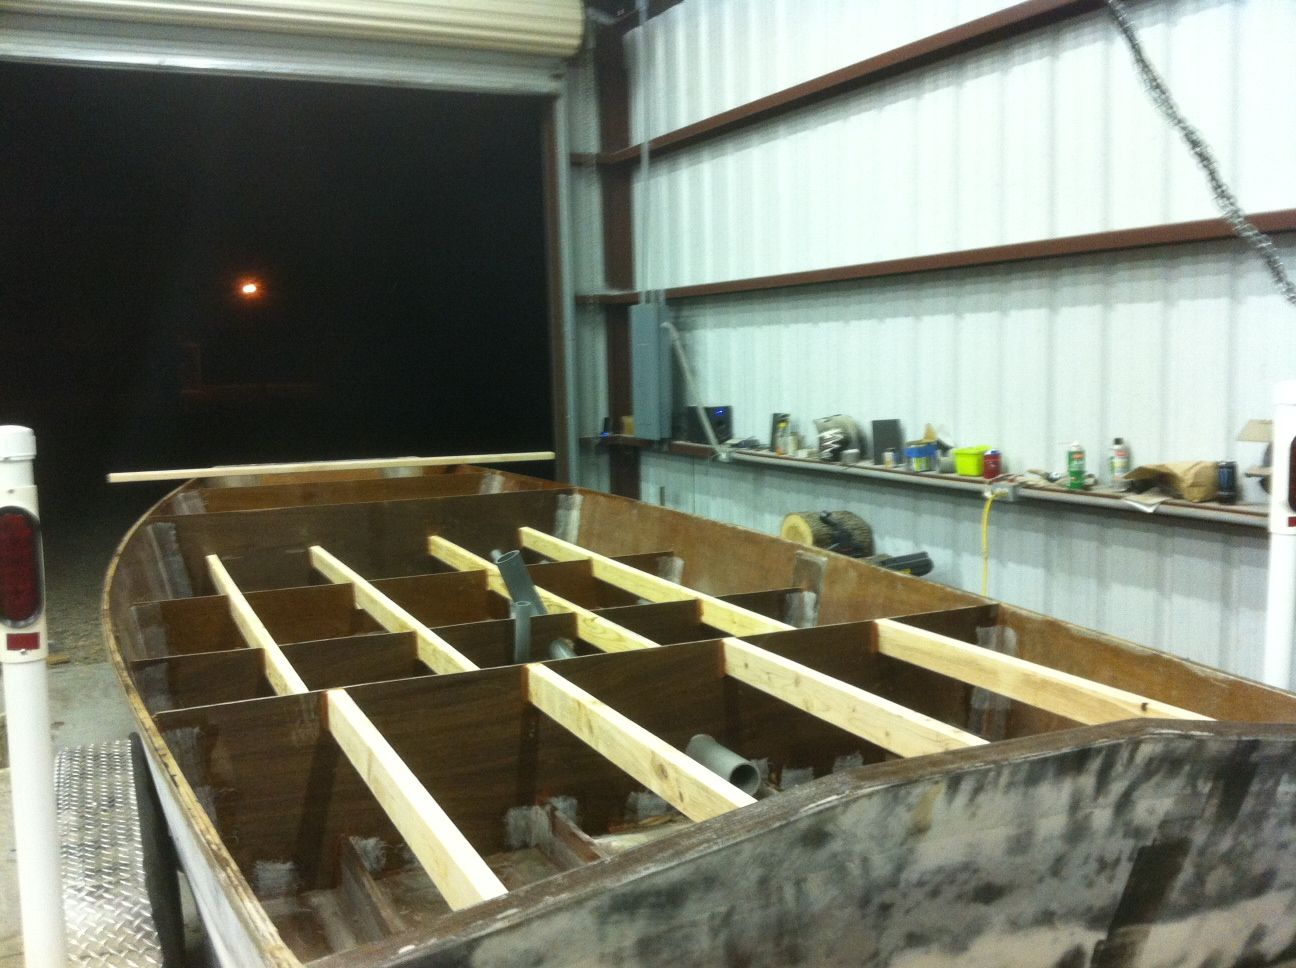
Stringers mounted on top of saw horses
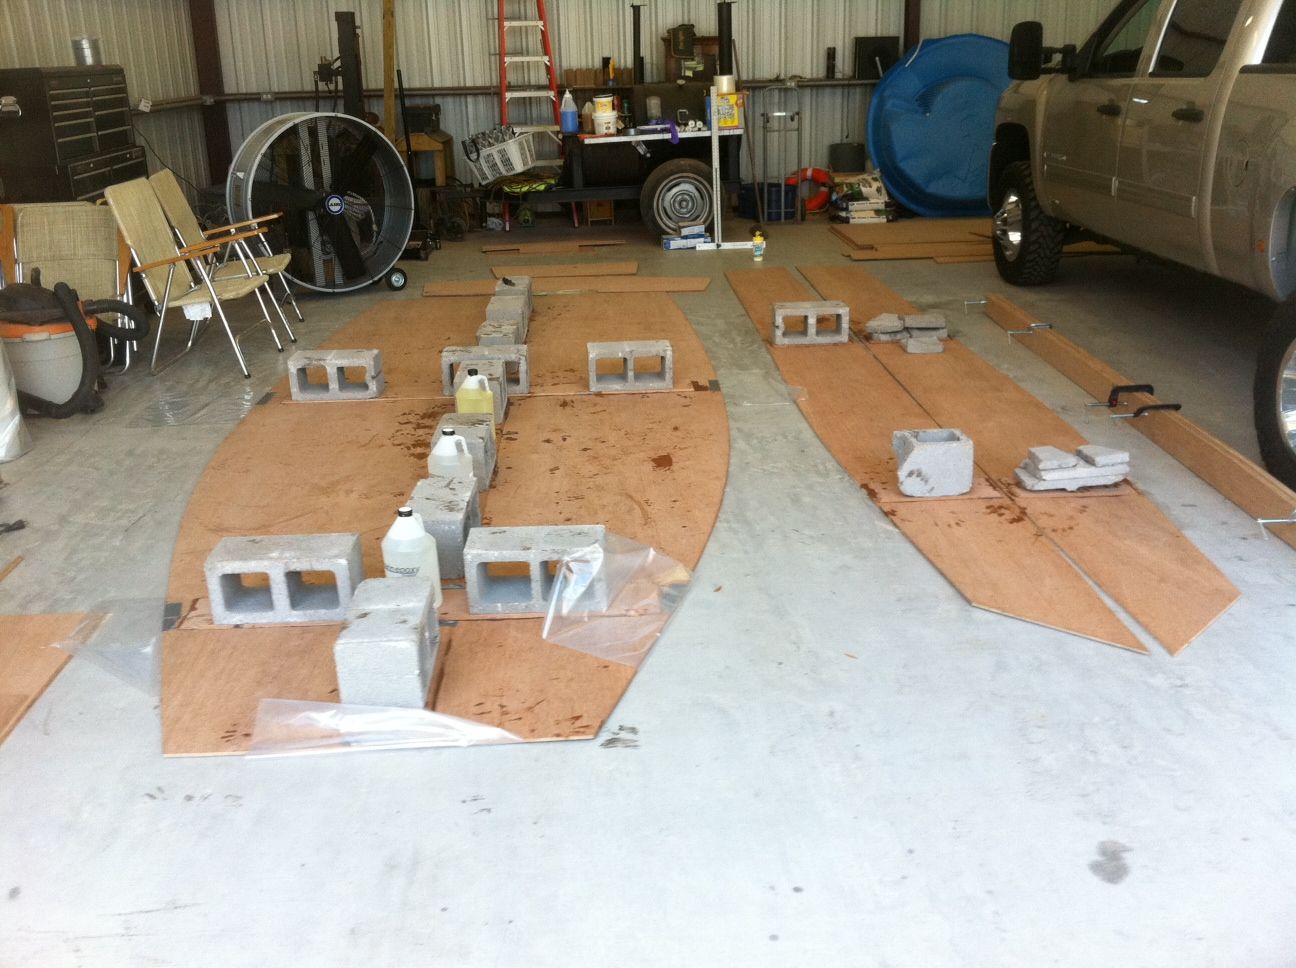
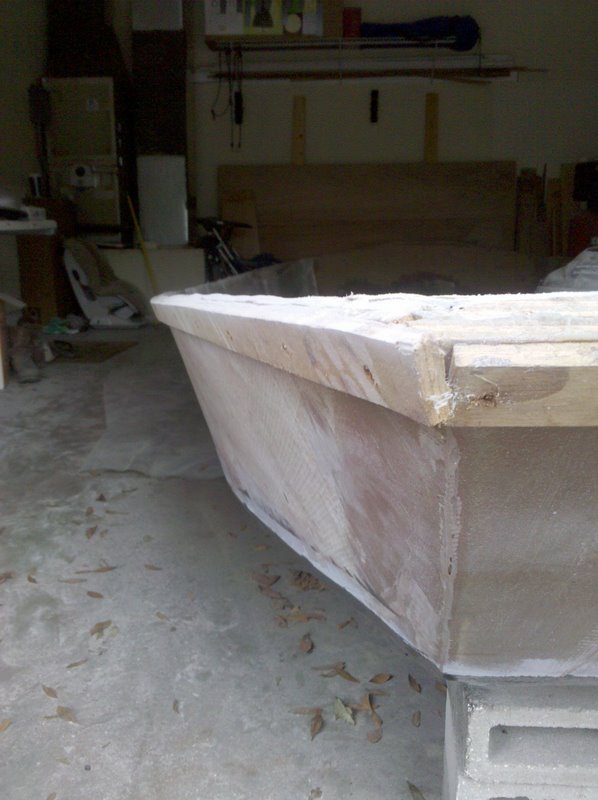
Bottom of hull laid on the stringers with holes drilled every 10" and tie wraps in the holes
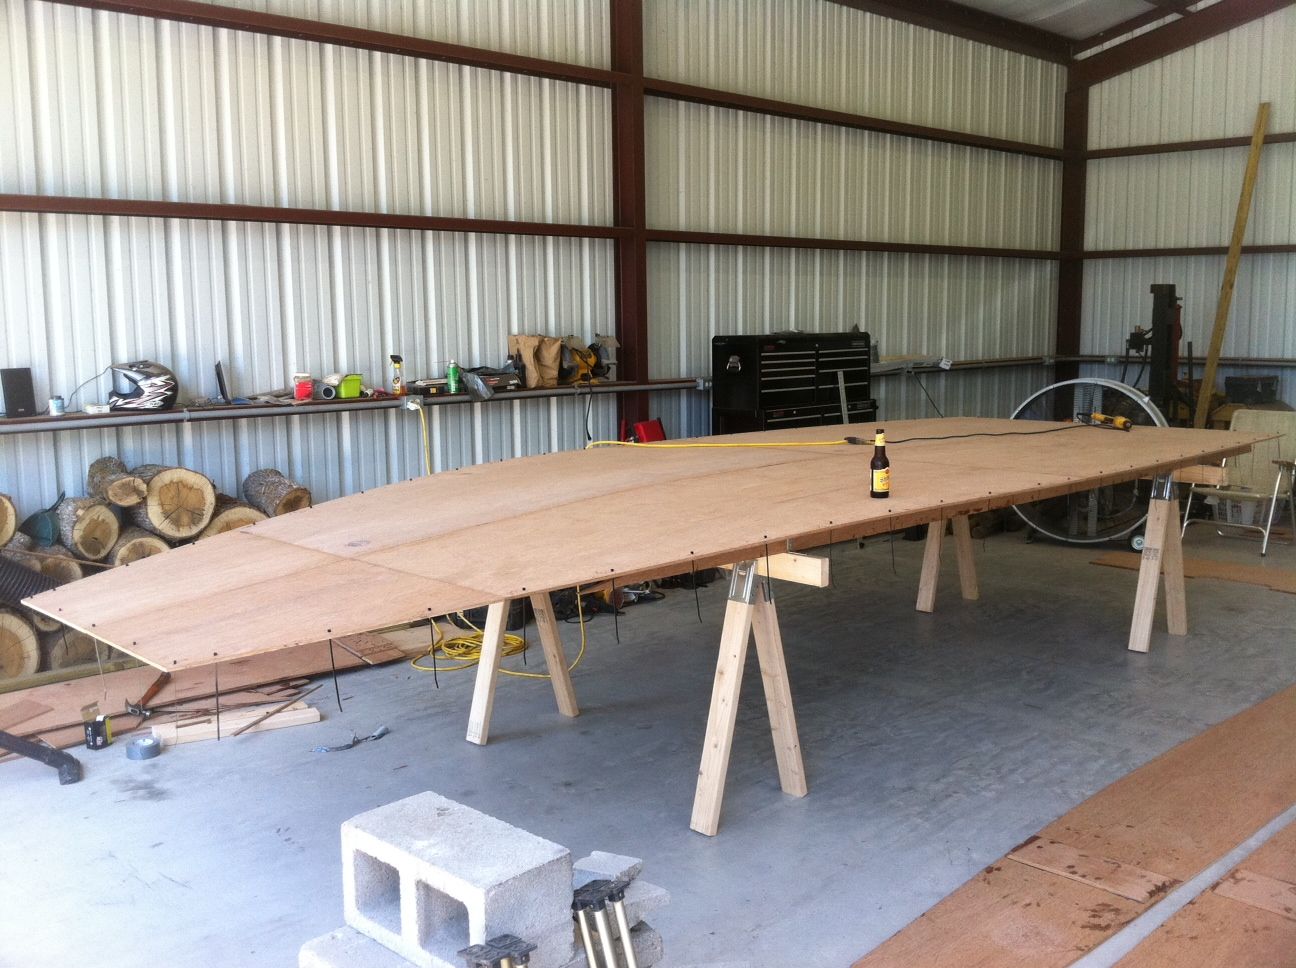
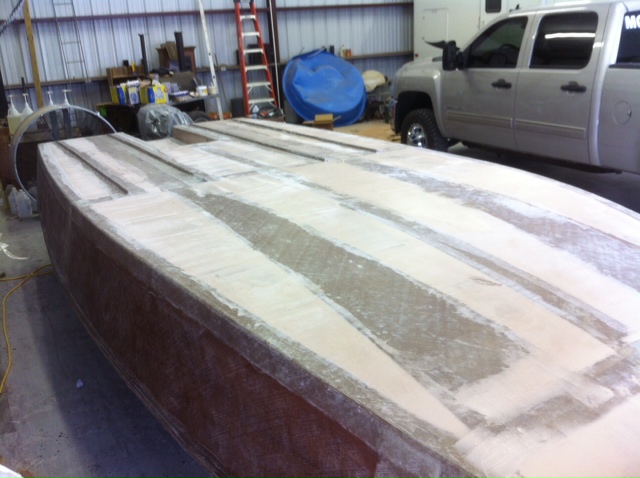
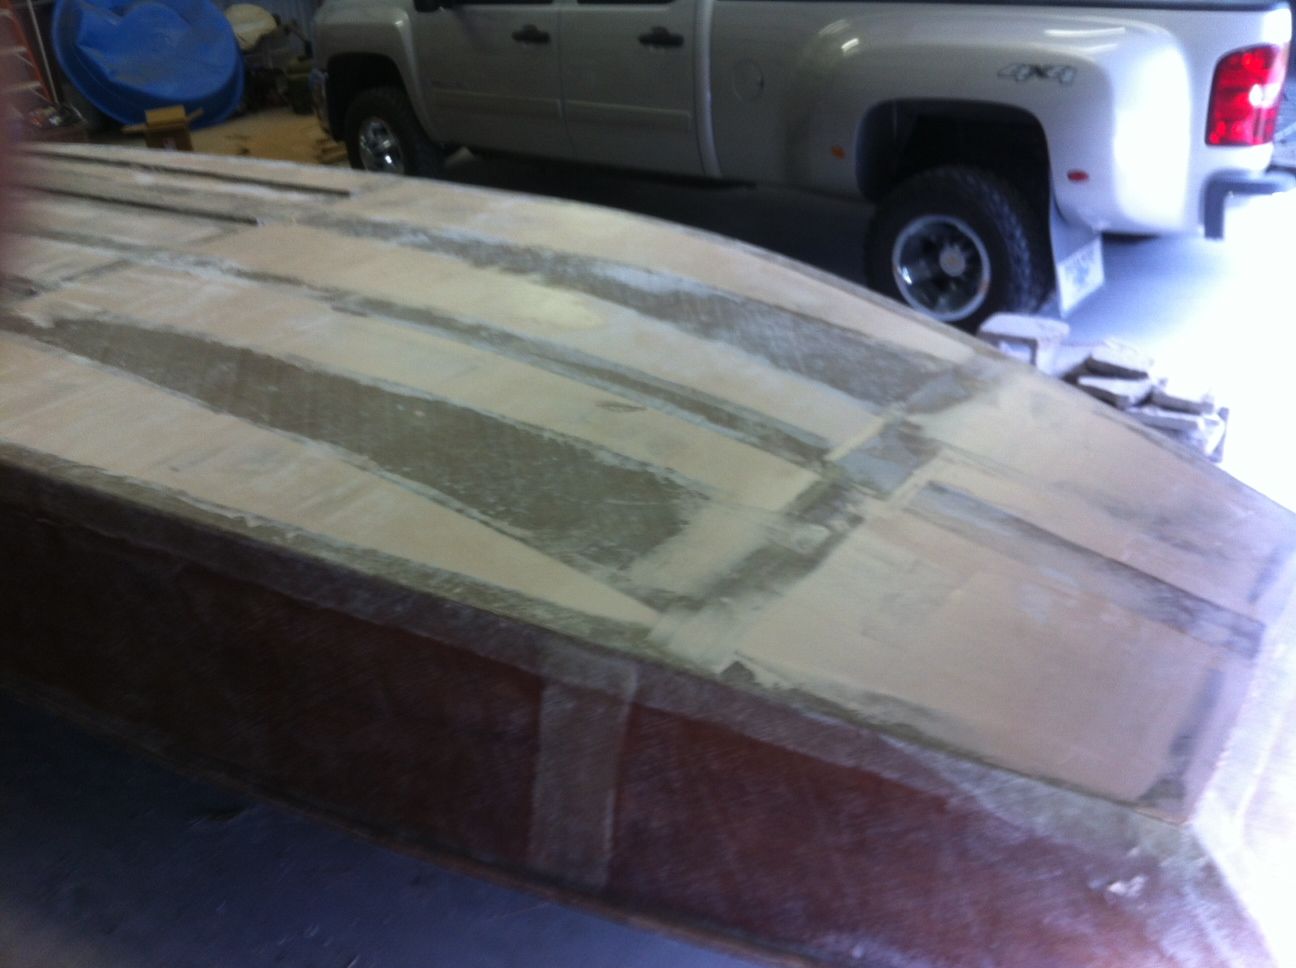
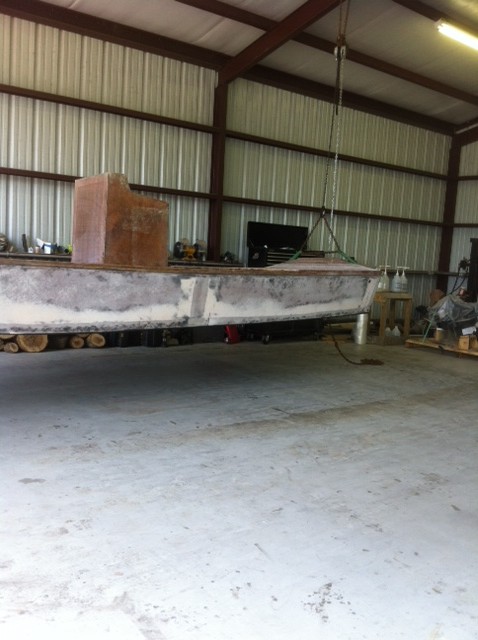
All the panels tie wrapped using a piece of 1" PVC under the hull
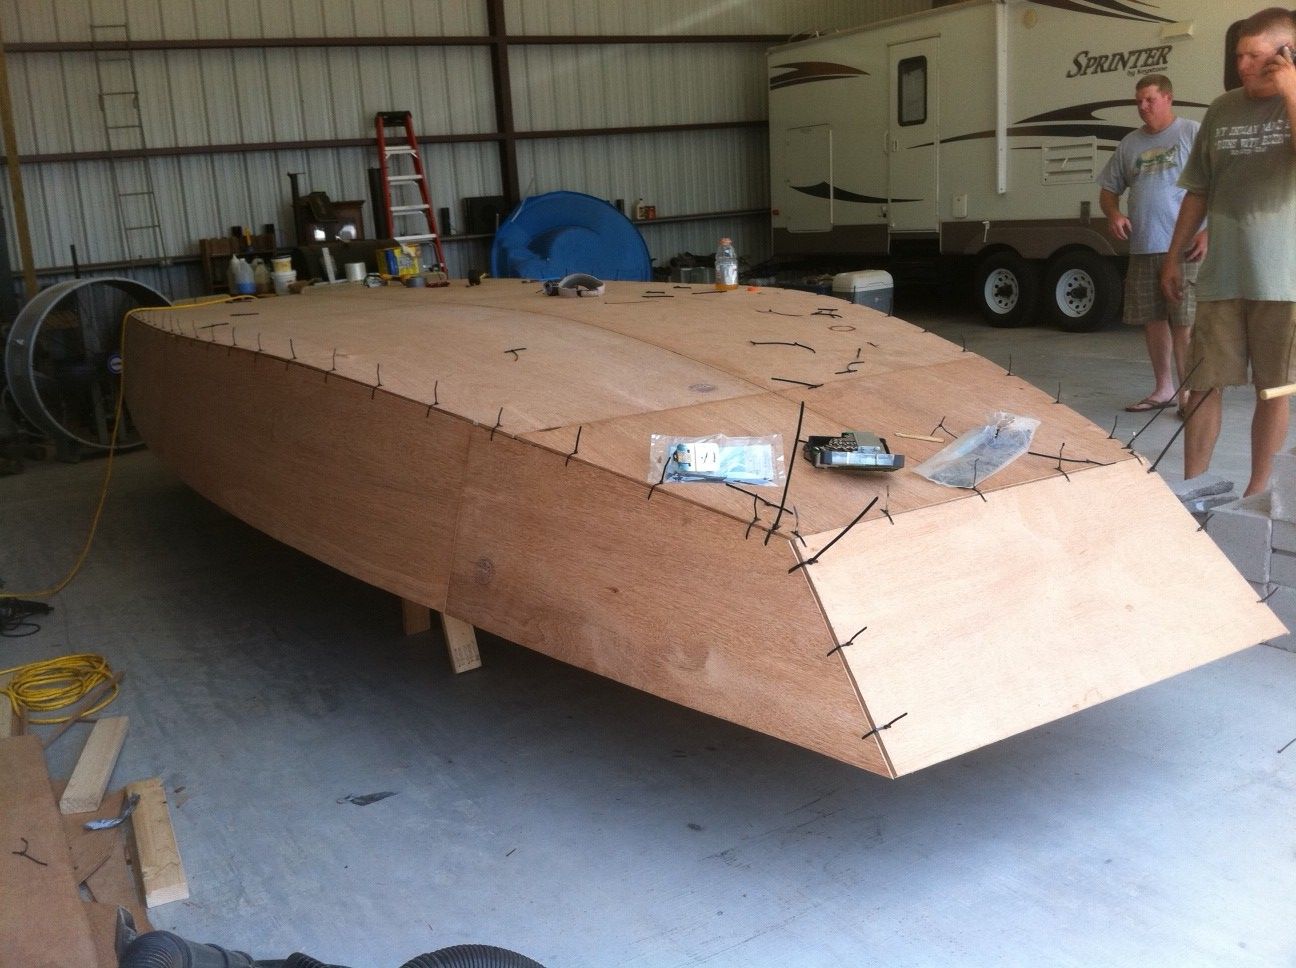

After tacking the hull with EZ-fillet
Re: FOSTER'S XF20
Posted: Sun Jul 03, 2011 7:17 am
by thb
Great progress. Can't wait to get started on my XF20 kit. Keep up the good work and keep those little workers working away. Cute kids. Is that Meranti or Okuome?
Regards
Tom in Steinhatchee
Re: FOSTER'S XF20
Posted: Sun Jul 03, 2011 9:37 am
by Cracker Larry
Yep, the boat looks great

Good to have helpers to make the work go faster. Please get them some dust masks for the sanding though, that is rough on little lungs.
Re: FOSTER'S XF20
Posted: Sun Jul 03, 2011 10:34 am
by FOSTER
Tom the wood is Meranti.
Cracker Larry yeah I need some dust mask I keep the fan blowing across them. They usually get tired really quick and start trying to build their own boat out of the scrap plywood I have to put in the pool.
Re: FOSTER'S XF20
Posted: Sun Jul 03, 2011 10:34 pm
by Prarie Dog
Looks real good Foster, nice work.
Have you thought about coming to the builders meet?
Re: FOSTER'S XF20
Posted: Tue Jul 05, 2011 9:08 am
by FOSTER
I haven't when is the meet and where?
Re: FOSTER'S XF20
Posted: Tue Jul 05, 2011 12:53 pm
by Uncle D
In Port O'Connor on the 29, 30 and 31 of July. Clark's Inn. Here's the link...
http://forums.bateau2.com/viewtopic.php?f=6&t=25550
Re: FOSTER'S XF20
Posted: Tue Jul 05, 2011 10:15 pm
by FOSTER
I have to work nights starting July 29 thru August 1 and don't think I can get off. I just took off for 12 days in June and am currently off until the 12th of July. I would like to come see the boats I will see what I can do.
I’m trying to figure if there is an easy way to make a good corner after the stitch and glue process before I fiberglass the seams. I sanded the seams but there are still some spots that aren’t completely full of the glue. Will the epoxy fill this in or do I need to mix more EZ-fillet?
Re: FOSTER'S XF20
Posted: Wed Jul 06, 2011 8:09 am
by thb
Foster,
I would mix up some wood flour and epoxy to a peanut butter consistancy and fill all the gaps at your panel joints. Then after cured the next day, sand or hand plane them to the round shape you are looking for for the fiberglass biaxial tape to lay nicely on top. The 1708 cloth on top of that. Doing them all wet on wet. Seams can still be tacky when cloth put on top. My 2 cents worth. Wetting out 1708 takes some time and plenty of epoxy so nice to have helpers for that job.
Regards
Tom in Steinhatchee
Re: FOSTER'S XF20
Posted: Wed Jul 06, 2011 9:51 am
by tech_support
here we are filling some holes and gaps with putty right before we cover them with a couple layers of Biax. You can save a step of sanding by doing this. So the order I would do it: putty up joints after the hull is stitched up, once cured remove stitches and round joint with sander/grinder, go over remaining gaps and holes with thickened epoxy right before applying glass.
Re: FOSTER'S XF20
Posted: Wed Jul 06, 2011 10:13 am
by thb
Shine,
The problem I have is that the thickened epoxy will droop thru the holes when applying just enough to fill the contour. If you tape right over that, then you could have have a void where the woodflour/epoxy drooped. Of course I do not tape the underside of the joint with masking tape or duct tape to keep it from drooping thru to the inside.
I find it easier to get plenty on the outside and then contour after it sets up. No voids possible here as you can fill in any after the contouring
Whatever works.
Regards
Tom in Steinhatchee
Re: FOSTER'S XF20
Posted: Wed Jul 06, 2011 10:34 am
by Cracker Larry
The problem I have is that the thickened epoxy will droop thru the holes when applying just enough to fill the contour.
I cover the inside lengths of the joints with duct tape before applying the putty from the outside. No droop through, no messy clean up

Re: FOSTER'S XF20
Posted: Wed Jul 06, 2011 1:20 pm
by majorgator
I cover the inside lengths of the joints with duct tape before applying the putty from the outside.
That's exactly what I did...great minds think alike
seth
Re: FOSTER'S XF20
Posted: Wed Jul 06, 2011 3:16 pm
by thb
I think I will try the duct tape on the next build. My goobers on the inside are a bit of a pain to sand down with the dremel prior to making the inside fillets. Anything to avoid some sanding is a great idea.

Tom
Re: FOSTER'S XF20
Posted: Thu Jul 07, 2011 10:47 am
by FOSTER
One thing I have learned is i could have saved myself a lot of sanding and EZ-Fillet if I would have found something to make a nice corner the first time I filled the seam with EZ-Fillet. I used a little hand held plastic shovel the kids had to make the corner and that worked great. I guess you live and learn.
I found my first mistake when I put the tunnel together instead of installing the side panels of the tunnel under the top panel of the tunnel I installed them on the side making the tunnel 1" to wide. My thought to fixing this is to just install a piece of 3/8" plywood on the inside of each side of the tunnel or make the cut out of the tunnel 1/2" wider on each side of the transom. What do y'all think?
Re: FOSTER'S XF20
Posted: Thu Jul 07, 2011 1:51 pm
by Aripeka Angler
Your boat is looking nice Foster
I built the same boat a few years ago, it sure looks big when it is stitched together.
I found my first mistake when I put the tunnel together instead of installing the side panels of the tunnel under the top panel of the tunnel I installed them on the side making the tunnel 1" to wide. My thought to fixing this is to just install a piece of 3/8" plywood on the inside of each side of the tunnel or make the cut out of the tunnel 1/2" wider on each side of the transom. What do y'all think?
Your fix will work fine. Just keep in mind that the stringers will move outward slightly and that will affect the notches in the seat frames. I'm going off memory, my plans are long gone.
Re: FOSTER'S XF20
Posted: Sun Jul 10, 2011 11:24 pm
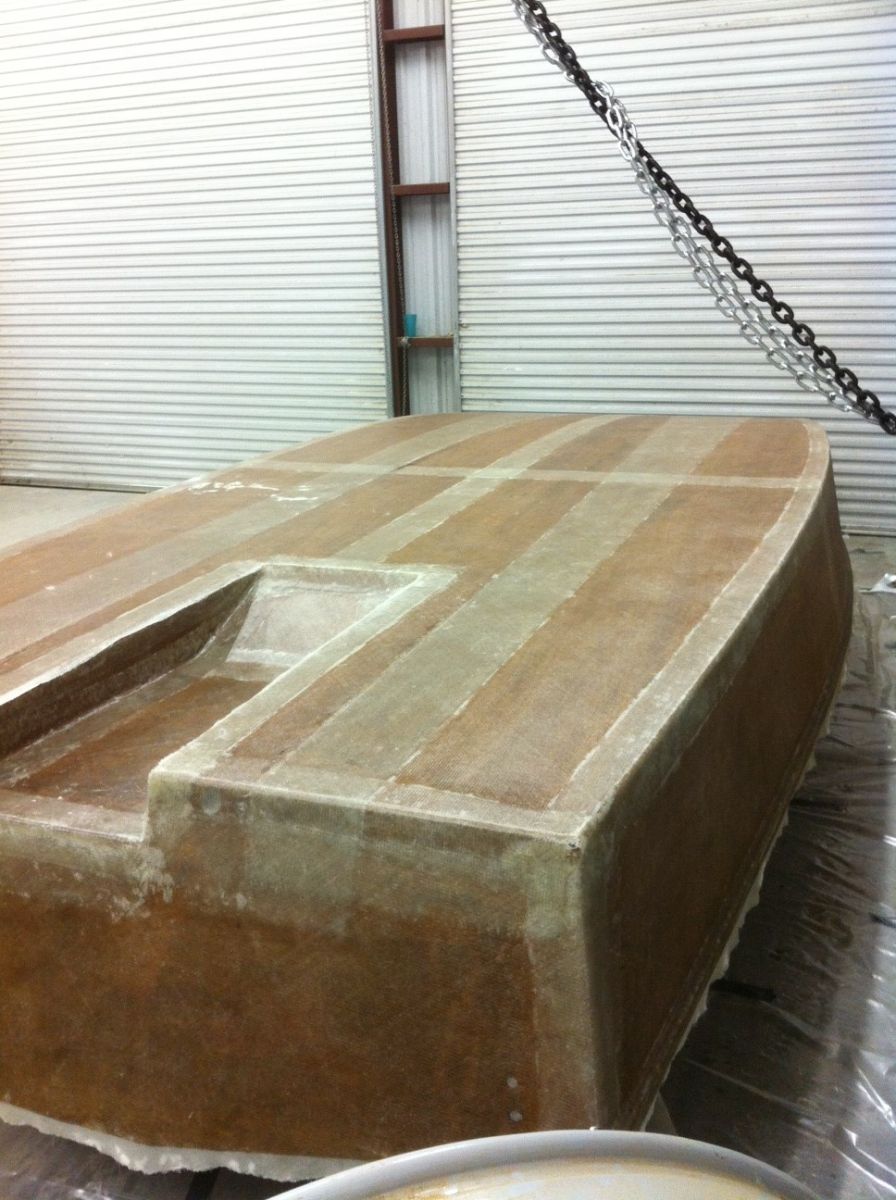
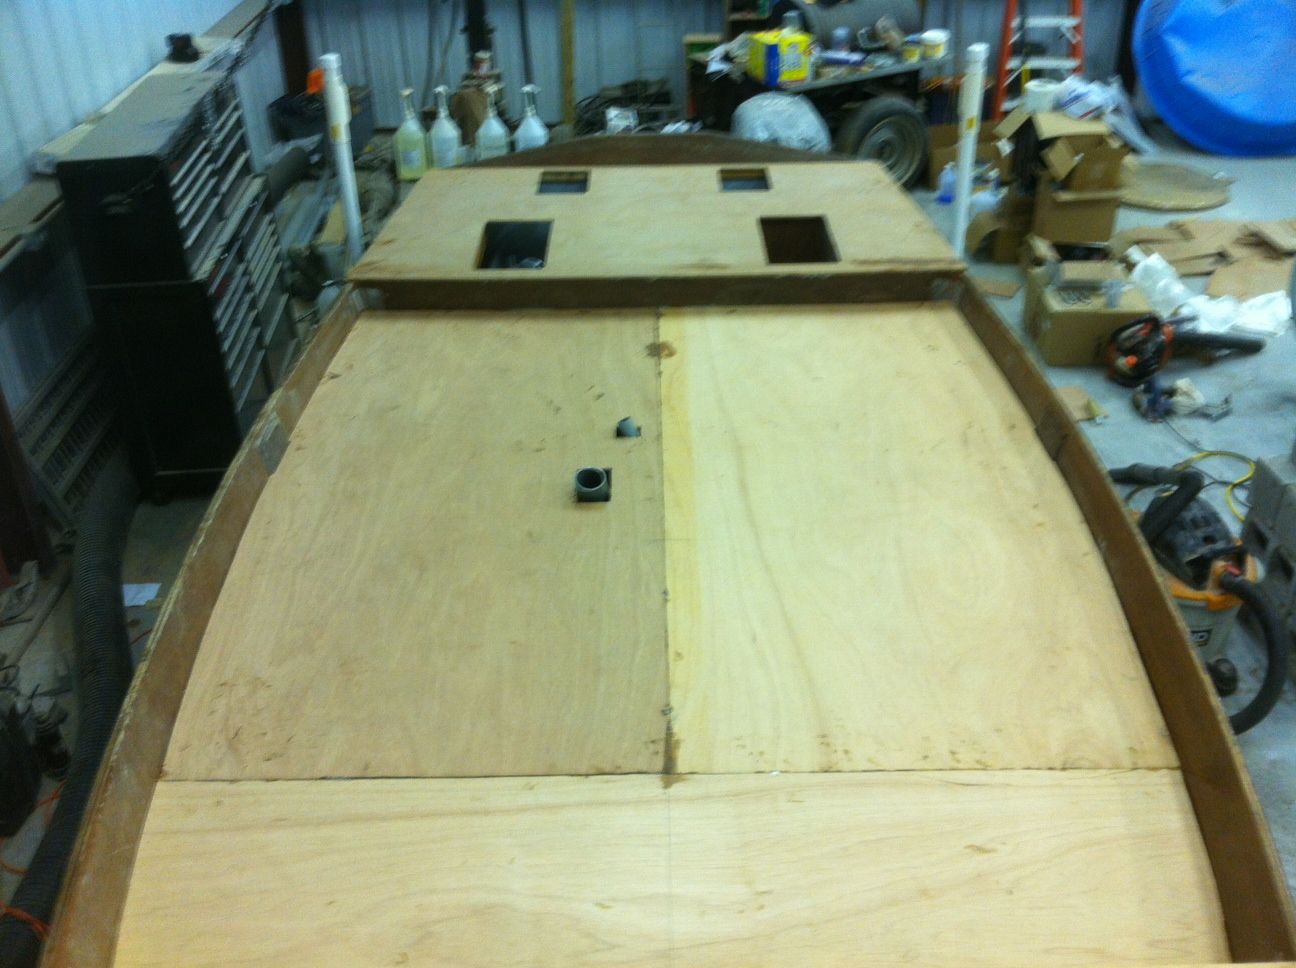
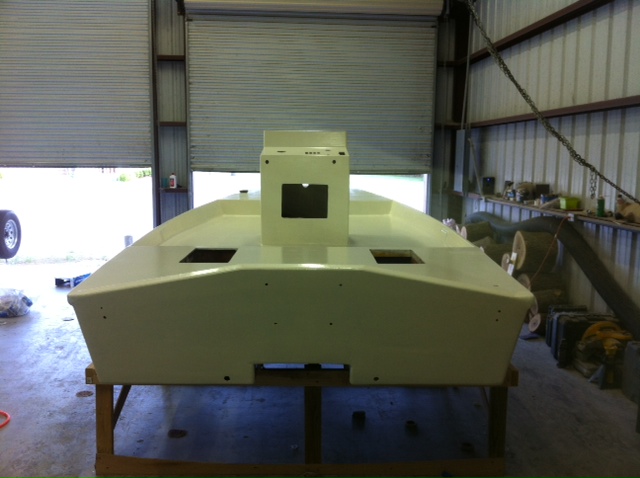
by FOSTER
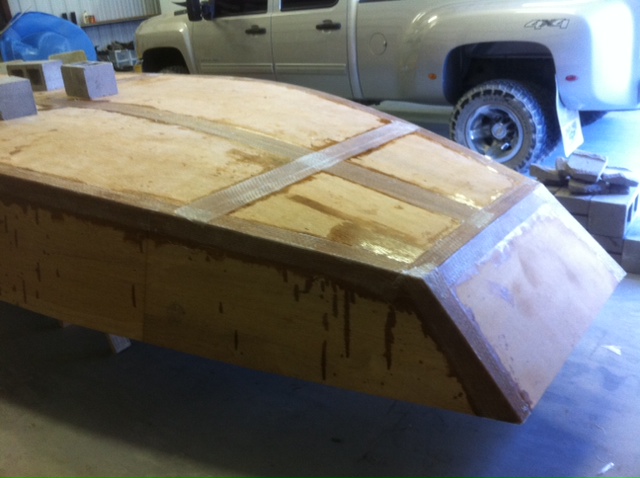
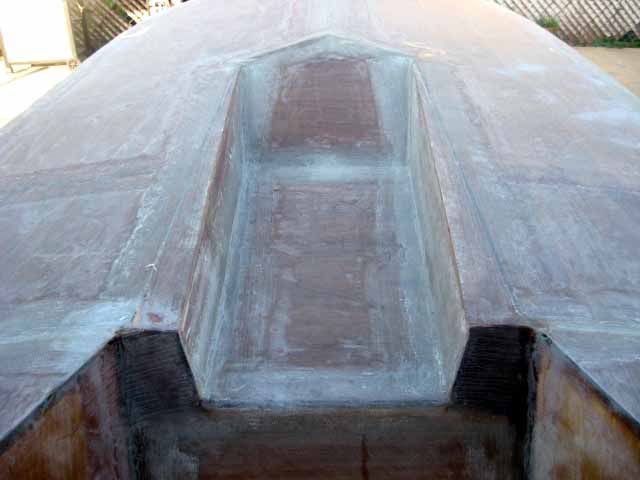
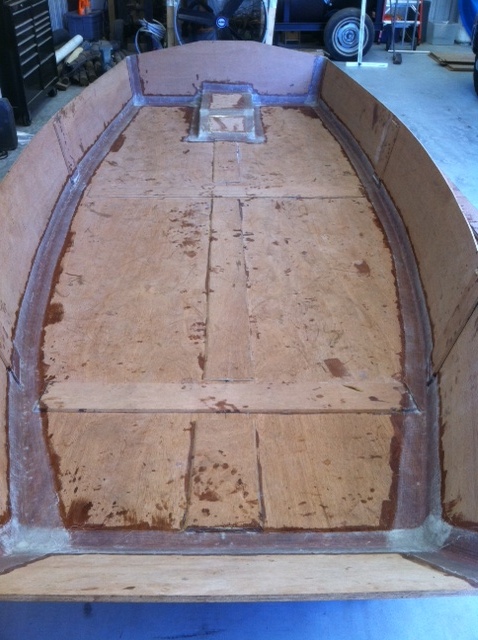
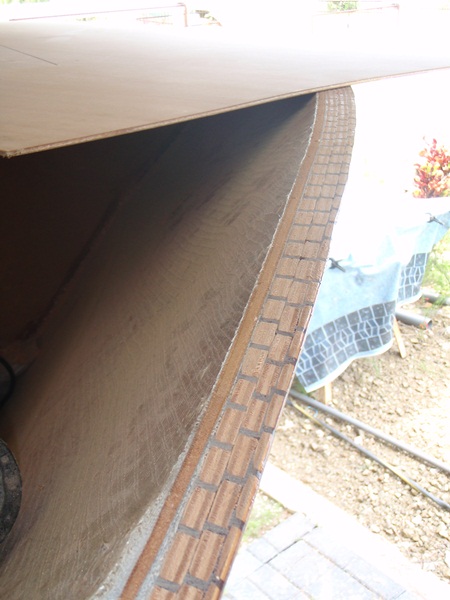
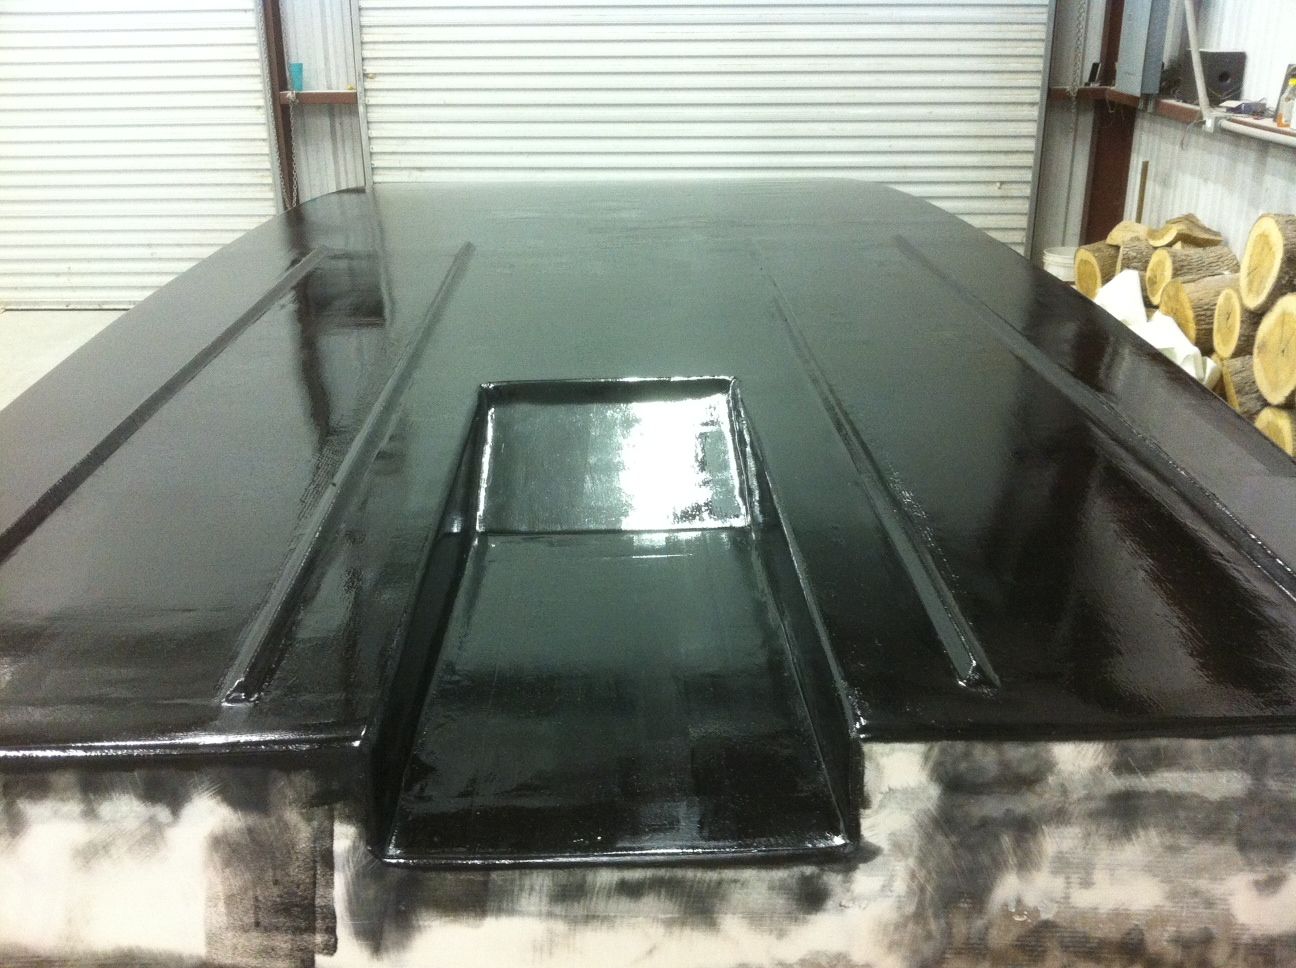
OK tunnel is fixed by putting 3/8" plywood on the inside of each side panel. I added first layer of fiberglass tape to tunnel.
Spot for tunnel cut out
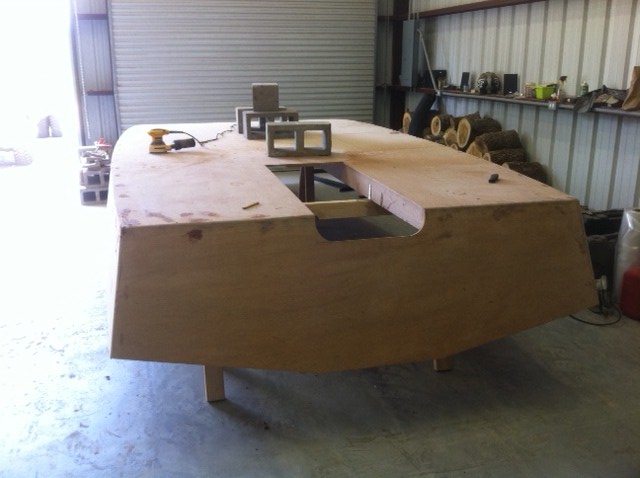
Fiberglass installed on all seams, but we forgot the side seams because my son Luke wanted to go to Gander Mountain to buy lures for fishing will finish them tomorrow. If you notice my son was helping me with the front of the bow and happened to spill a little resin on the hull. It sure is fun having him involved in the build though and he is actually pretty helpful.
Re: FOSTER'S XF20
Posted: Mon Jul 11, 2011 10:32 am
by Mad Dog
Looks good Foster. Looking at the second pic one can see why the XF20 drafts so little. Now that I know where Anahuac is I can see why you chose the XF20. Keep up the good work and keep your boy involved. The nice thing about epoxy is that it let;s you have little spills without really messing anything up.
MD
Re: FOSTER'S XF20
Posted: Wed Jul 13, 2011 2:24 am
by FOSTER
Before you put a second layer of fiberglass on the seams you sand the first layer correct? What grit paper do you use?
Re: FOSTER'S XF20
Posted: Wed Jul 13, 2011 2:35 am
by FOSTER
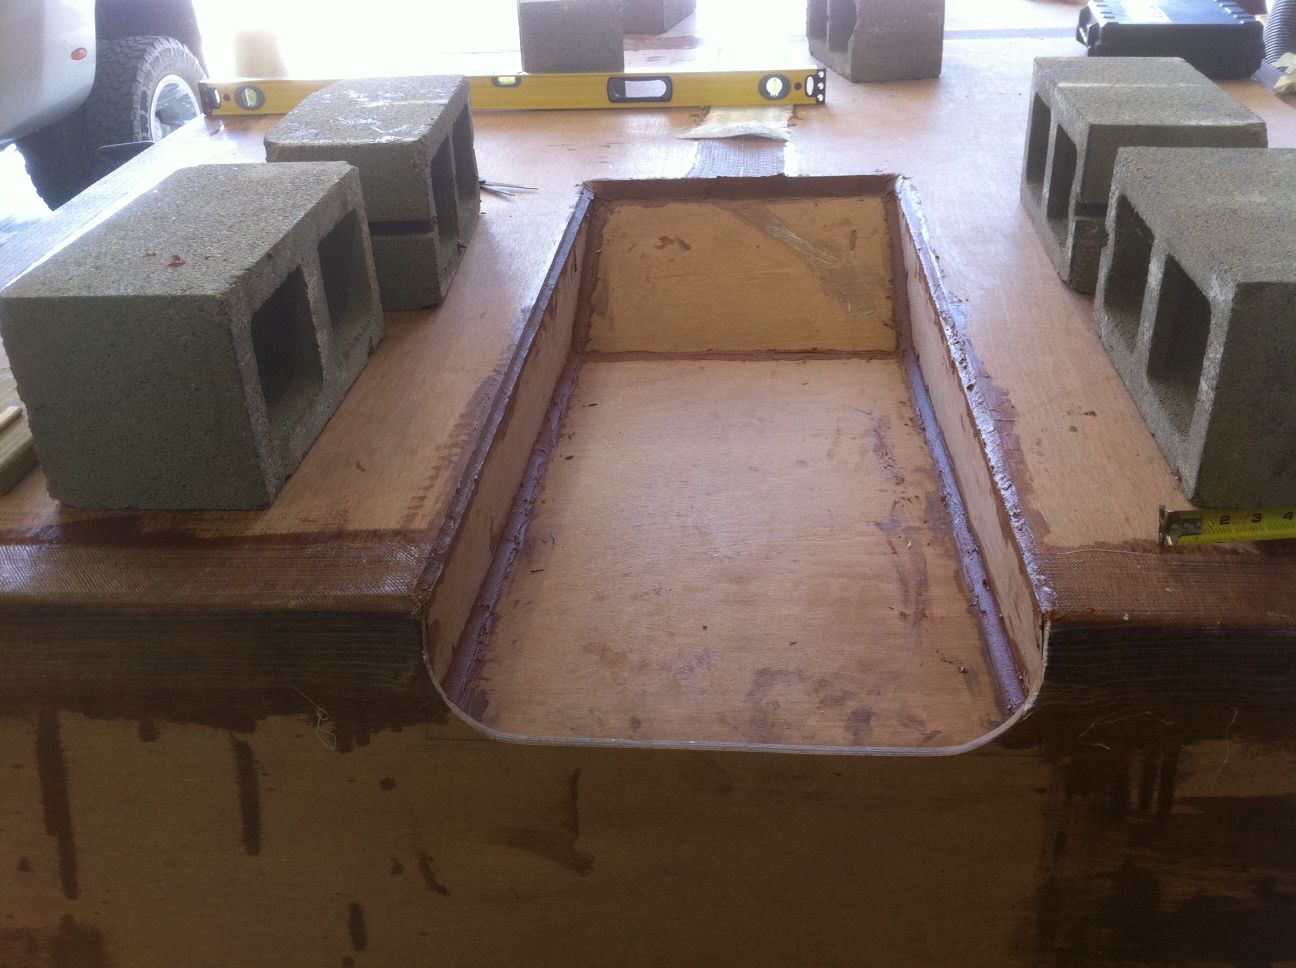
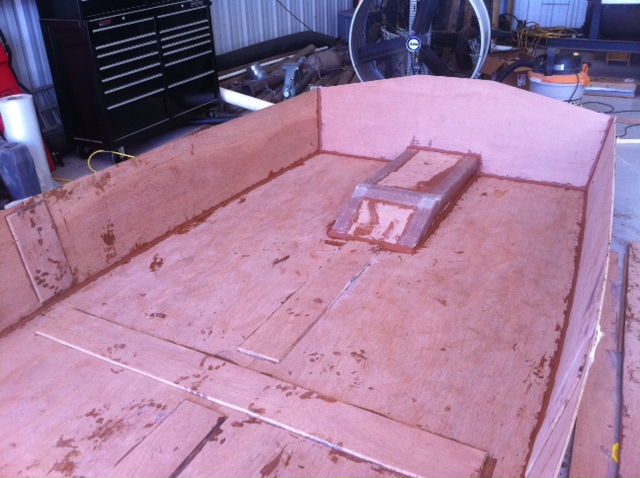
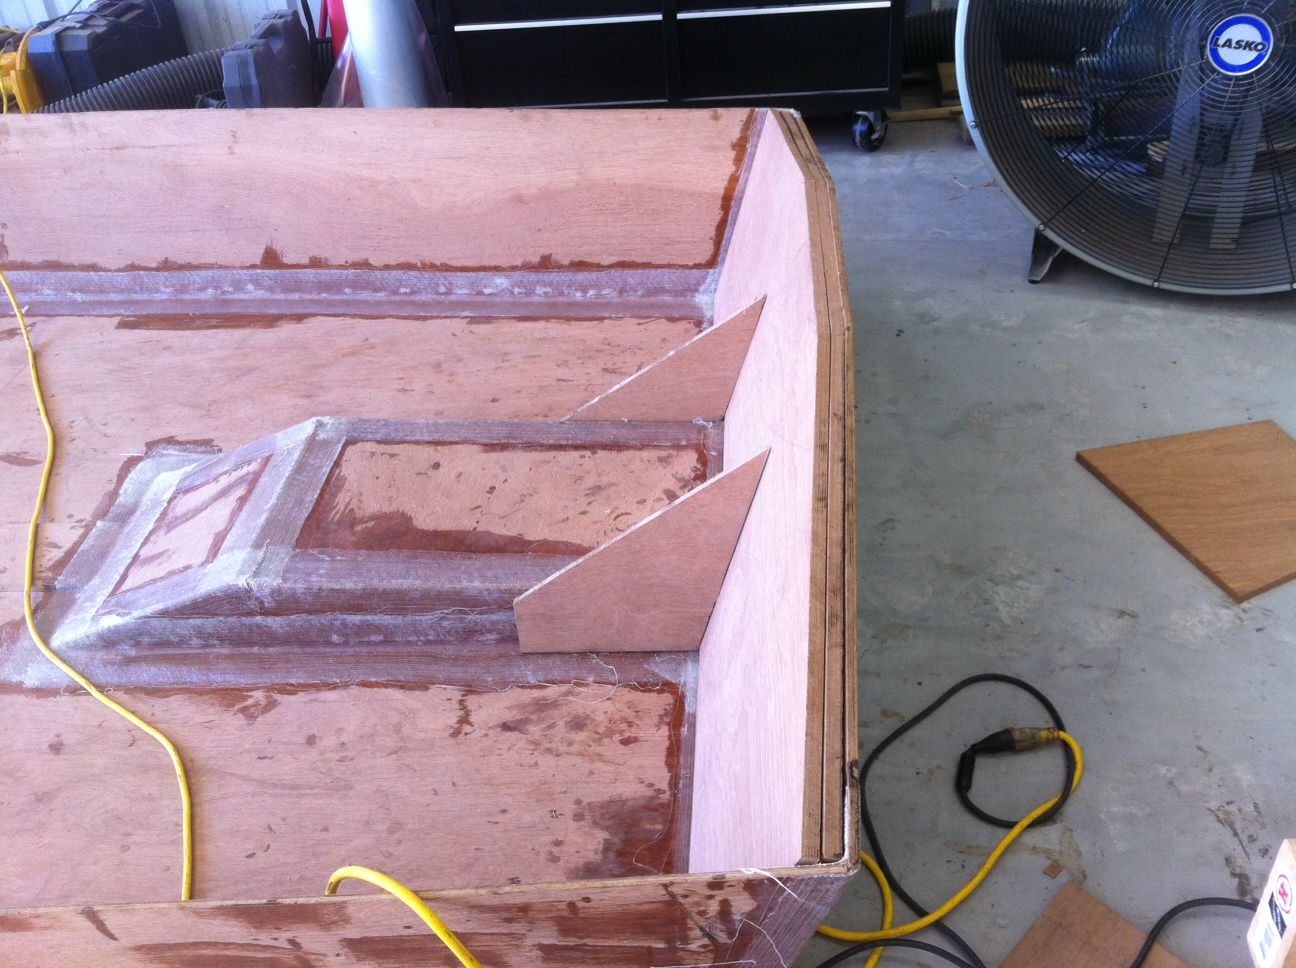
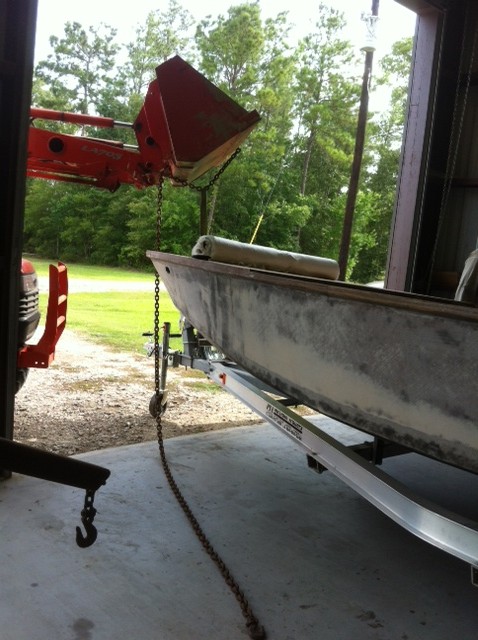
I installed the tunnel by using center blocks under the tunnel with bottle jacks on top of them to hold the tunnel in place. I then put center blocks on top of the hull to make sure there was a little weight to keep the hull level.
Re: FOSTER'S XF20
Posted: Wed Jul 13, 2011 2:40 am
by FOSTER
I have one last question for today. How do you make the rounded corner on the tunnel? I have thought about buying a piece of PVC pipe and cutting it to the correct shape and filling behind the PVC with some type of hard foam or something like that. Then I would remove the PVC pipe and fiberglass over the foam.
Re: FOSTER'S XF20
Posted: Wed Jul 13, 2011 12:06 pm
by Uncle D
I have always used the yellow plastic spreaders from HF that I buy in bulk. When I did my tunnel, I cut out the radius with scissors then spread it out.
As you can see, mine is a bit modified. The tunnel sides are 15 degrees layed out so I really didn't use much filler to get the radius. Sorry I haven't taken an after pic but the spreader worked very easy for me.
Don
Re: FOSTER'S XF20
Posted: Wed Jul 13, 2011 6:35 pm
by chlli willie
Hello Foster, your question about the sanding- I think i used 80 on the big uglies and then 120 ,they say not to go to deep as to scar the threads and weaken the bond. You really only want it smooth enough to not bubble up on you when your rolling-wetting it out.Also you might read up on the poor mans peel ply(-plastic )is used to help eliminate bubbles and sanding.
As for the tunnel your idea sounds like it would work. I used a piece of wood cut to fit in the corner for displacement so it did not need so much peanut butter-then shaped with the plastic spreader for proper radiuus it worked fine. I know there are instuctions for the tunnel and other tips on here somewhere if you get stuck. Keep going your doing fine
Re: FOSTER'S XF20
Posted: Thu Jul 14, 2011 11:18 am
by Aripeka Angler
How do you make the rounded corner on the tunnel?
Foster, here is a thread with some tips related to your question
It's a short thread but it may be helpful.
http://forums.bateau2.com/viewtopic.php ... lit=tunnel
Richard
Re: FOSTER'S XF20
Posted: Wed Sep 28, 2011 12:32 pm
by FOSTER
OK I'm back!!! I took the summer off the boat build to spend time with the family. I ended up getting the second layer of tape on the outside of the hull about a week ago. Then had some help to flip the hull. I managed to ez-fillet the inside of the hull yesterday and I hope to get the first layer of tape on the inside of the hull today. The reason I flipped the hull is because I may cheat a little and let the local shop here do the sheets of fiberglass inside and out. Finding help for two days is hard.
I gave up on the rounded tunnel and ended up going with straight sides after talking to some guys here locally.
Re: FOSTER'S XF20
Posted: Fri Sep 30, 2011 8:14 am
by FOSTER
After checking with the local fiberglass shop I think I will do the fiberglass myself. They were talking about the boat hull weighing over 900#'s when they get done with the glass work. Then I would still install the decks and they would add more fiberglass. I would then have a hull weighing over 1000#'s.
Re: FOSTER'S XF20
Posted: Fri Sep 30, 2011 8:25 am
by thb
Definately do it yourself. That is what this whole boatbuilding thing is about. Stay away from shops unless they have built with epoxy and fiberglass. You can do a better job yourself and you will be more proud of the finished product.
Regards
Tom in Steinhatchee
Re: FOSTER'S XF20
Posted: Fri Sep 30, 2011 10:35 am
by Uncle D
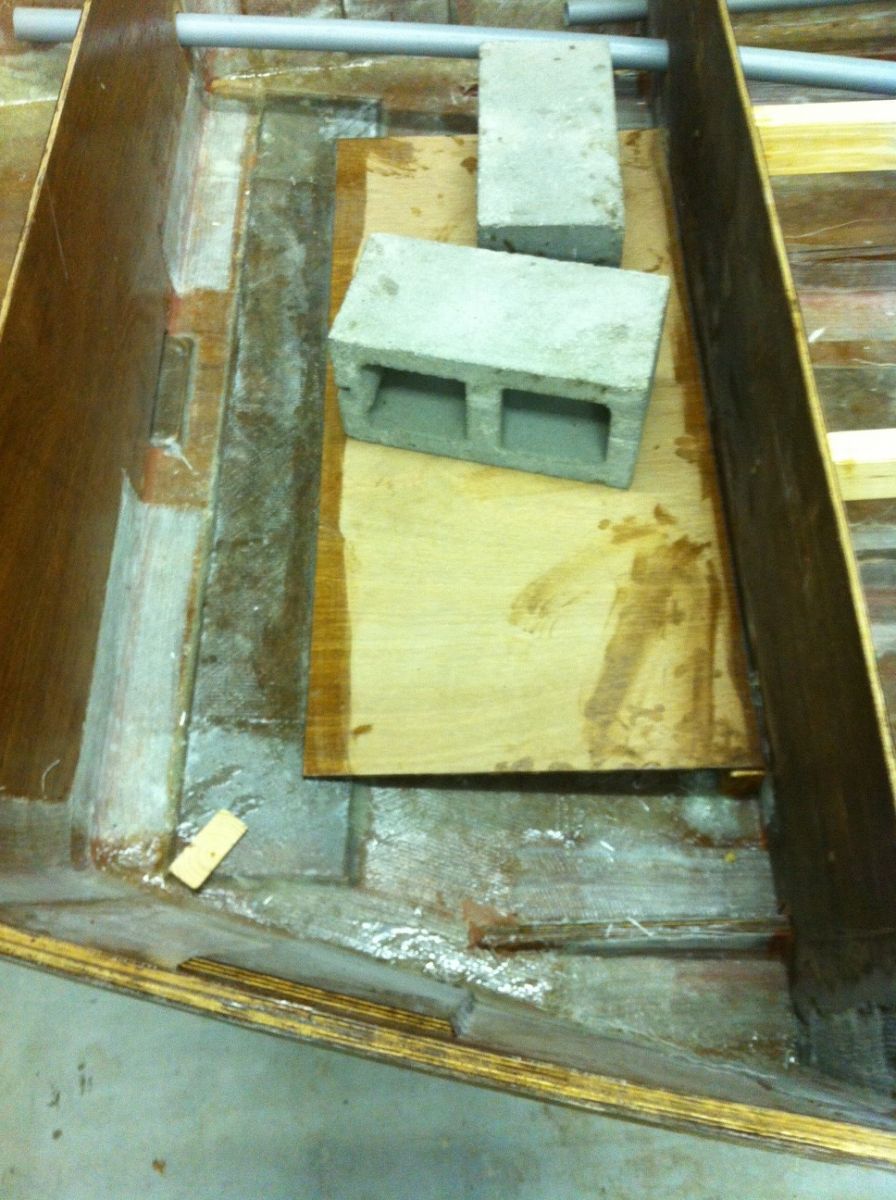
Foster, notice your in Anahuac. I have a pretty good guess where you'll be fishing and why your building the XF-20
I see the butt block and although I didn't use them, I'm thinking you will want to fill the edges with putty for a smooth flow to the hull so all your glass will lie down flat without creating a space for air bubbles to form. And round over any sharp edges. If i'm wrong about that I hope others will chime in but you want the glass to lay flat to all surfaces. Cooler weather around the corner will make the job a lot easier too. Great looking build too!!
Re: FOSTER'S XF20
Posted: Fri Sep 30, 2011 12:54 pm
by FOSTER
Yeah, I took Seth's advice on cutting 45's on all the butt blocks its hard to see from the pics. Do you think I still need to use putty to make a better angle to glass around?
Re: FOSTER'S XF20
Posted: Fri Sep 30, 2011 12:59 pm
by majorgator
The 45's cut on the edge of the butt blocks should save you from having too many hassles. I still had several areas that took some touch-up work, but overall, the glass laid down pretty good over the butt blocks. One area that I guarantee you'll have trouble with is right in the middle of the floor where the 2 longitudinal butt blocks meet up with the long crosser. That tiny space in there on both sides of the crosser is hard to glass...ask me how I know
You'll get it, but man will it be frustrating!
seth
Re: FOSTER'S XF20
Posted: Sun Oct 02, 2011 8:13 pm
by FOSTER
I have a few questions about jack plates on the XF20. What do yall think about running an 8" to 10" setback? I don't know what the water pattern looks like behind the boat if it would work better or should I just stick with the 5.5" to 6" setback? Also I was looking at the CMC jack plate for the fact that you don't have to mount anything in the boat like the Bobs Machine Shop jack plate. I'm looking at mounting a Suzuki DF90 on the back.
Re: FOSTER'S XF20
Posted: Mon Oct 03, 2011 11:48 pm
by FOSTER
Inside seams are glassed!!!
Re: FOSTER'S XF20
Posted: Wed Oct 05, 2011 1:12 am
by majorgator
That looks good Brent. That's a huge step in the right direction
seth
Re: FOSTER'S XF20
Posted: Wed Oct 05, 2011 3:13 am
by FOSTER
Thanks, I am cutting hay this week to make some extra money to buy the 1708 for the inside and outside of the hull.
Re: FOSTER'S XF20
Posted: Fri Oct 14, 2011 9:28 am
by FOSTER
I went and purchased a sheet of 3/4" plywood to build the transom with and the all the other 3/8" plywood I need for the decks and console. I think I'm going to have the 1/2" sheet on the hull with 2 pieces of 3/4" so that I can mount the fuel water separator, rear tow hooks and not have to worry about the transom flexing.
Re: FOSTER'S XF20
Posted: Sat Oct 15, 2011 9:26 am
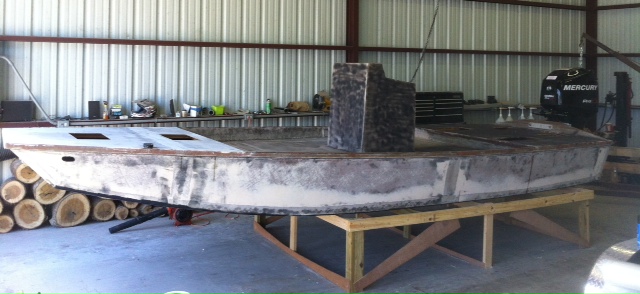
by FOSTER
Here is my transom cut out this should allow me to mount a 90 4 stroke and the rear tow hooks along with the fuel water separator all on the transom.
Re: FOSTER'S XF20
Posted: Sat Oct 15, 2011 9:30 am
by majorgator
Good idea Brent. If you look through my photos you'll see where I put 2 x 12 blocks on both sides of my transom for mounting things like jack plate pump, fuel/water separator, etc. Better to screw into a "sacrificial" board vs. going straight into the transom.
Seth
Re: FOSTER'S XF20
Posted: Sun Oct 16, 2011 4:44 pm
by FOSTER
Thanks Seth,I have read your thread about 100 times and have used a lot of your tips on my boat. Tonight I'm going to try and cut the rub rail and next set off I will build the console.
Re: FOSTER'S XF20
Posted: Fri Nov 04, 2011 11:49 pm
by FOSTER
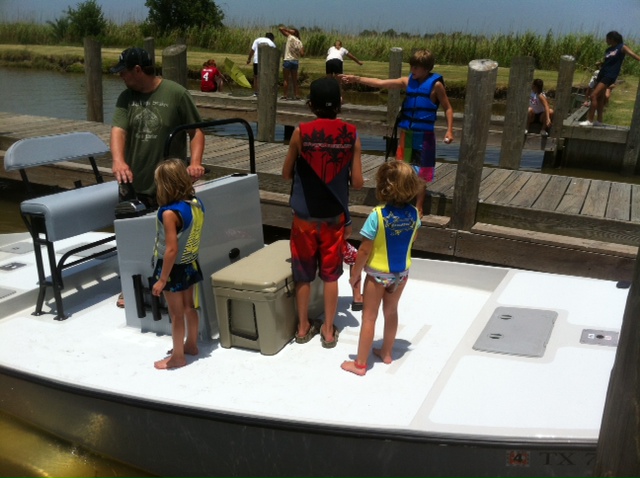
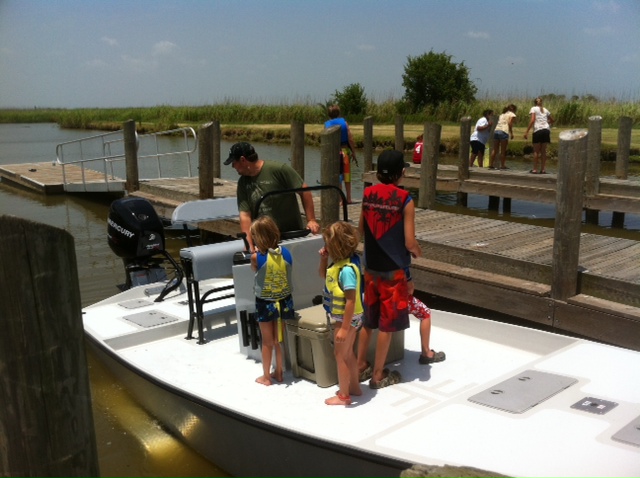
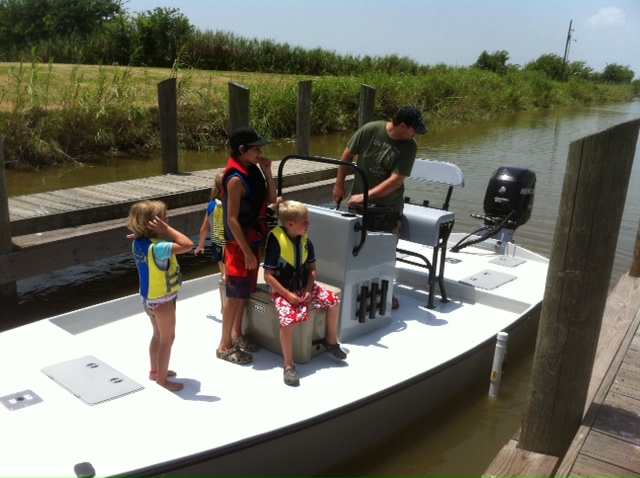
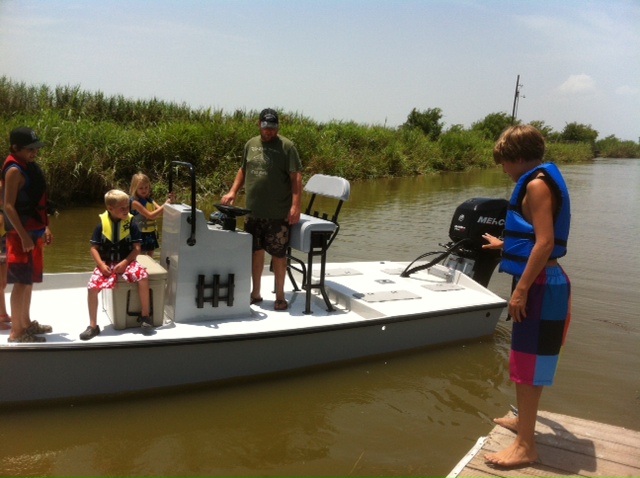
Ya’ll don’t let me quit I have to finish this boat. I just needed a little time away from it. Here are some pictures.
My console built (Thanks to Seth’s console plans)
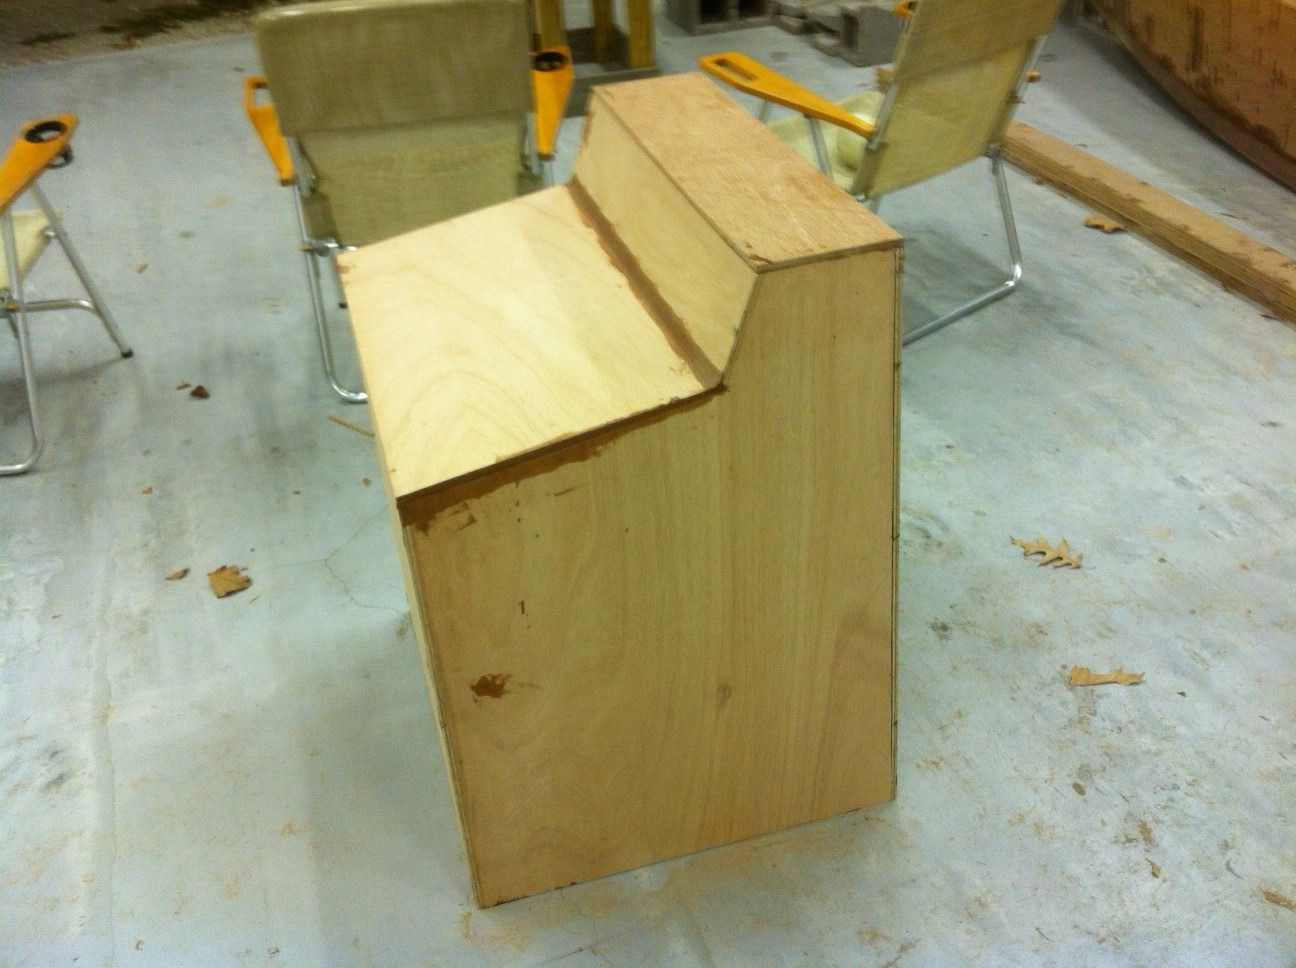
Gluing the ¾” boards on the transom together
Re: FOSTER'S XF20
Posted: Sat Nov 05, 2011 8:44 am
by thb
You will be glad you decided to carry on and not go the plastic boat route. You will be so proud and happy with your xf20 when you finish her. The center console looks great and I like your method of holding the inner transom layers up against the transom while glue dries. What ever works.
The XF20 is my next build to be started before Christmas as soon as I get the FS14 launched. It has been in work for about a year so you just have to take your time and be patient. Don't get in a hurry, just chip away at it a little each day if you can. Problem is I go weeks sometimes between chipping away at it.
Congratulations on your decision to carry on. What you have done so far looks great.
Regards
Tom in Steinhatchee
Re: FOSTER'S XF20
Posted: Sat Nov 05, 2011 10:08 am
by majorgator
Man, that's a fine looking console
seth
Re: FOSTER'S XF20
Posted: Sat Nov 05, 2011 7:44 pm
by FOSTER
Seth it took a lot of planning and hours to design on my part.
Thanks again Seth for the plans.
Re: FOSTER'S XF20
Posted: Sat Nov 05, 2011 7:48 pm
by FOSTER
Thanks Tom
Re: FOSTER'S XF20
Posted: Fri Nov 25, 2011 2:14 pm
by FOSTER
Well to give an update I ordered a McClain aluminum tandem axle trailer this past week and it will be ready at the end of the year. I finished taping the entire console. I finished gluing the two pieces of 3/4" plywood in the transom and put the first layer of tape on the transom (that transom ain't going anywhere now!!!). I cut and installed the rub rail. I glued two pieces of 3/8" plywood together and cut 45's on them to make it easier to fiberglass over the rub rail where it meets the side panel of the boat.
Re: FOSTER'S XF20
Posted: Sat Nov 26, 2011 7:03 am
by majorgator
Sounds great Brent. You'll be happy with the tandem axle. The weight and size of the boat doesn't really require it, but it sure does pull a whole lot nicer. Regarding the rub rails, did you cut them so that they're not facing downward? If you go to page 22 on my build thread you'll see what I'm talking about. Scroll down through the pictures and you'll see the up-close shots of the rub rail. Just a thought, FWIW.
seth
Re: FOSTER'S XF20
Posted: Sat Nov 26, 2011 11:31 am
by FOSTER
I did on the bow but not on the sides. Didn't think about the sides turning under that much guess that will require some modification. I was looking at it thinking something didn't look right. Thanks Seth for bring that up could always use a good second set of eyes to make sure I don't miss anything.
Re: FOSTER'S XF20
Posted: Sat Nov 26, 2011 7:46 pm
by majorgator
Brett it is plausible to leave the rub-rails "as-is" but if you intend on running the decks all the way over the edge, then you'll need a flat surface on top at a minimum. Then if you're goin to wrap the fiberglass tape over the edges, then you don't want the adjoining surfaces to be anything more than 90 degrees, which means that the rub rails will need to be perpendicular to the ground. Again, hard to describe this via a forum post. If you need a better description and you still have my number, give me a call. Just don't call me tonight, as I'll be passed out in about 20 minutes trying to beat this little cold I have.
PS - if I ever appear to be interjecting too much, it won't hurt my feelings a bit if you say. Sometimes I like to figure thi hs out the hard way myself.
Seth
Re: FOSTER'S XF20
Posted: Sat Nov 26, 2011 8:30 pm
by peter-curacao
majorgator wrote:Brett it is plausible to leave the rub-rails "as-is" but if you intend on running the decks all the way over the edge, then you'll need a flat surface on top at a minimum. Then if you're goin to wrap the fiberglass tape over the edges, then you don't want the adjoining surfaces to be anything more than 90 degrees, which means that the rub rails will need to be perpendicular to the ground. Again, hard to describe this via a forum post. If you need a better description and you still have my number, give me a call. Just don't call me tonight, as I'll be passed out in about 20 minutes trying to beat this little cold I have.
PS - if I ever appear to be interjecting too much, it won't hurt my feelings a bit if you say. Sometimes I like to figure thi hs out the hard way myself.
Seth
Seth you are confusing me with this post

I know it is not my thread but I like to learn
Re: FOSTER'S XF20
Posted: Sat Nov 26, 2011 8:49 pm
by gstanfield
Peter, look at the pics on page 22 of his thread, it explains it pretty well. What he is talking about is making the rub rails perpendicular to the deck instead of having them at the same angle as the hull sides.
Re: FOSTER'S XF20
Posted: Sat Nov 26, 2011 8:55 pm
by peter-curacao
gstanfield wrote:Peter, look at the pics on page 22 of his thread, it explains it pretty well. What he is talking about is making the rub rails perpendicular to the deck instead of having them at the same angle as the hull sides.
I'm missing things here, I see only 9 pages

Re: FOSTER'S XF20
Posted: Sat Nov 26, 2011 11:14 pm
by gstanfield
Not this thread, page 22 of Majorgator's thread
http://forums.bateau2.com/viewtopic.php ... &start=210
Here's the pictures he's talking about:
From this:
to this:

Make sense now?
Re: FOSTER'S XF20
Posted: Sun Nov 27, 2011 8:08 am
by majorgator
Peter, George summed it up. IMO, its a necessary step to make it all work out right
seth
Re: FOSTER'S XF20
Posted: Sun Nov 27, 2011 8:29 am
by peter-curacao
Aha perfectly clear now thanks!
Re: FOSTER'S XF20
Posted: Mon Nov 28, 2011 11:56 pm
by FOSTER
Seth don't hesitate to let me know when something doesn't seem right. It will save me saying some really nasty words and save time as well. I ended up buying a power planer to take care of the rubrail and should be able to work on it tomorrow. One question did you just eyeball the rubrail and get it as close as possible or is there a technique to it?
Re: FOSTER'S XF20
Posted: Tue Nov 29, 2011 12:46 am
by chicagoross
I've always left mine parallel to the hull without problems; not sure you need to shave the rails to a 90 degree to the deck. I haven't seen that addressed before, buat I can assure you that the fiberglass will wrap around more than a 90 degree bend. Here's the last boat with the glass already wrapped over the rails.

Re: FOSTER'S XF20
Posted: Tue Nov 29, 2011 6:01 am
by majorgator
One question did you just eyeball the rubrail and get it as close as possible or is there a technique to it?
Yep, the ole eyeball. I did throw a torpedo level on it as I went to make sure I was close, though.
seth
Re: FOSTER'S XF20
Posted: Mon Dec 05, 2011 1:31 pm
by FOSTER
Rub rails are now facing true out. Man I wish I would have bought a power planer a long time ago.
Re: FOSTER'S XF20
Posted: Mon Dec 05, 2011 3:05 pm
by Daddy
I would rather fair the top edge of the rails than plane any of the thickness and therefore the strength out of them Parallel to the hull is fine with me. If I remember rightly the plans don't even show fairing the top edge but just filling the gap with thickened epoxy.

Re: FOSTER'S XF20
Posted: Mon Dec 05, 2011 3:25 pm
by Cracker Larry
I plane the top edge myself. The plans I've seen do just show filling the gap with epoxy, but to me that's a heck of a big gap, about 40 feet of it, and it will eat a LOT of epoxy

Re: FOSTER'S XF20
Posted: Mon Dec 05, 2011 3:30 pm
by peter-curacao
Ditto
Re: FOSTER'S XF20
Posted: Thu Dec 22, 2011 5:03 pm
by FOSTER
Finally got the trailer!!!
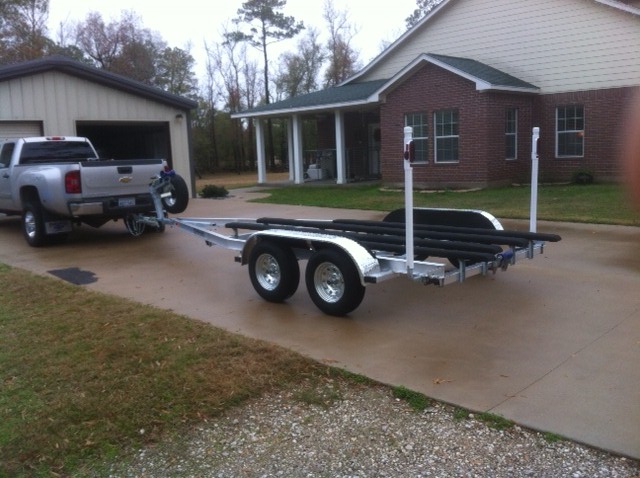
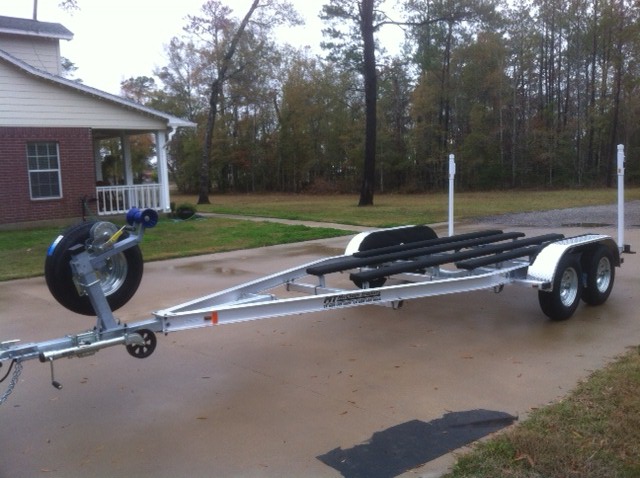
Re: FOSTER'S XF20
Posted: Thu Dec 22, 2011 5:31 pm
by gstanfield
Nice looking trailer
Now to just finish the boat and fit the trailer for the XF20
Re: FOSTER'S XF20
Posted: Fri Dec 23, 2011 8:11 am
by majorgator
Wow that is a sweet trailer! Merry Christmas to yourself
seth
Re: FOSTER'S XF20
Posted: Fri Dec 23, 2011 9:45 am
by FOSTER
Thanks, I may have to put longer brackets in the front to follow the bottom of the hull better. McClain trailers said to bring it back when I get the boat finished and they will get it adjusted for me.
Re: FOSTER'S XF20
Posted: Fri Dec 30, 2011 12:23 pm
by Southern Gent
Brent, Thank you. I just ordered a Power Planer. I have been wondering how I would true my rubrails.
Re: FOSTER'S XF20
Posted: Sat Feb 18, 2012 12:58 pm
by FOSTER
Well I have been working a shutdown so I haven't had time to work on the boat in the past few months. I was able to put the boat on the trailer and it looks like it fits pretty good.
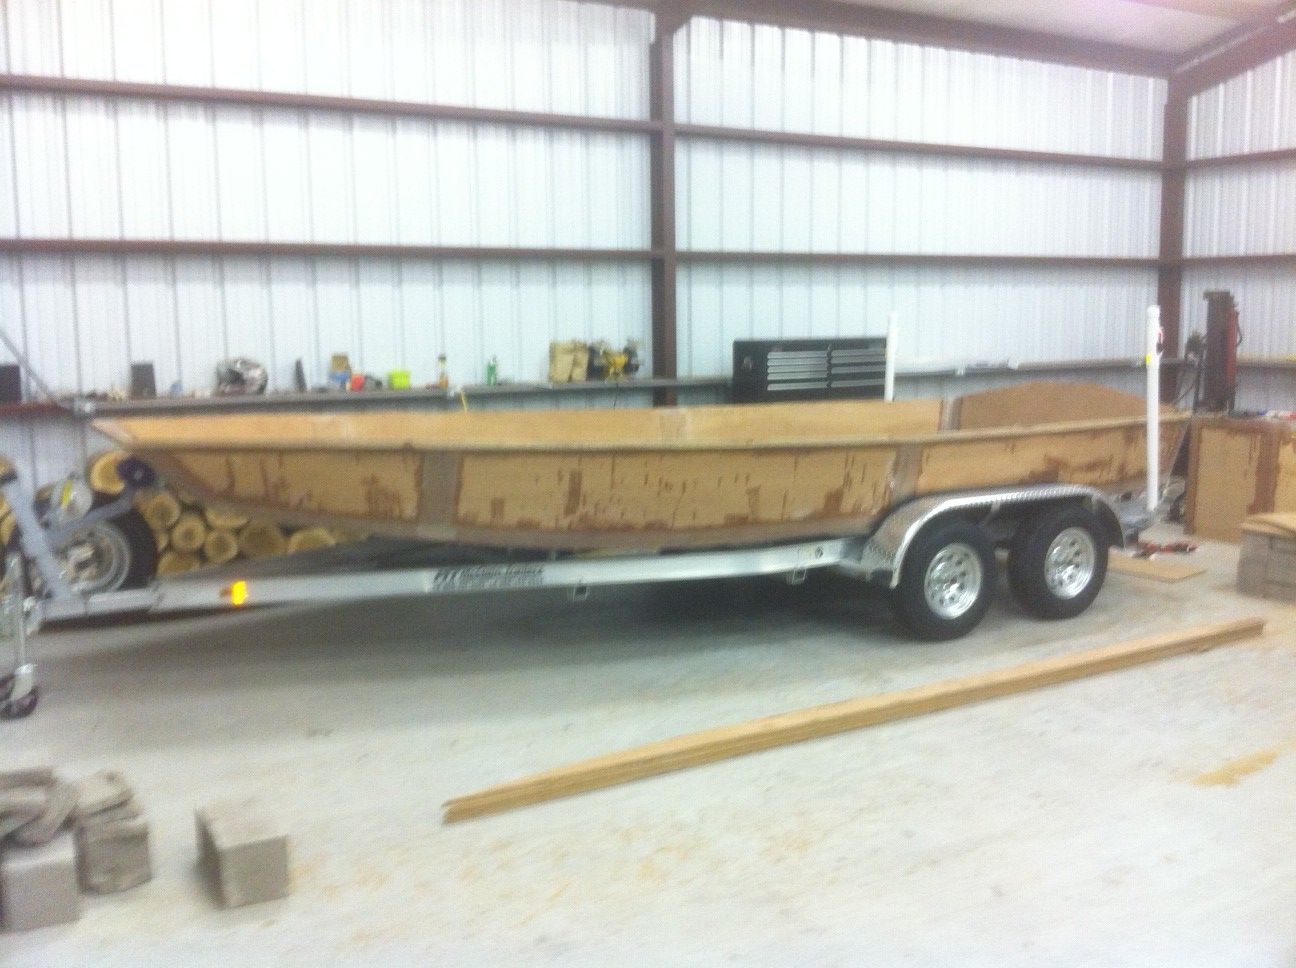
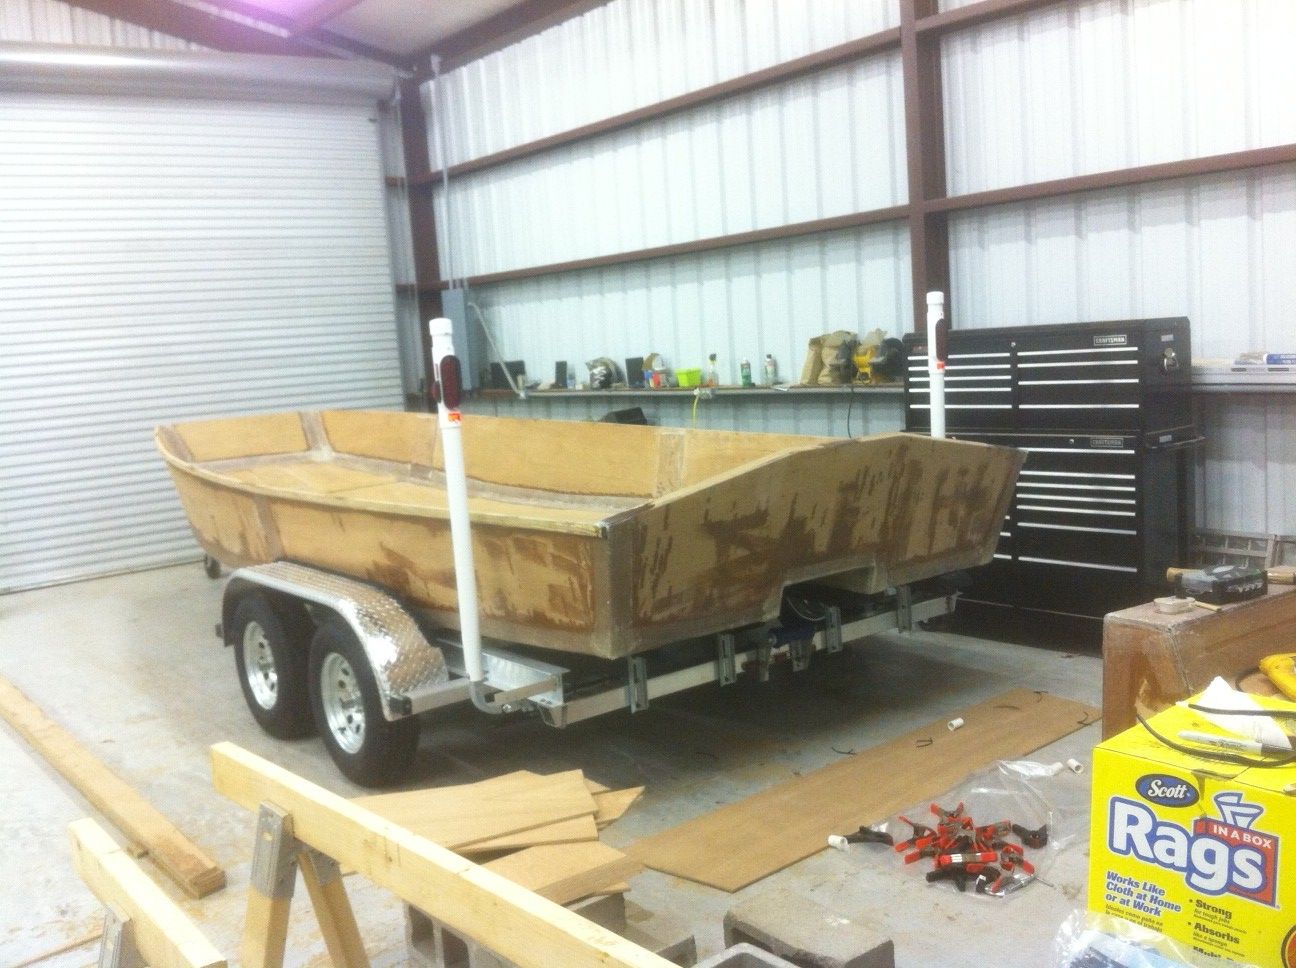
Re: FOSTER'S XF20
Posted: Sat Feb 18, 2012 1:02 pm
by FOSTER
Forgot to add my wife has decided that we don't need the ugly sponsons on the back of the boat so they got scratched.
Re: FOSTER'S XF20
Posted: Sat Feb 18, 2012 1:04 pm
by gstanfield
Looks good
. I'd want to add some support for the bow though.
Re: FOSTER'S XF20
Posted: Mon Mar 05, 2012 10:29 am
by FOSTER
Anyone interested in fiberglassing and finishing the outside of a hull to make some extra cash? I am currently working a shutdown and want to get my hull finished before summer. I won't have time to do the hull myself so I'm looking for someone to fiberglass it and install the stringers. I live in Anahuac, TX and could have someone bring the boat to you.
Re: FOSTER'S XF20
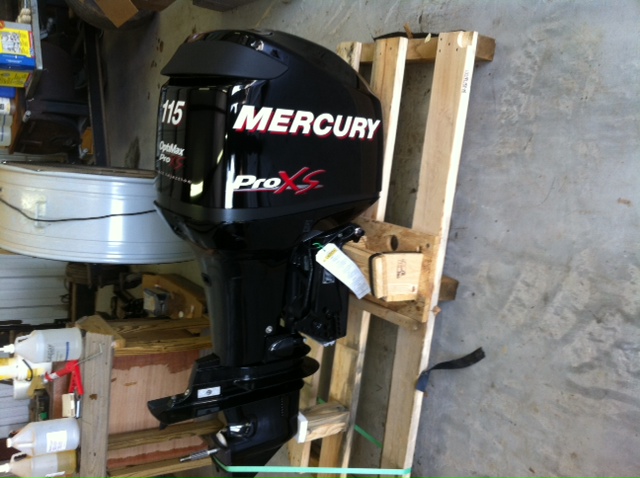
Posted: Mon Apr 30, 2012 8:03 pm
by FOSTER
Got my motor for the boat!!!!
Re: FOSTER'S XF20
Posted: Mon Apr 30, 2012 8:07 pm
by gstanfield
Re: FOSTER'S XF20
Posted: Mon Apr 30, 2012 9:32 pm
by Boater45
Dang!!!
That's a lot of motor for that boat!!
Nice though!!

Re: FOSTER'S XF20
Posted: Mon Apr 30, 2012 10:40 pm
by FOSTER
There is a little extra support added to the transom to handle the weight and power of the motor. Ordered the fuel tank from speedy tank which is the same place Aripeka Angler ordered his tank from. The tank will hold 35gals. and will be installed toward the front to compensate for the weight of the motor.
Re: FOSTER'S XF20
Posted: Tue May 01, 2012 8:37 am
by peter-curacao
FOSTER wrote:Got my motor for the boat!!!!
Very nice must be a great feeling
Re: FOSTER'S XF20
Posted: Thu May 03, 2012 5:38 pm
by cottontop
That's one fine motor! If you don't mind, what did she set you back? John
Re: FOSTER'S XF20
Posted: Fri May 04, 2012 12:27 am
by FOSTER
Just the motor was $8250. Found it cheaper at Jaco's Marine in TN $7610 but it would cost a little money to ship and it had to be shipped to an authorized Mercury dealer so figured it would be easier to get it here in TX. This way the motor could be checked out before purchasing. Plus I figure you would get better service if it was purchased from a local dealer. They had the 5 and drive sales event so the warranty was extended to 5 years.
Re: FOSTER'S XF20
Posted: Wed May 09, 2012 8:09 am
by FOSTER
I ordered all of the fiberglass and resin to finish the boat yesterday. How much primer, paint, etc. will be needed to cover the outside of the boat? I'm going to go with the sterling paint and plan on rolling and tipping the paint. I'm up in the air about the graphite on the bottom of the hull. What are the benefits of the graphite?
Thanks for all the help in advance.
Re: FOSTER'S XF20
Posted: Wed May 09, 2012 9:35 am
by Aripeka Angler
FOSTER wrote:I ordered all of the fiberglass and resin to finish the boat yesterday. How much primer, paint, etc. will be needed to cover the outside of the boat? I'm going to go with the sterling paint and plan on rolling and tipping the paint. I'm up in the air about the graphite on the bottom of the hull. What are the benefits of the graphite?
Thanks for all the help in advance.
Just got caught up on your thread, looking good. A gallon of primer will be enough to prime the boat. If you use Sterling, it will take less than a quart to paint the outside of the hull (if you graphite/epoxy the bottom). The inside of the hull will take about a quart and a half. As for the benefits of graphite/epoxy coating, it gives the bottom more abrasion resistance.
edit...Are you going to use a jac-plate?
Re: FOSTER'S XF20
Posted: Wed May 09, 2012 9:57 am
by majorgator
I agree with Richard. I used about 1/2 quart of the seamist green on my hull and almost a full quart of the cream on the interior. Of note, though, is that the majority of my topside is covered in KiwiGrip. I managed 3 coats of the cream on the interior and console, but like I said, most of it is KiwiGrip. I would go with what Richard said, though, with the quart and half. Having to do mine over again, I would have put one coat over the entire topsides, then put the 2nd and 3rd coats only where the KiwiGrip was not to cover. I put the KG on top of the primer, and there are a few tiny areas where you can see the primer.
Another vote for the graphite bottom. Its cheaper, easier, and more abrasion resistant and slick than the paint.
Re: FOSTER'S XF20
Posted: Wed May 09, 2012 10:51 am
by FOSTER
How much graphite do I need? So you mix the paint with the brushing catalyst and brush reducer then apply?
Re: FOSTER'S XF20
Posted: Wed May 09, 2012 10:54 am
by Mad Dog
I bought the one pound bag of graphite to coat the bottom of my rebuild. I put on three coats and still have half of the bag left. It goes a long way.
MD
Re: FOSTER'S XF20
Posted: Wed May 09, 2012 11:02 am
by Aripeka Angler
So you mix the paint with the brushing catalyst and brush reducer then apply?
Yes, after you wait 50 minutes for the mixture to induce.
Re: FOSTER'S XF20
Posted: Wed May 09, 2012 7:27 pm
by Aripeka Angler
edit...Are you going to use a jac-plate?
Foster, I asked that question earlier and maybe you missed it. I read back in your thread and I see that you will be using a jac-plate and I also see the big motor you will be using.
So I have a few things to suggest...
1)You will need some serious extra beef on those transom knees to hold up that big motor. The guys like myself, MG and Hunch tied in the transom to an aft deck. If you are not building the aft deck, you may have cracking issues. Especially with a 10 inch setback jac-plate and a heavy, high horsepower motor. I would beef up the glass in the back and moderate the setback on the plate if I were you. 115 hp
I thought my 70 was crazy
2)Put some strakes on the bottom. You will be glad you did, especially with that big motor.
3)If your transom is 20" (24 inches overall from the bottom) from the top of the transom to the top of the tunnel, grab a power saw and chop off two inches. The experts told me that the right way to build it was 24" overall, but I know now that it isn't. The stock transom as planned is drawn at 20". My 24" transom height directs every stinking weed to my water intake resulting in overheating in weedy areas. I think the 24" transom also kills my ability to back up. This is the worst boat to back up I have ever owned. The triple cup prop doesn't help, but half the blame goes to the jacked up transom.
4)Don't buy a prop yet, MG is onto a new improved model. I am going to take it for a test drive on Friday
Re: FOSTER'S XF20
Posted: Wed May 09, 2012 11:37 pm
by FOSTER
Thanks for the info and I appreciate the help.
1) I am going to have a back deck to brace the transom and will definitely take you advice on the extra glass. I also plan on putting a glassed in 2X4 at the top of the knee braces. My transom is built out of one sheet of ½” plywood and two sheets of ¾” plywood. I ended up going with the 8" setback that bob's machine shop builds. The new jack plate he is building has the pump mounted in the actual jack plate no more hydraulic oil in the boat. The motor also has its own oil reservoir under the cowling.
2) Built 4 strakes for the bottom of the hull after hearing multiple people talk about the boat sliding around corners.
3) I'm up in the air about the transom because I like the way it looks. It is possible that I could mount the jack plate 2" lower if needed correct?
4) Already screwed up there bought a prop when I bought the motor and probably will kick myself later for it.
Re: FOSTER'S XF20
Posted: Thu May 10, 2012 7:00 am
by majorgator
Foster, I pretty much echo AA's comment's. If I were you, I'd whack off 2" and mount the jack plate flush with the top. Even if that were not totally correct, you can still adjust the motor upwards on the bolt holes to get it tuned in right. And unless you've already bought the 8" offset plate, reconsider the 4" flats-jac from Bob's machine shop or the similar CMC model. You need good clean water exiting the tunnel and coming into contact with the motor. I'm afraid that the further away from the tunnel you get, the "less-uniform" the water becomes. I'm not sure of that, but its a thought.
Good idea on the strakes. There are times when I think I should have done the same. I've heard conflicting stories as to whether or not they're actually helpful, but have seen very little in the way of actual experiences on the XF20. Looking forward to your performance report
On my deck-to-transom glassing, I probably have about 6 layers of inter-lapping 12oz biax tape. So far, so good.
What kind of prop did you get? I started off with a PFS4 (stainless, 12-pitch triple cup 13"diameter 4-blade) by PowerTech. That's an amazing prop for hole-shot and grip, but sucks in terms of going in reverse, speed, and fuel economy. I'm not a flats boat speed demon like some folks, so I don't get in a hurry anyway, but due to the slower speeds I was getting terrible fuel economy and lower RPM (I suspect). By random luck, I ran into a guy that let me borrow (and ultimately sold me) his SWW4 (stainless, 13-pitch moderate cup 13.5" diameter 4-blade) by PowerTech. I've used it twice now and the results have been pleasing. The grip isn't as good, but I feel the hole-shot is more than acceptable. I get higher speeds (25 MPH vs. 33 MPH) and the fuel economy is about 35% - 40% better. That's absolutely no lie about the fuel economy; its an estimate, but my fishing areas and distances are predictable so I think its very accurate. In addition, I spoke to Jeff Whidden @ PowerTech and Billy Henderson here locally (he builds a similar boat as a business), and they both recommended this prop. This is the prop AA is trying on Friday. I hope and expect that he'll find favor in it
Re: FOSTER'S XF20
Posted: Thu May 10, 2012 7:21 am
by Aripeka Angler
If I were you, I'd whack off 2" and mount the jack plate flush with the top. Even if that were not totally correct, you can still adjust the motor upwards on the bolt holes to get it tuned in right.
Exactly
I have studied the back end of this boat for 4 years now, it's the right thing to do IMO. I also would check for motor clearance before you drop the plate 2". The fittings on my steering hit the top of the transom when it is fully tilted up (and my holes are drilled in the stock position) It may not be an issue with your motor, but I would check it out before you drill the holes. I have to jack up my motor an inch to keep from destroying the steering cylinder when tilting it all the way up.
I talked to Adam who bought the black boat a few weeks ago. I asked him he liked the boat? He said he absolutely loved it but said maybe the motor needs to be dropped 2 inches?
Re: FOSTER'S XF20
Posted: Thu May 10, 2012 9:06 am
by FOSTER
The prop is a Trophy Plus 13 3/4" X 19 pitch SS 4 Blade.
My thought on the 8" set back was the 5" to 4" tunnel would force the water up and out which would cause the 18" channel of water to shoot up further back off the transom than closer to the transom (if that makes sense not sure how to put it into words). What I gather is yall have mounted your motor at the lowest point on the jack plate and still need to lower it more?
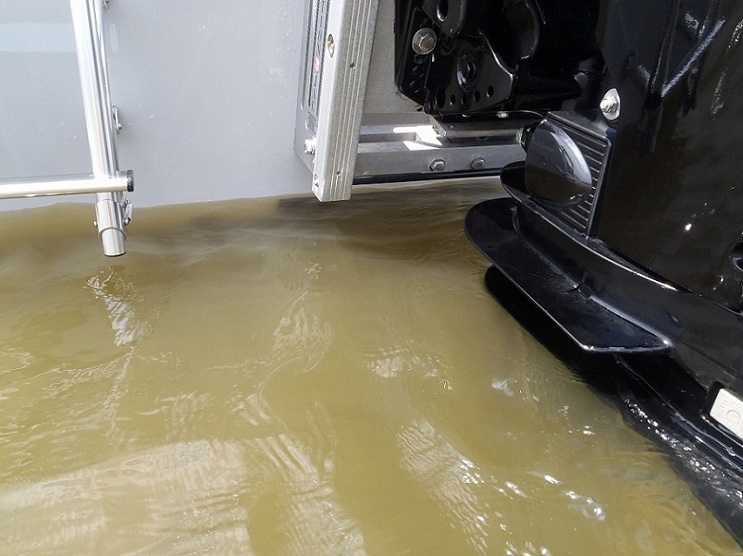
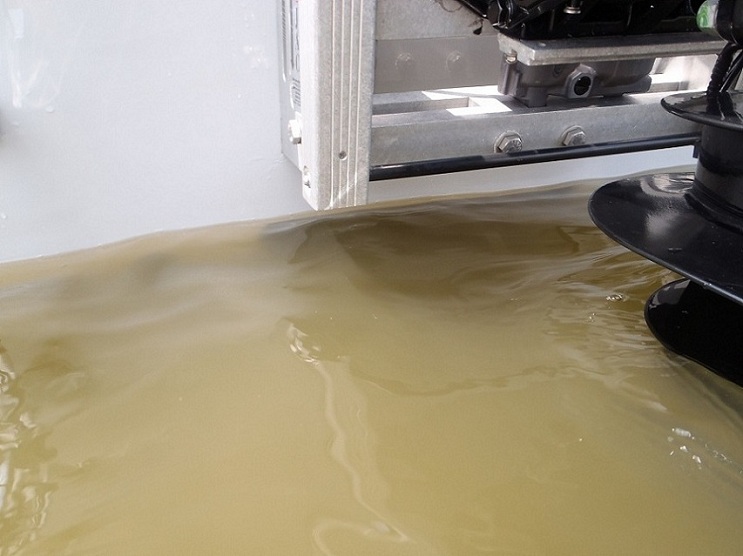
I also plan on venting the tunnel. Has anyone done this yet on a XF-20?
Re: FOSTER'S XF20
Posted: Thu May 10, 2012 9:46 am
by Aripeka Angler
What I gather is yall have mounted your motor at the lowest point on the jack plate and still need to lower it more?
Brent, that's correct. My motor is all the way down and it's still 2 inches too high. I need to pull the motor and chop 2 inches off the transom.
Re: FOSTER'S XF20
Posted: Thu May 10, 2012 11:25 am
by Uncle D
FOSTER wrote:I also plan on venting the tunnel. Has anyone done this yet on a XF-20?
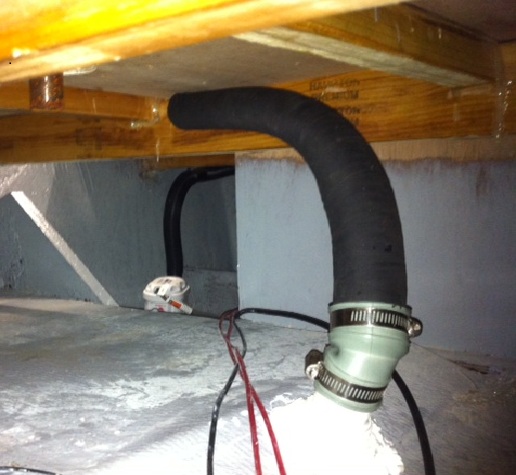
I plan on the same on my PH. timoub007 did one on his duck/fishing boat. He also made a baffle for it but I couldn't tell exactly how he did it. I'd like to see what you come up with. Good Luck, Don
Re: FOSTER'S XF20
Posted: Fri May 11, 2012 10:31 pm
by FOSTER
Uncle D, I hope to run a vent to the console somehow and be able to close a valve if needed from the console.
I ordered my paint went with Sterling Kingston Gray for the outside, graphite for the bottom, Sterling Graystone on the inside and Gray Kiwigrip.
Was hoping my fiberglass would get here so I could start on the boat, but looks like it will probably be Monday. Which will work better my son has 2 ballgames this weekend.
Re: FOSTER'S XF20
Posted: Thu May 17, 2012 12:22 am
by FOSTER
Started fiberglassing the inside of the hull and man I don't like butt blocks.
How do you fiberglass the side panels without the fiberglass bunching up due to the curve in the plywood? Do you cut the excess fiberglass off before you begin fiberglassing the side panels?
Re: FOSTER'S XF20
Posted: Thu May 17, 2012 1:10 am
by cali123
I thought like you did, that the 8 inch setback would put the prop right in the "wave". I have sat in the back of my boat at moderate speeds and watched the water level drop before it reaches the motor. I vote for the 4 inch setback. The water is pretty aerated by the time that it reaches the prop at 8 inches. I built my transom at 24 inches and I have the motor mounted in its highest position but when I finally get dialed in, I will probably have to drop it. In its present position the boat just barely backs up and doesn't want to go foreword very well until the tunnel is primed. I vented the tunnel but I think it will need a baffle to be effective. Sorry that I can't give better answers but I am in the process of getting things dialed in.
Re: FOSTER'S XF20
Posted: Thu May 17, 2012 1:17 am
by FOSTER
Not what I wanted to hear. Ordered the jack plate mid-April and received it on Monday so I am stuck with the 8".
Re: FOSTER'S XF20
Posted: Thu May 17, 2012 2:59 am
by dbcrx
FOSTER wrote:
How do you fiberglass the side panels without the fiberglass bunching up due to the curve in the plywood? Do you cut the excess fiberglass off before you begin fiberglassing the side panels?
If you just cut the cloth roughly to size first, it should work into the shape quite easily.
Re: FOSTER'S XF20
Posted: Thu May 17, 2012 12:35 pm
by cali123
Make sure that you taper the edges of the butt blocks or use a good fillet so the glass will flow over the blocks. I started on the bottom just like you and cut the glass for the sides to length first but left the width alone till later. I was always afraid of cutting it too narrow. ( You know, cut it twice and it was still too short )
Re: FOSTER'S XF20
Posted: Tue May 22, 2012 10:40 am
by FOSTER
Cali123, saw on Majorgator's build where he tapered the edges of the butt blocks so I did the same.
What trolling motor shaft length and thrust are most people using on their XF2O? Looked on MotorGuide's website and they have a 75# thrust with a 50" or 60" shaft. Which do yall suggest?
I finished glassing the inside of the boat and I’m working toward installing the stringers.
Re: FOSTER'S XF20
Posted: Tue May 22, 2012 11:11 am
by majorgator
Brent
Not that I'm the expert on this, but I have the 60" shaft. I think that Richard has the 50" shaft. I'm about 6'-3" (when I stand straight
), so the extra length is helpful to me. With the 60", I can easily control the motor without having to bend over. My deck is a little over 6' long, so it fits just fine. The newer models have the tilt-handle which might accomplish the same thing.

Re: FOSTER'S XF20
Posted: Tue May 22, 2012 11:32 am
by FOSTER
Man that is a fine boat you did a great job!!!!!
Re: FOSTER'S XF20
Posted: Sun May 27, 2012 1:54 am
by FOSTER
Here are some pictures
Installing the stingers but ran out of EZ Filet waiting on brown Santa Claus (UPS)
Installed knee braces
Re: FOSTER'S XF20
Posted: Sun May 27, 2012 1:59 am
by FOSTER
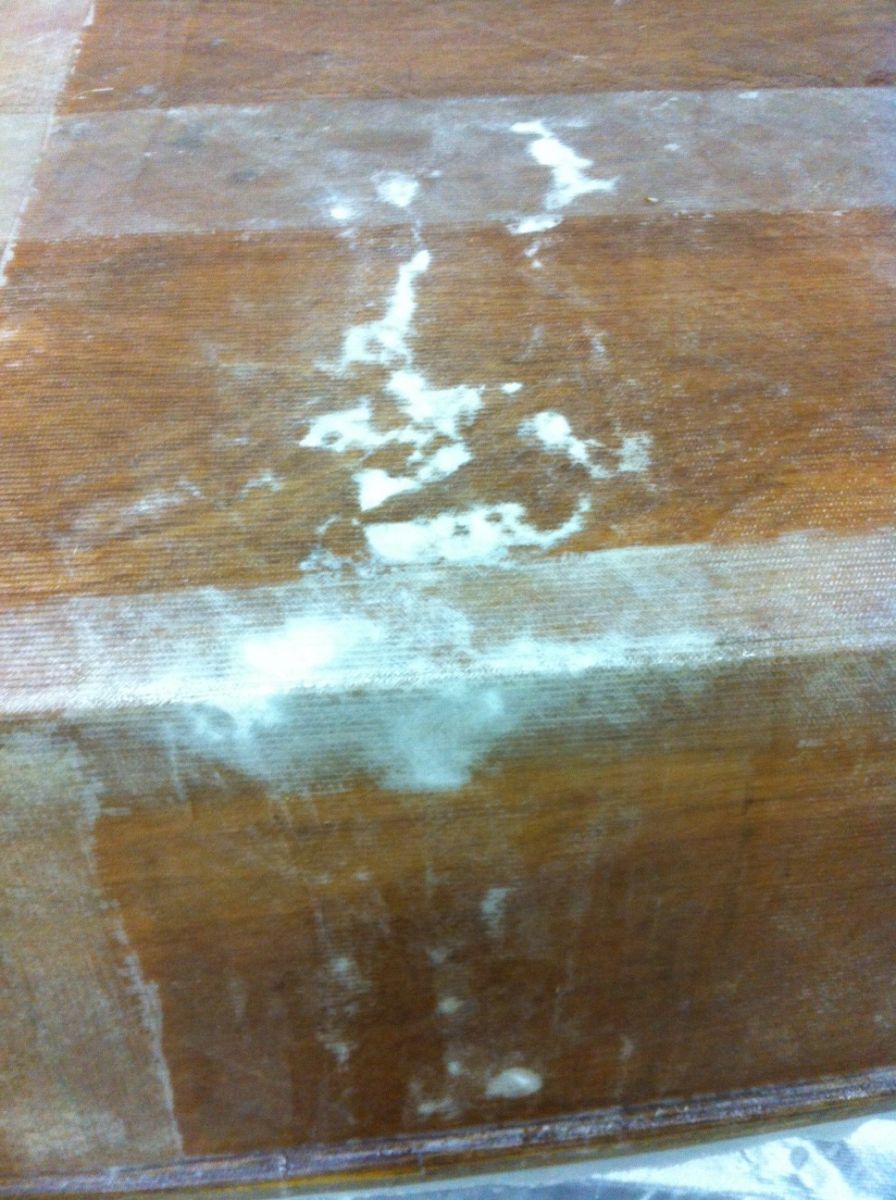
Didn’t have the stuff needed to finish the inside so I decided to flip it and fiberglass the outside of the boat it was a 12hr day. I need a little help though. I had help on one side of the boat and got a little excited with the mixing and mixed too much epoxy which caused little mishap. It is the last picture. What should I do?
and the problem
Re: FOSTER'S XF20
Posted: Sun May 27, 2012 2:03 am
by FOSTER
The mishap will be 24hrs old at 5pm on 5-28-12 if that helps on the fix.
Re: FOSTER'S XF20
Posted: Sun May 27, 2012 8:39 am
by chlli willie
If thats epoxy that cooked before it could be spread,about the only thing you can do is sand it down and look at the condition of the cloth under it. If the cloth was not saturated and dont have a good bond to the wood you may have to sand that part away until you get to the wood and make a small patch that over laps that small area and reglue that down.
Re: FOSTER'S XF20
Posted: Sun May 27, 2012 5:23 pm
by FOSTER
Thanks Chlli Willie, I was able to sand the outside and found good cloth under the cooked epoxy.
Another question: When you fair are you basically taking off the areas where you have overlapped the 1708 and where the fiberglass tape is under the 1708?
Re: FOSTER'S XF20
Posted: Mon May 28, 2012 7:33 am
by thb
Foster,
When you fair, you do not basically take anything off where there are several layers next to one layer. You are filling in the transition between layers to make them smooth and fair. You do not want to take any of your fiberglass off or sand thru it anywhere.
Watching your build with interest. Good job.
Regards,
Tom in Steinhatchee
Re: FOSTER'S XF20
Posted: Wed May 30, 2012 10:45 pm
by FOSTER
Thanks Tom, I put some quick fair on and need to start sanding.
I don't have pictures of the quick fair, but I do have pictures of the strakes after they were installed on the bottom of the boat.
Re: FOSTER'S XF20
Posted: Sat Jun 02, 2012 2:07 am
by FOSTER
Started putting the quick fair on had to fill in some large areas where a single layer of 1708 meets two layers of 1708. Hopefully I'm doing this right.
Re: FOSTER'S XF20
Posted: Sat Jun 02, 2012 10:38 am
by cali123
I used several sizes of drywall knives up to 14 inches on my XF. If you can get it on smooth there will be less sanding. Try to keep the knife strokes lengthwise of the hull or diagonal because side to side only makes lumps. That bottom is huge and I don't think the fish care how perfect it is.
Re: FOSTER'S XF20
Posted: Sat Jun 02, 2012 6:50 pm
by FOSTER
Cali123, I hear you about the fish and I'm starting not to care about the bottom either. Worked today sanding the bottom and will work on fairing the sides tomorrow. There are still a few spots that need to be touched up on the bottom before it is ready for primer and then epoxy/graphite.
Re: FOSTER'S XF20
Posted: Wed Jun 06, 2012 12:21 am
by FOSTER
Have a few more questions. How many coats of high build primer should I put on the bottom if I'm going to put graphite on it? How may coats on the side of the boat where the top coat paint will go? Last but not least do I need to buy the finishing primer to put on the boat before I install the top coat paint?
I will try and upload pictures tomorrow. Not much to show just a lot of quick fair and sanding.
Ready to start priming!!!
Re: FOSTER'S XF20
Posted: Wed Jun 06, 2012 4:51 am
by stickystuff
If you are going to put epoxy/graphite on the bottom you don't need primer. Just make sure you sand it with a 220 grit before applying. Clean the entire bottom with alcohol and then start rolling the epox/graph on. You only need the primer if you are painting.
Re: FOSTER'S XF20
Posted: Wed Jun 06, 2012 8:11 am
by majorgator
Brent, ditto what Ken said. I had primer on mine, but that's only because I painted the bottom with S3 before sanding it off and applying the graphite. Based upon the current condition of my bottom, I'm happy I went with the graphite/epoxy coating.
If I remember correctly, I applied between 2 and 3 coat of primer on my every painted surface of my boat. I used the S3 High Build Epoxy primer in lieu of the Sterling primer. Since its high build, it helped smooth out some areas of imperfection and filled in most of the big holes. The Sterling primer requires more steps, more coats, and is much more costly. The Sterling paint goes on very well over the S3 primer.
Re: FOSTER'S XF20
Posted: Wed Jun 06, 2012 10:22 am
by FOSTER
I have already purchased the Sterling primer so it looks like there will be a little extra work and money on my part. I didn't read about having to add finishing primer after the high build primer.
So on the epoxy/graphite do I need to put a guide coat over the quick fair to check for low and high spots before putting the epoxy/graphite down? Currently I have just filled in the large voids and transitions and hit it with a 5" orbital sander no fairing board yet.
Re: FOSTER'S XF20
Posted: Wed Jun 06, 2012 12:29 pm
by cali123
If you haven't used a long board to sand the bottom, I can just about promise you that it will look like a sack of walnuts. A 5 inch sander will not straighten a big flat surface like that. Stop by an auto paint supply store and pick up some 3-M dry guide coat to use.
Put a coat on and hit it with a long board and you will soon know where the high and low spots are.
Re: FOSTER'S XF20
Posted: Sun Jun 10, 2012 12:14 am
by FOSTER
Cali123, I'm glad I took your advice on the fairing board. Here are some pictures of the progress.
Fairing compound on and sanded

I applied three coats of graphite and epoxy. First coat was 3oz of graphite with 12oz of epoxy. Second and Third coat was about 2oz of graphite with 12oz of epoxy. There are still spots where it looks like air bubbles but they are hard thinking that is part of the graphite? I sifted it three times before applying not sure but think it will be ok since it’s on the bottom of the boat anyway.

Re: FOSTER'S XF20
Posted: Sun Jun 10, 2012 1:14 am
by cali123
looking good.
Re: FOSTER'S XF20
Posted: Sun Jun 10, 2012 1:31 pm
by chlli willie
looks like you've been hard at it, lookin back I wish i had used a fairing board I used a skinny piece of wood and sand paper- good tools make all the difference. Lookin good , don't forget about your radius in the corner of the tunnel.
Re: FOSTER'S XF20
Posted: Sun Jun 10, 2012 2:41 pm
by stickystuff
What you see are small graphite particles. No matter how much you sift and mix you will get them Doesn't effect the finish at all. You will still have a great almost total bullet proof hull. Why did you not install the 3" radius in the pocket? It will still work but water flow will not be as smooth. i would go ahead and try it. Can't hurt.
Re: FOSTER'S XF20
Posted: Mon Jun 11, 2012 11:37 pm
by FOSTER
We had long talks at work about the tunnel while working graveyards (it gets boring at night) and thought the tunnel would be ok without the radius in it. We will find out (I always have to be different)!!!
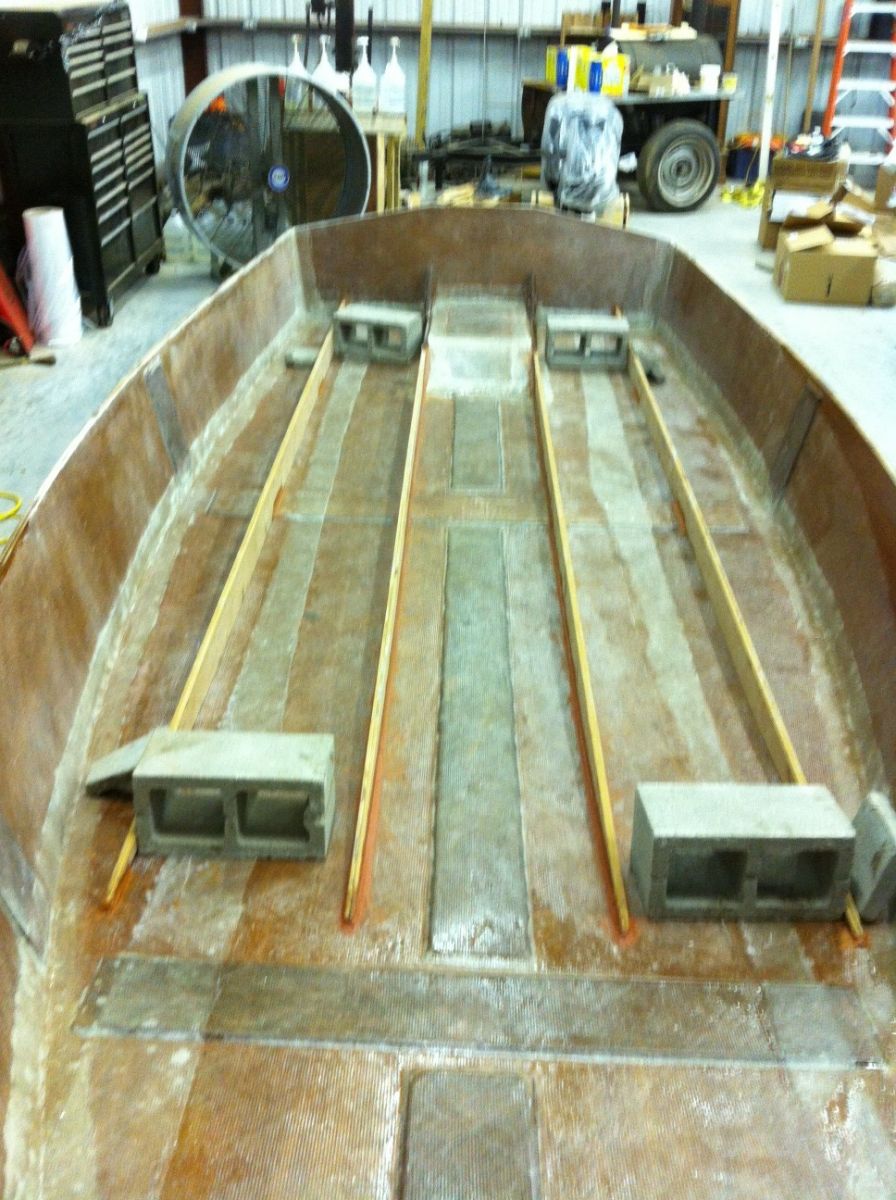
Well I have had some help from my Dad and a friend from work and we are rolling pretty well.
working on installing the bulkheads
Bulkheads installed, conduit ran and working on installing the decks.
Re: FOSTER'S XF20
Posted: Mon Jun 11, 2012 11:46 pm
by FOSTER
I had a question about the installation of the fuel tank. If you look at the picture below I am trying to install the fuel tank toward the front of the boat and wanted your opinions on how it looks. The middle two stingers go about 3/4 of the way down the board that is mounted for the fuel tank and we also installed blocks at the bottom of the bulk head for addition support. I plan on glassing in the board toward the front on the butt block will this be ok?
Re: FOSTER'S XF20
Posted: Tue Jun 12, 2012 5:00 am
by stickystuff
One thing to consider is that the upwards sweep of the bow. Make sure your fuel pickup is towards to stern. If it is to bow you will think you are running out of fuel because fuel will be angled towards the stern. It will reach a certain level and the fuel pickup will not be in the pickup area anymore.Foos for thought.
Re: FOSTER'S XF20
Posted: Sun Jun 17, 2012 8:30 pm
by FOSTER
Ken, I made sure and put the pickup tube toward the stern of the boat thanks for the info. When the tank was built I was planning on it going under the sole of the boat, but didn't have room so had to improvise and move it under the front deck.
Here are some updated pictures after a week worth of work 12hrs a day with my Dad’s help. We ended up building the sole as a raised sole similar to the style of the Boatright boats that they build and run in Texas.
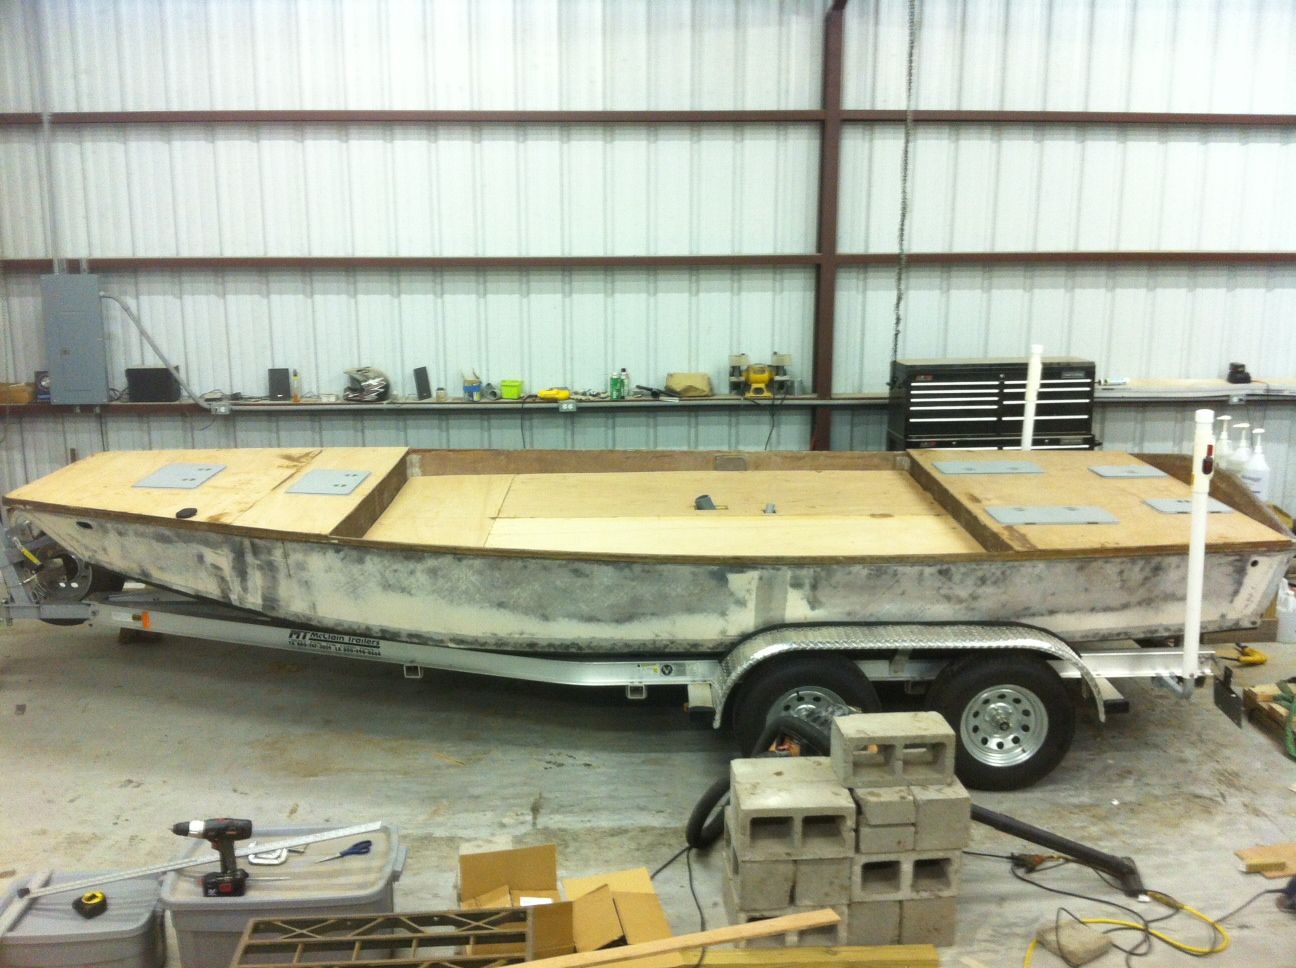
Here is the framing in progress didn't take a picture of the finished product. Had to add extra supports where the plywood joints were that’s about all that the picture doesn’t show. If I had to give someone advice I would say plan your framing around your hatches and the way the plywood is going to be laid on the deck. Some of us learn the hard way.
Livewell built and deck installed with holes cut for hatches.
Sounds simple, but it was a lot of work.
Re: FOSTER'S XF20
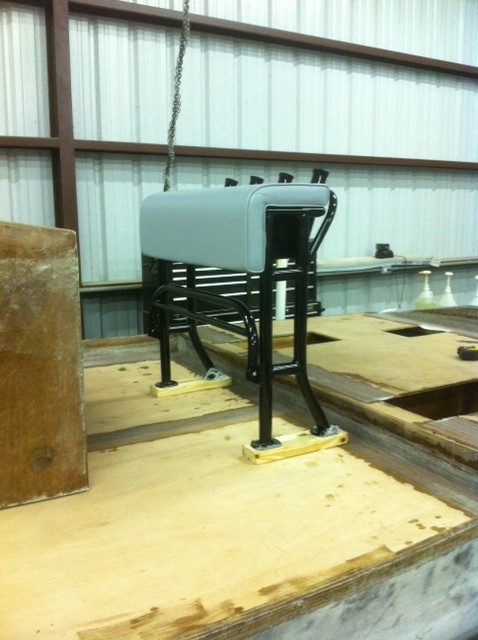
Posted: Tue Jul 03, 2012 3:37 am
by FOSTER
Here are a few pictures of the leaning post and grab rail which came from S&E Custom out of Florida. They did a great job and packaged it really well.
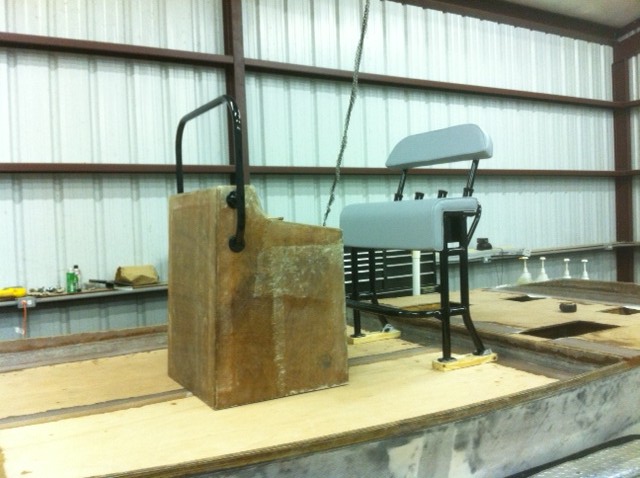
with the backrest removed
Re: FOSTER'S XF20
Posted: Tue Jul 03, 2012 3:51 am
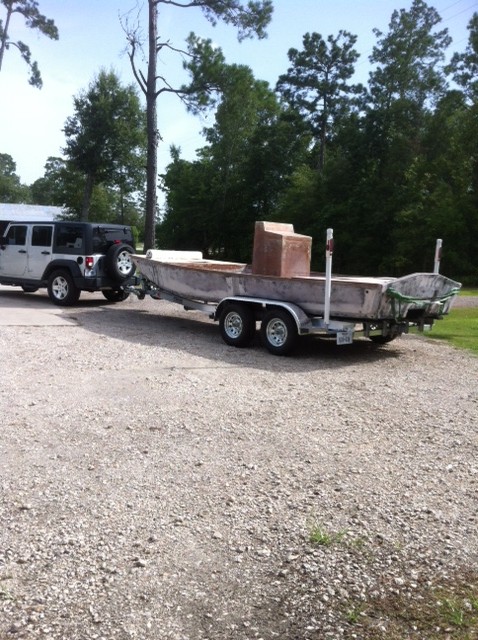
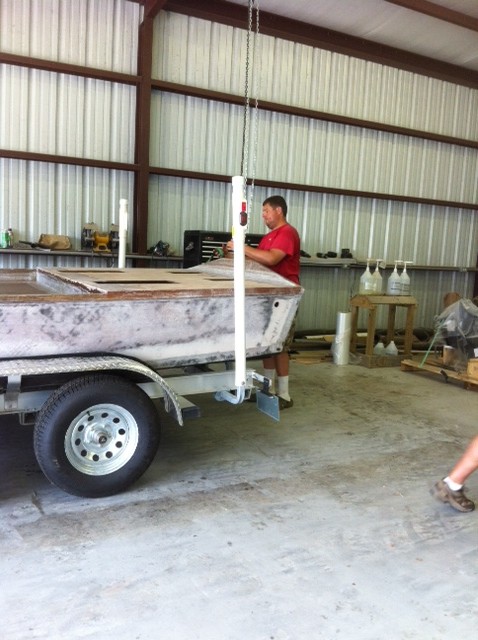
by FOSTER
We built a makeshift stand to put the boat on when we fair and paint the boat to keep from messing the trailer up. My Mom and Dad came over to help with the task Mom took pictures while Dad and I moved it from the trailer to the stand.
Here she is getting repositioned for the removal from the trailer (I think Mom took this picture just in case we dropped the boat I would have picture to remember the boat)
Dad and I rigging her up (notice me rocking the crocks with long socks
)

lifting her off the trailer
suspended in the air
sliding the makeshift stand under the boat
had to change the rigging so that we could move the boat back in the stall used an engine hoist on the back and the tractor on the front
Re: FOSTER'S XF20
Posted: Tue Jul 03, 2012 8:33 pm
by Southern Gent
Great Images. Tell Mom she did great. I wish I had a front end loader at the house.
Work Safe.
Re: FOSTER'S XF20
Posted: Fri Jul 06, 2012 12:20 pm
by tobolamr
If you lived closer, I'd just bring the tractor & front end loader from my dad's place over...
Re: FOSTER'S XF20
Posted: Wed Jul 11, 2012 11:32 pm
by FOSTER
I worked on the boat, not much to show. I had to add a 3/8" piece of plywood on the top of the rub rail between the front and back deck. The reason for this is after adding the front and back deck there was a 3/8" drop that needed to be filled to make the rub rail even down the length of the boat. Drilled holes in the side of the boat for the self-baling deck drains.
Routered the top of the rub rail, front and back decks. Cut a hole in the console for the access hatch. I finished fiberglassing the console to the sole of the boat inside and out. There are a few spots that had to be sanded down on the console that needs a do over on the fiberglass.
Re: FOSTER'S XF20
Posted: Thu Jul 12, 2012 12:13 pm
by Uncle D
Lookin' great Foster!! That has to be the perfect boat for the lake.
Don
Re: FOSTER'S XF20
Posted: Thu Jul 12, 2012 7:26 pm
by stickystuff
Hmmmm. looks like a custom camo job. Interesting build. Its amazeing what peoples ideas are when they design their crafts. Nothingbut a big fishing machine. Lots of deck room. Very nice. See what I started.
Re: FOSTER'S XF20
Posted: Fri Jul 13, 2012 6:39 am
by FOSTER
Thanks Don!
Ken, haven't got around to fairing the sides yet that is the black spray paint I was using looking for the high and low spot with a mixture of fairing compound and fiberglass under that it looks like a weird camo job. I think fairing is my least favorite task of the boat building process. I'm trying to sweet talk my wife into helping me fiberglass the front/back deck and fairing while the kids are with my parents on vacation for a week.
I wanted people to be able to fish out of the boat no matter where they were standing and like the idea of the raised sole. This way if you have a fish on and need to move around the boat you can do so with ease, but also wanted sides on the boat to keep something from sliding into the water. My thought was with the raised sole it would give the boat a little extra walking room and support the sides so that I wouldn't have to install a gunnel around the boat.
Re: FOSTER'S XF20
Posted: Fri Jul 13, 2012 9:46 am
by stickystuff
Great idea. Just kidding about the camo. I know fairing when i see it. I hate the process but it is well worth it i the end. Save your self some money and not use the Sterling paint. I would reccomend Industrial Imron. Much tougher paint and will save you some bucks. I think the Sterling is over rated on theseboats. Your call. Looks great and I know it will be a sharp looking hull when its done.
Re: FOSTER'S XF20
Posted: Sun Jul 15, 2012 11:53 pm
by FOSTER
Ken, I have already purchased the Sterling primer and paint. After talking with a few people I could have saved myself a little time and money going with the S3 primer. I have the high build primer and finishing prime which will require a few more coats. Maybe next time I will try the paint you recommended.
Finished fiberglassing the inside of the boat today. Plan on sanding and applying fairing compound tomorrow.
Re: FOSTER'S XF20
Posted: Wed Jul 18, 2012 7:47 am
by cottontop
Brent, I haven't been following your build very closely, but I really like it. The raised sole looks neat. Will certainly provide anyone on your boat an uncluttered fishing platform. John
Re: FOSTER'S XF20
Posted: Wed Jul 18, 2012 6:33 pm
by FOSTER
Thanks John!
Re: FOSTER'S XF20
Posted: Wed Jul 18, 2012 6:43 pm
by FOSTER
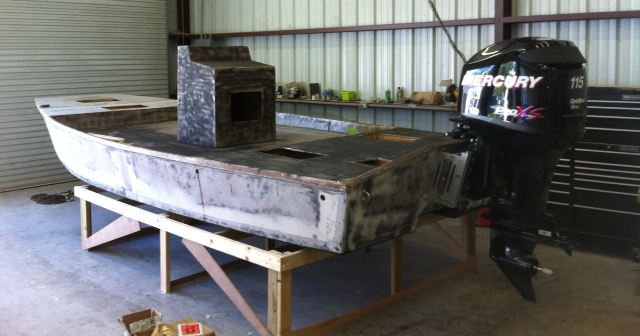
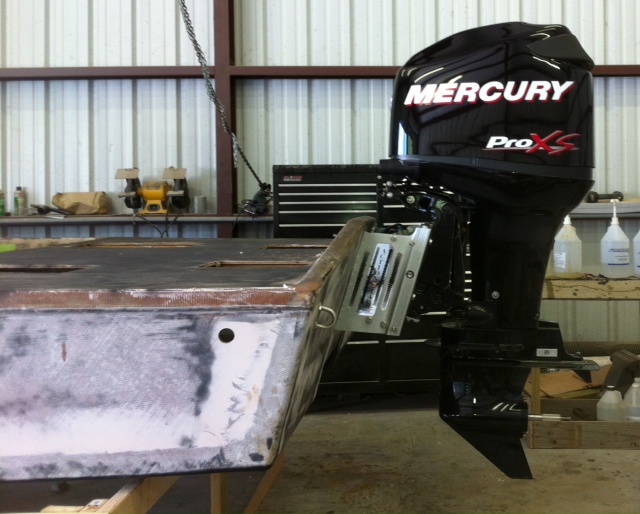
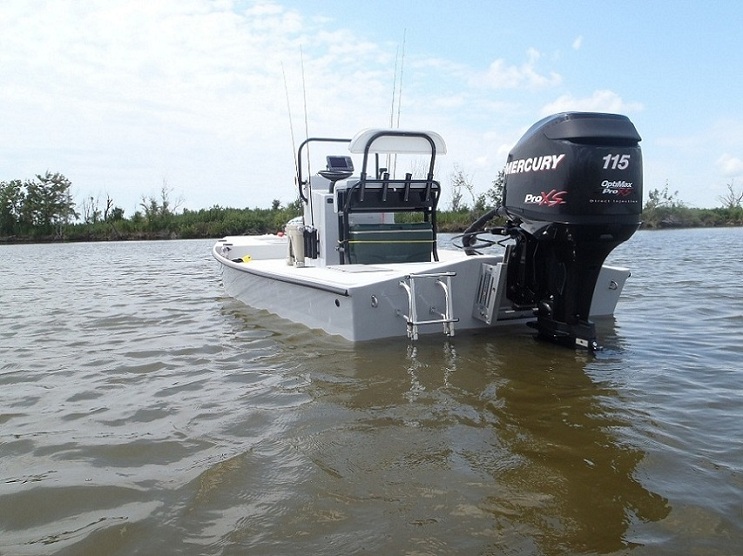
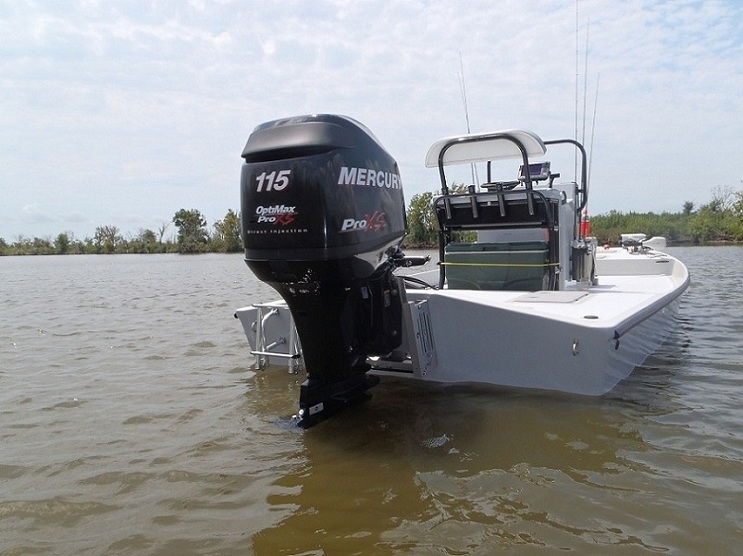
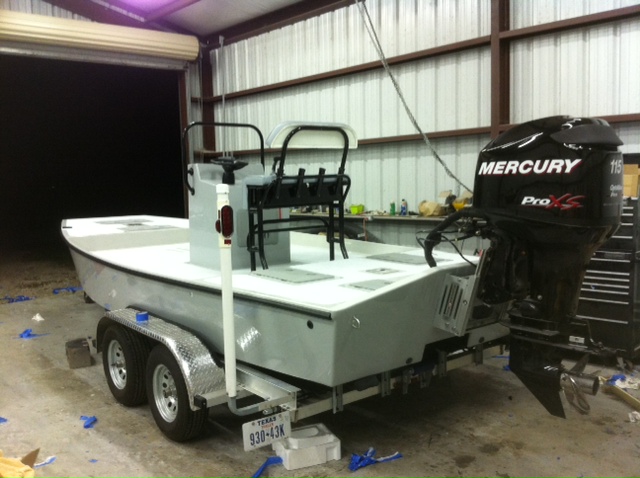
Re: FOSTER'S XF20
Posted: Wed Jul 18, 2012 6:46 pm
by cottontop
Brent, That 115 ought to make her fly...........
Re: FOSTER'S XF20
Posted: Wed Jul 18, 2012 10:40 pm
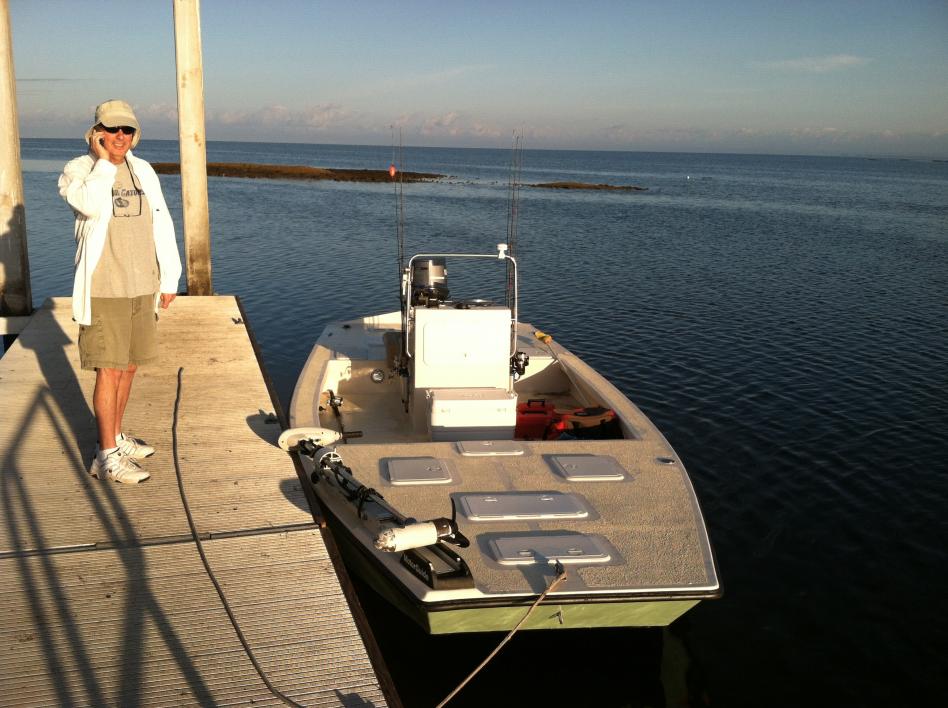
by FOSTER
I hope so John, ready to get her in the water and some performance numbers from the motor. It doesn't help that my son is on vacation with my parents at Lake Sam Rayburn telling me about the fish he is catching.
Seth and Richard I’m going to try something along the lines yall suggested. Without cutting down the transom I mounted the jack plate lower on the transom. I mounted the motor on the jack plate in the middle hole so I could move it up or down 2”.
Re: FOSTER'S XF20
Posted: Sun Jul 22, 2012 9:34 pm
by FOSTER
After a few more days of sanding we put the Sterling High Build Primer on. There are a few places that need some attention so I will work those tomorrow. Here are a few pics.
Re: FOSTER'S XF20
Posted: Sun Jul 22, 2012 10:15 pm
by Prarie Dog
Looks real nice Foster!!!
Re: FOSTER'S XF20
Posted: Mon Jul 23, 2012 10:11 am
by FOSTER
Thanks Prarie Dog.
Hope to fix the bad spots today and put the finishing primer on.
Re: FOSTER'S XF20
Posted: Tue Jul 24, 2012 10:15 am
by FOSTER
I was able to put on the finishing primer last night. Hope to sand for the last time today with some 320 and start painting the boat.
Re: FOSTER'S XF20
Posted: Tue Jul 24, 2012 10:46 am
by Southern Gent
Good loking rig, You are going to love fishing off this XF20.
Re: FOSTER'S XF20
Posted: Tue Jul 24, 2012 11:05 am
by majorgator
I still can't get over how great that console looks
Looks like you're moving along quite well. When the primer goes on, its a good feeling!
Re: FOSTER'S XF20
Posted: Wed Jul 25, 2012 12:43 am
by FOSTER
Majorgator, yes it was a good feeling when the primer went on and I put the sander down hopefully for the last time this build.
Thanks Southern Gent!! I can't wait to get it on the water.
Got the first coat of paint on inside and out here are a few pictures. The only problem is I ran out of brush reducer and need to try and find some in Houston tomorrow for the second coat.
Re: FOSTER'S XF20
Posted: Wed Jul 25, 2012 12:51 am
by Prarie Dog
Looks real nice, Foster. How hot was it when you painted your boat? We're having very high temps up here and wonder if it's okay to paint the sterling at 100 degrees.
Re: FOSTER'S XF20
Posted: Wed Jul 25, 2012 1:20 am
by FOSTER
Prarie Dog, not sure on the temp today. Didn't start painting till around 9 p.m. so it was a little cooler probably low 90's or high 80's. Did pretty good the only issue was when I painted around a hole on the side of the boat it wanted to run. Probably just normal just something I had to learn. I mixed 8ozs of thinner in a 24oz batch of paint seemed to work really well.
Re: FOSTER'S XF20
Posted: Thu Jul 26, 2012 3:57 am
by FOSTER
Thanks to Uncle D I was able to get the second coat of paint on the boat.
Wish me luck headed to the Texas Parks & Wildlife Department to try and get a Game Warden inspection today.
Re: FOSTER'S XF20
Posted: Fri Jul 27, 2012 11:46 am
by FOSTER
Re: FOSTER'S XF20
Posted: Fri Jul 27, 2012 11:55 am
by Aripeka Angler
Your boat looks great Brent
Dang it man you work fast
Good luck with the splash!
Re: FOSTER'S XF20
Posted: Fri Jul 27, 2012 12:26 pm
by Uncle D
You don't screw around with rigging. I'll throw a BBQ and Shiner for you and your buddies when it comes time for my rigging party.
Really though, it looks fantastic Brent.
You Know about the meet in Port A next weekend, right??
Re: FOSTER'S XF20
Posted: Sat Jul 28, 2012 3:07 am
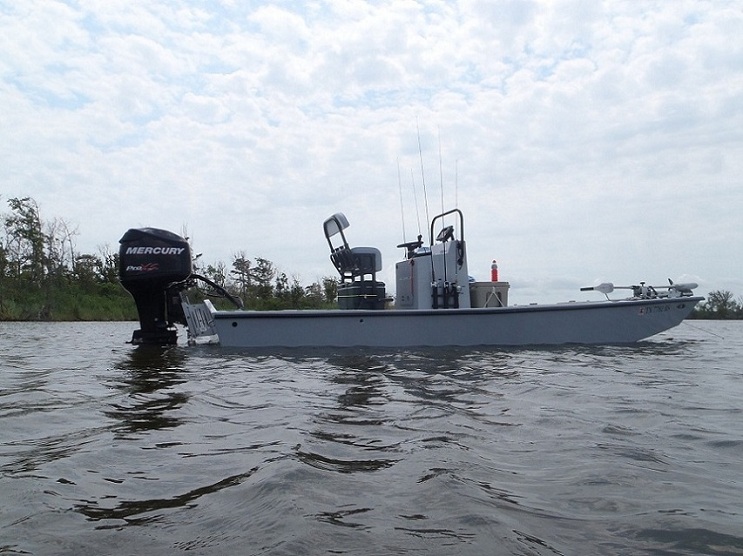
by FOSTER
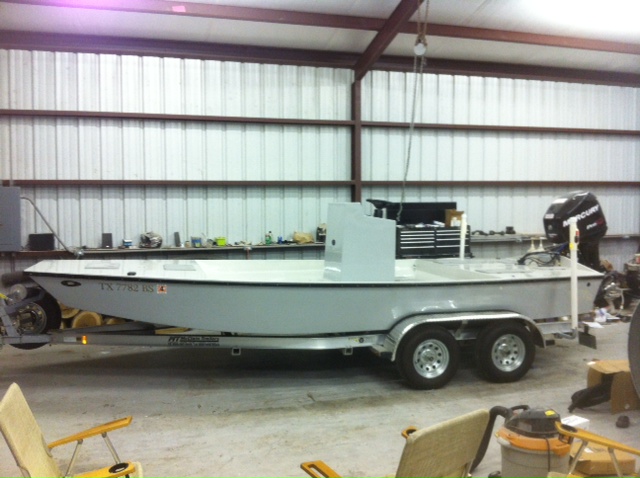
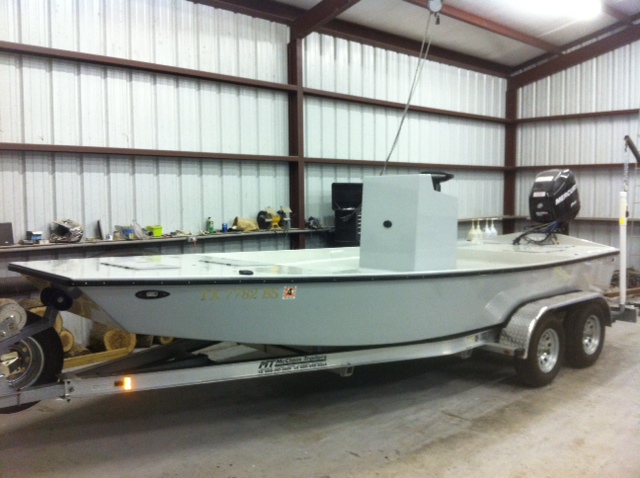
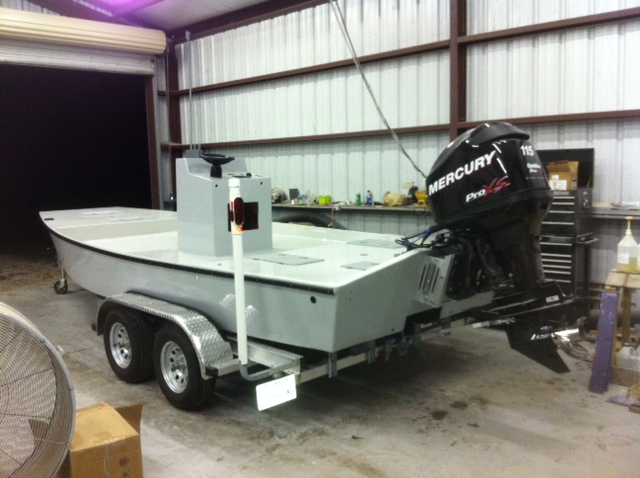
Thank yall very much and I couldn't have done it without yalls help. I would be more than happy to come help you rig your boat when you’re ready Uncle D. Don't know if I will make it to the meet or not have to start work on Saturday. We had another late night working on the rigging. It seems I ordered the wrong switch for the horn thought it was a momentary on and off switch seem like it is a momentary off and on switch. The horn stays on the whole time until you hold your finger down on the button. Still need to clean up the wiring and add labels to the switches, but that can be done latter. Have to install the smart gauge, fuel gauge and finish the live well. Here are a few pictures. I had four people helping today and we managed to get her water ready.
Picture without kiwi grip
Pictures after kiwi grip (the kiwi grip is called grey but it looks white to me) wish it was a little darker.
Re: FOSTER'S XF20
Posted: Sat Jul 28, 2012 7:05 am
by Cracker Larry
Very nice job, Brent

That's a fine looking boat
Re: FOSTER'S XF20
Posted: Sat Jul 28, 2012 7:50 am
by thb
Brent,
I love the colors you chose for your boat. Nice and pleasing to the eye. The black grap bar and leaning post tubing look neat with that black beast on the back. She should go like stink with that much power.
Great job and look forward to the splash and performance info.
Regards
Tom in Steinhatchee
Re: FOSTER'S XF20
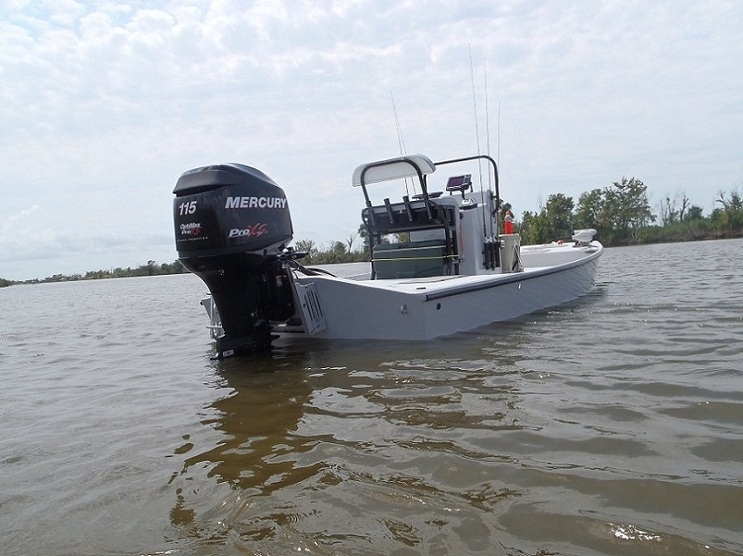
Posted: Sun Jul 29, 2012 12:07 pm
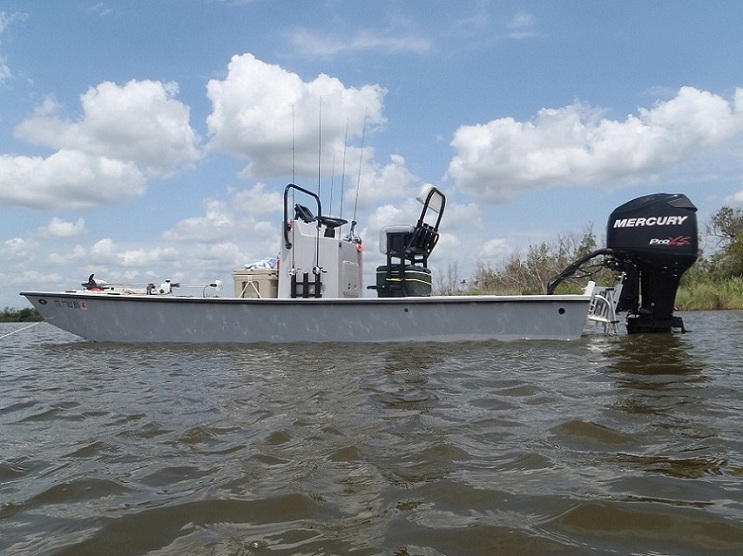
by FOSTER
Re: FOSTER'S XF20
Posted: Sun Jul 29, 2012 4:42 pm
by peter-curacao
Re: FOSTER'S XF20
Posted: Mon Jul 30, 2012 12:02 am
by FOSTER
Thank you
Re: FOSTER'S XF20
Posted: Mon Jul 30, 2012 12:08 am
by Prarie Dog
Looks awesome Foster. Can't remember, did you put strakes on her?
Re: FOSTER'S XF20
Posted: Mon Jul 30, 2012 6:28 am
by FOSTER
Thank you Prarie Dog. Yes, I put 4 strakes on the bottom.
Re: FOSTER'S XF20
Posted: Mon Jul 30, 2012 6:38 am
by FOSTER
Can you wax the sterling paint?
Re: FOSTER'S XF20
Posted: Mon Jul 30, 2012 9:44 am
by Mad Dog
Congratulations of the splash.
Everything looks perfect.
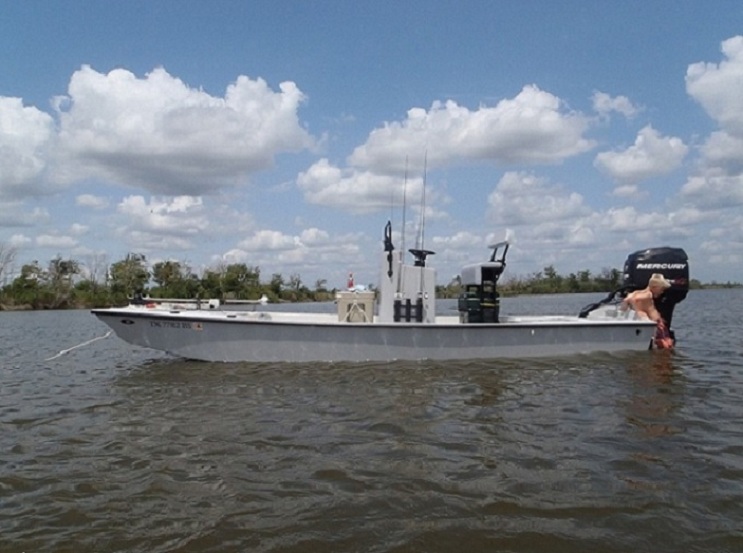
Just guessing from the pics but it looks like she is drawing 4 to 6 inches. That's going to be great for the flats.
MD
PS - It's only 5 hours to Port Aransas....
Re: FOSTER'S XF20
Posted: Mon Jul 30, 2012 11:00 am
by majorgator
Looks great Foster. Congrats on the splash!!
As a fellow XF20 club member, I'm interested to hear the performance numbers, like speed, turning ability, tunnel operation, fuel consumption, draft while occupied, etc. You'll probably need more time than this quick splash to figure it all out, so no rush...just enjoy the moment
BTW - my boat drafts 4 - 4.5" unoccupied in saltwater. Sound like you got it right!
Re: FOSTER'S XF20
Posted: Mon Jul 30, 2012 12:47 pm
by Uncle D
Give me a heads up when you want to hit the Laguna.
Good job!!
Re: FOSTER'S XF20
Posted: Mon Jul 30, 2012 4:18 pm
by cali123
[quote]Can you wax the sterling paint?/quote] You can polish/wax any paint but I would give it a couple months of warm weather to make sure all of the solvents are evaporated from the paint film.
Re: FOSTER'S XF20
Posted: Mon Jul 30, 2012 8:17 pm
by chlli willie
Congratulations! that came out good, nice family times on the water ahead for you.
Re: FOSTER'S XF20
Posted: Tue Jul 31, 2012 7:40 am
by Steven
Looks fantastic. Congratulations.
Re: FOSTER'S XF20
Posted: Wed Aug 01, 2012 5:45 am
by FOSTER
Thank y'all!!! I really wish I could make it to the builders meet. The only problem is I have been on vacation for 20 days and hate to take off more. I'm going to see what I can do to try and make it depends if I'm extra at work or they have me working a real job.
Re: FOSTER'S XF20
Posted: Wed Aug 01, 2012 5:48 am
by FOSTER
Had to order the clamshell covers for the self baling deck. I had the same problem Seth had with the water rocketing in when the boat is underway.
Re: FOSTER'S XF20
Posted: Wed Aug 01, 2012 9:13 am
by Mad Dog
FOSTER wrote:Thank y'all!!! I really wish I could make it to the builders meet. The only problem is I have been on vacation for 20 days and hate to take off more. I'm going to see what I can do to try and make it depends if I'm extra at work or they have me working a real job.
We understand completely about the work, got to pay the bills. However, there is nothing like the oohs and aahs you'll get when a bunch of guys with BBV are drooling over your boat.
MD
PS Drool wipes up easily...
Re: FOSTER'S XF20
Posted: Wed Aug 01, 2012 9:24 am
by Steven
Would be great to have you make it if you can. I'd love to see an XF20 in person.
Re: FOSTER'S XF20
Posted: Wed Aug 01, 2012 10:15 am
by Aripeka Angler
Brent, nice job on your boat!! When you get get a chance, can you give me some feedback on how your boat handles in high speed turns? I eventually want to add some strakes to the bottom of my XF20.
Re: FOSTER'S XF20
Posted: Wed Aug 01, 2012 2:41 pm
by wegcagle
Great job on the XF20 Brent. She looks great on the water. 4-4.5" draft is just awesome
Now it's time to enjoy her.
Will
Re: FOSTER'S XF20
Posted: Fri Aug 03, 2012 4:18 am
by FOSTER
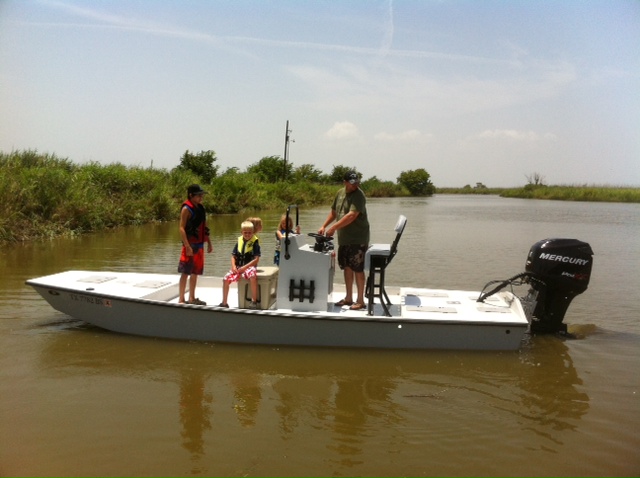
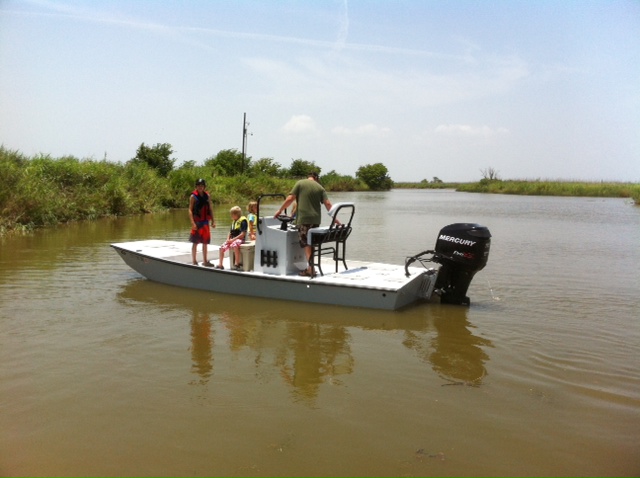
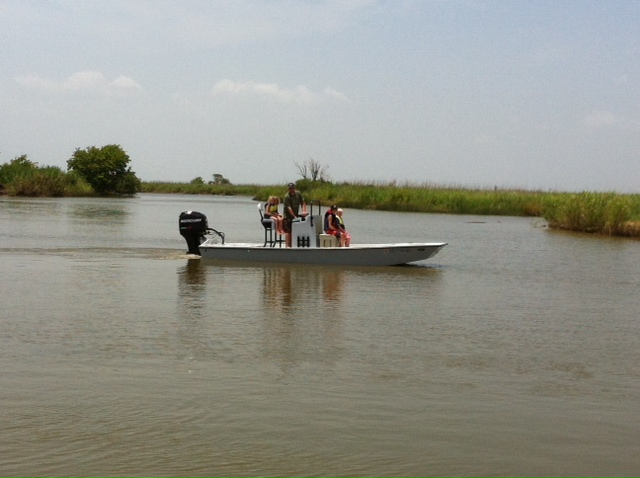
It's hard to say if the strakes help or not. I wish I could ride in a XF20 that didn't have them so I could compare the two. I have found if the tunnel has good suction the boat will run a top speed of 33mph and turn very well. If I intentionally make the boat porpoise and break the suction of the tunnel then trim the motor back down the boat will run 45mph, but at 45 you need a lot of room to turn her. When I make it porpoise to break the suction of the tunnel it seems like it ends up riding on a pad like a bass boat does with about 4' of boat in the water.
Re: FOSTER'S XF20
Posted: Fri Aug 03, 2012 4:21 am
by FOSTER
I will try and get a accurate draft number with the boat loaded when I have a few good size guys riding in the boat with me.
Re: FOSTER'S XF20
Posted: Fri Aug 03, 2012 9:08 am
by majorgator
Brent, please remind me, did you vent the tunnel or not?
Re: FOSTER'S XF20
Posted: Fri Aug 03, 2012 10:36 am
by FOSTER
Seth, I decided to try it without the vent first and vent it later if needed.
Re: FOSTER'S XF20
Posted: Fri Aug 03, 2012 11:53 am
by cali123
I built my XF without strakes for the sake of shallow draft. I think that was a mistake. Do you remember the old trucker song that said : "give me 40 acres and i'll turn this rig around" ? I think I need 60 or more. When I turn the wheel at app. 25 mph. the boat just slides until I slow it down. I'd sure like to ride in one with strakes to see if they really help. I think I will call her the Drifter.
Re: FOSTER'S XF20
Posted: Mon Aug 06, 2012 1:36 pm
by Uncle D
FOSTER wrote: If I intentionally make the boat porpoise and break the suction of the tunnel then trim the motor back down the boat will run 45mph, but at 45 you need a lot of room to turn her.
I think it's time to consider venting the tunnel. Over 10 mph is a huge difference.
Every flat bottom I've ran took a lot of space to turn. You just get use to it.
Re: FOSTER'S XF20
Posted: Mon Aug 06, 2012 6:27 pm
by tobolamr
Not meaning to hijack, but I believe I need some education. Please set me right if I'm wrong!
cali123 wrote:I built my XF without strakes for the sake of shallow draft.
You know, I'm not a builder yet, but this is a statement that always gets me scratching my head.
I look at the strakes on my production boat, and they are 3/4" tall off the hull. I've never had a problem getting into water because of the strakes, but rather I've had my keel too low to allow me to get where I want to go. On the other hand! I've NEVER fished the flats, or ultra shallow water like many here have. Is that 3/4" of depth really enough to make the strakes a non-option?
Re: FOSTER'S XF20
Posted: Tue Aug 07, 2012 11:35 am
by Uncle D
I'm sure that keel or strakes are a must unless you don't mind a 60 acre turn. I opted to eliminate the keel but installed 1 1/2"x1 1/2"strakes for flats and ultra skinny. I'm not flat bottom so the strakes are about even with center bottom of the deadrise. This way I should have good handling in turns and run skinny as possible. Plus I have extra layer of glass on hull. Guess we'll find out for sure later.
Re: FOSTER'S XF20
Posted: Mon Aug 13, 2012 1:06 pm
by cottontop
Congrats on finishing your boat. She looks great. Your family is going to love the boat and all the time ya'll will spend on her. Great looking family. John
Re: FOSTER'S XF20
Posted: Wed Aug 15, 2012 1:37 am
by FOSTER
Thanks John!
Re: FOSTER'S XF20
Posted: Wed Aug 15, 2012 1:38 am
by FOSTER
Re: FOSTER'S XF20
Posted: Wed Aug 15, 2012 7:45 am
by cottontop
Your sons big smile says it all. Man that boat sure sits shallow. The "reds and trout" better watch out!
Re: FOSTER'S XF20
Posted: Wed Aug 15, 2012 2:50 pm
by jorgepease
FOSTER wrote:I will try and get a accurate draft number with the boat loaded when I have a few good size guys riding in the boat with me.
At rest you can't see the top of the tunnel, I thought this boat was supposed to draft only 2". I guess the larger motor and jack plate pull it down another 2. BTW its a great looking boat and very fast at 45!!
Re: FOSTER'S XF20
Posted: Wed Aug 15, 2012 3:03 pm
by tech_support
I guess the larger motor and jack plate pull it down another 2
and batteries/fuel/etc. To float in 2" you would have to build the original version, which has a MUCh smaller motor and probably weights at least 1000 pounds less
Re: FOSTER'S XF20
Posted: Wed Aug 15, 2012 3:23 pm
by Cracker Larry
This is Red Alert, before it was red. It has 2" of tunnel exposed with a 70 Yamaha, and it's plenty fast enough.

Re: FOSTER'S XF20
Posted: Wed Aug 15, 2012 10:06 pm
by jorgepease
Good to see that, I am going with a 70hp as well. Also very nice boat!
Re: FOSTER'S XF20
Posted: Thu Aug 16, 2012 5:57 pm
by FOSTER
Jorgepease just to give you an idea of the extra weight the Mercury 115 motor ways in at 375 lbs vs Yamaha 70 2 stroke at 228 lbs. The 8" jack plate is about 56 lbs. There is 35 gallons of fuel toward the front of the boat which is roughly 212 lbs. I also have 3 batteries under the center console which is roughly another 150 lbs.
Re: FOSTER'S XF20
Posted: Thu Aug 16, 2012 10:42 pm
by jorgepease
Yes it all adds up. Are you happy with the 8" jack plate? I think I read somewhere that others were recommending 4".
I personally don't need a static draft of 2 or 3 inches but to be able to run in 3-4 would be just the ticket.
I am going for the new Yamaha 4 stroke 70, only 264 lbs. I have a much heavier Yamaha 75 four on my much heavier Carolina Skiff and it's adequate speed wise and doesn't burn much fuel so I am pretty excited about a 70 on a boat that will be almost half as heavy.
My gas tank on the skiff only holds 21 gallons and I only have one battery. How do these boats ride in a chop? Do they pound really bad? It's a really big boat so I was thinking that would help a bit.
Cheers on your boat!
Re: FOSTER'S XF20
Posted: Fri Aug 17, 2012 8:30 am
by majorgator
I'll add something about draft to this conversation.
See my picture below. In that picture, the boat is drafting about 3" with the bow slightly beached. Take it off the beach, and it draws between 3" and 4". The
balance of the boat plays a critical role. My motor goes about 270 lbs +/-, my main batteries and console sit a bit more aft than Richard's boat, and, arguably, I carry around a good bit of junk with me. I also have the 18 gallon fuel tank. Before I added the 24V trolling motor and 2 additional batteries on the bow, my draft looked more like Brent's when measured from the transom. Also, the salinity of the water plays a small role in this. Saltwater is more dense than freshwater, therefore objects naturally float better in salt vs. fresh. When I splashed my boat, I did so in pure freshwater, and the results were a bit discouraging. However, my spirits were quickly lifted when I put her in saltwater.
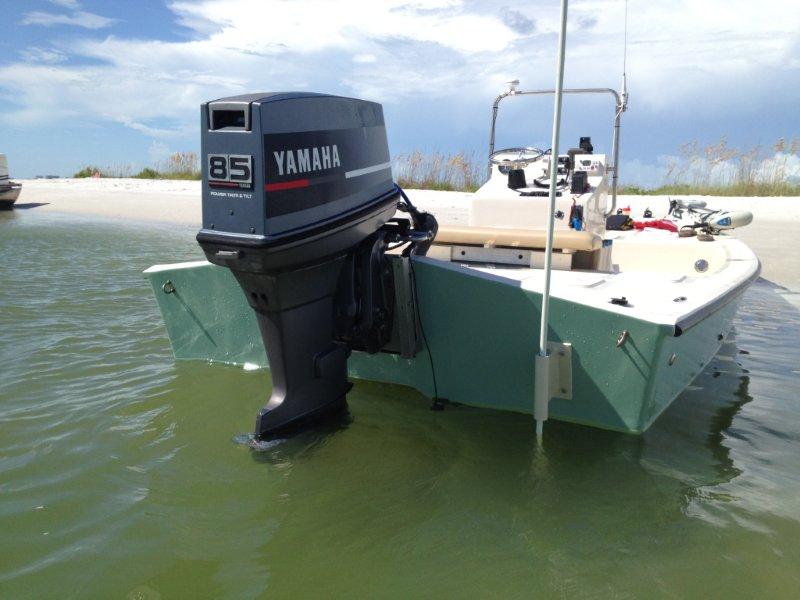
Now, about the balance again, as I said above, my trolling motor and batteries are mounted up front in/on the bow. This made the ride much worse, particularly in a chop. I thought this might happen, but you'll find that you have to tweak and experiment with this boat in order to accomplish the best overall scenario. I'm going to relocate the batteries to a more mid-ship location this Fall. I can't do anything about the location of the trolling motor, so I'll have to move the batteries around until I find the best location.
To answer you're specific question about chop, the boat does pound pretty good in a close chop, but not too bad if the chop is more distant. Rough water in general is hard on the kidneys in this boat. But like I said above, the balance is very important. Try not to get too much weight in the front. I think Chillie Willie might be one to comment on the fuel tank size. He has the same 4-stroke 70 that you're planning on, and he's commented to me that the fuel usage is pretty minimal.
Re: FOSTER'S XF20
Posted: Fri Aug 17, 2012 11:21 am
by jorgepease
I am all saltwater so perfect and I plan on glassing a vertical flange to secure a raised platform. That should give me the latitude fore and aft to get the right balance.
I never thought I would complain about ride but lately, the beating I am taking on my skiff has me wanting to add shock mitigation to the raised platform. I am talking super light weight systems like you would find on mountain bikes. I wont be adding a trolling motor but maybe one extra battery.
If mine shows a little tunnel like what you are showing, I will be very happy ... but either way once your on plane, about the only thing in the water is going to be the skeg
I am getting ready to infuse the outside of the hull. Major learning curve going on with this vac infusion, can't wait to be on the water as well!!
Re: FOSTER'S XF20
Posted: Fri Aug 17, 2012 7:18 pm
by FOSTER
If I had it to do over I would go with a 4" or a 6" setback. The extra weight further back on the transom doesn't help it just means you need more weight further upfront to offset the motor being further back on the transom.
Re: FOSTER'S XF20
Posted: Mon Sep 03, 2012 12:06 am
by FOSTER
Re: FOSTER'S XF20
Posted: Mon Sep 03, 2012 5:07 pm
by Pro Wader
Does your tunnel vent have a valve on it? I have been toying with the idea of a tunnel vent valve that I could close (burp the air from the tunnel) for a shallow hole shot and open when I am on plane.
Re: FOSTER'S XF20
Posted: Tue Sep 04, 2012 6:26 am
by stickystuff
The theory behind the tunnel is when the water passes through it builds up compression which allows the water to shoot through the tunnel. When you vent it you lose compression. If you don't want the compression then you reverse the tunnel. 4" at the entry and 5" at the exit . One of the local guides uses a reverse tunnel and his hulls run extremly shallow.Just food for thought.
Re: FOSTER'S XF20
Posted: Tue Sep 04, 2012 10:33 am
by jorgepease
FOSTER wrote:I think I will be able to solve this problem with a compression plate on the motor. As long as the jack plate is raised 2” or less it will turn fine anything over that and she blows out around a turn. If I’m running strait I can trim the jack plate all the way up with no problems. Here are some pictures. I will add a valve and make it look a little more professional later.
sounds great!! I think you are going to minimize blow out a lot when you put that cavitation plate on. On my build, I think the sponsons are going to help me a little with that issue. Especially since I installed my inside strakes flush with the inside of the sponson hopefully corralling the water even more ... That along with a compression plate should do the trick. I want to vent my tunnel as well, only need it when running slow in really shallow water.
Since I have that extra bit of flotation in the back I was thinking of making my tunnel just a bit wider, like an inch.
Re: FOSTER'S XF20
Posted: Tue Sep 04, 2012 12:43 pm
by cali123
If you are using the original XF20 (or are planning to)tunnel, you would do well to view the unedited version of my video titled " XF20 video". While I agree that a compression plate is necessary for keeping the water around the prop, I think that the major problem of prop bite and blowout comes from the tunnel not elevating the water high enough. I am using an 8 inch Bobs jackplate and I can see the water level falling off before it reaches the motor. I know that in theory the tunnel should produce a wave and thus elevate the water above the top of the tunnel but it just comes straight back for about 12 in. then starts to fall off. I have a 1 1/2 in. valved vent with a baffle and the only difference that I can see overall is speed. When I go WOT with the vent closed and the jack up, I reach 26 mph.As I open the valve the boat porpoises wildly until I trim it down. Once the hull settles down I am going 30 mph. and if I close the vent it immediately falls back to 26 mph. If I had it to do over, I would use a tunnel like Prariedog is using on T's Muncher.
Re: FOSTER'S XF20
Posted: Tue Sep 04, 2012 3:15 pm
by jorgepease
I just found that video (nice job on the video), thanks for sharing that.
I think I am going to add some spray rails after watching
Has anyone modified the tunnel on the XF20?
Re: FOSTER'S XF20
Posted: Tue Sep 04, 2012 9:59 pm
by cali123
[quote]Has anyone modified the tunnel on the XF20?/quote] Do a search for timoub007 in this forum. He has some interesting and informative things to say about the XF20 tunnel.
Re: FOSTER'S XF20
Posted: Wed Sep 05, 2012 11:27 am
by Uncle D
Glad you vented Brent. Fast and Shallow
cali123 wrote:Has anyone modified the tunnel on the XF20?/quote] Do a search for timoub007 in this forum. He has some interesting and informative things to say about the XF20 tunnel.
I'm going with a cross between the two. I used the basic XF20 tunnel plans. I changed the exit by narrowing it a bit and the sides of the tunnel are at a 15 degree outward angle. I'm also going with a completely different vent system.
Re: FOSTER'S XF20
Posted: Wed Sep 05, 2012 3:01 pm
by jorgepease
I found the timoub007 thread. It's an interesting design he ended up with ... and the out angled walls is something like a flats cat. funny how different these two mentioned are, one tapers in, the other out but at least the idea of both is to compress the water.
I remember an old western movie which had these miners using water pressure to strip mine. They started with a really large diameter pipe and kept narrowing the pipe for about a hundred foot of drop. It exited a pipe about the size of a fire hose with a huge amount of pressure.
I hope you guys finish yours and test before I get to that point
otherwise I will probably stick pretty close to the plan, maybe make the lines a little more gradual and rounded that is about it. I think a compression plate will take care of a lot of the blowout.
Re: FOSTER'S XF20
Posted: Thu Sep 06, 2012 7:08 pm
by FOSTER
One thing to add I didn't do the radius on my tunnel just strait up on the sides and 18" wide. I have no baffle and no vent valve.
Nice video Cali123!!! I haven't noticed that much spray coming from the side of my XF-20. I will try and video the hull running next set of off days.
I think with the tunnel vented the boat has a faster hole shot. I haven't noticed more draft in the hull unless it’s a 1/4" or less which is no big deal to me. I would also guess that it would allow the back of the boat to actually ride higher in the water without the suction on the bottom of the tunnel while underway (key word "guess"). I have noticed when in shallow water you can actually feel the back of the boat lift before the tunnel was vented. Haven't tried running the shallows with the tunnel vented yet.
I will try and video the water pattern coming out of the tunnel. It seems with the tunnel vented it has a better pattern to it.
Re: FOSTER'S XF20
Posted: Fri Aug 02, 2013 3:43 am
by FOSTER
1 year and 100hrs and the boat still runs strong.
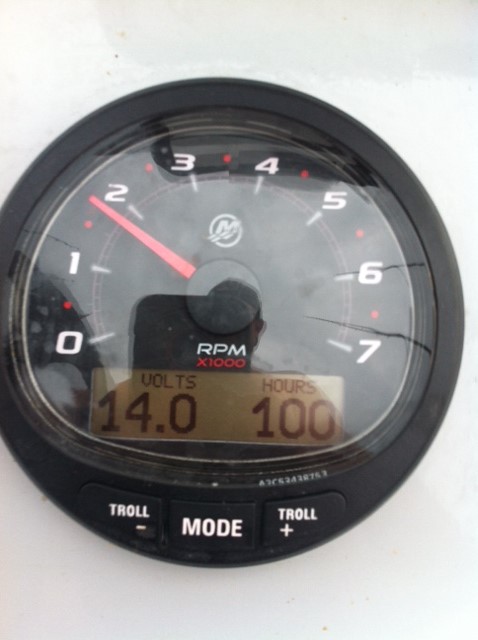
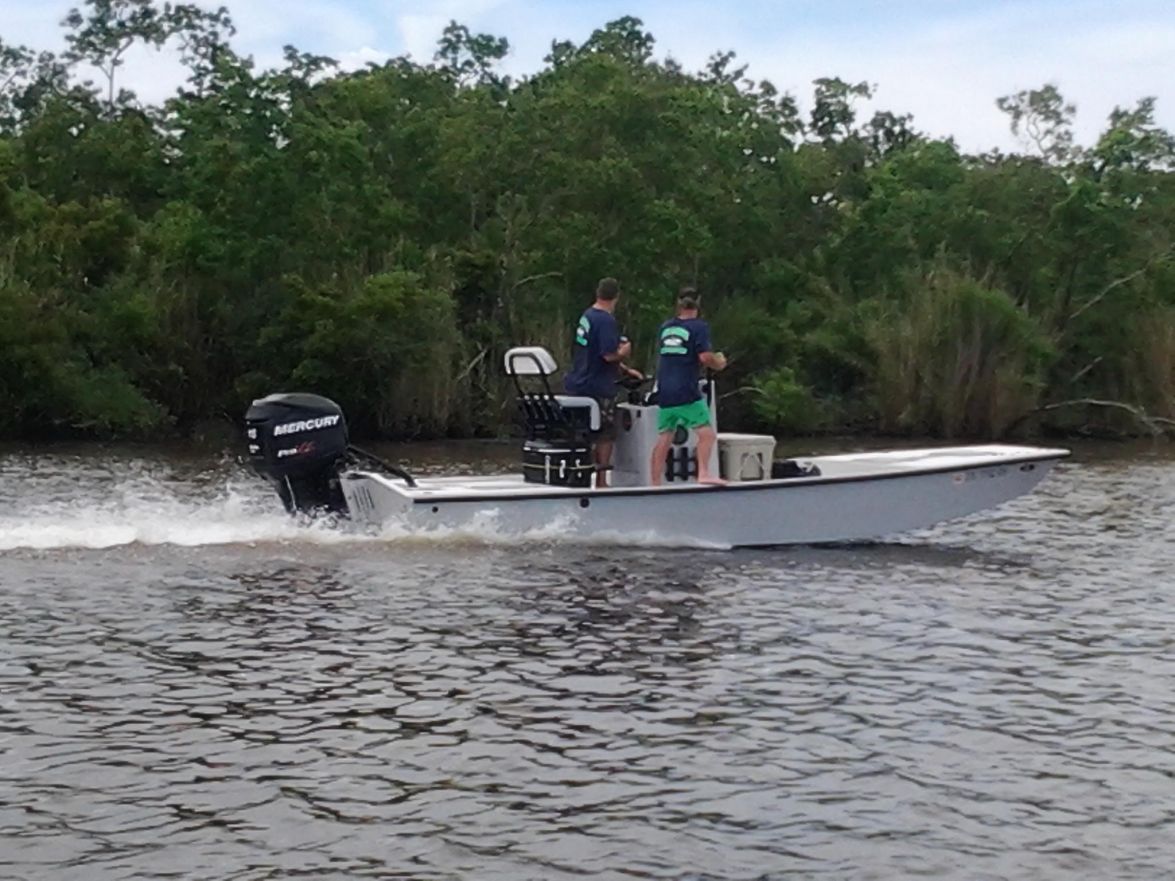
Re: FOSTER'S XF20
Posted: Wed Sep 17, 2014 8:12 pm
by jorgepease
Hope the boat is still running strong for you.
I am about to mount my Yamaha 70 on a 4 in jack plate and I was wondering … with the jack plate all the way down, where does the cavitation plate on yours line up? I keep reading it's supposed to line up with the top of the tunnel which means you have six more inches up, is that how yours is set up?
Thanks!
Re: FOSTER'S XF20
Posted: Wed Mar 18, 2015 7:54 am
by FOSTER
Jorgepease, sorry just saw your post I will check it when I get back in May. I'm currently living in Japan.
Re: FOSTER'S XF20
Posted: Wed Mar 18, 2015 9:32 am
by jorgepease
FOSTER wrote:Jorgepease, sorry just saw your post I will check it when I get back in May. I'm currently living in Japan.
No worries I got it. ))
my cav plate ended up about 1.5 inches below the top of a 6 inch round tunnel... that's with JP all the way down.
Thanks
Jorge