Page 1 of 1
PK78--First time builder progress report and recommendations
Posted: Sun Aug 17, 2003 9:39 am
by Stainless
This is my first stitch and glue project. I'm a reasonably competent woodworker (I've built houses and furniture). HOWEVER, I'm probably much more particular about the quality of my work than many people--certainly much more than is needed to build a seaworthy boat. Please bear this in mind when reading the rest of my ramblings.
I am building from fir marine plywood with 3/8" frames and transoms. I have completed all of the "stitching." This puts me, by my estimation, about 30% through the building process. I would say I'm about 20hrs into the project. As I said, I'm particular and a bit fastidious.
1. Read the directions. All of them. Read them again! Stop at every phase and read them again. This is especially true if you're building the sailing version because the prose isn't that clear (the sailing version directions are not well integrated into the main directions).
2. Plan on splinters from the wood and scratches from the wires. All other shop safety rules (eye protection, ear protection, dust masks, etc.) fully apply. Be Safe!
3. You're going to loft. The good news is, this isn't hard, and you'll get a much better set of lines on the plywood than through any pattern transfer method that I'm aware of. If there's interest, I can write up instructions on how to do this.
4. I bought the Skil 5.5" circular saw (trim) saw. Home Depot carries it at a great price. Blades are a little tricky to come by, but Orchard Supply Hardware carries a plywood blade that fits it. This combination yields a saw that is light and maneuverable and gives very clean smooth cuts. I highly recommend it.
5. Forget nailing or screwing the frames to the sides. I tried that and it caused me nothing but trouble. 3/8" plywood won't hold much of anything in the plys (endgrain). Stitch the frames to the sides. That means a hole about 1/4" on either side of the frame and one through the frame. Run the wire through all of the holes and twist it up. Two stitches per frame is plenty.
6. For drilling the stitching holes, build a jig. It astounds me that this is not part of the standard process and tutorial. I wish I had a way to attach a picture or two, but let me try to describe it. The jig is a piece of junk wood about 5" to 6" long and 3" to 6" wide. Along the long edge, glue a 1/4" to 1/2" straight strip of something. Then at about 3/8" in from the inside edge of that strip drill two holes 4" apart. The holes need to be the size of the holes you will be drilling in the plywood. To use the jig, you measure the location of the first hole and drill it. Then you put the jig on the plywood so that the strip hangs over the edge. Take a nail (put some tape or something on the head to make it easy to grab), and put it through one of the holes in the jig and through the hole in the plywood. Hold the jig against the plywood, and drill through the other hole in jig--this will be 4" from your first hole. Pull the nail out of the hole, slide the jig to the new hole, but the nail through the jig and the new hole and drill again. You just work your way along the edge until you are done. It is very easy and almost foolproof. I had my 11year old son do most of the drilling for the sides and bottom panels.
7. As a further time saver, clamp the side panels together and drill the holes through both at the same time. Same for the bottom panels.
8. The centerboard trunk cutout is 1" plus 2x the thickness of the material being used. The dimensions for the cutout are not given in the plans (but lines are shown). You may want to build the trunk first and take the dimension directly from what you have built. You don't have to be too fancy with tabs. Just cut from the bottom of the center frame up about 6". It's easiest to do these measurements while you're laying out the frame, and do the cuts as part of cutting out the frame (don't ask).
9. Vice grips make twisting the wires easier. Cross the wires and then pinch the cross with the vice grips. Twist the vice grips. Less strain on your hands and you can focus on getting an even twist.
10. Stitch the seams up loosely and then go back and tighten to the final seam. When tightening, work from the center to the ends. After tightening a half dozen or so stitches on one side of the boat, go and do the same to the other side of the boat. This will keep things from becoming twisted (when I measured the diagonals for the first time, my boat was less only 1/8" out of square).
I have mentally broken the project into 3 more major phases: Epoxying,
Fitting and Finishing, and Rigging, All try to update this thread as I get through each of those phases.
I hope this was interesting or even helpful.
Cheers.
Posted: Sun Aug 17, 2003 5:31 pm
by Rick
These are clear, helpful suggestions. Thanks for taking the time to write them up.
I have a couple of comments on your hole-drilling jig. First, 3/8" from the edge of the plywood to the edge of the stitch hole is a l-o-n-g way. I would recommend more like 1/8" or 3/16". You will appreciate this when you start your fillets. The closer your holes to the edge, the smaller the fillets you can make. Small fillets are better.
Second, stitch holes every 4" are way too close together. I used 18" on the NC16s I built and supervised building, and my PK78 holes at 6-8" are too close together. For the PK78 I would start at every 9-10" and be prepared to drill a few more at high stress spots when you start stitching the boat together. You really cannot screw this process up, and everything you are doing at the stitches is covered later.
I use a bunch of jigs in furniture work, but you just don't need that much precision at this stage of the game. I would save the nice woodworking for seat tops, rub strips, breasthooks, transom knees, and your spars and blades. No one will ever see tidy stitch holes.
Have fun, and I really hope you aren't offended by this. It's taken me 10 stitch and glue boats before I really relaxed about this stuff. I've built about 20 bookcases (I'm an amatuer woodworker, not a pro), and I'm finally about as relaxed about building small boats as I am about bookcases.
I've started to wonder about making a dresser for my 14-year-old son out of stitch-and-glue plywood...
Posted: Mon Aug 18, 2003 12:52 am
by Stainless
Not offended in the least.
Don't know about the spacing off of the edge for the holes... This is fir plywood. It's pretty stiff. I'd be worried about tearing them out at 1/8". Maybe a 1/4" would work.
Stitch holes at 4" are what the plans call for. When in doubt, follow the instructions.

Also and again, the fir plywood that I have just doesn't like to bend. I suppose that amidships I could have gotten away with 6-8" spacing, but at some of the ends, I had to go to 2" spacing to get nice fair seams.
Yes, it's going to suck come seaming time... I have planned on using the "spot weld" procedure. I have to remove the wires because they are galvanized steel (and water will get to them even if they are encased in epoxy). Because of all of the stress on the wires, I'm worried about the spot welds holding. I'm thinking that I might have to epoxy over them and heat the wires to remove them instead.
The jig that I describe is not perfectly precise, but it's fast and pretty much idiot proof (as long as you are careful with where you set your origin). Building a longer jig with various hole spacings wouldn't be that hard either. We started out trying to measure along the edges, but we found that measuring along the curved surfaces was a pain. Sliding the jig along worked great. I can't imagine a better way, but if you have another way that works better for you, then use it.
Posted: Mon Aug 18, 2003 10:45 am
by Johnmon
Stainless wrote:Not offended in the least.
Don't know about the spacing off of the edge for the holes... This is fir plywood. It's pretty stiff. I'd be worried about tearing them out at 1/8". Maybe a 1/4" would work.
Stitch holes at 4" are what the plans call for. When in doubt, follow the instructions.
Everyone will do theirs how they feel is best and it seems like it will really depend on the boat a lot. For smaller boats or places on larger boats where there is a lot of curve, you will probably put your stitches closer together. On long, relatively straight stretches, you will not need so many.
I personally really like the plastic zip ties except that I tend to over torque and break them sometimes.
Posted: Sat Aug 23, 2003 2:37 am
by Stainless
Johnmon, what size of ties do you use and what diameter of holes do you drill? I started with zip ties and the ones that fit through the size of holes that I wanted to drill weren't strong enough. The ones that were strong enough required displeasingly large holes. That's why I went with wire.
Posted: Sat Aug 23, 2003 7:22 am
by st
A note here that cable ties are not all created equal. You can't buy a bag from the dollar shop and expect high strength. Make sure you buy proper cable ties, electrical suppliers are a good place to shop. Bags I have show product details such as length, width, tensile strength and whether they are UV stabilized.
Scott.
Posted: Mon Aug 25, 2003 10:12 am
by Johnmon
Stainless wrote:Johnmon, what size of ties do you use and what diameter of holes do you drill? I started with zip ties and the ones that fit through the size of holes that I wanted to drill weren't strong enough. The ones that were strong enough required displeasingly large holes. That's why I went with wire.
I used the smaller ones for most of my stitches and then went with the bigger ones as needed. It seems like I used a 3/16 drill bit which was a little small for the larger ties, but I forced them. There can be a strength issue, but as Scott said, you can look at the tensile rating and get ones that take more force. I wasn't too worried about hole size since the holes get filled with putty anyway.
I was a little aprehensive about using wire just because of the possibility of corosion. Depending on what you use(or if you can get the wires out) it might not matter. I saw on a video(put out by GlenL) that you can heat the putty up with a heat gun and pull the wires out if you use something like steel.
John
Wire ties...a bit of history
Posted: Mon Aug 25, 2003 11:46 am
by JustRight
I've never had a problem pulling metal wire ties. Of course, I don't fillet over the ties, just tack between.
I built my first stitch and glue boat in the early 70's, perhaps so long ago that the plastic wire ties hadn't been invented yet. At that time, the idea was to use copper wire so it could be clipped off and left in the epoxy joint. The copper was tough to work with since it tended to stretch and break. I switched to soft annealed iron wire, commonly called stove pipe wire. It is strong, cheap and easy to pull out. I find that I can really torque down on a wire when I need too. Also, the wire tie is formable so I can align the panels rather than having to rely on a wood to wood joint to give the desired shape.
Another discovery on my second taped seam dinghy, was to build what Jacques now calls a basket mold. With the simple female mold, very few ties are needed. It is a tradeoff in time to construct the basket mold over having to work with perhaps three times as many ties and then have to true up the wired hull before filleting. With a larger hull like the Vagabond, particularly with the long 1/4 inch ply panels, truing up the chine joints without a basket mold would seem difficult to me.
Posted: Sun Nov 02, 2003 1:32 am
by Stainless
It's been a while. Here is my update on the "Epoxy Phase" of building my PK78. This also includes some further construction notes as the building process doesn't neatly break separate into woodwork and epoxy work. Same caveats as last time with the additional note that I have not worked extensively with expoxy or fiberglass previous to this effort.
As I said, this was my first serious experience with this process, so I learned a lot. Weather during this work was mid-70's to mid-60's. Moderate humidity. (Coastal south-central California Aug/Sept/Oct.) I started with an "Epoxy Kit" order from Jacques. I ran out of a number of supplies. I have been buying additional supplies .
Let me say here that my hat is off to ANYONE who can complete one of these boats in the time budget given in the plans with an attractive finish. I have put in at least 20 hrs since my last write up, and I can see that I probably have that much still to go. If I was sloppy or didn't care about filling in the fiberglass weave, I guess I could finish much sooner. I would guess I'll have close to 80hrs into the boat by the time it is totally complete.
Here's what I have done thus far. I will follow with my list of observations/suggestions.
- "Painted" epoxy into all of the joints to coat the wood.
- Put in a small fillet--about a 3/8" radius--interrupted by the wire stitches.
- Removed the wires by cutting them on the inside and pulling them out from the outside. Because the holes were so far from the seam, the wires weren't in the small fillet.
- Put in the full size fillet (1" radius) on the longitudinal hull seams a the bow and stern bulkhead seams.
- Applied the fiberglass tape to all seams with full size fillets.
- Turned the boat over and ground radius on all the exterior seams.
- Applied fiberglass tape to all exterior seams.
- Turned the boat over and put full size fillets on remaining bulkheads.
- Applied fiberglass tape to all seams.
- Cut out seat tops.
- Fit seat tops to seats.
- Built daggerboard trunk.
- Put the cleats on the bulkheads.
- Filled stern seat space with flotation foam.
- Cut mid bulkhead and placed trunk.
- Filleted in trunk (3/8" radius).
- Applied tape to trunk fillets.
- Cut out daggerboard hole in hull.
- Filled bow seat space with foam.
- Faired daggerboard hole.
- Have just begun fairing the fiberglass tape weave.
0. Small batches of expoxy are good. You can't get too much wrong, and also the whole exothermic heat problem is more manageable. I most usually mix 3 oz batches, occasionally 6 oz batches, and I gave up on the 9 oz batches.
1. I made some fillet shapers out of 2" plastic putty knives. I cut the end of them round. One at about a 3/8" to 1/2" radius and the other to a 1" radius. These worked very well. I "discovered" the filletting method described by the Gougeon Bros. in their book on boat building (which I just acquired and read last week). It is succintly described in figure 18 of chapter 9. I recommend it.
2. I tried the "plastic bag as a pastry bag" approach to putting the putty in the seams. It worked well for the small fillets. It didn't work very well for the larger fillets. I found that for the larger fillets that it worked best to use the spreader/shaper to just scoop out the putty and wipe it into the seam for further shaping.
3. In an earlier discussion about wire stitching, a correspondent opined that I would be unhappy with how far from the seam that I put the holes for the wires. This was not the case. Because the holes were so far away, the wires were not in the smaller fillet, and thus they were very easy to remove. For people that are planning to remove the wires, I very much recommend putting them 3/8" or more from the seams.
4. Making up the wood flour putty to the right consistency is an interesting challenge. When mixed on the thinner side, it self-levels to a very nice smooth surface. The downside is that it also sags out of any vertical joint. When mixed thick, it doesn't sag, but you end up with a rough surface after shaping. For the first quart of wood flour, I just guestimated. Then I ran out... Which brings us to my next observation:
5. The epoxy kit may not have enough material in it. I'm pretty careful, and not wasteful by nature. As best I can figure, the 1" radius fillets just consume a fair bit of material. Maybe I'm getting a lot of loss due to the small batches. I don't know. I do recommend that a builder early on figure out where they will source additional material if needed. I didn't do this, and it caused extra delay.
6. When I ordered more wood flour, I also order some other fillers/modifiers. I have been using a wood flour/cab-o-sil mixture for the remaining seams that I'm pretty happy with. It is 1/2 epoxy volume of cab-o-sil and 1 epoxy volume of wood flour. It doesn't sag, it has a fairly smooth finish and it is nicely workable. For the best tape joints, it still seems to need a little bit of sanding though.
7. I used the dry method of applying the fiberglass tape. I put epoxy on the seam, then the dry tape, and then worked epoxy into the tape. I like the method.
8. I found that it worked well to apply the first coat of epoxy about 1-1.5 hrs before putting the tape on the joint. The epoxy was very tacky at that point, but still workable. This made placing the tape easier.
9. I spread the epoxy over the tape with a 1" foam brush. This worked well, but I had to be careful not to work small air bubbles into the epoxy.
10. Rollers are nice, but not as useful as fingers (in gloves) and a 4" spreader. I found that I could work bubbles and smooth things best by holding the center with my finger and very gently spreading to the edge with the spreader.
11. Exterior corners are so very much easier than interior ones.
12. The interior seams around the daggerboard trunk were the most difficult. Deeply inside the boat they were difficult to get to. Also, many of them were purely vertical.
13. The selvedge of the tape is obnoxious. I tried cutting it off for some seams, but this causes the tape to come apart while spreading epoxy into the tape. I tried cutting it off while the epoxy was still soft, but that was still a bit rough. I gave all of that up and have been grinding it off.
14. Rotary rasps in my pneumatic die grinder work very well for shaping any part of the boat thus encountered. One of the best things about them is that most of the dust the produce is fairly large particle. Grinding the selvedge off with the rasps was much less itchy than using the sander to grind it off. I didn't try my angle grinder, but I can't imagine it being better.
15. The seat patterns provided in the plans didn't fit very well at all. I am skeptical that they would fit properly for anyone. To begin with, they don't properly allow for the 3" tabs of the bulkheads up the sides. They weren't a bad starting place, but I'm going to have to think about a better way to shape seats in the future.
16. The floatation foam is nasty stuff. I was a little paranoid about having it burst the seat boxes, so I poured without the tops being on the seats. It is impossible to get a nice level top that way, so I had to cut/shape the top. I got what I needed, but I don't like working with the dust generated-it is gritty and sharp.
17. I used my rotary rasps to grind out the hole for the daggerboard. I didn't think that I could get the trunk perfectly aligned, so I put the trunk on and cut the hole to the trunk. It worked OK, but grinding to nice straight lines is a challenge. I think that next time I'll cut the hole first with a saw and then use a jig to align the trunk.
18. I suck at cutting all of the swoopy curves that are in the plans for the seat tops--especially for the bow seat. Maybe it's just lack of practice, but what I got the first time out was atrocious. I'm redesigning the bow seat to something that I can cut and like the looks of.
19. I still don't like working with fiberglass. My first tape joints were ugly. My last ones were beautiful. I expected this, and so my first joints were in the places where I knew I would be pouring the flotation foam. No one will ever see them.
20. Working with epoxy is like performance art. Know your lines and hit your marks. You have to get started and just keep going. Once you start, you have to keep going and not waste time. It can be a little stressful. Medium speed hardner was a little fast for the warmer temperatures that I encountered--especially when I just starting out and learning as I went.
Posted: Tue Nov 04, 2003 1:51 am
by MNagy
Stainless, thanks for posting your experiences and reccommendations. They are helping me a lot as I get going on my first boat.
Posted: Tue Nov 04, 2003 9:30 am
by jacquesmm
Thank you for the post but I hope that it does not give a false impression. It is really not complicated at all to build a PK78.
Our basic stitch and glue tutorial shows the PK78:
http://bateau2.com/modules.php?name=Sec ... e&artid=20
and there is nothing more required than what we show.
For example, it is not necessary at all to use a jig to drill holes for stitches. I build 30+ S&G boats and never had any problems. Same for Devlin and all other builders.
A jig will not hurt however, feel free to work the way you prefer but I hope that those recommendations will not scare away potential builders.
A boat built with simple methods will be just as strong and seaworthy.
For the seattops, I agree that they rarely fit. Dimensions should be taken from the assembled hull because different builders and different plywoods will introduce some differences. We only supply the pattern because people ask for it but I consider it useless.
Sorry that you missed the width of the dagger board trunk, it is on drawing B131/5, bottom left.
We will soon post an new tutorial that shows how we put some temporary drywall screws through the edge of a 3/8 bulkhead. There is a trick . . .
Posted: Wed Nov 05, 2003 12:27 pm
by MNagy
I'm looking forward to that new tutorial. My problem right now is that I'm having a hard time visualizing how to do the stitching/filleting. I want to have the stitches out when I'm done, but I don't want to make things really hard on myself.
The only way I see right now is to make fillets inbetween the stitches, then remove the stitches and fill in the gaps between the fillets. I don't want to have to mess with trying to extract the stitching from an already finished fillet, be it with heat or any other method. Too much mess I think. Also, wouldn't it leave a hole through the plywood etc where there is no putty after the wire is extracted?
Making the stitches far enough away from the seam sounds good, but I can't see a way to get the putty under the wire when you're filleting, and I don't want to enclose the wire in the fillet.
Is this all much ado about nothing?
Posted: Wed Nov 05, 2003 1:11 pm
by DaveProka
MNagy,
Maybe it is much ado about nothing...it's just that designing is a science (mostly) and building is an art (mostly). If you expect a perfect construction method, you won't find it. Stainless seems to be looking for a perfect method of construction... ambitious, but an excellent idea from this reader's perspective. He's at least giving good feedback on different techniques that we commonly read about and rely on as amateurs.
I wouldn't worry about small stitch holes in any case. The greatest thing about this type of boat building, in my opinion, is that the materials are all forgiving. If you have a small hole left by a stitch, fill it with epoxy mixed with wood flour and it's sealed. If you have a big run in your fairing compound, spend three minutes with a sander and it's gone. Just about anything can be fixed.
BTW, I used the method that goes...stitch, weld with small fiberglass patches, duct tape behind seam, remove stitches, fill seam and stitch holes with epoxy/woodflour mix, tape seam, flip, remove duct tape and fillet/tape inside seams. It was the most annoying part of the whole construction.
-Dave
Posted: Wed Nov 05, 2003 1:19 pm
by jacquesmm
MNagy wrote:The only way I see right now is to make fillets inbetween the stitches, then remove the stitches and fill in the gaps between the fillets.
Let's say that you use plastic ties as we specify, Build the inside fillet over the stitches, they will dissapear under the putty. Glass over etc.
Flip the boat, knock the corner down to 1/2" radius stitches included and tape over it. That's all.
Now, if you want to follow Devlin's advice instead of ours and use steel or copper wires it becomes complicated.
For larger boats on a jig we start outside with spot welds and remove the stitches.
I agree with you that it is a lot of worries about nothing or almost nothing.

You'll see, it's easy.
Posted: Wed Nov 05, 2003 3:49 pm
by MNagy
So leaving the plastic ties in the fillet is not a problem? Devlin mentioned something about how metal ties expand and contract at different rates than the surrounding composite material, and if left in, they could cause damage over time. Why is this not an issue with plastic ties? Is it because thermodynamically plastic is closer to epoxy than metal is?
If plastic is okay to leave in, that would simplify things a lot.
Dave, were you using plastic or metal ties in the procedure you mentioned?
Posted: Wed Nov 05, 2003 4:10 pm
by BillyV12
MNagy,
I built the V12 using the plastic ties. I did not use duct tape, because I could not get it to stick very well (dust or some other problem, good duct tape). Anyway, I did the inside fillets first, right over the zip ties. When I flipped the boat, I cut the ties flush, radiused the edged and when I filled in the remaining gaps, also filled in the little holes around the zip ties. They get glassed over anyway, so there is no way they can cause a problem.
This saved a lot of time of adding glass spot welds, partial filleting, removing the glass spot welds, finish filleting.......
Just the way so many other people did it, I figured it was okay, too.
See the pictures by clicking on the www. button below.
Hope this helps some.
Billy
Posted: Wed Nov 05, 2003 4:53 pm
by jacquesmm
MNagy wrote:So leaving the plastic ties in the fillet is not a problem? Devlin mentioned something about how metal ties expand and contract at different rates than the surrounding composite material, and if left in, they could cause damage over time. Why is this not an issue with plastic ties? Is it because thermodynamically plastic is closer to epoxy than metal is?
Exactly: you guessed it right. The calorific capacity of the metal influences the cure of the paint and "telegraph" it's shadow through the paint. Devlin is an artist when it comes to finish and he knows those things. However, with plastic, it's not a problem.
Posted: Fri Nov 07, 2003 12:11 am
by Stainless
... It is really not complicated at all to build a PK78. ...
I don't mean to give the impression that it is a complicated boat to build. There just are lots of fiddly steps and I wrote them all down (as I warned everyone, I can be fastidious and particular
).
... it is not necessary at all to use a jig to drill holes for stitches...
I agree the jig is not necessary, but it makes it idiot proof. I gave that job over to my 11 year old son and he did it just fine.
It may be that with real marine (boatbuilder grade) plywood you don't use all of the holes, but the fir "marine" plywood I brought home is
stiff. I maybe could have skipped some ties in the middle of the large seams. Everywhere else, I was glad I had them at 4", and at the corners I actually had to go to 2"
and less to pull things together nicely.
... For the seattops, I agree that they rarely fit. Dimensions should be taken from the assembled hull...
I would love to hear how others go about fitting seat tops. What are the steps? I still have to cut out the bow seat. I have some ideas, but no experience. Perhaps we should start a different thread on this topic (easier for others to find)?
On a related topic, I'm wondering about grain direction on the seats. In order to fit the wood I had, I set grain in the athwartships direction, but thinking about the stresses and supports makes me wonder if it should be fore and aft instead.
Sorry that you missed the width of the dagger board trunk, it is on drawing B131/5, bottom left.
I take full responsibility for missing the exterior trunk dimension. I just wasn't thinking when I did the first cuts on the mid bulkhead. I was fixated the interior dimension being 1" and managed to forget that it was made of 3/8" plywood. I didn't think hard enough about the lines on the bulkhead plan at the time...

I'm still thiinking about how to center the trunk straightly when installilng it though. For this little boat, being off a little bit won't matter, but a bigger, more performance oriented boat wiill require more care. What are the chances of showing where the cuts will be on the plan for the bottom panels? (Can you intersect the rectangular volume through the curved panels and then flatten the panels to show where the cut out needs to be?)
We will soon post an new tutorial that shows how we put some temporary drywall screws through the edge of a 3/8 bulkhead. There is a trick . . .
I'll be interested to see how you used drywall screws on the edge of a piece of plywood without screwing it up (so to speak
). drilling a few holes and running wire through them and cinching it up was easy and worked well.
Posted: Fri Nov 07, 2003 12:39 am
by st
I would love to hear how others go about fitting seat tops. What are the steps? I still have to cut out the bow seat. I have some ideas, but no experience. Perhaps we should start a different thread on this topic (easier for others to find)?
I read a post where Evan suggested using cardboard and a hot melt glue gun to make a template for the seat. Thats what I did and mine came out almost perfect - I say almost; the template was perfect, my cutting was not. I made templates for every seat I have. Too easy.
Scott
Posted: Fri Nov 07, 2003 1:20 am
by Stainless
I am by no means an expert, but my experience is still pretty fresh in my memory. As always, your mileage will probably vary. Here are my two cents on the stitches/ties discussion:
The only way I see right now is to make fillets inbetween the stitches, then remove the stitches and fill in the gaps between the fillets. I don't want to have to mess with trying to extract the stitching from an already finished fillet, be it with heat or any other method. Too much mess I think. Also, wouldn't it leave a hole through the plywood etc where there is no putty after the wire is extracted?
It wasn't a problem for me. I think that once you get into it, you'll see that it's not a problem. I'll try to explain in more detail what I did and what happened.
After pulling all of the seams up fairly tight, we taped exterior of the joint with masking tape. I used 1.5" 3M blue tape. Making sure that you get a decent seal around the wires can be a little fiddly, but I had my 14 year old boy helping me and it went pretty fast. What worked best for us was to rip the tape in ~4" lengths and work it in between each "stitch".
Then we flipped the boat back over--made sure it was not twisted/warped by the flipping--and painted epoxy where the fillet was due to go. I didn't epoxy before bending. I like the idea of the epoxy helping to hold the shape rather than being stressed with the panel (probably delusional). I let this cure until it wasn't at all tacky.
Then I mixed up some epoxy putty, put it in a bag, cut the corner and squoze out a 3/8" bead down the seam. I smoothed the seam with my smaller fillet shaper (but a tongue depresser would do just fine). I just worked "around" the wires. When I came to a wire, I made sure there was putty under it, maybe scraped excess off of it, and started shaping again on the other side of it. I did all of the hull seams and bulkheads.
The key here is to make sure that you have everything at a pretty low profile. It's all going to get buried in the big fillet anyway. Just make sure that you don't leave anything around that will mess up the large fillet. One key consideration is to not leave a mess on the sides. The sides is where the shaper will run, and if it's rough, it will cause waves/roughness on the large fillet.
I let the fillets cure about 18hrs and then removed the masking tape and pulled the wires out of all of the stitches but the ones at the corners. As you might have noticed in my other postings, I'm dealing with some pretty stiff plywood and I was nervous about the corners.
About two days later, considering the epoxy to be fully cured, I pulled the wires from the corners. No problems.
To pull the wires I cut them on the interior and pulled from the exterior. I had the boat up on sawhorses for this whole filleting process (I'm about 6"6" and I hate working on stuff on the ground). This made the exterior seams very accessible. To pull from the exterior I used nail puller pliers (for lack of a better name). For stubborn wires I put a piece of 1/4" plywood between the pullers and the hull to avoid marking the hull. All of the wires came out without any problem. I didn't have to heat them or do anything special.
I then put down the large final fillet--the 1" radius fillet. This was so much bigger than the first fillet that there just wasn't any problem. It went over the little fillet smoothly,
and it was wide enough to fill almost all the wire holes as it went. Where it wasn't, I had putty and a spreader in my hand at the time, so I just filled them then. No problem.
For what it's worth, I think that zip ties probably work great with less stiff plywood. You don't have the removal step. You only have to build one fillet. I would caution however to drill the holes close to the seam in this case. You don't want the ties to interfere with shaping of the fillet--you want them well buried in the putty. It was my original intention to use zip ties but they ones I had weren't strong enough for the plywood I ended up with. Maybe next time.
Posted: Fri Nov 07, 2003 2:38 am
by MNagy
This is a great thread -- a lot of my questions are getting answered. I have one more thing to bother you about, Stainless: When you let the first fillet cure completely before doing the second one, did you sand the first fillet before applying the second? I remember hearing somewhere that if you let epoxy cure it is necessary to sand it before putting more epoxy on top.
Posted: Fri Nov 07, 2003 3:09 am
by Stainless
MNagy,
Please do not confuse me with someone who might actually know what they're doing...
You ask,
When you let the first fillet cure completely before doing the second one, did you sand the first fillet before applying the second?
Great question. You are a careful and thoughtful reader. The answer is "No." But, I think that it's OK. Here's why:
I'm using SystemThree epoxy. In
The Epoxy Book, 2001 edition, on page three is a discussion of the film (also known as amine blush) it says:
... One of the benefits of System Three eposy is that this film need not be removed between coats if successive coats are applied soon after the previous coat cures.
On page 11
... Subsequent coatings applied at any time between this soft set stage and 72 hours do not need to be sanded and will chemically bond.
Subsequent coatings may still bond well after 72 hours without sanding but the proposition gets riskier. ... If in doubt, sand."
Armed with this information, a natural impatience, and an abundance of chutzpah, I proceeded without sanding. In my opinion, the joints on this little boat are way stronger than they need to be as it is, so I am comfortable with the risk--I'm also not planning on crossing any oceans in this boat. I have had opportunity to grind into the fillet in a couple of the joints. They seem to be bonded, so I feel somewhat validated, but as the book says "If in doubt, sand." You make your own decision. I don't want your heirs coming after me because you were lost at sea due to joints failing from improper bonding.
Posted: Fri Nov 07, 2003 3:11 am
by Stainless
I read a post where Evan suggested using cardboard and a hot melt glue gun to make a template for the seat. Thats what I did and mine came out almost perfect - I say almost; the template was perfect, my cutting was not. I made templates for every seat I have. Too easy.
Can someone (st?) point me to that thread? I'd love to read about this process.
Thanks.
Posted: Fri Nov 07, 2003 3:28 am
by Stainless
I figured out how to post pictures. I apologize for the quality. When I was taking them they were just notes of progress--I never thought I'd be publishing them.
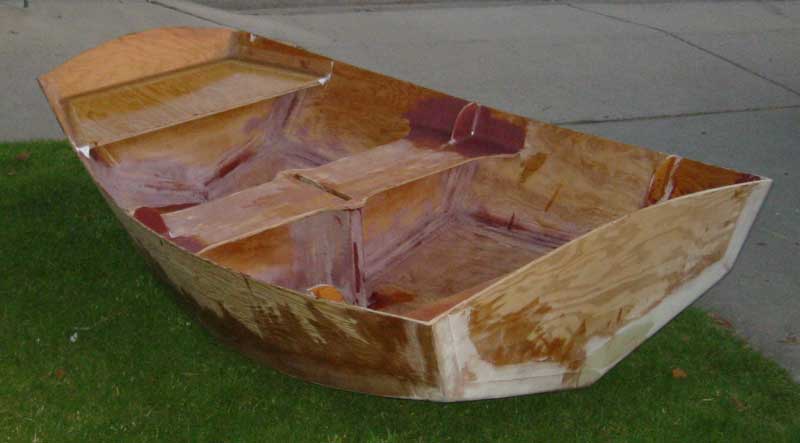
A couple of shots of the hull after the stitches were all in an pulled up tight.
<img src ="modules/Upload/stainless/from_stern_stitched.jpg ">
<img src ="modules/Upload/stainless/from_bow_stitched.jpg ">
A couple of shots after taping the seams. The trunk seams aren't taped in yet in these shots.
<img src ="modules/Upload/stainless/from_bow_taped.jpg ">
<img src ="modules/Upload/stainless/from stern_taped.jpg ">
Here's the stern seat foam after it was poured and cut down flush.
<img src ="modules/Upload/stainless/rear_seat_foam.jpg ">
A couple of shots of the trunk.
<img src ="modules/Upload/stainless/trunk_back.jpg ">
<img src ="modules/Upload/stainless/trunk_front.jpg ">
Detail shot of the trunk. The white vertical line on the trunk is where I ground off the edge of the fiberglass tape with the rasp. This tape application on the trunk is not called out in the plans, but I added it. As you can see I haven't ground down all of the tape corners yet.
<img src ="modules/Upload/stainless/trunk_closeup.jpg ">
Shot of exterior seams. (I expect some contorversy over this
)
<img src ="modules/Upload/stainless/exterior_seams.jpg ">
Here are the tools that I have made for this project. From left to right, the first is the highly controversial "jig."

As you can see it is a very very simple device. The other two items are my fillet shapers. The smaller one can be replaced by tongue depressors (I found a source and they are cheap). The large one has about a 1" radius on it.
<img src ="modules/Upload/stainless/tools.jpg ">
Posted: Fri Nov 07, 2003 5:31 am
by st
Ah ha – the infamous jig; so famous it’s infamous. The plastic putty knifes were my friends also.
Nice work also, the taping and fillets are very good. You'll end up with a great boat.
A few posts on using the hot melt glue.
http://www.bateau2.com/modules.php?name ... dboard+hot
http://www.bateau2.com/modules.php?name ... pic&t=1226
http://www.bateau2.com/modules.php?name ... t=hot+melt
Another post about hot melt glue where (about half way down) JohnP mentions observing the installation of a counter top with hot melt glue. Taking that same thought, a few spots of hot melt glue should be enough to hold a frame in place while the seams are done. Okay maybe not the transom or bow frame in my FL14 (a bit too much tension there) but it would have worked with the others. The hot melt glue is left in place and taped over. No scrw holes! Food for thought.
http://www.bateau2.com/modules.php?name ... t=glue+gun
Posted: Fri Nov 07, 2003 8:56 am
by Frankr
I've left copper, steel and plastic ties in my filets with no problems. Some have been in kayaks for over 5 years now. Inside fiberglass tapeing can be made easier by pulling the tape lengthwise first to smooth the tape out then folding the tape in half to form a crease down the center, wait till the epoxy is slightly tacky and then apply the tape and brush on the epoxy from the center fold outward to the sides. This method also helps on the outside radius corners.
Posted: Fri Nov 07, 2003 9:46 am
by DaveProka
MNagy,
Sorry I'm responding so late. I used both zip ties and copper wire. As Stainless mentioned, I found the zip ties too weak for some applications. They were flexible and less sturdy than the copper, but appropriate for some spots. Along the chine I used the ties, along the bow I used copper. The copper would also stretch a bit, but much less than the ties. I zip tied the bow and placed some patches on it. When I checked it about an hour later, the constant pressure had defeated the zip ties in a couple areas, causing them to snap, and I had to start over again. Next time, I used copper, and had better results. The problem I find with copper is judging how much you can twist it before it quits too.
Anyway, I did not fillet over any of them. I used the fiberglass patch method and then pulled the ties before running my fillets.
Stainless,
I admire your work. This is an exceptional review of the process and there are a lot of great tips here. Are you going to create a web site to broadcast this information?
-Dave
Posted: Fri Nov 07, 2003 9:48 am
by BillyV12
To make the seats isn't as hard as it sounds. I made the curved seats for the V12.
Just set a scrap piece of ply against the inside panel as far as it will go (I notched it for the frame). then use a scribing tool (homemade) that offsets the pencil and mark the seat edge. Trim to the line and check the fit. There is that template. Then repeat for the other side (they probably will not be the same). Get your seat panel (cut full width, I didn't cut the curves inner curves until it was in place). Trace both templates to the seat panel, maybe a bit wider than you think it needs to be at first. Trim to fit.
The seat panels are a trim in place type of fit.
Really, it's harder to describe than to just do it.
Billy
Posted: Fri Nov 07, 2003 2:51 pm
by Rick
Stainless wrote:Shot of exterior seams. (I expect some contorversy over this
)
Here are the tools that I have made for this project. From left to right, the first is the highly controversial "jig."
As you can see it is a very very simple device. The other two items are my fillet shapers. The smaller one can be replaced by tongue depressors (I found a source and they are cheap). The large one has about a 1" radius on it.
The only thing controversial about your exterior seams is that they have such a small radius. Either one of us did it wrong, or it doesn't matter much.

Your yellow epoxy spreaders look just like mine! I've since upgraded to a polyethelyne "scraper" from a kitchen store, but most of my PK78 was done with yellow tools from Home Depot.
Nice boat. Your centerboard trunk is nicer than mine.
Posted: Sat Nov 08, 2003 12:12 am
by Stainless
Thank you all for your kind words regarding the workmanship on the boat.
DaveProka; No I'm not planning on a website beyond this thread. This project was really just meant as an experiment in the stitch and glue process. I really want to build the R550 (I have been thinking about building the R550 since late 1996) or maybe the CK17. I managed to withstand the temptation to jump right in on the larger boat and started this PK78.
The PK78 is purely to learn and experiment with the building process. The notes are mainly for myself. Since Jacques has these forums, I thought that I'd share my notes. I'm very pleased that others have found them useful (or maybe just amusing
).
Rick; I dunno'. I don't see the need for a large radius on the exterior. In the interior the large radius keeps the tape from wanting to pull out of the joint when stressed. On the exterior, the only structural purpose (that I can see) for the radius is to keep from focusing too much stress at the corner. I don't think that it takes much radius to accomplish this. I don't think that it hurts to have a larger radius, but I don't think that it helps either. Being naturally impatient, I did the minimum.
Posted: Sat Nov 08, 2003 11:21 am
by MikeS
The outside corner radius helps the biax cloth make the turn without pulling away and leaving air pockets along the joint. If you don't use a good healthy radius (3/8" ) you will have bubbles for sure.
MikeS
Posted: Fri May 28, 2004 1:40 am
by Stainless
Well, it's been a long time since my last update. The project is still progressing. Just slowly...
The major undertaking since my last update has been working with epoxy fillers--exterior and interior. I have had mixed results. In many ways this has been my least favorite part of the process thus far.
The exterior has gone well. I have figured out how to apply slightly thickened epoxy in a way that gives me a nearly glass smooth bottom with very little sanding between coats:
- Coat well with epoxy and let cure
- Fill in the weave of the glass tape with filler
- Sand thoroughly (this first sanding is the most important one)
- Mix the epoxy with Cab-o-sil to abou the thickness of honey
- Spread on with a 4" spreader use a light hand to smooth it out. Strokes from keel to chine work best.
The interior is another matter. Firstly, the epoxy "putty" is a different animal than other materials that I've used (primarily spackle). Getting a smooth spread has been beyond me. I am particularly flummoxed by the problem of getting a nice smooth pass into the center of the joint. I know that a good filling job starts with a good hand with the spreader, and I am challenged... My only advice to others is to be careful not to make the filler to stiff: it won't adhere well and it spreads poorly. Too thin is also problematic, but can easily be addressed by adding a touch more filler to the mix after you get started.
Secondly, sanding the interior joints, especially the corners has been difficult. This has been frustrating as it has pitted my fastidiousness squarely against my impatience. I have struggled on, but I'm a bit worried about how it will look when I put paint on it. I have yet to find any good way to deal with these. I bought a "Mouse" sander and it seems to help, but the sander is not holding up very well to the demands that I'm putting on it.
My next endeavor is the rubrail. I did a little research on the forums. I'm a little depressed that the plans didn't include the suggestion to use the cutouts as patters for the rails. I'll probably have to re-draft the lines and hope that I'm reasonably consistent.
I'm also considering adding limber holes on either side of the centerboard trunk and at the chine of the middle bulkhead. I'm thinking maybe 1/2" in diameter. I'll probably just grind them into existence with my Dremel.
I'm looking for advice on building the mast step. Any words of wisdom before I get started? I'm not too keen on creating a great big pile of putty. I'm worried about how to keep it from runing and making a mess.
I'm also interested in advice regarding shaping the foils. I have sanders and grinders and even a planer. What process have people found most effective? There is a note from Jacques about how to do it, but the URLs that he refers to are 404.
Lastly, is there any advice for the knees? How to people align them with the curve of the bow and the transom?
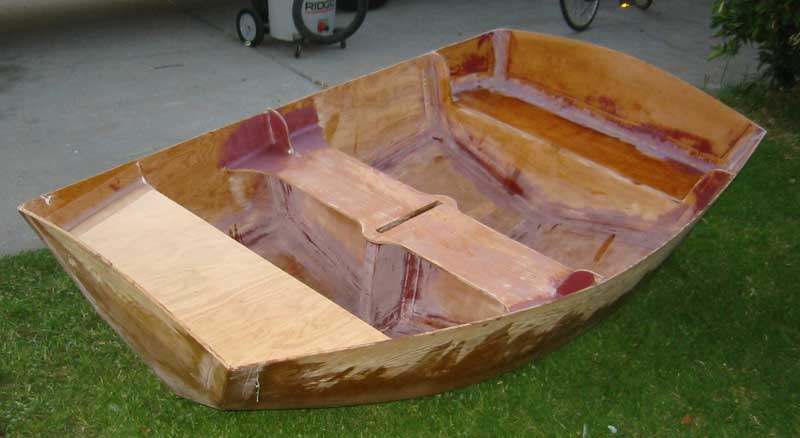
Below are some nearly current pictures of the boat. I'm in the process of glassing in the seats and then filling in the glass of the seat joints. The stern seat is essentially done. The midships seat is waiting for the filler to be sanded out and the bow seat is waiting for the filler to be applied. I'll get some pictures of the bottom next time.
Posted: Fri May 28, 2004 2:37 am
by Rick
Where's your mast partner and step? Where's the cutout for the tiller? I was surprised to see a daggerboard trunk but no place to stick the mast. Are you going to sail it? At first I thought it was rowing version until I noticed the trunk.

I'll see if I can remember to take pictures of my knees this weekend. It's sort of a "what looks right" kind of thing. I cut mine out of solid mahogany. They are going to look good just as soon as I get around to varnishing them.
I shaped my foils with a Stanley #5 plane. It didn't take that long, and it was refreshing to not have to use a dust mask and hearing protection. For a boat that will only move at 3 knots, I wouldn't waste much time with high-tech NACA profiles.
My rubrails are laminated from a resawn piece of 4/4 mahogany. I cut them straight and they laid nicely along the gunwale. I wouldn't bother with fancy shaping.
I see that you didn't bother with the teeny-tiny pieces of the rear seat that are supposed to be just forward of the seat frame. Good move. They are a pain in the butt to cut and install, and don't really serve much purpose.
If it ever stops raining I
swear I'll paint and varnish my boat.
Posted: Fri May 28, 2004 11:58 am
by Stainless
As I mentioned, I'm still thinking about how to build up the mast step. Advice is welcome
I just haven't gotten to cutting out the mast partner and the tiller cutout yet. I always planned on doing the mast partner after the seat was installed to ensure that it was properly centered. The tiller cutout is waiting for me to decide what style to go with.
I will row the boat as well as sail it. I'm still thinking about how I want to install the oarlocks. What have other people done? There used to be a bunch of photos of completed PK78's and D5's on the website, but I can't seem to find them anymore.
I'll look at some solid wood to resaw for the rubrails this weekend at the lumber stores. I'm planning on painting all of the boat--no brightwork. I'll probably just get a fairly clear piece of whatever and use it.
Thanks.