Page 1 of 1
Orca SK17 building report
Posted: Sun Aug 08, 2004 9:05 am
by Bart
Epoxy
Posted: Mon Sep 06, 2004 3:44 am
by Berend
Bart,
Your kayak is looking wonderful. Are you using normal plywood or a marine version?
What kind of epoxy system do you use, and where can one obtain it in The Netherlands?
Posted: Mon Sep 06, 2004 7:57 am
by Bart
Hi Berend.
Welcome to the club!
I'm using 4 mm Okoumé WBP plywood for my kayak. It is not real marine plywood like Bruynzeel Hechthout, but it works fine for these kind of small boats. And it is much cheaper.
I'm using WEST system epoxy, which is available in many marine stores here in the Netherlands. It is imported by Epifanes, so most shops that sell Epifanes marine paint also have West epoxy. West is rather expensive, but very good. There are several other epoxy systems available here, but I've only used West until now. I have heard good news about Polypox from Polyservice (
www.polyservice.nl) , which is sold in their own shop in Amsterdam (I did buy some glass tissue there). It is much cheaper than West and is supposed to be just as good. If I'm gonna build another boat, I consider using their epoxy. They also have an outlet in Nieuwerkerk a/d IJssel, but as far as I know they do not have dealers.
What kind of boat will you be building?
regards,
Bart[/url]
Boat project
Posted: Mon Sep 06, 2004 9:54 am
by Berend
Bart,
For starters I'm going to build a V12. I already made a scale model, scale 1:10. I did the rowing version (or with outboard). Look in my album for some pictures, see previous post in this forum!
Posted: Wed Oct 13, 2004 1:16 pm
by Toni V
Finally I managed to start my kayak. Waiting for epoxy to cure just now, It's taking time - slow hardener and the room's temp is cooler than I thought. Weather outside is getting quite cold too, check this pic from my sister's home:
http://gallery.bateau2.com/displayimage.php?pos=-2213
first project pic:
http://gallery.bateau2.com/displayimage.php?pos=-2214
Panels awaiting epoxy. Note the windows - the kayak will (hopefully) fit out through one.
Posted: Wed Oct 13, 2004 4:24 pm
by Bart
Hi Toni,
Congratulations on your project start.
There is a simple way to check wether the kayak will fit through those windows or not: pick the largest bulkhead (the aft one) and check if it can pass through the window, you should have some spare room on all sides (depending on the thickness of your panels).
Regards,
Bart
Posted: Wed Oct 13, 2004 5:24 pm
by Toni V
Bart,
I actually did measure the window before starting

The kayak will be slightly bigger than bulkhead, cockpit is higher and fixed skeg will be lower... It should fit out

Posted: Mon Oct 18, 2004 7:34 am
by Toni V
So, my project started really in last week.
Here's what I have done so far:
Tuesday-Thursday: Tested the epoxy, joined panels together.
Friday: I "equalized" the panels, hull stitched and bulkheads glued in place
Saturday: Inside glued & glassed
Sunday: Did some leftover inside glassings, removed the stitches, sanded outside, joined wood for sheer clamps.
Monday: Glued the sheer clamps
Tuesday: Did all the outside glassings, glassed the whole bottom with cloth.
Wednesday: Made keel guard from epoxy putty, made the fixed skeg
Thursday: Smoothed the keel guards, they end up quite nice! Sanded the bottom and spreaded one more layer epoxy to bottom and sides. Glued and glassed the skeg.
I'll add some pics.
I did run to one problem. My kayak's bow is a bit bended, I'm sure it was straight after stitching but I guess the putty inside has bended it a little while curing. It's not too bad, so I'll glue the sheer clamps and then i'll just sand it to straight.
Now I have sanded it, other side of the bow is slightly flared while other is straight. I think it cannot be noticed if you don't examine it carefully, so I'll be happy with it.
Posted: Sat Oct 30, 2004 2:40 pm
by Toni V
Well, some time has passed... I had the previous weekend pretty much of the project but now I have made some progress.
So currently I have almost all glassings done, I need to glue the deck on place and install some brackets etc...
I cut the hatches and cockpit hole earlier than the plan suggested, it just fit my plans better (I did not have the foot braces yet and I thought the fitting would be easier without deck). Also I wanted to varnish the inside of kayak, it's much easier without the deck, strangely it's not mentioned in the plans.
I also made little trick on my own (again
). The bow and stern are very narrow and hard to sand or varnish so I put little soft foam pieces to both ends and epoxied them. Now the ends are much nicer... I'll see tomorrow if they end up as I would like. I'll take then a pic or two...
Another thingy I'm been thinking is little brackets to both sides just behing the cockpit. They would ease getting in and out of kayak. I think I'll add extra deck brackets to those places.
I have also puchased fiberglass seat, back rest and foot pedals - cost ~60 euros.
Posted: Sun Nov 14, 2004 4:12 pm
by Bart
Picked up building again - my injuries are almost over now.
Just added some new pic's, check out
http://gallery.bateau2.com/thumbnails.php?album=174
Bart
Posted: Tue Nov 16, 2004 5:34 am
by Toni V
Good to hear you are okay. The kayak is looking nice. I've done little painting and lot's of waiting in the last week. I might do the CF paddle next if I can
. Then there would be the sanding and varnishing stuff...
Posted: Mon Mar 07, 2005 3:00 pm
by Toni V
Heh, the paddle project is waiting.
Now I have just started the second kayak.
I made one big problem at start - I joined the bottom panels wrong way! Decided not to wait for re-joining, I just used butt block to keep the panels together until I'll do the inside fillets and taping.
few pics here:
http://gallery.bateau2.com/displayimage.php?pos=-3282
http://gallery.bateau2.com/displayimage.php?pos=-3283
http://gallery.bateau2.com/displayimage.php?pos=-3284
New BBC Euro store in The Netherlands
Posted: Sat Apr 16, 2005 11:28 am
by Frank@BBCE
Hi Bart and Berend,
The Euro store is now open. We are located in Amsterdam and ship through Europe. But offcourse you can always come over to pick it up.
And the good news is that we have really sharp prices.
Check out
www.europe.boatbuildercentral.com
Groeten,
Frank
Dutch store
Posted: Wed Apr 20, 2005 1:03 pm
by Berend
Thanks for the post. I will certainly visit your store (and web-site)
Posted: Wed May 11, 2005 1:58 pm
by Toni V
After over month time off, I'm back working with kayak (the second one). I did the aft hatch opening and supports. Also glued the cockpit coamings and made the inpection port. The port came out nicely, I was a bit worried how the round hole will came up, but it was fine. Not sure what kind of closing system I'll make to it yet.
Uploaded couple pics too.
Posted: Wed May 11, 2005 2:53 pm
by glcost
Not sure what kind of closing system I'll make to it yet.
Toni,
I built a kayak last year with oval hatches. The lip on the openning is made similar to yours. I use 2.5cm wide nylon straps with aluminum cinch cams to hold down the cover. Here's a picture.
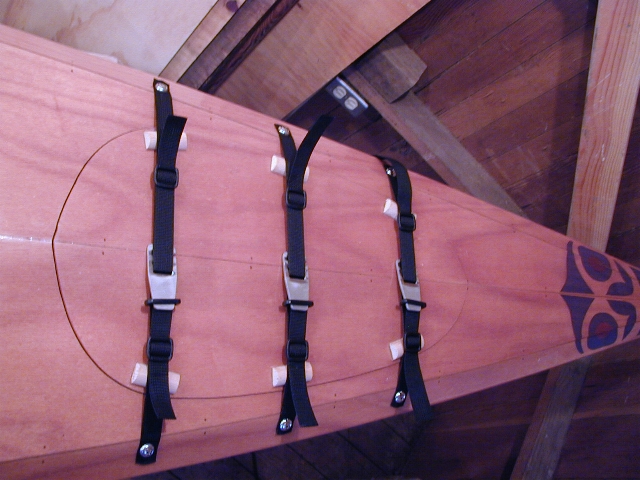
George
Posted: Wed May 11, 2005 4:17 pm
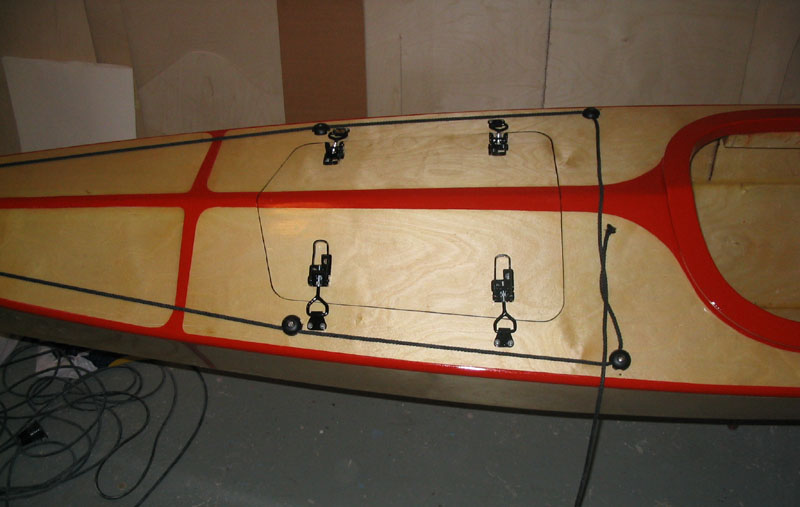
by Toni V
Those "spacers", which are increasing the pressure against seal, seems very nice idea! I was thinking a lot for similar closing system, but I thought the straps might look a bit too "much" because the paint scheme I had. The latch system seemed better (pic is under the text).
However, for the aft hatch I'll most likely use similar latches as my first kayak. Just not sure how I'll close the inspection port at bow.
Posted: Wed May 11, 2005 5:36 pm
by glcost
I agree, the straps do create a lot of clutter on the deck, especially with the deck lines. I used the same eyelets for my deck lines too.
You definitely need deck lines on a kayak with a smooth finish. It's very difficult to hold on to if you come out of the kayak.