Page 1 of 1
OB17 - Northern Virginia
Posted: Mon Aug 15, 2016 8:54 am
by csaroka
Opening a new thread to track the progress of my OB17 build. I'm hoping to complete the boat by late Spring 2017.
-Charles
Re: OB17 - Northern Virginia
Posted: Mon Aug 15, 2016 11:08 am
by Jeff
Nice having you on the Forum!!! Let me know when the delivery arrives!! I will check again after lunch and mail you later!! Jeff
Re: OB17 - Northern Virginia
Posted: Thu Aug 18, 2016 5:35 pm
by csaroka
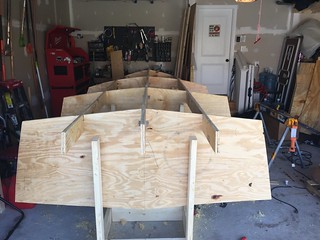
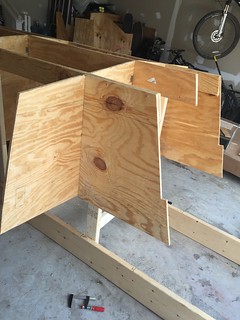
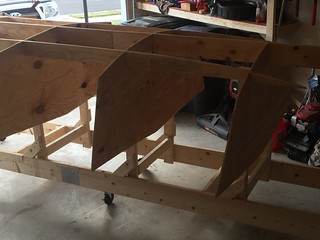
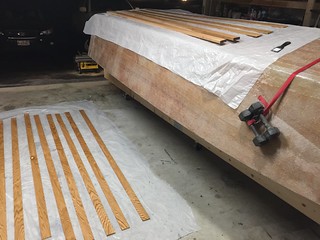
Building a pair of 2x8x18 strongbacks

and separating them by 30"

Using inexpensive plywood from Home Depot for the station molds, which will be later discarded. Learned some lessons with this approach that will hopefully help reduce mistakes when cutting the good stuff.

Built the center stringer and measured out the cuts for interfacing with the station molds. Made a slight mistake here and cut the molds too deep for the center stringer. For each station, the drawings illustrate a center stringer, which extends to the sole, and a typ. for each side stringer, which extends to 3" below the sole. Since the center stringer and side stringers are detailed with different dimensions on separate sheets, there should probably be another typ callout for the center stringer. Anyways, I found some thin metal (electrical protection plate) to correct the issue support the center stringer at the proper depth.

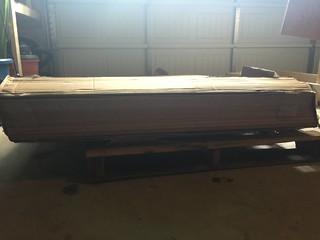
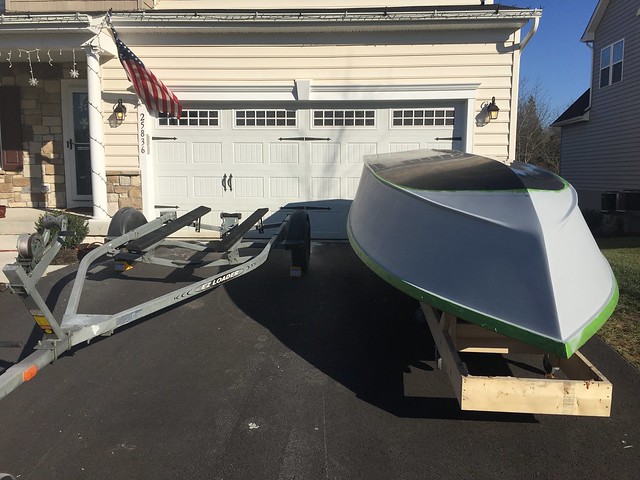
16 sheets of Meranti 1088 arrived this afternoon:
Re: OB17 - Northern Virginia
Posted: Thu Aug 18, 2016 6:04 pm
by pee wee
Nice start!
A couple things to think about- when it comes time to place the hull panels and you're tugging them this way and bending them that way, it can cause your stations and strongback to shift out of alignment. If you attach a few diagonal braces while you can get to things, that will help keep things lined up. Secondly, and you may have already thought about this, some guys find it helpful to have wheels to be able to roll the whole thing around. Lots of boats have been built without the wheels, just something to consider.
Re: OB17 - Northern Virginia
Posted: Thu Aug 18, 2016 6:23 pm
by Fuzz
PeeWee is correct all the way around. also if you do put wheels under it this is one place where bigger is better. I started out with little casters and kept getting bigger ones. Would have been much faster and cheaper to have gone big to start. 8 inch is good and make them heavy duty

Re: OB17 - Northern Virginia
Posted: Thu Aug 18, 2016 6:27 pm
by TomW1
Agree with peewee. 'brace your uprights so that they remain straight and square.
Re: OB17 - Northern Virginia
Posted: Thu Aug 18, 2016 7:49 pm
by Jeff
csaroka, what a great start!!! Good documentation from the start as well!!! Jeff
Re: OB17 - Northern Virginia
Posted: Thu Aug 18, 2016 8:20 pm
by csaroka
Wow, excellent recommendations! Didn't think of either one but I will definitely implement both of them.
Re: OB17 - Northern Virginia
Posted: Mon Aug 22, 2016 8:01 am
by csaroka
Made some descent progress this weekend.
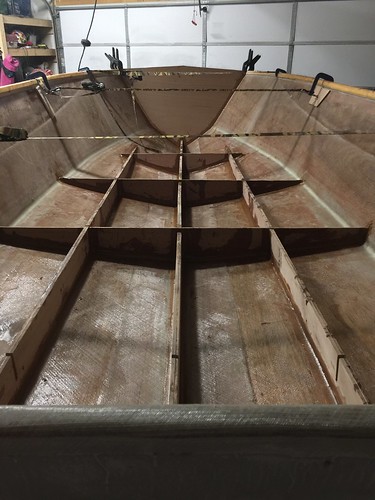
Added the two side stringers:
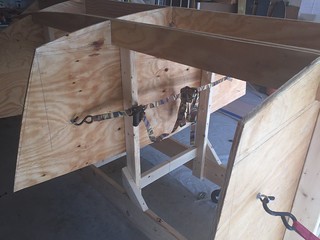
Added the motorwell sides:
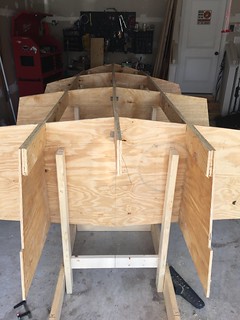
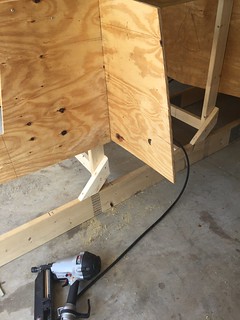
Added the diagonal braces as recommended by pee wee, Fuzz, and TomW1. The jig is a much more solid structure now.

Added the transom and clamping boards:
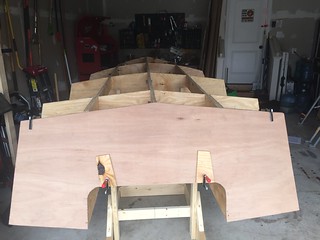

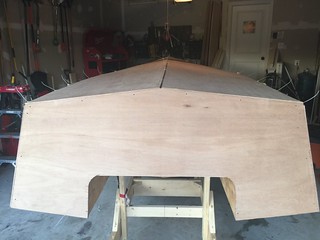
Added the bow mold:
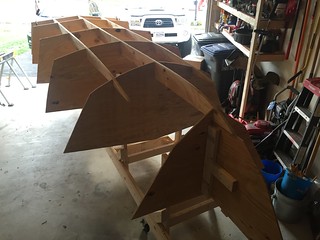
Added 5" casters as recommended by pee wee, Fuzz, and TomW1. This is going to make life much easier!
Re: OB17 - Northern Virginia
Posted: Mon Aug 22, 2016 11:12 am
by Fuzz
That is looking really good! Before you know it things are going to look a lot like a boat

Keep posting the pictures, we like our boat porn around here

Re: OB17 - Northern Virginia
Posted: Mon Aug 22, 2016 12:09 pm
by Jeff
csaroka, really nice work!! You are moving at a very fast pace!! Jeff
Re: OB17 - Northern Virginia
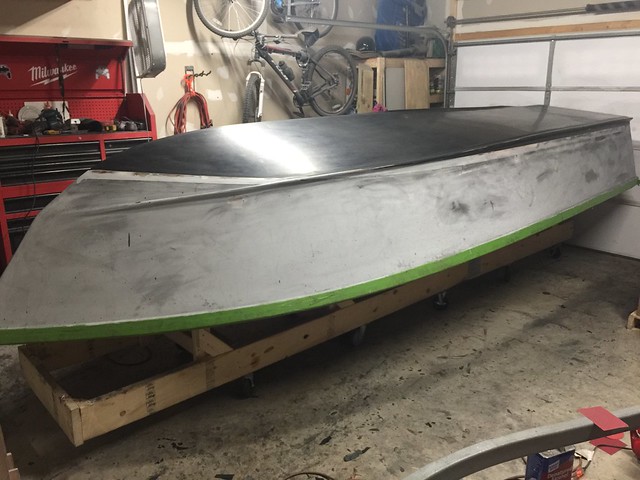
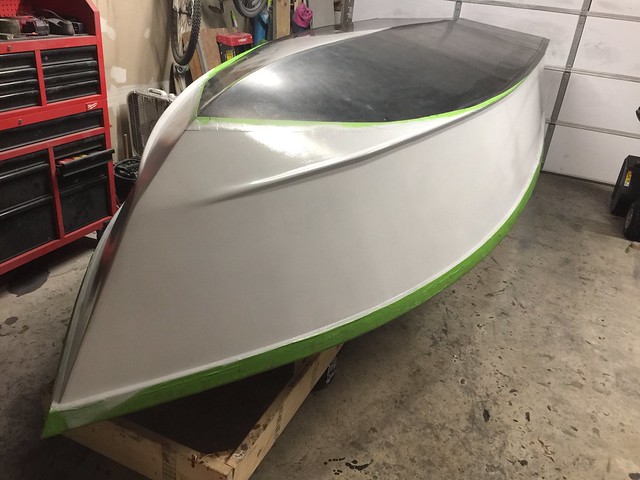
Posted: Tue Aug 30, 2016 11:37 pm
by csaroka
An update on weekend progress...
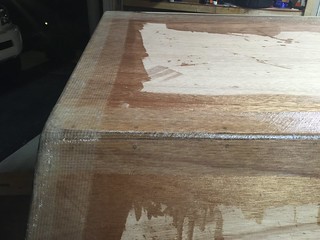
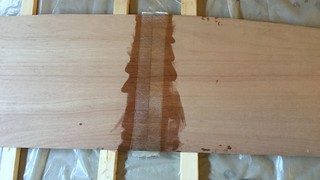
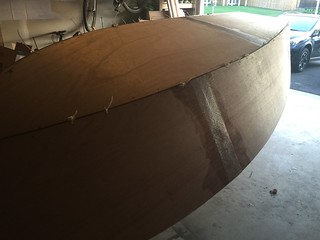
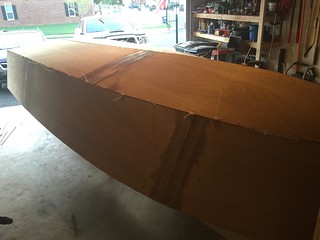
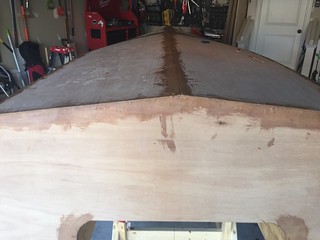
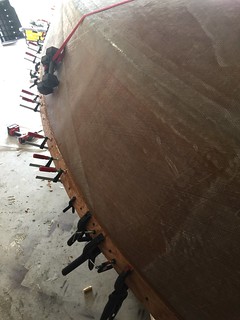
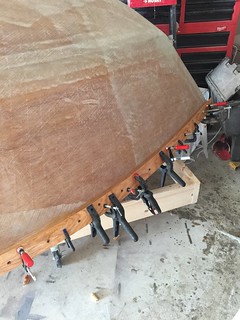
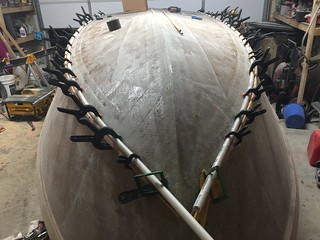
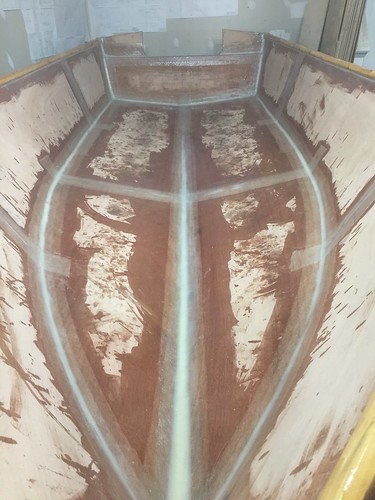
Cut the bottom and side panels and extended them with fiberglass patches on each side
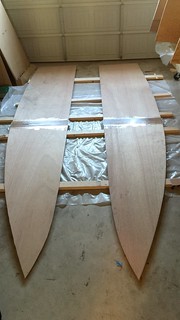
Checked my diagonals and used straps to correct warps in the cheap plywood
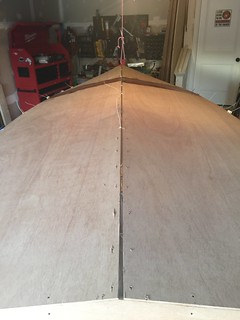
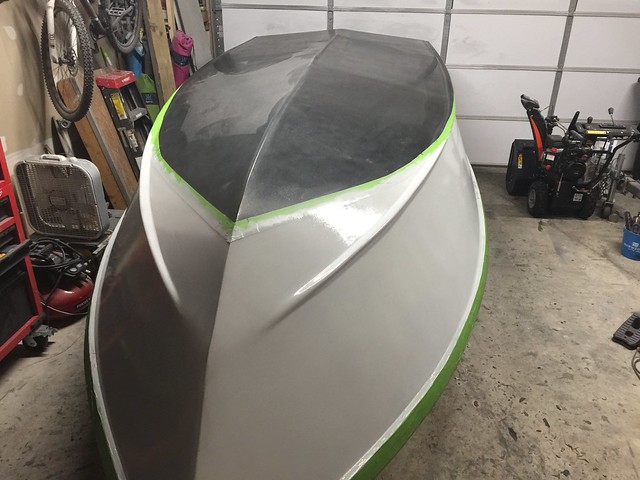
Lined the center stringer with plastic and the station corners with duct tape. Laid the bottom panels on the jig to verify center alignment, and fixed the bottom panels to the transom with SS screws.
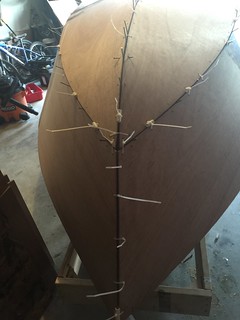
With zipties, I anchored the side panels to the transom and connected them together at the bow. To prevent the bow from rising, I threaded a steel wire through each panel and the bow mold.

After elevating the side panels so I could achieve flush edges at the transom, I returned to the transom, removed the zipties, and fixed the side panels edges to it with SS screws.
Starting from the bow, I stitched to the intersection with the bottom panels, leaving 1" of separation between the panels. Then alternating port and starboard, I stitched the side panels to the bottom panels, leaving 1" of separation between panels . Every meter, I progressed towards the aft, I loosely stitched the bottom panels together, leaving 3"+ of separation between panels. After reaching the intersection with the transom, I returned to the bow and tightened the zipties to .5" separation between panels and again, worked my way towards the aft, alternating port and starboard. Repeated the same process once more but tightening the zipties to the width of a nail. Note: Tightening the side panels with the bottoms panels was always in advance of tightening the bottom panels together.
I dealt with occasional overlapping panels, both side with bottom and bottom with bottom, primarily at the bow. Using a combination PVC sections to transfer the pressure and inserting nails to maintain separation, I was able to get beyond those issues.

Used a plastic putty knife to the fill the seams with the resin and wood flour mix. After allowing it to dry overnight, I cut out the zipties and removed the nails.

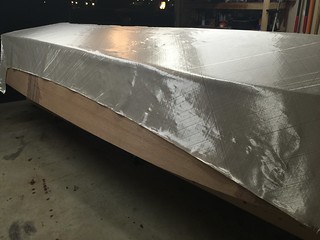
I'm going to start with a cabinet scraper and plane to remove the built-up expoxy but I'm awaiting the arrival of a 3M mask and filters before I start any sanding.
In the meantime, I've been thinking about materials for the rub rails, spray rails, sheer clamps, and skeg. Reviewing the forums, most seem to recommend fir; however, I'm not finding much fir stocked locally. Any issues using PVC trim, like Azek, for these functions? Other than that, cedar, pine, oak, walnut, and poplar seem to be the most common options.
Re: OB17 - Northern Virginia
Posted: Wed Aug 31, 2016 6:33 am
by Jeff
Excellent progress!!! I had thought you were away but clearly you have been hard at work on your build!!! Very clean and well organized!! Nice, Jeff
Re: OB17 - Northern Virginia
Posted: Wed Aug 31, 2016 9:11 am
by pee wee
You have done a masterful job of getting all the panels lined up, that looks great!
You mention using stainless steel screws at the transom and at the bow- are you planning to leave those screws in place?
Re: OB17 - Northern Virginia
Posted: Wed Aug 31, 2016 9:33 am
by csaroka
Thanks! I didn't use any screws at the bow of the boat, only the transom. I had considered leaving them in the transom, which is why I used SS, but I started rounding the transom edges and bumped a few. I'm not sure that I can achieve .5" radius with them in place so I will likely pull them prior to fiberglassing the seams. The primary purpose for them was to maintain flush panel and transom edges as I stitched the panels elsewhere. Aside from that, are there any concerns with leaving them in?
Re: OB17 - Northern Virginia
Posted: Wed Aug 31, 2016 9:39 am
by Cracker Larry
Don't leave them in. Just a later source of trouble and rot. Stainless will rust fast when encapsulated, it requires air to maintain it's properties. I always use deck screws, temporarily, to attach the sides to the transom, and remove them after I glue the transom on. Don't leave any fasteners in, anywhere.
Re: OB17 - Northern Virginia
Posted: Wed Aug 31, 2016 9:42 am
by csaroka
OK, thanks for that info and advice! I will certainly remove them.
Re: OB17 - Northern Virginia
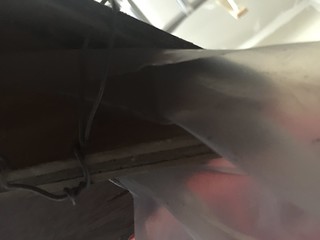
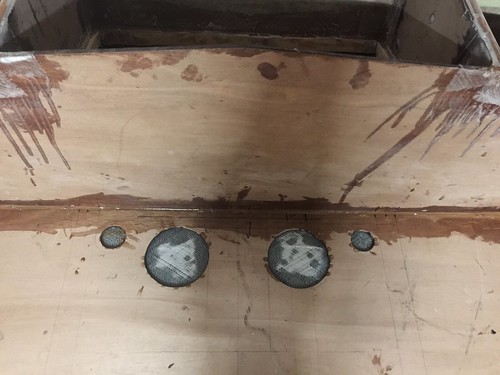
Posted: Sat Sep 10, 2016 7:46 pm
by csaroka
Re: OB17 - Northern Virginia
Posted: Sat Sep 10, 2016 10:57 pm
by Fuzz
Can you post some closer/larger pictures of the worse areas? Probably help others to give the best advice.
I hate this happened to you

Re: OB17 - Northern Virginia
Posted: Sun Sep 11, 2016 12:36 am
by csaroka
Re: OB17 - Northern Virginia
Posted: Sun Sep 11, 2016 9:25 am
by Dougster
That happened to me with the PY12. I don't know what went wrong, but in the end I used 80 grit on the RO pretty ruthlessly. I ground all the suspect areas out, including most of the keel, and patched it up. PITA, but just a thing. You'd never know it to see it now and I don't have to worry about it.
Dougster
Re: OB17 - Northern Virginia
Posted: Sun Sep 11, 2016 11:21 am
by Fuzz
Dougster is totally correct. I think you are going to need to get real friendly with your sander

If you have a tool like the sonic crafter you might be able to cut a bunch of it out and save some sanding. Either way it can be fixed, just takes some time.
Re: OB17 - Northern Virginia
Posted: Sun Sep 11, 2016 11:38 am
by cape man
I didn't want to be the one who told you it had to be fixed, but it does. I'd use 60 grit, or maybe even 30 to do the rough work.
Re: OB17 - Northern Virginia
Posted: Sun Sep 11, 2016 11:53 am
by csaroka
Thanks for the reassurance, Gents!
After removing the suspect area but before applying a patch, do you recommend filling the void with a wood flour mixture to level it with the surrounding fiberglass?
While reviewing your responses, the idea that came to mind was creating 4 boat-length strips from the 50" fabric roll, each 12.5" wide. Two of the strips, I would run down the keel with 4" of overlap. The other two strips, I would run one down each chine. In effect, I would have the equivalent number of layers as designed. However, my concern is the distance from the flaw to the edge of the fiberglass. What is the minimum radius that you would recommend from the edge of the suspect area to the edge of the patch?
Re: OB17 - Northern Virginia
Posted: Sun Sep 11, 2016 12:29 pm
by danieloldhouse
For what concern fiberglassing I leave the answer to others much expert then me, but for your first question yes, that's the correct way to go
Re: OB17 - Northern Virginia
Posted: Sun Sep 11, 2016 7:03 pm
by jacquesmm
I agree with Dougster, Fuzz and the other ones who recommend to grind it off and go over it with another layer.
Do not use the plastic sheet (peel ply), that may be the cause. It leaves no way for the heat to escape and gasses that do not escape = bubbles. That technique is fine at "normal" temperatures but not in very hot weather like what we have now.
Re: OB17 - Northern Virginia
Posted: Mon Sep 12, 2016 9:30 am
by csaroka
Jacques-Did you see my question regarding creating 4 boat-length strips from the 50" fabric roll, each 12.5" wide? Two of the strips, I would run down the keel with 4" of overlap. The other two strips, I would run one down each chine. What is the minimum radius that you would recommend from the edge of the suspect area to the edge of the patch?
Re: OB17 - Northern Virginia
Posted: Tue Sep 27, 2016 2:42 am
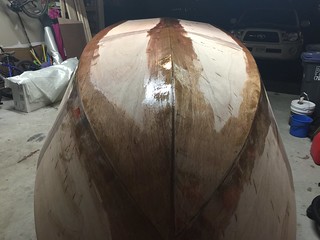
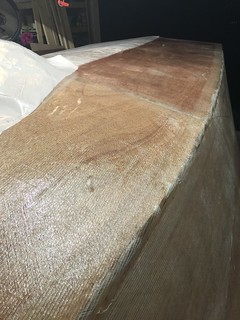
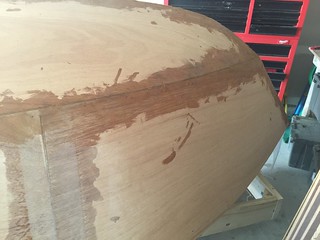
by csaroka
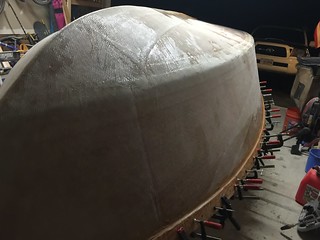
Sanded out the bubbles that elevated the fiberglass from the plane of the hull but after further inspection, noticed many smaller, embedded bubbles and dry areas throughout. Spent a considerable number of hours sanding the hull down to a base that I was satisfied with before making another glassing attempt. Spread the wood floor / epoxy mix to level the surface area, and sanded the hull smooth.


Gave the hull a good wipe-down, tried to blow all of the porcupine quills out of the garage, and prepped my supplies before starting the next glassing marathon.
LIBERALLY applied epoxy at all stages (wet-on-wet seams and panels). Used chip brushes for the initial application and spreading; used a squeegee with only gravitational pressure to level pools; used a fiberglass roller to destroy the bubbles; and used a syringe to fill any remaining air pockets.
Fiberglass Roller:
https://www.amazon.com/gp/product/B005R ... UTF8&psc=1
Syringe:
https://www.amazon.com/gp/product/B000V ... UTF8&psc=1
Did not use any peel-ply or plastic this time around.
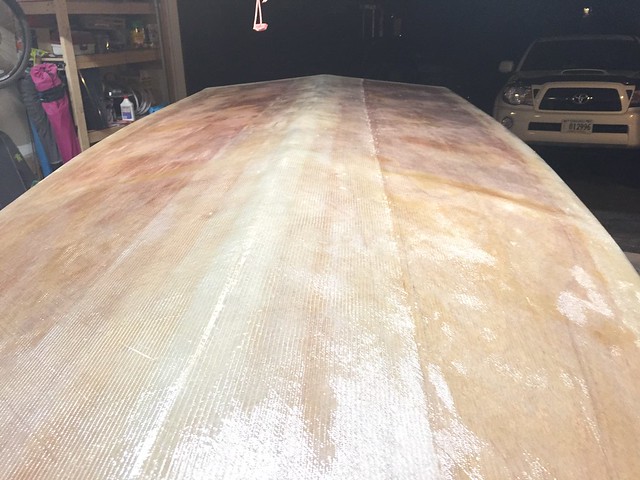


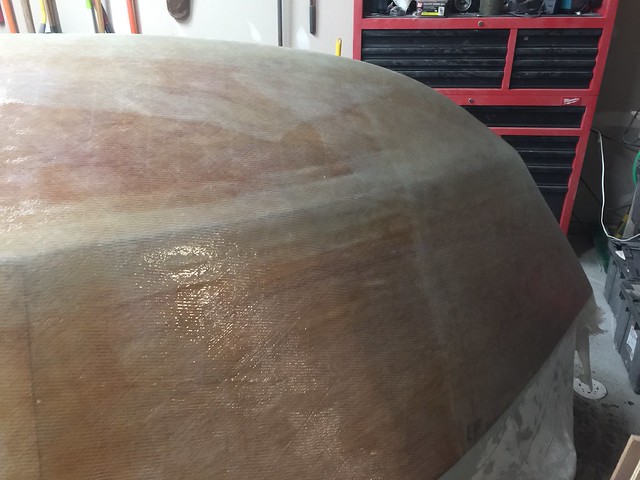
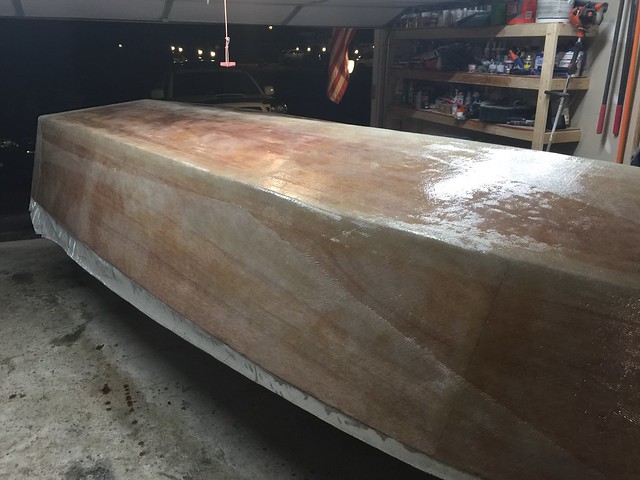
Much happier with the results. Now, for a taste of the infamous fairing process that everyone seems to love so much. If anyone has any good references with pointers bookmarked, please share the links.
Re: OB17 - Northern Virginia
Posted: Tue Sep 27, 2016 7:52 am
by Jeff
csaroka, well done!!! She is really taking shape!! On to fairing!! Jeff
Re: OB17 - Northern Virginia
Posted: Wed Sep 28, 2016 1:07 am
by Fuzz
Glad to see you got your glass problem taken care of
All I can tell you about fairing is keep telling yourself sweating is good for me, sweating is good for me

Re: OB17 - Northern Virginia
Posted: Wed Sep 28, 2016 7:23 am
by cape man
It's not the cheapest product, but Quick Fair is the fastest and easiest thing to use. Fill the weave if you need to with epoxy mixed with the silica mix sold here, but use the quick fair afterwards. It goes on smooth as silk, and is easy to sand. Best way to mix is with a small scale, but I've also just eye balled a 1 to 2 ratio and have never had a problem with it setting up. I've found a sharp, metal plaster spreader works best.
Re: OB17 - Northern Virginia
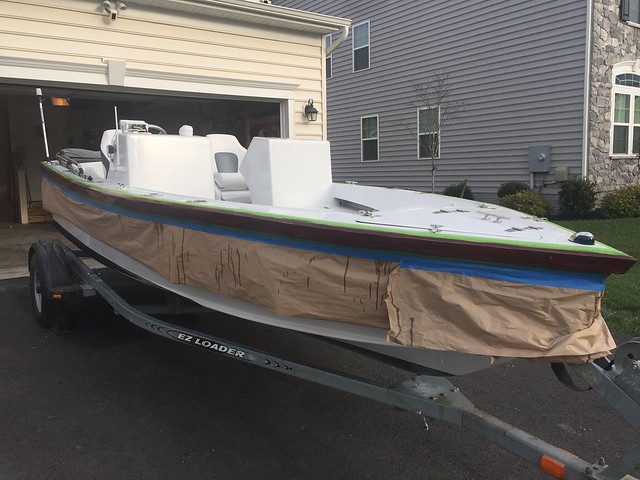
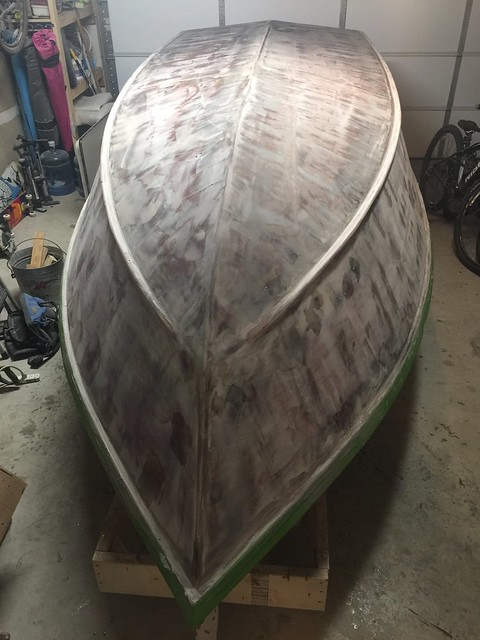
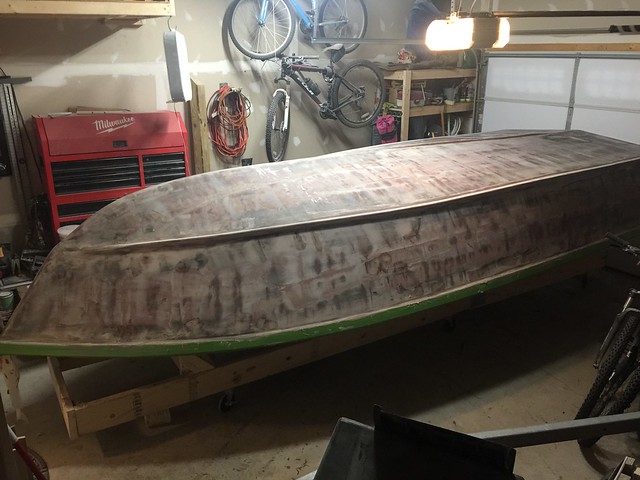
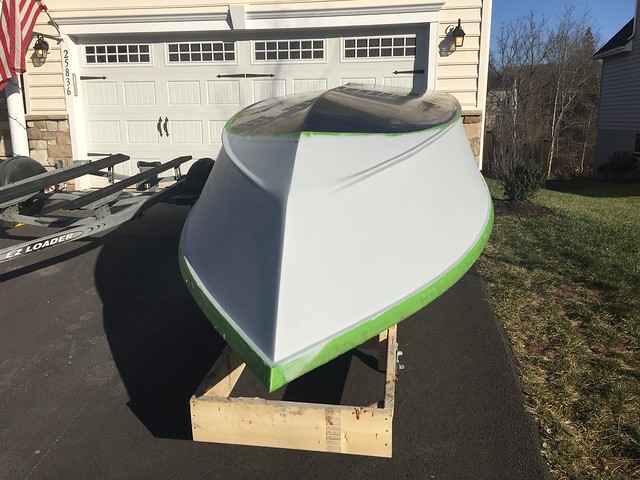
Posted: Wed Oct 12, 2016 11:52 pm
by csaroka
Decided to hold off on fairing until I completed the rub rails, skeg, and spray rails.
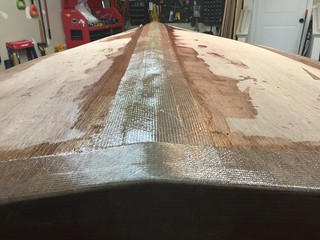
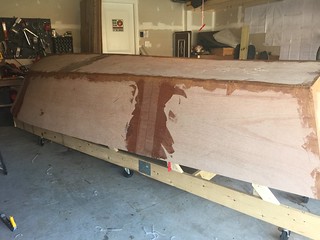
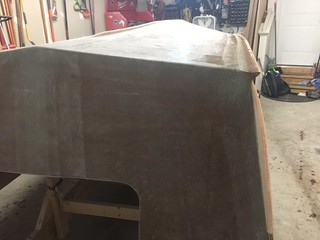
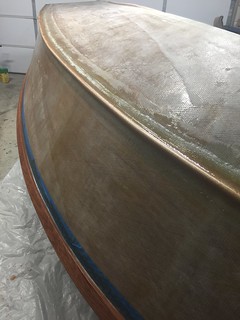
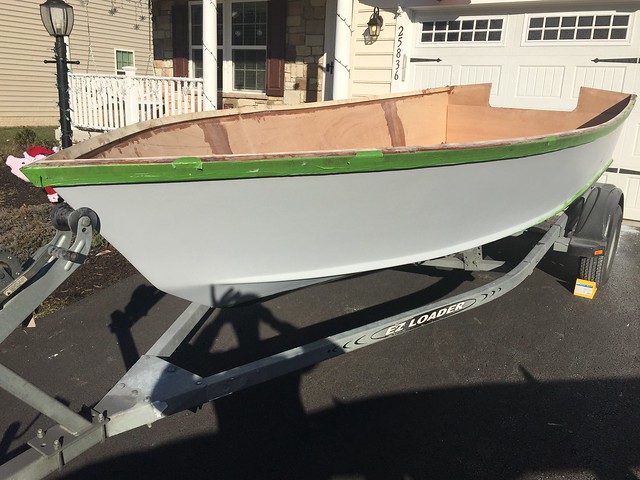
Cut enough 8' X 2.5"w strips from 1/4" oak ply for three layers on each side of the boat, and laminated them.
Draped a few weights on each side to form the hull tighter with Station B. Then, started applying the layers.
In parallel, I added the skeg. I cut a 8'x1"x1" strip of oak and planed each end.


For layers 1 and 2, filled the empty screwholes with the wood flour mix and started the filet with the hull

Started on the spray rails. Trimmed 3/4"x1 5/8" strips of 12' oak molding to 3/4"x 1 1/4" and kerfed a 1/2 dozen sections of the forward 8'. As shallow as possible, secured 1/2" PVC along the chine on each side. Spread the wood flour mix beneath the PVC and clamped the spray rails to the PVC.
While waiting for the spray rails to cure, I managed to apply the third layer of rub rails without any screws. Removed the PVC and filleted both the spray rails and rubrails with the hull. Then sanded...Then filleted again... Then sanded... Then glassed the spray rails


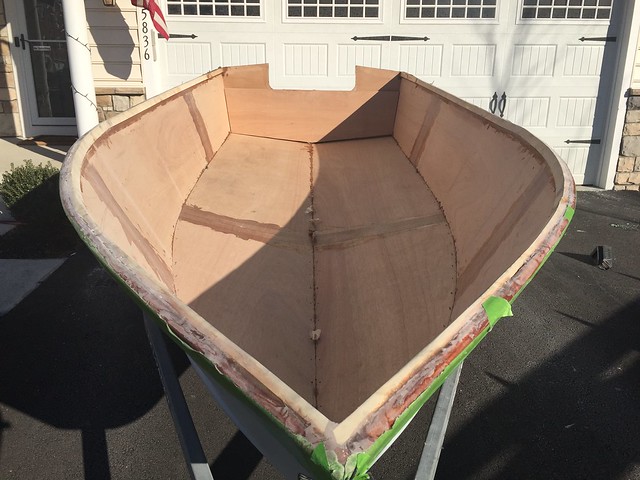
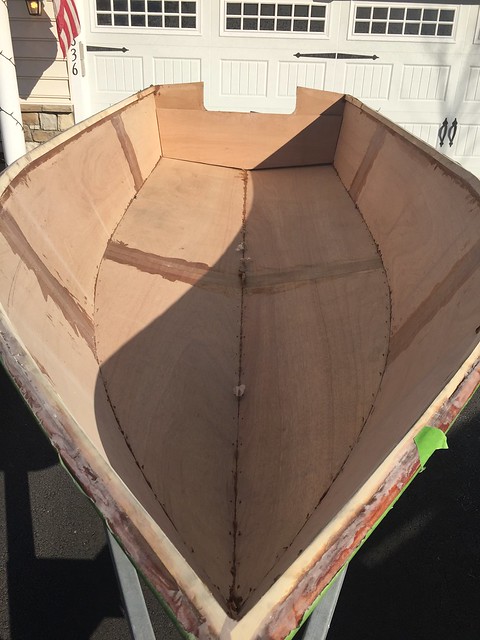
Figured now might be a good time to give the rubrails some color. Sanded them down then applied a pre-stain conditioner and gunstock stain.
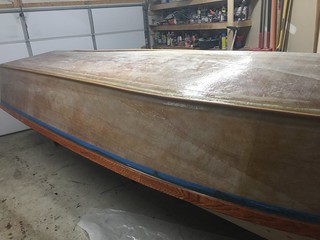

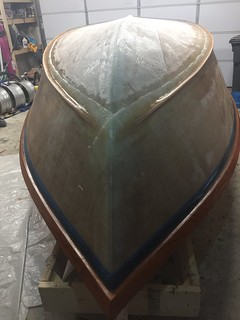
I'll laminate the rubrails after they dry but I'm considering glassing them too. Over the next few days, I'll give the hull a light sanding and nice wipedown, then start fairing.
Re: OB17 - Northern Virginia
Posted: Thu Oct 13, 2016 10:35 pm
by csaroka
Re: OB17 - Northern Virginia
Posted: Fri Oct 14, 2016 5:25 am
by Eric1
I'm really enjoying your build! She is looking great!!
Re: OB17 - Northern Virginia
Posted: Fri Oct 14, 2016 6:15 am
by Jeff
Agree with Eric, really nice work!!! Jeff
Re: OB17 - Northern Virginia
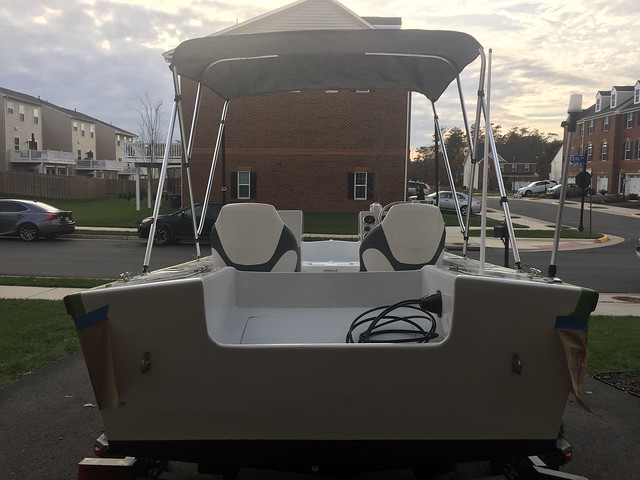
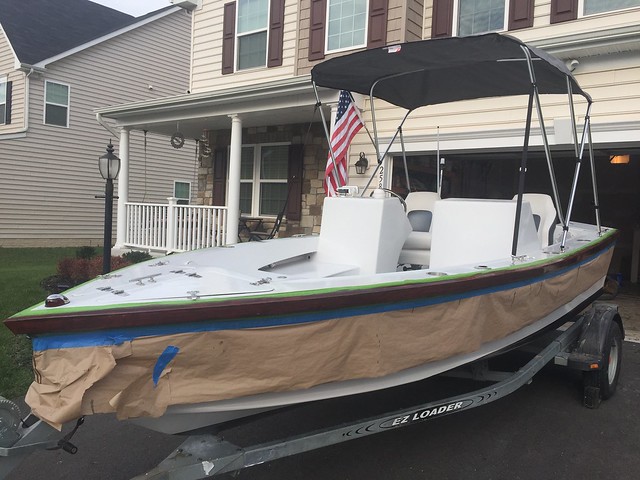
Posted: Thu Dec 22, 2016 6:05 pm
by csaroka
Not even going to talk about the fairing process in this update because I really don't like thinking back on it. So I am just going to add a few pictures I took during the unpleasant process then jump into the good stuff.
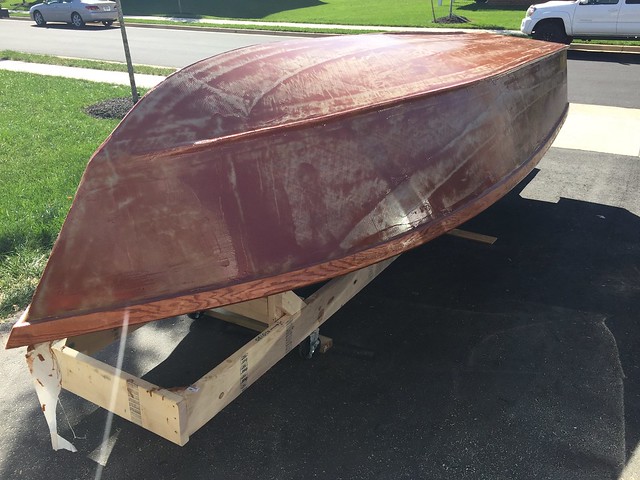


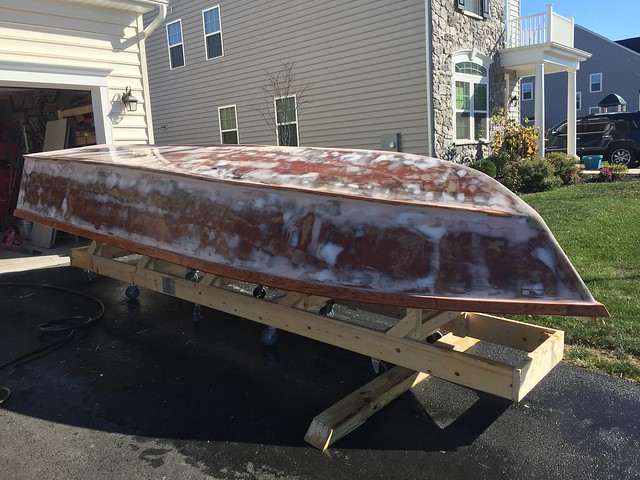


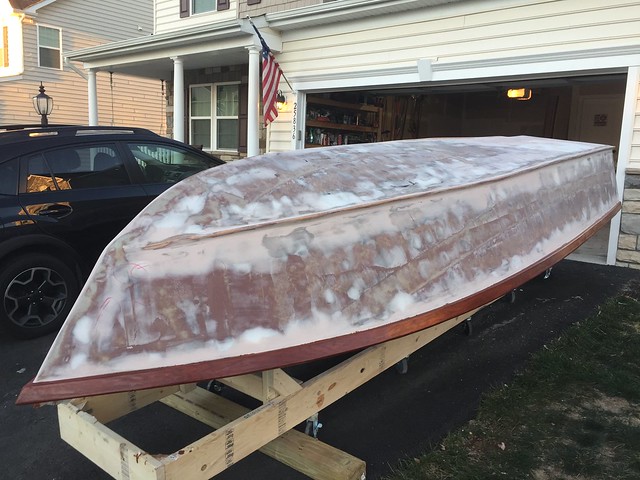
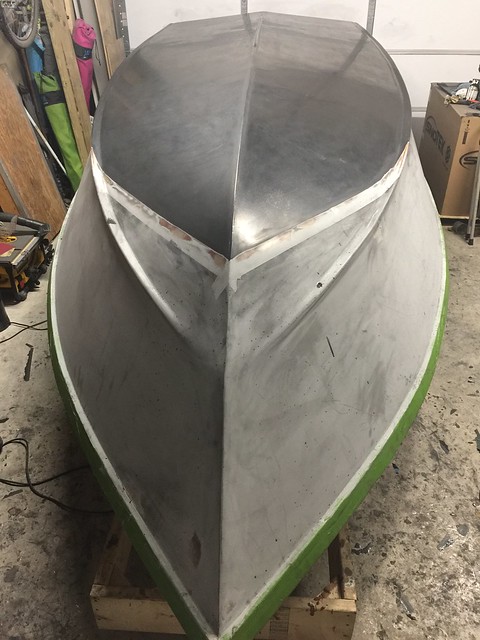
Added a couple coats of System Three Yacht Primer before applying graphite to the bottom of the hull.


In total, I probably applied 5 coats of graphite, progressively lessening the amount of graphite in the epoxy mix. By volume, coats 1 & 2 were ~30% graphite, 3 & 4 were ~20% graphite, and 5 was ~10% graphite. With exception to the last coat, between each coat I sanded with 120 grit. The only rollers that I recommend are the "Better 9 in. Adhesive and Epoxy Roller"
http://www.homedepot.com/p/Better-9-in- ... /100083297. For curves, tighter areas, and tipping I recommended the "Wooster Foam Varnish Paint Brush"
https://www.lowes.com/pd/Wooster-Foam-V ... /999957729. I tried foam rollers and several the top end, 3/8' woven rollers, and they all shed with epoxy. Foam rollers do lay a very smooth coat but if the epoxy begins to cure, it will rip the roller to pieces. The mix certainly does apply much easier when warm but use caution if you try to accelerate that process with the microwave. I was 1 for 2 with the microwave, then switched over to the oven with heat at the lowest setting and door partly ajar. The 2nd attempt with the microwave cooked-off on the hull, shortly after mixing it and pouring on. That resulted in a mess and time wasted waiting out the cure period and then resanding. After the last coat, I sanded with 220, 400, 600, 800, 1000, and finally 1500.
Taped off the bottom of the hull and applied two more coats of primer to the side panel. Noticed a few fairing flaws and correct them prior to the second coat of primer. I'm sure that I will add another coat later before the top coat.

Allowed 2.5 weeks for everything to cure, then pulled both the trailer and jig out onto the driveway in preparation for the flip.


Three large male adults and two lean male teenagers managed to flip the hull onto the trailer without any issues.


Re: OB17 - Northern Virginia
Posted: Thu Dec 22, 2016 6:50 pm
by Jeff
Glad to hear from you and great progress!!! I won't even ask about the fairing but what did you think of the S3 Yacht Primer?? Boat looks great!! Happy Holidays to you and your family!!! Jeff. PS, what do you think she weights now??
Re: OB17 - Northern Virginia
Posted: Thu Dec 22, 2016 9:16 pm
by glossieblack
Very nice work, and fast work too. Well done.
Re: OB17 - Northern Virginia
Posted: Thu Dec 22, 2016 9:25 pm
by Fuzz
Really slick trick with the spray rails

Your boat is coming along nicely. Nice and super clean work.
Re: OB17 - Northern Virginia
Posted: Thu Dec 22, 2016 9:56 pm
by cape man
Wow.
Re: OB17 - Northern Virginia
Posted: Thu Dec 22, 2016 10:14 pm
by seaslug
I'll second Cape Mans Wow! That's some beautiful workmanship, and those spray rails are amazing. Everyone can learn from this one. You deserve a day off.
Re: OB17 - Northern Virginia
Posted: Fri Dec 23, 2016 12:31 am
by willg
Wow x 3! You are a sanding sum-gun. Great work and great pictures!
Re: OB17 - Northern Virginia
Posted: Fri Dec 23, 2016 11:31 am
by bateau-webmaster
Awesome work, You are featured on the front page:

Re: OB17 - Northern Virginia
Posted: Fri Dec 23, 2016 3:39 pm
by csaroka
That's awesome! Thanks everyone for the feedback! Can't wait to get started on the inside. Merry Christmas and Happy New Year!
Re: OB17 - Northern Virginia
Posted: Fri Dec 23, 2016 5:26 pm
by Jeff
Merry Christmas to you and your family!!! Jeff
Re: OB17 - Northern Virginia
Posted: Fri Dec 23, 2016 8:02 pm
by seaslug
Geez! now you're telling me to get back on the front page I have to sand down to 1500 grit. Bah Humbug! I quit at 100 grit, and slapped on the paint. A Merry Christmas to all. Mike
Re: OB17 - Northern Virginia
Posted: Mon Jun 05, 2017 10:10 am
by csaroka
Had to take a break for a few months to finish the Capstone for my MS degree but now that I am done with that, I'm looking forward to picking back up where I left off on the boat.
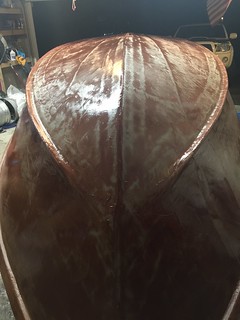
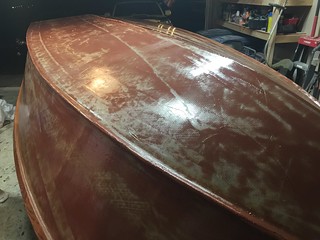
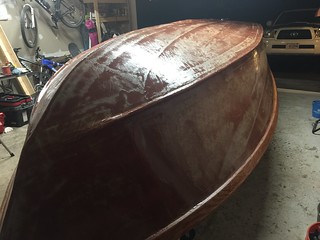
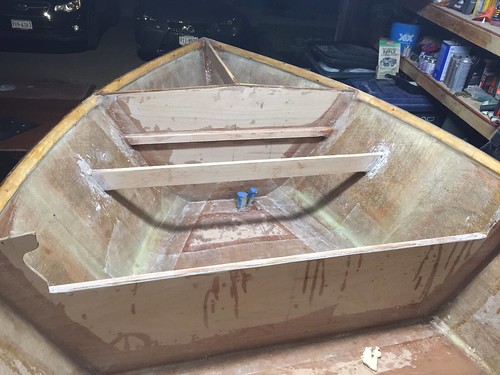
After the flip, filleted and glassed the seams.
Glassed the hull
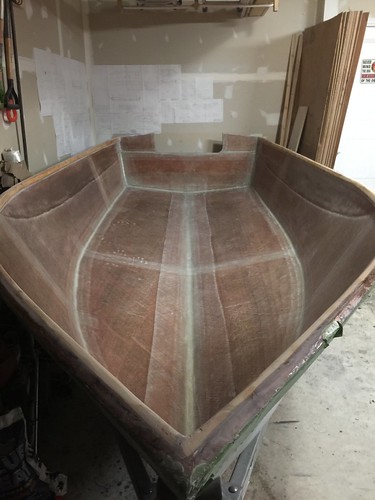
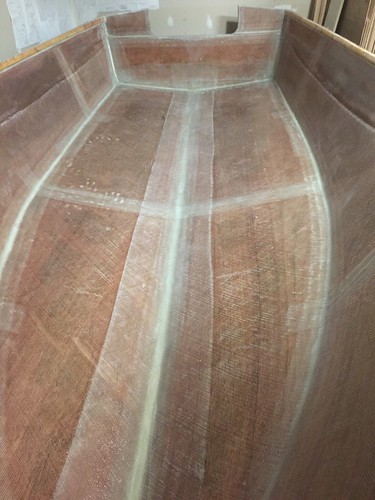
Dry-fit the stringers and stations
Ran beads of PL Premium under each stringer and station. Then, filleted the seams with the wood flour epoxy blend.
Glassed the seams and add support cleats (no pictures of this process)
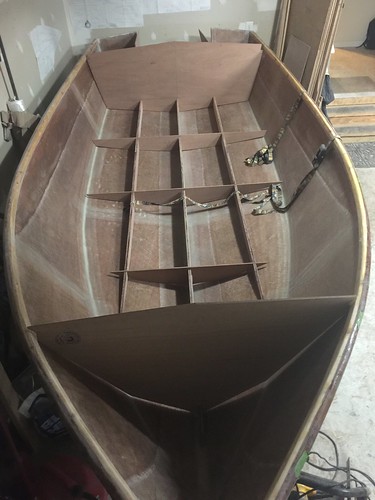
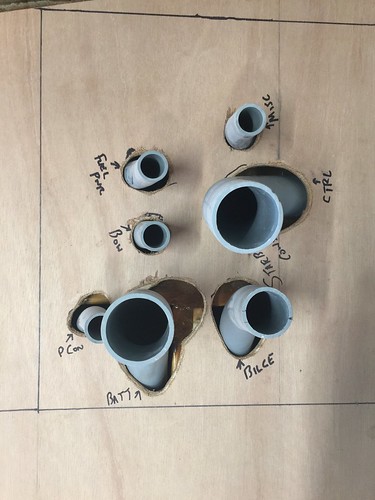
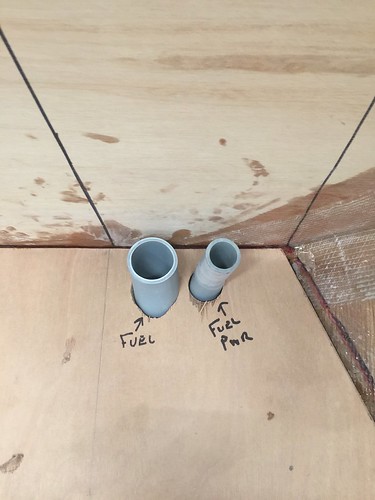
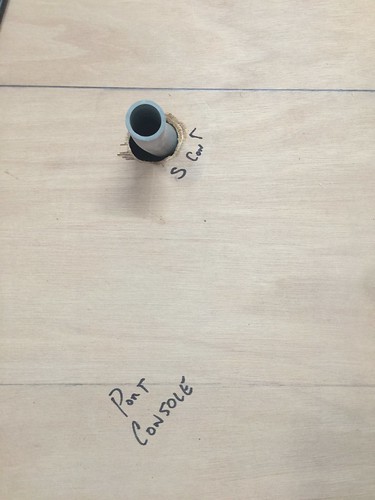
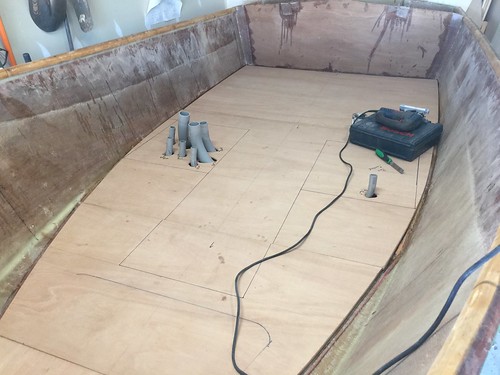
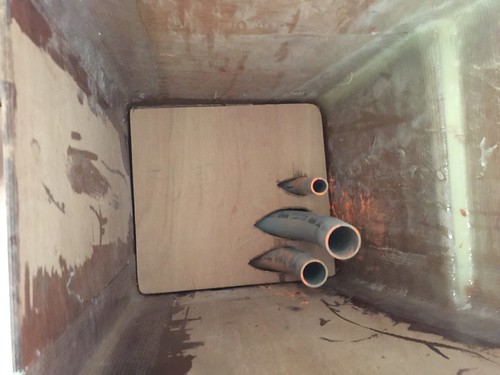
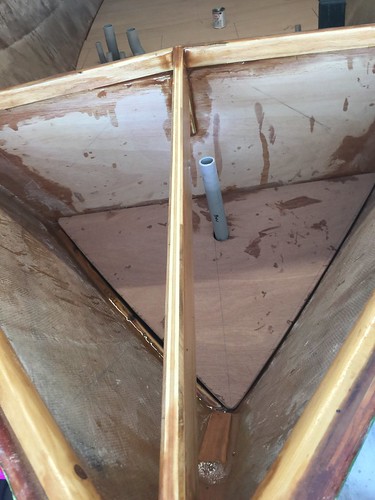
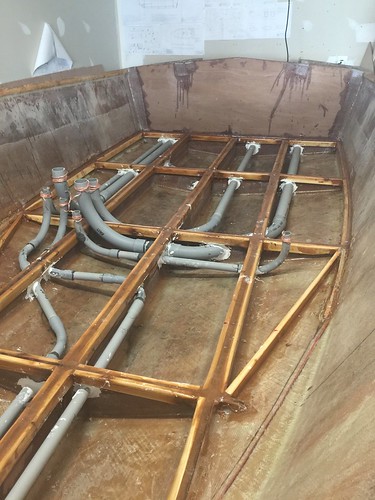
Started installing the conduit
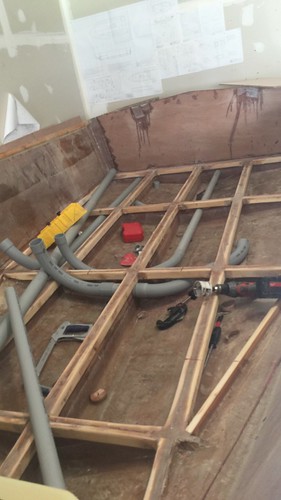
...and ended up with this
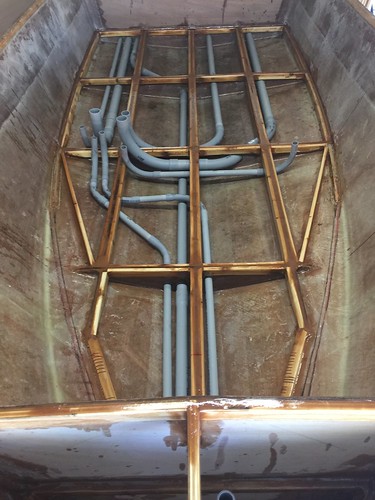
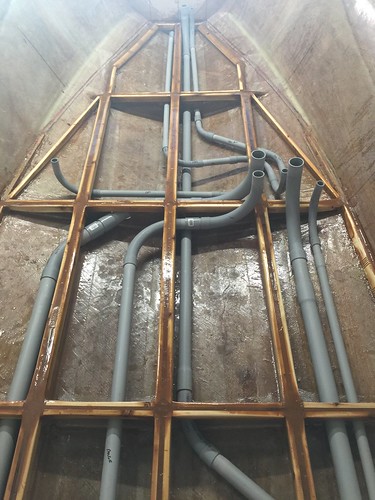
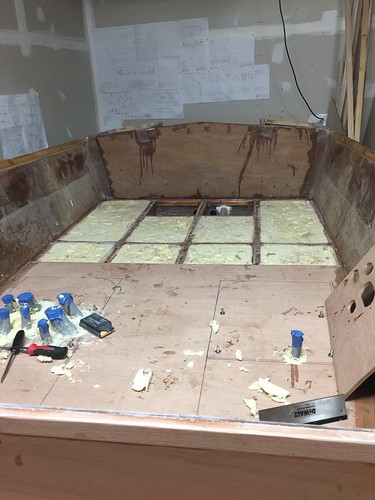
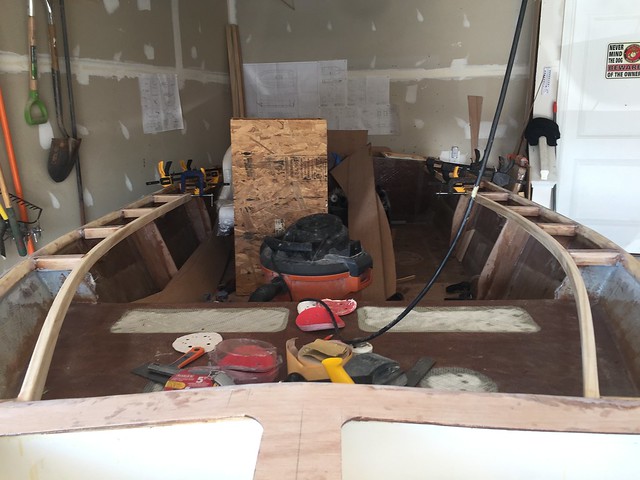
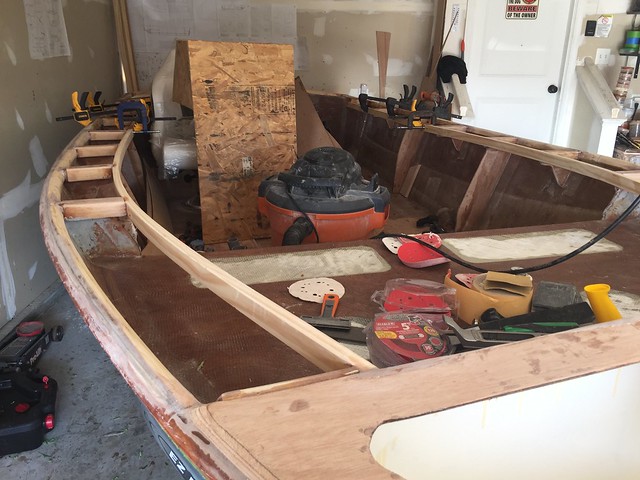
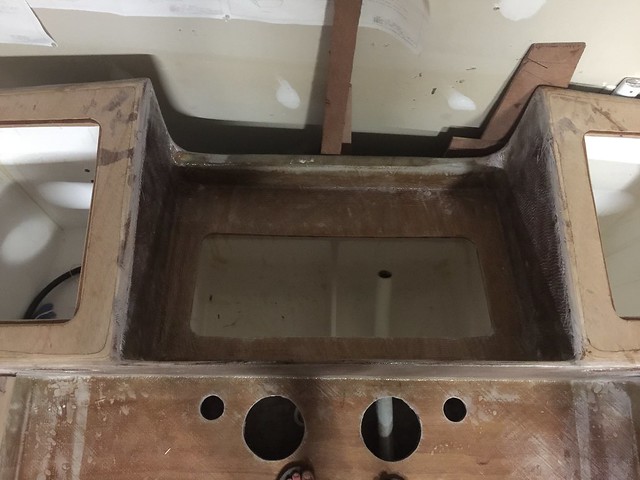
Dry-fit the sole

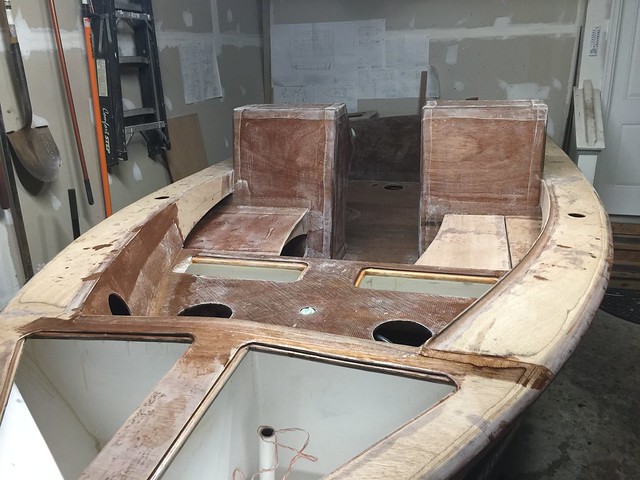
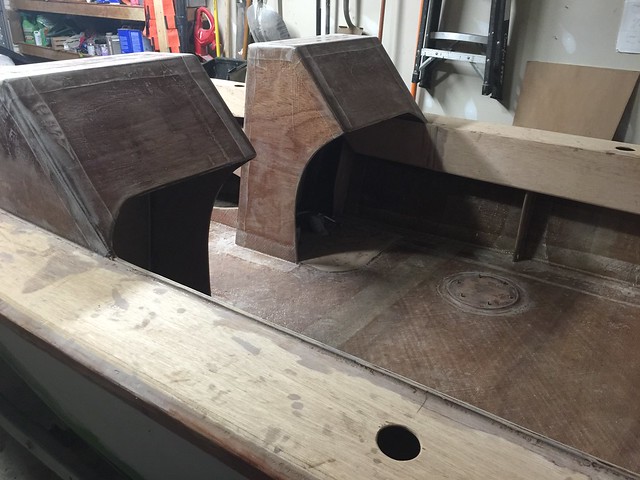
Starboard stern well
Port stern well

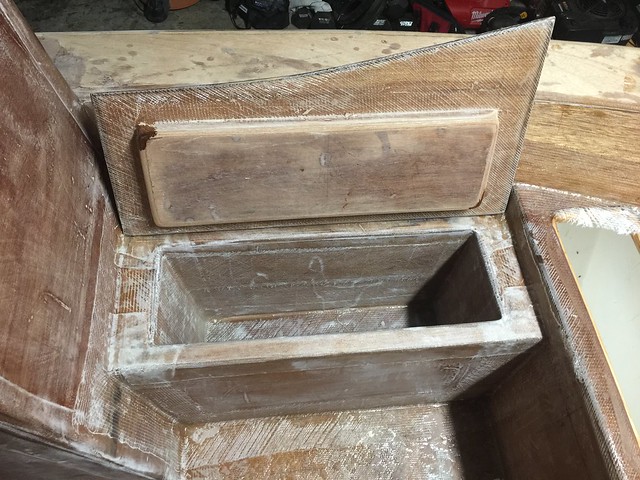
Bow anchor locker
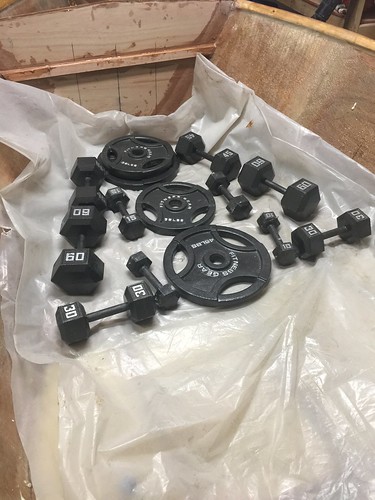
Finding resting location for fuel tak

I'm waiting for a pair of scupper drains (anti-return) to arrive, which I plan to install in the rear of the cockpit and drain into the bilge. Afterwards, I'll foam under the sole panels. Any advice on foaming and work to do prior to sealing the sole would be very helpful. I've been thinking about holding off on sealing the deck until after I have built the consoles and know their exact mounting locations. Most of the documentation illustrates console hardware under the sole, and I'm not quite sure how I would do that with foam in the way and the deck fixed to the hull. One other thing, do the cockpit sole panels need to be spliced together on both sides or just glued to the stringers underneath and spliced on the top?
Re: OB17 - Northern Virginia
Posted: Mon Jun 05, 2017 4:05 pm
by TomW1
Attach the sole panels with plenty of glue to the underside structure and make sure you weight it well to get maximum adhesion. Then tape the top sides.
Re: OB17 - Northern Virginia
Posted: Mon Jun 05, 2017 4:29 pm
by Jeff
csaroka, I knew you had been very busy with your Masters Degree and did not expect you would have accomplished this much in the last few months, NICE WORK!!! Jeff
Re: OB17 - Northern Virginia
Posted: Mon Jun 05, 2017 7:21 pm
by csaroka
How deep should the motorwell cover sit below the edge of the transom?
Re: OB17 - Northern Virginia
Posted: Mon Jun 05, 2017 7:52 pm
by Jeff
csaroka, sorry to delay you but that is a question for Jacques and he is away on a camping trip to Yellowstone. I will make sure he sees your question as soon as he has wifi!! Again, really nice work!! Jeff
Re: OB17 - Northern Virginia
Posted: Mon Jun 05, 2017 8:37 pm
by TomW1
csaroka, that measurement should be in the plans. Please double check for it, since Jacques won't be back for a couple of weeks I am on vacation also or I would check on it for you.
Tom
Re: OB17 - Northern Virginia
Posted: Tue Jun 06, 2017 5:59 am
by csaroka
I have gone through both the digital and printed copies at least a half dozen times and I am not finding the measurement.
Re: OB17 - Northern Virginia
Posted: Tue Jun 06, 2017 9:44 am
by bateau-webmaster
Sorry for the delay.
Being that the hatch/cover for the motorwell is optional, the placement is entirely up to you. Personally I would suggest measuring the inside edge of the clamp on your outboard, and giving it a reasonable amount of clearance (2-3 inches more than the bracket's depth is probably enough.)
Re: OB17 - Northern Virginia
Posted: Tue Jun 06, 2017 9:54 am
by csaroka
Unfortunately, I don't have a motor yet. Any idea if there is a typical measurement for a ~70-90HP motor? I saw some web references indicating at least 4" while others said at least 6" such as here:
http://www.glen-l.com/designs/outboard/motorwell.html.
Re: OB17 - Northern Virginia
Posted: Tue Jun 06, 2017 10:08 am
by bateau-webmaster
I'd say you are going to have to pick out a motor, to make the determination. Otherwise you could go with the lowest recommendation, so that in the future, a different manufacturer's outboard could fit.
Re: OB17 - Northern Virginia
Posted: Tue Jun 06, 2017 10:41 am
by TomW1
Motor mounting systems are a standard size and meet a BIA standard. Other wise you would have to re-drill your boat it you changed motors. I will try to find that for you. Here it is. 4" is plenty, the first hole on the motor mount is down 2" from the part that rests on the transom. You can then angle it up to the next frame forward and drill a couple of drainage holes in the corners of the transom.
Tom
Re: OB17 - Northern Virginia
Posted: Tue Jun 06, 2017 11:40 am
by csaroka
@ TomW1... Makes much more sense and many thanks for researching the measurement. I tried locating a copy of ABYC "S-12 Transom/Motor Well Dimensions" but it looks like you need to cough up $50 to review the 2002 version. I was hoping the designer would maintain a copy on-hand for compliance verification.
Re: OB17 - Northern Virginia
Posted: Tue Jun 06, 2017 11:59 am
by bateau-webmaster
@TomW1 Thank you for looking that up!
Jacques probably does have it on hand. Unfortunately he's out in Yellowstone still. He'll be back about the end of June, hoping to bother him for as many resources like that as possible.
Re: OB17 - Northern Virginia
Posted: Tue Jun 06, 2017 6:04 pm
by TomW1
Jamie there is a motor mounting hole drilling template floating around that Cracker Larry built and passed on to other builders. I do not remember who had it last but maybe he will see this and bring it up.
Tom
Re: OB17 - Northern Virginia
Posted: Tue Jun 06, 2017 7:38 pm
by Jeff
Tom, thank you for that guidance!!! I will ensure we search for it tomorrow and get back to you and csaroka!!! Jeff
Re: OB17 - Northern Virginia
Posted: Mon Jun 19, 2017 9:58 am
by csaroka
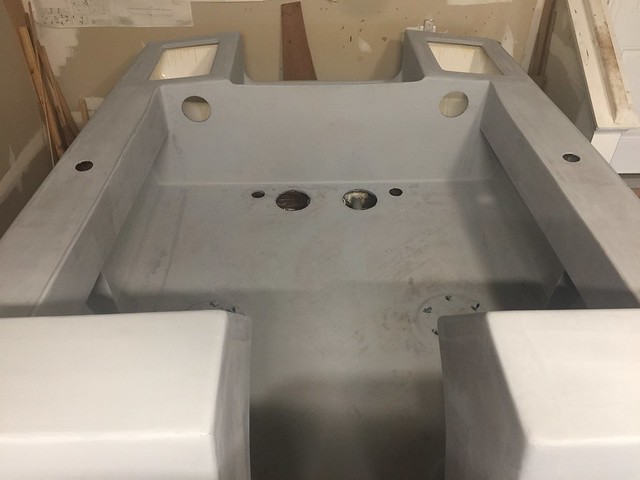
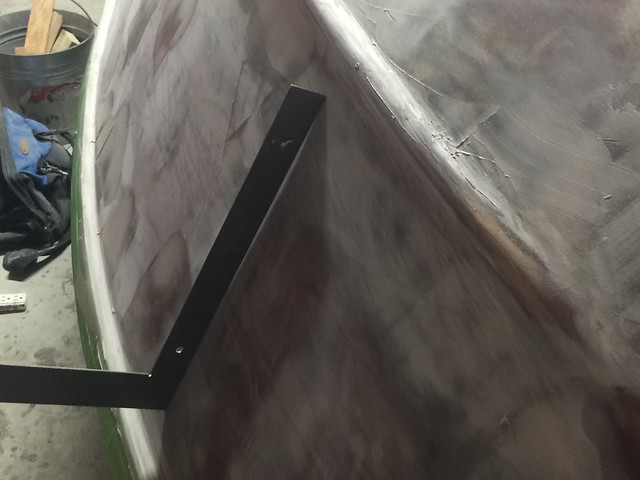
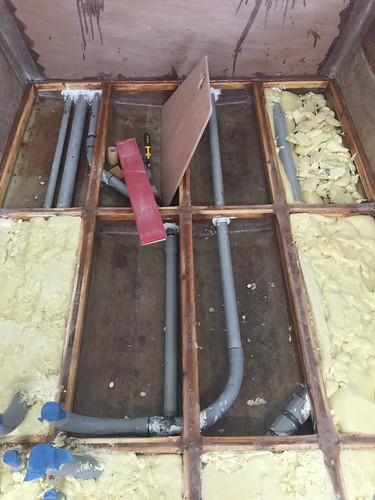
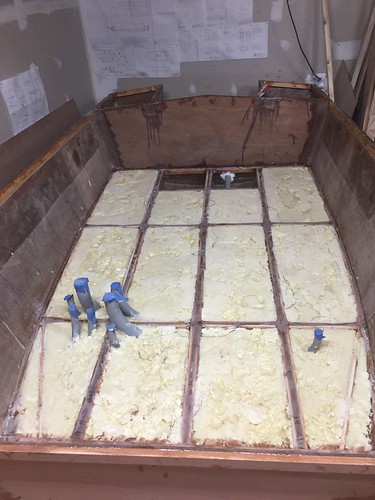
Fished pull strings through the conduit
Foamed the anchor locker, cockpit and, both side motorwells. Had minimal waste and it took 7 gals. of two-part foam to fill all bottom compartments. The temperature ranged from mid-80s to low-90s during the process.
[
Created a nonstructural station for the cockpit drain components, which will dump into the bilge

Glued the first sole section to the structure underneath and weighted it down
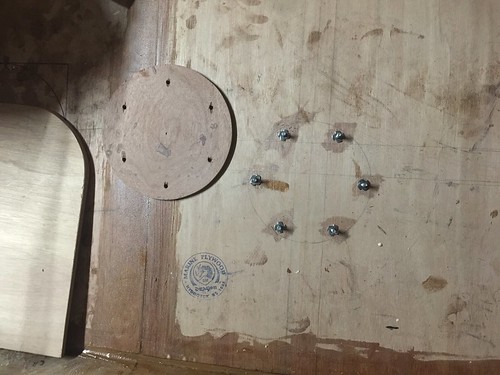
Added the second sole section. The foam caused the pipes to shift some so I had to modify the template. Went through two backsaws; handle broke off. Added SS lugs for each console base.
And the final sole section. Added SS lugs, with a aluminum backing plate for each seat pedestal. Glassed underside of the the drain and beckson plate cut-outs to reinforce that area.

Started framing the casting deck
I'm going to glass the seams for all sole sections tonight. Is it either necessary or recommended to glass the cockpit deck completely?
Re: OB17 - Northern Virginia
Posted: Mon Jun 19, 2017 10:19 am
by pee wee
That's to builder's preference whether or not to glass the entire sole, but I'd guess most builders choose to. Set an anchor down harder than you intended . . .
Re: OB17 - Northern Virginia
Posted: Mon Jun 19, 2017 12:46 pm
by TomW1
Glassing the cockpit decks is really up to you, but they will last longer if you glass them with 6oz glass. If you took a poll I think most would glass there decks.
Re: OB17 - Northern Virginia
Posted: Mon Jun 19, 2017 1:13 pm
by csaroka
Thanks for the feedback, guys! That sounds like something I should do.
Re: OB17 - Northern Virginia
Posted: Mon Jun 19, 2017 3:36 pm
by Browndog
Looks great. Hope to be doing the interior on my build soon. Nice job.
Re: OB17 - Northern Virginia
Posted: Mon Jun 19, 2017 4:19 pm
by Eric1
Looking Great! I'm plus one for glassing the sole.
Re: OB17 - Northern Virginia
Posted: Tue Jun 20, 2017 9:17 am
by Jeff
Wow Charles, did you get some time off to work on your build as you are really making great progress!! Really nice and clean work and your foam looks great!! Jeff
Re: OB17 - Northern Virginia
Posted: Tue Jun 20, 2017 9:17 am
by bateau-webmaster
That's a lot of work done in one post! Nice job on the foam.
Re: OB17 - Northern Virginia
Posted: Tue Jun 20, 2017 11:19 am
by csaroka
Came across the post by Cracker Larry, which Tom referenced on the universal mounting template details. Here is the link -
https://forums.bateau2.com/viewtopic.ph ... 50#p263208
Re: OB17 - Northern Virginia
Posted: Tue Jun 20, 2017 1:24 pm
by bateau-webmaster
Cracker Larry's post has been linked from the builder's tips page. I also featured this build on the
front page this week.
Re: OB17 - Northern Virginia
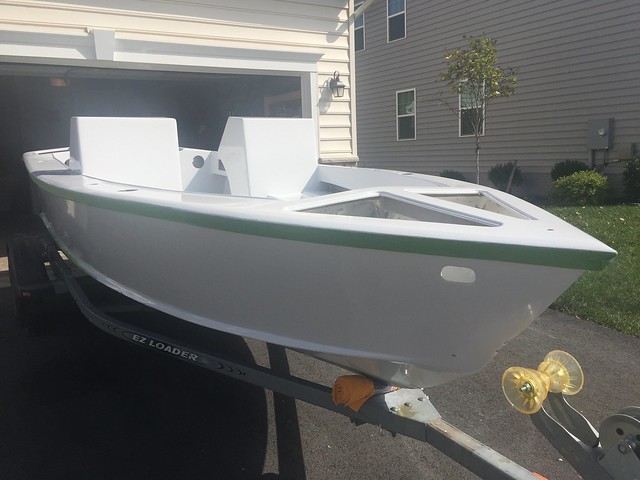
Posted: Tue Aug 08, 2017 9:54 am
by csaroka
Installed and mounted the fuel tank under the casting deck and installed support for the side decks.
Roughed in a pair of consoles


Pulled it out into the light for cleanup


I don't have pictures yet but the inside combing is also complete; built a seat forward of the starboard console with a stash cubby underneath; and built the seat framing and cooler (in progress) forward of the port console. I'll post updated pictures in a few days.
A few questions...
For a Class D VHF radio (UM380) do I need to install a dynaplate for grounding it or is the neg. terminal sufficient?
I've read that I need to ground all full vents and the fuel fill port; does anyone have images on this, specifically the fuel fill port?
Trying to conserve space and eliminate excess weight, what is the general recommendation on a single "Dual Purpose Battery" vs. a separate "Starting Battery" and "House Battery" ?
Leaning towards a Yamaha F90 motor, how would I go about identifying the prop for optimal performance?
Re: OB17 - Northern Virginia
Posted: Tue Aug 08, 2017 1:53 pm
by narfi
I like those consoles. Are they in the plans for the OB17? or did you design them yourself?
Re: OB17 - Northern Virginia
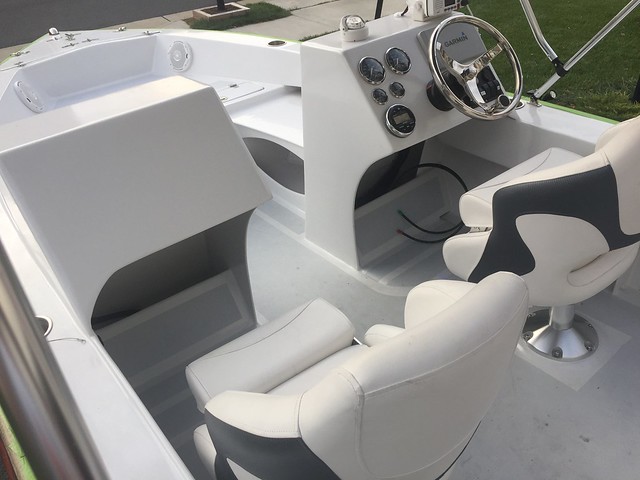
Posted: Tue Aug 08, 2017 2:25 pm
by csaroka
I used the plans as a starting point but after building a mock-up with particle board, I found them too tall and square. I dropped the overall height close 4" and added a few curves for style.
Re: OB17 - Northern Virginia
Posted: Tue Aug 08, 2017 11:39 pm
by TomW1
That is really looking nice. Like the seat also.
Tom
Re: OB17 - Northern Virginia
Posted: Wed Aug 09, 2017 11:13 am
by csaroka
Recently, I've been on the look out for a motor and calling around to local dealerships for quotes. I probably should've have done a bit more research on the pricing before starting the build. Anyways, its too late to turn back. Although I'll drop the cash if I have too but the 2017 Yamaha, Honda, and Mercury motors are more than I would like to spend. With that, I did some exploring for used motors and found a 2014 90HP Mercury ELPT for $6K (1/2 the cost of a 2017 installed). I talked to the owner and he claims its like new and has been rarely used since he bought it 2-3 years ago. He is downsizing so only the motor is for sale. Understanding that I would forfeit a new motor warranty and would be responsible for rigging, etc, does anyone have experience with this motor or would advise against this approach?

Re: OB17 - Northern Virginia
Posted: Wed Aug 09, 2017 10:06 pm
by Newt
Hard to tell it from a new one.
On these new outboards with computers, can a dealer plug in and tell the hours?
Newt
Re: OB17 - Northern Virginia
Posted: Wed Aug 09, 2017 11:27 pm
by Fuzz
They should be able to tell the hours and how many hours at different RPMs. I hate this policy of the dealer must rig the boat. Feels like just a rip off to me but then I hate any policy telling me what to do.
Re: OB17 - Northern Virginia
Posted: Thu Aug 10, 2017 3:32 am
by BarraMan
Wow, I always have thought that outboards were significantly cheaper in the US than in Australia, but not by those figures.
I can buy a 90hp 4-stroke Yamaha here for about A$13,000 fitted which is about US$10k.

The 2014 Merc seemed dear to me!
Re: OB17 - Northern Virginia
Posted: Thu Aug 10, 2017 7:20 am
by Jaysen
With the exception of Apple products, I think most "internationally distributed" products follow your observation. There is a lot of politics but it comes down to "shipping from point of origin" and import tariffs in the US.
At least that's what I noticed in some recent meetings in the US.
Re: OB17 - Northern Virginia
Posted: Thu Aug 10, 2017 7:49 am
by Jeff
Wow, you have gotten a lot accomplished since the last photo posting!! She is looking great!! She will be a great fun/ski boat!! Jeff
Re: OB17 - Northern Virginia
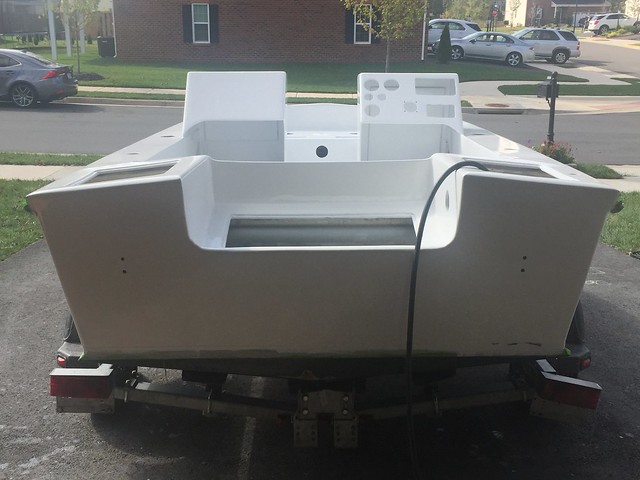
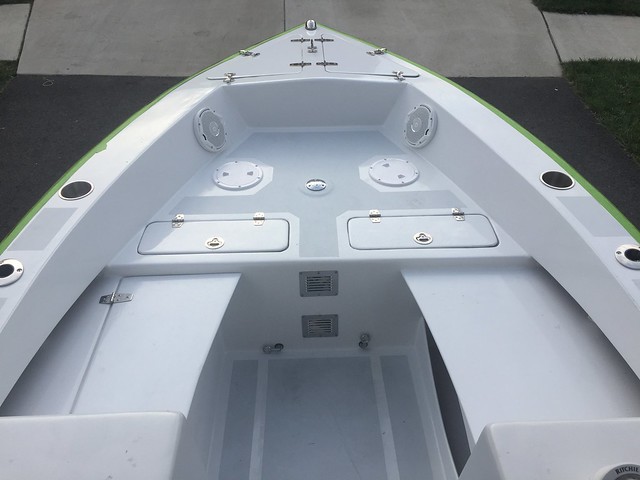
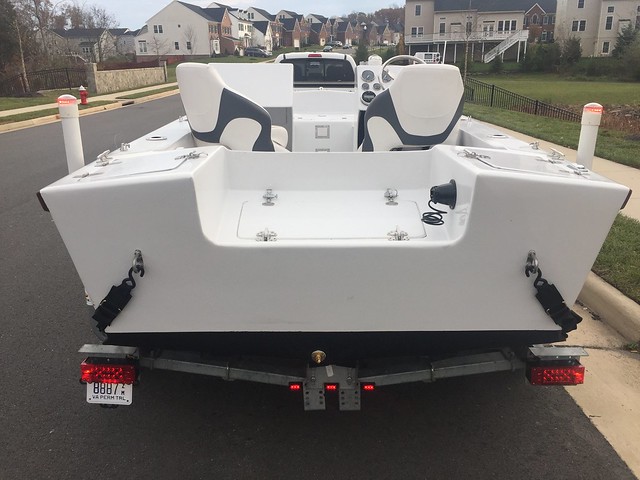
Posted: Mon Aug 14, 2017 10:23 am
by csaroka
Forward gunwales and seats

Cooler under starboard seat - forward
Forward and aft walls - 3 x .5"
Center-facing wall - 2 x .5"
Hull-facing wall - 1 x .5" but void filled with insulation
Bottom - 2 x .5"
Cover - 2 x .5"


Rear gunwales

Motorwell
Question:
For a Class D VHF radio (UM380) do I need to install a dynaplate for grounding it or is the neg. terminal sufficient? Is there any other reason for a dynaplate?
Re: OB17 - Northern Virginia
Posted: Mon Aug 14, 2017 3:53 pm
by TomW1
A dynaplate provides excellent protection from lighting strikes for all of your electronics, you will want it to be the highest point on your boat, like on top of the T-top and use a heavy wire down to the dynaplate in the hull. You will need to ground any metal like a T-top frame Other than that a standard negative terminal connection will be fine for your VHF. It has been quite a while since I researched and figured out what should be tied to a dynaplate but they are definitely worth your time if you are going to going to be out in storms. If not the standard grounding terminal will do you fine.
Tom
Re: OB17 - Northern Virginia
Posted: Tue Aug 15, 2017 9:31 am
by BB Sig
The boat is looking great! I love the curved consoles.
The below link is a recent thread on the subject of a dynaplate. The end result from reading it was on small boats it is not necessary but can be done. It seems unless you have a large sailboat or a true yacht, it might not be worth it to me. I usually have run from storms. No desire to be near a thunderstorm but sometimes you just get caught.
 https://forums.bateau2.com/viewtopic.ph ... te#p399831
Re: OB17 - Northern Virginia
Posted: Tue Aug 15, 2017 1:28 pm
by csaroka
Thanks for the information! I certainly don't plan to linger around in storms. While researching and planning the electrical layout, aside from the lightening safety precautions, I found several reports of people grounding their VHF radios, among a few other components, to dynaplates for improving the RF signal quality. I'll hold off on it for now. Semper Fi
Re: OB17 - Northern Virginia
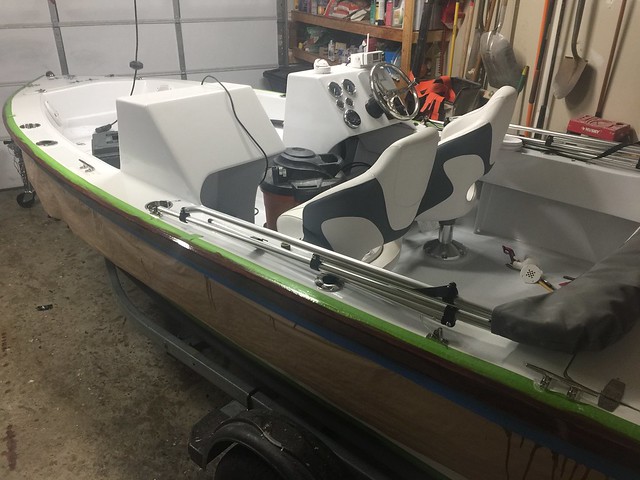
Posted: Sun Nov 19, 2017 5:51 pm
by csaroka
Re: OB17 - Northern Virginia
Posted: Sun Nov 19, 2017 6:17 pm
by peter-curacao
Sweet! great work nice layout
Re: OB17 - Northern Virginia
Posted: Sun Nov 19, 2017 7:18 pm
by Jeff
csaroka, really well done!!! Jeff
Re: OB17 - Northern Virginia
Posted: Mon Nov 20, 2017 5:33 am
by Eric1
Beautifully Done!
Re: OB17 - Northern Virginia
Posted: Mon Nov 20, 2017 10:20 pm
by Fuzz
Very nice job
I do see one problem though...........pretty sure Barraman would say you are a little short on HP for a 17 foot boat
115

Re: OB17 - Northern Virginia
Posted: Tue Nov 21, 2017 5:16 am
by jtdums
That is a beautiful job. Can't wait to hear what she is going to do with that 115. Did you do anything to beef up transom or adjust for weight of the bigger motor?
Re: OB17 - Northern Virginia
Posted: Tue Nov 21, 2017 7:13 am
by Browndog
Congratulations and best wishes for many years of happy enjoyment!
Re: OB17 - Northern Virginia
Posted: Tue Nov 21, 2017 12:59 pm
by csaroka
Thanks for the feedback!
@jtdums - Just reinforced the corners with additional fiberglass as recommended in the design. The Mercury 115 Pro XS is the lightest in the Pro XS line at 359lbs and the same weight as the 75, 90, and 115 motors in the FourStroke line. Although the 75 and 90 are comparable in weight, a Honda 115HP is close to 100lbs more than the Mercury 115HP. Regarding Yamaha, it weighs close to the 75 and 90, and about 20 lbs less than the 115.
Re: OB17 - Northern Virginia
Posted: Tue Nov 21, 2017 5:01 pm
by TomW1
The weight on the transom is not the problem. It is the water dynamics on the hulls bottom that is not being considered here . With the increase in speed the forces on the bottom increase. Did you add an extra layer of fiberglass on the bottom. If not I do not feel comfortable with you putting a 115 on the OB17 when I know what kinds of speeds a 50 and 75 can obtain. Running it through my calculators you will have a top speed in the mid to high 50's, maybe 60 , this is much higher than what Jacques designed the boat for unless you doubled up the fiberglass on the bottom. I no longer have my books to calculate the numbers since my house burnt down but perhaps Jacques can say something about this.
Tom
Re: OB17 - Northern Virginia
Posted: Tue Nov 21, 2017 5:24 pm
by jacquesmm
Thanks Tom, that is correct. The transom can take it, all my transoms are overbuilt.
The bottom pressure is what we have to keep in mind.
As speed increases, the slamming loads on the bottom will increase as the square of the speed since F=Ma where a is the acceleration.
Double the designed speed and the energy that must be absorbed by the bottom panel is multiplied by 4.
There is a safety margin in my designs plus, many of our builders add a layer of glass "just to be certain" and also, I hope they will get a feel for the limits of their boat and slow down when the pounding gets excessive.
Re: OB17 - Northern Virginia
Posted: Tue Nov 21, 2017 6:40 pm
by csaroka
@TomW1 - That's certainly not comforting. There are not two complete layers on the outside, bottom of the hull; 1st layer had some errors and a good portion was sanded off before applying a 2nd layer. All joints around the transom were reinforced with additional layers. I sent an inquiry to the designer back in August and below are the details, including his response.
- My inquiry
"Thanks for the response but I'm not asking for an ideal engine recommendation; I'm looking at this more "black and white". You based the design around requirements and I'm asking for the maximum HP and engine weight specifications that the boat can structurally support and stay afloat without substantial reinforcements.
I don't know the weight of the boat and it's not complete so if I were to take it over to the landfill for weigh-in, it could be different in a month from now. I built the dual console option, filled the bottom with foam, and installed a 19 gal tank under the casting deck. Outside of using an excessive amount of epoxy (1st boat factor) over the Meranti 1088, everything else closely resembles the design plans. The intended use is fish/ski. Up to 4 adults could be on the boat at any time but one of them might be in the water and pulled behind.
Bottom line:
Regardless of whether I need the HP or not, can I run the throttle wide open on a 115 HP or more engine for an extended period without risk of damage to the boat itself? If not, 90? If not, what is the max?
Can the boat support a 360 lbs engine? Can it support a 475 lbs engine? If not, what is the max?"
-Jacques response:
"It looks like the question is about strength, not speed.
While this boat is designed for amateur building, it is conform to the ABYC industry standards: the transom and motorwell are designed to the standards for engines up to 150 HP, the bottom of the boat is designed for speed up to 45 mph in light displacement.
Anything above 115 HP is IMHO, excessive and even dangerous not that anything will break but it will be difficult to control such a small boat with that much HP.
If you are not confident in the strength of the boat, read this about transoms:
http://bateau2.com/howto/transom.php
All what I show there is important, you can increase the number of glass layers but I think you already did that. You can add layers of glass to the bottom and transom. It is not necessary and probably too late.
Out of thousands of boats build, I never had a transom crack or failure at sea even when fitted with excessive HP.
Note that I wrote at sea: transoms fail on the trailer, on bumpy roads. For that reason try to stay below 400 lbs and use a transom saver.
If you have more questions, please post on the forum. Other builders will help and testify about the strength of my designs."
Re: OB17 - Northern Virginia
Posted: Wed Nov 22, 2017 7:05 am
by jtdums
Sorry to have opened a can of worms for you. I was not even aware of the hull complications with the force squaring with speed. Good to know.
You answered my question about the weight and the transom answer was also given. If Tom's calculations are correct (and I've never heard otherwise) 60mph is crazy fast. I'm not sure what water you are planning on using her on, but maybe if its inland (lake) it isn't an issue? The pounding seems to be what will get you in this scenario.
Re: OB17 - Northern Virginia
Posted: Wed Nov 22, 2017 1:52 pm
by TomW1
Charles I re-did my calculations with 4 people instead of 2 plus added gas to the gas tank and max speed dropped to the low 50's. I also did the calc's with a 90 HP and came up with low to mid 40's. As Jacques pointed out the design speed is 45mph so it is your choice on what you do. If you already have the 115 I would keep it throttled back to 45mph it would save you gas also.

Remember these are very preliminary numbers based on the study plan and the info you gave in your post in August. I readjusted my previous numbers with those in your post and the speed was reduced a little to the mid-50s. We will need to get an accurate weight after the boat is built, weight is the most important factor in determining speed.
Just for real world comparison, JimW built a C19 and put a 115 Yamaha on it, his top speed is 42 mph and study plan hull weight is 1200lbs while the OB17 hull weight is only 750lbs. That is where the extra speed comes from if people are asking why the difference. The difference in hull shape also favors the OB17.
Tom
Re: OB17 - Northern Virginia
Posted: Wed Nov 22, 2017 4:18 pm
by csaroka
Many thanks for running the calcs, Tom! I just received a call moments ago from the service department indicating that the installation was complete. Unfortunately, I won’t be able to pick it up until late next week. When I do, I’ll drive it over to the landfill and get the weight. I really appreciate you concern and adding clarity to the actual risks.
@jtdums Excellent question! Hopefully, others will
benefit from this discussion, specifically Tom’s valuable insight on the topic.
Re: OB17 - Northern Virginia
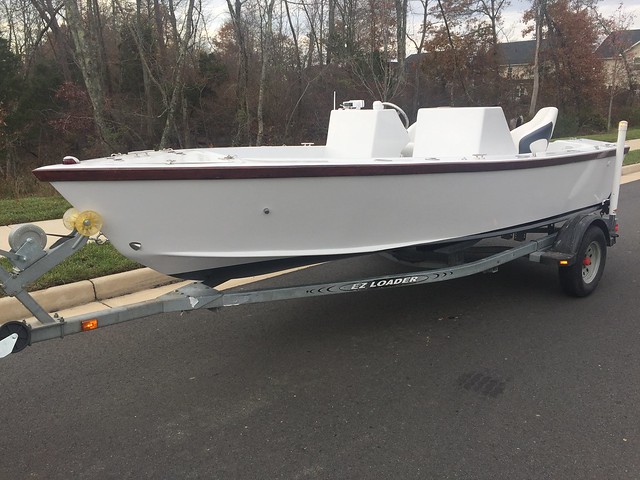
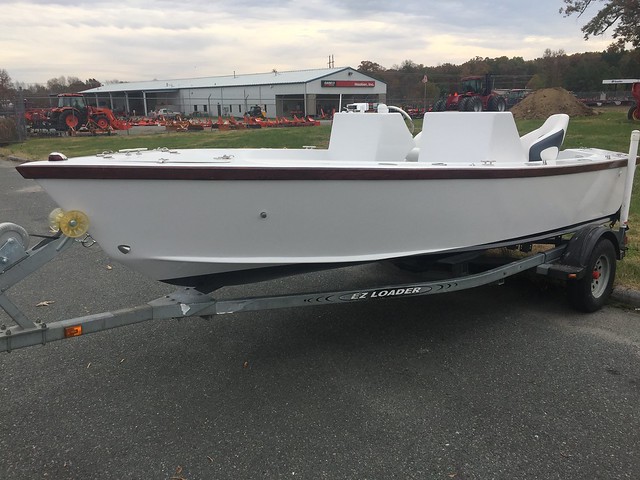
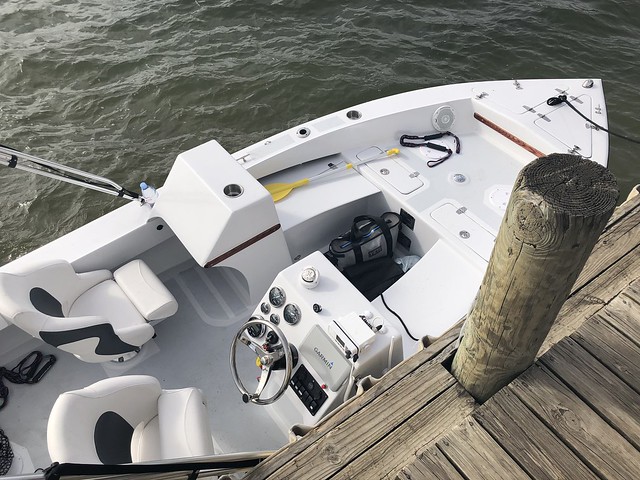
Posted: Mon Jan 29, 2018 9:25 am
by csaroka
Re: OB17 - Northern Virginia
Posted: Mon Jan 29, 2018 9:29 am
by Reid
Charles,
Glad to see you were able to get on the water this weekend. The OB17 looks great! Don't be surprised if one of these pics makes it on to the front page of the website in the future!
-Reid
Re: OB17 - Northern Virginia
Posted: Mon Jan 29, 2018 9:40 am
by pee wee
Congratulations on a fine build. The boat looks great and it sure runs!
Re: OB17 - Northern Virginia
Posted: Mon Jan 29, 2018 10:12 am
by peter-curacao
Boat looks great
Re: OB17 - Northern Virginia
Posted: Mon Jan 29, 2018 11:04 am
by narfi
Looks like a great boat and lots of fun!
Re: OB17 - Northern Virginia
Posted: Mon Jan 29, 2018 11:39 am
by csaroka
Thanks! We had a great time for the few hours that we were out on the water. Although I had a bearing buddy pop off the trailer on the way to the lake, which resulted in 1 hour delay detouring to AutoZone, there were no problems with the boat itself. Found some smooth water and took the boat to just shy of 50mph before backing off; there was certainly some left in the throttle but that's for a different day.
On a separate topic, I need to order a capacity tag for the boat. To do that, I need to calculate the Maximum Weight Capacity, which requires the Maximum Displacement as input to the formula. Looking over the OB17 design documentation, I can only find the Displacement at DWL. Is there a way to convert the Displacement at DWL to Maximum Displacement? Calculating the Maximum Displacement using Simpson’s Rule appears to be a rather manual and tedious formula; does anyone already have this information on the OB17 or can the designer automate the calculations software? Maybe there is another way to do it but I am referencing:
https://www.uscgboating.org/regulations ... OADING.pdf
Re: OB17 - Northern Virginia
Posted: Mon Jan 29, 2018 1:41 pm
by jacquesmm
For the capacity tag:
I posted a lot about that in essence saying that you do not need it.
See my last post here:
https://forums.bateau2.com/viewtopic.ph ... ag#p410861
I have calculated them for some boats that are built professionally but I don't know if I ever did it for the OB17.
I will post the values here but you must be patient, it's a free service but I give it low priority because the tag is not required.
PS: don't waste your time doing those calculations, my software does it automatically but in some cases I have to edit the 3D model which takes time.
Re: OB17 - Northern Virginia
Posted: Mon Jan 29, 2018 2:13 pm
by jacquesmm
Got a clean model and the max, displacement per ABYC rules is 8,970 lbs.
If it looks ridiculously high, read my comments about this in several places on the forum.
The reason for that very large displacement is the existence of the motorwell bulkhead. I design very safe boats and always put a high MW bulkhead in front of the splashwell.
I"ll put that in the spreadsheet now, give me a minute.
Re: OB17 - Northern Virginia
Posted: Mon Jan 29, 2018 2:31 pm
by jacquesmm
Here it is with max. HP 80 for a boat built exactly as designed.
Max. total 1714 lbs
Max. persons weight: 1309
Max. persons: 7.11
That is very conservative because I did not trim the boat and put the flooding point low. I could get more than that but anyway, read the thread referenced above.
For the tag, I propose:
Max. total 1570 lbs
Max. persons weight: 1200
Max. persons: 6
I also did with a 125 HP, less calculated values but same final output
Re: OB17 - Northern Virginia
Posted: Mon Jan 29, 2018 4:38 pm
by csaroka
Many thanks, Jacques! That helps a lot!