
K2FS18
Re: K2FS18
What some builders do to save money is use a less expensive "filler" material, like the blended filler they sell here, or even a wood flour mix, to fill the lowest areas that won't require sanding. Quick Fair can be saved for the last rounds where you are feathering things out ready to prime paint.
Hank
Re: K2FS18
Good to know Pee Wee.
Re: K2FS18
So I used Pee Wee's advise and filled in the low spots with wood floured epoxy. Also got may order of quick fair in early. THANK YOU Bateau!!
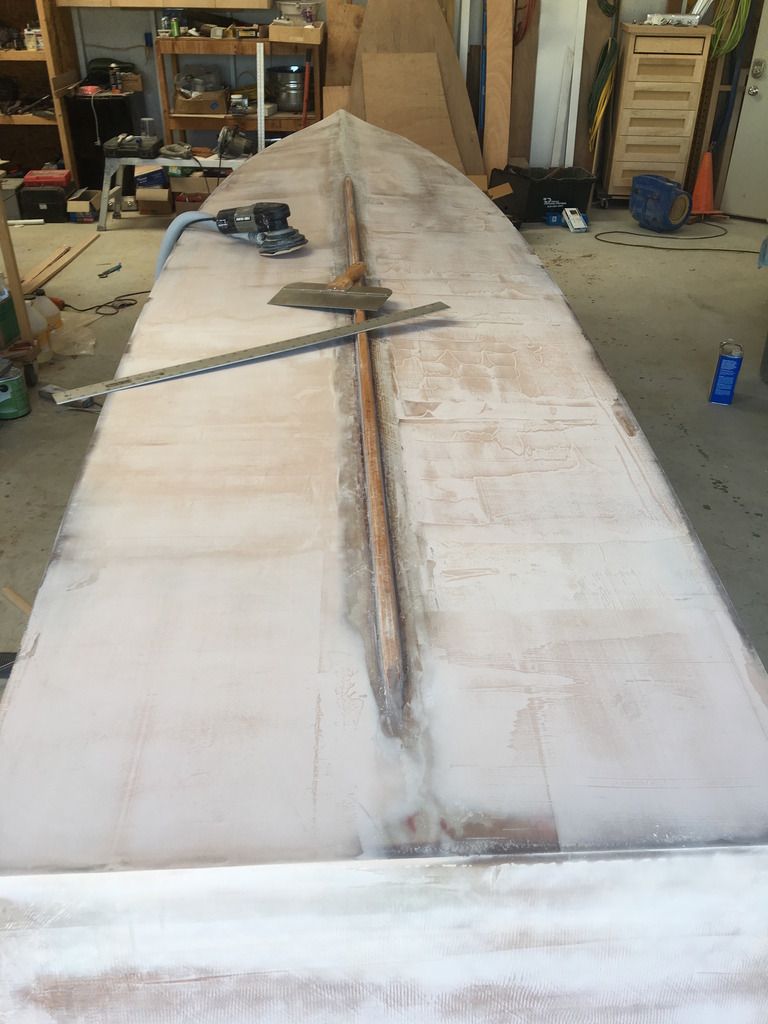
So I have two coats of quick fair on the left and one on the right (after the low was filled with flour epoxy; 3/32nd at most). My tools of choice are the 4" knife for mixing and applying to hull. The 12" knife to spread a good layer and the screed it off with the 36" aluminum rule. Then sand with 80 grit on the 6" sander attached to vac.
So this is what worked the best for me. Apply quick fair and screed from back to front with rule from skeg to outside edge. This fills the lows created by the fiberglass tape at the edge and at the skeg. A second coat is applied the same way, but with the end of the rule closer to the skeg. This fills just a little bit deeper and covers the holidays from the first coat. Then I apply and screed side to side, starting at the skeg and pulling towards the edge. 4th coat is a skim coat applied with the 12" knife and feathered just like drywall mud. Before I apply any quick fair, I check for lows with the edge of the rule and marks-a-lot that area with an arrow pointing the direction that I need to pull.
The hull in front of the skeg is a little different. This area has no real flat area and a skim coat of quick does the trick.
I will say that when I glassed the hull, i used 6mil poly on top of the glass and pushed the excess epoxy out. This created a very smooth epoxy finish and the laps in glass are very smooth as well. I had no problems removing poly. FYI, those areas I did not use poly I had more epoxy then needed. I also used peel ply on the interiors and that worked great as well.
My thoughts on peel ply and poly. The poly you could puss the epoxy forward to wet out more area. I believe I used less epoxy using this method. You could also clearly see the plywood and glass and could make sure there where no air bubbles. You need to sand before the next layup to create a tooth.
The peelply provided a great tooth so no sanding was required. But I was not as succesful in getting air bubbles out or pushing epoxy forward. Both worked really well if you applied a little epoxy to the outer surface and used a soft plastic spreader as the applied epoxy on the outside provided lubrication.
Those areas I did not use either I had too much epoxy and faught the glass "strings" and did not get a smooth layup, creating more sanding. And that sanding sucks as the glass fibers are then cut. Tyvek suit, approved face mask, sweat, goggles. etc. You still get itchy arms and eyes. That can't be good.
Re: K2FS18
Well, that could have ended much worse than it did.

Ended up damn near cutting the end of my middle finger off on my left hand. A bunch of stitches latter and my finger is back on! Missing the last 1/4" of bone or so.
Couple things went bad really quick. Yes, I should have a guard on that saw. Been meaning to for a long time, just cant seem to buy just the guard. I bought second hand w/o. Would have been a lot cheaper too just to have bought a whole new saw. Never really paid attention to the no hand emblem on the saw as well. That was exactly where my hand was. I was getting ready to cut that 1x2 in half to use as shims to raise the rear of the skiff up to make level to mark my 4" water line for epoxy graphite. When I placed the block down and started to lower the blade, I realized there was something under the block. I raised blade and picked up stock to see what was under and must have caught the blade. BAMM! That fast. Pulled my hand into the saw and capped my finger.
Good news is I finished fairing the bottom and the sides down 6". Ready to mark graphite line and epoxy. Should be able to get back on it in a few days.
-
BB Sig

- Very Active Poster

- Posts: 1751
- Joined: Thu Sep 29, 2011 9:20 am
- Location: Tallahassee, FL
- Contact:
Re: K2FS18
Wow! Be careful! 
Glad everything is back together.
Glad everything is back together.
-
stickystuff

- * Bateau Builder - Expert *

- Posts: 2219
- Joined: Tue Aug 27, 2002 1:00 am
- Location: Crystal River, Fl.
- Location: Crystal River, Fl.
Re: K2FS18
I know the feeling.Back some 20 some years ago I was instaling some base board on the job. We, the company I was working for, had one of the older skill brand chop saws. The one with a wood fence, not like the newer versions we have today. 15 min left on the job before quitting my boss was pushing us hard to finish. Chop saw was onj the floor. Needed a 1/2 in piece of base with a 45 deg cut on one end. I don,t like to waste materia. Toook a full length of base layed it out on the saw, My leg on one knee the other stretched out to hold up the baseoff thee floor, I took my hand and pushed down on the base with my left hand a dn pulled down on the handle to chop the small piece off. Picture this. As you push down straddling the base and the back side of the fence I started the saw and pushed ownd and zip I fellt something not right. Looked down and cut the tip off my finger on a 45 degree angle. Hollard at my buddy and he had a rag and we wrapped it aound my finger. Ran and got a paper towel got some ice out of the cooler and picked up my finger tip and wrapped it in the towel with some ice. Odf to emergency room we went.They stuck my finger in some betadine in one jar and the finger tip in another. i waited about an hour before a Doc.showed up. Well he was a not so doctor. he messed my buddies arm up in a car wreck. Long story short he wanted to cut my finger off at the joint. I told the nurse to get him out of here. I want somebody else. After another hour a plastic surgeon came in, smoking a cigarett. I thought , now this is my kind of guy. Well he took a little piece of skin off the tip and stuck it on my finger tip for a graft. Said to come see him in two weeks for check up. About 5 days later I was scratching my nose and had to back off. Something was rotten. Smelled awful. Called him up and told him what was going on. Went to his office immediately. About 20 miles away. He said, yep its not all taking and with this note he ripped off the the old tip. YOWWZA< Talk about pain. He took a scalpel, numbed up my forearm anf cut another piece of fresh skin and grafted it on my tip. Took awhile for me to get used to pick up nails again. Workmans comp covered it. Funny about 6 months later I get a check in the mail for I think 60 some $ for partial diss 

 ability.
Capt. Ken Owens
A little saw dust, a little glue, and a lot of love, and she will float.
A little saw dust, a little glue, and a lot of love, and she will float.

Re: K2FS18
Reminds me of my step dad's accident. He cut the end of his thumb off with a table saw right at the joint. His thumb shot out the sawdust port and when he was going over to pick it up to see if they could sew it back on...the dog ate it.
I asked him how the hell he managed to cut his thumb off with a table saw and he blamed his bifocals. Said he'd get real nervous when the dog would sit there looking at him and licking her chops.
I asked him how the hell he managed to cut his thumb off with a table saw and he blamed his bifocals. Said he'd get real nervous when the dog would sit there looking at him and licking her chops.
Re: K2FS18
My dad lost a 1/2 inch off his right middle finger on a jointer when he worked for a fine furniture building company shop back in the 50's. Not as many guards in place back then. My jointer has several that he never saw, but could still do serious damage.
Restored Mirror Dinghy, Bought OD18 built by CL, Westlawn School of Yacht Design courses. LT US Navy 1970-1978
Re: K2FS18
A few more days and I should be able to get back at it. Stitches come out next Friday but pain is pretty much gone and pain med free, clear head! First in order......cut that block of wood that is still stuck in the blade. Thinking I will scrap that piece and start with a fresh, longer section.
Re: K2FS18
A guard won't prevent all accidents, but have you considered shopping for a new chop saw? Might be a good time to treat yourself!
Hank
Who is online
Users browsing this forum: Ahrefs [Bot] and 15 guests