Page 1 of 1
OD18 Build
Posted: Sat Sep 17, 2016 11:15 am
by Bbolton2
Hey Guys,
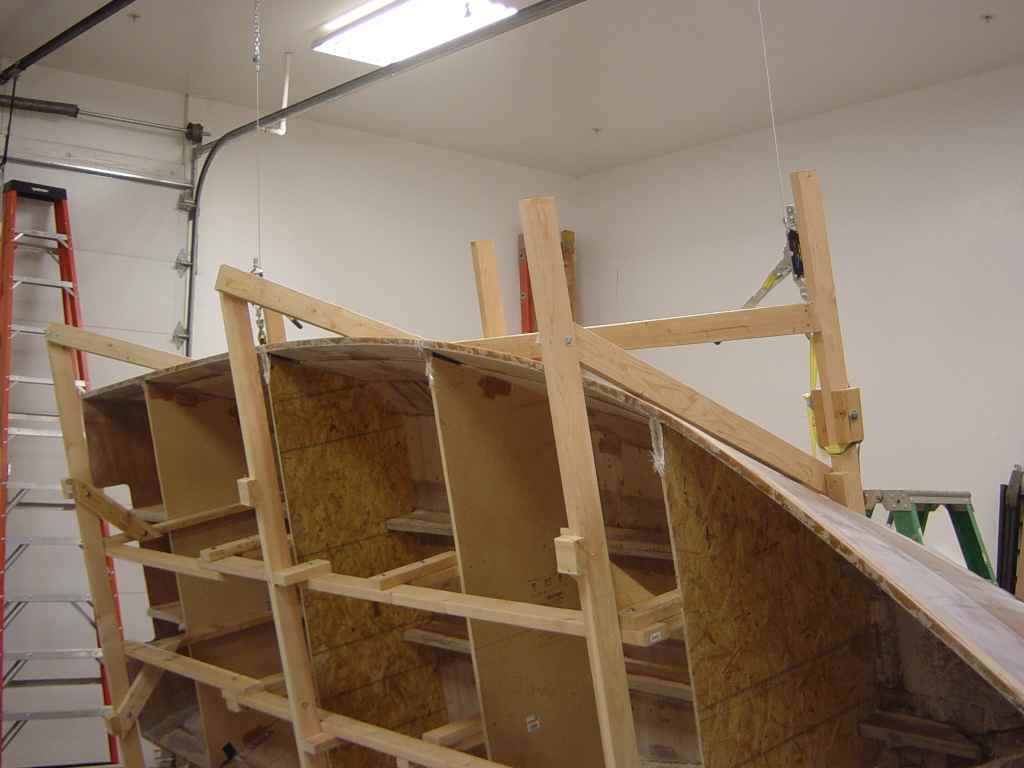
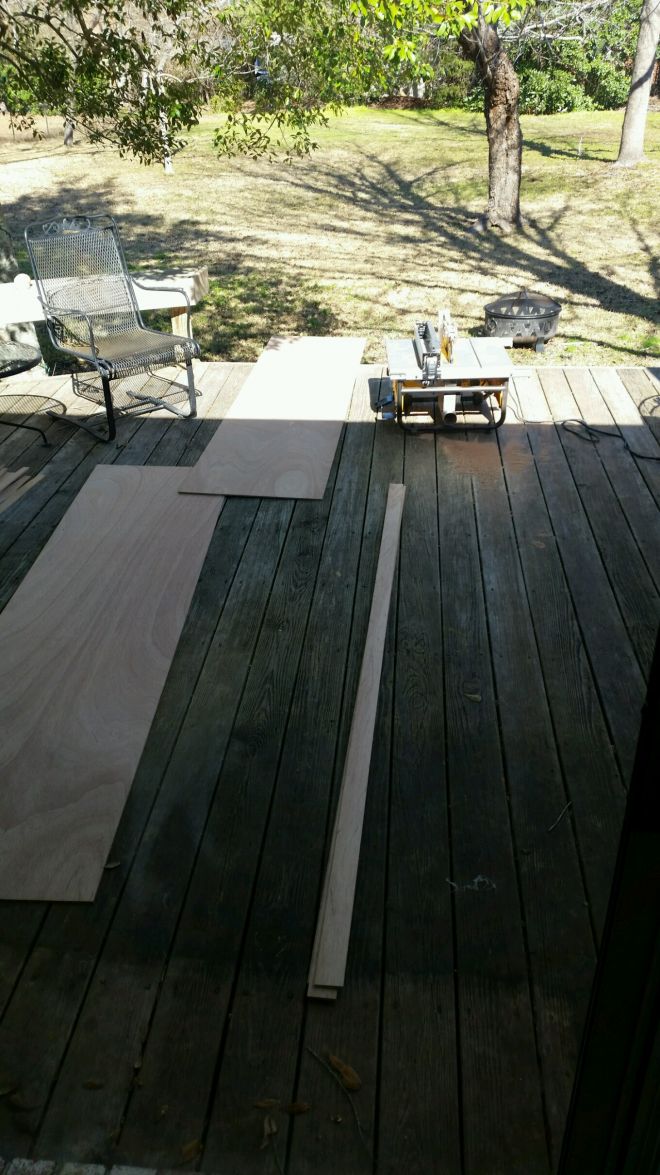
Just wanted to start a thread for my OD18 build. I have the bottom cut out along with the stringers. Took some advice from some exceptional od18 builders and glued 3/4 ply to make the stringers. I am now trying to get all pieces drawn and cut before I start assembling the hull. I am a total newbie, so I am trying to take it slow to get things right.
First challenge of mine was using a fine tooth or 144 tooth circular saw blade. This blade would bind up in the 3/4 ply and not cut real well. So I switched to a blade that came with my circular saw with a lower tooth count, and it cuts much smoother. I have to say my stringers are not the straightest things but after putting some time with a belt sander I am hoping they will be ok.
I will be drawing and cutting panels this week. With the panels being 1/4" ply, I am going to clamp two sheets together and then make my cuts. I know other OD18 builders have done this. Any tricks of the trade are gladly accepted.
Thanks
Re: OD18 Build
Posted: Sat Sep 17, 2016 11:26 am
by Cracker Larry
First challenge of mine was using a fine tooth or 144 tooth circular saw blade. This blade would bind up in the 3/4 ply and not cut real well. So I switched to a blade that came with my circular saw with a lower tooth count, and it cuts much smoother.
The trick is to set the blade depth only slightly deeper than the thickness of the wood. Clamping 2 sheets together and cutting them both as 1 is the way I do any parts that I need duplicates of. This insures they are exactly the same.
Re: OD18 Build
Posted: Thu Sep 22, 2016 9:19 pm
by Bbolton2
Feels good to get all the panels cut out. Clamping the 2 sheets of plywood is the way to go. The cuts were very easy with the 1/4 inch stacked on top of each other.

Re: OD18 Build
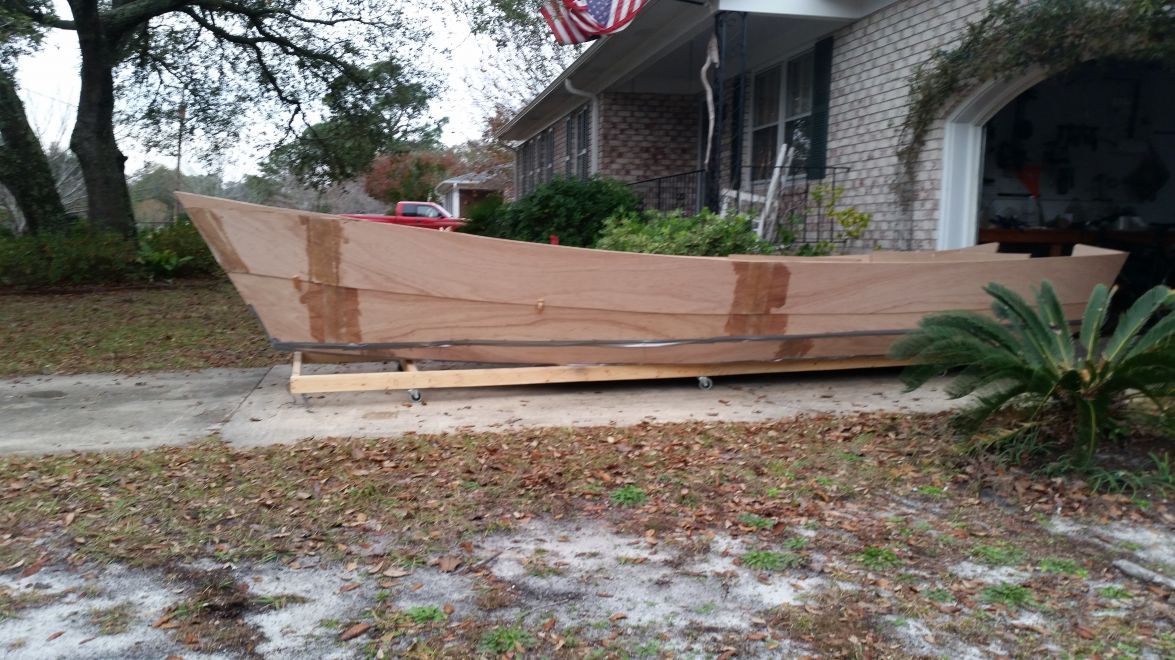
Posted: Sun Nov 27, 2016 9:53 pm
by Bbolton2
Re: OD18 Build
Posted: Mon Nov 28, 2016 1:02 am
by Fuzz
Making good progress. If you have questions do not hesitate to ask. There have been a ton of them built and for good reasons. The OD-18 makes a truly fine boat.

Any man who can get his wife to help and she enjoys it is one lucky dude

Re: OD18 Build
Posted: Tue Nov 29, 2016 9:13 pm
by Bbolton2
Okay, so I am assuming I need to go ahead and spot weld the chine panel to the bottom and the lower panel to the chine panel. At some point I will also need to glue the transom down as well then panels to the transom. After, spot welding did you guys go ahead and put some biaxial down on each seem after removing the zips? Also, any advice on what order to achieve all of this?
Re: OD18 Build
Posted: Tue Nov 29, 2016 11:26 pm
by Fuzz
At the top of the page there is a tab marked "build threads" click on it and go to the OD-18 group. Go to Larry B's thread. Starting on about page 5 or 6 you will see how he did his. His boat turned out to be a work of art so you will not go wrong doing like he did.
There are several other OD-18 threads you should go over also there. Capeman's dory is great. And of course there is Cracker Larry's. His is the bible on how to build but the pictures all got deleted

Re: OD18 Build
Posted: Wed Dec 07, 2016 9:11 pm
by Bbolton2
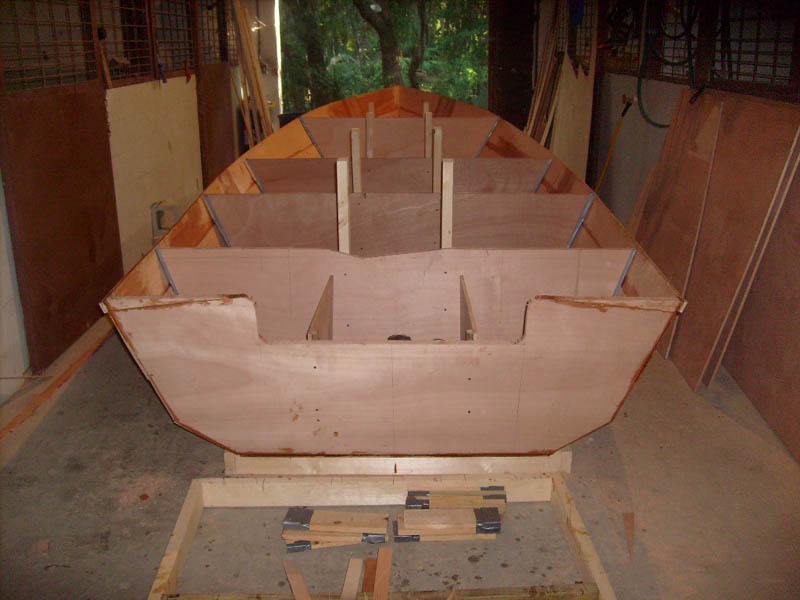
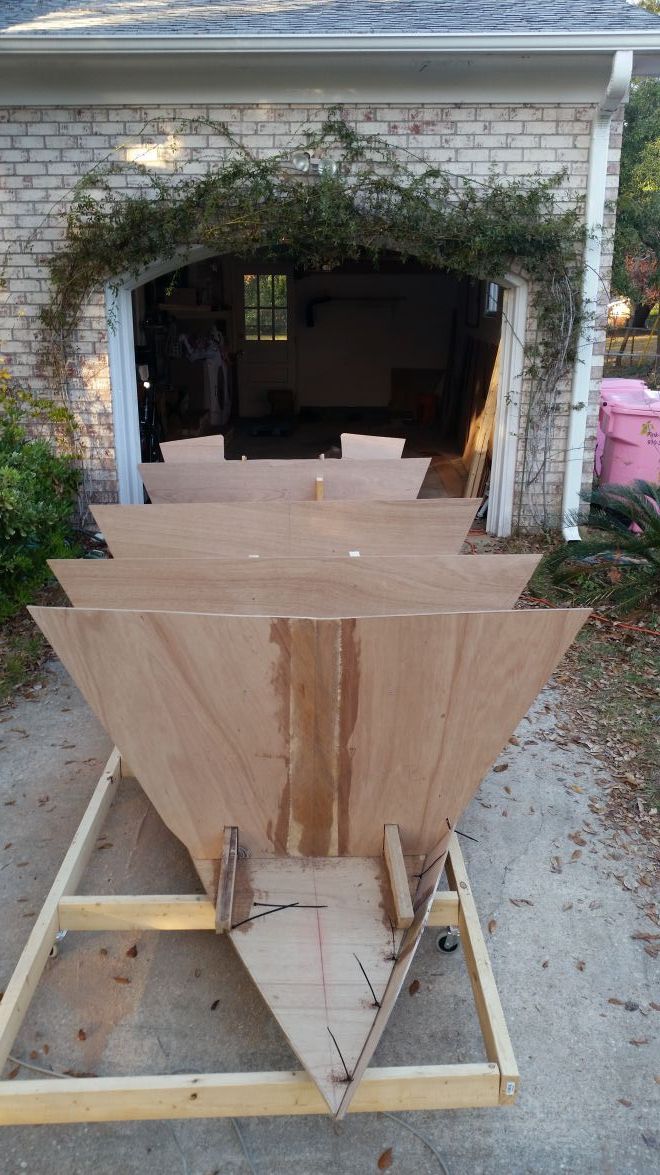
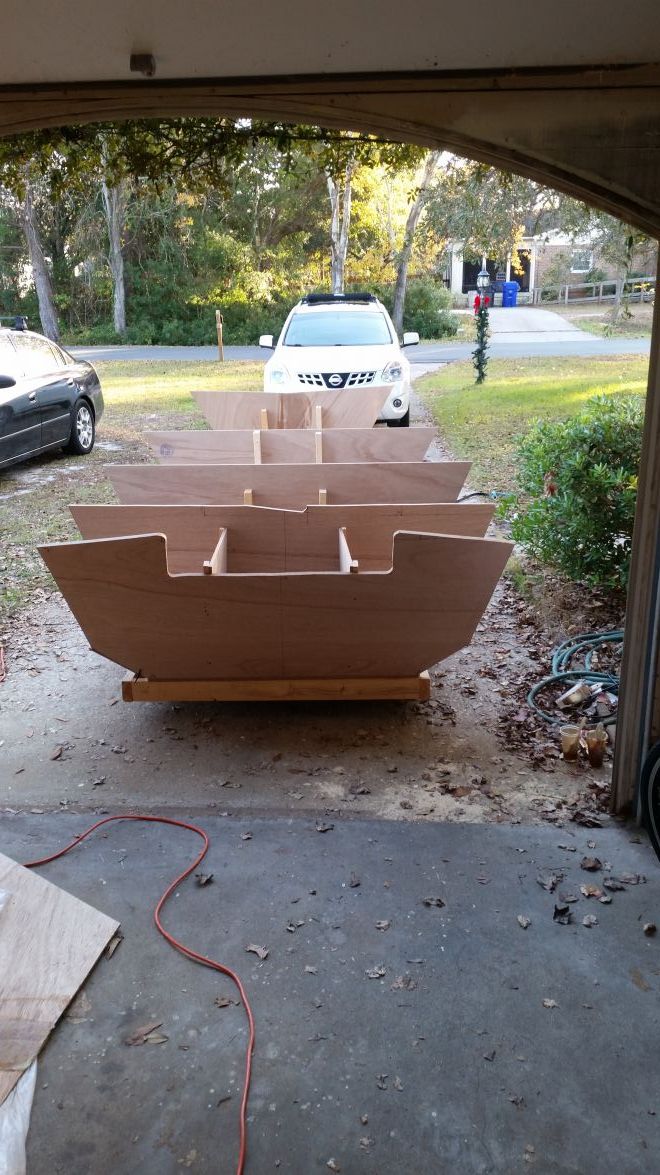
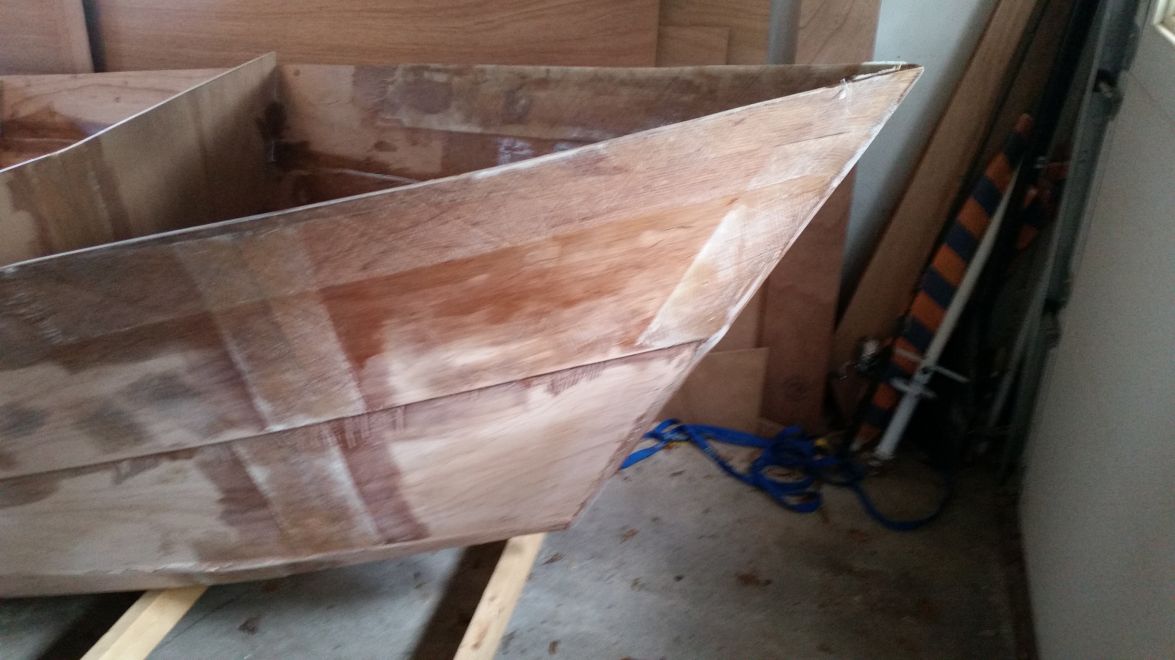
Ok, just ran into my first significant issue. I need some wisdom from previous ODer's. Okay, so I am dry fitting the upper panels to see how they fit before gluing them on. After securing the starboard panel, the panel doesn't meet the lower panel at the bow.
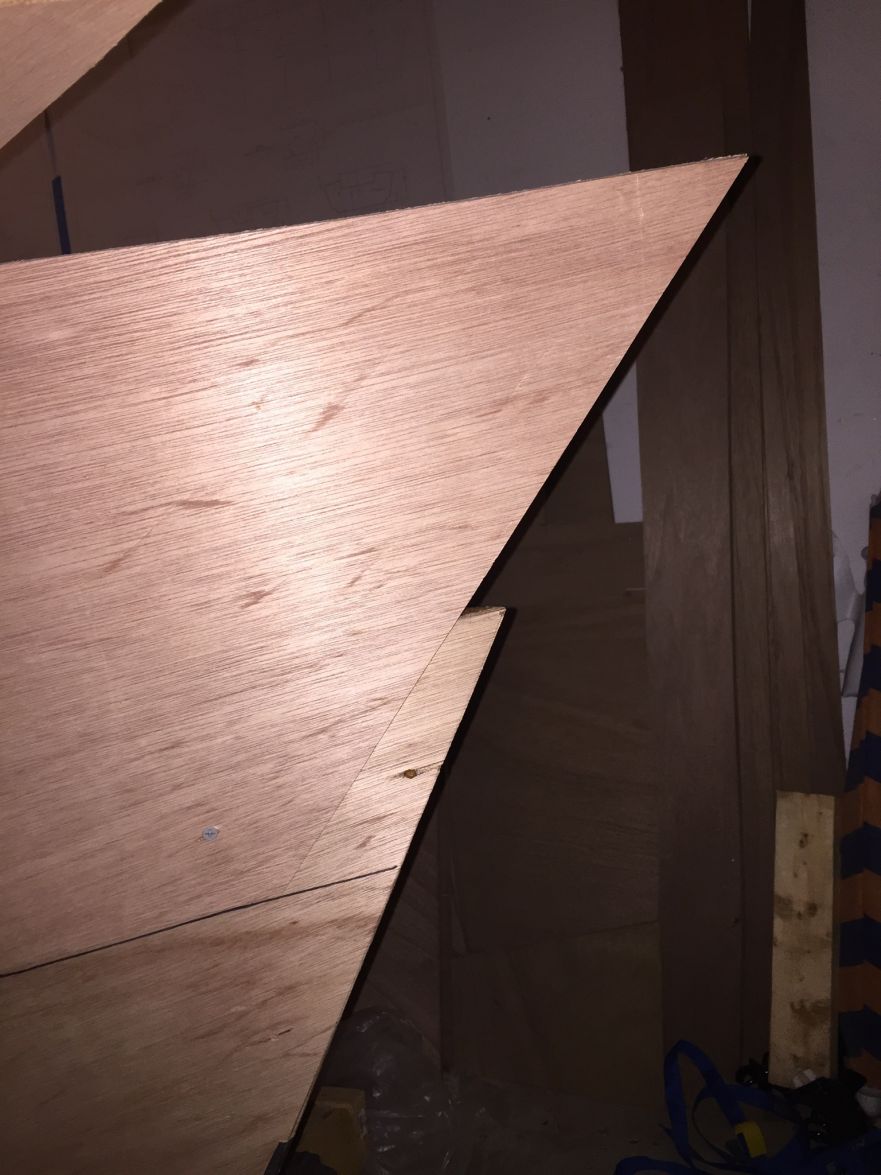
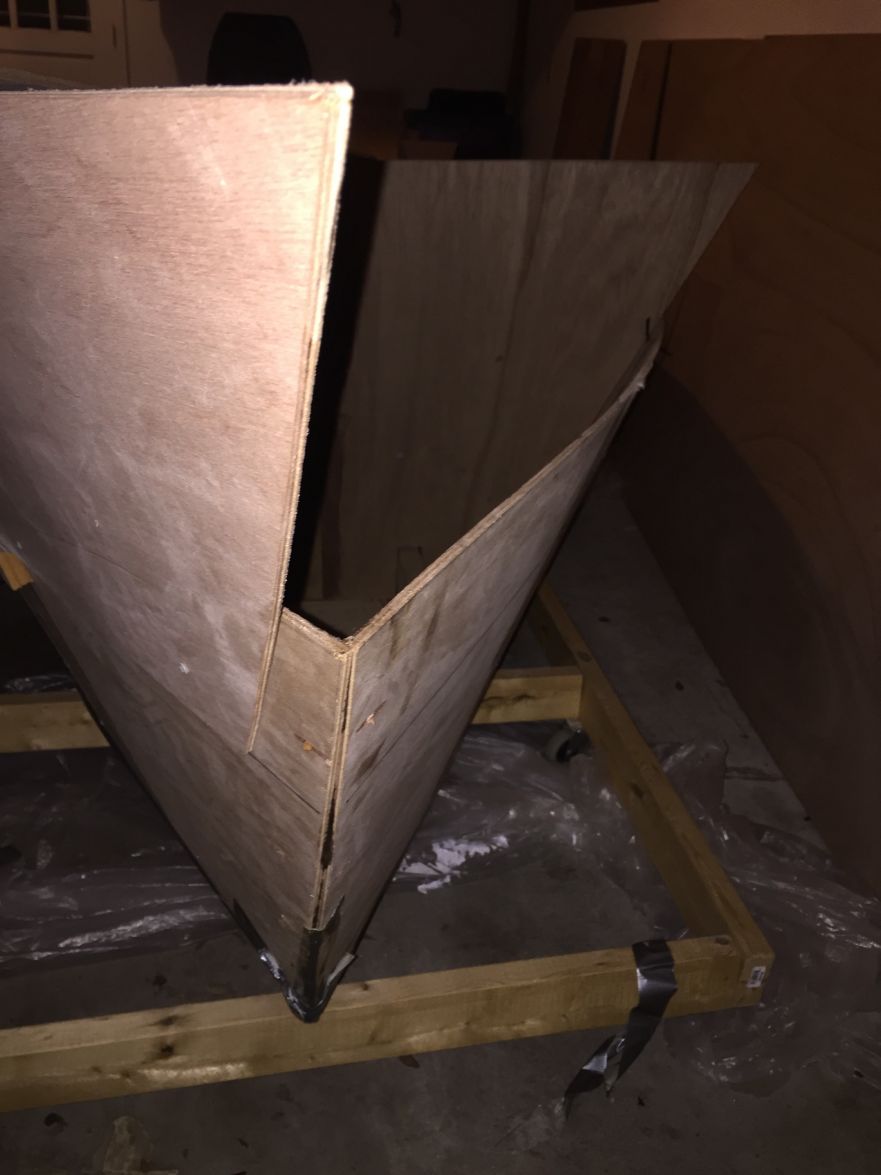
These panels were clamped together and cut, so they are exactly alike. My thought is I messed up measuring, but after doing some rough measuring, it looks like it is right. These pictures were taken with the aft portion of the panel even with the transom. I know if I had to, I could always make a cardboard template and add to the bow. Any advice will be greatly appreciated.
Re: OD18 Build
Posted: Wed Dec 07, 2016 11:11 pm
by Fuzz
When you say they were clamped together and cut at the same time do you mean both of the lowers or do you mean both an upper and a lower? If you cut an upper and a lower at the same time that is the problem. The short side of the upper should be as long as the long side of the lower panel.
Have no fear............all is not lost
Cut a filler and splice it to the upper panel and keep on going. It will be plenty strong and after fairing only you...........and us

will ever know it happened. I made lots bigger goofs on my dory and it seems to work just fine

Re: OD18 Build
Posted: Wed Dec 07, 2016 11:12 pm
by Fuzz
Also the angle of the dangle does not look right on that top panel

Re: OD18 Build
Posted: Thu Dec 08, 2016 9:31 am
by cape man
What Fuzz said...
Re: OD18 Build
Posted: Thu Dec 08, 2016 9:34 am
by cape man
Are you sure you don't have the panels mixed up? Can't really tell from here and my plans are stored at home, but I think you may have the top panel on the bottom...
Re: OD18 Build
Posted: Thu Dec 08, 2016 9:39 am
by cape man
I do think that's your issue. Look at this pic. The upper panel is thinner at the bow than the lower.

Here's just the lower panel on mine.
Re: OD18 Build
Posted: Thu Dec 08, 2016 1:20 pm
by Fuzz
By Golly I do think CapeMan has hit on it. It does look like you have the top panel on the bottom?
Re: OD18 Build
Posted: Thu Dec 08, 2016 1:50 pm
by Larry B
Here is the picture of mine, maybe it will help ya, maybe not
Re: OD18 Build
Posted: Thu Dec 08, 2016 2:37 pm
by cape man
Always loved puzzles
Hopefully you have just tacked the panel to the chine

Re: OD18 Build
Posted: Thu Dec 08, 2016 8:42 pm
by Bbolton2
Okay, I can confidently say that the panels are put on in the correct order. Y'all were freaking me out for second. I haven't had a chance to tack on the port side upper panel. Once I do, I will roll it out of the garage and take a picture. It was hard to take a photo cause the garage was shut and it's super dark on my street. If it wouldn't get dark at 5pm, I could probably get more done on the boat. Thanks for advice, I will keep the pictures coming on this little hiccup, but I think I will be slapping on an extra piece to each panel.
And for the record the chine, lower panel, transom, and the bow(being only the chine and lower panel) are epoxy filleted in. Did any of you guys tab some of the molds to the panels?
Re: OD18 Build
Posted: Thu Dec 08, 2016 8:44 pm
by Bbolton2
Fuzz, I clamped 2 sheets of plywood when I made my panel cuts.
Re: OD18 Build
Posted: Thu Dec 08, 2016 11:05 pm
by Fuzz
Glad the panels are on correct. Cut a filler and move on, no big deal. It is really hard to screw up things to the point they can not be fixed with this building method
If you tab the frames in it will help keep them in place for the flip. You will have a little clean up to do but by that time you will know it is nothing but a thing
Keep posting those pictures.............we love watching a boat come together
Re: OD18 Build
Posted: Fri Dec 09, 2016 7:17 am
by Larry B
Bbolton2 wrote: Did any of you guys tab some of the molds to the panels?
If I remember correctly, I believe I did. Not a lot but enough to keep them in place. Leave a gap and then just cut them loose when your done sand smooth and continue on.
You can see in this picture where I tabbed them:
Re: OD18 Build
Posted: Fri Dec 09, 2016 8:28 am
by Bbolton2
Larry B wrote:Bbolton2 wrote: Did any of you guys tab some of the molds to the panels?
If I remember correctly, I believe I did. Not a lot but enough to keep them in place. Leave a gap and then just cut them loose when your done sand smooth and continue on.
You can see in this picture where I tabbed them:
Okay, it makes sense, and I believe Jacques mentions it in the building notes. I need a propane heater or something, cause it is taking forever for the glue to cure. I am more than 48 hrs in from the last glue, and it is still tacky and pliable.
Re: OD18 Build
Posted: Fri Dec 09, 2016 9:07 am
by Larry B
I built in Arizona and always used the slow
If I had used the fast it would have cured before I got it out of the cup
Re: OD18 Build
Posted: Fri Dec 09, 2016 9:01 pm
by Tungsten
Propane creates moisture which can cause blush,a blanket or tarp over the boat and a small electric heater does wonders for slow hardener.
Re: OD18 Build
Posted: Fri Dec 09, 2016 9:36 pm
by joe2700
Tungsten wrote:Propane creates moisture which can cause blush,a blanket or tarp over the boat and a small electric heater does wonders for slow hardener.
That was one reason I was looking for a blush free epoxy for the build I'm starting, since the only way I can heat the shop quickly is a open propane heater. Also have to watch out for CO when using a non-vented propane heater. I just got a CO detector so I can run the unit with the doors mostly closed and still be safe. I've been leaving the door well cracked open when suing the heater so far but that limits how well it heats. It is amazing how much heat those propane construction heaters can make from a BBQ tank.
Re: OD18 Build
Posted: Sat Dec 10, 2016 6:24 am
by cape man
I stitched the frames to the hull using tie wraps and filled the holes from the outside when flipped.
Re: OD18 Build
Posted: Sat Dec 10, 2016 9:21 am
by Tungsten
I may be wrong but i don't think there is such thing as a blush free epoxy.Some are less prone to it but given the right conditions it can happen.
Nice work on the boat,build on!
Re: OD18 Build
Posted: Sat Dec 10, 2016 12:15 pm
by joe2700
Tungsten wrote:I may be wrong but i don't think there is such thing as a blush free epoxy.Some are less prone to it but given the right conditions it can happen.
Nice work on the boat,build on!
Silvertip laminating resin claims "Cures without forming an amine blush with either the fast or slow hardener." No personal experience with it yet but it seems like that would be a risky statement to make if it weren't true. It was something I wasn't sure about either though.
Re: OD18 Build
Posted: Sat Dec 10, 2016 2:43 pm
by Jeff
Joe2700/Tungsten, we have never had a complaint on the System Three Silver Tip Resin. I hope SeaSlug see's this thread as he only uses System Three Silver Tip Products and can give you a better detailed discussion of his use and results with the S3 ST line of products!! Happy holidays, Jeff
Re: OD18 Build
Posted: Sat Dec 10, 2016 3:25 pm
by fishgitr
After 24 hours you would need to sand it to be on the safe side for a good bond.
Re: OD18 Build
Posted: Sat Dec 10, 2016 5:51 pm
by Jeff
Fishgitr, drop me a note or call me the day before you stop by the shop as I want to meet you!! Hope you enjoy your cruise to the Bahamas!! Jeff
Re: OD18 Build
Posted: Sat Dec 10, 2016 6:14 pm
by fishgitr
Jeff,
I'm going to stop by Friday morning. Around 9 or so.
Travis
Re: OD18 Build
Posted: Sat Dec 10, 2016 6:20 pm
by Jeff
Ok!! See you then!! Jeff
Re: OD18 Build
Posted: Sat Dec 10, 2016 6:23 pm
by fishgitr
I am looking forward to it..have y'all started that build? (fs18)
Re: OD18 Build
Posted: Sat Dec 10, 2016 7:13 pm
by Jeff
No, will be starting this week or next at the latest!! See you Friday!! Jeff
Re: OD18 Build
Posted: Sat Dec 10, 2016 7:26 pm
by seaslug
I just finished my second build and used the Silver Tip epoxy. I'm no authority on epoxies by any means, but I worked in temperatures ranging from 50-90 degrees and never experienced any blushing. I still lightly sand regardless if I let it cure for a day, that's why I try very hard to time everything right and work wet on wet as much as possible.... Mike
Re: OD18 Build
Posted: Sat Dec 10, 2016 9:06 pm
by Jeff
Thanks SeaSlug!!! I appreciate your input regarding System Three Products (and much more)!!! Happy Holidays, Jeff
Re: OD18 Build
Posted: Sun Dec 11, 2016 7:42 am
by peter-curacao
Jeff wrote:Thanks SeaSlug!!! I appreciate your input regarding System Three Products (and much more)!!! Happy Holidays, Jeff
Silver tip IMHO best epoxy ever, period
.
Re: OD18 Build
Posted: Sun Dec 11, 2016 8:15 am
by topwater
All i have ever used is Silver tip and never had a blush problem . If you go to System Three web site they say you can go
as long as 72 hours and still get a chemical bond without sanding but i have never gone more than 24 hours .
Great epoxy but expensive but i really like it and it's all i use .
Re: OD18 Build
Posted: Sun Dec 11, 2016 9:17 am
by Jeff
Top water/Peter, thanks guys!! Really appreciate your experience with S3 ST!! Happy holidays, Jeff
Re: OD18 Build
Posted: Tue Dec 13, 2016 9:23 am
by Bbolton2
Okay here's a shot of the bow before and after I added a small piece. I think I just mis-measured the upper panel, but oh well it can be fixed.
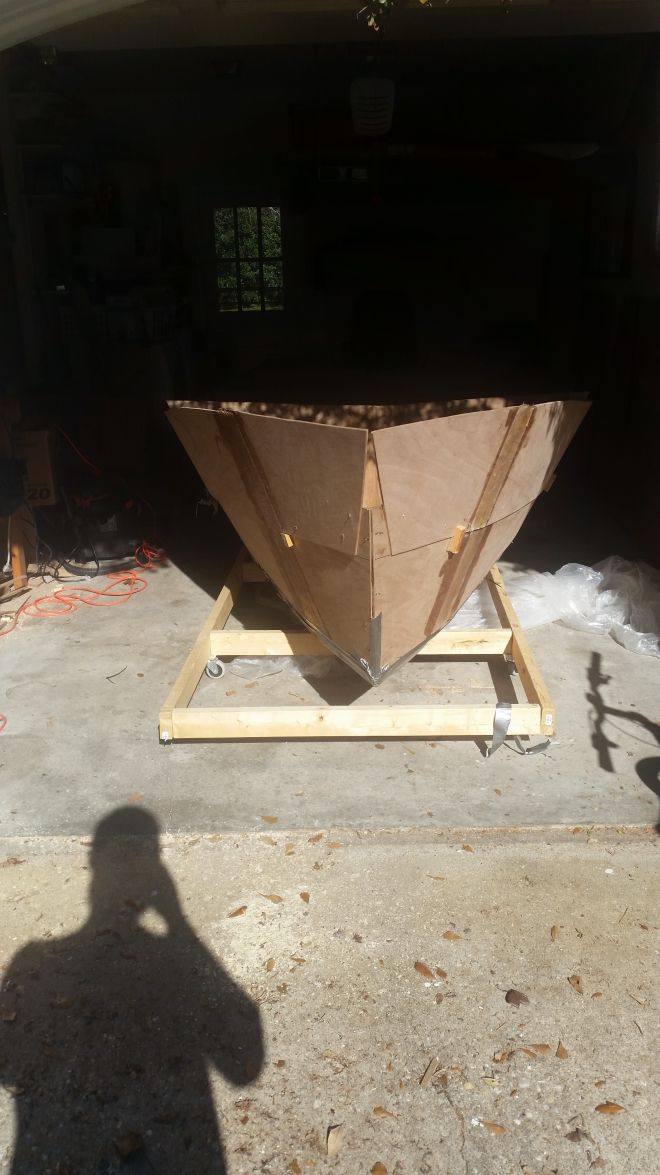

So I have marked my 6 inch overlap and am preparing to glue the upper panel on. The upper panel is about and inch and a half higher than the transom line on both sides. I think I should just drop the panel down in the aft section which will change the line a bit. Any of you guys dealt with this?
Re: OD18 Build
Posted: Tue Dec 13, 2016 9:25 am
by Cracker Larry
Yes, I had the same issue. Just drop the rear of the panel flush to the transom.
Re: OD18 Build
Posted: Tue Dec 13, 2016 9:59 am
by Bbolton2
Cracker Larry wrote:Yes, I had the same issue. Just drop the rear of the panel flush to the transom.
Did you try to keep the bow the same height, or drop the whole panel (level) lowering the bow height?
Re: OD18 Build
Posted: Tue Dec 13, 2016 10:37 am
by jacquesmm
Something went wrong when measuring there.
You can correct that by adding a bulwark. Look at the TW28 to see what a bulwark is: a plank that you add to the sheer. Cut that plank with a nice sheer curve and nobody will ever know that there was a problem there.
Re: OD18 Build
Posted: Tue Dec 13, 2016 11:37 am
by Bbolton2
jacquesmm wrote:Something went wrong when measuring there.
You can correct that by adding a bulwark. Look at the TW28 to see what a bulwark is: a plank that you add to the sheer. Cut that plank with a nice sheer curve and nobody will ever know that there was a problem there.
Will do, any advice on how far aft of the bow it should go?
Re: OD18 Build
Posted: Tue Dec 13, 2016 11:49 am
by jacquesmm
Make a template from cardboard and trim it until it looks right. The sheer line should flow smoothly from the stern to the bow, it should not dip at the bow. That is in profile view.
I supervised the building of the first OD16 and the 1st OD18. For each boat, there was a gap of about 1" between the edges of the two upper panels. Tape it with many layers and round it, it produces a nice bow.
Re: OD18 Build
Posted: Tue Dec 13, 2016 9:26 pm
by Fuzz
I had a problem a little like yours with the shear line in the bow. I just added the first layer of rub rail and let it run up as it wanted to at the bow. The curve of the hull makes the rub rail naturally want to rise. All I had to do then was add a triangle looking piece to fill in the missing bow side panel. Plus this made sure I did not have the droopy bow look.
Re: OD18 Build
Posted: Wed Dec 14, 2016 8:17 am
by Larry B
this is what I did
Before:
After:
Re: OD18 Build
Posted: Wed Dec 14, 2016 9:37 am
by pee wee
Does the OD18 plans include a bow mold? If so, now is a good time to put it in there and check for fit; you may need to coerce that bow point aft, that will add flare to the bow and bring the sheer up, avoiding the dreaded droop bow (although some people grow an appreciation for that look).
If you've already glued things in place, then Larry's method would be the way to go; the boat will be fine either way.
Re: OD18 Build
Posted: Wed Dec 14, 2016 10:42 am
by jacquesmm
No bow mold in the plans but the trick is to respect the total length: pull the bow back until the boat is truly 18'. On the prototypes, I did this with a cable pulling form the transom to clamps on the bow panel.
The last pictures look good.
Re: OD18 Build
Posted: Wed Dec 14, 2016 11:18 am
by cape man
I brought the transom up to the sides.

Was easier than bringing the sides down to the transom for me. Either way, it works.
Re: OD18 Build
Posted: Wed Dec 14, 2016 3:26 pm
by Bbolton2
I drop the upper panels maybe an inch a half to meet the transom. I added the small bulwark up forward. I was definitely looking at Larry B's to get an idea about how it would end up. I made the templates out of cardboard last night and cut out the pieces, tabbed them in. I will try and roll the boat out of the garage to get a clear view of the sheer line if its not raining. I will post some more pics when I get it outside. Thanks for the help...I definitely need it.
Re: OD18 Build
Posted: Wed Dec 14, 2016 5:21 pm
by Bbolton2
Re: OD18 Build
Posted: Wed Dec 14, 2016 6:11 pm
by jacquesmm
Yes, that looks good.
Re: OD18 Build
Posted: Wed Dec 14, 2016 7:18 pm
by Jeff
I agree, looks great!! Happy holidays, Jeff
Re: OD18 Build
Posted: Wed Dec 14, 2016 9:42 pm
by Fuzz
Dory is looking good! I will admit I am partial to them..................because I have one
If you are looking for ideas for the gap at the bow go to Texasrds OD18 thread on page 3 and see what he did. It sure looked like a good way to fix a small problem to me.
Re: OD18 Build
Posted: Thu Dec 15, 2016 2:54 pm
by cape man
Onward!!
Re: OD18 Build
Posted: Tue Jan 17, 2017 8:44 am
by Bbolton2
Okay, its been a while, but I was able to glue the upper panels on and filet the bow. She starting to look pretty good. Before putting the rubrails on, I need to finish the filet on the transom corners, and add a little glass on the inside. Also, I need to glass the outside of the pieces I added up front to make sure nothing happens on the flip. The molds are tabbed in for the flip.
A few questions about the rubrails...I know the plans say 1 3/4" in diameter. I saw Cracker Larry used 2 1/4, I wonder if that really helped beef up the sheer. Also, was it easier to add the black rubber railing with the 2 1/4"? Any thoughts?
Re: OD18 Build
Posted: Tue Jan 17, 2017 1:45 pm
by Fuzz
Some of this depends on how you plan to finish that area of the boat. Are you going to add gunnel’s? Either way you could add some to the outside and some to the inside, depends on what you want.
Re: OD18 Build
Posted: Wed Jan 18, 2017 3:50 pm
by Bbolton2
Fuzz wrote: ↑Tue Jan 17, 2017 1:45 pm
Some of this depends on how you plan to finish that area of the boat. Are you going to add gunnel’s? Either way you could add some to the outside and some to the inside, depends on what you want.
Yeah, I do plan on having gunwhales.
Re: OD18 Build
Posted: Wed Jan 18, 2017 9:21 pm
by Fuzz
I have never added the rubber rub rail to a boat so I am hoping someone else will help with that part. The only reason I have not used it is shipping issues. I would like to add it to my next project. I do know if you go with gunnel’s they will take care of stiffening the sides no matter what you do with the rub rails.
Re: OD18 Build
Posted: Sat Jan 28, 2017 10:54 pm
by Bbolton2
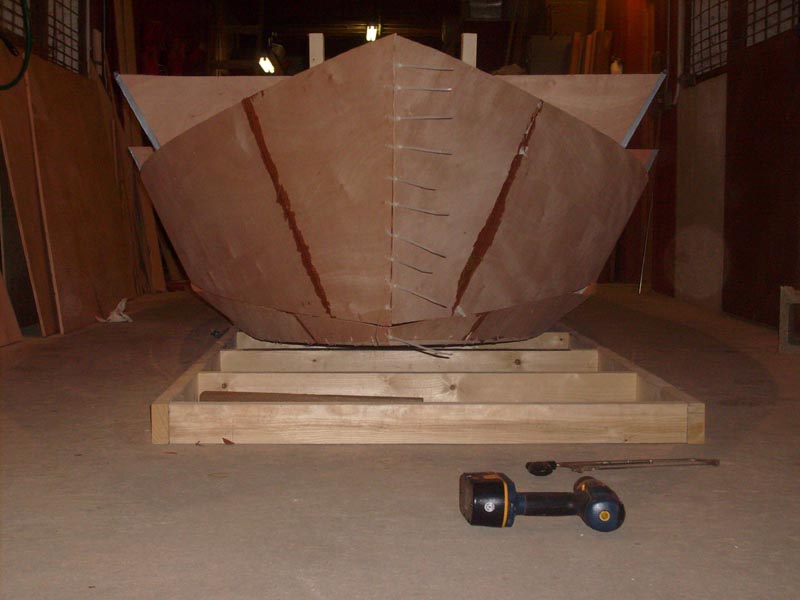
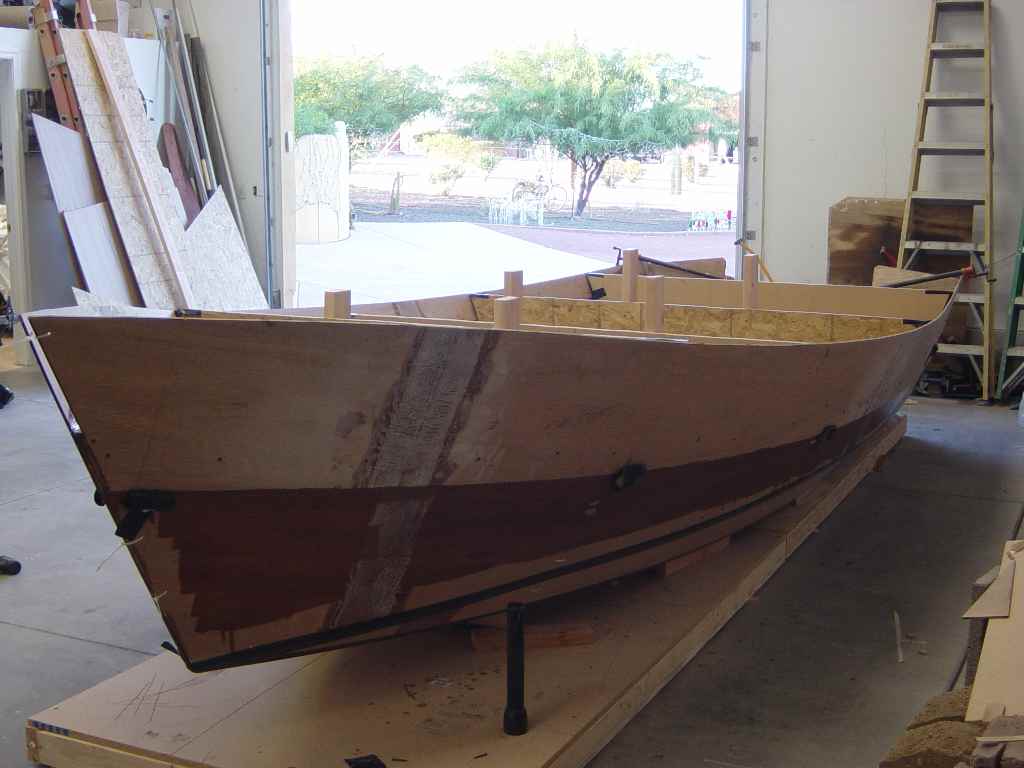
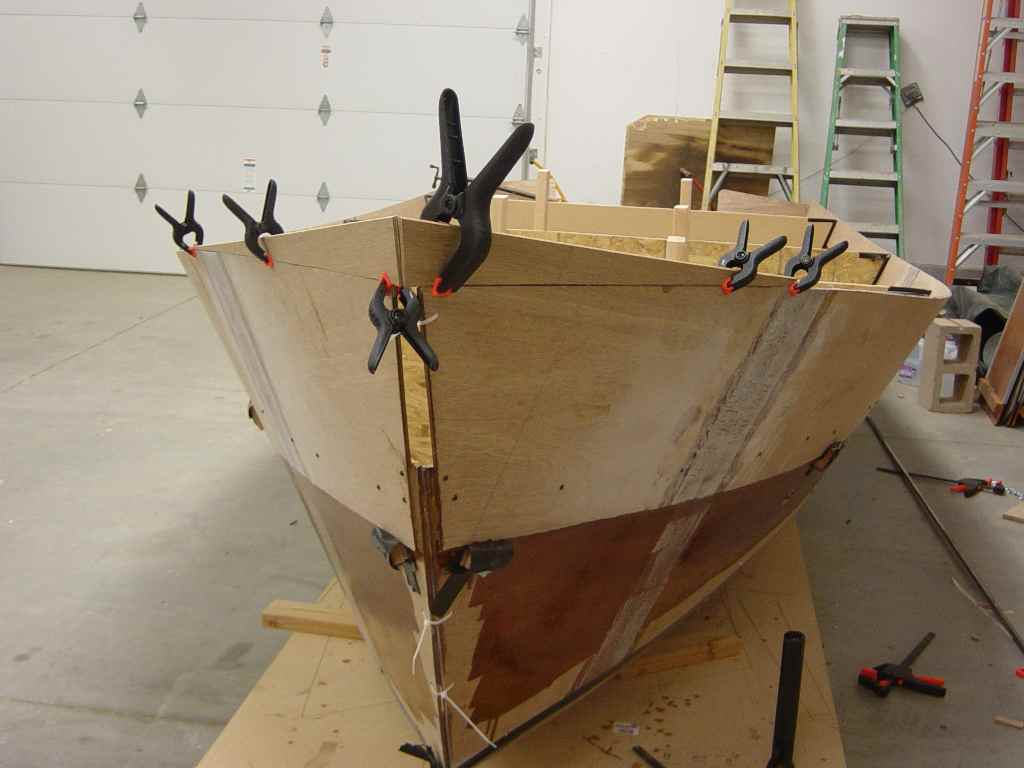
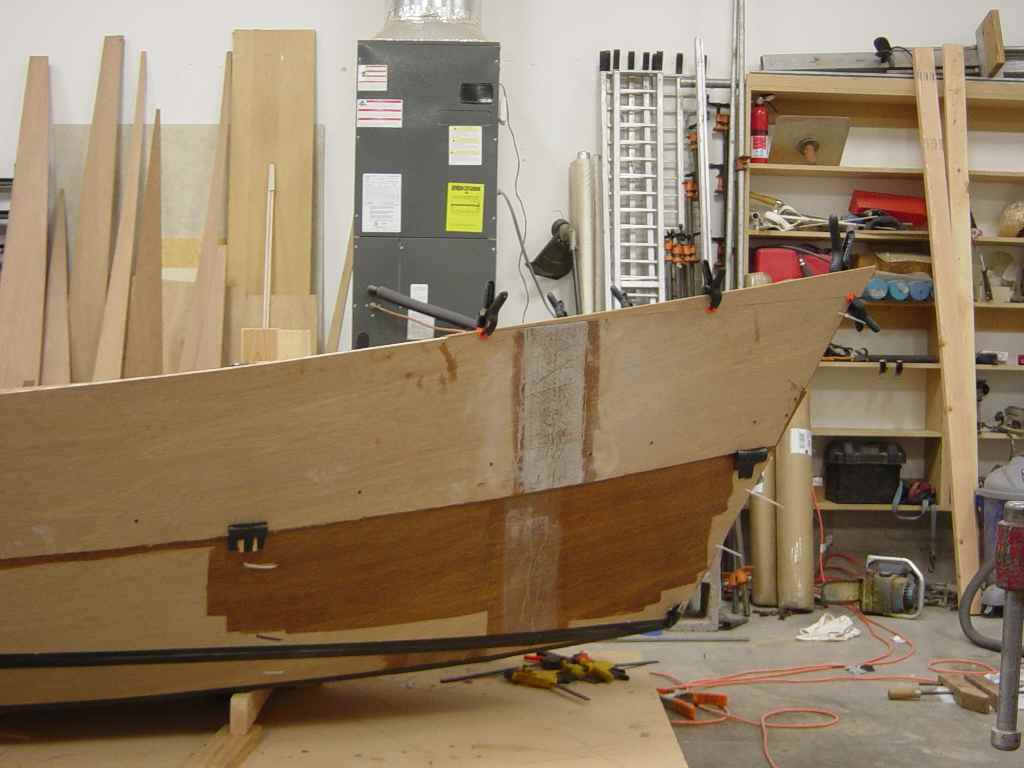
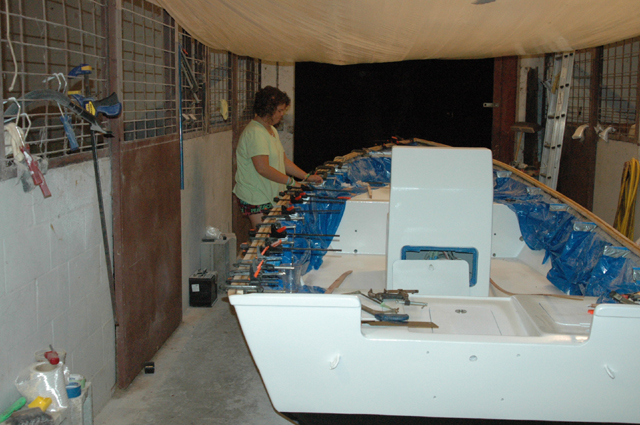
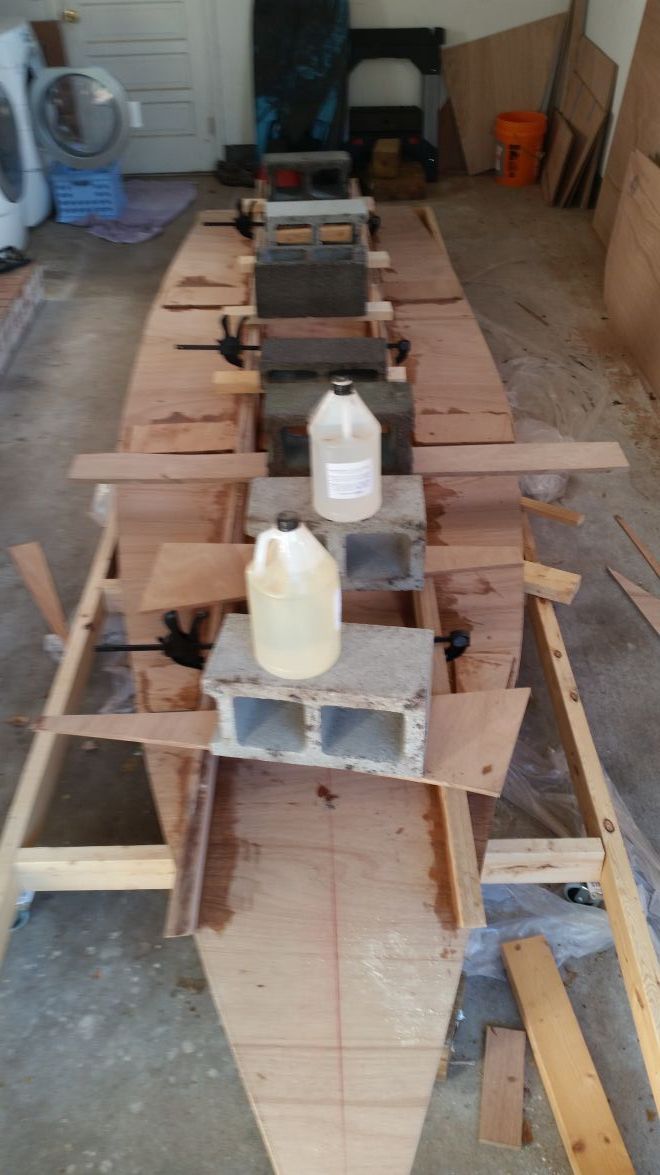
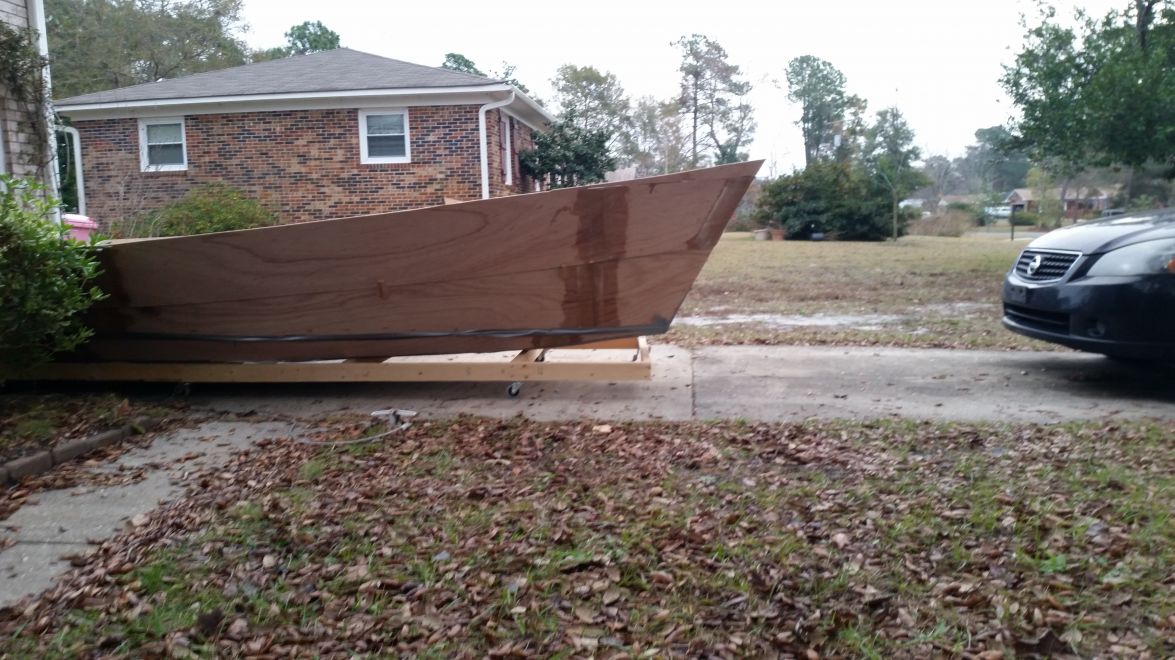
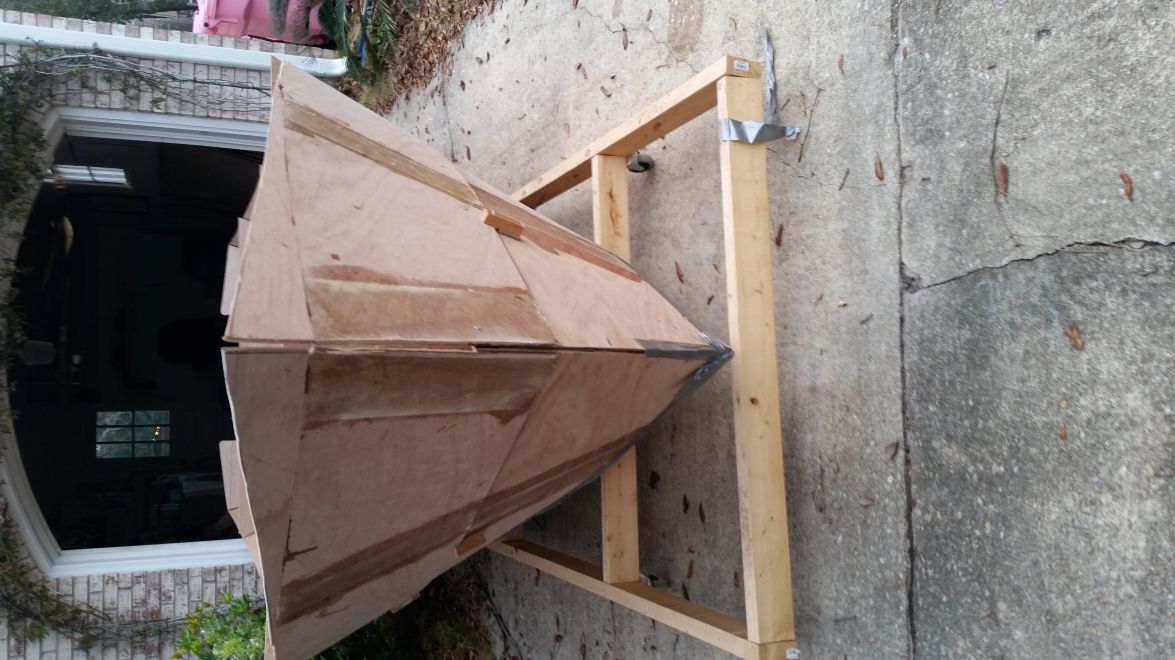
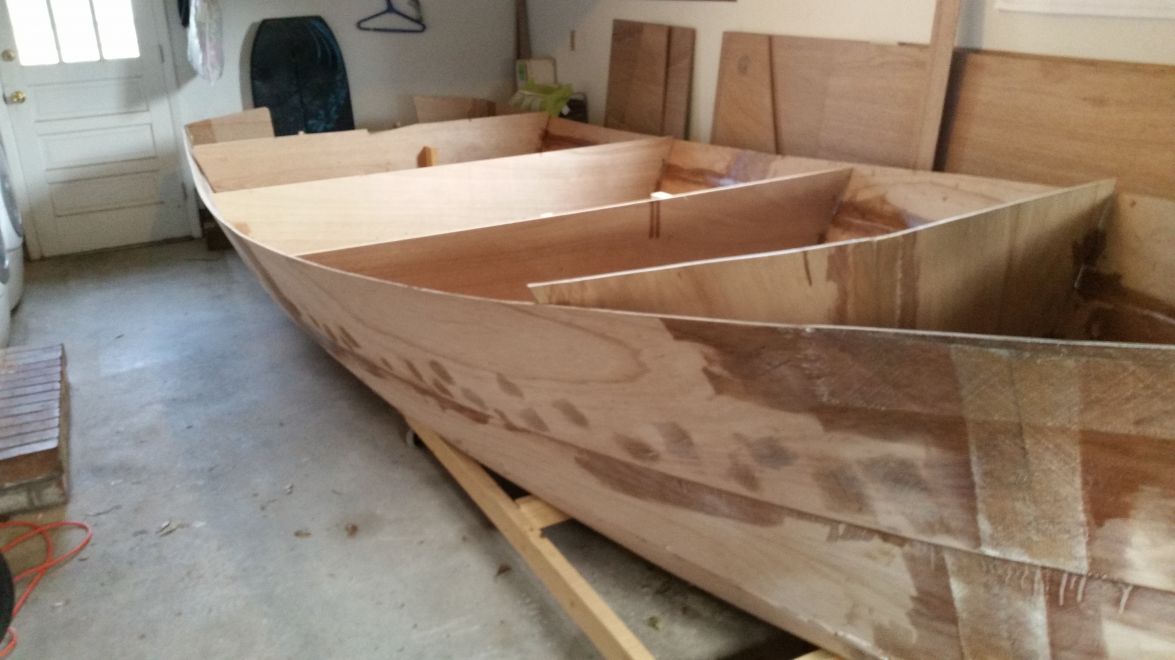
Okay, been doing a little here and there...Glued the upper panels on with success, also fillet the bow and transom to the panels. Put some glass on the outside of the bulwark piece I added earlier. Been doing a lot of sanding because I am a novice, I think on my next build it will go ten times smoother, literally. Tabbed the molds for the flip, also tabbed with some glass in between the molds on the lower seam, transom, and bow per the instructions.
Today I also ripped enough 1/4 inch plywood to be able to glue all of the rubrails. Any of y'all have any advice before flipping the boat? After I glue the rubrails in, I guess Im gonna flip it.
[image]
http://gallery.bateau2.com/albums/userp ... /6459.jpeg[/image]
[image]
http://gallery.bateau2.com/albums/userp ... 152527.jpg[/image]
[image]
http://gallery.bateau2.com/albums/userp ... 152530.jpg[/image]
Re: OD18 Build
Posted: Sat Jan 28, 2017 11:29 pm
by Fair WX Pilot
Looks really great. The bulwark really gave it that Dory appeal. I'm quite a bit behind you so I'm following your build for advise.
Good luck with the flip.
Re: OD18 Build
Posted: Sun Jan 29, 2017 1:04 am
by Fuzz
If you have the frames lightly tabbed in, and it looks like you do, go for it. They are a lot tougher than you think already at this stage.
Re: OD18 Build
Posted: Sun Jan 29, 2017 12:20 pm
by Bbolton2
Fair WX Pilot wrote: ↑Sat Jan 28, 2017 11:29 pm
Looks really great. The bulwark really gave it that Dory appeal. I'm quite a bit behind you so I'm following your build for advise.
Good luck with the flip.
Thanks for the encouragement...Im am keeping up with your build as well. There is a lot of little things that get left off this forum that you do during the build, that is very important. I am trying to make sure I don't leave anything out.
Re: OD18 Build
Posted: Mon Jan 30, 2017 4:18 pm
by cape man
Flipping it is a lot easier than you think. Get a couple of friends and just gently roll her over, supporting the weight as you go. It won't break. It will be a little heavier the next time with the glass and epoxy on the outside, but not by much. I carried it out and brought it back in because it was easier than managing it in the barn's breezeway.
Re: OD18 Build
Posted: Tue Mar 07, 2017 5:47 pm
by Fair WX Pilot
How's the boat coming? Did you flip it yet?
Re: OD18 Build
Posted: Thu Mar 09, 2017 9:35 am
by Bbolton2
Not yet, I have been slaving away on the rubrails. I am finishing them tonight. So I have 3 layers of 1/4" all the way around and even on the transom. I used 2 1/4" in width for the rub rails, I believe CL did the same thing. The sheer line is beefed up, ready to flip. I am going to give it a good sanding, and then try to entice some coworkers with some fresh oysters and cold beer to help flip it next week. I'll try to get a time lapse of the flip, but I have to say the boat is super stiff/strong which makes the flip less stressful.(no pun intended)
It's hard to get work done on it, when you have a full-time job. I just try to do a couple hours at least three to four times a week, and hopefully get a free Saturday here and there.
Re: OD18 Build
Posted: Thu Mar 09, 2017 10:34 am
by Fair WX Pilot
I know what you mean about the job, short of a lottery win I'm in the same position. Shame I don't live closer, with beer and oysters on offer you could count me in
.
Good luck with the flip.
Re: OD18 Build
Posted: Sat Mar 11, 2017 6:35 pm
by Bbolton2
Okay finished up the rub rails...shes rough but strong as hell. Going to try and flip some time this week. Here is a few shots with the 3 layers of rub rails. I also sanded everything down including the rubrails, hull(where left over epoxy was applied), and shaped the bow.
Re: OD18 Build
Posted: Sat Mar 11, 2017 6:41 pm
by Fuzz
Looking good. You are going to really enjoy this boat.
Re: OD18 Build
Posted: Sat Mar 11, 2017 7:27 pm
by Jeff
Bbolton2, good looking boat and even better looking pup!!! Jeff
Re: OD18 Build
Posted: Sat Mar 11, 2017 10:33 pm
by Bbolton2
Jeff wrote: ↑Sat Mar 11, 2017 7:27 pm
Bbolton2, good looking boat and even better looking pup!!! Jeff
Thanks, she's my partner in crime.
Re: OD18 Build
Posted: Thu Mar 16, 2017 5:25 pm
by Bbolton2
Re: OD18 Build
Posted: Thu Mar 16, 2017 5:38 pm
by Fair WX Pilot
Looks great, how many people did it take to flip it?
Re: OD18 Build
Posted: Thu Mar 16, 2017 5:46 pm
by Bbolton2
Fair WX Pilot wrote: ↑Thu Mar 16, 2017 5:38 pm
Looks great, how many people did it take to flip it?
I ended up having 7 guys not including me, which was more than enough. During the flip, when the boat was sideways somewhat resting on the gunwale; one of the tabs where I had welded the mold D to the upper panel separated. So that kind of freaked me out but it did no harm. I remember for that specific weld I had forgotten to apply resin before laying a small filet, so that is the reason why it separated. Other than that, all is well.
Re: OD18 Build
Posted: Tue Mar 28, 2017 9:26 am
by Bbolton2
Prepping to glass the seams with biaxle tape. Used a syringe to fill all the holes with glue, and sanded everything down. Cut out all the biaxle tape to do 2 layers offset by 2 inches for each seam.
Re: OD18 Build
Posted: Tue Mar 28, 2017 1:10 pm
by Fair WX Pilot
Looks great.
Re: OD18 Build
Posted: Tue Mar 28, 2017 1:18 pm
by Jeff
BBolton2, Nice boat and beautiful pup!! Jeff
Re: OD18 Build
Posted: Tue Jul 18, 2017 9:26 pm
by Fair WX Pilot
Hi BBolton2, how's the build going?
Re: OD18 Build
Posted: Fri Jul 21, 2017 10:40 am
by Bbolton2
Sorry for my dormancy on the forum...I been offshore and out of town. Also my wife and I are adopting a baby and we have been matched with a birth mother who is due at the end of July so needless to say I have been busy. However, I have managed to get some work done on the boat. I have taped all of the seems to there specs, glassed the hull up to the style line, installed and glassed skeg, faired/sanded to my liking, and have one coat of expoxy with graphite on the hull. I hope to have the second and 3rd coat done this weekend. I need to take some pics of the latest stuff and then I will post them all.
Having fun offshore for work...hope yall are taking advantage of the good weather.
Re: OD18 Build
Posted: Fri Jul 21, 2017 1:47 pm
by Jeff
Bbolton2, Great thing you and your wife are doing in adopting!! Really great for the baby and you guys as well!! And yes, you gotta love off-shore fishing!! Nice shark!! Jeff
Re: OD18 Build
Posted: Fri Jul 21, 2017 2:19 pm
by cape man
Congrats on the baby!
Nothing else is as impressive to me as a big Tiger.
Re: OD18 Build
Posted: Fri Jul 21, 2017 5:42 pm
by Fair WX Pilot
Fantastic news, congratulations to you both. Perhaps you had better name your boat to mark the occasion, perhaps "The Stork".
Great picture of the tiger, I ended up snorkeling with two of them (by accident) but thankfully had all my fingers and toes in place after the event.
Re: OD18 Build
Posted: Sat Jul 22, 2017 11:00 am
by Dougster
More congratulations on the baby! 68 yrs ago my Mom and Dad did the same thing, and instead of who knows what, I grew up in a wonderful extended family. Doting parents, Cousins, Uncles, Aunts, Grandma, etc. Talk about a win/win
Dougster
Re: OD18 Build
Posted: Wed Aug 09, 2017 4:00 pm
by Bbolton2
Re: OD18 Build
Posted: Wed Aug 09, 2017 4:05 pm
by Bbolton2
Ok here are some photos of where I am at. I decided to skip the spray rails. I know they are helpful with spray but I really like the non-sprayrail look. Applied 3 layers of graphite and 3 layers of Brightside-ocean blue. I am ready to flip and begin finishing the topside. Hope you guys have been fishing.
Re: OD18 Build
Posted: Wed Aug 09, 2017 4:13 pm
by jacquesmm
I agree with you that the boat look better without a spray rail but there is a built in rail: the lap of the upper panel over the lower panel.
If you keep that edge very sharp, it will deflect some sprays quite well.
Re: OD18 Build
Posted: Wed Aug 09, 2017 5:27 pm
by Eric1
Your boat looks Great!!
Re: OD18 Build
Posted: Wed Aug 09, 2017 7:52 pm
by Jeff
I agree, boat is looking good!!! Jeff
Re: OD18 Build
Posted: Thu Aug 10, 2017 1:25 am
by TomW1
Very pretty OD18. I have Cracker Larry's and he always regretted not putting spray rails on his. After having it over a year and 1/2 I will definitely be putting them on. It is fine in calm water but in any type of chop you really need them.
Tom
Re: OD18 Build
Posted: Thu Aug 10, 2017 6:15 pm
by Bbolton2
I am going to run it without, and see how it goes. Who knows I may be doing the same thing.
Re: OD18 Build
Posted: Thu Aug 10, 2017 6:41 pm
by Fair WX Pilot
Hi,
It looks great and I love the color. The graphite on the bottom came out really well. Did you have any headaches putting the graphite down? I have read mixed reviews on the best application method and your boat looks great.
Re: OD18 Build
Posted: Fri Aug 11, 2017 10:25 pm
by Bbolton2
I was a little worried, because I didn't have an exact measurement for the graphite. I used a roller and touched up the skeg with a 2" brush. It does have some orange peel look, but I think if you make sure the powder is completely homogenized and hopefully not real clumpy it will be okay. Hey, it's going to be under the waterline anyway so don't sweat it.
Re: OD18 Build
Posted: Tue Aug 22, 2017 10:03 am
by bateau-webmaster
Nice work so far! I've added your thread to the build threads page.
Re: OD18 Build
Posted: Tue Aug 22, 2017 1:00 pm
by TomW1
Fair WX Pilot wrote: ↑Thu Aug 10, 2017 6:41 pm
Hi,
It looks great and I love the color. The graphite on the bottom came out really well. Did you have any headaches putting the graphite down? I have read mixed reviews on the best application method and your boat looks great.
One thing that everyone recommends doing is sifting the graphite.
Re: OD18 Build
Posted: Wed Jan 23, 2019 10:55 am
by Bbolton2
Been awhile...So In the past year and some change, I have adopted a little boy; bought a house, and then Florence. All in all, I can't complain. The boat is in the new garage with starboard chines taped along with bow and transom. I plan on taping the port side chines next, and then on to cutting the frames/molds down to stringer height.
Re: OD18 Build
Posted: Wed Jan 23, 2019 1:06 pm
by OrangeQuest
Nice looking build!
Re: OD18 Build
Posted: Wed Jan 23, 2019 1:19 pm
by Jeff
Bbolton2, very nice!! Jeff
Re: OD18 Build
Posted: Thu Jan 24, 2019 12:31 pm
by Fair WX Pilot
Hi, congratulations on the little boy, surviving Florence and the new house. The boat looks great in that color blue.
Re: OD18 Build
Posted: Thu Jan 24, 2019 1:23 pm
by TomW1
You have definitely been busy. I like the color on the boat. I don't see spray rails on her though. Everyone who has not put them on has regretted it. cape man just finished retro fitting them. I will very soon. They do make a big difference on how wet the boat is.
Tom
Re: OD18 Build
Posted: Thu Jan 24, 2019 2:20 pm
by Bbolton2
Yeah, I debated on it, and decided to go for the non spray rail. I am not looking to take it out the inlet, just plan on bumming around the intercoastal and barrier islands. I was also thinking about a side console, but I have not seen anyone build an od18 with the side console.
Re: OD18 Build
Posted: Thu Jan 24, 2019 3:24 pm
by Fuzz
About the spray rails..........you will put them on sooner or later
When I built my dory I had planned on it being tiller steering. She ran nose high enough I switched and went remote. Because I had not planned on remote steering I did not have case tubes installed so I went with a side console. It has worked out just fine for me. The dories are so stable it does not matter if there is a little extra weight on one side or the other.
Re: OD18 Build
Posted: Sat Jan 04, 2020 3:57 pm
by Bbolton2
Hey Fuzz, didn't you install a side console on your dory? If so, do you mind posting a photo? I am contemplating a side console and would love to see an example. It's been a crazy, but I do have a new 24x25 metal building in the backyard to house the boat and workbenches. I am hoping to get some serious work done this year if not complete it. Pictures coming soon.
Re: OD18 Build
Posted: Sat Jan 04, 2020 9:05 pm
by Fuzz
My console is not very fancy more just plain Jane but it has worked out for me. I am in the middle of doing some remodelling so it is a mess right now. Having the console on the side leaves a ton of room to walk fore and aft.
Re: OD18 Build
Posted: Mon Jan 06, 2020 10:15 am
by Bbolton2
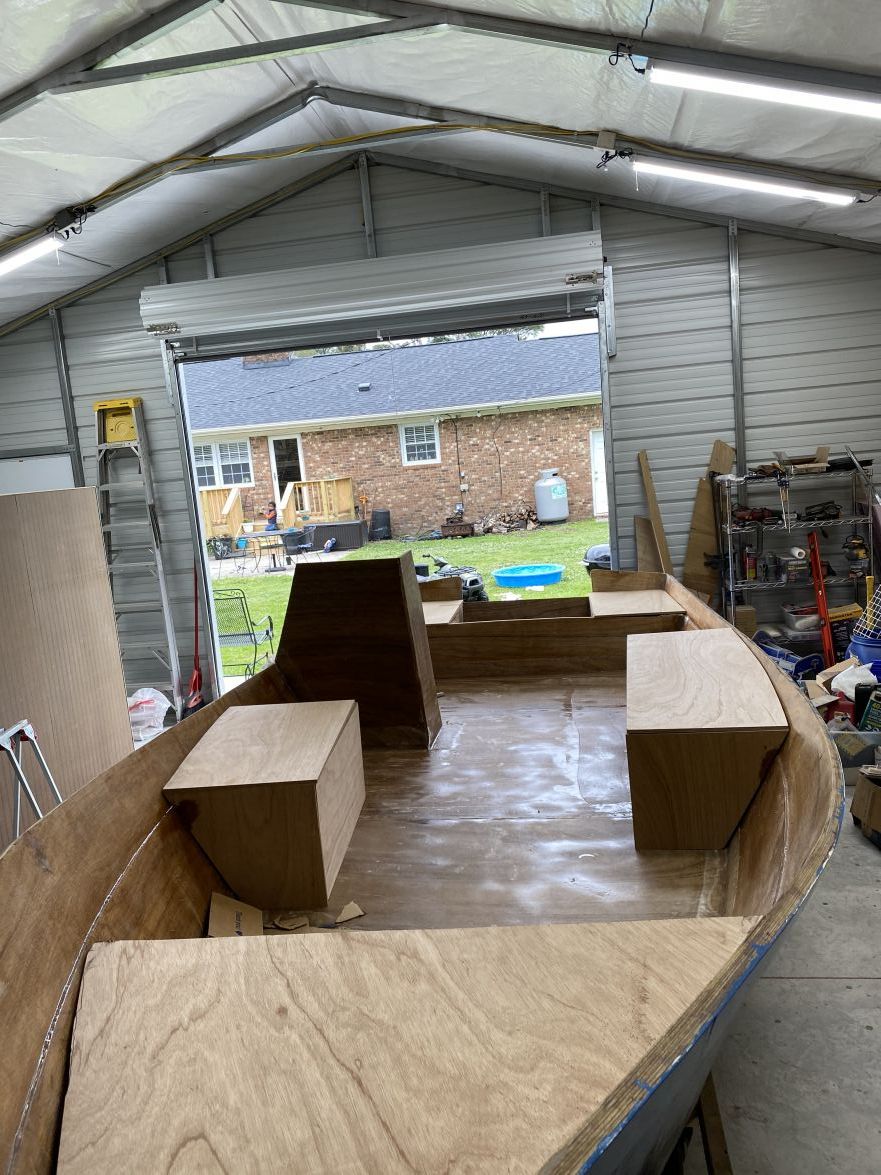
Okay cool, thanks for the photo. Got some work done. Cleats glued to stringers/frames. The bottom of the boat is completely covered in epoxy. Started mixing foam yesterday, only had a gallon of A and B, so it only covered about a third of the boat. Gotta order some more. My plan right now is to install a side console, and route cables wiring under the gunnel and have a portable fuel tank back by the stern to make everything simple and easy to get to.
I have been working on the boat for a long time now. Some guys finish, but I am seeing more and more not finishing. I am motivated to finish this year, with that being said I am not looking to put a ton of extra time into the details of the vessel. I frankly just don't have the time. I have knee surgery tomorrow which throws a wrench into boat building for 6 weeks. Hopefully after that I can really get cranking on it.
Re: OD18 Build
Posted: Mon Apr 06, 2020 9:48 am
by Bbolton2
COVID boat building...[/attachment]
The foam was a pain, glad it's done.
Re: OD18 Build
Posted: Mon Apr 06, 2020 9:49 am
by Jeff
Nice foam work!!! Jeff
Re: OD18 Build
Posted: Mon Apr 06, 2020 10:30 am
by cape man
Looks great from here.
I would suggest you think about spray rails again. Even on flat, inside waterways, the water shoots up the sides from about midship to the stern. Just a little side wind and water comes in the back. I used ash and just epoxied them to the sides using temporary bolts to hold it until cured. I ran mine for 8 years without them and survived, but am glad I finally put them on. Would be much easier now than later...
Re: OD18 Build
Posted: Mon Apr 06, 2020 3:57 pm
by Fuzz
Very nice. Glad to see some good coming out of this virus thing.
Re: OD18 Build
Posted: Tue Apr 07, 2020 8:54 am
by Bbolton2
Thanks. Cape Man, I have been pondering it. I was looking at Larry B's you tube video showing the performance of the spray rails. Was the ash hard to bend? Was it a 1x2?
Re: OD18 Build
Posted: Wed Apr 08, 2020 11:42 am
by Bbolton2
Re: OD18 Build
Posted: Wed Apr 08, 2020 2:20 pm
by cape man
The ash is more like 1 x 1". All you need is a little rail to push the water out just above the style line where the two side panels come together. I did not run it past midship so there's very little curve in the sides back there. I spent years running it without them so knew exactly where the spray started, which was right at the console. When running, even with a full load, everything in front is pretty much out of the water so you dont need them towards the bow.
Re: OD18 Build
Posted: Thu Apr 09, 2020 8:51 am
by Bbolton2
Looks good, I love the photo of the boat on a boat. Cape man, I like how your gunwales came out. How difficult was that, other than buying every clamp known to man?
Re: OD18 Build
Posted: Thu Apr 09, 2020 9:30 am
by cape man
The boat in the boat was due to the 2.5 yamaha that powers the SC16 crapping out on that trip. The gunwales were not hard to do, but VERY time consuming, as it was basically gluing one strip per day. It added almost a month to the build, but I am glad I did it.
Did call for a few clamps...
Re: OD18 Build
Posted: Sat Apr 18, 2020 3:05 pm
by Bbolton2
working on boats...one baby step at a time. [imgur2]
http://gallery.bateau2.com/albums/userp ... G_0246.jpg[/imgur2]
Re: OD18 Build
Posted: Sat Apr 18, 2020 6:06 pm
by cape man
Interesting layout.
Re: OD18 Build
Posted: Sat Apr 18, 2020 7:14 pm
by Bbolton2
Think she could hold 5-6 people?
Re: OD18 Build
Posted: Sat Apr 18, 2020 7:53 pm
by GuyP
Looking good. I had to look at the study plan as I saw you were gluing in the stringers before stitching together bottom and sides. That is a flat hull! I noticed the plan said you could “get USCG approval for a capacity of 8 but it would be crowded”. So aught to handle 5 - 6 ok.
Re: OD18 Build
Posted: Thu Apr 30, 2020 8:26 am
by Bbolton2
Dry fitting the gunwhales...
Re: OD18 Build
Posted: Thu Jun 25, 2020 10:09 am
by Bbolton2
I added some height to the side console and had to change the paint on her. Bought a trailer and ordered the motor about a month ago. Found out it is on back order from Suzuki...here are some photos.
Re: OD18 Build
Posted: Thu Jun 25, 2020 3:43 pm
by cape man
What is on the deck?
Re: OD18 Build
Posted: Thu Jun 25, 2020 4:20 pm
by Bbolton2
It’s just grey topside paint then I sprinkled those vinyl flakes from Home Depot. Then I used HD clear coat over it.
Re: OD18 Build
Posted: Thu Jun 25, 2020 4:47 pm
by Fuzz
Very nice looking dory you have there
Re: OD18 Build
Posted: Sat Jun 27, 2020 12:13 pm
by cape man
Two things...let us know how hot the gray deck gets, and if the clear coat was epoxy you should think about a layer of varnish or clear urethane for UV protection. If garage stored you may be okay, but sunlight does a job on epoxy.
Re: OD18 Build
Posted: Mon Jun 29, 2020 7:38 am
by Noles309
Don't know where you are, but I had a deck a similar shade of grey and it got so hot in the FL sun you couldn't stand on it barefoot.
Re: OD18 Build
Posted: Thu Jul 02, 2020 10:26 am
by Rover1
The OD-18 came out very well. Great job!
Rover1
Re: OD18 Build
Posted: Mon Jul 06, 2020 8:00 am
by Rover1
Great looking boat! Real nice layout.
Rover 1
Re: OD18 Build
Posted: Wed Jul 29, 2020 10:15 am
by Fair WX Pilot
The boat looks great, fantastic job.
Re: OD18 Build
Posted: Fri Jul 31, 2020 9:00 am
by TomTom
Lovely looking OD18. I like the layout. Very roomy.
Re: OD18 Build
Posted: Wed Oct 07, 2020 7:21 pm
by Eastelite
Do the plans call for a self bailing deck? Is the footboard above the waterline?
Re: OD18 Build
Posted: Wed Oct 07, 2020 8:53 pm
by Fuzz
Eastelite wrote: ↑Wed Oct 07, 2020 7:21 pm
Do the plans call for a self bailing deck? Is the footboard above the waterline?
If you build it to plan it will self bail when empty. Problem is none of us build to plan and our dories end up way over weight. I raised the deck one inch and still need to plug the scuppers with people in it. But it is amazing how stable it is and I have had over 1000 pounds of people many times.
Re: OD18 Build
Posted: Wed Oct 07, 2020 10:27 pm
by Eastelite
I'm trying to decide between the od18, ob17 or fs17
Re: OD18 Build
Posted: Wed Nov 04, 2020 8:49 am
by Bbolton2
Finally got the 60hp Suzuki installed and splashed the boat a couple of days ago. Couldn’t be happier...
Re: OD18 Build
Posted: Wed Nov 04, 2020 9:16 am
by gstanfield
Beautiful boat, congrats!
Re: OD18 Build
Posted: Wed Nov 04, 2020 9:28 am
by pee wee
That turned out great!
Looks very practical, with lots of room to move around, too.
Re: OD18 Build
Posted: Wed Nov 04, 2020 10:20 am
by Jeff
Beautiful boat!!! Congrats, Jeff
Re: OD18 Build
Posted: Wed Nov 04, 2020 10:33 am
by Dougster
I sure admire it too. Love the lay out.
Dougster
Re: OD18 Build
Posted: Wed Nov 04, 2020 12:29 pm
by cape man
Beautiful!!! You're gonna love it! What was the final weight?
Re: OD18 Build
Posted: Wed Nov 04, 2020 2:34 pm
by Fair WX Pilot
The boat looks great. You certainly did a fantastic job on her. (Very envious
). You will have to let us know how she handles.
Re: OD18 Build
Posted: Wed Nov 04, 2020 10:29 pm
by Fuzz
Really nice! How does it run?
Re: OD18 Build
Posted: Thu Nov 05, 2020 9:27 am
by Bbolton2
It runs and rides very smooth. It takes turns on plane very well. Super stable...I had 4 people including me in it and no problem getting up on plane. I was a little worried about the side console, but it runs really well. I’m glad I stuck with the side console...a ton of room.
Re: OD18 Build
Posted: Thu Nov 05, 2020 1:56 pm
by Fuzz
If you get the chance to get an all up weight it would be very interesting to see how it compares to some of ours. Do you think the 60hp is enough? The stability is the thing I like best about mine. Makes it very nice for boating fish
Re: OD18 Build
Posted: Sat Nov 14, 2020 10:36 pm
by GuyP
Beautiful craft. I had my 90 Suzuki on back order for 2 months. The 6 year power train warranty was a big selling feature with me. It’s trailered in a garage awaiting a little more rigging before the splash. The two month back order got into a very busy time of year for me. Probably won’t slash until mid December. I’m glad you’re happy with the new Suzuki.
Re: OD18 Build
Posted: Sun Nov 15, 2020 12:50 am
by TomW1
Hey Guy that 90HP will serve you well you will never need full HP often I expect. My 70 does me well and really enjoy it.
