Page 1 of 1
SOBX Solo Flats Skiff SK14
Posted: Sun Nov 06, 2016 3:16 pm
by BrianC
Starting a Solo Flats Skiff SK14 build here on the coast of NC - just at the southern end of the outer banks.
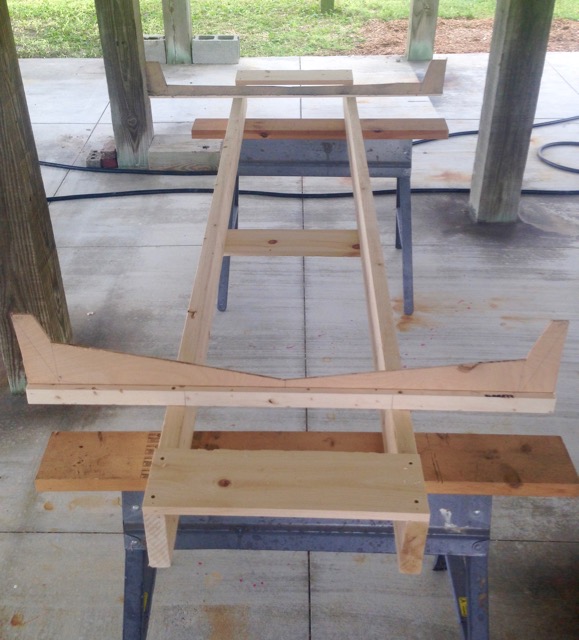
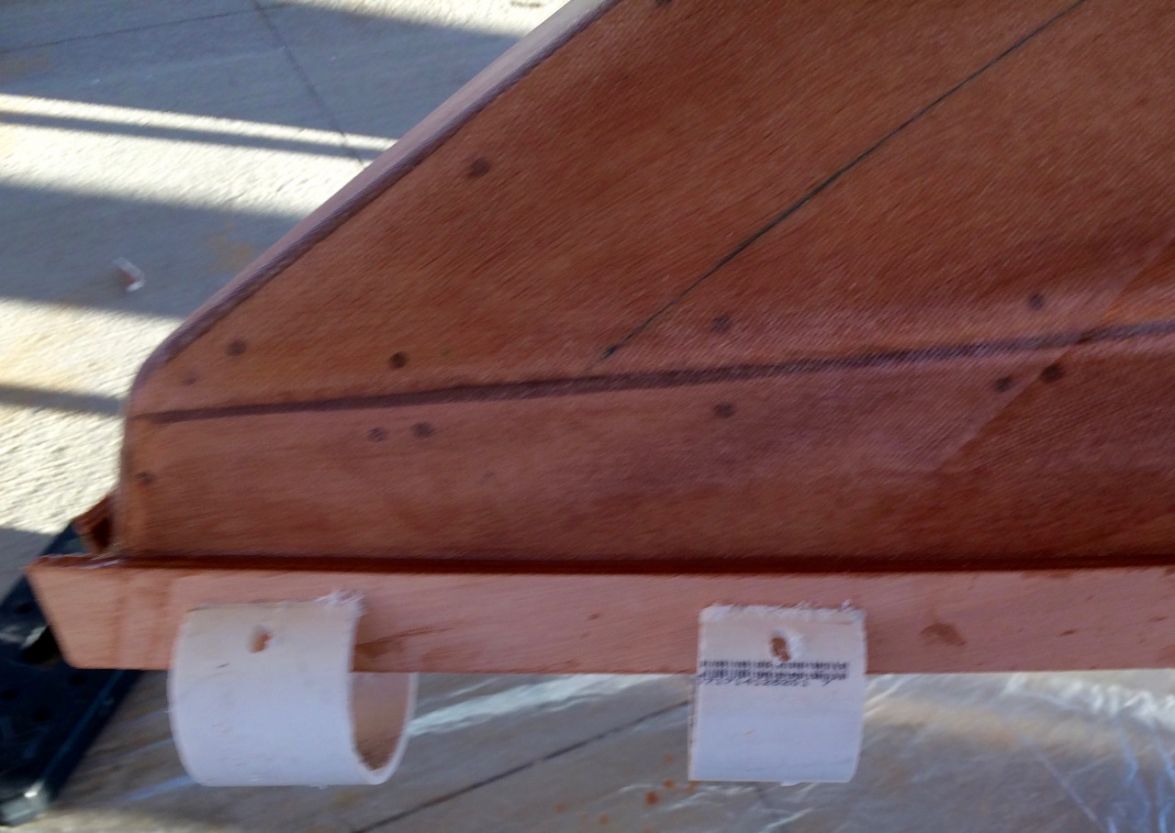
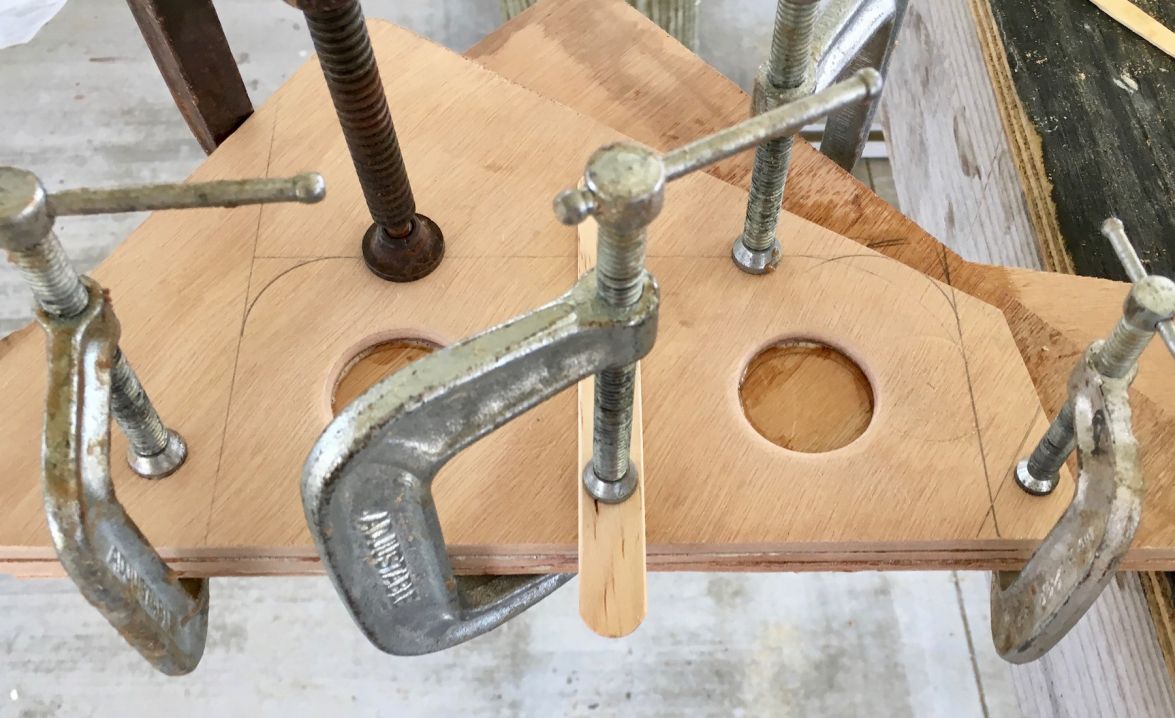
Built a quick jig to hold the hull during zipping - mirror image of frames D & B
Re: SOBX Solo Flats Skiff SK14
Posted: Sun Nov 06, 2016 4:26 pm
by BrianC
I started a few days ago - a quick catch up, part 1:
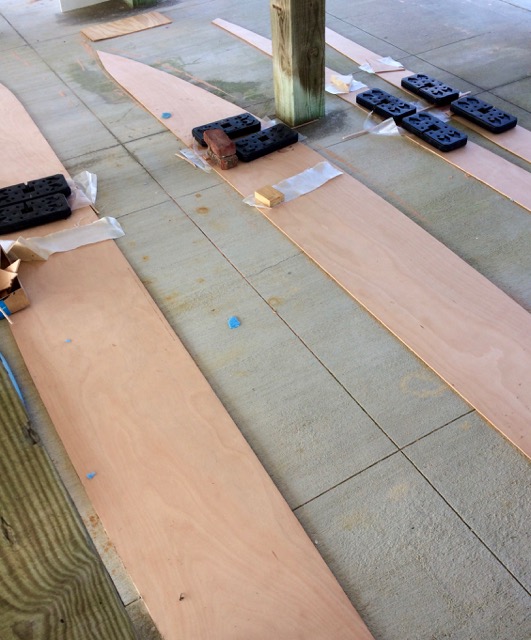
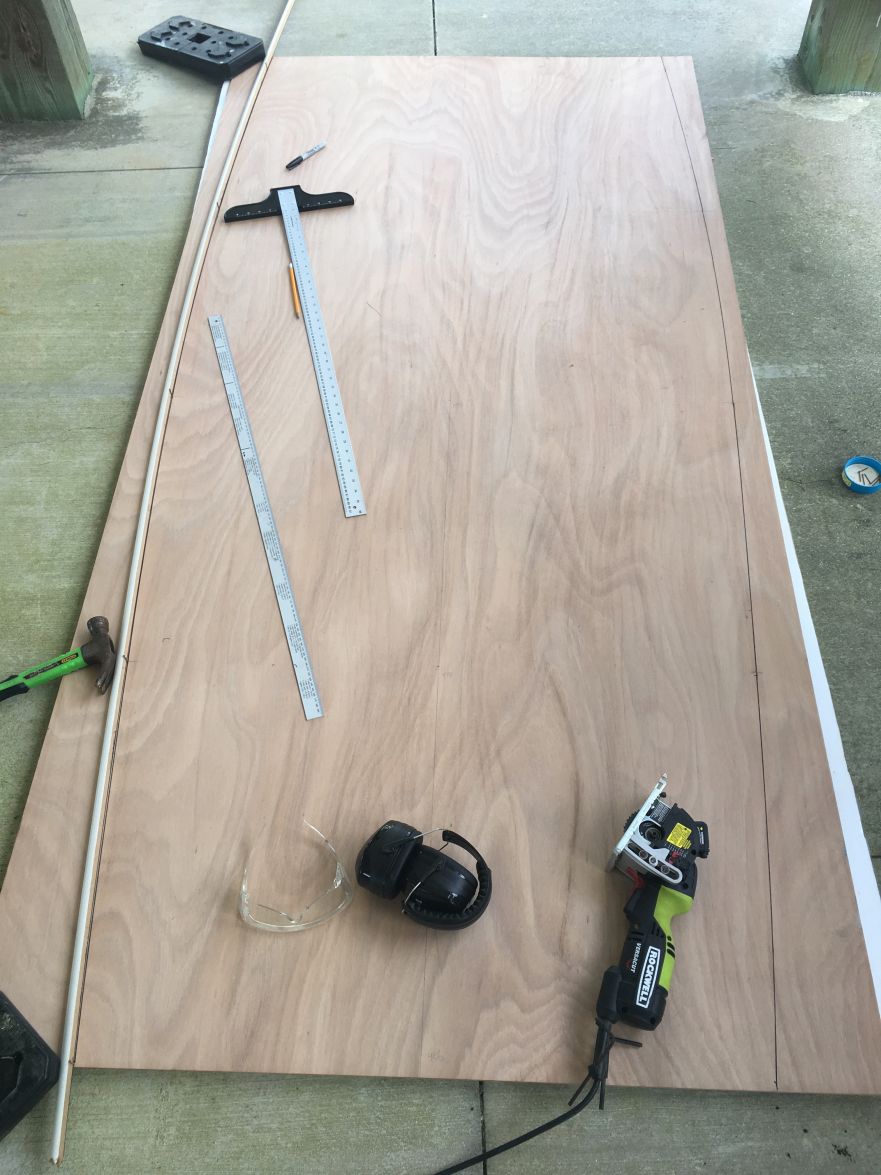
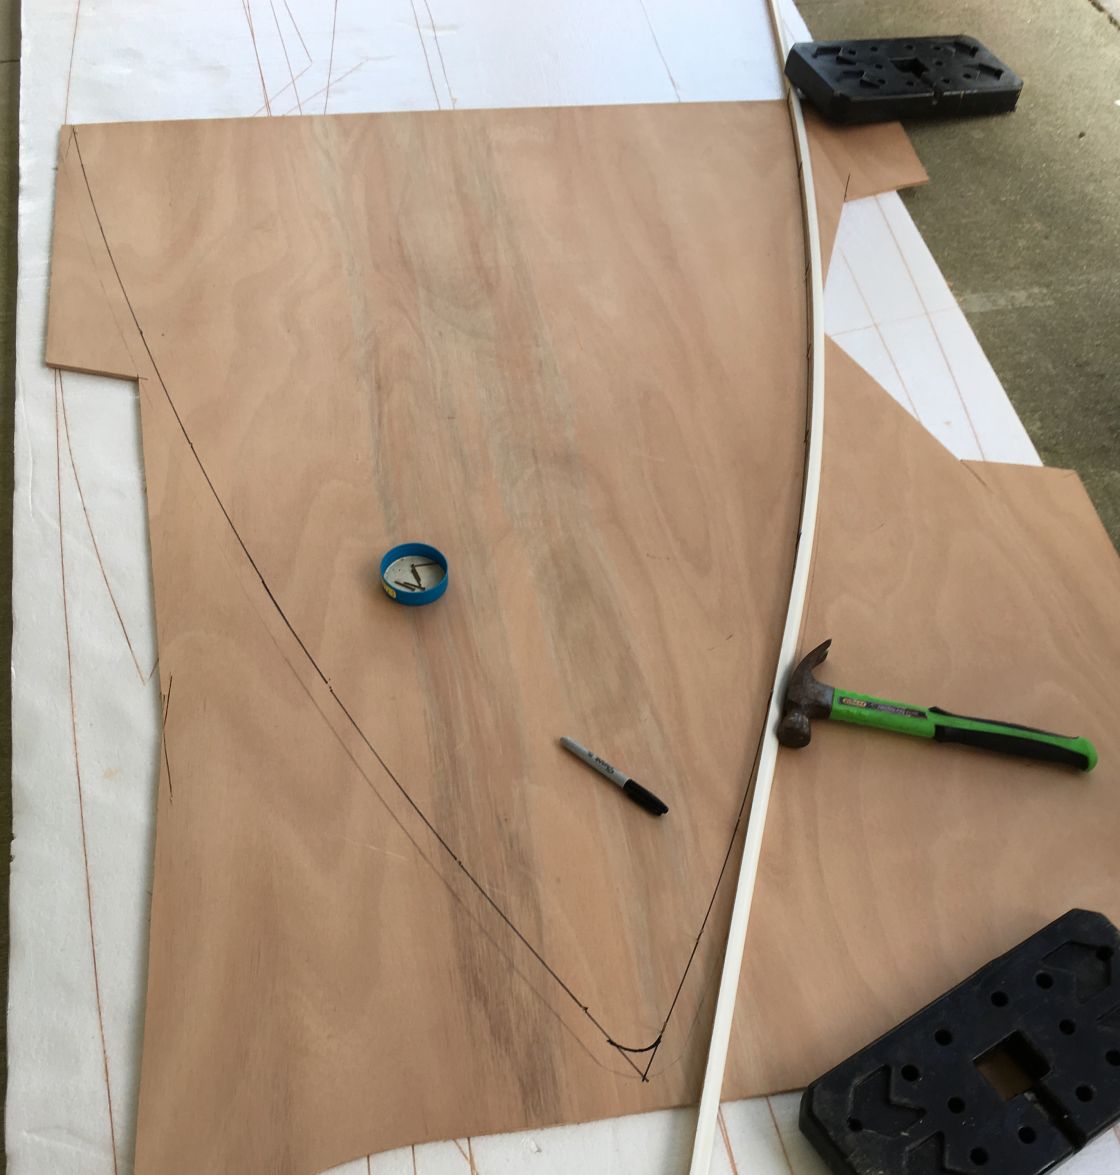
laying it all out - getting started:
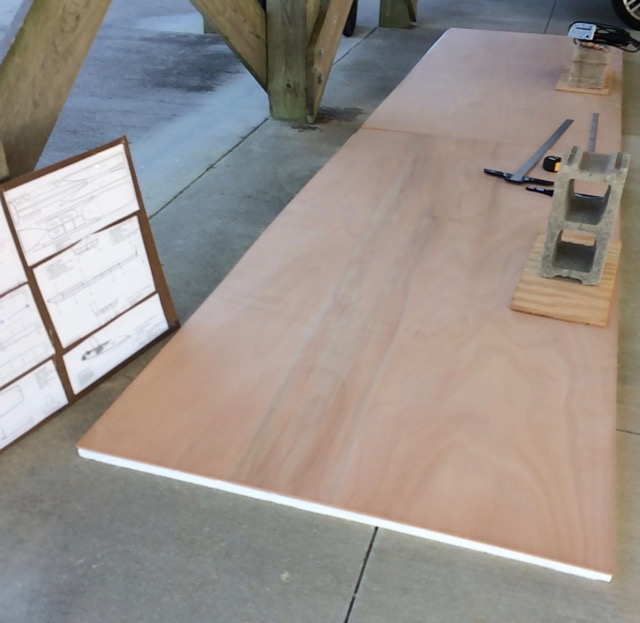
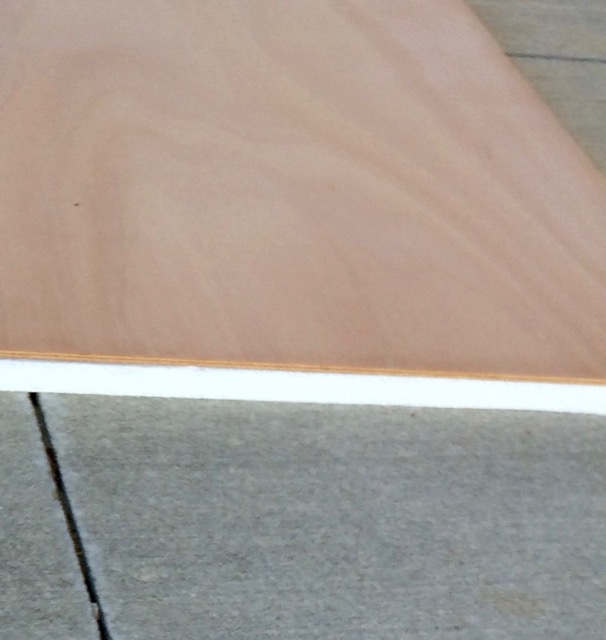
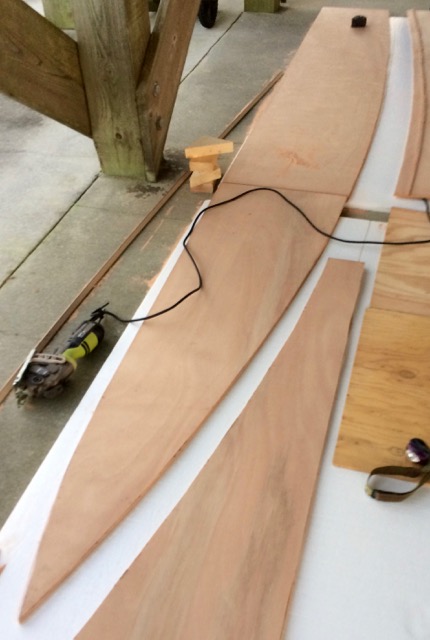
I used a couple of 4'x8' foam sheets under the plywood (as others recommended) - this make cutting easier:
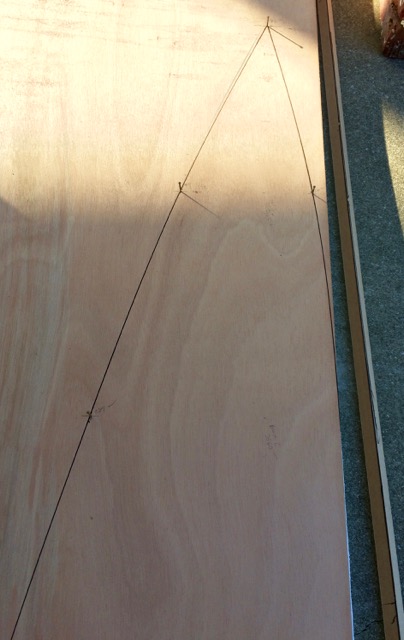
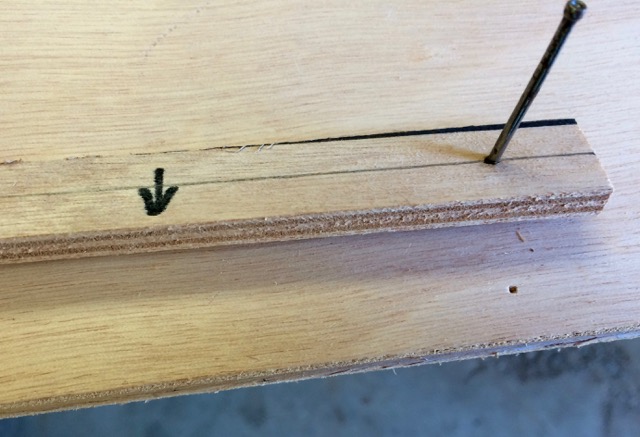
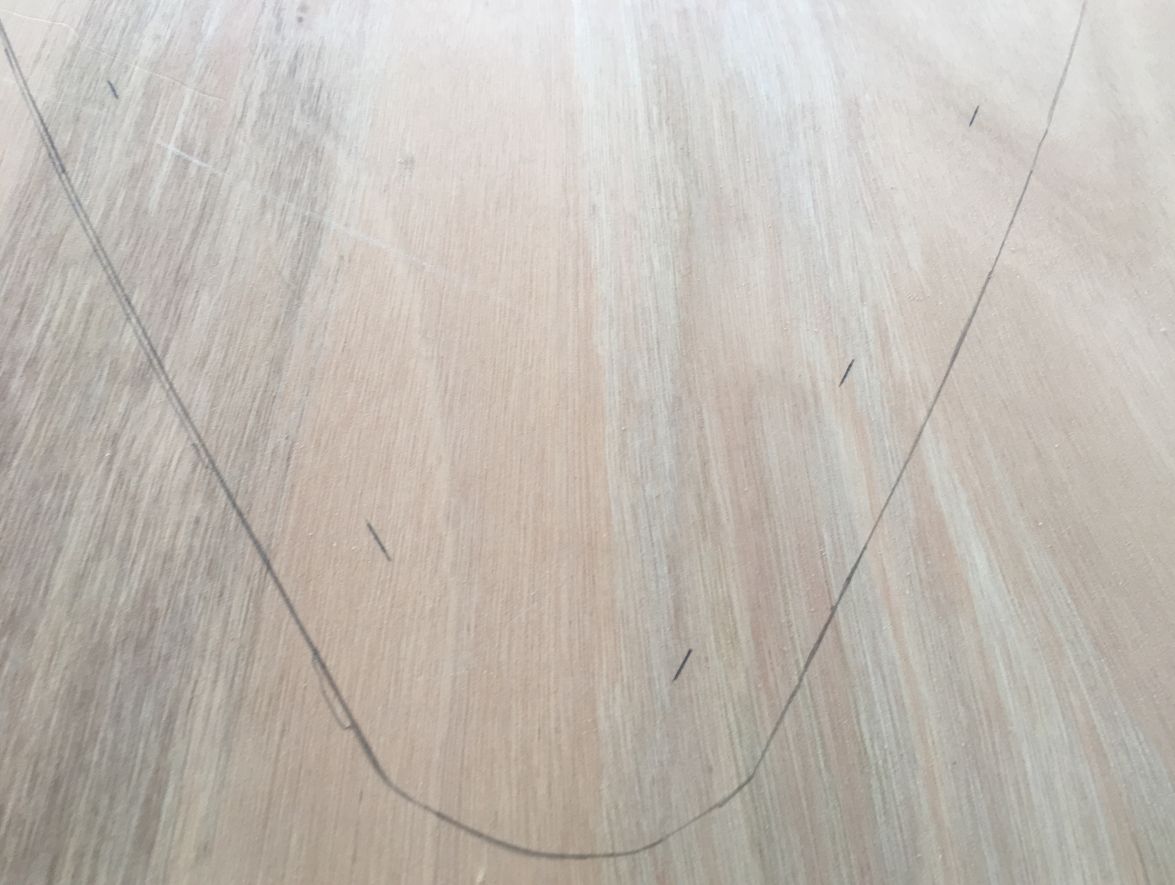
I found that not all the dimensions are from baseline:
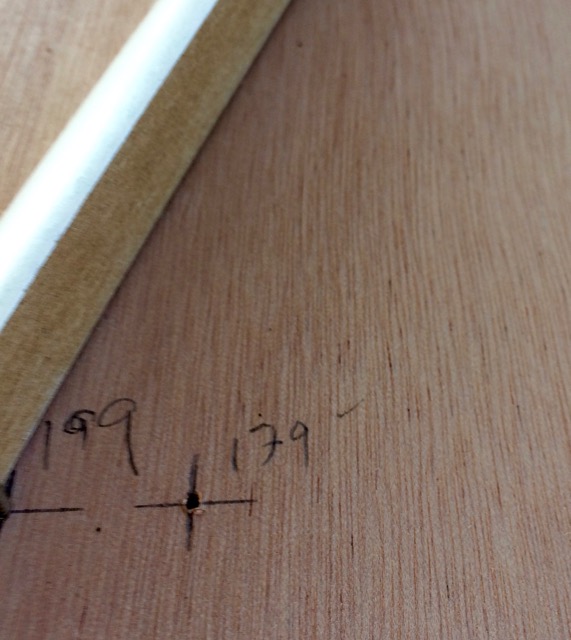
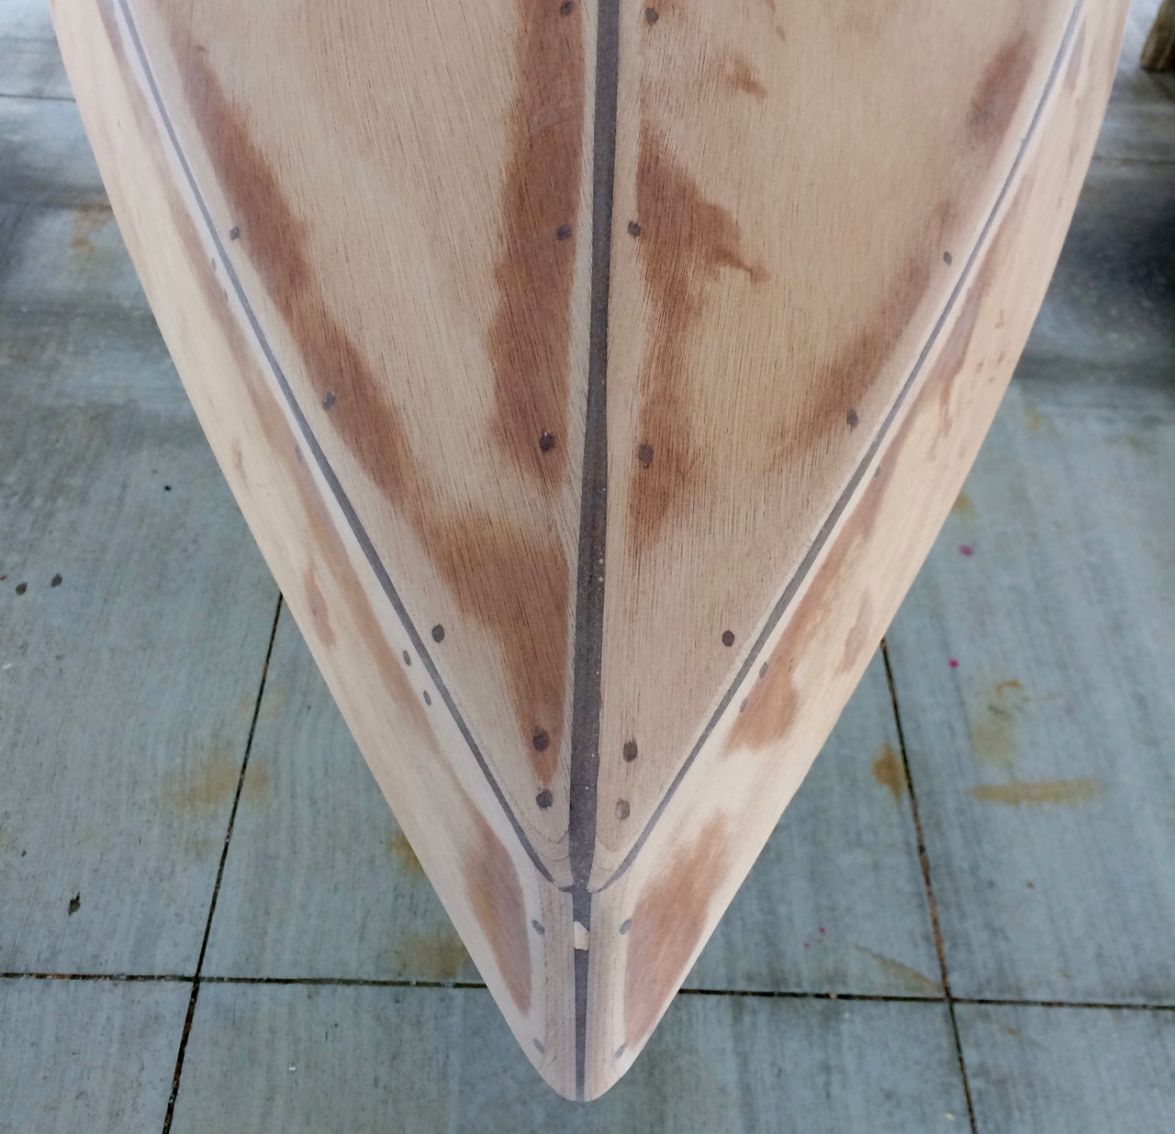
Here is the detail - the dimension is 199 mm(179+20) from baseline, not 179mm:
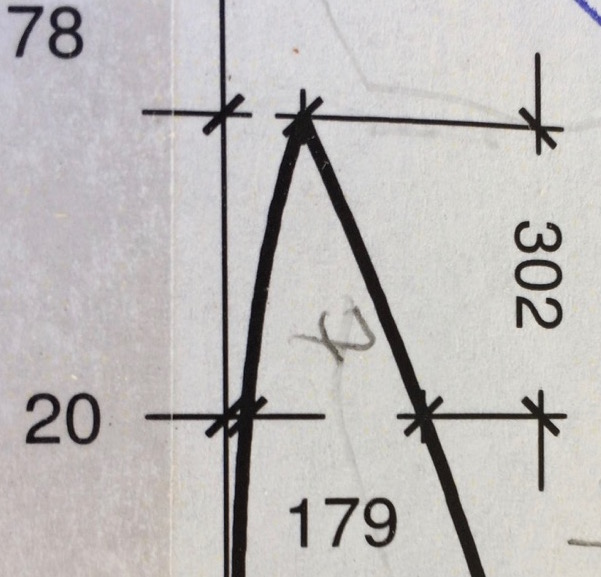
Using the 199 mm dimension, it is nice and fair (would bow in using 179):
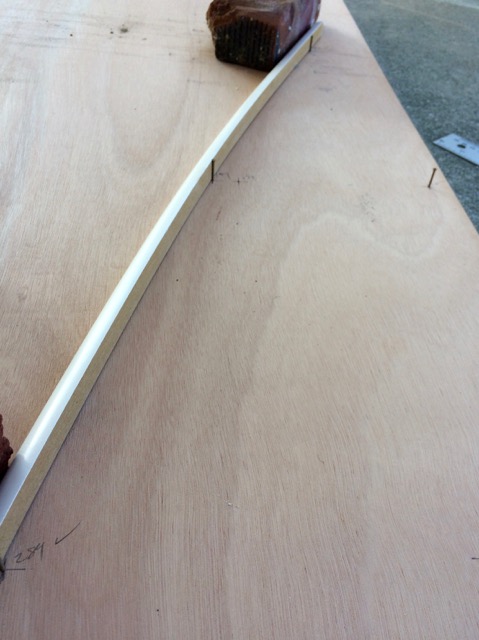
Here it is all marked out:
Re: SOBX Solo Flats Skiff SK14
Posted: Sun Nov 06, 2016 4:38 pm
by BrianC
continuing the catch up, part 2 -
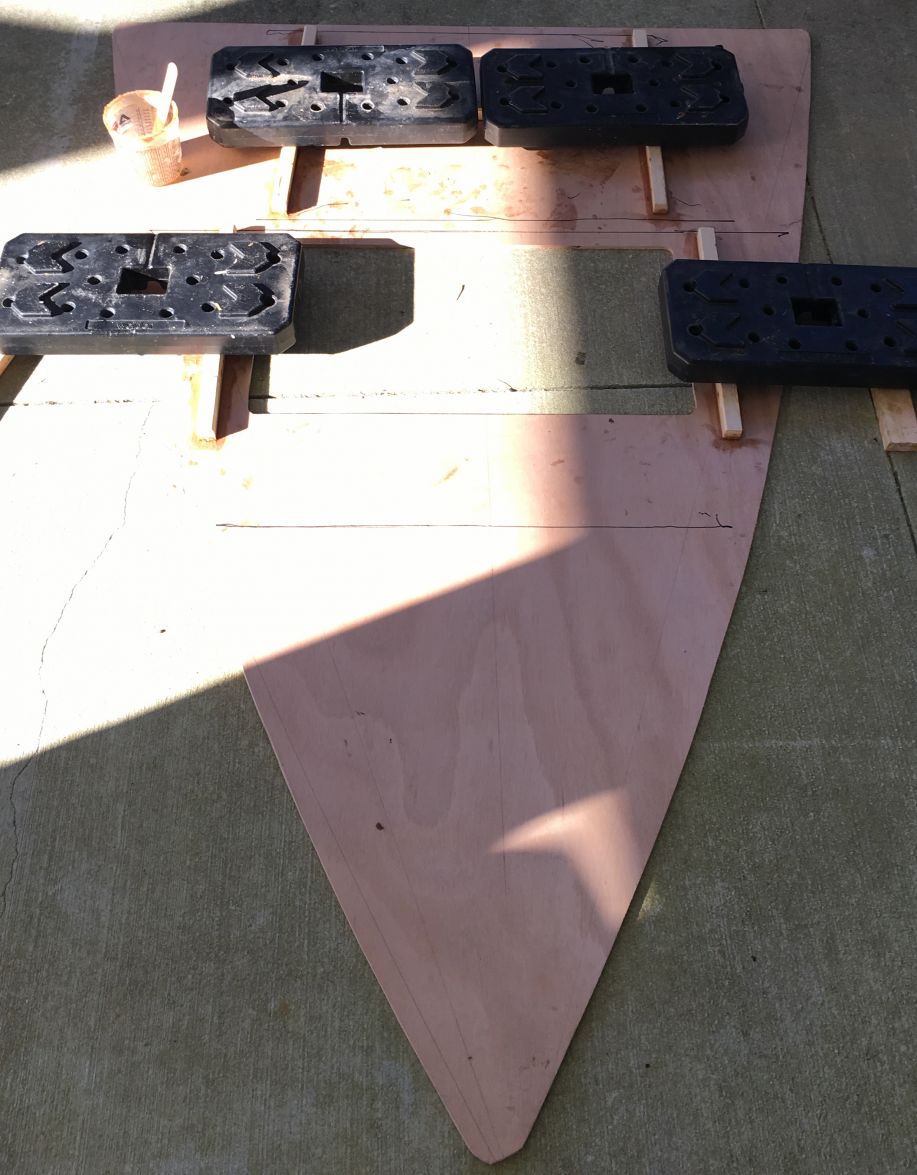
Cutting using a small circular trim saw - any time there were two mirror image parts, I stacked the plywood and pinned with a few finishing nails so they'd be the same shape:
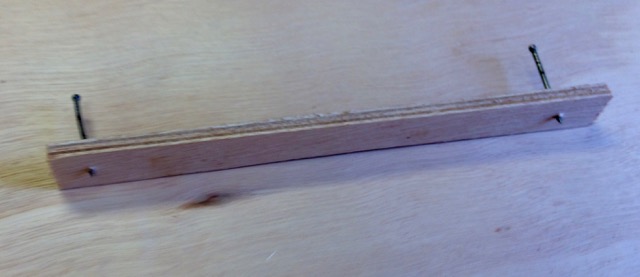
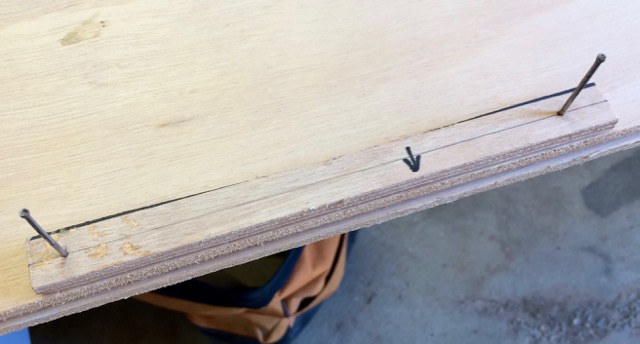
I made a small fixture to mark out equal spaced zip tie holes:
I did the splicing in two stages - first the epoxy 'glue' then the 6 oz. cloth after the glue set:
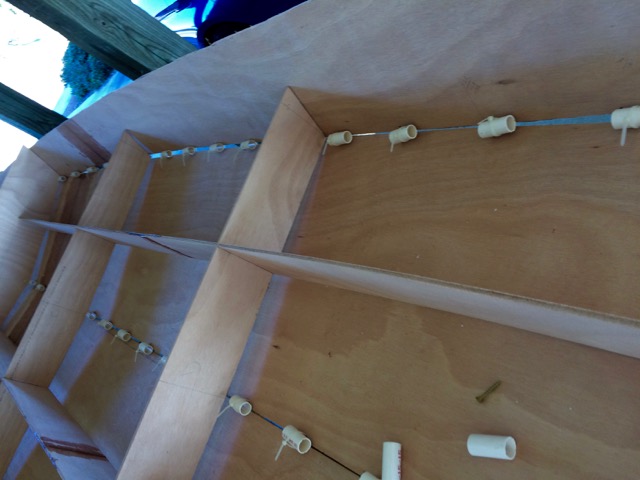
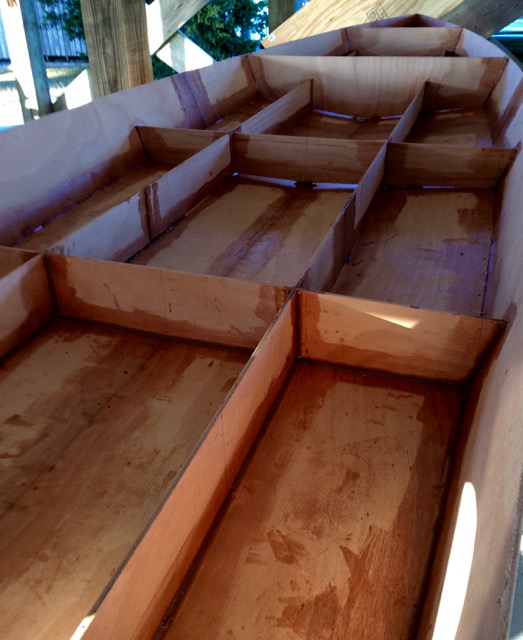
Here it is loosely stitched:
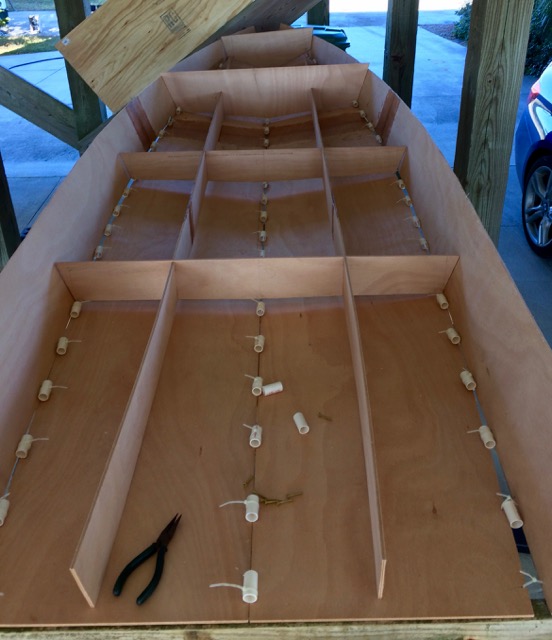
Beginning the tightening:
I couldn't get it into proper shape when it was in the improvised jig - moved it to the floor, shimming to get it aligned, and all was good:
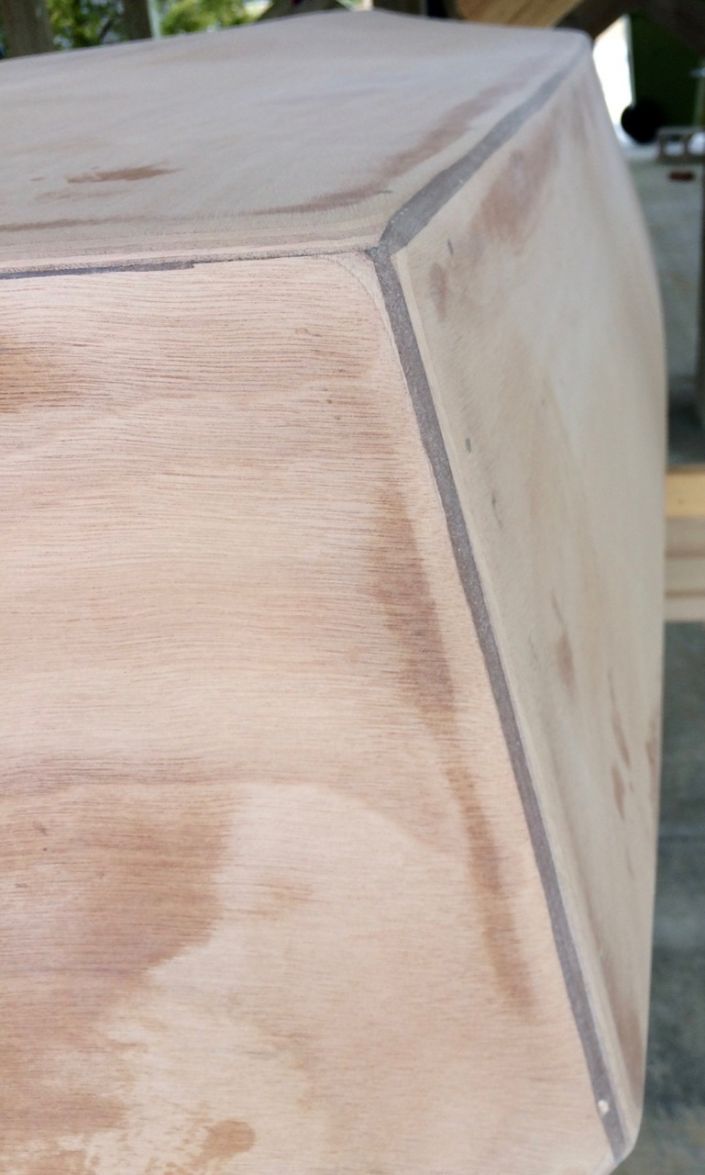
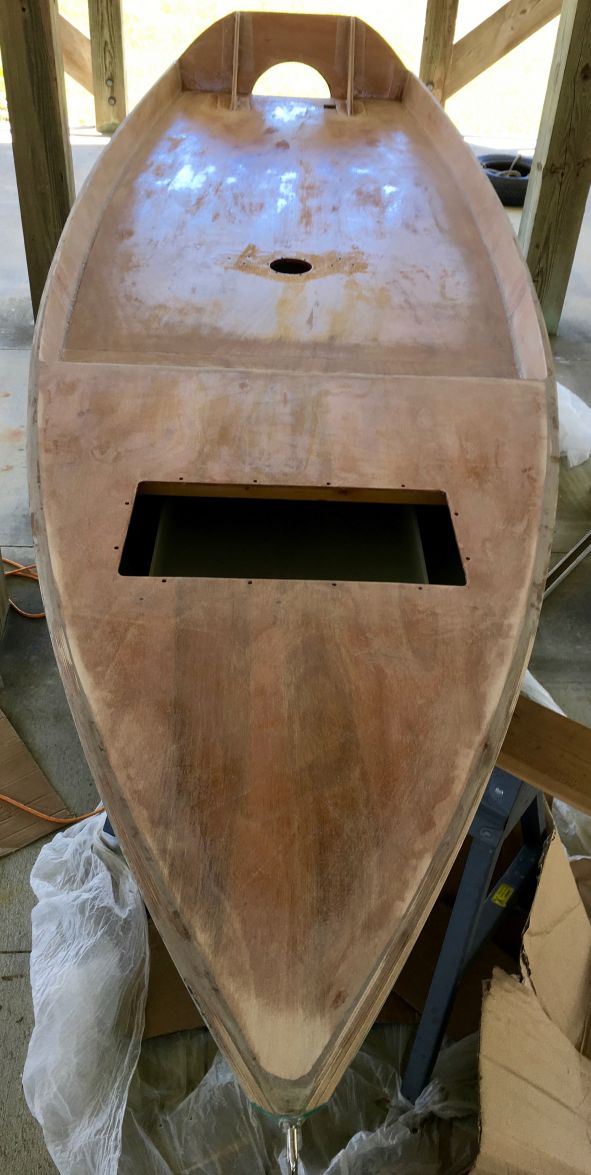
A view from the bow, all epoxy fillet tacks in place:
Back near the transom, there really wasn't much of a gap for the fillet/glue so I used small fiberglass tabs:
Tomorrow the zip ties come off and full fillets will be applied.
Re: SOBX Solo Flats Skiff SK14
Posted: Sun Nov 06, 2016 5:31 pm
by Jeff
Brian, really nice progress!! Keep the photos coming!! Jeff
Re: SOBX Solo Flats Skiff SK14
Posted: Mon Nov 07, 2016 11:30 am
by bateau-webmaster
Very nice Jigsaw Work, almost looks like a CNC Kit!
Re: SOBX Solo Flats Skiff SK14
Posted: Mon Nov 07, 2016 6:10 pm
by BrianC
The saw is a Rockwell RK3440K VersaCut Circular Saw - it has a 3 3/8" dia. blade and can make cuts up to 1 1/8" deep. If I had it to do over again, I'd get the Rockwell RK3441K Compact Circular Saw - it has a 4 1/2" dia. blade. The down side of the VersaCut is that it is a bit hard to see where it is cutting - the other one is more open around the front edge of the blade. The VersaCut is also designed for plunge cutting - the blade can be slowly lowered down into the wood. I found this to make cutting harder so I removed one of the guide bearings on each side and replaced them with a stack of lock washers - this allows the saw to be locked to a particular depth. The small diameter of the blade made following the curves quite easy although I had to cut twice when cutting the arc on the transom (23.5" radius).
Re: SOBX Solo Flats Skiff SK14
Posted: Mon Nov 07, 2016 7:27 pm
by BrianC
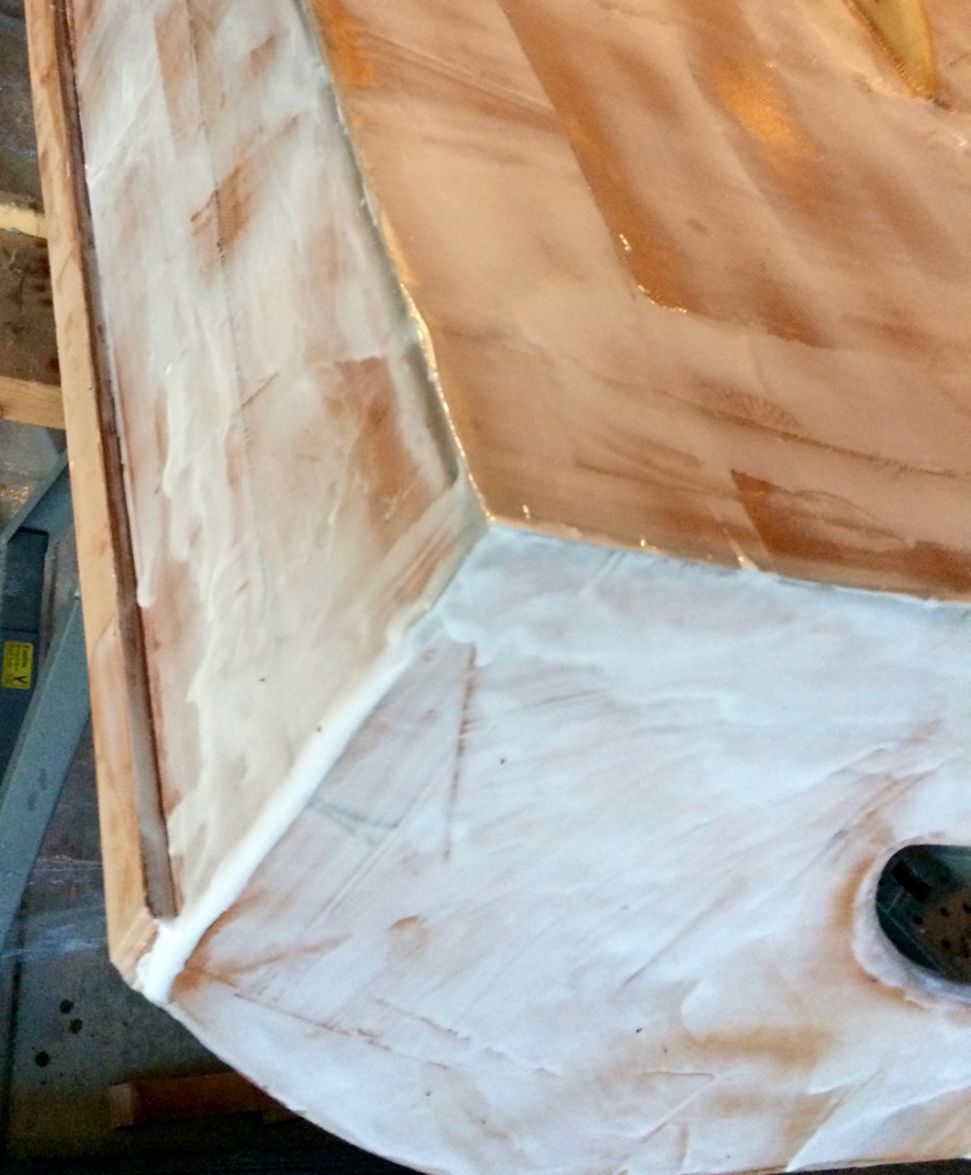
Today was the start of filleting - 68°F mid-day so it was a great day to do this for the first time. First got all the zip ties off and taped the underside of all the seams. Then I moved the hull back to the saw horses so that it was at a better working height. Next, I painted all the surfaces that will get fillets with neat epoxy.
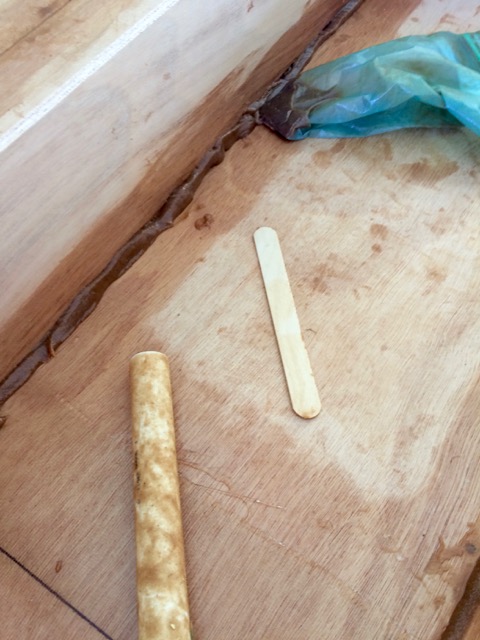
I donned a dust mask and made my own fillet mix by premixed 1 part fumed silica (aka Cabosil) to 2 parts wood flour (both by volume). I mixed up 6 oz. batches of epoxy, added the fillet mix to peanut butter consistency, scooped it into a freezer ziplock bag (tip reinforced with packing tape - another good tip from this board!), cut the tip and then piped it along the hull seams, stringers, and frames.
I used a piece of PVC pipe with ~1" diameter to form the fillet and used an oversized wood popsicle stick to scrape off the overage. Also filled any unfilled stitch holes. I only got the back 1/3 done - this is going to take a few days! (or maybe I'll get faster!)
A couple of pictures:
Re: SOBX Solo Flats Skiff SK14
Posted: Mon Nov 07, 2016 7:41 pm
by peter-curacao
Looking good

, don't forget to clean or sand the already epoxy painted surfaces next time your at it, unless you have blush free epoxy that is.
Re: SOBX Solo Flats Skiff SK14
Posted: Wed Nov 09, 2016 11:15 am
by BrianC
Thanks Peter - it is low blush but just in case I've gone ahead and given it a quick sanding before each layer.
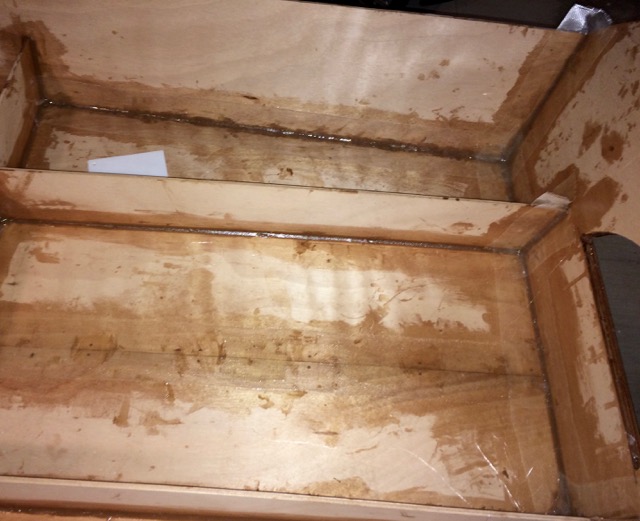
Yesterday was day 2 of the inside filleting - here are a few pictures.
The first one show the piping bag (just a freezer ziplock with tip reinforced with packing tap), PVC pipe fillet forming 'tool', and a wooden mixing stick AKA tongue depressor used to scrap up the overages. As others have recommended, I quickly piped out the epoxy fillet putty so that it wouldn't kick off in the bag:
The next photo is the fillets after smoothing and scraping up the excess:
I hope to finish up the filleting today and get started on the inside fiberglass tape. The plans call for tap just on the keel, bow, and around the transom. I may go ahead and do the chines as well.
Re: SOBX Solo Flats Skiff SK14
Posted: Thu Nov 10, 2016 7:07 am
by Cracker Larry
Nice looking fillets

Re: SOBX Solo Flats Skiff SK14
Posted: Thu Nov 10, 2016 10:53 am
by BrianC
Thanks Larry! I've read several of your build threads and have used several of your methods (more in the future!). In particular, stacking the wood when cutting to get identical mirror image parts.
Re: SOBX Solo Flats Skiff SK14
Posted: Thu Nov 10, 2016 12:00 pm
by BrianC
Pictures from yesterday -
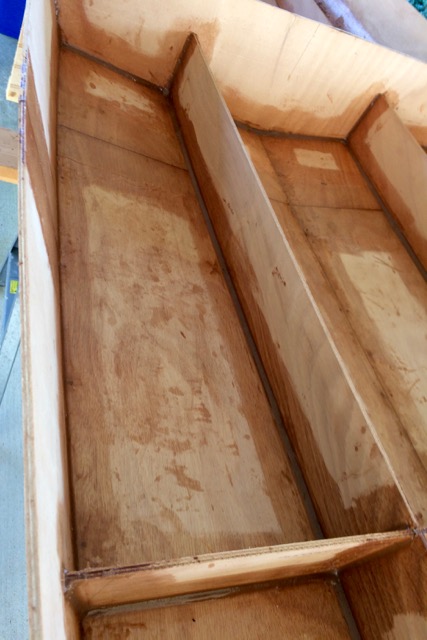
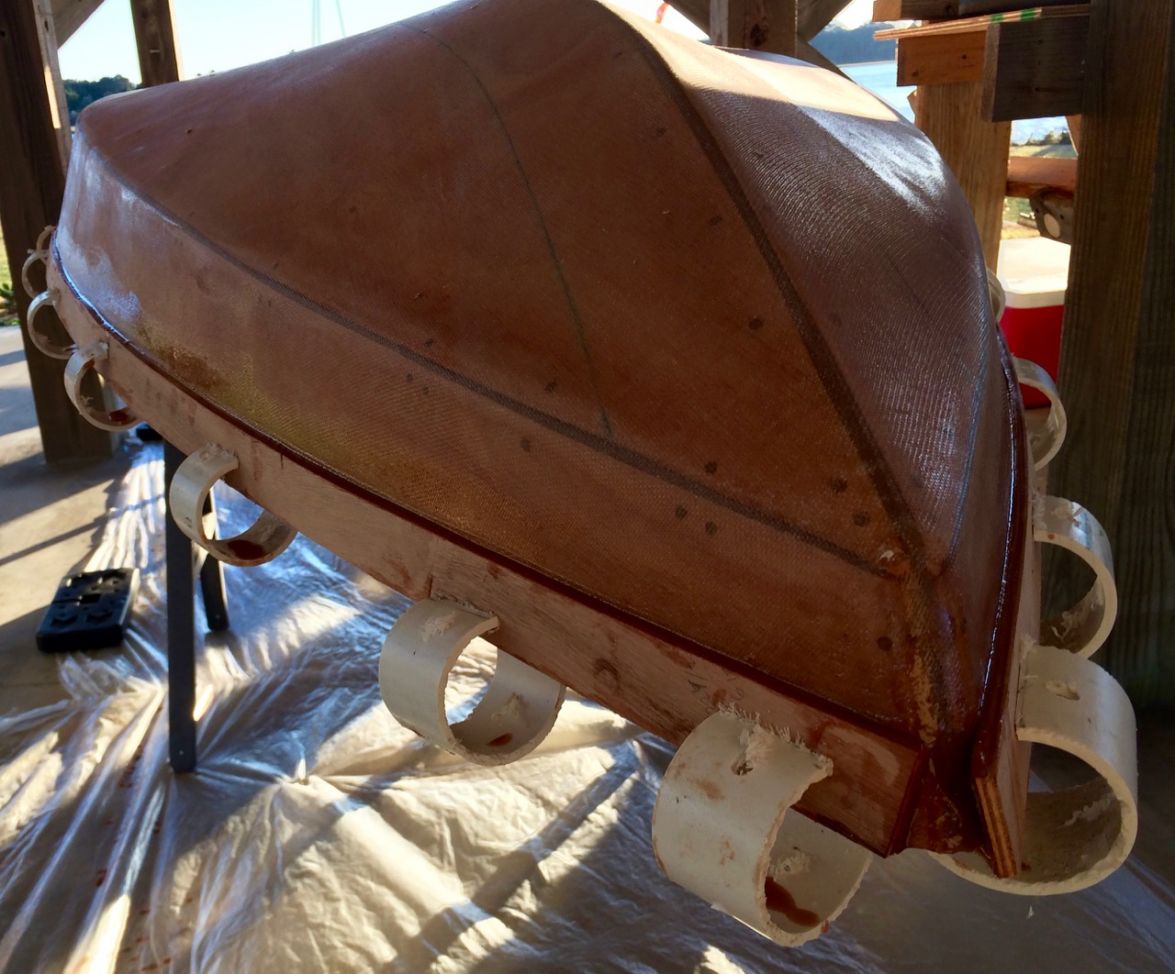
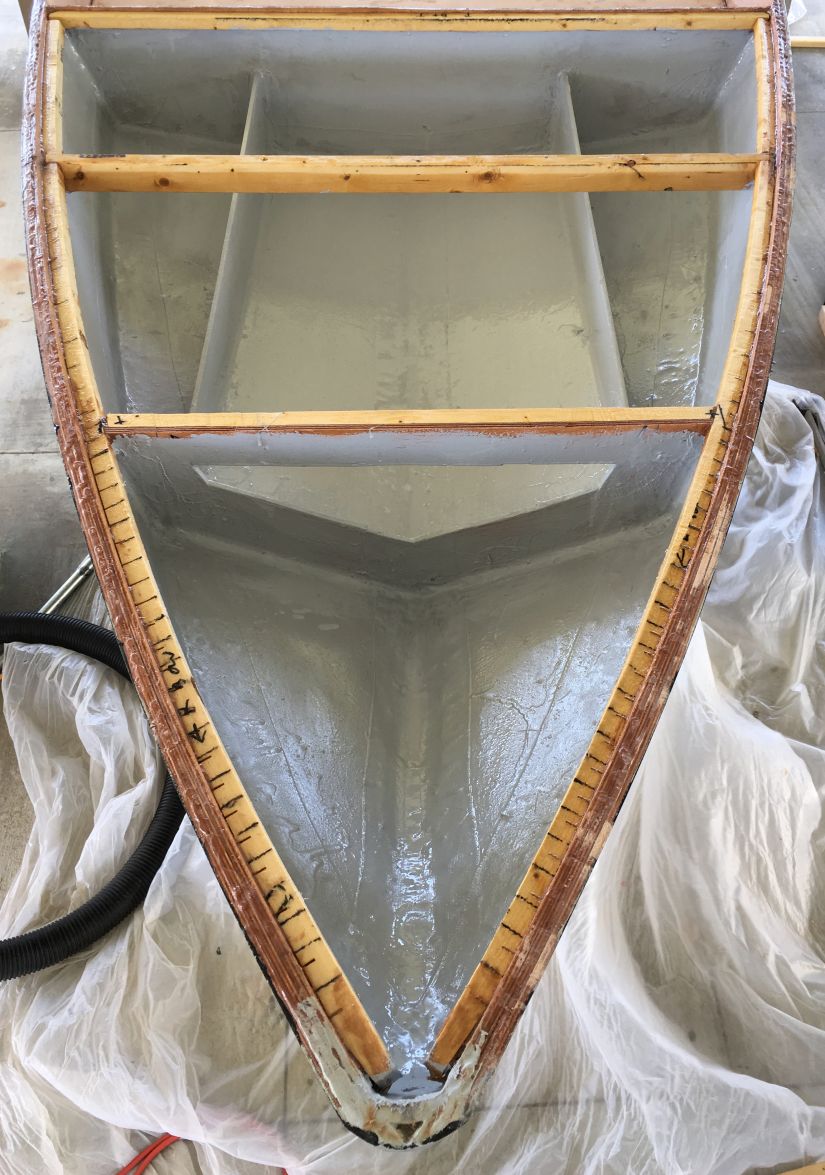
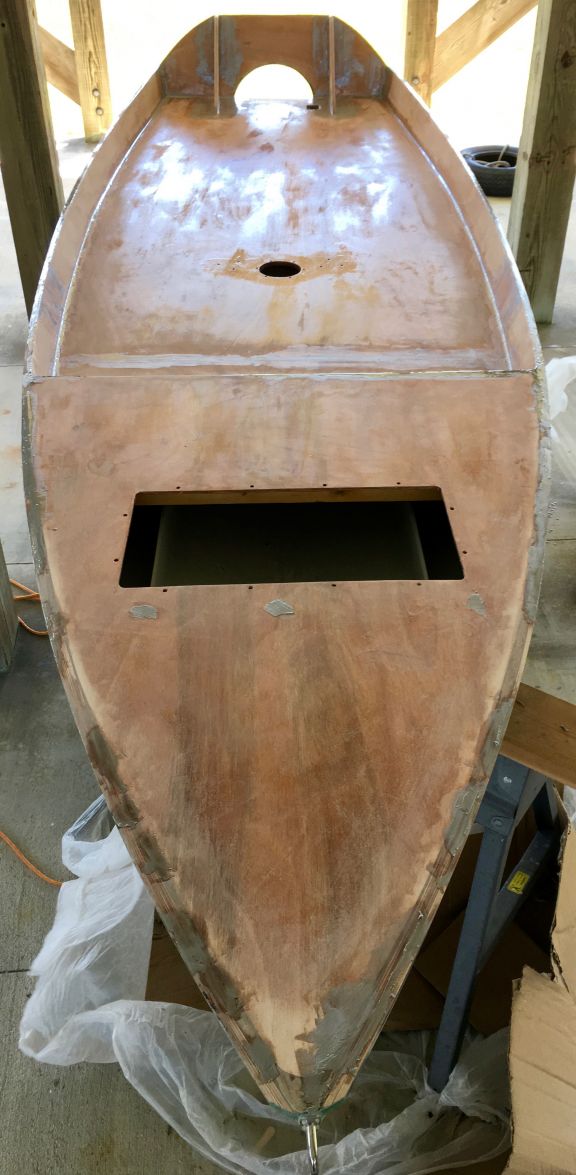
Inside filleting all done - ready for taping:

This took much longer than I was expecting - a total of about 7 hours for about 100' of fillets. It was also a big consumer of epoxy since there were some 1/4"+ gaps on some of the forward frames.
Taping done between the transom and frame D:
Spending time making smooth fillets really pays off when taping. I had a few rough spots where it was really hard to get the tape to lay flat. Next time I'll smooth those off more before taping. Would something like a Rockwell Sonicrafter be a good choice for this?
It was getting cooler as I taped - the warmer epoxy attracted quite a few mosquitos who are now a permanent part of the build:

After hull assembly, filleting, and about 1/3 on interior taping, my epoxy supply is down by about 3/4 of a gallon:
While the plans call for 1.5 gallons total, I'm guessing that I'll use a bit more than that!
Re: SOBX Solo Flats Skiff SK14
Posted: Thu Nov 10, 2016 1:23 pm
by Fuzz
Don’t worry about using more epoxy than the plans call for. I think everyone uses more, most of us a lot more. The only one who did not was Capeman on his canoe. He was fanatic on keeping the weight down.
Re: SOBX Solo Flats Skiff SK14
Posted: Thu Nov 10, 2016 8:43 pm
by seaslug
Brian, I see that you're already finished with the fillets and taping, but if you decide to build another boat in the future it's much easier to do the taping soon after you do the fillets, after the fillets firm up a little, than the fiberglass cloth pushes easily into the still soft epoxy fillet using a small diameter roller. Makes it easier, and you get a nice strong bond also. Mike
Re: SOBX Solo Flats Skiff SK14
Posted: Fri Nov 11, 2016 5:10 am
by topwater
I agree with Mike and will also save a bunch of time like waiting for the epoxy to cure , sanding, cleaning up . Sanding
fillets especially in corners is no fun and time consuming .
Re: SOBX Solo Flats Skiff SK14
Posted: Fri Nov 11, 2016 7:26 am
by Cracker Larry
Would something like a Rockwell Sonicrafter be a good choice for this?
Yes, it is the perfect tool for that, and lots of other things. Every boat shop need one, and mine ain't for sale

Re: SOBX Solo Flats Skiff SK14
Posted: Sat Nov 12, 2016 11:15 am
by BrianC
Thanks for the pointers on taping - it sure would have been easier to tape onto partially set fillets. What type of roller do people use to press the tape into the fillet? Not sure what is meant by "small diameter roller."
The weather has turned cooler for a few days and that has put a temporary hold on further epoxy work. Here are the things that I think come next when it warms up:
1. rub rails made from strips of 6mm ply
2. cutting and glueing sole cleats
3. fiberglass on bottom
4. skeg (material??)
Should I install the sole before doing the bottom? This boat is really easy to flip so multiple flips are not an issue. I've been puzzling over the grab rail - buy or build (out of ply)? As for position, several threads have talked about taking the dimension off the drawing. I went ahead and put on dimensions - here it is - dimensions are in meters:
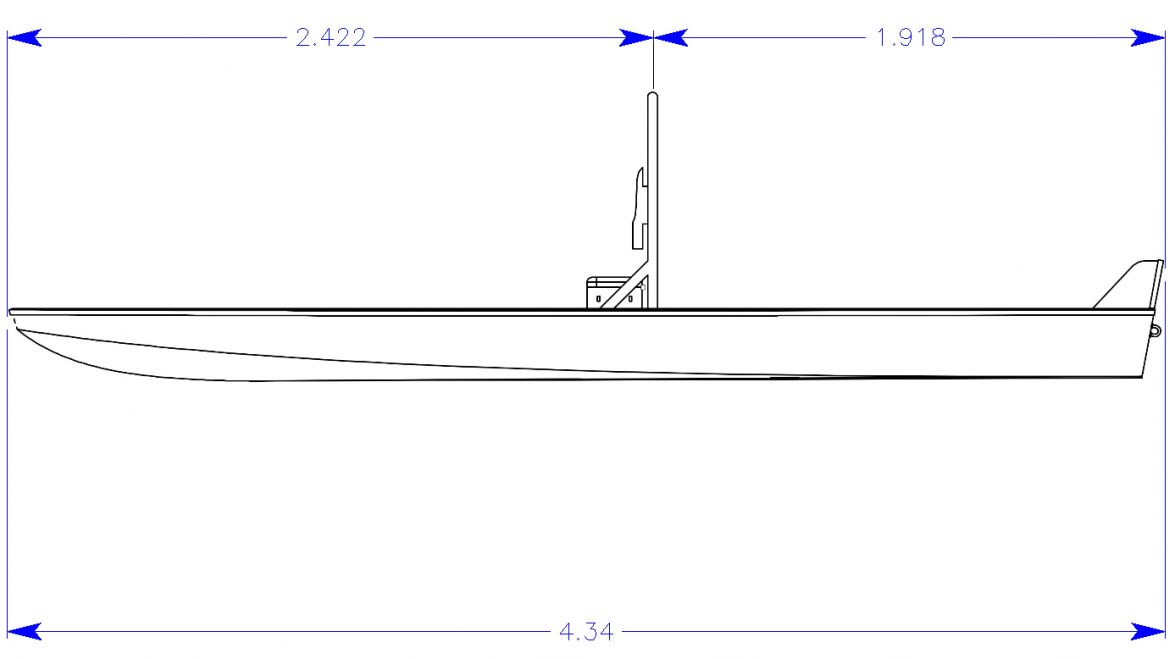
From this, it looks like the grab rail is just about centered over frame C.
Re: SOBX Solo Flats Skiff SK14
Posted: Sat Nov 12, 2016 11:54 am
by jacquesmm
Use the grabrail location from the plans please, above C.
Re: SOBX Solo Flats Skiff SK14
Posted: Sat Nov 12, 2016 12:28 pm
by BrianC
I couldn't find any specification for the grab rail location on the plans. That is why I took it off the (undimensioned) side view since there isn't a view that shows both the position of the grab rail relative to the frames.
Re: SOBX Solo Flats Skiff SK14
Posted: Sat Nov 12, 2016 3:28 pm
by peter-curacao
BrianC wrote:Thanks for the pointers on taping - it sure would have been easier to tape onto partially set fillets. What type of roller do people use to press the tape into the fillet? Not sure what is meant by "small diameter roller."
I like those and prefer them way better than the foam ones, when you are done let them dry on the holder not touching anything that way you get a nice sanding holder for the fillets
Some build grab rails from pool noodles do a search you will find it here

Re: SOBX Solo Flats Skiff SK14
Posted: Sat Nov 12, 2016 8:18 pm
by seaslug
The picture of the roller cover Peter shows is very similar to what I've found at Lowes. They are, Whizz Roller System 4" kitchen and bath 1/4" nap. They work excellent, and don't ever come apart while in use, and you can really work them if need be, pushing hard into epoxy fillets that are firming up. Mike
Re: SOBX Solo Flats Skiff SK14
Posted: Sun Nov 13, 2016 12:26 am
by Fuzz
I think what was meant by small diameter roller is a laminating roller. Go to the building/tools site here and look for laminating rolls. You can get them in several different lengths and diameters.
Re: SOBX Solo Flats Skiff SK14
Posted: Sun Nov 13, 2016 8:42 am
by topwater
Fuzz what Peter and Seaslug suggested is what we use, i like these better than foam but have used both.
Foam cigar rollers disintegrate after a while.
Re: SOBX Solo Flats Skiff SK14
Posted: Tue Nov 15, 2016 10:00 am
by BrianC
Thanks all for the suggestions - all filed away so the next build will go faster!
I have a few questions about the bottom - if I am using epoxy+graphite (using CL's recipe!), does that go on first followed by the sides and boot stripe or should it go on last? For the hull I'm probably going to go low cost: either Rust-Oleum Marine Topside or step up a bit to Pettit Marine EasyPoxy - both seem to get good reviews here.
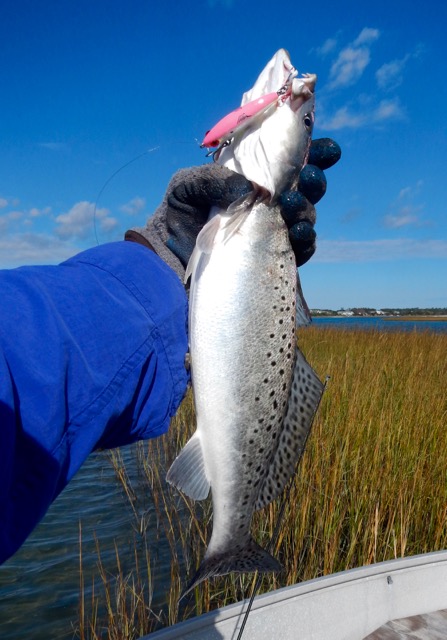
I've been away from the build the last few days - did get out fishing and caught three nice keeper spotted sea trout; here is one:
Re: SOBX Solo Flats Skiff SK14
Posted: Tue Nov 15, 2016 1:26 pm
by Jeff
Nice catch!! Jeff
Re: SOBX Solo Flats Skiff SK14
Posted: Wed Nov 16, 2016 10:55 am
by Cracker Larry
I put the graphite on first, before the boot stripe or side painting. I usually just leave those in primer until the inside is complete.
Nice trout
Re: SOBX Solo Flats Skiff SK14
Posted: Wed Nov 16, 2016 10:02 pm
by BrianC
So I'm all done filleting the seams on the bottom - it took 2 passes to get them fully built up - much more work than the inside fillets. Tomorrow I get to use the new toy - a Dewalt 5" RO sander. As per the plans, I'll be rounding all the edges to 3/8" radius as prep for fiberglass. I assume that I'll be sharpening back up the edge where the bottom meets the transom since I've read here that the sharpness of that edge has an impact on performance. What about the chines - is it fine to leave them at a 3/8" or is there some value in sharpening them back up?
More pictures tomorrow - promise!
Re: SOBX Solo Flats Skiff SK14
Posted: Sat Nov 26, 2016 1:59 pm
by BrianC
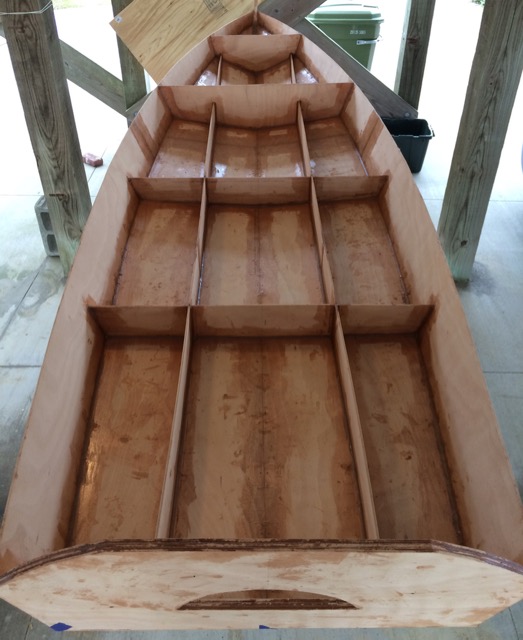
Re: SOBX Solo Flats Skiff SK14
Posted: Sat Nov 26, 2016 2:07 pm
by BrianC
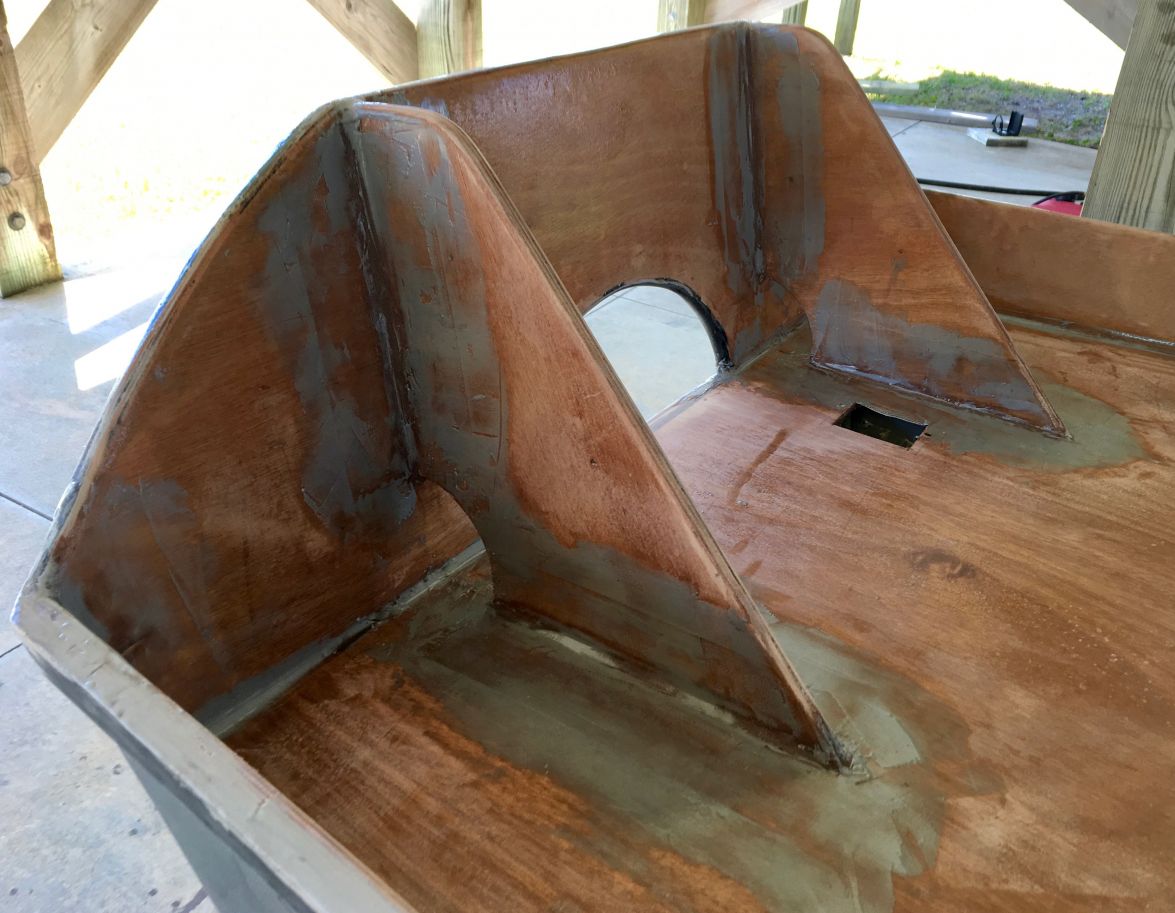
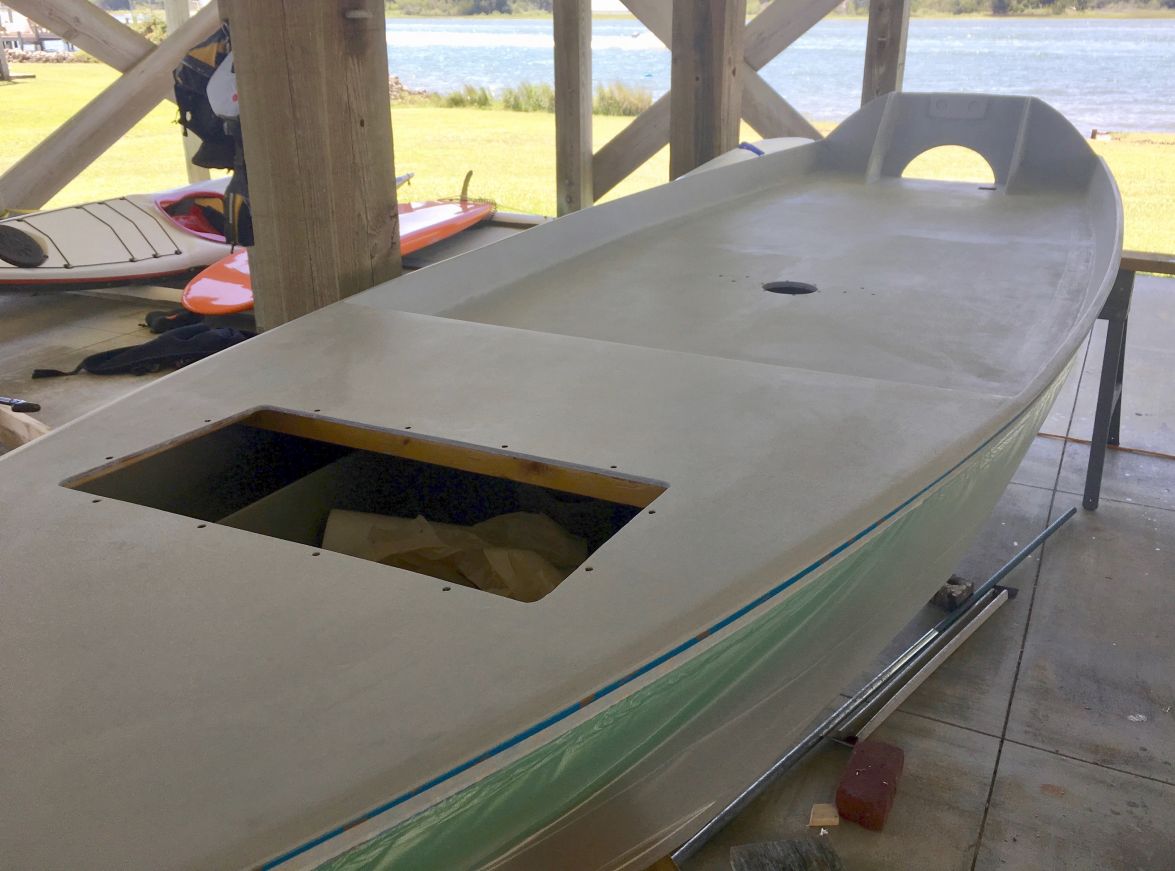
I've been accumulating all the other parts. I'm building the version with a large foredeck (starting at frame B) so will have two compartments with hatches. Also, I'm installing a small screw in inspection port (just large enough to get in my hand) so that I can bolt the grab rail with great big fender washers - didn't want to go with the braced grab bar because I want to be able to put a cooler with seat just forward of the grab rail.
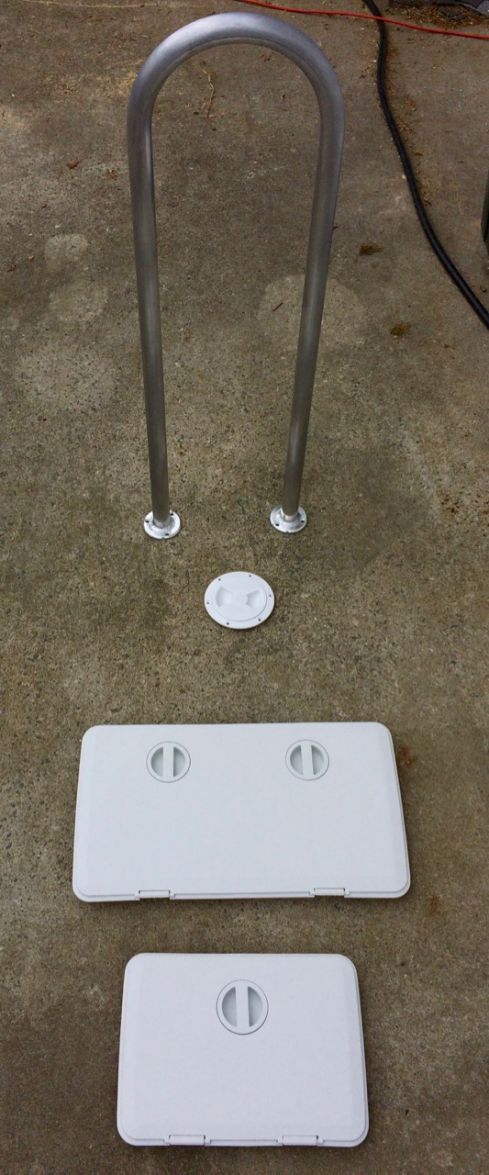
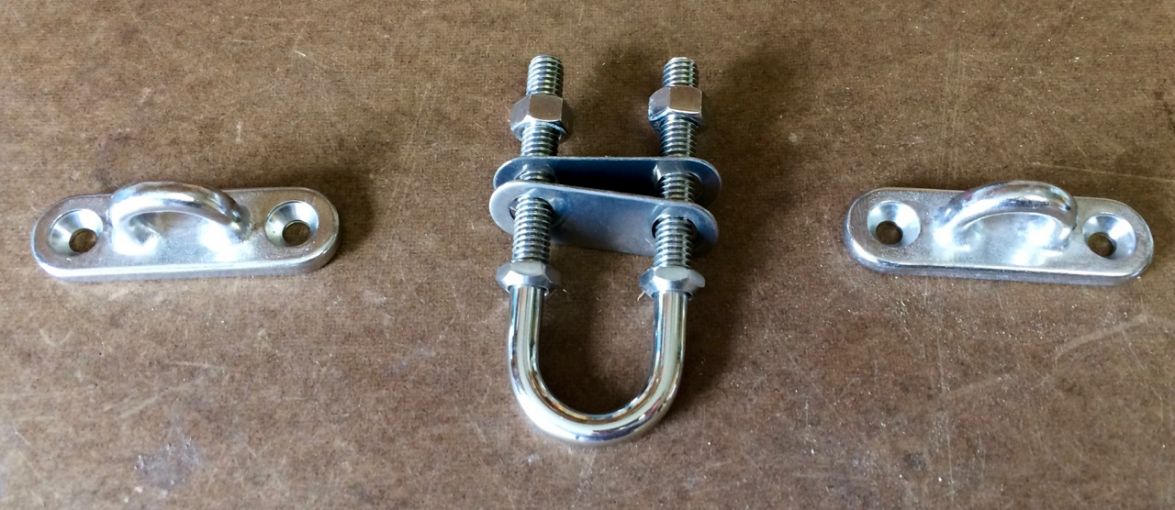
Here are a few more shiny bits - bow eye and mooring rope attachments:
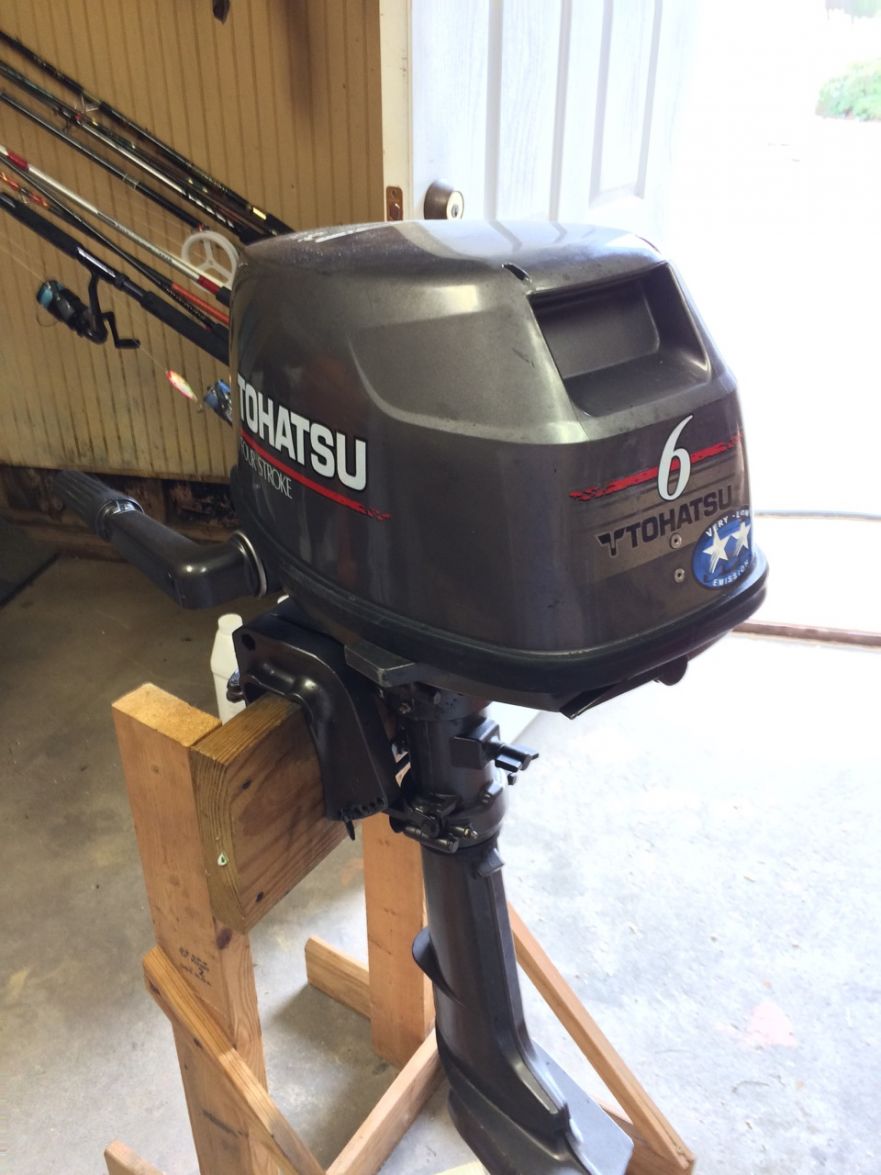
Lastly, I got a sweet deal on a Tohatsu 4-stroke 6HP:
Re: SOBX Solo Flats Skiff SK14
Posted: Sat Nov 26, 2016 3:33 pm
by Cracker Larry
That hull looks great
It looks like I did it

Re: SOBX Solo Flats Skiff SK14
Posted: Sat Nov 26, 2016 4:30 pm
by Jeff
BrianC, really nice work on the hull!! Jeff
Re: SOBX Solo Flats Skiff SK14
Posted: Sat Nov 26, 2016 8:41 pm
by BrianC
Thanks Cracker Larry & Jeff! I have gotten this far without major mistakes largely because of this forum. I spent quite a few months just reading many of the build threads - every one of the "tricks" I have used so far have come from reading this forum. I accumulated quite a few pages of notes which have helped enormously to guide my build; unfortunately, I didn't always record the source so I haven't always been able to give credit for the specific tips. All the information here in the forum and in the Bateau web site tutorials really helps fill in the details. Of course, the starting point are Jacques' designs. Also, his "fairness above all" has been a key guiding principle.
Re: SOBX Solo Flats Skiff SK14
Posted: Mon Nov 28, 2016 10:50 am
by BrianC
I just mailed in my NC registration papers - the only thing needed on a home built boat here in North Carolina is to fill out, sign, and have notarized the section attesting that the vessel is homemade and has never been registered - nobody has to see or inspect the boat so sending it in prior to completion isn't an issue.
Re: SOBX Solo Flats Skiff SK14
Posted: Mon Nov 28, 2016 1:08 pm
by Jeff
Good laws there in NC!!! Glad it went so smooth for you!! Jeff
Re: SOBX Solo Flats Skiff SK14
Posted: Mon Nov 28, 2016 5:08 pm
by BrianC
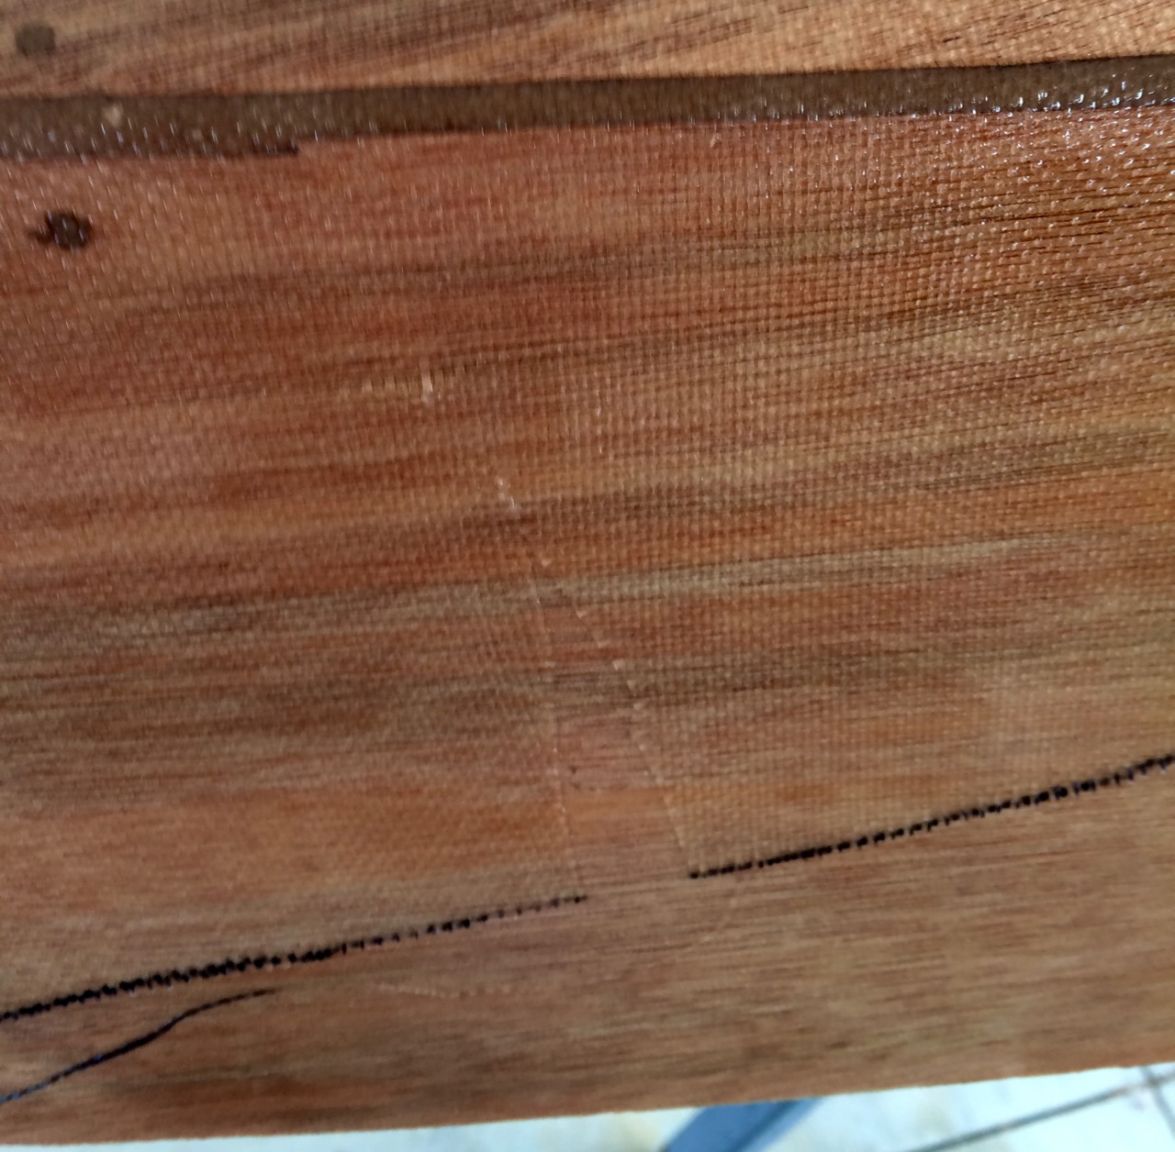
I spent four hours today glassing the hull - I followed the plans and cut the 50" wide 6 oz. cloth into two 25" wide strips. I also cut a piece for the transom. Lots of pictures - I hope folks will let me know if it gets to be too many!
The first step was to mark the hull to guide the placement of the glass cloth - putting a pen to the hull wasn't a good feeling but it all get covered with primer and paint so not to worry:
I had rolled up each piece of glass cloth to make it easier to lay down. I thought about doing both pieces at once - I'm really glad I didn't! This piece was rolled out on the bare wood:
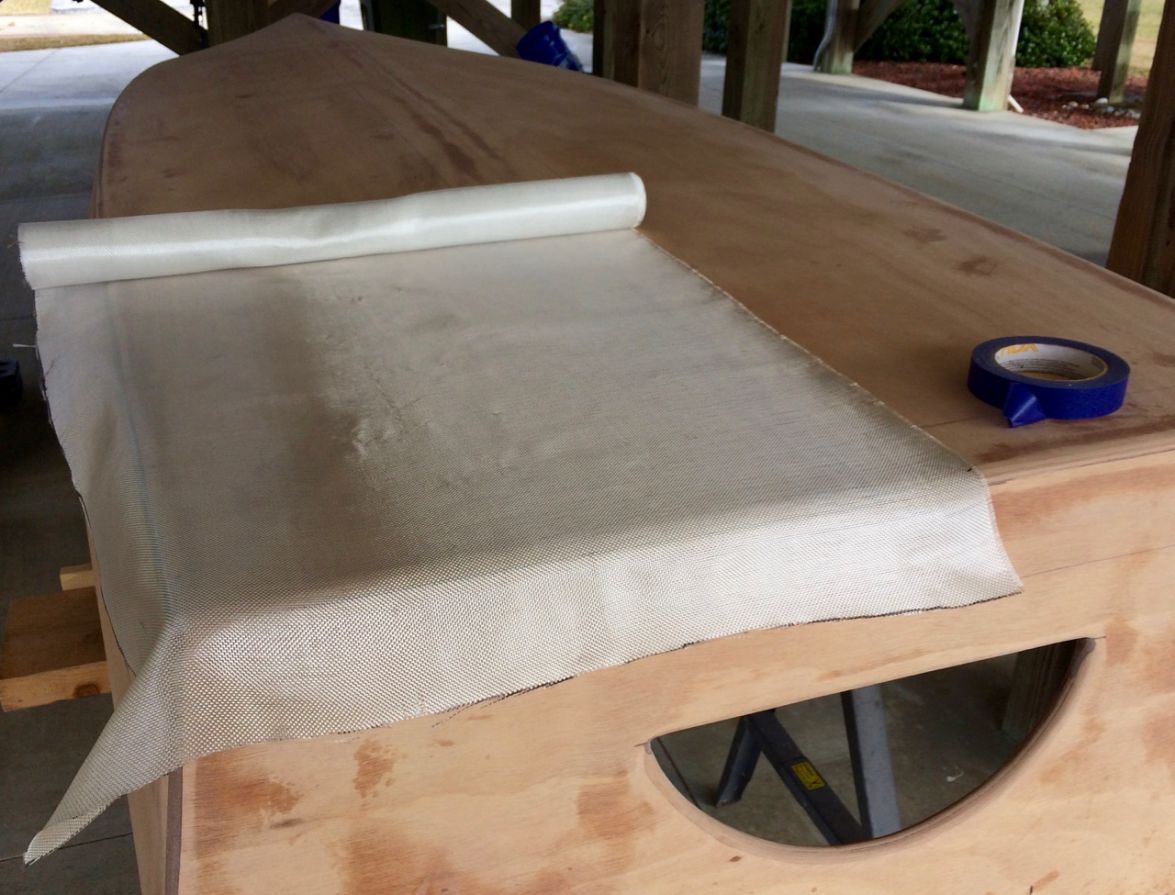
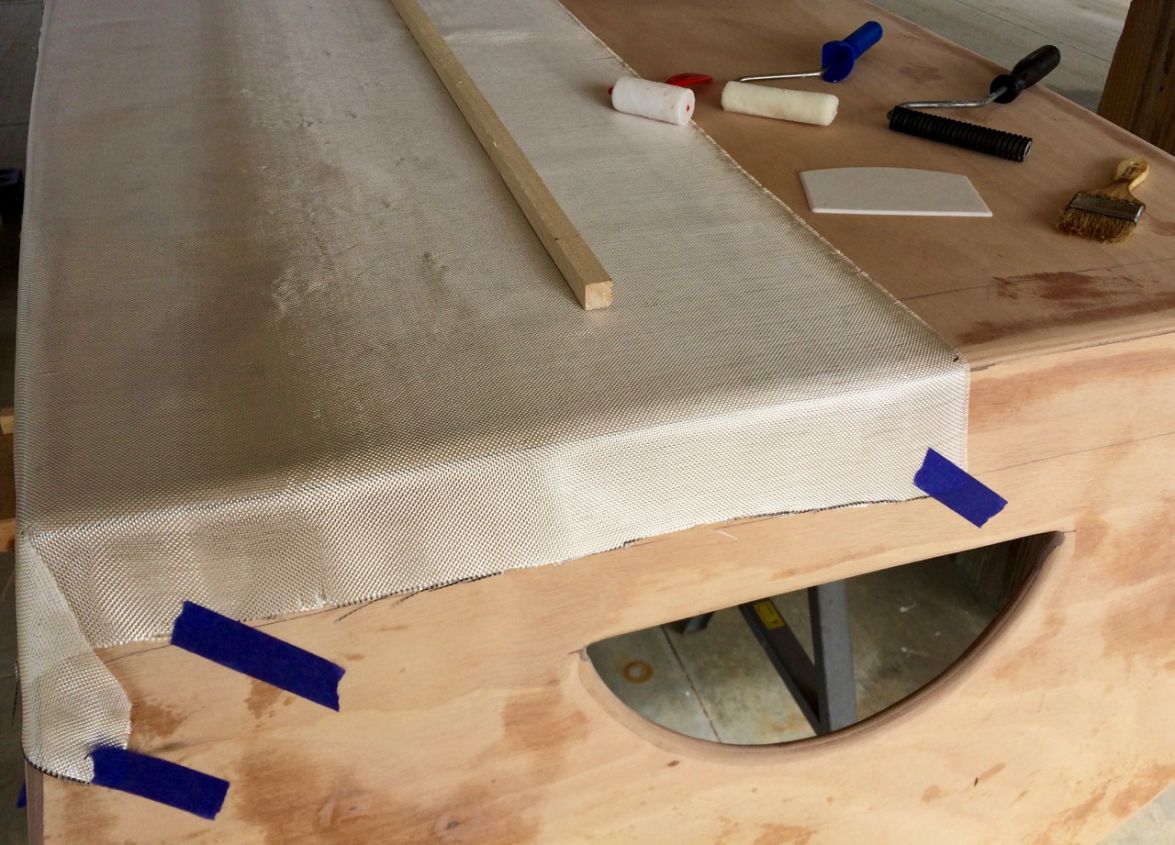
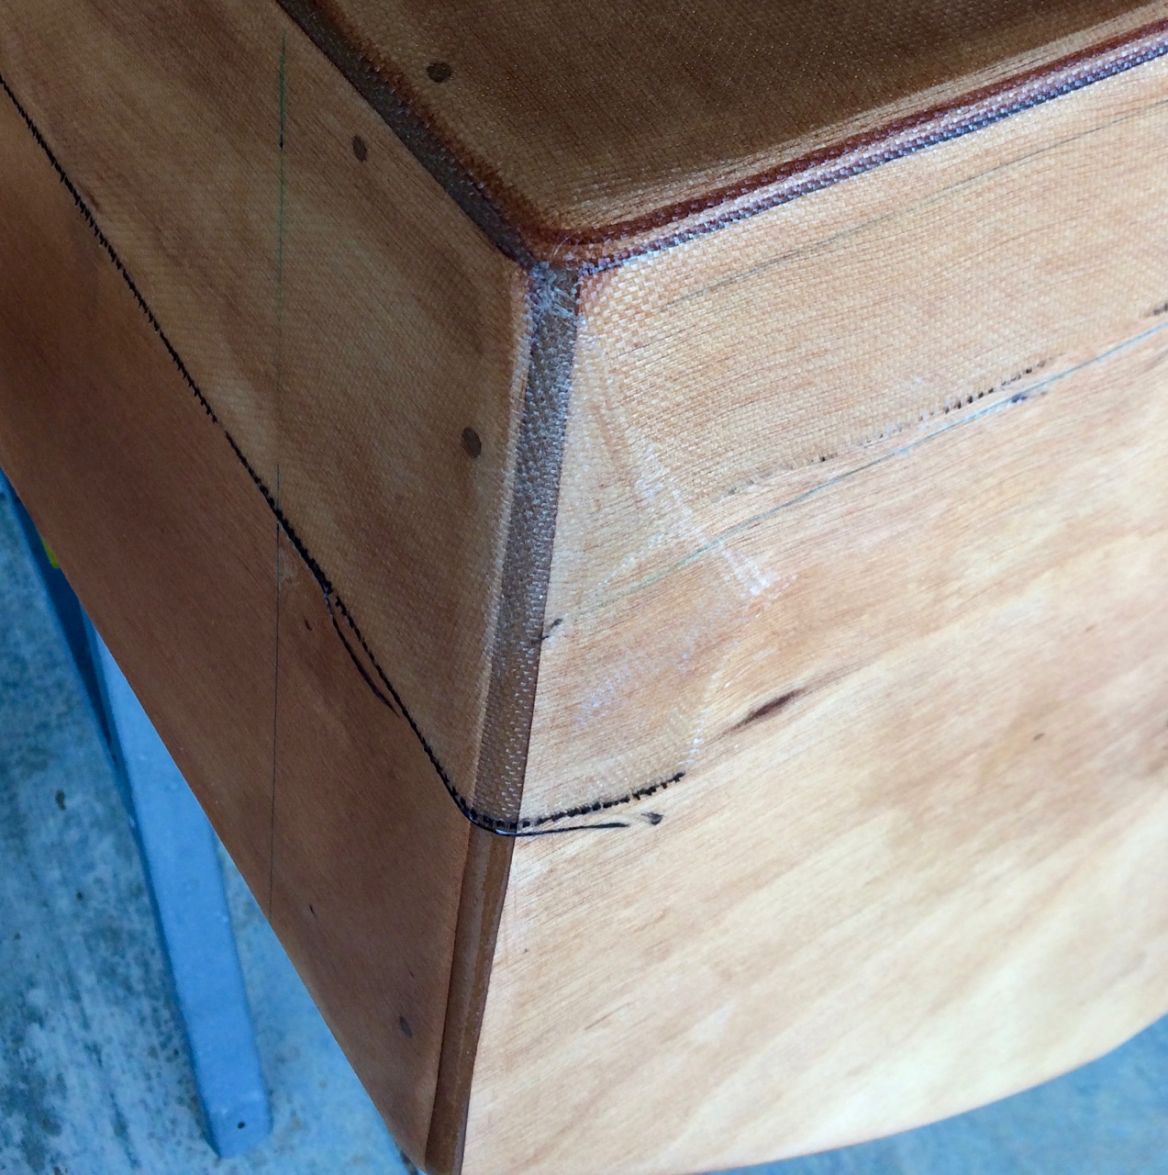
I cut small pie wedges out of the transom corner and folded over. There is still an overlap but with less bulk than doing a corner like a bed sheet. I also put a few temporary tape pieces to hold it in place:
I wasn't sure what tools I'd need so I started with a full set:
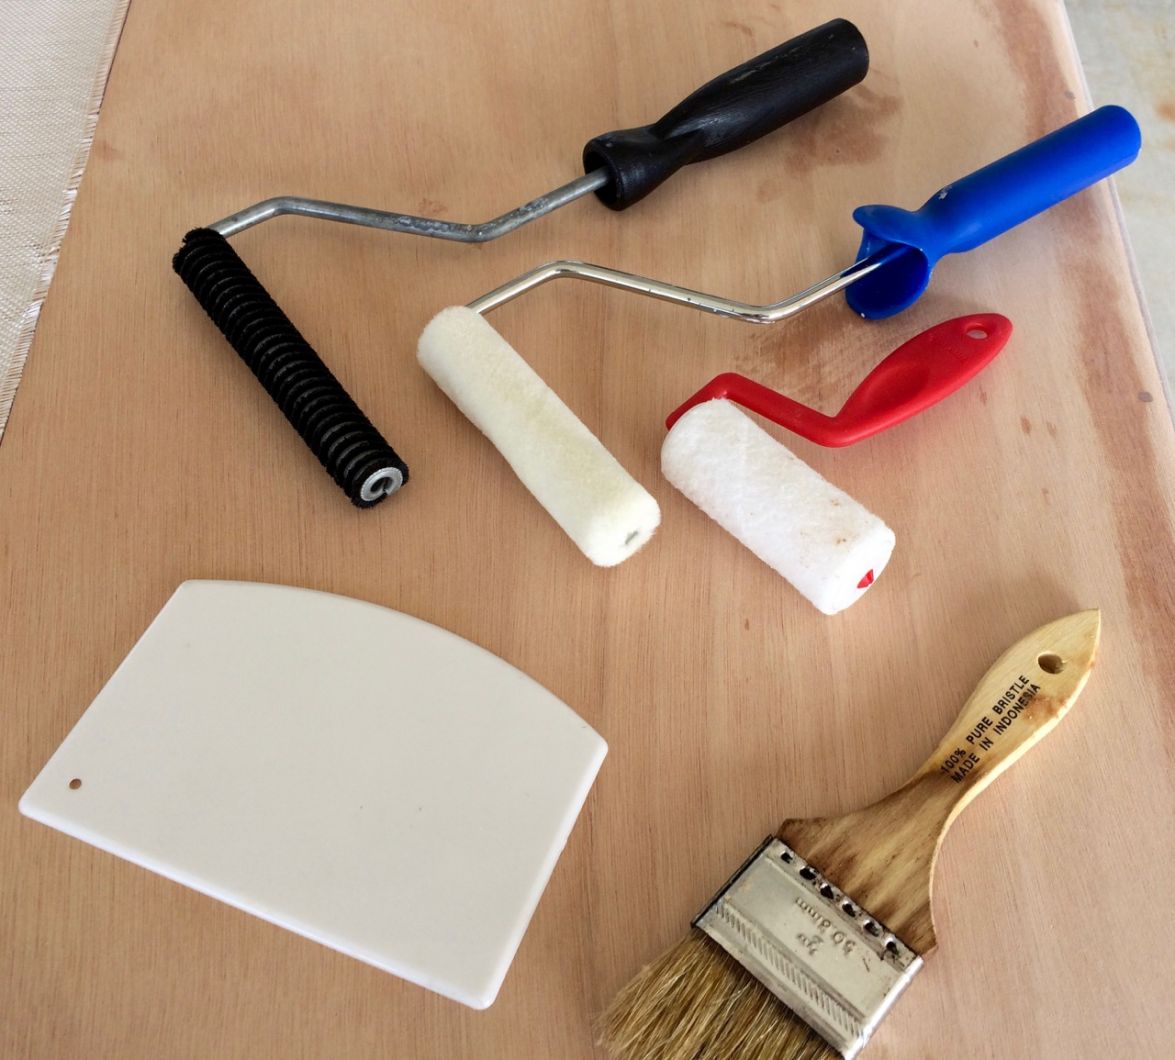
fiberglass laminating roller (that is the black one), 4" roller (Whizz woven fabric, 4" wide, 1/4" nap), a small touch up roller with even less nap, a plastic scraper, and a chip brush. I ended up only using the 4" roller and the plastic scraper. The scraper really made it easy to move the epoxy around and to move all the excess to the next section to be glassed. It is just a cheap ($0.15!) dough scraper from a nearby restaurant supply place. The 1/4" nap fabric roller was also perfect - many here suggested this one - thanks! Just mix the epoxy in the cup with an oversized popsicle stick, dribble onto the glass near the keel, move it around with the scraper and roller, dab on extra where needed with the mixing stick, scrap to move the excess to the next section, finish with the roller for a smooth finish.
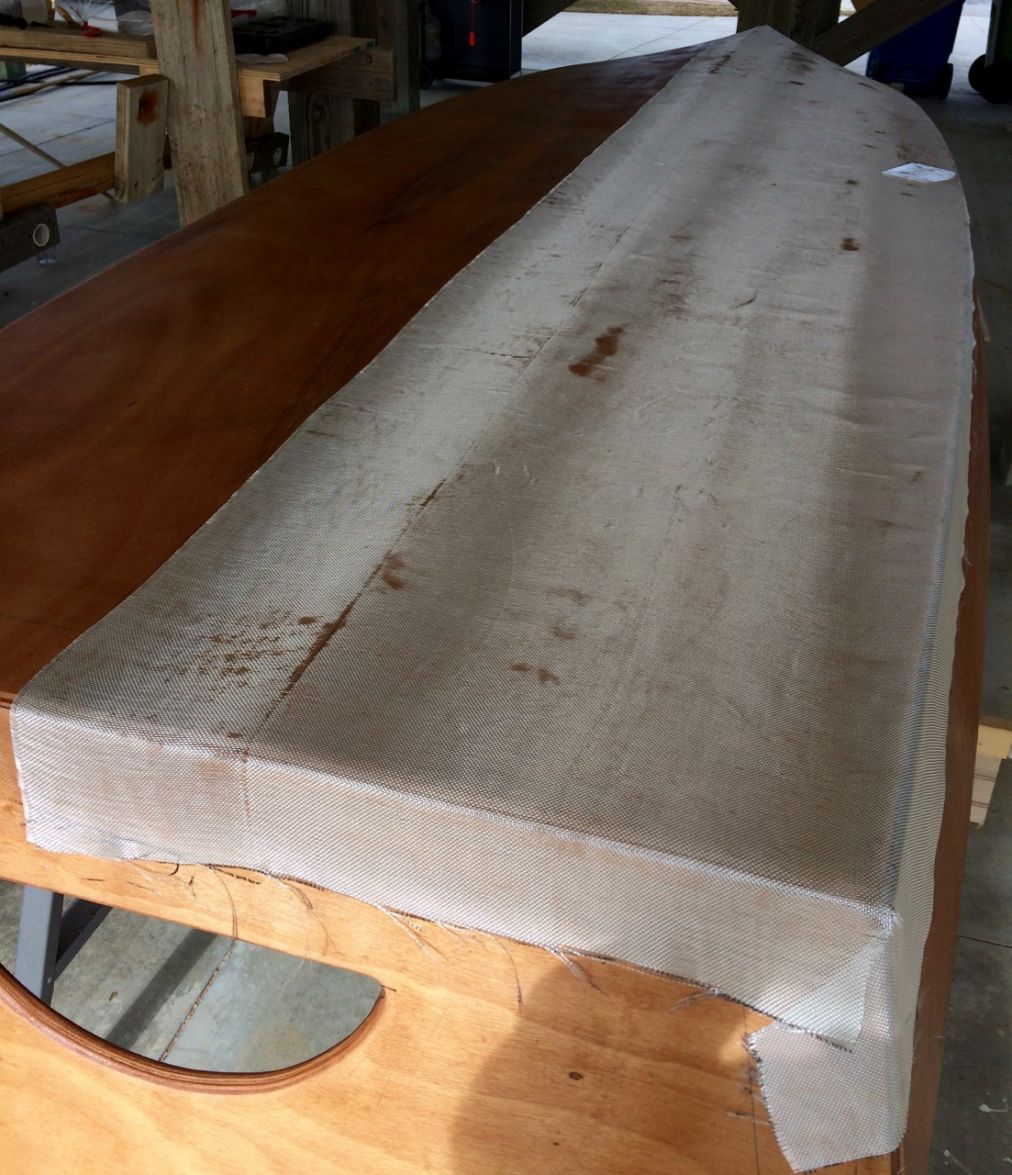
Here it is with the first side glassed:
I had epoxy left so I went ahead and rolled on a quick coat over the remaining exposed wood.
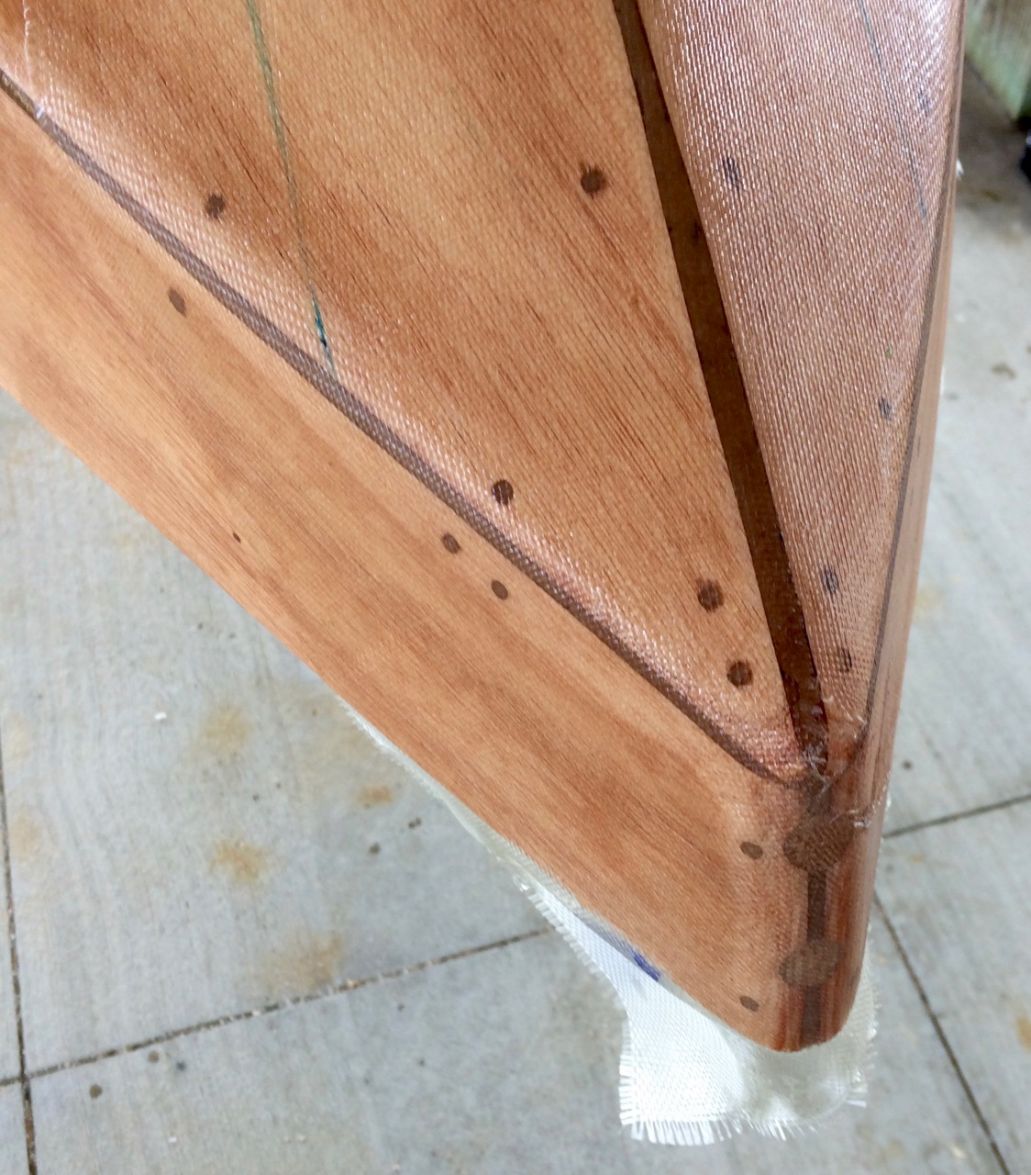
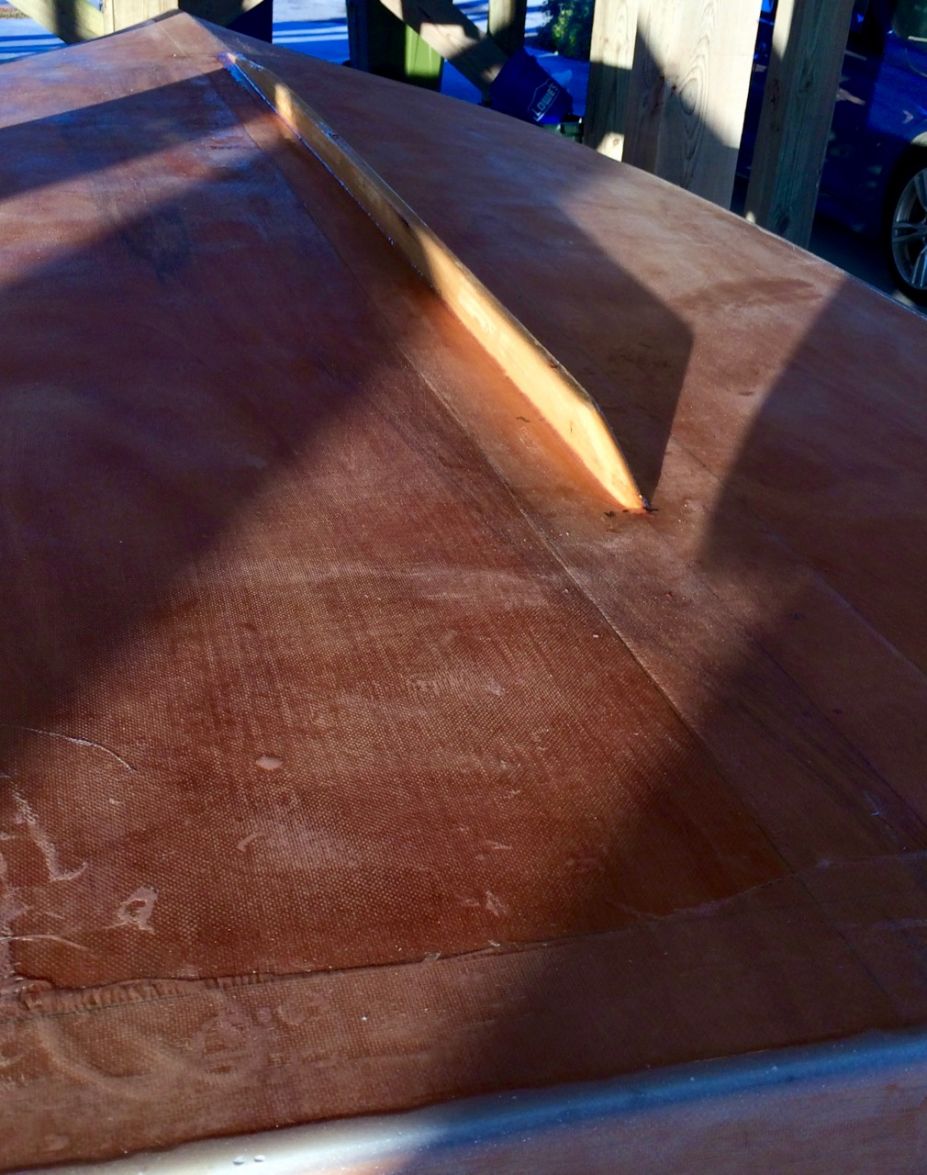
There was one place near the bow that wouldn't lay flat. A small pie slice shaped cut out fixed the problem. I did another on the other side but cut a bit less so that there was just a bit over overlap - I think I cut a bit too much on this one; no overlap:
Here is the finished corner back on the transom:
And here is a detail of the bow area - lots of layers!
The second side was rolled out over the wet epoxy coated wood:
This went faster and with less fuss than the first half which was placed over bare wood - also, I put on a fresh roller just in case. Pre-coating would seem to be the way to go (CL can say he told me so!)
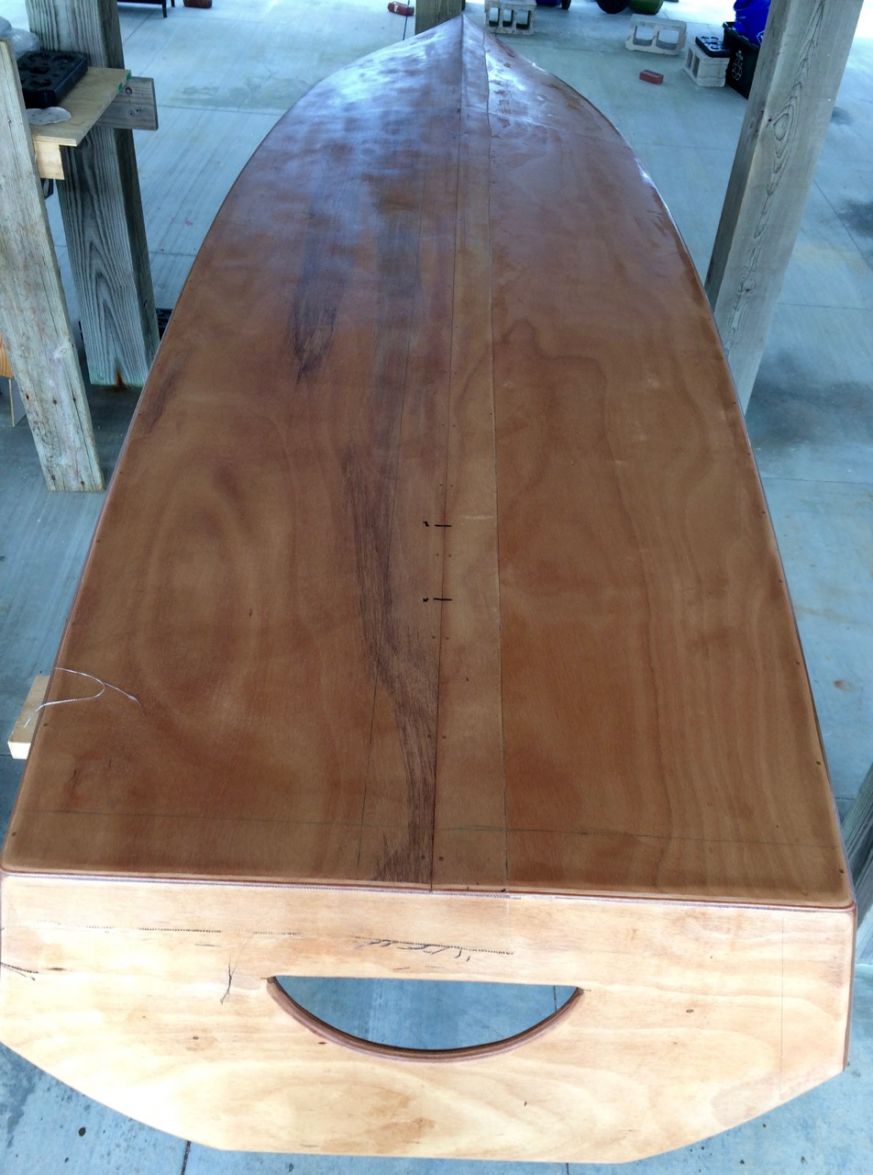
And four hours later, here is the glassed hull:
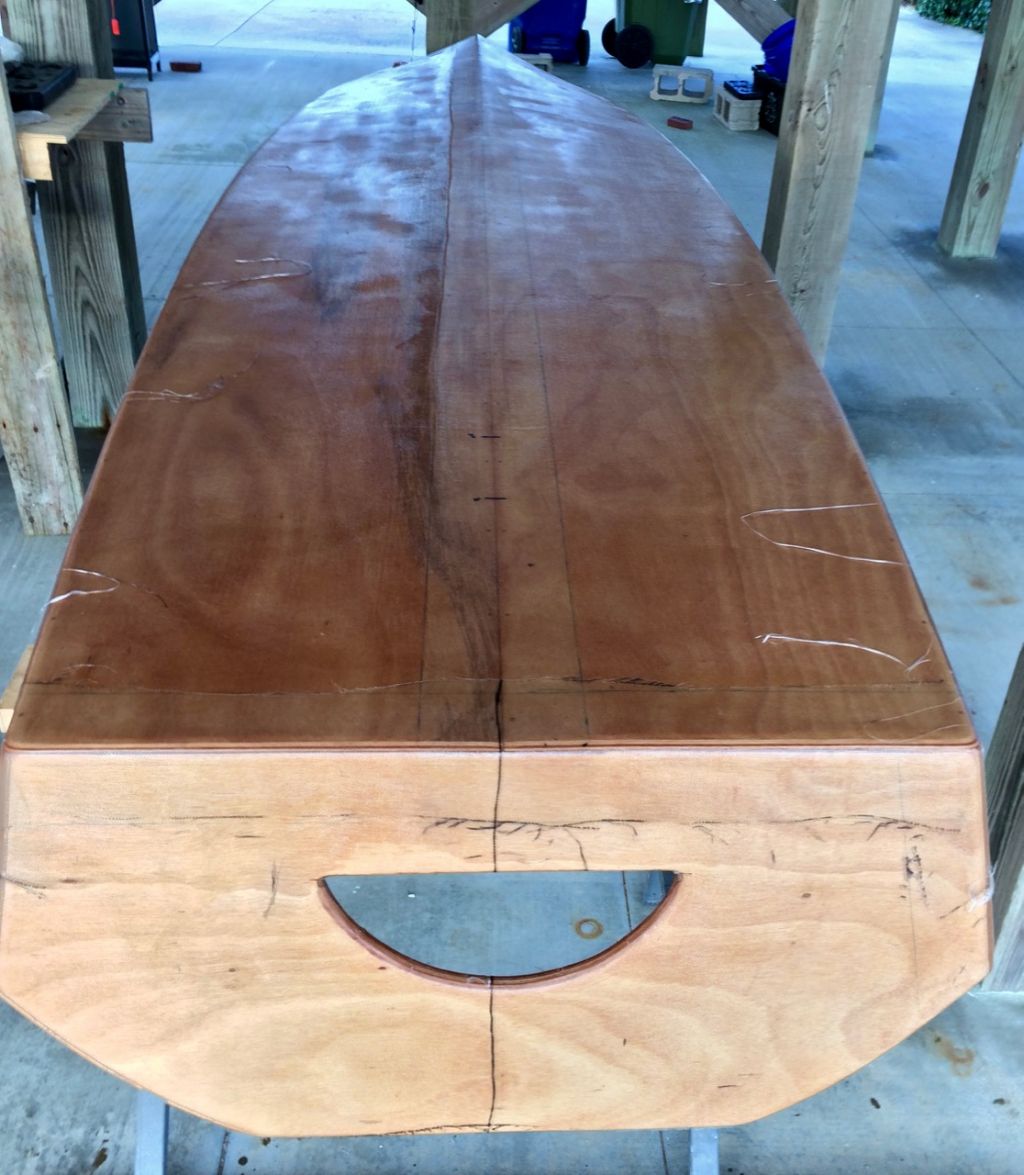
Nothing but vinegar for cleanup - soaked and rinsed the rollers so I can maybe use them again. This works with chip brushes so maybe

Re: SOBX Solo Flats Skiff SK14
Posted: Mon Nov 28, 2016 5:34 pm
by Jeff
BrianC, Really nice job!! Jeff
Re: SOBX Solo Flats Skiff SK14
Posted: Mon Nov 28, 2016 8:28 pm
by BrianC
On to the next stage - first a question - do I need to "fill the weave" by rolling on some neat epoxy before moving on to the next step? Is this really necessary before progressing on to resharpening the trailing edges of the hull and back half of the chines?
Re: SOBX Solo Flats Skiff SK14
Posted: Mon Nov 28, 2016 9:08 pm
by seaslug
Brian, Beautiful glass job, and being well organized pays off as everyone can see. I really like the looks of that dough scraper, guess I'll be visiting a restaurant supply store soon. Although it isn't necessary, if I have time I like to work wet on wet, or at least spread the initial coating of fairing compound before the resin fully cures. I'm on my second build and after laying the glass, I wait a few hours until it's firm enough, than spread epoxy thickened with fairing filler to a pancake batter consistency that I can pour out of the mixing container. It flows out nicely filling the weave, and if I do a good enough job, will only need 1 sanding, with very few small areas to touch up. If the mix isn't too thick you can even roll it on with that 1/4" nap 4" roller, it works for me quite well.... For building up the hard chines I used PVC boards for forms from Lowes I had left over from a job. You know the boards that have a simulated wood grain texture on 1 side and smooth on the back side. I screw them tight to the hull with a few thin drywall screws, and pour the epoxy and milled glass fiber and level off just like pouring and troweling cement. The screw holes get filled afterward, so no worries there. Another way is to use any wood board as your form with plastic packaging tape, wax paper, so the forms come off. Hope this helps. Mike
Re: SOBX Solo Flats Skiff SK14
Posted: Mon Nov 28, 2016 9:21 pm
by BrianC
The plastic scraper is a Winco PDS5 Dough Scraper - Amazon also has them for a bit more if your local restaurant supply store doesn't carry them - $11 for a dozen, $15 for two dozen:
https://www.amazon.com/Winco-12-Piece-P ... B003HEYYDK
Re: SOBX Solo Flats Skiff SK14
Posted: Wed Nov 30, 2016 9:03 am
by BrianC
Are there any tricks for attaching the skeg? Do I need to tab it to the hull with tape on both sides or is a healthy fillet all around sufficient? thanks!
Re: SOBX Solo Flats Skiff SK14
Posted: Wed Nov 30, 2016 9:32 am
by Dougster
Brian, I just glued mine down and nothing else. No fillet. I meant to put a fillet on, but its just an inch high and seems solid so I haven't bothered. Mine is just shy of 6 feet long and 1" by 1". I figured if it comes off (and I notice

) I can just pull her of the trailer on to the grass, roll her over and glue anther one on. Your glass work it neater than mine BTW.
Dougster
Re: SOBX Solo Flats Skiff SK14
Posted: Wed Nov 30, 2016 9:42 am
by BrianC
Thanks Dougster! I modeled the shape of my skeg after yours - tapered down at the front so it doesn't catch on things when beaching and such. I did have to go with softer wood than you used - no ipe to be found at Lowes or Home Depot!
- Brian
Re: SOBX Solo Flats Skiff SK14
Posted: Thu Dec 01, 2016 7:14 pm
by BrianC
The temperature got up to about 70°F today so it was build, build, build!
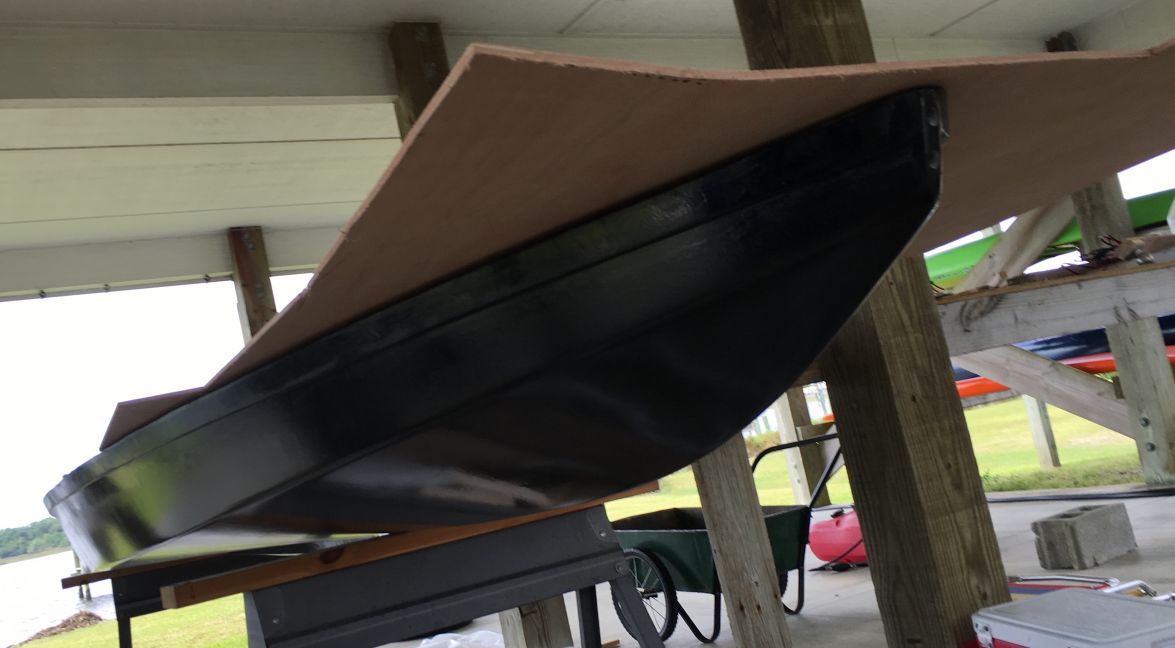
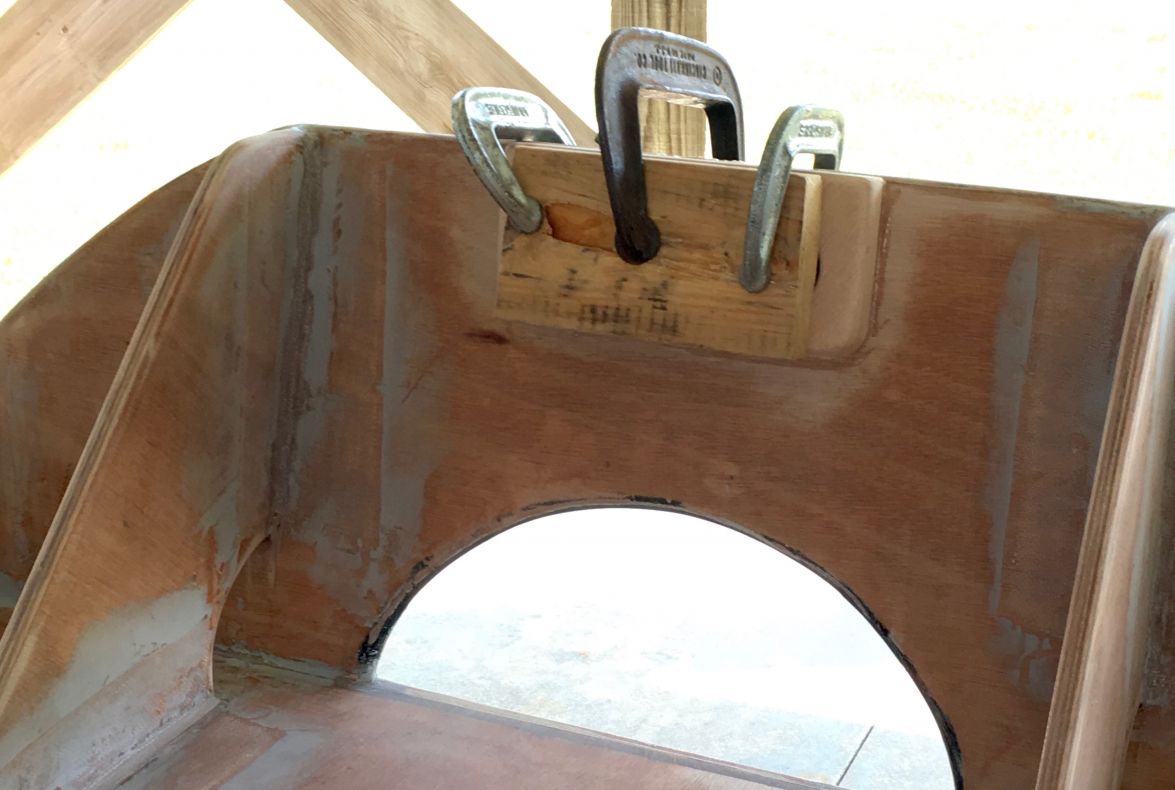
The skeg was cut and the edges were all routed to 1/2" radius. It is just over 6' in length and ends about 18" from the transom. Epoxy + wood flower glue was applied and a few screws were used to hold it in place. After it set, the screws were removed and the holes filled with epoxy + wood flower. I still might still add a piece of 6 oz. tape:
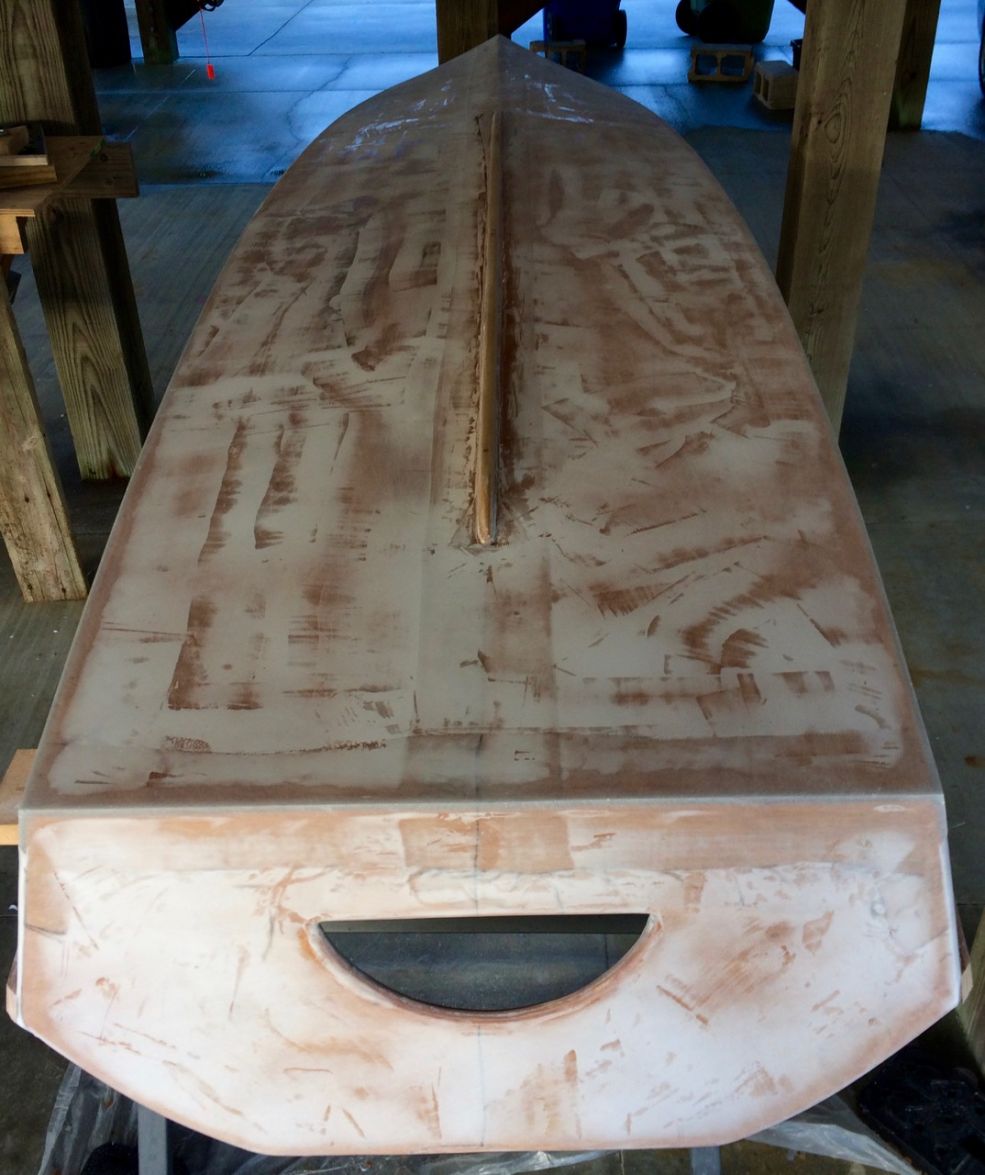
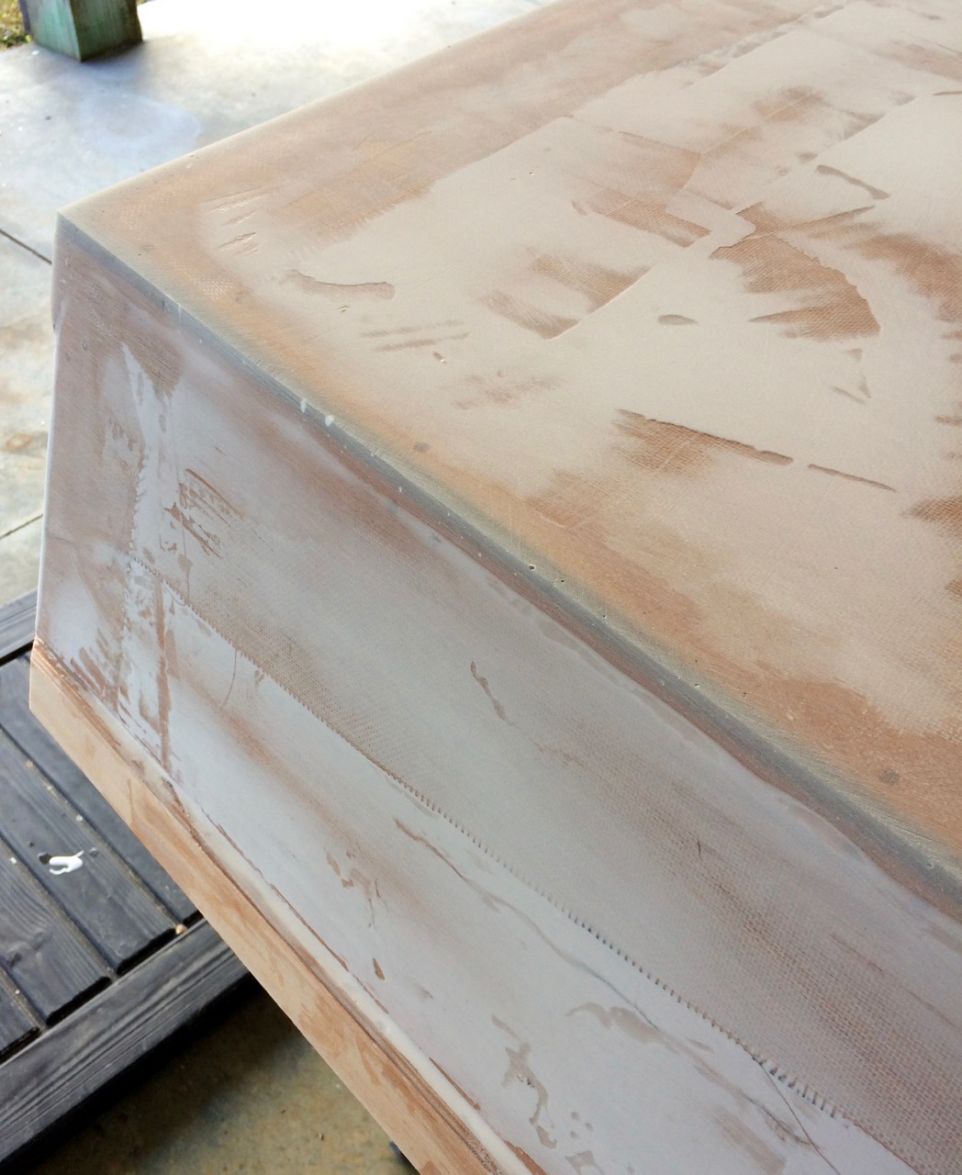
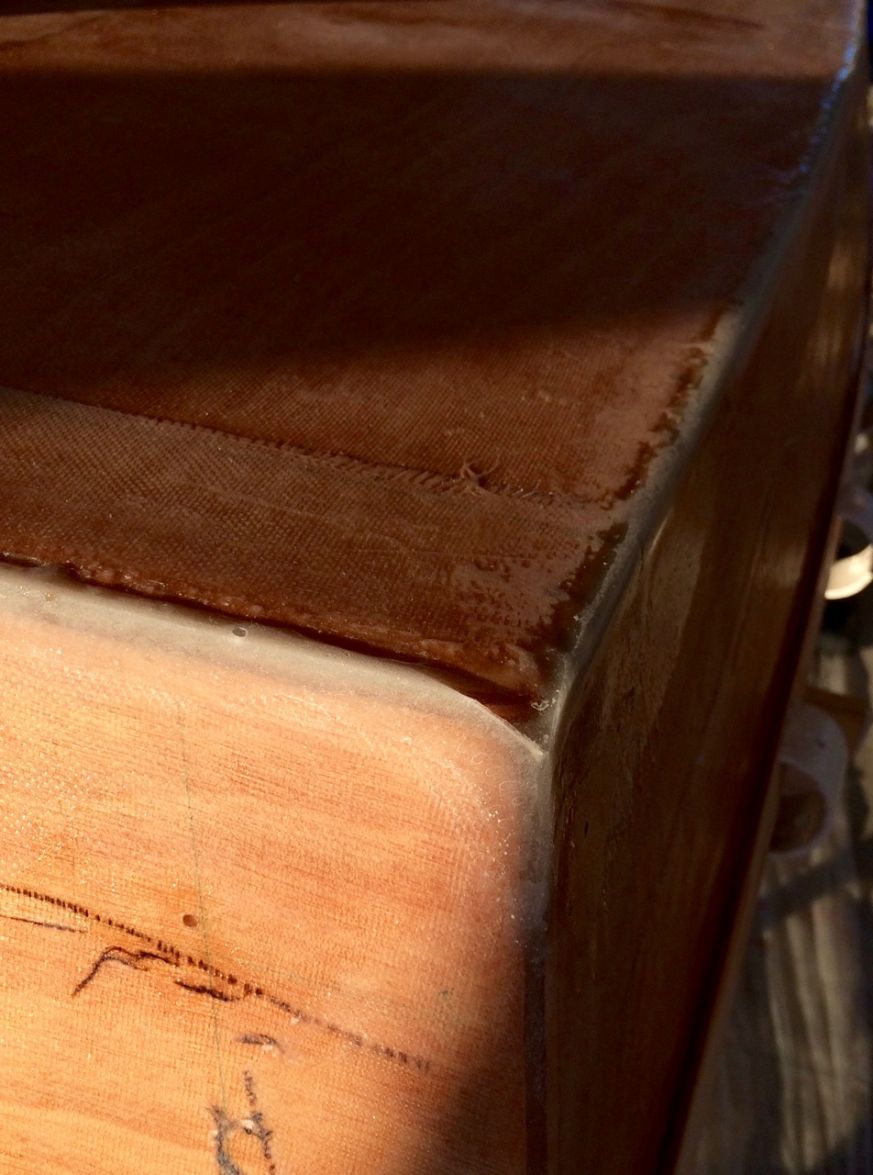
Next up: sharpening the back 6' of the chine and the transom edge. I picked up a few 7' lengths of cheap composite molding at Lowes, covered them in packing tape, and screwed them in place to form dams for a mixture of epoxy + milled fiberglass. After removal of the molding it looks pretty good, although there are still a few holes to be filled - here it is after a quick hit with the RO sander:
The rub rails were cut 1.5" high from 6 mm plywood - there will be two layers total (it will have scuppered inwales also). Then I prepped the surfaces to be glued: a quick sanding and acetone wipe down of the hull followed by a brushed on coat of neat epoxy on both the hull and rub rail. Next, I mixed up some epoxy + wood flower glue, applied it to the rub rail strip and clamped it in place. Since I had to splice together two strips, I made a matching slanted diagonal cut on both pieces. The ends will get trimmed after the clamps come off the second layer. Here are a couple of pictures of the first layer glued and clamped:
I'm getting closer to fairing. Just a few more touch ups to the sharpened edge and a second rub rail layer, then on goes the first layer of fairing gloop!
Re: SOBX Solo Flats Skiff SK14
Posted: Thu Dec 01, 2016 7:36 pm
by Jeff
BrianC, really nice work!! Jeff
Re: SOBX Solo Flats Skiff SK14
Posted: Sun Dec 04, 2016 11:11 am
by BrianC
Just about done with the basic hull build - up next fairing. Using the info here on the forum, I built a fairing board:
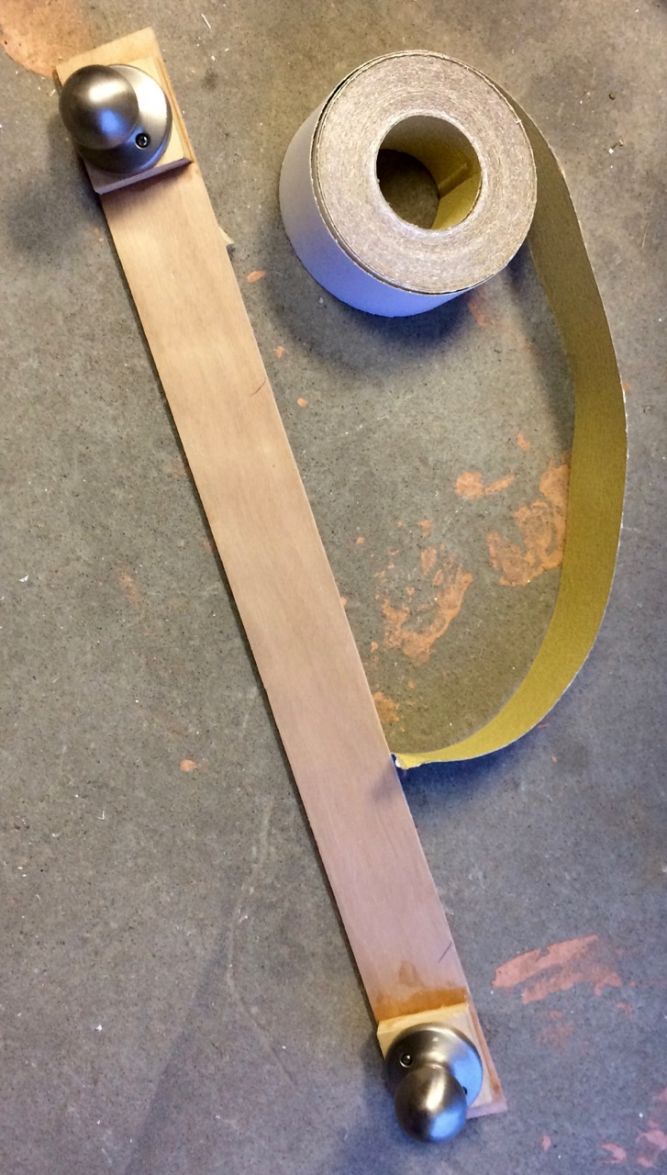
It is about 30" long and 2.75" wide (to match the 80 grit adhesive backed paper). I used the same 6 mm ply as used for the hull. Do I need to stiffen the back or add any curvature, or is it good to go?
Re: SOBX Solo Flats Skiff SK14
Posted: Sun Dec 04, 2016 9:35 pm
by seaslug
Brian, I love the door knob handles for your long board. I made a long board with some plastic handles I had that weren't very sturdy, and I'll definitely make my next one with door knobs. Thanks for showing us that little gem. For your long board you'll want to ditch the plywood and use something rigid and dead straight like a 2"x4" or 1"x4". Most of your long boarding is for the wide flat sections of the hull bottom. I also use a lot of sticky back paper I purchase in rolls of all different grits, sticking it on whatever shaped piece of wood I need for a particular job. I also use those 24"x24" closed cell foam interlocking floor mats used a lot in kids rooms etc., and cut to what ever size I need for a flexible sanding pad. I even have a piece cut in a 6" circle to use with 6" sticky back disks. I use these foam blocks more than anything else for all my shaping and hand sanding.... Keep up the good work. Mike
Re: SOBX Solo Flats Skiff SK14
Posted: Mon Dec 05, 2016 5:52 pm
by BrianC
Mike, the door handles are called dummy door knobs - they are used in closets and such where there isn't a latch. They are just a non-turning knob attached to a plate - this makes them real easy to attach to the board.
Made some progress today. I added some tape to the keg and the first batch of fairing compound is applied:
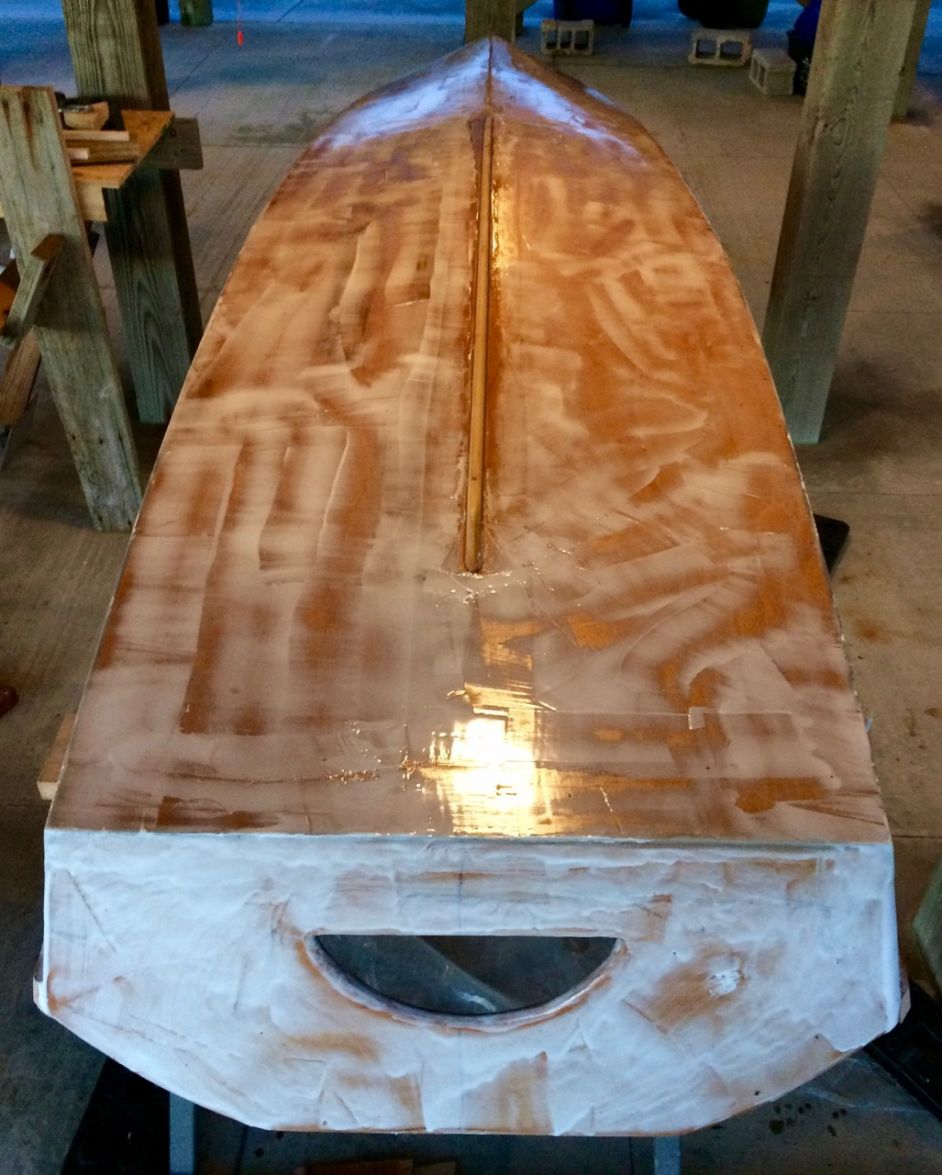
Got some drips on the vertical surfaces. Looks like I either need to add a touch more Cabosil next time around (used about 4 parts glass microspheres to 1 part Cabosil) or mix it a bit thicker:
Good news came in the mail today, my registration arrived:
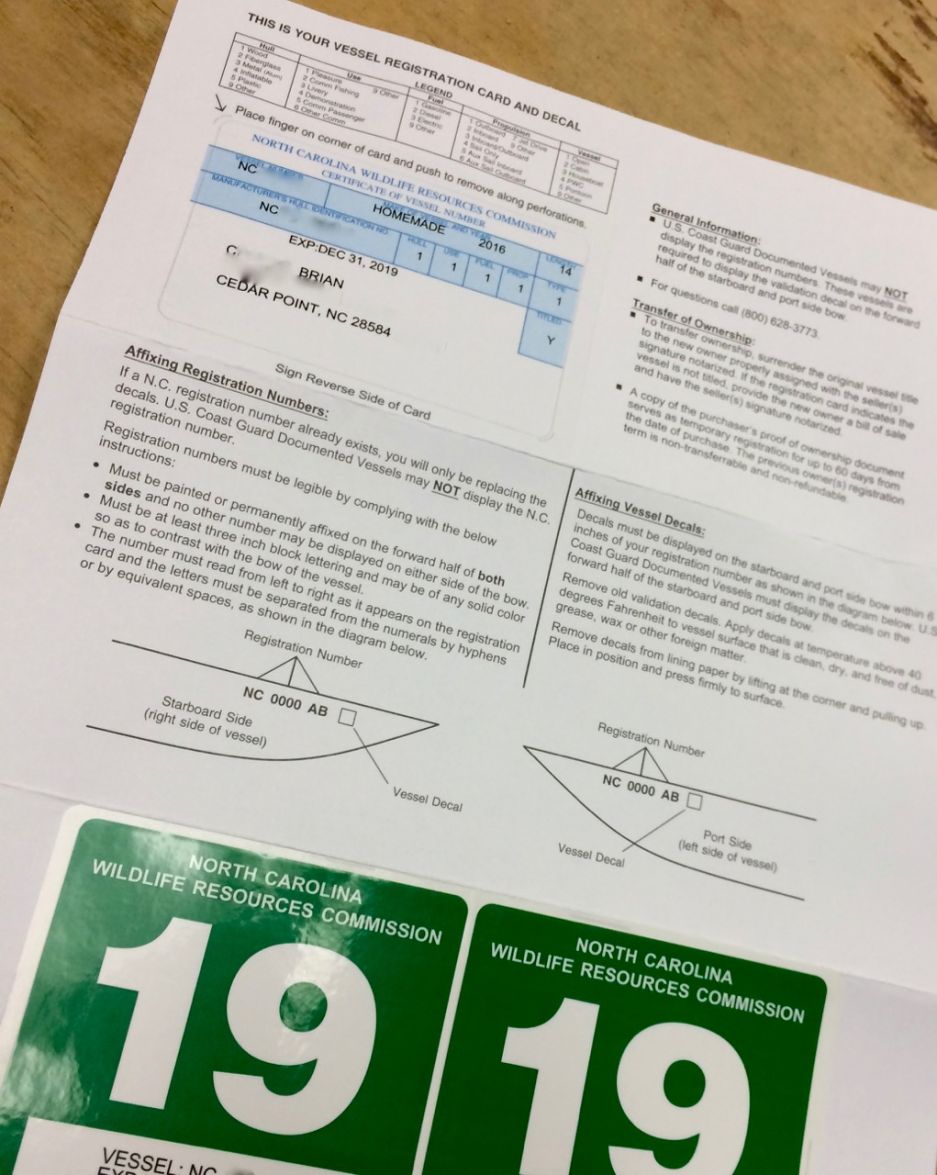
How do people mark the hull ID number? I could use a Sharpie, but that wouldn't look very good!
Re: SOBX Solo Flats Skiff SK14
Posted: Mon Dec 05, 2016 9:49 pm
by Dougster
looking good Brian. I'm about where you are. No time lately, but soon come. I think I look for excuses not to avoid sanding

I used a numbers for the hull from a little decal kit for the purpose from Bass Pro. Easy on.
Dougster
Re: SOBX Solo Flats Skiff SK14
Posted: Tue Dec 06, 2016 5:09 pm
by BrianC
Re: SOBX Solo Flats Skiff SK14
Posted: Tue Dec 06, 2016 7:10 pm
by Jeff
Looking really good Brian!! Jeff
Re: SOBX Solo Flats Skiff SK14
Posted: Fri Dec 09, 2016 10:12 am
by BrianC
Does anyone have any neat tricks for gluing the sole cleats to the hull? The ones on the stringers are easily clamped in place, but I'm scratching my head over how to clamp the ones against the hull. Besides the clamping issue, I assume that I'll need to either shape them or cut lots of notches to get them to follow the curve of the hull.
- Brian
Re: SOBX Solo Flats Skiff SK14
Posted: Fri Dec 09, 2016 10:44 am
by bateau-webmaster
BrianC wrote:Does anyone have any neat tricks for gluing the sole cleats to the hull? The ones on the stringers are easily clamped in place, but I'm scratching my head over how to clamp the ones against the hull. Besides the clamping issue, I assume that I'll need to either shape them or cut lots of notches to get them to follow the curve of the hull.
- Brian
There are a number of methods.
Typically we just either use smaller sections and glue them up individually, or a single longer section of a thinner material, you can also build up in layers in this way.
Re: SOBX Solo Flats Skiff SK14
Posted: Fri Dec 09, 2016 1:38 pm
by seaslug
Brian, I posted an answer earlier, but for some reason some of my posts never show up, and I'm always sure to be logged in. Anyone else ever have this problem? I use clear fur which is very light and flexible and rip into long lengths with the top at 3/4", tapering down at the bottom by ripping at the hull angle so it fits nicely against the hull and the top planes off with the floor frames. I use a multi tool to cut notches in the floor frames and slide the long cleats down into the notches which presses it against the hull. No kerfs necessary, only 2 cleats for the sole and 2 for the deck support, if you have long enough material, otherwise you do it sections. Looks good, locks everything together, and no clamping or bracing. Mike
Re: SOBX Solo Flats Skiff SK14
Posted: Fri Dec 09, 2016 2:20 pm
by Noles309
I used hot glue/glue gun then put a fillet around them. If the hull is curved use short pieces.
Re: SOBX Solo Flats Skiff SK14
Posted: Fri Dec 09, 2016 6:15 pm
by BrianC
Lots of great ideas - that what I like about this forum.
I do like Mike's way, what could be easier:
I use a multi tool to cut notches in the floor frames and slide the long cleats down into the notches which presses it against the hull. No kerfs necessary, only 2 cleats for the sole and 2 for the deck support.
I have a few small sections of cleat and I'll likely use
Noles309's hot melt approach on those.
I also ran across the one on
Mikem59's FS18 Build where he uses pieces of wood clamped near the shear line to hold the cleats in place while glueing -
Re: SOBX Solo Flats Skiff SK14
Posted: Mon Feb 20, 2017 2:20 pm
by BrianC
Another few weeks and I'll be restarting my SK14 build that was put on hold in early December. I haven't decided how to finish the foredeck. I'm building the version with the large foredeck that starts at frame 'B'. Has who has gotten theirs on the water tried standing on the foredeck? Does is stay above water? The engine is about 55 lbs. (Tohatsu 6hp 4-stroke) and I'll be using a 3 gallon tank (another 25 lbs. or so when full).
- Brian
Re: SOBX Solo Flats Skiff SK14
Posted: Wed Apr 26, 2017 3:39 pm
by BrianC
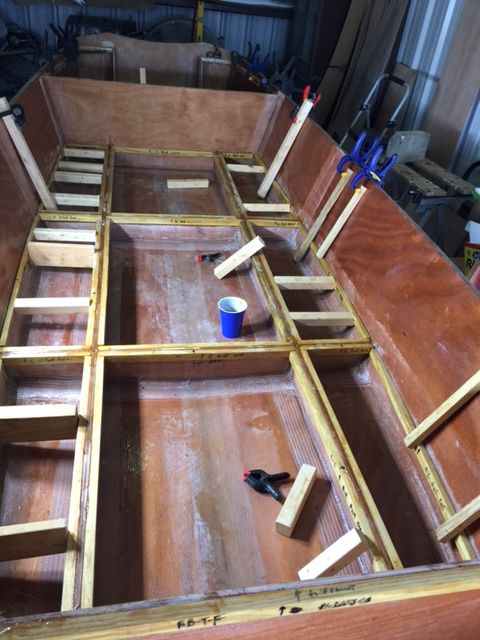
Lots of progress in the last few weeks: epoxy + graphite applied to the bottom; most of the cleats glued in - I used Mikem59's clamping trick to clamp the ones that are against the hull and seaslug's slot cutting technique for the long ones running fore & aft (much better than dealing with all the little segments!):
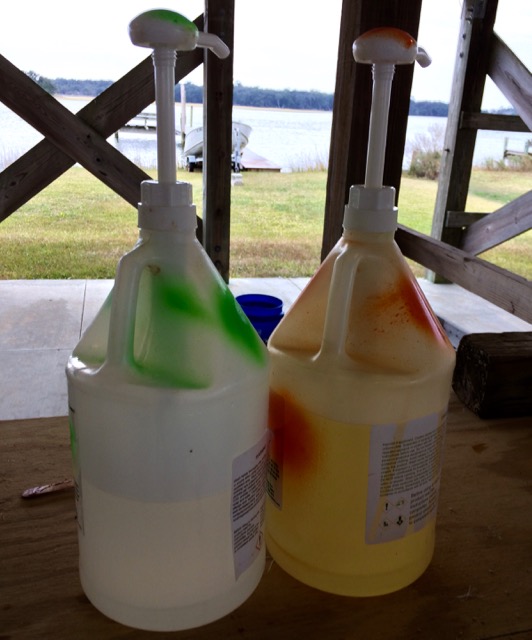
Next up, foam. I'll be using the trick of heating the jugs to 85-95°F by immersing in a hot water filled cooler - from what I've read here that helps insure that the foam fully expands - I've seen lots of build threads where the foam doesn't grow to the expected volume leaving the builder to either buy more or live with a partial fill.
Re: SOBX Solo Flats Skiff SK14
Posted: Wed Apr 26, 2017 3:59 pm
by Jeff
Looks good BrianC!! Also, a really beautiful spot to build a boat!! Jeff
Re: SOBX Solo Flats Skiff SK14
Posted: Wed Apr 26, 2017 7:35 pm
by BrianC
Jeff wrote: ↑Wed Apr 26, 2017 3:59 pm...a really beautiful spot to build a boat!! Jeff
Yes, it is. The water is the ICW, that's
Hammocks Beach State Park in the background and Bogue Inlet beyond that. It does get quite windy at times (it was gusting to 35MPH Monday evening) so I often have to do all the epoxy weighing and mixing of things like wood flower in the shed. I may need to put up some temporary walls for the next build - likely a Panga 22 starting this fall.
Re: SOBX Solo Flats Skiff SK14
Posted: Wed Apr 26, 2017 10:31 pm
by Fuzz
Brian, about heating the foam. You can get it too hot if you are not careful. I let the hockey game distract me and got my water way too hot. When I poured the clear part, system3, into my measuring cup it foamed some on me. I went ahead and mixed the two parts together. It started to foam before I could get it mixed well and it did not expand as it should have. After pouring 10 gallons in the past few weeks I think 85-95f is where you want to be. And be careful opening the jugs after heating as they will be under pressure.
Re: SOBX Solo Flats Skiff SK14
Posted: Thu Apr 27, 2017 10:10 am
by Marshall Moser
BrianC,
You are not far from our vacation house. We have a place at Harker's Island. I'd love to meet up the next time I'm down.
Re: SOBX Solo Flats Skiff SK14
Posted: Mon May 01, 2017 3:47 pm
by BrianC
Marshall Moser wrote: ↑Thu Apr 27, 2017 10:10 am
You are not far from our vacation house. We have a place at Harker's Island. I'd love to meet up the next time I'm down.
We are only here part time as well - now through end of May; then back again in August. Let me know next time you're down this way!
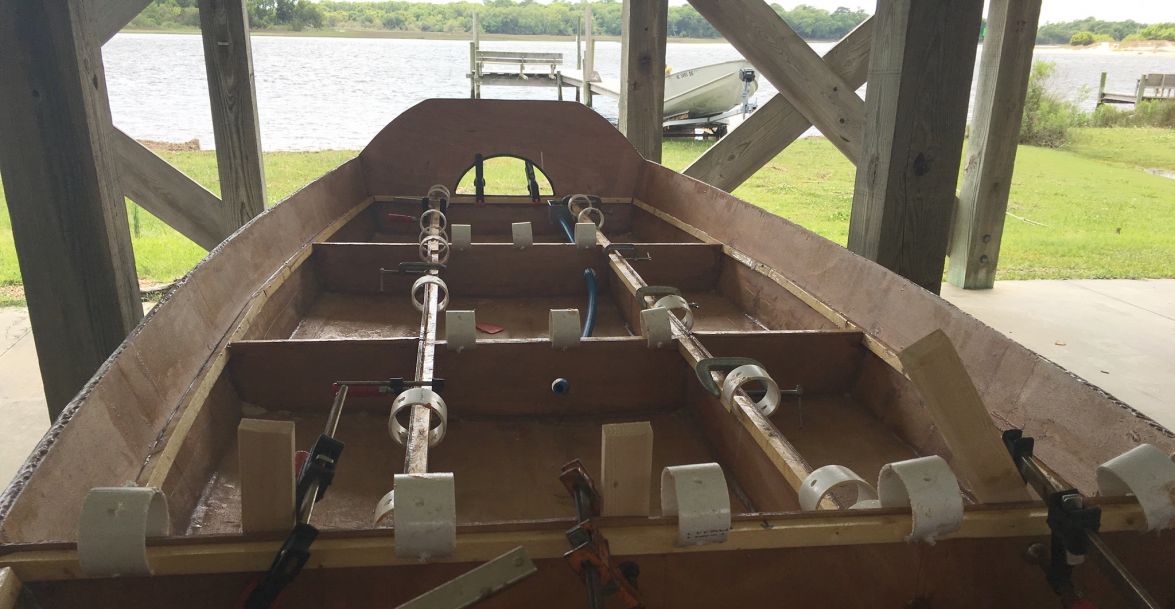
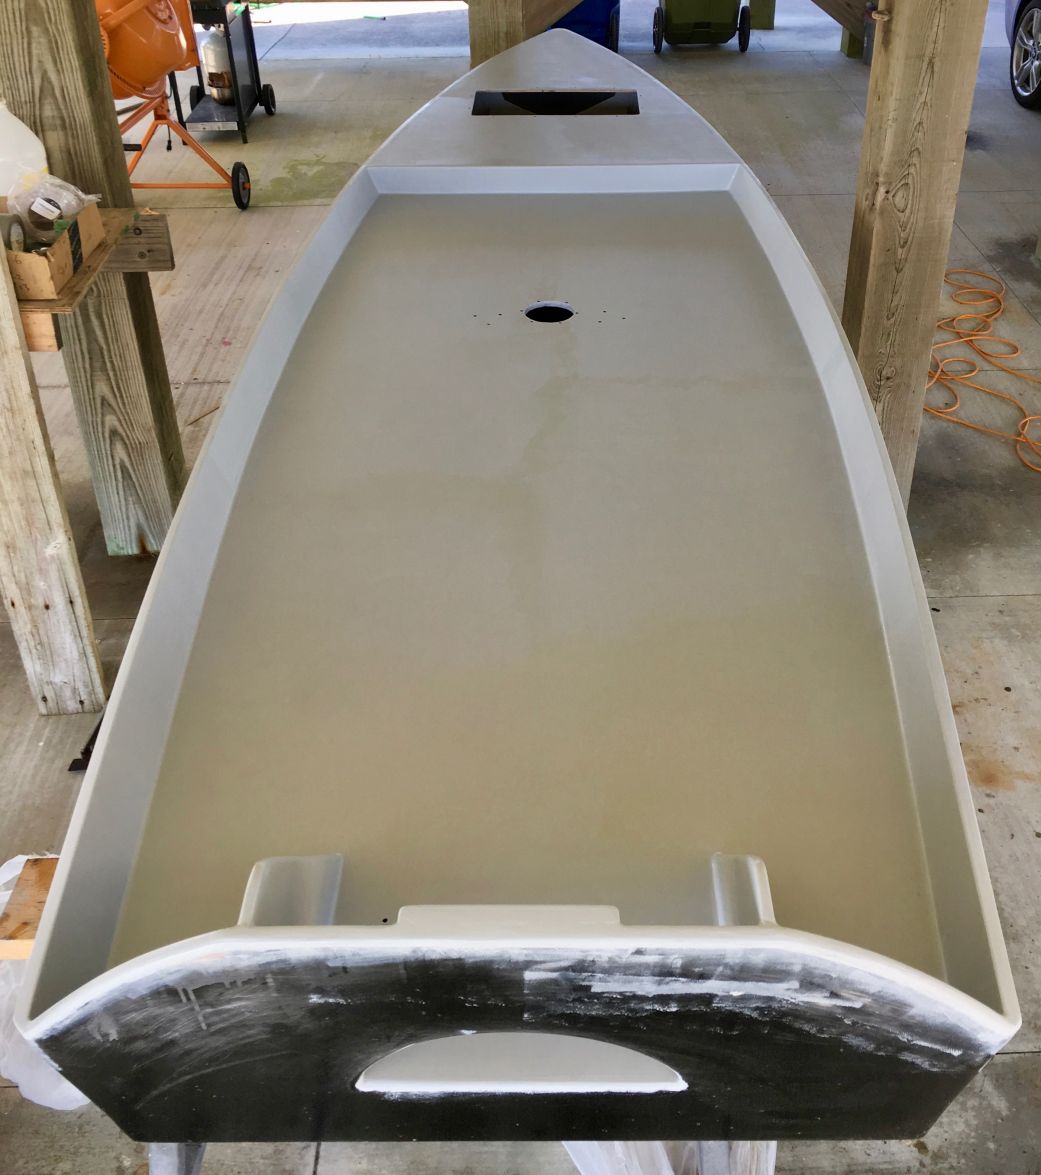
Got the sole put in. Beforehand I cleaned up all the cleats and the glued in doublers and made a few minor adjustments with a sander to make sure the sole goes in flat. Also, rather than using the dimensions in the plans, I went ahead and took the measurements for the sole right off the finished hull. While the differences were only 3-4 mm in places, the fit is better this way:
I gave the underside a good coating of epoxy, applied epoxy glue (epoxy+wood flour to thick ketchup consistency) to the cleats and previously epoxy coated doublers, laid the sole down, and added a bunch of weights centered over either a stringer, doubler, or the cleats along the shear line:
Re: SOBX Solo Flats Skiff SK14
Posted: Mon May 01, 2017 3:56 pm
by BrianC
Fuzz wrote: ↑Wed Apr 26, 2017 10:31 pm
Brian, about heating the foam. You can get it too hot if you are not careful. I let the hockey game distract me and got my water way too hot. When I poured the clear part, system3, into my measuring cup it foamed some on me. I went ahead and mixed the two parts together. It started to foam before I could get it mixed well and it did not expand as it should have. After pouring 10 gallons in the past few weeks I think 85-95f is where you want to be. And be careful opening the jugs after heating as they will be under pressure.
Even though I heated the foam to 95°F, I didn't get the full volume I was expecting on the first sub-sole cavity. For the next cavity, I tried heating it by placing a hair dryer inside the cavity and covering it with a piece of cardboard (it was about 78°F outside). The next pour into the pre-heated cavity went better: a quick pour and then place the cardboard back on to retain as much heat as possible - I got about 80% of the advertised volume. I went with the hair dryer pre-heat on all the others and got pretty consistent results of about 80% of the advertised volume. My guess is that, since the foaming reaction seems to be exothermic, a small volume pour is never going to expand as much as a larger one - the foam just cools off too quickly.
Re: SOBX Solo Flats Skiff SK14
Posted: Mon May 01, 2017 4:10 pm
by pee wee
I did basically the same as you did, I placed an electric space heater in the space to heat things up first. I'm convinced it helped, and I didn't start the boat on fire, so I guess it was a success.
Re: SOBX Solo Flats Skiff SK14
Posted: Mon May 01, 2017 4:29 pm
by Fuzz
When I was pouring foam it was in bigger batches. I am sure that helped. I have noticed the same thing, small batches do not expand at the same rate.
Re: SOBX Solo Flats Skiff SK14
Posted: Mon May 01, 2017 10:39 pm
by BrianC
Next up, the forward deck. The cleats have lots of bend so I cut slots on the side facing the shear. The cleats were glued in so that the upper surface of the deck would be flush with the rub rail. I added a cross brace between frames A and B to support the deck and painted the inside with System 3 epoxy high build primer:
Once again, I took the measurements off the finished hull rather than using the plans. First, I simply placed the chunk of plywood on the hull and traced:
Of course, the tracing is oversized since the deck will drop down inside the hull such that the upper surface is flush with the rails. I measured the distance between the outside of the rub rail to the inside of the hull so that I could mark off the true size of the forward deck:
I then put in a few finish nails and used a batten to trace the outline of the forward deck:
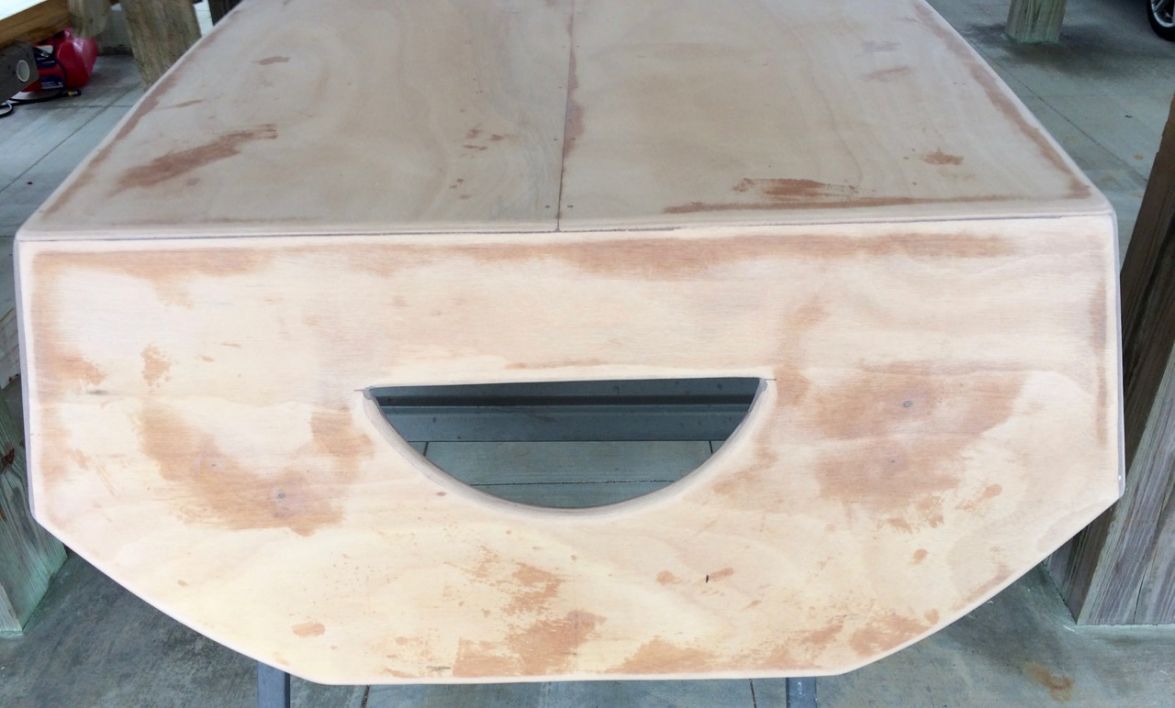
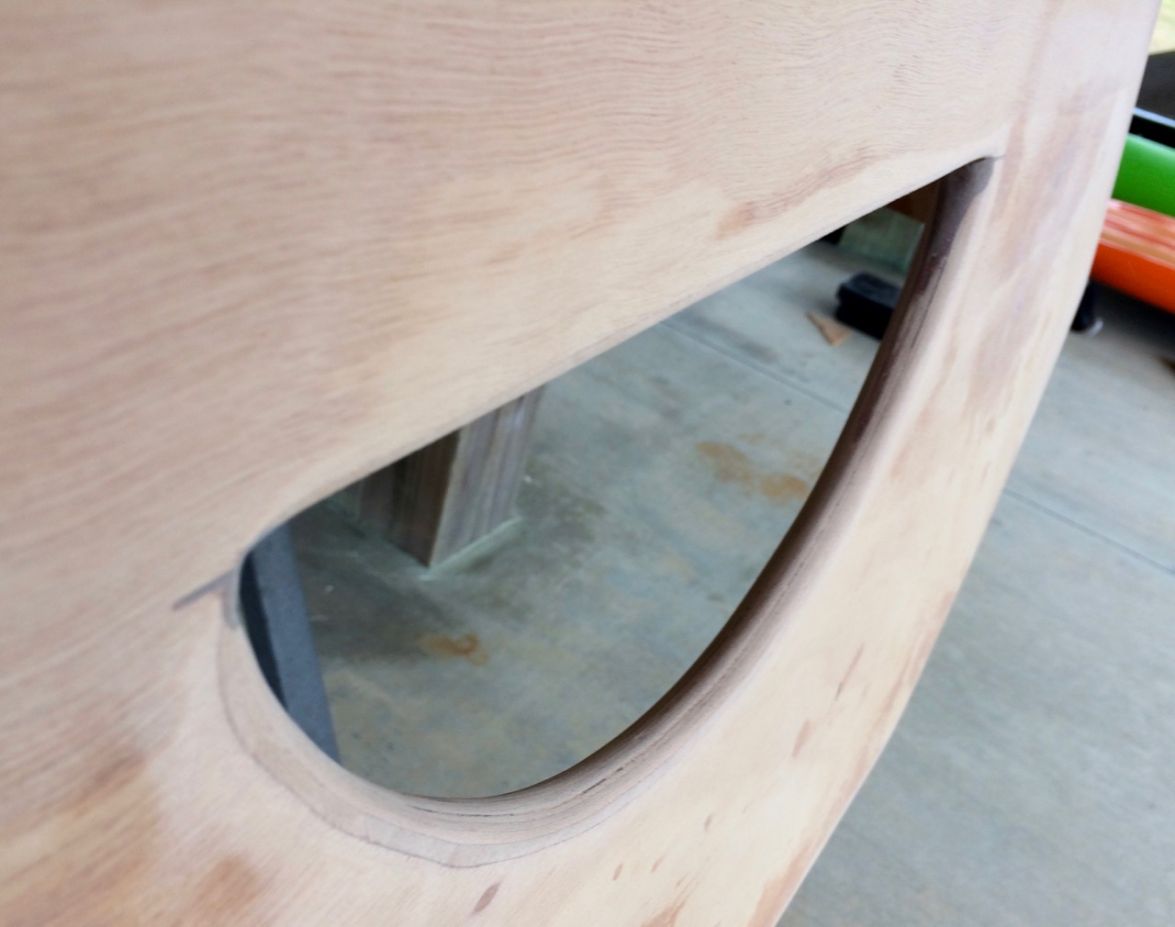
Since there will be a hatch installed between frames A & B, I epoxy glued a few supports on the underside of the deck to give it the needed stiffness - you can also see the cut out for the Tempress hatch:
A few questions:
1) After painting of the last coat of epoxy on the sole and adding the fillet around the margins, how long do I need to wait before applying the System 3 High Build Primer?
2) After applying the System 3 High Build Primer, how long do I need to wait before applying paint? (I'll be using Rust-Oleum Marine Topside)
Re: SOBX Solo Flats Skiff SK14
Posted: Tue May 02, 2017 9:20 am
by Dougster
If the weather is reasonably warm, I'd be willing to put primer on 24 hrs after epoxy, $8 for sure. I'd wait a good week after primer before I'd paint. BTW, those pics sure look familiar (just finished my SK14)
Looks real good.
Dougster
Re: SOBX Solo Flats Skiff SK14
Posted: Sun May 14, 2017 4:24 pm
by BrianC
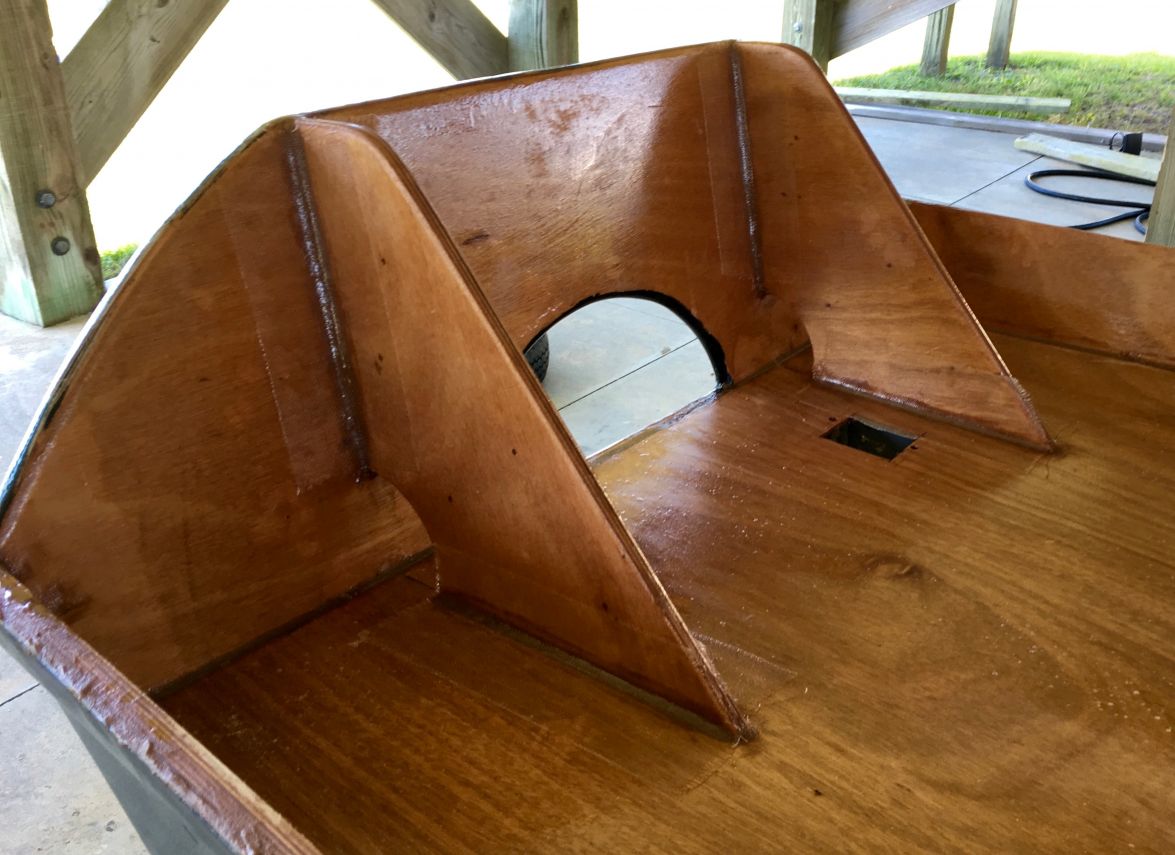
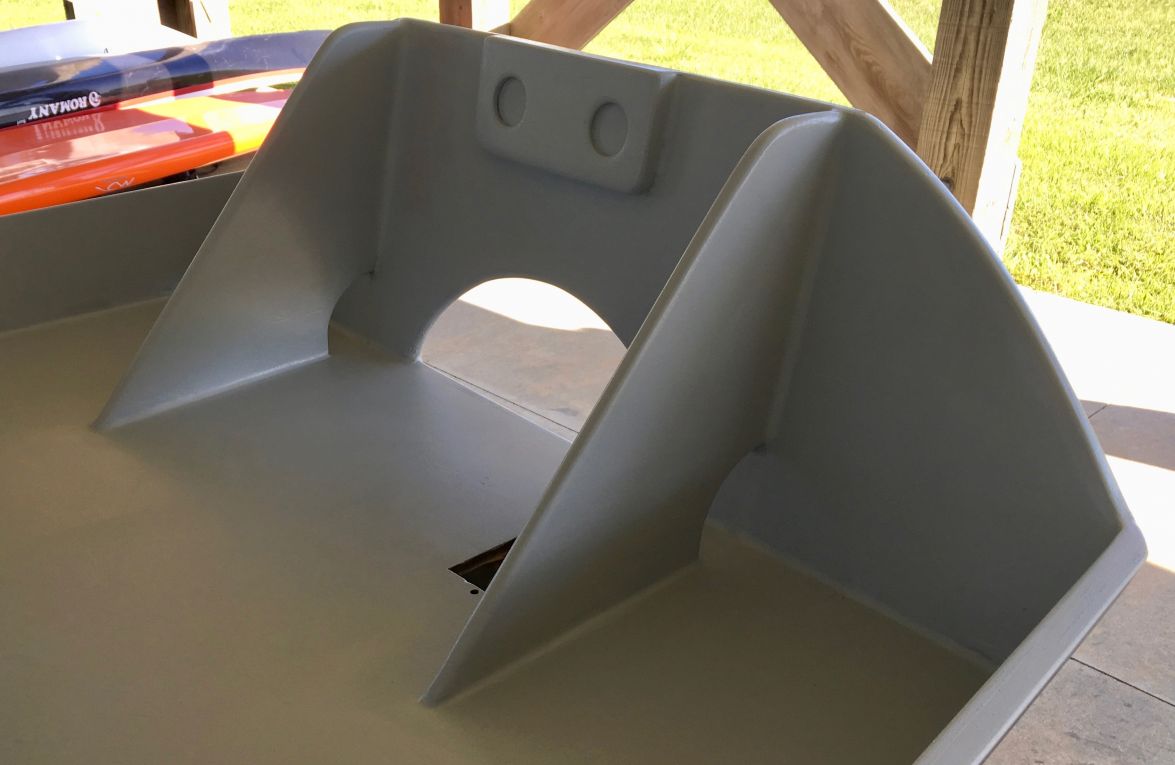
A few major milestones - the knees are glued in and tape [last application of fiberglass!]:
Wet-on-wet when taping over fillets is the only way to go! So much easier to just press the tape into the unset fillet mix - so sanding or other prep of the finished fillet needed.
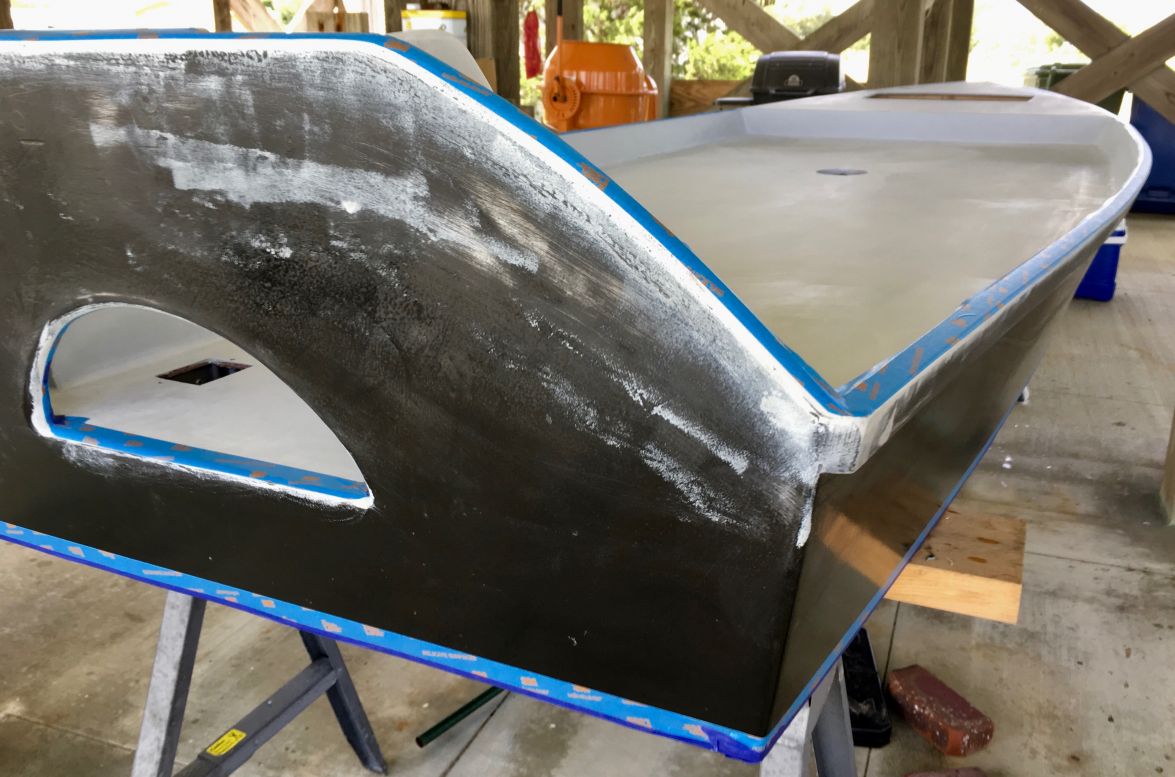
Next up, apply wood flour mix to uneven parts of rub rails - another lesson learned: I should have cut the rub rails strips more evenly to avoid all the sand and fill needed to make the upper surface of the rub rail smooth (next time!). Here it is after sanding the sole, deck, and rub rails - all ready for the final application of fairing mix:
Here it is after the fairing mix is applied [hopefully the last batch I'll need1]:
A close up of the transom:
Next up, fairing, sanding, & priming the inside...
Re: SOBX Solo Flats Skiff SK14
Posted: Sun May 14, 2017 5:41 pm
by BrianC
Quick question - do I need to prime over the graphite epoxy coating on the sides before I apply the top coat paint or just rough up the surface? I'll be painting with Rustoleum topsides if that matters. Thanks!
- Brian
Re: SOBX Solo Flats Skiff SK14
Posted: Mon May 15, 2017 8:51 pm
by BrianC
Got it all sanded today. Ran out of time for primer so that goes on tomorrow.
When test fitting the outboard, I found I needed to add one more part - the clamps on the engine bottom out so I can't get it tight to the transom. I had recalled a rectangular clamping board add on that I saw on Seaslug's
Mike's SK14 build thread. Knocked one out by building up three layers of scrap 6 mm ply - cut holes to match the outboard's clamps in the top layer.
Added a epoxy+wood flour fillet around the clamping board this evening, just a bit of sanding, then primer!
Re: SOBX Solo Flats Skiff SK14
Posted: Tue May 16, 2017 7:08 pm
by BrianC
Topsides all primed - a bit of light sanding with 220 grit tomorrow then the wait...
I might flip and do the outside first, then flip again to do the inside (I suppose I shouldn't get used to the ease of flipping since the next project will just get a single flip!).
Re: SOBX Solo Flats Skiff SK14
Posted: Tue May 16, 2017 7:56 pm
by Jeff
BrianC, she looks really good!! Nice work!! Jeff
Re: SOBX Solo Flats Skiff SK14
Posted: Sat May 27, 2017 6:45 pm
by BrianC
Nixed the flip - it is getting heavy! Taped for painting the sides:
Sides painted, taped and ready to go for the inside painting:
I got one coat on today, another tomorrow. Then assorted hardware gets bolted on...
Re: SOBX Solo Flats Skiff SK14
Posted: Sat May 27, 2017 8:01 pm
by Jeff
Nice Brian!! She is looking great!! Jeff
Re: SOBX Solo Flats Skiff SK14
Posted: Mon May 29, 2017 9:49 pm
by BrianC
Sort of launch today - the outboard had some issues at mid- to full throttle so a couple of short loops at about 1/2 speed then back to shore was it.
[youtube]
https://youtu.be/6mzy_GJCyAI[/youtube]
Re: SOBX Solo Flats Skiff SK14
Posted: Tue May 30, 2017 6:10 am
by Eric1
Congratulations! That's a beautiful skiff!
Re: SOBX Solo Flats Skiff SK14
Posted: Tue May 30, 2017 6:39 am
by cape man
Sweet!
Re: SOBX Solo Flats Skiff SK14
Posted: Tue May 30, 2017 7:47 am
by Jeff
BrianC, Congratulations on the launch!!! Looks like you did great even with all of the boat traffic!! Sorry about the motor but I am sure you will get it right for the next launch!!! Jeff
Re: SOBX Solo Flats Skiff SK14
Posted: Wed May 31, 2017 4:59 pm
by BB Sig
Looks good! You seemed pretty steady after you got on your feet.

Post another video when you get the motor worked out...
Re: SOBX Solo Flats Skiff SK14
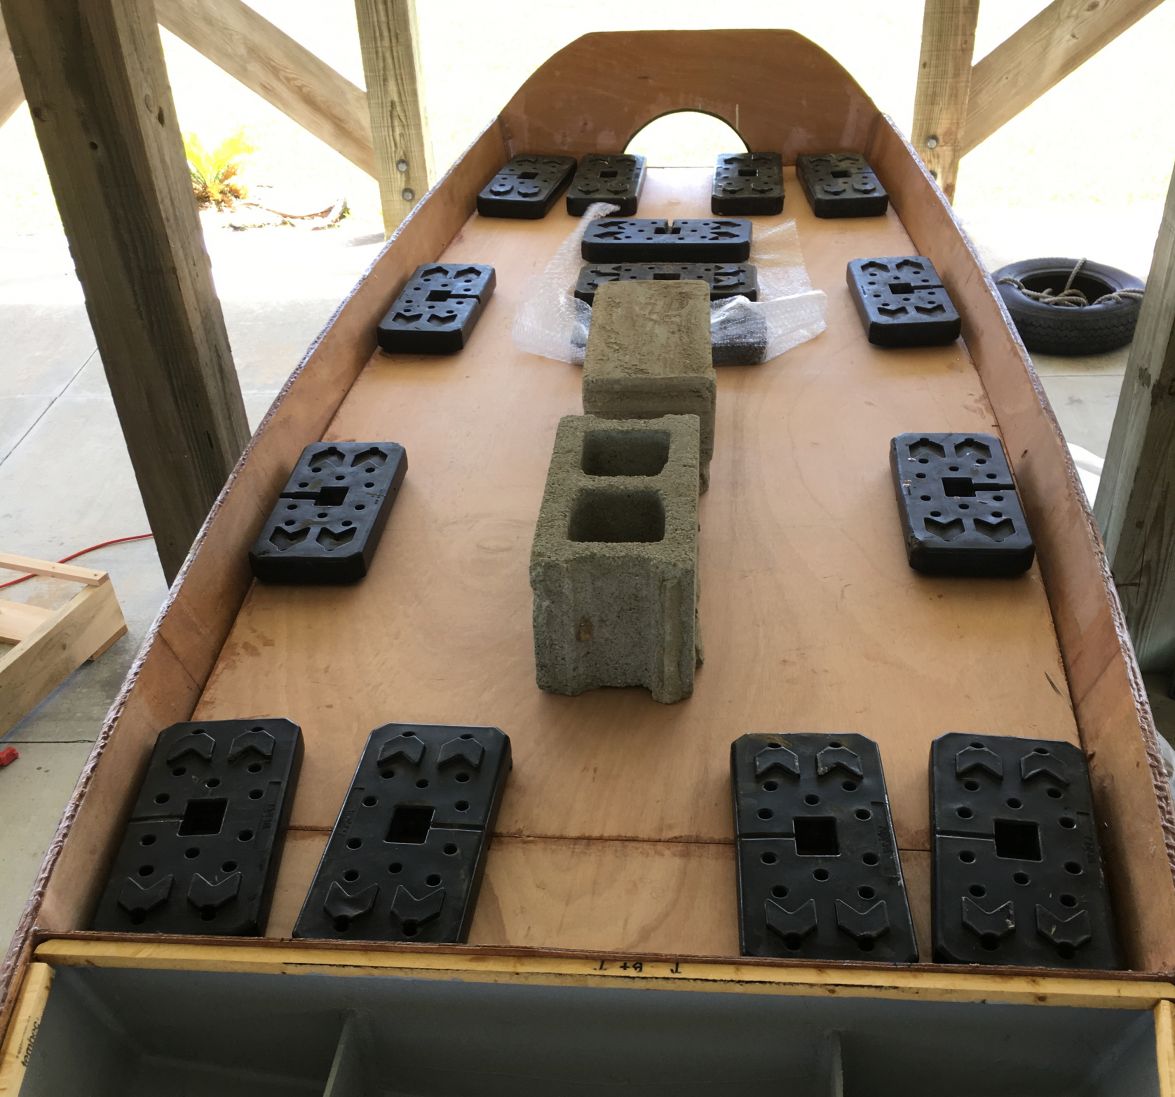
Posted: Tue Apr 30, 2019 1:35 pm
by larryasmin@gmail.com
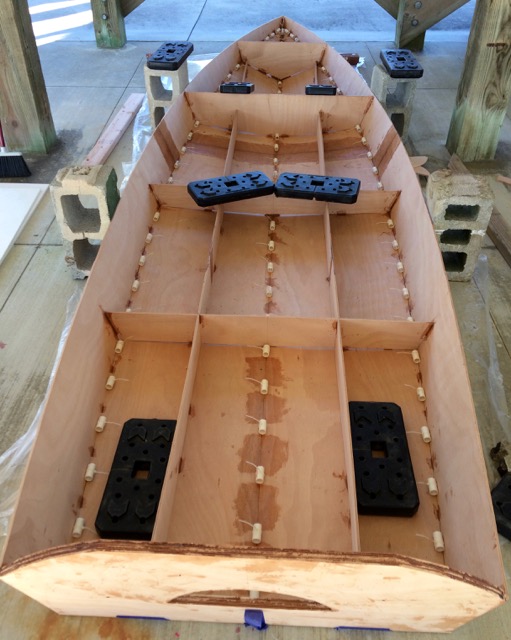
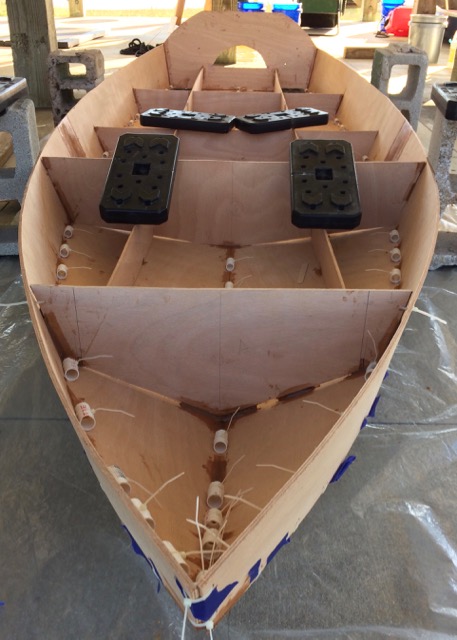
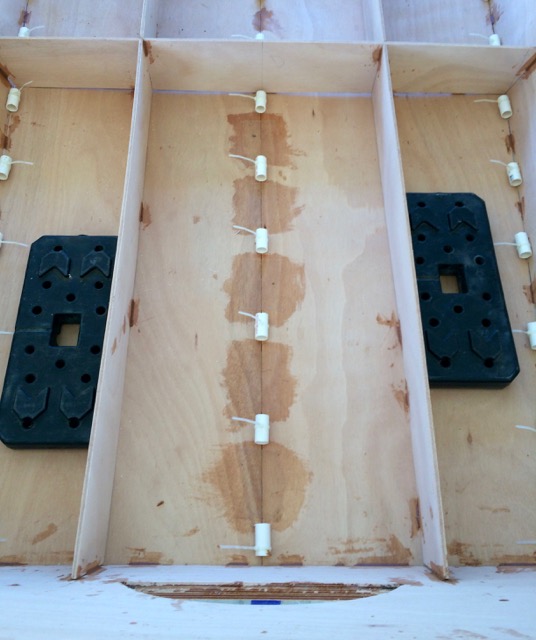
What are those black blocks (I assume some sort of weight) holding the internal frame components in place?
Thanks!
Re: SOBX Solo Flats Skiff SK14
Posted: Tue Apr 30, 2019 9:17 pm
by BrianC
larryasmin@gmail.com wrote: ↑Tue Apr 30, 2019 1:35 pm
What are those black blocks (I assume some sort of weight) holding the internal frame components in place?
Those are weights salvaged from an old weight lifting machine. The plastic covering keeps them from scratching or gouging the wood surface and they interlock so stacking them is easy.