Page 1 of 1
mat australia sk14
Posted: Sat Nov 26, 2016 6:45 pm
by mataus
Well here goes,
After stalking the forum here for a bit over a year, i have decided to start my first build.
I have no previous experience or expertise to get me through so i am hoping this forum will help with the "dumb"
questions.
I live on the Gold Coast in Queensland, Australia. If you have a quick peek at google earth you
will see there is an extended area of inland waterways and canals to explore plus a few dams (lake/impoundments/reserves) locally
I have been looking at different builds and plans and have come up with my list of requirements for my first boat.
1- easy , i have never done anything like this before and i would like to go onto bigger and better things so i didn't want this build to put me off.
2- quick, relatively for the same reasons above i would like to finish it in under 6 months for the same reasons.
3- cheap, relatively as i didn't want to purchase $1000s in timber and resin only to find i couldn't do it or didn't enjoy it.
4 - although this is a trial to see if i enjoy the build process, i didn't want a throw away product at the end that i wounldn't use or be proud of.
5- to be able to stand- there are a lot of good canoe plans, but i was nervous about their stability when standing as i like to fly/lure fish
6- small, for the above reasons of first boat, but i also wanted to power it with an outboard small enough to take off as some of our local dams are electric power only
7- i don't mind if it is trailered or car topped (i have a ute/pickup with roof racks)
So when the sk14 came out it pretty much ticked all the boxes! (i love the look of the fs14 ls and fs18 but one step at a time)
My plan was to keep it simple and stick to the plans. a central grab rail with a tiller extension. if i power it with a outboard under
6hp then the boat doesn't require registration in this state and i don't need to get Australian builders plates.
So wish me luck
ps i will have a play to see if i can get some photos going.
Re: mat australia sk14
Posted: Sat Nov 26, 2016 6:53 pm
by Jeff
mataus, great choice in the SK14!! Great skiff and I think you will really enjoy the SK14!! Jeff
Re: mat australia sk14
Posted: Sat Nov 26, 2016 7:31 pm
by mataus
thanks jeff!
Re: mat australia sk14
Posted: Sat Nov 26, 2016 7:34 pm
by mataus
20161101_212747.jpg
Re: mat australia sk14
Posted: Sat Nov 26, 2016 8:25 pm
by mataus
ok first question.
I have a boat building store about an hour away. I went to buy all the supplies in one go,
however, as a storm started to roll in I elected to not get the timber, as getting it wet was a risk.
This was a couple of weeks ago. Looking at the plans i began to get itchy and wanted to start
but didn't have the time to get back to the boat shop.
I found this local add (warehouse around the corner) with cheap marine ply which meant i could start the build each night
after work. the add read:
"Superior Marine Plywood for all indoor or outdoor applications. Best for Roofing, flooring, boatbuilding, terraces, garden sheds etc. High quality water proof Marine Plywood manufactured to BS 1088. Made with Hardwood Eucalyptus Core and outer Okume African Hardwood veneer in AA Grade both sides, sanded and polished. 3 times hotpressed.Better then any other "normal" plywood. Does not warp, does not shrink and looks beautiful. Made with water proof phenolic glue it is boil and water proof and does not deleminate. We pride ourselves of best quality at unbeatable prices near 50% below normal price"
Now the more I read about ply the more confused i become. I brought 6 sheets of 6 mm as I really wanted to start and it was going to be weeks until i could get back to the boatshop/timber yard. The ply looks great and i can't see many voids (when looking at the cut edges). Doing more reading on the net i have found that to be "Marine" it should be one species of timber

This had me a little worried. i am almost finished cutting the panels so i hope this isn't an issue? I will try to post some photos (trying to figure out how to convert a jpeg to img on a mac/ do i need permission as well?)
Cheers for your help guys
Re: mat australia sk14
Posted: Sat Nov 26, 2016 8:30 pm
by Jeff
Mataus, is the marine plywood you purchased Okoume or Meranti and is it Lloyds Certified? I am sure you can get great Marine Plywood in Australia but there is a lot of Chinese stuff out there so be careful!!!! Jeff
Re: mat australia sk14
Posted: Sat Nov 26, 2016 8:46 pm
by BrianC
The BS1088 is a good start, if the plywood has a stamp or label post a picture.
Re: mat australia sk14
Posted: Sat Nov 26, 2016 9:09 pm
by mataus
Im thinking this is the Chinese import stuff.
I have only one sheet intact and i can't find stamps or stickers.
the add says made TO standard but that doesn't mean its has been checked and approved.
"Hardwood Eucalyptus Core and outer Okume African Hardwood veneer in AA Grade both sides"
What i was wondering is if it is cheap Chinese import is this a problem on a small boat?
is there a test i can do to test strength etc? I was going to do the heavy duty taped/reinforced version will this help?
I am still working on the photo uploads (just downloaded photo bucket)
Re: mat australia sk14
Posted: Sat Nov 26, 2016 9:23 pm
by mataus
Re: mat australia sk14
Posted: Sat Nov 26, 2016 9:24 pm
by narfi
If you click on the 'Attachments" tab below where you post, you can just attach your images here without worrying about figuring out how to go through a 3rd party host.
Re: mat australia sk14
Posted: Sat Nov 26, 2016 9:25 pm
by mataus
it not a photo in the post, but i think that link allows people to look at the photos i have taken so far
Re: mat australia sk14
Posted: Sat Nov 26, 2016 9:27 pm
by mataus
ERROR
Sorry, the board attachment quota has been reached.
is what comes up if i attach them direct to the post
Re: mat australia sk14
Posted: Sat Nov 26, 2016 11:49 pm
by BrianC
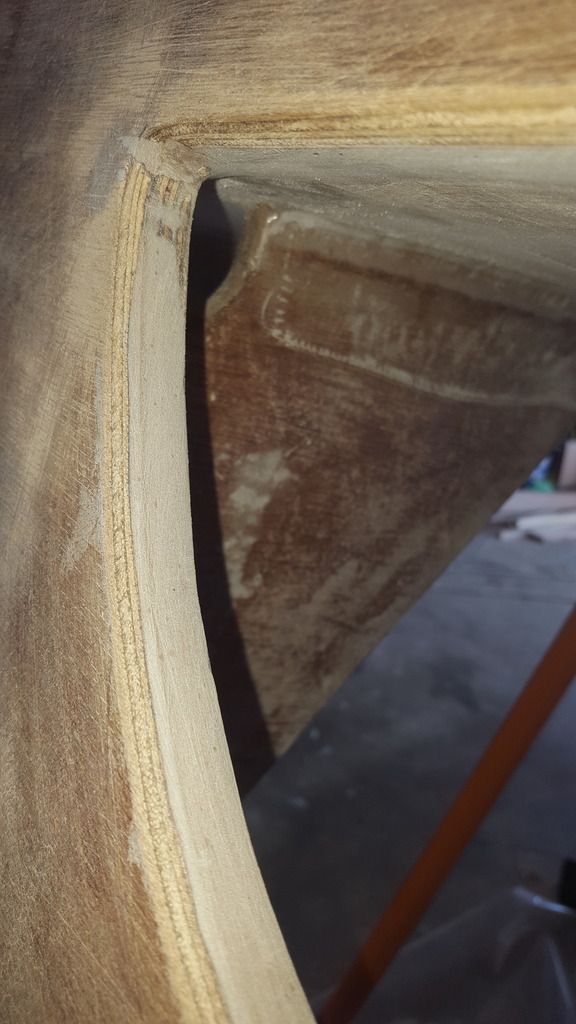
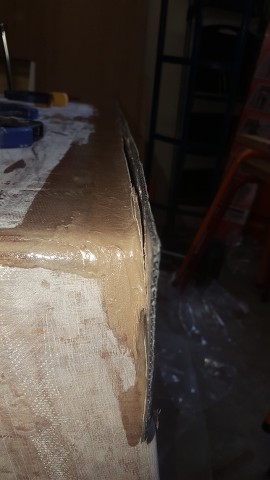
From your pictures it looks like your plywood is 3 ply - most 6 mm marine BS1088 plywood is 5 ply. The picture below is the rounded edge near the transom on my SK14 build:
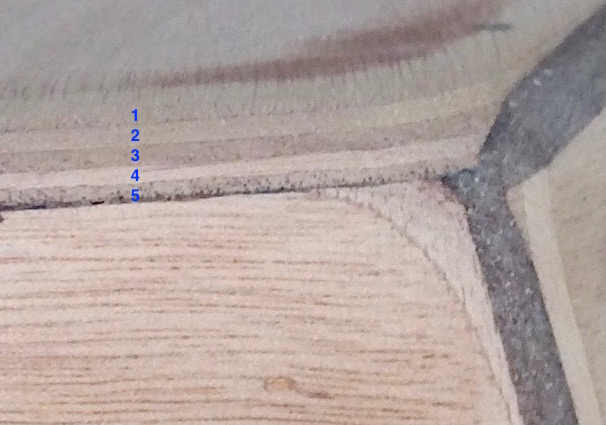
The surface veneer looks good though - I'd suggest doing the boil test to be sure that the glue is going to hold up: take a small piece and boil it for a while; if it holds together the glue is good. If it passes, I'd suggest giving all edges a good coating of epoxy before assembly. Also fill and edge exposed voids with epoxy+wood flour mix. Others with more experience might have other suggested corrective actions.
Re: mat australia sk14
Posted: Sun Nov 27, 2016 7:31 am
by mataus
Thanks Brian C
Thats the sort of info I was after.
My initial thoughts were, this is just a trial and it is only little in terms of time and money so if it didn't work...
lesson learnt. But I am really enjoying the build (I know only early days, i have not had to sand anything yet)
and i am getting "attached" even though its just a pile of timber bits at the moment. My next thought was
turf it all, wait until i get back to the boat shop and buy the expensive stuff. I have cut all the panels and now
spliced half of the long panels, so if the brains trust of the forum thinks it would be ok then i will probably push on.
I was thinking of taping all seams, and glassing with 6oz the interior as well. I know this will add weight but increase strength also (?).
the epoxy system these guys sell also have a additive that is added to first lot of epoxy applied to get better penetration into the timber so I was going to do this as well.
looks like i will be boiling wood after work tomorrow night!
Thanks again guys
Re: mat australia sk14
Posted: Sun Nov 27, 2016 8:33 am
by Tungsten
Ive never seen or read about any epoxy that has an "additive", this most likely is a solvent such as xylene.
None of the quality epoxy's over here recommend adding thinners.
Re: mat australia sk14
Posted: Wed Nov 30, 2016 7:04 am
by mataus
Hey Tungsten,
I have not heard about any so this is all new to me.
I looked up the product and it said:
"(product x ) is a thin epoxy liquid which reacts with (marine epoxy name) to reduce its viscosity. This enables it to penetrate deeply into a timber surface...................... (product x) is not a solvent and does not evaporate, as such liquids can leave a porous layer which would permit easy penetration of water."
There are a couple of other unusual things about this product like the mixing ratios.
I picked this epoxy system not as an informed decision but as it is the system of the local guys (about an hours drive away) and as it is a boat building shop it is a one stop for me and they have plenty of helpful info.
Using different products has been raising some concerns for me, even before i start making mistakes! If I lived in the states I would have loved to do a kit for the first time round. Cost of goods and shipping is a killer down here.
All the panels are now spliced and I should get some time to start stitching this weekend. I s it recommended to sand the epoxy splice or put it on the inside then most of it is out of sight?
Re: mat australia sk14
Posted: Wed Nov 30, 2016 8:02 am
by Tungsten
Well if its tried and tested then your good.Generally the part A is pretty consistent the part B can differ greatly in color and viscosity between brands.
Re: mat australia sk14
Posted: Sat Dec 17, 2016 8:09 am
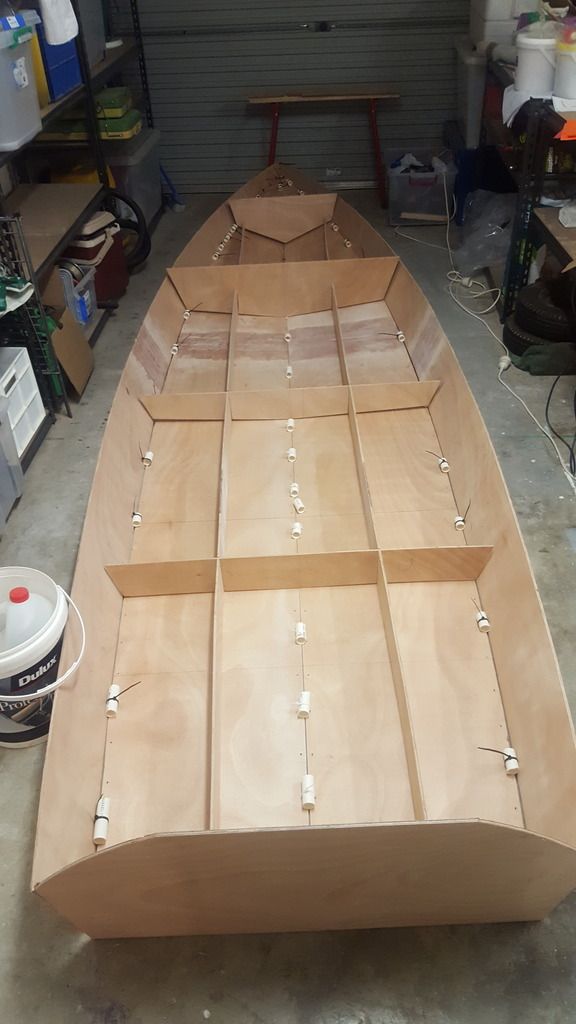
by mataus
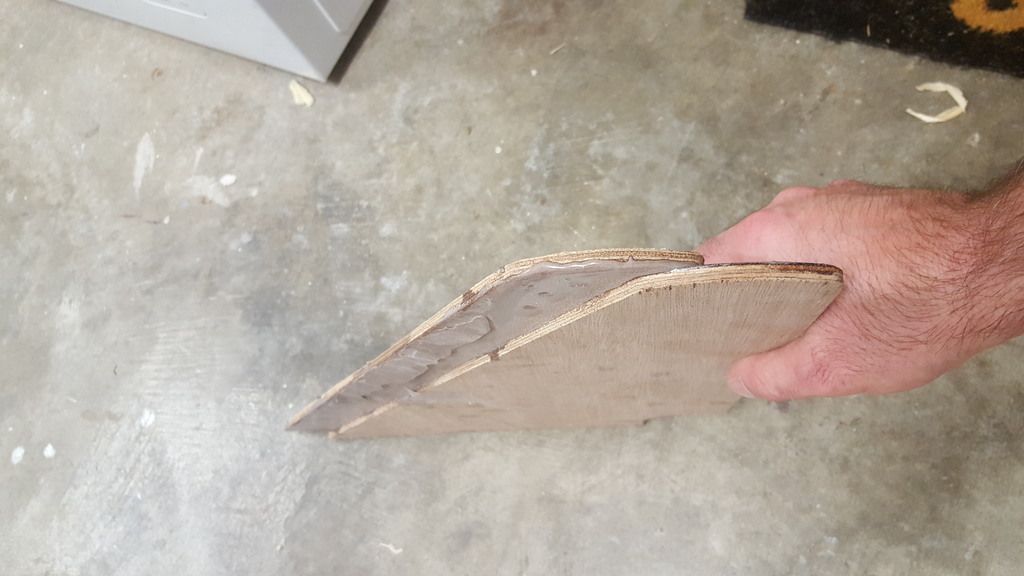
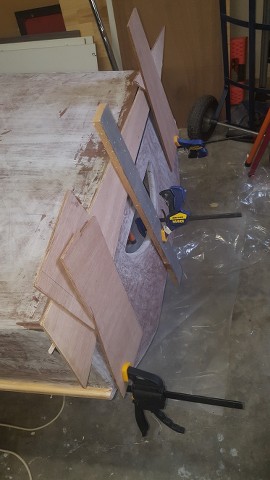
I have been pottering in the shed of a night. It is starting to look like a boat, the process of stitching is very rewarding. it is like the first time you see one of those 3d pictures when you are staring and staring then the picture jumps out at you.
Brian C. I boiled some timber. I brought the water to boil then put a couple of small pieces in after 3o mins if boiling i could get the 2 outer layers off by running a scalpel under them but the 3 inner layer were breaking before the glue would give. I am not sure if this is a pass or not.(?)
Unless the knowledge base here tells me otherwise I think I will proceed forward.
I will leave a link to a photo of where i am upto. Next I will laminate/glue the transom then hopefully sunday afternoon spot glue between the sutures.
mat
Re: mat australia sk14
Posted: Sat Dec 17, 2016 8:11 am
by mataus
Re: mat australia sk14
Posted: Sat Dec 17, 2016 2:16 pm
by Fuzz
Real clean and neat looking work there Mat. I do have one question. Are there gaps between the panels for the glue? It looks like you did such a good job cutting out the parts that there is no gap.
Re: mat australia sk14
Posted: Sat Dec 17, 2016 3:40 pm
by jacquesmm
mataus wrote: . . .
Brian C. I boiled some timber. I brought the water to boil then put a couple of small pieces in after 3o mins if boiling i could get the 2 outer layers off by running a scalpel under them but the 3 inner layer were breaking before the glue would give. I am not sure if this is a pass or not.(?)
If it delaminates, it is not adequate for boat building.
Re: mat australia sk14
Posted: Sun Dec 18, 2016 2:39 am
by mataus
Thanks guys,
This timber thing has been playing on my mind so I will just turf it and start again.
Fuzz, yes there are gaps but it is pretty tight on the keel.
If I buy 6 new sheets should i remeasure and cut or should i use the old panels as templates and just trace around??
Re: mat australia sk14
Posted: Sun Dec 18, 2016 3:23 am
by Fuzz
Your panels look so good I would use them as templates. If you do not think you have enough gap a sander would cure that quickly. I think you are making a good move to get new wood. No reason to use less than top quality on one of the few places you can not replace.
Re: mat australia sk14
Posted: Wed Jan 11, 2017 8:08 am
by BarraMan
Mateus, look at the AS2722 Hoop pine Marine ply from Boatcraft Pacific in Brisbane. Just Google the name. They will ship to the Gold Coast.
Cheers
Lee
Re: mat australia sk14
Posted: Sun Jan 15, 2017 5:30 am
by mataus
Hey Lee,
Boatcraft Pacific are the guys that I am using for all my gear. The problem was, that a storm was brewing when I first went up to pick up my materials. This is why i didn't originally get the timber that day. As Its only an hour away I didn't get it shipped i just drove my ute (pick up) up. Then I got impatient and wanted to start, that is is when o sourced some ply locally. I have since been back up and brought timber off those guys it has put me a few weeks back and cost a small amount, but I don't think it was a complete waste, as the second time round everything was significantly better. I am currently in the process of pulling the sutures and sanding the spot welds. I think I read in your thread somewhere you are a vet. Is this correct and are you still practicing? I love your thread it is one main reasons I have started this project. Can I enquire about the process of getting the builders plate for rego on your boat? I will need plates if the sk14 has a outboard larger than a 4hp (need to check this).
Thanks for the help mate
mat.
Re: mat australia sk14
Posted: Sun Jan 22, 2017 3:05 pm
by WHP
hi Mat , i live on the sunshine coast,Caloundra, building FL 14 almost finished . I have a 6 Hp motor . You don't need the VN plate because you build it your self, called QLD transport and motoring . fill out the form pay your money and thats it.
Re: mat australia sk14
Posted: Sat Mar 18, 2017 5:15 am
by mataus
Hey guys,
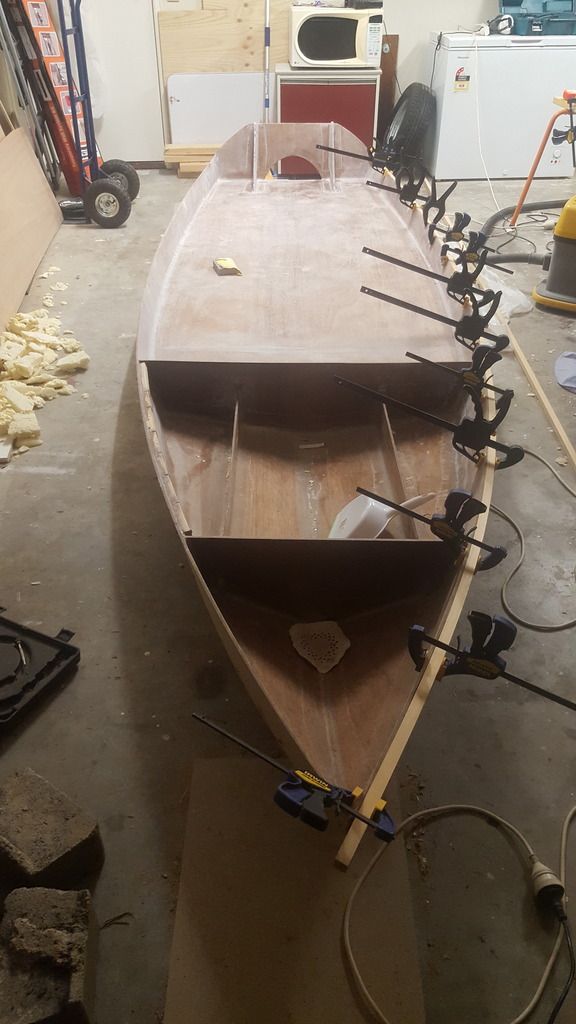
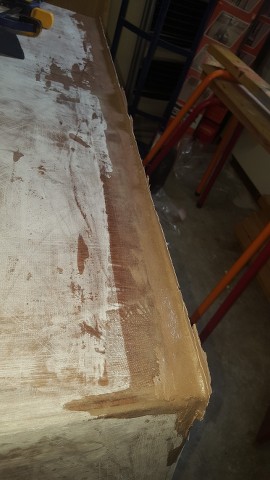
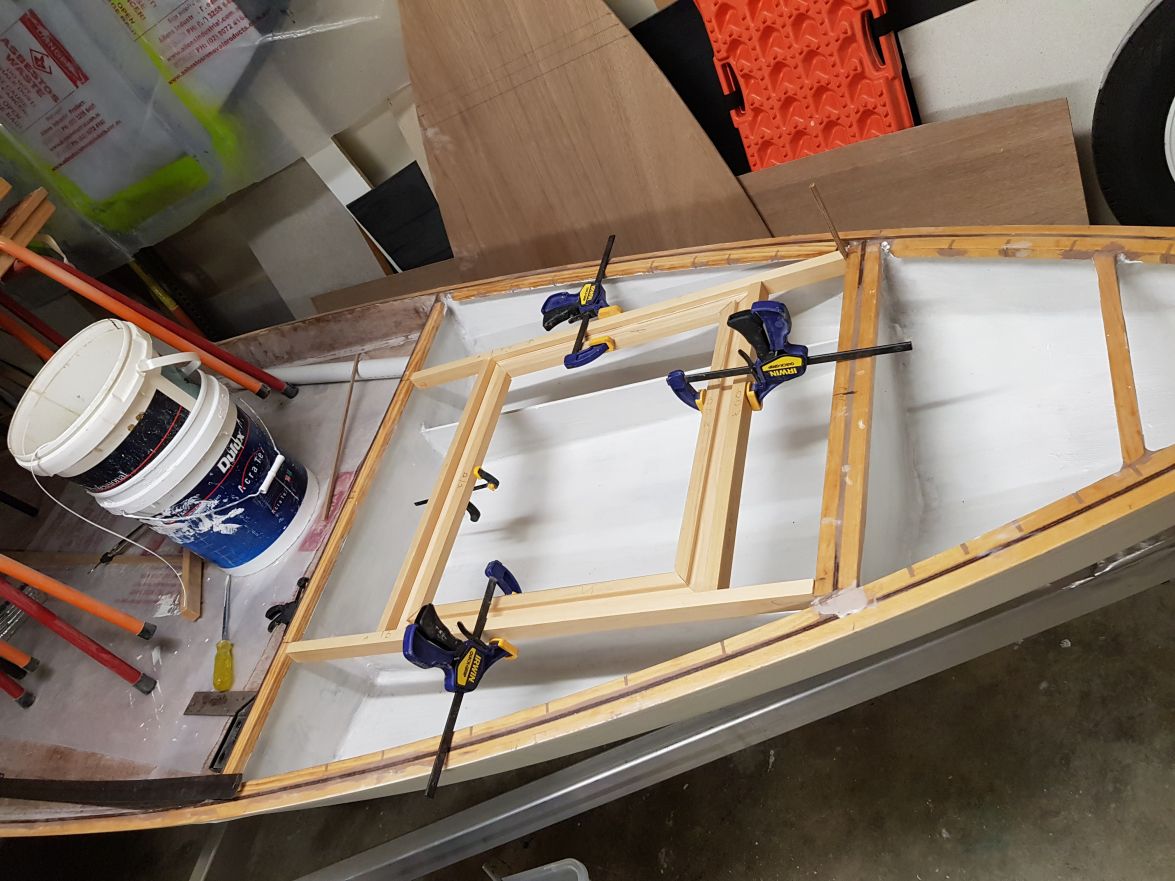
I am still plugging away. I am not the fastest builder but i am enjoying it. I have finished filleting (and often taping. I know probably more than needed,i put tape on more than just the keel internally) and epoxying the inside (see photo attached). This weekend I am sanding with 60grit in area that are already epoxied and attaching the cleats for the sole to lie on. I am not sure If i will use an elaberate clamp system or hot glue for the lateral cleats and the ones against the transom and bulkhead b.
I have seen a 8 hp honda second hand on "gumtree" (like craigslist in the usa) for what i thought was a good price. I saw the youtube video with the 8hp 2stroke yamaha from skiff life and it looked good. 8 is listed as the strongest output for an outboard, but, the weight of 42kg worried me on such a small boat (2stroke 8hp yamaha is 26kg i think from memory). the 6hp in varies brand drop down to single cylinder and about 28kg depending on brand. I don't want a speed boat but i do want it to easily plane and i do plan on covering some larger bodies of water. My lack of experience/competence makes me think that my boat will be heavy then specified in the notes so i was leaning towards a 6 or 8.
I was just wondering what the smarter people on this forums thoughts were?
Re: mat australia sk14
Posted: Sat Mar 18, 2017 5:17 am
by mataus
Re: mat australia sk14
Posted: Sat Mar 18, 2017 7:23 am
by Eric1
Looking great!
Re: mat australia sk14
Posted: Sun Mar 19, 2017 6:25 am
by nev
Hi Matt, i wouldnt go for the honda, there are heavy and dont rev out like the 2 strokes. I dont think you would want over 30 kg on the back of these little boats. I am happy with a 5hp 20kg 2stroke on mine. Have tried a couple of larger motors that i own but the 5 suits me better, plus no need for rego in nsw for a 5hp. If you really want power the 9.8hp tohatsu 2 stroke is only 26 kg and are a great little motor, allways a few second hand around. Power to weight is what its all about with small boats.These are top little boats for us in Australia, have fun with it. Nev
Re: mat australia sk14
Posted: Tue Mar 21, 2017 6:45 am
by mataus
Hey Nev,
Thanks for the info mate. I checked the qld transport info and it says 3kw (4hp) or over needs rego. I have thought of keeping it as an electric boat
as we have two local dams that are electric only (Hinge and Carrie hall). I have a 54b transom mount already and a 100amp/hr deep cycle. I priced the torqeedo on the weekend but they are out of my price range. living on the gold coast there are lots of protected waterways that is why i started to lean towards petrol. I was thinking a 5 or 6 hp (2 or 4s) as 2 other dams are 4s only (Wivenhoe and Lenthalls) i liked this option. At this horsepower the 6s are about the same price and weight the 2strokes , but are 2 cylinders instead of 1. It would be nice to be able to try 2 or 3 different options prior to purchase. I would not go over the rec 8hp even though i know they are the same block in many brand as higher output motors.
Nev with the 5 does the sk14 plane easy? Do you have any sort of performance figures?
Last year I put decks in a 3.75 v- nose aluminium punt. it has a 15hp usa built mercury 2 stroke. I was great with 1 or 2 up pre decks. now its great with 1 but with 2 guys and gear it really struggles. So although i don't want a speed boat i guess i am worried about the weight of my build and i don't want to repeat this issue.
Thank again mate.
Re: mat australia sk14
Posted: Fri May 26, 2017 8:11 am
by mataus
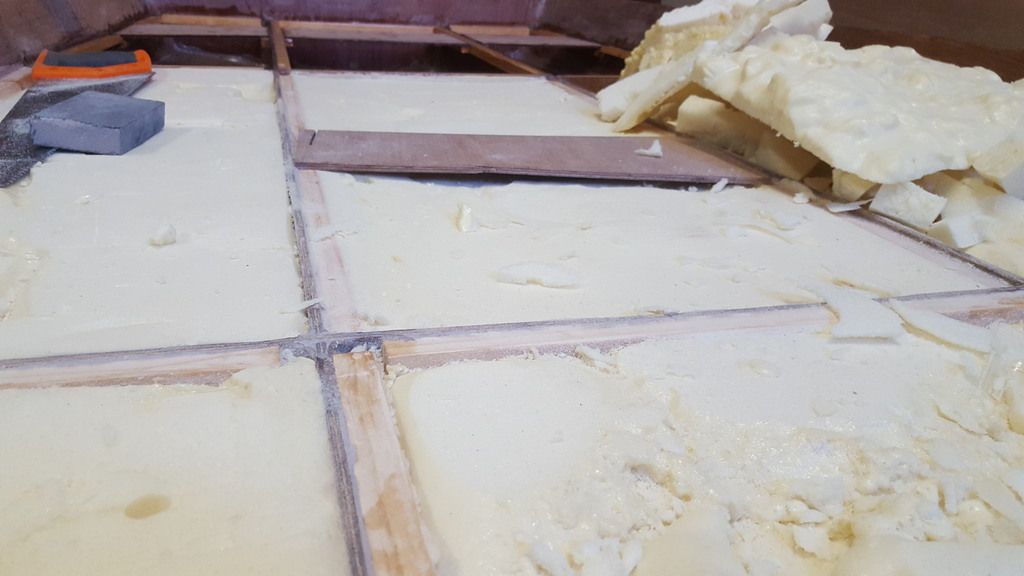
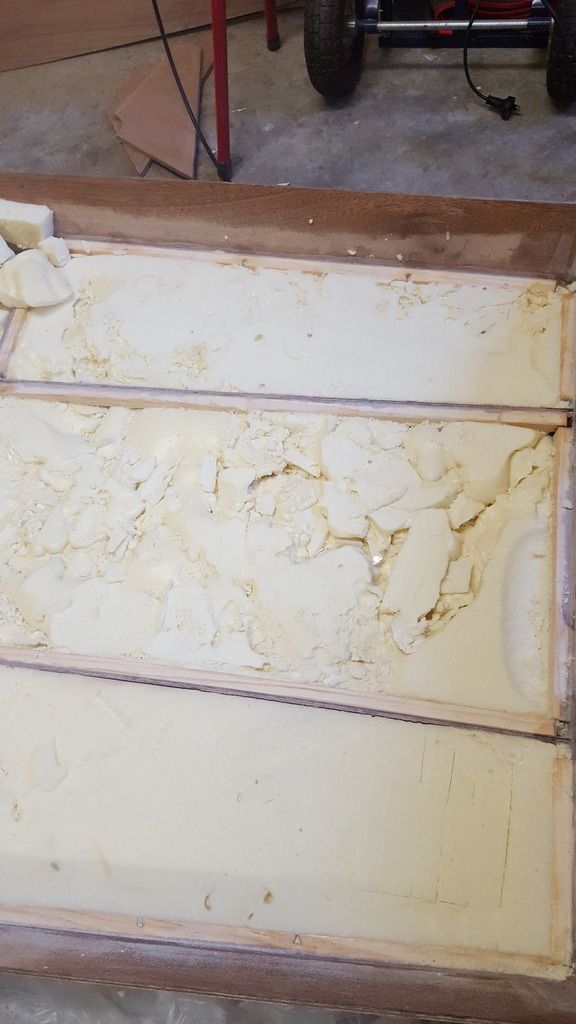
Hi Guys,
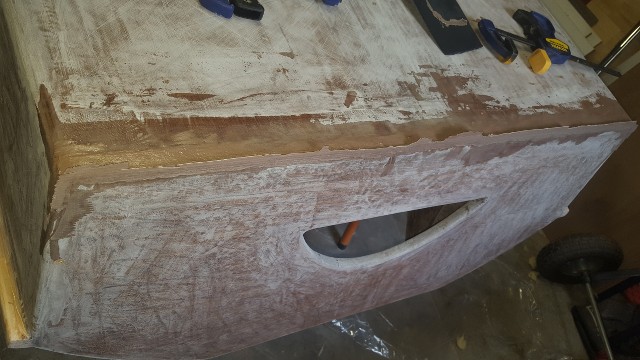
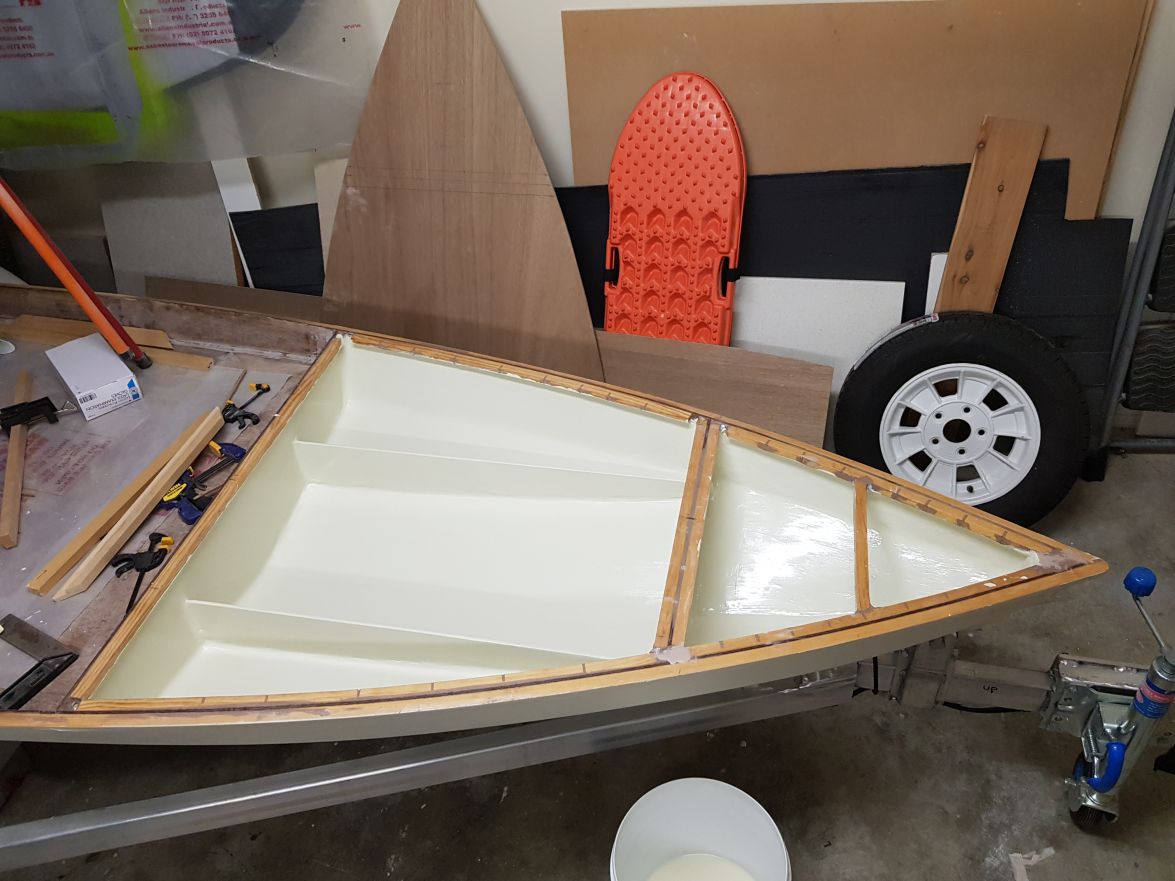
I am in the process of laying the foam. I have a question. The foam stiffens the hull, acts as buoyancy in case the hull is breached and as it is space occupying stops pressure from air pressure changes due to temperature changes. My question is does the cell need to be perfectly full to support the sole.
In the following photo you can see there is a few mm gap in places
http://i613.photobucket.com/albums/tt21 ... djkvnl.jpg
In the aft middle cell as it was my first the pour was done in a few stages It didn't finish neat as you can see.
http://i613.photobucket.com/albums/tt21 ... wf8ehy.jpg
Is the sole structurally sound by itself or does it rely on the foam. Will it sag or depress when stood on if i don't try to "top it up" to get it perfect.
Or am i overthinking all of this. Excuse my ignorance.
Re: mat australia sk14
Posted: Fri May 26, 2017 9:18 am
by bateau-webmaster
Sole should be pretty well structurally sound. You will definitely want to encapsulate the foam where it is cut, with at least neat epoxy (you could also thicken it, and use it to help glue down the sole, might be able to fill up that gap if you are worried about it).
The only drawback of having spaces that are unoccupied by foam, is that water could collect there, but as long as your sole is laminated, and the compartments are laminated all around there shouldn't be any chance of that.
Re: mat australia sk14
Posted: Sun Jul 02, 2017 7:05 am
by mataus
Re: mat australia sk14
Posted: Sun Jul 02, 2017 7:06 am
by mataus
Re: mat australia sk14
Posted: Sun Jul 02, 2017 7:07 am
by mataus
Re: mat australia sk14
Posted: Sun Jul 02, 2017 7:09 am
by mataus
Re: mat australia sk14
Posted: Sun Jul 02, 2017 7:10 am
by mataus
Re: mat australia sk14
Posted: Sun Jul 02, 2017 7:15 am
by mataus
Re: mat australia sk14
Posted: Sun Jul 02, 2017 7:16 am
by mataus
Re: mat australia sk14
Posted: Sun Jul 02, 2017 7:42 am
by mataus
ok it has taken a while but i have the photos embedded in posts now.
I have learnt so much and have really enjoyed watching everyone else build with the photos, its just not the same without the pictures. I was feeling a little guilty that i just had links, not that i have a lot to add to the collective information on this site but hopefully someone will pick up a tip or just enjoy the photos.
as the photos show, the sole is down, fillets in and epoxy the floor. I would like to work wet on wet where possible but as i do a little at a time it is not always possible so the next step will probably be sanding for the knees and tape them in and the rub rail. Although I am thinking of flipping and starting on the outside and finishing the rest of the inside later. I am really keen to see the underside of this hull.
I have read that a chemical bond is stronger/superior to a mechanical bond, however I was wonder how important this fact was? Is it just everyone wants their boats to be as strong as possible or in say some of the larger designs would a mechanical bond not be strong enough for a particular job? Is there a measurable difference?
Re: mat australia sk14
Posted: Sun Jul 02, 2017 9:05 am
by Jeff
mataus, really nice work!!! Jeff
Re: mat australia sk14
Posted: Sun Jul 02, 2017 9:24 am
by topwater
Thats some nice looking work

Re: mat australia sk14
Posted: Sun Jul 02, 2017 9:39 am
by Eric1
Oh Yea, Pretty stuff!!
Re: mat australia sk14
Posted: Sun Jul 02, 2017 10:15 am
by cape man
I'm sure someone has a number of percent strength between the two, but on a small boat like that I can't see where it would matter. My motivation for wet on wet was more for me avoiding sanding between.
Re: mat australia sk14
Posted: Sun Jul 02, 2017 12:25 pm
by BB Sig
cape man wrote: ↑Sun Jul 02, 2017 10:15 am
My motivation for wet on wet was more for me avoiding sanding between.
This is my reason as well. Saves a lot of time and energy!
Re: mat australia sk14
Posted: Thu Jul 13, 2017 6:17 am
by mataus
Yeah i am aware of the need to sand between applications for a good mechanical bond and i was just about
to make a smart remark about being early in the build and still "enjoying sanding" but i have just sanded the fillets and
particularly in the corners i think i removed as many layers of epoxy as i did skin.
Re: mat australia sk14
Posted: Thu Jul 13, 2017 6:18 am
by mataus
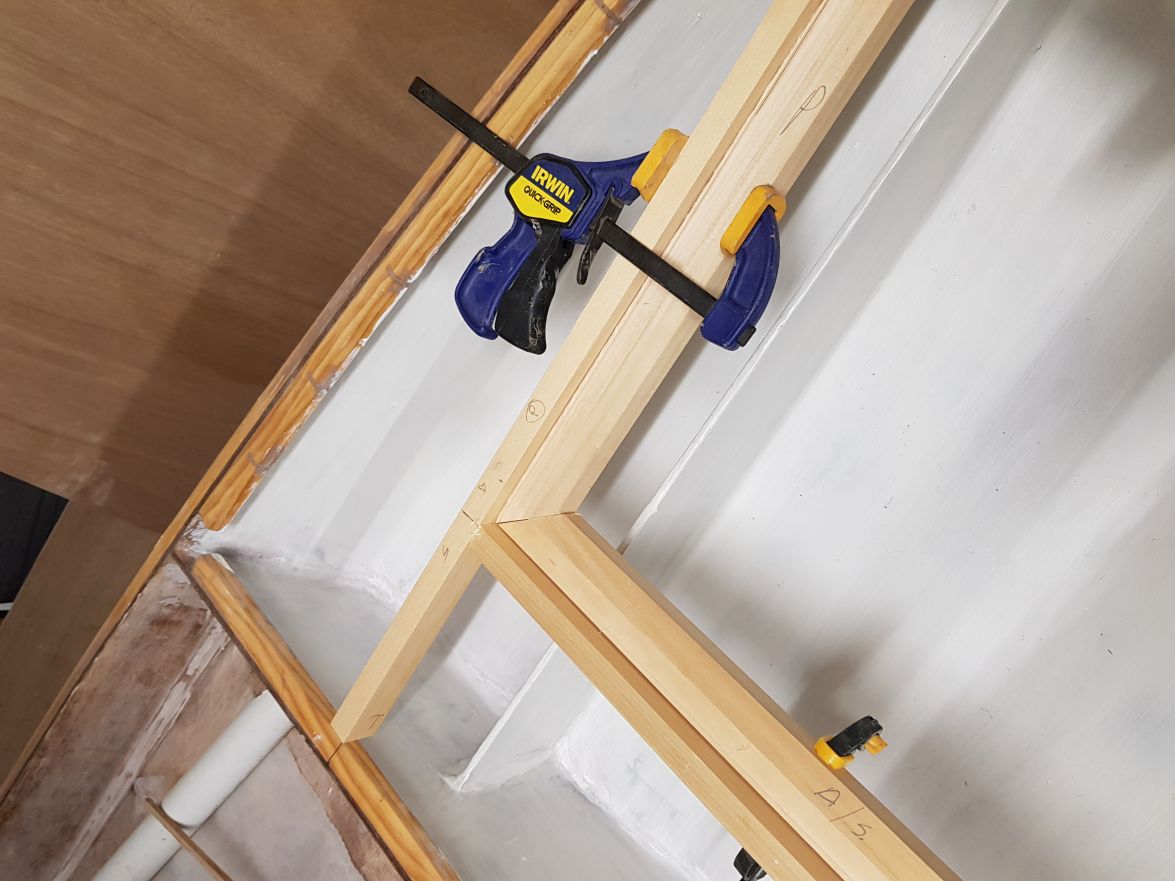
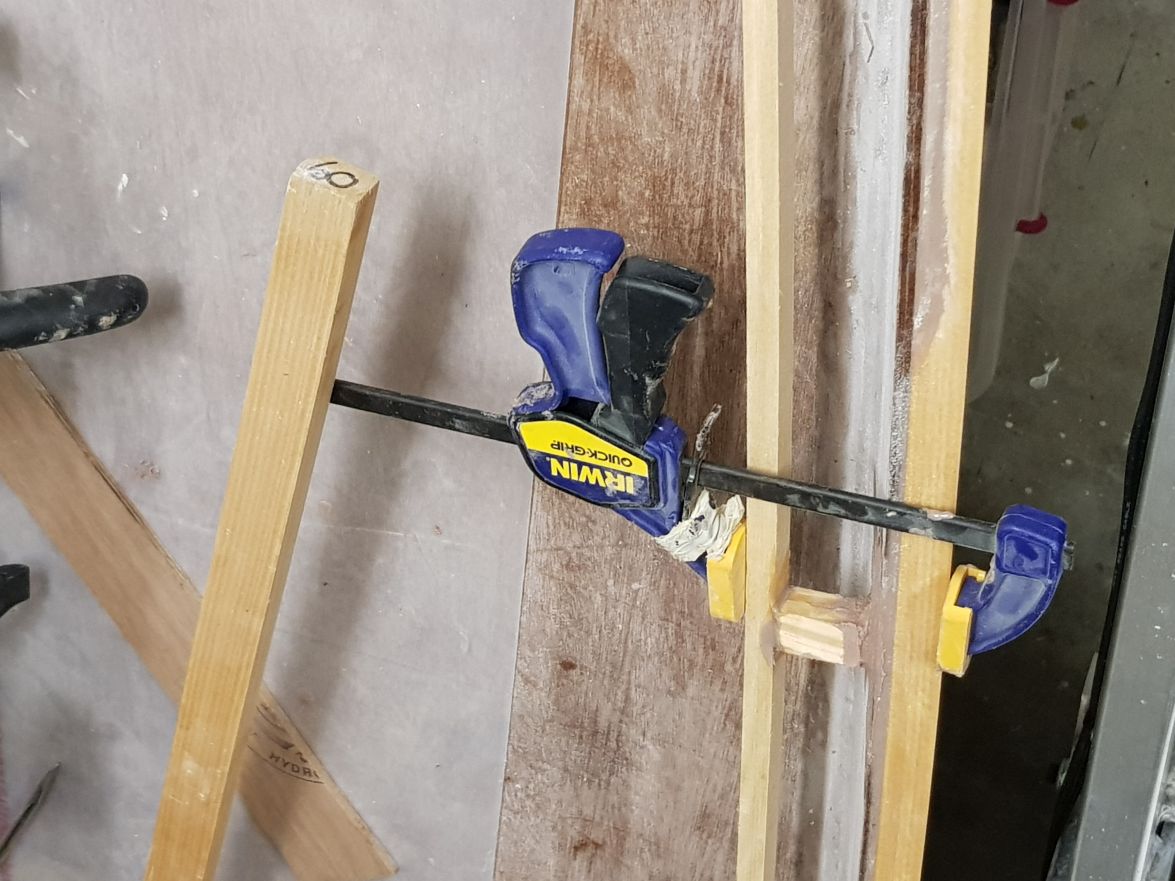
Has anyone got some good tips for holding the knees in place while the epoxy sets?
Re: mat australia sk14
Posted: Thu Jul 13, 2017 7:06 am
by glossieblack
I sometimes use a hot glue gun to spot weld pieces in place, after gluing or before filleting.
Re: mat australia sk14
Posted: Thu Jul 13, 2017 8:11 am
by Jaysen
Tape.
While some idiot forgot to put the knees in my boat, I did use tape to hold more than a few parts in place. Plain old masking tape works if you will be sanding it all smooth (over fill the seam to you don't get adhesive down in the epoxy).
I'd use the glue method if I actually had a glue gun the wife would let me touch. Apparently she will never forgive me for the mess I made with the last one...
Re: mat australia sk14
Posted: Thu Jul 13, 2017 8:14 am
by BB Sig
Gallon Jugs on both sides with shims to get them plumb. Use small amount like when you initially did the hull between stitches. Just enough to hold them in place if you have time and/or are patient enough to do this!

I've used tape before to hold parts and I must not do it right because they always seem to move slightly. Whichever method you use, use the fastest hardener you have to ensure it cures as fast as it can so there are less chances to bump the boat out of alignment.

Re: mat australia sk14
Posted: Sun Jul 16, 2017 8:03 am
by mataus
Thanks guys,
I had proceeded before i checked the forum. I was scared that i was going to have a repeat of the issue when I laminated the knees in the first place.
They were place on plastic then the 2 pieces with tomato sauce consistency then plastic and a brick.
this is what i found in the morning. I had enough timber to just make another.
Re: mat australia sk14
Posted: Sun Jul 16, 2017 8:10 am
by mataus
The way I completed the task (probably wrong) was to use temporary screws. I measured and remeasured and once I was happy,
strategic screws were place into the sole and transom to hold the part still. Only deep enough they they wouldn't wobble. I used thickened epoxy to peanut butter on the contact area and used a gloved finger to wipe off squeeze out.
Re: mat australia sk14
Posted: Sun Jul 16, 2017 8:14 am
by mataus
The next day the screws were removed. I drilled the holes out with a larger bit. the filleting area was resanded. then I filled the holes placed my fillet and then tape over the top.
Re: mat australia sk14
Posted: Sun Jul 16, 2017 8:19 am
by mataus
rub rails next, then i can flip!
Re: mat australia sk14
Posted: Sun Jul 16, 2017 9:19 am
by topwater
Nothing wrong with using screws to hold things together while epoxy sets .build on
Re: mat australia sk14
Posted: Sun Jul 16, 2017 1:45 pm
by Fuzz
For the rubrails you can use screws like you just did or drill a hole in them the size of a wood dowel and use that to help line things up. You may get lucky and just clamps are needed but if not do what you need to do.

Re: mat australia sk14
Posted: Sun Jul 16, 2017 7:45 pm
by BarraMan
The way I completed the task (probably wrong) was to use temporary screws. I measured and remeasured and once I was happy, strategic screws were place into the sole and transom to hold the part still. Only deep enough they they wouldn't wobble. I used thickened epoxy to peanut butter on the contact area and used a gloved finger to wipe off squeeze out.
I don't usually read the "small boats" thread (a bit elitist I know!
) - but "Australia" got my attention.
For what its worth I dealt with this issue by gluing small blocks of wood in place with a hot glue gun to hold the part that I wanted to epoxy glue in place. When the epoxy had hardened it was easy to leaver off the small wooden block or grind it and/or any residual glue off. I don't know if your build has stringers, but that is how I did my stringers also, and I set them up on plastic tile spacers between a bed of expoxy/woodflour to ensure that there were no hard spots. When the epoxy is hard its easy to pull out the spacers and push some epoxy glue into the small space left behind.
Build on!
Cheers
Lee
Re: mat australia sk14
Posted: Mon Aug 28, 2017 2:17 pm
by snook
nice build. can't wait to see it completed.
Re: mat australia sk14
Posted: Fri Sep 01, 2017 8:10 am
by mataus
Thanks Snook!
It is taking longer than i thought but i am enjoying every step.
I will post some early photos of putting the cleats in under the sole as this was a stage that i found a bit of a fiddle.
My ideas were taking off this web site but it may make it easy for someone else to find.
Re: mat australia sk14
Posted: Fri Sep 01, 2017 8:12 am
by mataus
Re: mat australia sk14
Posted: Fri Sep 01, 2017 8:13 am
by mataus
Re: mat australia sk14
Posted: Fri Sep 01, 2017 8:14 am
by mataus
Re: mat australia sk14
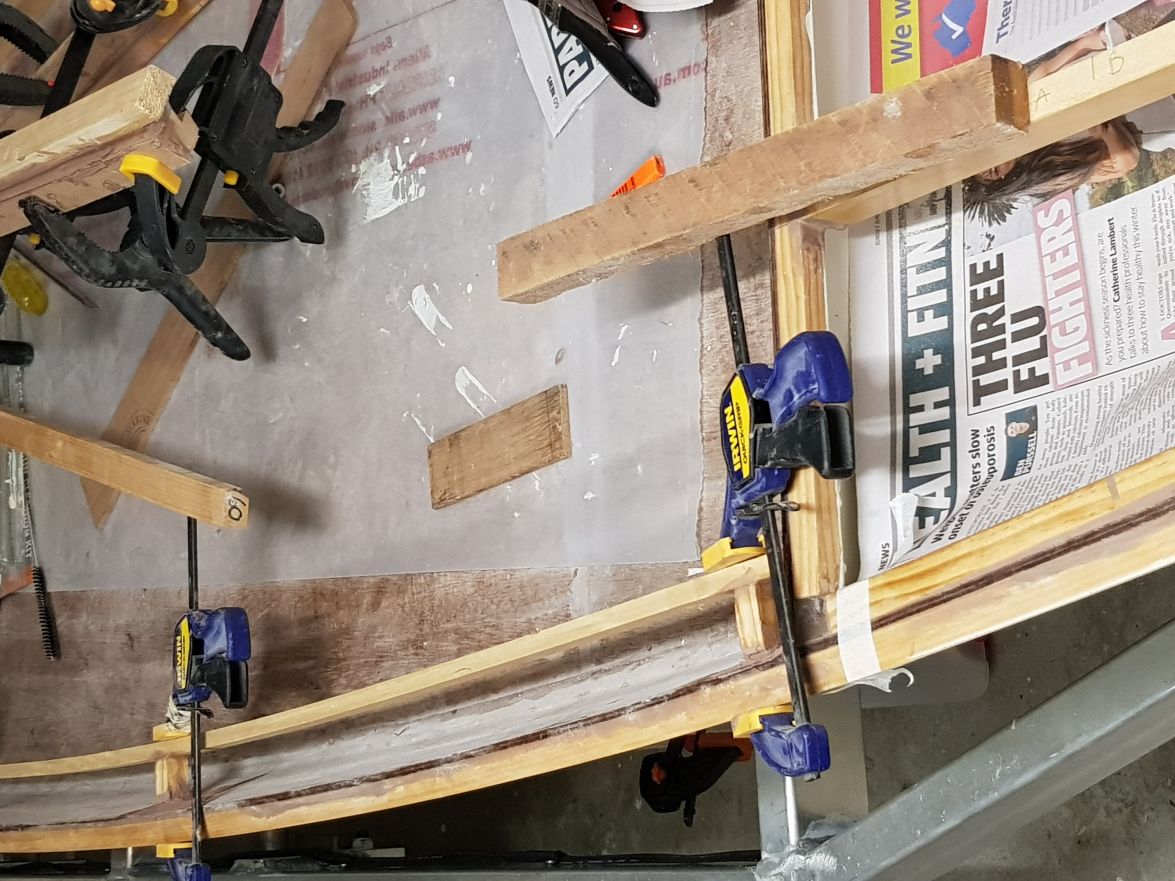
Posted: Fri Sep 01, 2017 8:19 am
by mataus
and as the side plates are on an angle i then had to plane/sand the cleats them down to the appropriate angle, so it would be flush/level with the sole.
my one bright idea was "clamp condoms" for "safe clamping" which were just the fingers cut off gloves. but as it turns out it was much better to just work cleaner.
Re: mat australia sk14
Posted: Fri Sep 01, 2017 8:20 am
by mataus
Re: mat australia sk14
Posted: Fri Sep 01, 2017 8:37 am
by mataus
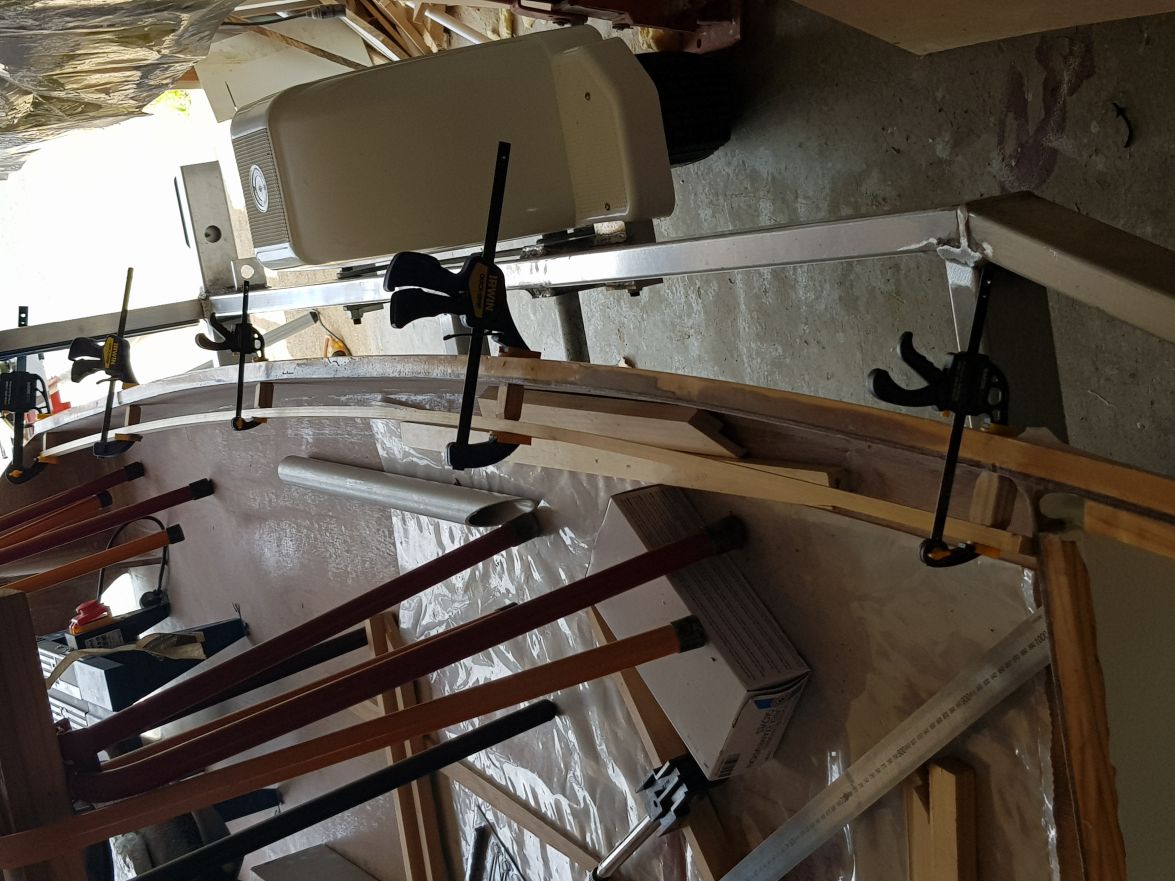
rub rails on and flipped!!
Re: mat australia sk14
Posted: Fri Sep 01, 2017 8:39 am
by mataus
Re: mat australia sk14
Posted: Fri Sep 01, 2017 8:42 am
by mataus
Next was to give the whole boat a sand. fill the holes and joins with thickened epoxy, then sand again.
I know Jm thinks it is overkill but i did tape the keel and chine as well.
Re: mat australia sk14
Posted: Fri Sep 01, 2017 8:42 am
by mataus
Re: mat australia sk14
Posted: Fri Sep 01, 2017 8:44 am
by mataus
Re: mat australia sk14
Posted: Fri Sep 01, 2017 8:49 am
by mataus
another one of my firsts was to use a router today.
use a round over bit on the transom scupper/hole and on the under side of the rub rail.
I was nervous as everyone says to be careful as it is easy to make a mistake, but it was pretty straight forward.
Re: mat australia sk14
Posted: Fri Sep 01, 2017 8:51 am
by mataus
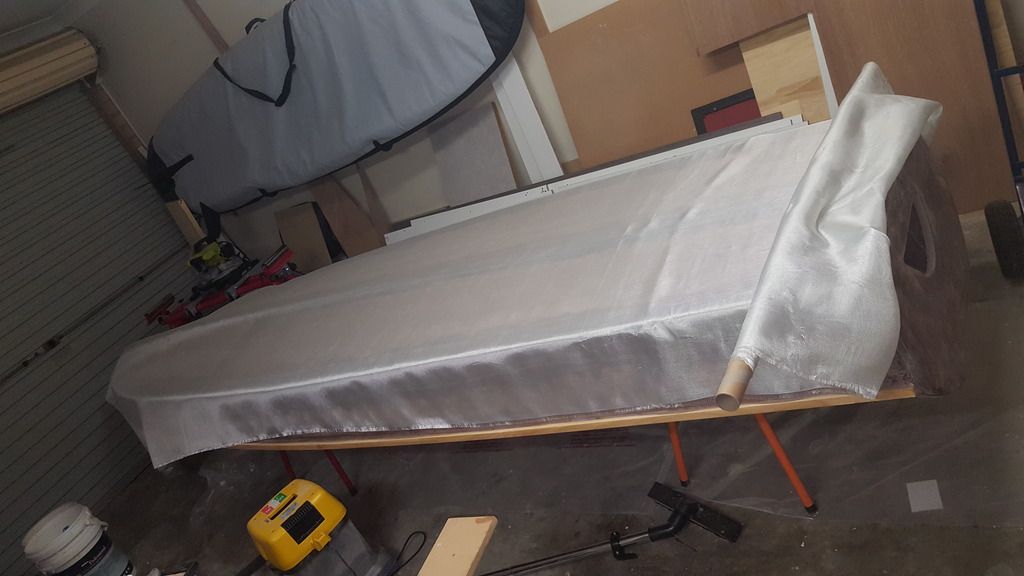
time for glass
Re: mat australia sk14
Posted: Fri Sep 01, 2017 8:59 am
by mataus
I cut the glass to fit (and in half overlapping 10cm at keel). wet out the boat with a foam roller then laid the glass on and
used a squeegee(?) to wet out and move the epoxy around.
Re: mat australia sk14
Posted: Fri Sep 01, 2017 9:05 am
by mataus
I then left it 1-2 hours. At this stage the leftover epoxy in a cup was solid, but i could push indents in it, and i still could leave a finger mark on the boat.
I mixed the last of my epoxy (back to the shop for more) and used a small amount of sanding filler to thicken and smeared it out very thin over the glass to fill the weave.

Re: mat australia sk14
Posted: Fri Sep 01, 2017 1:18 pm
by Fuzz
Really good update. It is nice to be able to fill the weave while it was still green. That was a smooth move
Re: mat australia sk14
Posted: Fri Sep 01, 2017 1:38 pm
by narfi
Looks great!
I am just learning with a small router as well, and it is amazing how a complete idiot(myself) can make something look so nice so easily with it.
You said JM doesnt require the tapes on the seams? This boat just uses the cloth over everything? (its interesting to me which designs use taped seams and no cloth, cloth over all and no tape, tape + cloth but not up the sides, etc....)
Re: mat australia sk14
Posted: Sat Sep 02, 2017 9:23 am
by BB Sig
I put tape on the outer seams. It's not for strength but for abrasion resistance. Lots of oyster beds were I am.
Looking good!
Re: mat australia sk14
Posted: Sat Sep 02, 2017 11:32 pm
by mataus
Thats is exactly why i did it too.
On the same note the epoxy company i am using doesn't have graphite as a additive.
I am looking into either adding it to the epoxy i have (doing a little trial first) or after a sand
getting some west which is available locally and i think does have a graphite as an additive option.
I assume different brands of epoxy will have a sufficient mechanic bond with one another?
or stop being pedantic .
I have started to think about names as well.
so far i have "handyman"- as when i first came up with the idea of building a boat my partner scoffed and said you're no handy man. That pretty much sealed the deal, I was doing it. I may save this for the next larger build. the next one was "bean about". as the build is small and i almost epoxied onto the boat a coffee stirrer early in the build. Also at $5-6 for a coffee locally i could fund the build on cutting or kicking my coffee addiction. "Done & Dusty"
is my current favourite as I am pretty sure thats how I will feel once I am finished. "Rome" as it was not built in a day. My mate said "more glass than class" which is probably true. Feel free to weigh in on what you think of the names.
Re: mat australia sk14
Posted: Sun Sep 03, 2017 3:58 am
by narfi
Glass & Class
Re: mat australia sk14
Posted: Sun Sep 03, 2017 7:59 am
by Jaysen
Rome... I like that word play.
Re: mat australia sk14
Posted: Sun Sep 03, 2017 7:17 pm
by Fair WX Pilot
Hi,
Initially I also thought "Rome" was a great name and was going to agree, but then I remembered what happened to it under the Nero administration. Flames..... not good! For the same reasons I have always liked the name "Atlantis" but the whole "slipping beneath the waves " makes it a little inappropriate. How about "Elbow Grease " your surely going to be using a lot of that as you sand down all the fairing.
Re: mat australia sk14
Posted: Sun Sep 03, 2017 7:26 pm
by Jaysen
I think we can mitigate the Nero problem... as for ID before anyone boards. If named Nero ... well, let them meet the same fate!
Re: mat australia sk14
Posted: Thu Sep 07, 2017 7:36 am
by mataus
I like the name "Elbow Grease "but as the faring is only starting i feel that i am yet to earn the name!
what level of finish will i be happy with
Re: mat australia sk14
Posted: Thu Sep 07, 2017 8:12 am
by Jaysen
Perfect. Name.
No matter what level you decide is acceptable you will earn the right to use that name.
Re: mat australia sk14
Posted: Tue Sep 19, 2017 7:58 am
by mataus
Hi Guys,
I like the name" elbow grease". it is currently in pole position.
I have sanded down the whole boat and i am about to put on the first/next layer of fairing mixture.
I am aware that sharpening the edges and a keel are optional in this design but i plan on doing both from a learning point of view.
should they both be done now and then fair on top or do you get everything fair and then add corners/keel? if there is fairing epoxy first will that weaken the bond?
Also I was hoping to get an idea of design as it is not specified in the plan, i.e. should i sharpen the aft 3rd ? if you sharpen too far forward, will it create hull slap? will you notice if there is no sharpener transom/ chine ? i plan on using petrol electric and paddle power at different times.
the keel, how long should it be? what characteristics does the keel length give? is there an ideal length or height or profile?
I know in this design it probably doesn't matter but out of interest I was hoping to spark some conversation in general theory around these topics.
Thanks guys
Re: mat australia sk14
Posted: Tue Sep 19, 2017 9:18 pm
by Fuzz
To sharpen the chines I like to do it before fairing and I use epoxy/wood flour to do it. I will let some one else answer the other questions.
Re: mat australia sk14
Posted: Tue Sep 19, 2017 9:58 pm
by seaslug
After creating a 1/2" radius, than glassing the hull, you build a dam around the transom and down each side of the hull going forward and fill the chine with a mixture of epoxy and milled glass fibers. From my experience the milled glass fiber mixture is a harder surface than with using wood flour. After removing your forms and sanding and shaping the sharp chine edge using a rigid long board from keel to chine on the bottom, you can also use the longboard from chine to sheer keeping the board flat against the hull sides. This way the milled glass and epoxy makes the finished sharp chine without any softer fairing compound along that edge that can chip off easier. The newly formed sharpened chine edge than becomes your guide to fill in the low spots with fairing compound. For form, I use lengths of 1x6 with clear packaging tape so they release after the epoxy cures fully, and I screw the boards tightly to the hull and the screw holes get filled on the outside, than the inside of the hull gets glassed anyway. Do not try to remove the forms until the epoxy is fully cured, or it can pull away from the hull. I sharpened my chines about 5 feet forward of the transom. Just a guess on my part.
Re: mat australia sk14
Posted: Wed Sep 20, 2017 12:00 am
by Newt
Think of how much will be in the water while on plane. That's the part that needs sharpening.
Newt
Re: mat australia sk14
Posted: Wed Sep 20, 2017 8:34 am
by BB Sig
Keep in mind that this is still designed as a large SUP/ kayak. Pulling it in and out of the truck will damage the sharp edges quickly. I think as low speed as the design was meant to go, I would forgo the sharp edges.
All that said, it is your boat and if you plan to go fast and far, it might be worth it. You have to make the call if the effort is worth the small perceived gain.
Re: mat australia sk14
Posted: Fri Sep 29, 2017 5:56 am
by mataus
Thanks guys,
this is all a learning process for me, so i was going to sharpen just to give it a go.
I asked the question to try to confirm the theory in my head.
just clarifying:
-if only paddling or electric motor, there would be no gain.
- at planing speed sharper edges would decrease drag? thus theoretically reducing fuel consumption, increase speed, faster onto the plane, better grip in turns ?
- only sharpen the transom and caudal 4-5 feet; as a) any further is a waste of time and b) it may increase hull slap if at the bow.
-I know for my build it probably doesn't matter but is that a reasonable summary?
I have a long weekend and was hoping to achieve something on the boat. Everyone talks of adding milled fibre to the epoxy so the edges are tougher. I have no milled fibre.
if i just use fillet powder will they readily chip out or once again am i overthinking it and to add an Australian saying.
"she'll be right mate" or can you make your own chopping up 6oz mat (or is that a stupid suggestion)
cheers.
Re: mat australia sk14
Posted: Fri Sep 29, 2017 9:28 am
by terrulian
Yes, you can chop up your own fibers. The store-bought milled fibers will be finer but that's no big deal.
Re: mat australia sk14
Posted: Sat Sep 30, 2017 2:40 pm
by bateau-webmaster
Progressing well,
I've added your thread to the build threads page.

Re: mat australia sk14
Posted: Sun Oct 29, 2017 7:54 am
by mataus
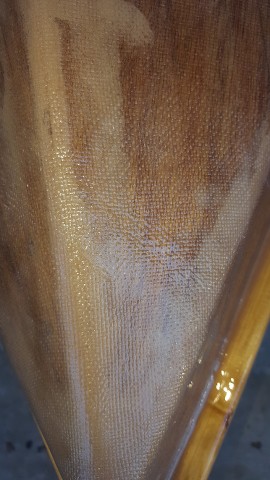
So I chopped up some left over mat. I made it as fine as i could. I set up a mold using coreflute as the non-stick material. It worked well
but the mix of fibreglass epoxy and a little fillet powder was significantly harder to work with as when you try to push it down in one area you move it in the area you just filled as it is all connected. I then sanded them to shape.
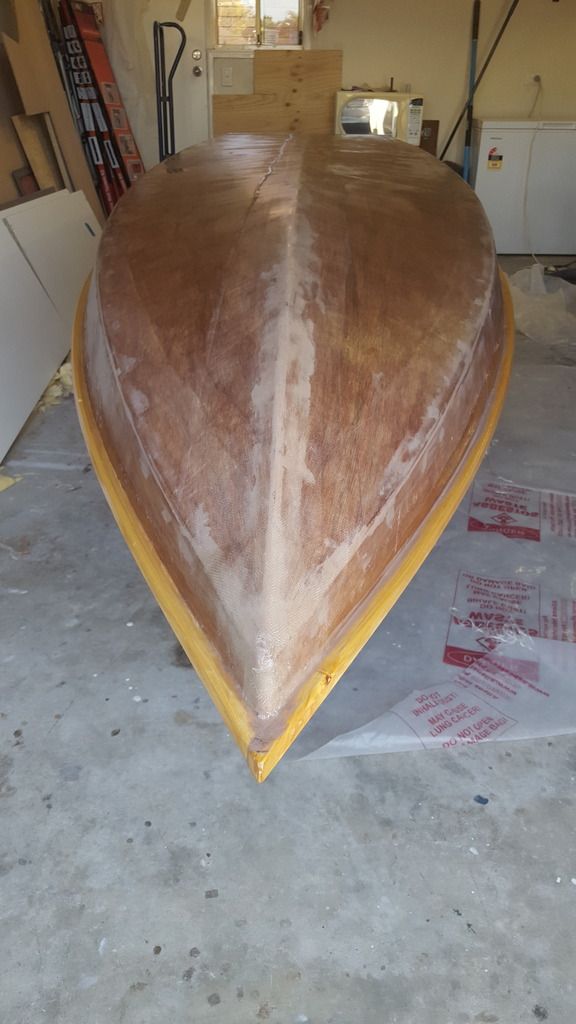
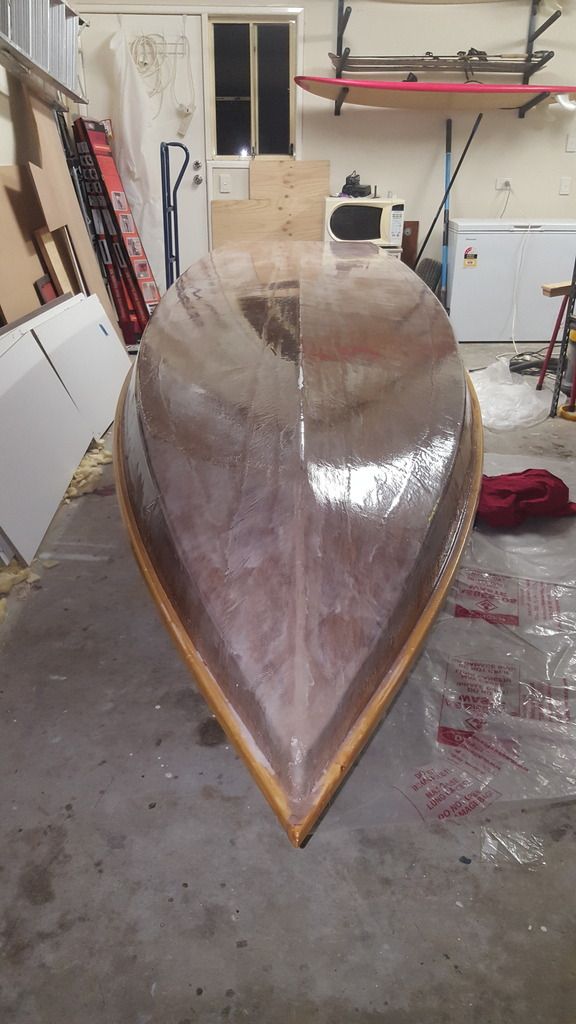
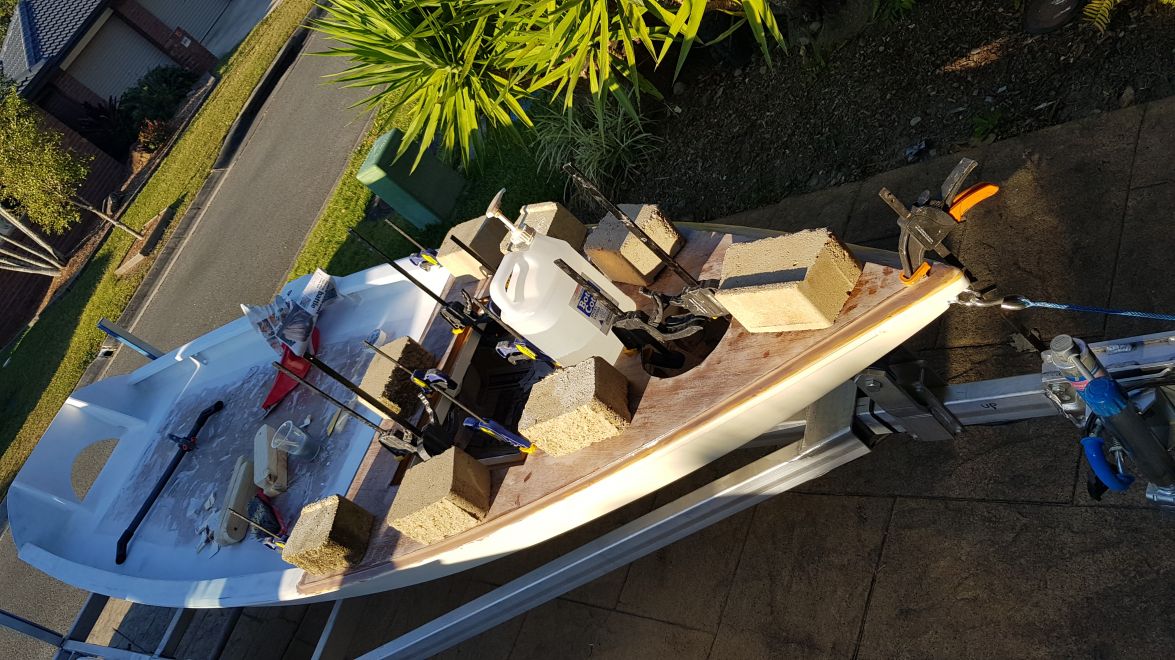
I covered the whole boat in thickened (fairing powder) epoxy and gave the boat a light spray pain of black. Then went to work earning the boats potential name. I think I put it on a bit thick. Although I thought it looked good and I applied it smooth as, the guide paint and the long board thought otherwise. There was alot of sanding. I was going to sand it all by hand but the ro sander got a pretty good workout.
I will upload some photos as soon as figure out why photobucket has stopped me.
next will be the keel and Iam thinking of putting a little piece on the transom in case I add a sounder down the track. I plan on always drill/fill/redrill but i like the idea of not compromising the transom. it will just be ugly.
on keel design does anyone have any tips. I was thinking 30mm x 18mm then length 1-1.3m. slope in back rounded. round over edges. should it be stopped short of the transom if so why? can it be too long/short? For height i am guessing it is a trade off between tracking and draft. I may paddle the craft as well as have and electric/outboard.
Re: mat australia sk14
Posted: Sun Oct 29, 2017 6:27 pm
by Fuzz
PhotoBucket changed their rules and you have to pay for them to host your pictures and post them. Use the gallery here it works just fine.
Re: mat australia sk14
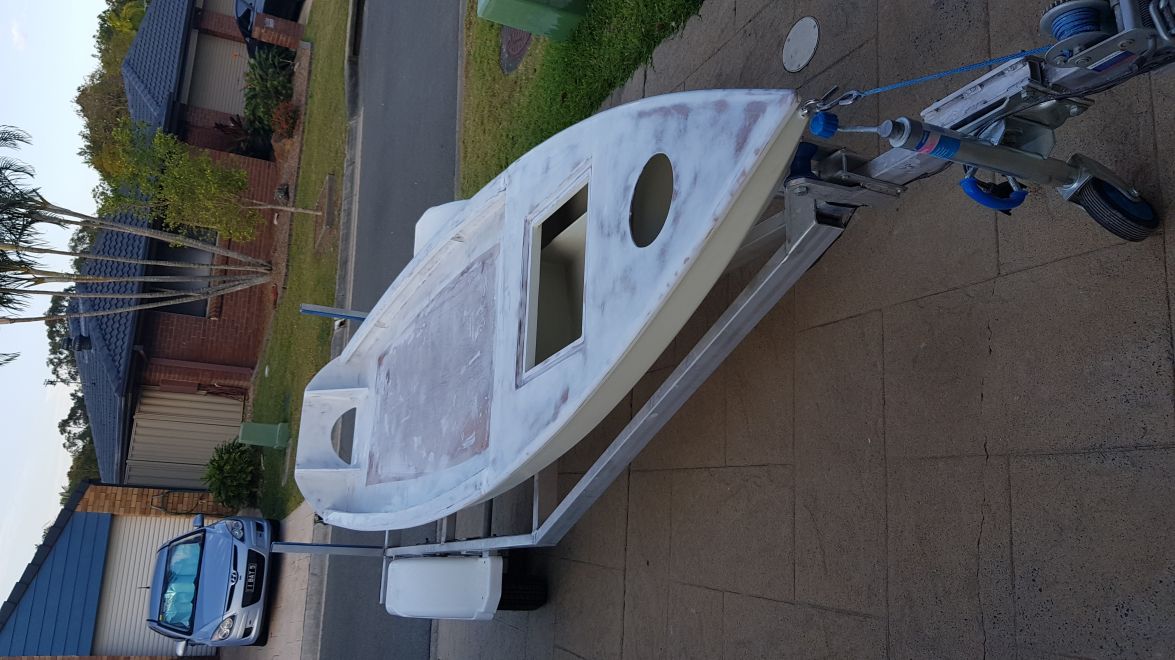
Posted: Sun Mar 18, 2018 5:10 am
by mataus
Thought i better post some photos as it has been a while.
the building process has slowed as life/work got in the way. i am still trying to chip away at it when i can.
Re: mat australia sk14
Posted: Sun Mar 18, 2018 5:14 am
by mataus
[/URL]
Re: mat australia sk14
Posted: Sun Mar 18, 2018 5:16 am
by mataus
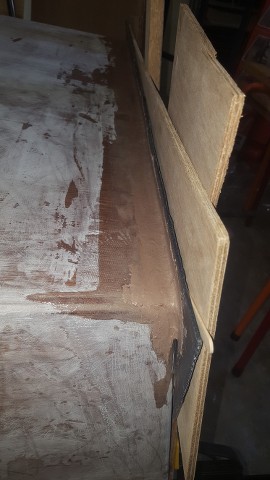
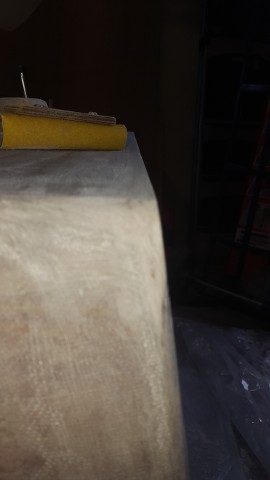
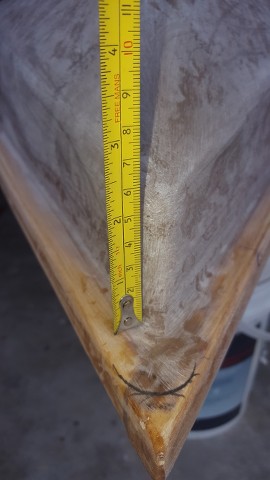
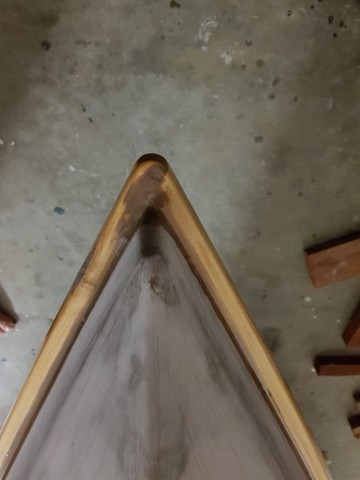
the following is how i sharpened the edges on the stern and sides. I measured follow so i could stop them equally and the phased them into rounded over about 10cm.
Re: mat australia sk14
Posted: Sun Mar 18, 2018 5:19 am
by mataus
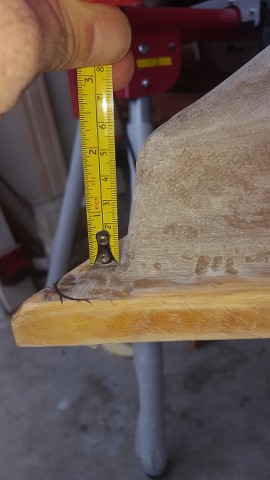
The black product is coreflute (Polypropylene sheet, I am not sure what it is called elsewhere) I used it as a mould as the fibreglass and epoxy didn't stick to it. I then sanded to shape.
Re: mat australia sk14
Posted: Sun Mar 18, 2018 5:20 am
by mataus
[/URL]
Re: mat australia sk14
Posted: Sun Mar 18, 2018 5:20 am
by mataus
[/URL]
Re: mat australia sk14
Posted: Sun Mar 18, 2018 5:22 am
by mataus
[/URL]
Re: mat australia sk14
Posted: Sun Mar 18, 2018 5:23 am
by mataus
[/URL]
[/URL]
Re: mat australia sk14
Posted: Sun Mar 18, 2018 5:25 am
by mataus
[/URL]
[/URL]
Re: mat australia sk14
Posted: Sun Mar 18, 2018 5:28 am
by mataus
I used left over glass from the build chopped as fine as i could with scissors and some fillet powder in the epoxy. It was not too hard to work with (the longer the fibre the more it gets pulled out of place as you are trying to work it) and hopefully it is a little tougher than just fillet powder/wood flour.
Re: mat australia sk14
Posted: Sun Mar 18, 2018 5:29 am
by mataus
oh and my home made faring board.
and the sides below.
Re: mat australia sk14
Posted: Sun Mar 18, 2018 5:31 am
by mataus
Re: mat australia sk14
Posted: Sun Mar 18, 2018 5:33 am
by mataus
[/URL]

[/URL]
Re: mat australia sk14
Posted: Sun Mar 18, 2018 5:34 am
by mataus
Re: mat australia sk14
Posted: Sun Mar 18, 2018 5:37 am
by mataus
Re: mat australia sk14
Posted: Sun Mar 18, 2018 5:39 am
by mataus
[/URL]
Re: mat australia sk14
Posted: Sun Mar 18, 2018 5:41 am
by mataus
[/URL]
[/URL]
Re: mat australia sk14
Posted: Sun Mar 18, 2018 5:43 am
by mataus
[/URL]
Re: mat australia sk14
Posted: Sun Mar 18, 2018 5:47 am
by mataus
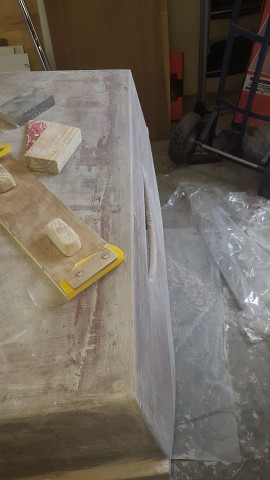
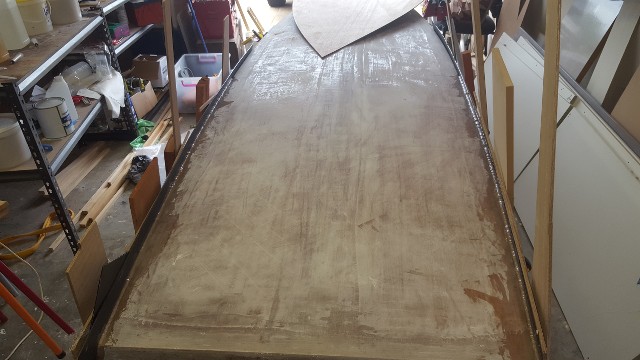
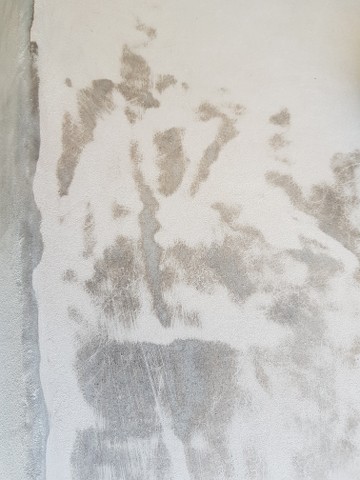
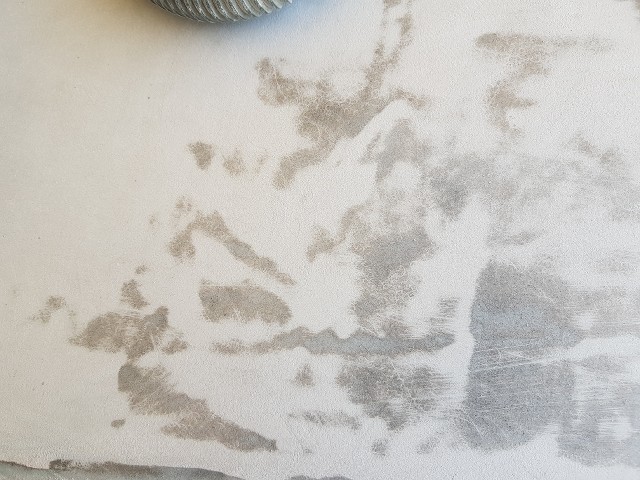
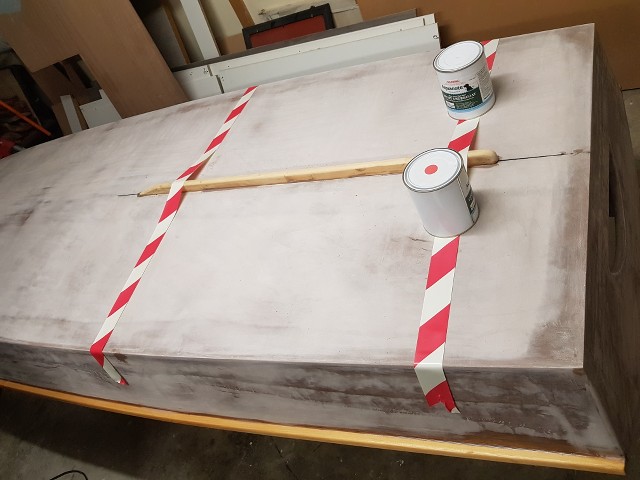
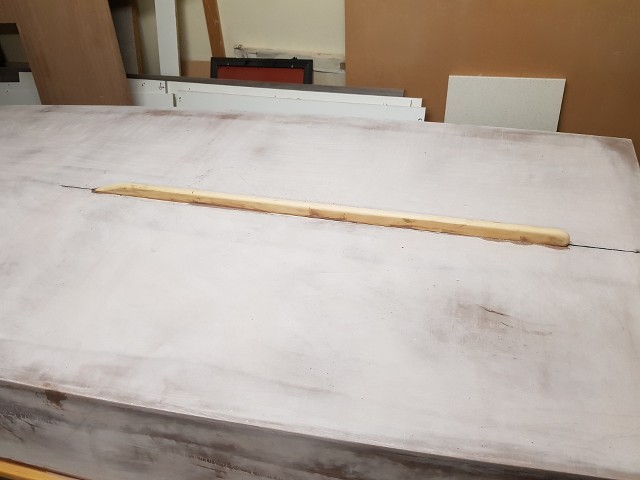
Next was fairing. I used the fairing powder from the epoxy company i am using.
I used a light spray of black spray paint as a guide.
Re: mat australia sk14
Posted: Sun Mar 18, 2018 5:49 am
by mataus
Re: mat australia sk14
Posted: Sun Mar 18, 2018 5:50 am
by mataus
Re: mat australia sk14
Posted: Sun Mar 18, 2018 5:51 am
by mataus
[/URL]
Re: mat australia sk14
Posted: Sun Mar 18, 2018 5:53 am
by mataus
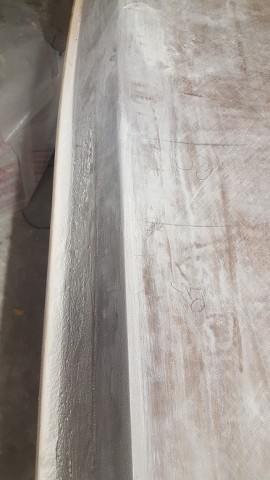
I might just be stupid, but when the forum chats about fairness i thought it was due to different bends of the timber. but the guide coat and a flat fairing board soon show just how not flat the timber/my epoxy work was
Re: mat australia sk14
Posted: Sun Mar 18, 2018 5:54 am
by mataus
from this
[/URL]
[/URL]
Re: mat australia sk14
Posted: Sun Mar 18, 2018 5:55 am
by mataus
to this
[/URL]
Re: mat australia sk14
Posted: Sun Mar 18, 2018 7:22 am
by mataus
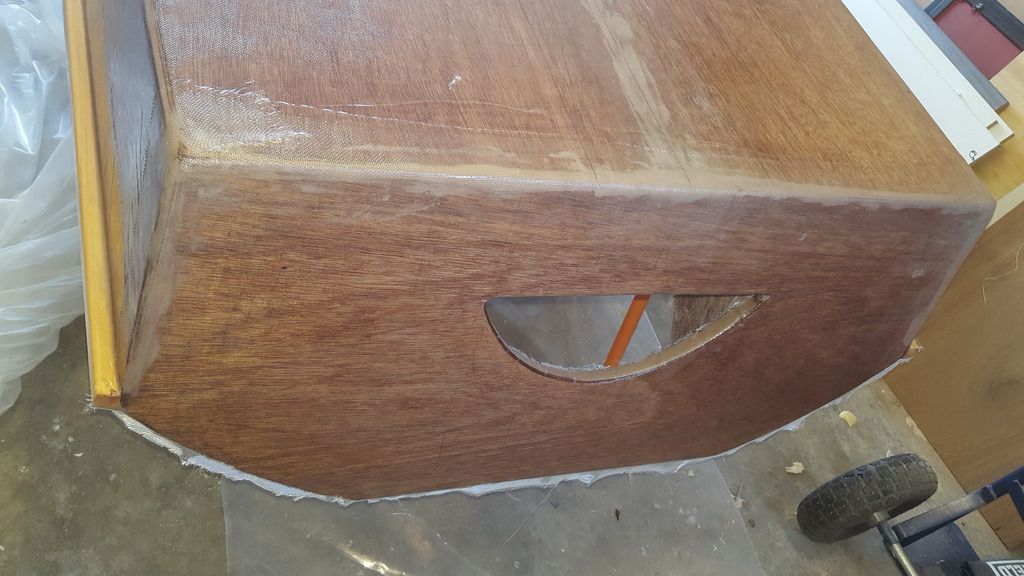
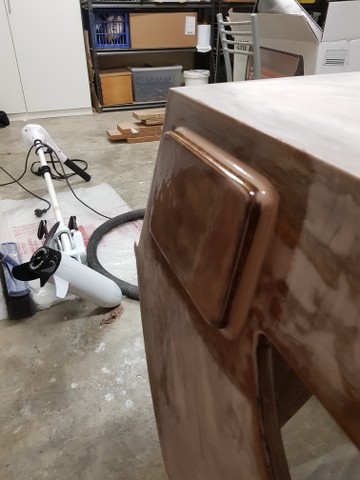
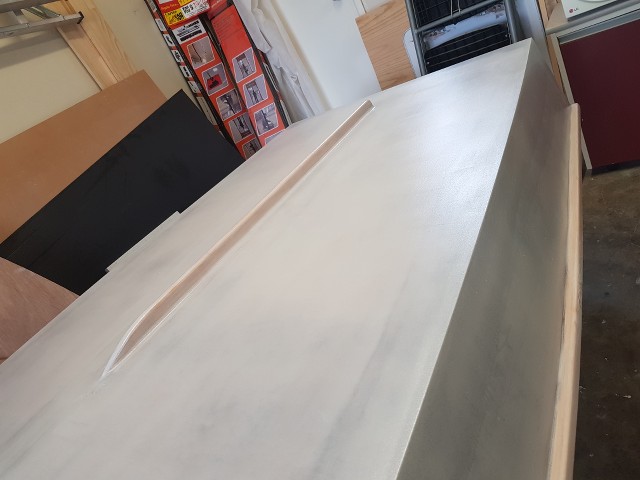
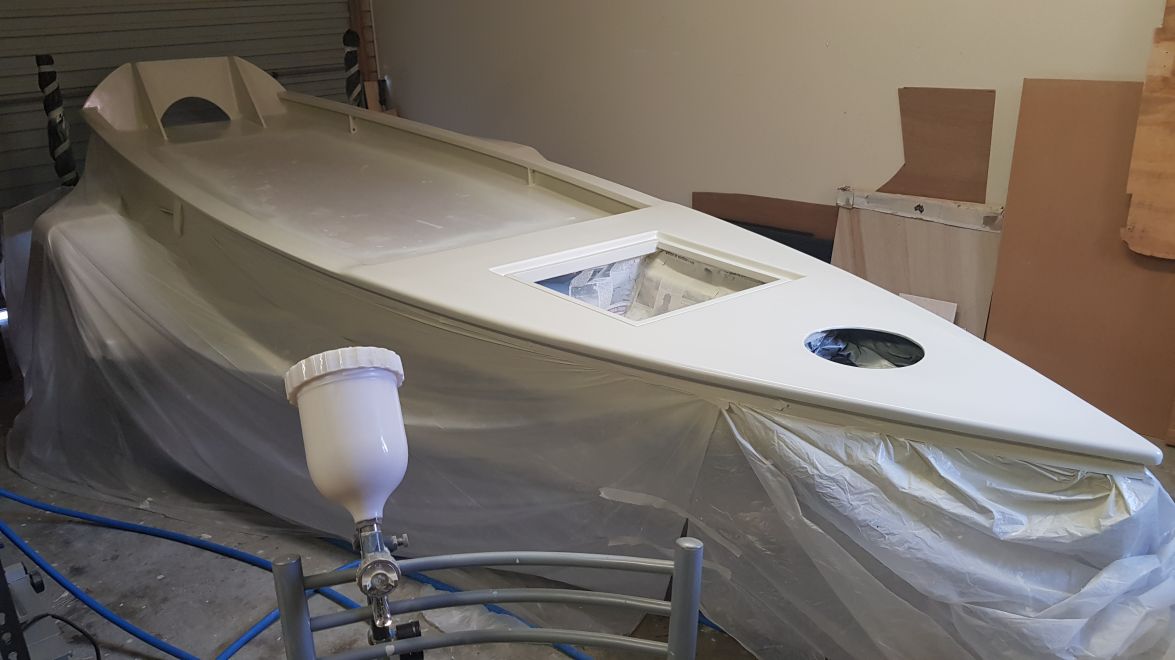
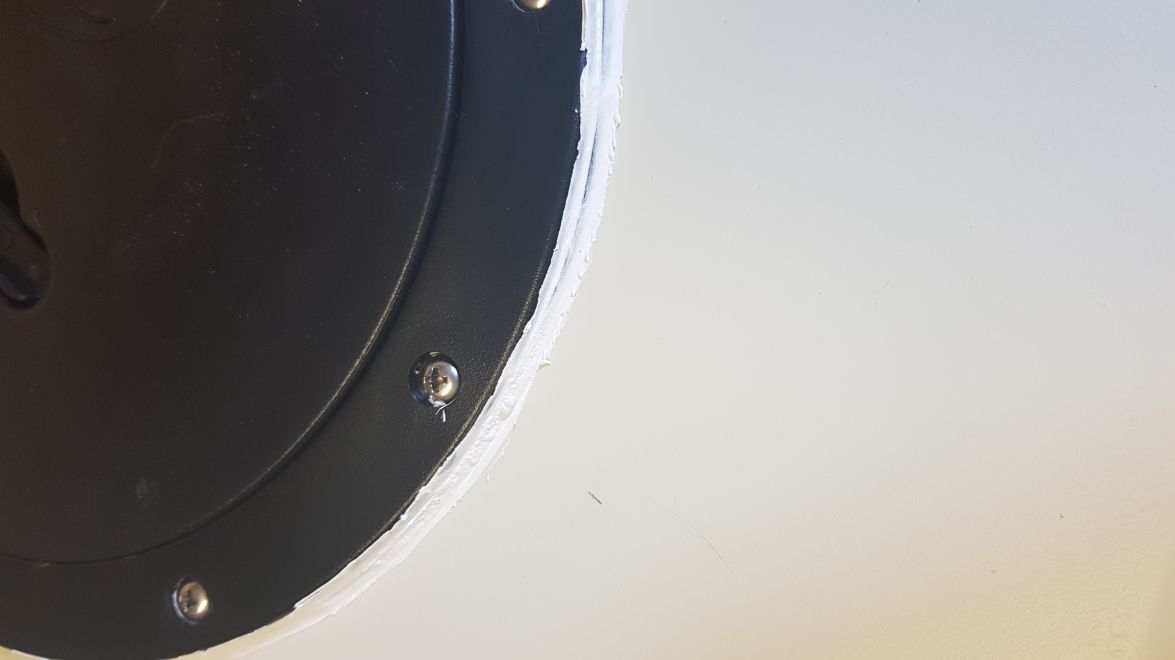
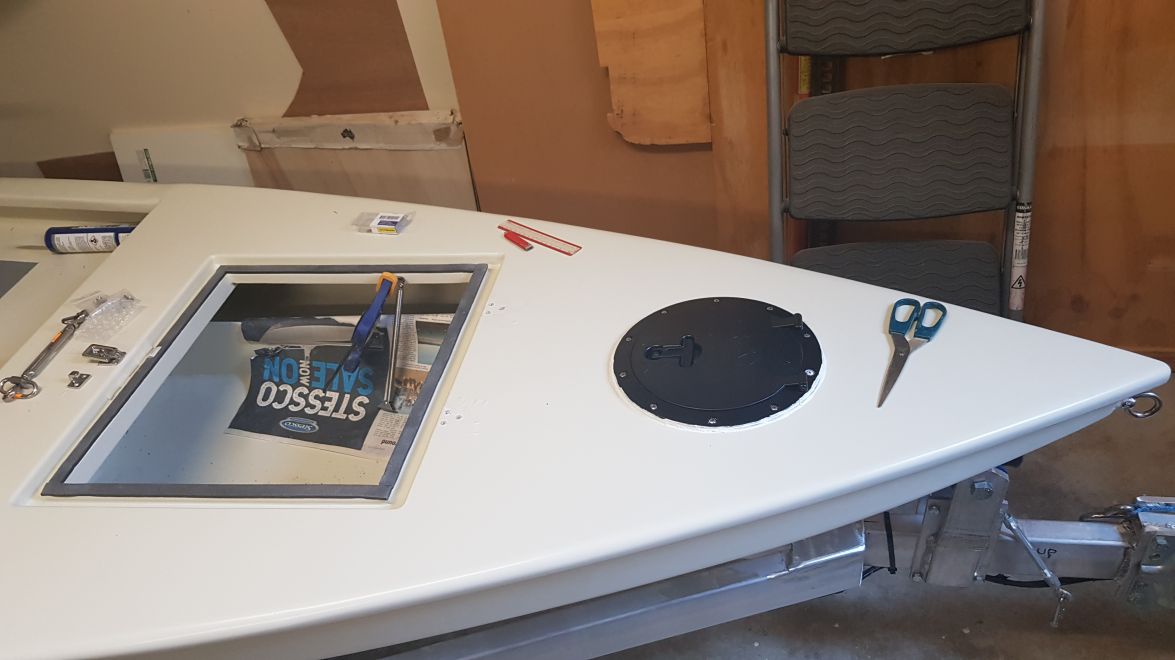
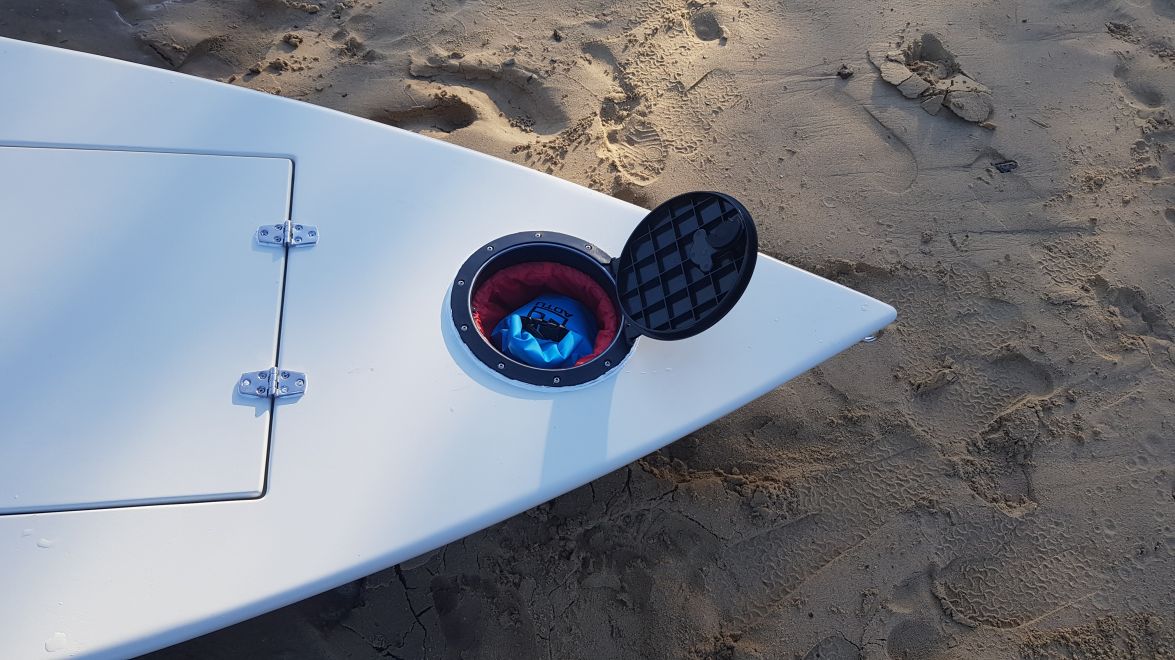
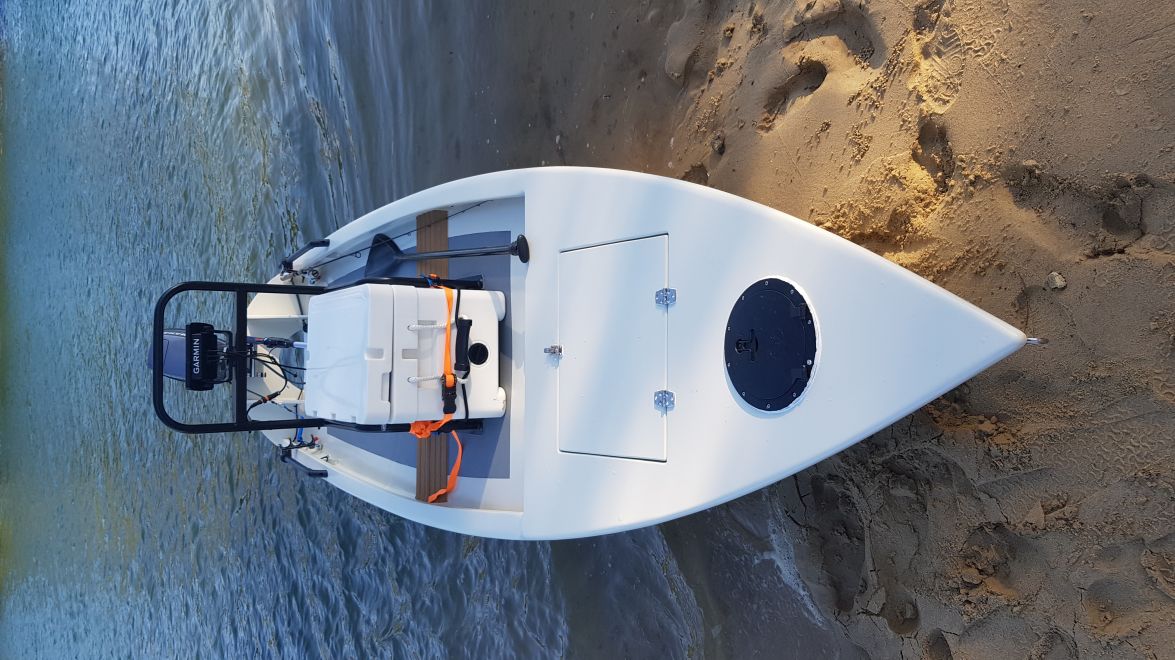
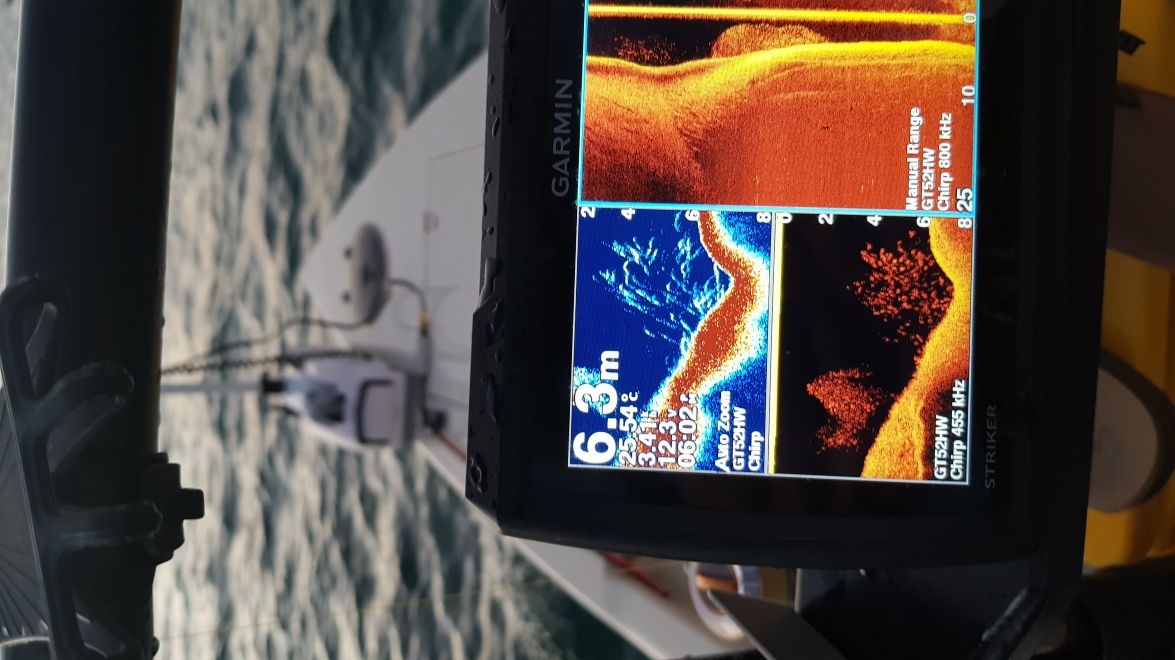
I decided to put a small plate on the transom to mount a sounder. I know what everyone will say, 1- as long as you drill fill and redrill it is not needed. And 2- it is ugly. I agree with both (i still don't like the idea of screw in the transom) but as i have said early on this boat is more about the process and the learning than anything else. It allowed me to have a play and see how it functioned /looked and use the router.
Re: mat australia sk14
Posted: Sun Mar 18, 2018 7:23 am
by mataus
[/URL]
[/URL]
Re: mat australia sk14
Posted: Sun Mar 18, 2018 7:25 am
by mataus
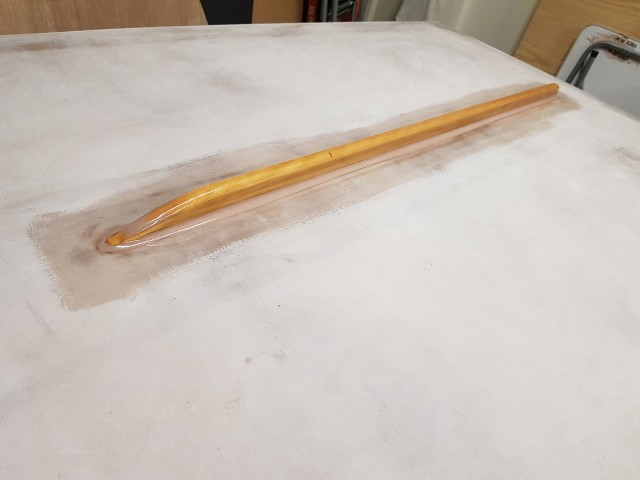
next was the keel
[/URL]
[/URL]
Re: mat australia sk14
Posted: Sun Mar 18, 2018 7:28 am
by mataus
just a note. I think screws/nails would have been a good options to keep in place. The keel did move about 25mm (1inch) to the left to stern and to the right toward the bow. Had i not been checking it very reg it could have been a painful mistake. It worked well in the end i just had to watch it until the epoxy was more tacky.
Re: mat australia sk14
Posted: Sun Mar 18, 2018 7:31 am
by mataus
then to fillet it on. I used a small radius as it is not a large keel and no glass. As someone said in another build, If it falls off the boat is easy enough to flip and add another.
[/URL]
Re: mat australia sk14
Posted: Sun Mar 18, 2018 7:32 am
by mataus
Re: mat australia sk14
Posted: Sun Mar 18, 2018 7:35 am
by mataus
then epoxy high build primer.
[/URL]
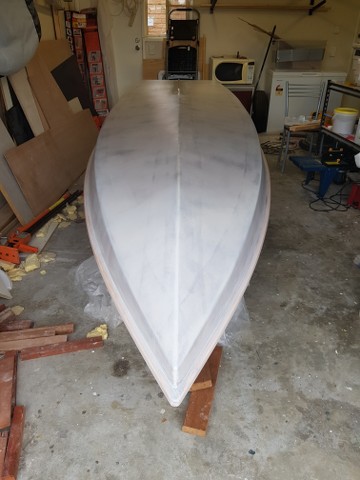
[/URL]
[/URL]
Re: mat australia sk14
Posted: Sun Mar 18, 2018 7:42 am
by mataus
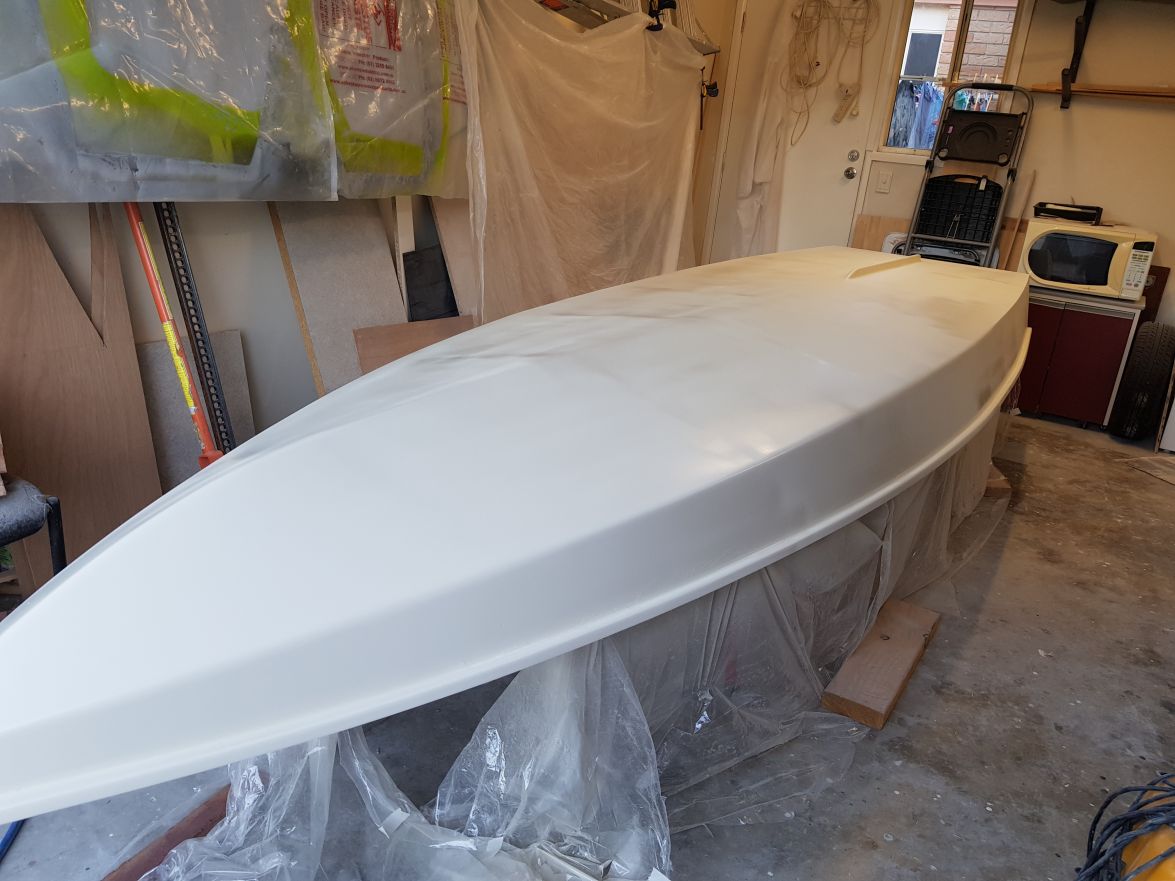
The next step is to sand this layer smooth (240+ is the recommendation) and start top coating.
Also Photo bucket is not hosting for free, so I started Image shack but it appear that you only get a short free period as well.
It has been recommended to start a gallery here but i have looked around and cannot figure it out. Can anyone spell it out in luddite terms or share a link on where it has been explained elsewhere?
Re: mat australia sk14
Posted: Sun Mar 18, 2018 8:41 am
by Jeff
Nice, clean work on your SK!! Jeff
Re: mat australia sk14
Posted: Mon Mar 19, 2018 7:47 am
by mataus
Thanks Jef.
Can you give me any tips on how to start/upload to a bateau gallery?
Re: mat australia sk14
Posted: Mon Mar 19, 2018 9:05 am
by pee wee
Re: mat australia sk14
Posted: Mon Mar 19, 2018 9:45 am
by Jeff
Thank you Pee Wee!! Jeff
Re: mat australia sk14
Posted: Mon Oct 01, 2018 7:55 am
by mataus
Sorry for the delay. Life got in the way of more important things.
I have sanded the boat through to 400. At first I was going to roll and tip the boat but as this is an exercise in learning I decided to try
spraying. I can't say I got a better result but it was an interesting process. I would do 2-3 coats in a "sitting". I had only planned on one sitting but twice i got runs so I let dry for a week and sanded them out and spray the whole boat again.
I have also finally worked out how to use the gallery here. I was getting error messages on my phone but seem to be getting around it fine now if i upload the photos one at a time.
Re: mat australia sk14
Posted: Mon Oct 01, 2018 7:57 am
by mataus
Re: mat australia sk14
Posted: Mon Oct 01, 2018 7:58 am
by mataus
Re: mat australia sk14
Posted: Mon Oct 01, 2018 7:59 am
by mataus
Re: mat australia sk14
Posted: Mon Oct 01, 2018 8:00 am
by mataus
Re: mat australia sk14
Posted: Mon Oct 01, 2018 8:55 am
by Jeff
Nice work mataus!! Jeff
Re: mat australia sk14
Posted: Wed Oct 03, 2018 6:52 am
by mataus
Re: mat australia sk14
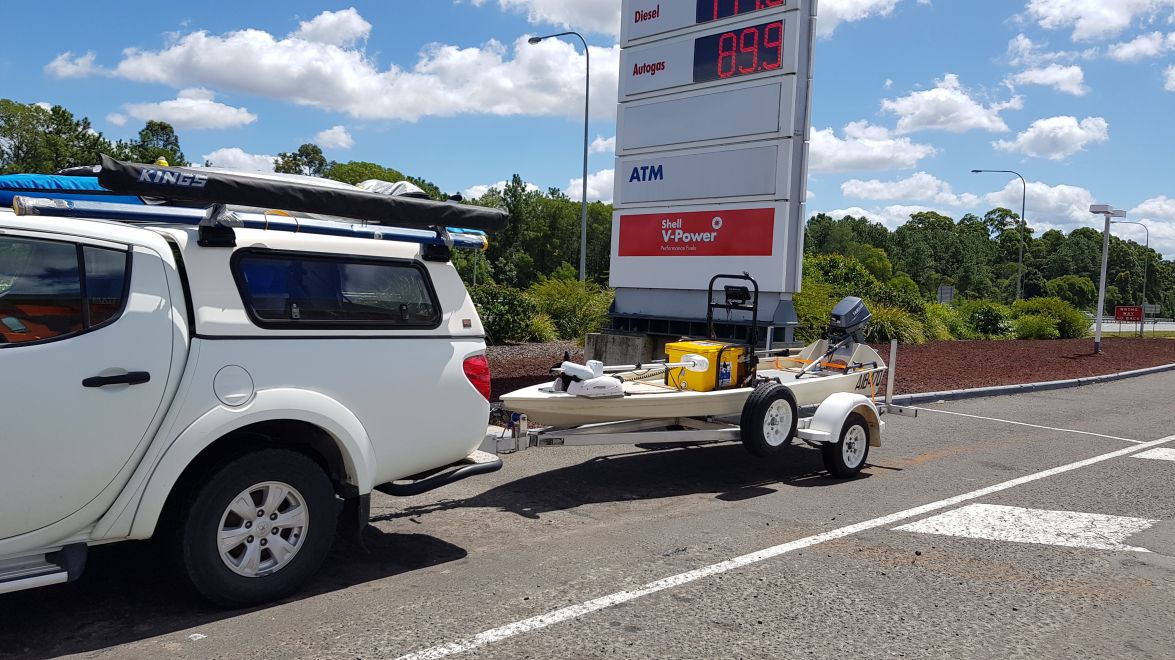
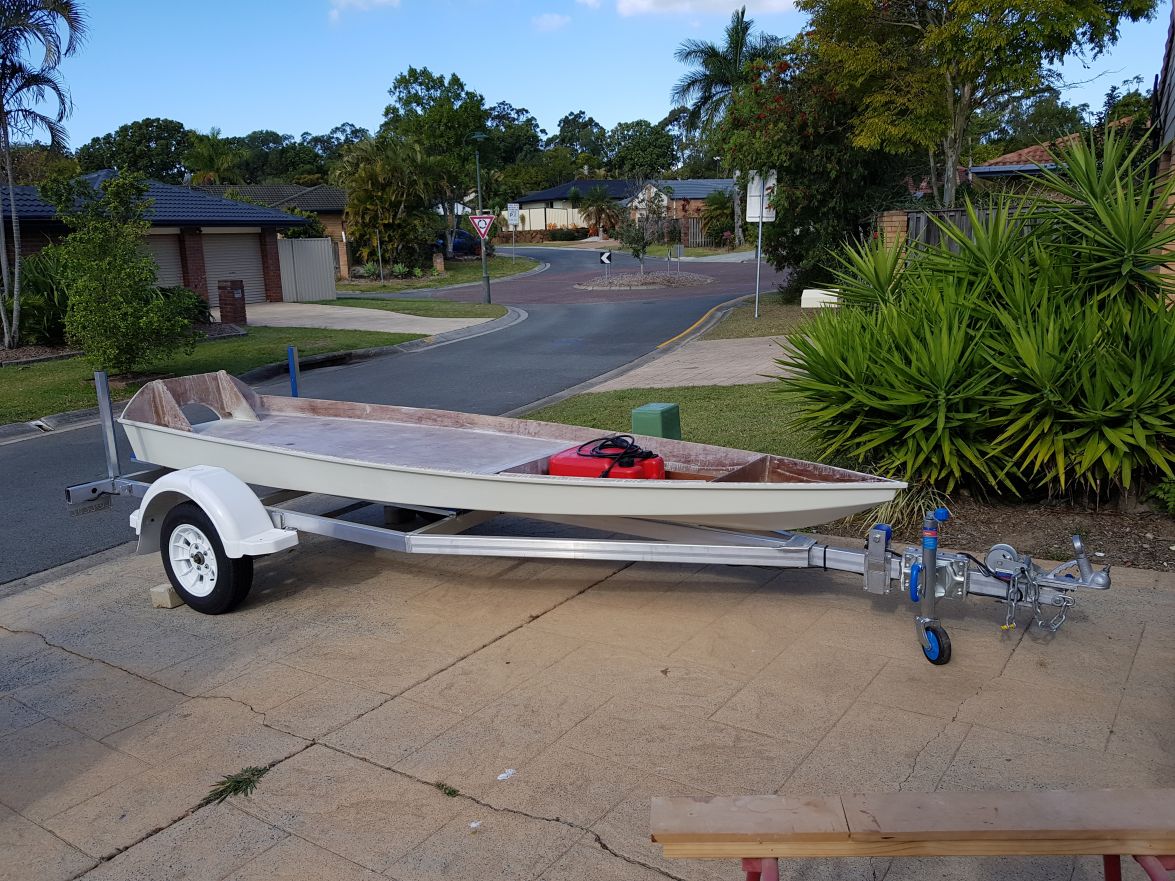
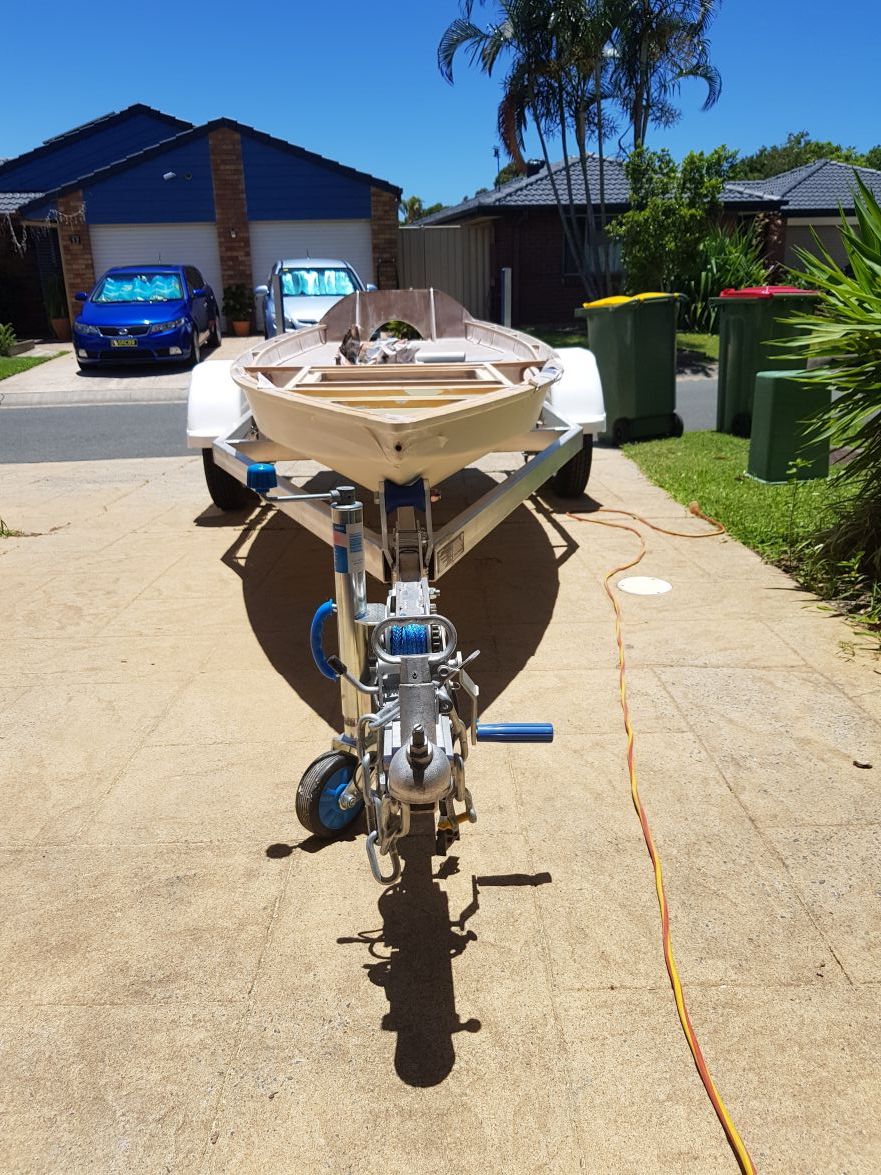
Posted: Wed Oct 03, 2018 6:56 am
by mataus
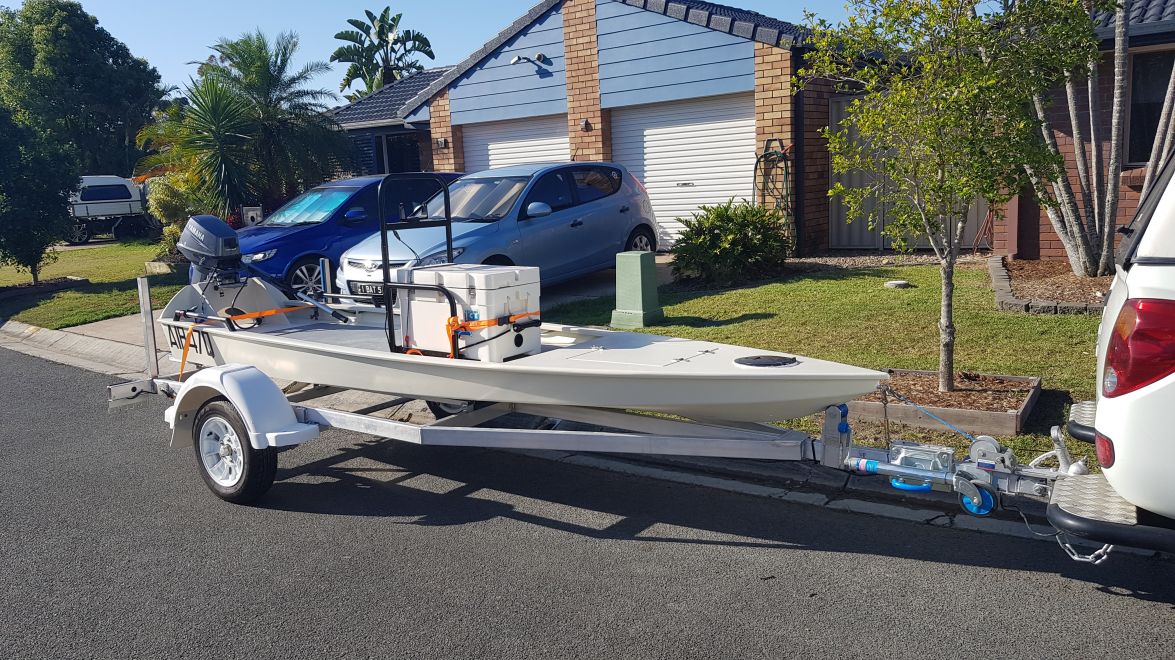
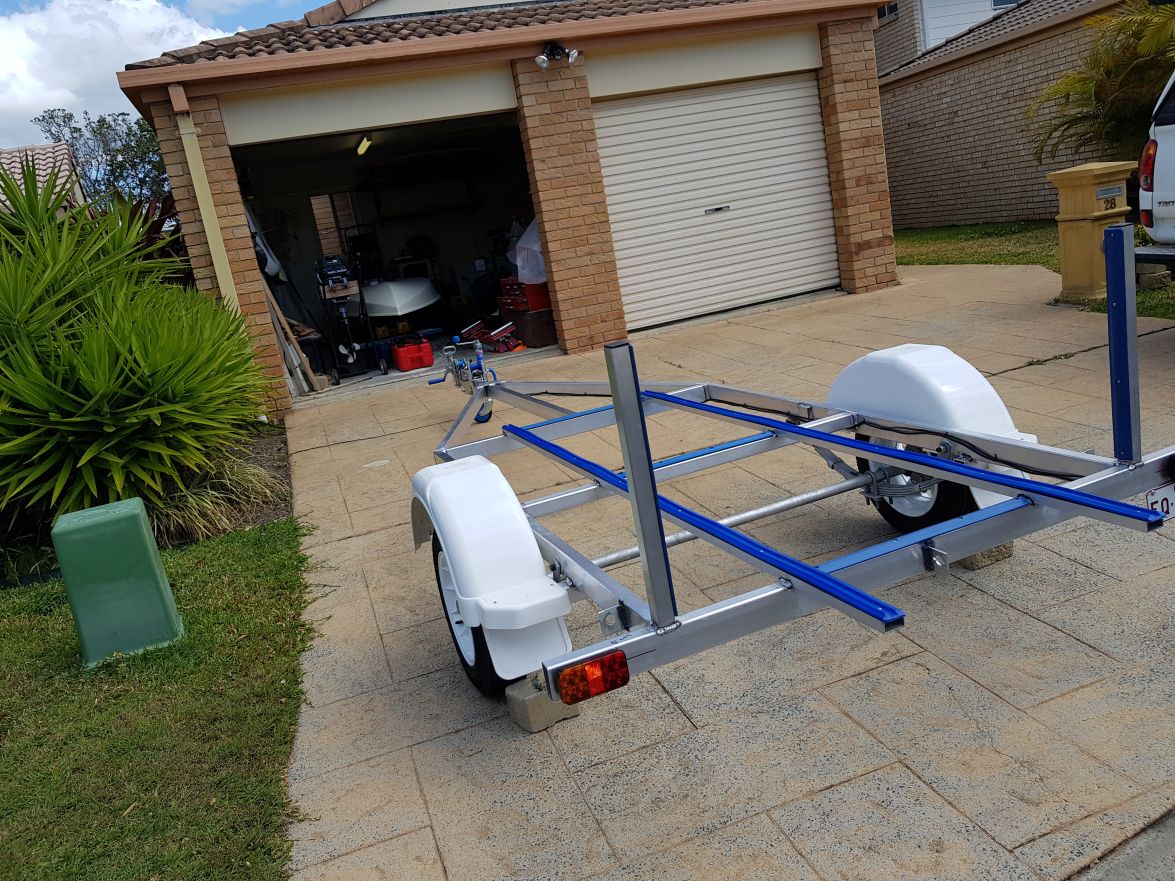
new toys
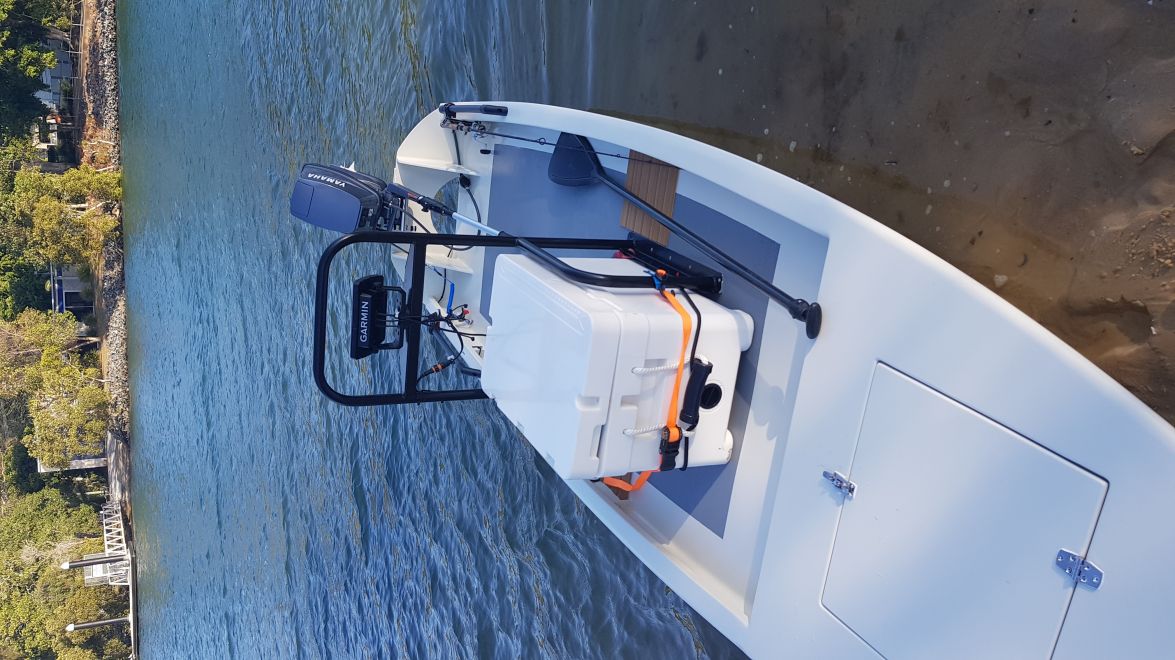
yamaha 8hp 2 stroke.
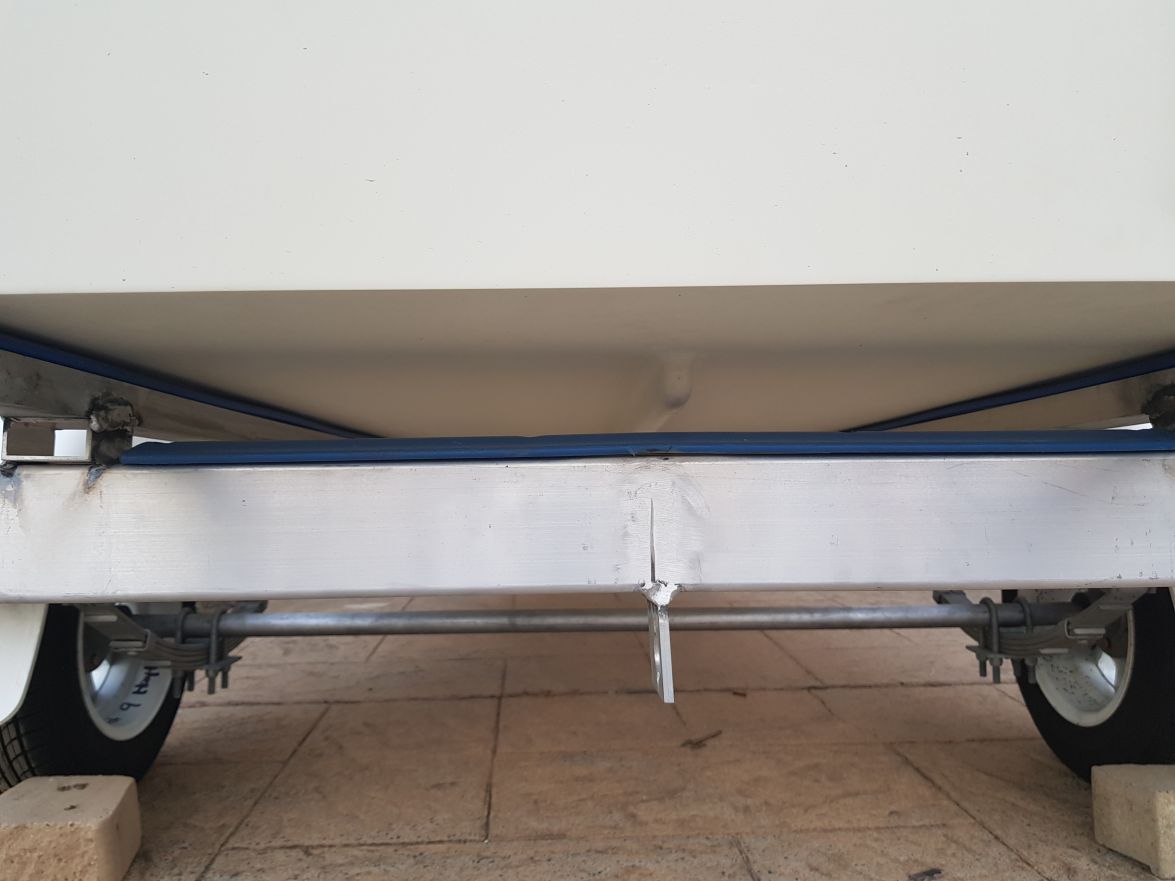
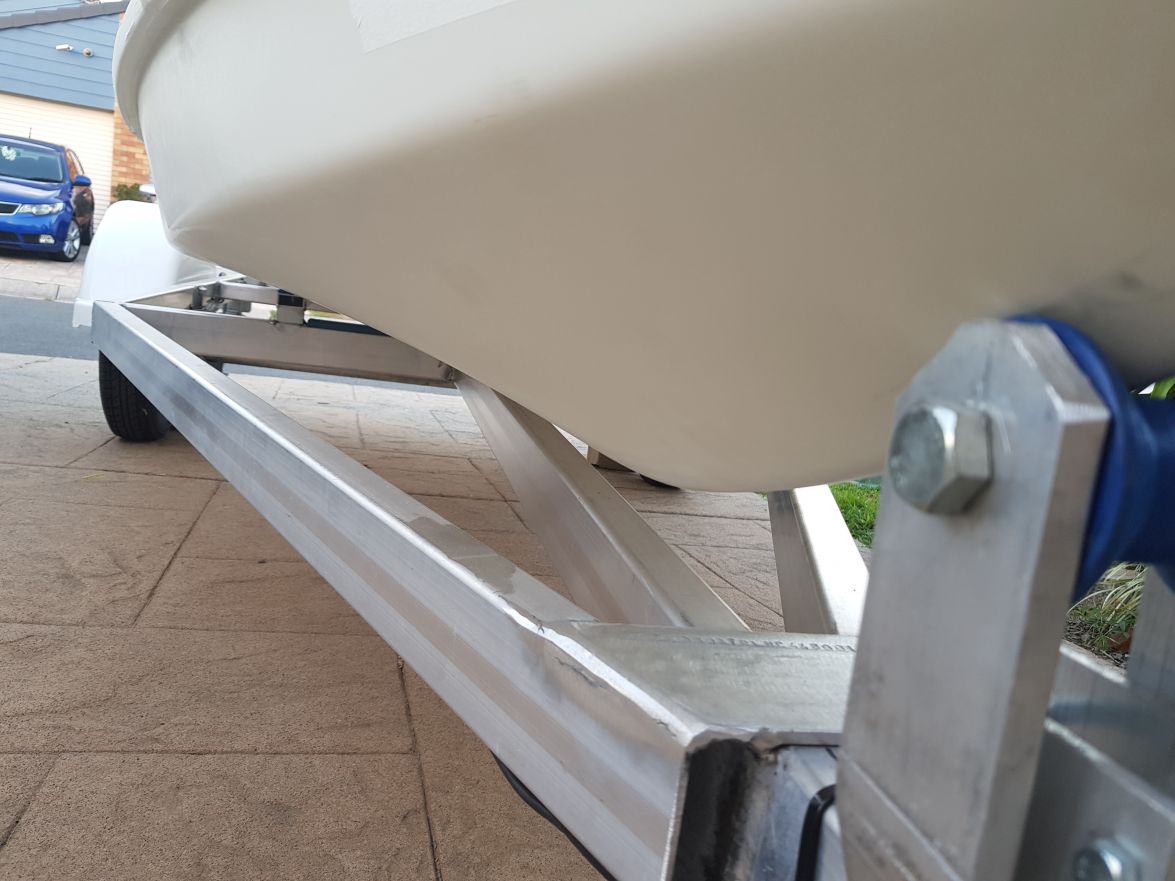
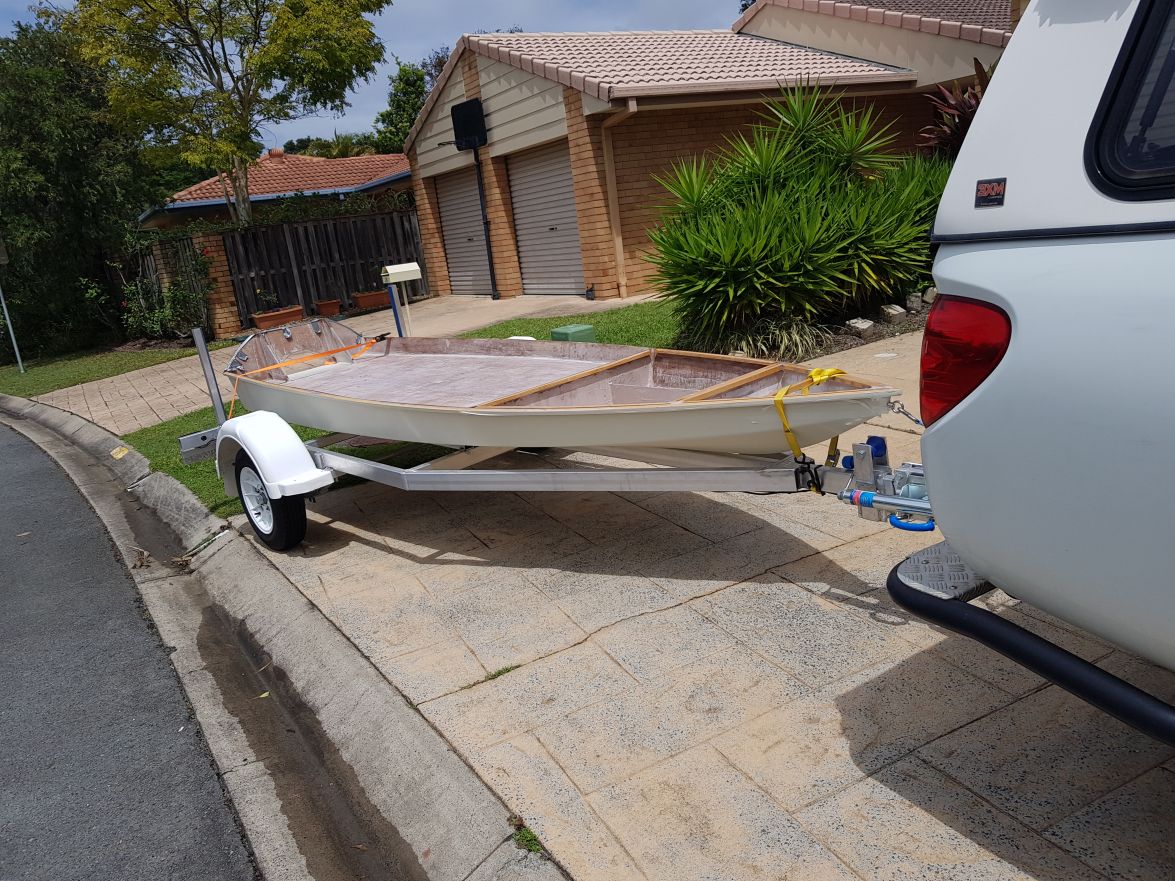
also an ali trailer made by a local welder.
Re: mat australia sk14
Posted: Wed Oct 03, 2018 6:57 am
by mataus
Re: mat australia sk14
Posted: Wed Oct 03, 2018 6:58 am
by mataus
Re: mat australia sk14
Posted: Wed Oct 03, 2018 6:59 am
by mataus
Re: mat australia sk14
Posted: Wed Oct 03, 2018 7:56 am
by Jeff
Nice mataus!! Jeff
Re: mat australia sk14
Posted: Wed Oct 03, 2018 8:09 am
by OrangeQuest
Very nice SK14! I like your plate you added for the sounder/transducer, looks very good and once you mount the transducer it will make it look like it belongs.
Re: mat australia sk14
Posted: Sun May 19, 2019 6:55 am
by jasonmckavanagh
Hey Mat,
I am in Brisbane and have just ordered the plans to start building a SK14 and very excited. Really enjoyed reading your build and seeing the progress. I am a novice at this so any advice will be gladly taken.
Regards
Jason
Re: mat australia sk14
Posted: Wed Jun 05, 2019 10:55 pm
by Jeromesfs14ls
Very nice build you have going there.
Jason, I will say that viewing the forum as you build held you stay motivated and thinking a head. Good luck
Re: mat australia sk14
Posted: Thu Jul 25, 2019 8:51 am
by mataus
hi Guys,
Sorry I have not posted in a while. The build is still coming along slowly.
I will try to update some photos over the next few weeks. I occillate between wanting the boat perfect and getting it finished.
Jason if you want to chat pm me and we can talk over the phone, or if you are down the gold coast you can pop in and see
"elbow grease" in the flesh.
In other news, I sanded my finger prints off the other day. Not that that is a big deal, except I can't open my smart phone!
Also I am getting married on fraser Island in a few weeks. I was hoping to have the boat finished but I am waiting on a grab rail.
Mat
Re: mat australia sk14
Posted: Fri Nov 22, 2019 6:28 am
by mataus
Re: mat australia sk14
Posted: Fri Nov 22, 2019 6:29 am
by mataus
Re: mat australia sk14
Posted: Fri Nov 22, 2019 6:30 am
by mataus
Re: mat australia sk14
Posted: Fri Nov 22, 2019 6:40 am
by mataus
Sorry for the delay guys.
I had planned to try to be detailed with each step, in case it helped someone else. But I have not posted much in the last 12 months or so.
I was thinking that my experience with the build may be helpful to others as I had no experience at all. Not even with the tools when I started.
I have forgotten some details now with regard to each step, as they all have their own challenges. It does feel like 1 step forward and 2 steps back at times.
I will continue to post the photos in case it helps anyone, and I enjoy looking at everyone elses.
Mat
Re: mat australia sk14
Posted: Fri Nov 22, 2019 6:43 am
by mataus
Re: mat australia sk14
Posted: Fri Nov 22, 2019 6:45 am
by mataus
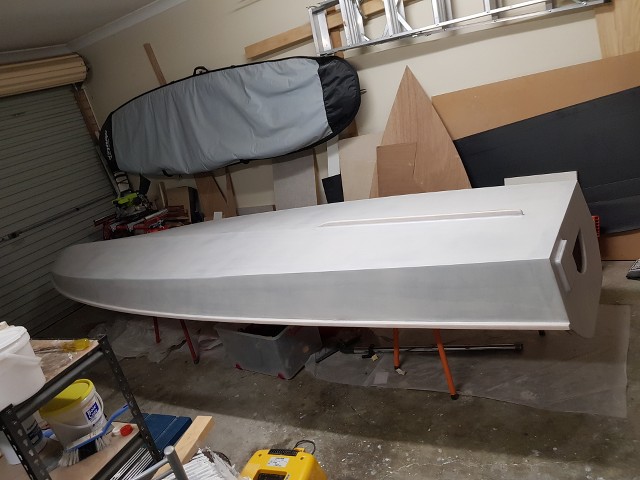
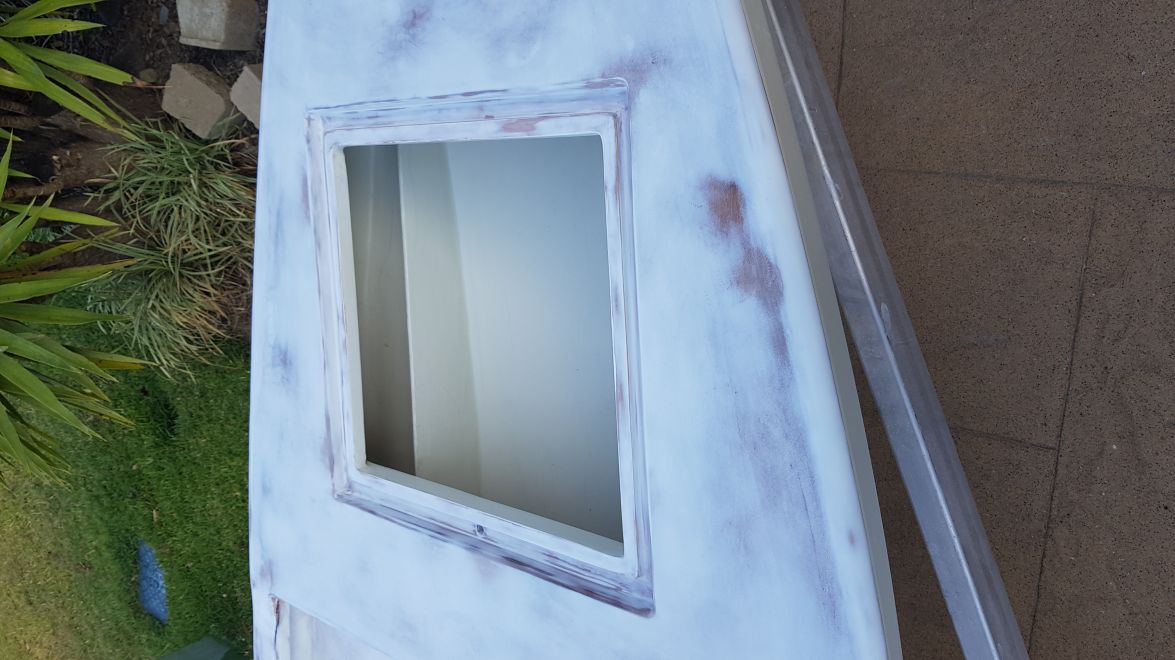
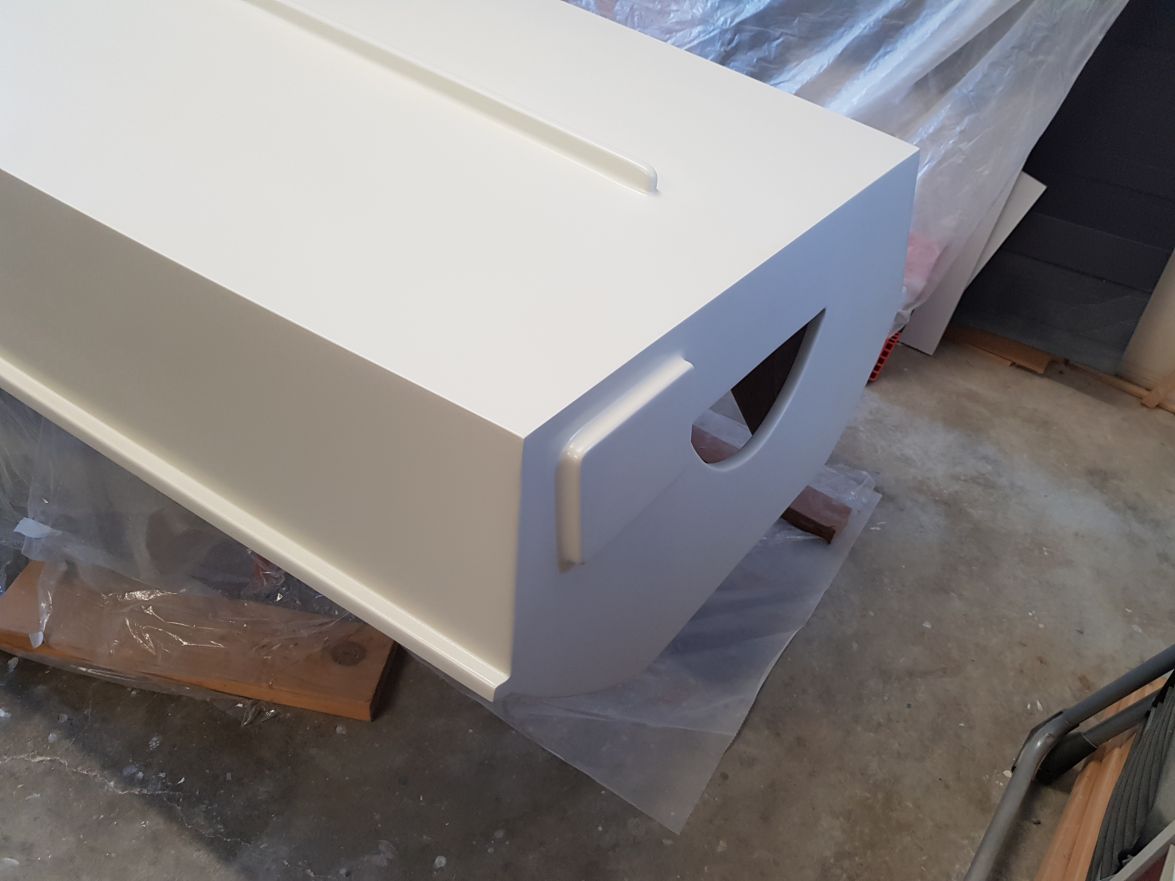
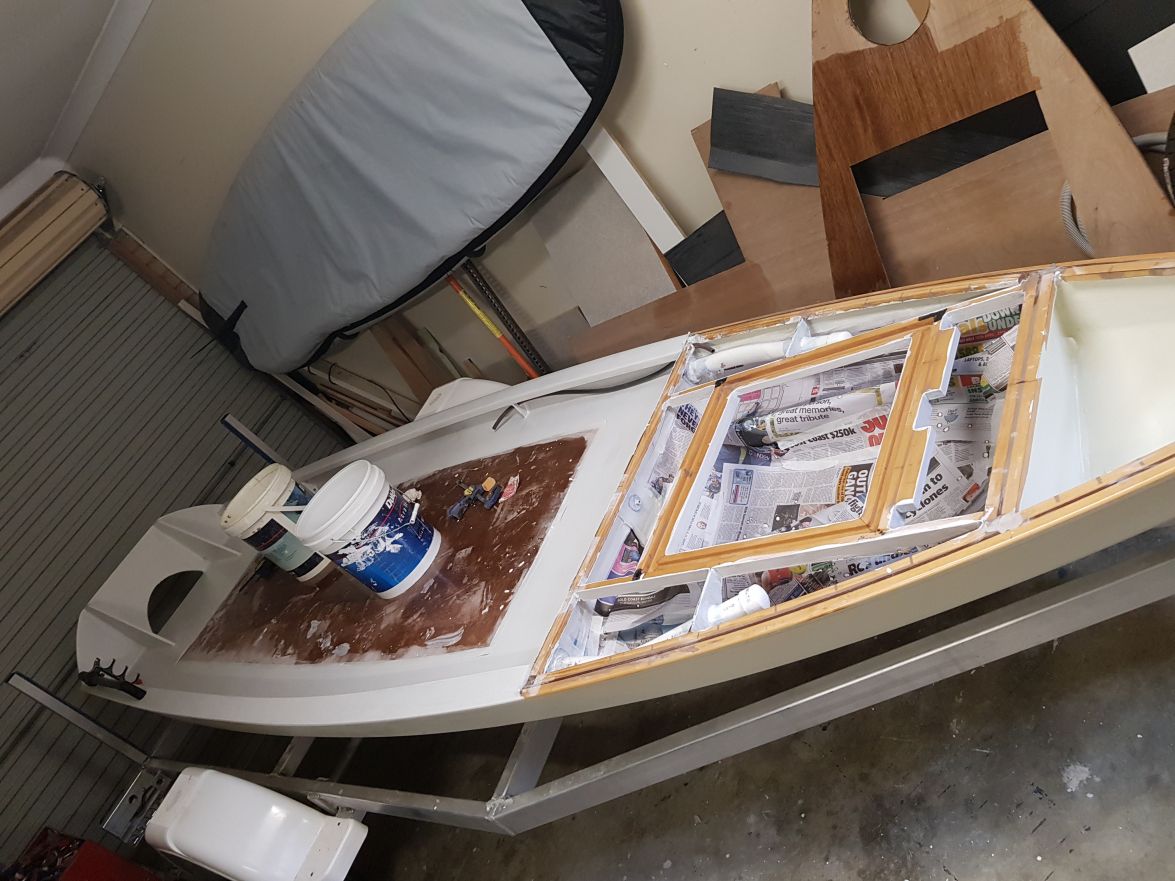
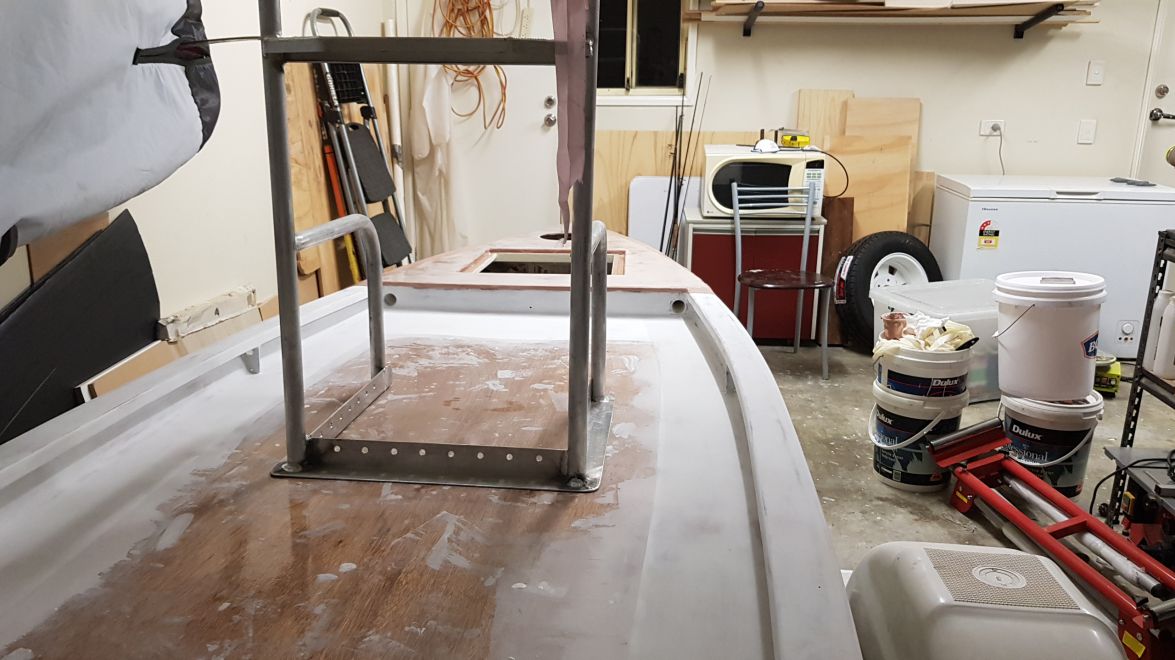
Painting inside the hatches.
Re: mat australia sk14
Posted: Fri Nov 22, 2019 6:57 am
by Jeff
mataus, nice work!!! Jeff
Re: mat australia sk14
Posted: Fri Nov 22, 2019 7:28 am
by mataus
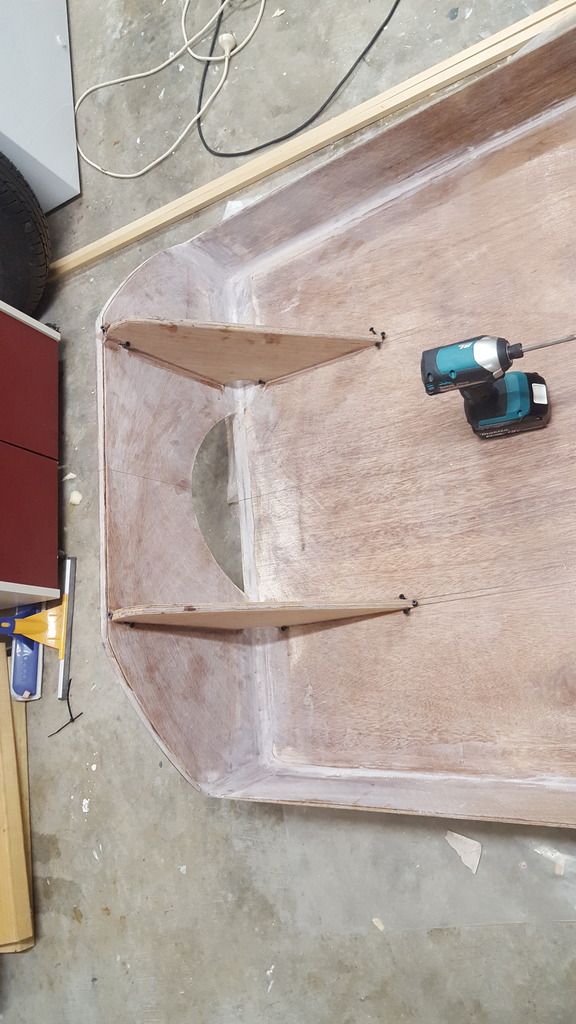
I thought long and hard about the hatches. It would be much quicker and easier to get plastic hatches and drop them in. I did however decide to try to make a waterproof(ish) hatch with a gutter. Mike's build was too good to ignore! And this project was all about learning. I thought I would use a prefab one in the nose to see the difference. Then it was back to the forum to search for ways to do it. Thankfully many generous people have posted their versions.
I also wanted to be able to store fly rods along the sides but frame b was about 10cm (5inch) too far caudal to allow rods to lie on the soul. So I thought I would put in rod tubes. This also meant I could move them forward which would make it easier to stow and retrieve with regard to the balance of the boat.
At this time I also started to think about a sounder and where and how i was going to rung cables and where I was going to put the fuel tank. Small gunwales (inwales) to hide this stuff under.
Re: mat australia sk14
Posted: Fri Nov 22, 2019 7:30 am
by mataus
dry fit the idea
Re: mat australia sk14
Posted: Fri Nov 22, 2019 7:31 am
by mataus
h[img]ttp://gallery.bateau2.com/albums/userpics/90098/normal_20181207_215820~0.jpg[/img]
Re: mat australia sk14
Posted: Fri Nov 22, 2019 7:32 am
by mataus
Re: mat australia sk14
Posted: Fri Nov 22, 2019 7:42 am
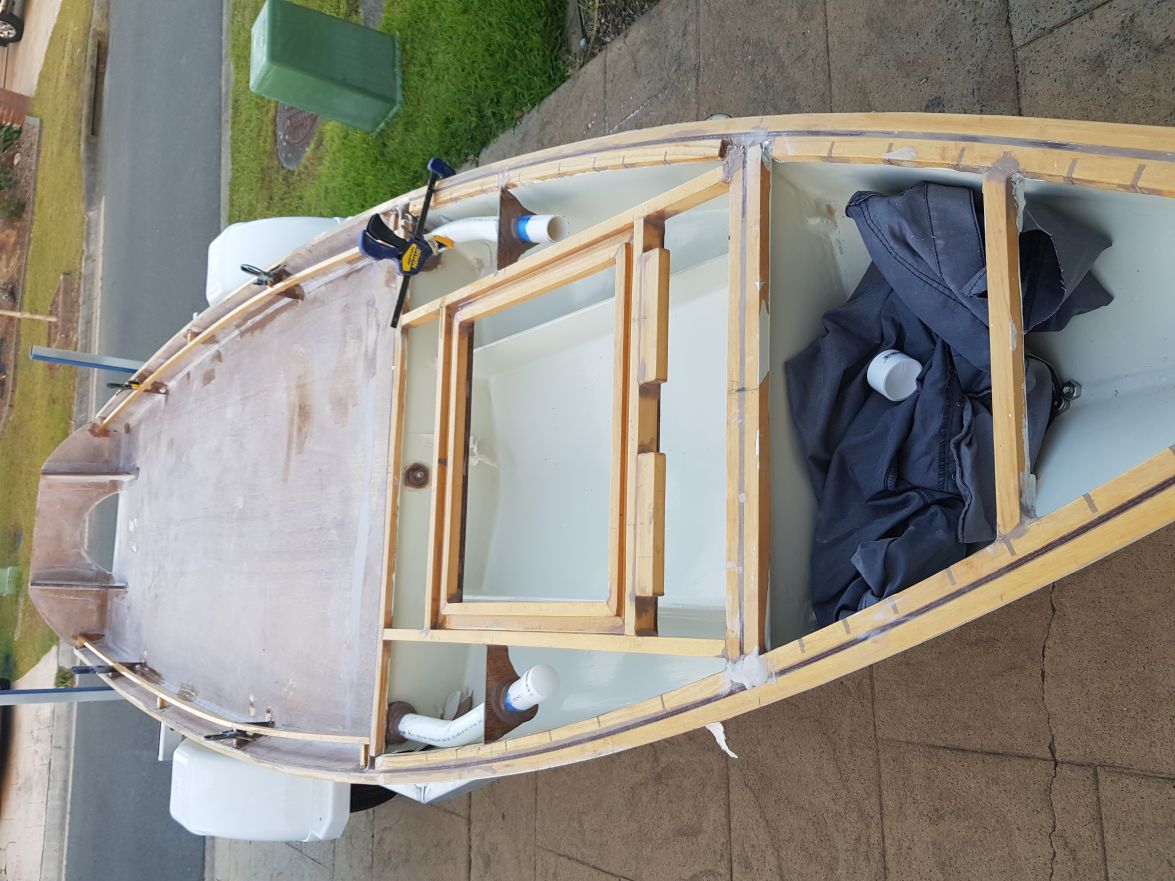
by mataus
The idea was to box in the shape I wanted which was slightly wider aft, and slightly wider than the stringers to make it easier to reach in.
I then routered a piece of timber (sorry I can't remember the dimensions). Then I cut it on 45 to make a square. As it was not square, sanding made it fit and thickened epoxy worked it's magic in the gaps. the routered piece was dropped 6mm (1/4inch) to allow for a foam/rubber gasket.
Re: mat australia sk14
Posted: Fri Nov 22, 2019 7:55 am
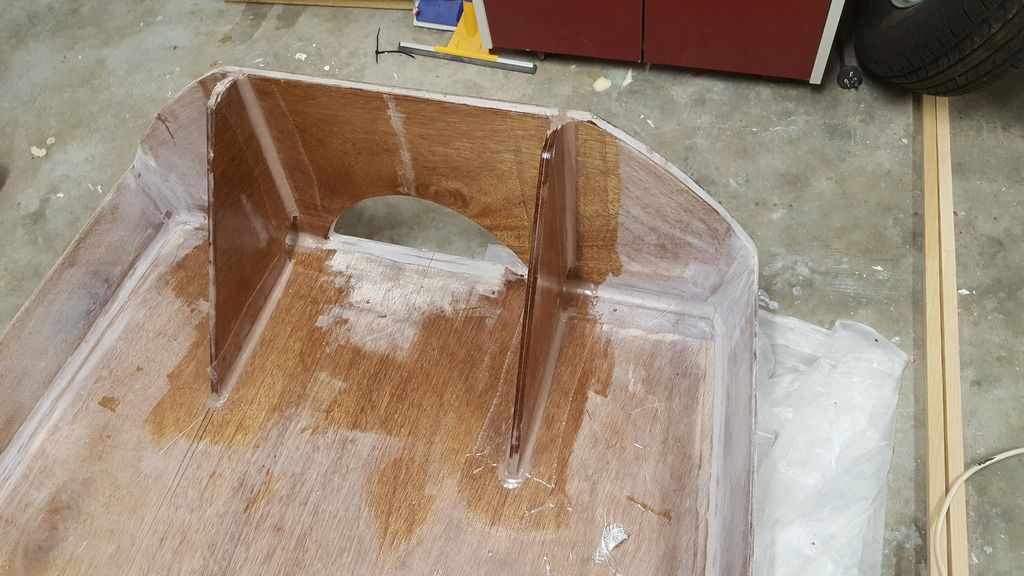
by mataus
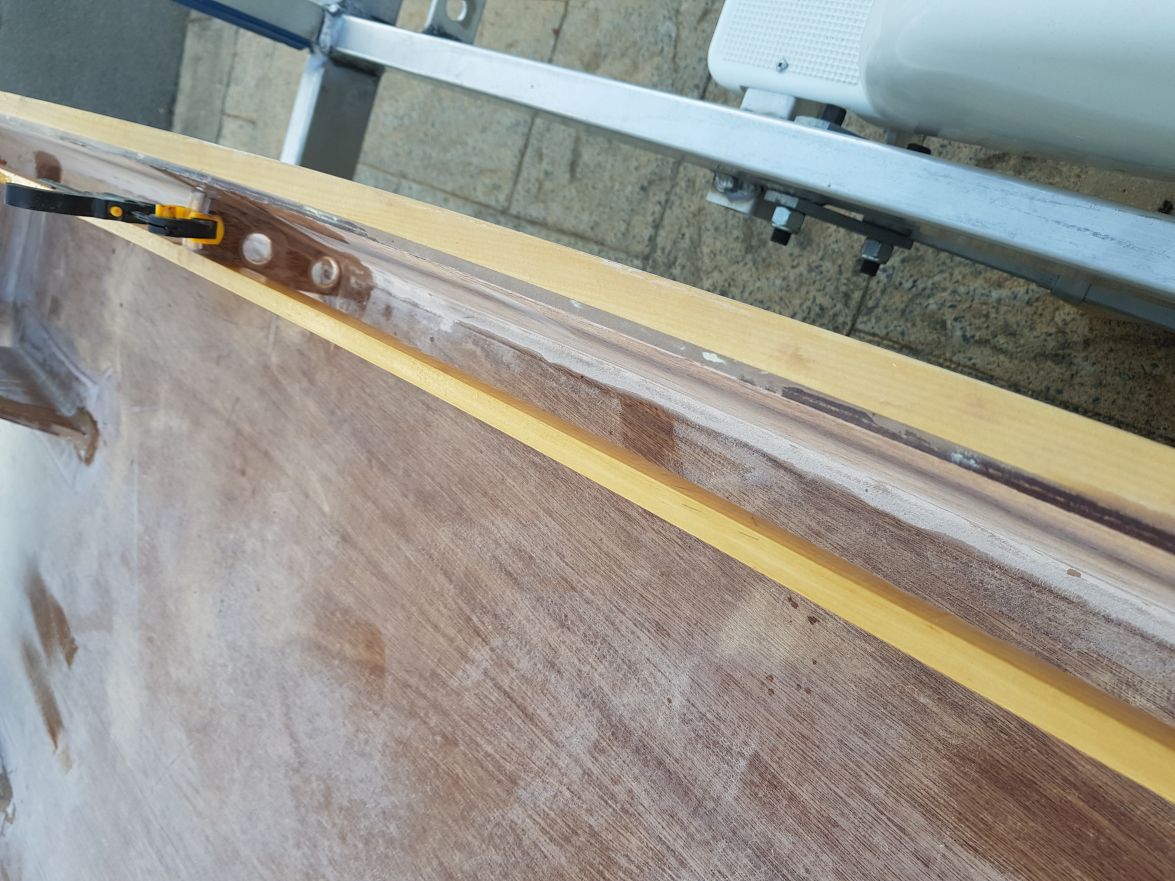
The gunwales were made by:
setting up a stop block on the drop saw so i could make repeatable length cuts in 19cm (3/4ish inch) square timber (Australian hoop pine). Evenly space these and epoxying them to a longer inwale as spacers letting that set up then clamping that to the hull the next day. later I made a cardboard template for 6mm (1/4) ply to cover.
It may have been ok but there was some flex before the ply went on so each side got 2 ribs for support. these were drilled, filled, redrill and pvc rings epoxied in. the lower ring was for drainage and the upper one was to run the cables. you can now stand on them.
Re: mat australia sk14
Posted: Fri Nov 22, 2019 7:56 am
by mataus
Re: mat australia sk14
Posted: Fri Nov 22, 2019 7:57 am
by mataus
Re: mat australia sk14
Posted: Fri Nov 22, 2019 7:58 am
by mataus
Re: mat australia sk14
Posted: Fri Nov 22, 2019 8:07 am
by mataus
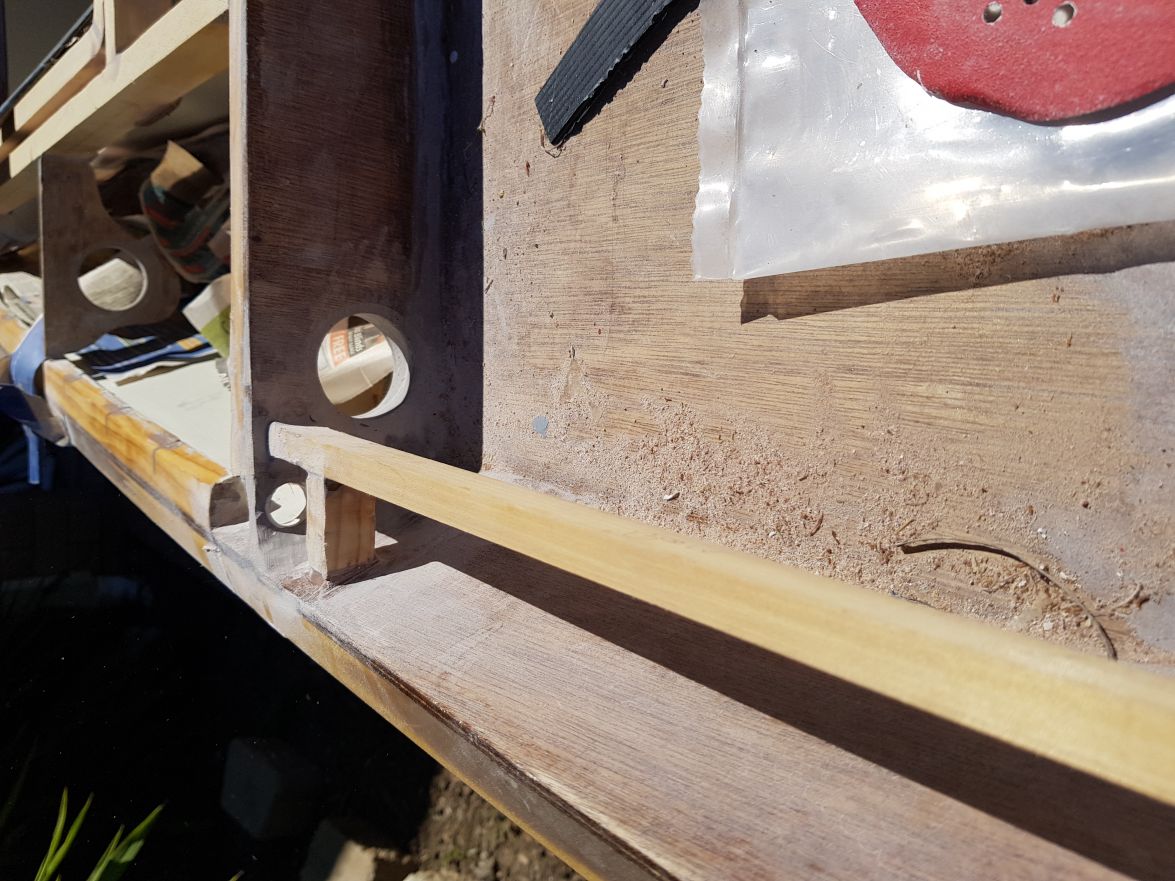
The pvc rod tube holes were drilled, filled and redrilled. This was a little harder as it was only 6mm (1/4") thick vertical and quite a large surface area.
I used clamps and more coreflute as backer.I had heard you cant get epoxy /glass to stick to pvc. I was searching various techniques (heat, sand etc) but settle on pvc glue which you then epoxy. This seemed to work well. A heat gun was used to bend the pvc to the hull shape. I also epoxied in a pvc ring under one gunwale so I could run a fuel line.
Re: mat australia sk14
Posted: Fri Nov 22, 2019 8:08 am
by mataus
Re: mat australia sk14
Posted: Fri Nov 22, 2019 8:09 am
by mataus
Re: mat australia sk14
Posted: Fri Nov 22, 2019 8:10 am
by mataus
Re: mat australia sk14
Posted: Fri Nov 22, 2019 8:13 am
by mataus
Re: mat australia sk14
Posted: Fri Nov 22, 2019 8:14 am
by mataus
Re: mat australia sk14
Posted: Fri Nov 22, 2019 8:16 am
by mataus
Re: mat australia sk14
Posted: Fri Nov 22, 2019 8:53 am
by Dougster
Very nice! Wish I'd done the pvc thing on mine. I run the transducer, sonar power, and trolling motor power under the gunwale and it's a bit messy. The rod tubes are nice too. You're going the extra mile and it sure is paying off.
Dougster
Re: mat australia sk14
Posted: Mon Nov 25, 2019 4:45 am
by mataus
Re: mat australia sk14
Posted: Mon Nov 25, 2019 4:53 am
by mataus
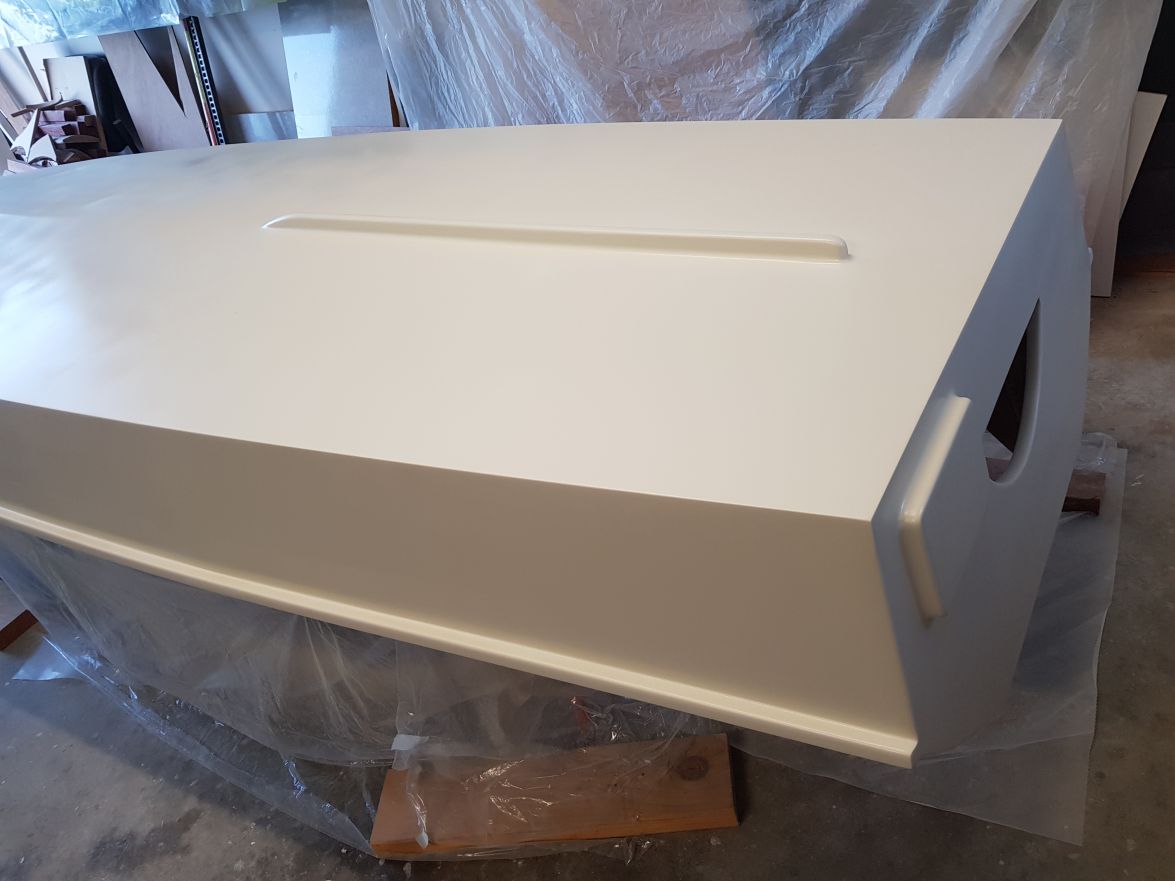
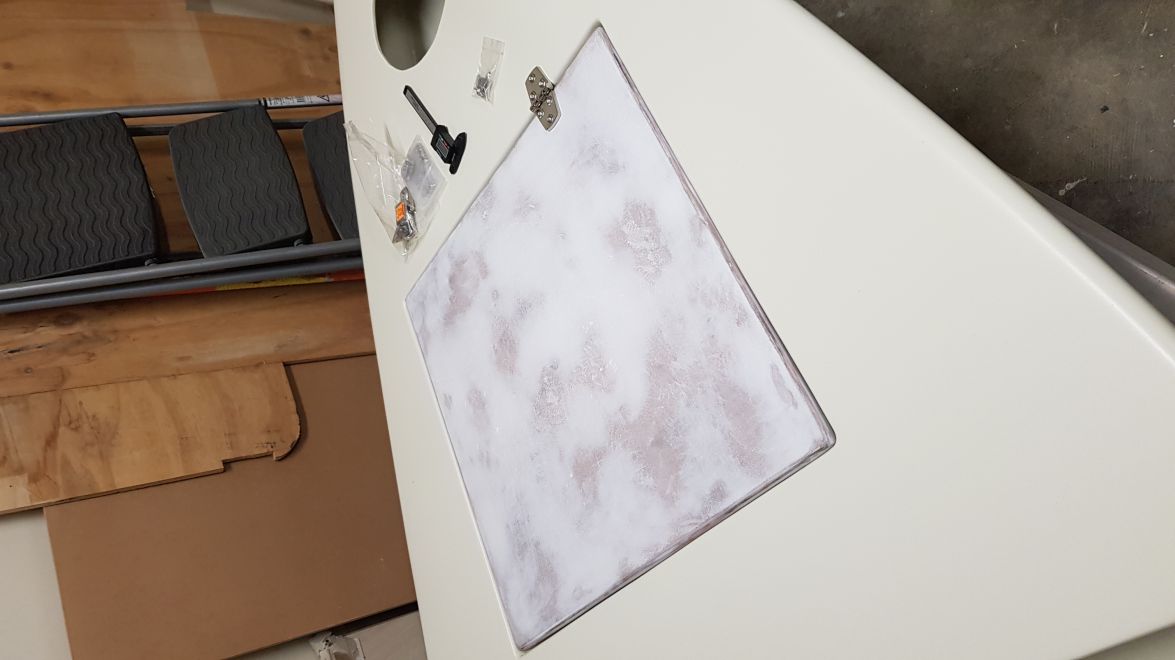
the extra 2 bits of timber on the bow side of the hatch are backers for the hinges.
I am really happy with how the hatch turned out but I would have liked to recess it more and make the lid out of 12mm (1/2") instead of 6mm (1/4") I didn't because of the weight, but the smallest screws i could find are 12mm which made securing the hinges into the lid hard. I placed the screws removed then drilled and refilled. Then replaced the screws, and then replaced those screws with screws filed to 6-8mm. I also used epoxy and sika to help with adhesion.
Re: mat australia sk14
Posted: Mon Nov 25, 2019 4:55 am
by mataus
Re: mat australia sk14
Posted: Mon Nov 25, 2019 4:59 am
by mataus
time for the lid!
Re: mat australia sk14
Posted: Mon Nov 25, 2019 5:11 am
by mataus
The lid also was more difficult than I expected. I had to cut the 2 openings out, but I cant trace the hole under when the lid is on as the is no openings.
I thought of several different methods. In the end I just took several measurements checked them multiple times, then drilled pilot holes where I thought the corners of the hatch would be and I needed to just one by a few mm.
Re: mat australia sk14
Posted: Mon Nov 25, 2019 5:12 am
by mataus
Re: mat australia sk14
Posted: Mon Nov 25, 2019 5:17 am
by mataus
building up the edges to match
Re: mat australia sk14
Posted: Mon Nov 25, 2019 5:18 am
by mataus
Re: mat australia sk14
Posted: Mon Nov 25, 2019 5:19 am
by mataus
Re: mat australia sk14
Posted: Mon Nov 25, 2019 5:22 am
by mataus
Re: mat australia sk14
Posted: Mon Nov 25, 2019 5:26 am
by mataus
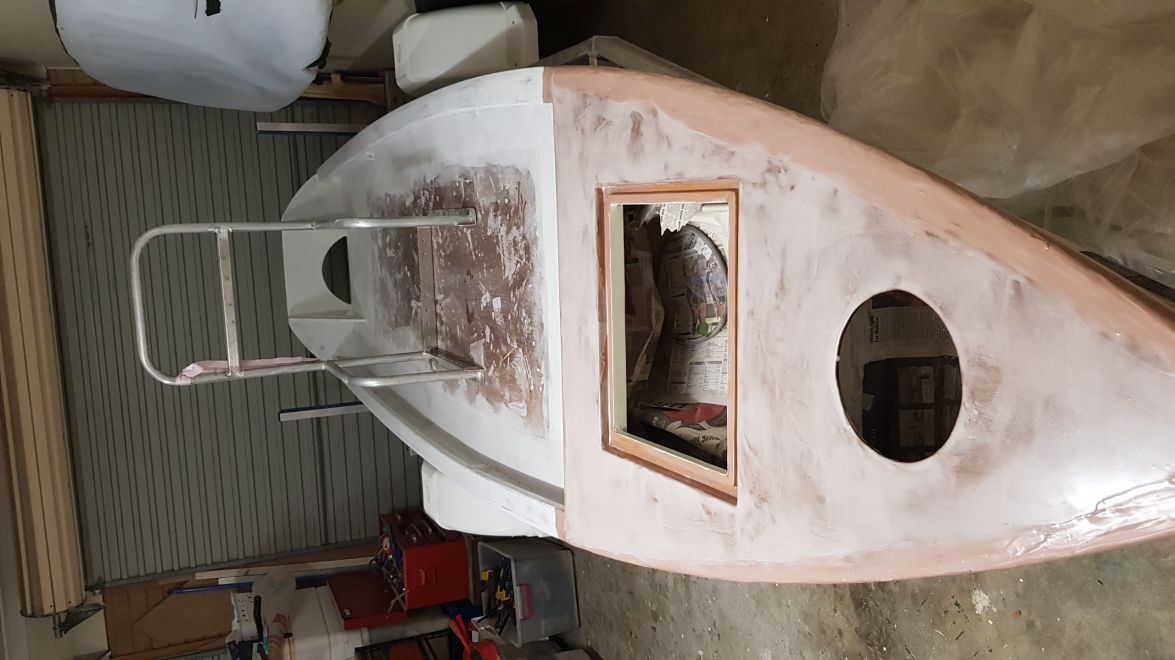
fairing the topsides
Re: mat australia sk14
Posted: Mon Nov 25, 2019 5:27 am
by mataus
time for paint
Re: mat australia sk14
Posted: Mon Nov 25, 2019 9:33 am
by Jeff
Nice progress!!! Jeff
Re: mat australia sk14
Posted: Wed Nov 27, 2019 5:17 am
by Eric1
Outstanding!
Re: mat australia sk14
Posted: Fri Nov 29, 2019 8:21 am
by mataus
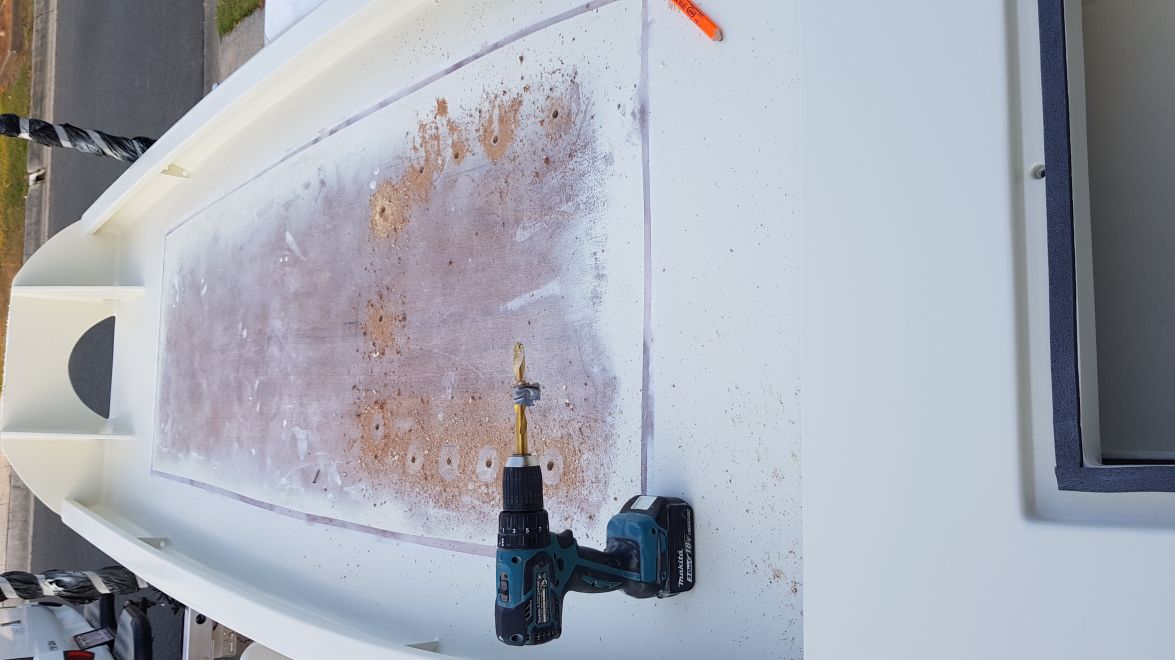
more drilling and refilling.
Re: mat australia sk14
Posted: Fri Nov 29, 2019 8:25 am
by mataus
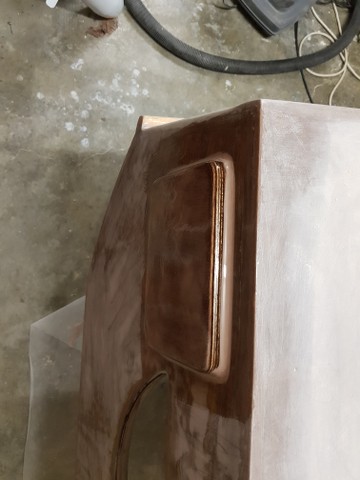
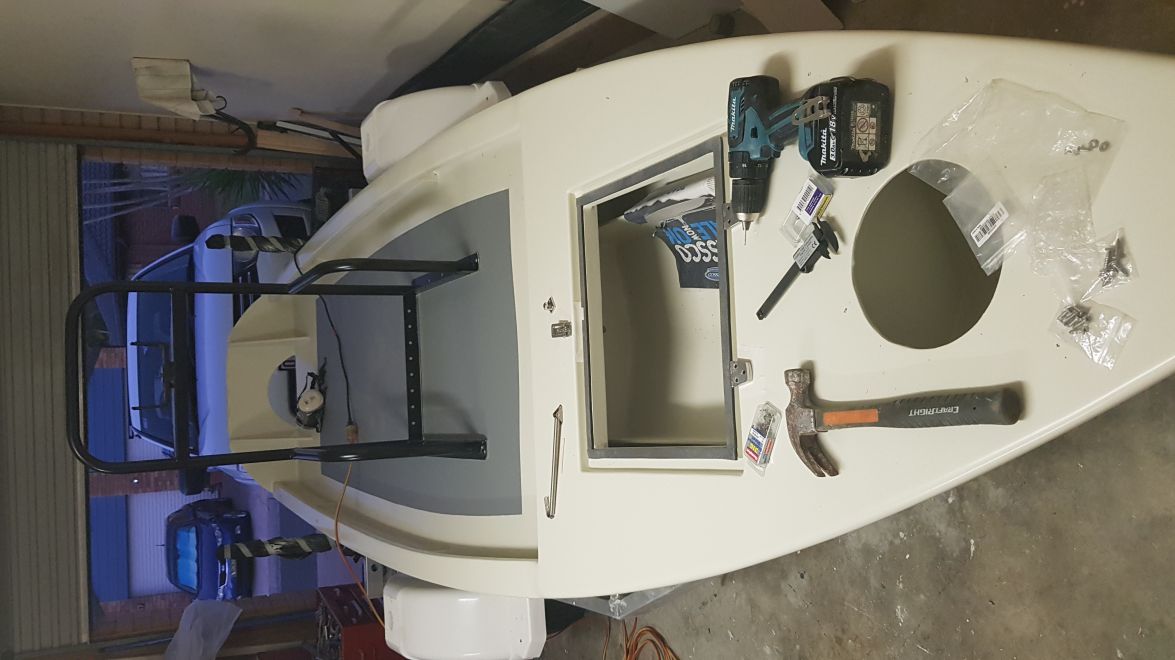
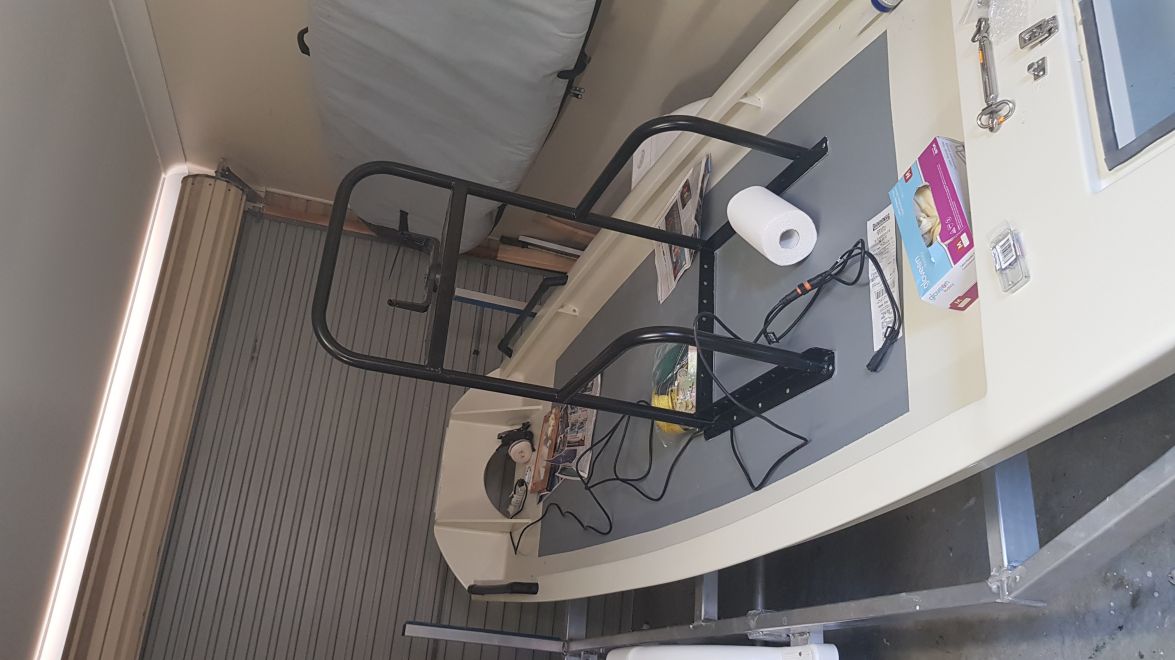
In my reading of other sk14 builds, I saw the grab bar is to be over station/frame c.
due to the size of my grab bar, the length of my tiller extension and i wanted to make sure I had a last a few screws in the doubler I mover the grab bar back about 50-100mm (3-4inch ish).
Re: mat australia sk14
Posted: Fri Nov 29, 2019 8:38 am
by mataus
I used tape on the drill bit to get the right depth (few mm longer than the screws.) then I refilled with thickened epoxy and recoated the entire area. I got some 5200 off eBay (not sold in shops that I can find in Australia) and use a liberal coat on the bottom of the grab rail, around all screws and screw heads and a bead along all edges.
Then it was onto finishing the hatch. I enjoyed making the hatch, but it added lots of time to the build. I was going to router in the hinges but given it is only 6mm I didn't think this would be a good idea. In fact If I had my time over I think I would make the hatch out 12mm so it would be easier to screw into. 12mm (1/2 inch) long screws were the shortest I could find. So I filed down screws.
Initially I was also going to have a nice recessed latch but all of them I could find looked like they would leak through the mechanise. I know there is no such thing as a 100% waterproof hatch, but after I had just added significant amounts of time to the build I didn't want to undo my work with leaky latches. So I went with a simple ontop one. It works well but it is only a matter of time before some fly line finds it.
Re: mat australia sk14
Posted: Fri Nov 29, 2019 8:39 am
by mataus
Re: mat australia sk14
Posted: Fri Nov 29, 2019 8:40 am
by mataus
Re: mat australia sk14
Posted: Fri Nov 29, 2019 8:41 am
by mataus
Re: mat australia sk14
Posted: Fri Nov 29, 2019 8:43 am
by mataus
Re: mat australia sk14
Posted: Fri Nov 29, 2019 8:47 am
by mataus
The grab rail and the Painter were the only items that I used 5200 on. all the rest I used Marine Sika. I found It harder to work with. That is to get a nice smooth bead/fillet.
Re: mat australia sk14
Posted: Fri Nov 29, 2019 8:52 am
by mataus
the floor was easy.
I was a textured paint that the boat shop sells. It is water based quite thick and has small chunks of material (rubber I think?) They recommend it for boats but I think it is made for playground and outdoor living areas etc. It was easy to work with, I like the feeling under foot and it looks good. I have however noticed some scuff marks from where I tie down the esky (cooler) after only a few trips.
Re: mat australia sk14
Posted: Fri Nov 29, 2019 8:53 am
by mataus
Re: mat australia sk14
Posted: Fri Nov 29, 2019 8:58 am
by mataus
I also 5200 a thin strip of white chopping board ontop of the transom so the outboard wouldn't rub. I was going to use a stainless strip but the guy at the chandlery said that was likely to make a tinny noise against the outboard and that cutting board/hdpe would be a better option.
Re: mat australia sk14
Posted: Fri Nov 29, 2019 9:00 am
by mataus
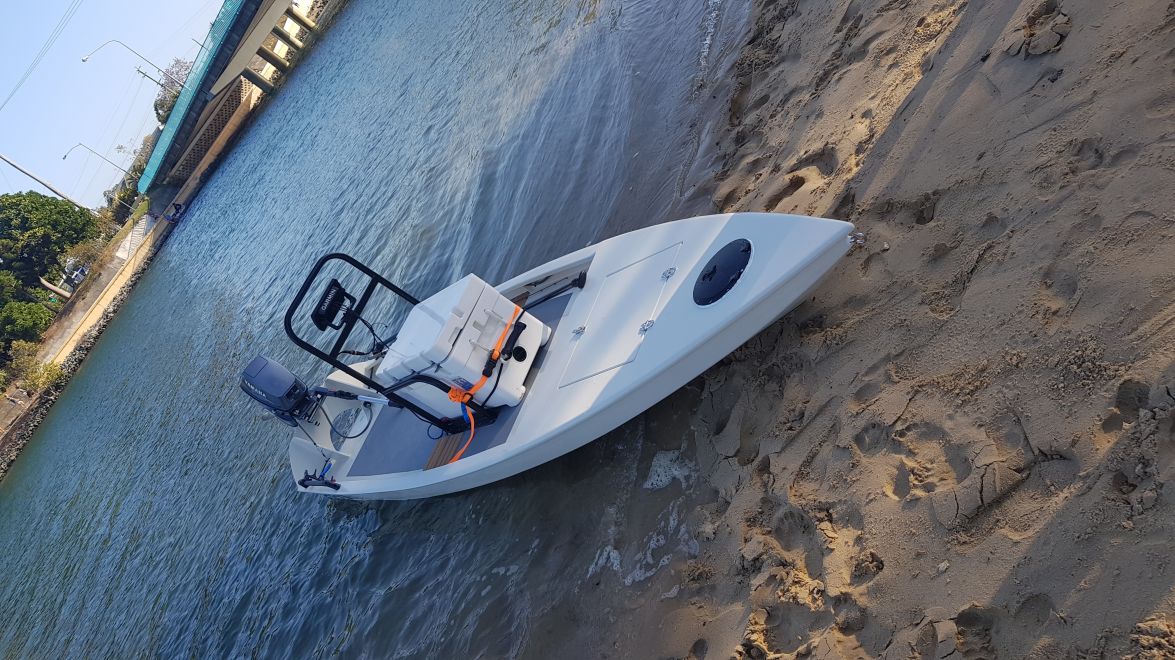
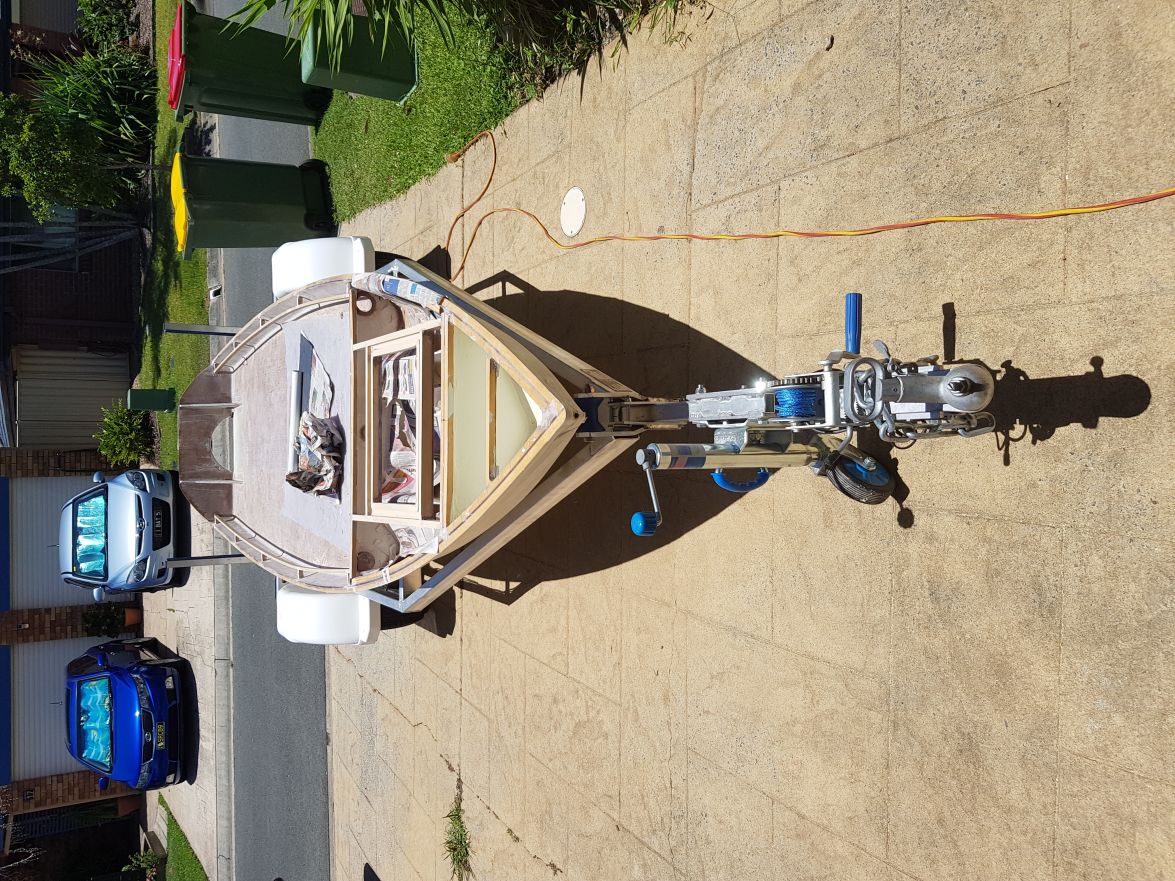
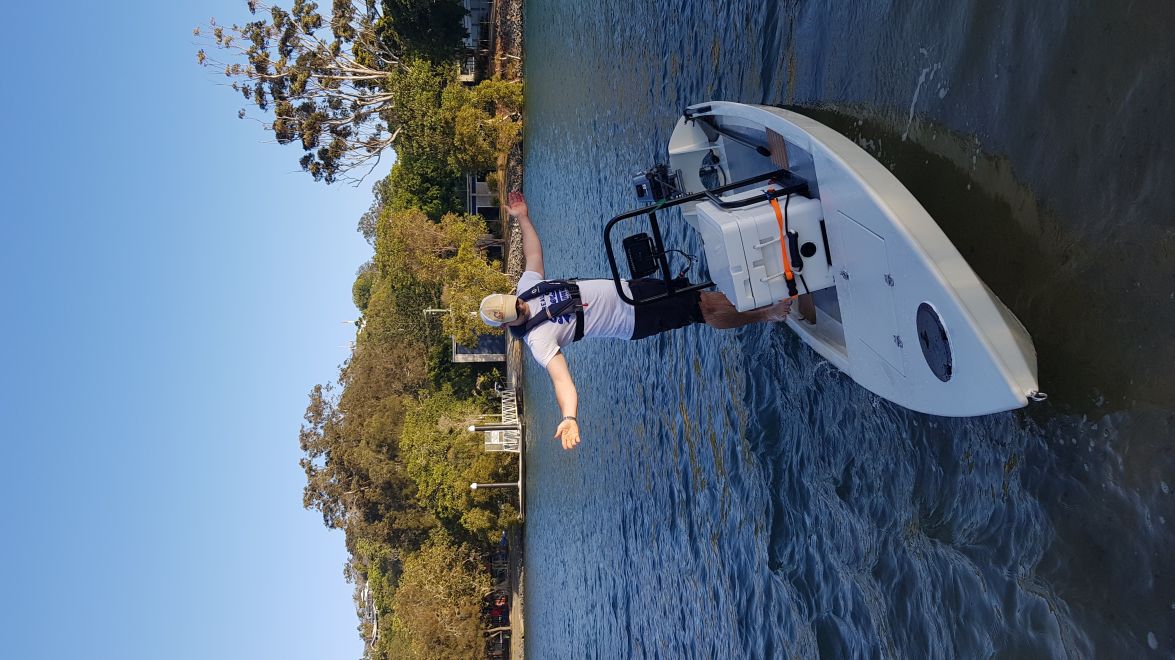
She Floats.
Re: mat australia sk14
Posted: Fri Nov 29, 2019 9:01 am
by mataus
Re: mat australia sk14
Posted: Fri Nov 29, 2019 9:03 am
by mataus
Re: mat australia sk14
Posted: Fri Nov 29, 2019 9:03 am
by mataus
Re: mat australia sk14
Posted: Fri Nov 29, 2019 9:04 am
by mataus
Re: mat australia sk14
Posted: Fri Nov 29, 2019 9:05 am
by mataus
Re: mat australia sk14
Posted: Fri Nov 29, 2019 9:06 am
by mataus
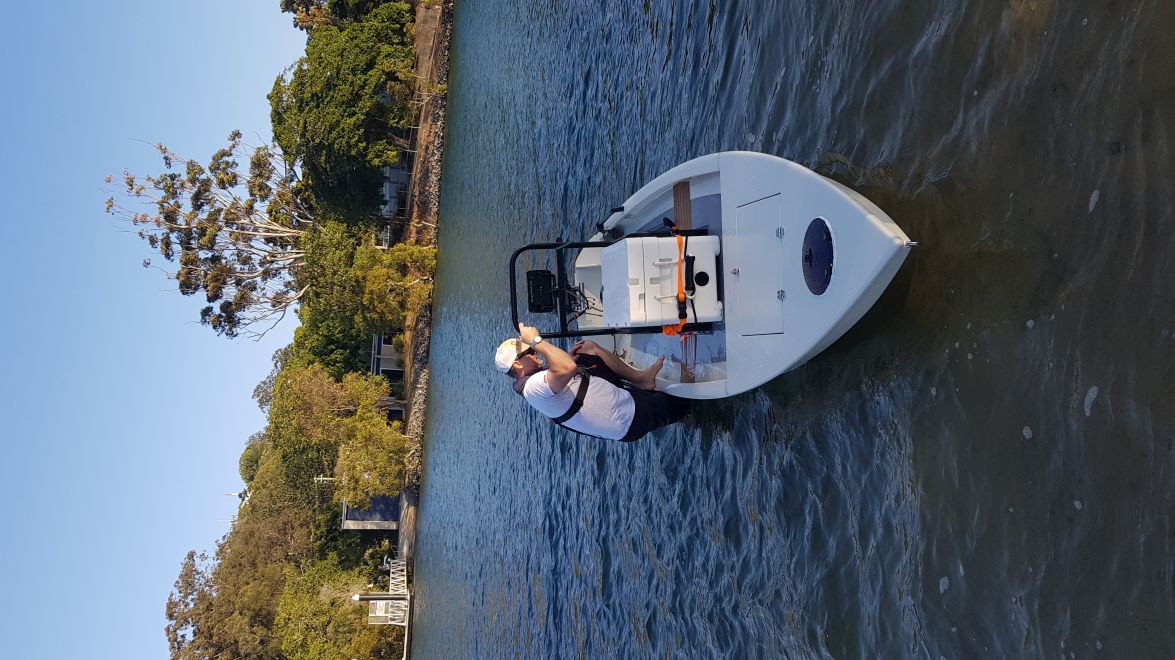
stability test

Re: mat australia sk14
Posted: Fri Nov 29, 2019 9:07 am
by mataus
Re: mat australia sk14
Posted: Fri Nov 29, 2019 9:11 am
by mataus
Re: mat australia sk14
Posted: Fri Nov 29, 2019 12:23 pm
by cape man
Nice!
Re: mat australia sk14
Posted: Fri Nov 29, 2019 11:54 pm
by Fuzz
Man that went from paint to in the water quickly! Boat looks great and lots of fun
Re: mat australia sk14
Posted: Sun Dec 01, 2019 6:17 am
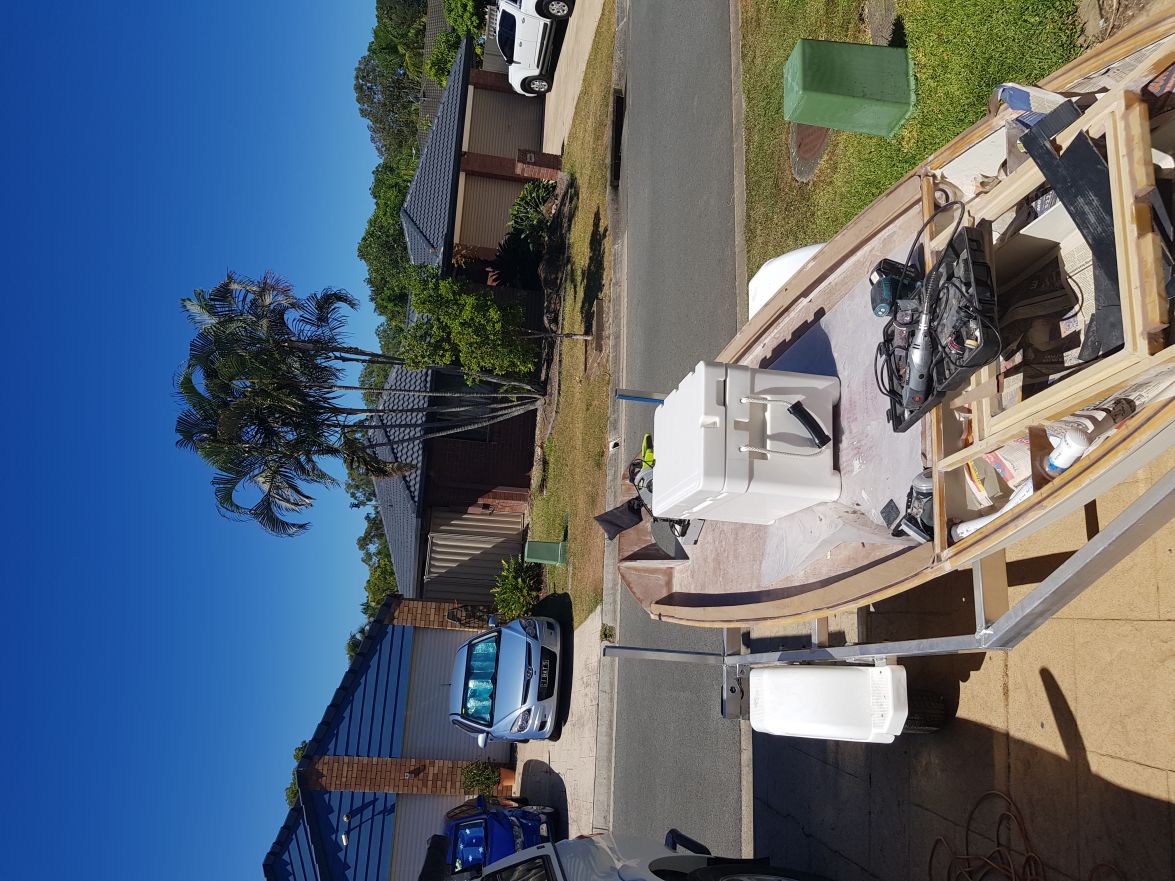
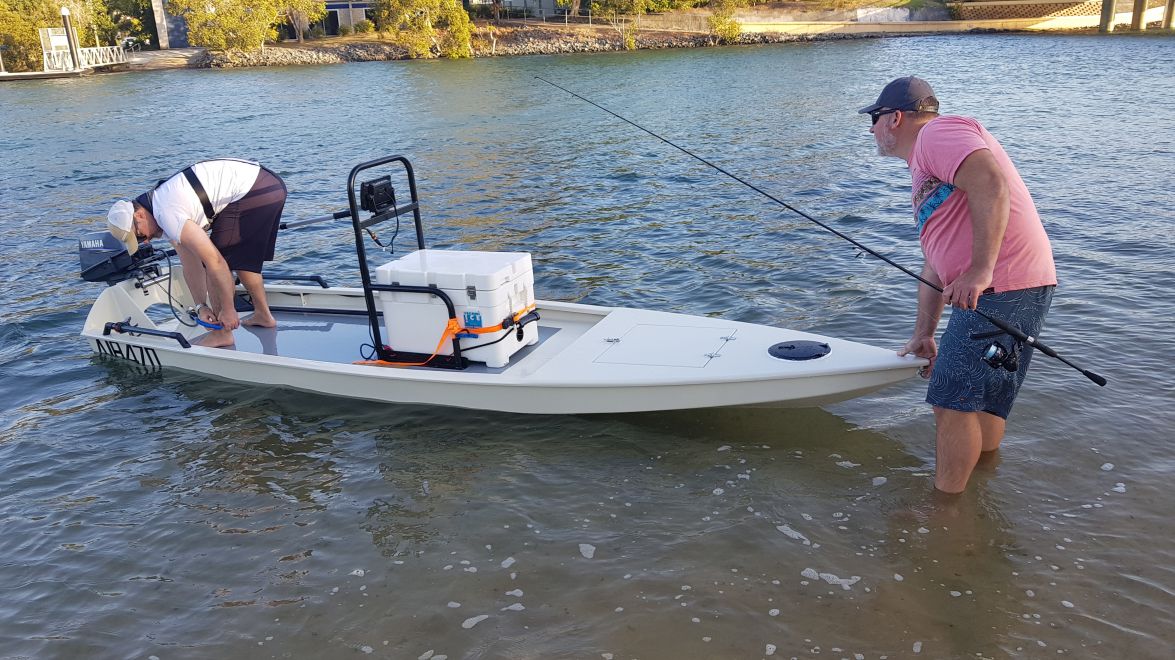
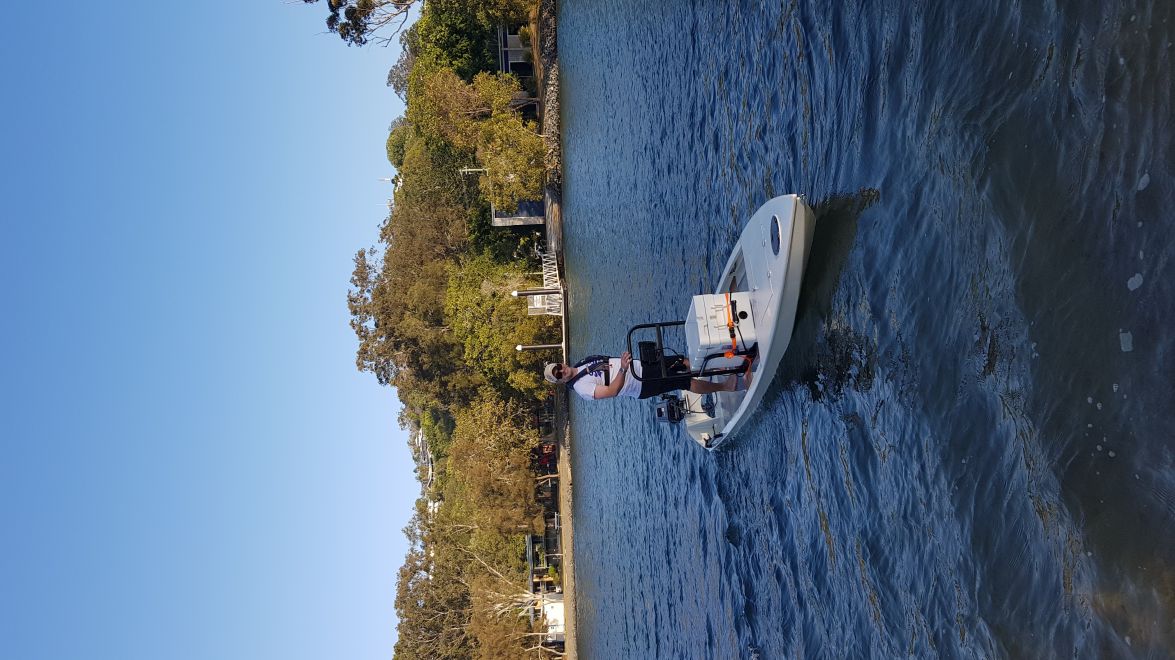
by mataus
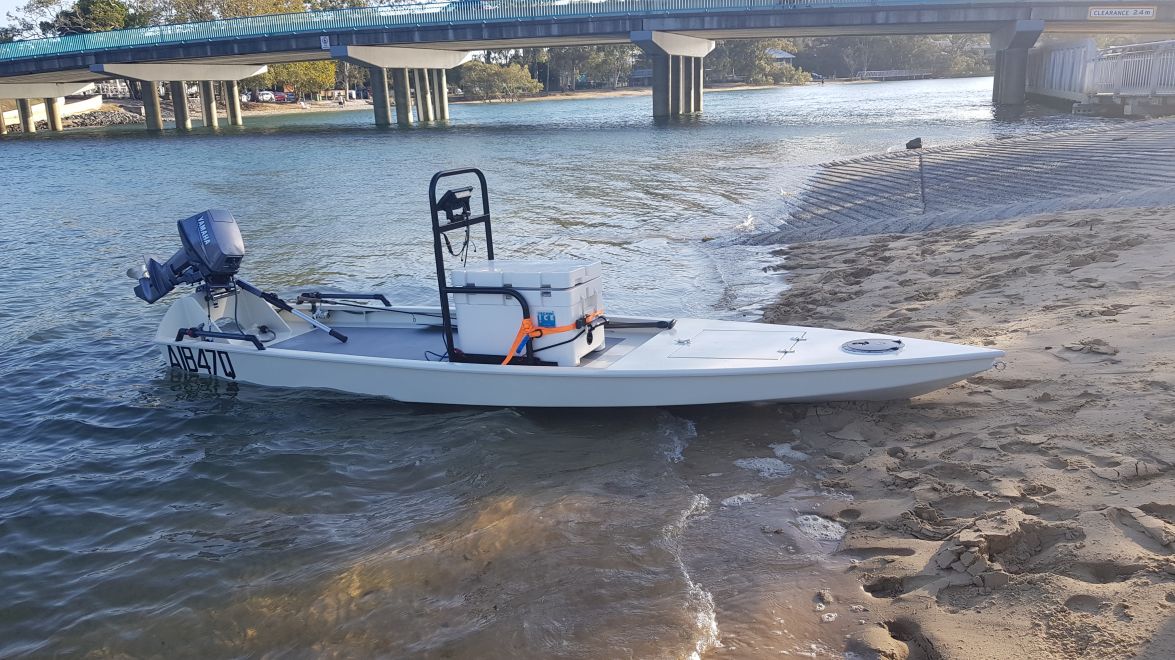
I finished her a few weeks ago. I had a trip planned so there was a big push over a month or so to finish, so i could take her. As it turned out the weather was not appropriate so I went in a mate's larger boat.
I will try to get some videos on the net.
In case anyone was wondering. with the 8hp my build goes 35km/hr (19knots/22mph) wot. I will check the prop I assume standard?? and no tacho.
I still need to install the front h- rails. I am also thinking of beach wheels.
Also, for the fishing i do an electric trolling motor would be very handy. However weights are not listed. I am worried about deploying it I put it on the nose and whether it goes bow or aft I am worried about the weight of the motor and the battery.
Any thoughts??
Re: mat australia sk14
Posted: Sun Dec 01, 2019 12:54 pm
by Dougster
My SK14 handles a trolling motor plus the battery on the bow fine. It did so before I put a 5 horse tohatsu on and after as well. It also barely planed with the 5 horses, two guys, battery and troll motor on nose. Pic of the bow is shown below in the link to my thread. Bottom of page 17
https://forums.bateau2.com/viewtopic.ph ... &start=160
Dougster
Re: mat australia sk14
Posted: Tue Mar 31, 2020 7:42 am
by mataus
Thanks Dougster,
I followed your thread.
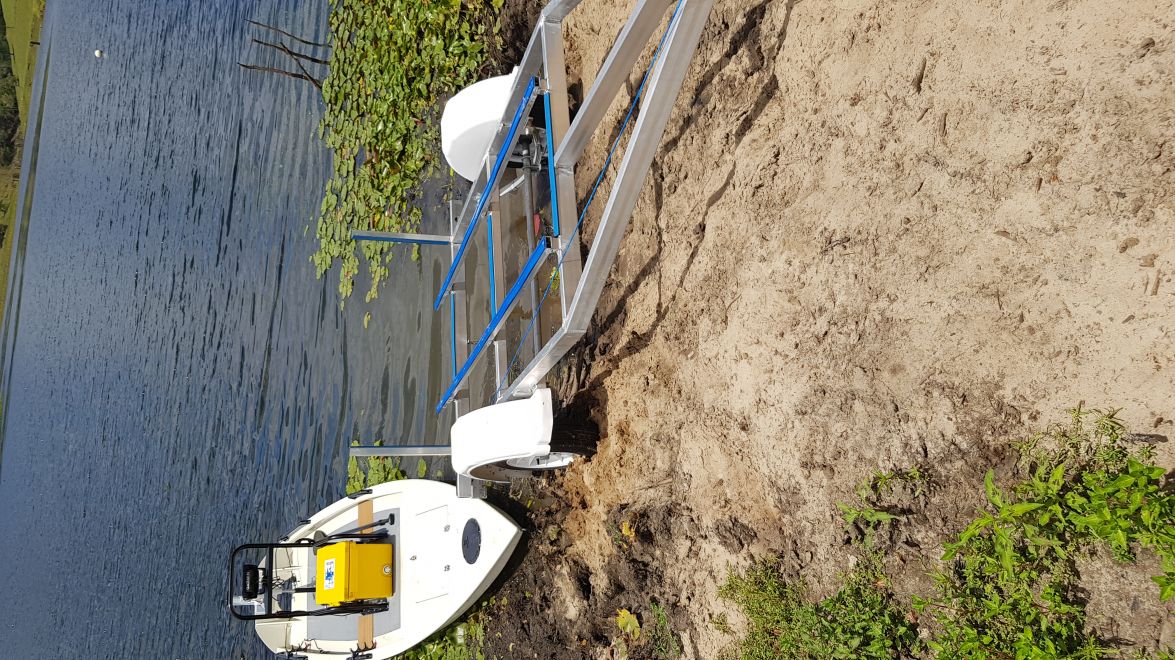
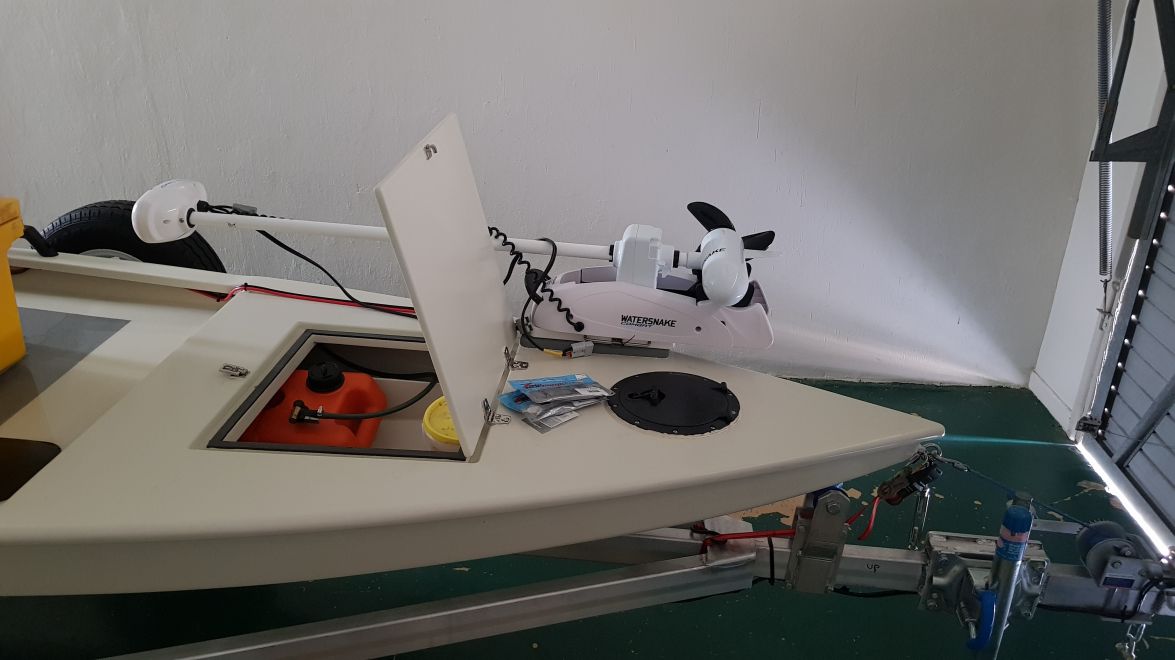
I decided to gamble and mount the electric (trolling motor) off axis.
This allowed the hatches to still be used on water or trailer with the electric stowed. I played with weights and thought long and hard.
I also bought 2 lithium batteries one 17.5amp for the sounder and the other 50amp for the electric. I got a great deal on the motor so it helped with the cost of the batteries.
We had a weeks holiday at Noosa (this was as the cover 19 was kicking off locally).It was not much off a holiday as a result and the winds were also blowing hard. I did get Elbow Grease out a few times to test run. I was stoked with the result the extra weight off axis doesn't have that much effect. Running, you can shift slightly right with your weight which is more comfortable as the tiller is off centre to the left. Having 13kg hanging outside the boat on the port side means you do have to be careful going around the grab rail on the left but other than that it is great. Top end speed has dropped from 35km/h (18knots) to 27 km/h (14.5knots) which is fine. I never wanted a speed boat I just wanted her to be able to get up and plane fully loaded, which she does nicely. If you turn tightly I do get ventilation which is worse on a turn to port and my body position can also affect this. It does ship water pretty easy and the worse is the short sharp wake of the large boats like Riviera and trawlers. It drains quickly. My hatch has faired more waterproof than the commercial plastic one. Still if I did it again I would make the gutters larger.
A pleasant surprise was seeing Skinny-dip out on the river.
In different times I would love to look over her and chat to Glossyblack.
Re: mat australia sk14
Posted: Tue Mar 31, 2020 7:46 am
by mataus
Re: mat australia sk14
Posted: Tue Mar 31, 2020 7:47 am
by mataus
Re: mat australia sk14
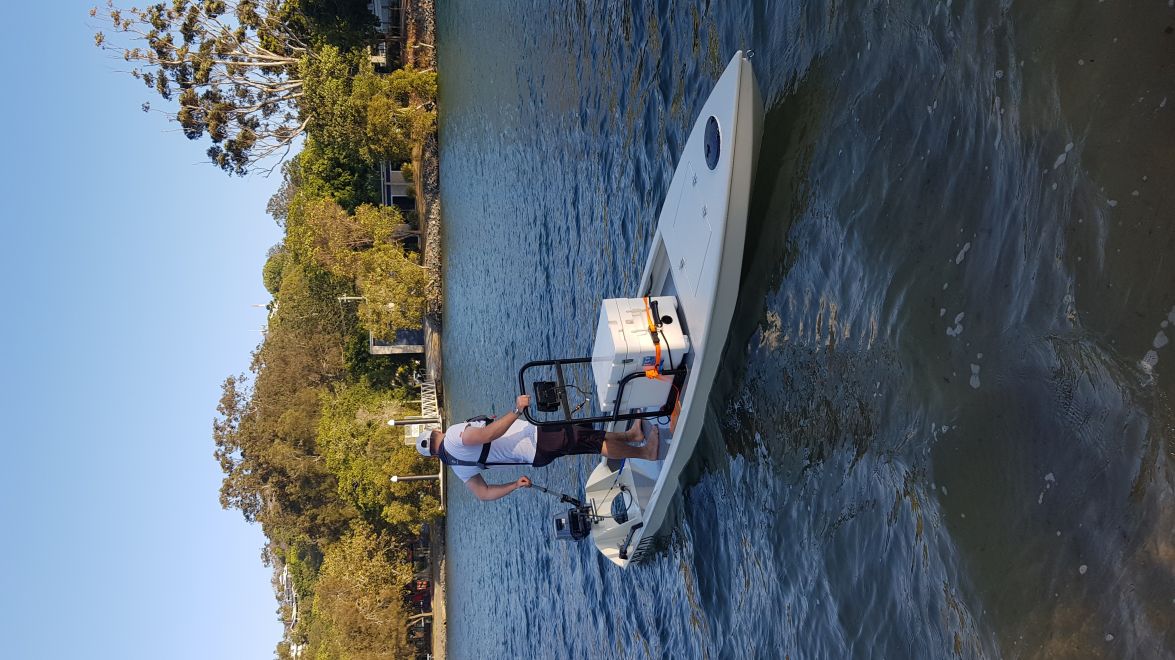
Posted: Tue Mar 31, 2020 8:12 am
by mataus
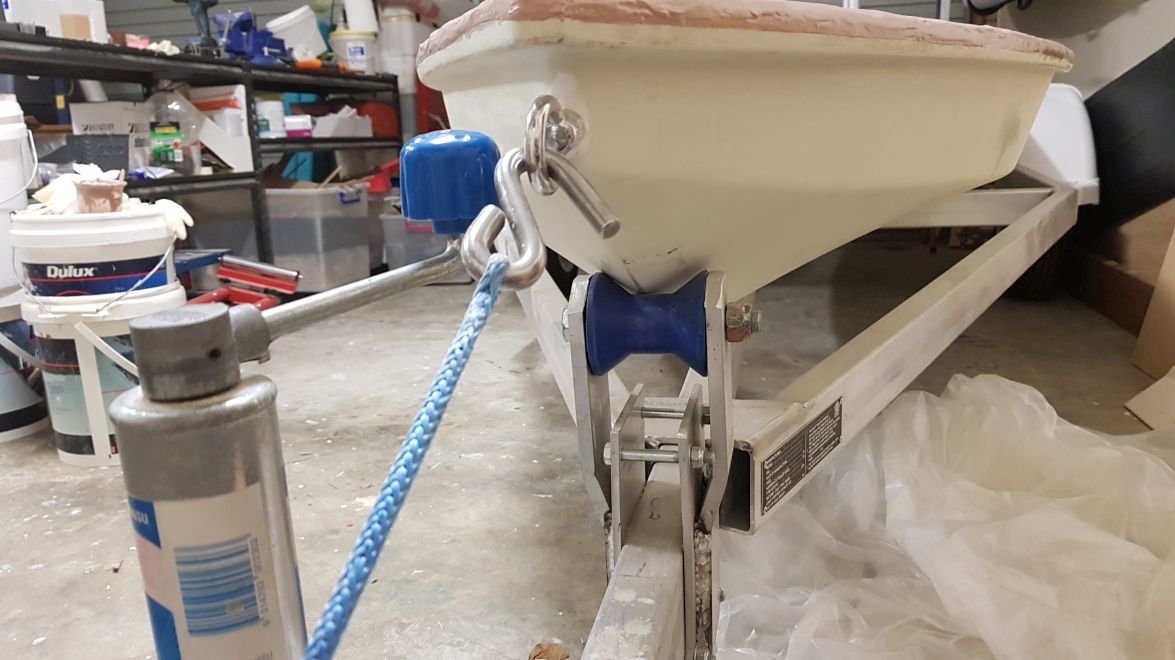
this was a day at a local dam before we left.
Re: mat australia sk14
Posted: Tue Mar 31, 2020 8:14 am
by mataus
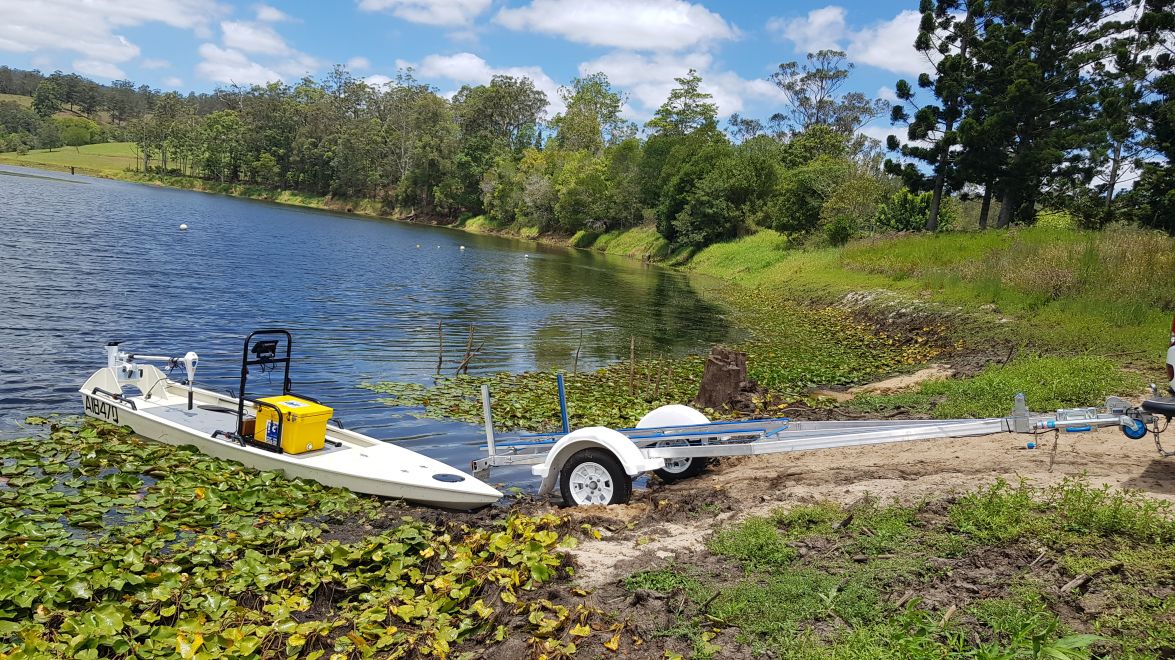
It was pretty low due to drought.
Re: mat australia sk14
Posted: Tue Mar 31, 2020 8:15 am
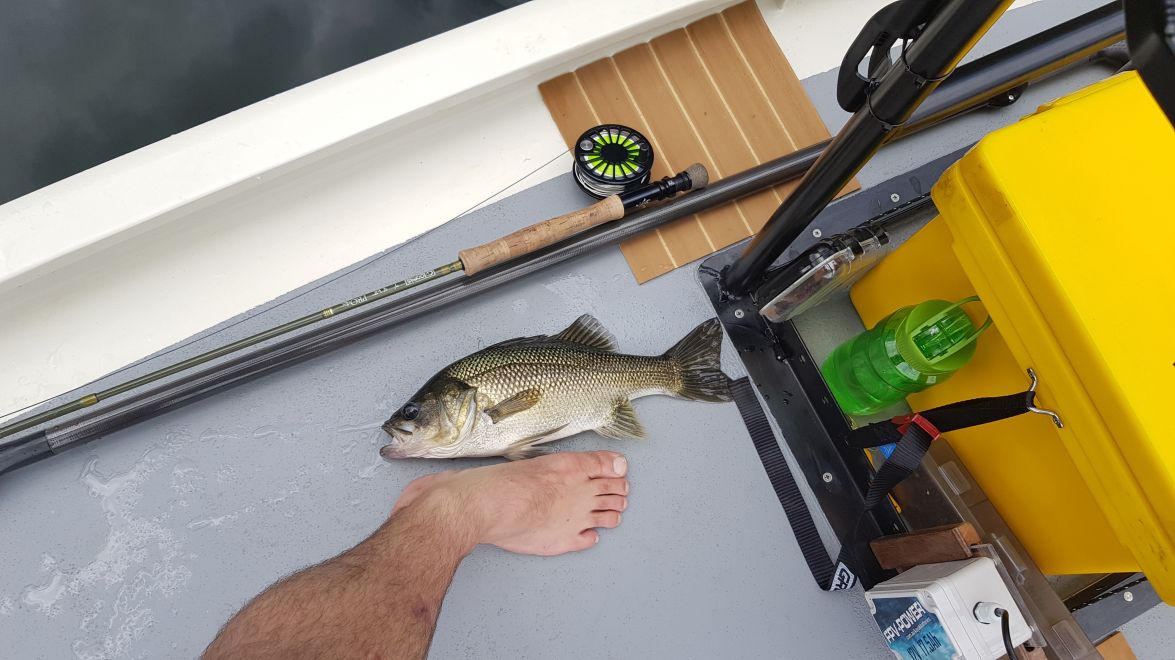
by mataus
A small local Australian Bass
Re: mat australia sk14
Posted: Tue Mar 31, 2020 8:18 am
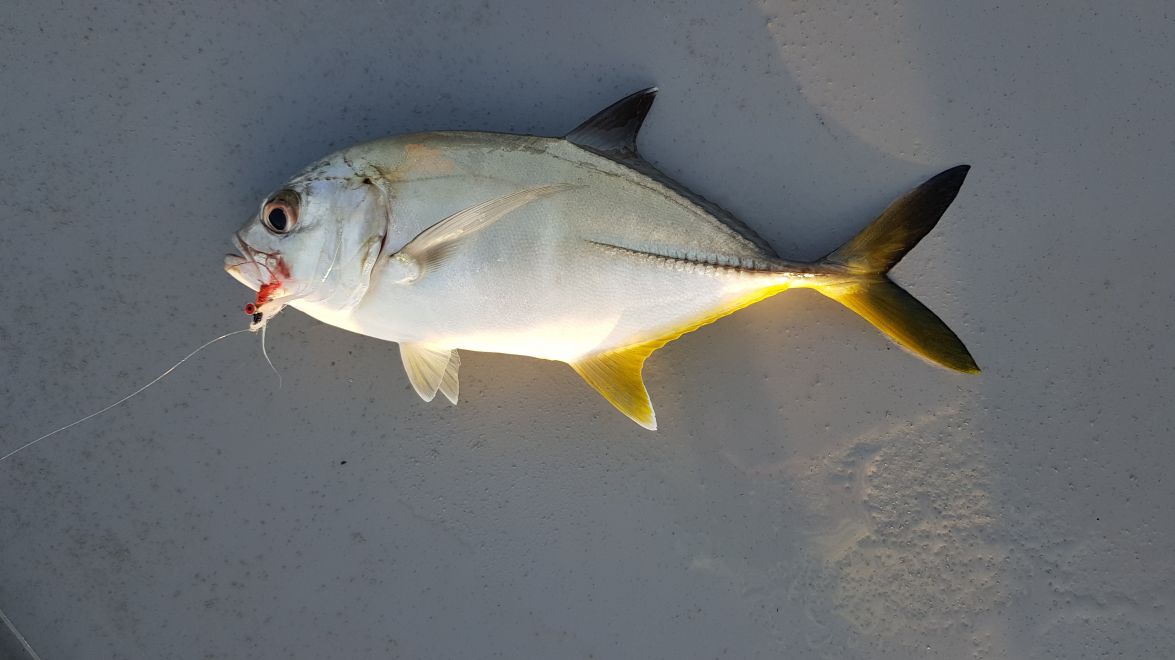
by mataus
One of the many local Trevally species
Re: mat australia sk14
Posted: Tue Mar 31, 2020 8:20 am
by mataus
Re: mat australia sk14
Posted: Tue Mar 31, 2020 8:23 am
by mataus
loaded up.
Re: mat australia sk14
Posted: Tue Mar 31, 2020 8:27 am
by Jeff
Beautiful boat!! Jeff
Re: mat australia sk14
Posted: Tue Mar 31, 2020 10:18 am
by Dougster
Looks great. You've got it set up much like mine, with a little outboard in the back, a nice sonar, and trolling motor on the nose. Last time out a big V boat mushing along throwing a big wake went right by me. I just nose toward the wake, which rolled right over my bow some and immediately ran out the rear scupper. Nothing but wet shoes as a result. It was reassuring. Also I took a 200 lb. neighbor out who sat just in front of the grab bar. The 5 horse propane Tohatsu planed us right at 9.5 to 10 mph. Seems like a lotta boat for the buck. BTW, your fishing area sure looks fine.
Dougster
Re: mat australia sk14
Posted: Sat Apr 18, 2020 10:29 am
by smdavidson
mataus, Beautiful boat! Thanks for the detailed photos and build log. You have inspired many great features for my sk14 build!
smd


 [/URL]
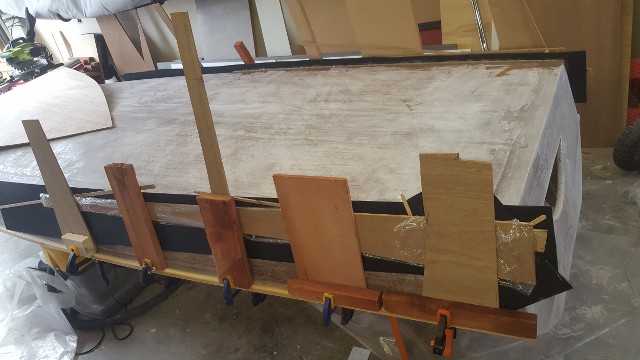 [/URL]
 [/URL]
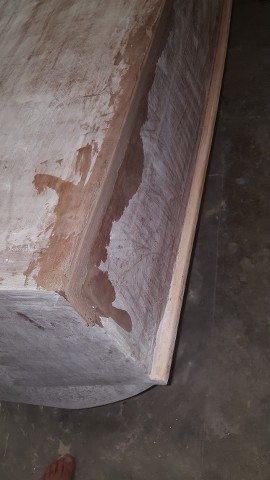 [/URL]
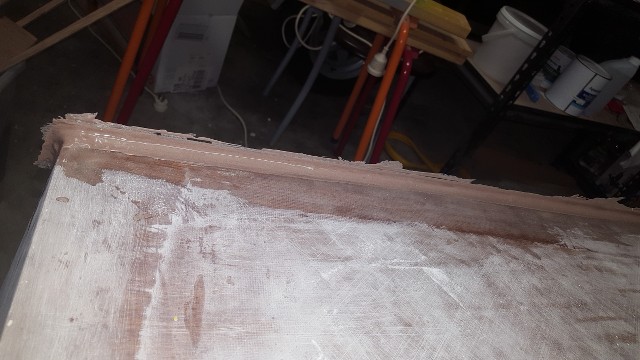 [/URL]
 [/URL]
 [/URL]
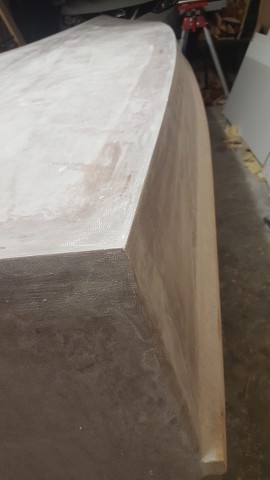 [/URL]
 [/URL]
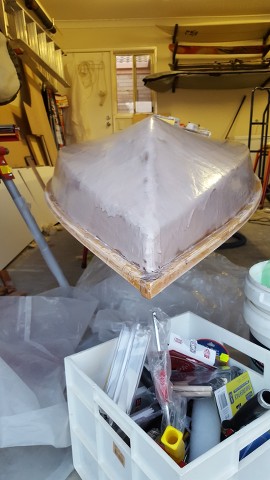 [/URL]
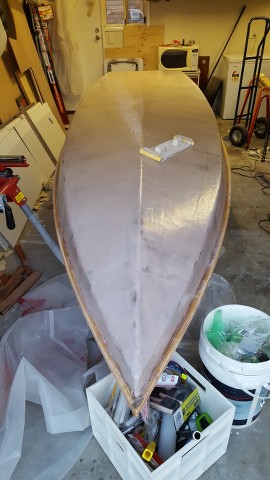 [/URL]
 [/URL]
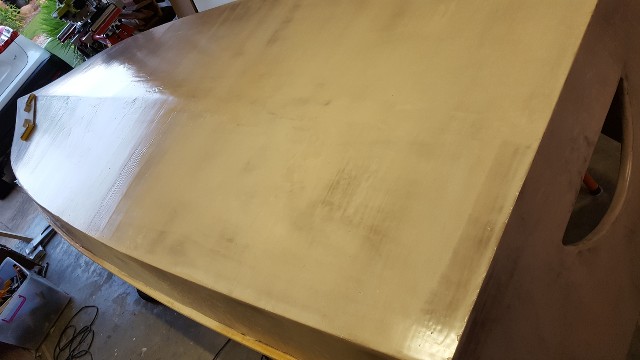 [/URL]
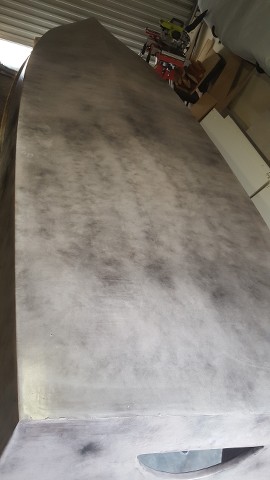 [/URL]
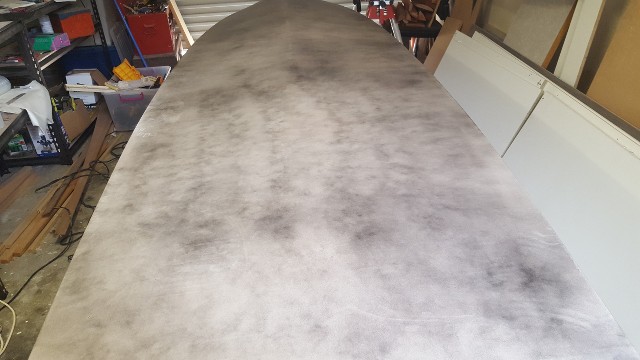 [/URL]
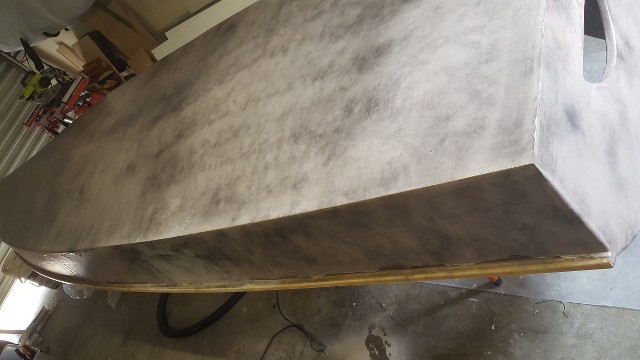 [/URL]
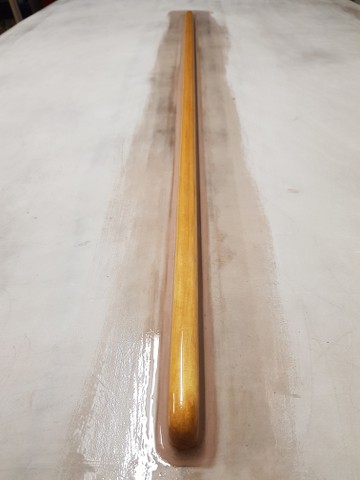 [/URL]
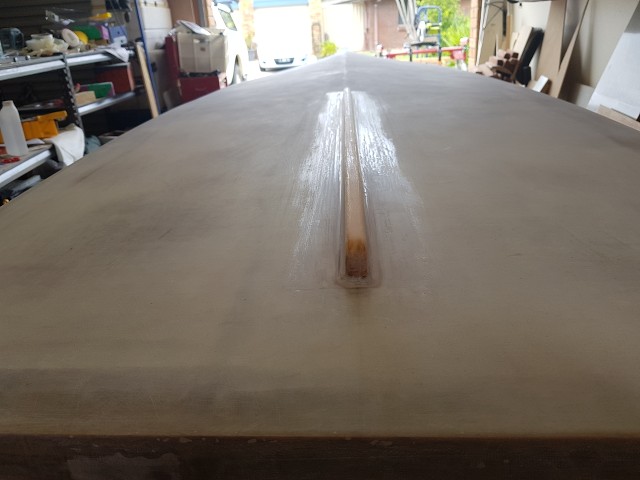 [/URL]
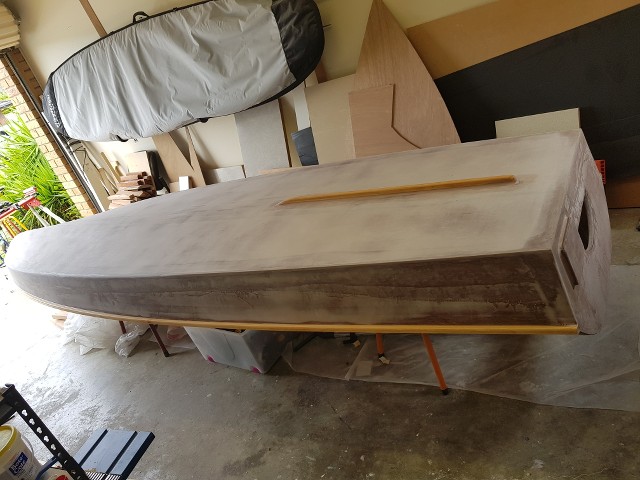 [/URL]


