Page 1 of 1
C-17 Our first Build !
Posted: Sat Dec 03, 2016 4:12 pm
by David516
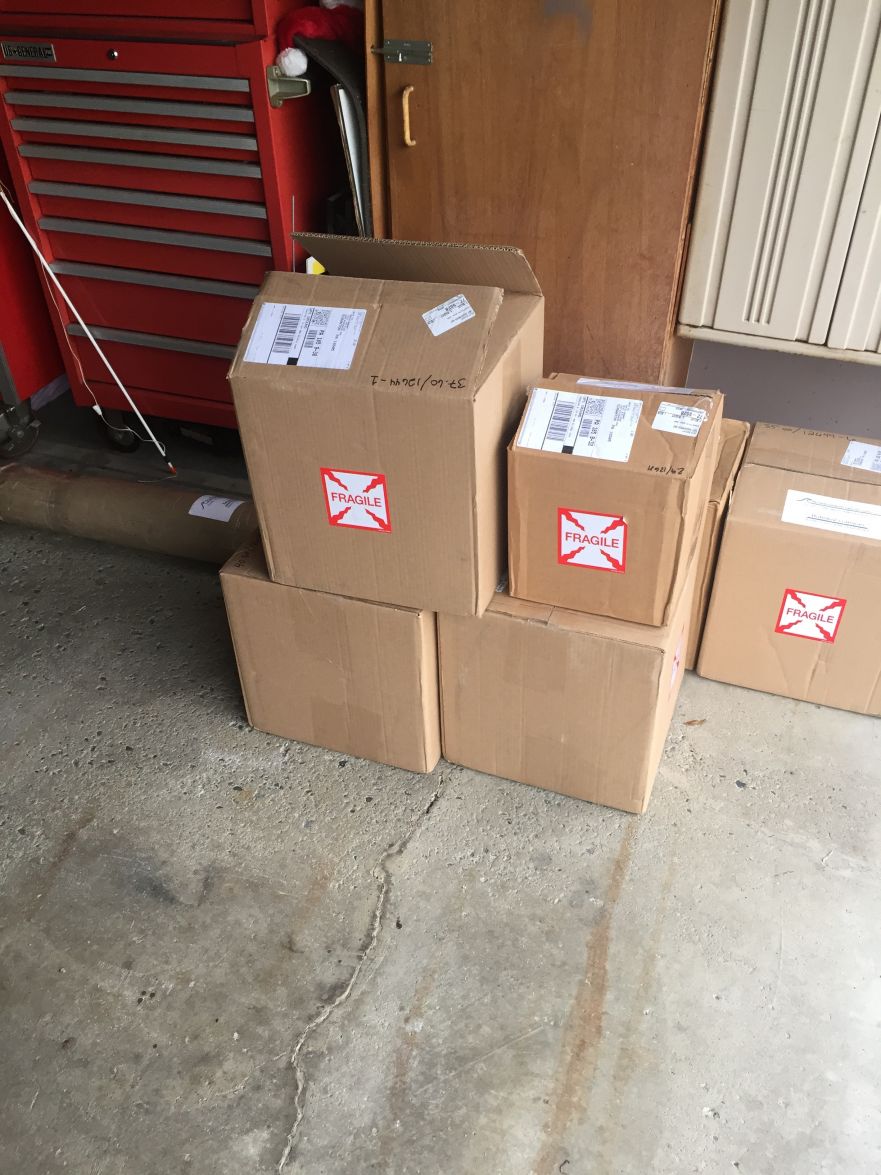
Well, we're excited. The materials started to arrive for our new C-17. We received the fiberglass, epoxy and supplies. I'm planning on starting the boat in mid January when things calm down a bit!
I am curious about one of the epoxy chemicals That was included in the kit. It is called "System Three Gel Magic" I looked it up on line and im drawing the conclusion that it is intended for the glueing part of the stitch and glue assembly. What I'm wondering is whether or not that would be used in adhering the two overlapping hull sections or would the regular epoxy (silver tip) be used for that purpose?
Anyone have any thoughts on it?
Re: C-17 Our first Build !
Posted: Sat Dec 03, 2016 4:26 pm
by joe2700
Good luck on the build, I've just started mine of an FS17.
I'm interested in the question you asked as well. Normally I would have used thickened epoxy but much more wet than I'd used for other glue jobs. I'd be tempted to coat both sides with a thin coat of unthickened epoxy followed by the gel magic even though gel magic shouldn't require pre-wetting. Let's see what other people say though.
Re: C-17 Our first Build !
Posted: Sat Dec 03, 2016 5:08 pm
by David516
agreed. I would guess we want that area as strong as possible.
I have heard this term "thickened epoxy" before. I that done with the silica beads or wood flower?
Re: C-17 Our first Build !
Posted: Sat Dec 03, 2016 5:47 pm
by joe2700
You can thicken epoxy with different fillers, for different purposes. There are adhesive fillers, fairing fillers, etc. The system 3 products like gel magic are really just pre thickened epoxy so the gel magic is thickened with adhesive filler, quickfair with fairing filler, etc. You could get almost the same effect by mixing the system 3 epoxy with those different fillers yourself, this is just easier and more consistent, and possibly with a few special benefits.
Gel magic claims to be an adhesive epoxy you don't need to prewet for, and my test batch shows that to be true. I was first thinking it would be better to coat with plain epoxy but now that I think about it that would probably just make it harder to keep the pieces from staying aligned, and straight gel magic is probably how I will go.
Here is a video that shows about how I plan to do it. It's from a wooden boat building channel I really like. There as a lot different about wooden boat building v. building a stitch and glue boat but laminating layers of would should be about the same either way.
https://youtu.be/-t_w38mS9bo?t=323
If you have some time to kill watch the 20+ videos of the work skiff he is building right now.
Re: C-17 Our first Build !
Posted: Sat Dec 03, 2016 6:49 pm
by David516
Interesting video ! I think that gives me a direction to go in joining the two hull overlaps! I'll most likely do the same as you. i dont see how that could fail. The inside of the joined parts will be waterproof and the outside will be biaxial on the lower (chine) side and thin epoxy sealed on the upper section.
when do you plan on starting to build?
Re: C-17 Our first Build !
Posted: Sat Dec 03, 2016 6:57 pm
by joe2700
Re: C-17 Our first Build !
Posted: Sat Dec 03, 2016 11:57 pm
by David516
I looked at your post. I wish you the very best of luck !
I ordered the kit since I have limited time and am notorious for mis-measuring complex cuts!
I think you do not have problems in that area!
Re: C-17 Our first Build !
Posted: Sun Dec 04, 2016 8:28 am
by topwater
You use gel magic to glue anything together " rubrail layers, transom layers, stringers, hull seams pretty much
any time you glue . You do not have to prewet before use . that's the beauty of it , saves time .
Re: C-17 Our first Build !
Posted: Sun Dec 04, 2016 11:33 am
by Parkrat
I used the gel-magic for the stringers and transom for my FS17. I still used epoxy and wetted out the surfaces before spreading the gel-magic. I did read that you don't have to do that first, but thought it couldn't hurt. It's pretty impressive stuff... apparently it will glue anything together.

I did a fiberglass splice for the hull and bottom panels. Didn't use gel-magic.
I'm going to use the Silvertip EZFillet to stitch it together. I guess you could use the gel-magic?
Gel-Magic would be ideal for your overlapping panels.
Re: C-17 Our first Build !
Posted: Sun Dec 04, 2016 6:42 pm
by David516
Thank you Topwater that explains a lot!
I think I'll get more and use the Ez Fillet for the beams, closets bulkheads, and benches !
Re: C-17 Our first Build !
Posted: Tue Dec 06, 2016 12:32 am
by David516
Thanks, Parkrat, It does seem a good idea to use it on attaching the hull pieces.
Ill post my progress when I actually start the build which hopefully should start a week or so after New Year.
Happy Holidays guys !
Re: C-17 Our first Build !
Posted: Wed Dec 07, 2016 10:21 am
by Parkrat
You can use the Silvertip gel-magic for the outside hull seams as long as the temp is okay and it doesn't sag. Another member willg suggested to run blue tape along the seams underneath. I did that and tacked mine together last night using the EZ fillet. Worked real well and glad I ran the blue tape first. Didn't get anything on my garage floor.
The EZ fillet is really easy to work with and doesn't sag at all.
Re: C-17 Our first Build !
Posted: Wed Dec 07, 2016 2:08 pm
by David516
Thats what they say about the Gel magic in their technical information. Ive never worked with either before. Ive only done lamination previously.
I guess i have a few weeks to decide. Temperature is no problem (only problem is paying the heat bill !!!!!!!). I guess either would be acceptable.
Re: C-17 Our first Build !
Posted: Wed Dec 07, 2016 3:28 pm
by Parkrat
Yes, either works. I keep my garage around 70 degrees when working and I think the gel magic would have run through the seams.
Re: C-17 Our first Build !
Posted: Wed Dec 07, 2016 4:46 pm
by David516
Good point. Mines about 65 Degrees. How much of a gap do you leave in the keel and chine seams?
Re: C-17 Our first Build !
Posted: Wed Dec 07, 2016 4:59 pm
by Parkrat
What I've gathered and did with mine is use a common nail as spacing between the seams so you can see light from the other side.
It also depends on how well you cut and draw the panels. Mine is a little wonky in places so i have some larger gaps. Once you get to that point you will probably be able to decide.
Re: C-17 Our first Build !
Posted: Wed Dec 07, 2016 5:16 pm
by David516
Im not doing that cutting

I'm having Bateau do the cnc cutting to save me time...I usually have no time to even die (good thing) but it does put a strain on projects so anywhere I get a break i take it !
Have you thought about wood wedges (their like 3 bucks a dozen) to space the seams? Im thinking they might be very stable for you to work and adjust.
Re: C-17 Our first Build !
Posted: Wed Dec 07, 2016 9:50 pm
by TomW1
The easiest thing to get and manage is tile spacers. Available at Lowes in the tile section in sizes from 1/8 to 3/8 inch sizes. They have four legs one in the joint, two resting on the panels. Wood wedges might or might not work I can see them falling through the gaps if you don't put a nail in each one to keep them from doing so.

Re: C-17 Our first Build !
Posted: Thu Dec 08, 2016 1:53 am
by David516
Thats actually a good idea. I dont suppose the gap has to be extensive so its worth using since they also take up less space.
nice.
Re: C-17 Our first Build !
Posted: Tue Dec 13, 2016 10:15 pm
by David516
http://gallery.bateau2.com/displayimage.php?pid=63466
Just wanted to document the very beginning and learn how to upload an image!
Thank you Jamie ! Got it...I think !
Re: C-17 Our first Build !
Posted: Tue Dec 13, 2016 10:40 pm
by Parkrat
Re: C-17 Our first Build !
Posted: Wed Dec 14, 2016 12:54 am
by David516
I gotta admit Parkrat, Thats the best one I've ever seen !
The cut plywood should be here early next week!
Then after a short Christmas break the fun starts!
First one, makes me a little nervous !
Re: C-17 Our first Build !
Posted: Wed Dec 14, 2016 9:25 am
by pee wee
If you right click on the full size image and copy image address, then paste that into your post, highlight it and click on the IMG button, you get this:
Good luck with your build.
Re: C-17 Our first Build !
Posted: Wed Dec 14, 2016 12:07 pm
by David516
Thank you very much my friend!
I definitely will be using that.
Im a little challenged on forums.
Re: C-17 Our first Build !
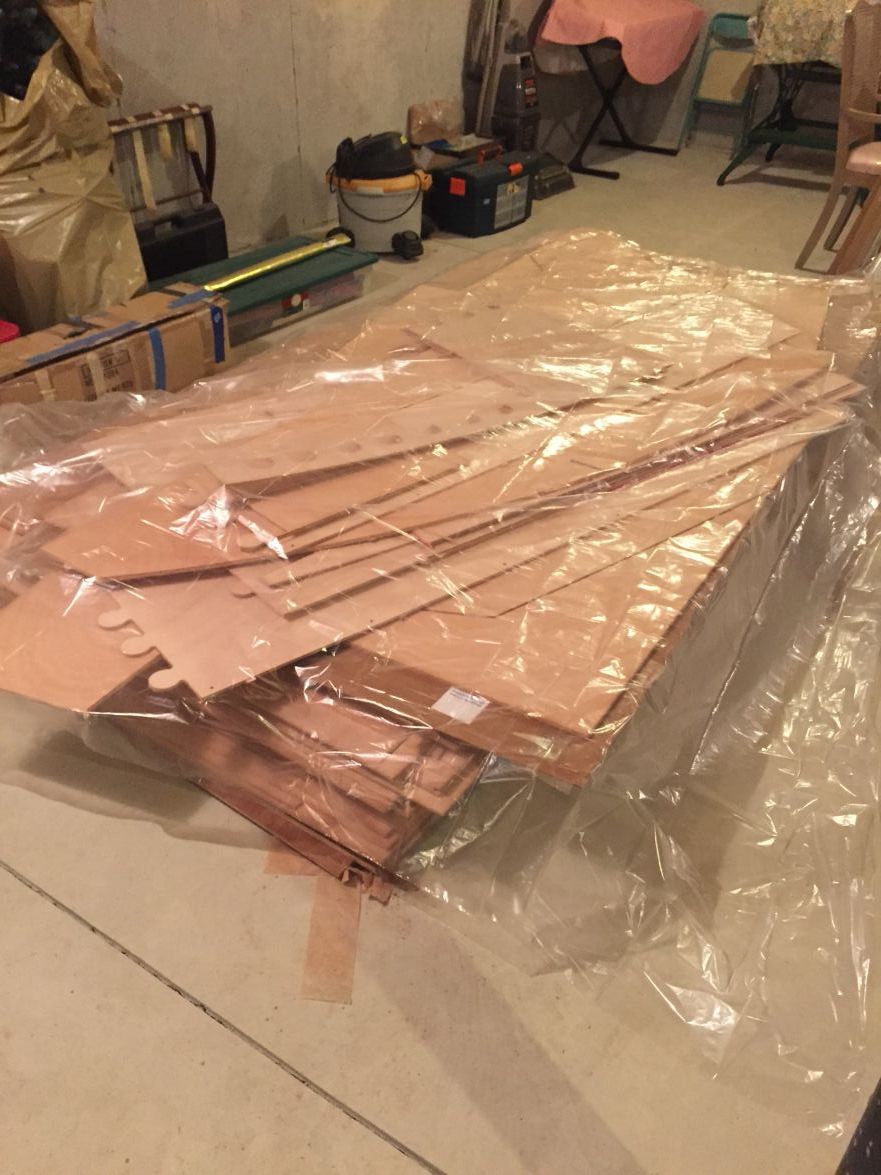
Posted: Fri Dec 16, 2016 1:18 am
by David516
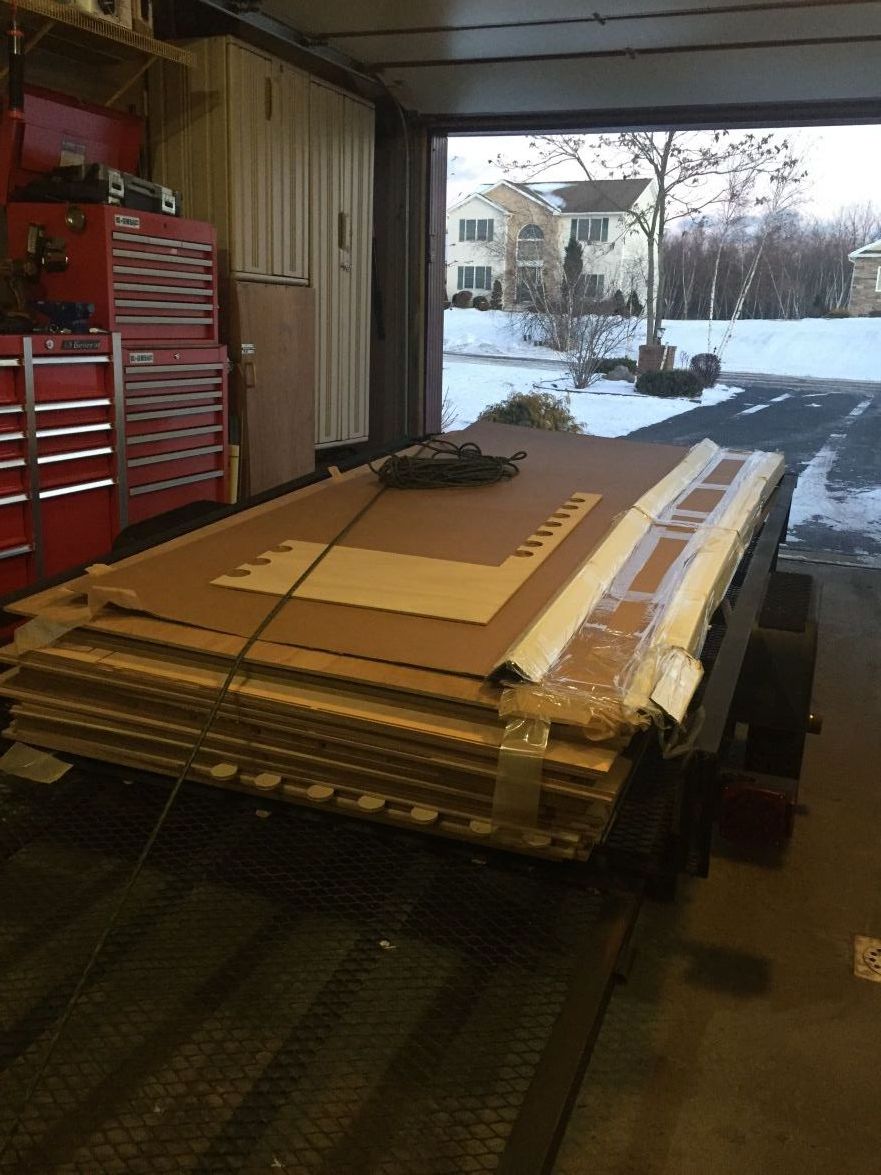
Well, we took delivery of all the panels and after fighting -5 windchill we got them into the basement where I'll be assembling panels before bringing them upstairs to the jig. Some of the tabs on the pre cuts seperated prematurely in the 40+ mile wind gusts. That only slightly confuses my life as I'll be spending most of january identifying parts and determining which need splicing or glueing and trying to figure out what goes where !
I cant stress enough how nice the pieces were cut and how fast they got here !
Once I start to figure out where they belong I'm guessing theyll be a lot nicer to work with than any plywood I've used before!
Re: C-17 Our first Build !
Posted: Fri Dec 16, 2016 1:56 pm
by TomW1
Nice pile of lumber.
May I suggest that you go into your profile and add your location to it. This will help us with questions on epoxy curing. There may also be another builder or more in your area that you could visit.
Good luck as you get started on your build. Please feel free to ask plenty of questions.
Re: C-17 Our first Build !
Posted: Fri Dec 16, 2016 2:37 pm
by David516
Good advice Tom ! I will do that. But just for now I'm building in SCRANTON, PA. (on top of a mountain called East Mtn.) It's like the tundra here in winter. What i'm planning is to make the jig in our garage and the pieces that have to be spliced or glued ahead of time will be done in my moms basement accross the street which is at least 70 Degrees (my moms almost 90! likes the heat up !!!).
Since I'm new to this, all advice is VERY appreciated!
I figured since its the holidays im going to continue to study the plans and parts identification and acyually start gluing in the latter part of January. Believe it or not it will be a bit less cold and by then I should have learned enough not to put the transom on the nose !!!!
And thank you my friend !
Re: C-17 Our first Build !
Posted: Fri Dec 16, 2016 4:43 pm
by jacquesmm
David, if you have questions about parts identification, post here. There should be a package of printed files in the box that shows the nesting of the kit pieces. It is very close to the nesting of the standard plans.
Re: C-17 Our first Build !
Posted: Fri Dec 16, 2016 10:10 pm
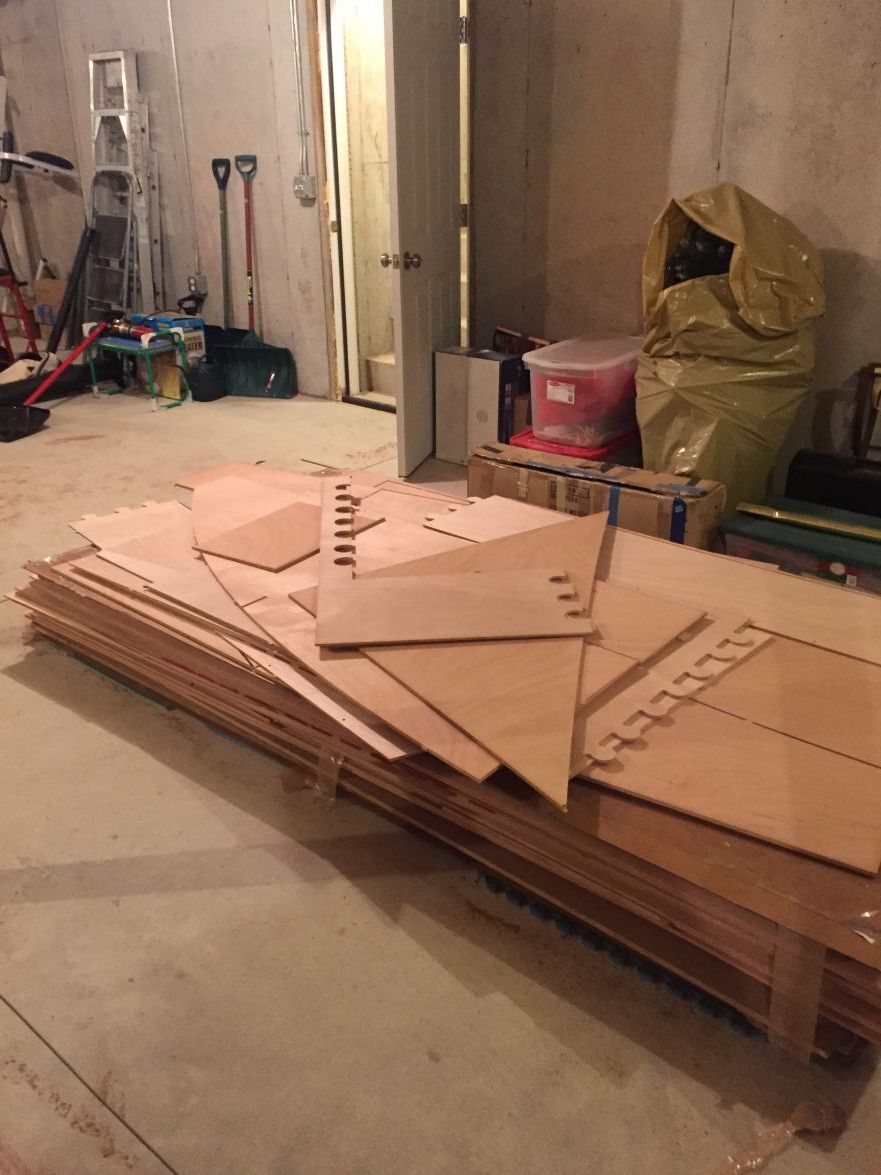
by David516
Thank you Jacques! I think every time I look at the nesting diagrams I get a little more familiar. some of the tabs broke loose in transit so I have to match the individual pieces. I think if I stay focused on one step at a time I should do OK figuring out where most pieces go.
If I get stuck I'm not shy, I will post lots of questions i'm sure! And It's nice to have you and everyone else to advise me. It takes a lot of pressure off!!!
So far my wife, Deb and I are very excited. I thank you for all your guidance !!!
Re: C-17 Our first Build !
Posted: Sat Dec 17, 2016 9:57 am
by Jeff
David516, you guys have a great holiday season and try and stay warm up there!!! We will be watching your build!! Jeff
Re: C-17 Our first Build !
Posted: Sat Dec 17, 2016 7:36 pm
by David516
Thank you Jeff ! You also. have a great holiday !
Re: C-17 Our first Build !
Posted: Sat Dec 17, 2016 11:44 pm
by David516
Well, I decided to start doing some studying tonight.
I went accross the street and checked the temp and humidity and put a dust cover over the panels.
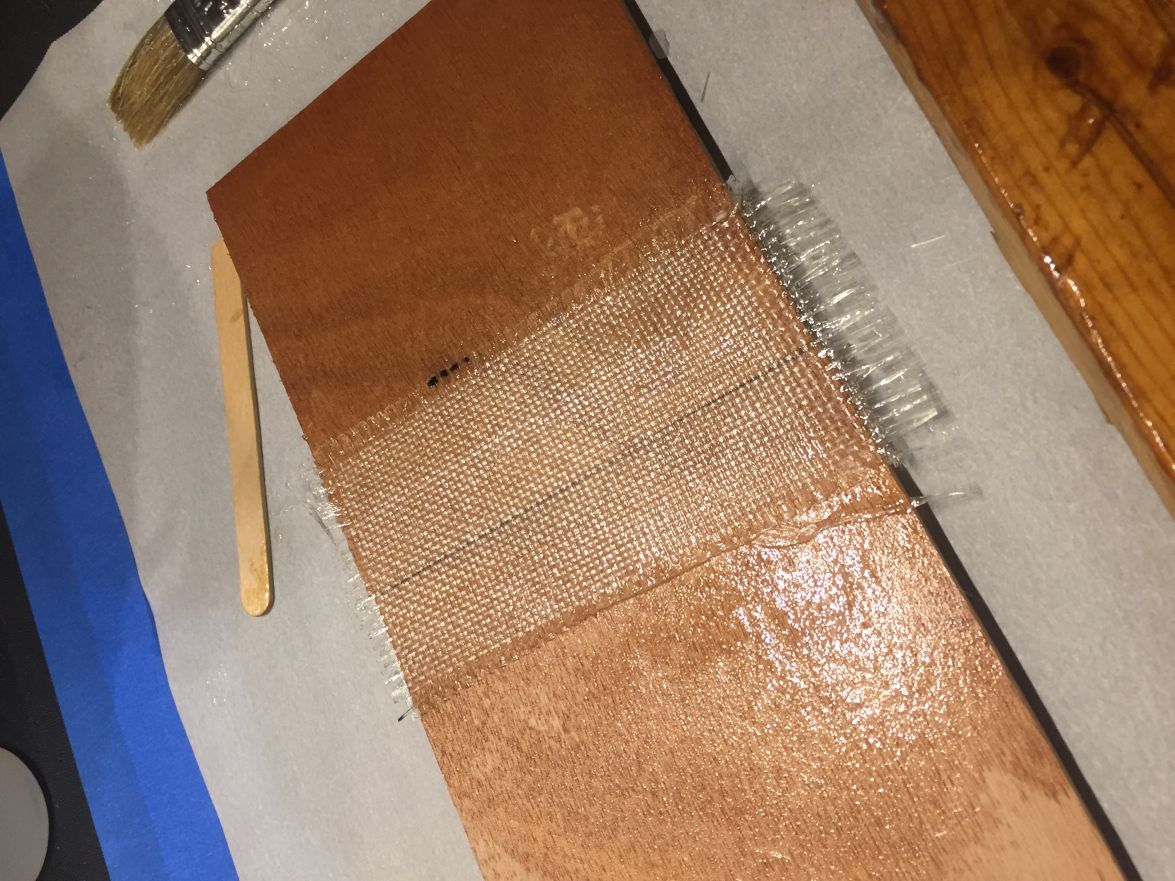
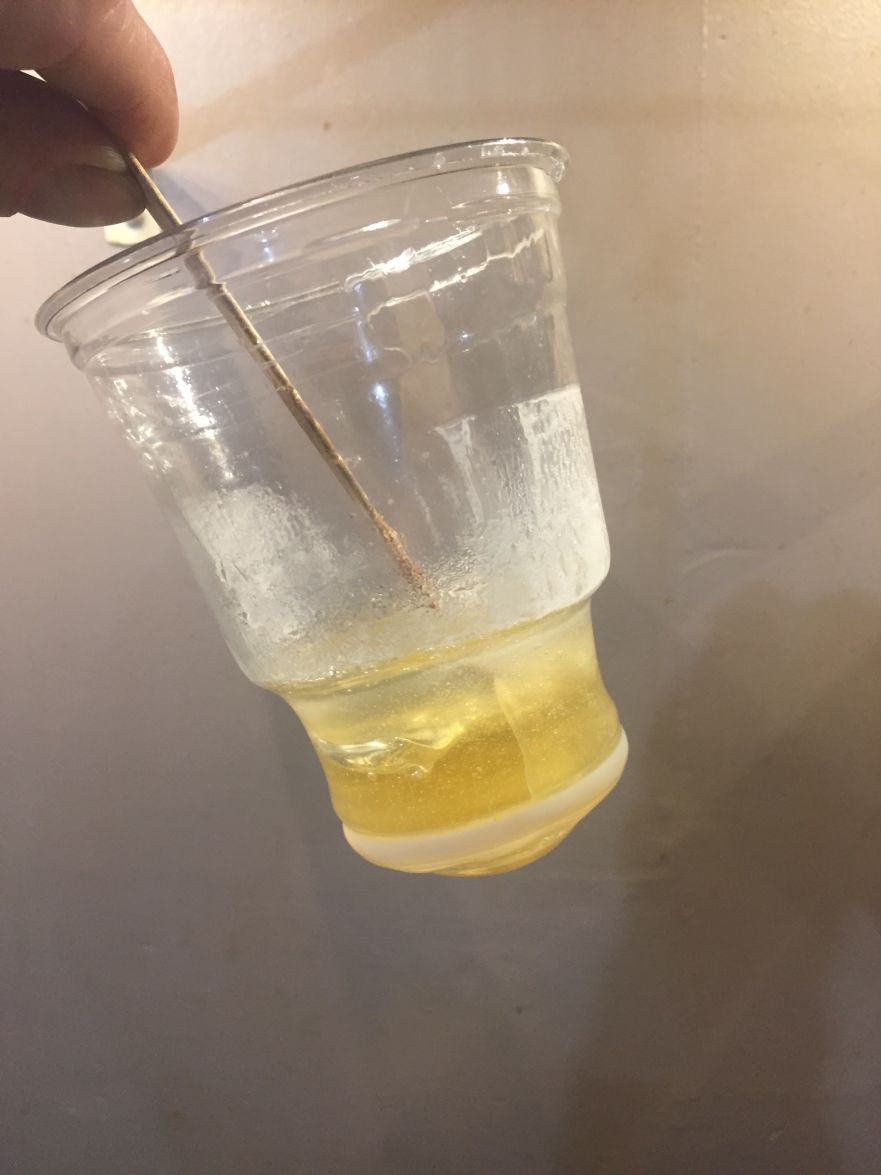
I cut two scrap pieces in half and decided to practice joining them with the sample kit. I think I did a fairly good job but I'm not sure so I posted a picture. Waiting for the first side to cure (at 60 deg.)
This brings up a few questions...
Using 9 oz woven I was able to completely saturate the fabric but it does not get totally transparent. Is this normal?
I also noticed the edges of the fabric like to pick up as they frey quite easily. does this get sanded or faired?
I read that all panels should be sealed before fiberglassing. Does that include the hull panels, and if so, do i let them dry before glassing?
Should this sealed wood be sanded?
I understand that once the glass is wetted and cured it gets faired before filling in the weave with epoxy. Is there any time table for filling in the weave? and is it better to let each coat cure then sand, or fill the weave while it is still uncured?
I'll wet out the other side of the join tomorrow.
Thanks to anyone who can set me straight !!!
Re: C-17 Our first Build !
Posted: Sun Dec 18, 2016 3:15 am
by Fuzz
Your glassing looks good. The heavier the glass the more you will see it.
Before glassing over bare wood many builders will put epoxy over where the glass will be and let it soak in and tack up some. Depending on what you are doing things could change. Ask at each step if you are unsure. Take it one step at a time and ask questions. You will get timely answers. And do not be afraid of making a mistake. It can be fixed

Ask me how I know
Re: C-17 Our first Build !
Posted: Sun Dec 18, 2016 3:19 am
by Fuzz
One more thing. While you are doing some testing make up a small right angle with plywood and glue it together with the wood flower glue. After it sets up try to brake it apart. This will show you how strong it is and will come in handy later on when glueing parts together.
Re: C-17 Our first Build !
Posted: Sun Dec 18, 2016 3:28 am
by David516
Thank you !
I guess the first things I'm going to do (right after all the holidays) are to join the hull pieces then glue the transom pieces and clamping board.
It seems the thing is to not let any sealed pieces completely cure. That, I can do!
And I'll do the wood flower test tomorrow night! Thanks!
Re: C-17 Our first Build !
Posted: Sun Dec 18, 2016 8:13 pm
by seaslug
Hey David, There are a number of ways guys go about the glassing. I like to pre-cut all my cloth, both the 6" tape and the 50" wide cloth. After rolling out the 6" for the chines etc., I roll it back up and label so there's no confusion during the glassing as to where each piece needs to go. It's also very helpful to mark the hull with a sharpie marker as your guide when rolling the tape out onto the hull. Not necessary, but makes for a nice neat job. On the wide cloth, you can mark the cloth anywhere you think it will help guide placement, as well as marking the hull. That way when you have resin mixed, you don't end up fumbling around trying to figure out which piece goes where. If you're organized, calm, and methodical, it's a breeze. 1 piece at a time, no panicking, just move along slowly and it all comes together. If you haven't done glass work before, you'll learn on the job very fast. I also never mix more than 24 ounces at a time, 24 ounces being plenty of resin to keep you busy for a little while without it kicking off. Start with less at first to get a feel for the process.... If you are using the Silver Tip you don't have to sand if you're going over it within 24 hours, but I always light sand anyway if I let it cure overnight.....Ideally I like to apply the 6" tape, let it set up a little, and while it's still sticky, roll out the wide cloth, what's referred to as working wet on wet, that way you get a really good bond, and no need to knock down the edges of the 6" tape with a sander before applying the wide cloth.....Whichever way you choose to work, after the wide cloth is cured you can knock down the high spots with a sander, the more even you make the overlaps, the less fairing filler you'll need.....When you spread the fairing filler, try to work as neatly as possible, spreading it on as evenly as you can, which will make the sanding a lot easier. Mike
Re: C-17 Our first Build !
Posted: Sun Dec 18, 2016 9:43 pm
by David516
Thanks Mike! Yes, I'm new to fiberglassing. I did epoxy coatings for many outdoor applications over 30 years ago but have never wetted out cloth. All this new stuff is amazing and a bit confusing. Your suggestion to pre cut is genius! Now, if I tape the keel (the prescribed layers) and bottom to lower chine panels, say early in the morning, as well as the transom, I can then do each half of the bottom hull say, in the afternoon? Theoretically I can then have the entire lower hull glassed in a day? Of course I know I have to fill the weave and fair.
this brings up two questions. Should the first wet out cure, can it be sanded without damaging the glass cloth? Also, on the c-17 the upper chine panels overlap the lower chine panels by 6 inches. Is it alright (advisable) to glass the lower chine panel say an inch or so under the upper chine panel before gluing for extra strength? Or am I over thinking things?
Re: C-17 Our first Build !
Posted: Sun Dec 18, 2016 10:39 pm
by seaslug
Correct, you can do all the 6" and the wide cloth in one day. If you have the time to do it this way, great, it's the best way to go. I did my FS18 and the FS14 without any help, and had no problems, but you will be dealing with a larger surface area, so if you have an assistant to help with draping or rolling out the wide cloth, mixing epoxy, serving beverages, etc. you'll soon see it's not that complicated, and actually quite fun knowing that you're really building a boat. Enjoy the fun stuff for when you're pushing a sander for a few hours. Like I said earlier, working smart will save a lot of unnecessary sanding. On my second build I went one step further and after applying the 6" and the wide cloth, came back when it was set up enough to trowel on my first coat of very thin fairing filler to fill the weave. 1 day, all wet on wet, and saved me a lot of down time waiting for epoxy to cure, and saved a lot of sanding. I don't have much patience for waiting around watching epoxy cure. Just remember, everyone makes mistakes, and most of us aren't professional fiberglass guys, so if you follow the lamination schedule, grind away and patch any really egregious mistakes, the hull will be plenty strong enough, in fact a lot stronger than most factory built boats.....My favorite tools for glassing is the 4" Whizz brand 1/4" nap kitchen and bath rollers you can get at Lowe's. $4.48 for a 2 pack, and they don't fall apart like the foam rollers, and you can really get the cloth to lay down nice, especially useful when you get to the part glassing over the epoxy fillets on the inside of the hull. Also from Lowe's, my favorite resin spreader for the hull bottom is a Blue Hawk brand 10" plastic 'triple edge paint guide'. It's not flexible like a bondo spreader, so better for the large flat areas, has a nice comfortable handle, and the 10" width is great for moving around the resin to saturate the cloth, than works great to screed off the excess resin..... Have plenty of mixing cups on hand, as well as plastic paint trays, and a box of Nitrile gloves, I used at least 200 gloves on my builds..... I'm not sure I understand your last question. Mike
Re: C-17 Our first Build !
Posted: Sun Dec 18, 2016 11:03 pm
by David516
Thanks Mike !
Im always at Lowes. Will get the rollers and guide.
My other question may sound dumb. What I'm saying is that since I glass the lower chine panels and they say not to glass the upper panels which are glued to the lower panels with a 6" overlap should I run the glass so that the fiberglass extends a little under the upper chine panel that is overlapping the lower panel? Kind of like a sandwich with about an inch of glass in between. I dont know if this will add strength or not.
Anyway I learned the hard way not to let the epoxy set up in the pot! Also not to use cheap thin cups! See Photo
Re: C-17 Our first Build !
Posted: Sun Dec 18, 2016 11:15 pm
by TomW1
David nice choice in boats. First always precut your fiberglass to size. Then precoat the wood with epoxy. After that start laying out the fiberglass, seams first with the proper amount of epoxy. Then the bottom fiberglass you have measured out. There are several ways to make sure that the epoxy and fiberglass join together. Most important is smoothing the epoxy after you apply it.
Re: C-17 Our first Build !
Posted: Sun Dec 18, 2016 11:26 pm
by David516
Thanks Tom. By smoothing do you mean filling in the weave or fairing or both in between layers of glass like several layers of tape?
Re: C-17 Our first Build !
Posted: Sat Jan 07, 2017 1:46 pm
by David516
well, the holidays are over so I'm planning on starting our build next week. Ive had the pieces and plywood sheets sitting at a constant 68 degrees at 40% humidity weighted to prevent warping.
i thought I would start by gluing all the parts that need to be pre glued such as transom, clamping board, and splicing the hull and chine panels (lengthwise) and the top bow deck.
My question, is that I've noticed that some builders like to pre glue the upper and lower chine panels where they overlap before attaching them to the lower hull panels on the frame. Others prefer to glue them after the lower chine panels have been attached to the lower hull panels. Which is the overall better way to do this???
Re: C-17 Our first Build !
Posted: Sat Jan 07, 2017 3:00 pm
by Fuzz
David on boats with upper and lower panels you do NOT want to glue them together to start with. Install the lower panel, get it all set and then install the upper panel. Many times you need to make small adjustments with the upper panels and there is no way to do this if they are glued together. Also if glued together they will be too stiff to make the bends.
fuzz
Re: C-17 Our first Build !
Posted: Sat Jan 07, 2017 3:59 pm
by jacquesmm
Fuzz is correct. It is impossible to bend the top and bottom panels once they are epoxy glued together.
This is for the side panels. The splices are done before installation on the hull.
Re: C-17 Our first Build !
Posted: Sat Jan 07, 2017 4:54 pm
by TomW1
By smoothing I mean sanding the fibers that hold the main fibers away and then applying a thin layer of epoxy/filler mix to fill the weave. This is by no means a fairing layer. But it sets you up for fairing as the fiberglass is ready to be faired. Keep up the good work my original boat to build was a center console was the C17.
Re: C-17 Our first Build !
Posted: Sat Jan 07, 2017 9:05 pm
by David516
Thank you guys! I will post some pictures as I go along ! Will start with the transom in a few days!
I hope everyone had a good New year !
Re: C-17 Our first Build !
Posted: Tue Apr 04, 2017 1:48 am
by David516
Greetings everyone,
Been a long distracting winter. Ive been starting my set up and some work on the transom and hull sections. I dont know if Im going to be able to post pictures because Ive been trying for two hours and still cant figure it out! Lets face it, two things I'm very challenged at apparently. Computers and boat building. Im a very decent carpenter but my problems dont fall into that category. Getting a little frustrated with my own confusion. I laminated the transom and clamping board pieces and they seem to have come fine. I joined one of the bottom hull pieces together and this is where I am confused. I joined the puzzle ends by pre sealing the area and wetting out the 8' biazial tape. Since the pieces would not sit flat I weighted them with a board with plastic sheeting in between under a weight. My confusion lies in whether I did this right because when I checked it the next day, although the panels met perfectly there is a smooth sort of thick appearing resin appearance on most of the tape area. some of the area seems not to be that way where there are some very tiny gaps in the weave and some small "pot holes" on the edges.
I also had a build up of resin on the unfinished side that needed to be sanded down. I know I wetted all the cloth properly but now do I have to sand it,fair it or what in order to prevent air bubbles on the edges when I finally put the biax cloth over everything when the hull is together? In other words, am I headed in the right direction?
Im experienced enough to do anything any of you tell me, but sadly, at the moment I feel i am too %&#&!! stupid to know what it is I need to do !!! Any help will be very appreciated. I will continue to attempt to post [image]pictures.
http://gallery.bateau2.com/albums/userp ... G_7408.JPG[/image]
Re: C-17 Our first Build !
Posted: Tue Apr 04, 2017 1:55 am
by David516
Re: C-17 Our first Build !
Posted: Tue Apr 04, 2017 2:40 am
by BarraMan
Looks fine to me - give it a light sand with 120 grit and build on!
Cheers
Lee
Re: C-17 Our first Build !
Posted: Tue Apr 04, 2017 2:44 am
by David516
Thank you Lee ! I shall ! and Ill keep posting to let you guys know my progress !!!! Very much appreciated !
Re: C-17 Our first Build !
Posted: Tue Apr 04, 2017 6:40 am
by Jeff
David516, glad to see you are well on your way!!! Jeff
Re: C-17 Our first Build !
Posted: Tue Apr 04, 2017 2:04 pm
by tcason
looks good
Use as little resin as possible to fully wet out glass squeegee excess or use a roller to spread on dry plywood to "pre-coat"
I prefer 80 grit as minimum until fairing - in my case every hour of sanding now saved two hours of fairing - feather edges of tape and knock down all high spots
Re: C-17 Our first Build !
Posted: Wed Apr 05, 2017 1:30 am
by David516
Thanks Jeff ! It's good to be back to work after this awful winter !
The big storm (and other stuff) had put a damper on my ambition!
Re: C-17 Our first Build !
Posted: Wed Apr 05, 2017 1:41 am
by David516
Thank you tcason!
That is what I did on the top half of the second piece. I see where I need to sand some little pot holes on the first piece. I understand that I should avoid sanding into the biaxial tape so anything there i guess would need feathering or fairing before the biaxial goes on the hull so as not to create air pockets.
Im very glad to get all your advice. You guys are giving me a lot more confidence than I would have if I were alone on this.
It's not the type of project to be done carelessly.
I'll try to post the results of tonights work (hope my pictures are posting!).
Re: C-17 Our first Build !
Posted: Sun Apr 09, 2017 3:32 pm
by David516
Last night I joined the first side of the lower chine panels.
The panels were pretty warped (it seems the thinner marine ply likes to do that) but I overcame this by weighting the wetted out glassed pieces with heavy weights on a board.
For the most part they came out very well. I have a question on two of the edges where they dont meet perfectly. they are about 1/32" off where they meet. what would the best way to fix this be before I put the glass on the other side? I would like to sand them even then fill any unfilled areas (where the joints meet) with resin when I pre coat the wood before wetting out the biaxial tape on the join. Is this the right way to go?
[image]
https://forums.bateau2.com/app.php/gall ... 837/medium[/image]
[image]
https://forums.bateau2.com/app.php/gall ... 836/medium[/image]
[image]
https://forums.bateau2.com/app.php/gall ... 835/medium[/image]
[image]
https://forums.bateau2.com/app.php/gall ... 838/medium[/image]
Re: C-17 Our first Build !
Posted: Sun Apr 09, 2017 6:00 pm
by Fuzz
That is the right thing to do. If you have a bump there you will end up with a bubble in your glass. Low spots can be filled with wood glue and when it has stiffened up a little you can lay your glass right over it.
Re: C-17 Our first Build !
Posted: Sun Apr 09, 2017 7:36 pm
by David516
Thank You !
Re: C-17 Our first Build !
Posted: Mon Apr 10, 2017 12:38 am
by David516
Re: C-17 Our first Build !
Posted: Mon Apr 10, 2017 1:02 am
by Fuzz
Glad it worked for you. So now you can move ahead. Love watching new boats go together.
Re: C-17 Our first Build !
Posted: Mon Apr 10, 2017 8:51 am
by peter-curacao
Thought I help out with the pics, next time use the picture link 9th from the left between the * and the chain links
David516 wrote: ↑Mon Apr 10, 2017 12:38 am
OK. Repairs worked on the lower chine panel! Good adviceFuzz.


Re: C-17 Our first Build !
Posted: Sun Apr 30, 2017 1:27 am
by David516
Thank you very much Peter!
Have not been online for a bit. Was fixing transom and making a temporary storage brace from 2x4s!
weighed almost 200 Lb with all the 2x4s I used!
Ill try some pictures and see if i can get it right!
again, Thanks !
Re: C-17 Our first Build !
Posted: Mon May 08, 2017 11:51 pm
by David516


Oh boy, This week I worked on the stringers. I laminated them meticulously each one individually looked perfect. When I put them together they would not match up perfectly. If I matched the front then the back was off 1/4" If I matched the back, the front was off 1/4". I finally determined that each stringers dimensions are off 1/8 " at the mid section. I could trim them both and they would match perfectly but would then have a width of 4 5/8" instead of 4 3/4.
My question is if these need to be exact and If i trim them Would it be a problem building them up an eighth of an inch at either the hull or where the beams fit in with fillet compound or gel magic?
I have not built the strong backs yet as I wanted to finish the bottom and chine panels, transom and stringers. I was planning on building the strongbacks and frame starting tomorrow.
Re: C-17 Our first Build !
Posted: Tue May 09, 2017 7:39 am
by pee wee
That's fine, get them matched up and fill that 1/8" when you set them in the boat.
Re: C-17 Our first Build !
Posted: Tue May 09, 2017 10:06 am
by glossieblack
I agree with Pee Wee.
Re: C-17 Our first Build !
Posted: Tue May 09, 2017 1:44 pm
by David516
Thanks Guys!
I was actually thinking that but its always better to check
Re: C-17 Our first Build !
Posted: Sun May 21, 2017 1:47 am
by David516
Greetings!
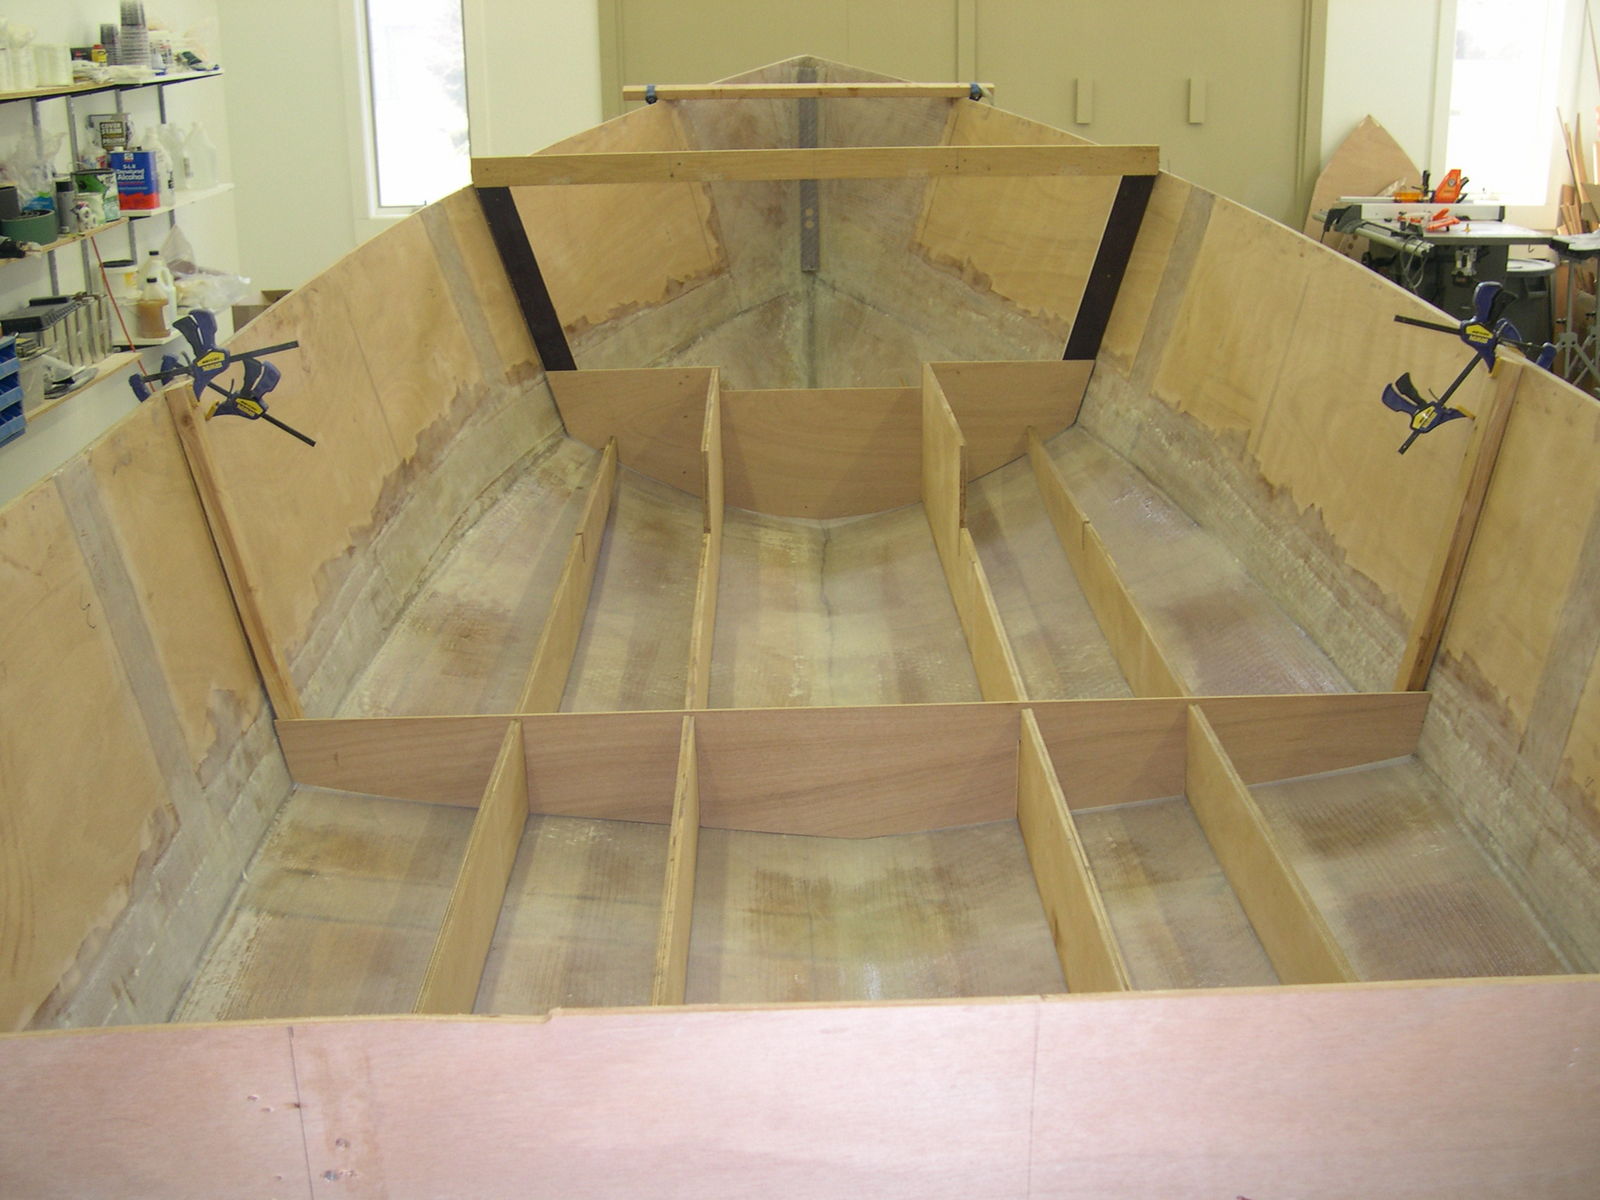
With all the stringers, Hull panels and transom/clamping board all together, I started building my Jig. Ive been reading and re-reading jig instructions and specific building notes for a couple of days. I was confused on the motorwell sides but I finally figured it out. I'm apparently not the fastest horse in the race but I'm starting to get it.
I had to splice an 8'and 10' 2x8 together with a 4' 2x8 0n each as I could not get a single 20' piece. the splice is very strong so I dont think that will be a problem since theyre as straight as any 20' piece. Ill post pictures when I get the jig base together.
Just curious, I did not see ant reference to any origin point on the plans (at least I cant find one) so I wanted to designate my origin at frame "A" since it seems easier for me to work off of. Is there a better place or does it make a difference??? and thanks!
Re: C-17 Our first Build !
Posted: Thu May 25, 2017 11:52 pm
by David516
I have a serious question... I started assembling my strong backs and cross beams (please expect me to work about three times slower than you might expect cause of knees. no big deal, just make me slower) I was looking at the moulds that jacques was kind enough to cut for me. I have nose, and stations B,C & D. I'm going to make a mould from OSB for station A.
My question is on station E, the motor well walls, and transom. There are no moulds to hold the transom and after reading both sets of building notes 4 times I think I'm supposed to install actual station E, the motor well walls and transom and put those permanently in place BEFORE putting the hull panels on. Am I right??? Otherwise I suppose I can screw the parts together temporarily but I am confused as to which approach is the correct one.
By tonight I will have the strong backs done and marked. Tomorrow, after an errand, starting to mark and place the 2x4s for the stations.


Re: C-17 Our first Build !
Posted: Fri May 26, 2017 10:29 am
by Reid
David,
Glad to see you are making some progress!!! I would caution about putting any of the frames and motor well parts together permanently. The reason for this is you want to be able to take all of the "guts" (frames/stations, stringers, motor well, etc...) out of the hull so you can glass the inside of the hull. Do your best to rig up battens and temporary cleats in order to hold all of the frames in place while you stitch, glue, and glass all of the hull panels together. When the outside of the hull is complete you want to be able to remove the hull from the frames with relative ease so you can flip and start on the interior glassing.
Some suggestions on your strongback:
- Make sure the strongback is as square as you can make it, especially your cross members. This will help you set the stage for getting your frames square.
- Build some sturdy legs with castors that can lock on your strongback. It is nice to be able to move the boat around if you need to. Set the height of the strongback so you can get under the hull and work easily but can still reach all areas on top of the hull comfortably.
- If you can, allow the bow to hang over as much as you can. This will help you gain access underneath when stitching in a tight space.
Good luck! I look forward to seeing your progress!!!
Reid
Re: C-17 Our first Build !
Posted: Fri May 26, 2017 12:57 pm
by David516
Thank you so much Reid.
I actually forgot about the inside glass!!!!
The rest of your suggestions made have been done already. Strong backs, casters done!! Got them perfectly square full length with corner clamps and 6" head lock screws.
Ill post more pics soon and again, THANKS !
Re: C-17 Our first Build !
Posted: Sat Jul 08, 2017 1:18 am
by David516
Well, finally able to get back to work!
Got frames and molds nearly perfect. Tomorrow I start putting the bottom and lower chine panels on. I'm thinking I'm going to need more stitch holes in the keel panels? I guess we'll play that one by ear.


Re: C-17 Our first Build !
Posted: Sat Jul 08, 2017 6:12 am
by Eric1
That looks great. Glad to see you moving forward.
Re: C-17 Our first Build !
Posted: Sat Jul 08, 2017 8:15 am
by topwater
Looks like a nice set up. You might have to cut the front of the jig back some to get clearance for the side panels at the
bow . you won't know until you hang them for the first time.
Re: C-17 Our first Build !
Posted: Sun Jul 09, 2017 12:34 am
by David516
Thank you! and, I agree, may have to cut strongbacks to allow bow room. Didnt want to make frames too high at the keel for slightly easier access to the center line.
I do have a question, I took both lower panels off to put some more stitch holes in the panels and when I matched up the two hull pieces to drill holes I noticed that the center of the panels (the middle between the two splices) are 1/16th different in width. I hesitate to cut or shave them even as there will be a gap in the centerline for gluing and I can probably adjust the difference at the gap.
The question is, should I do what I said or should I actually shave the panels till they are exact? which might shorten the width of the panels since it seems the difference is a result of play in the sections of the hull panels when I joined them

Re: C-17 Our first Build !
Posted: Sun Jul 09, 2017 2:56 am
by Fuzz
You do not want two pieces of the plywood touching. Most folks use some form of spacer when assembling their hull. So remember "gaps are good" You can fill a pretty large gap if you put some packing tape on the back side to keep it from falling through. 1/8 is nothing
Re: C-17 Our first Build !
Posted: Sun Jul 09, 2017 9:40 am
by Dougster
I'd ignore that 1/16th and stitch things up. When you glue up the panels, run a fillet down the seams, and round the outside for glass, it'll be gone.
Dougster
Re: C-17 Our first Build !
Posted: Sun Jul 09, 2017 10:03 am
by cape_fisherman
I don't think there will be an issue with your panel.
I will dissent...gaps are workable...but I don't think I would classify them as "good". I know it's a popular saying here, and I'll be chastised for going against the grain (again).
Re: C-17 Our first Build !
Posted: Sun Jul 09, 2017 11:30 am
by Jaysen
cape_fisherman wrote: ↑Sun Jul 09, 2017 10:03 am
I will dissent...gaps are workable...but I don't think I would classify them as "good". I know it's a popular saying here, and I'll be chastised for going against the grain (again).
Cape man, my question and statement is to get information not to disagree with you...
If space is required under stringers, why would it not be good between panels? JM seems to suggest space created using PVC or nails is ideal for proper glue up.
Re: C-17 Our first Build !
Posted: Sun Jul 09, 2017 1:51 pm
by pee wee
cape_fisherman wrote: ↑Sun Jul 09, 2017 10:03 am
I don't think there will be an issue with your panel.
I will dissent...gaps are workable...but I don't think I would classify them as "good". I know it's a popular saying here, and I'll be chastised for going against the grain (again).
cape_fisherman, I know you mean well but you may be taking what you learned from Devlin's teachings and thinking they apply equally to all of the designs at Bateau. Take a look at this:
https://forums.bateau2.com/viewtopic.ph ... 6&start=10
Especially Jacques comment:
"Yes, the Devlin book is good but my method is slightly different.
He is more a wooden boat builder and does not use fiberglass boat building techniques as I do."
Re: C-17 Our first Build !
Posted: Sun Jul 09, 2017 2:29 pm
by jacquesmm
Gaps are needed to avoid hard spots.
It is not a simple preference or a pet peeve.

We don't want the plywood panels or the framing to push against each other.
Years ago, I posted a copy of a fiberglass boat building text book showing that gaps are recommended. We want the fiberglass to transmit the loads over the structure, not the edge of the plywood.
Yes, the Devlin book is good but the 1st edition did not mention the use of biaxial tape, an important point. He switched to biaxial later.
The very first book mentioning biaxial tape in stitch and glue was published in France, about 10 years before Devlin wrote his book, 10 years before the 1st bateau.com web site. I learned the technique in Europe and it evolved in a composite plywood sandwich method later.
Re: C-17 Our first Build !
Posted: Sun Jul 09, 2017 3:06 pm
by David516
Thank You all !!!! I can now proceed! More pics soon!
Re: C-17 Our first Build !
Posted: Sun Jul 09, 2017 4:33 pm
by Jeff
David, glad to see you back building!!! Jeff
Re: C-17 Our first Build !
Posted: Wed Jul 12, 2017 10:00 pm
by David516
Im glad to be back !!! This year it was hard to get anything done! But in between the chaos I always start up again!
I do have four questions or i might screech to a stop !
Is there a good way to get the lower chine panels in the proper position for gluing? Tried nails and tile spacers but the boards push them to the sides.
which section should I try to stitch first? I don't know if im approaching this correctly by loosly attaching all 4 hull pieces. Cant get the bow stitched without it pressing together and overlapping. I have an inordinately large gap one third from the bow and the centerline is sagging between frames D & E.
There's a camber in stations A & E, how do I get the hull panels to conform to it as there is no camber in the transom?
When I glue the upper chine panels to the transom there will be a space between the upper chine panel and transom. What is recomended to fill that space?
As always, any help is tremendously appreciated !
Some pictures are posted below.
Re: C-17 Our first Build !
Posted: Wed Jul 12, 2017 10:16 pm
by David516
Re: C-17 Our first Build !
Posted: Thu Jul 13, 2017 8:53 am
by Eric1
Coming along great! Keep at it!!
Re: C-17 Our first Build !
Posted: Thu Jul 13, 2017 9:05 am
by Jeff
Nice work David, it is now looking like a boat!! Jeff
Re: C-17 Our first Build !
Posted: Thu Jul 13, 2017 11:33 am
by David516
I do have four questions or i might screech to a stop !
Is there a good way to get the lower chine panels in the proper position for gluing? Tried nails and tile spacers but the boards push them to the sides.
which section should I try to stitch first? I don't know if im approaching this correctly by loosly attaching all 4 hull pieces. Cant get the bow stitched without it pressing together and overlapping. I have an inordinately large gap one third from the bow and the centerline is sagging between frames D & E.
There's a camber in stations A & E, how do I get the hull panels to conform to it as there is no camber in the transom?
When I glue the upper chine panels to the transom there will be a space between the upper chine panel and transom. What is recomended to fill that space?
As always, any help is tremendously appreciated !
Re: C-17 Our first Build !
Posted: Thu Jul 13, 2017 11:41 am
by jacquesmm
David516 wrote: ↑Thu Jul 13, 2017 11:33 am
I do have four questions or i might screech to a stop !
Is there a good way to get the lower chine panels in the proper position for gluing? Tried nails and tile spacers but the boards push them to the sides.
If you build on a jig, install a support batten across the frames/molds, at the sheer level. I show that in some tutorials.
which section should I try to stitch first? I don't know if im approaching this correctly by loosly attaching all 4 hull pieces. Cant get the bow stitched without it pressing together and overlapping. I have an inordinately large gap one third from the bow and the centerline is sagging between frames D & E.
The building notes and the tutorials say bottom first, very loose stitches and tighten progressively. Locate panels from the transom and sdjust as you go = loose stitches.
There's a camber in stations A & E, how do I get the hull panels to conform to it as there is no camber in the transom?
Get as close as possible but focus on fairness, not the small camber.
When I glue the upper chine panels to the transom there will be a space between the upper chine panel and transom. What is recomended to fill that space?
There should not be a space but you don't glue before all your stitching is right. Plus, I think my notes say to use drywall screws for the transom, loose again.
Everything should be free to "float", move and take it's shape without excessive force except maybe at the cutwater (bow).
Re: C-17 Our first Build !
Posted: Thu Jul 13, 2017 11:43 am
by jacquesmm
BTW, I see that you have molds with a notch (our kit?). That notch exist to support the edge of the side panel.
Your pictures look good, you are on the right track.
Re: C-17 Our first Build !
Posted: Thu Jul 13, 2017 12:29 pm
by cvincent
I used small pieces of PVC pipe on the inside of each stitch. This was the easiest method that I have found to keep the panels from overlapping when stitched together.
Re: C-17 Our first Build !
Posted: Thu Jul 13, 2017 12:37 pm
by David516
Thank you, yes it's your kit.
I will do as you say.
As I see it the bottom panels may have a larger gap at the middle piece (second spliced piece). Is that ok? I can fill it with gel magic but won't do anything like that without advice.
Again, thank you.
And thank you for the Idea on the pvc. sounds good.
Re: C-17 Our first Build !
Posted: Thu Jul 13, 2017 7:44 pm
by Eric1
Do not use Gel Magic for gap filling. If you fill use woodflour/epoxy or easyfillet.
Re: C-17 Our first Build !
Posted: Fri Jul 14, 2017 1:26 pm
by David516
now Im a little confused Eric. I read thats what it was for and system three and others say the opposite. Is there something that happened with it that I should be aware of before i do anything bad?
Re: C-17 Our first Build !
Posted: Fri Jul 14, 2017 1:29 pm
by Eric1
David516 wrote: ↑Fri Jul 14, 2017 1:26 pm
now Im a little confused Eric. I read thats what it was for and system three and others say the opposite. Is there something that happened with it that I should be aware of before i do anything bad?
Gel magic is a glue for bonding direct. Gap filling is a different thing.
Re: C-17 Our first Build !
Posted: Fri Jul 14, 2017 7:41 pm
by David516
ok now I see what your saying however several months ago i wrote to system three. one of their technicians said no problem with the new formula (more solids) he even said it can be used to fillet as well. now it is a vertical structural adhesive with gap filling properties.
Re: C-17 Our first Build !
Posted: Fri Jul 14, 2017 8:02 pm
by Eric1
I hope that works out for you!
Re: C-17 Our first Build !
Posted: Fri Jul 14, 2017 8:05 pm
by David516
I wrote system three again just to double check . I can wait until monday. better be safe than sorry!
Re: C-17 Our first Build !
Posted: Fri Jul 14, 2017 8:50 pm
by Jeff
David, please post the feedback from S3!! Their response will be interesting!! Jeff
Re: C-17 Our first Build !
Posted: Sat Jul 15, 2017 12:18 am
by David516
Jeff, I will copy the e-mail and post probably Monday. They usually respond fairly quickly.
But...More questions!
I brought the transom over and temporarily put it in place with four deck screws. I know I have a bit more adjusting before stitching, however, I dont think the gap is going to be as wide as i thought. But, when I look at the bow, it seems that the gap will close when stitched but the two curved parts of the bow at the center line seem very close (see pictures below)! I hesitate to sand them down until I start stitching as the gap and close bow section may be resolved when stitched. Anybody else experience this? I'll just have to try it.
Not having built a boat before but having done extensive carpentry I expect every piect to fit to the millimeter (0r at least 1/32").
I'm thinking my expectations are too high and like Jacques mentioned I think I'm going to start concentrating on hull fairness than perfect fit which can be adjusted later. Any comments are welcome !!!


Re: C-17 Our first Build !
Posted: Sat Jul 15, 2017 10:29 am
by cape_fisherman
I would think something is amiss with those bottom panels. Make that priority #1...in my opinion.
Re: C-17 Our first Build !
Posted: Sat Jul 15, 2017 10:59 am
by terrulian
Cape fisherman may well be right, but since it is a CNC kit I'd trust that the panels are correct and will come together properly as the boat gets stitched. I wouldn't panic yet.
I know what you mean about having different expectations for tolerances when building with this method versus cabinet making. But Jacques' emphasis on fairness is to be taken seriously. The strength of the joints is created by the fiberglass and fillets, not, as in joinery, by a perfect meeting of the boards. I would think that you'd want to get the whole boat stitched and see how the panels shape themselves to fit, and then make small adjustments, which will be possible. That is one of the great benefits of stitch and glue. You can get things roughly in shape with the zip ties loose, and then tweak the joints until all is fair; whereas in joinery, the fit has to be absolutely perfect and there is no fiddling possible, or very little.
Re: C-17 Our first Build !
Posted: Sat Jul 15, 2017 1:20 pm
by TomW1
In this type of building you don't want a wood to wood seam. You want a gap to prevent what is called a hard spot where the wood rubs on other wood. The epoxy and fiberglass provides the strength to hold the joint together. If you look at the lamination schedule you will have as many as 6 up to 8 layers of fiberglass at the keel and chines. So leave a 1/8 to 1/4 inch gap. You will want to get under the boat and apply tape so the epoxy doesn't run through.
Tom
Re: C-17 Our first Build !
Posted: Sat Jul 15, 2017 2:48 pm
by David516
Thank you for the advice guys ! Advice well taken!
I'll Keep you posted!
Re: C-17 Our first Build !
Posted: Sat Jul 15, 2017 6:33 pm
by David516
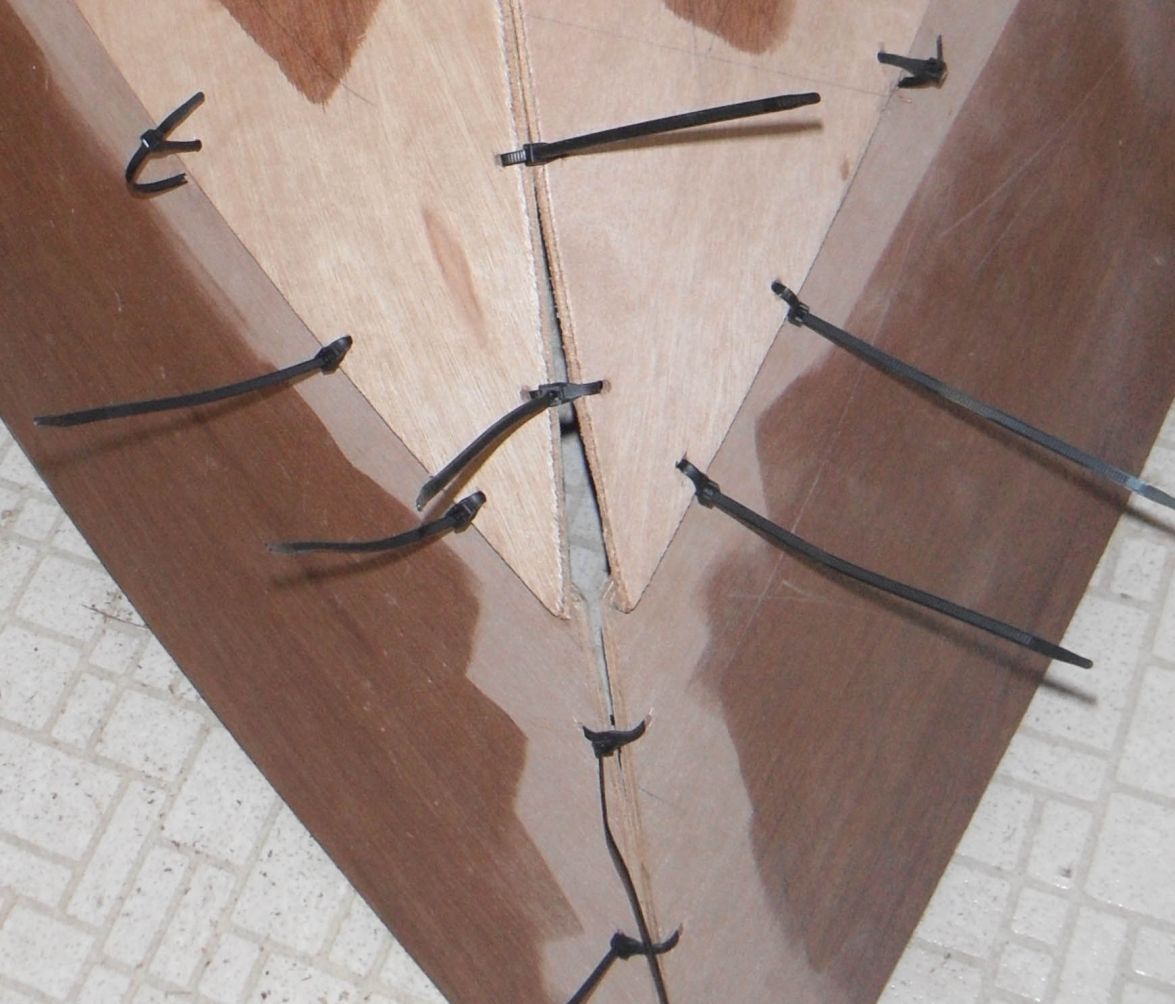
I think I somehow have a big problem!
Well, I started to try to fit the bottom panels to the transom when I line them up there is an enormous gap in the midfront section. I was able to line up the panels fairly evenly but noticed a new problem. when I closed the large gap at center lineand tried to close the bow, the bow pieces hopelessly overlap and the width does not fit station C or D they are too narrow by about half inch. I just did the stitches to test my concerns with the centerline. (they are intended to be cut off before i continue). If I adjust the centerline to proper width I will have about a 3/4 to 1" gap at the centerline, yet the bow wants to overlap!!!
When I put the panels together I sanded them even as they were uneven by 1/4" in width...
Im wondering if I should not have done this and I'm beginning to wonder If my project is over before It goes any Further!!!
Right now praying!!!
see the pictures below..


Re: C-17 Our first Build !
Posted: Sat Jul 15, 2017 7:09 pm
by Marshall Moser
I know this may be a silly observation, but are the bottom panels in the correct places? I.e left and right not switched?
Re: C-17 Our first Build !
Posted: Sat Jul 15, 2017 7:23 pm
by glossieblack
Marshall Moser wrote: ↑Sat Jul 15, 2017 7:09 pm
I know this may be a silly observation, but are the bottom panels in the correct places? I.e left and right not switched?
An out-of-the-square question, but well worth asking.

Re: C-17 Our first Build !
Posted: Sat Jul 15, 2017 8:12 pm
by cvincent
Try inserting a small piece of PVC under each stitch (on the inside of the hull) as you move forward on the bow. I had the same problem with the bow panels overlapping. It took some force to keep the panels at the bow from overlapping, the ply only wants to bend so far. I also wedged the gap between the panels at the bow with popsicle sticks to maintain the gap. I did use a few temporary wood screws fastened into the underlying frames to keep the panels from pulling in. I had to pull out the angle grinder to slightly trim the gap at the bow. Try loosely attaching the side panels moving from the back of the boat moving forward. The weight of the side panels will help to keep the bow pieces pulling in and overlapping. This worked for me I hope this helps you.

Re: C-17 Our first Build !
Posted: Sat Jul 15, 2017 8:15 pm
by David516
I thought about that but theres only one way they can go . even if you flip them they still have the same centers because the back of the bottom panels flare out to fit the angle of the transom. So no matter how you flip them theyre the same.
I did measure them in width. because I evened them out they seem to be 1/8 to 1/4 " short.
Re: C-17 Our first Build !
Posted: Sat Jul 15, 2017 8:20 pm
by David516
cvincent thanks. I did try the PVC but did not think of the screws. I will try to line up the transom again and start stitching the back to front. Then i'll try your idea.
Re: C-17 Our first Build !
Posted: Sat Jul 15, 2017 8:54 pm
by seaslug
After building the FS18 and utilizing the pvc pipe trick I wouldn't stitch another hull without a piece of pipe at every cable tie, in fact used the 100+ pieces from the first build on both of my other builds. I don't see any problems with the panels, and if you go back aft and cut those ties where it's binding and use the pipes and I use 12 penny common nails for spacers, it won't overlap and you'll be able to slowly work toward the bow forcing the ply into place a little at a time. Build on. Mike
Re: C-17 Our first Build !
Posted: Sat Jul 15, 2017 9:14 pm
by David516
Thank you mike. If I have a larger gap than I expected in the middle can that be fixed?
Re: C-17 Our first Build !
Posted: Sat Jul 15, 2017 9:15 pm
by Aripeka Angler
Seaslug and Cvincent are spot on with the advice of stitching with pvc pipe.
I would add this, don't start tabbing your transom in without first glueing it to the hull panels with the epoxy/wood flour mix.
I also like to see the transom sticking out past the hull panels by the thickness of the bottom panel.
This is so the fillet you make will have a equal amount of "bite" on both the transom and the hull panels.
Re: C-17 Our first Build !
Posted: Sat Jul 15, 2017 10:30 pm
by seaslug
No need to worry about a wide gap anywhere as long as you're happy with the overall shape of the hull. The gaps will be filled with epoxy and wood flower or whatever structural filler you're using, and then covered with multiple layers of cloth inside and out. Just be sure and destroy any photographic evidence of the gaps if they're really massive. Carry on. Mike
Re: C-17 Our first Build !
Posted: Sat Jul 15, 2017 10:31 pm
by David516
Again, Thank you.
I do have one question. Should the bottom panels come right up to the edge of the frames, or overlap them, or come short. I'm not sure how to create that gap at the chine for gluing. I dont know if there is a difference how I do it as long as it comes fair in the end? Slightly confused.
Truth is, without all the advice from all of you I probably would have thought this was impossible and thought about giving up by now!
Thats how important your advice is to me ! so, Thanks !!!!
Re: C-17 Our first Build !
Posted: Mon Jul 17, 2017 11:19 pm
by David516
Response from System Three regarding use of Gel Magic on wide gap.
I emailed System Three and asked If Gel Magic could be used on a wide gap If I should have a problem with the center line on the bottom panels. They said that yes, there is no problem using it. See the copy of their response email below.

Just a note, after I calmed down a bit and took all the advice I received, I'm pretty sure the gap in the bottom panels is minor at best if at all! Good news. I started stitching as advised and I'm about one third into the bottom panels with loose stitches and the PVC pipe sections!

Re: C-17 Our first Build !
Posted: Tue Jul 18, 2017 12:36 am
by fishgitr
Gaps are good. They are to be filled with thickened epoxy. You have problems when there is wood touching wood. Vibrations and twisting will cause cracking..
Re: C-17 Our first Build !
Posted: Tue Jul 18, 2017 4:43 am
by David516
Agreed!
Re: C-17 Our first Build !
Posted: Tue Jul 18, 2017 4:49 am
by Aripeka Angler
That looks WAY better than what you had before!
Re: C-17 Our first Build !
Posted: Tue Jul 18, 2017 5:37 am
by glossieblack
If at first you don't succeed .....
Well done David!
Re: C-17 Our first Build !
Posted: Tue Jul 18, 2017 8:34 am
by Jeff
Yes, well done David!!! Jeff
Re: C-17 Our first Build !
Posted: Tue Jul 18, 2017 11:46 am
by David516
Thanks, guys !
I will keep everybody updated !!!
Re: C-17 Our first Build !
Posted: Tue Jul 18, 2017 11:48 am
by Reid
David,
I didn't notice, but do you have the side panels attached yet? Before I do any gluing I stitch ALL the hull panels together and let it sit for a day or so. This allows the wood to take its natural shape around your frames. Once the panels are loosely stitched, methodically start tightening the zip ties until you are happy with the gaps and complete shape.
As the others have said, don't worry about gaps. Woodflour and Epoxy will fill those in just fine. Seaslug gave me a good tip, get under the hull and tape (painters tape works fine) the back side of the gap. This will save you a lot of grinding work later on when you flip the hull and give you a cleaner seam on the inside of the hull.
Reid
Re: C-17 Our first Build !
Posted: Tue Jul 18, 2017 8:24 pm
by David516
Re: C-17 Our first Build !
Posted: Tue Jul 18, 2017 10:19 pm
by seaslug
So far I think everything looks pretty good, but I wouldn't go any further without stitching on the side panels. Once you get the side panels stitched using the pvc pipes you'll see if all 4 panels line up ok at the bow. That little gap at the bow isn't a problem, and with the side panels in place you still have room for another stitch or a screw, or even a bolt, to pull the bow together. If you do use a screw or bolt, just be sure you're able to remove them after tacking everything together. As far as the gaps where the bottom panels are off the frames, if your frames are laid out and cut properly you should be able to place some weights on the panels before tack welding it all together. But, if when you apply weight and push the panels down and it creates a bottom that's not perfectly straight, adjust the weights, shim underneath, or whatever you need to do to get it nice and straight before applying the epoxy between the ties. A few screws here and there to hold things in line before gluing is fine, and can be removed after the epoxy sets up. Mike
Re: C-17 Our first Build !
Posted: Tue Jul 18, 2017 11:01 pm
by David516
Thanks Mike.
So then If I'm understanding you correctly once I get the hull fair the glue will hold it that way?
Re: C-17 Our first Build !
Posted: Wed Jul 19, 2017 12:29 am
by terrulian
I agree with Mike; you need to get all the panels together including the sides and then tighten slowly, paying more attention to the fairness of every curve than to having every board join to the next one uniformly.
Yes, once you tighten all the ties and have the hull the shape you want including all panels, put epoxy thickened with wood flour in the spaces between the ties (taping the inside is a good idea as others have suggested). Let it kick, clip off the ties, and bingo, you've got a boat. Almost.
They are very unlikely to break apart except if there are areas, like the bow, where there is extensive strain. In that case do as others have suggested and fortify the zip ties with a screw or two, or as I did, with a bolt. On my build the strain was intense enough at the bow that I added a piece of tape in the questionable joint for insurance before removing the ties but this probably will not be necessary.
Re: C-17 Our first Build !
Posted: Wed Jul 19, 2017 1:52 am
by David516
Thanks! I will put the side panels on in the afternoon and take it from there.
Ive got the bottom panels where I feel at least I can work with them and get them fair, so I'll get the lower chine panels on and see what happens!
Re: C-17 Our first Build !
Posted: Wed Jul 19, 2017 10:37 pm
by David516
Re: C-17 Our first Build !
Posted: Thu Jul 20, 2017 9:27 am
by pee wee
That's looking very good! Now is the time also to lay a straight edge along the last five or six feet of the planing surface to see if it is pretty flat. You'll end up adding several layers of tape at the hull/transom intersection, so you'll need to return to this subject later, but if there were a major "flatness" issue now is the time to find out about it. It looks good in the photo, though. Your perseverance is paying off, that is coming together nicely.
Re: C-17 Our first Build !
Posted: Thu Jul 20, 2017 12:22 pm
by David516
Thanks Hank!
I did that with the straight edge in different sections including the planning surface I had found a hollow that's what was driving me crazy. But I'm pretty sure a combination of waiting down the hull temporarily and putting the sides on I helped quite a bit at this point now it's completely flat
Re: C-17 Our first Build !
Posted: Thu Jul 20, 2017 12:33 pm
by terrulian
Looking good!
Re: C-17 Our first Build !
Posted: Thu Jul 20, 2017 1:42 pm
by David516
Thanks Tony. Im working on getting that right (far) side to lay down a bit (about 1" to touch the frame) and I think I figured it out but not sure till I try it. Gotta tighten the center line a bit then very very slightly change position of the right (actually port side) lower panel which is trying to creep under the edge of the bottom panel. Nails not helping so I think about 2/3 that side need to be loosened a bit.
best case scenario the tighter center line forces the side panel from under the bottom panel.
Re: C-17 Our first Build !
Posted: Thu Jul 20, 2017 11:33 pm
by David516
Did a little more tweaking today. I'm almost completely satisfied the hull is very fair.
I'm still unsure about the the hull not touching every part of every frame. Is that ok? I'm also having a problem with one of the lower chine panels refusing to lay flat on frames D & E. the hull appears perfectly even (when I push the one panel against the frames) and it's not under much pressure at all but it's impossible to get to lay flat. every time I try something like
re-positioning panels, tightening or loosening the zip ties in different places something else causes a worse problem. (see below photo).
what I was wondering was If I could temporarily hold the panel in place while I glue and glass the bottom and lower chine panels and possibly temporarily tab the panel to station D (MDF board) until rollover so that when I apply the upper chine panels everything will remain in place???
I'm thinking the panel might be warped since nothing I do resolves it.
Any assistance is appreciated !

Re: C-17 Our first Build !
Posted: Fri Jul 21, 2017 4:48 am
by Eric1
David, All I can tell you is that mine didn't touch every surface either. They were close bit not making full contact. If you look under my boat now there are still places that don't touch. All of that will be corrected when I glass the frames in place. That shape will have to be adjusted after glassing inside regardless. Concentrate on getting a fair shape. If you like go back to the early part of my build "Eric's C21" and read through it. I had many of the same questions you are asking. It will come together, Believe me.
Best of Luck!!!
Re: C-17 Our first Build !
Posted: Fri Jul 21, 2017 1:40 pm
by David516
Most places are close or making contact. There are a couple of places where the non contact is more than an inch. I can adjust for it but i don't know if it will stay in place after the gluing. I also notice that due to the high humidity a lot of apparent warping is taking place.
My question is if i forceably overcome all this warping will the gluing be adversely affected?
Re: C-17 Our first Build !
Posted: Fri Jul 21, 2017 2:03 pm
by Reid
David,
The hull panels are never going to touch the frames the entire way. Your goal should be to minimize the gaps to under 1 inch. Small gaps will be filled with woodflour/epoxy mix and eventually glassed over with tape and fiberglass cloth. Your biggest concern is not to have any flat spots in the hull sides and not to have any concave or convex curves in the hull bottom. These are difficult to correct after you glass the hull.
First, I would double check and make sure all your frames are accurate and square, both in distance apart and sitting at 90 degrees on the strongback. Next, I would play around with the zip ties. I prefer to hang all panels very loose and let them sit a day. I will then start to tighten the ties very slowly working my way from stern to bow or bow to stern. Also, use the method of cutting pvc pipe and placing that in between the zip tie and the back side of the seam. This will help keep an evenly spread apart seam and avoid binding in some spots which will cause larger gaps in others (particularly the bottom of the frame). Be careful not to stitch your keel seam to tightly. This is common among first time builders and often leads to larger gaps between the frames and hull side panels. Stitching the hull definitely takes patience but will pay off when you start to glue.
The last piece of advise before you glue is to use some painters tape and tape the back side of the seams. This will help you form cleaner fillets and save time when you flip the hull.
I hope this helps, keep fighting the good fight my friend!!!
-Reid
Re: C-17 Our first Build !
Posted: Fri Jul 21, 2017 2:26 pm
by terrulian
My question is if i forceably overcome all this warping will the gluing be adversely affected?
The glue is very strong. However, if you have, out of necessity, used some weight or clamp or screw or bolt to hold together a particularly difficult part and there is a lot of stress on it, there is the off-chance it will pop when you remove the ties. In case you're concerned about this, while you're putting the putty welds between the ties, right at the stress point add a little glass tape. This will hold everything together and eliminate your concerns.
Couldn't get the panels to come together:
I gave up on zip ties in exchange for the power of a bolt:
I taped the interior just in case the glue wouldn't hold when I released the bolt. This looks cockeyed from the photo but is actually symmetrical, believe it or not:
This is not pretty, more like watching sausage being made, but it held fine, and the bow, with a bit of fairing, was just right. I'm not as neat as the good builders.
I never uploaded a close-up of the finished bow but here it is:
Re: C-17 Our first Build !
Posted: Fri Jul 21, 2017 3:35 pm
by David516
Thank you Reid. I have to this point taken almost all of your advice and I find I still have to loosen some stitches in the midsection And I still need to add some battens higher up to get the sag out of the mid hull however, everything is almost perfectly lined up and may only require a slight adjustments as I was able to get the gaps inside under an inch.
The lower chine panels look pretty good to me but I don't understand what you mean about flat spots. The aft section of the panels are not curved whereas the forward half of the panels seem to be curved perfectly.
Is this what you were referring to?
I will be loosening the mid centerline zip ties to allow the lower hull panels to be properly spaced on the frames.
If there is anything else that you think I should be doing please let me know. Thank you.
Re: C-17 Our first Build !
Posted: Fri Jul 21, 2017 3:39 pm
by David516
And thank you Tony for the explanation and the pictures.
I may be taking your idea for the bow since I have to move all of the nose panels in another eighth of an inch.
I am waiting to see what the rest of the boat looks like first after I do all my adjustments.
Actually if you look at the pictures I posted my hull looks very similar to yours at this stage except for the two problems I mentioned.
Re: C-17 Our first Build !
Posted: Sat Jul 22, 2017 1:00 am
by David516
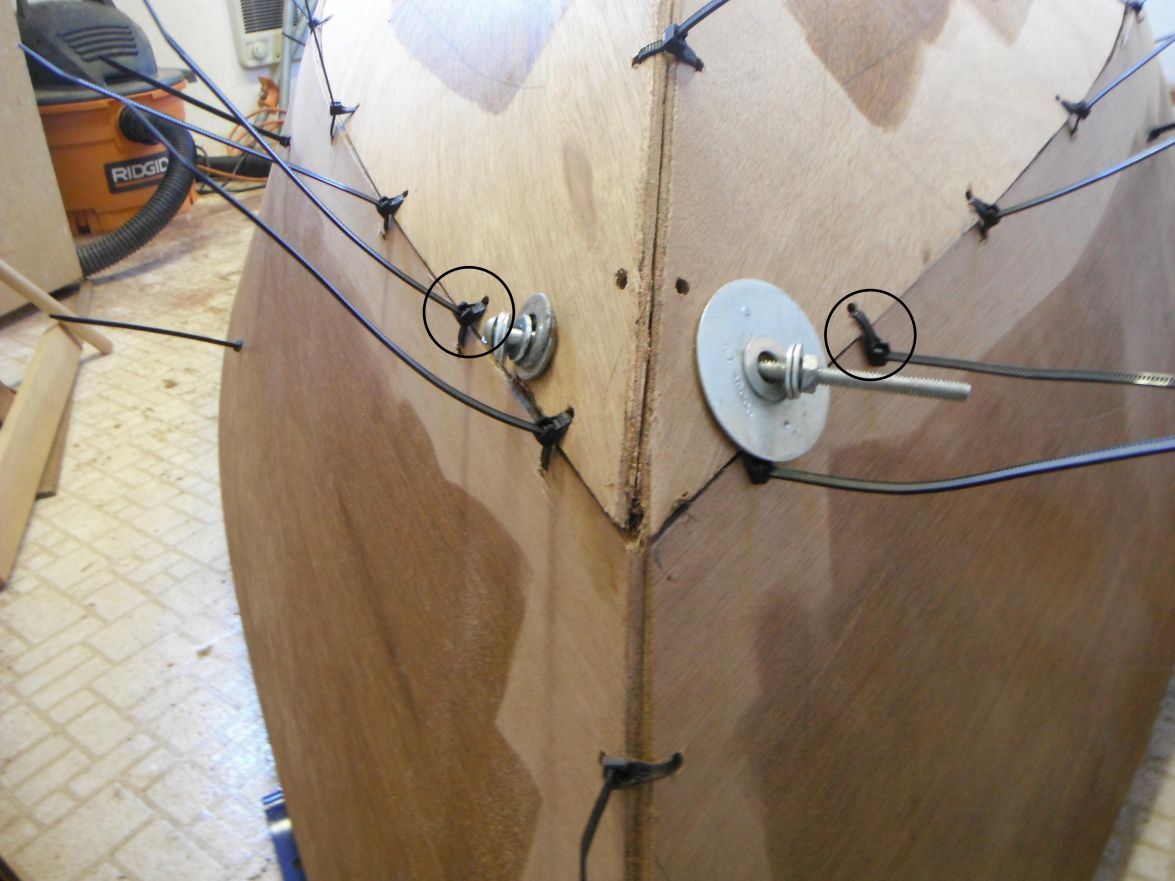
This is whats driving me crazy!
I removed some stitches between frame C (third from left) and E at the centerline. I added some weight above frame C, The hull sits perfectly straight and fair.
When I re-stitch that area (whether loose or tight) and remove the weight, The bow just in front of frame C bulges up about 1 1/2 inches and screws up the straight centerline and some of the fairness! I cannot figure out the solution! I have completely unstitched and re-stitched all the panels twice and re-did that section several times all with the same result !
Any suggestions ?

Re: C-17 Our first Build !
Posted: Sat Jul 22, 2017 4:23 am
by dbcrx
Can you not just leave the weights on while you glue it. Or put a few ties through the frame to hold it down.
Re: C-17 Our first Build !
Posted: Sat Jul 22, 2017 8:26 am
by topwater
Remember you are going for fairness first , if it won't fit flush to the frames at the bow don't sweat it.
it's much easier to adjust the frames for slight deviations which you will have to do anyway after you add all the glass
tape .
[img]
http://gallery.bateau2.com/albums/userp ... 73.JPG/img]
If you look at the bottom of the frame B near the bow you will see a good size gap . That's as tight as i could fit it
without messing up the fairness of the bottom panels. I just cut a piece to fill it it in and then glassed it into position.
Re: C-17 Our first Build !
Posted: Sat Jul 22, 2017 8:34 am
by topwater
Sorry i tried 9 times to post an image and as usual i can't do it.
Re: C-17 Our first Build !
Posted: Sat Jul 22, 2017 11:22 am
by David516
Ok , thanks !
Re: C-17 Our first Build !
Posted: Sat Jul 22, 2017 11:27 am
by terrulian
Topwater...
The URL of the photo needs to have [img] on each end when you place it in the text.
Re: C-17 Our first Build !
Posted: Sat Jul 22, 2017 3:57 pm
by Jaysen
topwater wrote: ↑Sat Jul 22, 2017 8:26 am
Remember you are going for fairness first , if it won't fit flush to the frames at the bow don't sweat it.
it's much easier to adjust the frames for slight deviations which you will have to do anyway after you add all the glass
tape .
If you look at the bottom of the frame B near the bow you will see a good size gap . That's as tight as i could fit it
without messing up the fairness of the bottom panels. I just cut a piece to fill it it in and then glassed it into position.
Re: C-17 Our first Build !
Posted: Sat Jul 22, 2017 6:21 pm
by David516
OK, I'm beginning to understand this concept! I was not sure of myself and I was questioning myself. So I had a friend look at the hull that I have to this point And he feels that everything is perfectly fair. So right now all I have to do is put some more zip ties on top Line the hull up with The transom, put a couple of wedges and then I should be ready to start gluing. Depending on the weather that could be in a day or two or three.
Re: C-17 Our first Build !
Posted: Sun Jul 23, 2017 2:27 pm
by David516
OK, I'm getting the hull panels ready for gluing with some final adjustments. I looked more carefully at the motor well walls. When I placed the Transom on The motor well walls protrude approximately an eighth of an inch higher than the bottom of the transom. Because right now they're resting against the bottom panels and I probably would not be able to adjust the transom with the proper gap for gluing. I know I'm likely going to have to sand down the bottom of the motor well walls when I flip the boat anyway so my question is should I do it now and at least match the transom so that I can line everything up properly? I really don't see much choice in the matter if I want to line the transom up properly with the hull. I know the transom is set at an angle but this seems a bit high.

Re: C-17 Our first Build !
Posted: Mon Jul 24, 2017 9:06 am
by pee wee
There's no need to trim the motorwell sides at this point, wait until you flip and glass, then trim top and or bottom.
Re: C-17 Our first Build !
Posted: Mon Jul 24, 2017 2:13 pm
by David516
Ok thanks
Re: C-17 Our first Build !
Posted: Mon Jul 24, 2017 6:06 pm
by Chuck H
David,
I can't tell for sure what your picture is showing, a little distance would provide some context. The motor well sides are usually used to set the transom angle and hold it in place on the strong back. If that picture shows the motorwell sides 1" proud of the transom, somethings not right. How do the m/w sides line up with the m/w bulkhead?
Chuck
Re: C-17 Our first Build !
Posted: Mon Jul 24, 2017 7:36 pm
by David516
Chuck, they're about a quarter to 3/8 " higher. I thought that might be a bit long to hold the transom close enough to the lower hull panels for gluing.
Otherwise, they seem to fit everything else pretty well.
I also had them mounted approximately an eighth of an inch below the stringers I have since made them even.
Re: C-17 Our first Build !
Posted: Wed Jul 26, 2017 5:00 am
by David516
I finally finished stitching the bottom and lower chine panels to the point where I'm satisfied. a few wedges and I can glue.
My question is that when I placed the transom on the motorwell wall panels I noticed a small, about 1/8" warp at the center of the transom which causes the middle to fit perfectly but the both sides stick out of the panels a bit. I can even them out with gel magic and straighten the transom with fiberglass, resin and quick fair, but is this acceptable, or do I have to cut a new transom? (see pictures).


Re: C-17 Our first Build !
Posted: Wed Jul 26, 2017 5:42 am
by Aripeka Angler
I can't tell from the pic, have you laminated the transom layers together yet?
Re: C-17 Our first Build !
Posted: Wed Jul 26, 2017 10:44 am
by David516
Yes all four pieces are together. But the funny thing is if you look at it it looks perfect I needed a straight edge to tell it was a little off and it just went in the little bit in the middle
Re: C-17 Our first Build !
Posted: Wed Jul 26, 2017 11:04 am
by pee wee
How big a gap do you have between the molds and the hull panels at the center around station B or C?
Re: C-17 Our first Build !
Posted: Wed Jul 26, 2017 12:20 pm
by David516
About an inch on C.
Unless anybody thinks it's a major problem I'm going to do what I said and straighten the edge with the Gel magic.
Since the protrusion is even on both sides.
Re: C-17 Our first Build !
Posted: Wed Jul 26, 2017 1:11 pm
by jacquesmm
It is not a problem at all.
Fill the gaps with resin and wood flour, not Gelmagic.
Most of the time, I line up the panels with the transom and deal with the gaps at the bow but this is fine too.
Re: C-17 Our first Build !
Posted: Wed Jul 26, 2017 1:15 pm
by David516
That is great news!
THANK YOU Jacques !!!!
Re: C-17 Our first Build !
Posted: Tue Aug 15, 2017 5:58 pm
by David516
And If I didnt have problems I'd faint ! Another hull problem!
Finally got the lower chine and bottom panels glued together and transom is glued and perfectly fitted to the panels (with proper gap).
I brought the upper chine panels and did a dry fit. The problrm is the panels come 7/8 of an inch short on each side!!! I have no idea why this is. I dont know how to handle this.
The question is should I just glass the nose where there is a big gap or do I try to extend the panels with more plywood?
See photos below.


Re: C-17 Our first Build !
Posted: Tue Aug 15, 2017 6:04 pm
by Eric1
Do you any room at the transom to move them forward a little? Maybe you could shift them forward and close some of the gap. Then fill with epoxy and wood flour.
Re: C-17 Our first Build !
Posted: Tue Aug 15, 2017 6:10 pm
by jacquesmm
In all the boats with overlapping top side panels, I expect the bow to be rounded.
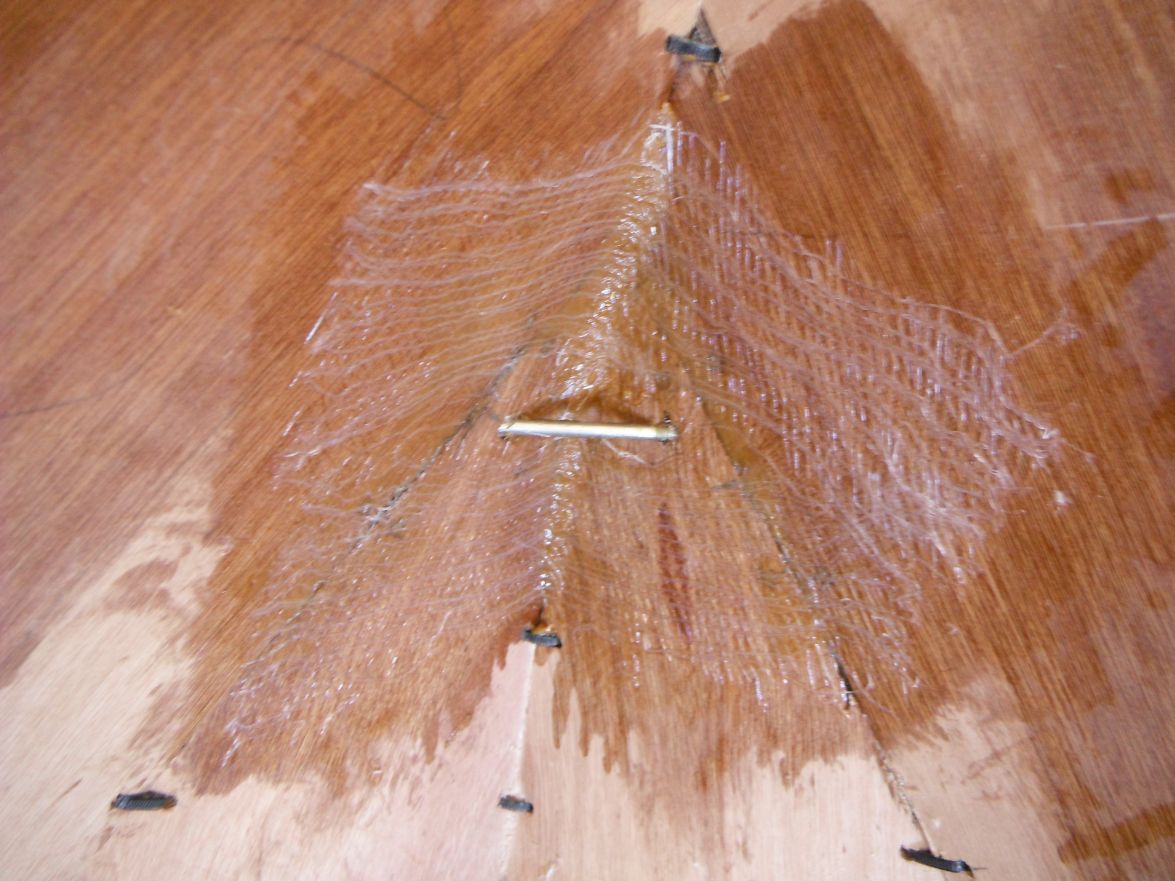
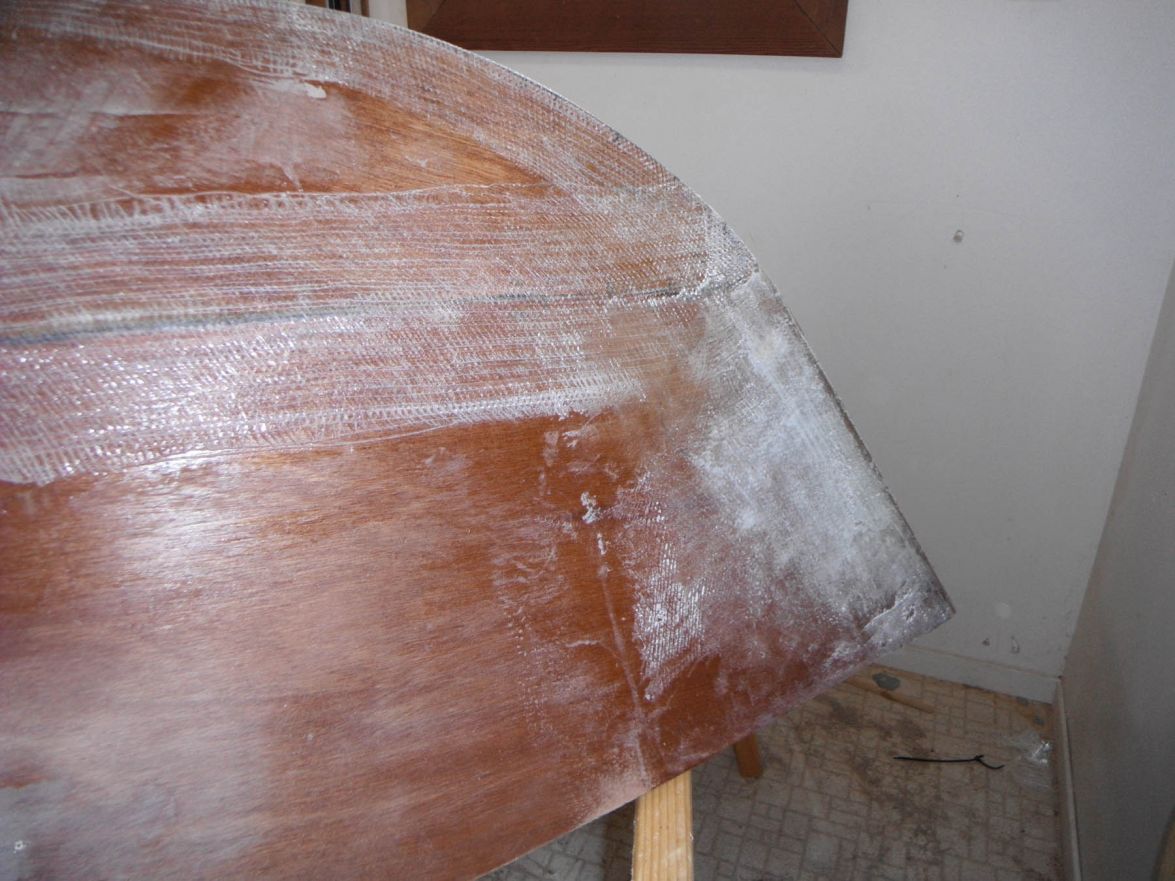
A sharp bow will chip right away and a rounded bow is prettier anyway.
You guessed right, you should round that with fiberglass tape.
I don't think that I expected a 7/8 gap, probably 1/2" but what I see in the picture is fine.
If you want, you can put a small batten in there to keep the glass from sagging when you build the rounded tip of the bow. Think of the fiberglass that will be taped on the inside, keep it clean and simple.
At that stage, in all boats, I expect the builder to "sculpt" the bow.
Stitch the panels and spot weld.
Remover the stitches and fill the gaps with putty.
That is when you shape the bow: round the intersection between bottom panel and top side panels, especially in profile.
Tape as specified then glass the outside and overlap the wide fabric over the bow.
Same inside: tape then overlaps.
That will create a very strong bow equivalent to a stem piece in wooden boat building.
That is the way the stem is built in fiberglass boat building.
Think that you are building a fiberglass boat, not a wooden boat in which all parts must be fitted to each other. It is the fiberglass that matters, the plywood is the core.
Re: C-17 Our first Build !
Posted: Tue Aug 15, 2017 6:29 pm
by David516
Jacques, Thank You Very Much !!! Will do!
Best Regards!
Re: C-17 Our first Build !
Posted: Tue Aug 15, 2017 8:04 pm
by jacquesmm
I am not in town right now but on Friday, I will take pictures of what I call a "sculpted" bow. Reid did a great job of it on his FS18 kit, I"ll take pictures of it.
Re: C-17 Our first Build !
Posted: Tue Aug 15, 2017 9:56 pm
by David516
Thank you!
Re: C-17 Our first Build !
Posted: Mon Aug 21, 2017 10:02 pm
by David516
Well, I was able to work enough to get the seems good and shaped pretty much the way I want them. I have a little more touch up to do before I'm ready to put the fiberglass tape on the seams. I temporarily fitted the upper chine panels to get an idea how I'm going to shape the upper nose and so far everything looks good. I found that there are a couple of sags in the hull which will probably need to be faired.
Does anybody ever start fairing the hull before the fiberglass goes on then finishing afterwards before the final coats of Epoxy go on before priming? Or is all the faring done after the fiberglass goes on?
I thought it would be easier to put the fiberglass on a more even hull even though the sagging is not really noticeable until you put a straight edge across it. I'm really not sure what to do there and if I do fair the hull first should I pre-coat it with epoxy?
Just an unrelated question, I am searching for pieces of wood to use for the keel and strakes. Can anyone tell me how long the keel and the strakes should be ? I know the height and width, but not the Length.
Thanks!
See photos below.


Re: C-17 Our first Build !
Posted: Tue Aug 22, 2017 1:13 am
by glossieblack
David516 wrote: ↑Mon Aug 21, 2017 10:02 pm
Does anybody ever start fairing the hull before the fiberglass goes on then finishing afterwards before the final coats of Epoxy go on before priming? Or is all the faring done after the fiberglass goes on?
This question is asked very now and again by builders on this forum, and the weight of responding opinion is that all fairing is best done after fibreglassing.
My hunch is that to do so beforehand, you wold need to use a filler with high structural strength, which wold make fairing a right royal pita. By doing it afterwards, you can go with a softer filler, which is far easier to fair. But I'm not an expert on the matter.
You've done a great job on getting the hull so nicely shaped.
Re: C-17 Our first Build !
Posted: Tue Aug 22, 2017 4:07 am
by David516
Thank you !
Re: C-17 Our first Build !
Posted: Tue Aug 22, 2017 4:21 am
by Fuzz
Glossie is right on with his answers. Does not take long when looking at his build thread to know he is one sharp dude. If you can use a shim or something like that to remove the small sags it would save you some work later but either way there will be fairing to be done

Re: C-17 Our first Build !
Posted: Tue Aug 22, 2017 12:24 pm
by David516
OK, thank you. I will start the Biax on the seams tonight. I can't shim the panels up anymore because they seem to be warped the whole boat moves when I try to do that. But we're only talking fairing approximately an eighth of an inch and only in certain areas. Otherwise I think I'm actually in pretty decent shape!
Re: C-17 Our first Build !
Posted: Tue Aug 22, 2017 12:56 pm
by David516
Guys, since I am going to epoxy the entire lower Hull and start glassing the seams. I should be getting close to getting the entire hull glassed. That is assuming I can work every day for the next few days without having to deal with the constant emergencies that go on here

So I actually have two questions.
I already figured out the spray rail but I wonder if anybody has any suggestions for the type of wood that would be best for the skeg and strakes.
Also I don't know what the length of the skeg or the strakes should actually be. I know the dimensions but not the length. I also don't know but could probably guess That those parts go on after having wetted out the fiberglass but I don't know if they're supposed to go on immediately or wait until I fill the weave or wait until the boat is fared ?
Re: C-17 Our first Build !
Posted: Tue Aug 22, 2017 2:14 pm
by TomW1
The preferred wood is something like southern yellow pine, nice and hard. For the skeg 6' is good, start it a foot from the transom so you don't get any interference to the prop. For the strakes 10' should be plenty, that is what I was going to use when I was going to build the C17.
There are a couple ways to go on when to glue the strakes and skeg down. Others can give you the ways they did it.
Re: C-17 Our first Build !
Posted: Tue Aug 22, 2017 4:03 pm
by David516
OK thanks
Re: C-17 Our first Build !
Posted: Sun Sep 03, 2017 1:36 pm
by David516
OK, I haven't had the most time in the world this summer. As a matter of fact I've been so busy I wish I was back at work I wasn't as busy when I was working but nonetheless I got my bottom hull to the point where i'm going to start fiberglassing The seams and the transom today in the larger Sheets tomorrow. When I coated the hull I used slow Hardner last evening. I figure that gives me a couple of days without having to sand!
Here's the pictures before the tape goes on.


Re: C-17 Our first Build !
Posted: Sun Sep 03, 2017 5:24 pm
by Browndog
Man does that ever look nice and shiny! Good luck with the fiberglassing.
Re: C-17 Our first Build !
Posted: Sun Sep 03, 2017 6:56 pm
by David516
Thanks browndog!
I'm getting there slowly.
I took a picture of the tape on the transom because it's the first time I've ever put biax on a boat!!!

Re: C-17 Our first Build !
Posted: Sun Sep 03, 2017 7:14 pm
by terrulian
Incredibly fine work! Keep the photos coming to give us something to aspire to.
Re: C-17 Our first Build !
Posted: Sun Sep 03, 2017 7:29 pm
by Jaysen
terrulian wrote: ↑Sun Sep 03, 2017 7:14 pm
Incredibly fine work! Keep the photos coming to give us something to aspire to.
Tony, did you see that he's a first timer with that tape? I think we should ban him from the forum if that's what he's going to be doing "the first time". Grrrr....
David516, that's my attempt at humor to cover my jealousy. Excellent work. Keep it up and you will give Eric1, AA, and the other "production finish" guys a run for their money.
Re: C-17 Our first Build !
Posted: Sun Sep 03, 2017 7:32 pm
by terrulian
BTW, where did you get the biax with selvage? Mine had ragged edges. That's my excuse, anyway.
Re: C-17 Our first Build !
Posted: Sun Sep 03, 2017 8:32 pm
by David516
Thank you guys, you've definitely given me some extra confidence. The trick to my doing a neat is that I'm terrified to screw up. But no I actually never did fiberglass on anything but displacing the panels until now. And Tony, I got the 6 inch biax from Reid at Bateau. It does not seem too badly priced at all. It does wet out nice but I keep after the edges as it's drying I figure it'll save me more work in the future.
I'm going to finish the seams tonight and do the bottom panels tomorrow and I will post the pictures I'm hoping it comes as good as this did!!!
Re: C-17 Our first Build !
Posted: Mon Sep 04, 2017 9:21 pm
by David516
I was able to do all the taping of the seams last night. What surprises me is how nicely the Biax conforms to different things. Although I will say doing the sides vertically you guys must've heard me from where you are because boy was I Cursing. That is quite a job. Anyway now tonight I'm going to file down the high spots and tomorrow I'll fill the weave with another coat of Apoxsee and put the 52 inch biax on the bottom panels in the lower chine panels. As slow as I am I think I'm actually making some progress here!!!
Some pictures from last night. As always, any advice you guys give me from anything you see is always very well received thank you.


Re: C-17 Our first Build !
Posted: Mon Sep 04, 2017 9:39 pm
by BB Sig
Looking good! Are you sure this is your first build?!

Re: C-17 Our first Build !
Posted: Mon Sep 04, 2017 9:57 pm
by David516
Thank you. Definitely my first build! I have done quite a bit of carpentry but I see that that is extremely different than building a boat. I do ask a lot of questions though.
I also am much slower than most people because of my knees which I guess is a blessing because I have no choice but to take things very slow and to notice what I'm doing. But it's nice to know that you guys think it's coming along well. The encouragement gives me a lot more confidence than I would have otherwise.
Re: C-17 Our first Build !
Posted: Tue Sep 05, 2017 1:13 am
by glossieblack
David516 wrote: ↑Sat Jul 15, 2017 6:33 pm
I think I somehow have a big problem! .................... I'm beginning to wonder If my project is over before It goes any Further!!!
Right now praying!!!
You sure have come a long way since July 16! Your build is look great. Build on.
Re: C-17 Our first Build !
Posted: Tue Sep 05, 2017 1:42 am
by David516
Re: C-17 Our first Build !
Posted: Tue Sep 05, 2017 5:08 am
by Eric1
Looking good David!
Re: C-17 Our first Build !
Posted: Wed Sep 06, 2017 3:09 pm
by David516
Not sure how to word this question. Of course I have all the seams on the lower panels taped including the centerline and transom and I have now put another coat of epoxy over everything. First I sanded high spots nubs, Sharp glass edges, etc. And now I want to put the two large sheets of biax on the hull bottom.
The question is do I have to completely fill the weave on the seam taping until it's perfectly smooth? Or is the one coating of epoxy good enough?
I posted a close-up picture of the weave to show what it is like right now. And that was done 15 hours ago. Slow hardener.

Re: C-17 Our first Build !
Posted: Wed Sep 06, 2017 3:33 pm
by pee wee
I'd give it a quick sanding with some rough grit to knock down the stitch threads, they're not doing anything for you now that the fiberglass is down. Sand the cotton threads, not into the fiberglass.
Re: C-17 Our first Build !
Posted: Wed Sep 06, 2017 4:05 pm
by David516
OK will do. Thanks Hank
Re: C-17 Our first Build !
Posted: Wed Sep 06, 2017 5:02 pm
by BB Sig
I agree. Sand until you see a cross pattern.
Re: C-17 Our first Build !
Posted: Wed Sep 06, 2017 6:21 pm
by David516
Ok thanks Barry
Re: C-17 Our first Build !
Posted: Tue Sep 12, 2017 1:02 pm
by David516
Just an update.
Let me first say that I hope everyone in Florida remains safe and dry !
Finally got the first half of the hull glassed. looke almost perfect. took 5 hours (I move slow)!
noticed some tiny (pin head sized) bubbles just under the surface. they do not affect adhesion nor do they protrude...
Dont know what they are but i'm not too concerned at this point as most should come out when I sand the threads before filling the weave.
With any luck Ill get side two done tomorrow!!!
Hope everyone is well.


Re: C-17 Our first Build !
Posted: Tue Sep 12, 2017 1:08 pm
by Eric1
The layup looks great.
Re: C-17 Our first Build !
Posted: Tue Sep 12, 2017 4:37 pm
by Jeff
Really nice work David!! Speed is not a good gauge in boat building, take your time and do it correctly just as you are doing!!! Again, nice work!! Jeff
Re: C-17 Our first Build !
Posted: Tue Sep 12, 2017 6:08 pm
by David516
Thank you!
The work goes on !
If anyone out there has an idea on how to get that spray spray rail bent at the chine feel free to let me know!
Re: C-17 Our first Build !
Posted: Tue Sep 12, 2017 7:13 pm
by blueflood
Excellent progress David516
Marc
Re: C-17 Our first Build !
Posted: Tue Sep 12, 2017 8:21 pm
by David516
Thank you Marc !
Re: C-17 Our first Build !
Posted: Wed Sep 13, 2017 9:18 am
by pee wee
David516 wrote: ↑Tue Sep 12, 2017 6:08 pm
Thank you!
The work goes on !
If anyone out there has an idea on how to get that spray spray rail bent at the chine feel free to let me know!
You don't say what material you intend to make the spray rail out of. If it is plywood, the easiest way is to clamp a wider strip around there and trace it, thereby showing the curved line to cut it by. Make it out of at least two layers and offset the seams. If you will be using lumber, you can build it up with thinner strips that will bend more easily, or you could cut kerfs in the area of the sharpest bends, or you could wrap it in plastic and steam it until it bends to shape.
I like the plywood version, and then it could be topped with another strip of metal, rubber or wood.
Re: C-17 Our first Build !
Posted: Wed Sep 13, 2017 1:39 pm
by David516
Thank you Hank. Yes I was considering plywood or a strip of pine.
I do think I'm going to go with the plywood.
Re: C-17 Our first Build !
Posted: Thu Sep 14, 2017 4:06 pm
by pee wee
Take a look at how Eric1 is fitting the rubrail on his build, it is a straightforward and accurate method for cutting the strips of ply:
https://forums.bateau2.com/viewtopic.ph ... start=1200
Re: C-17 Our first Build !
Posted: Fri Sep 15, 2017 8:35 am
by topwater
I built my spray rail out of 1 1/2" cypress and bent it on in one piece . I used long screws and big fender washers to hold
it in place while the epoxy cured. My thread has pic's Topwater NV 23.
Re: C-17 Our first Build !
Posted: Fri Sep 15, 2017 9:07 am
by Eric1
David if you are interested in how I'm doing my rub rails I posted a bit more about them this morning.
Re: C-17 Our first Build !
Posted: Fri Sep 15, 2017 1:29 pm
by David516
Ok thanks !
I will check out Eric's spray Rail.
Re: C-17 Our first Build !
Posted: Fri Sep 15, 2017 8:10 pm
by David516
I checked everybody's spray rails out and I'm pretty sure I decided what to do. I love the idea of having Cypress unfortunately it is nowhere near available in my area without great expense , So I think I'm going to cut them to match the curve out of three-quarter inch Douglas fir marine plywood. I plan on cutting kerfs to make it flexible and then saturating with sealer. Once the epoxy glue curers I can then fill the kerfs and possibly route the edges as I would like them rounded.
In other news I happily finished the biax on the lower hull and chine panels. So as soon as I fill the weave I can start putting the skeg, strakes and spray rail on.
I noticed Eric1 has longer strakes than skeg. I was actually thinking the opposite with a 9 foot skeg and 7 foot strakes.
Is this something that is up to the builders discretion ?

Re: C-17 Our first Build !
Posted: Sat Sep 16, 2017 9:05 am
by pee wee
David516 wrote: ↑Fri Sep 15, 2017 8:10 pm
So I think I'm going to cut them to match the curve out of three-quarter inch Douglas fir marine plywood. I plan on cutting kerfs to make it flexible and then saturating with sealer.
It is possible to do what you propose, but a good argument could be made for using thinner plywood: it bends more easily, it may not need kerfing at all. You will build up two or three layers (in place) to arrive at the thickness you desire, and offset the seams. If you use thick material there is a tendency to get a visible kink in the sheer line where the 8 foot ply ends meet, with thinner material stacked and offset you get a nice, smooth curve.
When stacking thinner layers you will want to dry fit them, perhaps use screws or dowels to lock them in their final position so the lower edges will stay aligned as you fit the pieces.
On the skeg, it is possible to make it so long it hampers your turning efforts. I don't know the ideal length, but 9 feet sounds long to me.
I'll let someone else chime in on the best time to install strakes and skeg, I've heard some people like to get a little hull surface smoothing done before those go on.
Re: C-17 Our first Build !
Posted: Sat Sep 16, 2017 1:05 pm
by David516
I noticed other builders wait for faring to be done before installing the skeg and strakes. I was actually thinking that they might adhere better if they went right on the epoxy resin? this I have no idea about. I think like you said Hank, I might I have to wait for a few expert comments on the question !
The question being whether or not the skeg and strakes would adhere well over fairing compound?
Re: C-17 Our first Build !
Posted: Sun Sep 17, 2017 9:08 am
by topwater
I installed my skeg and spray rails before fairing that area. Stronger bond imho.
Re: C-17 Our first Build !
Posted: Sun Sep 17, 2017 12:40 pm
by David516
Thank you my friend! I was not going to take one step further without that info! I gave myself a two day rest.
( an excuse to be lazy! )
Re: C-17 Our first Build !
Posted: Thu Sep 21, 2017 11:28 pm
by David516
The weave on the bottom and lower chine is almost full and smooth, so tomorrow I start cutting and shaping the skeg, strakes and spray rails.
Yellow pine for skeg and strakes and I decided on marine plywood (okoume- not sure of spelling) layered for the spray rails.
Here's my progress so far:

Re: C-17 Our first Build !
Posted: Fri Sep 22, 2017 4:41 am
by glossieblack
As usual, very nice work.
Re: C-17 Our first Build !
Posted: Fri Sep 22, 2017 7:48 am
by Jeff
David, very well done!! Jeff
Re: C-17 Our first Build !
Posted: Sun Sep 24, 2017 1:05 pm
by David516
Does anybody have an idea on how far from the transom I should place the back of the Skeg?
I noticed some people put it right up to the transom and others have it up to a few inches forward of the transom. Which is the better way to install it???
By the way I made it 7'2" , if anyone has a different opinion please feel free to let me know. At this point I am in unfamiliar territory completely so I would most likely be inclined to listen to your advice.
Hope everyone is having a good weekend !
Re: C-17 Our first Build !
Posted: Sun Sep 24, 2017 4:02 pm
by TomW1
David the minimum should be 8" and 12" is better. This allows the disturbed water coming off the skeg to come back together before reaching the propeller.
Tom
Re: C-17 Our first Build !
Posted: Sun Sep 24, 2017 9:35 pm
by David516
Thank you Tom.
At this point I have not yet installed the keel but I am working on the nose part of it. I'm not happy with the design I'm coming up with it reminds me of a sharpened pencil. Does anybody have any design recommendations or comments on this?

Re: C-17 Our first Build !
Posted: Sun Sep 24, 2017 10:07 pm
by Jaysen
As a general statement...
Don't get too hung up on the pencil point. I'd whack the end of and then create the desired shape with thickened epoxy. That will let you round it nicely.
Re: C-17 Our first Build !
Posted: Sun Sep 24, 2017 10:09 pm
by David516
OK thank you that sounds good.
Re: C-17 Our first Build !
Posted: Mon Sep 25, 2017 12:46 am
by TomW1
I would try to avoid the epoxy just cut it off and round it off with a sander to the form you want.
Tom
Re: C-17 Our first Build !
Posted: Mon Sep 25, 2017 8:26 am
by topwater
Also put some taper on the trailing edge .
Re: C-17 Our first Build !
Posted: Mon Sep 25, 2017 4:50 pm
by David516
After a couple of hours this afternoon I finally got the tip of the skeg to the shape I wanted and was able to taper the rear and cut it to size. Although it is not installed yet I just threw it on top of the hull panels to take the picture.

Re: C-17 Our first Build !
Posted: Mon Sep 25, 2017 5:00 pm
by Jeff
Nice David!!!! Jeff
Re: C-17 Our first Build !
Posted: Wed Sep 27, 2017 5:55 pm
by David516
I have a stupid question. I put another coat of epoxy on today. I have already sanded the weave fill coats about three times. Do I need to keep sanding and coating with this epoxy until everything is flat like glass or is the finish I have posted below enough to put the skeg and other parts on and do the fairing?
I've never done this before so in other words I don't know when to stop with the epoxy and start with the faring compound.

Re: C-17 Our first Build !
Posted: Wed Sep 27, 2017 6:37 pm
by Dougster
Looks like it's easily time for fairing compound to me
Dougster
Re: C-17 Our first Build !
Posted: Wed Sep 27, 2017 7:00 pm
by David516
OK, thanks Dougster.
Re: C-17 Our first Build !
Posted: Fri Oct 06, 2017 2:49 pm
by David516
Greetings everyone! I thought I would update you all on my progress although as we are all painfully aware at this point that I am indeed very slow. But I must say thank you to all of you for all this advice you're giving me. I truly have never known such concern from strangers. You all give me a very great deal of confidence. Moving on I posted two pictures of how I cut The spray rail which will go on in six pieces scarfed with the bow sections kerfed. I included pictures of the way I measured using a stiff cardboard under a long sheet of tracing paper and I am surprised everything fit very impressively. I am currently at the point of finishing the pieces to make them all exactly the same with with sanding and fair enough to go on the boat with a minimum of touchup.
And please keep the comments and advice coming. Without that I'd actually even be a lot slower!


Re: C-17 Our first Build !
Posted: Sat Oct 07, 2017 3:41 pm
by David516
Well I managed to screw up the measurements on the rear half of the spray rail so that has to be redone. But on the bright side I now have sheer clamps for the bow!!!
Also, the skeg and strakes are finished and should be installed tomorrow or the next day !
Re: C-17 Our first Build !
Posted: Sat Oct 07, 2017 3:46 pm
by David516
Re: C-17 Our first Build !
Posted: Sat Oct 07, 2017 4:07 pm
by peter-curacao
Nice
Re: C-17 Our first Build !
Posted: Sun Oct 08, 2017 11:35 pm
by David516
I looked at your movie Peter.
I'm speechless. Outstanding work!
Re: C-17 Our first Build !
Posted: Wed May 09, 2018 4:23 pm
by David516
Greetings My friends and administrators ! IM back to work since late April as I took the winter off through no choice of my own. However I have been able to get a couple of more coats of epoxy applied then sanded. I got the skeg on and finally am satisfied with it's appearance. I started working on the spray rails that I cut in the fall. I had cut them to the curve of the chine since I have zero skill at bending wood. The problem was that I could not match the curve perfectly. The solution was that I cut the sections into small pieces and beveled the edges and was able to match them to the chine reasonably well. I intend to make the rails fair with wood flour mix and then put a layer of biax tape over them before fairing the sides. Im hoping it works just like im thinking! I'll keep you posted


Re: C-17 Our first Build !
Posted: Wed May 09, 2018 4:36 pm
by Jeff
David516, really good to hear from you and glad you are back building!!! Tough winter you guys had up there!! Jeff
Re: C-17 Our first Build !
Posted: Wed May 09, 2018 4:55 pm
by David516
Thanks Jeff !!! Good to be back! and yes, winter was one of the rough years, to add to the complications, Deb had Pneumonia for five months! But everything is fine now (we fight like heck) and I'm back to entertaining the neighbors with my boat project!
no matter how difficult it gets I always love the work !
By the way, I have a new note to make! Before permanently attaching my spray rails i thought to try clear yellow pine...
I cant answer why I never tried this before but it bends !!!!!!!
Back to work...
tRe: C-17 Our first Build !
Posted: Wed May 09, 2018 5:14 pm
by TomW1
David great to have you back. I love the C17 and can't wait till you finally launch yours. Glad your wife has recovered.
Tom
Re: C-17 Our first Build !
Posted: Wed May 09, 2018 6:43 pm
by David516
Thank you Tom !!!!
Actually I think it should start going a lot faster once I get it flipped I think that’s the major hurdle here! I already talked to a dealer about the engine and while I was talking with him I mentioned that he was going to connect the gas tank because I want it done properly he said he’s got no problem doing that but of course I’m going to run everything by you guys before I choose a tank but like I said I think it should go pretty quickly once I get this thing flipped !
Re: C-17 Our first Build !
Posted: Wed May 09, 2018 7:43 pm
by Jeff
David, very glad to hear your wife is well!!! Jeff
Re: C-17 Our first Build !
Posted: Wed May 09, 2018 9:21 pm
by Capt UB
David nice to see another Classic 17 build. I'm going to wait till next year to start my C17, $$. I will be following your build.
Just finishing a FS14, hope to splash her soon.
Good luck and hope you have some fun...
Re: C-17 Our first Build !
Posted: Wed May 09, 2018 10:22 pm
by TomW1
David516 wrote: ↑Wed May 09, 2018 6:43 pm
Thank you Tom !!!!
Actually I think it should start going a lot faster once I get it flipped I think that’s the major hurdle here! I already talked to a dealer about the engine and while I was talking with him I mentioned that he was going to connect the gas tank because I want it done properly he said he’s got no problem doing that but of course I’m going to run everything by you guys before I choose a tank but like I said I think it should go pretty quickly once I get this thing flipped !
David what motor and how much HP are you thinking of. You can run the fuel line from the tank to the back through a 1.5" tube. And the dealer can connect it from there. 3/8 inch fuel hose is standard. I would also like to get an idea on what your going to use your boat for.
Tom
Re: C-17 Our first Build !
Posted: Thu May 10, 2018 5:52 am
by Capt UB
From what I have seen and read about the Classic 17, a 60 hp 4 stroke would work great. Not sure if the C17 was designed for a 2 stroke or 4 stroke, thinking of weight. She is a beauty of a boat design, following you Tom on the OB choice you recommend.
Re: C-17 Our first Build !
Posted: Thu May 10, 2018 7:21 am
by Rmarsh
Good to see you back here and the progress you are making. Some builders have time and money to expedite things. My build took two and a half years. It takes time for it to all come together...and it will be soooo worth it.
Are you going to flip before attaching the upper side panels? Not sure it makes any differance, but I did mine while still upside down. In hindsight I may have avoided some bow droop doing it with the hull upright.
Re: C-17 Our first Build !
Posted: Thu May 10, 2018 2:01 pm
by David516
Thanks Guys!
Tom,
this is a long story! Ill keep it brief!
I had a 27' offshore from 2001 - 2017 with one expensive re-power. I got hurt at work and to the extent that I limp and cant run and I was forced to retire (and I mean forced)... Income went to 1/3 what it was and couldn't keep paying over 12,000 yr for the maint. and storage...mechanic also not honest and i Dont live close to where the boat was stored!.
The reason I go through this all is to give you an idea how depressed I was to have to sell my boat. My wife suggested I build one which I actually have wanted to do for many years!
Heres for my intent for the boat... I live in PA (came 30 years ago for work) I'm from the coast. around boats all my life. I can operate in anything. I want my boat to have a small cabin for my wife and enough power and dimensions to take me where I like to fish which is outside the New York Harbor and the New Jersey coast out to the area of the 44025 Buoy which is 20 miles Offshore. 70% of the time it is rough. I need enough power to get home through the breakers (3 miles offshore) which I have noted can actually pull an under powered or heavily loaded boat back on the waves approach. So I wanted sufficient power and I wrote to Jacques and asked if I could do a 70 and was given the OK . I dont intend to go fast, just to get home. I found this Yamaha F-70 which weighs in at 258 Lb.
Sadly, Among my few skills I'm good at, Engines are not included!!!! I only know how to operate them but nothing else. So I was going to have the yamaha dealer wire the wireing harness and fuel tank and do the fuel connections.
Since we're on gas tanks I have a question I was curious about. I wanted to mount a 24 gallon tank port side inside the port bench closest to the walkway. I figured this would center the weight the best possible way?
Re: C-17 Our first Build !
Posted: Thu May 10, 2018 2:45 pm
by Capt UB
Re: C-17 Our first Build !
Posted: Thu May 10, 2018 5:42 pm
by TomW1
David516 wrote: ↑Thu May 10, 2018 2:01 pm
Thanks Guys!
Tom,
this is a long story! Ill keep it brief!
I had a 27' offshore from 2001 - 2017 with one expensive re-power. I got hurt at work and to the extent that I limp and cant run and I was forced to retire (and I mean forced)... Income went to 1/3 what it was and couldn't keep paying over 12,000 yr for the maint. and storage...mechanic also not honest and i Dont live close to where the boat was stored!.
The reason I go through this all is to give you an idea how depressed I was to have to sell my boat. My wife suggested I build one which I actually have wanted to do for many years!
Heres for my intent for the boat... I live in PA (came 30 years ago for work) I'm from the coast. around boats all my life. I can operate in anything. I want my boat to have a small cabin for my wife and enough power and dimensions to take me where I like to fish which is outside the New York Harbor and the New Jersey coast out to the area of the 44025 Buoy which is 20 miles Offshore. 70% of the time it is rough. I need enough power to get home through the breakers (3 miles offshore) which I have noted can actually pull an under powered or heavily loaded boat back on the waves approach. So I wanted sufficient power and I wrote to Jacques and asked if I could do a 70 and was given the OK . I dont intend to go fast, just to get home. I found this Yamaha F-70 which weighs in at 258 Lb.
Sadly, Among my few skills I'm good at, Engines are not included!!!! I only know how to operate them but nothing else. So I was going to have the yamaha dealer wire the wireing harness and fuel tank and do the fuel connections.
Since we're on gas tanks I have a question I was curious about. I wanted to mount a 24 gallon tank port side inside the port bench closest to the walkway. I figured this would center the weight the best possible way?
Okay sounds like a plan the new Yamma 70 is a nice motor and has excellent power to weight ratio. The gas tank in the port bench would work well as it would weight roughly 168lbs. Here is the specs for the 70 it only weighs about 8lbs or so more than the 50.
https://yamahaoutboards.com/en-us/home/ ... cs-compare The 2.33 gear ratio will allow us to run a higher pitch prop than a motor with a lower gear ratio.
Good luck with your build. When you get close to launch let me know and I'll help find the right prop for the Yamaha.
Tom
Re: C-17 Our first Build !
Posted: Thu Sep 27, 2018 3:06 pm
by TomW1
Hi David any more progress?
Tom
Re: C-17 Our first Build !
Posted: Sat Oct 13, 2018 2:55 pm
by David516
Greetings Tom and everyone else. Sorry I haven’t posted for a while. Was not a good summer. It rained nearly every day with high humidity so I couldn’t do too much work on the boat plus I had Landscaping problems and home repair problems that I had to deal with all damn summer! Still have a couple of Home repair problems to deal with but I’m ignoring them until spring now. I was able to get the spray rails on (which took a month) And after about seven coats total of resin on top of the wetted out glass I sanded the entire hull less the upper chine panels which are not on yet as I tabbed two beams for eventual flipping. As soon as I remember how I’m going to post a couple of pictures in a few minutes I’ve got more than 99 9/10% of the surface scuffed with sanding but I’ve got little tiny pinhead sized shiny spots that I am beside myself on figuring out how to scuff because they seem to be slightly lower than where I’m standing I am avoiding sanding into the glass fabric But I want those tiny spots scuffed before I fair the bottom chine panels. I think with all the delays and distractions I’ve been plagued with this project is taking longer than I thought which is OK because I’m going to do everything the very best I can before I say it’s finished! Standby for some pictures and you’ll see what I’m talking about. I’m also going to try to do a little work every day so I can keep talking to you guys I really did miss that. I thought with all the work I did this past summer I should technically be dead but since I’m Not I must be one of the strongest 62 yr olds I know !!! Ha ! So the pictures will be forthcoming very shortly I’m glad once again to be back.
Re: C-17 Our first Build !
Posted: Sat Oct 13, 2018 3:12 pm
by David516
Re: C-17 Our first Build !
Posted: Sat Oct 13, 2018 3:21 pm
by David516
Re: C-17 Our first Build !
Posted: Sat Oct 13, 2018 3:24 pm
by David516
Re: C-17 Our first Build !
Posted: Sat Oct 13, 2018 3:27 pm
by David516
Re: C-17 Our first Build !
Posted: Sat Oct 13, 2018 5:20 pm
by Jeff
David, welcome back!! Sorry for all the issues but glad to see you back building!!!! Jeff
Re: C-17 Our first Build !
Posted: Sat Oct 13, 2018 5:52 pm
by David516
Thank you! As always glad to be back!
I’ll be ordering paint and primer soon if all goes well !
Re: C-17 Our first Build !
Posted: Sat Oct 13, 2018 8:01 pm
by David516

Now that I’m back I started reading to try to address the issue of the pin head sized shiny spots on the hull after sanding
When I happened to read Jacques’ comments on Skegs. Specifically that they should be a couple of feet in front of the transom. As you can see from the photograph mine goes right up to the Transom as I was copying some other thread photos.
I now I don’t know if I should cut a couple of feet off it and grind it down in the back or would it affect anything badly if I left it the way it was? I guess I can do pretty much whatever is required but now I’m a bit confused as to what is required?
Re: C-17 Our first Build !
Posted: Sat Oct 13, 2018 8:50 pm
by OrangeQuest
I have read that when it goes all the way to the back it will cause cavitation. But like I said I read it and don't know for sure. Would need one of the more educated guys on hull/motor relationship to answer.
Re: C-17 Our first Build !
Posted: Sun Oct 14, 2018 2:55 am
by David516
I also read this (a little late). That’s why I’m wondering if I have to take a bit of the Skeg off to keep it away from the transom.
Re: C-17 Our first Build !
Posted: Sun Oct 14, 2018 7:04 am
by Rmarsh
[quote Now that I’m back I started reading to try to address the issue of the pin head sized shiny spots on the hull after sanding
When I happened to read Jacques’ comments on Skegs. Specifically that they should be a couple of feet in front of the transom. As you can see from the photograph mine goes right up to the Transom as I was copying some other thread photos.
I now I don’t know if I should cut a couple of feet off it and grind it down in the back or would it affect anything badly if I left it the way it was? I guess I can do pretty much whatever is required but now I’m a bit confused as to what is required?
[/quote]
Hi David.....I ran my skeg all the way back to the transom (sorry if it was photo of my build that mislead you))...before realizing that Jaques had recommended stopping it about 12 - 18" back.
I knew it would be fairly easy to remove that small portion of the skeg but I went ahead and launched the boat without correcting it, thinking that I could do it afterwards, if it was a problem. I have had zero issues with the boats performance and handling in all type of conditions so I have left it as is.
That being said.....It would be very easy to shorten your skeg now while still inverted.
Bob
Re: C-17 Our first Build !
Posted: Sun Oct 14, 2018 11:45 am
by David516
Hi Bob,
No worries I believe it was a 13 year old post!
But you’re right. Now would be the easiest time so maybe I’ll just take a foot off (the Skeg!) to be cautious knowing the way my luck runs!
Thanks ! It’s good to be back building !
Re: C-17 Our first Build !
Posted: Mon Oct 15, 2018 8:51 pm
by TomW1
The reason for shortening the skeg in front of the transom is to prevent disturbed water reaching the prop and causing cavitation. It doesn't have to be much a foot is plenty. But it really is necessary .
Tom
Re: C-17 Our first Build !
Posted: Tue Oct 16, 2018 1:02 am
by David516
Thanks Tom. Got it.
In the AM, I’m going to saw off the section, then grind the part the saw doesn’t get to match the hull. I’ll post a picture when I finish.
I guess I’m lucky I asked before it was on the trailer! I’d hate to do an otherwise easy job laying on the garage floor!!
Best regards !
Re: C-17 Our first Build !
Posted: Fri Oct 19, 2018 2:54 pm
by David516

Started to shorten Skeg at transom. After sanding I would like to add a small strip of e glass for a bit more protection.
Re: C-17 Our first Build !
Posted: Fri Oct 19, 2018 3:00 pm
by David516

Does anyone else experience this? Small (1/8” or less) “craters” where my sander can’t reach. Only a few in just a few spots. They are probably between 1/32 and 1/64 deep. Is there any way to address this ???
Re: C-17 Our first Build !
Posted: Fri Oct 19, 2018 4:58 pm
by narfi
It's from offgassing from the wood while the epoxy cures. If the wood increases in temp while epoxy cures it blows bubbles, if it cools while curing it sucks some in.
I cut out bubbles with an xacto knife and filled with epoxy. If it's really bad you can put some glass over it, but I didnt.
Re: C-17 Our first Build !
Posted: Fri Oct 19, 2018 6:17 pm
by OrangeQuest
And the wood heats up when the epoxy cures because the epoxy heats up. You will get more bubbles on cool days than on warm days. Here in Houston if I lay glass below 70° I will get a few bubbles. If the temps are above 100° zero bubbles.
Re: C-17 Our first Build !
Posted: Fri Oct 19, 2018 6:27 pm
by David516

Now that I opened the can of worms I may as well ask for opinions. I noticed these bubbles throughout the bottom hull in places. They are very deep as I tested and can’t get to them. Would it be better to just put another sheet of biax on the lower hull panels or just put a couple of more coats of resin? Or is this a more drastic problem that I was thinking?
Re: C-17 Our first Build !
Posted: Fri Oct 19, 2018 7:38 pm
by narfi
I think it's mostly cosmetic, at least the small ones like you show.
The critical thing is the glass bonding to the wood. Those bubbles dont prevent that. They do make fairing harder though..... the deep ones I would leave alone and the surface ones cut out so you can fill easier with epoxy/fairing.
Of course that's just my opinion, Jacques might say something different. He is the expert.
Re: C-17 Our first Build !
Posted: Fri Oct 19, 2018 7:51 pm
by David516
Thank you !

Re: C-17 Our first Build !
Posted: Fri Oct 19, 2018 8:01 pm
by narfi
To help you feel better about it all, you can look at what a really bad blistered layup looks like :/
https://forums.bateau2.com/viewtopic.ph ... 70#p431950
Re: C-17 Our first Build !
Posted: Fri Oct 19, 2018 10:50 pm
by David516
Wow! I see what you mean! Most of mine are like really narrow (1/24th) and about 3/16 to 3/8 long. They’re above the glass but way below the surface, beyond normal sanding.
With the information you gave me I think i’ll Put one more resin coat before fairing. Of course I have to finish the back of the Skeg first and sand the transom. And thanks !
Dave
Re: C-17 Our first Build !
Posted: Fri Nov 02, 2018 2:07 am
by David516
Re: C-17 Our first Build !
Posted: Fri Nov 02, 2018 2:21 am
by David516

Took me quite a while but I got the Skeg where I can make it perfectly straight with reasonably sharp edges using the makeshift brackets in the picture. This should help me make the Skeg as straight and fair as I can get it. Anyway, I’ll find out tomorrow!! By the way, the brackets are taped to avoid sticking. When the Skeg is finished I decided to put the upper panels on right before fairing.
Re: C-17 Our first Build !
Posted: Sat Nov 03, 2018 1:22 pm
by David516
Took off the brackets from the Skeg. Top came almost perfect. The sides didn’t completely fill in the gaps because they are so narrow but I was able to get enough wood flour down in the gaps to give me a guide to fair and sand. When I finish that the sides are going on.
Re: C-17 Our first Build !
Posted: Sun Nov 04, 2018 12:06 pm
by fallguy1000
To avoid bubbles or air in the laminate....a few things.
Warmer than cooler resin.
Good precoating of plywood to avoid dry suck.
Consolidation roller. I like a 6" x 1/2" bubble buster.
https://www.amazon.com/gp/aw/d/B007VQS1 ... B007VQS102
Post cure injection. Drill two small holes in large bubbles and inject slow resin. I buy needles locally that are 0.064" and you drill two holes in each bubble-one is a vent. If you leave any of those big bubbles in the bottom; they can be the start of delamination as water pushes against the air pocket and forces the edges to open. The top filling does very little.
My non-spiked rollers I won't even use anymore.
Re: C-17 Our first Build !
Posted: Sun Nov 04, 2018 12:28 pm
by David516
There really are no big bubbles on the hull. The largest there are about an eighth of an inch long but only less than a 16th wide. I’d say about 1/24 actually. They seem to be very deep also I have many coats of resin over them and also below them. In order to get to those bubbles I would probably have to sand four coats of resin off.
On the skeg there is no problem whatsoever. I used the two boards you see clamped to it As a mold for the wood flower. What that accomplishes is getting the top flat and square and I was able to get enough wood flower on the sides in the gap’s to become a faring guide.
Re: C-17 Our first Build !
Posted: Sat Feb 09, 2019 7:44 pm
by David516

Well, The holidays and subzero temperatures are over so it’s back to work. It’s taking an awful lot of time to get the Skeg perfect. It wasn’t happening with you RO Sander So I finally tried sending with the faring board and seem to be getting better results. With any kind of luck I will be fairing The transom and bottom panels by next week. This skeg Has taken an unbelievably long time! Hope everybody’s doing well.
Re: C-17 Our first Build !
Posted: Sat Feb 09, 2019 7:54 pm
by David516

Another shot of the aft end of the Skeg after The first pass with the faring board. At least it’s starting to come straight and the slight taper from front to back is also square and straight. Finally starting to see a light at the end of the tunnel with this skeg.
Re: C-17 Our first Build !
Posted: Sat Feb 09, 2019 9:37 pm
by fallguy1000
Looks good from here.
Six foot rule for bottoms?
Re: C-17 Our first Build !
Posted: Sun Feb 10, 2019 7:35 am
by David516
I’m not sure I know what the 6 foot rule would be? Let me know if it’s something important I’ll do it !
Re: C-17 Our first Build !
Posted: Sun Feb 10, 2019 9:22 am
by Fair WX Pilot
I think he’s referring to the “if you can’t see it from six feet away then it doesn’t matter “. Looks like you’re like me and have been working to the one foot rule. The boat looks great and the fish will be much happier being attracted to a perfect bottom
Re: C-17 Our first Build !
Posted: Sun Feb 10, 2019 9:57 am
by David516
Haha !!! Now I see!!! You are correct though, I was beginning to think I’m a little OCD with perfection !!!!
Every time I want to take a short cut I think that I did everything and made sure it was right up until this point so I figure I may as well continue. Even though my one friend tells me I’ll finish the boat one day before I die of old age !!!! I am hoping he’s wrong on that one !!!!
Re: C-17 Our first Build !
Posted: Wed Mar 13, 2019 5:08 pm
by David516

Finally After being able to work a little more I finally got the skeg laser straight! Now maybe I can start to move forward a bit !!!
Re: C-17 Our first Build !
Posted: Wed Jul 24, 2019 5:01 pm
by David516

Greetings again. I would imagine everybody gave up on me but I had more delays due to personal medical issues nothing serious but temporarily very painful so now I’m back! I would like to let everybody have all my updates.
The keel is done. It took me months on and off but I got it to within a half a millimeter straight. Now I’m just about finished with the transom quick fair. I was continually working on it until a friend of mine who happens to be an engineer came over for a visit and pretty much told me “ stop trying to make it factory perfect get it done and MoveOn “ he said this after measuring the transom. I believe he was a little annoyed with me because he would like to go on the boat as well when it’s finished. So anyway I have the transom to within approximately a 16th of an inch and perfectly smooth so I’ll be finishing that up in the next day or so and with any kind of luck by the weekend I will be starting the bottom hull panels.
I’m terrified because I know I’m going to start trying to make everything perfect once again. This time I’m going to Try to get it right and MoveOn so I can get the upper chine panels on And hopefully Paint and flip the boat before the end of summer. That way if I have any luck this winter I can finish top side or at least most of it and get the engine and gas tank on. Once again good to be back working on the boat after the last few months it’s good to be back working on anything! Best wishes to all!
Re: C-17 Our first Build !
Posted: Wed Jul 24, 2019 5:05 pm
by Salty F17
Good to see ya back at it looking forward to your progress, i wouldnt worry to much on the transom as you still will have to put glass tape on the seams your going to have to fair it again ,but keep pushing
Re: C-17 Our first Build !
Posted: Thu Jul 25, 2019 12:26 am
by David516
Re: C-17 Our first Build !
Posted: Thu Jul 25, 2019 12:31 am
by David516

I’m figuring the transom is good enough for me to MoveOn to the bottom panels. After that I’ll put the sides on and finish the transom once the seams are taped as I have been advised!
Re: C-17 Our first Build !
Posted: Thu Jul 25, 2019 12:35 am
by Salty F17
David516 wrote: ↑Thu Jul 25, 2019 12:31 am
I’m figuring the transom is good enough for me to MoveOn to the bottom panels. After that I’ll put the sides on and finish the transom once the seams are taped as I have been advised!
Yep thats right
Re: C-17 Our first Build !
Posted: Thu Jul 25, 2019 12:43 am
by David516
Good advice! Thank you my friend !!!
Re: C-17 Our first Build !
Posted: Thu Jul 25, 2019 12:49 am
by Salty F17
Tip:once you have got a few coats of fairing on lightly spray the hull with some fast drying spray paint then use a long board to sand the hull to see your high and low spots then fill the lows with fairing
Re: C-17 Our first Build !
Posted: Thu Jul 25, 2019 11:01 am
by Jeff
David516, Good to hear from you and looks like you are progressing well!!!! Jeff
Re: C-17 Our first Build !
Posted: Thu Jul 25, 2019 11:21 am
by David516
Hi Jeff!
Thanks ! It’s good to be working again it’s coming along. It may be moving slowly but it certainly is moving!
Re: C-17 Our first Build !
Posted: Thu Jul 25, 2019 1:22 pm
by David516
Salty, thank you very much for that tip believe it or not I have an actually been doing the exact opposite which is probably why it took me so long working on the Transom.
I am ready to start the port side bottom panel tonight and your advice came just in the nick of time. I’m glad at least one of us pays attention to what he reads. I had read that and misunderstood It!!!! I thought you had to say in the high spots down but since there were so few low spots it was taking me forever. It’s amazing how one simple change can probably take 2/3 less time than what I had been doing.
Re: C-17 Our first Build !
Posted: Thu Jul 25, 2019 4:58 pm
by Salty F17
David516 wrote: ↑Thu Jul 25, 2019 1:22 pm
Salty, thank you very much for that tip believe it or not I have an actually been doing the exact opposite which is probably why it took me so long working on the Transom.
I am ready to start the port side bottom panel tonight and your advice came just in the nick of time. I’m glad at least one of us pays attention to what he reads. I had read that and misunderstood It!!!! I thought you had to say in the high spots down but since there were so few low spots it was taking me forever. It’s amazing how one simple change can probably take 2/3 less time than what I had been doing.
No problem
Re: C-17 Our first Build !
Posted: Sat Jul 27, 2019 1:48 am
by David516
Re: C-17 Our first Build !
Posted: Sat Jul 27, 2019 1:50 am
by David516
Re: C-17 Our first Build !
Posted: Sat Jul 27, 2019 1:53 am
by David516
I’ve always been told if things don’t seem right take a break. I think I’ll start again tomorrow since it’s getting late anyway but my first attempt at faring the bottom hull panels didn’t exactly go as smoothly as I had hoped. Literally. First made 100 g of quick fare and about 25 g kicked too fast because I was taking too long and I’m not really sure how to approach what I want to accomplish here. I’m attempting to start filling the lower spots that I know about but it’s not coming very neatly I don’t know if this is normal or if I’m messing up royally since I’ve actually never done it before and the hull panels are much bigger than the transom! I also noticed that slightly forward of the Keel The centerline rises a bit as it did when I was trying to stitch the panels onto the frame. I don’t know if this is a problem and should be fared straight from that point back or if it’s not a problem and I can just take care of the low spots. Very confused tonight that’s why I took a break. I Posted two photos of the fiasco I did tonight.
Re: C-17 Our first Build !
Posted: Sat Jul 27, 2019 7:06 am
by Browndog
Your boat is looking good and you are making good progress.
Each step along the way entails a bit of a learning curve.
Quickfair tends to kick off pretty quickly when mixed into a good size batch especially when it is warm out. On the plus side, the quick set-up also allows it to be sanded a few hours later. If you are using slow curing hardener for your regular epoxy, it can be a bit of a shock due to the different curing speeds.
A small amount also goes a long way, because you spread it on and then scrape most of it off again. The spreading and scraping also tends to work the material due to friction heat and causes it to thicken and toughen as you go.
Kind of a pain to mix up lots of small batches, but it is the only way I’ve figured out to not waste the stuff. It’s expensive and when a big blob kicks off on you it feels like a real waste.
In looking at your pictures, it appears to me that you’ve applied the Quickfair a little too thick. Which is fine, but it will require more sanding. Try to spread it from the dry surface to the wet and be careful not to press too hard at the end of your spreading/scraping motion and make an inadvertent depression or hard edge line from your trowel or applicator.
Each project I’ve done generally has required 4 or more rounds of Quickfair application, applied in different directions, and lots of sanding to get everything really smooth. Working steadily, but not slowly. using small batches on a small area at a time has generally given me the best results.
Quickfair is good for smoothing things out, not so good for filling holes, gaps or larger depressions, EZ Fillet is better for that.
Anyways, after it looks really good and smooth and you are fed up with fairing and sanding you’ll get to priming and then you’ll find all of the places that you missed the first few times and get to touch up everything a time or two. Followed by a guide coat and then more touch ups. Finally after the last coat of primer and that hull will look so good and you’ll be so proud you’ll want to burst. Then you get to paint it with three or four or however many coats needed to get it just right.
Keep it up and don’t be too hard on yourself, it will get better as you go.
Re: C-17 Our first Build !
Posted: Sat Jul 27, 2019 8:30 am
by Salty F17
It looks fine so far use a long board to sand in between coats it will start to take shape you made need more fairing mix in those areas
Re: C-17 Our first Build !
Posted: Sat Jul 27, 2019 9:35 am
by Dougster
Browndog's description sure matches my experience with Quickfair---wish I'd read it long ago. I soon gave up on big mixes, couldn't get 'em spread fast enough. I went to more manageable smaller mixes which gets tedious. Thought it was just me
Dougster
Re: C-17 Our first Build !
Posted: Sat Jul 27, 2019 10:41 am
by David516
Thank you guys I will be doing some more this afternoon and I definitely will be doing a really small batches ha ha !!!
I’ll post more pictures when I get some visible progress made here.
I was able to cut down the ridges formed at the edge of the trowel with my surform which helped me ultimately need to do less sanding. So most likely I’ll post more tonight or tomorrow when I get some visible progress here and thank you guys very much for the advice!
Re: C-17 Our first Build !
Posted: Sat Jul 27, 2019 10:53 am
by Salty F17
I was the same way fairing never seamed to end but just keep at it before you know it will be over its the worst part of the build process
Re: C-17 Our first Build !
Posted: Sat Jul 27, 2019 10:59 am
by David516
Salty I don’t know how you do it but you said exactly what I was thinking. This is never going to end! But I know you’re right I’m going to keep at it and I can absolutely safely say I’m sure I won’t mind doing such repairs in the future existing bolts but at this size level definitely I can say I hate fairing! And sanding! But I already know we all hate Sanding!!!
Re: C-17 Our first Build !
Posted: Sat Jul 27, 2019 2:47 pm
by Salty F17
What grit sand paper are u using i did all the rought sanding with 80 grit then use 220 to smooth it out
Re: C-17 Our first Build !
Posted: Sat Jul 27, 2019 5:42 pm
by David516
That’s what I use 80 grit. In some places where I felt it was too smooth even with the 80 grit it very lightly scratched it with a 36 grit on an automotive sanding board a friend lent me. But I just made very light marks I didn’t dig into the epoxy of course. That seems to work really well in getting it to stick. What actually was making me nervous what is that I have two depressions in the middle from the centerline about 2/3 of the way down to the chine. I may take a coat of wood flower just to help fill those depressions and save on quick fare. Either way I’ll do more tonight because I was going to start this afternoon but it’s still 86 in the shade so I figured if I waited till it got a little cooler and buy myself some more working time !
Re: C-17 Our first Build !
Posted: Sat Jul 27, 2019 7:32 pm
by Salty F17
Sounds like you have a good plan of action
Re: C-17 Our first Build !
Posted: Sun Jul 28, 2019 1:02 am
by David516
Couldn’t work today I had to cut and trim about an acre of lawn.
Going to start in the morning
Re: C-17 Our first Build !
Posted: Mon Jul 29, 2019 1:51 am
by David516

I started working on the depressions at the centerline tonight on the port side. I must say Salty was right, if feels like this will never end! But I know it will I got all the fairing from Friday night sanded and did approximately 300 g of wood flour mix using moderate Hardner Put on the beginning of that section. I’m doing it slow so I can keep control of it. I also use a teaspoon of silica thickener which helped me a bit. I am a lot more pleased with my work tonight than I was Friday night possibly because I’ve done it already and I was not shaking like a leaf this time! Now it’s almost 2 AM so I’m going to let everything harden, I will sand tomorrow night And keep going!
Actually thinking about it I do have one question if anyone knows the answer. Since the wood flower is not going to have time to fully cure is it absolutely necessary to sand it before putting another coat of wood flower on it? The reason I ask is because I make it with the same epoxy resin and Hardener that i use to wet out the fiberglass.
Re: C-17 Our first Build !
Posted: Mon Jul 29, 2019 3:22 pm
by Salty F17
Sanding between coat makes for a better outcome i think cause then you just filling ing the low spots thus use less and less fairing as you go
Re: C-17 Our first Build !
Posted: Mon Jul 29, 2019 8:56 pm
by David516
Re: C-17 Our first Build !
Posted: Mon Jul 29, 2019 9:03 pm
by David516

Was able to put two more coats of wood flower mix On the port side depression today. I’m very pleased with the progress I think it’s saved me a lot of fairing mix. It’s hard to see from the above two pictures but pretty much the larger depression is gone and I think all I need is a couple of skim coates with the faring! I actually got to work early today so I was able to finish early !!!
Again as always thanks to all you guys for the advice!
Re: C-17 Our first Build !
Posted: Mon Jul 29, 2019 11:54 pm
by Salty F17
Looks good are you planing on putting graphite on the bottom
Re: C-17 Our first Build !
Posted: Tue Jul 30, 2019 1:23 pm
by David516
I wasn’t planning on putting graphite or anything on the bottom other than once everything is fair on the entire boat I was going to do five coats of epoxy resin before I started to prime the hull.
I read something on System Three’s website. They said it’s very strong resin and could actually be used stand alone If necessary. Since I already have the seams taped and the two sheets of biaxial glass On the bottom I was just going to do the epoxy.
I don’t really know what graphite is in relation to a boat.
Re: C-17 Our first Build !
Posted: Tue Jul 30, 2019 1:38 pm
by Salty F17
David516 wrote: ↑Tue Jul 30, 2019 1:23 pm
I wasn’t planning on putting graphite or anything on the bottom other than once everything is fair on the entire boat I was going to do five coats of epoxy resin before I started to prime the hull.
I read something on System Three’s website. They said it’s very strong resin and could actually be used stand alone If necessary. Since I already have the seams taped and the two sheets of biaxial glass On the bottom I was just going to do the epoxy.
I don’t really know what graphite is in relation to a boat.
Almost the same thing you just would add the graphite powder to your epoxy then roll it on the hull and tip it with a good foam brush and roller it will give you a very hard glossy bottom plus the black look cool you can also paint over it if you want bbc sells the graphite powder its pretty cheap
Re: C-17 Our first Build !
Posted: Tue Jul 30, 2019 2:08 pm
by David516
Ahh ! Now I understand! I did not know that material existed. I think that is very interesting and I’ll tell you what I was thinking first of all since I was planning on this one to make it white or light blue pretty much to blend with the sky when we’re fishing the area we go in that seems to make quite a bit a difference out in the open ocean especially for the Mahi which sometimes appear to have a greater intelligence than I do

, However you have given me an excellent idea because once this boat is finished I was planning on making an 11 foot rowing boat for the lake up here. Just to keep in shape at my age (63). You have given me the idea to do that on the hull of the rowing boat! That would look really nice with graphite and a lighter colored stripe going around it!
Re: C-17 Our first Build !
Posted: Tue Jul 30, 2019 2:45 pm
by Salty F17
What color are u planning for the c17
Re: C-17 Our first Build !
Posted: Tue Jul 30, 2019 4:39 pm
by David516
Pretty much my wife Debbie picks the colors on this one, So far it’s going to be dark navy blue Down to the lower chine panels With most likely a white bottom. But knowing Debbie that could change to light blue or gray very quickly. My only requirement is that the bottom has to be a light color because I had more success up here with blue fish and Mahi Mahi with a light colored hull. I don’t know why but it does work. The top is going to remain wood grain probably just clear resin and spar urethane.
Re: C-17 Our first Build !
Posted: Tue Jul 30, 2019 4:46 pm
by Salty F17
David516 wrote: ↑Tue Jul 30, 2019 4:39 pm
Pretty much my wife Debbie picks the colors on this one, So far it’s going to be dark navy blue Down to the lower chine panels With most likely a white bottom. But knowing Debbie that could change to light blue or gray very quickly. My only requirement is that the bottom has to be a light color because I had more success up here with blue fish and Mahi Mahi with a light colored hull. I don’t know why but it does work. The top is going to remain wood grain probably just clear resin and spar urethane.
Ha ha this boat seams to call the color and white blue most c17 are that color for some strange reason

but i do like your choice with the wood finish it will look very clean dont think I've seen a grey and light blue c17 yet that would be nice
Re: C-17 Our first Build !
Posted: Tue Jul 30, 2019 11:20 pm
by David516
I agree with you I think the gray and navy blue would look nice. I used to have a Boat with Navy blue sides and black bottom paint which is how it came and we never caught very many fish for some reason. The next one I had was like almost white on the bottom there was a really big difference in how many fish we caught. So I have either become superstitious or there’s actually some facts of it somewhere

Couldn’t do any work tonight have to fix the roof leak. The weather channel says storms tomorrow!
Re: C-17 Our first Build !
Posted: Sun Aug 04, 2019 11:14 pm
by David516
Re: C-17 Our first Build !
Posted: Sun Aug 04, 2019 11:16 pm
by David516
Re: C-17 Our first Build !
Posted: Sun Aug 04, 2019 11:22 pm
by David516

I finally got through all the little household emergencies this week so I was able to put the first full coat of fairing on the port lower hull panel. I am satisfied with that as a first coat. I did indeed notice it was not necessary to do more than a very thin skim coat towards the bow. That area was almost perfectly fair with simply minor imperfections.
You guys mentioned spraying that coat with a very light spray paint in order to spot the low spots. I understand that principal now however which paint do you guys used to do that? Or does it matter?
I should make note that where ever you can see through the faring material to the hull Is where there are high spots that I was already aware of.
Re: C-17 Our first Build !
Posted: Mon Aug 05, 2019 6:23 am
by Salty F17
Regular quick dry spray paint
Re: C-17 Our first Build !
Posted: Mon Aug 05, 2019 6:32 am
by David516
Thanks. I’ll get a can.
Re: C-17 Our first Build !
Posted: Mon Aug 05, 2019 6:40 am
by Salty F17
Looks great tho ,start sanding it out Use the pray after each coat i would get a a couple different colors that way you will be able to see the layers as you reaplly the faining after u sand once you got the hull pretty smooth put the primer on with a light guide coat of fast dry spray paint you will be able to see a the small spot with the primer on sand it smooth then put another coat of primer on you should be good then but from here its just about what you're willing to live with as far as the finish on the outside of the hull
Re: C-17 Our first Build !
Posted: Mon Aug 05, 2019 9:40 am
by Dougster
Go real light with that guide coat. You're just looking for speckles really. I didn't realize that and put too much on my LB22 build and like'd to died sanding it all off. Wouldn't use it again. I read about using graphite---dusting it on with a rag.
Dougster
Re: C-17 Our first Build !
Posted: Mon Aug 05, 2019 11:40 am
by David516
Ok, got it. Thanks !
Re: C-17 Our first Build !
Posted: Tue Aug 06, 2019 8:12 am
by fallguy1000
Don't forget to apply in different directions.
Re: C-17 Our first Build !
Posted: Wed Aug 07, 2019 4:40 pm
by David516
Got it.
I’m going to try a “flexi sander” fairing board. (Was a gift).
It’s supposed to save on fairing compound. Apparently you still have to apply the faring compound with the trowel and I can see going in different directions there then you scrape over evening it out with the longboard before it hardens
Either way I’ll let you guys know by Monday night or Tuesday because I’ll probably be sanding until then. Between sanding and doctor appointments I probably won’t have a chance to do faring until Monday.
Re: C-17 Our first Build !
Posted: Wed Aug 07, 2019 8:25 pm
by Salty F17
there will be plenty on sanding

Re: C-17 Our first Build !
Posted: Wed Aug 07, 2019 11:17 pm
by David516
Yes Salty, and I agree with you. I hate sanding!
I also noticed I have a tendency to sand too much!
I wind up wasting faring compound that way !!!

Re: C-17 Our first Build !
Posted: Thu Aug 08, 2019 9:48 am
by Salty F17
What grit are you using?
Re: C-17 Our first Build !
Posted: Thu Aug 08, 2019 11:00 am
by fallguy1000
David516 wrote: ↑Wed Aug 07, 2019 4:40 pm
Got it.
I’m going to try a “flexi sander” fairing board. (Was a gift).
It’s supposed to save on fairing compound. Apparently you still have to apply the faring compound with the trowel and I can see going in different directions there then you scrape over evening it out with the longboard before it hardens
Either way I’ll let you guys know by Monday night or Tuesday because I’ll probably be sanding until then. Between sanding and doctor appointments I probably won’t have a chance to do faring until Monday.
Easy to coat to heavy with the flexitools.
Do NOT try to fair it in one shot.
Re: C-17 Our first Build !
Posted: Thu Aug 08, 2019 11:16 am
by David516
Easy to coat to heavy with the flexitools.
Do NOT try to fair it in one shot.
[/quote][/quote]
I watched a video because I never saw the thing before. You’re supposed to put the fairing compound on with the small trowel and then smooth it with that thing.
I already have a full coat on the one side I think I’m going to be doing a lot of sanding this weekend.
Re: C-17 Our first Build !
Posted: Thu Aug 08, 2019 11:22 am
by David516
Salty, I have everything from 36 grit up to 320.
However, for faring depending upon how thick it is I usually use an 80 to 100 grit.
For wood flour I usually could go from 60 to 120 depending on what I’m doing.
I only use the 36 grit if I mess up and make a really big ridge or something that needs to be cut down.
Re: C-17 Our first Build !
Posted: Thu Aug 08, 2019 12:13 pm
by Salty F17
I used 80 and 60 to knock down those high ridges and use 220 to start to smooth it out after that ,the 220 ,320 really makes a difference smooth out all the scrapes and small pin holes
Re: C-17 Our first Build !
Posted: Thu Aug 08, 2019 4:06 pm
by David516
Thank you good plan.
Re: C-17 Our first Build !
Posted: Wed Aug 14, 2019 12:55 pm
by David516

First thin coat of faring is fully sanded And I am ready for the second coat tonight.
Re: C-17 Our first Build !
Posted: Wed Aug 14, 2019 1:28 pm
by Salty F17
ahh starting to see the end of the tunnel
Re: C-17 Our first Build !
Posted: Wed Aug 14, 2019 10:17 pm
by David516
ahh starting to see the end of the tunnel
At least on one side!!!
I hope to be finished with this side by tomorrow or the next day the latest.
Re: C-17 Our first Build !
Posted: Thu Aug 15, 2019 8:35 am
by Jeff
Nice progress!!! Jeff
Re: C-17 Our first Build !
Posted: Fri Aug 16, 2019 7:44 pm
by David516
Jeff wrote: ↑Thu Aug 15, 2019 8:35 am
Nice progress!!! Jeff
Thanks !!!
Not working as fast as I’d like to but we’re getting there!
Re: C-17 Our first Build !
Posted: Fri Aug 16, 2019 7:50 pm
by David516

Other than the edge lines that need to be sanded I think I’ve pretty much got the side of the hull straight.
My only question is Exactly how Fair does the hull have to be? I mean does it have to be like a factory boat? Because this is taking forever. And even then I can’t tell if it’s like a factory boat or not it’s very hard to know what’s perfect and what isn’t.
Re: C-17 Our first Build !
Posted: Fri Aug 16, 2019 8:30 pm
by Salty F17
David516 wrote: ↑Fri Aug 16, 2019 7:50 pm
Other than the edge lines that need to be sanded I think I’ve pretty much got the side of the hull straight.
My only question is Exactly how Fair does the hull have to be? I mean does it have to be like a factory boat? Because this is taking forever. And even then I can’t tell if it’s like a factory boat or not it’s very hard to know what’s perfect and what isn’t.
At this point i like to call it to builder pref just sand and fair till you think it looks good and smooth do the guide coat .but if you want factory looks keep sanding and fairing then do it some more then once its super smooth sand and fair somemore then once all thaf is done either get your paint job sprayed on on you will be doing more sand with very fine grit 1000,2000 etc to get that factory look but you really dont got go thur all that to get a nice finish just get a guide coat on sand then fair ,guide coat agian ,sand and you will be ok
Re: C-17 Our first Build !
Posted: Fri Aug 16, 2019 9:36 pm
by David516
[/quote]
At this point i like to call it to builder pref just sand and fair till you think it looks good and smooth do the guide coat .but if you want factory looks keep sanding and fairing then do it some more then once its super smooth sand and fair somemore then once all thaf is done either get your paint job sprayed on on you will be doing more sand with very fine grit 1000,2000 etc to get that factory look but you really dont got go thur all that to get a nice finish just get a guide coat on sand then fair ,guide coat agian ,sand and you will be ok
[/quote]
Ok I think I get the picture. This may be embarrassing as a question but what exactly does the term guide coat mean? I’m sure I have probably done it but I’m not familiar with that term.
Re: C-17 Our first Build !
Posted: Fri Aug 16, 2019 9:47 pm
by Fuzz
Sand and fair to the level of finish you will be happy with. Cracker Larry used to say sand and fair till you can't take it any more then walk away for a few days. After the break come back and do it some more. All most all of my work is indoors with less than perfect light. I have thought it was all good until I rolled it out into the sunshine and then went crap it looks like dog dookie

Re: C-17 Our first Build !
Posted: Fri Aug 16, 2019 9:55 pm
by Salty F17
Lightly spray of fast dry paint over the hull would be a guide coat ,so what you do is spray the hull with the paint then sand the hull witha long board or use your RO sander knock down the high spots fill the lows sand the hull smoth then prime the hull you could do another guide coat on top the primer then sand again this will show you any spots that you have left to touch up (pin holes ,high ,lows )making the hull one color and using the guide coat makes it easier and faster then prime it again and your probably done also wet the hull if you can wet hull , it will def show you how smooth it is
Re: C-17 Our first Build !
Posted: Fri Aug 16, 2019 9:56 pm
by Salty F17
Fuzz wrote: ↑Fri Aug 16, 2019 9:47 pm
Sand and fair to the level of finish you will be happy with. Cracker Larry used to say sand and fair till you can't take it any more then walk away for a few days. After the break come back and do it some more. All most all of my work is indoors with less than perfect light. I have thought it was all good until I rolled it out into the sunshine and then went crap it looks like dog dookie
Lol
Re: C-17 Our first Build !
Posted: Fri Aug 16, 2019 11:20 pm
by fallguy1000
You can also guide coat with guide powder. I am a little nervous about it bonding well, but I have been trying it.
But the spray paint coat is not going to be a bond failure go forward, so it has an upside.
AND, you can change colors of the guide coats I suppose as well.
I'll show you a carbon guide coat pic from my phone in an edit in about 5 minutes.
Re: C-17 Our first Build !
Posted: Sat Aug 17, 2019 12:35 am
by David516
Salty F17 wrote: ↑Fri Aug 16, 2019 9:55 pm
Lightly spray of fast dry paint over the hull would be a guide coat ,so what you do is spray the hull with the paint then sand the hull witha long board or use your RO sander knock down the high spots fill the lows sand the hull smoth then prime the hull you could do another guide coat on top the primer then sand again this will show you any spots that you have left to touch up (pin holes ,high ,lows )making the hull one color and using the guide coat makes it easier and faster then prime it again and your probably done also wet the hull if you can wet hull , it will def show you how smooth it is
Ok, I did do that however instead of paint i used an easily removable black chalk so whatever didn’t Sand off like the low spots I was quickly able to erase!
Re: C-17 Our first Build !
Posted: Sat Aug 17, 2019 12:40 am
by David516
fallguy1000 wrote: ↑Fri Aug 16, 2019 11:20 pm
A2066460-4FEE-4EE3-8009-44BB2EFD85AD.jpeg
You can also guide coat with guide powder. I am a little nervous about it bonding well, but I have been trying it.
But the spray paint coat is not going to be a bond failure go forward, so it has an upside.
AND, you can change colors of the guide coats I suppose as well.
I'll show you a carbon guide coat pic from my phone in an edit in about 5 minutes.
I actually have been doing that I was not familiar with the term but I was using a black chalk that’s easily removable If it doesn’t sand off such as the low spots. I’ll post a picture of the one side where I had to sand Slight depressions I found. Looks like a leopard!
Re: C-17 Our first Build !
Posted: Sat Aug 17, 2019 12:47 am
by David516

I’m pretty sure I’m doing it the opposite way I’m marking the surrounding area of the depression and I sand Until the chalk disappears. It seems to be working but very slowly.
I’ve been using a flashlight with the room completely dark in order to see depressions and high spots. And then I mark them.
Re: C-17 Our first Build !
Posted: Sat Aug 17, 2019 12:50 am
by David516
Salty F17 wrote: ↑Fri Aug 16, 2019 9:56 pm
Fuzz wrote: ↑Fri Aug 16, 2019 9:47 pm
Sand and fair to the level of finish you will be happy with. Cracker Larry used to say sand and fair till you can't take it any more then walk away for a few days. After the break come back and do it some more. All most all of my work is indoors with less than perfect light. I have thought it was all good until I rolled it out into the sunshine and then went crap it looks like dog dookie
Lol
Ha ha !!!!!!! That is how I feel every time I open the door on a sunny morning !!!
Re: C-17 Our first Build !
Posted: Sat Aug 17, 2019 6:53 am
by Salty F17
Just keep sanding the high spots and fill the low spots
Re: C-17 Our first Build !
Posted: Sat Aug 17, 2019 11:14 am
by David516
Salty F17 wrote: ↑Sat Aug 17, 2019 6:53 am
Just keep sanding the high spots and fill the low spots
Absolutely. Will do!!
Re: C-17 Our first Build !
Posted: Fri Aug 23, 2019 1:07 am
by David516

I am pretty sure that the nose on this side forward of the keel is finished! Cant find one high or low spot and I like the shape.
Still more sanding and filling to do behind it !!!
It actually does seem like it’ll never end !!!
A little bit at a time.
Re: C-17 Our first Build !
Posted: Fri Aug 23, 2019 7:43 am
by Salty F17
David516 wrote: ↑Fri Aug 23, 2019 1:07 am
I am pretty sure that the nose on this side forward of the keel is finished! Cant find one high or low spot and I like the shape.
Still more sanding and filling to do behind it !!!
It actually does seem like it’ll never end !!!
A little bit at a time.
Told you it never ends but when you start to feel like dat you're really at the finish line with fairing dust in ya eyes thats why you can't see your almost done
looking smooth tho
Re: C-17 Our first Build !
Posted: Fri Aug 23, 2019 8:07 am
by Jeff
David516, you are doing great!! Nice progress!! Jeff
Re: C-17 Our first Build !
Posted: Fri Aug 23, 2019 6:23 pm
by David516
Thanks Jeff !
Re: C-17 Our first Build !
Posted: Fri Aug 23, 2019 6:30 pm
by David516
Told you it never ends but when you start to feel like dat you're really at the finish line with fairing dust in ya eyes thats why you can't see your almost done
looking smooth tho
You are 100% correct ! I’m glad the fronts done tonight I try to finish the rest. Once I get to the other side it looks a lot better than the first side so I’m hoping it’ll be a bit less work. I’ll find out !
Re: C-17 Our first Build !
Posted: Sun Sep 08, 2019 8:31 pm
by David516

Had to stop work for three or four days to get some necessary things done however I started again two days ago. The advice I received to build up the area with wood flower is excellent I started on the other side, that’s the left side and I think I’m pretty well finished with the right side. It’s actually starting to look very good I’ll know more when I finish sanding it but other than a small dip in the middle that’s really tiny I think I’m just about done on that side. Thank goodness! Now all week I think I’m clear To continue working. Taking a long time but it’s getting there!
Re: C-17 Our first Build !
Posted: Tue Sep 10, 2019 8:37 am
by Salty F17
Fairing sucks lol but once u realize the best way to apply it it's starts to get easier
Re: C-17 Our first Build !
Posted: Wed Sep 11, 2019 12:03 am
by David516
Salty you are absolutely correct fairing sucks !!!
I do think I found a technique that helps me get the faring even. I have been using a flexible sanding board with 40 grit to do the shaping and fix my mistakes and I finish with the random orbital sander 80 grit Just to make sure everything is smooth and even. That seems to be working the best although it’s a little difficult on the arms I’m certain I’ll get used to it. I haven’t lifted for quite a while because of my injury so I lost a lot of muscle mass I’ll be changing that shortly!
I did notice that were the bow curves down toward the flat part of the hull I think I have a bit much of a sharp taper near the Skeg. I will be cutting that down a bit As the V in front came out 1 inch higher than I wanted but I guess that could be considered a good thing in very rough water ( it’s always somewhat rough where we go. If we get a calm day it’s an actually big surprise! ) nonetheless I want a more even transition to the mid and rear sections.
Re: C-17 Our first Build !
Posted: Wed Sep 11, 2019 9:14 am
by Salty F17
I also like to use the orbital sander but i used 220 grit it really smooths out the hull give the 220 grit a try i think u will be surprised how much smoother it will be over the 80 grit
Re: C-17 Our first Build !
Posted: Thu Sep 12, 2019 2:03 pm
by David516
Salty F17 wrote: ↑Wed Sep 11, 2019 9:14 am
I also like to use the orbital sander but i used 220 grit it really smooths out the hull give the 220 grit a try i think u will be surprised how much smoother it will be over the 80 grit
I agree. I do have 220 grit for the orbital sander and also the flexible sanding board. I wanted to wait until I got the shape better so right now I’m using the 80 and the 60 and 40 to shape the bottom flat. I understand the 220 grit is good also before you start priming I don’t know if this is true but I will double check when we’re ready to prime but I still have the sides to put on first so that’s a way off! I also was noticing that the manufacturer of the fiberglass resin System Three stated in a e mail to me That after all the faring is done and all the parts are on before I paint I should be putting several coats of epoxy resin and I’m guessing that I would have to use the 220 grit on that before priming. At least I hope I’m right.
Re: C-17 Our first Build !
Posted: Thu Sep 12, 2019 2:36 pm
by Reid
David,
Here is the standard progression of building:
- Fairing compound and sanding
Once you apply the first coat of primer you can go back and add additional fairing compound if you find more imperfections that you want to fix. There is certainly no reason to add more epoxy after you have applied fairing compound. This goes for System Three Epoxy or our MarinEpoxy. Once you have applied all your Primer Coats (System Three Yacht Primer) I would sand through different sandpaper grits in order to get the finish I am looking for (ex: 80 to 120 to 220 to 320 etc...)
Reid
Re: C-17 Our first Build !
Posted: Thu Sep 12, 2019 3:23 pm
by David516
Thank you Reid! That clears things up, However, the more I think about it when I put the upper Sides on I am going to have to tape the corner and there is no fiberglass sheet to put over the tape, So then once that tape is wet out I know there will be an overlap in resin. That’s going to have to be fared Which has me a tiny bit confused because I can smooth out where the tape is but do I have to go the length of the boat with the faring to make everything exactly even or can I taper it down?
Re: C-17 Our first Build !
Posted: Fri Sep 13, 2019 8:47 am
by Salty F17
David516 wrote: ↑Thu Sep 12, 2019 3:23 pm
Thank you Reid! That clears things up, However, the more I think about it when I put the upper Sides on I am going to have to tape the corner and there is no fiberglass sheet to put over the tape, So then once that tape is wet out I know there will be an overlap in resin. That’s going to have to be fared Which has me a tiny bit confused because I can smooth out where the tape is but do I have to go the length of the boat with the faring to make everything exactly even or can I taper it down?
I would assume that your going to coat the wood with epoxy also for protection or fiberglass you will need to fair it to some degree i would think
Re: C-17 Our first Build !
Posted: Fri Sep 13, 2019 8:53 am
by Reid
David516 wrote: ↑Thu Sep 12, 2019 3:23 pm
Thank you Reid! That clears things up, However, the more I think about it when I put the upper Sides on I am going to have to tape the corner and there is no fiberglass sheet to put over the tape, So then once that tape is wet out I know there will be an overlap in resin. That’s going to have to be fared Which has me a tiny bit confused because I can smooth out where the tape is but do I have to go the length of the boat with the faring to make everything exactly even or can I taper it down?
You can taper it down. Another trick is to let the fiberglass tape cure and then use a sander and taper the edges of the fiberglass tape. This will give you less of a lip when starting to fair.
Reid
Re: C-17 Our first Build !
Posted: Fri Sep 13, 2019 8:59 am
by pee wee
It is recommended to coat the fairing compound with a sealing coat of epoxy before going to paint, but the System3 Yacht Primer sold here is an epoxy, so if you use it you don't have to apply separate coats of neat epoxy.
Re: C-17 Our first Build !
Posted: Fri Sep 13, 2019 12:42 pm
by David516
OK thanks everybody for the advice! Much appreciated !!! now it’s back to work!
Re: C-17 Our first Build !
Posted: Fri Jan 03, 2020 9:54 am
by Dan_Smullen
David516 wrote: ↑Fri Sep 13, 2019 12:42 pm
OK thanks everybody for the advice! Much appreciated !!! now it’s back to work!
Just checking on you. How is progress?


 , However you have given me an excellent idea because once this boat is finished I was planning on making an 11 foot rowing boat for the lake up here. Just to keep in shape at my age (63). You have given me the idea to do that on the hull of the rowing boat! That would look really nice with graphite and a lighter colored stripe going around it!

