Page 1 of 1
Privateer roamer skiff project
Posted: Tue Nov 13, 2018 6:36 pm
by greymare89
What is the best way to support the hull for deck removal once it is removed from the trailer? I want to replace the deck on an old privateer, hopefully I don't need to replace the stringers but I'm sure I'm just dreaming.... I know the old privateers are notorious for rot. I'm trying to do an "economy" build to be used for duck hunting, clamping, scalloping etc so I don't need it to be picture perfect. I would like to however remove the cap to make it easier to install the deck and make necessary repairs to the cap itself. This will leave the hull flimsy.
My original plan was to run 6x6 railroad ties under the keel and chines for support once the boat is off the trailer. Is additional support needed under the boat? Is is just as good to leave the boat on the trailer (roller trailer) . Thanks
Re: Hull support off trailer
Posted: Tue Nov 13, 2018 7:44 pm
by Aripeka Angler
Welcome! And good luck with your rebuild.
The key words in your question are “economy build”.
I’d leave the boat on the trailer even though it’s a roller type in order to save time and money.
Re: Hull support off trailer
Posted: Tue Nov 13, 2018 7:47 pm
by Fuzz
Are you going to be able to leave the boat in one spot for the rebuild or will it need to be mobile? If you will not need to move it I would take it off the trailer and then set it as close to the ground as I could. The reason for it being low to the ground is to make it easier to get in and out of. And you will be climbing in and out lots more than you think.
On or off the trailer the hull will need to be well supported at the keel and chines so it does not change shape. It will amaze you how floppy the hull will be if you end up cutting the stringers out. The railroad ties will work good just make sure they support the hull over a large area.
The advice from AA is good. It will save time and that is money

Re: Hull support off trailer
Posted: Tue Nov 13, 2018 8:19 pm
by greymare89
Thanks for the replies! I frequented this site years ago when I rebuilt an 18' privateer and I recieved a lot of guidance and insight. Having said that, I know there really is no such thing as an "economy" build when it comes to rebuilding a boat..... I just want to try and save money where it counts and not waste it on needless bells and whistles and un necessary build steps. Although the 18 footer came out nice I feel like I wasted a lot of money on things like a new rub rail, cleats, kiwi grip etc.
I had one other question regarding tank location under the console. If everything pans out and the stringers are salvageable, I'd like to install a moeller tank under the console with the batteries and fuse panel on a shelf just above the tank. If the stringers are shot, I'm going to do a complete gut job which will obviously entail a lot more money. Am I asking for trouble with a potential explosion. Will I run the risk by even if I plan on leaving the tank/ batteries open to the elements and not closing it off with a door or cover? Thanks again, I really appreciate it.
Re: Hull support off trailer
Posted: Tue Nov 13, 2018 8:35 pm
by greymare89
Re: Hull support off trailer
Posted: Wed Nov 14, 2018 10:31 pm
by Fuzz
I think it would make me nervous to have both the gas tank and the electrical parts in the console. If done that way I would want them well isolated from each other.
Re: Hull support off trailer
Posted: Thu Nov 15, 2018 5:58 am
by OrangeQuest
There could be a federal law that would say that you should not mount a battery directly above or below your fuel system but that could be seen as not Appling due to being an outboard motor driven vessel. - common sense would say not to do it.
FEDERAL LAW:
183.420 Batteries.
(d) Each battery must not be directly above or below a fuel tank, fuel filter, or fitting in a fuel line.
Re: Hull support off trailer
Posted: Thu Nov 15, 2018 8:35 pm
by greymare89
I know common sense would dictate this is not a good idea so I'm not even sure why I asked the question. I guess I'm just a little hesitant to install a below deck tank because I've never done it before. I want to make sure it's done right so I can avoid problems in the future. Since the deck is already going to be out I guess the cost difference between the above and below deck tanks will be minimal.....
Re: Hull support off trailer
Posted: Thu Nov 15, 2018 9:45 pm
by OrangeQuest
You could leave the tank there just move the battery. Most the time you want the battery closer to the motor so the starting wirings don't have to run to far. Is it going to be a portable tank?
Re: Hull support off trailer
Posted: Fri Nov 16, 2018 9:33 am
by pee wee
There are a few advantages to going portable tank:
build/rebuild is simpler
installation is less expensive re: fill hoses, vents, etc.
easy to remove tank for filling at gas station
easier to empty tank so fuel doesn't get too old
fewer penetrations through the sole, less chances for water entry
easy to inspect the tank
easy to replace the tank
Re: Hull support off trailer
Posted: Fri Nov 16, 2018 5:11 pm
by Fuzz
I would say that boat is big enough and will need enough power to justify a built in tank. Just a guess but I think 40 gallons or more would be needed and that is too much for portable tanks.
Re: Hull support off trailer
Posted: Tue Dec 18, 2018 3:26 pm
by greymare89
Thanks for the replies. I've been prepping everything lately and I think I'm going to start with repairing the console since it's winter and I'll be able to glass in my basement. I was digging around today and I found some left over marinepoxy from 2013 when I rebuilt my 18' privateer. I know this stuff has a shelf life but since it's only small 6" holes in the console and nothing too structural, do you think I'll be able to get away with using it? It's 5+ years old now.... Also, I should add that it has been opened and there is about a quarter gallon of the epoxy left and about half the container of hardener..... Any input would help, thanks
Re: Hull support off trailer
Posted: Tue Dec 18, 2018 3:36 pm
by Jeff
greymare89, We have had many users of MarinEpoxy that they have used some that had been in storage for 10 years. Just test a small batch to to ensure!! Jeff
Re: Hull support off trailer
Posted: Tue Dec 18, 2018 5:00 pm
by greymare89
Thanks Jeff. Does it make a difference if it's been opened vs storing it in a sealed container? I will definitely test a small batch to be sure. If it hardens and isn't tacky, then I should be good or are there certain indicators which will tell me it has gone bad? Thanks again!!
Re: Hull support off trailer
Posted: Tue Dec 18, 2018 5:14 pm
by terrulian
By "open" do you mean without any cover? Or just that the jug has been opened and then the cap put back on tight. If the latter, like Jeff says, I've used really old epoxy that has no issues.
But like you say, a little test run will confirm it's ok.
Re: Hull support off trailer
Posted: Tue Dec 18, 2018 8:43 pm
by Fuzz
I have used epoxy that was so old the bottom half of the jug had solidified. I just put it in a hot water bath and let it heat soak. Took a couple of tries but 98% of it went back into solution and worked fine. This was system 3 epoxy. I am using some 20 year old west system epoxy now and it has been fine. I have never let marine epoxy to set around for very long so I do not know how it would do but I have every reason to think it would work also.
Re: Privateer roamer skiff project
Posted: Fri Dec 21, 2018 9:16 pm
by greymare89
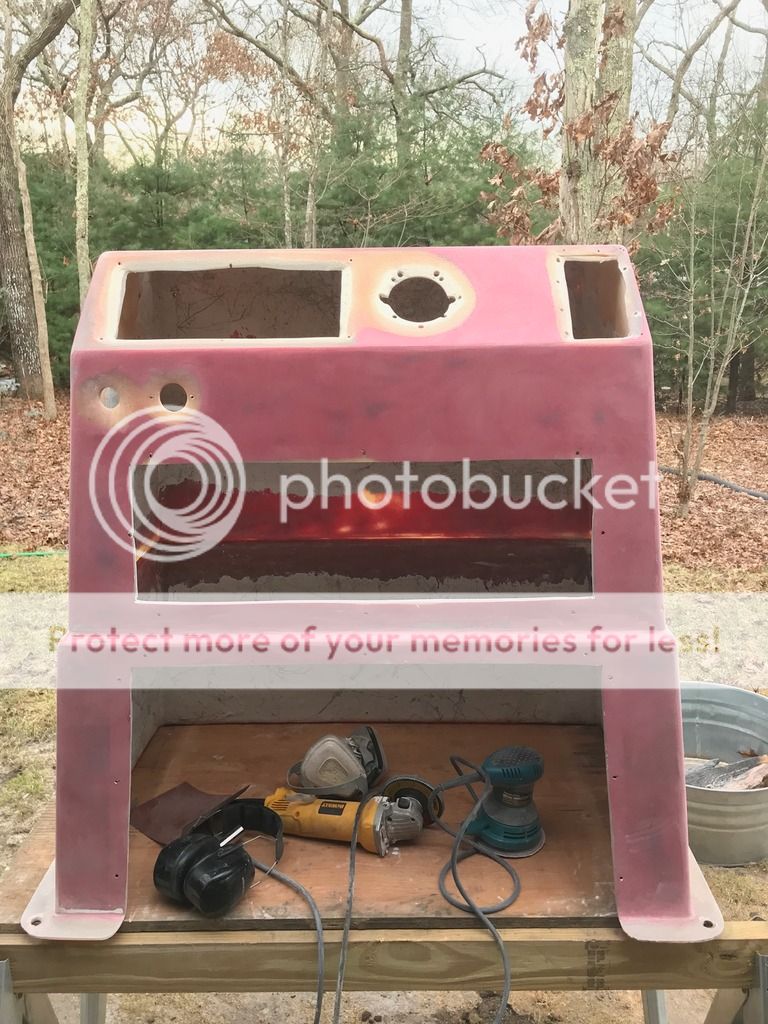
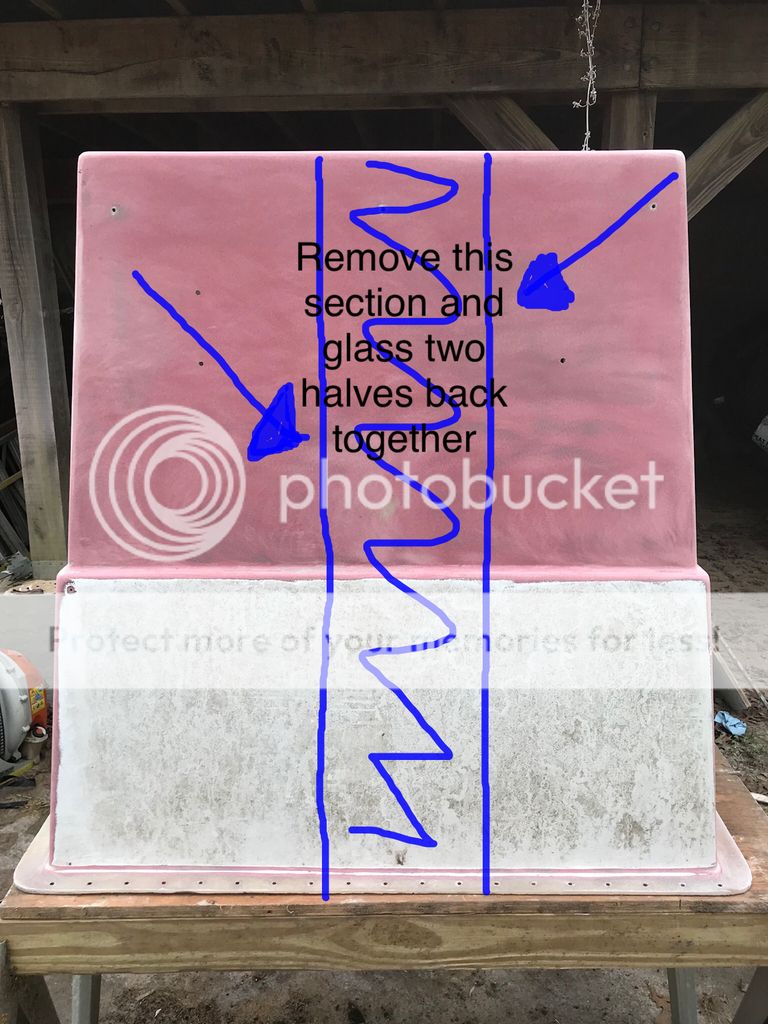
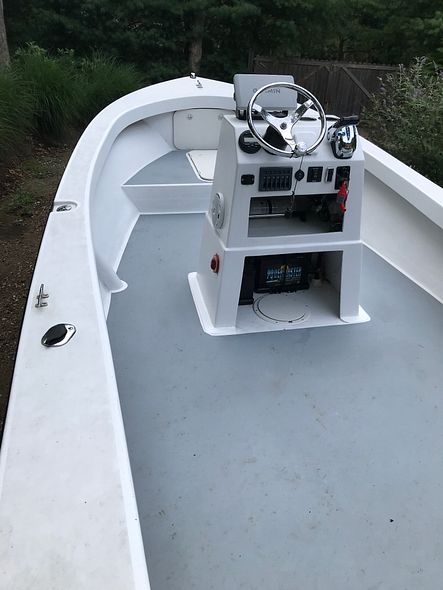
I started prepping the console. I tried to bevel the large holes the best I can so I can build up layers of glass and regain some strength integrity. Unfortunately the holes cut out by the previous owner are very close to the console edge so I can't create a gradual bevel. As it sits now, the beveled edge I ground down is approximately 45 degrees. My plan is to fill the existing holes with some 12 oz mat that I've had laying around since my last project. I'll plug the holes with cardboard wrapped in peel ply or plastic from the outside and glass in a sheet or two of the 12 oz mat from the inside. Once that dries, I will then build up the layers inside the beveled holes on the exterior of the console. If all goes well, I then want to find the center line down the middle of the console and measure out 3" inches on either side and remove a 6" strip from the console to make it narrower. This will make it easier to walk around since It's just a bit too wide for the boat as it sits right now. I'm trying to figure out if I should cut the 6" out first or glass the large holes and then cut out the 6" "strip". What do you guys think?
Re: Privateer roamer skiff project
Posted: Sat Dec 22, 2018 2:54 pm
by Fuzz
I think I would cut the console down first. If not you might spend time and material working a spot that gets cut out.
Re: Privateer roamer skiff project
Posted: Sat Dec 22, 2018 7:52 pm
by fallguy1000
Fuzz wrote: ↑Sat Dec 22, 2018 2:54 pm
I think I would cut the console down first. If not you might spend time and material working a spot that gets cut out.
Bulldozer method.
Biggest change first.
Re: Privateer roamer skiff project
Posted: Sat Dec 22, 2018 8:26 pm
by Fuzz

I like that. Might have to steal it
Re: Privateer roamer skiff project
Posted: Sat Dec 22, 2018 10:53 pm
by greymare89
Ok that makes sense. I originally thought the cut out was best to do first since I will be able to access the hard to reach areas on the inside once the console is cut open.
Question on the epoxy. I used marinepoxy on my last build with good results, at least I think they were good. The price difference between marinepoxy and epoxies from system3, west system and sliver tip are pretty significant. Is any one epoxy superior to the other? Marinepoxy is almost half the price of the other three in gallon size.
Re: Privateer roamer skiff project
Posted: Sat Dec 22, 2018 11:30 pm
by Fuzz
Over the years I have used a bunch of different epoxies. For my needs Marine epoxy is as good or better than the others 90% of the time. If you are building with a foam core JM says to use either System 3 or West System. System 3 is great because it is not supposed to blush at any speed. Marine epoxy at medium or fast and West system both must be watched for blushing.
Re: Privateer roamer skiff project
Posted: Sun Dec 23, 2018 10:24 am
by fallguy1000
I am either at 130 or 145 gallons of System 3 Silvertip. Probably 25% waste rate with wet bagging; so not all in boat.
So far the only issues have been human error.
It hasn't blushed once.
If I could go back, I would have learned panel infusion, bit that would be useless on your job.
I am planning to build my console as a hybrid between foam and ply. Foam sides for weight and a plywood face to easily change if I lose a device or want to change it. Maybe even a plywood front for a door. The only trouble is my star side is getting a bit heavier than the port (livewell and pumps, helm, captain). I digress. Anyhow, the idea of an easier to modify and screw into helm seems smart to me. I need to mount the autopilot pump; so even the bottom needs some plywood...
Re: Privateer roamer skiff project
Posted: Sun Dec 23, 2018 8:10 pm
by boguesounder
Greymare,
Hi there. Just wanted to give you a quick shout - Privateer fan also. I remember your other build well. I have looked at it and several other retriever builds for help. I look forward to watching what you do with the roamer.
I'm sure you've seen this one:
https://www.thehulltruth.com/boating-bo ... build.html.
The build thread was never finished, but what was shown was good to see.
Keep up the good work.
-Bogue
Re: Privateer roamer skiff project
Posted: Tue Mar 19, 2019 9:37 pm
by greymare89
Re: Privateer roamer skiff project
Posted: Wed Mar 20, 2019 4:23 am
by Fuzz
Your plan for the transom cut out should work just fine. You could use a cheap piece of hard board and coat it with pva also. Clamp or screw it to the outside and do your lay up.
Re: Privateer roamer skiff project
Posted: Thu Mar 21, 2019 10:41 pm
by boguesounder
Glad to see you are back at it! I think Bob Maes did a similar conversion from 20 to 25" on his transom. He reached out in my Privateer thread and we have spoken on the phone a few times. Super nice guy and he may have some photos of that renovation that may be useful.
Re: Privateer roamer skiff project
Posted: Mon Mar 25, 2019 6:32 pm
by greymare89
Question about supporting the hull and taking out the stringers.
Before I started cutting into the boat I took it off the trailer and placed it on leveled out 6x6's - two under the chines and one under the keel. Everything felt solid until I removed the deck, wet transom, tank and foam between the stringers. Now, there is an approximate 1/2 gap between the chine at the transom and the 6x6 support. When I walk around the inside I can feel the back of the boat bounce and hit the 6x6. The boat is still sitting perfectly level but I'm worried there shouldn't be gaps anywhere between the hull and beam supports. There must be a "rake" in the hull so I think it's impossible for the hull to make contact with the beam every square inch along the chine.
Also, I noticed issues with the boat sitting solid on the chine beams once I attempted to support the keel. If I lose the keel beam I think the hull will sit flatter on the two chine beams. Is that a good idea or is the keel support very important? I never supported the keel n my last build but it was a smaller boat. I might be over thinking it but I don't want to royally screw anything up once I install the new transom and start removing the old stringers.
Re: Privateer roamer skiff project
Posted: Tue Mar 26, 2019 1:42 pm
by Fuzz
I am pretty sure you want support at the chines to keep things straight. When you put support under the keel it raised up off the chine support and now there is some rocker if I am reading correctly? What happens if you remove the keel support? Or better have it touching but not taking much weight?
Re: Privateer roamer skiff project
Posted: Sat Apr 06, 2019 9:45 am
by greymare89
I made some more headway grinding and prepping. All the foam has been removed and the gel coat has been ground down on the gunwales to prep for the deck to be tabbed in when the time comes. I'll leave the stringers until the transom is finished. They're shot!!! I measured everything out to get an idea of how much material I will have to order. I plan to use a layer of 12 oz mat on the stringers for waterproofing then tab each one in with two layers of 6" 1708 tape. Obviously the transom will be 1708, I'm thinking at least 4 layers for strenghth. Again that will be tabbed in by two layers of 1708 also. Lastly, I'd like to coat the underside of the sole with one layer of 12 oz mat for water proofing then a layer or two of 1708 on the topside. I want to create a thick layer of glass on the topside since things will be banging around like scallop dredges, etc. It might be a waste of epoxy to put down 1708 on the topside so I'm open to alternatives that will create a thick, tough deck. Anyway the rough measurements are as follows:
Transom- 80" wide by 30" deep
Outside stringers- 7" tall by 10' long
Inside stringers- 8" tall 13' long
Center stringer- 12" tall by 15' long
Deck Beam at transom- 78" wide
Deck Beam midship- 76" wide
Overall length of deck- 17'
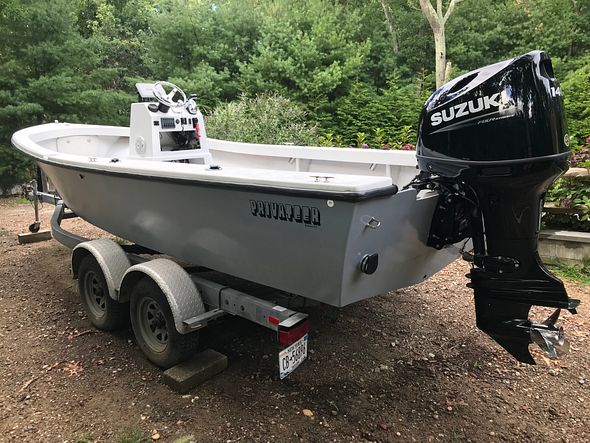
Given the layup schedule I just proposed, does anyone have an idea of how much fiberglass, epoxy and filler material I will need to order? id like to put one large order in to avoid paying shipping costs multiple times. Thanks in advance, the pictures of the boat as it currently sits are below to help get an idea of how everything looks.


Re: Privateer roamer skiff project
Posted: Sat Apr 06, 2019 10:07 am
by fallguy1000
Straight mat will not perform well with epoxy. Use 1208 instead. It will disfigure and clump during wetout.
Before you figure the bom, make sure to get the right stuff.
Tab transom with three layers. Assuming two layers of 3/4" ply.
Save some money and just neatcoat the sole bottom well with epoxy. Is it 3/4" ply?
Stringers should also be encapsulated with 1208 of they are ply or doug fir, etc.
Did yoi get it supported? You'll find forum responds better with photos. It is give and take. You give photos and we give you time and advice. That helps us satisfy our boat addiction.
Re: Privateer roamer skiff project
Posted: Sat Apr 06, 2019 10:32 am
by greymare89
Fallguy
Yes, the stringers, transom and deck will all be 3/4 marine grade ply from our local supply yard. In my last build I used 12 oz mat to cover the deck with relatively good results. I didn’t find that it clumped or disfigured. Also, I put a neat coat on the underside like you mentioned on my last build so I may do it to this one as well. I found the 12oz mat to be fairly cheap that’s why I figured I’d put a layer on. The 1208 will give it a little more “beef” I guess right? My goal is to make this boat strong, I’m not overly worried about the intricate finishing touches. Also, I’ll be using marinepoxy as it’s affordale and I’ve had good results thus far.
I did add 3 more photos to show the current state of the project I hope you’re seeing them on your end. If not please let me know and I’ll try and upload them again. Thanks
Re: Privateer roamer skiff project
Posted: Sat Apr 06, 2019 11:29 am
by fallguy1000
12 oz mat is really not as strong as 1200 or 1208.
Of course 1208 is heavier, but pound for pound 1200 beats mat glass afaik.
Re: Privateer roamer skiff project
Posted: Sat Apr 06, 2019 8:33 pm
by Slickcav
on my previous privateer build roamer skiff I used 17-19 gallons of ebond epoxy, 35 yds maybe of 50" 1708, two big tubs of wood flour.
Re: Privateer roamer skiff project
Posted: Wed Apr 10, 2019 8:16 pm
by greymare89
Slickcav
How did you determine how much material to order? I was about to place the order but I decided to double check and figure the best way to measure the amount of epoxy/glass. With regards to the fiberglass, I can go by my measurements that I posted before to come up with a rough idea on how much to order. The problem I am having is figuring the amount of epoxy. I'm going to layup everything with 1708 so I know it's going to soak up a lot of resin. Thanks again to everyone for their responses, I really appreciate it.
Re: Privateer roamer skiff project
Posted: Thu Apr 11, 2019 9:17 am
by fallguy1000
Figure epoxy as follows:
Pounds of glass divide 9.01 pounds per gallon times 128 ounces per gallon-gives you ounces if epoxy to wetout.
Figure fillets and infills at one ounce of epoxy for 17 inches. Large fillets use more like one ounce for 12 inches
Figure a waste factor of something like 5-15 percent..waste is tricky, but it happens, bucket residues, roller residues, overages, lost batch to kick times; the bigger the job, the higher the factor
Re: Privateer roamer skiff project
Posted: Mon Apr 15, 2019 9:59 pm
by Slickcav
greymare89 wrote: ↑Wed Apr 10, 2019 8:16 pm
Slickcav
How did you determine how much material to order? I was about to place the order but I decided to double check and figure the best way to measure the amount of epoxy/glass. With regards to the fiberglass, I can go by my measurements that I posted before to come up with a rough idea on how much to order. The problem I am having is figuring the amount of epoxy. I'm going to layup everything with 1708 so I know it's going to soak up a lot of resin. Thanks again to everyone for their responses, I really appreciate it.
buy 5 gal, reorder at 2 gal used, and youll have an idea after the first 5 what you need, but will have your next shipment before you run out of the first 5 and just go from there I would say?
Re: Privateer roamer skiff project
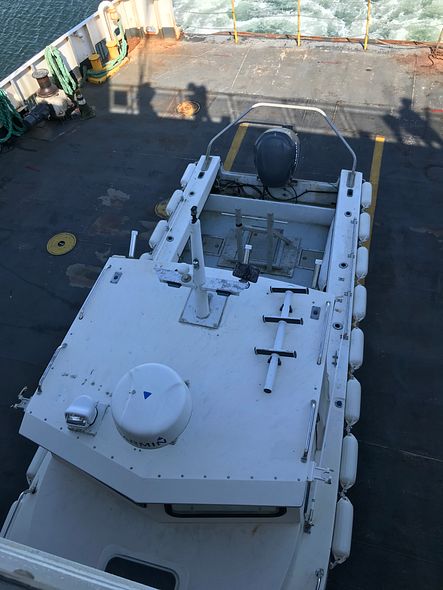
Posted: Thu Jan 19, 2023 6:14 pm
by greymare89
Re: Privateer roamer skiff project
Posted: Thu Jan 19, 2023 6:29 pm
by greymare89
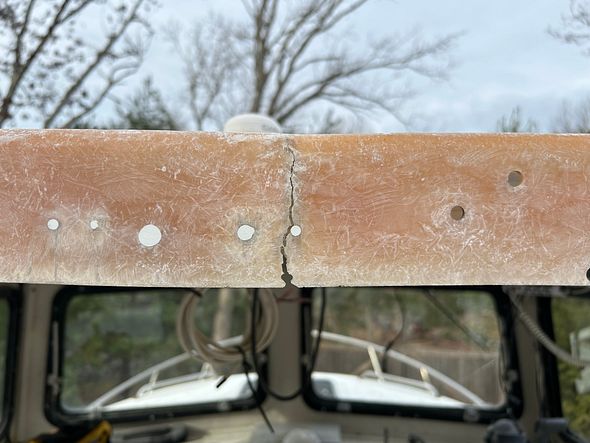
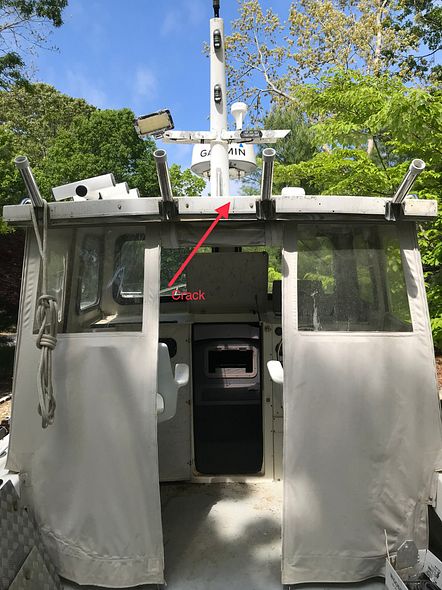
I had the opportunity to buy a 24’ Privateer in the spring of ‘22 which needs some cosmetic work but for the most part is solid. I cruised it “as is” last summer but will be doing some work to it prior to this season to get it ready. One of the ares of concern is the roof. It has many old mounting holes which have been covered up over the years as well as a decent crack on the rear lip. I plan on filling all the old holes with thickened epoxy once any rotten core is removed before placing a layer of 17oz glass over the repaired areas. My main question is how to address the crack. I thought about ripping down a piece of 3/4 marine plywood to match the inside width of the roof “lip”which would be set in thickened epoxy before running a layer or two of 17 oz or 1708 mat over the new plywood which would wrap around from underneath the roof to the top edge of the roof itself.
Is it necessary to set plywood underneath to stiffen everything up or will glassing over the crack with several layers of glass be sufficient? Here are some pictures which show the crack and the area I sanded the gel coat away to prepare for the repair.
Re: Privateer roamer skiff project
Posted: Thu Jan 19, 2023 6:54 pm
by greymare89
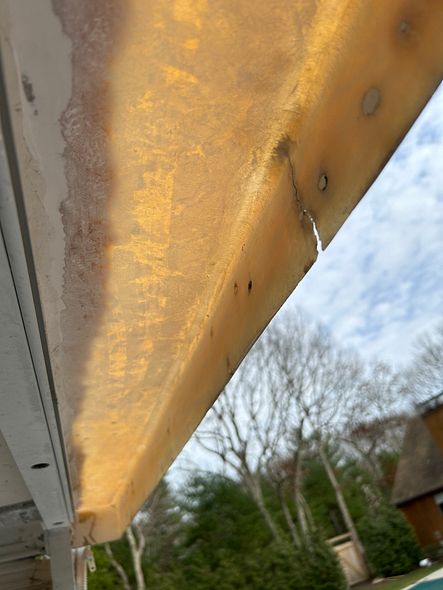
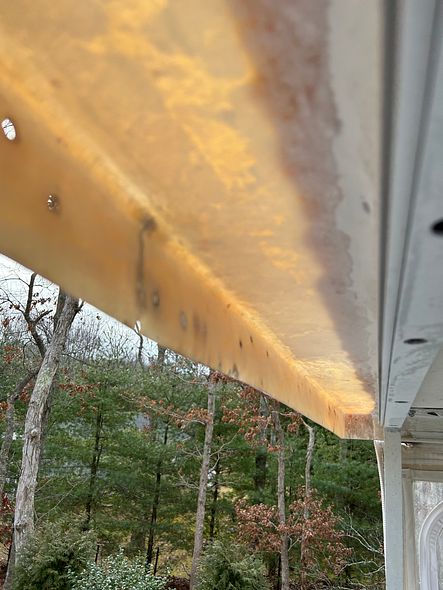
The photos I have of the 24’ Privateer I posted before are pretty poor and I will work on getting some clearer shots to show what I’m trying to achieve. In the mean time, here are a couple of photos which show the overall rear roof “lip”crack before the area was prepped for prepare as well as the entire top of the roof with the many holes that need to be properly repaired.
Re: Privateer roamer skiff project
Posted: Fri Jan 20, 2023 8:53 am
by fallguy1000
I would sister a vertical piece of plywood or clear harddwood timber the width of the door opening plus a couple inches to the roof deck there. The wood needs to be dry and stable to warpage. The deck has sagged, so do the work in steps. Radius the edges not touching the roof and the mating corner with 3/8" router bit and leave the support shy about 1/4" for room for glass. No sharp edges will remain except the bottom and sides touching the edges Pretreat the wood with clear epoxy on the edges bonding to the deck for about an hour. Use thickened epoxy putty with wood flour or cabosil to bond it. The thickness of the final seam is best at 1 millimeter, but you might use a bit more here to takeup any voids.
Scrape away any gelcoat from the contact area or remove any chalked old materials and dirt with 40 grit and clean it with acetone.
Apply the glue with 1/8" vee trowel to all mating sides. Clamp with light pressure with a board taped with shipping tape on the inside and use some wood shims or rubber pads on the exterior.
Then lift the wood up with a 2x4 and a jack until the seam closes. Once you lift the deck up and the seam closes, add a little more clamp pressure.
Let this cure for overnite or longer if the weather is less than 65F. A week for 50F. Then remove the jack and glass over the timber with at least a single layer of 1708, or two layers of 12oz biax. The glass covers the entire timber.
It looks like the mass of the stuff above was just too much for the thing roof, so consider adding a flat piece of 3/4 inch plywood under all that crap up top. That piece would go side to side and be done similarily. This will keep the roof from breaking somewhere else under pounding or dynamic loading.
Re: Privateer roamer skiff project
Posted: Fri Jan 20, 2023 8:54 am
by fallguy1000
What's the story on the fenders end to ended?
Re: Privateer roamer skiff project
Posted: Fri Jan 20, 2023 2:43 pm
by greymare89
Thanks for the response. I had a strong feeling I would need to sister some wood underneath to beef it up so your description is spot on with my original plan. Good call on jacking it up to close the seam, I’ll definitely take your advice on that. As far as the fenders, this privateer was in service as a tow boat by the prior owner. I’ve since removed all the fenders and will be sealing up the bolt holes from mounting the fenders along with the hundred other holes throughout the entire boat….
Re: Privateer roamer skiff project
Posted: Sat Jan 21, 2023 10:39 am
by pee wee
Sounds like you're heading in the right direction. I would assume the glass broke either because an unusual strain was put on it, or (more likely) it was not designed with enough strength and it just took a while to become evident. I guess the builder was trying to reduce materials out of concern for weight or cost . . .