Page 1 of 1
C17 in New Zealand.
Posted: Sun Jan 05, 2020 11:22 pm
by OneWayTraffic
I bought the plywood today. Tunnel greenhouse (plastic tent) is on the way. I am in contact with a shop to order the epoxy (WEST 5:1) and glass. I have ordered a 100metre roll as it's cheaper than ordering piecemeal. I can cut my tape off it.
Some here who remember my post history may recall that I have gone through several ideas on what boat to build. In the end I think I made the sensible choice for the South Island of New Zealand. Capable offshore on the days I'd want to take it out, cabin for bad weather, sleeps two, holds 5 or 6 (if need be) moderate power requirements and not too heavy to tow. I'd still prefer a panga or FS19 for pure fishing, but the cabin will be nice and keep the other half happy.
I will be aiming for the best finish that I can get on the outside. Inside will be workboat: lots of kiwigrip or flowcoat, minimal fairing. I am planning to go for a euro transom (full height frame E for safety.) This allows room on the 6mm ply for a slight stretch of the rear. Hmm.
Re: C17 in New Zealand.
Posted: Sun Jan 05, 2020 11:37 pm
by OneWayTraffic
The inspiration.
Re: C17 in New Zealand.
Posted: Mon Jan 06, 2020 6:28 am
by Dan_Smullen
Congratulations on the beginning!
I look forward to following along.
Beautiful blue on the C17 in your inspiration pic!
Re: C17 in New Zealand.
Posted: Mon Jan 06, 2020 12:27 pm
by OneWayTraffic
Check out the reflections of the spray on the paint. That is some fairing job!
Re: C17 in New Zealand.
Posted: Mon Jan 06, 2020 5:11 pm
by Dan_Smullen
OneWayTraffic wrote: ↑Mon Jan 06, 2020 12:27 pm
Check out the reflections of the spray on the paint. That is some fairing job!
Dig it!
Re: C17 in New Zealand.
Posted: Tue Jan 07, 2020 2:55 pm
by OneWayTraffic
First head scratcher. On the C17 the baseline is the top of the sole. In some of the other designs that I have plans for it is the bottom. D'oh! I was wondering why my stringers wouldn't match the height of the frames. There is about 13mm (1/2") to spare for the notch. I assume I will need to trim to fit later. Or I could lay a strip of 9mm over the stringers and lift the sole a bit.
If things don't seem to fit, and measurements are triple checked, go have a careful look at the drawings!
Re: C17 in New Zealand.
Posted: Tue Jan 07, 2020 3:41 pm
by jacquesmm
Just put a strip of ply on top of the stringers, it will be just as strong. Or, raise the stringers cleats by that small difference and fill with epoxy putty. Less work but a little more epoxy.
Re: C17 in New Zealand.
Posted: Tue Jan 07, 2020 5:21 pm
by OneWayTraffic
Thanks. I haven’t actually cut anything yet still drawing out the frames. I have deviated from the nesting a little partly due to the wider transom cut and partly due to not wanting to buy all the 9mm ply up front. I have decided to make the stringers a little higher. There is plenty of room.
I used one sheet of 12mm for two transom layers and motorwell and have got frame E (completely)and D(bottom half) on a sheet of 9mm. Room for frame A on that seconded sheet there if I draw it in two parts. Using my geometry skills!
Re: C17 in New Zealand.
Posted: Thu Jan 09, 2020 4:08 am
by OneWayTraffic
Not much to report. Almost finished drawing out the panels. The tunnel house arrived, and is partly errected. Cutting out and building the jig is next weeks plan.
Re: C17 in New Zealand.
Posted: Mon Jan 13, 2020 2:37 am
by OneWayTraffic
Most frames are cut, hull panels tomorrow. I’ll dry install the jig soon with the stringers just screwed together for a check. How much tolerance is there? 3mm (1/8”?) or can things be out more before planing is affected.
Re: C17 in New Zealand.
Posted: Mon Jan 13, 2020 10:29 am
by piperdown
Not completely sure on tolerance but I made sure my jig was level and that the boat was "square" by measuring corner to corner. I was probably off by 2mm and couldn't really tweak it anymore that that without causing the fairness to swing out of shape.
Of course my GF16 is built different from how other of JM's boats are put together, so hopefully others will jump in and definitively answer your question.

Re: C17 in New Zealand.
Posted: Tue Jan 14, 2020 1:50 am
by OneWayTraffic
I glued the stringers together today. Some of the parts were cut rough and wider than needed so I screwed them together and gave them a buzz with the power planer. To get them more even. Neat tool. I wouldn't buy one; borrowed this from school, flattened them very fast.
I was using WEST with fast hardener while I'm waiting for the new order to arrive. Using 50ml (2oz) batches it took eight batches to prime and glue two 3.5m stringers. Had to move fast even with such small batches.
Spot the layout mistake!
Re: C17 in New Zealand.
Posted: Tue Jan 14, 2020 1:52 am
by OneWayTraffic
Caught it before gluing though. Just as well.
Re: C17 in New Zealand.
Posted: Thu Jan 16, 2020 12:36 am
by OneWayTraffic
Well those that have been following my questions threads will know that I had some ‘challenges’ gluing the stringers. I have cut some more. Being completely unable to rip parallel lines I cut a little oversized and then screwed them to my strong back. I went over once with a circular saw and then a power planer. This is the current state of affairs. This edge will be against the hull. Are they straight enough or do I keep at them? They are within 1/8” 3mm of straight.
Re: C17 in New Zealand.
Posted: Thu Jan 16, 2020 12:37 am
by OneWayTraffic
If I can’t get these right I’ll borrow the schools table saw but that is more effort.
Re: C17 in New Zealand.
Posted: Thu Jan 16, 2020 6:01 am
by Jaysen
The glory of the stitch and glue is you need the general shape more than accurate shape. You will just use thickened epoxy to fill the gaps. That stuff will be harder and stronger than the plywood.
Build on!
Re: C17 in New Zealand.
Posted: Thu Jan 16, 2020 2:44 pm
by OneWayTraffic
Cheers. I actually went out and got a flush cut bit for my router. I will flush cut the edges facing the hull against a factory sheet of plywood. My concern isn't so much putting the stringers in later, its avoiding hook or rocker when I plank up the hull on the jig. I figure the flush cut bit will come in handy for other things as well.
Re: C17 in New Zealand.
Posted: Thu Jan 16, 2020 7:18 pm
by OneWayTraffic
Amazing the difference a suitable tool makes. I took off a bit more than I should have but I can build it up when I do the inside.
Re: C17 in New Zealand.
Posted: Thu Jan 16, 2020 10:00 pm
by Fuzz
A guy can not have everything but having both the right tool and a good quality tool sure makes a difference.
Re: C17 in New Zealand.
Posted: Fri Jan 17, 2020 12:16 am
by mohrscott
Piper down; a few of us have these underway. I didn’t fuss over close tolerances too much and mine worked out fine. I did double check constantly to make sure the over all shape stayed true and level. You can fill a lot of gaps with resin mix. It will be fun to watch you progress!
Crabby Scott building CrabbyPatti.
Re: C17 in New Zealand.
Posted: Fri Jan 17, 2020 10:11 am
by piperdown
mohrscott wrote: ↑Fri Jan 17, 2020 12:16 am
Piper down; a few of us have these underway. I didn’t fuss over close tolerances too much and mine worked out fine. I did double check constantly to make sure the over all shape stayed true and level. You can fill a lot of gaps with resin mix. It will be fun to watch you progress!
Crabby Scott building CrabbyPatti.
I should have said strongback not jig. The GF16 doesn't use jigs. So the only thing I had to make sure was in close tolerance was that it was level and square.
Believe me I've filled a LOT of gaps with thickened epoxy

Build on, love seeing the progress!
Re: C17 in New Zealand.
Posted: Sun Jan 19, 2020 3:42 am
by OneWayTraffic
Hull panels cut out. I screwed the panels together where possible to get a mirror image. Cleaned up the cuts with a power planer. Probably not needed, but I have one on loan from school so why not? I also rebated a little channel for splicing the panels together. Also not needed but hey.
Re: C17 in New Zealand.
Posted: Sun Jan 19, 2020 3:45 am
by OneWayTraffic
And this may explain why I had issues with the fast hardener. The greenhouse was open at both ends but still stinking hot. It fogged over not much later and temperatures dropped to 17C.
This is good news for the winter though. We have plenty of settled sunny days at anytime in the year. I should be able to get work done in July and August.
Re: C17 in New Zealand.
Posted: Wed Jan 22, 2020 5:20 pm
by OneWayTraffic
OK I’ve spliced the panels. Not having done this before I simply butted them without putty and glassed then weight over the splice. Flipping to do the other side the next morning I heard a CRACK as the glass flexed at the slight void between the panels.
Took the day off and went hiking to reconsider and then read that putty was needed. I cleaned out the excess on the second side as best I could using a dermal like tool to get into the gaps. Filled with putty and glassed.
Attached is a photo of the cleaned panels and the one with the worse air bubbles along the join. I used an awl to confirm that they have air in there. Is it better to grind and patch now or just leave it to after planking? I’m thinking that the bottom glass will cover it if I grind out the air bubbles after I’ve got the hull glued together on the jig. Voids are about 1/4” 6mm wide and a few inches long right at the panel join.
Re: C17 in New Zealand.
Posted: Wed Jan 22, 2020 5:36 pm
by OneWayTraffic
Just to clarify. Both sides have now been done. There were some voids in in the first side and probably places where the glass popped loose a bit while flipping the panels. I did the second sides better using the glass underneath to act as a scrim for the putty. The photo is of the worst voids on the original side after glassing both sides.
Do I grind and fill now or later? I am tending towards later.
Next time I do this I might try doing both sides at once.
Re: C17 in New Zealand.
Posted: Wed Jan 22, 2020 8:32 pm
by Fuzz
The panel flexing and cracking will happen even if you had used 2-3 layers of tape. It is the glass on two sides with a core that gives the stiffness. For me with glass on just one side I clamp a board across the joint to keep it from flexing while I flip the panel. After getting the glass on both sides the bracing is not needed so much.
Re: C17 in New Zealand.
Posted: Thu Jan 23, 2020 1:07 am
by OneWayTraffic
Cheers Fuzz, I may try that or something similar when I splice the top side panel. I'm considering very small butt blocks on the inside only. Just enough to hold it in position.
I have started preparing the transom. This is modified from the original design. A side benefit is that I needed fewer sheets of ply. At the moment I have used one sheet of 12mm, 4 of 9mm and 9 of 6mm and have a lot of usable scrap left over even after my stringer booboo.
It looks a bit like swiss cheese at the moment, but four of those holes will be putty filled. I have two holesaw bits one 60mm (2 3/8") and 31mm (1 1/4")
I measured, measured, measured and cut the holes oversized for the outboard, then measured again.
Small hole in the middle is for the drain plug, at this stage I am thinking a 25mm expandable plug.
The two big holes will be for scuppers. I'll make them myself with layflat hose on fibreglass pipes. They work well under the waterline if the boat is moving forward. It will not be left unattended at a dock.
Re: C17 in New Zealand.
Posted: Thu Jan 23, 2020 2:09 am
by Fuzz
Slick move cutting the holes now when it's easier to do it. I was never that smart

It will be interesting to see how those scuppers work out.
Re: C17 in New Zealand.
Posted: Thu Jan 23, 2020 7:45 am
by piperdown
Just a FYI. Those panel joints are going to be weak if you just butted them together. A bit of thickened epoxy should have been put between the panels, then pushed together and the excess wiped off, then the fiberglass over the top.
I made the exact same mistake and will have to grind the inside splice when I work on the interior, fill with thickened epoxy and then patch the splice.
The strength of the splice is in the core and the fiberglass. If you have a void where there is no core to support the fiberglass it is a stress point and will eventually break.
Re: C17 in New Zealand.
Posted: Thu Jan 23, 2020 8:40 am
by Bogieman
Very nice! Love your shelter. I've kicked myself a bunch for not building one. Maybe next time.
Re: C17 in New Zealand.
Posted: Thu Jan 23, 2020 1:29 pm
by OneWayTraffic
piperdown wrote: ↑Thu Jan 23, 2020 7:45 am
Just a FYI. Those panel joints are going to be weak if you just butted them together. A bit of thickened epoxy should have been put between the panels, then pushed together and the excess wiped off, then the fiberglass over the top.
I made the exact same mistake and will have to grind the inside splice when I work on the interior, fill with thickened epoxy and then patch the splice.
The strength of the splice is in the core and the fiberglass. If you have a void where there is no core to support the fiberglass it is a stress point and will eventually break.
Cheers, when doing the other side I used a rotary tool to ream out the gap until I could see the glass on the other side and then filled with putty. Flipped again and only the one join with air bubbles. I'll grind them out after planking unless I hear that its better to do it now.
Re: C17 in New Zealand.
Posted: Thu Jan 23, 2020 4:41 pm
by piperdown
If it were me I'd go ahead and grind the air bubbles out or inject them because sure as sh*t I'd forget later on.... but that's just me
Re: C17 in New Zealand.
Posted: Thu Jan 23, 2020 7:33 pm
by OneWayTraffic
Good point. I'll have to do a sanding of the whole inside anyway before I glass; that will be part of that.
I am building outside, and at this time of the year we get hot dry weather. 40C (104F) degrees is common in that little tunnel house I have set up. When winter hits we get a lot more rain and humidity. I want to have the inside coated just once to control moisture swelling before I get around to glassing the inside (in spring I hope.)
Re: C17 in New Zealand.
Posted: Sat Feb 01, 2020 7:17 pm
by OneWayTraffic
Well those who have been following my build may be aware that I had some issues with transom and stringer glueups. I have just about moved on from those now, and have my new transom mostly laminated. I have decided to move the scuppers above the waterline as the layflat hose isn't entirely watertight. The plan is to use a bilge pump in a sump under the outboard at the transom. This will deal with the normal water that gets in and any leakage from scuppers. If I take a wave or get pooped then moving forwards will release water out the rear. The pump can deal with the rest.
Re: C17 in New Zealand.
Posted: Fri Feb 07, 2020 9:52 pm
by Salty F17
It's good to see another c17 build

Re: C17 in New Zealand.
Posted: Sat Feb 15, 2020 5:27 pm
by OneWayTraffic
Well the stringers and transom are basically done, I am calling them done. Glassed over the top with two layers biaxial tape offset a little bit. Had to cut out a few voids in the first layer where it lifted. Filled with epoxy PB. Second is curing now.
The jig is nearly complete, Frames A-E all lined up as accurately as I can, with a lot of measuring of diagonals. The ground is on a slight slope, so I am squaring off the strongback then checking measurements and adjusting so the notches lie even with the stringer (useful straightedge).
I used the trick of drilling a 10mm hole in the frames at BL and CL and pushing a bike LED light into frame E. The light is visible through a hole clamped over the CL of frame A (Frame A doesn't go through the baseline.)
Next step is to notch the stringers so they fit flush in the frames, then fit the motorwell frames and hang the transom. I'll probably support it from below and screw through the putty filled holes for the outboard bolts.
Re: C17 in New Zealand.
Posted: Sat Feb 15, 2020 5:39 pm
by OneWayTraffic
After a fair bit of stressing about the strongback timber warping or swelling, and thinking that I'd never level the jig on grass it was gratifying when I first saw that blinking red LED through the holes in the boat!
Re: C17 in New Zealand.
Posted: Tue Feb 18, 2020 1:47 am
by OneWayTraffic
I cut the notches In the stringers after a quick measure. Perfect fit! Better than I hoped.
Got a quick question for anyone reading. Two of the frames were cut short. Like shown in the photos, B and D. Every second frame is full height. Will that be enough to support the hull sides or should I extend the sides of those two frames?
Re: C17 in New Zealand.
Posted: Tue Feb 18, 2020 10:18 am
by jacquesmm
Is that question about the molds being sufficient?
Yes, it will work but pay attention to the top edge (sheer side). If necessary, clamp a temporary batten along that edge to keep it fair.
Re: C17 in New Zealand.
Posted: Tue Feb 18, 2020 1:24 pm
by OneWayTraffic
jacquesmm wrote: ↑Tue Feb 18, 2020 10:18 am
Is that question about the molds being sufficient?
Yes, it will work but pay attention to the top edge (sheer side). If necessary, clamp a temporary batten along that edge to keep it fair.
Thanks. I’ll check before gluing. I was going to glass the bottom to the lower side panel before attaching the top side panel as space is limited. I suppose then the lower side panel would help to fair the top side.
Re: C17 in New Zealand.
Posted: Sun Feb 23, 2020 6:55 pm
by OneWayTraffic
Well the bottom and side panels are stitched.
I put the bottom on first to check alignment. Stitched the sides a day later. It went well once I removed the starboard chine panel from the port side, turned it the right way up, redrilled the stitching holes at the bottom rather than the top and restitched!
Mostly happy with it; it all went together well except I need to check symmetry in a few places.
I think frame B is slightly off centre: the side bulges out at B about 10mm (3/8") more one side than the other. Still need to put the transom on, the current plan is to support it on blocks and just lean it against the side and bottom panels. I'll use screws, then glue. I did fill the weave of the glass tape on the transom, and put a generous fillet under the clamping board. I really don't want water getting in there.
The inside of all the hull panels has a very thin coat of epoxy, just enough to hopefully moderate expansion and moisture absorption. It's dry this time of year, but we get rain in the winter. No snow I hope.
There seems to be some gaps between the panels and the frames, I am not stressing about these, but am wondering how much the Meranti will bend to take the camber if I leave it a few days before gluing?
Photos in an hour or so.
Re: C17 in New Zealand.
Posted: Wed Feb 26, 2020 2:20 am
by OneWayTraffic
And the transom is on. Just screwed and sitting on a bracket at the moment. I think I’m nearly ready to glue this thing. Not much if any hook or rocker in the bottom and sides are laying nicely on the frames nearly everywhere.
Re: C17 in New Zealand.
Posted: Wed Feb 26, 2020 2:22 am
by OneWayTraffic
That last photo should indicate what I plan with the transom. I’ll cut the sides diagonally between Frame E and the transom either before or after flipping.
Re: C17 in New Zealand.
Posted: Fri Feb 28, 2020 4:35 am
by OneWayTraffic
I tacked the hull yesterday. Today I went around with a power planer to round off some of the hard edges and remove excess glue. For better or worse, the hull shape is set.
I'm not sure if I will get time to glass it this weekend. Expecting showers tomorrow so I've wrapped a groundsheet over it. The tunnel house has a leak or two.

Re: C17 in New Zealand.
Posted: Tue Mar 03, 2020 10:12 pm
by OneWayTraffic
Well I found a bit of rocker in the hull. I posted a question to the 'Power boats' forum. Hopefully I'll get some age advice before I jump in and start fixing or glassing.
Re: C17 in New Zealand.
Posted: Wed Mar 04, 2020 3:06 pm
by MikeyGnz
What part of NZ you in OWT?
Re: C17 in New Zealand.
Posted: Wed Mar 04, 2020 4:41 pm
by OneWayTraffic
MikeyGnz wrote: ↑Wed Mar 04, 2020 3:06 pm
What part of NZ you in OWT?
Amberley. You are welcome to drop by and have a look sometime. PM me.
Re: C17 in New Zealand.
Posted: Wed Mar 04, 2020 7:35 pm
by MikeyGnz
OneWayTraffic wrote: ↑Wed Mar 04, 2020 4:41 pm
MikeyGnz wrote: ↑Wed Mar 04, 2020 3:06 pm
What part of NZ you in OWT?
Amberley. You are welcome to drop by and have a look sometime. PM me.
That's about an hour from me. Give me a yell if you need a hand with anything.
Re: C17 in New Zealand.
Posted: Sun Mar 08, 2020 4:56 am
by OneWayTraffic
When I started this build I told myself two things.
1. That I'd do the best job that I was capable of considering my experience at the time.
2. That I'd post the bad and the good online, so I could get reliable advice. Brag posts are for my Facebook page.
So I had a bit of a setback during the hull glass layup. I've layed up glass before, but never so much.
Anyway day dawned fine and hot so I got into it. I had decided to glass one side of the boat at a time with secondary bonding along the keel.
One layer 400g along the bottom running down the hull side. Glass isn't required all the way down the side. A second layer on top. Wet on Wet Ouch
So I started. Cut out the first layer of glass, and got it wet out in about 3 hours. It got hot, probably about 35 degrees C pushing 40 in that tunnel house. Even with WEST Slow I had to hurry at times.
That layer actually wet out ok. There were a few air bubbles here and there, but nothing to cry about.
After finishing at about 2pm I was buggered. So I went inside and took a break. I was beginning to feel the heat, which may explain why I left my bubble buster roller outside rather than in the container of acetone.
Anyway time for the second layer. The first layer was barely tacky by then and I was beginning to worry about getting wet on green without sanding.
So after considering whether I should just stop at one layer for the day, I started being in "get 'er done" mode. Mistake.
The problems started almost immediately. I managed to get the glass spread out fairly smooth with a bit of wrestling. But as soon as I started wetting out, bubbles! A lot of them, hundreds at least, mostly small buried under the glass.
I tried pushing them out with a lot of force from the squeegee, but I really needed that roller!
So anyway 7pm done, quick shower and off to a restaurant for tea. This morning I drilled out all of the bigger bubbles, injected epoxy in those that I could, filled the weave with epoxy thickened to ketchup consistency and put a first light coat of fairing on the sides.
But the more I look at the remaining bubbles the more it bothers me. I think that they aren't a structural issue, due to the first layer of cloth laying down well. I am worried about water getting in, and issues down the line.
I know now how to prevent most of this happening again: Fill the weave between layers, and apply in the pm when it's steady temp or cooling down. But I have a bit of pondering to do.
A lot of air bubbles around the bottom to transom overhang as well. I put a radius on but should have done twice as much. I got some of the glass to lay down, but not all.
Being my own QA, I am currently thinking that I will reject that job and introduce the layup to my Saw-max diamond blade. Then a belt sander, much bigger radius on the corner and retape with some generous overlaps.
I will mull it over a bit first, but that joint is very important; it needs the best work possible and currently that's not on it.
One of the reasons I chose to build rather than buy is I like solving interesting problems, and I wanted a challenge. Well I have no shortage of interesting problems so far, but each step is a step closer to launch.
Re: C17 in New Zealand.
Posted: Sun Mar 08, 2020 10:24 pm
by joe2700
OneWayTraffic wrote: ↑Sun Mar 08, 2020 4:56 am
Anyway time for the second layer. The first layer was barely tacky by then and I was beginning to worry about getting wet on green without sanding.
I was about to let you know that you can still recoat without sanding after the surface is no longer tacky, but I looked up the west system documentation before I opened my mouth and it seems you can't with their epoxy. In the manual the only mention of the word recoat is below:
The mixture will become tack free about midway through the initial cure phase. While
it is still tacky (about like masking tape), a new application of epoxy will still chemically
bond with it, so you may still bond to or recoat the surface without special preparation.
However, this ability diminishes as the mixture approaches the final cure phase.
-
https://www.westsystem.com/wp-content/u ... l-2015.pdf
With system 3 silvertip you have 72 hours to recoat without sanding, perhaps because it's blush free? You can keep working without sanding as long as you get about a layer per day, which I take advantage of.
Cures quickly to a sandable state (no sanding required between coats when recoating within 72 hours).
-
https://www.systemthree.com/products/si ... poxy-resin
West system 105 is quality stuff, but some of its properties are falling behind the 2:1 high performance epoxies we have now. I know some are pretty hard to find in some places though, or people already have west on hand or can get it cheap.
Re: C17 in New Zealand.
Posted: Sun Mar 08, 2020 10:53 pm
by OneWayTraffic
System 3 is not available in NZ. WEST is the only locally available epoxy that I trust. No issues with blush yet though I wash any surface that’s fully cured. I’d guess that even after 48 hours with WEST there would still be some chemical bonding but would always wash and scuff after that long. So much is temp dependent.
Re: C17 in New Zealand.
Posted: Sat Mar 14, 2020 4:50 am
by OneWayTraffic
Putting the boat on hold for a couple of weeks while i consider my options. The whole bottom panel is riddled with air bubbles. Most are very small (1mm) but there are a few bigger ones, which I have mostly ground or injected, and a few places where hundreds of bubbles join together to make one big mess.
Details are on the other threads where I asked some questions but I am giving up on grinding out all the bubbles.
https://forums.bateau2.com/viewtopic.ph ... 91#p465291
I estimate the total amount of bubbles at about 10,000 spread over the whole side panel. This is a conservative estimate. Most are between the two layers of glass, but some are under.
I ground out the glass on the transom completely, and started on the hull. I have given up on grinding everything, I just can't make that happen in my back yard, at least if I want to stay married and on good terms with the Neighbours. At this stage I am mulling a few options:
1. Grind out the very worst and largest bubbles, especially along chine and keel. For the very worse patches on the hull bottom cut partially into the wood and try to lift the wood and glass together with a chisel. Then patch and fix, and laminate a couple of layers of good glass over the top.
2. As above but cut into the whole hull in a 2 by 2 grid pattern and chisel off the the top of the wood. Or try to lift the glass with a heat gun. Then plane the surface fair and laminate back to specified thickness.
3. Rough up the surface, cold mold some wood over the top probably 4 or 6mm plywood and glass the outside with a single layer of glass. The hull will be heavier, and the bubbles in the glass will still be there, but buried under wood and glass it shouldn't be an issue.
4. Cut out the whole panel and start again. I would be worried about getting it fair, but structural strength comes first. I can tab the side panels to the frames.
5. Cut up the whole boat put it in a dumpster, sell the epoxy and glass on Trade me, and then go buy an aluminium boat.

Re: C17 in New Zealand.
Posted: Sat Mar 14, 2020 2:50 pm
by Fuzz
The hull bottom resists the water forces so it needs to be strong. All the sides do is keep it out so do not need to be as strong. So for the sides I would not sweat the bubbles too much. Grind out the big bubbles and don't worry over the little ones. One the bottom grind out the big spots and fill with puddy. From your pictures I think I would trowel a skim of wood glue over things and the sand smooth. I would then put a layer or two of glass on the bottom. Make sure this glass is something you can wet out without a huge fight. I would not try using a heavy biax or triax that is tough to wet out.
Re: C17 in New Zealand.
Posted: Sat Mar 14, 2020 3:27 pm
by fallguy1000
OneWayTraffic wrote: ↑Sat Mar 14, 2020 4:50 am
Putting the boat on hold for a couple of weeks while i consider my options. The whole bottom panel is riddled with air bubbles. Most are very small (1mm) but there are a few bigger ones, which I have mostly ground or injected, and a few places where hundreds of bubbles join together to make one big mess.
Details are on the other threads where I asked some questions but I am giving up on grinding out all the bubbles.
https://forums.bateau2.com/viewtopic.ph ... 91#p465291
I estimate the total amount of bubbles at about 10,000 spread over the whole side panel. This is a conservative estimate. Most are between the two layers of glass, but some are under.
I ground out the glass on the transom completely, and started on the hull. I have given up on grinding everything, I just can't make that happen in my back yard, at least if I want to stay married and on good terms with the Neighbours. At this stage I am mulling a few options:
1. Grind out the very worst and largest bubbles, especially along chine and keel. For the very worse patches on the hull bottom cut partially into the wood and try to lift the wood and glass together with a chisel. Then patch and fix, and laminate a couple of layers of good glass over the top.
No need to cut into wood, except by accidents or overgrinding.
2. As above but cut into the whole hull in a 2 by 2 grid pattern and chisel off the the top of the wood. Or try to lift the glass with a heat gun. Then plane the surface fair and laminate back to specified thickness.
No need.
3. Rough up the surface, cold mold some wood over the top probably 4 or 6mm plywood and glass the outside with a single layer of glass. The hull will be heavier, and the bubbles in the glass will still be there, but buried under wood and glass it shouldn't be an issue.
Absolutely not.
4. Cut out the whole panel and start again. I would be worried about getting it fair, but structural strength comes first. I can tab the side panels to the frames.
Only if you have the molds.
5. Cut up the whole boat put it in a dumpster, sell the epoxy and glass on Trade me, and then go buy an aluminium boat.
No need. Mistakes are a part of it. I had my first two panels fail; estimated cost; $4000. I used the panels in non critical locations.
Re: C17 in New Zealand.
Posted: Sat Mar 14, 2020 3:56 pm
by OneWayTraffic
Thanks guys.
I'll try hiring an electric planer with Tungsten carbide blades. Hopefully that will take down the glass to a smooth surface, and I can hook up a vac or hose to collect the shavings. Bigger bits too so there should be less dust. The amount of dust generated is my primary concern at the moment. More than finishing the boat. More than cost. I knew that the grinder would put out a lot of dust but that is ridiculous. I estimate that I am 10% done if that. In the photos I've posted there are places where it looks good but looking really close there are still a lot of bubbles. Getting a fair surface is also a pain.
If that doesn't cut it (heh) then I'll tab all the sides in to the frames/molds, cut out the panel and build another. That will only cost what I spent on a grinder, and I can reuse some of the bottom panel on seats or benches.
My fibreglass is on a wide roll. Next time I'll try precoating the wood in the heat of the day, then rolling out epoxy into the wood once the heat starts to dissapate. We are well into autumn now. If there's outgassing I'll wait for cure then wash and sand. Then roll out the glass onto the wet epoxy with a couple of the kids to help. Should still be some chemical bonding.
I can wet out 400g db tape ok, but this was my first time with wide cloth.
I could see some of the bubbles under when I first was wetting out, and I am kicking myself for not ripping off the glass when I still could.
Re: C17 in New Zealand.
Posted: Sat Mar 14, 2020 4:02 pm
by Jaysen
Only thing I don’t see in you plan is adequate consumption of non-soft drinks.
Re: C17 in New Zealand.
Posted: Sat Mar 14, 2020 4:47 pm
by OneWayTraffic
I have a wine every night after school. Cider when the wife feels like a drink. Beer only when I've earned it. I'll treat myself if and when I get the glass off, and then back on.

Re: C17 in New Zealand.
Posted: Sat Mar 14, 2020 7:39 pm
by fallguy1000
I did throw out a few pieces of wetted glass when I realized it was gonna fail.
You have to know when to abort. It is not fun, but as you can see; necessary.
Re: C17 in New Zealand.
Posted: Sun Mar 15, 2020 7:58 pm
by OneWayTraffic
Yes. If I was making better decisions I would have aborted. Learned that the hard way. I'm putting a lot of thought into the process when I try again, but first I need to deal to that surface.
Re: C17 in New Zealand.
Posted: Tue Mar 31, 2020 2:00 am
by OneWayTraffic
Since NZ is on lockdown for the next few weeks I have some time to spend on the boat. We are in the fortunate position of having income throughout all this (I am a teacher, wife’s a pharmacy technician) so I don’t need to put it on pause.
I went through the whole bottom with a power planer. This removed most of the glass easily. Reversed the blades halfway through.
This left a lot of little ridges and bumps so I then went over the top with a RO sander 40grit and grinder 26grit. Went down to wood at chine and keel.
I think I’ll need to go over again with a new planer blade then fill any gouges with putty. I’m thinking about doing that wet on wet just before I glass.
Re: C17 in New Zealand.
Posted: Tue Mar 31, 2020 8:20 am
by Dan_Smullen
Wow. Must have been heartbreaking to do, but I imagine, in retrospect, it won't seem like much work after it is all said and done, and you're going to have a much better finished product that you will be much happier with.
Some other guys may chime in, but with those gouges, I would be inclined to screed in a wood flour epoxy mix as you would fairing, after wetting out the hull with neat epoxy, and just before laying glass. Would a tropical or extra slow hardener afford you the time to go through this process without causing any of the same trouble as before?
Re: C17 in New Zealand.
Posted: Tue Mar 31, 2020 2:47 pm
by OneWayTraffic
I don’t have wood flour and it’s not an essential service so it’s out of the question. I do have WEST fillers that will do. I’ll try and do it as soon as it hardens so there’s chemical bonding. Not yet though, I’ll try and get the surface perfect first. Not going to risk it now.
The heat issue will take care of itself as we go into winter. The bottom glass needs to be done in one shot but for the rest I’ll probably only get an hour long window where it’s warm enough. Part of building outside. Can’t be helped.
I tell myself that with current events I’m really very fortunate. No job loss, health is good, our country has a real shot at eliminating Covid19. Helps keep a poor glass job in perspective.
Re: C17 in New Zealand.
Posted: Fri Apr 10, 2020 5:56 am
by OneWayTraffic
Got a layer of glass on the Transom, and tape on the keel done today. I have a limited working window in the am, and again in the pm. In the middle of the day there's direct sun and the temp gets up to 35 degrees in there.
No photos yet, but I followed a routine that I will use for the rest of the bottom. I went over with epoxy on a foam roller where the tape was going to go. Then over this with thickened epoxy to fill the grinding/planing gouges and little holes. Then over again with the roller, and rolled out the tape off my roll directly onto the wet epoxy. Then I rolled more epoxy on top, gave it time to soak in and over again for any dry spots. After I had the tape all wet out I pullled out the bubble buster, rolling away from the centre to the outside of the tape.
No air bubbles! Glass laid down ok over the corners etc.
I'm planning to do the bottom glass a section at a time, with overlaps. This will keep the sizes manageable that I can do when the temp is right. I'll need to fair the overlaps, but I think I can manage it better than doing it all in one shot. Strength won't be affected with a decent overlap, and I will be able to take my time and ensure the quality of the work is good. I don't see any way that I can glass the whole thing solo without a helper otherwise.
There will be the specified thickness of glass at chine and keel. Keel is supposed to have another layer of tape, but I'm running a full length skeg right to the front with a wear strip and will glass over that once the bottom glass is done.
Re: C17 in New Zealand.
Posted: Sat Apr 11, 2020 7:13 pm
by mohrscott
I had two helpers when I epoxied my hull! One mixing, one helping me spread epoxy. I think you are correct in doing smaller sections; will take more time fairing..........good luck. once you get the process down it is much easier to get good results and less prone to mistakes.
Re: C17 in New Zealand.
Posted: Sat Apr 11, 2020 10:19 pm
by Fuzz
I have not done much glassing when there are big temperature swings but I think it would be best if you glass while the temps are either stable or dropping. Much less chance of the wood out gassing during the cure phase.
Re: C17 in New Zealand.
Posted: Mon Apr 13, 2020 7:18 am
by OneWayTraffic
Well yes. Lesson learned I suppose. I have made another minor booboo with bubbles and glass. Anyway this isn't nearly as bad, and I am digging out a few of the holes, and ignoring everything at the mm size. I then went ahead and puttied the whole side of the boat, to seal it and to smooth the surface some. I plan to sand tomorrow, and then lay up a bit more glass if the weather holds. By the time I've finished this bottom its going to look like one of my mother's quilts!
I wanted to take some more photos, but it's hard to get good angles inside the tunnel house.
Re: C17 in New Zealand.
Posted: Mon Apr 13, 2020 7:23 am
by OneWayTraffic
Some photos. Heatgun is really the only way to remove large amounts of glass. I scored with a diamond blade Saw-Max.
Some of the wood popped up with the glass, Meranti is very splintery. Also photo of the bow and chines with tape. You can also see the progress I've made glassing the bottom.
I'd like better photos, but the tunnel house does not help.
Re: C17 in New Zealand.
Posted: Tue Apr 14, 2020 4:05 am
by OneWayTraffic
I spent a couple of hours sanding the putty I put on to seal the surface. Slow going as I used fumed silica as a thickener. 40 grit on a RO and 60 grit on a hand sanding board.
I could put on putty to fill lows, but currently too cold to add any and I am concerned about the preparation of them. What's the easiest way to get in there? At the moment I am using sandpaper held with my fingers. If anyone has better ideas, I'm all ears.
Re: C17 in New Zealand.
Posted: Tue Apr 14, 2020 4:42 pm
by Dan_Smullen
[quote=OneWayTraffic post_id=467468 time=1586851545 user_id=78860
I could put on putty to fill lows, but currently too cold to add any and I am concerned about the preparation of them. What's the easiest way to get in there? At the moment I am using sandpaper held with my fingers. If anyone has better ideas, I'm all ears.
[/quote]
I think it best to screed it on with a long, stiff scraper or trowel, scraping off most of the material, but only leaving behind in the lows, then sanding, then repeating as needed, after sanding with a semi flexible/semi rigid block or board using 40 grit.
Re: C17 in New Zealand.
Posted: Wed Apr 15, 2020 4:51 am
by OneWayTraffic
I was more concerned with complete abrasion of the surface, than getting the putty in. The lows aren't that bad!
Anyway did another bit of cloth today. No photo at the moment.
The Gougeon bros books recommends 3M scotch brite pads for cleaning/abrading epoxy. I had just thought of them for doing the pots. Anyway we can still visit the Supermarket in lockdown, so I picked up a packet. Gave the surface a wash, scrub, dry with paper towels light sand with the board and 60grit, then went over with the scotch brite and dusted it off. Apparently they are Silicon Carbide grit embedded in nylon fibres. Flexible enough to scrape out small hollows, and gentle on the hands. I rubbed the whole surface until it was dull, except for some very small parts, and screed on some putty. Then laid the glass.
Temperature was low today, too low for the epoxy to flow well, and below the minimum recommended for WEST 206. I needed to use a heat gun to start off the reaction in the cup while I cut the glass. I poured it on, spread it out close to a 50/50 ratio and then spent half an hour with the heatgun and bubble buster, looking for any bubbles that I could see. I think I got them all.
Re: C17 in New Zealand.
Posted: Wed Apr 15, 2020 8:06 pm
by OneWayTraffic
Here’s last nights glass job. Despite the low temperatures overnight cure seems to be going fine as it warms up in the day. Still some minute air bubbles here and there. I really don’t know how to do a better job than this so I’m accepting it.
Re: C17 in New Zealand.
Posted: Wed Apr 15, 2020 8:57 pm
by Fuzz
That looks very good to me. If there is a problem I sure do not see it in the photos. I would move forward.
Re: C17 in New Zealand.
Posted: Wed Apr 15, 2020 9:07 pm
by OneWayTraffic
The big picture looks great, but under close examination of the close up you can see a lot of tiny little bubbles. I’m just digging and popping all the bigger ones and hopefully the smaller ones won’t matter. I know that even microscopic voids weaken a laminate so I am trying to do the best I can. I may need to settle for less than perfection though.
Re: C17 in New Zealand.
Posted: Wed Apr 15, 2020 9:20 pm
by Fuzz
I think you said you are using West System epoxy. I have used a little of it but probably less of it than 5-6 other brands. I am wondering if the West is a part of the problem
As careful as you are being I just do not understand why you are having problems.
Re: C17 in New Zealand.
Posted: Thu Apr 16, 2020 1:19 am
by OneWayTraffic
Could be the epoxy, could be the way i mix it (trying to slow down my mixing so I don't put bubbles in it, could be the glass (made in some Chinese factory), could be building outside with temperature swings, could be little irregularities in the surface trapping air. Could be a lot of things.
I'm just trying to control what I can and trust that the boat will be strong enough. I prepared the bow of the boat today for glass. Sanded 60grit, dry rub with Scotchbrite. Laid out the glass on it and carefully cut to shape. Then I rolled it up on a pool noodle and went over the surface again with a wet scotchbrite and wiped with paper towels, dried with a heat gun.
When dry I put some epoxy on the surface and puttied the gouges etc. Happy that it was all good to go I rolled out the glass, and poured some epoxy left over in a mixing pot. It looked ok. Nope. It had gelled in the mixing pot and wouldn't wet out the glass. Putting fresh epoxy on top and rolling it in did not help much. I got some of it wetted out ok but in the end I asked myself if I felt like grinding tomorrow. That was an easy question, so I get to put more glass on it tomorrow. Ripping off the glass didn't overly wreck the surface and I spent a few minutes brushing the surface smooth. Will go for a wet on green tomorrow.
Re: C17 in New Zealand.
Posted: Thu Apr 16, 2020 1:32 am
by Fuzz
What speed hardner are you using and how long after mixing does it gell?
Re: C17 in New Zealand.
Posted: Thu Apr 16, 2020 6:22 pm
by OneWayTraffic
I'm using WEST 105/206 slow. Normally enough time, but I had put it in the sun to get the reaction going (air temp was marginal) and then forgot about it while puttying the boat. I gave it a quick stir before pouring it on, but it had thickened just to the point where it wouldn't really wet out. I played around with a heat gun and roller for a bit but didn't have the time to do it properly, so I aborted. Right call and my own fault. The glass isn't an issue as I bought a whole roll. I am out a bit of epoxy though. $10 if that.
Not a problem really.
Re: C17 in New Zealand.
Posted: Thu Apr 16, 2020 10:19 pm
by BarraMan
OneWayTraffic wrote: ↑Thu Apr 16, 2020 6:22 pm
I'm using WEST 105/206 slow. Normally enough time, but I had put it in the sun to get the reaction going (air temp was marginal) and then forgot about it while puttying the boat. I gave it a quick stir before pouring it on, but it had thickened just to the point where it wouldn't really wet out. I played around with a heat gun and roller for a bit but didn't have the time to do it properly, so I aborted. Right call and my own fault. The glass isn't an issue as I bought a whole roll. I am out a bit of epoxy though. $10 if that.
Not a problem really.
OWT, where in NZ are you? What sort of temps are you dealing with in NZ in April? There seems to be something basically wrong here, as you are making hard work of it.
I used WEST 105/206 for 99.9% of my build - the other 0.1% was with Very Slow or Fast Hardener. I only had one near disaster where the epoxy kicked sooner that I was expecting and I started to have trouble wetting out a long run of glass cloth - so I ripped it out and went and had a lie down.

Unless you are at the bottom of the South Island in the middle of winter, I find it hard to believe that 105/206 is too cold to kick! Up here in Nth Queensland, I put my epoxy and hardener in the fridge to cool it down when I was working in warmer conditions.
I didn't have any issues with bubbles either, once I learned not to epoxy wood that was gassing out.
IMO, you just can't do multiple layers of glass solo on big runs - wet on wet. I did one layer, let it set overnight, sanded it with 80 girt the next morning, wiped it off, then did the next layer.
For BIG runs, I rolled out the glass cloth, pre-cut the it - then rolled it on to a 'pool noodle'. Then I only wet the surface to be glassed for about a metre ahead of the working area, rolled the glass onto that area and wet it out, then moved on to the next metre.
BIG boat - 22'/6.7M runs!

Re: C17 in New Zealand.
Posted: Fri Apr 17, 2020 4:36 am
by OneWayTraffic
Halfway down the South Island. Temperature can be 35 degrees under the sun, or 6 degrees at night. I haven't ever actually had it not kick, but we are getting some inclement weather. It can change in the time it takes to sand and prep. To be honest I'm more concerned about cold epoxy not flowing and wetting well than anything else.
I built a little dinghy before this. Didn't have any issues that weren't user error. I think I'll get it dialled in eventually.
Recommended temp for WEST is a minimum of 16 degrees, and we do get a few days below that this time of year. Not an issue if I can get the reaction going, and we get sunny weather in the next few days apparently it will post cure. But with NZ weather you never quite know...
Re: C17 in New Zealand.
Posted: Fri Apr 17, 2020 4:54 am
by OneWayTraffic
At the moment it is hard work as I am trying to undo issues earlier. The other side is still virgin plywood with the A grade face showing. I'll seal it the night before I glass it. That will hopefully go much easier.
This side I have all the gouges and grooves from the first bad glass job. I'm happy doing it a little bit at a time, as there is a
lot more prep work glassing on an uneven surface.
I learned my lesson about doing two layers in a day believe me.
I'm done to one layer except tape etc for the rest of the build.
That attempt to do two layers in a day was about half the problems I had back in March, the other half was heat and not sealing the surface prior. I am still trying to recover from that but am still enjoying the build mistakes and all.
Re: C17 in New Zealand.
Posted: Fri Apr 17, 2020 3:45 pm
by Fuzz
You have the right attitude and that is half of the battle. I have a lot of faith your boat is going to turn out just fine
Re: C17 in New Zealand.
Posted: Sat Apr 18, 2020 1:14 am
by OneWayTraffic
There must be some prize for taking the longest time to wet out one side of a boat right?
Quality of the laminate is much better. There are tiny little bubbles but your need to get your eyes within a handspan to see them. Not as many as before either.
Re: C17 in New Zealand.
Posted: Sat Apr 18, 2020 1:21 am
by Fuzz
Sounds like the glassing is going much better for you. Glad to hear it
Re: C17 in New Zealand.
Posted: Sat Apr 18, 2020 3:01 am
by OneWayTraffic
Ok so I went out with a toothpick and popped all the bubbles. I think I’m obsessing about it but I have earned the right to.
Re: C17 in New Zealand.
Posted: Sat Apr 18, 2020 5:22 am
by OneWayTraffic
Fuzz wrote: ↑Sat Apr 18, 2020 1:21 am
Sounds like the glassing is going much better for you. Glad to hear it
I think it will always be an issue on this build. Some glass jobs I can do inside then take to the boat, but I can't build in the garage. It's not just temperature, space is limited around the sides of the boat, and when it's hot enough there's direct sun on the epoxy. In the evenings we get dew, rain can come at any time except summer when droughts are common. Wind is common, so I get bits and pieces of grass on the resin from time to time, and a few small bits have made into the glass. When it rains I get drips through holes in the roof of the tunnel house, and then there are the chickens. Twice I had to clean poo off the boat. First time was on a bit of plastic, second time was on bare ply. We have a cat as well but she seems smart enough not to climb on fresh epoxy. I'm glassing outside in natural light only, so once I was trying to roll out bubbles in the dark. New Zealand's weather is very changeable, this morning it was cloudy, wet and cold, this afternoon sunny warm and a clear blue sky. We sometimes get bright sun and rain at the same time!
I'll prime in in the tent, but the finish paint job may need to wait until I can get it on a trailer and in the garage. Or I may do a workboat job, and get a vinyl wrap for the sides.
Not complaining, but if anyone asks why I'm breaking up all my glassing jobs into small bite sized pieces, I'll refer them to this post.

Re: C17 in New Zealand.
Posted: Sat Apr 18, 2020 6:26 pm
by OneWayTraffic
Better view.
Re: C17 in New Zealand.
Posted: Sat Apr 18, 2020 7:59 pm
by glossieblack
Better view of a better boat.
Re: C17 in New Zealand.
Posted: Wed Apr 22, 2020 3:38 am
by OneWayTraffic
Anyway on with the glassing. Layer of tape on the chine, glass over the transom other side and also on the bottom between transom and motorwell frame. Really happy with the glass job here. Put on plenty of epoxy, let it soak in and squeegeed off the excess. I’ll try to fill the weave tomorrow and do the next section or two. About three hours work.
Re: C17 in New Zealand.
Posted: Fri Apr 24, 2020 5:51 pm
by mohrscott
One way; you are getting it! Looks good. Keep going. If boat building teaches you anything , it is that anything made out of wood can be fixed!
Re: C17 in New Zealand.
Posted: Sat Apr 25, 2020 4:30 am
by OneWayTraffic
Indeed. Half the side done now. Will wrap it up tomorrow. Then strakes, side glass and fairing.
Re: C17 in New Zealand.
Posted: Sat Apr 25, 2020 4:37 am
by OneWayTraffic
The overlaps will be a bit of a pain to fair, but I don't want to glass under direct sunlight in there if I can help it. I much prefer going at a slow pace. Spending half an hour after glassing looking for bubbles etc, but the quality of the glass work is much, much better.
Re: C17 in New Zealand.
Posted: Sun Apr 26, 2020 3:08 am
by OneWayTraffic
Got the last of the hull bottom glass on today. Spent some time fighting wrinkles laying out on kicked epoxy then gave up and cut out and replaced the whole section (thank goodness that glass wastage is not a factor in this build).
Laying on kicked epoxy rather than fresh, I had a thousand bubbles in the glass. It was reminiscent of my disaster last month. Fortunately I do learn from experience. I finished brushing epoxy on all the glass, pulled out the bubble buster and heatgun and started rolling. I got them all though it took a good hour. Filled the weave and called it a day.
Re: C17 in New Zealand.
Posted: Sun Apr 26, 2020 3:39 am
by OneWayTraffic
Photo.
Re: C17 in New Zealand.
Posted: Sun Apr 26, 2020 5:27 am
by OrangeQuest
Looks good! Hopefully the rough part is behind you and smooth sailing the rest of the build.
Re: C17 in New Zealand.
Posted: Sun Apr 26, 2020 5:57 am
by OneWayTraffic
Let's hope so. I am running out of time before things need to take a break over winter. Overnight temperatures drop to well below the recommended for WEST 206, just a few degrees C above freezing but according to Epoxyworks that's ok as long as the daytime temperatures are warm enough to complete the cure. At the moment temperatures get up to 20-30 degrees C under the sun. I'm not sure how much longer I'll be able to work for until that is no longer the case. I could always buy a container of Fast 205 I suppose. I am currently considering that.
Re: C17 in New Zealand.
Posted: Mon Apr 27, 2020 4:16 pm
by Fuzz
The news is saying you guys got this virus whipped. Congratulations to your entire country

Re: C17 in New Zealand.
Posted: Mon Apr 27, 2020 7:31 pm
by OneWayTraffic
Fuzz wrote: ↑Mon Apr 27, 2020 4:16 pm
The news is saying you guys got this virus whipped. Congratulations to your entire country
Thanks! Compliance was good, very good according to Google tracking phone data. Communication was clear from the top. "Stay at home, save lives." The PM, her party, and most of the opposition party were saying the same thing more often than not. There was a bit of political game playing, but not much, and to be honest the leader of the opposition might find his party removing him for some of the times when he showed poor judgement and got a bit political.
We also have a pretty clear expectation about what we can and can not do at each of the four alert levels that have been set up. Level 4 is an almost complete lockdown: essential services only. Level 3 which we moved to today, we can go and get takeout, construction workers, tradesmen and some schools can open. Keyword being 'safe'. No physical contact, drive thru or takeout only at restaurants. There were queues outside McDonalds pre dawn this morning.
The govt isn't patting themselves on the back just yet. Emphasis now is on a managed return to normality, with tracking and testing the few (average 5-10 per day) new cases that pop up. Then it's all about keeping it out at the borders for the next two or three years. If a vaccine isn't workable it could be indefinite.
None of it is rocket science. Clear messaging, no games playing and compliance. We had a few cases of people getting selfish and breaching rules etc, but the police were out and about giving warnings and making arrests in some cases. There were phonelines and websites to report people breaching rules. It's a small country. Somebody is always watching you.
Two people tried suing the PM for the lockdown. Judge listened and kicked the case out of court.
Re: C17 in New Zealand.
Posted: Mon Apr 27, 2020 8:56 pm
by OneWayTraffic
Well the rocker in my hull is back. Only over the last 400mm (16") on the starboard side mainly though with a little port right in the stern corner. About 4.5-6mm (3/16-1/4"). I am mulling ways to fix, and the minimum acceptable amount. My calculations have this at about 1 litre (quart) of volume. I could use putty, or maybe some wood strips or layers of glass. If i use wood strips to bulk it up in places I'd need to plane them flat then a layer of glass on the top? Putty would be a bit more expensive but easier to do.
Photos to follow.
Re: C17 in New Zealand.
Posted: Tue Apr 28, 2020 12:25 am
by OneWayTraffic
Here’s the rocker at transom. 5mm(3/16”) over the last 400mm from the motorwell frame.
Other side is good.
Except in the rear corner. I may have put too much radius on.
And there’s a big dip here between frame D and the motorwell. 3mm (1/8”) over a fair bit of distance.
As I understand it the rocker needs to go as it will sap power. I’m not so sure about the dip. There’s other places in the stern with slight ridges and hollows but that is the biggest one. Since it’s the bottom I am mainly concerned with performance not looks.
Re: C17 in New Zealand.
Posted: Tue Apr 28, 2020 11:02 am
by jacquesmm
Don't. Please do not glue them together while unrolled. You will not be able to bend them.
Apply the chine panel first then glue the sheer panel on top. Note that on the plans, I show an offset between the panel pieces. Those long panels are made from several pieces and the seams between those pieces are staggered. That will fair the panels.
Re: C17 in New Zealand.
Posted: Tue Apr 28, 2020 1:10 pm
by Dan_Smullen
OWT, would you be inclined to pour epoxy thickened with cabosil along the edge to the bottom of the transom, aligned with the high spot where the rocker starts?
This will give you two pints of contact to work between filling the depression. I think it will fill quickly with a layer or two of 12oz. fabric and thickened epoxy. You could control the height of the dam at along the edges with a flat batten hot glued to either the transom or the side panel.
Re: C17 in New Zealand.
Posted: Tue Apr 28, 2020 3:18 pm
by OneWayTraffic
Dan_Smullen wrote: ↑Tue Apr 28, 2020 1:10 pm
OWT, would you be inclined to pour epoxy thickened with cabosil along the edge to the bottom of the transom, aligned with the high spot where the rocker starts?
This will give you two pints of contact to work between filling the depression. I think it will fill quickly with a layer or two of 12oz. fabric and thickened epoxy. You could control the height of the dam at along the edges with a flat batten hot glued to either the transom or the side panel.
That would probably be how I do it. Other way I'm considering is scraps of 6mm plywood near the transom, Planed down to size just to save a touch of weight, structural putty to smooth it, then glass on top, with fairing putty to fill any left over gaps. I'm not actually sure what to do with the depression at the moment. It's where I was mulling over placing a strake with glass over it. I think I'd want to take the worst out before doing that, just so the strake has a better chance of running straight. I am relying on the strakes to help keep the hull in shape when I flip, which will probably be in Spring.
Re: C17 in New Zealand.
Posted: Tue Apr 28, 2020 3:40 pm
by OneWayTraffic
jacquesmm wrote: ↑Tue Apr 28, 2020 11:02 am
Don't. Please do not glue them together while unrolled. You will not be able to bend them.
Apply the chine panel first then glue the sheer panel on top. Note that on the plans, I show an offset between the panel pieces. Those long panels are made from several pieces and the seams between those pieces are staggered. That will fair the panels.
I was confused

by this then saw a much earlier question on this thread where I quoted you. The board would have sent a notification.
Anyway I am well past this point now. The chine panel is well and truly applied. But I will apply the sheer panels before fairing, except some filling of the bottom as noted above.
Re: C17 in New Zealand.
Posted: Tue Apr 28, 2020 4:18 pm
by Dan_Smullen
OneWayTraffic wrote: ↑Tue Apr 28, 2020 3:18 pm
That would probably be how I do it. Other way I'm considering is scraps of 6mm plywood near the transom, Planed down to size just to save a touch of weight, structural putty to smooth it, then glass on top, with fairing putty to fill any left over gaps. I'm not actually sure what to do with the depression at the moment. It's where I was mulling over placing a strake with glass over it. I think I'd want to take the worst out before doing that, just so the strake has a better chance of running straight. I am relying on the strakes to help keep the hull in shape when I flip, which will probably be in Spring.
I had a similar experience, and ultimately opted to add rigid members around a low areas, chine, skeg, and now strakes. Making an effort to install these features flat and straight, with the intention of using them as guides when it comes time to level any areas that persist, of which, there are a few. Tackling smaller defined areas seems more fun than chasing around a large hole.
Re: C17 in New Zealand.
Posted: Tue Apr 28, 2020 11:59 pm
by OneWayTraffic
I went with a plywood scrap screwed to the transom. Got it mostly right by eye then planed it down to level half a mm at a time. I also sanded the whole area to scuff it up for epoxy but ran out of time today for that. Will scuff again and do that tomorrow. I have decided not to put an add on spray rail at the chine. I was concerned about damage to the wood there. Instead I’ll sharpen it with putty and add strakes on the hull bottom. Also there will be a bright finished rail up the side. That will help deflect spray.
Re: C17 in New Zealand.
Posted: Wed Apr 29, 2020 3:30 am
by OneWayTraffic
Dan_Smullen wrote: ↑Tue Apr 28, 2020 4:18 pm
I had a similar experience, and ultimately opted to add rigid members around a low areas, chine, skeg, and now strakes. Making an effort to install these features flat and straight, with the intention of using them as guides when it comes time to level any areas that persist, of which, there are a few. Tackling smaller defined areas seems more fun than chasing around a large hole.
It seems that there are two schools of thought with respect to that. Whether to fair before or after adding appendages. I plan to grind lumps, fill depressions with structural putty then add the appendages. This makes fairing harder, going around those things, but they should also break up the surface, making it a bit harder to see issues. I know then that my strakes and skeg are attached as hard as it is possible to do so. I never liked the thought of bonding things over fairing putty. The hull bottom needs to be strong and relatively smooth, it does not need to look good. Topsides are another story. I will add some fairing putty where I need to after all those are glassed in and the major lumps out.
Re: C17 in New Zealand.
Posted: Thu Apr 30, 2020 12:41 am
by OneWayTraffic
Filled the radius at the transom with epoxy mixed with silica and some scrap glass I chopped up with scissors. If anyone wants to do that I would recommend the milled glass filler instead much easier and cleaner. Anyway put some filler over that and waited for it to kick. Then 50/50 micro balloon silica mix. Idea is the micro balloons add some bulk and a little flexibility. There will be glass over but it’s not going to be structural. That’s underneath. I’m waiting for it to kick a bit then will glass over. Then a cure and see what needs to be filled.
Also tried putting an edge on the chine with putty. This would have been better if I had made a dam.
Re: C17 in New Zealand.
Posted: Fri May 01, 2020 11:11 pm
by OneWayTraffic
Some progress.
Put a couple of layers of glass over the 'fairing' compound at the back. A technical blah follows.
I've been doing some research into syntactic foams, which is essentially what microballoons embedded into an epoxy matrix are. There is a fair bit on the Internet about them, as they are used in some serious applications. Deep sea submersibles for example.
Generally speaking the more microballoons you have the weaker they get, but embedding fibres helps greatly with tensile and fracture resistance. On the other hand microballoons have decent compressive and crush resistance. Specific strength is high, as is stiffness. They are used as core materials. A material made of about a 50% microballoon mix by volume will have about 20 MPa (3000psi) tensile strength, similar to a light weight wood.
In short I believe that as long as there is sufficient epoxy in the microballoon putty not to degrade its strength too much, and you take care that the surface the putty is applied to is wetted out with a thin coat of neat epoxy before fairing onto it, then there would be no issue gluing strakes, skegs or whatever to the surface. Tabbing in with glass would help enormously as well. This is for microballoons, I wouldn't know if it holds for Quickfair.
With that in mind, I put the glass on the fairing putty with a clear head. It's not structural, but that probably wouldn't matter. The rocker is mostly gone. Some finishing and it will be good to go.
I also put dams against the chine over the stern half of the chine and filled with microfibre/microballoon/hand chopped glass putty. Thickened just to the point where it still barely flows. I will sand and shape it later. The side will get 400g glass over up to the the false clinker. Upper side panel 100g glass (3oz). I still haven't decided whether to put more strakes in, but at this stage am leaning no. The chine flats at the stern, and a sprayrail over the chine panel overlap should suffice.
Re: C17 in New Zealand.
Posted: Sat May 02, 2020 4:50 am
by OneWayTraffic
Looking at that I think that Frame E lifted up slightly, or the boat was sitting slightly off. It might have been while I was stripping the glass, as I spent some time leaning on it. I really should have rechecked fairness when reglassing. Anyway it was only a few mm, that photo really shows it but the gap there is less than 2mm (1/16") now, with a bit more fairing to go. I'll try to put thinner layers on, get it fairly fair and then a final sanding and coating of aluminium epoxy.
Skeg first though.
Re: C17 in New Zealand.
Posted: Sun May 03, 2020 8:58 pm
by OneWayTraffic
This may cause a little discussion, but I want to make clear now that I am not looking for advice just outlining a significant change I am making from the plans, my reasons for making it, the reasons why I believe that the boat will not break. I also want to make clear right now that I am not advocating anyone do it my way. I do not think it better, just more suited to me. Having said that any feedback will be read, though possibly not followed. After all it's my boat.
I have glued in the stringers direct to the hull throughout their length. Today I will glue the frames in as well. There is even contact throughout and there will be no hardspots. The idea is to leave the framing in, and glass inside the boxes when I flip the boat.
Why am I doing this? When glassing the outside I had real issues with temperature swings, air bubbles under the biaxial cloth and other environmental issues from working outside. After the experience of removing glass from half the hull I had another go, doing it in sections with overlaps between. I managed to plan the overlaps so they sat under frames, reinforcing the hull there. This worked better but air bubbles were still a concern no matter what I did. At times I spent an hour on the bubble buster and heatgun to get the cloth down flat and clear over a metre of the boat.
I will be glassing the inside the same way, a section at a time, babying each section to remove air. I've tried laying the glass down dry, down wet, I still get bubbles. The more I push it the more I get. I am not willing to put 5m lengths into my boat alone at this stage. I don't know if it's something I am doing in the mixing (I try not to whip excess air in) the cloth itself (it's from a factory in China somewhere, but from a search of this forum it seems that some brands of biax do do this) or if it's outgassing from the epoxy. I still get bubbles even over putty.
From extensive searches of this forum there are some that believe that this is weaker. It may be the case but I think that it is strong enough, the more important aspect is if I do a good job. I have done my research on this forum and elsewhere.
Reasons:
Jacques used to specify this for PH16s and PH18s as an option. In 2007 there was a post where he detailed the two methods, and stated that the first was preferable but the second one would be 'just as strong'.
SideSlippa built his OB17 this way as well. He was more concerned about the hull moving during the flip. He significantly bulked up the inside laminates. (Far more than I believe needed). He put a 90hp on it, and no longer posts on the forum, but his last posts indicated no concerns after 300+ hours and a lot of rough water. He asked for feedback on this before doing it was advised not to and did it anyway.
From other posts from Jacques on this he implies that the major reason that the glassing inside the boxes option was dropped from the Phantoms was to do with the other method being cleaner and easier to do good work. I think that I will do better work this way due to being able to divide the interior glassing into sections I can do wet on wet during the limited windows I get where conditions are right for glassing. I was going to glass the inside in pieces anyway I may as well get some benefit. The reason for the glass inside boxes was it was easier to use scraps of cloth, more economical in those materials. Not an issue either way for me.
There is a well regarded designer in Australia that designs almost all his boats this way. I don't want to post a direct link to a competitor, but one 18' boat in particular that I have seen up close in construction and corresponded with the builder is built from 6mm ply. Two layers of glass on the outside, one on the inside. Layers of tape on keel and chines etc. The exact inside glass specs are practically identical to the C17. That boat does have a double stringer, but it also takes a 150hp outboard, a 20 degree deadrise and 200L of fuel underfloor. It also goes 40 knots. So if tabbing the frames and stringers directly to ply works for this boat it should work for a C17 going 25mph with a 60hp.
So to sum up, this is the way I'm building it, I did think this through, I am confident that the boat will be strong enough and my work will be better quality this way. If it's wrong it's my own fault and nobody elses. If you are reading this and thinking of building your boat this way please do not. If I had a different situation I would do it as specified.
Re: C17 in New Zealand.
Posted: Thu May 07, 2020 12:40 am
by OneWayTraffic
Moving on. Pulled off the dam from the chine and had a look.
Next time I screw into glass over wood I'll drill a pilot hole. The action of the screw lifted up some of the glass over the wood. I wouldn't have thought that possible. I'm thinking the twist of the ply I was using as a dam acted as a lever to peel the glass. Glues are always much weaker in peel. Ground out already and filled with putty.
Put an edge on the chine, and got the skeg on and glassed in.
Next up, glass on the side panel, lower side panels on and fairing!
Re: C17 in New Zealand.
Posted: Thu May 07, 2020 2:43 am
by BarraMan
The easiest way to make a dam is:
Corflute (plastic 'cardboard' often used in election advertising etc) from a hardware store.
Scissors
Hot glue gun
1) Cut a suitable width strip of corflute
2) hot glue it to the boat to form a dam
3) fill the dam with epoxy mix
4) when expoxy has hardened, peel off the corflute (epoxy won't stick to it)
5) pick off any glue with your finger nail (it won't stick hard to epoxy either)
6) sand the rough bits off your dam
7) Done!


Re: C17 in New Zealand.
Posted: Thu May 07, 2020 4:23 am
by OneWayTraffic
I did consider cardboard or something like that. Of course hardware stores are closed to walk ins under lockdown and the nearest decent one is 25km away; I'm not sure if they have that plastic board either. So I used what I had to hand. May as well do the other side the same now I'm halfway there.
Re: C17 in New Zealand.
Posted: Thu May 07, 2020 4:30 am
by OrangeQuest
I have used masking/painter's tape over wood to form a release. Put the tape on your dam board, when you remove it, even if the tape is glued to the epoxy it will pull off your board. Then sand the remaining tape off.
Re: C17 in New Zealand.
Posted: Thu May 07, 2020 6:35 am
by OneWayTraffic
OrangeQuest wrote: ↑Thu May 07, 2020 4:30 am
I have used masking/painter's tape over wood to form a release. Put the tape on your dam board, when you remove it, even if the tape is glued to the epoxy it will pull off your board. Then sand the remaining tape off.
I did tape it. No issues with the wood board, it pulled away clean. Just screw damage into the glass. Anyway that's sorted now. I'll put glass down to the sheerline, at this stage I'm thinking 400g biax to the styleline and 100g woven above it. So the screw holes will be covered with glass.
Re: C17 in New Zealand.
Posted: Thu May 07, 2020 9:57 am
by OrangeQuest
Ok, Sorry.
Re: C17 in New Zealand.
Posted: Sun May 10, 2020 4:14 am
by OneWayTraffic
Put a couple of coats of thick Aluminium filled epoxy on the skeg. Looked a bit rough, I was just trying to get the basic shape. Tickled it with a grinder today. 26 grit and no longer rough. I will put no fairing putty on the keel line anywhere I don't absolutely have to.
Then a coat of fairing on the hull bottom. Long boarded it off today, just to see the highs and lows. The front half is really good, no major work to do there. Most of the lows in the back half are less than 1mm, only a couple of areas where it's more than that.
Other thing I did yesterday was try dry fitting the upper hull panel. I first tried it as three separate panels. This was a bit of an experiment as it quickly became clear that this would not work. Spliced them together then dry fitted today. Will let it stay for a day or two to take shape before gluing. They hold the shape much more fairly when spliced together.
Photos as soon as I get onto my phone.
Re: C17 in New Zealand.
Posted: Sun May 10, 2020 4:37 am
by OneWayTraffic
Looks like I'll get the typical gap at the bow. I'm not sure what exactly to do with that yet, I can't work on both sides at once easily with limited space. I'll probably fair near it then tape and do the bow with the other side. If anyone has built one of the C series and has some feedback on how they did theirs I'm all ears.
Re: C17 in New Zealand.
Posted: Sun May 10, 2020 4:47 am
by Fuzz
Happens a lot with the panel hull builds. You can raise the panel up and it will close the gap. Or if you like where it is then it will not be too hard to fix. Texard cut a strip out of a piece of pvc pipe for a mold and placed it on the outside. Or you can hot glue a pvc pipe on the inside to lay glass over and fill the gap.
Re: C17 in New Zealand.
Posted: Sun May 10, 2020 5:30 am
by OneWayTraffic
I've read that before but never really visuallised it until building my own. The sheer is lined up with frames C and E, and only a touch above A, less than an inch, I didn't measure. It just wanted to bend that way. I suppose the Dorys are the same. I think I'd rather fill than lose a few centimetres of freeboard, but I'll sleep on it. I already drew on the overlap with pencil so I can see where to put the glue.
Re: C17 in New Zealand.
Posted: Sun May 10, 2020 7:35 am
by Dan_Smullen
OneWayTraffic wrote: ↑Sun May 10, 2020 4:37 am
. If anyone has built one of the C series and has some feedback on how they did theirs I'm all ears.
I did some fiddling, moving the upper panel up and down a few times, finding the right blend of shear, and minimizing gap at the stem as well as any buckle in the panel. I think I ultimately settled with 4” of over lap and accepted about 13mm of gap. This was easily filled with a series of spot welds and fillets over the course of a few days.
This is the best pic I’ve got, which shows the gap filled behind the tape.
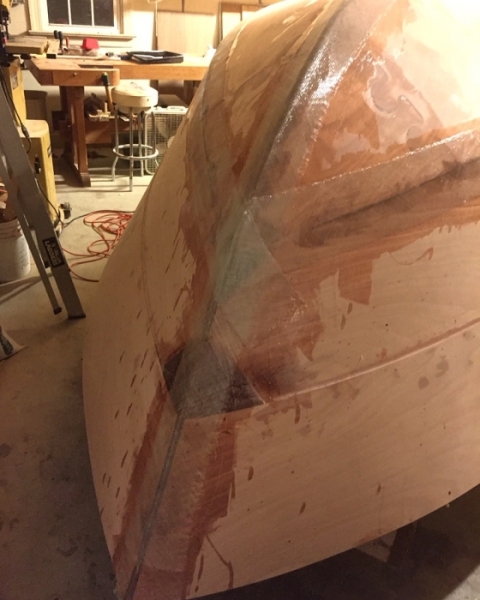
Might also be worth noting, I added wood flour above the the. Bottom of the upper panel to allow for the tape to run continuous over the step created by the upper panel.
Only regret, after looking at the pic, is not staggering the overlaps more deliberately on the two layers of tape. But I’m guessing it will be fine.

Re: C17 in New Zealand.
Posted: Sun May 10, 2020 8:02 am
by OneWayTraffic
Dan_Smullen wrote: ↑Sun May 10, 2020 7:35 am
I did some fiddling, moving the upper panel up and down a few times, finding the right blend of shear, and minimizing gap at the stem as well as any bicycle in the panel. I think I ultimately settled with 4” of over lap and accepted about 13mm of gap. This was easily filled with a series of spot welds and fillets over the course of a few days.
Might also be worth noting, I added wood flour above the the. Bottom of the upper panel to allow for the tape to run continuous over the step created by the upper panel.
Only regret, after looking at the pic, is not staggering the overlaps more deliberately on the two layers of tape. But I’m guessing it will be fine.
I think I'll go have a look tomorrow.
If you are worried about stress concentrations, a couple of solutions come to mind:
- Put bigger overlaps on the inside.
I doubt it will cause issues though.
Re: C17 in New Zealand.
Posted: Mon May 11, 2020 7:37 pm
by OneWayTraffic
I put another coat of putty on the lows, will sand when cured. I have decided to start fitting the rubrail while the side is screwed on to help keep the shape of the side when I take it off and glue.
Found a use for my dodgy stringers (I had a layup with possible voids. The last couple metres of the sheer is basically straight. Since I have already got stringers 'laminated' at the right thickness I will try ripping them and see if there are any pieces I can salvage. Ripped down to 50mm size it should be clear where the glue up is good and where not. I don't need a perfect bond either for this, a couple of small voids here or there won't hurt. I'll have the gunwale sitting on top and a fillet the other side.
Re: C17 in New Zealand.
Posted: Fri May 15, 2020 12:40 am
by OneWayTraffic
Little experiment with UHMW rubstrips. Two problems with using these. They are fantastic for abrasive and impact qualities but very low surface energy so glue will not wet them out. Also the thermal expansion tends to lever out fixings over time.
I have heard of flame treatment so I thought I would try. Just used a camp cooker propane/butane mix. The trick is to just kiss the plastic with the blue flame and draw it quickly over the flame. About a foot per second. Too close or too far it won’t work. Tested wet out with water. Same strip treated side vs untreated. Big difference in wet out from the water test. Need to bond within 30minutes of treatment.
Strips will go on keel and the sheer. Not sure yet if I’ll do the whole sheer or just part. Keel strips will be fastened with screws into epoxy plugs and glued with WEST G-flex. Should hold.
Re: C17 in New Zealand.
Posted: Sat May 30, 2020 3:55 am
by OneWayTraffic
Well today was as good weather as I could ask for. But between the morning dew and short day I have decided that there’s just not enough time for the epoxy to dry before dew fall at night. Wrapped it up and that’s it for a few months. See you in the spring. Probably late August when the days get a bit longer.
Re: C17 in New Zealand.
Posted: Sat Jul 18, 2020 1:35 am
by OneWayTraffic
Found a donor boat!
Nice condition for its age too. 40 years old. Floor and stringers were redone by a boat builder friend of the current owner. Got a tentative offer accepted subject to a check over and a service and if the bank gives the slight increase to our revolving credit the green light. Shouldn't be an issue. Best part is that I get to take it fishing until my build is done. Offer is a bit more than 4k US. I don't think I could buy a motor and trailer for that. Trailer is almost pristine, well looked after.
https://www.trademe.co.nz/a/motors/boat ... 2393594277
Re: C17 in New Zealand.
Posted: Sat Jul 18, 2020 1:46 am
by Fuzz
That looks like a whole lot of good boat parts plus a good trailer for $4000. If the motor is good I think you a real buy.
Re: C17 in New Zealand.
Posted: Sat Jul 18, 2020 2:45 am
by OneWayTraffic
Fuzz wrote: ↑Sat Jul 18, 2020 1:46 am
That looks like a whole lot of good boat parts plus a good trailer for $4000. If the motor is good I think you a real buy.
Looks as good under the hood as on the cowling. Started up first pop and ran on muffs with no worries. Purchase will be conditional on service/checkover and a seatrial. In NZ a new trailer alone would run me 4.5k NZ or 3k USD for quality NZ made. New motor (60hp Etec or similar 4stroke) would go for ~13k NZ (9k USD) plus gauges, fitting and controls, and sometimes prop.
Re: C17 in New Zealand.
Posted: Sat Jul 18, 2020 9:02 am
by BrianC
I love the name (Chicken Tonight) — they must have the same luck fishing as I often do!
Re: C17 in New Zealand.
Posted: Sat Jul 18, 2020 5:59 pm
by OneWayTraffic
Funny. He told me he goes off Moeraki, in the lower South Island. Catch large amounts of blue cod. Yummy.
Fuzz: Yeah if the motor is good. All I know is that it's running now. DI two strokes are always run on the edge of failure as a design feature. They rely on the oil injection actively working, the emm actively working, the injectors actively working. Run like a top until something doesn't. I like the technology features of them, the reduced servicing, the larger LU, the clean burning, the mid range oomph, but there is something reassuring about a motor with less electronic gizmos. I'll run an aux always just in case.
I had a Suzuki DF20a with batteryless efi. That motor was awesome until the day it almost stranded me with family in a lake. Choked and spluttered home. Took it to the shop and found a fouled plug with a possibly loose connection. No problems after though it hit my confidence at the time. When it worked (almost all the time!) it worked really really well.
Re: C17 in New Zealand.
Posted: Sat Jul 18, 2020 10:26 pm
by Fuzz
I have not had an outboard strand me in many years but I still run a kicker on any boat that is not powered by Caterpillar.
Re: C17 in New Zealand.
Posted: Sun Jul 19, 2020 5:26 pm
by MikeyGnz
OneWayTraffic wrote: ↑Sat Jul 18, 2020 5:59 pm
Funny. He told me he goes off Moeraki, in the lower South Island. Catch large amounts of blue cod. Yummy.
Got to plan it well with weather and tides but Moeraki is a great spot. Last time I went down we only went 15-20 min from the ramp, was catching them so fast that I spent more time gutting than actually fishing. Found that I didn't need to bother measuring length, instead I was using the rule that if it isn't as big around as my thigh then there isn't enough meat on it.
For the non-kiwis this is a blue cod
https://en.wikipedia.org/wiki/Blue_cod Depending on where you are the minimum legal length is either 300mm/12" or 330mm/13" and there are some places where you will be fishing all day just to find a few takers. Moeraki our catch was all in the 400-560mm range. Only problems are the ramp is exposed so needs to be the right weather, ramp is shallow so need to plan the launch and retrieve around the tide and is 4 hour drive each way from where Dan and I are so not as easy as just heading out when the stars align.
Re: C17 in New Zealand.
Posted: Sun Aug 09, 2020 10:22 pm
by OneWayTraffic
Donor boat is in its new home. I have to figure out what to do with the trailer. There is a line of centre rollers supported by a couple of steel brackets, and four rollers on fixed brackets near the back. The steel beam supporting the center rollers has sagged slightly. It's also unlikely that the rear rollers will fit the new boat. I have plenty of time to figure it out but at this point it seems the easiest and cheapest fix is to cut off the rear rollers, fabricate wooden bunks, and place them under the stringers with u bolts. Not sure if a plastic skid strip on the bunks is worthwhile or not, preference would be strips of UHMWPE. Then the boat would sit on both the bunks and some of the non sagging centre rollers.
Oh, and even though it's still winter here, the weather has been very mild recently. 15 degrees air temp, 24 degrees C (75F) in the greenhouse. I got the C17 unwrapped and epoxy sealed the side panel. Then fairing on top over the taped seams and chines, screwholes and other divots and dings. Will sand down when cured and a layer of glass over the side. At this stage I have 100g cloth, 200g cloth and 400g DB (3oz,6oz,12oz). I'm thinking heavier to the style line, lighter above it or just 200g over the whole side. All the structural glass is done, this is just to toughen the side vs impacts and scratches etc.
Re: C17 in New Zealand.
Posted: Mon Aug 10, 2020 7:06 am
by Dan_Smullen
On my C19, I used, per plans, 12oz on bottom and lower side panels. As glass on the upper side panels is optional, I used 10oz for the greater abrasion resistance anticipating bouncing off of docks.
Looks like some good parts on the donor boat!
Re: C17 in New Zealand.
Posted: Tue Aug 11, 2020 1:03 am
by OneWayTraffic
Dan_Smullen wrote: ↑Mon Aug 10, 2020 7:06 am
On my C19, I used, per plans, 12oz on bottom and lower side panels. As glass on the upper side panels is optional, I used 10oz for the greater abrasion resistance anticipating bouncing off of docks.
Looks like some good parts on the dodge boat!
The C17 is a bit smaller, no glass required on the lower side, apart from taping and bottom glass run up the sides a bit. I am thinking of going biaxial to the styleline, then 200g above but 200g on all of it would work just as well I think.
Re: C17 in New Zealand.
Posted: Fri Aug 21, 2020 4:46 pm
by OneWayTraffic
Trailer came back from the engineering shop today. Got the drawbar extended one metre so there's room for a jockey wheel and importantly to dial in the towbar weight. The boat had a negative force on the towbar- dangerous! Winch post was cut off and welded onto an adjustable bracket bolted on to the new drawbar. I had the almost useless rear rollers removed, there were only two at the back. There was a lot(maybe half the boat!) of weight on the central keel roller; the donor boat has a skeg and the rear two keel rollers were not in contact.
This has bent the central metal beam down slightly even with the boat off. I had that angle iron straightened slightly and doubled in thickness.
The keel rollers are the rubber type and in fairly bad shape. They are on long steel bolts (not stainless) and the front one is bent (will replace.) I will also replace all the keel rollers with new, but not sure whether paying twice as much for polyurethane is worth it at this stage. The rollers will be taking a fair bit of weight. I will build some wooden bunks to take the load of the last metre of the boat. That will support the transom and the motor. The bunk brackets are ubolted to angle iron, not ideal but they won't need to support any weight as the bunks will be sitting directly on the crossbeams. I can adjust left and right, not up or down. Will attempt to get them under the stringers. If not the last metre of the boat is extremely strong, shouldn't be an issue.
Going forward, I can make v shaped supports once the new boat is on the trailer, and ubolt those onto the side flanges to support the front half of the boat.
Anyone know how long those black rubber keel rollers last, assuming I get NZ made not made in China?
Re: C17 in New Zealand.
Posted: Fri Aug 21, 2020 4:48 pm
by OneWayTraffic
Photo
Re: C17 in New Zealand.
Posted: Sun Aug 23, 2020 4:01 am
by OneWayTraffic
Cut off the rollers. After mucking around too long with pliers etc, I pulled out the dremel sawmax with an Al Oxide disc and cut the split pins off. The bolts were all standard galved, and a bit the worse for wear. I have some nice little piles of rubber dust from the insides on my garage floor.
Ordered a set of six rollers from a Chinese kiwi on Trademe. He imports and sells Panga boats, and has non black rubber rollers in a 190mm size, rather than the common 150mm and 200mm. Come with galv bolts and nylocks. Would have preferred stainless, but galv will work. With the nylocks they should be easy to remove and clean.
Not sure what kind of grease to put on the roller pins. Hear that standard marine grease attracts dirt and dust. Maybe silicone spray?
I was also a wee bit concerned that the keel strip currently on the donor boat will damage even HDPE or Urethane rollers. Have seen pictures of this happening online.
Re: C17 in New Zealand.
Posted: Sun Aug 23, 2020 7:36 am
by Dan_Smullen
Have you thought about converting to a bunk style trailer?
Much friendlier on the keel.
Re: C17 in New Zealand.
Posted: Sun Aug 23, 2020 9:55 am
by Rmarsh
Dan_Smullen wrote: ↑Sun Aug 23, 2020 7:36 am
Have you thought about converting to a bunk style trailer?
Much friendlier on the keel.
Dan...I wholeheartedly agree......been using a bunk style trailer for my C17 six seasons now. I launch and load single handed with never a glitch.
Bunks are positioned directly under the internal stringers for optimal support. I've seen too many boats dumped onto the ramp by rolling off the trailer prematurely.
Re: C17 in New Zealand.
Posted: Sun Aug 23, 2020 3:00 pm
by OneWayTraffic
OneWayTraffic wrote: ↑Fri Aug 21, 2020 4:46 pm
The rollers will be taking a fair bit of weight. I will build some wooden bunks to take the load of the last metre of the boat. That will support the transom and the motor. The bunk brackets are ubolted to angle iron, not ideal but they won't need to support any weight as the bunks will be sitting directly on the crossbeams. I can adjust left and right, not up or down. Will attempt to get them under the stringers. If not the last metre of the boat is extremely strong, shouldn't be an issue.
Going forward, I can make v shaped supports once the new boat is on the trailer, and ubolt those onto the side flanges to support the front half of the boat.
Yes. I did consider bunks.
For the current boat it was designed around keel rollers, and has been sitting on those for 40 years. The boat is a 1980 CrestaCraft. I don't want to think about just how thick and heavy the keel is; they were designed to sit on the keel, with side rollers as supports only. Just 40 years caused a slight bend in that central ladder. I do not yet know how long I will be using the current boat as is, so do not want to stray too far from the current design, just yet. Earliest I put the C17 in the water end of 2021, but sometimes these projects go on for years.
Looking ahead for the C17; we have a lot of shallow ramps in NZ, a few people beach launch, and the majority of boats live on trailers, not at the dock. For the most part bunk trailers are either found on jetskis, dinghys, or boats imported secondhand from the USA. Some very large trailer boats use custom designed trailers with bunks, but they are made for the boat for 15-25k each. So I found that the hardware brackets etc for carpeted bunks would need to be imported from the USA also. On top of that, I can't find angle Ubolts designed around angle iron anywhere in the country at all.
So at the moment I have four brackets designed for jetski bunks --no vertical adjustment. My current plan is to make skids a bit longer than a metre. These will sit on the rear of the trailer, where the two crossmembers are only 50cm apart. I can built them at the right height so they should take most of the weight of the last metre of the boat, plastic skids on top should allow launching at our numerous shallow ramps. I could build them longer, but attaching to the now reinforced crossmember would be a bit of a pain, and I don't think that would fit the current boat well with it's changing deadrise and strakes under the hull. I plan to build and glass the keel strake of the C17 to the extent that it will easily be able to take the extra weight.
I also plan to add some forward supports later.
Re: C17 in New Zealand.
Posted: Sat Aug 29, 2020 3:57 am
by OneWayTraffic
Well I ordered some polyurethane keel rollers that came in at 200mm when they were supposed to be 190mm. Too big to fit, and no 190mm are available. Took a discount from the supplier and took a roller into school for the tech teacher to play with. Came back 20 minutes later lathed down to an even 190mm. Handy man to have around.
Today I sprayed rust converter on all visible trailer rust, including some spots under the C sections not visible on a casual inspection. Scrubbed of flaky bits then took it outside to wash with the high pressure hose. Probably should have done that first. Will have another go over tomorrow. I'll probably buy a tin of brush on next.
There's a part of the c section where it's hard to get in there as there's a beam over. The steel inside there is not in as good condition. I can't get in with my wire brush. Maybe sandpaper? I'll post a photo in a minute or two. The previous owners had some Wattyl killrust paint, so I'll use that to touch up, but will probably go to spray galv when that's done. I think the galv is better protection, but the rust converter is decent all by itself.
Also glassed the completed side panel. 200g woven. Used a squeegee to remove excess epoxy, then instead of discarding I put it in an icecream container. Was still able to mix it with microballoons and partially fill the weave when done. I'll try to dig up a photo tomorrow.
Re: C17 in New Zealand.
Posted: Sat Aug 29, 2020 4:08 am
by OneWayTraffic
Photo of the trailer. I’ll have to get in there somehow. Rust never sleeps.
Re: C17 in New Zealand.
Posted: Sat Aug 29, 2020 7:27 pm
by OneWayTraffic
Photo of the side with glass on. Bloody wrinkles under the glass around the curve. Will need to really block that back. It wasn’t obvious last night.
Trimmed the edges and got some fairing on this morning. Looking a bit better now. Will sand it back when it cures. At this stage I am not sure whether I’ll use more micro balloons or the commercial fairing putty I bought. Planning bedliner under the style line, paint above with a possible vinyl wrap.
Temperature under the tunnel house. Weather’s been pretty rough; I had to shovel the snow out of the way before starting.

Re: C17 in New Zealand.
Posted: Sat Aug 29, 2020 9:31 pm
by Dan_Smullen
Weather looks amazing under that blue sky.
Re: C17 in New Zealand.
Posted: Sun Aug 30, 2020 1:25 am
by OneWayTraffic
Enjoying it while I can. Supposed to be a Antarctic front going up the country in a couple of days. It's nearly the end of winter, but the days have been getting longer and warmer for a while. Morning frosts, then shirt sleeve weather for a few hours and colder nights. Nothing to compare to a North American winter though.
Re: C17 in New Zealand.
Posted: Sun Aug 30, 2020 7:08 am
by Jeff
Beautiful sky!!! Jeff
Re: C17 in New Zealand.
Posted: Sat Sep 05, 2020 5:47 pm
by OneWayTraffic
Couple of photos from the first sanding pass. Went over the chine and rubrail edges of glass with grinder and then some of the obvious air bubbles or bits of glass sticking up a few mm. Only a couple here and there. Then sanding block on the lower side panel (top of photo) for about 20 minutes.
It really shows the high and low points. Low points are less than 1mm lower but the sandpaper can't apply pressure to them, so they stick out. Second photo is of the the curve shown earlier with the wrinkles. I took it down just until the glass was showing in a couple of places. These are the highs. I'll try to fill the lows to that level.
No fairing to go on today, as the weather is not cooperating. I'll run over it again on the upper side panel same business, then again next week just before fairing again so the next layer of fairing goes on a freshly prepare surface.
For preparing a surface I use a sander on the whole surface , then scotchguard abrasive cloth to get into the little dips and gaps, then a thin layer of neat epoxy over everything. The neat epoxy layer should be as thin as you can make it; the idea is to have maximum bonding potential to the surface. This helps really thick putty (which might be a little epoxy starved near the interface) bond to the surface.
Current plan is another layer of microballoons on the side then once fully cured a layer of commercial epoxy fairing bog on that for the final finish. Then graphite pencil and a tickle with 120-180grit to see if I've missed anything.
If all good there will be two thin roller coats of Aluminium filled epoxy on the whole side to act as a sealer below the paint finish.
Re: C17 in New Zealand.
Posted: Sat Sep 19, 2020 3:49 am
by OneWayTraffic
Couple steps forward couple back. Done some fairing on the hull, poly tunnel blew off in a gale so I replaced and reinforced with a heavy duty tarpaulin cable tied to the frame.
I also plan to redo the skeg. Not really happy with it: slightly off centre and I’m going with a flat profile for the trailer rollers.
Re: C17 in New Zealand.
Posted: Wed Sep 30, 2020 5:12 am
by OneWayTraffic
Despite the recent cold weather I got back into it this week. I'm looking for some photos but it's hard to take them in the tent with the tarp over. Camera doesn't pick up the detail. Sorted out the best tool I've found so far for applying fairing putty.
https://www.bunnings.co.nz/morgan-handh ... e_p4480413
Just a regular bathroom squeegee. Works like a charm. I mix the epoxy in a container, then add the fillers 3:1 microballoon for sanding to fumed silica for thixothropy.
This gets it mostly mixed in, and when it's like a thick chocolate cake batter (it really looks like this but I don't recommend eating it!) I put it all on the well sanded hull. Then I use a smaller squeegee to finish the mixing, smooth out any remaining lumps of filler, and get it to where I need it on the hull. Then I go over it with a few long passes of the shower squeegee. It leaves a smooth slightly textured surface, with the occasional mark from the edges of the silicone rubber.
So far I've put three passes of fairing on. First to fill the weave and two more. I think with the experience of this side I can get the other down to two passes to get it to the same state. I could choose to seal and paint at this stage, but will spot fill all the little remaining bits and pieces first. This could easily take another 3+ passes but I won't be using as much putty. I also need to fillet and tape the skeg, so haven't finished that part yet. Annoyingly I will need to tape it twice, from each side as room is so lacking.
I'll try to get some photos up tomorrow. I do have a photo of my sanding board. Took me about 20 minutes to make, plus time for the glue to set. Follows the curves ok, though much of the boat is sandable with the flat painting blocks.
Re: C17 in New Zealand.
Posted: Wed Oct 07, 2020 4:18 am
by OneWayTraffic
Took the boat trailer to the galvaniser today. Actually I took it yesterday then took it back to grind out a bullock nut

Got the frame off and on a hire trailer with help from the kids. Charge is by the kilo works out to a little less than $1US a pound.
I’m only doing the frame, rollers will be new and I’ll use POR15 on the axle and hubs. Springs will be dealt with as best I can. Lanocote mainly. Parabolic galved springs are on the wish list but there’s plenty of life left in these.
Weight of the frame is 130kg, drawbar axle and wheels 140kg.
I drilled a hole in the axle to inspect it: no rust I could see. Poured in some oil and sealed with epoxy.
Re: C17 in New Zealand.
Posted: Fri Oct 30, 2020 3:10 am
by OneWayTraffic
Trailer is back looking all shiny. I have needed to get some new leaf springs custom made, so have been busy fairing the sides of the boat and epoxy coating the wooden bunks. The bunks are only about 1 metre long. The centre rollers will be taking most of the load, on the skeg there will be plenty of bearing surface.
Re: C17 in New Zealand.
Posted: Fri Oct 30, 2020 4:07 am
by OneWayTraffic
Photos.
Just moved to a premixed fairing epoxy. It mixes to green which will be a good contrast. The photo is before I put that on.
Re: C17 in New Zealand.
Posted: Sat Nov 07, 2020 4:08 am
by OneWayTraffic
So here's the latest photos on the side and a couple of closeups of some little holes in the fairing putty. What do you guys reckon? Will they fill with high build primer or do I patch with a little epoxy putty? Aside from little details like that I'm just about ready to put a couple of coats of epoxy on top and move to the other side, which is still in the same state it was back in May.
Re: C17 in New Zealand.
Posted: Sat Nov 07, 2020 10:24 am
by joe2700
OneWayTraffic wrote: ↑Sat Nov 07, 2020 4:08 am
So here's the latest photos on the side and a couple of closeups of some little holes in the fairing putty. What do you guys reckon? Will they fill with high build primer or do I patch with a little epoxy putty? Aside from little details like that I'm just about ready to put a couple of coats of epoxy on top and move to the other side, which is still in the same state it was back in May.
I don't think there's anyway high build primer will fill those. Up to you what level of finish you are going for though.
Are you putting epoxy over the top now? That's setting you up for a ton more sanding I think and not sure what the benefit is. I'd move to epoxy primer after fairing not more laminating epoxy unless your fairing compound says you have to.
Re: C17 in New Zealand.
Posted: Sat Nov 07, 2020 12:57 pm
by OneWayTraffic
I was planning on using a single pack polyurethane, with the poly high build primer for that. So I thought a thin roller coat would help seal the surface. The boat bottom will have Aluminium filled WEST over it. The finish on the bottom will be workboat but I am after better on the sides. I'll try and fill any hole that I can feel with a fingernail.
Thanks!
Re: C17 in New Zealand.
Posted: Mon Nov 09, 2020 8:49 pm
by Dan_Smullen
OneWayTraffic wrote: ↑Sat Nov 07, 2020 4:08 am
So here's the latest photos on the side and a couple of closeups of some little holes in the fairing putty. What do you guys reckon? Will they fill with high build primer or do I patch with a little epoxy putty? Aside from little details like that I'm just about ready to put a couple of coats of epoxy on top and move to the other side, which is still in the same state it was back in May.
Agree that they’re too deep for HB primer, but if you want to spread some, it will highlight other spots you may have missed, and you can then them all with fairing compound.
For small spots like this, I really enjoyed using Awl Fair, which seemed to go on more smoothly than QF or TF. Just a small container...
Re: C17 in New Zealand.
Posted: Mon Nov 09, 2020 9:08 pm
by OneWayTraffic
That was a commercial fairing putty made by a NZ fibreglass shop. Not a proper brand name, but it works ok. I think I'll put a roller coat of tinted epoxy on the whole side to seal and protect from UV, and then fill the holes I can see with WEST 410 wet on green. Then I'll leave it to work on the other side. High build can wait.
Re: C17 in New Zealand.
Posted: Wed Nov 11, 2020 5:15 am
by Salty F17
I would just get a long board and sand the high spots then fair the boat again the I would lightly spay the hull with a spay paint then use the long board again this will show u your high and low spot the just fair it again repeat this process until desired smoothness then prime the hull and be done with it I would not add epoxy to those spot the fairing should get rid of those
Re: C17 in New Zealand.
Posted: Wed Nov 11, 2020 9:21 am
by Dougster
Some of those holes may not be on high spots and not sand out. I'd just slap a schmear of Quickfair to sand on those.
Dougster
Re: C17 in New Zealand.
Posted: Wed Nov 11, 2020 6:45 pm
by OneWayTraffic
Dougster wrote: ↑Wed Nov 11, 2020 9:21 am
Some of those holes may not be on high spots and not sand out. I'd just slap a schmear of Quickfair to sand on those.
Dougster
I would love it if I had Quickfair, but will need to make do without. System 5 is not sold in NZ. Bigger issue is some of the putty has not properly bonded to the surface below. I did sand, well I thought, but in a couple of places I can scratch it off with a thumbnail. I'll need to go over the whole side checking adhesion before I proceed.
Re: C17 in New Zealand.
Posted: Thu Nov 12, 2020 9:55 am
by Dougster
Yeah, I see, an overall sand on questionable areas is surely in order. After that how about some kind of microballoon mix for a fairing mix? You wouldn't need much.
Dougster
Re: C17 in New Zealand.
Posted: Thu Nov 12, 2020 10:09 pm
by OneWayTraffic
I have WEST microballoons, will need to buy another bag I guess, then there's the WEST microlite filler. I have a little left from the little dinghy, but will buy a big bag.
As an experiment today I tried adding a little neat mixed WEST to a little of the commercial 1:1 fairing mix. (I'll call it epoxybog from now on.) Then put it on a scrap bit of wood and left it in the polytunnel. It's at least 50C (120F) in there today with the sides closed in so a fast cure! Seems to be curing just fine, and if it cures properly and sands well afterwards I may do that in future to mix it a little thinner for adhesion, and so I don't need to wait for a full cure before swapping. When it's gone I think I'll stick to WEST with fillers. I'm used to it.
Main job this weekend is get the trailer put back together, and the donor boat on it. I have finished the wooden mini bunks with brackets for attaching on the trailer. I went the full monty and epoxy coated treated wood, then used my portable drill press to locate the bolt holes. Holes were sealed, plastic skid strip added on top and I glued some rubber pads to the bottom of it. Not the best look, but functional. I'll spray paint the sides and exposed areas later. Need to reassemble: new leaf springs, axle, tires, centre rollers, bunks, drawbar, jockey wheel, then crank the boat on. Fishing this weekend I hope!
Re: C17 in New Zealand.
Posted: Sat Dec 05, 2020 5:41 pm
by OneWayTraffic
Anyway, some measuring of both the bunks on the trailer, and the project in the tent convinced me I needed to reduce the height of the bunks. This will bring the stern down a bit, and for the new boat it is needed to have the keel sitting on the rollers. I've done that and will bolt them on today. Bunks will need to come in a little. Then I'll remove that centre roller, and see how it sits.
Yesterday I put the final coat on the starboard side. Used a squeegee and tinted the epoxy with black tint and Aluminium powder. The side is fair, though there are a couple of drips that I'll sand flat when the high build goes on. Took the polytunnel off today and moved it across to make room to do the other side. Gave the lawn a much needed mow.
It's not really visible in the photos but the skeg is slightly off centre. I'll build out the other side of it a bit to get it symmetrical. Not going to affect performance or appearance.
I'm pondering what to do with paint. I was thinking I'd paint below the styleline when the boat is upside down, and above after I put it on the trailer. Now I'm wondering if I'd be better advised to wait until I can get it into the garage. Every time I put epoxy on it I'm picking out insects.
Re: C17 in New Zealand.
Posted: Tue Dec 15, 2020 10:02 pm
by OneWayTraffic
Plugging away. Only being able to work on one side at a time has its disadvantages. The other side of the skeg has multiple drips and runs to smooth before I can profile and glass it. Also the front of it is slightly off the centreline. I had considered using dowels for aligment, but didn't want the holes in the hull. I would do it that way if I had to do it again. After a lot of measuring and pondering I planed a 9mm strip of ply into a wedge and glued to the side of the skeg to build it out a bit. I'll try to feather it in with a dam and some putty later then sand it down to match the other side as best I can. At least nobody will be looking at it.
50 degrees C under the tunnel so had to work quickly. I also have spliced the port side upper side panel together. Will dry fit and glue tomorrow I hope.
Re: C17 in New Zealand.
Posted: Wed Dec 30, 2020 3:53 pm
by OneWayTraffic
Not so much to report. I've been busy with Christmas stuff and the weather has been ****e. I have put a coat of fairing on the side panel. This is the one where I had the glassing stuff up in March so am filling a lot of dings and dents before I glass the side. Photos below.
I did do some calculations on buoyancy for the donor boat. Best estimate of underfloor volume is about 340-360L. Hull weight is approx 450kg of which about 35% will need to be supported over and above the inherent buoyancy force of the glass. Then the battery aux and engine weigh about 160kg with essentially no buoyancy.
450*0.35+160=320L. There's essentially no safety factor for my calculations being out and not enough margin to float crew etc in the unlikely event of swamping. If the underfloor is just trapped air, and it gets compromised then I'm done to lifejackets and my PLB.
Moreover it's all underfloor, I have no idea whether it's foam or air, and so if the boat floats at all it will barely float above the surface and probably just the bow not immersed, and inverted.
But I don't want to spend a lot of money on it that I can't put to use later if I can help it. So I paid a trip to Bunnings.
9 packets of EVA foam mats, each about 15L in buoyancy over their own weight. EVA foam is closed cell (I've got a sample immersed in a bucket to confirm), UV resistant, durable and resistant to petrol etc. It will all go under the gunwales at the back and in unused space near the outboard. I'll push a couple of my buoyancy bags that I made for the dinghy (each 70-80L) down the sides and front and tie down a spare empty tote tank under the front ( I have 3 24L tanks, but will be using two at most generally.)
That's another 300L of buoyancy, all above the floor and in the sides, and it's only cost an extra $100, and almost no usable space. I will repurpose the EVA mats as seating mats or as foam in the gunnels.
Re: C17 in New Zealand.
Posted: Fri Jan 01, 2021 5:24 pm
by OneWayTraffic
Mats.
Gluing up. Spray adhesive in the middle and epoxy around the outside. About 50ml between each sheet. Next time I’d just chuck a few blobs down rather than try and work it into the puzzle joints.
All glued up, ready for a tidy up and fixing to the inside near the transom.
Not yet sure how I’ll attach them. Want them slightly off the sole so they don’t get wet all the time. Thinking a small glass tab at the sides or some glue behind. I want to be able to remove them in a year or two. They are tall enough to just slide in under the gunnels with pool noodles for a friction fit, so I could just do that. Net buoyancy is 75kg-5kg=70kg each for their own weight. That's 300lb all added near the transom.
Re: C17 in New Zealand.
Posted: Fri Jan 01, 2021 7:27 pm
by VT_Jeff
I like the use of the closed cell foam. I have a bunch leftover from a floor that didnt work out but like you, didnt want it under floor. I'm now thinking of adding some under the bow and stern deck where I can keep an eye on it and remove it if needed.
Re: C17 in New Zealand.
Posted: Sat Jan 02, 2021 2:08 am
by OneWayTraffic
Removing the side shelves was easy. I came prepared with grinder and multi tool just like an epoxy job. In the end I just stood on them and they peeled away clean. Chopped mat with poly over damp rotting wood. Cleaned up the edges with the grinder and just pushed the mats under the gunnels. A friction fit will hold I think. .
Re: C17 in New Zealand.
Posted: Tue Jan 12, 2021 3:08 am
by OneWayTraffic
Got the side glass on today. I had spent days on it fairing before the glass thanks to surface damage on the ply. The job was nearly perfect: tight only a couple of cuts to make it fit and no visible air bubbles except some on the overlapping side panels. Sadly I didn’t get a photo before filling the weave. I use the excess epoxy squeegeed from the wet out, save it in a container then mix with a bit of fresh epoxy and filler to fill an earlier piece. Other scraps of epoxy go underneath to fill a chine join or the like. Saves waste but I’ll need to grind when I flip. Fairing rub rails and paint!
Re: C17 in New Zealand.
Posted: Sun Jan 31, 2021 3:43 am
by OneWayTraffic
Been plugging away at the boat. Aside from fairing I've been working on sprayrails. These are UHMWPE, along the chines, side panel styleline and rubrail. Also along the rear part of the keel. Front of the keel gets 3mm Aluminium extrusion. Aluminium bonds well with epoxy; I used G-flex. Acetone wipe and scrub the sand until shiny with a RO. Then work on the epoxy and sand it in with a scrap of sandpaper. I used temporary screws to hold it in place and filled the holes later. Sanded the outside for appearances sake. It’s right down the centre despite some of the photos seeming to show it off.
 Viewed 1554 times")
Chine strips are 20mm by 10mm UHMWPE also visible in the photo. Harder to glue so the 316 SS screws stay in the boat. Below the waterline so care was needed. First drilled pilot holes and dry fit the strip. Then located the pilot holes from inside and used a 13mm drill to rout out the wood core. Filled that with putty. Would have been easier to just drill but I wanted minimal damage to the glass, which is a couple of mm thick here. The strips above on the style line just get over drilled as there is no glass to speak of there (200gsm only).
 Viewed 1559 times")
 Viewed 1559 times")
Preparing the UHMWPE. Some will say that this can’t be glued at all. Well apparently it can. The plastic has very long chain molecules that don’t strongly interact so the surface needs to be modified. First I wiped with acetone to remove dust. Then sanded with 60 grit. This was a very quick sand. Then acetone again and on to the propane torch. Kissing the surface with a quick pass of the torch (about 30cm a sec) propels reactive atoms (single oxygen and others) which are supposed to break up some of the long chains and also replace some hydrogen atoms with oxygen which can electron bond to the glue molecules. The treatments max effect is supposed to last about 15 minutes so you need to get the glue on fast afterwards. Then I screwed this into the chine like before. The screws will stay as insurance, though the glue is supposed to bond with over 2000psi to HDPE with good treatment. I have a couple of small samples: one just sanded and acetone wiped and one fully treated with wipe-sand-wipe-flame. I’ll test when fully cured. It would have been easier to go with hardwood, but I'm hoping this will be stronger and longer lasting.
 Viewed 1559 times")
Re: C17 in New Zealand.
Posted: Sun Jan 31, 2021 7:04 pm
by TomW1
Looks great
Re: C17 in New Zealand.
Posted: Mon Feb 01, 2021 1:45 am
by OneWayTraffic
Tried breaking my test piece today. 20mm square glued, and tied a rope through the hole. I then screwed the ply to a beam and leaned on it. Then again. Then tried bouncing back and forth. I gave myself a rope mark on my back but the plastic is still attached. I'll try getting more aggressive with it later.
Removed screws today, and drilled out the holes to 4mm. I then inspected both sides for evidence of cracking or places where there could be water getting to the wood.
I'll leave them be for now then probably replace them bedded in g-flex after the flip. I am pondering whether to keep them, or just fill with epoxy or even use a couple of larger longer screws at the ends of each strip.
Re: C17 in New Zealand.
Posted: Tue Feb 02, 2021 12:15 am
by cracked_ribs
That's really interesting; I had always heard that UHMW was pretty much impossible to glue and have it hold but that sounds like success to me.
I'm curious to see how you feel about it after a year of running the boat, say. I need to put a wear strip on my full length skeg, because I'll be beaching on rocks constantly, but I'd planned to just use PVC for ease of attachment.
Very curious to hear how the UHMW works out. If it stays attached, it's amazing stuff and I'd prefer it.
Re: C17 in New Zealand.
Posted: Tue Feb 02, 2021 2:11 am
by OneWayTraffic
I broke the test piece today. Put it on the ground stood on it, pulled on the rope and broke the plastic off with little effort. It was in peel, which is the weakest way for adhesives, as the forces are concentrated. But on closer examination I saw this. A successful bonding job.
Re: C17 in New Zealand.
Posted: Tue Feb 02, 2021 2:35 am
by OneWayTraffic
cracked_ribs wrote: ↑Tue Feb 02, 2021 12:15 am
That's really interesting; I had always heard that UHMW was pretty much impossible to glue and have it hold but that sounds like success to me.
I'm curious to see how you feel about it after a year of running the boat, say. I need to put a wear strip on my full length skeg, because I'll be beaching on rocks constantly, but I'd planned to just use PVC for ease of attachment.
Very curious to hear how the UHMW works out. If it stays attached, it's amazing stuff and I'd prefer it.
No way it's coming off without taking some hull with it. I'll have those screws back in when it hits the water with some bigger ones at the ends of each strip to guard against peel. If not screws then the gaps will be filled with glass filled epoxy making little pins.
I'd use UHMW. Follow the procedure I used: solvent wipe, sand, solvent wipe, flame treat, water break test, clean with paper towels then G-flex ASAP then again with thickened G-flex to bed it in. Drill holes every foot or less and bed in epoxy. Then screw it down. Then you could bed the screw holes with fibre fulled epoxy acting like composite rivets. Or put 316L screws in to hold it. I don't think it will come off.
Flame treating is the trick. There's videos online on how to do it. It chemically changes the surface.
Re: C17 in New Zealand.
Posted: Tue Feb 02, 2021 2:43 am
by OneWayTraffic
Oh and watch the temperatures. I glue in the afternoon so falling temperatures shrink and tighten the plastic to the hull. In the morning could be an issue as it expands. I also checked when dry fitting and gluing to make sure it was close to the same temperature.
Re: C17 in New Zealand.
Posted: Tue Feb 02, 2021 10:12 am
by cracked_ribs
Very interesting, thank you! I'll do some testing, I guess.
Re: C17 in New Zealand.
Posted: Tue Feb 02, 2021 1:24 pm
by OneWayTraffic
3m make a glue as well that they claim needs little prep: scotchweld DP-8005. Might be cheaper in small jobs; no flame treatment required.
https://www.glueguru.co.nz/site/gluegur ... ch_248.pdf
Re: C17 in New Zealand.
Posted: Tue Feb 02, 2021 6:11 pm
by OneWayTraffic
https://www.westsystem.com/specialty-ep ... -adhesive/
Info and video on G-flex. It was the rotomould polyethylene kayak repair that sold it to me. Especially the bit where they throw it off the bridge.
Re: C17 in New Zealand.
Posted: Sat Feb 06, 2021 11:04 pm
by OneWayTraffic
Bit of progress this weekend. Made some fibreglass tube by rolling biaxial tape around a taped pool noodle. Broke it free the next day and set into my transom scupper holes with the use of a lot of putty to fill the gap entirely. Then a few more layers around the tubes overlapping onto the transom. Will have a bit of work to do to fair it in properly, but with all the things I'll have on the transom minor fairing issues won't show.
Speaking of things on the transom I glued some 18mm ply samples to a piece of pine, then glassed it in on a fillet. This is the underneath side of what will be a small boarding/swimming platform on the transom. The transducer will go underneath out of the way, and the platform will both protect from damage, and deflect spray.
Also a photo of the sheer and chine UHMWPE strips. Quite happy with how they've turned out, but painting around them will be a pain. I did think about installing after paint, but I will always value strength over looks. I wasn't keen to glue them onto paint.
Re: C17 in New Zealand.
Posted: Sun Mar 07, 2021 12:51 am
by OneWayTraffic
Ok I don't know if the fairing is finished, but I do know that I'm finished with it. I've got the best finish I can manage given the circumstances and put two coats of epoxy on the hull today. Roller coats with 140ml of epoxy, two spoons of Aluminium powder and one spoon of Cabosil in each batch. Some slight stipple from the roller, which I kind of like.
I've got some tiny little irregular spots visible only when I look down the hull sides. I can't feel them with a finger, or see them side on. I've not put any high build primer on yet, that will wait until after the flip when I'm ready to paint. With small bits of grass and insects getting in the epoxy I'll try to do that inside.
I also had a fair few drips on the UHMWPE rubrails. I used a heatgun and a scraper to get rid of most of it, and then scrubbed with a Scotchbrite. Turned out ok.
If the finish turns out to be substandard I'll put a vinyl wrap on the upper side. About $700 a side if a pro job.
Flip will be next week weather permitting.
Re: C17 in New Zealand.
Posted: Sun Mar 07, 2021 12:54 am
by OneWayTraffic
Photos
Re: C17 in New Zealand.
Posted: Sun Mar 07, 2021 4:28 pm
by TomW1
Looking good guy!
Tom
Re: C17 in New Zealand.
Posted: Thu Apr 01, 2021 8:00 pm
by OneWayTraffic
Well the boat building has gone on but I've been remiss in not posting updates.
Quick recap. Like Sideslippa and his OB17, and some of the earlier PH16s and PH18s I decided a few months ago not to remove all the inner framing. I posted my reasoning back here so won't go into it again.
viewtopic.php?p=468821#p468821
Flip was a piece of cake, four guys walked it out of the tent laid it down, rolled it over, and carried it back in. It's sitting on blocks under the keel with 2x6 supporting under the stringers. I'll rig up benches or something to support the front when I get there. At the moment though it's solid at the back.
Then started glassing the back boxes, one at a time. I'm not a fast worker so prepping filleting and glassing one a day is about all I can do. Two layers overlapping up onto the stringers and frames. Tape as well to bring up to spec where needed. Few bubbles here and there, but no disasters. I thought about using a single layer on the inside, but I'm out of tape so it's easier not to cut and lay tape from my roll of wide biaxal.
Looking back towards motorwell. I am still thinking about what this will look like, but am likely to go with the 4" setback bracket that came with the outboard, so have cut it a bit shorter. E-tec 60hp only needs 360mm of space, and I will have more in case I need to fit another OB later.
Cut out Frame D. I've cut it down so I can run the inside stringer cleats the full length unbroken. 18mm by pine clears will add significant longitudinal strength, and I already have the wood. Left some in place to locate the side benches. Current idea is to have these running back to the motorwell, and portable tanks, battery and storage under.
Re: C17 in New Zealand.
Posted: Thu Apr 01, 2021 11:53 pm
by Fuzz
You have made good progress
It sure is nice to get back to building after all that fairing
Re: C17 in New Zealand.
Posted: Fri Apr 02, 2021 12:23 am
by OneWayTraffic
Yes. The fairing is not done, but I am done with it. I might name my boat "sanding fatigue" or "tired of grinding."
Amazing difference once the glass goes on. Forward where it's not sanded there's detectable give where I stand on it. Walking on the glassed area feels like walking on concrete.
Re: C17 in New Zealand.
Posted: Fri Apr 02, 2021 3:56 am
by OneWayTraffic
I've started giving some thought to foam vs airtight compartments vs compartments with breather holes and inspection hatches. The designer recommends two part foam, and many on the Bateau forums have used it successfully, but there's also some horror stories out there, often (not always) involving water getting in through unsealed holes and penetrations.
My thoughts:
I don't want fully foamed compartments below the waterline. I'd always be worried about water getting in there even if it is unlikely. Neither do I want nothing but airspaces. I'd be concerned about water getting in there and pressure from the air expanding and compressing with temperature changes working at weakpoints in the structure. Also unlikely but...
On the other hand hatches and limber holes can let water in as easily as out. In the worse case of a swamping or some kind of structural damage to the hull the boat could go under very fast without some flotation.
So far this is what I'm settling on. I'll have several compartments in the hull under the floor. I'll use some of my already bought and glued together EVA foam pads (about 150L) to fill some of this, and some medium density pour foam (65kg/cubic metre) to fill strips near the stringers of the central underfloor compartment, supporting the sole and leaving the central area free for ventilation. Bung at the back of the central compartment, small plugs for the side compartments, with 2mm breather holes up at the bow end to equalise pressure. I'll use a hole saw to allow air to flow through the frames where needed.
Above floor flotation will be down the side walls above the floor level so I can get my toes under, and also in semi watertight storage seats etc. Looking at about 300L of foam buoyancy which should be enough since the hull material floats, even with fibreglass skins. I just need to float the motor, battery and crew.
Would be interested in thoughts or comments, though there has been a lot written on here about foam.
Re: C17 in New Zealand.
Posted: Fri Apr 02, 2021 6:42 am
by Browndog
The horror stories that you often hear about foam in compartments under the sole is most often related to older production boats.
Several things to consider. Most production boats do not use epoxy resin. They use polyester resin. Polyester resin is quite porous even with newer polyvinyl ester gel coat. So water tends to infiltrate the fiberglass hull more in a polyester built boat leading to osmosis induced hull blistering, core delamination and saturation of the cores. Older types of foams that were used were also not as resistant to chemical breakdown and water saturation. The fear of wooden cores is generally a result of using polyester resins instead of epoxy.
Epoxy is a very good sealant and its waterproofness is substantially better than polyester.
The specification of quality marine plywood in most stitch and glue designs further improve the water resistance of the epoxy, fiberglass cloth and plywood laminate.
Using wood that has not been coated with epoxy and inferior grades of plywood in moist environments is not recommended regardless of whether foam is used or not.. That is why hull penetrations after manufacture are a leading cause of water intrusion. For example, drilling a hole or screwing something to the hull and not sealing the core provides an unsealed edge where water tends to wick from the unsealed edge into the core.
The reality is that air intrusion is much harder to prevent than water intrusion.
Air contains water vapor which will ultimately condense due to ambient temperature, pressure and humidity changes.
Modern two part polyurethane foam is very resistant to chemical breakdown and water saturation. A testament to its durability is that it is frequently being used now in place of concrete for underground fence post support for continuous unprotected outdoor use.
But there are alternatives to foam. Air filled containers or bags are frequently used in kayaks and other light craft to fill under deck areas to aid buoyancy.
If your boat will mostly reside on a trailer on land when not in use, the storage conditions are more likely to impact the longevity of the boat than anything. If the boat will spend its life in the water in a slip, than bottom paint will be necessary.
A well cared for boat built with high quality materials should outlast its creator.
Re: C17 in New Zealand.
Posted: Fri Apr 02, 2021 2:08 pm
by Cowbro
I don't have tons to add, but I saw at one point someone that used plastic balls, like you'd see at a kids indoor play area. (Roughly 2.5"-3") in diameter. You could install hatches and fill under the sole through the hatches. You wouldn't get 100% floatation in the space, but it would still be pretty high (75-80%?). Then if you ever wanted to remove all of them you could fish them out through the hatches and fully inspect/dry the hull as needed.
I like to be able to inspect every part of the boat after every outing. Part of my cleaning routine is to open up every hatch and check for water or moisture and then let all of them air out for an afternoon in the sun.
Similarly, common practice on sit-on top fishing kayaks is to fill the hull with pool noodles so if you ever get a leak the kayak will stay afloat. I've never had to test it, but it is a very nice piece of mind and easy to remove for service.
Re: C17 in New Zealand.
Posted: Fri Apr 02, 2021 2:57 pm
by TomW1
Please fill your compartments full of foam. Water condensing in your air space will be more of a problem than water getting into a compartment than is a properly sealed one. Make sure what ever foam you get is 2 part polystyrene and your Coast Guard approved. You would need a 4 gallon kit for a 1600lb displacement as listed in the study plans. Drill limber holes at the back of the compartment to drain to the center compartment which will then be pumped out by the bilge pump. The center of the frames should all have limber holes to drain water to under the motor well, this should be shown in the plans.
The foam will probably over fill the compartments as it expands. No big deal, just cut it off even with a saw.
Regards, Tom
Re: C17 in New Zealand.
Posted: Fri Apr 02, 2021 3:24 pm
by OneWayTraffic
Thanks all for the thoughts. The boat will be trailered, and never spend more than a day or two on the water at a time. Usually 3 or 4 hours, then weeks on land under a tarp or cover in a reasonably but not always dry climate. With hatches open and ventilating. If anything water vapour would be more of a concern in foamed compartments without limbers or inspection ports. I do want enough foam in the right places to ensure level preferably upright flotation which means above the floor if possible.
It's good to know that foams have moved on. Most the horror stories are to do with old boats, or poor workmanship. But it would bother me that I can't check. I'll think about it while glassing the inside.
Re: C17 in New Zealand.
Posted: Fri Apr 02, 2021 11:03 pm
by TomW1
OneWayTraffic to obtain upright flotation you need to add flotation under the side decks. Build a box frame to hold the foam, and then add the top to it after foaming. I don't remember how wide the side decks are on the C17 7 or 8 inches but 17' x 12" x 2" x 8" is 3264 cubic inches for x2 both sides or almost 4 cubic feet. As you can see I used 8".
With the foam beneath the sole this is enough to keep the boat upright. You still need the foam under the main deck, this is supplementary to it to keep it upright.
I hope this helps. do not worry about the foam under the deck. Make sure you have done a good fiber glassing job. Some of the boats that have been built by other builders are 24 years old this year. Make sure as I said before that you have a place for any water to go to another compartment through a limber hole. That is the secret to a dry boat. As I recall there are limber holes in all of the center compartment frames
Well I hope this helps you out.
Regards, Tom
Re: C17 in New Zealand.
Posted: Sat Apr 03, 2021 3:40 am
by OneWayTraffic
That's pretty close to what I was planning. Great minds and all.
Re: C17 in New Zealand.
Posted: Fri Apr 30, 2021 5:33 pm
by OneWayTraffic
Inside glass is almost complete! I have some bubbles to drill and fill from frames C and E today and Frame A to tack into place. Front of Frame B, I had done one of my best glassing jobs in the morning, only to have the sun come out and blow bubbles in it for me.
The outside of the hull is gray epoxy and warms up nicely with the sun on it. I mucked around with trying to push them back into the gelled epoxy, then drilling and injecting but in the end, the SOB tool with a carbide blade and some patches of tape were the go.
I've just started my 4th batch of 24L epoxy. That's 72 litres used, and the BOM stated 60L.
I wonder if that's got something to do with building two transoms, 3 sets of stringers, double glassing then stripping half the hull once, light glass to the sheer, slightly more glass inside than specified or my first time fairing efforts? At least it's not all extra weight in the boat. I'm glassing the sole as well, and will probably use light glass on all interior surfaces so I doubt that I've ordered my last batch of epoxy.
I've sorted the plan for inside drainage. Five compartments under the sole, no limbers under the stringers. I have limbers cut in all frames except the sides of frame D, as I didn't preplan for that. Instead I'm running with inspection ports and rubber plugs, Bung down the centreline. All plugs and inspection ports will be protected from rain and other nuisance water. I'll about half foam fill the compartments with block foam and use that as extra support for the sole. I'll also put some very small permanent vent holes in unobtrusive places forward in the cabin to equalize pressure inside and out.
Only about a month of decent boat building weather to go, though I should be able to get some things done in Winter. Ordered some fast hardener for that.
I'll get some photos up on my phone in a minute.
Re: C17 in New Zealand.
Posted: Fri Apr 30, 2021 5:35 pm
by OneWayTraffic
Photos
Re: C17 in New Zealand.
Posted: Sat May 01, 2021 7:00 am
by OneWayTraffic
Spent a while mucking about with Ubolts. I'd read an old thread where Cracker Larry had made a drill jig on a 2 by 4, and clamped that to get the holes, so I tried it. Holes in transom were great, so I overdrilled to 13mm (0.5") and filled. Then used the jig again but couldn't get the holes right. Either the jig slipped, or I'd screwed up something, maybe in the overdrilling. So I got out the holesaw, drilled them all to 25mm (1") and tried again. Used the drill jig to put holes in scrap and fitted the Ubolts into them. I put hose and tape over the Ubolts to leave a wider radius. Then clamped into place and filled around the Ubolts. I'll remove tomorrow, fill the rest of the way with a Gflex mix around the bolts. Tape as a release agent so I can remove for painting.
Also drilled the front UBolt. No worries here yet, though amazed at the thickness of the hull on that front curve. 18mm thick!
Re: C17 in New Zealand.
Posted: Sat May 01, 2021 8:16 am
by Dan_Smullen
Looking neat and clean!
I’m surprised the C17 has 2 stringers rather than 4. I assumed the C series boats were scaled versions of each other.
Re: C17 in New Zealand.
Posted: Sat May 01, 2021 3:29 pm
by OneWayTraffic
Dan_Smullen wrote: ↑Sat May 01, 2021 8:16 am
Looking neat and clean!
I’m surprised the C17 has 2 stringers rather than 4. I assumed the C series boats were scaled versions of each other.
It's not so neat if you get close to it.
I'm planning to have a sand and tidy up, then coat with tinted epoxy everywhere before I get the sole on. Not needed, but I'll feel better about it.
I have plans for several boats in that size. They all have two stringers: FS17, OB17, PG20, C17. The OB17 has a third central stringer. The C17 panel size is small enough I think, same hull thickness as the C19, but 10% smaller width. The skeg acts as a third stiffener down the keel, which is already thick and strong. Also less weight, and HP leading to a bit less speed. I doubt I'd go faster than 25mph for the most part.
To be honest I was thinking about putting battens down the middle of the panels on the inside or strakes on the outside as stiffeners. Now I've got most the boat structure together I really don't think it's needed. As you pointed out on your thread, this is the strongest thing I've ever made. Only thing I'd like to do differently would be to use 9mm bottom ply rather than 6mm. That's because I took so long to glass it the 6mm ply went a little out of straight, and I used a lot of putty and time fairing it. I don't know how bending 9mm would have gone, but I would have tried.
Re: C17 in New Zealand.
Posted: Sun May 02, 2021 7:41 pm
by TomW1
Do not worry about it, Jacques already over designs his boats.
They will take a kicking and keep on ticking.
A PH15 took a log all the way though the hull and upper deck and made it home just fine. Just use the glass called for 12os not 6oz, Biax not flat.
Re: C17 in New Zealand.
Posted: Sun May 02, 2021 8:45 pm
by OneWayTraffic
Yup. The inside glass is already slightly more than specced in most places. I have a lot of wide cloth but no more tape. So for the inside boxes I was running two wide pieces across and tape cut from the cloth on the joins as well. This equates to the specced thickness at all keel, chine and stringer joins, but more in the middle of panels. Won't make a difference in use I expect.
The dense block foam will be in the middle of each box and built to the level of the sole, which will rest on the cleats and foam. This will further stiffen the panels, and give quieter operation.
Re: C17 in New Zealand.
Posted: Mon May 03, 2021 12:37 am
by Fuzz
I am thinking this is going to be one tough boat
Re: C17 in New Zealand.
Posted: Mon May 03, 2021 3:41 am
by OneWayTraffic
Fuzz wrote: ↑Mon May 03, 2021 12:37 am
I am thinking this is going to be one tough boat
Increased toughness and safety without greatly increased weight is what I am after. I can buy more block foam on the cheap as well.
I'll put pour foam down the sides in pontoons above the sole. That will stiffen the sides, but the purpose is purely flotation. I'm after Stabicraft levels of safety.
https://www.youtube.com/watch?v=JzZdY8RxAiI
https://www.youtube.com/watch?v=tE8lpOrlv98
Re: C17 in New Zealand.
Posted: Mon May 03, 2021 5:06 am
by Fuzz
The Stabicraft have a lot of great features going for them. We have had a local dealer for a fairly long time. With that being said I do not see many of them out on the water. I think it is because they have two things working against them. One, they do not offer much in the way of creature comforts. Two, they are just butt-ugly

I love the idea of building a boat that will float high out of the water fully swamped. And having one built that will remain upright when swamped is a great idea. Most boats that will remain floating will only do so upside down. Here we need boats that will keep most of your body out of the water as even in mid summer an immersed person's life span is measured in minutes. I think many of us would be better off putting most of that foam we love high in the sides and not in the bottom.
Re: C17 in New Zealand.
Posted: Mon May 03, 2021 7:07 am
by OneWayTraffic
Fuzz wrote: ↑Mon May 03, 2021 5:06 am
The Stabicraft have a lot of great features going for them. We have had a local dealer for a fairly long time. With that being said I do not see many of them out on the water. I think it is because they have two things working against them. One, they do not offer much in the way of creature comforts. Two, they are just butt-ugly
I love the idea of building a boat that will float high out of the water fully swamped. And having one built that will remain upright when swamped is a great idea. Most boats that will remain floating will only do so upside down. Here we need boats that will keep most of your body out of the water as even in mid summer an immersed person's life span is measured in minutes. I think many of us would be better off putting most of that foam we love high in the sides and not in the bottom.
Agree. Bottom only can work if you have massive scuppers to clear any water on deck. Then in effect you have a surfboard with a safety rail.
Not comfortable and possibly wet, certainly in the 17' size.
We have a lot of similar boats (we call them pontoons) in NZ: Stabicraft, DNA, Frewza, Osprey, Profile, Senator, Kiwikraft come to mind immediately. They are a popular choice for day fishing boats, and down South in Foveaux Strait, where a combination of cold shallow water, changable weather and a wind funnel effect can be deadly. NZers don't always have deep pockets, nowhere is more than 100miles to the sea, so it's not unknown for people to take 16' boats 20miles offshore. I took a 12' 6 miles into the Tasman sea, though I picked the weather carefully. So in the smaller sizes they are a popular choice. Glass boats are more for family than fishing. Riveted boats are either old, imported or very rare in sizes above a dinghy. That leaves welded Aluminium, and pontoons are safer.
https://www.stuff.co.nz/national/779100 ... ter-season
Re: C17 in New Zealand.
Posted: Mon May 03, 2021 4:47 pm
by MikeyGnz
Fuzz wrote: ↑Mon May 03, 2021 5:06 am
they do not offer much in the way of creature comforts
Kiwi creature comforts are along the lines of a bucket to piss in.
Boom Bucket
Re: C17 in New Zealand.
Posted: Mon May 03, 2021 8:02 pm
by OneWayTraffic
I'm definitely getting one of those. Maybe a cassette toilet if the wife comes regularly.
Re: C17 in New Zealand.
Posted: Mon May 03, 2021 9:41 pm
by Jaysen
That is what my wife wants! She’s too cheap to spend on a nice head.
Re: C17 in New Zealand.
Posted: Sat May 22, 2021 12:56 am
by OneWayTraffic
Bit of progress the last couple of weeks. Winter is jut around the corner, so I've ordered 800mL of WEST fast Hardener and am using that in conjunction with the slow for the next few months. Progress will be slow, just a few hours every weekend, if that.
Painted the outside of the hull except the transom area with two coats of POR15 high build primer. POR15 is the only one part polyurethane available in NZ. I decided long ago not to use 2 part paints, and not to spray. So roll and brush it is. The primer is sandable and will get blocked back before topcoating. I'm not 100% happy with the finish; there's a little orange peel in places, but a good sanding and another coat will sort it.
Also sorting out Frame A. Hole cut in the center for anchor storage. My first attempt freehanding with a jig saw looked a little like I'd ignored power tools and just chewed it out with my teeth. So I widened the hole for a second attempt with hole saw, cutting guides, and a flush cut router bit. Much better. Sistered a couple of supports for the deck and laminated it on.
Re: C17 in New Zealand.
Posted: Sat May 22, 2021 12:58 am
by OneWayTraffic
Photos
Re: C17 in New Zealand.
Posted: Sun Jul 25, 2021 1:24 am
by OneWayTraffic
Not a lot to report. It took me a week to get the front frame the way I liked it then tacked it in Friday night end of May or thereabouts. Then it rained, and we had floods South of here. I waited about 3 weeks before I could glass it. Then another two weeks for fairing. That went on a while ago and I'll get around to sanding it one day. I did cut out the rear motorwell frames as I was not really happy with the way I installed them (not square and symmetrical.) I'll put the sole on first and then some new frames on top. After going back and forth a bit I also filled the bung hole in the motorwell frame today. I figured that water was at least as likely to enter there as exit there. I'll inspect and drain (if needs be) the underfloor from inspection ports placed in lockers and in the cabin.
I also cut some more out of the side frame to fit the sole around and prepared for the cleats. The cleats inside the stringers will be one continuous piece of clear wood. Outside cleats will fit into the frames.
Days are getting longer so I should be making some progress soon. I want the sole on by October if I can manage it so I can spend the summer holidays on above sole details.
Re: C17 in New Zealand.
Posted: Sun Jul 25, 2021 1:29 am
by OneWayTraffic
Took the chance to take a photo after a clean out.
Re: C17 in New Zealand.
Posted: Sat Sep 04, 2021 5:41 pm
by OneWayTraffic
Making progress on the cleats and underfloor foam. The foam sheets are glued in place with generous spots of epoxy/microballoon putty. I may use some tabs of glass to hold them in place as well, especially where the boat is subject to slamming. The gaps and holes will be filled with pour foam on the higher side of each compartment leaving a downhill section in each for inspection, ventilation and possible drainage.
It's a lot of work and epoxy cutting coating and fitting the cleats. We are on a lockdown at the moment, so I have time. OD16s,18s and Tolman skiffs have the stringers as dimensional lumber or versalam LVL plywood. As a result no need for cleats, and in some cases less need for tape. Although it must be heavier, it would certainly save time and possibly epoxy.
I fitted the bow eye yesterday. Most use 5200 or similar for this; I went a different route. 10mm 316SS U-bolt, in holes drilled out to 13mm. The small amount of exposed ply near the outside was given a coat or two of thickened epoxy using a stirstick, then checked the next day, after initial cure. Then G-flex thickened with Colloidial silica and Aluminiumn powder into the hole and a generous coating on the Ubolt itself. Pushed through the hole, under the washers and nuts tightened until squeeze out all around. The outside of the bolt near the hull was coated to protect against Crevice corrosion and water ingress. It will eventually be painted over to keep the UV out.
G-flex has several times more flexibility than regular epoxy and a lot more strength than any sealant. It's recommended for structural hardware fitting. Admittedly a much more expensive option, but I'd previously purchased a bottle. As a bonus it will provide extra strength with some bonding all the way through the boltholes.
Re: C17 in New Zealand.
Posted: Sun Sep 05, 2021 5:45 pm
by TomW1
OWT looks like your moving along. Make sure that Styrofoam is water and oil and gas resistant. Other wise it is not useable in boat hulls. Well keep on building.
Tom
Re: C17 in New Zealand.
Posted: Sun Sep 05, 2021 8:19 pm
by OneWayTraffic
Thanks Tom. The foam is 6lb density Polyurethane. I got about 5cubic feet of it for about $30USD. I'll pour foam around the sides later.
Re: C17 in New Zealand.
Posted: Sat Sep 11, 2021 11:49 pm
by OneWayTraffic
Added a little sole to the front compartment. Rough cut 9mm ply to shape with three holes cut with the holesaw, coated the underside with epoxy. Poured foam in the bottom, with the plywood just sitting on top. Glassed over yesterday, faired over after this photo. I cut sheets of the block foam to make a rough fit to the hull. After seeing the pours down the side find every little gap and hole I filleted down the foam with putty. This will prevent leaks and keep the foam in place while I wait for a warm day to pour foam in between the sheets and the stringers. I'll put an inspection port in the front middle later.
Re: C17 in New Zealand.
Posted: Sat Sep 11, 2021 11:52 pm
by OneWayTraffic
Photos. I like the flat bottom to the storage compartment, so put it in. Also it becomes a kind of 'stringer' to the boat between Frame A and B. Since that sole is now part of the structure it gets biaxial glass, of which I have plenty.
Re: C17 in New Zealand.
Posted: Sun Sep 12, 2021 1:26 am
by Fuzz
Is some of that foam being used to form stringers? You probably have said and I just missed it.
Re: C17 in New Zealand.
Posted: Sun Sep 12, 2021 2:55 am
by OneWayTraffic
Not exactly. I could use some glass on one side to tab them in, but I am currently just planning to use them as a dam to hold the pour foam. Drainage down between so if water ever gets in I will know. I'm sure that the foam adds some strength but couldn't put numbers on it. I may secure the foam to the sole, it's built up to that level so it's all close to coplanar.
Re: C17 in New Zealand.
Posted: Sun Sep 12, 2021 5:04 am
by OneWayTraffic
Fuzz wrote: ↑Sun Sep 12, 2021 1:26 am
Is some of that foam being used to form stringers? You probably have said and I just missed it.
I did think about adding some stiffeners in between the existing ones right where the trailer rollers would go. Decided against in the end. The trailer I got has keel rollers and after getting it I removed the keel skeg and replaced with a larger flat one: glassed in and aluminium flat bar glued on. This will support most of the boat’s weight. The keel area is extremely strong even without it. I have some side skids and rollers for extra support.
Re: C17 in New Zealand.
Posted: Sun Sep 12, 2021 11:15 pm
by TomW1
One Way Traffic please do me a favor and do not use rollers unless they go directly under the stringers. They are notoriously know to form themselves to the bottom of the boat leaving dimpls where they rest against it. For the C17 it would even be better to use planks with carpet or the new glass type glides. Rollers are not needed for a C17 and can do more damage than good. If you insist on them put them in the proper place.
Good luck with your decision. Tom
Re: C17 in New Zealand.
Posted: Mon Sep 13, 2021 4:10 am
by OneWayTraffic
Tom nearly every boat in NZ sits on a roller trailer. They do not cause a lot of issues. Bunks are generally a non starter in NZ due to the ramp conditions we have here. The boats are built to handle it. The typical aluminium trailer boat here has a hull thickness of 3/16" to 1/4" for bigger boats. I don't know exactly the hull thickness of glass boats, but every single one in NZ sits on a roller trailer. If it didn't work it wouldn't work. But it does so it does.
I know that it's better to spread the weight. The keel in my boat is built to spec and then has a skeg on top, glassed in with aluminium flat bar. This will hold the majority of the weight. There are skids ( metre long bunks with plastic skids) at the back supporting the transom area. I will try to put these near or under the stringers. I have two wobble rollers further forward to provide extra side support. They will not hold a lot of weight.
I did do my Maths on this; I am confident that this is more than sufficient, even on NZ roads.
Re: C17 in New Zealand.
Posted: Mon Sep 13, 2021 4:21 am
by OneWayTraffic
This picture shows the setup. The weight distribution would be at least half on the stoutly built keel and most of the rest on the rear skids. I might have made the skis longer but they wouldn’t make full contact along the length anyway. I might make longer ones later. The rollers are not in this picture but are positioned further forward under the third crossbar. They are adjustable to only stabilise the boat side to side. No real weight in use.
The keel rollers are unlikely to dimple the aluminium that is glued to the skeg. The keel layup is 5 layers glass, 6mm ply, four layers glass,18mm skeg then two layers glass and 3mm flat bar. Estimated weight per keel roller under 50kg.
If I’m not happy with it adjustments will need to wait until I have the boat on the trailer. I might make a pair of longer UHMWPE covered skids for the back but want to get it on the trailer first.
Re: C17 in New Zealand.
Posted: Mon Sep 13, 2021 1:48 pm
by Fuzz
I have seen you speak about the boat launches there a couple times. I am just wondering what is different there? I fully understand that local conditions often times dictate how things are done. Most folks do not have to deal with 30 foot tide ranges and the current they bring but this is normal for me.
Re: C17 in New Zealand.
Posted: Mon Sep 13, 2021 3:04 pm
by OneWayTraffic
Tidal ranges are one thing. There are several places in NZ with enough of a range where you can launch into water but the ramp will be completely dry at low, and you are dragging the boat over mudflats. Other places without that tidal range (sea or lakes) have no built ramps at all, you just back the car into the water. Anyway if you buy a boat in NZ, 95% of the time it will be on a roller trailer. You can't even get a bunk trailer in larger sizes (over a 14' boat say) unless it is custom built for the boat, or you take off the rollers and build your own bunks. Many older boats in NZ have keels built very strong and were designed to sit on the keel on the trailer. My keel roller trailer is 40 years old, so I gave it a complete rebuild. It seems the older trailers last longer than new ones. Many modern trailers have box section, which rusts from the inside out in under 10 years if you don't look after it right.
I think some of this is tradition; I see no reason why even a heavy glass tub will not slide right off two plastic covered skids on a decent slope. The other part of this is that since most boats in NZ are trailer launched every day rather than left at a dock, and we are a small country where people may trailer to either coast, launch from a variety of places with different tidal conditions and our few trailer manufacturers need to design for a wide variety of boats, and wobble rollers are easier to setup for a hull, wobble rollers are the norm. They also make it much easier to offload the boat onto the lawn for DIY repairs.
Anyway my trailer is best described as keel rollers with skids. After getting the trailer I modified the build of the boat to suit. The keel can handle the load, the current donor boat rolls right off and cranks right on. I will check and possibly rebuild the skids once the C17 is on the trailer, as early as this summer.
Re: C17 in New Zealand.
Posted: Mon Sep 13, 2021 6:26 pm
by TomW1
I hope you make September that is the beginning of your Summer. Enjoy your boat you have done a wonderful job on her.
Tom
Re: C17 in New Zealand.
Posted: Mon Sep 13, 2021 9:31 pm
by BarraMan
I have a somewhat unique perspective on this issue as my boat has been on both a bunk trailer and a roller trailer!

It started out on a bunk trailer - typical USA style alloy trailer with rubber torsion bar suspension and wide plastic bunks of some sort. It was custom fitted to the boat - so the bunks sat directly under the stringers. There was no support under the keel. It was essentially drive on/drive off and OK for launching and retrieving provided you sank the trailer sufficiently to take some weight off the bunks. However, the bunks did do some scraping damage to the bottom of the boat which was: 2 pack polyurethane top coat, over 2 pack polyurethane undercoat, over epoxy/graphite, over multiple layers of glass cloth.

One trip to the Northern Territory destroyed the suspension on that trailer - so it was replaced with a custom built alloy trailer with roller/rocker spring suspension. The builder talked me into a keel roller ladder and support rollers that were also aligned with the stringers.
This trailer is easy drive on/drive off and a Boat Catch makes it easily handled solo. So I can rock up to a boat ramp in most conditions and quickly launch or retrieve a 22' boat solo. The keel rollers a closely spaced and seem to support the hull well. The side rollers just keep the boat level and don't carry any significant load. The keel of my boat has at least 16 layers of 12 oz biaxial glass cloth (9 on the outside and 7 on the inside. Before each big trip I get under the boat and inspect the bottom of the hull and keel and tap it with a small hammer to check for any weakness. The boat has now done about 25,000 miles on this trailer and many many launches and retrieves. It has nil damage to the hull that I can detect.
So far I have not found a similar pic of the roller trailer - but I’ll keep looking!
Essentially the same as this - with red rollers!

Re: C17 in New Zealand.
Posted: Tue Sep 14, 2021 2:50 am
by OneWayTraffic
Thanks for that Lee. That is pretty much how I plan to support my boat, which weighs a lot less than yours. The keel is pretty much the strongest part of any boat, and is an easier target than lining up on stringers exactly. Got a picture of the trailer sans boat?
Re: C17 in New Zealand.
Posted: Fri Sep 24, 2021 10:32 pm
by OneWayTraffic
Major milestone today. Just got it in while the sun was still shining and warm. Weather change this afternoon so I’m inside with a cup of tea and waffles looking at the wind and rain come in.
I was surprised at how fast that foam kicks off once mixed.
I’ll have some muffin tops to trim next weekend. Then off to get more plywood and get the sole on.
Re: C17 in New Zealand.
Posted: Sat Sep 25, 2021 12:23 am
by Fuzz
Is your foam blue or is it the light coming through the tarp that makes it look that way?
Be happy about a little wind and rain, at least you are not looking at f@#%&ing snow

Re: C17 in New Zealand.
Posted: Sat Sep 25, 2021 1:29 am
by OneWayTraffic
Definitely a blue/green foam. Most of the pour went ok, I did have one small area where it's gotten too much air in it and I can push holes in it. I'll cut that back and seal over it, or more foam.
I don't want any water traps in there at all when the sole goes down. Any gaps in the foam will either be filled with more foam, putty, or a hole drilled to allow drainage. Lowest parts of every compartment have either a limber or an inspection port.
NZ is known for it's wind, right in the middle of the roaring forties. Southern hemisphere doesn't have a lot of land in it, so the wind picks up speed over the ocean. NW gales gusting to over 100km/h in exposed places are fairly common. But not many tornados or hurricanes, so I'm not complaining.
Re: C17 in New Zealand.
Posted: Sat Sep 25, 2021 2:45 am
by TomW1
Nice job on the foam as I recall from my plans that is where Jacques designated it go to make the C17 unsinkable. Love the color.
Tom
Re: C17 in New Zealand.
Posted: Sat Sep 25, 2021 5:53 am
by OneWayTraffic
TomW1 wrote: ↑Sat Sep 25, 2021 2:45 am
Nice job on the foam as I recall from my plans that is where Jacques designated it go to make the C17 unsinkable. Love the color.
Tom
I have some left to go under the gunwales and along the sides above the waterline.
Re: C17 in New Zealand.
Posted: Sat Sep 25, 2021 12:07 pm
by TomW1
OneWayTraffic wrote: ↑Sat Sep 25, 2021 5:53 am
TomW1 wrote: ↑Sat Sep 25, 2021 2:45 am
Nice job on the foam as I recall from my plans that is where Jacques designated it go to make the C17 unsinkable. Love the color.
Tom
I have some left to go under the gunwales and along the sides above the waterline.
Good move that will keep her upright also.
Tom
Re: C17 in New Zealand.
Posted: Sat Sep 25, 2021 6:52 pm
by OneWayTraffic
Someone on another forum asked me a question about the foam. I replied in some detail and thought it might be worth a cross post here.
I put a lot of thought into this, as I really don't want to be ripping off the sole and digging out sodden foam ten years down the road, nor do I want to end up a statistic.
Standard 2 part polyurethane foam, that I bought from an industrial supplier in ChCh. The blocks are high density foam 100kg/cubic metre and the pour foam was partly the same high density and mostly a standard 33kg foam. All supposed to be closed cell.
I am aware of the potential for it to absorb water. Apparently this is mainly due to not being mixed perfectly with a 1:1 ratio, at the right temp and humidity, or a bit of water gets in through where the denser skin has been cut and then through hydraulic action, slamming of the boat, or freeze thaw cyclesmigrates its way through over years.
Otherwise it is pretty waterproof, especially the polyurethane block foam made in a factory at optimum conditions which is therefore of higher quality.
Thinking about all this the key in my mind is to a) do a good job of laying the foam b) keep water from sitting in there and c) allow a method of checking and removing water from compartments. The foam is there to allow me to sleep better at night without that nagging what if...
The middle compartment is by far the biggest. I glued two layers of high density block foam down the middle of it as a dam. This is quite strong; a small square will support my weight. Then high density 2 part pour on the inside of them to help secure and support.
Then multiple pours of the 2 part standard density foam between that and the stringers. That explains all the little muffin tops. One or two places where the 2 part didn't set off correctly, which I will mostly dig out and replace. Once I've cut it level I'll go about plugging and sealing any little places where water can gather. I'll keep the muffin tops for later if they are good.
Outside compartments have the block foam just glued to the floor with some high density pour foam on the upper side between foam and chine. The high density takes longer to go off; I underestimated how far it would migrate. It does do a good job of plugging holes and water traps.
Each side has two separate compartments, the middle just one big one. In either case the lowest part of every single compartment is left bare and uncovered. Should water ever get inside in any significant amount it will end up there and I will know about it.
When the sole goes on it will be epoxy coated and glassed both sides and glassed in all around the perimeter as per the plans. There will be five inspection ports. Circular screw in type. To avoid leaks through these they will not be in places where water can gather. Two at the back will be partly up the vertical motorwell bulkhead, the other three will all be on the sole, but either inside a hatched compartment or at least under a shelf and on a raised surface. I'll seal them as well as I can, but no water should ever be sitting up against the inspection ports. There will be some small breather holes but not where water should get in, and if it does, I will know.
The cockpit will be designed so that if and when rainwater gets in, it will run to the rear and either out the back or out two plugholes I'm putting in the sides. No nooks and crannies for it to accumulate. Benches will have either a sloped uphill side or gaps under to let water by, either salt, rain or when I hose it out.
The boat will be stored outside but under a cover. I may get one custom made eventually. Thinking about a carport as well to keep UV and the worst of the rain off.
If water ever gets into that foam I will be surprised.
There will be foam under the gunwales as well for a measure of upright buoyancy. Not yet 100% sure what exactly it will look like.
As you can see I didn't just come up with this plan over a couple of beers.
Re: C17 in New Zealand.
Posted: Sat Sep 25, 2021 7:36 pm
by BarraMan
I did something similar with my boat - a combination of Microlen high density foam blocks and 2 pack polyurethane poured foam. The way my boat is built, its almost a double-hulled foam sandwich!
I know my boat will not sink - I've done the maths. Theoretically it will float upright if swamped - but I haven't tested that.
Where I go, the boat is our life support system. Its very remote and hours from any help. Lose your boat and you are in a world of hurt, in a very inhospitable environment.
Here's some specs on Micolen.
Microlen® Marine Buoyancy Foam
A New Cross-Linked Buoyancy Foam Developed for Positive Buoyancy in Small Vessels. Microlen® closed cell foam is cross-linked, a chemical irreversible process that makes the foam inert to solvents and gasoline. Microlen® will not cause any electro chemical reaction when coming into contact with wood, steel, aluminium alloy, glass fibre laminates, paints, varnishes or adhesives. Microlen® has high impact resistance and will not powder or crumble, making it suitable for installation without the need to seal in an outer skin. The foam is easily cut with a standard bandsaw. Microlen® will only absorb fractional amounts of water because of its closed cell structure.
Re: C17 in New Zealand.
Posted: Sat Sep 25, 2021 7:56 pm
by OneWayTraffic
BarraMan wrote: ↑Sat Sep 25, 2021 7:36 pm
I did something similar with my boat - a combination of Microlen high density foam blocks and 2 pack polyurethane poured foam. The way my boat is built, its almost a double-hulled foam sandwich!
I know my boat will not sink - I've done the maths. Theoretically it will float upright if swamped - but I haven't tested that.
Where I go, the boat is our life support system. Its very remote and hours from any help. Lose your boat and you are in a world of hurt, in a very inhospitable environment.
Here's some specs on Micolen.
Microlen® Marine Buoyancy Foam
A New Cross-Linked Buoyancy Foam Developed for Positive Buoyancy in Small Vessels. Microlen® closed cell foam is cross-linked, a chemical irreversible process that makes the foam inert to solvents and gasoline. Microlen® will not cause any electro chemical reaction when coming into contact with wood, steel, aluminium alloy, glass fibre laminates, paints, varnishes or adhesives. Microlen® has high impact resistance and will not powder or crumble, making it suitable for installation without the need to seal in an outer skin. The foam is easily cut with a standard bandsaw. Microlen® will only absorb fractional amounts of water because of its closed cell structure.
Looks ideal. I remember looking around for a supplier of that earlier on. Couldn't find one in NZ, so I went another route.
Re: C17 in New Zealand.
Posted: Sun Sep 26, 2021 9:01 am
by Dougster
"Double-hulled foam sandwich"
I think that way of my LB22. It's almost a huge surfboard with sides. I would be surprised too if any water has gotten in there.
Dougster
Re: C17 in New Zealand.
Posted: Tue Oct 05, 2021 6:32 am
by OneWayTraffic
Well I went to go buy the remaining plywood I needed. Went with 9mm rather than 12mm on the sole, as I have enough biaxial to glass both sides. Should even be cheaper, factoring in the already bought glass and cost differential between 12mm and 9mm plywood.
Speaking of cost differential the plywood was over 1.5 times the price Jan 2020. If I'd bought all I needed back then I'd would have saved hundreds of $$. COVID mucking up the freight companies.
There was a silver lining though. I ordered 2 sheets of 6mm (cabin top and forward deck) and 5 of 9mm (sole, berths and seating.) They said they'd give me a coversheet to keep the ply dry on my trailer, and they did. A 4mm sheet of Meranti BS1088 marine!
I'm now thinking about leaving the C17 open cabin and making the CC14 with one sheet of 6mm and 4mm ply for the sides.
Re: C17 in New Zealand.
Posted: Thu Oct 07, 2021 11:11 pm
by OneWayTraffic
Sole dry fit. I took my time painstakingly measuring from the boat and then cutting slightly oversized with repeated trimming and grinding and was rewarded with an almost perfect fit with an even gap most everywhere.
I managed to save a sheet of plywood over the nesting diagram. This does mean that one of the butt blocks is quite close to a frame. There's just enough overlap though I'll reinforce the join on that side. I'd forgotten about rebating the foam there for the butt block, so pulled out Mr Grinder with 36 grit. 10 seconds later I was ankle deep in foam dust. It does take up a lot less space as dust in the trash compared to the foam.
The front panel halves will be taped both sides and a butt block where the inspection port will be. This will be on top of the sole to keep it proud of the deck, but under the berth to save toes.
Re: C17 in New Zealand.
Posted: Fri Oct 08, 2021 2:37 pm
by TomW1
'Looking good OWT. Keep up the good work. Like that you built the raised shear.
Tom
Re: C17 in New Zealand.
Posted: Fri Oct 08, 2021 3:08 pm
by OneWayTraffic
Hey Tom. it's been a while since you've had the C17 plans IIRC, so you may have forgotten that this is the standard C17. I've omitted the transom boxes is all, going for a full width motorwell.
Re: C17 in New Zealand.
Posted: Fri Oct 08, 2021 3:26 pm
by TomW1
OneWayTraffic wrote: ↑Fri Oct 08, 2021 3:08 pm
Hey Tom. it's been a while since you've had the C17 plans IIRC, so you may have forgotten that this is the standard C17. I've omitted the transom boxes is all, going for a full width motorwell.
Gotcha.

Tom
Re: C17 in New Zealand.
Posted: Fri Oct 08, 2021 11:38 pm
by OneWayTraffic
Glass going down on the underside of the stern sole piece. It overlaps onto the edge of the buttblocks to further tie them in. 9mm sole with 400gsm glass turned out to be cheaper than 12mm ply in my case.
Re: C17 in New Zealand.
Posted: Sun Oct 10, 2021 10:07 pm
by OneWayTraffic
Major milestone last weekend.
Glued the rear sole in. Took my time using a Grinder with 100grit disc to take the tops of the stringer and cleats to wood--I'd never epoxy coated these systematically, but a lot of drips and drops. Then a coat of epoxy to prime and another on the underside of the sole, just over the stringers and frames. Then a coat of epoxy thickened to near ketchup consistency on top of that and left to gell.
After an hour I mixed about 500ml (1 pint) of epoxy and thickened with chopped glass fibres, silica and microfibres to a glugly peanut butter paste. The chopped fibres allow the mix to be a little wetter and still hold together very well. Also good for filling gaps. This was piled on the stringers and mounded into a little inverse V with the sole on top. Then with my son's help we dropped the sole on and weighed it down. I filled in the edges today to stay within the primary bond window. I'll clean it up and glass once it's fully cured. The milled fibres are great but they make it impossible to keep things clean.
What I didn't do is glue the block foam to the underside of the sole. In this back section there's a gap, it's not completely level with the stringers. I'm wishing I had (I'd thought about it) as there's noticeable flex when I stand on the middle of the back panel, even with the glass underneath. I can think of a few remedies for it, but will wait and see if it improves once the epoxy is fully cured and edges taped. Front sections will have the high density foam glued to the sole.
Re: C17 in New Zealand.
Posted: Tue Oct 12, 2021 1:12 pm
by VT_Jeff
Congrats on the Milestone OWT, and great description of the process!
Re: C17 in New Zealand.
Posted: Tue Oct 12, 2021 8:46 pm
by Dan_Smullen
Feels good to stand on something flat, doesn't it!
Re: C17 in New Zealand.
Posted: Thu Oct 14, 2021 1:12 am
by OneWayTraffic
Dan_Smullen wrote: ↑Tue Oct 12, 2021 8:46 pm
Feels good to stand on something flat, doesn't it!
VT_Jeff wrote: ↑Tue Oct 12, 2021 1:12 pm
Congrats on the Milestone OWT, and great description of the process!
Thanks you two. I'm not sure if flat is the right word. About 5/32th" of give when I step in the middle. Some of that might be hinging around the glue at the framing. If so it will improve when I glass the top. Glass on top will be in tension at the frames.
I was thinking about drilling holes to fill with foam or connect the high density foam to the underside of the hull, but I think I'll use plan B and put a chilly bin (icebox) there. I have block foam left over for it, so this will be a good use. I'll put it right in the middle of the panel, up against the motorwell bulkhead. Room to fish either side, strong enough to sit or stand on. Glassed into the sole it will act as very substantial framing. I was never keen to spend $500 or more on a commercial one big enough for a Hapuka (groper) or kingfish (Amberjack).
Re: C17 in New Zealand.
Posted: Thu Oct 14, 2021 6:42 am
by Dan_Smullen
What’s the span between the stringers? 30” or so? Also, 400 gram is equivalent to our 12oz?
It would take a fair amount of glass to stiffen 9mm spanning that width, I believe, but the chilly box would give it a lot of rigidity from the top.
On the forward sections, will it be possible to bring the edges of the foam dams up to the top of frames/stringers? They’ll act as joists and help support the floor over wide spans.
I’m jealous we don’t have blue expanding foam stateside.
Re: C17 in New Zealand.
Posted: Thu Oct 14, 2021 1:21 pm
by OneWayTraffic
Hi Dan. Span is about 32" OC, or 30" from the inside points. This is a bit much for 9mm (3/8th) ply to span, even with glass under it seems. I am definitely going to bring that block foam to the sole in the forward sections. That will leave a span of 16".
In the meantime glass over will help a bit, and strength shouldn't be an issue.
Re: C17 in New Zealand.
Posted: Sat Oct 23, 2021 10:53 pm
by OneWayTraffic
Well after a bit of time on the pondering stump, I cut out some of the floor and filled some of the back section in with foam. There's still room in there for water to get out, but now it's up to the sole in the middle there.
Photo of the hole with foam in, then routed out using the grinder primarily, and then with the lid back on.
Re: C17 in New Zealand.
Posted: Sat Oct 23, 2021 10:55 pm
by OneWayTraffic
Last photo is of the front sole. Now taped together and holes cut out for the inspection ports. I'm cutting a little oversize, and filling in with putty about where the screws will go.
I’ll try to glass the underneath today or tomorrow then on she goes.
Re: C17 in New Zealand.
Posted: Mon Nov 01, 2021 3:57 am
by OneWayTraffic
Finally got the sole on. Spent way too much time on the inspection port holes. Glued down on to a thick mix of chopped fingers and cabosil. Filled around the sides then micro balloons over as I don’t want to sand chopped glass any more than I need too. Needed to use screws to lock the front down flat so had those holes to fill as well. I screwed up the little stern sole pieces as well, which explains the extra wood sistered on there. Motor well sole is at an angle and will drain to the sump. Possibly next week I’ll be able to glass it.
Edit: spot where my iPhone doesn’t understand what chopped fibres are…
Re: C17 in New Zealand.
Posted: Mon Nov 01, 2021 5:40 am
by Jaysen
I was wondering who wouldn’t be able to pick their nose anymore.
Re: C17 in New Zealand.
Posted: Mon Nov 01, 2021 6:36 am
by OneWayTraffic
Jaysen wrote: ↑Mon Nov 01, 2021 5:40 am
I was wondering who wouldn’t be able to pick their nose anymore.
I'm pretty sure that the bones would be a good structural reinforcement. That chopped glass on the stringers looks rough though. Thanks to the inspection ports I could reach under in places and see that there's ooze out. I'm sure it looks like crap in under there, but I don't need to look at it anymore so it's all good.
Re: C17 in New Zealand.
Posted: Mon Nov 01, 2021 7:48 am
by piperdown
Making some steady progress!
Re: C17 in New Zealand.
Posted: Sun Dec 05, 2021 4:01 am
by OneWayTraffic
Over the last month I got the sole taped in, glassed over and filled the weave.
Today I got the rear cabin frame in. One layer tape each side. Straps are to hold the sides in while the glue cures, they were sagging out a little. Cleats on the bow side locate the berths. Frame was glassed both sides with 100g cloth before installing. I used some scrap pieces of plywood to make the side supports.
Sitting only headroom in the cabin. 85cm to 100cm max to the roof from the bunk. Under the bunk will be left open. Enough room for a tote tank or life jackets. Possibly some block foam under the bunks. Flotation and insulation if I ever sleep on board. Had considered an open layout but fishing down here is mostly drop and wind. I might be able to get on the cabin roof but walk around in a 5.3m boat means centre console.
Further to the cleats vs fillets debate I've gone with cleats on the back of the cabin frame and will finger fillet under the berths. Call me a bob each way.
Re: C17 in New Zealand.
Posted: Sat Jan 08, 2022 4:09 am
by OneWayTraffic
Motor well, Side benches, leaning post and all frames taped in. On the left side will be a 115L(about 30 gallons) capacity icebox instead of storage under the seats. This will be framed in 9mm ply and use polyurethane block foam glassed over for the inside. I’ll run a drain tube out the side with a bung. There will be a smaller cooler or shelf near the transom. Might do double duty as a bait tank but I don’t really live bait much. Going away for a week but when I get back I’ll glass the sides with a light cloth.
Re: C17 in New Zealand.
Posted: Wed Jan 26, 2022 3:53 pm
by OneWayTraffic
Inside is glassed with a light cloth and some initial fairing over. No photos of that but I do have some initial photos of the cooler I am building under the port bench. Construction is plywood with a light glass on the hull side with pour foam between the cooler and the hull proper. The other panels have block foam covered in a micro balloon putty then 400g biax over that to protect the inside from fish spines etc. All the inside will be coated the same as the outside hull. Aluminium and silica filled putty. I am fabricating it outside of the boat and will assemble with fillets inside. I don’t think I need to tape the inside corners if I use a big enough fillet.
Re: C17 in New Zealand.
Posted: Sat Jan 29, 2022 12:32 am
by OneWayTraffic
Here’s the start of my cooler. Plywood side in from the hull side. The hull side curves a bit here so it’s as close as I can get it and have it perpendicular. Glass tube to join the two and out through the hull to drain most the water and slime out. I filled all around the tube with a thick chopped glass putty to keep it all in place and watertight. Tomorrow’s plan is to fix it in place in place with glass and fill with foam once cured. Then the other side goes on, ends and lastly the top.
Re: C17 in New Zealand.
Posted: Mon Mar 28, 2022 12:21 am
by OneWayTraffic
Cooler is done, and the benches are almost good to go. I'll paint inside the lockers first. The Cooler has got foam all around and is about 3.5'x1'x1.3' in dimensions.
Re: C17 in New Zealand.
Posted: Mon Mar 28, 2022 12:23 am
by OneWayTraffic
Photos.
Re: C17 in New Zealand.
Posted: Mon Mar 28, 2022 2:14 pm
by TomW1
Looking good OWT. Tom
Re: C17 in New Zealand.
Posted: Wed Apr 20, 2022 4:19 am
by OneWayTraffic
Front berths dry fit. All credit to the designer as I cut to the plans and planed to an epoxy fit in half an hour. 200g glass under and some reinforcement under for the hatch and cutout. I’ll glass in the little stringer as I expect that to get stood on from time to time. May need support to the sole under. I’ll be storing the aux outboard underneath stern side of frame b.
Re: C17 in New Zealand.
Posted: Wed Apr 20, 2022 12:35 pm
by glossieblack
Looking good.
Re: C17 in New Zealand.
Posted: Sat May 14, 2022 3:50 pm
by OneWayTraffic
Big shout out to BBC who sent me the full digital plans for the CX19 when I just asked for a peek at the developed panels and offsets for the cabin. I will be building the cabin like the CX19, but with a bit (maybe 100mm) more height under (compensating for the smaller hull side) to get the bare minimum sitting headroom under. Depending on how it looks on the boat it may be more slouching headroom.
. I will spend very little time in the cabin and don't want to compromise looks for comfort much in this case.
The sheerline is quite similar between the two, but the Cx19 has wider gunwales and obviously is a bit bigger overall. The cabin is specced from 6mm ply, decks and cabin top cut from the same pieces. Assembled stitch and glue fashion and then removed from boat to glass the inside. Toughened glass windscreen on top. Since my boat has a standing console starboard and a bench to port I may put in a half windscreen.
This is the scaled drawing full size from the old study plans. I found this higher quality version thanks to wayback machine.
- CX19.PDF
- (52.48 KiB) Downloaded 28 times
Re: C17 in New Zealand.
Posted: Sat May 14, 2022 8:28 pm
by glossieblack
OneWayTraffic wrote: ↑Sat May 14, 2022 3:50 pm
I will be building the cabin like the CX19, but with a bit (maybe 100mm) more height under (compensating for the smaller hull side) to get the bare minimum sitting headroom under. Depending on how it looks on the boat it may be more slouching headroom.
. I will spend very little time in the cabin and don't want to compromise looks for comfort much in this case.
Good call.
Re: C17 in New Zealand.
Posted: Sun May 15, 2022 1:54 pm
by TomW1
OneWayTraffic I want to make a suggestion to you. Since the CX19 is larger than the C17 make sure the cabin does not extend to far back as you don't lose deck space on 0.your C17. I like you prefer the CX19 cabin over the C17 cabin just be careful not to lose to much deck space and the C17 is one of my favorites and have the plans, you are doing a nice job on her.
Tom
Re: C17 in New Zealand.
Posted: Mon May 16, 2022 5:02 am
by OneWayTraffic
From frame A to Frame C is 1830mm. A bit more as it's round the sides. I have two scrap pieces of plywood from hull panels that are 2400mm long. The CX19 cabin is 2885mm long. That leaves about 600mm from Frame C back to act as a coaming or wing. The windscreen can sit on this and light targa top or bimini overhead.
Once the side decks are on, I'll build frame supports at B and C and run a batten from frame corner to frame corner up to the front. I'll take measurements from the boat and the cx19/c17 cabin side and use that to mark a template. Then dry fit, check and plane into shape before using the good ply. I can use the C17 cabin as a developed panel but will also have a look at the CX19 offsets and see how that fits.
Hopefully it will work. The roof is easier as I'll have the shape from leftover ply after cutting out the decks, cut oversize bend to fit and then rout off the excess.
If I get it all done I'll try to write down the final offsets for any future builders.
Re: C17 in New Zealand.
Posted: Sat May 21, 2022 9:07 pm
by OneWayTraffic
Finally got a fine warm weekend to glass in the front berths. Taped in with 400g biax cut to under 10cm width and a 200g woven tape over. I put a very light cloth over the whole lot, more for checking insurance and an indication that everything is properly wet out. The light cloth uses no more epoxy and not much more labour. I had to set up a fan heater and plastic drop cloth to cure it late afternoon once I lost the sun.
It would have been much cleaner to glass both sides in the garage. In the event I had a lot of wrinkles to cut out this morning and so put some fairing on top. I’ll probably not be able to do much until Spring, but will do a bit more minor fairing. Most of it will be painted white and some will be covered with a fabric lining or squabs.
Re: C17 in New Zealand.
Posted: Tue Jun 28, 2022 11:00 pm
by OneWayTraffic
Well just after the shortest day we had three consecutive days of fine settled weather in a long weekend. So I got a little done.
Rear motorwell compartments now have lids, glassed both sides and taped in. 200g on the outside and 100g inside. 100g is a very light cloth, almost surfboard quality and really only serves to stop minor abrasions and checking. It costs very little so is worth it in my view. I applied a bit of fairing to fill the weave as well, before final cure but don't have a photo as it's under plastic to keep it warm enough to cure.
Transom U-bolts are installed. Sealed in with 3M4000uv in an overdrilled and epoxy filled hole. The sealant makes an ungodly mess. I thought I'd ruined the aesthetics, but a rag with acetone works wonders.
Inspection hatches also sealed in on generous amounts of 3M4000 as a gasket. Should be sealed tight against water, but time will tell. Normal use should not see a lot of water in there, and both sides slope down to the holes draining into the motorwell sump anyway. About the only way I can see water getting in is if I take a wave wrong and need to use the scupper tubes to bail. Then water would run over that lip.
I've decided to have the gunwales at the back of the boat level rather than sloping outwards. Slightly easier to build and gives a nice seat. I'll run a gunwale lip over the motorwell as well.
I drilled a hole in the sump earlier for the transducer. Not installed it yet, but it's drilled a 9mm plywood backing plate is in, and the hole is sealed. I'll sand and put some more epoxy on it before sealing in the transducer.
Re: C17 in New Zealand.
Posted: Mon Oct 17, 2022 12:49 am
by OneWayTraffic
Days are getting longer and warmer so it’s back to the boat. I’ve left the plans behind; my word, it slows things down!
I’ve cut out the front and side decks and got some cabin sides on. I couldn’t figure out how to get a closed cabin the way I liked it so will leave the roof off. Compared to the plans my boat has a bit more room in the cockpit in front of frame C, lowered cabin sides at the front and a more angled windshield. All those parts were cut from scrap 6mm plywood. The windshield was a real pain building it piece by piece and templating from the boat. But I prefer this to wasting a whole sheet of plywood cutting it in one piece then discarding all the holes. Paint and fairing will cover all my sins and the Perspex will likely be tinted as well.
A biaxial carbon sleeve arrived today from Amazon. That will go on two 35mm wooden dowels that will form supports for the t-top. Then I’ll wrap a layer of glass over the whole thing to protect the carbon. Hopefully I’ll be able to clear coat but paints an option as well. The top will be made from 6mm ply and built off the boat. Just about the last thing I do will be to glue it in place.
Re: C17 in New Zealand.
Posted: Sat Dec 17, 2022 11:29 pm
by OneWayTraffic
Slow progress with the weather and finishing school for the year. The boat is nearly completely done structurally, just console lids and glassing the gunwales and outside cabin. It’s satisfying to get the little details in place and thinking about how I’m going to use it.
Re: C17 in New Zealand.
Posted: Sun Feb 12, 2023 6:32 pm
by OneWayTraffic
Some progress photos.
It's basically done structure wise. I've got glass on all surfaces that are going to get it, and there's just some fairing to go really, before the fittings go on.
Re: C17 in New Zealand.
Posted: Sun Feb 12, 2023 6:39 pm
by OneWayTraffic
Photos of the hardtop. I’m calling it that though it’s more like a t-top. 6mm ply 1800mm by 1100mm. Slight camber in it, glassed on the top with carbon fiber (just because) and underneath a bit of wood framing and light glass. The underside will be left bright and the top will be painted white. I’m going through the design process of the supports but it will be as light as possible. The top weighs about 10kg currently. I’m thinking that it will be bolted in so I can remove it for storage.
Re: C17 in New Zealand.
Posted: Mon Feb 13, 2023 9:43 am
by Dan_Smullen
Looks good! Did you laminate in a form?
Any notable takeaways after laminating with cf?
Re: C17 in New Zealand.
Posted: Mon Feb 13, 2023 1:40 pm
by OneWayTraffic
I just supported the plywood from both sides and then laminated the cf over the natural sag of the wood. I used WEST 207 and wet out the wood underneath first. Then with help from my son rolled out the carbon. Then flipped it and let it sag the other way while putting on the glass. Not much sag as the cf is now in tension. Then I cut the wood beams, about 3/4” by 1 1/4 inch and kerfed them. Glued them in place with some weights in the middle to keep the plywood cambered a little. Final result is about 1” camber or less. I wanted it just cambered enough to let water run off and to stop the plywood from vibrating. More camber would require a form for sure.
Cheaper than a metal t-top by far but the metal one would look nicer. It’s a good option for someone that wants to put a longer lasting top on an existing metal framework though. I’m doing everything myself that I can so I’ll make wood cf and glass supports for it. I’m still working through those details, making it up as I go.
Re: C17 in New Zealand.
Posted: Mon Feb 13, 2023 2:03 pm
by Dan_Smullen
Seems to be the way to go once the panels are glassed around the mold!
Re: C17 in New Zealand.
Posted: Mon Feb 13, 2023 4:32 pm
by Fuzz
At last! Pictures of a real work area and not one trying to be an operating room.
Re: C17 in New Zealand.
Posted: Mon Feb 13, 2023 4:42 pm
by OneWayTraffic
Place is a mess for sure. But it's nice to work under an actual roof, rather than in a tent.
I'll clean it all out properly when done, but right now I'd just mess it right back up again so why bother?
Re: C17 in New Zealand.
Posted: Mon Feb 13, 2023 11:50 pm
by OneWayTraffic
Dan_Smullen wrote: ↑Mon Feb 13, 2023 9:43 am
Looks good! Did you laminate in a form?
Any notable takeaways after laminating with cf?
Biggest difference is that there is no clear indication that you’ve got enough epoxy on. It basically looks the same wet or dry. Prewet what you put it on, and measure out the correct amount of epoxy as well. It’s much stiffer than glass, but for something like this compounded plywood with framing probably wouldn’t need it. It does allow you to reduce framing though. I didn’t want 2 by 4s overhead. I’ll likely cf tape or glue an aluminium strip underneath to make a sandwich of sorts.
Re: C17 in New Zealand.
Posted: Tue Feb 14, 2023 9:23 am
by fallguy1000
OneWayTraffic wrote: ↑Mon Feb 13, 2023 11:50 pm
Dan_Smullen wrote: ↑Mon Feb 13, 2023 9:43 am
Looks good! Did you laminate in a form?
Any notable takeaways after laminating with cf?
Biggest difference is that there is no clear indication that you’ve got enough epoxy on. It basically looks the same wet or dry. Prewet what you put it on, and measure out the correct amount of epoxy as well. It’s much stiffer than glass, but for something like this compounded plywood with framing probably wouldn’t need it. It does allow you to reduce framing though. I didn’t want 2 by 4s overhead. I’ll likely cf tape or glue an aluminium strip underneath to make a sandwich of sorts.
Best way is to add a neat coat over the carbon so any sanding won't hurt it.
Re: C17 in New Zealand.
Posted: Tue Feb 14, 2023 3:23 pm
by OlivierP
Out of curiosity, I see that your cockpit gunwales and motor well bulkhead look horizontal, you have removed the camber of the original plan, and kept it on the front deck, is that right ? I'm currently considering what camber to use on mine, probably half the original design.
Re: C17 in New Zealand.
Posted: Tue Feb 14, 2023 4:28 pm
by Fuzz
News says you guys are having bad flooding. I hope it is not happening in your area.
Re: C17 in New Zealand.
Posted: Tue Feb 14, 2023 6:18 pm
by OneWayTraffic
OlivierP wrote: ↑Tue Feb 14, 2023 3:23 pm
Out of curiosity, I see that your cockpit gunwales and motor well bulkhead look horizontal, you have removed the camber of the original plan, and kept it on the front deck, is that right ? I'm currently considering what camber to use on mine, probably half the original design.
That's right. Frame C is pretty much as designed, except that instead of the designed cabin, I had the walls a bit closer to the sides, and about 150mm lower than designed. It's high enough to give shelter from the wind, but low enough that one can stand and cast over, or reach forward to get the anchor. A canvas canopy from the t-top to cover the windscreen is an option for camping, if I want to.
Frame D and the motorwell are cut straight and the gunwale curves between C and D from cambered to horizontal. With the open transom I think this looks better, and it's definitely better for sitting on. The gunwale is a great height to sit on and fish in good weather.
I did lose some storage space in the boat when I cut the transom straight, but it's easier to climb over and fix an auxiliary outboard to, and there's still room there for tote tanks and battery. There's also a little bit of side storage, a compartment under the skippers seat, a 30gallon cooler compartment on the left side (drain out the side), storage under the berths forward, some storage in the consoles, and the anchor locker forward.
Re: C17 in New Zealand.
Posted: Tue Feb 14, 2023 6:20 pm
by OneWayTraffic
Fuzz wrote: ↑Tue Feb 14, 2023 4:28 pm
News says you guys are having bad flooding. I hope it is not happening in your area.
Thanks for the concern.
I'm in Canterbury, about halfway down the South Island. We don't normally catch the cyclones here. In general NZ only gets a bad Cyclone once every generation or so. Last time was 1988. This one has certainly casued a lot of widespread damage. Auckland especially can't catch a break with really bad flooding only two weeks ago.
Anyway, so far all we've had is a gentle rain.
Re: C17 in New Zealand.
Posted: Sat Mar 25, 2023 1:31 am
by OneWayTraffic
Finally contracted sanding fatigue and put two coats of bed liner on. This is Bullyliner, a waterborne rubber coating. Brush or spray on and hides minor scratches and marks. Two coats a day. I’d recommend it for places where you want a tough coating and aren’t afraid of workboat style.
Re: C17 in New Zealand.
Posted: Sat Mar 25, 2023 3:59 pm
by TomW1
Good US product no VOC's like others. Yours looks good. Did you use the light gray?
Tom
Re: C17 in New Zealand.
Posted: Sat Mar 25, 2023 6:37 pm
by OneWayTraffic
Lightning grey yes. I’m using the last of it for another coat today, looking to touch up pinholes first and then wherever I’m expecting extra wear. I brushed up and under the gunwales as well, mostly just for protection vs UV reflection.
Re: C17 in New Zealand.
Posted: Fri Apr 28, 2023 11:45 pm
by OneWayTraffic
Took it out of the tunnel house for a sand and wash prior to paint. Few bits and pieces that I’d like to fill first. At the moment it’s a ten foot finish.
Re: C17 in New Zealand.
Posted: Tue May 02, 2023 12:43 pm
by pee wee
Well, from ten feet away it looks pretty good!
Re: C17 in New Zealand.
Posted: Thu Nov 30, 2023 5:14 pm
by OneWayTraffic
Finished and ready for fitting out, I'll be putting another coat of paint on as soon as I sand out some runs and drips. But from a distance it does not show, and that's fine.
Getting it around the house was a mission. But there was enough room. I made sure of that before I started building.
In the water this summer ready or not!
Re: C17 in New Zealand.
Posted: Thu Nov 30, 2023 9:28 pm
by TomW1
I assume your summer which means you have till March or so.
The boat looks good. Tom
Re: C17 in New Zealand.
Posted: Fri Dec 01, 2023 8:50 am
by fallguy1000
Is the blue gonna get awful hot down under?
Re: C17 in New Zealand.
Posted: Sat Dec 02, 2023 2:26 pm
by OlivierP
Congrats for completing the build, eagerly awaiting to see her on the water !
Re: C17 in New Zealand.
Posted: Sat Dec 02, 2023 6:48 pm
by TomW1
OneWayTraffic I would be glad to run the numbers through my prop calculator as I have done for many years and others here on the forum. Let me know the know the weight of the boat as it would leave the dock with people, gear and ice. Then what motor you have put on her. I have specs on all new motors and all older motors going back 20 years or so. This will kick out the ideal prop for your boat.
Regards, Tom
Re: C17 in New Zealand.
Posted: Sun Dec 03, 2023 1:22 pm
by OneWayTraffic
The 60hp E-tec I've already got has an Aluminium prop already. I'll see how it performs first. I'm not sure what the pitch and size are to be honest, but I'll have a look sometime.
Re: C17 in New Zealand.
Posted: Sun Dec 03, 2023 5:31 pm
by TomW1
OneWayTraffic wrote: ↑Sun Dec 03, 2023 1:22 pm
The 60hp E-tec I've already got has an Aluminium prop already. I'll see how it performs first. I'm not sure what the pitch and size are to be honest, but I'll have a look sometime.
Okay OWT I have the specs up for your 60HP ETEC and will wait for your initial test runs to see if you need to change the prop. With your motor you want top speed rpm's at 58-6000's for that motor.
Tom
Re: C17 in New Zealand.
Posted: Sun Dec 03, 2023 5:49 pm
by OneWayTraffic
fallguy1000 wrote: ↑Fri Dec 01, 2023 8:50 am
Is the blue gonna get awful hot down under?
Hopefully not. NZ has intense sun, but the temperatures usually stay moderate all year round.

