Page 1 of 1
C17 (Classic 17) in London
Posted: Wed Apr 20, 2005 6:59 pm
by WobblyLegs
Well guys, I'm finally starting the real boat!
Last year I built a 1:10 scale model of the boat to see how it all fits together -

More images of this model can be found at :
http://gallery.bateau2.com/thumbnails.php?album=287
Last Thursday I took delivery of a load of marine ply...
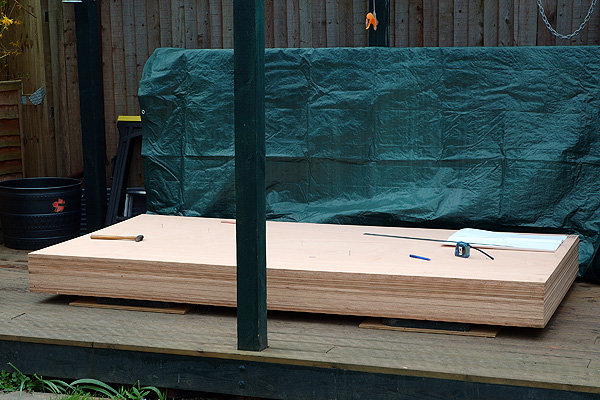
...which at some point I am hoping will become a BOAT!!!
I will keep adding pictures to the gallery for "Jack-a-Doodle" (I think this it what the boat will be called) in the gallery at:
http://gallery.bateau2.com/index.php?cat=12964
I will keep in touch.
Wobbly.
Posted: Thu Apr 21, 2005 12:10 pm
by Dane_Ger
Looks like you are all set . . . . keep us posted with your progress!
Posted: Thu Apr 21, 2005 10:44 pm
by Steve_MA
That looks like excellent work on the model. I wish I could make one of those. Can you describe how you did it (if you have the time and inclination). How long did that take?
Posted: Fri Apr 22, 2005 5:58 am
by WobblyLegs
Steve_MA wrote:That looks like excellent work on the model. I wish I could make one of those. Can you describe how you did it (if you have the time and inclination). How long did that take?
Steve, thanks for your comments...
I basically followed the original plans and construction technique. I re-drew the plans on a computer (my plans are metric, so I just added a decimal point before the last digit e.g. 76mm becomes 7.6mm). I'm actually finding marking out the full-size plans onto the ply easier than the computer transfer.
The only deviation from full size was the order of doing the joining. I started with the transom, added the motorwell sides and bottom, then frame E to give a stiff box at the rear to start joining hull panels to. In other words I never made a mould for the hull: the panels formed the shape quite naturally when bent to join the edges. I will add a couple of images later that will illustrate this quite clearly.
The bottom panels went on first, using super-glue to "stitch" the keel before joining with glass and epoxy. All still very flexible at this point.
I then super-glue stitched the frames to the bottom panels, to mould the sides around. They got broken out later to enable me to seal the inside. There are more pix in the album now.
Then the lower sides, followed by upper sides. All seams were glassed with a strip about 10mm wide, inside and out, as per full size (although only one layer) after which internal frames were added back in to the structure. I was still a bit concerned with the flexibility of the structure at his stage.
Next, the whole of the bottom and small overlap onto the lower side was glassed (one layer). I have added an image of this to my album. After that I added the deck and the entire structure "suddenly" become extremely rigid and strong. A sigh of relief.
The decking effect is made of small 0.2x5mm wood strips, spot super-glued in place and then painted over with epoxy. I'm still undecided if I am going to repeat this on the full size boat, but I would like to. It depends on whether I can find suitable wood that won't add too much weight and if I have the inclination (and time as I'm on a summer deadline due to this all being built outdoors!) when that point arrives.
The entire boat is put together using 0.3mm and 0.8mm plywood from my local model shop.
The fairing was done with a hi-fill primer aerosol spray (model shop again), sanded, then sprayed with model enamel, sanded and polished (still haven't finished that to my satisfaction). Now, when I look at and feel the hull, it actually seems like it's moulded in plastic.
All done, I suppose I spent about a year putting it together, restricted mainly by having to wait for epoxy to set on every join before proceeding to the next one, and not being able to work on it indoors during the winter. It would be nice to have a workshop, but space is scarce for those kind of luxuries over here.
I hope this is all clear enough, but any other questions, feel free to ask. I know I'm going to be posting plenty of questions myself as the real boat goes together.
Regards,
Wobbly
Posted: Fri Apr 22, 2005 3:49 pm
by glcost
WobblyLegs,
Your C17 model looks wonderful. I'm impressed with the level of detail you went to, like glass and epoxy of the joints.
One suggestion for your cockpit decking in case you can't find suitable planking. Jacques sells marine ply with the outside layer of teak. You could use this and route grooves to give it the look of planking.
George
Posted: Fri Apr 22, 2005 6:30 pm
by WobblyLegs
glcost wrote:I'm impressed with the level of detail you went to, like glass and epoxy of the joints.
Thanks George,
I really just wanted to see how it all went together, using the same techniques as the full size boat, and hopefully it will be strong enough to run a REALLY fast RC motor on! As it progressed, it just seemed natural to try and make it look nice.
BTW, I can grab the bow and stern of this little thing in my hands and try to twist or bend it: not possible!! Credit to the designer!
glcost wrote:One suggestion for your cockpit decking in case you can't find suitable planking. Jacques sells marine ply with the outside layer of teak. You could use this and route grooves to give it the look of planking.
George
I saw that on the site, but he's in Florida and I'm in UK, so not really practical. I'm not actually too worried about the looks of the boat inside the cockpit (probably paint it white there), but thinking of doing the upper-deck in this style.
Regards,
Wobbly
Posted: Fri Apr 22, 2005 8:17 pm
by glcost
Yeah, I found building the model made me pay close attention to all the details of the plans and building process, although I skipped the glass and epoxy. Something I wanted to do before taking on the full scale project, plus I immensely enjoyed building the model.
I saw you are in London and assumed Jacques' European branch would carry the same marine ply, but looking at the site I don't see it.
http://europe.boatbuildercentral.com/index.php
Also, most of the exotic marine ply comes from Europe. The okuome I bought came from Greece and France.
Anyhow, it was just a thought I had for mimicking the look of wood boards without adding weight.
Posted: Sun Apr 24, 2005 7:54 am
by WobblyLegs
glcost wrote:Anyhow, it was just a thought I had for mimicking the look of wood boards without adding weight.
Thanks for the idea, George. I was thinking of laying thin strips side by side to create the effect, but after thinking a bit about your suggestion of routing out through a teak finished ply, perhaps it might be easier for me to laminate a thin veneer and the make grooves afterwards for the decking effect.
Like I said earlier, I'll decide when the time comes. There is still an awful lot to do before then.
Wobbly
Posted: Sun Apr 24, 2005 11:52 am
by Steve_MA
You can also by ply that looks like planking.
www.boulterplywood.com has teak and holly ply that isnt totally out of sight price wise. I dont know what you can get where you are.
Thanks for the explanation on how you built your model. I am thinking of building a C17 one day and thought i might try it myself, but i can see it would be a big job.
Update: 24 April 2005
Posted: Sun Apr 24, 2005 2:44 pm
by WobblyLegs
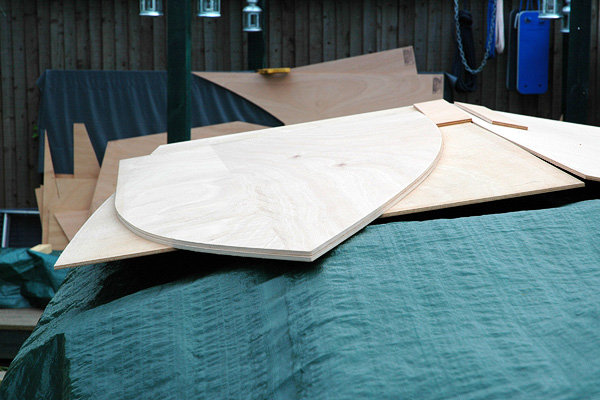
Well, I have now measured all the 9mm ply (10mm on the plans) except for the stringers. I was hoping to cut it all this weekend, but it rained all Saturday, and the weather was so good this morning that we had to go out for a nice 100mph bike ride!!! Oops.

I have changed the nesting supplied, as I wanted to create frames that were all going to be used later in one piece. See the pic, with explanation under:
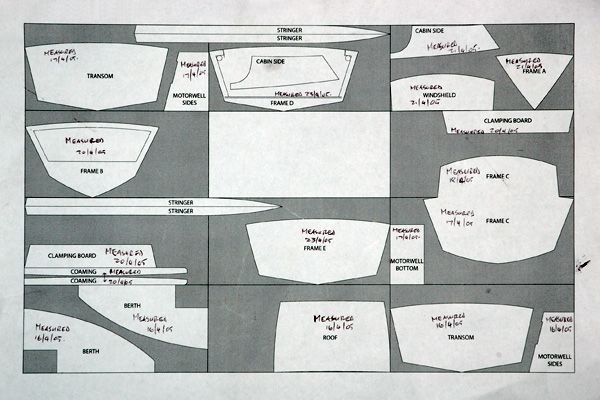
The supplied nesting was 10 sheets of ply, which meant that frame D was split into 3 pieces, and frame C was bisected vertically. I felt that by adding one more sheet of wood, I could split frame C at the deck line horizontally (which means I can build the hull closer to the ground), and keep frame D as one piece for the moulding (cabin side to be cut out of it later).
Personally, it's a small cost with a big ease-of-use advantage for one extra sheet of plywood.
Also, it leaves me with quite a lot of large off-cuts to use later for building a console and other little bits of woodwork that I'm sure to encounter.
Anyway, hopefully I will be able to start cutting all this wood during the week and next weekend, hoping to be able to set up the mould framework by the end of the weekend (it's a 3-day weekend for us here!).
More to follow, I'm sure,
Wobbly
Posted: Tue May 03, 2005 6:51 am
by WobblyLegs
Well, a busy weekend for me.
I have managed to cut all my 9mm panels (with the exception of one cabin side which will come out of frame D after rollover), and the stringers.
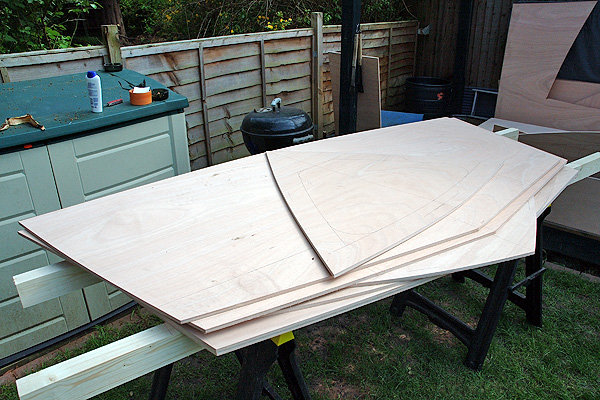
I've left the stringers for last as I want to laminate some of the longer lengths of off-cuts together so that I can measure (and cut) them as one piece instead of trying to get everything to fit together later. It makes sense to me...

So far the only error I found was when I laid the two motorwell sides together to match them, and found that I had measured one sloping upwards towards the transom and one sloping downward towards the transom.

So, not a panic, as I have lots of large off-cuts, and was able to cut a new one without a problem.
I only hope I haven't made any other errors in measuring.
If the weather holds (thunder showers predicted for today!) I'm hoping to laminate what will become the stringers tonight and cut them tomorrow or the next day, and also laminate all four transom pieces before the weekend, leaving me ready to begin building the mould on the weekend.
As before, I have uploaded some more pic's in my C17 album.
http://gallery.bateau2.com/thumbnails.php?album=286
Wobbly.
Posted: Thu May 05, 2005 5:48 pm
by WobblyLegs
Well, I had to wait a couple of days as the weather isn't co-operating, but I have managed to laminate the stringer wood tonight.
http://gallery.bateau2.com/albums/userp ... 00x400.jpg
I have decided that it's probably better not to post pic's of everything I do here, so I'll keep the pic's in the thread to major development (like the next one hopefully will be the frames/mould), and just put links to the "minor" pic's (which are in my gallery).
Posted: Thu May 05, 2005 8:24 pm
by Cracker Larry
So far the only error I found was when I laid the two motorwell sides together to match them, and found that I had measured one sloping upwards towards the transom and one sloping downward towards the transom.
Just a suggestion for anytime you are cutting mirror image pieces. Stack the two pieces together, secure with clamps or screws, then cut as one piece. They will always match, you only have to lay it out once and cut it once.
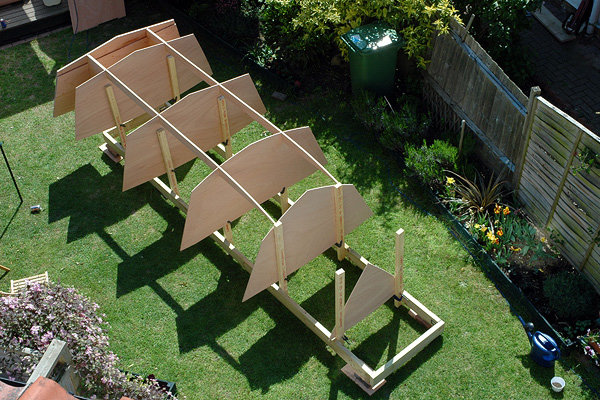
8 May
Posted: Sun May 08, 2005 2:54 pm
by WobblyLegs
So, this weekend has been a little more relaxing, but still keeping ahead of my schedule.
Stringers laminated, measured and cut, in that order, then notches cut. Followed by notches cut into frames "C," "D" and "E."
I had to check whether they all fit:

It's also the first real indication of the size of the boat that I'm building. Somehow a tape across the ground showing 17 feet doesn't mean anything!
I had planned on laminating the transom, but got hit by a thunder-storm with hail like I have never seen (in England) before… (20 minutes after this pic was taken, the sky was black. Unbelievable!).
More pic's in the gallery as usual.
Re: 8 May
Posted: Wed May 11, 2005 9:57 pm
by BillTwo
WobblyLegs wrote:So, this weekend has been a little more relaxing, but still keeping ahead of my schedule.
Stringers laminated, measured and cut, in that order, then notches cut. Followed by notches cut into frames "C," "D" and "E."
I had to check whether they all fit:
More pic's in the gallery as usual.
Wobbleylegs, I posted earlier to your thread in a differrent category but I didn't get your response. This is the perfect one that I really wanted.
I'm now waiting on my Pre-Cut Plywood Kit to begin building my OB17. While waiting, I was practicing notch cutting using my table saw and jig saw (I do have a Bandsaw, but its still in the box). Both tools did not give me the quality of notch cut that I was looking for. I had to use my wood chisel on one or two, and fine trim some other notch cuts due to undercuts, and splinters. My question to you is
HOW DID YOU GET SUCH PERFECT LOOKING NOTCHES for those frames and stringers? What tool(s) did you use and how did you use them? Woodworking is not my best suite and the only project that I've ever built in my life was birdhouses.

Any instructions or details on how you did yours would be greatly appreciated.

If you would like, you can email me the information, but any details on cutting those notches correctly would be of great help to me. I've use masking tape to reduce the splinters but I still have a poor quality cut notch when I finish cutting. Whether it be on my table saw, which causes an overcut. I have a general purpose blade (60 tooth blade) on my table saw and my Jig Saw has an all-purpose blade that can be used for cutting Plywood. The Table Saw is a Craftsman, the Jig Saw is Black & Decker and my BandSaw is a Delta (which I haven't used yet).
Regards,
BillTwo
Re: 8 May
Posted: Thu May 12, 2005 4:39 am
by WobblyLegs
BillTwo wrote:HOW DID YOU GET SUCH PERFECT LOOKING NOTCHES for those frames and stringers? What tool(s) did you use and how did you use them?
Hi BillTwo,
Sorry, I never saw your question in the other thread (once I had an answer for that one I kinda forgot it was there, and didn't have a "notifier").
Regarding the notches, I measured the widths to EXACTLY 9mm on the stringers and 18mm on the frames (stringers are 2 x 9mm ply). My stringers are 122mm high so I made the 60mm deep on the stringers which turned out to give me 62mm to be cut out of the frames.
As to cutting, I used a jigsaw, taking it slowly and making sure that the measured line stayed on the centre of the blade (i.e. taking out about 1mm [half the blade width] or so of wood either side of the line). Doing the end of the notch was a bit crude: after cutting each side of the notch to full depth, I started about 2/3rds of the way in on one cut and cut a curve heading towards the end of the other cut. I then cut straight in to the line of the notch-end repeatedly and SLOWLY shaving away the edge of that curve, basically using the jigsaw as a "file" to square off the end.
Does this make sense?
The notches are NOT a tight fit which is the way it needs to be. You need some space for epoxy to glue the frames to the stringers at a later stage. In my case I'm guessing at just under 1mm on either side as my jigsaw blade cuts a width somewhere between 1 and 2mm or so.
I'm using a plain "high-speed" cutting blade, and am getting some splinters as you do, but they are small and I just brush them off (it's all getting covered eventually).
I hope this all helps, but I'm really not the expert on this forum. I'm basically working out how to do stuff as I get to it. I seem to be improving though

Posted: Thu May 12, 2005 8:58 am
by Steve_MA
As he said, you dont want the joints to be tight..you want epoxy to get in there. Almost any mess you make at this point with the saw can be fixed with epoxy...so long you dont cut the stringer in half

I think the biggest headache might be if you cut the nothes too deep. But even there you could use a clamp/wood block to keep it at the right height and tab it with epoxy.
Re: 8 May
Posted: Thu May 12, 2005 11:37 am
by BillTwo
WobblyLegs wrote:
Hi BillTwo,
As to cutting, I used a jigsaw, taking it slowly and making sure that the measured line stayed on the centre of the blade (i.e. taking out about 1mm [half the blade width] or so of wood either side of the line). Doing the end of the notch was a bit crude: after cutting each side of the notch to full depth, I started about 2/3rds of the way in on one cut and cut a curve heading towards the end of the other cut. I then cut straight in to the line of the notch-end repeatedly and SLOWLY shaving away the edge of that curve, basically using the jigsaw as a "file" to square off the end.
Does this make sense?
The notches are NOT a tight fit which is the way it needs to be. You need some space for epoxy to glue the frames to the stringers at a later stage. In my case I'm guessing at just under 1mm on either side as my jigsaw blade cuts a width somewhere between 1 and 2mm or so.
I'm using a plain "high-speed" cutting blade, and am getting some splinters as you do, but they are small and I just brush them off (it's all getting covered eventually).
I hope this all helps, but I'm really not the expert on this forum. I'm basically working out how to do stuff as I get to it. I seem to be improving though
Thanks Wobblylegs, that's just the input that I needed. When you are a novice at something and you try to do those things that you haven't done before, its always great to get that experienced help you need to keep you going in the right direction.
As I indicated before, I was practicing with two different tools to cut notches; using a Table Saw and then a Jig Saw. Now I just have to improve on using my Jig Saw. Every thing that you explained to me made sense. Also, it jogged my memory about gaps are good - especially for epoxy, as long as its within the given tolerances. I was trying to make a near tight fit less than 2mm. My gaps were coming out around 5-6mm. In terms of
US measurement, I want to keep my cuts down to 1/8 inch or less but not so tight as to defeat the epoxy glue.
Thank you so very much for your input and I too will post some more of my pictures on the Gallery as soon as I have something to Post. Currently it's just a model concept that I plan on incorporating on the OB17 once I get my Pre-Cut Plywood delivered. I can be searched on the Builder Galleries under "OB17".
Steve, thanks for your input also. I will keep a close eye on my gaps when doing my Stitch and Glue process.
Regards,
BillTwo

Re: 8 May
Posted: Thu May 12, 2005 11:54 am
by WobblyLegs
BillTwo wrote:Also, it jogged my memory about gaps are good - especially for epoxy, as long as its within the given tolerances. I was trying to make a near tight fit less than 2mm. My gaps were coming out around 5-6mm. In terms of US measurement, I want to keep my cuts down to 1/8 inch or less but not so tight as to defeat the epoxy glue.
Hello again BillTwo,
I seem to recall reading somewhere (either on the Bateau site, or in my plans) the the gap must be no more than 1/8 in TOTAL, so only 1/16 on each side (remember we're talking notches here - other parts of the boat allow bigger gaps). I've been looking at some of the tutorials since my first reply, and they suggest cutting with your blade on the outside edge of the line.
Have a look here:
http://bateau2.com/content/view/77/28/
You'll get better with the saw as you progress - I'd cut all my 9mm before doing the notches, and am now confident enough to cut most curves to within about 1mm (1/16?) of my line. When I started I was about 3-5mm out.
Good luck.
W.
Posted: Thu May 12, 2005 2:02 pm
by Cracker Larry
Hi BillTwo,
As to cutting, I used a jigsaw, taking it slowly and making sure that the measured line stayed on the centre of the blade (i.e. taking out about 1mm [half the blade width] or so of wood either side of the line). Doing the end of the notch was a bit crude: after cutting each side of the notch to full depth, I started about 2/3rds of the way in on one cut and cut a curve heading towards the end of the other cut. I then cut straight in to the line of the notch-end repeatedly and SLOWLY shaving away the edge of that curve, basically using the jigsaw as a "file" to square off the end.
That's one way to do it. Here's another......drill a hole slightly larger than the jig saw blade just inside one of the corners. Make your first cut to the corner with the hole, then use the hole to turn the saw 90 degrees to make the back cut.
As to splintering, the plywood will splinter pretty bad cutting cross grain. To prevent this, put down a strip of masking tape where you will cut, lay out the line on the tape then cut with the tape in place. No splinters.
Re: 8 May
Posted: Thu May 12, 2005 5:14 pm
by BillTwo
WobblyLegs wrote:BillTwo wrote:
Have a look here:
http://bateau2.com/content/view/77/28/
You'll get better with the saw as you progress - I'd cut all my 6mm before doing the notches, and am now confident enough to cut most curves to within about 1mm (1/16?) of my line. When I started I was about 3-5mm out.
Good luck.
W.
WobblyLegs
That is exactly what I remembered about the 1/8 inch. You want believe how many times that I've read that tutorial. My problem was what tool was best for doing this?
Now that I know what tool to use, and how it should be used to cut the notches, I will perfect my skills on scrap plywood until the real thing gets here

You answered my question in that last thread that you so kindly wrote me. I will be perfecting my cuts with both my table saw and jig saw and using my Jig Saw as my tool of choice for my notches.
Cracker Larry
Thanks for your advice with the drilling of the holes. Somewhere, I did read about drilling holes in a corning but the explaination and details were not as clear as yours. I will try that first thing when I get home. Thanks
Regards,
BillTwo

Posted: Sun May 15, 2005 5:39 pm
by WobblyLegs
Well, it's been a good weekend (no rain) so have managed quite a bit.
After a bit of a panic on Friday:
http://forums.bateau2.com/phpBB2/viewtopic.php?t=8213 I started to assemble the mould, which has worked out very well.
Getting everything in the right place wasn't easy, but modern equipment helps:

And this is what I ended up with this afternoon:
Surprisingly, still ahead of my schedule, but then again, I haven't started sanding yet!!
As usual, more pics here:
http://gallery.bateau2.com/thumbnails.php?album=286
Regards,
Wobbly.
Posted: Sun May 15, 2005 11:18 pm
by DrBones
Looks like you're well you your way, Paul!

I've been looking forward to someone documenting the build of a C17.
One thing though I would keep a secret from whomever tends to that lawn...well, I don't think it will survive the mistreatment it will get
Wobblylegs C17 Construction
Posted: Mon May 16, 2005 12:58 am
by BillTwo
WobblyLegs wrote:Well, it's been a good weekend (no rain) so have managed quite a bit.
After a bit of a panic on Friday:
http://forums.bateau2.com/phpBB2/viewtopic.php?t=8213 I started to assemble the mould, which has worked out very well.
Getting everything in the right place wasn't easy, but modern equipment helps:
Surprisingly, still ahead of my schedule, but then again, I haven't started sanding yet!!
Regards,
Wobbly.
Wobbly, keep doing what you are doing. It looks great to me and I see that your area of construction seems to be in your back yard. Hope the weather holds up for you. I'll be starting my OB17 within the next 2-3 weeks, as soon as my Plywood arrives. Your efforts to keep us posted on your progress and sharing with us your mistakes are commendable. I am already learning from you some things before I begin my OB17 construction; method used for cutting notches, what things to remember when epoxying and your efforts to maintain a tight tolerance in your building of your C17.
I also read your thread on the Transom gluing concern and the methods in which it was resolved. Your construction details and the posting of pictures, with comment, to the gallery is like reading a good novel - you can't wait to get to the next chapter.
Wobbly, keep up the good work and don't let mistakes take you away from your objective of building yourself a first rate boat. I hope to do the same.
Take care,
BillTwo

Posted: Mon May 16, 2005 7:39 am
by WobblyLegs
DrBones wrote:Looks like you're well you your way, Paul!
I've been looking forward to someone documenting the build of a C17.
Yeah it feels like I'm building now, and that the last month or so has merely been "preparation" if you know what I mean by that? Up until last Friday it all just looked like an Ikea flat-pack! I'm surprised by the size of it, although it is just right for what I want. BTW, dunno where you got "Paul" from, the name's Tim.

I'm enjoying keeping a record of progress here - I've found the site to be very useful for me, so maybe others can also learn from my mistakes as well.
DrBones wrote:One thing though I would keep a secret from whomever tends to that lawn...well, I don't think it will survive the mistreatment it will get
Ah, the lawn is my domain - the flowerbeds are "her's" so as long as I don't trample the flowers I should be OK.... Still it took a lot of persuading to get permission from SWMBO to build it there. I'm sure there is going to be a boat shaped path worn into the ground very soon.

Later,
Wobbly. (Tim)
Posted: Mon May 16, 2005 11:54 am
by Dane_Ger
Wobby, Looking good!
I'm also pleased to see you documenting this boat due to your building outdoors . . . I'm going to have to build my next one outdoors also, so I'm following with great interest the steps you are using to align and level everthing!
I'm sure there is going to be a boat shaped path worn into the ground very soon.
I was sweeping out the garage yesterday and I have a nice outline of epoxy drops on the floor in the exact shape of my boat.
Dane
Posted: Sun May 22, 2005 3:35 pm
by WobblyLegs
So, here we are then...
The weather this past week has been rain-sun-rain-sun-rain!
Still, I managed to measure (Friday) and cut (Saturday) the bottom hull panels. Saturday was really frustrating 'cos I had to pack everything away 3 or 4 times when the rain came. But, I managed to get the panels cut.
Then, today I joined the fore and aft sections of the panels together. As you must know by now, I'm building in my garden - so I don't have any nice flat surface to work on. My work-around on that is to make what I'm now calling my "joining-boards."
Basically, a strip of ply, lots of screws, turn it over and epoxy-glass the other side. The plastic in-between is so that the "joining-board" doesn't end up being glued to the panels.
I know it's strong enough, as I went indoors, came out 10 minutes later to find one had been blown off the frame onto the ground (it's been windy too), and all was still aligned!
Anyway, it's now glassed on one side, tomorrow I will do the other side and hopefully start stitching the bottom together the day after!
Wish me luck!
Wobbly.
C17 Classic - London
Posted: Tue May 24, 2005 4:02 pm
by BillTwo
WobblyLegs wrote:
Anyway, it's now glassed on one side, tomorrow I will do the other side and hopefully start stitching the bottom together the day after!
Wish me luck!
Wobbly.
Wobblylegs, just a few words- Since you are building outdoors, under a tent. What I've been reading while waiting on my OB17 Pre-Cut Plywood is the concern about moisture. I'm sure you are too. Don't forget those edges while glassing the other side. You are doing perfect quality work from what I see and I just thought that I might add that just in case.
Regards,
BillTWo
Re: C17 Classic - London
Posted: Tue May 24, 2005 5:52 pm
by WobblyLegs
BillTwo wrote:What I've been reading while waiting on my OB17 Pre-Cut Plywood is the concern about moisture. I'm sure you are too.BillTWo
Hi Bill,
Yeah, I have been concerned about moisture, but circumstances are what they are. I have to deal with it, or not build a boat...
Hopefully, by leaving the sides off the tent, there will be enough airflow around the whole thing to prevent condensation, etc.
Anyway, I decided against glassing the other side of the bottom panels, and went ahead with stitching them on the frame (the join is in a relatively low-stress area, and the stress will be on the outside anyway, so I didn't see the point in adding another day or two to the project).
So far, looking good:
Keep well,
Wobbly.
Posted: Thu Jun 02, 2005 4:35 pm
by WobblyLegs
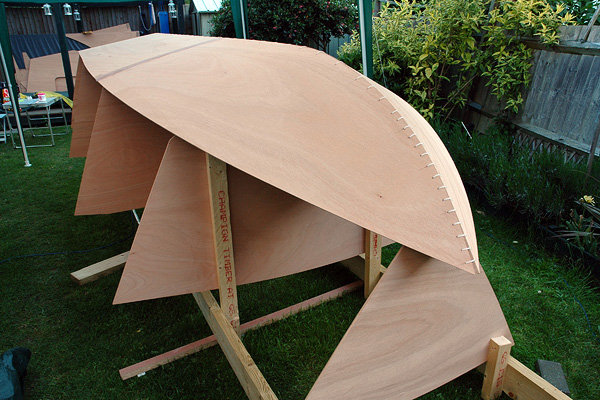
Forming the hull.
Well, it's been a bit longer than usual since my last update, but it's all been a bit boring, really.
Until now.
I've joined the lower side panels together (pic's in the usual place) and have spent the past week or so (after work) stitching the bottom and lower sides together.
And un-stitching, re-stitching, un-stitching, etc., etc.!
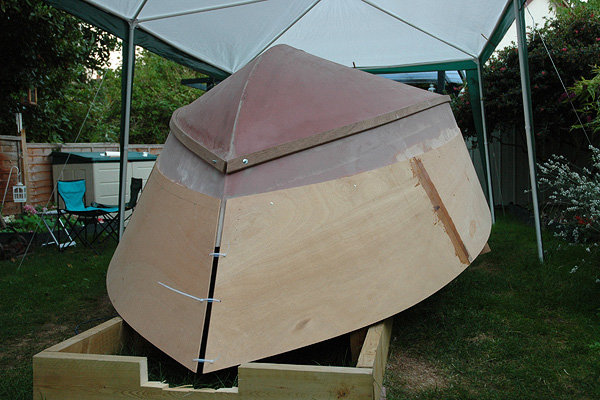
Here's the result so far:
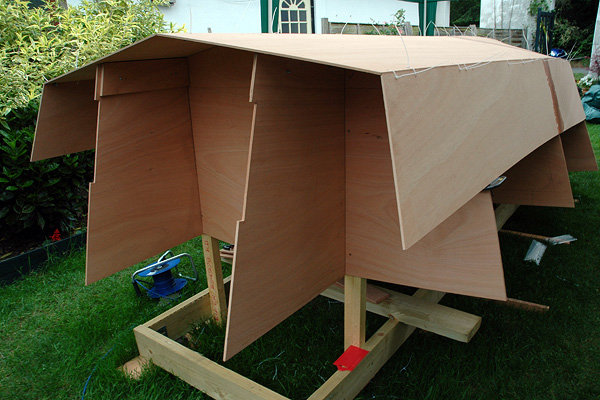
I have to say, everything is starting to fit together
extemely well. I hope it continues this way.
Anyway, I'm feeling quite knackered right now, so I will leave it at that for now...
Later,
Wobbly.
C17: The boat-shaped hedgehog
Posted: Thu Jun 02, 2005 11:28 pm
by BillTwo
WobblyLegs wrote:Forming the hull.
You can see here the the ends of the stringers don't meet the back of the motorwell sides - that's 'cos I measured thinking the transom was four layers thick there, not two!
Reminder to self: Add a couple of layers of 9mm ply to the end of the stringers after roll-over!!!
Wobbly.
Wobbly,
I took this quote from you last gallery posting showing the Stern end of your Hull without the Transom. I take it that you're going to wait until you flip the Hull before making the correction to your Stringers? If this is the case, are you concerned about mis-aligning the shape of the Hull when flipped without the Transon epoxied with the rest of the Hull?
Your "Joining Board" technique seems to be ideal for the environment that you're working in. Even though I will be building (I hope) in my Garage, I am considering using the "Joining Board" method. My question is, with all those screws in the board, how time consuming is it to putty-in all those screw holes and approximately how far into the splice do these screws penetrate?
Wobbly, you're an inspiration for me. I can't wait to start on my OB17 (custom) boat. I'm still waiting on my Plywood delivery - should be delivered within the week.
Keep pumping-out those pictures with text. I look forward to seeing your progress.
Regards,
BillTwo
Re: C17: The boat-shaped hedgehog
Posted: Fri Jun 03, 2005 4:03 am
by WobblyLegs
BillTwo wrote:I take it that you're going to wait until you flip the Hull before making the correction to your Stringers? If this is the case, are you concerned about mis-aligning the shape of the Hull when flipped without the Transon epoxied with the rest of the Hull?
Hi again BillTwo,
I am going to join the transom to the hull before roll-over, but the frames, motorwell sides, and stringers aren't joined at this stage. They all come out after the boat has been flipped (is it called a boat at this stage?) so that the inside of the hull can be glassed.
Thats when I'll make the correction to the stringers, before putting them back into the glassed hull.
Keep well,
Wobb.
Posted: Sun Jun 12, 2005 3:59 pm
by WobblyLegs
Getting closer to glass!
Well, the past couple of weeks, I've been joining the bottom and lower-side panels together.
Yesterday I sanded the chines down to a radius in preparation for laying the bi-axial tape (next weekend).
It's still looking good, but to be honest, I'm kinda dreading next weekend.
BillTwo, I don't have an answer about filling screw holes yet, as I haven't done it (leaving it till after rollover). I'm probably going to drip pure epoxy into them, and use a little nail to work the epoxy in to the hole.
As to the depth of the screws: the joining board is 9mm ply, and the panels are 6mm ply. The screws are 16mm, but I haven't counter-sunk the joining board. So, when I screw the boards to the panels, I do it to just a but more that finger-tight (on the screwdriver), and the points of the screws end up just below the outer surface of the panels. Also, holes were drilled into the joining board, but not into the panels - I push-twisted the screws in there.
So, here's looking forward to a fun weekend in 5 days time!!!
Wobbly.
Posted: Sun Jun 12, 2005 4:50 pm
by Yoda
That is really looking good, Wob......... Yessireee!
Getting Closer to Glass
Posted: Sun Jun 12, 2005 10:38 pm
by BillTwo
WobblyLegs wrote:Getting closer to glass!
Well, the past couple of weeks, I've been joining the bottom and lower-side panels together.
Yesterday I sanded the chines down to a radius in preparation for laying the bi-axial tape (next weekend).
Wobbly.
Wobbly,
I don't remember if I asked you this before - did you pre-coat your plywood prior to assembly of the Hull? If you did, did you have any problem bending any of the panels for the stitching and forming of the Hull?
I will be getting my Pre-Cut Plywood delivered hopefully this week. Once I do receive it, I will be applying those recommendation and references such as those from your threads and pictures to my building process.
Continue the good work.
Regards,
BillTwo
Re: Getting Closer to Glass
Posted: Mon Jun 13, 2005 4:36 am
by WobblyLegs
BillTwo wrote:I don't remember if I asked you this before - did you pre-coat your plywood prior to assembly of the Hull?
Hi BillTwo,
No, I haven't pre-coated anything. I wouldn't think that it would be a good idea, as it would all have to be sanded for the glass/epoxy to grip to.
This way, I'll coat the wood, allow it to "soak" for a bit, then lay the glass. I think that starting, say, at the stern with the coating, by the time I get to the bow, I'll be ready to start laying glass from the stern.
Regards,
Wobbly.
Posted: Wed Jun 22, 2005 3:32 am
by kiwi
You are one clean builder! This boat is going to be beauty to behold if you keep this quality throughout.
Tony
Posted: Wed Jun 22, 2005 5:43 am
by WobblyLegs
Okay, so things didn't really go to schedule.
I had no idea how difficult it would be to get the epoxy to wet the glass out. I think maybe if I got a "wetting-out" roller for doing the fabric it might be easier than using a squeegee.
Anyway, I managed to prepare the boat on Saturday - this involved sanding all the joins and lumps of mixture used for filling the cable tie holes etc. Not very pleasant as it hit 36 degrees C (97F) in the garden. Same on Sunday.
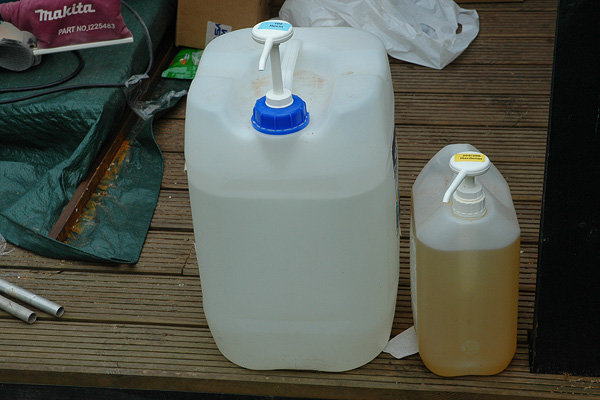
Sunday I measured and cut the fabric for the bottom. I also did a few tests and practice fibreglass laminations with the West slow-cure resin/hardener mix that I hadn't used up to now. Just as well, as in spite of using the measuring pumps I found that due to the heat, the hardener becomes so thin that it flows back into the pump! So the method now involves doing a little "primer" squirt from each container into little tubs, then doing the mixing measurements. Having sorted that out, I have to admit that it as real easy to get the right mixture with the pumps.
The other really useful tool that I've discovered is this little cutter:
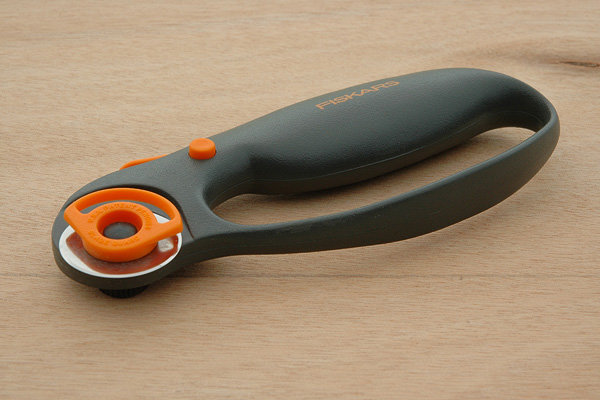
I had to get my own from the local sewing shop (Mrs Wobbly wouldn't let me use hers) - it's a fabric cutter that I used to cut the glass fabric to fit the hull. All I did was lay the sheets on the hull and walk around it pushing this along the glass - easy, accurate cut. It does need good pressure though!
Monday morning things got delayed (again, weather, a thunderstorm that lasted until about 11). I was only able to start work at about 2 when my work area had dried out enough. I suppose it had to rain, as it was the start of the Wimbledon tennis tournament (and it
always rains during Wimbledon - and it's just up the road from me!
Oh well.
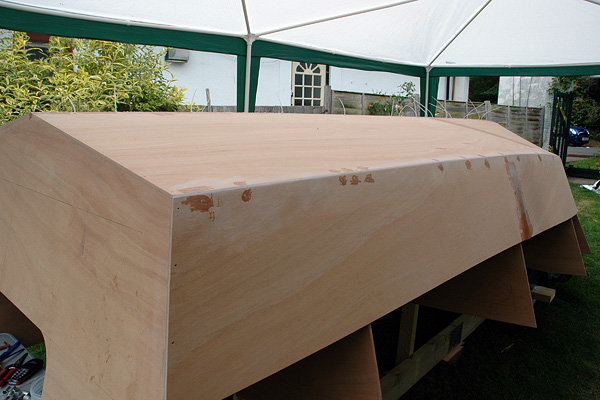
I managed to get the keel laminations done Monday afternoon, followed by the chine laminations done on Tuesday. I also managed to get one layer of tape on the transom, but had to stop there as my last pair of gloves tore. I need to make sure that I don't run out again!
I have to say, I really don't like working with large amounts of epoxy. It's easy enough to spread on a horizontal surface, but on vertical surfaces? Grrr. As you can see from my transom pic (below), it drips all over the place. And sticks to everything. And once it gets on the gloves and squeegee everthing gets all slippery and slimy. And my hands
still feel sticky now, even though I only got a little bit of epoxy on them.
Well, that's about it for now. I now have to sand all those edges before proceeding with the layer of fabric. I'm not going to assume that I will be able to do it all this coming weekend (considering I had thought I could have done it all by now!!). At the very least, I hope to get it all sanded and ready.
kiwi wrote:You are one clean builder!
Tony
Tony, you might not think so anymore after seeing this:
.
That's it for now.
Keep building guys... (BOD's)
Wobbly.
Posted: Wed Jun 22, 2005 9:22 am
by Steve_MA
Hey, it still looks pretty clean. Working with fiberglass/epoxy is messy business. I am on my third box of 100 pr. gloves and still not done with my FL14. It might be late now, but one thing I was thinking of doing next time I build is masking off areas where you dont want epoxy. This might help eliminate the amount of runs and splotches you have to sand off.
It must be a pain having to dodge the weather there...hats off to you! Looks good.
Posted: Wed Jun 22, 2005 9:28 am
by fishingdan
Wobbly, the boat is looking great.
One suggestion....pump epoxy/hardener into measuring cups. The pumps get less accurate over time (also with differences in temps) and with a 5 to 1 ratio, there is less room for error.
Keep up the great work!
Posted: Wed Jun 22, 2005 11:14 am
by Lucky_Louis
Great looking work and pictures Wobbly
. Sounds like we are the same stage, I'm building my OB17 outside and did the tape and hull glass last weekend. Question for you - why did you stop taping the corners half way up the transom? That whole joint is highly stressed by the engine weight and stresses. Maybe check your scantlings or with Jacques before applying the skin glass.
cheers, Lou
Posted: Wed Jun 22, 2005 11:28 am
by jacquesmm
Good looking job but what was the problem with wetting out the fiberglass? Does it stay white? In that case, it may be the binder. Not all types of glass are compatible with epoxy.
Normally, the fiberglass should become transparent in a few minutes if not seconds.
From the pictures, it looks OK now.
Posted: Wed Jun 22, 2005 11:40 am
by WobblyLegs
jacquesmm wrote:Good looking job but what was the problem with wetting out the fiberglass? Does it stay white? In that case, it may be the binder. Not all types of glass are compatible with epoxy.
Normally, the fiberglass should become transparent in a few minutes if not seconds.
From the pictures, it looks OK now.
Hi Jacques,
The glass does go transparent quite quickly, but it took more epoxy than I expected. The problem I had was trying to eliminate all the air bubbles that formed between the weave and it took a lot of repetative squeezing with the squeegee to make sure all the air was expelled.
Regards,
Tim.
Posted: Wed Jun 22, 2005 11:49 am
by WobblyLegs
Lucky_Louis wrote:Question for you - why did you stop taping the corners half way up the transom?
cheers, Lou
Good question Lou - one reason is that with the upper side panels in place I cannot reach the middle of the boat when standing on my little stepladder. Also, I wouldn't be able to work underneath the boat as I wouldn't have enough space to get in - most of my tools and materials are stored underneath.
I'm not concerned about strength as on the coners of the transom (and the bow) the tape goes all the way to the top of the lower side panels. When the uppers side panels are put in place, I will be doing more tape all along that corner, so in effect each corner will end up being a glass-wood-glass-wood-glass laminate for the middle six inches or so (the overlap of the two side panels).
Keep well,
T
Posted: Wed Jun 22, 2005 2:47 pm
by glcost
The hull is looking very nice Wobbly. I like your fabric cutter too; my wife uses one of those for quilting.
On my boatbuilding project last year, I made the mistake of borrowing my wife's sewing scissors. My old shop pair were too dull to cut the FG. She was so pissed at me when she found out. You obviously have better sense then I do.
George
Posted: Wed Jun 22, 2005 2:54 pm
by ArizonaBuilder
I have to say, I really don't like working with large amounts of epoxy. It's easy enough to spread on a horizontal surface, but on vertical surfaces?
When taping, some wet the tape out on a separate table and then put the wetted out tape down on the seams. It is a lot easier then wetting out the tape on the seam.
For a table, I simply use my 12 quart cooler lid. I have put a layer of poly plastic sheeting on the lid. The cured epoxy just peels off as a thin film the next time I am doing a taping session. It is a quick and easy way to tape and the tape has the right amount of epoxy.
Not Meeting Schedule
Posted: Wed Jun 22, 2005 3:40 pm
by BillTwo
WobblyLegs wrote:Okay, so things didn't really go to schedule.
I have to say, I really don't like working with large amounts of epoxy. It's easy enough to spread on a horizontal surface, but on vertical surfaces? Grrr. As you can see from my transom pic (below), it drips all over the place. And sticks to everything. And once it gets on the gloves and squeegee everthing gets all slippery and slimy. And my hands still feel sticky now, even though I only got a little bit of epoxy on them.
Keep building guys... (BOD's)
Wobbly.
Wobbly, your work is still looking good. I shouldn't worry about staying on schedule. Schedules are nothing but references in time as to when you would like for a particular event(s) to occur. The main focus, as I'm sure you are already doing, is detailing and maintaining a good quality of work which you are currently doing.
When I was uploading more pictures to my gallery "OB17 Building Phase", I came across your recent gallery input and saw this strange looking tool with the orange wheel. Now I can rest easy since you explained what it is. I'm always on the look-out for new tools and better ways of doing things.
Finally a word of CAUTION, you mentioned that you "got a little bit of epoxy on" your hands. A little is too much. If you should happen to have that occur again, immediately clean it off with "white Vinegar". This is what I've read in various books and manuals as I'm sure that you have.
I've just now received my Pre-cut Plywood and will begin today cutting out the pre-cut patterns.
Keep up the good work and BOD
Regards,
Billtwo
Posted: Wed Jun 22, 2005 4:08 pm
by jasonmcintosh
Wobbly,
Just wanted to say that it looks like you're doing a fantasic job. The hull looks great. Hope things keep going well for you.
Jason
Posted: Wed Jun 22, 2005 9:46 pm
by JimW
Looks Great!
Posted: Mon Jul 18, 2005 7:10 am
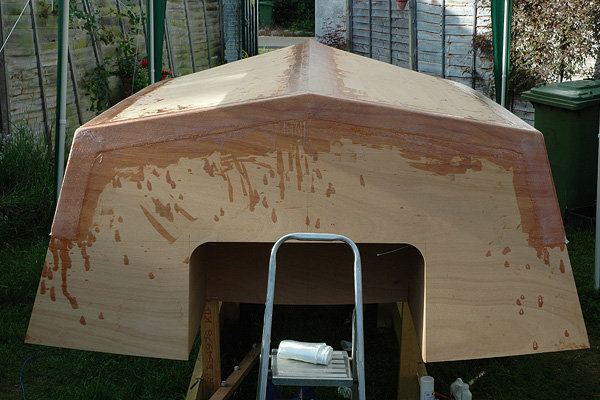
by WobblyLegs
Well, it's been a while since the last update, and things have been progressing slowly.
I think, though, that I'm over the main epoxy hump, that is covering the hull (I know the inside still has to be done, but at least that doesn't have to be fair!).
Since the last update, the weather has really been playing havoc, as for a couple of weeks it seemed to rain every afternoon so I couldn't work in the evenings, and then a couple of weekends too (not as bad as it seems some of you guys in Florida seem to be experiencing, from what I hear).
Anyway, summer seems to have well and truly arrived, so last weekend I managed to sand all the taped seems in preparation for the final lamination, then during the week I measured out the upper side panels (not cut yet).
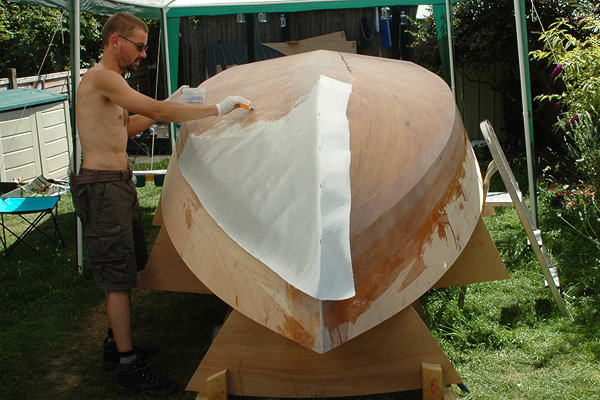
Then, this weekend I finally bit the bullet and laid the cloth over the boat.
I eventually decided to go "wet on dry" as people here seem to refer to it. Laid down the cloth on the starboard side, positioned it and got on with mixing. Starting at the transom, I just poured the whole lot on the cloth at the centre-line over a distance of about 0.5m (1.5'). As this started to run down towards the chine, I very lightly and without trying to force the epoxy into the cloth, used a squeegee to spread the epoxy over the first area, then went to mix a second pot of goo.
By the time the second mix was ready, I was able to pour on to the cloth again, just below halfway between the centre and the chine, and the first pouring was soaked into the cloth enough to squeeze the air out. After spreading about three areas like this, I had my routine going pretty well.
The port side took about two and a half hours to lay. By now I was on a roll, but it was getting really hot and I was contemplating delaying the second half. But, a half hour break, and nearly two litres of water later, decided it had to go on.
The second (port) side took only one and a half hours to do, working with a nice method:
- Mix one pot, pour at centre and spread towards me (chine) lightly.
- Mix another pot, pour 2/3 of it closer to chine, spread lightly.
- Squeeze first mix to get air out.
- Pour half of remaining mix onto overlap on starboard side and spread lightly.
- Squeeze second batch on the bottom.
- Spread remaining epoxy onto the glass on the side lightly.
- Squeeze starboard side overlap.
- Squeeze side.
- Start again one step closer to the bow.
Measuring and mixing was made easy by having pumps in the resin and hardener that pump proportionally so each pot was four pumps resin, four pumps hardener (about 150ml/5oz). It also helped that the resin had warmed up quite a lot, so was thinner and easier to spread than the first half.
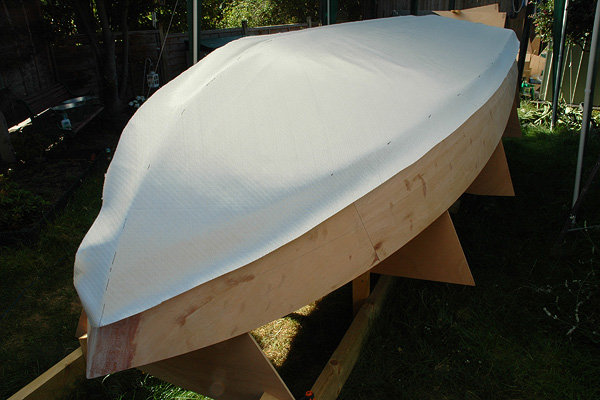
Of course, working in hot conditions did cause a little bit of out-gassing from the wood, but I was able to squeeze almost all of it down again. There are a few very small patches where air got caught under the glass, but looking at it this morning I will be able to grind a small area with a Dremel and squeeze some epoxy into that. Also, having already done the centre and chines, obviously no air could come out there and I have ended up with one very strong looking hull.
It really does look nice now, and as Mrs Wobbly said when looking at the dark wood through the glass, it seems a shame to paint it. I think I have now decided that I am going to try and keep the entire topside natural wood if I can get all the joints neat enough.
Also, I ordered all the wood that I need for the hull trimmings - keel, strakes, spray rail, rub rail laminations - which will be cut to shape (strakes and spray rail) and delivered on Saturday. This week I plan on filling the weave on the bottom in preparation for fairing and hopefully I'll be able to join the keel (skeg?) and spray rails on the weekend.
I shall let you know how I get on (hopefully things will start moving quicker again).
As usual, more pics here:
http://gallery.bateau2.com/thumbnails.p ... 286&page=6
Oh, and I've just noticed that the gallery pics seem a bit out of order, but I'm sure JM will sort that out...
Wobb.
Posted: Mon Jul 18, 2005 6:40 pm
by glcost
Wobbly,
You're moving at an impressive rate even with the weather delays. I'll be following your method on fiberglassing when I get there. Sounds like a good systematic approach when working by yourself.
I have a question for you. How large of a gap did you leave between the hull panels at the bow stem? This weekend I placed the hull bottom panels and the lower side panels. I initial left a 6mm gap where the bottom panels meet at the bow. Placing the lower sides, however, pulled the bottom panel together, so there is very little gap now. I do have a 4-5mm gap between the lower side panels.
When the builder gallery is back online, I plan on starting a progress thread too.
George
Posted: Tue Jul 19, 2005 6:18 am
by WobblyLegs
glcost wrote:Wobbly,
I have a question for you. How large of a gap did you leave between the hull panels at the bow stem? This weekend I placed the hull bottom panels and the lower side panels. I initial left a 6mm gap where the bottom panels meet at the bow. Placing the lower sides, however, pulled the bottom panel together, so there is very little gap now. I do have a 4-5mm gap between the lower side panels.
George
Hi George,
It may or may not be the right way to do it, but I have actually had very few gaps in the boat so far. The only place that I made sure that there was a gap between panels is along the centre-line of the boat and near the front between bottom and lower side panels.
I'm really comfortable with the joins as they are - bottom panels to transom has an angle, so there is a large wedge of epoxy glue in there.
At the front, it took quite an effort to bring the bottom panels together, and that basically forced me to have no gap along the curve (using little cylinders - cut up tent poles - inside, under the cable ties, to stop them overlapping), but the wood (at the edges) touched corner-to-corner, so I filled that groove with a fillet mixture.
With the lower side panels, the same along the chines up until the point near the front where the hard chine started to become flat with the bottom panels, where I put spacers in to force a gap of about 3mm. Where the lower side panels join at the bow, again it was corner-to-corner. I was looking over the plans after I'd filleted this joint and noticed that they say to leave a gap here, but obviously it was too late to change by then. I'm not worried - I can only imagine that my boat will be a couple of millimetres shorter as a result.
As for the bottom panels, again where the angle of join is very shallow, I put spacers in to create a 3mm-ish gap from stern up to the point where it starts curving up to the bow.
With all of these joins, I used a mixing stick to squeeze an epoxy glue (fairly thick) mixture into the gap until I could see it oozing out the other side, making sure there was enough sitting over the join to allow for absorbtion. Then removed cable ties (about a week later to be sure the glue was properly cured) and filled the spaces where they were (and all the holes left behind...).
When I get to laying the upper sides, there will probably be a substantial gap at the bow which suits me, as I'll need to create a flat area for mounting the bow-eye. The rest of the bow there, I will build up a radius of fillet mixture above and below where the eye will be, on top of the fibreglass layers.
Regards, and enjoy building (I am, still)
Wobb.
Posted: Tue Jul 19, 2005 3:35 pm
by glcost
Yeah, my joints are all very tight. Along the keel and chine it's corner to corner between the panels for the most part. I used the bow mold and even there I have very little gap. Even though my hull is very fair, I didn't get the hump in the keel forward of frame C, I think I'll go back through and loosen the ties before gluing the joints.
Not much will happen over the next couple weeks since I'll be on holiday. First, I go up to Edmonton Canada for a rugby tournement then off to Orlando FL.
Take care,
George
Posted: Wed Jul 27, 2005 6:26 pm
by WobblyLegs
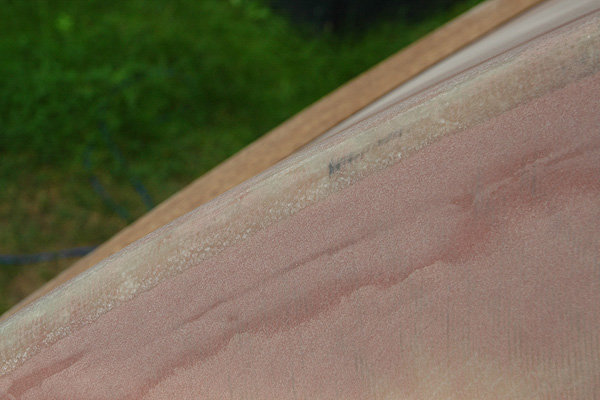
So, it's been raining again!
But, unlike the other rain I've had to avoid so far on this project, which have been short showers followed by long, hot, dry spells (usually while I'm in the office!!), over the past two days it's been a light drizzle, fairly warm, and a relative humidity of 98%.
I think you could call it "sticky!"
So, what has this to do with the boat?
Well, the wood has started to absorb moisture and expanded. As I've recently covered the bottom with glass, this is mainly happening on the inside of the boat, and on the side panels. So, as the inside has expanded, the whole boat is changing shape. Not very good!
I don't think it's a real problem, but it is going to be a real delay as the weather is forecast to stay like this for another week or so, and then I will have to wait (hoping) for it to dry out again for me to continue building.
The pic below is of frame C, where - two days ago - the bottom panels and side panels were lying flush against the frame.

And this one is frame D, same again. The gap (again two days ago was flush) is 30mm!!!

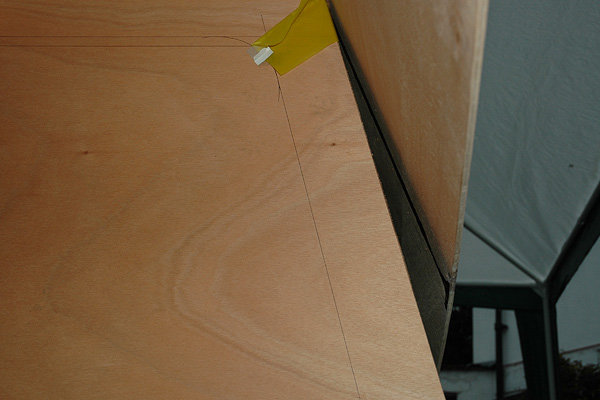
I wonder how much moisture this wood can take before causing strain on the joints? I guess I'm about to find out...
Regards,
Wobbly.
Posted: Thu Jul 28, 2005 4:14 am
by esparver
WobblyLegs wrote:
... the wood has started to absorb moisture and expanded
Hi Wobbly,
As you're building outside, why don't you apply first coat of epoxy on the recently cut plywood and then sand the flat pieces before assemply? this is the way I am working with my CR11 right now and I'm sure it will avoid those problems.
I've been following your project very close as I like the C17 boat. You're doing a great job with it.
Regards,
Posted: Thu Jul 28, 2005 8:51 am
by tech_support
esparver wrote:WobblyLegs wrote:
... the wood has started to absorb moisture and expanded
Hi Wobbly,
As you're building outside, why don't you apply first coat of epoxy on the recently cut plywood and then sand the flat pieces before assemply? this is the way I am working with my CR11 right now and I'm sure it will avoid those problems.
I've been following your project very close as I like the C17 boat. You're doing a great job with it.
Regards,
Not a bad idea. But wait for a few dry days first or you will seal in a high moister content.
Posted: Thu Jul 28, 2005 1:45 pm
by Welsh_diver
I am watching this build very carefully as I plan to build a CX19 outside. Since it rains even more in Wales expansion due to moisture absorption is going to be a problem. Would it be possible to pre-coat all the plywood once it has been cut and then assemble the boat as normal?
Posted: Thu Jul 28, 2005 1:50 pm
by tech_support
Yes, you can pre-coat it all. In a very small boat where the curves are more severe, pre-coating might make the wood more difficult to bend – but in your case it would probably be a good idea
Posted: Mon Aug 01, 2005 6:36 pm
by JASmine
Wobbly....Looking at your recent photos I noticed that you are adding the sprayrails before you fair...IMHO it might be easier to fair if you add the spray rails after you fair the hull.
It looks great so far..good luck as you continue.
Posted: Wed Aug 03, 2005 11:16 am
by Deadgobot
Shine wrote:Not a bad idea. But wait for a few dry days first or you will seal in a high moister content.
I thought about posting a question re: this topic on the Plywood board, but since you brought it up...
Do you have to take care to epoxy/fiberglass the plywood in relatively equal humidity conditions? Asked another way, is sealing in different moisture content in different panels a Bad Thing?
For a small boat like my first project, it will be easy to epoxy the whole thing at once, but as I move on to bigger boats the problem will present itself.
Posted: Mon Aug 08, 2005 5:44 am
by WobblyLegs
Starting to make progress again.
Well, after another couple of dodgy weather weeks, things started to turn around about the middle of last week.
Last weekend I managed to join the first two of three pieces of ply to make up each of the upper side panels, and also have made up the spray rails to be attached later. The spray rails are measured and cut to form a point at the front, and are at the moment soaking in a tube full of water, to be put on the boat and moulded soon.
This weekend has been fairly productive, starting with screwing and gluing the keel on on Wednesday evening, followed by removing the screws, drilling out the screw holes and filling them with epoxy on Thursday evening.
Then starting a general clean-up of the hull in preparation for coating of a fairing mixture.
Saturday was spent sanding any remaining lumps and bumps out of the glass covering the hull, tidying the join between the keel and the hull, and final shaping of the keel (planing it so that the bottom is dead level).
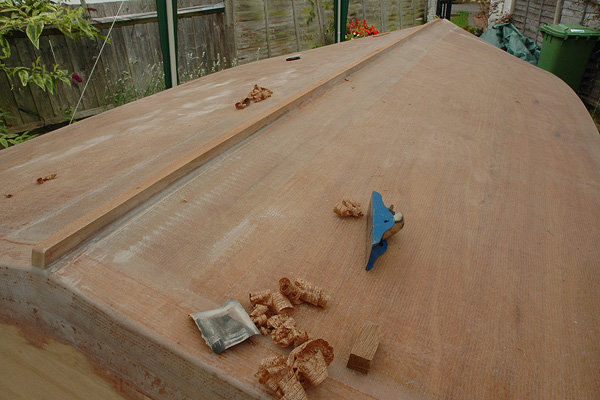
Last job of the day was the fairing mixture going on the lower side panels.
Yesterday (Sunday) morning I found that that fairing mixture was still soft (but not sticky) which raised concern about whether I had my epoxy ratio off - I checked the nozzles of my pumps and found that the hardener was a bit clogged up, so was starting to get a bit worried (cue frantic search on this forum for epoxy problems). Anyway, there was nothing to do about it, so I left that, and finished off joining the upper side panels.
I turns out that my panic about the fairing wasn't necessary, as by yesterday evening it was hard and I was able to hand-sand some ridges out. Phew.
One of the reasons for doing the side fairing first is to get a feel for the filler on a relatively small area before doing the bottom. Hopefully I will be able to lay filler on the bottom this evening, trying to make it a bit thinner (the layer, not the mixture) that the stuff I've done so far to keep sanding time down. We'll see. It feels more like cake icing than peanut butter when mixing (slightly gritty). As Mrs. Wobbly has been asking for the past month or so, "when are you starting with the peanut butter?" Well, now I have, and I now feel like I'm on the way to finishing off the hull. Feels good.
Oh, and the wood is finally starting to dry out properly and is returning to it's original shape, lying flat against the frames.
Also, as the side panels are so long, I have nowhere to store them, so I made little hooks out of plywood which are clamped to the transom and frame B, which the side panels are resting on.
The result of this weekends work:

More pic's here:
http://gallery.bateau2.comindex.php?cat=12964
The weather is supposed to be good for the rest of this week, so I'm looking forward to getting lots more done!
Later,
Wobbly.
Posted: Mon Aug 08, 2005 10:49 am
by WobblyLegs
Deadgobot wrote:Shine wrote:Not a bad idea. But wait for a few dry days first or you will seal in a high moister content.
I thought about posting a question re: this topic on the Plywood board, but since you brought it up...
Do you have to take care to epoxy/fiberglass the plywood in relatively equal humidity conditions? Asked another way, is sealing in different moisture content in different panels a Bad Thing?
For a small boat like my first project, it will be easy to epoxy the whole thing at once, but as I move on to bigger boats the problem will present itself.
I don't have the answer for this, but the problem I experienced was due to the wood absorbing moisture on one side only (the other side was sealed) which caused the wood to curve where it could.
All my wood lives outdoors (under shelter) but gets taken off the stack and well aired (both sides exposed) at least a week before being used. This makes sure that the wood is nice and flat.
I would imagine that if there is more moisture in one side than the other, it would
eventually even out in a sealed panel.
I think the most important thing is to make sure the wood is flat (uniformly dry) before working with it, so making it more important to have similar moisture content on each side of the panels, rather than in each panel.
I've said it before: I'm not the expert, but it makes sense to me.
Wobbly.
Posted: Mon Aug 08, 2005 11:27 am
by Deadgobot
WobblyLegs wrote:I think the most important thing is to make sure the wood is flat (uniformly dry) before working with it, so making it more important to have similar moisture content on each side of the panels, rather than in each panel.
I've said it before: I'm not the expert, but it makes sense to me.
Since I'm even less of an expert, until I hear words to the contrary yours will work as passable gospel.
Your boat is shaping up nicely!
Posted: Mon Aug 08, 2005 1:49 pm
by Welsh_diver
Where did you get the gazibo? I would like a photo of the storage method you are using?
Thanks
Posted: Mon Aug 08, 2005 1:58 pm
by PaulMcClure
It looks like one I bought from Homebase a couple of years ago.
Posted: Mon Aug 08, 2005 3:14 pm
by WobblyLegs
PaulMcClure wrote:It looks like one I bought from Homebase a couple of years ago.
It's probably the same - I got it from Argos (part of the same group as Homebase) for about 80 quid. Been very useful.
Posted: Mon Aug 08, 2005 3:56 pm
by PaulMcClure
Yep, sounds like it. I just turfed mine out and bought a new one from Argos for £60+. The old one was a bugger to put up on your own, the new one is really easy, since the frame is collapsible without dismantling.
One caveat for these is that the fabric is not really waterproof, so bear that in mind when leaving it out when rain is expected.
Posted: Mon Aug 08, 2005 4:23 pm
by circlehook
hi wobbly i have been checkin out this site for a while and hope to build the c17 someday. yours is looking really great. any ideas yet how you are going to lay out the interior? paul
Posted: Mon Aug 08, 2005 5:10 pm
by WobblyLegs
PaulMcClure wrote:Yep, sounds like it. I just turfed mine out and bought a new one from Argos for £60+. The old one was a bugger to put up on your own, the new one is really easy, since the frame is collapsible without dismantling.
One caveat for these is that the fabric is not really waterproof, so bear that in mind when leaving it out when rain is expected.
Mine is obviously of the old design then (6x3 metre) - poles that slide into each other, nothing fits perfectly etc., etc.
Yeah, I know it's not waterproof - I cover the boat with a tarp as well (except when I'm leaving epoxy to cure - which is why I need to be confident of dry spells before doing major work like fibreglass on the bottom!!).
circlehook wrote:hi wobbly i have been checkin out this site for a while and hope to build the c17 someday. yours is looking really great. any ideas yet how you are going to lay out the interior? paul
I'm thinking of running benches both sides, far enough forward that it also becomes a seat for me to use with some leg-room while steering. I'm not planning on installing a proper seat - I can always lean on the side if needs be on a long river trip (or hopefully Channel crossing to France!!!). If at sea with biggish waves, I'd prefer to be standing anyway.
But the layout is, as they say, very much subject to change.
And, tonight, I have discovered that I was a bit generous with the fairing mix. When they say "easy to sand" I guess they mean "relative to stone" or something like that. So, new procedure, enough to fill the weave, and if needs be, more later.
The stuff is easier to mix than to sand.
Welsh_diver wrote:I would like a photo of the storage method you are using?
Thanks
I built a deck at the bottom of the garden a couple of years ago, which is where everything is. It's quite protected, surrounded by fence/shed on three sides, but open at the front. What you can't see in the photo is that it has a roof.

The wood lying on the deck is sitting on some 2x2's, so is kept "in the air," while the stuff stacked at the back is mostly off-cuts (but of a size to be used later for a console, or other fittings that I might dream up.
Everything lying flat stays covered with a tarp until ready to use. Usually, if I need a sheet, I'll take it out, stack it near the back with a big air gap for a week, then get on with it.
Nice chatting,
Wobbly.
Posted: Mon Aug 08, 2005 5:33 pm
by PaulMcClure
Yep, that's the one. I threw mine out after having to put it together myself for the millionth time - every time you get one pole in the rest fall apart.
I'm thinking of doing my C17 with a similar layout, but converting the benches to being fish storage, so I can keep them from filling up the floor
A plug at the bottom will aid washing them out.
Commiserations on the sanding. I'm using QuikFair right now (N7 for my daughters) and it's great
Posted: Mon Aug 08, 2005 6:09 pm
by WobblyLegs
PaulMcClure wrote:I'm thinking of doing my C17 with a similar layout, but converting the benches to being fish storage, so I can keep them from filling up the floor.
Yeah, my benches will be storage to - probably camping stuff - not much into fishing.
Paul, where are you based?
We're hoping to do a week or two next year on Loch Lomond with this tub.
Tim.
Posted: Mon Aug 08, 2005 7:35 pm
by PaulMcClure
Tim,
I'm about an hour away from Loch Lomond, in Skelmorlie which is near Largs. If you are going to be up this way then give me a call. I'd love to see your boat. I've had the C17 plans since they were released and had planned to start building it a year ago. However my workshop got flooded while I was building an SH14 which got ruined, so I had to wait until some ground works were completed.
I built an FL14 a couple of years ago and I'm just finishing off an N7 this week. Once the C17 is done I'm thinking about a DE25 long cabin. And I suppose I should do another SH14. I still have the water damaged panels to use as tempates.
This boatbuilding stuff is addictive, no?
Posted: Tue Aug 09, 2005 4:14 am
by WobblyLegs
PaulMcClure wrote:Once the C17 is done I'm thinking about a DE25 long cabin.
You're reading my mind!
Re: 8 May
Posted: Tue Aug 09, 2005 7:49 pm
by attownsend
WobblyLegs wrote:So, this weekend has been a little more relaxing, but still keeping ahead of my schedule.
Stringers laminated, measured and cut, in that order, then notches cut. Followed by notches cut into frames "C," "D" and "E."
I had to check whether they all fit:
It's also the first real indication of the size of the boat that I'm building. Somehow a tape across the ground showing 17 feet doesn't mean anything!
I had planned on laminating the transom, but got hit by a thunder-storm with hail like I have never seen (in England) before? (20 minutes after this pic was taken, the sky was black. Unbelievable!).
More pic's in the gallery as usual.
Most excellent,Evildwarf.Build on!
Posted: Tue Aug 16, 2005 6:57 am
by WobblyLegs
The boat is now reaching full size.
A week of steady progress since the last update!
I have managed to fair the side panels of the boat, creating a load of dust, but the neighbours seem quite tolerant so far - lucky for me. In fact, they are more intrigued than anything else, always asking when the floods are coming, and making comments about arks etc.
So, after smoothing the sides, applied a fairing mixture to the bottom, trying to keep it as thin and smooth as possible, but I'm still going to have a lot of sanding to do.
Also, I've taken the spray rails out of their two week soak (it was going to be one week, but you know how it goes...). Even though the wood was thoroughly saturated, it still took a major effort to bend and twist them along the chine. In order to keep the rail from pulling away from the chine, I put a little (5mm) bolt through the front of it and the hull, then loads of screws from inside into the rail to hold it in place while it dries. More filling to do later.
The rail is going to stay there until properly dry (and hopefully hold it's shape) while I work around it.
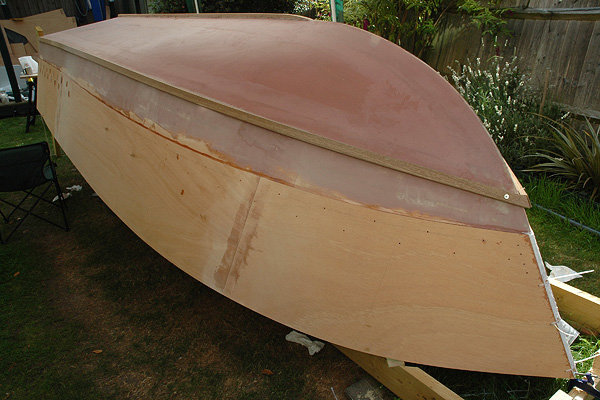
The next parts to go on are the upper side panels. Last night I did a proper dry-fit, screwing the panels into place, starting at the transom and fastening every 500mm towards the bow. That seems enough to hold it. I might put more screws in when gluing, just to hold the panels together more uniformly.
Once again, I'm impressed with how well everything is fitting together. After reading on one of the posts here a while back that the overlap of the side panels is 6 inches, I made a mark 6" up (down if right-side up) the lower side panel midway along the boat, and another one midway between there and the front. Then a single screw through the back end of the panel into the transom for the panel to rotate on. I aligned the panel against the midway mark, then against the forward mark, the screwed into place. First one went on perfectly. Second one need a couple of screws removed, a little nudge, then together again. Perfect. Everything lines up very nicely at the front.
I think this pic shows much of what I've done during the past week.
So now I will be working on gluing the uppers, then taping to the transom and at the front, then the rubrail before returning to sanding the bottom.
We shall see how it goes.
More pics in the gallery:
http://gallery.bateau2.com/thumbnails.php?album=286
Keep building.
Wobbly.
Posted: Tue Aug 16, 2005 9:18 am
by tech_support
The bottom looks very fair from the pictures - nice job
Posted: Tue Aug 16, 2005 11:04 pm
by Mike Adams
Hi Wobbly,
I've been following your build with interest, especially now I've virtually finished the FL14 and am hoping to start on the LB22 soon. Thanks for some very informative photos - particularly of the strongback and your use of the laser level, which I found very helpful.
I think you are doing a terrific job - beautiful work on the hull, which looks as fair as one could wish for.
BTW, whereabouts in London are you? I was born in Hendon; also lived in Greenford for a while. I'll be in London (Watford/Bushey area) in early October, but unfortunately won't have a lot of time or I would try to come and visit you and see your boat "in the flesh".
Again, great work - keep posting pics!
Posted: Wed Aug 17, 2005 3:05 am
by Barney
that is an impressive piece of workmanship
Posted: Mon Aug 22, 2005 6:42 am
by WobblyLegs
The hull is finished.
Well, it's all glued together. I have to tape the bow, and the corners of the transom to the upper side panels, and then the structure is complete.
Loads of screws went into it to hold the upper side to the lower side while the glue cured, so I have most of those still to fill. The boat looks more like a sieve than a boat at the moment.
But, it does really look like a boat now. Not a pile of wood. It feels like I've reached a point where I'm starting to
finish a boat as opposed to
starting to build a boat.
Now, if only the weather would co-operate. I know I go on a bit about the rain, but it seem like each day of rain delays me by two or three days of progress as I have to wait until everything dries out. I've been hoping to seal the entire hull with epoxy for days now, but it always seems to rain the day before I'm able to do it.
Next time I do something like this, I guess I should seal the wood (as suggested here before) before building, or maybe move to a drier place (which is also quite possible - a DE25 in South Africa is an idea brewing at the moment).
Anyway, I'm sitting with a boat, waiting for the weather to turn so I can finish off the outside of the hull. Let's hope it does, as I've decided to take next week off so that I have nine days dedicated to it.
I'll let you know how it goes.
Wobbly.
Mike Adams wrote:BTW, whereabouts in London are you?
Mike, I'm in Worcester Park, just beyond Wimbledon. It's a very wet place right now

Posted: Mon Aug 22, 2005 1:03 pm
by circlehook
very nice cant wait to see her flipped over
Posted: Mon Sep 19, 2005 5:09 pm
by WobblyLegs
circlehook wrote:very nice cant wait to see her flipped over
Yeah, me too, but not this year.
So, it's been almost a month since the last update...
What can I say, it's been raining for most of it.
But, I have managed to get a bit further on the boat. I took a week off work at the end of August to concentrate on the hull. The weather co-operated perfectly, and I managed to sand the entire bottom of the hull, which took three days (about 4 hours a day was all I could manage) and 42 sanding disks-
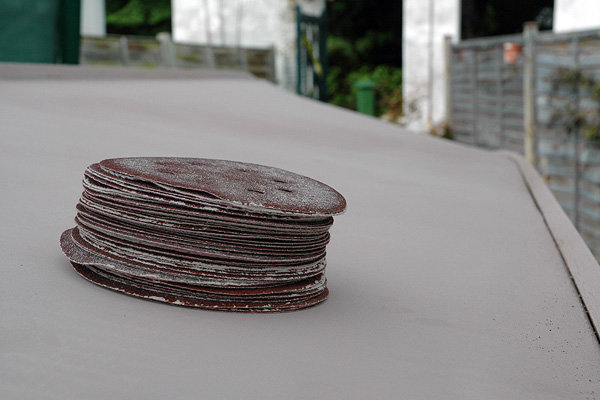
Also, laid some FG tape along the keel, continuing up the bow to just under (if the boat was right-side up) the spray rails. Two reasons for this - one is to give the keel some protection from grounding, and secondly, running it over the corner towards the bow gives me more lee-way when sanding that curve smooth, and avoiding sanding into the bi-ax. It worked perfectly, and will probably give a tiny bit more protection against hitting debris that often floats down the Thames. -
Lastly, I have (eventually) joined the spray rails and strakes to the hull. I put a post on the process of shaping the front of the strakes
here as I thought it might be useful for other builders. The strakes I did last week with the assistance of Mrs. Wobbly - she held them in place while I pulled them down with screws from inside, and the spray rails went on yesterday, with myself holding them in place on the outside, an assistant holding the long end up, and another assistant to push screws in from inside. Went smoothly.
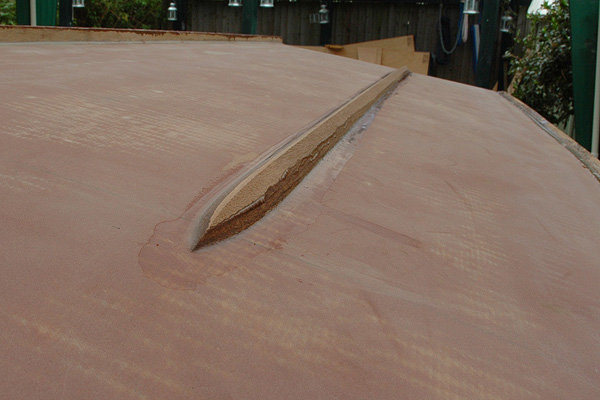
It did help that I'd soaked the rails, then put them in place to dry. When I removed them, they kept a very nice curve, not quite a perfect match to the hull, but nearly.
The season's changing now, very definitely heading into autumn, so I'm planning on covering everything with a layer of epoxy, wrapping it all up under a new tarpaulin (my present one now has loads of holes in it) and pulling the tent down for the winter (it won't stand up to the wind that usually comes in late autumn).
If, after that, I manage to get a bit of sanding done here and there (there's lot's of finishing touches to do before painting), I consider that a bonus, but I'm not counting on it. With the arrival of spring next year, I'm looking forward to putting some colour on the boat.
Well, that's my progress for five month's of building my C17. A lot of the time I've been held back by weather, but the last month or so has been a case of doing something while opportunity presents, and find something else to do when it's wet (not that easy to do). I will put more updates here as things go on, but don't hold your breath until about March/April 2006.
As usual, more pics
here.
Later.
B.O.D.
Wobbly.
Posted: Sun Oct 30, 2005 1:04 pm
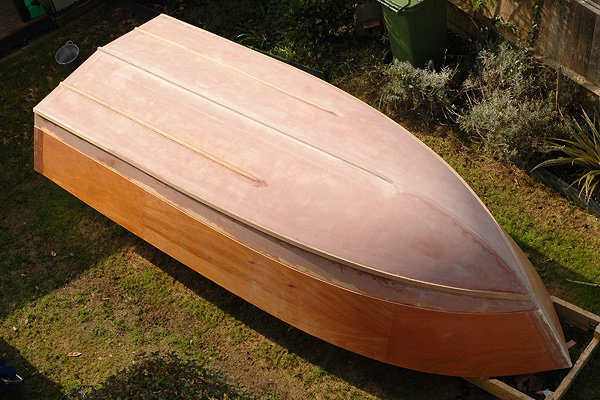
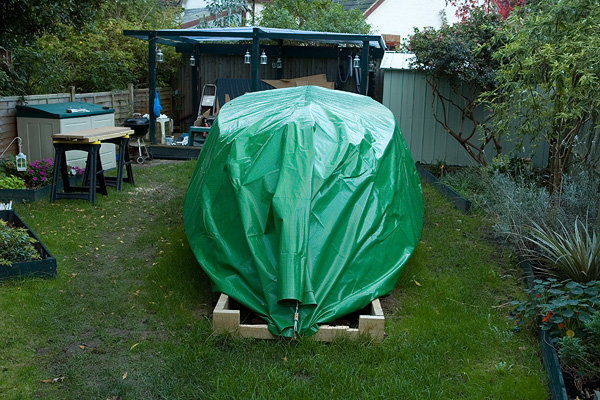
by WobblyLegs
Well, that's it for this year
So, a pic of this summer's progress:
And, now it's wrapped until spring:
Have a good winter peeps (I'm going looking for some piste soon!).
Wobb.
Posted: Sun Oct 30, 2005 2:17 pm
by MadRus
No! No! No! It's going to kill me to have to wait to see this one finished. Heve a nice nap.
Posted: Sun Oct 30, 2005 5:14 pm
by Mike Adams
Wobb,
That's a BEAUTIFUL hull! Well done. Looking forward to seeing you resume work in the Spring. Until then, take care.
Mike
Posted: Sun Oct 30, 2005 6:44 pm
by SurfRider
WobblyLegs wrote:Well, that's it for this year
And, now it's wrapped until spring:
A more patient man I have never seen.
Posted: Mon Oct 31, 2005 12:43 pm
by Lucky_Louis
Looking great Wobbly! I fully understand the challenges of building outside in our Northern climes. I would like to share what happened to me last winter so the same doesn't happen to you this winter. When I resumed my OB17 build this spring, I peeked up into my hull only to find a bumper crop of mildew had taken hold everywhere. Apparently the stuff loves mahogany. Before this winter takes hold, I'm going have a few hours of scrubbing with bleach before I can dry and seal with epoxy. I'm not really ready to flip my hull yet but I may flip, seal the inside, and flip back onto the mold before winter. A light bulb for a bit of heat and a small fan for air circulation may work too.
Posted: Mon Oct 31, 2005 1:04 pm
by WobblyLegs
Lucky_Louis wrote:Looking great Wobbly! I fully understand the challenges of building outside in our Northern climes. I would like to share what happened to me last winter so the same doesn't happen to you this winter. When I resumed my OB17 build this spring, I peeked up into my hull only to find a bumper crop of mildew had taken hold everywhere. Apparently the stuff loves mahogany. Before this winter takes hold, I'm going have a few hours of scrubbing with bleach before I can dry and seal with epoxy. I'm not really ready to flip my hull yet but I may flip, seal the inside, and flip back onto the mold before winter. A light bulb for a bit of heat and a small fan for air circulation may work too.
Lucky_Louis, thanks for the the advice. I'll make sure that I do periodical checks through the winter.
Most of it on the outside is sealed, and the inside is very open to air circulation (and easy to access), but it's no problem to keep an eye on it.
To the other responses to this "blog" through the summer - thanks guys, this site has been a mine of information, and the responses have been great!
I'm already getting fidgety and the wife is telling me to get a new (winter) hobby. Boat-building = addictive? No, surely not! Now, where's the credit card for the DE25 plans?
Later guys,
Wobbly.
Posted: Mon Oct 31, 2005 3:05 pm
by glcost
Wobbly,
It's a real shame you have to stop building for the winter. I've enjoyed following this thread and appreciate your help/advance while building my C17.
Your hull is a beauty!
George
Posted: Tue Apr 04, 2006 10:06 am
by WobblyLegs
Well, it feels like its been a really long winter!
But, its finally over (although I can't say that summer is here yet!). So, this last weekend I finally managed to get back to the boat!
Ah, daylight:
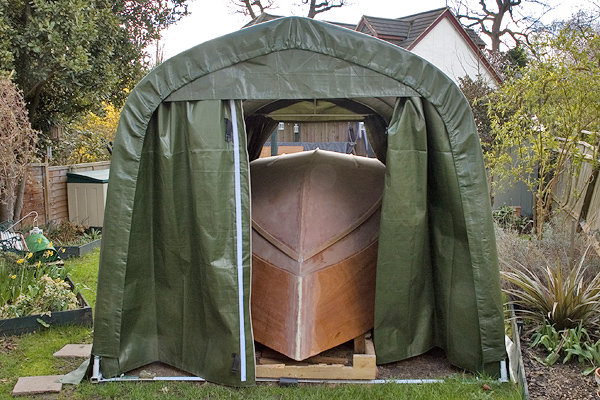
I've inspected inside the boat, and it seems to have survived the winter really well. There are some tiny patches of mildew, but overall it is dry and sound. Fortunately (for me anyway) it's been an unusually dry winter - to the point of banning the use of hosepipes as of April 3rd in order to conserve water. Not so good for the garden.
Before wrapping up last year, I decided to put a coat of epoxy on the transom, just seal it. Well that didn't work out to well. I'm guessing that as I did it late in the day, some dew had formed on the wood as the epoxy didn't end up sticking very well.
In the pic you can see where the "good" epoxy (from taping previously) and the "bad" epoxy meet:
The other thing that made me think the wood was wet, was the high level of blush present that I had to wash off. Oh well, live and learn.
And, so, back to sanding:
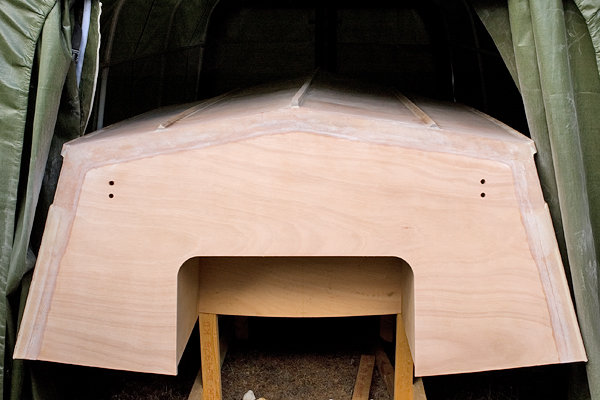
Belt sander all the way - all the old epoxy has been removed, and we're ready (again) to glass the transom. This time I'll wait until conditions are right, and do it wet-on-dry, as I did the hull.
Its good to be working again.
Wobb.
My Gallery
Posted: Tue Apr 04, 2006 10:25 am
by MadRus
Hey, finally! Looks pretty good for being wrapped up all winter. Keep us posted as usual. Going for a late season splash?
-Dave
Posted: Tue Apr 04, 2006 11:53 am
by Lucky_Louis
Welcome back Wobb! Looks like we'll be racing to a finish. Just now our weather has picked up to the point where I can start mixing sticky stuff again. Our winter was just the opposite, the wettest on record. Vancouver came within one day of breaking the all time record for most consecutive days of rain. 40 days with measurable precip. The upside is that the mildew comes off easily with a dry Scotchbrite pad and I'm not finishing any plywood surfaces bright.
Posted: Sun May 07, 2006 4:30 pm
by WobblyLegs
OK,
We're working again, in-between the typical April/May showers which seem to always happen on weekends.
So, I've painted the keel and the strakes with epoxy, in preparation for sanding (again) and final sealing of the hull.
Also, I have finally sealed the lower side panels, as well as sanding the upper side panels (which were sealed last autumn) in preparation for (epoxy) priming for paint.
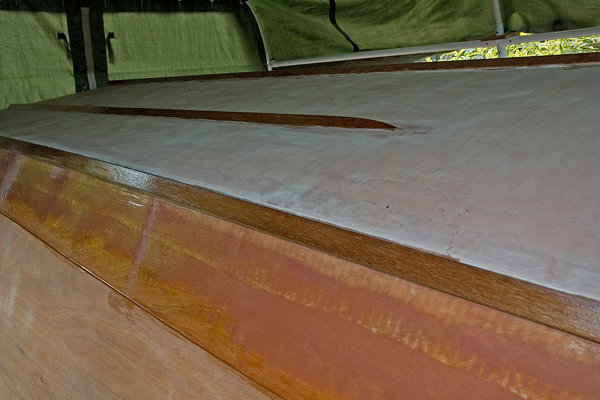
Since then, started on the rub-rails - try as I might, I could not get the wood to bend to the curve of the gunwales, so eventually (and I cut this last autumn as well) I kerfed the laminates towards the bow. Works for me.
Got clamps?

And, in-between times, have been slowly sanding my bow down to create a flat spot for the bow eye to rest against:
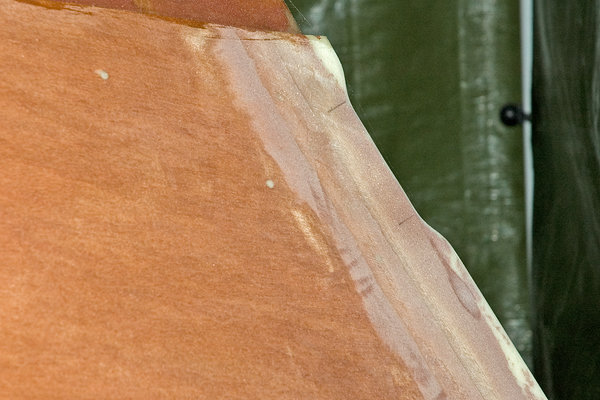
.
The transom has been glassed as well, waiting to be faired and sanded. I have been doing so much sanding the past month that Elton John's song "I'm Still Standing" has being going through my head as "I'm Still SANDING" endlessly while my hands vibrate with the RO sander. Ugh!
Next step, well, um, sanding the transom to prepare for fairing, and uh, again, sanding the keel in preparation for some fillets on the sides, and, uh, sanding the strakes in preparation for the final coating of epoxy for painting.
Did anyone ever mention that sanding is the biggest part of building a boat? Not to me they didn't!
Later.
Wobb.
Posted: Sun May 07, 2006 5:13 pm
by WobblyLegs
Oh, and one more pic for you:
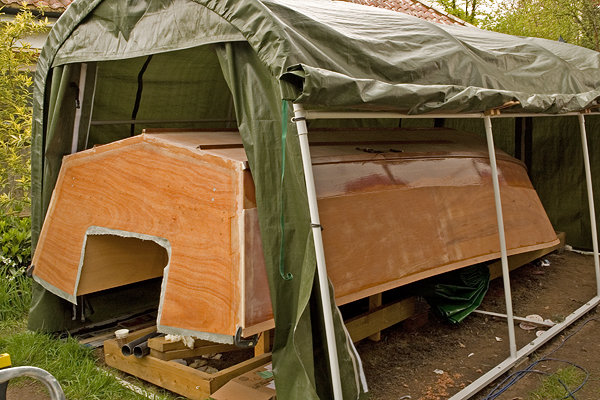
Wobb.
Posted: Mon May 08, 2006 9:11 am
by JimW
WobblyLegs wrote:OK,
Did anyone ever mention that sanding is the biggest part of building a boat? Not to me they didn't!
Wobb.
SHHHH! It's a secret!
Posted: Mon May 08, 2006 12:29 pm
by ks8
SSSSSHHHHHHHHHHHHHHH!
it's a secret that its a secret...
Posted: Mon May 08, 2006 12:51 pm
by Yoda
Seems to me that I remember signing a non disclosure agreement when we joined the forums. About sanding.

Posted: Mon May 08, 2006 1:00 pm
by ks8
Yoda wrote:Seems to me that I remember signing a non disclosure agreement when we joined the forums. About sanding.
I know that you know that I know... but do they know? If its a secret, they are not supposed to know? Then how do they know not to tell?
The C17 is looking good waiting to break out of its cocoon and plane away. Does it fit in the tent without pressing against the ends? If not, do you lay cloth over it to protect it from a beating from the tarp in a wind? The transom looks like nothing was leaning or scraping against it all winter...
ks
Posted: Mon May 08, 2006 5:36 pm
by WobblyLegs
ks8 wrote:Yoda wrote:Seems to me that I remember signing a non disclosure agreement when we joined the forums. About sanding.
I know that you know that I know... but do they know? If its a secret, they are not supposed to know? Then how do they know not to tell?
The C17 is looking good waiting to break out of its cocoon and plane away. Does it fit in the tent without pressing against the ends? If not, do you lay cloth over it to protect it from a beating from the tarp in a wind? The transom looks like nothing was leaning or scraping against it all winter...
ks
OK, I won't mention parchment with gritty stuff stuck to it again (well, today anyway).
ks, if you look at the pic you'll see a clamp at each corner - they're nice and smooth and stick out enough to hold the tent away from the boat. The 'doors' are connnected to the side frame with bungee toggles, so they stretch enough to allow the doors around the back of the boat.
I managed to fit the third rub-rail layer tonight - port No. 2. three more to go. I can only do one side at a time, having them alternately overlapping at the bow. Still, should manage to get them finished before the end of the week, then some more, uh, yeah, well more of that dusty stuff on the weekend.
Wobb.
Posted: Tue May 09, 2006 12:22 am
by ks8
WobblyLegs wrote:I managed to fit the third rub-rail layer tonight - port No. 2. three more to go. I can only do one side at a time, having them alternately overlapping at the bow. Still, should manage to get them finished before the end of the week, then some more, uh, yeah, well more of that dusty stuff on the weekend.
This week I'm also trying to finish up rubrail and trim, in a tent...
Those small mahoghany splinters I could live without.

I'll post to my thread later this week... Now I understand the clamps. My south tent side is in total shreds again. Time to replace. Hope yours holds up well until you are ready to launch. I've occasionally had birds and other beasts find the sheltered boat a convenient roost. Have you had any guest crew yet?
Can't wait to see that C17 ready to plane. The boat looks very roomy. Consequently, it looks like you have a tighter work area than me. It will be very worth it when you are done.
Posted: Tue May 09, 2006 6:30 pm
by WobblyLegs
ks8 wrote:I've occasionally had birds and other beasts find the sheltered boat a convenient roost. Have you had any guest crew yet?
If you can call our oldest cat "guest crew" then yes - he's laid claim to the thing, in the manner that tomcats do.

So apart from cleaning dust, I also have to eliminate the cat-wee smell. I hope it doesn't stay.
It's a real problem as he sleeps on top of the boat, and I'm preparing to seal and paint pretty soon - and I really, really don't want to go outside one morning to find a cat epoxy-glued to a boat. I mean, what do you do? Shave the cat off the boat, or cut the wood????
I looked at pics of your "tent" by the way - there's enough piping there to plum my whole house!!!!
N-i-c-e looking boat though.
Wobb.
Oh, and rub-rail layer number four (st'bd No 2) stuck on tonight!!
Posted: Tue May 09, 2006 6:39 pm
by MadRus
Posted: Tue May 09, 2006 10:55 pm
by ks8
Makes for purr-fect laminations...
Posted: Wed May 10, 2006 9:31 am
by MadRus
I checked with S3 and kitty fur is one of the additives they recommend for building stronger fillets. Another alternative is baby seal tongues. Okay, too much. I've got mice in my garage and I keep thinking I'm going to have one pop out of my drainage holes or something when I'm out on the water. And if it happens when I'm with my wife, it's going to quickly turn into a "save the mouse" mission.
Wobbly, I was thinking about your boat all winter- as were you I'm sure. It's nice to see you back at it.
Posted: Wed May 10, 2006 9:52 am
by WobblyLegs
MadRus wrote:I checked with S3 and kitty fur is one of the additives they recommend for building stronger fillets.
I was thinking of asking about that..., thanks for doing the research. I'll post pics of three bald-shaven cats once I start working on the inside.
MadRus wrote:Wobbly, I was thinking about your boat all winter- as were you I'm sure. It's nice to see you back at it.
As was I, and it is s-o-o-o-o-o good to be doing something again. It was a long, long winter for me.
Wobb.
Posted: Wed May 10, 2006 12:52 pm
by kiwi
I watched the weather on the beeb yesterday and you actually have house martins back for the Spring! Wow way to go UK
We had a very warm spot in April - some people went swimming - but temperatures are still up and down like a yoyo. Be carefull with that epoxy man!
I could tell some horrible UK grade jokes about cats but we have to be carefull about those who don't have the same sense of humour... It is a lot like curry - different strengths for different folk (yes I eat full on Indian strength curry, how did you guess?)
Cheers
Tony
Posted: Sat May 13, 2006 5:11 am
by WobblyLegs
Finished the last layer of side rubrails on Thursday night, and spread peanut butter all over the transom yesterday (Fri).
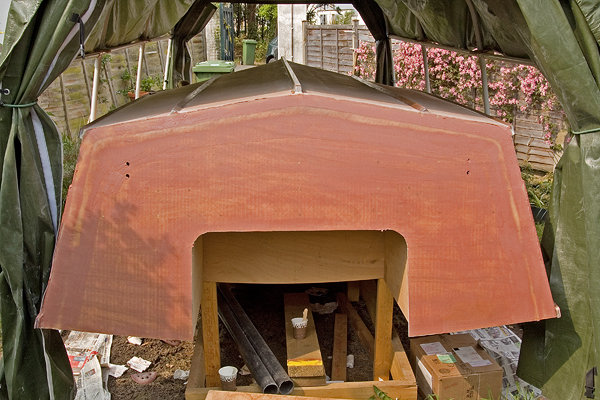
Today, I think, will be mostly playing with my little Makita random orbital thingy.
Posted: Sun May 14, 2006 4:05 pm
by WobblyLegs
OK, so I didn't get to sand the transom (fairing is still a bit 'spongey' as I used the slow mix) so I put some finishing touches to the sides where the panels overlap using a fairing mixture and a plastic teaspoon.
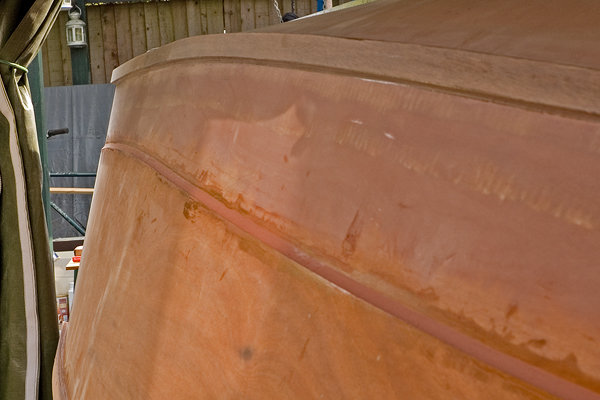
I'm planning on doing something similar where the keel joins the hull. Then, some sealing....
Posted: Mon May 15, 2006 6:50 pm
by BillTwo
WobblyLegs wrote:Finished the last layer of rubrail on Thursday night, and spread peanut butter all over the transom yesterday (Fri).
There you are WobblyLegs!!
I was looking in the wrong forum for your input. I looked in the Builder Galleries for you and saw the lastest post (#116) but no comments in the forum until I searched and found you in the "Builder's Progress Forum".
I have now finished taping and doing some light fairing using Quick Fair in some spots to smooth out those tape edges.
Before I start my fiberglassing, I'm going to coat my whole Hull with its first layer of epoxy resin to seal out any potential moisture that might get into my plywood. Next, with the help of my wife, I'll begin the layout and laminating the hull with fiberglass and epoxy. I've decided to break this into quarters such that I'm not trying to cover too much area at once and get caught making a mess of fiberglassing my Hull. Speaking of Hull, yours looks great with the "peanut butter".
What are you mixing to make your "peanut butter"?
I will be posting some more pictures this week. Its not many, but they will show some of the progress that I've made.
Wobbly keep up the good work. You are inspiration for me to try and do as well as you are doing with your boat.
Regards,
Billtwo
Posted: Tue May 16, 2006 5:23 am
by WobblyLegs
BillTwo wrote:Speaking of Hull, yours looks great with the "peanut butter". What are you mixing to make your "peanut butter"?
Hey there BillTwo, I was wondering how your build was going...
This is the stuff I use for fairing:
Basically a micro-balloon mix that they say easy to sand, but I guess its relative
I get about two, maybe three square-feet sanded per disc on my sander, so you can imagine my pile of used discs is still growing. For fairing, I've found that 4 tablespoons per stroke of the epoxy pumps give an easy to spread mixture, while 5 spoons is perfect to fill, like on the side of the boat. It's real hard on the wrist to mix though, and I'm having to make my own quarter inch thick mixing sticks so they don't break.
Looking forward to seeing your pics...
Wobb.
Posted: Tue May 16, 2006 2:17 pm
by Jerry-rigged
BillTwo wrote:Wobbly keep up the good work. You are inspiration for me to try and do as well as you are doing with your boat.
Regards,
Billtwo
Yea, me too. Wobbly, you C17 is looking great. Hopefully, here will be a C17 in my future, but with a CC instead of a cabin. I am following both your's and Glcost's progrss, enjoying every post.
Build On!
Jerry
Posted: Tue May 16, 2006 2:40 pm
by WobblyLegs
Jerry-rigged wrote:I am following both your's and Glcost's progrss, enjoying every post.
Build On!
Jerry
I haven't seen any activity on George's thread and pix for a while - I guess Washington is as wet as I've heard...
He's doing a nice job.
Posted: Tue May 16, 2006 4:42 pm
by glcost
Hi Wobbly,
I'm still around and keeping an eye on yours and Billtwo's progress. I'm fortunite to have a garage to keep my boat in, but I have to roll it outside to work on. So I had to stop over the winter too. I started fairing earlier in the spring when we had a dry saturday or sunday.
The weathers changed now, but my building permit finally came through. I was going to build a workshop before starting the C17, but the city government wasn't cooperating and wouldn't grant me a permit to build it. I got impatient waiting and decided to start building the boat. This spring I finally got the permit and there's a time limit, so I've been working on it among other things.
If I could only quit my job and work on my hobbies fulltime, than I'd be in heaven.
George
Posted: Tue May 16, 2006 4:45 pm
by WobblyLegs
glcost wrote:If I could only quit my job and work on my hobbies fulltime, than I'd be in heaven.
George
You and me both...!
Posted: Wed May 17, 2006 2:00 pm
by BillTwo
glcost wrote:
If I could only quit my job and work on my hobbies fulltime, than I'd be in heaven.
George, I couldn't pass that comment by - you, Wobbly, myself and most (I believe) of those on this forum who are still working feel the same way.
I'm working out of my garage and I am considering building a separate Utility Building but at this point I'm using all the little spare time that I have building my boat. That will be my next project. Until then, I'll just have to make due in my garage.
I have entered five more pictures to my folder in the gallery (under "OB17"). Here's one of them (it's not the best picture considering I'm no photographer and have poor lighting in my garage):
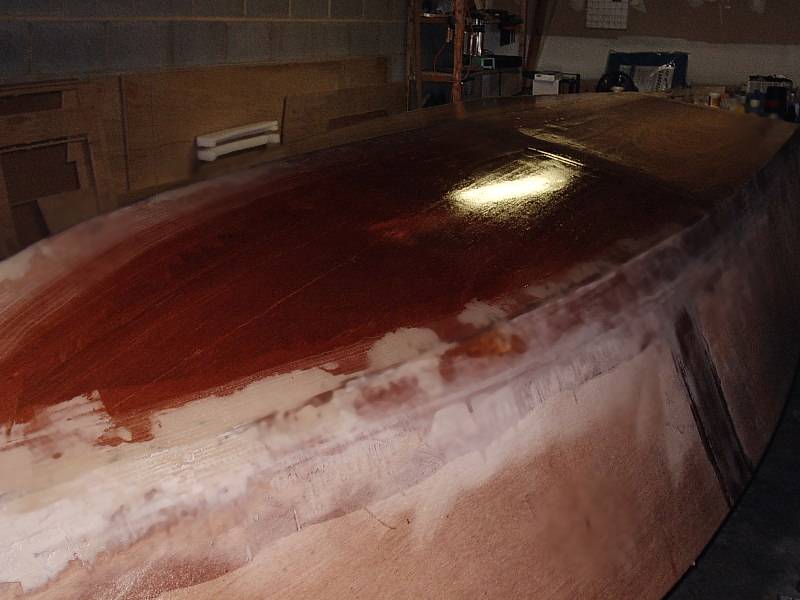
I have just finished putting resin on both halves of the Bottom of the Hull. As you can see, beyond the glare, light spots round and beneath the tape. This is Quick fair and putty seams that you see at the chine. Good thing I'm painting my Hull.
My next task is putting resin on the sides and the begining of fiberglassing. Then the task of fairing the Hull which include the "Secret" process that no one likes to do or talk about.
Wobbly
Thanks for the feedback on the "Peanut Butter" and details and such. As you can see, my attempt at fairing the tape edges and the filling-in of low spots stand out quite a bit.
Regards,
Billtwo
Posted: Tue May 30, 2006 10:57 am
by WobblyLegs
We're supposedly experiencing a drought here in the South-East of England, but its apparently come close to being the wettest May on record. So, the past two weeks have been kinda frustrating.
But, I have managed to do bits here and there, and am making progress.
So, I have no more holes to drill in the boat. No more bits of wood to stick on the boat. No more fibre-glassing to do. I am ready now to start preparing for painting.
Well, I do actually have a couple of holes left, for cockpit and anchor locker draining, and of course, mounting an outboard. But that is later. Much later.
Latest pics...
A dry fit of the bow eye. I know it looks a bit chunky, but I like being able to fit a couple of fingers in there and being able to pull - some I've seen on production boats look like nothing more than slightly thick wire.
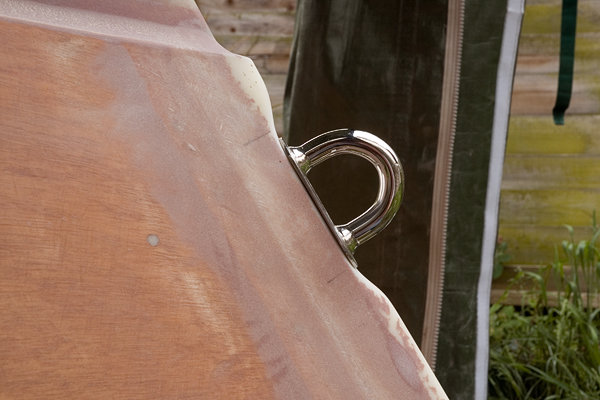
Final laminations of the rub rail done - three layers each side and on the transom.
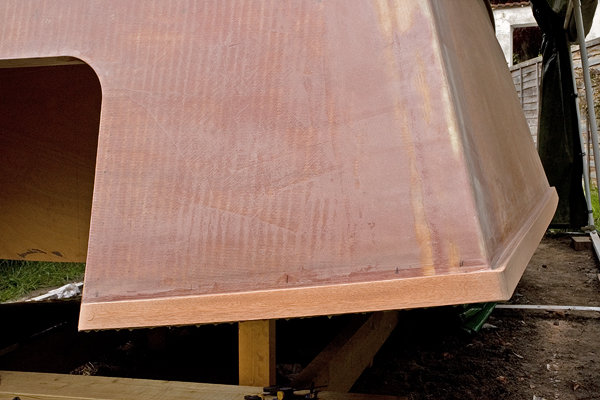
And, a spot of tidying up - a fairing mix making fillets either side of the keel, then sanded down smooth. I made a curved sanding block from a piece of pine - worked a treat.
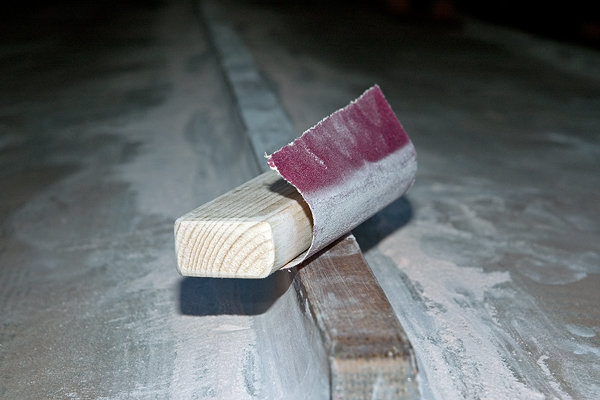
Next, a (very little) bit of sanding here and there just to rough up some smooth spots of epoxy (got all week to do that) and then some sealing layers of epoxy over the whole boat.
Later.
Tim.
PS, BillTwo - I saw your post about fairing on your boat, but others had answered your questions before I saw the post. Nice looking hull.
Posted: Sun Jun 04, 2006 4:14 pm
by WobblyLegs
First layer of sealing epoxy on!!!
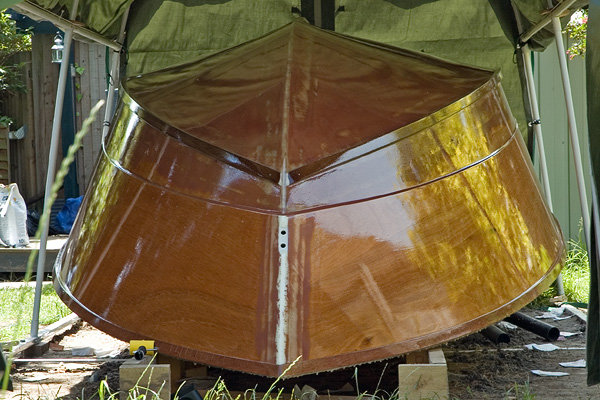
Feeling very sticky
Posted: Sun Jun 04, 2006 4:26 pm
by MadRus
Nice! Keep us posted. I, for one, am watching with great interest, but I'm trying not to reply and fill up your thread, which has managed to stay pretty clean so far..
Posted: Mon Jun 05, 2006 1:55 am
by Salty Dog
Very nice work, well done.
Cheers,
S.D.-
Posted: Mon Jun 05, 2006 2:01 am
by baba101
Daaamn....! this thing is beautiful....Wobbly….. you are doing one heck of a job...

I don't understand how you can make the wood grains show from under the fiberglass and fairing compound...

Posted: Wed Jun 07, 2006 5:53 am
by WobblyLegs
baba101 wrote:I don't understand how you can make the wood grains show from under the fiberglass and fairing compound...
baba, there's no glass or fairing on the upper side panels. I have glassed (and faired) around the chine and 'up' (down?) the lower side panels as per the plans. I know some builders are glassing the sides, but I'm trying to keep weight to a minimum. Also, I'm not planning on using it as an icebreaker
.
Also, the upper and lower panels overlap each other by 6 inches, the full length of the boat, so is about half an inch thick there and is plenty strong enough.
Did you know "baba" is Zulu for "Father?"
Anyway, the latest: I have epoxied the whole boat (as per my previous post) and now sanded the whole thing again, and epoxied the whole thing again and now consider it waterproof.
Its not "showroom" smooth as you can see in this pic, but certainly smooth enough for me (and the fact that I want to actually get around to
using the boat sometime in the (near?) future...
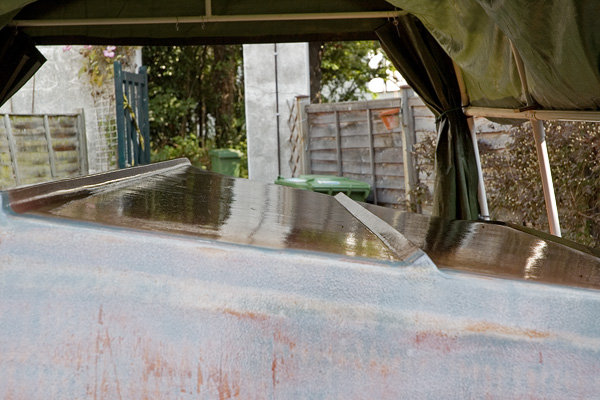
So, now its back to sanding. FOR THE LAST TIME!!!!!! (on the outside anyway
)
Thanks for all the comments guys - its great encouragement!!
Build on.
Tim.
Posted: Thu Jun 08, 2006 4:30 pm
by WobblyLegs
So.... no prizes for guessing what I've been up to today...
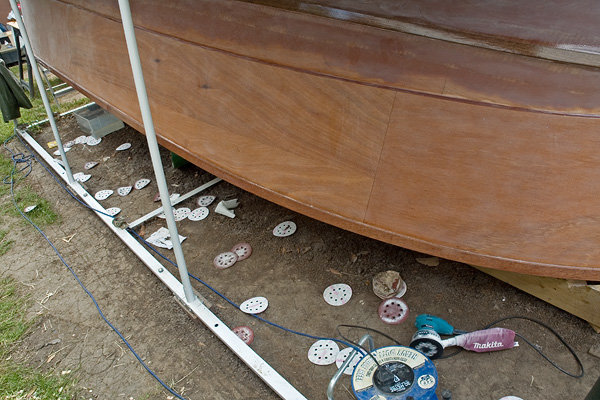
55 discs later...
Posted: Thu Jun 08, 2006 5:05 pm
by Evan_Gatehouse
55 is a lot of discs. Are you using a relatively fine grit? For fairing before painting with a high build primer, I would not use anything finer than 80 grit.
Posted: Thu Jun 08, 2006 5:29 pm
by WobblyLegs
Evan_Gatehouse wrote:55 is a lot of discs. Are you using a relatively fine grit? For fairing before painting with a high build primer, I would not use anything finer than 80 grit.
Hi Evan,
I'm using 120 grit - this is my final preparation before painting, no primer, which is why I'm getting it smooth at this stage. I'm going to paint with International 'Perfection' two part, which for GRP (which this essentially is) states no primer necessary and sand with 220-320 grit paper. So, I'm compromising with 120...
Also, I think the discs are a bit crappy. I've used 3M paper (by hand) which is great, but cannot find the same for my RO sander.
Posted: Thu Jun 08, 2006 5:41 pm
by Lucky_Louis
I feel your pain! I've purchased 'Perfection' as well for my OB17 but I'm using an Interlux 'sanding' primer. Can't remember the name (yellow and white 1 litre can) but it was the recommended primer for coating epoxy. Are you going to spray or roll and tip?
Posted: Thu Jun 08, 2006 5:50 pm
by WobblyLegs
Lucky_Louis wrote:Are you going to spray or roll and tip?
Roll and tip...
I found with rolling epoxy on, a good thing is to soak the roller completely before starting to roll on (like, really saturate), then there are less bubbles to pop later...
I'm knackered now...
g'night.
Tim
Posted: Thu Jun 08, 2006 7:18 pm
by ks8
I spoke with an Interlux staffer about Perfection. I realize they want to sell product, and so an emphasis on primer, but they also stated that there may be problems on an epoxy substrate, depending on whether it is amine based or poly amine based. Their primer will function as a compatible interface to their topcoats, including Perfection, on either amine or poly amine epoxies, but, if I remember right, there will be problems with their topcoats, I think it was on amine based epoxies, which I think S3 may be. You may want to have them clarify this to your situation since Epoxy is not as broad a category as GRP. Primers are not just for fairing or for selling. They are sometimes very necessary.
I don't know which epoxy you have been using or whether or not you know if it is amine or poly amine. Maybe make that phone call? I hope this saves you trouble more than giving you trouble.
ks
Posted: Thu Jun 08, 2006 7:32 pm
by Evan_Gatehouse
I'd also recommend primer. All the 2 part paints are very very thin. To get sufficient coverage 3 coats are usually required.
If you're painting something like white over a darker wood, even more coats may be required. The primer not only prepares the surface and is easy to sand, it also makes for an cheaper coating than lots more coats of the finish coat of Perfection.
A quart of primer is very cheap compared to the cost of the paint. It is totally worth it and required in my view.
I've painted my old boat twice with 1 part Brightsides and the primer did a very good job of creating a nice even surface ready for the finish coats. It also shows any flaws that need fixing before that expensive finish coat goes on...
Posted: Thu Jun 08, 2006 7:36 pm
by ks8
55 more discs?
Posted: Fri Jun 09, 2006 3:09 am
by fmiles
2 Questions/solutions:
1) I noticed discs last a lot longer if you reduce the orbital speed. I think excessive speed creates too much friction, and epoxy goes soft, gumming the pads. I reduced speed, and got better results.
2) Have you sourced your 2 pack yet? I used perfection, and was encouraged to use primer, which was also 2 pack. Dont bother with the chandlers, they know very little and charge the earth. Give Barry a call at Dauntless Boat Yard, 07833 562536, and be prepared for some ripe language!
Posted: Fri Jun 09, 2006 5:38 am
by WobblyLegs
Thanks guys for the input.
A couple of phone calls too. Primer it is.
Posted: Fri Jun 09, 2006 12:02 pm
by ks8
With primer, the surface it is to be applied to can be a bit more scratched up for more bite. If you just brought it all down with 120 grit, that may be alright, but check the primer app notes. you may need to go over it one more time by hand with a slightly rougher grit to scratch it up more... nothing compared to what you did with 55 discs though!
Certainly go with the primer recommended for the topcoat. Stick with the same manufacturer and finish system when you can. They match their products for good reason. I've got to go grind biax...
Posted: Fri Jun 09, 2006 1:56 pm
by WobblyLegs
ks8 wrote:Certainly go with the primer recommended for the topcoat. Stick with the same manufacturer and finish system when you can. They match their products for good reason. I've got to go grind biax...
I spoke to International this morning - their suggested procedure (after I told him what I had done so far) is two coats of "Interprotect" primer followed by two coats of Perfection undercoat.
I have this now, the boat is acceptably sanded according to them, and I will be putting the first coat on in about an hour from now. Just waiting for the sun to get a bit lower so that the boat is in my neighbour's house's shadow.
I'll post a pic in a few hours time (if all goes well
)
Thanks again for your (and everyone else's) input.
Tim.
Posted: Fri Jun 09, 2006 4:08 pm
by WobblyLegs
OK, Primer on the bottom...
I obviously have something to learn about using this stuff. I presume it needs to go on thick (which this didn't - my fault for trying to extend the coverage of what I had)? Also, I need more of it!
And, it causes my foam rollers to disintegrate...

So, tomorrow, more rollers, and more primer...
Wobb.
Posted: Fri Jun 09, 2006 4:27 pm
by tech_support
The wrong foam rollers can ruin your day - and a few extra sanding disks
Posted: Fri Jun 09, 2006 4:55 pm
by ks8
Yep. That stuff has got some mean solvents in it. When you shop for rollers, get another brand or two while there. Next priming session, dip a little bit of the other two in some primer and let it sit. Then you can take a look see later if the other brands turned into ooze.
Posted: Sun Jun 11, 2006 5:17 pm
by WobblyLegs
OK, so this is how it goes...
Primer on (well, most of it when this pic was taken)...
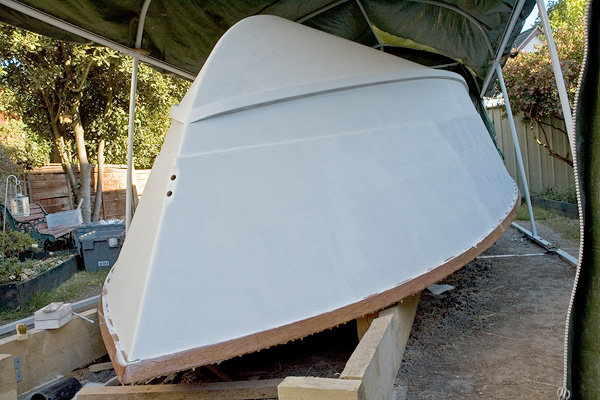
Sand off...
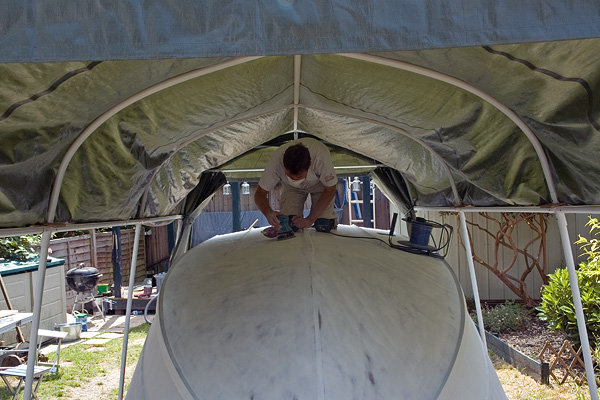
I have to sand the sides, then I'm ready for undercoat...
Posted: Mon Jun 12, 2006 3:29 am
by fmiles
I got pretty good results with the short pile rolers. Ok for primer, as I sanded this for key anyway. If you can't get short pile, give a long pile one a haircut!
Posted: Mon Jun 12, 2006 3:51 am
by WobblyLegs
fmiles wrote:I got pretty good results with the short pile rolers. Ok for primer, as I sanded this for key anyway.
For the primer only? Does the short pile work for a gloss finish?
T
Posted: Mon Jun 12, 2006 3:59 am
by maxgsx
Wobbly,
Boat is looking really nice.!!!!
I bet you were hot under your tent this weekend
Posted: Mon Jun 12, 2006 4:34 am
by fmiles
I sprayed the top coat. I had exactly the same problems with my primer, it shredded the foam rollers pretty quick, so changed to short pile.. I think its possible to get good results with the foam rollers, but you definately need to change them regularly (you know, when it feels like its sticking, and sounds different when rollering). Also, if you are really having problems applying primer, add a little thinners, not too much. Let this cure properly before you apply successive coats, otherwise you end up with solvent entrapment.
Incidentally, there is talk of some good foam roller covers on the market. might be worth looking at these as a possible solution
http://www.cfsnet.co.uk/acatalog/CFS_Ca ... TEM_3.html
Posted: Mon Jun 12, 2006 2:27 pm
by ks8
WobblyLegs wrote:fmiles wrote:I got pretty good results with the short pile rolers. Ok for primer, as I sanded this for key anyway.
For the primer only? Does the short pile work for a gloss finish?
T
If you are not spraying on your topcoat, then the alternative is roll and tip. You roll on the topcoat a section at a time, and then immediately follow it up with a brush, lightly *tipping* the rolled on paint to smooth and break bubbles. The roll helps ensure a good and evenly applied amount of topcoat, but the brush smooths it all out. It is one of those things that would be good to practice in an area that no one will see, or on some scrap. Remember, the topcoat you are using is not water-based, so test the roller first to see if it can handle the solvents. It would be a shame to see that nice prep work turn into a mess, especially with paint that ain't cheap!
I am no expert with roll and tip, and have no experience with the topcoat you will be using. Maybe someone else will have some gems of wisdom before you mix paint?
What will you be doing with the rubrail? I see you stopped short with the primer.
Posted: Mon Jun 12, 2006 5:46 pm
by WobblyLegs
maxgsx wrote:I bet you were hot under your tent this weekend
You're so right there. Even hotter today! SWMBO had to drag me away to the pub (the Albany, opposite Hampton Court Palace) for lunch yesterday 'cos she thought the neighbours had had enough of listening to my RO sander.
A nice afternoon spent drinking German beer and watching boats go past on the Thames. Encouragement indeed. BTW, there was a Monterey "180 FS" moored at the pub's jetty, about 6" longer than my project - nice looking boat with a seriously mean looking Mercruiser outdrive. I got home and looked it up on the 'net - that thing weighs over a tonne!!!!!! No thanks!!!
Also, an invitation to get on yer bike and come have a look is always open - pm me...
fmiles wrote:I had exactly the same problems with my primer, it shredded the foam rollers pretty quick, so changed to short pile..
I tried the short-pile rollers today with my first coat of undercoat - definitely last longer than the foam, but start to shed fluff after about 10 minutes. It does put the paint on nicely though. If I had the means to spray, I would, but not an option for me.
ks8 wrote:What will you be doing with the rubrail? I see you stopped short with the primer.
At the moment, the rubrails are a catch-all for drips and mess etc... They're well coated with epoxy, so when I'm done painting, I'll sand all the crud off them. I'm hoping to leave them bright. Time will tell.
And, a pic of today's effort - first layer of undercoat, to be followed by another in the morning:
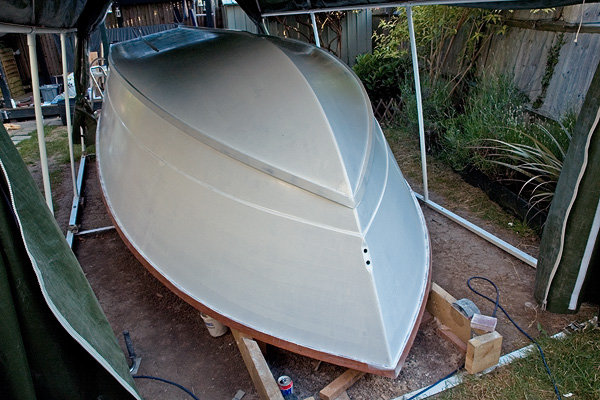
Regards,
Tim.
Posted: Tue Jun 13, 2006 3:45 pm
by WobblyLegs
And...
Fully undercoated...
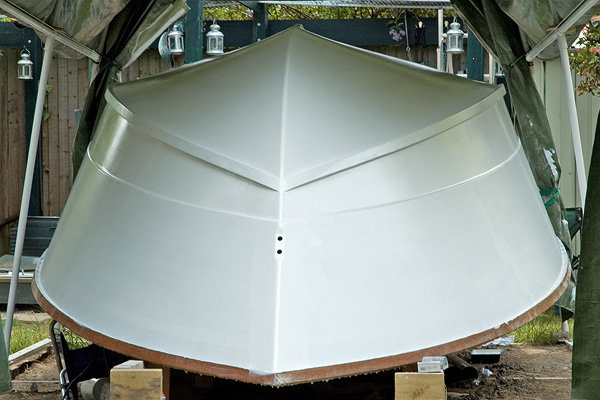
Posted: Tue Jun 13, 2006 4:29 pm
by glcost
Wobbly,
Her hull looking beautiful. I think you'll be the first to flip a C17.
Cheers to ya!
George
Posted: Tue Jun 13, 2006 5:18 pm
by MadRus
Wobbly,
You sure do nice work. That's going to be a real beauty when she's done.
Cheers!
Posted: Sat Jun 17, 2006 5:40 pm
by WobblyLegs
OK, the bottom and lower sides are now painted.
The whole boat has had two coats of International epoxy primer, followed by two coats of their white undercoat, and now the bottom and lower sides have three coats of "Mediterranean White" completeing that stage of painting.
It's not easy painting gloss over gloss - can't see where you've been - but what I did was paint the first two coats rolling length ways, and the final coat very slowly rolling cross ways, making sure that every bit of the hull was evenly covered. There is a roller texture to it, but short of spraying its as good as I can do.
So, here it is:
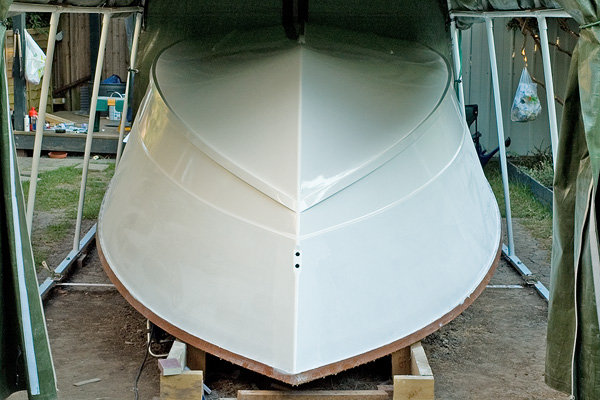
There are some runs, especially underneath the spray rails (on the lower side panels), but I will live with that in order to get the boat afloat.
Oh, and I was all set on the roll-and-tip method, but whatever bubbles appeared in the paint disappeared by them selves. I guess I was lucky (it helps to really squeeze the roller into the tray to saturate it on the first pickup). What isn't good though is that there are some tiny speckles of roller-foam in the paint, I think from when the rollers were made (cut to size). It helps to give the rollers a spin or five on the handles - you can see little bits of foam flying from them...
That's it until I start playing with the blue stuff.
Next update in a week or so, methinks.
Regards, and have fun guys.
Tim.
Posted: Sat Jun 17, 2006 8:38 pm
by ks8
I hope the outside of my hull looks even half as nice as that! Great Job!
I'm hoping my trim work will distract from a less than perfect finish. You've got no worries there!
Posted: Sun Jun 25, 2006 11:10 am
by WobblyLegs
So, this is the checklist...
Stage 1, build the hull.
Done.
Stage 2, fair the hull.
Done, eventually.
Stage 3, paint the hull.
Done - Wooooohoooooo!
It has been a long process, but looking at it now all that sanding is a distant memory and well, well worth it. I'm sure it will happen again. Mmmm, still very partial to a Maia 24. Later.
So, now I need to tab the frames to the hull, disassemble the framework holding it all together and figure out a way to turn it over.
Oh, and find some volunteers to help me do it!
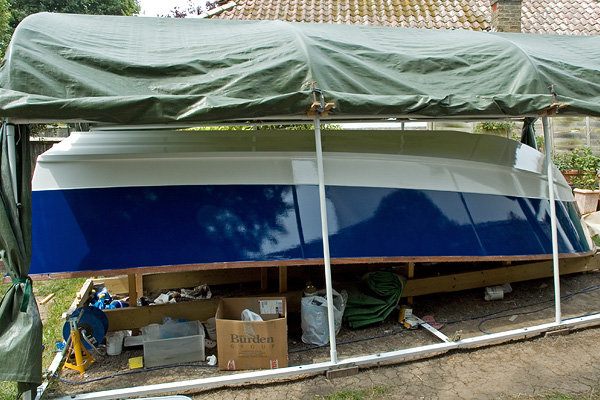
There are some more pics
here.
I think I might rest for a bit, but then again, I have to build a cradle for the boat to rest on after turning. Maybe start on that tomorrow.
Later,
and keep building.
It can rain now!
Tim.
ps. MadRus, if you read this, I'm sorry you've decided to leave us. I think there is more on this forum worth staying for than the times when it gets silly.
Posted: Sun Jun 25, 2006 8:16 pm
by Mike Adams
Beautiful job, Wobbly! I'm amazed at the mirror finish you've got on that hull using a roll and tip technique - if you hadn't told us I would have thought it was a spray job.
I've followed your progress on this hull from day one - I'll bet it feels great to have the hull build stage completed! You will enjoy the rest of the building and fitout (once you've managed to find enough volunteers to flip her, that is!).
Again, congratulations on a superb job.
Mike
Posted: Mon Jun 26, 2006 6:13 am
by WobblyLegs
Mike Adams wrote:I'll bet it feels great to have the hull build stage completed!
Mike
Thanks Mike,
The last roll of paint, the last tip, a slow walk-around to check all is OK (a couple of small fuzzy spots but I would have done more damage than good trying to touch-up), step back and,
...a huge sense of relief more than anything else.
I actuallly sat around and did mostly nothing for the rest of the day.
Oh, and its been raining for most of this morning.
Posted: Mon Jun 26, 2006 6:30 am
by StuM
WobblyLegs wrote:Oh, and find some volunteers to help me do it!
Just shout Tim, no probs.
Cheers
Stu
Posted: Mon Jun 26, 2006 6:38 am
by Mike Adams
WobblyLegs wrote:
Oh, and its been raining for most of this morning.
Well, what do you expect? After all, you ARE in England.....
I was there for two weeks in May and it rained every single day!
Posted: Tue Jun 27, 2006 4:19 pm
by WobblyLegs
Mike Adams wrote:WobblyLegs wrote:
Oh, and its been raining for most of this morning.
Well, what do you expect? After all, you ARE in England.....
I was there for two weeks in May and it rained every single day!
Yeah, and it was the wettest May in something like a quarter-century or so! Fortunately it stayed dry in June for me to epoxy-sand-prime-sand-undercoat-sand-paint and then rained the day after I finished!
But that's to be expected - Wimbledon started yesterday as well. That was my deadline as it ALWAYS rains during Wimbledon.
I took the tent down today (its now covered with a tarp again) so I can start preparing for roll-over.
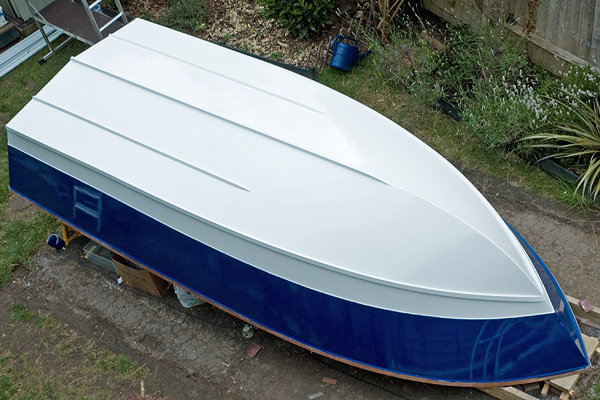
Posted: Tue Jun 27, 2006 4:27 pm
by Old E.
Beautiful job!!!!
Posted: Tue Jun 27, 2006 4:33 pm
by Rick
As my 20-something friend would say, S W E E T!
Can I have a ride sometime?
Posted: Tue Jun 27, 2006 4:33 pm
by Rick
Accidental double post. Nice boat, though!
Posted: Tue Jun 27, 2006 4:36 pm
by jeremy
That's a gorgeous boat. Well done.
Posted: Tue Jun 27, 2006 4:50 pm
by UncleRalph
A beautiful boat and a testament to what can be done without an enclosed space in which to build!
Ralph
Posted: Tue Jun 27, 2006 4:52 pm
by tech_support
what a gloss
Posted: Tue Jun 27, 2006 5:00 pm
by maxgsx
I say old chap, that is a fine looking boat.
Most excellent Dude !!!
S w e e t !!
Bitchin !!
You do seem to have rodgered the lawn though ! Give your gardener a beating and tell him to get straight on to it.
Posted: Tue Jun 27, 2006 5:49 pm
by Daddy
Can I have a ride too?
Looks great!!
Daddy
Posted: Sun Jul 02, 2006 6:13 pm
by WobblyLegs
StuM wrote:WobblyLegs wrote:Oh, and find some volunteers to help me do it!
Just shout Tim, no probs.
Cheers
Stu
Hey Stu,
Thanks for the offer, but the best time for me to do the roll-over looks like July 8th, and I do believe you might be '
otherwise occupied' that day...
To the multiple requests for a ride, if you get yourself over here then we'll do it!!! But, hey, it's not afloat yet!!!
So, this week was spent tabbing the frames to the hull (and buying wood, and cleaning up, and, and, and...) and I've started removing some of the supporting structure underneath the boat in preparation for roll-over.
Today I built a cradle for the boat to rest on (with some free used carpet from the local carpet dealer):
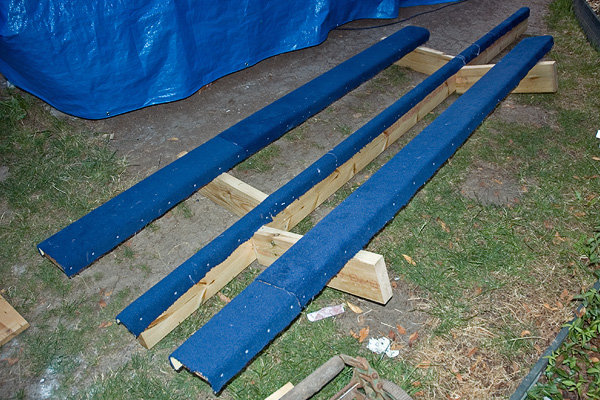
And then, just to make sure, checked to see if the cradle fits the boat (or the other way around).
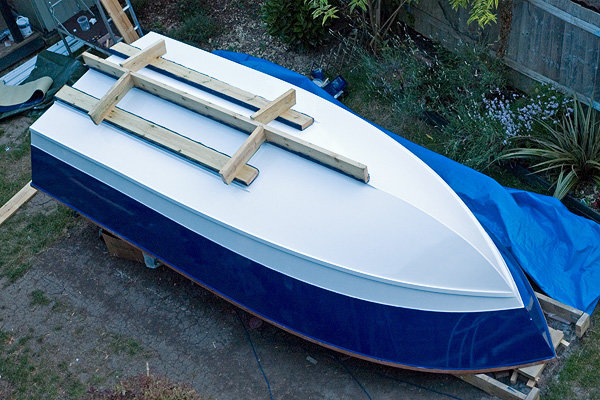
It does.
Still to do: I think the best thing to go for is a couple of box frames around the boat so we can "roll" rather than have to lift the boat and risk dropping/scratching/etc... So, a box around frame 'E' and another around frame ''C' is the plan for this week.
Later guys, and thanks for all your encouraging comments.
Tim.
Posted: Sun Jul 02, 2006 9:39 pm
by JASmine
Tim..it may be just the pic but your cradle looks to me to be too short. You need to keep the hull VERY stable as you crawl around in it to do the interior.
Good Luck
Posted: Mon Jul 03, 2006 5:11 am
by WobblyLegs
JASmine wrote:Tim..it may be just the pic but your cradle looks to me to be too short. You need to keep the hull VERY stable as you crawl around in it to do the interior.
Good Luck
Hi JASmine,
Good point, but the cradle won't be the only support under the boat - the reason for building it as it is, is to have something ready for the boat to lie on after rolling over that can easily be moved into place while the boat's being held in the air by my willing volunteers, but, more importantly, I have three sturdy and
flat lengths for the keel and the area under the stringers to lie. The hull is still quite flexible, so this seem to be the best way to approach aligning everything. I've also made it in a way that is relatively easy to make small adjustments, so when it comes to installing the frames/bulkheads, I will be able to raise/lower/twist either of the stringer rests to get my diagonal measurements correct.
T
Posted: Mon Jul 03, 2006 9:27 am
by tech_support
I think JASmine is concerned about the boat pitching bow down as you roll it over. I was thinking the same when I saw the pictures. You might consider another "bunk" towards the bow.
Dont scratch that beautiful paint job
Posted: Mon Jul 03, 2006 5:56 pm
by WobblyLegs
shine wrote:I think JASmine is concerned about the boat pitching bow down as you roll it over. I was thinking the same when I saw the pictures. You might consider another "bunk" towards the bow.
I think the picture might be a bit deceiving. The centre (keel) section of the cradle is 3.4m long, so the boat will be overhanging at the front by about 1.8m or so only. Considering the weight of the transom, methinks it will be OK. Still, I will be keeping a close eye, if only to make sure the paint don't get scratched...
Also, the support of the boat will be increased after rollover - the cradle is the for something to roll it onto, and later some fine-tuning of the hull.
I disassembled the jig tonight - somehow it makes the boat look bigger. It's really strange building in a small environment where I can't get more than about 3m away from it in any direction (which is why I love looking at it from the top floor) - sometimes it looks big, sometimes it looks small. I guess I'll only know what 'size' boat I have once it's on the water....
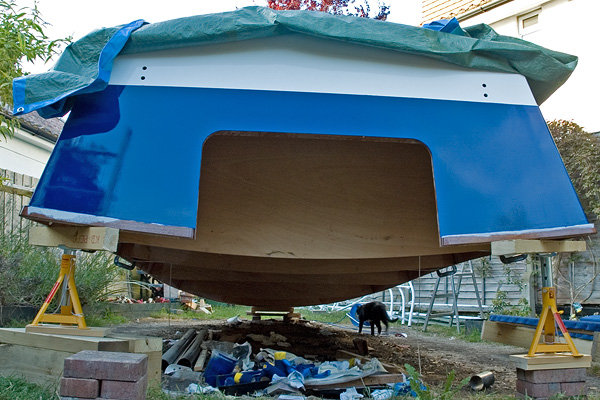
You can also see that there's quite a bit of trash that seems to have snuck under the boat while I wasn't looking...
Later,
Tim.
Posted: Sun Jul 09, 2006 4:58 pm
by WobblyLegs
glcost wrote:Wobbly,
I think you'll be the first to flip a C17.
Cheers to ya!
George
Thanks George, you might be right...
Here goes...
OK, so I built this cradle thingy...
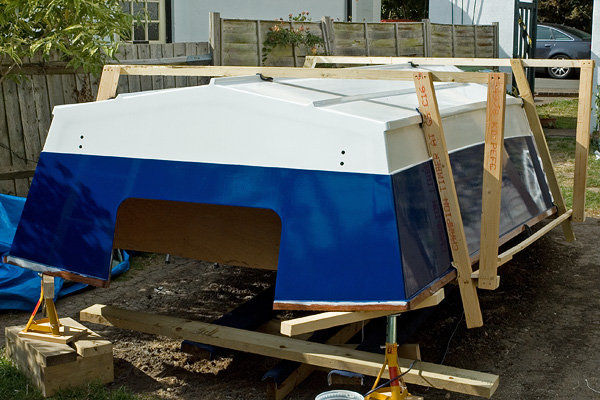
...and the we rolled...
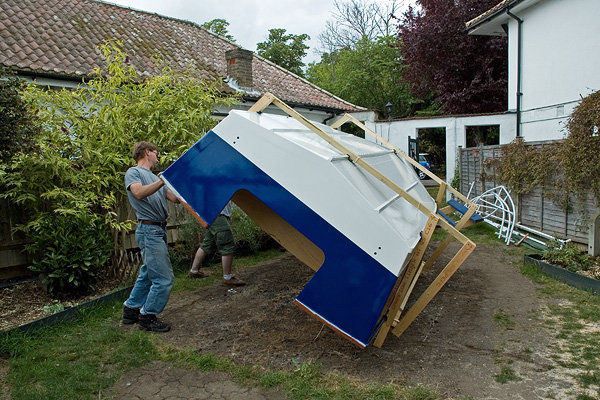
and I posed for a picture (bloody hell, it's big!!)...
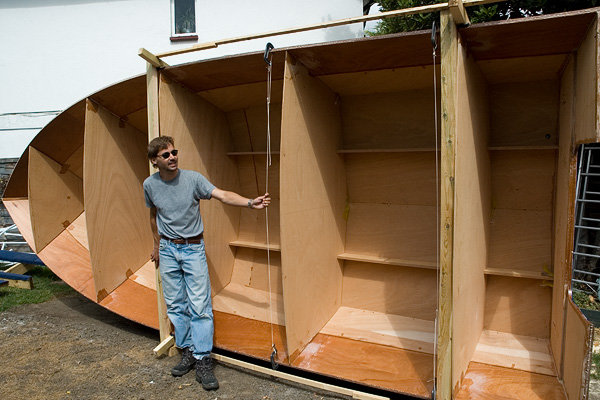
...then rolled some more...
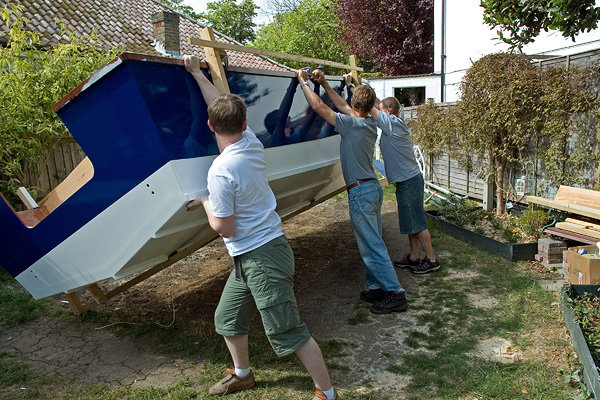
...then got the cradle in position...
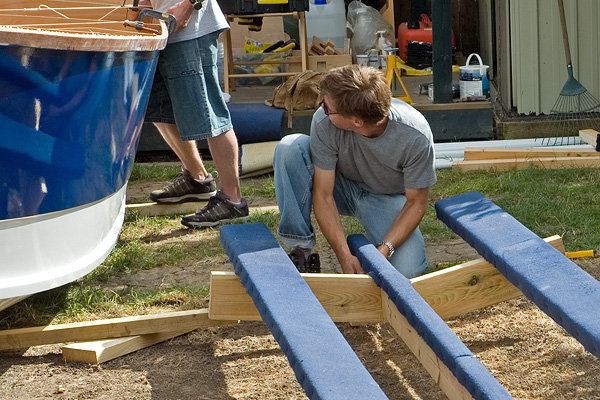
...and this is
IT!
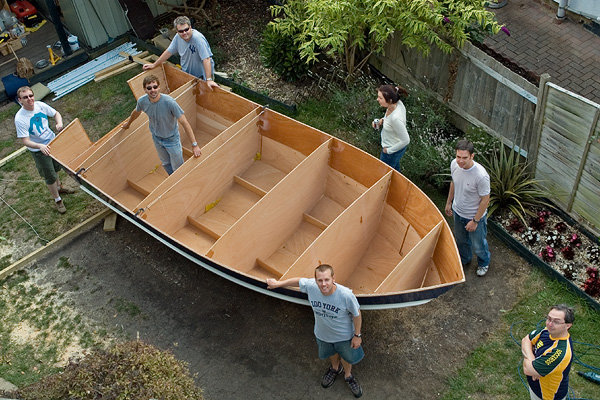
I have to say, leading up to this I was nervous as hell, pacing up and down waiting for the "rollers," but in the end it went really well.
I'm happy!!!!
Posted: Sun Jul 09, 2006 5:06 pm
by robbiro
Congrats to you on the splendid beginning and roll of a nice design. I wish you well and hope that the rest of the boat goes as well and is as great to look at as that beautiful blue hull we have been seeing in your builders gallery and on the message board.
I do have a question and I may have missed the answer earlier in this thread, but what type of finish did you use and what is the color?
Keep building,
Posted: Sun Jul 09, 2006 5:27 pm
by WobblyLegs
robbiro wrote:Congrats to you on the splendid beginning and roll of a nice design. I wish you well and hope that the rest of the boat goes as well and is as great to look at as that beautiful blue hull we have been seeing in your builders gallery and on the message board.
I do have a question and I may have missed the answer earlier in this thread, but what type of finish did you use and what is the color?
Keep building,
Thanks robbiro,
I did the roll-and-tip method, using International two-part polyurethane. The white is "Mediterranean White" and the blue is "Royal Blue."
A word of warning though - I went through twenty rollers as they keep disintegrating due to the solvents in the paint!
Tim.
Posted: Sun Jul 09, 2006 8:35 pm
by Yoda
Good on you Wobbly. Your off and running.
Posted: Sun Jul 09, 2006 10:17 pm
by msujmccorm
Awesome!
Posted: Mon Jul 10, 2006 2:26 am
by fmiles
Looking through the piccies, 3 people and the job was done. Doddle! then the last picture shows 7!
Were they the backup team
Posted: Mon Jul 10, 2006 2:39 am
by kiwi
Quick get it covered before it rains!
While on weather jokes they say that in Northern Brittany there are two seasons: Winter and the afternoon of August the 15th...
I would like to attract the attention of everyone to the interior - no visible epoxy runs! Wobbly are you a surgeon? That thing is so clean to be unbelievable.
Cheers
Tony
Posted: Mon Jul 10, 2006 4:12 am
by WobblyLegs
fmiles wrote:Looking through the piccies, 3 people and the job was done. Doddle! then the last picture shows 7!
Were they the backup team
fmiles, you're right - 3 of us got it over, but it took 5 (just to be safe) to lift it off the ground and carry it over onto the cradle.
The rest were there to drimk the beer....
Posted: Mon Jul 10, 2006 8:46 am
by Yoda
WobblyLegs wrote:fmiles, you're right - 3 of us got it over, but it took 5 (just to be safe) to lift it off the ground and carry it over onto the cradle.
The rest were there to drimk the beer....
Sounds about right for a rollover party to me.
Posted: Mon Jul 10, 2006 9:10 pm
by glcost
Whaaooo that's a big boat, Wobbly. I love the picture of you standing next to her half turned over and the one from above.
You don't know how easy you make building mine. All I have to do is follow your lead.
The paint looks perfect too, very fair, smooth and glossy.
I'll raise a glass in your honor tonight!
George
Posted: Tue Jul 11, 2006 2:12 pm
by BillTwo
WobblyLegs wrote:
Here goes...
OK, so I built this cradle thingy...
...and the we rolled...
and I posed for a picture (bloody hell, it's big!!)...
...and this is
IT!
I have to say, leading up to this I was nervous as hell, pacing up and down waiting for the "rollers," but in the end it went really well.
I'm happy!!!!
Wobbly,
I can feel your anxiety when you started flipping your boat. Since I've had the opportunity to see inside your boat after final rollover, I didn't realize or had forgotten that you only have 2 stringers running the length of your boat - mine (OB17) has 3.
You've done a wonderful job - good quality workmanship. All your frames and stringers seem to fit perfectly. After looking at how perfectly everything fits (frames & stringers) inside your Hull, I need to crawl under mine (which is still bottom-side-up) and check how things are fitting in my Hull.
Again, great job and BOD (Build On Dude)!!
Regards,
BillTwo
P.S. I finally corrected my problem with the gooey mess that I made fiberglassing, but it took two weeks to correct. I'm just now finishing the last of the fiberglassing (Port side) of my Hull. After correcting my epoxy error, I believe now that I can repair just about any fiberglass and/or epoxy damage. Now to look under my Hull
Posted: Sun Jul 30, 2006 4:34 pm
by WobblyLegs
So, all the taping has been done inside the boat now - over the last week or so did the keel and inside of the chines, and yesterday did the tape on the transom to sides and bottom.
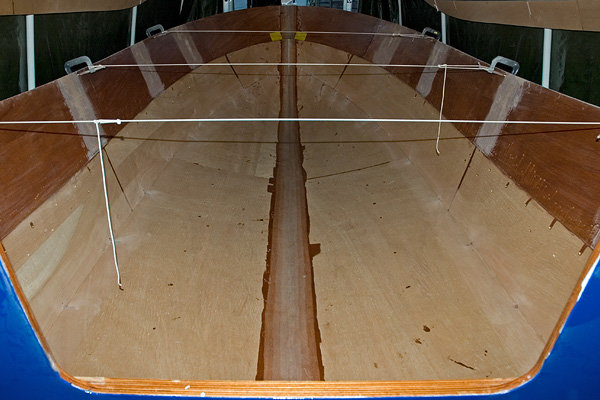
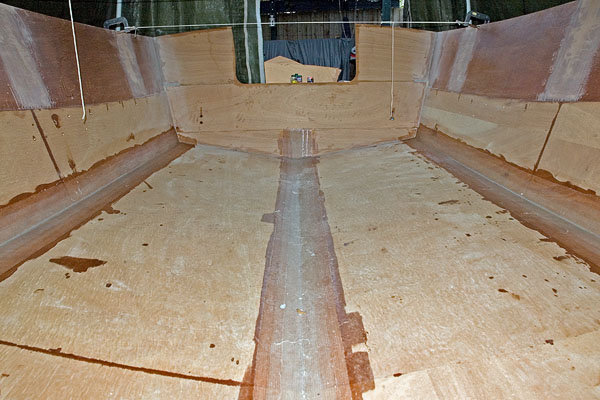
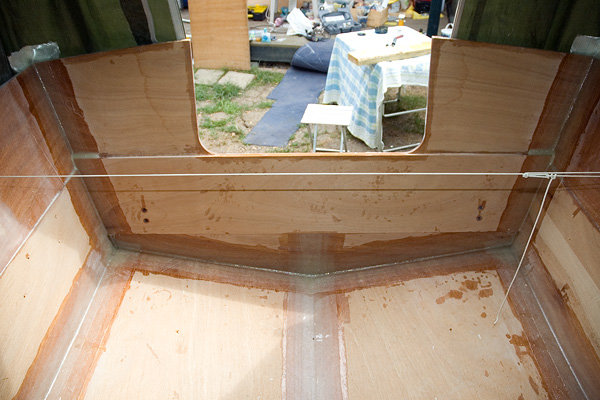
Today, been cutting wood, for the first time this year - makes a change!
I need a large flat area to roll out the bi-ax fabric to measure and cut it, and the only way I can do this is to lay out a couple of sheets of 12mm ply, and lay the cloth out on that. Problem: getting to that ply... (all my frames have been stacked up against it) - so, I'm using the boat as storage for the frames, and have used the time to cut each frame to it's final shape just before stacking in the boat...
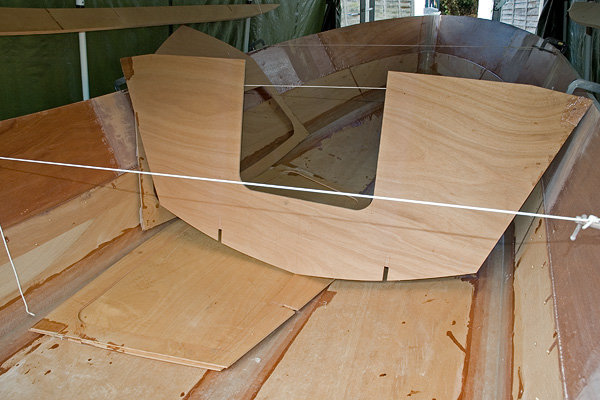
What we have here is frame 'C' (cabin aft bulkhead) standing upright, frame 'B' laying against the port side behind that, frame 'D' underneath 'C', 'E' lying under 'D' and 'A' not visible under all of it...
I have more
pics in the album as well...
Posted: Sun Jul 30, 2006 4:42 pm
by maxgsx
Woobly,
You should be ashamed of yourself !!!
Your paint finish is so rough and your fillets and glasswork is scruffy
Seriously, you are making a wonderful job of your boat, hope you can get loads done before the weather turns.
Just one question........in the pictures of you and your mates flipping the hull, there doesn't appear to be a way out of your garden !!
Is the finished boat being craned out ???
There was a guy local to me who build a 55ft steel narrowboat behind his bungalow and that was craned out over the roof. I have a picture somewhere, very impressive??
Posted: Mon Jul 31, 2006 6:38 am
by WobblyLegs
maxgsx wrote:Your paint finish is so rough and your fillets and glasswork is scruffy
No, Max, that's my lawn your talking about...
maxgsx wrote:Is the finished boat being craned out ???
That is the plan. We had our loft converted (doesn't everyone???)(where my "aerial" pics are taken from) and I saw the steel joists being lifted in with a crane, right over where the boat is now, so I know it can be done. Also, found a local crane operator who can do it...
maxgsx wrote:There was a guy local to me who build a 55ft steel narrowboat behind his bungalow and that was craned out over the roof. I have a picture somewhere, very impressive??
That must have been something to see. Also, quite something to build!!!
Posted: Mon Jul 31, 2006 12:19 pm
by maxgsx
Woobly,
You will be pooing your pants when you see all your years of hard work dangling 40ft up on a 10mm cable !!!!!!!
Will be one hell of a photo though.
A narrowboat isn't really that hard to build; much like building in ply but with a sore back and squashed thumbs.
Are you intending to float this year ??
Posted: Mon Jul 31, 2006 5:06 pm
by WobblyLegs
maxgsx wrote:Are you intending to float this year ??
I'm hoping, but not expecting...
Just been "asked" by a client to be available more hours (this happened this morning) that pretty much writes off any work on the boat during the week for the rest of the summer as I would get home too late to do anything.
So, it looks like weekends only now. *@£*
Not happy.
Posted: Mon Jul 31, 2006 5:57 pm
by Lucky_Louis
Hello Wobbly! We're neck and neck but Lucky pulls ahead
. I just laid down the last piece of the inside bottom glass - man, I'd forgotten how much epoxy the big pieces of biaxial drink. Your work looks stunning as usual.
Isn't is great to to take a break from sanding,fairing,sanding,fairing,painting,sanding,painting,sanding,painting? I'll be posting some new pics tonite or tomorrow. I've got the next 8 days off to do nothing but build bateau
Posted: Mon Aug 21, 2006 3:30 pm
by WobblyLegs
Lucky_Louis wrote:Man, I'd forgotten how much epoxy the big pieces of biaxial drink.
I'm about to be reminded...
Lucky_Louis wrote:Isn't is great to to take a break from sanding,fairing,sanding,fairing,painting,sanding,painting,sanding,painting?
A change is as good as a holiday. This feels like a world cruise!!!
As to my progress, slow as it is at the moment, I thought I'd update...
Got all the taping finished in the first week of August:
Then I lost a weekend at the beginning of the month to take a short break (and preserve the peace with SWMBO) in Belgium (Bruges - lots of tourists, but a lovely little town)!
Since our return, it's been raining, so it's been difficult to get anything done. Well, on Saturday I decided to bite the bullet and work on the deck in limited space come rain or shine (don't you love the clichés).
My cutting table (12mm ply that will be the cockpit sole. One day.):
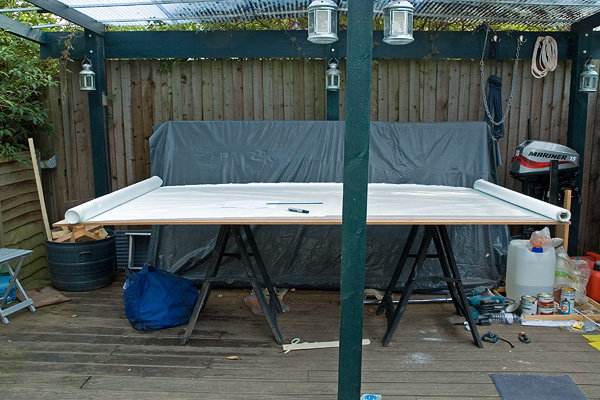
Marked up glass:
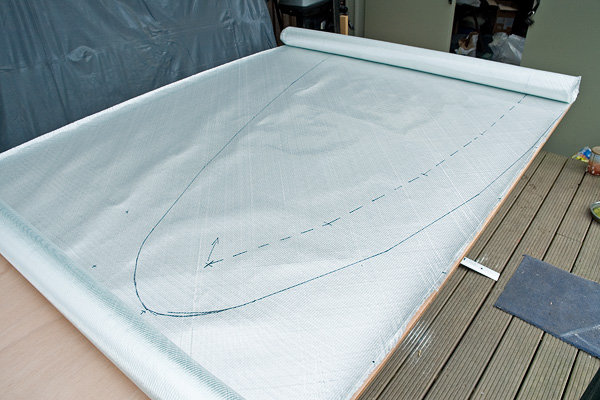
Sunday was far to wet to do anything as I didn't want to walk mud into the boat (and there was a bike race on - Capirossi won).
Today, I managed to sand all the remaining lumps of epoxy, vacuum the dust and filings and leaves and spider webs and bits of epoxy out, wipe down with acetone, and roll out one sheet of glass.
It fits:
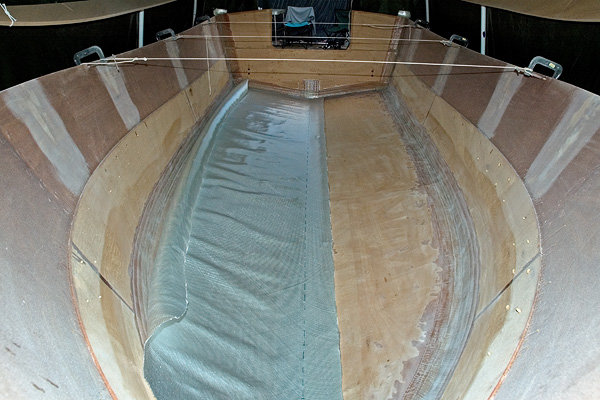
So, now I wait for a nice warm dry day to spread epoxy over it...
Also a long weekend (3 days, this weekend) coming up, so I really want to be able to start moving ahead by then.
My (after roll-over) album:
http://gallery.bateau2.com/thumbnails.php?album=496
My album list:
http://gallery.bateau2.comindex.php?cat=12964
Later,
Wobb.
Posted: Tue Aug 22, 2006 3:19 pm
by WobblyLegs
WobblyLegs wrote: So, now I wait for a nice warm day to spread epoxy over it...
Sooner than I thought!
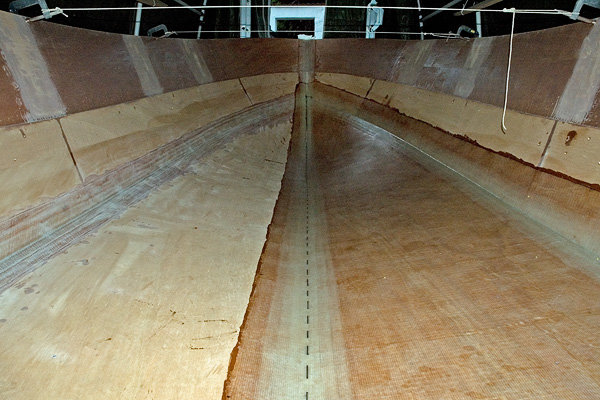
Used a roller for most of it, and a brush up front to tab into the corners.
My (after roll-over) album:
HERE.
My album list:
and HERE.
Later,
Wobb.
Posted: Tue Aug 22, 2006 4:56 pm
by Lucky_Louis
Well done Wobbly

Looks like you're back on track. Nice not to be sanding, eh?
I took a 2 hour lunch break today and finished tabbing all the joints in my motorwell. Hoping to hang my engine by the weekend.
Carry on then..

Posted: Fri Aug 25, 2006 4:13 pm
by WobblyLegs
Lucky_Louis wrote:Nice not to be sanding, eh?
And how!!!
So, the weather forecast for this weekend seems to be mostly rain, and I was sitting in the office this morning with the sun shining, dreading the thought of another wasted (three days this time) weekend.
Solution: I skipped at lunch time, hurtled home and got to it!
Sanded the previous lamination (starboard), vacuumed all the dust out (again), acetone again, rolled out port glass:
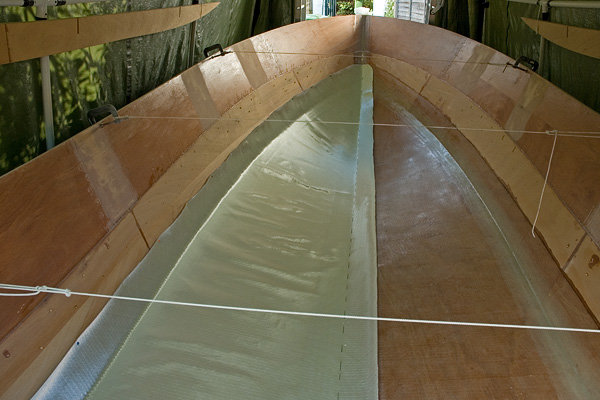
Using a roller, started the sticky stuff once more:
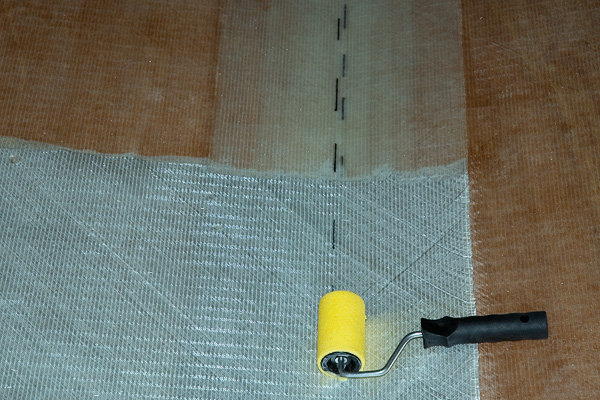
And now, it is done!
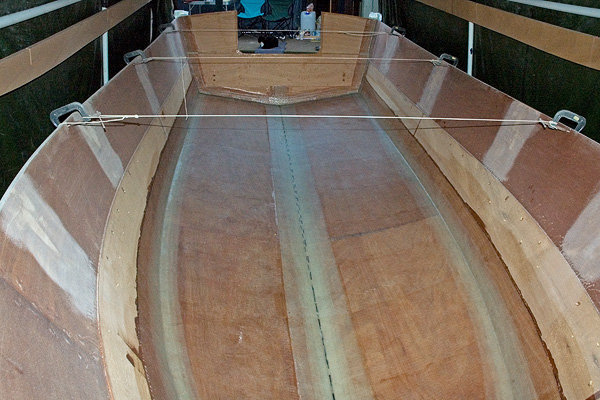
As far as I'm concerned that is the last
major task done. From now on, everything can be done one (relatively small) piece at a time. This took me four and a half hours from start to finish.
I ache everywhere (still not totally over putting my back out on the roll-over) and then I managed to (I suspect) crack a rib or two last weekend doing a luge (without the sled) impersonation down some stairs...
Still, having fun!!!
My (after roll-over) album:
HERE.
My album list:
and HERE.
Later,
Wobb.
Posted: Fri Aug 25, 2006 6:04 pm
by gk108
I'm amazed at how straight your dotted lines are. I put lines on my cloth too, but they never end up straight.
Posted: Fri Aug 25, 2006 8:11 pm
by Mike Adams
gk108 wrote:I'm amazed at how straight your dotted lines are. I put lines on my cloth too, but they never end up straight.
Maybe Wob puts 'em on afterwards, just to impress the hell out of us?!!
Mike
Posted: Fri Aug 25, 2006 9:29 pm
by Steve_MA
Heck of a lunch break too....
Posted: Fri Aug 25, 2006 10:02 pm
by BilltheCat
Bullet Proof and way too neat! You're raising the bar for us slops!!! Build On, Dude!
Dave
Posted: Sat Aug 26, 2006 4:33 am
by maxgsx
Posted: Sat Aug 26, 2006 6:24 am
by laporter
Sheez! Everybody's a boatbuilding critic nowadays! Don't let em get to ya Wobbly! You're doing great. I really like your dotted lines even if one or two is a little screwy!
Remember the only critic that matters in your work is you!
Rick
Posted: Sat Aug 26, 2006 11:36 am
by Rick
laporter wrote:
Sheez! Everybody's a boatbuilding critic nowadays! Don't let em get to ya Wobbly! You're doing great. I really like your dotted lines even if one or two is a little screwy!
You know Max was kidding, right?
Posted: Sat Aug 26, 2006 12:00 pm
by laporter
Rick wrote:
You know Max was kidding, right?
Hehehe Yup. I thought I stuck a smilie in there but musta misfired! *lol*
Posted: Sun Aug 27, 2006 10:09 am
by Lucky_Louis
Looking good Wobbly! Now you can get settled in for 'tabbing season'.
Posted: Wed Aug 30, 2006 9:03 am
by PERCY
Good job so far....and quick.
If you want to see a C21, nearly finished ,in Littlehampton, West Sussex let me know. It may answer a few questions that you might have.
Posted: Wed Aug 30, 2006 4:06 pm
by WobblyLegs
Yeah, awright, I got some of the lines off centre... (where's the raspberry smiley when you need it???).
Thanks for the positive comments though, it's always encouraging!
So, finished laminations, put stringers in, put frames in to hold stringers in place, marked out position of stringers, took it all out again, sanded glass, acetone cleaned glass and now have mostly glued port stringer into place, from transom to just behind frame "C." I'm using matchsticks to hold the stringers off the hull, giving a nice even gap.
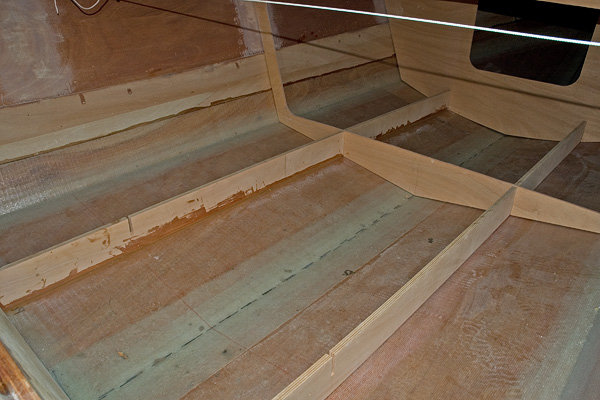
I glued behind frame "E" last night, so I was able to take that out and do between "E" and "C" tonight... (without having to climb over "E").
Hopefully I can do aft of frame "E" starboard tomorrow night...
LuckyLouis, a question for you - did you glue in your motorwell sides before frame "E" (assuming it's the same on your boat) or did you put the frame/bulkhead in and then the motorwell sides? I can't seem to decide which is going to be easier, but either way I'm going to have to stretch and contort to do glassing in the back corners...
Percy, I might well take up on that offer!
_______________________________________
My (after roll-over) album:
HERE.
My album list:
and HERE.
Later,
Wobb.
Posted: Wed Aug 30, 2006 4:48 pm
by Lucky_Louis
Looking GOOD!
I tabbed in all my frames "A" through "E" and the stringers too before I placed the motorwell sides. I don't know the C17 but on the OB17, the two outside stringers and the engine cutout in the transom defined where the sides went. I had to do some creative trimming to get them to fit around the fillets and glass but that's the order I would follow if doing it again.
PS: You may want to do the cutouts for your chase tubes before gluing the frames down. Cutting an oval or round hole once in place could be a spot awkward.
Posted: Wed Aug 30, 2006 4:55 pm
by WobblyLegs
Lucky_Louis wrote:PS: You may want to do the cutouts for your chase tubes before gluing the frames down. Cutting an oval or round hole once in place could be a spot awkward.
Thanks Louis...
I'm not doing any chase tubes - everything is going to be above sole, running through tubes in the sides of the frames.
Under the sole is sealed forever (or will be). Did you do foam?
Tim.
Posted: Wed Aug 30, 2006 5:05 pm
by Lucky_Louis
Yes, I used a Coast Guard Approved two part polyurethane foam. I completely filled the bow 'crush' zone under the anchor locker, the sub-sole area under the casting deck, and the two aft sub-sole areas on either side of the bilge. For under main sole, I placed all the big chunks of Styrofoam I've been accumulating and poured the rest of my foam around them to lock them in. I used 2 gallons of foam. Four gallons would have filled everthing.
Posted: Sun Sep 03, 2006 1:42 pm
by WobblyLegs
Well, the stringers are now completely glued in, although not glassed yet.
Frame "C" has been completed. I changed the nesting, so "C" was split horizontally, not vertically as per the plans. The two bits are now one, resting on the stringers as that's the best place to store it:
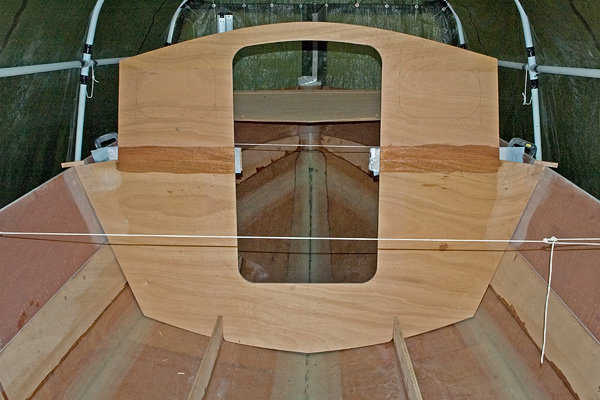
I still haven't decided whether to add little windows either side of the door, or even whether to open it right up...? I will probably stay as it is now until I've used the boat - I can always change it later.
Tasks for this coming week are glassing the stringers and filleting the frames to the hull. We'll see how I get on...
_______________________________________
My (after roll-over) album:
HERE.
My album list:
and HERE.
Later,
Wobb.
PS: bbuckl, thanks for your help!
Posted: Sun Sep 03, 2006 1:50 pm
by WobblyLegs
Also, I have (obviously) kept the door cut-outs in order to make a, well, door.
My hesitation in doing this is that if my cabin is left open, i.e. no door, and if I have no appliances, like a fixed gas stove, and if I have a removable fuel tank, then I don't have to get a BSS (Boat Safety Scheme) certificate.
At a later stage I'm planning on adding a canvas cover over the cockpit with roll-down sides, so will still be able to stay dry when boat-camping...
And still not have to pay for a BSS cert, I think...
Later,
Tim.
Posted: Sun Sep 03, 2006 3:06 pm
by Yoda
You may want to cut limber holes in the frame bottoms now before you glass them in. Saw a simi-circle so you have half a hole in each frame for water to run through right on the keel line. Sorry if you knew this.
Posted: Sun Sep 03, 2006 3:20 pm
by WobblyLegs
Yoda wrote:You may want to cut limber holes in the frame bottoms now before you glass them in.
Hi Yoda,
I'm still undecided about this. Foam and seal forever or (as you say) limber holes, leave the area under the sole as air spaces with inspection hatches...
Bear in mind that I will have no cables, chase tubes, or anything for that matter running under the sole. I like everything to be accessible (and repairable if need be).
What are you thoughts on this?
Posted: Mon Sep 04, 2006 2:13 pm
by JASmine
If nothing NEEDS to be accessed then I vote for full foam...what's the point in having more holes in the decking??? I'm quite sure that a SEALED deck will last longer than one with holes in it..no matter how well you seal them.
You've done a great job so far..keep up the good work
Posted: Tue Sep 05, 2006 2:37 am
by Lucky_Louis
Ya Wobbly, what they said. In some place, somewhere, Jacques said that all you'll find in a Bateau bilge is dust. Foam her and seal her. Personally,

I did leave a tiny hole into the bilge (high on station "E") to allow air equalization so the sub sole wouldn't be completely airtight for those really hot and really cold days. I don't want my hull expanding and contracting with every temperature change.
I'm into day 3 away from my OB17 somewhere in Southern California about 1700 km SE from my tools.
Posted: Tue Sep 05, 2006 8:09 am
by kiwi
May I suggest a breather tube for sealed floor compartements. If the floor is painted white and the foam fills the entire space it should be OK without but I would have all compartements communicating and a breather tube anyway (just out of superstition).
Tony
Posted: Tue Sep 05, 2006 3:18 pm
by WobblyLegs
kiwi wrote:May I suggest a breather tube for sealed floor compartements.
You may.
Would a breather hole through frames suffice? I'm thinking of a light tan colour for the sole (white gets dirty real quick...).
Posted: Mon Sep 11, 2006 4:35 pm
by WobblyLegs
Finished taping the stringers yesterday, and tonight fitted all the frames back in to see if they fit...
It's really starting to look like something now!

I've kept the top of frame "D" to hold the sides together so I can lose the clamps once glued.
_______________________________________
My (after roll-over) album:
HERE.
My album list:
and HERE.
Later,
Wobb.
Posted: Mon Sep 11, 2006 5:04 pm
by MadRus
Tim,
Really impressed with the consistency of your quality workmanship as I follow along.
I have to ask what kind of wood you're using, looks like really nice stuff. The nicest wood I've used is Meranti BS1088. But that stuff you're using makes it look like exterior.
-Dave
Posted: Mon Sep 11, 2006 5:16 pm
by WobblyLegs
MadRus wrote:Tim,
I have to ask what kind of wood you're using, looks like really nice stuff. The nicest wood I've used is Meranti BS1088. But that stuff you're using makes it look like exterior.
-Dave
Hi Dave,
It's okoume, and those panels were sanded about four hours ago before going back in... They looked a bit scruffy five hours ago...
My rub-rails are meranti, as are my strakes and keel (which has a glass layer for protection).
Tim.
Posted: Tue Sep 12, 2006 3:33 pm
by WobblyLegs
My motorwell sides had "bent" a bit while sitting underneath an upside-down boat for over a year and after gluing them to the stringers, I had to find a way to get them straight...
Solution - a pair of 500mm pieces of angle-iron, clamped very tightly to the wood, and then glued into place (the sides, not the iron!).
I wasn't sure it would work, but it did.
Note the usual match-stick spacer top left...
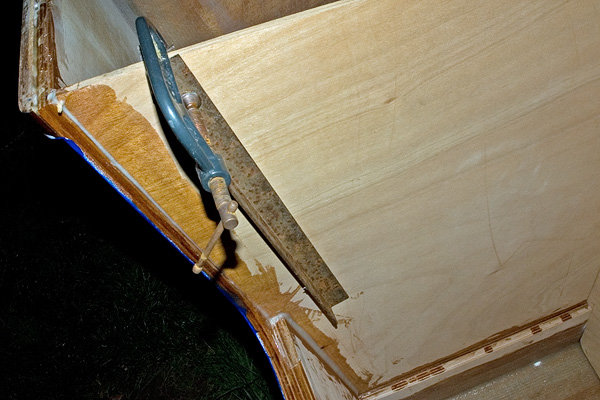
Oh, I sanded the other side of those bits of metal with a flapper wheel - don't want to dirty the wood now, do we....?
I asked "Lucky_Louis" whether he glued the motorwell sides or frame "E" first, and I'm doing it the other way around to him - sides, then frame. I'm skinny enough to fit into those side compartments to do the frame glassing when the time comes (not saying you're not Louis - I have no idea what you look like), and I think this way, for me, is easier in order to prepare the cleats to glue the aft pieces of the sole extension in those corners...
I'll let y'all know how it goes. Will I get them in this year? I don't know, but the weather has been nice for the past few days - but it can't stay this way forever...
The starboard side is going to be a bit more difficult though as the transom seems to have warped a bit over the months. Where the port motorwell side gave pressure on my matchstick and held it all in place (with the aid of a tiny drop of 5 minute epoxy), I have a gap of about 5mm on the starboard side, and need to find a way to pull the transom onto the motorwell side...
I haven't had any ideas yet, but I'm sure something will come along...
_______________________________________
My (after roll-over) album:
HERE.
My album list:
and HERE.
Later,
Wobb.
Posted: Wed Sep 13, 2006 2:12 am
by kiwi
Seems like you are seeing the effects of building outside in a dampish climate. You will prevail! That seems to be what the dampish climate does to people - or would that be the massive doses of tea...
Tony
Posted: Wed Sep 13, 2006 4:14 am
by WobblyLegs
kiwi wrote:Seems like you are seeing the effects of building outside in a dampish climate.
Tony
To be honest, this year has been quite dry mostly, I think that the warping has happened mostly over last winter, and I'm only now getting to a stage where I need (or am able) to do anything about it. Not a problem, just need to be aware of it really. The wood itself is very dry.
Tim.
Posted: Thu Sep 14, 2006 3:31 pm
by WobblyLegs
WobblyLegs wrote:I have a gap of about 5mm on the starboard side, and need to find a way to pull the transom onto the motorwell side...
I haven't had any ideas yet, but I'm sure something will come along...
OK, not too difficult, brain cells are still a bit active...
One l-o-n-g clamp, a bit of newspaper to protect the paint, and voila!
Well, almost - I had to move the transom end of the clamp around a bit to find the right "sweet spot" so that there was no curve created by the pressure. Still, only took a couple of minutes... And, I was lucky that I didn't need to straighten this one as I did on the port side - just a couple of panel pins tapped into place to hold it in position.
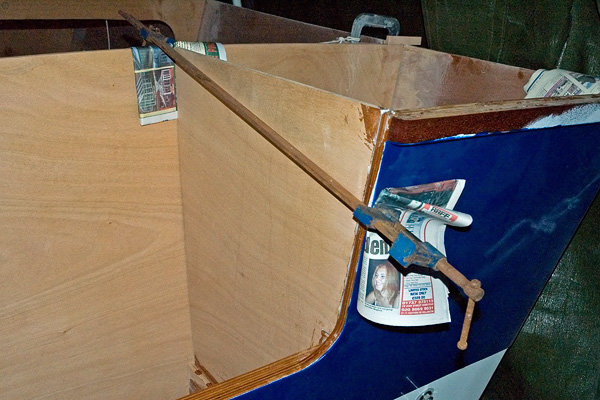
Oh, I should learn not to report good weather (as in my previous post). It absolutely poured down last night.
W.
Posted: Sun Sep 17, 2006 3:24 pm
by WobblyLegs
OK, bulkheads (is that what we call them at this stage?) are starting to get glued in...
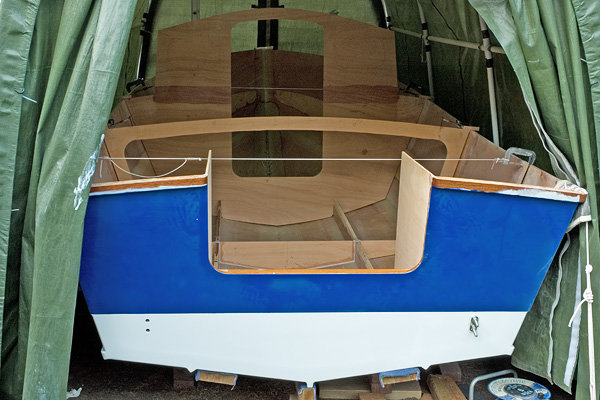
_______________________________________
My (after roll-over) album:
HERE.
My album list:
and HERE.
Later,
Wobb.
Posted: Tue Sep 19, 2006 2:38 pm
by Lucky_Louis
Looking GOOD Wobbly. I'm back from our 2 week/6500km junket through the US to San Diego and back by way of Las Vegas and Reno. Took an extra day off yesterday to cut and fit my side frames/inwale supports and build the casting desk trusses.
I had the same issue with my transom warping above the clamping boards. I just took two nice straight 2x4s and pulled the transom to it for one and braced station "E" with the other. By the time I did the motorwell sides and bottom, nothing could move anymore and is now nice and straight.
Your motorwell and frames look great. Now may be time to drill your engine mounting holes. That way if there's a conflict between bolt locations and any woodwork, it's very easy to deal with before you start tabbing everything into place.
Posted: Tue Sep 19, 2006 3:15 pm
by WobblyLegs
Lucky_Louis wrote:Now may be time to drill your engine mounting holes.
Hey Louis,
You might be right, but I
still haven't decided which motor I'm going to get, so no hole drilling there until next year (London Boat Show in January is always a goood time to get deals).
You didn't by any chance go past a place called "Cupid's Chapel of Love" in Reno, did you? I know someone that got married there...
Taped the motorwell sides to the transom tonight as well as a sheet of bi-ax across the inside of the transom inboard of the motowell sides. (And no witty comments about lines please...
)
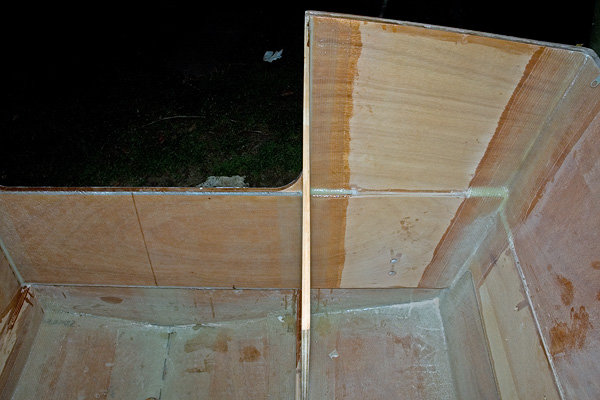
So another question - should I cover the rest of the transom with glass, or just seal it? It seems to me that all the major stress points are covered, and any more glass will be a bit superfluous, no?
Summer is definitely coming to an end, but we're having above average temperatures and it's dry, so I'm doing as much as I can before packing it all up for the winter. I have ordered some big lights to set up in my tent so I can work after 19H00 as long as it's not cold - should get them tomorrow or Thursday.
The filler for gluing the rest of the frames in arrived today, so will carry on with that for the rest of the week...
_______________________________________
My (after roll-over) album:
HERE.
My album list:
and HERE.
Later,
Wobb.
Posted: Tue Sep 19, 2006 5:30 pm
by Lucky_Louis
I think we should stick to the scantlings spec'd by Jacques. I'm not sure about the C17 but the OB17 was 3 layers of tape on the bottom-transom interior joint and 3 on the side-transom interior joints and two each side of the stringer-transom interior joint. Because I'm at the top end of recommended HP with my 75hp and the engine is quite heavy for it's output, I added 1 more layer of tape to all of the motorwell joints. I can't see any need for biax inside or where it would help.
Sorry, no we didn't see your chapel
Reno was kinda a blur
Let's just say I didn't win enough to buy my last gallon or two of epoxy
Our weather is changing too. Rained like a bugger the last couple of days, highs down to +15 or so and nights around 7. Epoxy season for us outside builders is coming to an end.
Posted: Wed Sep 20, 2006 4:25 am
by WobblyLegs
Lucky_Louis wrote:I think we should stick to the scantlings spec'd by Jacques.
I agree, but a while ago I asked about putting glass on the outside and the answer I got from Jacques was that the transom was considered part of the bottom, and suggested putting glass there, so Im wondering about treating the inside the same.
I have glassed the inside (inboard of the motorwells sides) for durability and extra strength for bolts going through it... or, at least thats the way I see it - no harm done, very little extra weight and glass really...
Lucky_Louis wrote:I'm not sure about the C17 but the OB17 was 3 layers of tape on the bottom-transom interior joint and 3 on the side-transom interior joints and two each side of the stringer-transom interior joint.
Ditto. Same specs.
Posted: Sun Sep 24, 2006 2:16 pm
by WobblyLegs
Well, not a bad week at all.
I have finished gluing frames "C" and "D" and even managed to tape the outer sides of frame "D" to the hull.
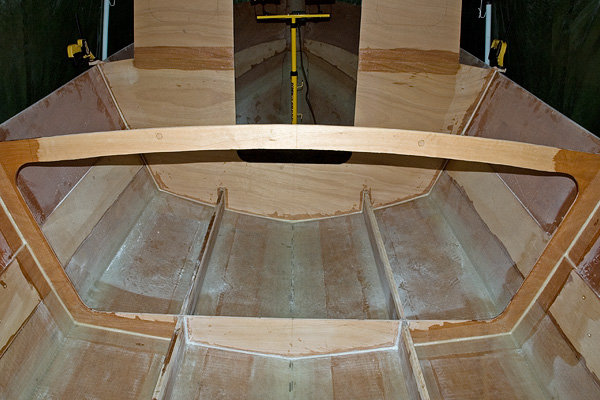
I have really little daylight after work now, so if I get a bit of sanding done I consider it a bonus.
Epoxy work now has to wait for weekends, as the past week has had some heavy dew, and even though I close the tent, I still have moisture probs in there (as I found out after laminating the inside of the transom earlier this week - a nice milkyness to it). Fortunately it wasn't much, but there was definite blush on the epoxy the next morning.
I have about two litres of resin left in my barrel, and think that when that is used up, that it will be the end for this summer... I don't want to buy more only to have it sit in the shed for the whole winter. Still, I'm happy with the progress (funny - I thought I could get it all done in one summer when I first started - not!).
_______________________________________
My (after roll-over) album:
HERE.
My album list:
and HERE.
Build on...
Wobb.
Posted: Sun Sep 24, 2006 5:05 pm
by ks8
You've accomplished much in the time you have been building! Looking good...
During the winter, when I did not have the *cathedral* on top of the boat within the tent, I had moisture problems and some slight mold problems on bare wood by spring. Once I put the cathedral on and kept a couple of lights on, within the cathedral, well away from the tarp (fire hazard), during the winter, those moisture problems were greatly reduced. Those lights all night help keep the air drier in the cathedral, discouraging dew formation, though, a few guests decided to enjoy the added comfort as well. Fortunately they only left some *pellets* here and there. Loose gear and tools were all packed and locked away, well out of their reach.
Having taken five years, I now always try to have whatever is permanently bonded in for the winter, sealed with at least one coat of epoxy, even if I'm going to sand back to wood in the spring in that section. I'm sure this also helps greatly with the moisture issues.
Posted: Sun Sep 24, 2006 8:42 pm
by Michael_L
Posted: Mon Sep 25, 2006 11:07 am
by Lucky_Louis
Well done Wobb. Sounds like our weather is very similiar. Isn't it funny how everything takes soooo much longer than you think? I would take KS8's advice and use what's left of your epoxy to seal all of your bare wood before the fall/winter/spring break. I'm still pushing to finish this year, the weatherman has given us two more weeks of warm, sunny weather before reality of West Coast weather returns
Posted: Mon Sep 25, 2006 11:14 am
by MadRus
Wobb,
It's looking great! Could you, when you have some time, write about your method for laying in and shaping fillets? If you've discussed it before, could you point me to it? Thanks.
-Dave
Posted: Mon Sep 25, 2006 2:33 pm
by ks8
Having used exterior ply, I needed a bit of extra confidence after the mold experience (acetone zapped the mold, and helped me find the Stainless 316 from Mars...
).
What you are using may not need the precaution, but it wouldn't hurt to look in on it once a month on a calm dry day...
Posted: Mon Sep 25, 2006 4:32 pm
by WobblyLegs
You've accomplished much in the time you have been building! Looking good...
Thanks, but not nearly as neat (English sense) as yours...
I now always try to have whatever is permanently bonded in for the winter, sealed with at least one coat of epoxy, even if I'm going to sand back to wood in the spring in that section. I'm sure this also helps greatly with the moisture issues.
That is my plan - and there is not that much to cover really, just the frames, the lower side panels (I still don't know why I didn't seal those last autumn, but they don't seem to have suffered for it?), the rest of the transom and the motorwell sides.
Another "thank you"
- as I said on another thread - just following plans...
I would take KS8's advice and use what's left of your epoxy to seal all of your bare wood before the fall/winter/spring break. I'm still pushing to finish this year, the weatherman has given us two more weeks of warm, sunny weather before reality of West Coast weather returns
RE: sealing - see above...
I wish you best of luck for finishing (just been chatting to a friend in Vancouver, and he says the weather is quite good there at the moment).
It's a bit murky here at the moment, and it's not practical to mix epoxy when I get home during the week. I'm hoping that I can at least measure and cut wood (but it's raining tonight) for the cleats that the sole will sit on, then do a bit of a taping and gluing session this weekend.
Wobb,
It's looking great! Could you, when you have some time, write about your method for laying in and shaping fillets? If you've discussed it before, could you point me to it? Thanks.
-Dave
I'm blushing now... :0
Fillets:
You know the expression "gaps are good" very well by now I'm sure - so with the stringers and frames I've been using matchsticks to create an (approximate) 1.5mm gap between the hull and the bit being glued in. Not many, just enough to keep the wood off the hull - I think I used three on each stringer. On the stringers, that gap is on the outboard edge, the inboard edge has a much bigger gap due to the angle of the hull and took a LOT of filler. From there, used the mixing sticks to squeeze the mix into the gap until I can see it appearing through the other side - not much - just enough to know that ALL the wood is in contact with the mix. A bit more detail - from the mixing cup scrape enough to cover about on third of the length of the stick (mine are probably just under an inch wide) lay the stick long edge against the hull about half an inch away from the stringer/frame, tilt onto frame at 45º and squeeze the bottom edge of the stick against the frame. Repeat until goo appears through to the other side.
After I've done a section, say the centre of a frame between stringers, I then go back and generously (and not very neatly) slop more mix into those corners. Final part, again, same stick, run the end along the corner, scraping away the excess epoxy, holding the stick at about 45º into the direction of travel (gives a larger radius). I usually do this about three times, first with the stick 45º to the frame and the hull (and always 45º into the pulling direction), then laying on the hull to pick up the epoxy that squeezes out the edges, then again laying on the frame to scrape up that excess which goes back in the cup. After all that, when the epoxy is nearly hard, I go back and fillet a thin layer onto it again, just to smooth things out a bit. Before glass, a final sand with the RO, grind the fillets lightly with a Dremel, vacuum, clean with acetone, and glass...
One of the reasons it takes me (on average) two days to do one frame, is that I start with the centre section of the frame, let that cure, then do the outer sections - the boat is lying true on its bunks, but it still moves a bit when I'm moving about in it, so I want each bit secure before moving on to the next. Also, the hull is thicker now (from glass lamination) so when the frames are resting in the notches in the stringers, they stand a bit high of the the hull sides, so I have sanded a bit off the bottom of the frames so I can keep a gap and glued the centre section making sure that my baseline and stringers are at the right place. After that, I use clamps on the hull sides to bring the hull up level with the frames. The pic isn't clear, but I think you can see enough. The clamp is on holding a temporary bit of wood on the frame down against the hull, from the bottom of the rub rail. Then I glue the outer edges of the frames to the hull. All these fillets were done in small stages using the FAST curing hardener.
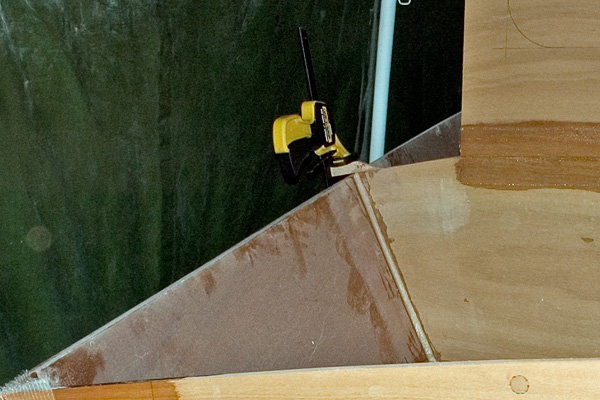
I struggled to come up with a method of making sure that the notched parts of the frames and stringers were glued properly, so what I did was cut the notches of the frames a bit wider (I'm using the sides of the boat to make sure they rest correctly), squeezing glue into those gaps, and running a fillet up the top half (where the notch is in the stringer) but NOT squeezing it through. There is a bit of a gap there, and I have built a little epoxy "dam" around it and poured SLOW curing epoxy down into one side of that gap to fill it. It flows in really nicely, until I see it appearing on the other side of the frame (takes time and constant watching but it does flow through - I cut a little nick out the top of of the frame notch to make sure there was an air gap all the way down, under and up again) Sometimes a bit of help is needed to keep a gap - I used the pointy end of a cable tie here on frame "C" - frame "D" rested on the stringers nicely and didn't need help. See before and after pics...

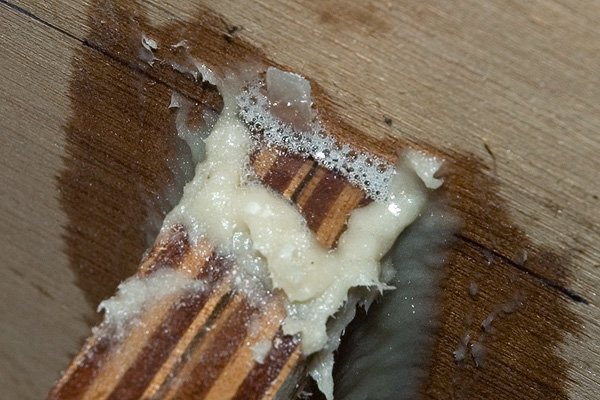
The bubbles come out for ages, so I'm pretty sure that there is a good bond in that area. But, even if there are some air spaces down there, I'm not too concerned as once the sole goes down on the stringers and cleats there won't be much scope for movement anywhere. And, of course, the glass tape on the fillets...
A note about mixing cups: all mine say "Happy Birthday" on them as I get them from the local supermarket - they are the only "hot and cold" paper cups they have and I feel sorry for anyone who has a birthday 'cos I buy them all when I need to re-stock! In fact, thay are now starting to give me funny looks when I buy them - maybe they tink I have a big family?
Dave, I'm surprised you ask - you did such a fine job on "Mad Russian!"
...and helped me find the Stainless 316 from Mars...
).
The what?
Tim.
_______________________________________
My (after roll-over) album:
HERE.
My album list:
and HERE.
Build on...
Wobb.
Posted: Mon Sep 25, 2006 4:34 pm
by WobblyLegs
OK, so why didn't my quotes work properly?
Messy!
Posted: Mon Sep 25, 2006 4:46 pm
by maxgsx
Wob,
I don't feel that I can build my boat now !!
Or if I do I will have to construct in secret.
You have set such a high standard for the rest of us Brits to live up to.
I am getting through my jobs at home.... Just need to replace / refurb the bathroom and fit new windows to the whole house before I can start building my little boat
I plan to build over winter and launch in the spring, well I'll launch as soon as it's finished. Boll**ks to the weather.
Posted: Mon Sep 25, 2006 4:52 pm
by WobblyLegs
Boll**ks to the weather.
Indeed!
Edit
Now that quote didn't work properly either...
Posted: Mon Sep 25, 2006 5:14 pm
by Knottybuoyz
WobblyLegs wrote:maxgsx wrote:Boll**ks to the weather.
Indeed!
Edit
Now that quote didn't work properly either...
Hey Wobb, I think Jacques disabled some features to help prevent some of the SPAM that's been showing up. Weekend before last was especially bad.
Nice job on the boat. You've set a high standard the rest of us will be hard pressed to match. Keep up the good work.
Rick
Posted: Mon Sep 25, 2006 5:21 pm
by MadRus
Thank you Tim- for the compliment and the work above. When I compare my fillets to yours, yours seem much more consistent and clean. Oddly, we follow basically the same proceedure for filling and shaping, although I sometimes use my finger or a spoon to shape, but I often use a tongue depressor, which I think you're using. That was an excellent description in any case, thank you. I can only conclude that you have a patience equal to ks' and that I need some work in that area. Although, I must say, my fillets on the PK78 were much refined over the GV. I want my next boat to display the kind of workmanship I see here and on a few others. Keep it up man!
Posted: Mon Sep 25, 2006 6:45 pm
by ks8
Tim Wrote:
ks8 wrote:
the acetone helped ... and helped me find the Stainless 316b from Mars... ).
The what?
Tim.
see my 9-22-06 entry...
http://gallery.bateau2.com/forum/viewto ... &start=225
... and then wonder if it was worth the effort you just made to read it ...
Quote posts manually with the Quote command as the button to quote the entire posting is disabled. We can all figure out what's on the screen fine if people use it anyway. the spammer bots are a nuisance.
Posted: Mon Sep 25, 2006 7:20 pm
by sgorey
WobblyLegs,
I'm not sure if this is the issue with quoting other posts, but make sure the checkbox labeled Disable BBCode in the post is unchecked when posting a message.
Posted: Tue Sep 26, 2006 2:35 am
by fmiles
Slightly OT; Talking about mixing cups, DONT use the cheap poly drinking cups when mixing 2 pack poly paints. I cant positively prove this, but am almost certain the chemicals in the paint 'ever so slighly' corrode the inner lining of the cup, and produce fish eyes in the end paint job result. I just couldnt get rid of them, and when I moved to proper mixing cups, the fish eye issue definately improved.
Posted: Tue Sep 26, 2006 9:25 am
by mecreature
Its very fun watching your project take shape. Good learning for me.
thanks for taking the time to make descriptions and take pictures..
Posted: Tue Sep 26, 2006 2:41 pm
by WobblyLegs
fmiles: Slightly OT; Talking about mixing cups, DONT use the cheap poly drinking cups when mixing 2 pack poly paints. I cant positively prove this, but am almost certain the chemicals in the paint 'ever so slighly' corrode the inner lining of the cup, and produce fish eyes in the end paint job result. I just couldnt get rid of them, and when I moved to proper mixing cups, the fish eye issue definately improved.
I guess I missed that purely by chance - I used the "proper" measuring cups for my paint as they had ml markings on the side to get the mix right...
I read in another post to use paper cups for hot liquids as the ones for cold liquids are generally sealed with wax, which is a b-a-d thing...
mecreature: thanks for taking the time to make descriptions and take pictures..
No worries - I enjoy it...
Taped the inboard section of frame "D" tonight...
Grinding fillets of frame "C" tomorrow under the warm glow of my new spotlights...
ks8: ... and then wonder if it was worth the effort you just made to read it ...
I have to assume you never bought the washer, so you assume it came from Mars? Could be Pluto.. Ah, no, Pluto is apparently no longer considered a planet, therefore definitely does not have washer-making facilities...
So, an interesting tit-bit: I have been told by my local supplier that they can no longer provide biax cloth or tape, and that the last roll they got for me was definitely the
last roll. Anyway, on the weekend I asked them to try, and had a message on my phone tonight that they had two rolls left in stock (one was rejected last time by my local for being so dirty - I saw it, it was bad) and another was a little bit dirty. No more after that until the end of the year. I'll take the little bit dirty one (I get to see it on Thursday and will decide then).
The reason - apparently, the manufacturer is running at full capacity to supply
Airbus for aircraft manufacture...
They're making 'planes out of my glass???
Scary...
Tim.
Posted: Tue Sep 26, 2006 5:32 pm
by ks8
Making Airbusses from your glass? Some people have wrong priorities. Maybe one day they'll come round.
The meteor didn't look like a washer at all. It looked something like Pluto. I had to grind and sand it to shape.
Poor Pluto... never had a chance. Well, that leaves us with the other Pluto, the one who is friends with a certain mouse of reknown... I wonder if he is upset that there is no longer a planet with the same name? Yes, I wonder many strange things... all day long... but then, someone has to. It eases the burden off everyone else you know...
!
Posted: Tue Sep 26, 2006 5:34 pm
by Knottybuoyz
They're making 'planes out of my glass???
Scary...
Ya know Tim, it's more like you're making a boat out of their glass!!! Hah!
And a damn fine boat it's gonna be too!
Rick
Posted: Tue Sep 26, 2006 5:44 pm
by Norbas
Hi Tim,
Are you using a new tent/gazeebo this year? If not I must be imagining it looks different
Could you tell me where you got it and how much if you don't mind me asking? It looks ideal for another project (as well as a TW28) I might be starting.
Keep up the good work and lots of updates, I enjoy reading them and they're an education.
Many thanks.
Dave
Posted: Wed Sep 27, 2006 4:50 am
by WobblyLegs
Hi Tim,
Are you using a new tent/gazeebo this year? If not I must be imagining it looks different
Could you tell me where you got it and how much if you don't mind me asking? It looks ideal for another project (as well as a TW28) I might be starting.
Dave
No, you're not imagining things - I threw the gazeebo away last autumn - it was next to useless for winter, and got a new tent from
Dancover (click me!).
I found it through a link on "Kiwi's" Amateur Boat Building website.
Mine is the 5.10x2.3m shelter - prices are on their website.
Totally waterproof too - not a drop has touched my boat since I put it up at the beginning of last winter...
T.
Posted: Wed Sep 27, 2006 8:07 am
by kiwi
Wobbly you are too kind!
I love feeling useful
Tony
Posted: Fri Sep 29, 2006 4:44 pm
by WobblyLegs
So totally off topic, but I know some of you will will appreciate this...
See (and respond)
HERE!
I'm just so blown away by this project that I have to tell everyone!!!
Posted: Sun Oct 01, 2006 2:23 pm
by WobblyLegs
My God, did it rain this weekend!!!!
The tent is proving very useful, as are my new lights. It's nice to be able to continue working after dark, but I'm accumulating clutter in the boat now...
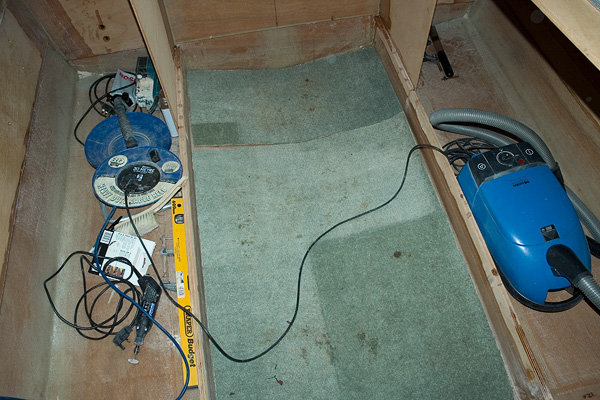
The carpets (free from the local carpet shop from their bin) are to absorb the mud from my shoes, and lately there is a LOT of mud about!!!! Oh, and it's not all as bendy as it looks, that's just distortion from a cheapie lens on the camera. The stringers are STRAIGHT!
I've also managed to move my sticky stuff into the boat, so I can do continuous sessions in the tent without having to go walkabout in the mud outside:
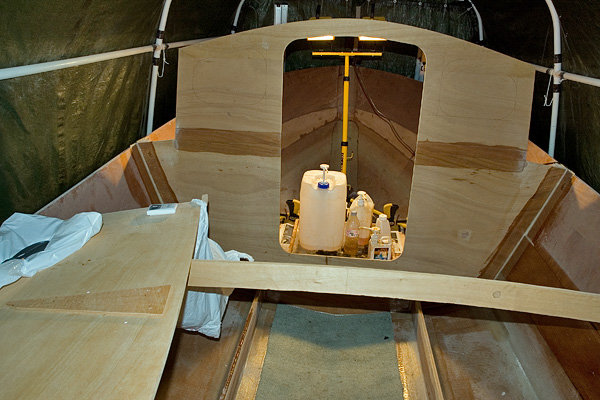
And, have finished taping frame "C" to the hull, as well as sealing the lower side panels between "C" and "D":
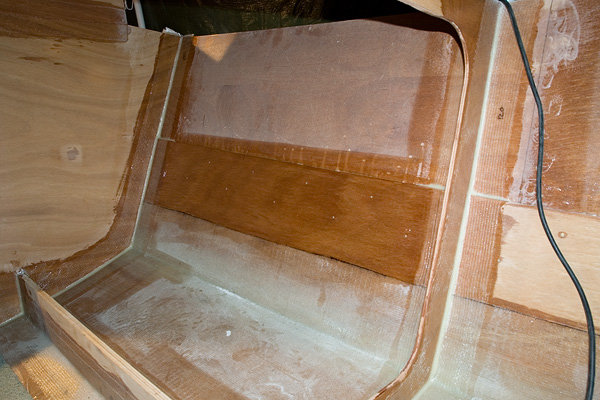
Those little white dots are filler where the screws that held the upper and lower side panels together were while gluing them together. Screws were removed, holes drilled out, and filler squeezed in (about a year ago I think...)
I bought a load of 25mm (1") square wood last weekend, so now will be working on cleats between frames "C" and "D" and in the areas each side of the motorwell before installing frame "E"
So far so good.
_______________________________________
My (after roll-over) album:
HERE.
My album list:
and HERE.
Build on...
Wobb.
Posted: Sun Oct 01, 2006 6:20 pm
by ks8
Looking excellent Tim...
regarding muddy shoes and carpet... the carpet can only help so much. What I've done for three years is wear a pair of shoes with the laces removed... my epoxy shoes. They get kicked off and left on the bench as I climb into the boat with socks only, double pair in november and feb and march. No mud problems at all, and the shoes are easy to slip back into as I climb out again. But the carpets are a good idea to protect from accidental drop of something heavy or sharp, until you've got your glass lamination on the floor or some other way to protect the floor.
I extended my build time into december with the smaller tent *cathedral* on the boat itself, inside the larger tent, with multiple work lights that help to heat the work space, but you can't push it too far into winter with surfaces of the outer hull itself, since they can still drop to freezing even with a light pointed at it on the inside.
Thanks for the pictures.
ks
Posted: Mon Oct 02, 2006 12:00 pm
by Lucky_Louis
Looking great Wobb. I can see your epoxy supply is indeed dwindling. Make sure you come out for air now and then. The epoxy fumes may not smell that strong but they are still present and will pool inside the hull.
Posted: Mon Oct 02, 2006 4:44 pm
by ks8
Make sure you come out for air now and then. The epoxy fumes may not smell that strong but they are still present and will pool inside the hull.
Yes. Though many never have a problem with it, some can develop skin and respiratory sensitization if over exposed. Why find out if you are one of them, the hard way.
Long lamination sessions, I use the 3m 6000 with the fiber and charcoal filters, else I get a nasty sinus headache after approx 4 or more hours in the *cathedral*. With the respirator, all is well.
Posted: Thu Oct 05, 2006 6:30 pm
by WobblyLegs
So, following my questions about
pine/fir and working in
cold weather, I have started joining cleats to the under sole framework.
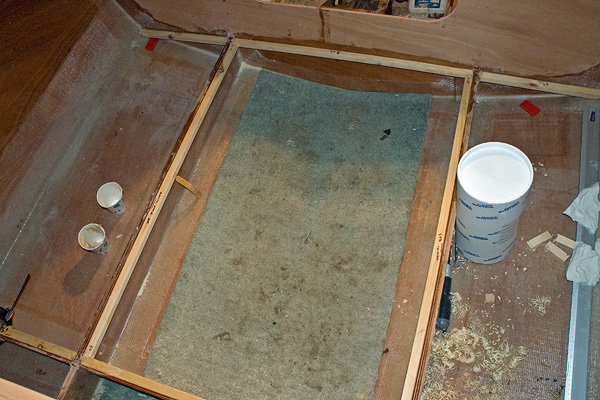
Oh, remember, the curve in the wood is the lens, not the wood!!
Tonight is quite warm (17ºC) so all is good!
Regards,
Tim
Posted: Mon Oct 09, 2006 5:45 pm
by WobblyLegs
Cleats under the mid-section of the sole are in. Sole for the cabin is cut and resting in place. Mid-sole section was cut tonight and is also resting in place.
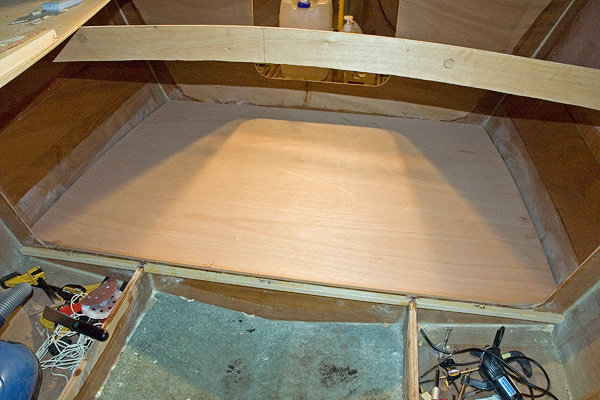
This will come out again, probably in the spring, to have foam put underneath and then get sealed and glued.
The cockpit sole is going to be two pieces, and as was discussed a long time ago, I decided to have the sides of frame "D" extend through the sole, rather than cutting the frame, so here you can see how this is achieved...
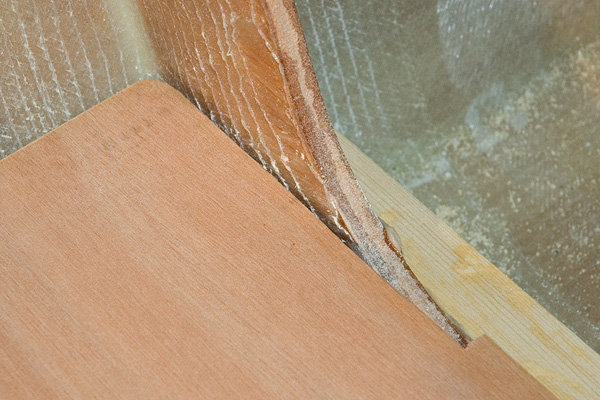
Weather has been very obliging lately so still working in the evenings, although I have to admit I feel like I'm running out of steam at the moment. I guess I'm getting a bit tired of working a full day in the office, and then spending every free moment I have on the boat, so I'm quite looking forward to winter now and taking a break from it. But, until then, I'm working on the "get one task a day done" if that's all I do...
Today's was cutting the mid-sole. tomorrow's is lifting it, sanding the tops of the stringers and cleats smooth, and then we'll see what's next. I need to start installing cleats in the compartments either side of the motorwell for the small sole sections that go in there before fitting frame "E." I'll let you know how it goes.
T
_______________________________________
My (after roll-over) album:
HERE.
My album list:
and HERE.
Build on...
Wobb.
Posted: Mon Oct 09, 2006 8:11 pm
by DrBones
Thanks for posting all those pics...I would love to see one of the cuddy cabin on it..just to get an idea of the space there.
Posted: Tue Oct 10, 2006 10:46 am
by Lucky_Louis
Lookin' great as usual Wobbly. You must be just about out of epoxy by now. Amazing how stiff the floor is, isn't it?
We've been plagued by some of your London fog here for the last week or so I had to halt any progress and take all my un-epoxied pieces inside. I know what you mean by taking a break. I was pushing too hard trying splash this year but now I'm pretty sure I'll wait until spring. Just too much to do and I don't want to rush the finshing work. How is it working out with leaving the frame top pieces intact? If it was me, I would have banged my head a dozen times and tripped over them at least that many too. Cheers mate.
Posted: Wed Oct 11, 2006 4:51 pm
by WobblyLegs
DrBones:
Thanks for posting all those pics...I would love to see one of the cuddy cabin on it..just to get an idea of the space there.
When I get there, there will be pics...
Lucky_Louis:
How is it working out with leaving the frame top pieces intact? If it was me, I would have banged my head a dozen times and tripped over them at least that many too.
Not my head, my lower back catches it when I stand up after crouch-crawling under it!
I have more scratches on my back from frame "D" in the last month than I have from...
Cut and dry fit the sole either side of the motorwell tonight.
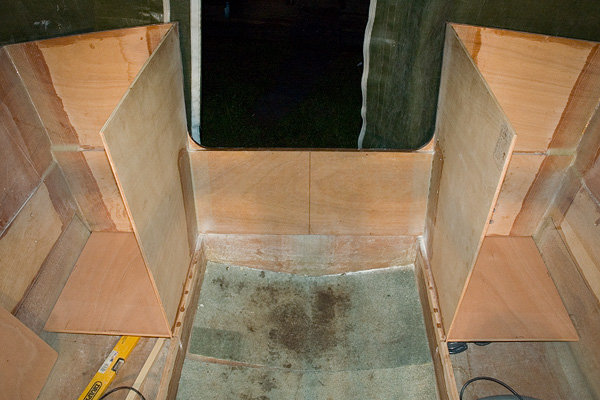
I have two more nights of work, then away to Portugal for a week (MotoGP penultimate race at Estoril on Sunday followed by a week of touring) and I guess by the time I get back the 'season' will be over...?
_______________________________________
My (after roll-over) album:
HERE.
My album list:
and HERE.
Build on...
Wobb.
Posted: Wed Oct 11, 2006 5:58 pm
by Cracker Larry
That is some really nice looking work
Posted: Sun Oct 29, 2006 2:57 pm
by WobblyLegs
I'm still here, plugging along...
Following KS8's idea, I now have another tent inside my main tent (which hasn't blown up, like one somewhere near New York...)
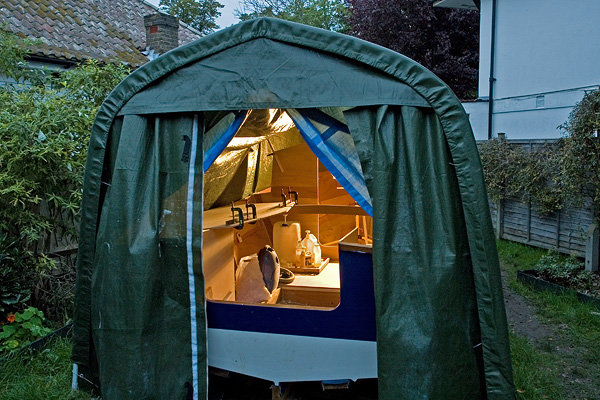
The lights work well, keeping the temperature inside the tent quite a bit higher than outside and a noticeable difference in humidity as well.
I was all ready to install frame "E" into the hull today after doing the cleats for the motorwell and the motorwell sides' sole over the last few days only to find that I'd glued the motorwell sole cleats to frame "E" on the baseline, not 12mm lower to account for the sole! Doh!!!
I think the next pic best shows how to remove a mistake! Cut slots, break off, then grind down,
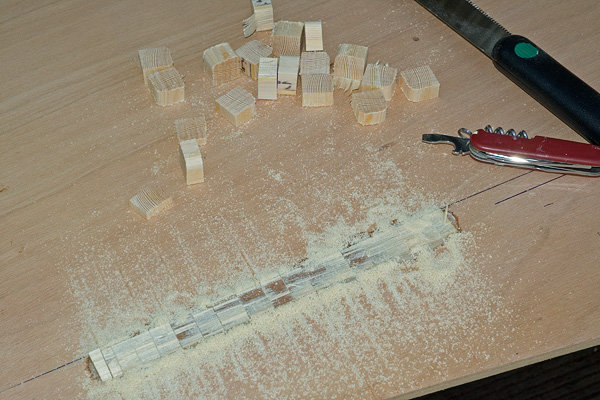
Anyway, there's no rushing at the moment, as the next major step will be doing foam under the sole, and I think I will need to wait till next spring to do that. In the meantime, I'm cutting and gluing little bits of wood here and there - hoping to do the shear-clamps over the winter too!
_______________________________________
My (after roll-over) album:
HERE.
My album list:
and HERE.
Build on...
Wobb.
Posted: Sun Oct 29, 2006 3:19 pm
by gk108
Little mistakes are part of the process. Luckily that spot will be buried deep in the finished product. No one will know but us, right?
You are right about waiting for warmer weather for the foam pour. It will yield
much more volume when it is not cold outside.
Posted: Sun Oct 29, 2006 7:25 pm
by ks8
But, until then, I'm working on the "get one task a day done" if that's all I do...
Those days are more immediately rewarding than the others.
Nice tent within a tent. Tight fit. I imagine you will get more retained BTUs from lights than I do. The sole is looking good.
Isn't it fun chopping off perfectly good cleats that you just installed? I utilized some small, we'll call them *mounts*, that I used to hold battens in place while I finished shaping the hull panels. I then removed a few of them with a cutting blade on a Dremel, but found something that worked better. A small handsaw with a blade that was very sharp and moderate flex. I forced it to flex with my other hand by holding the other end with a bit of tension. This slightl bowed blade then very easily sliced through the temporary *mounts* very close to the plywood, leaving very little to grind flush. Here's hoping you do not need to utilize this info later.
Last two days here... unbelieveable wind and gusts, more than NorEasters or hurricanes of the past 30 years, or so it seemed! The Blue Tarp actually held. If the roof hadn't blown out last week, I don't think I could have gotten that tarp on in the last two days. Looks like you're all set for winter, but til then, build on!
Cheers...
Posted: Mon Oct 30, 2006 11:39 am
by Lucky_Louis
Good progress Tim. The gaps between your sole and the frames/boat sides look PERFECT. For mine, let's just say that woodflour and epoxy is a truly wonderful thing.
I echo the foam advice. Wait for a +25C or warmer day. Heat your part "A" and part "B" in a tub of hot water for 15-20 minutes. For measuring and pouring, I used disposable 1 pint plastic beer glasses. My foam mix was 1:1 so I 1/4 filled 10 glasses with "A" and 10 glasses with "B", marking each glass with it's letter. Then I parked these cups where I could reach them from inside the hull. A pile of tongue depressors were within reasy reach. I put on 3 pairs of latex gloves, and a long sleeved shirt. Then, non stop, was grab a "B", pour into "A", drop empty "B" into separate garbage bag, stir like a maniac for 30-45 seconds until colour was even, and pour into compartment in a line. Repeat and pour next line about 6" parallel to 1st one. Keep going and get a feel for how much the foam expands as to how thick to pour your lines. Go back in 5 minutes and top up between your rows. The trick is the prep. I had a lot a fun doing mine, couldn't take pictures - too gooey and no time. When this stuff goes, it goes FAST. For the smaller compartments (under anchor locker, under casting deck sub-sole, and motorwell side compartments), I drilled 2 x 2" holes in each compartment in opposite corners with a hole saw and saved the 'holes'. By this time, I had a pretty good 'feel' for how much foam was produced by a 1/2 pint batch so I just mixed 50% of what I figured I'd need and poured it into one hole. When the last drop went in, I placed my gloved palm over the hole for a couple of minutes and poured into the 2nd hole. I'd cover this with my palm too, but this time when the foam pushed, I'd ease up a bit and let it ooze out. Then I redrilled the holes with a Forstner bit and epoxied the plywood holes back into the sole.
You can reuse the part "B" cups but the "A" cups will be beyond salvage, toss 'em. Toss the mixing sticks too. The three pairs of gloves are so that when you get gooey, you just peel off one pair without having to stop.
I can't remember what exactly the distraction was, but SWMBO came out to check on the foaming operation and we both were looking at something and chatting. I'd totally forgotten that I'd just poured a "B" into an "A" and was just holding the cup in my hand. All of a sudden, my hand got REAL warm, REAL fast and the creature from the black lagoon magically exploded from the mixing cup like a demented python. My hand and forearm were enveloped in 3 seconds. SWMBO's quick thinking saved the day when she grabbed a garbage bag and trapped the beast (including my arm) saving hours of cleanup. A shirt and one latex glove were sacrificed to beast.
Posted: Tue Oct 31, 2006 4:58 pm
by WobblyLegs
I echo the foam advice. Wait for a +25C or warmer day.
25 degrees!!?? That means next April, or even May!!!! Ja, well, we'll see how it goes... I have lots to do before then.
I've spent the last two nights dry-fitting frame "E" (after re-doing the sole cleats, which are now spot-on!).
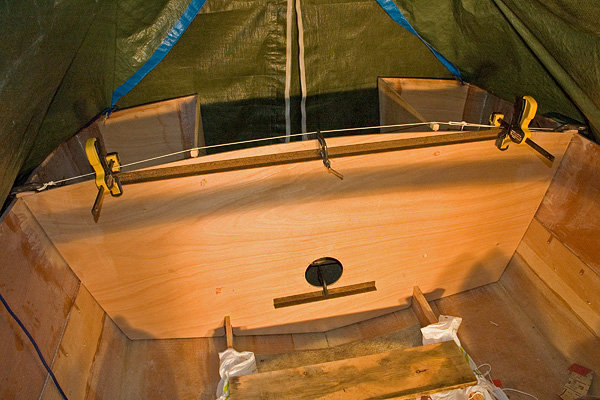
It looks complicated, but it's not really - the steel bars are only to take the slight curve that has developed in the wood out.
I have two worries at the moment - one is the tension that is in that cord to pull the sides into the frames (it's tighter that anything I have done so far) and the other is temperature. It's predicted to be about 3ºC tonight and sunny for the rest of the week - so I'm going to monitor the temp tomorrow (it gets really warm inside the tent if the sun is shining) and plan the gluing from there...
Later,
Tim.
Posted: Wed Nov 01, 2006 12:46 am
by maxgsx
Hello Wob,
About the temperature thing, check that we all speak the same language.
25c = 77f
25f = 4c
or thereabouts.
We are expecting frost later this week so that will slow things down a bit for you.
Although maybe you don't get frost yet in the Big City !!
Laters
Max
Posted: Wed Nov 01, 2006 4:18 am
by WobblyLegs
Hello Wob,
About the temperature thing, check that we all speak the same language.
25c = 77f
25f = 4c
or thereabouts.
We are expecting frost later this week so that will slow things down a bit for you.
Although maybe you don't get frost yet in the Big City !!
Laters
Max
Hi Max,
You're right, although I only know Celcius (so all my temps are ºC) - I can never relate to Farenheit... although I do sometimes mix inches and milimetres...
Big city? Not quite - I can't vote against Red Ken... (just over the border in Surrey). 2ºC this morning...
Posted: Wed Nov 01, 2006 6:30 am
by badaboum
25C=77F but 25F= minus 4C.
To convert C to F: (C x 9/5)+32
To convert F to C: (F-32)x5/9
Posted: Wed Nov 01, 2006 10:42 am
by Lucky_Louis
Same issue on this side of the pond, last three mornings -3C, -6C, and -4C this morning. It will be tough to fit in any outside painting or epoxy sessions between now and next April. I'll probably spend the winter making my cooler/seat unit in the shop. If I can paint my motorwell, I may mount the engine just to get it out of the way and see if it actually runs
As a coincidence, I had exactly the same problem with station "E" on my OB17. It bowed about a cm (1/2") and I just straightened it by running a board on the flat from shear to shear and clamped to it until I glued in the motorwell sides. The top of my transom did the same thing but not as much. All my pieces were epoxy encapsulated prior to placement. Once the motorwell sides were placed, filleted and taped, everything stayed nice and straight with the braces off.
Posted: Wed Nov 01, 2006 5:22 pm
by Lucky_Louis
Just read your post on Mad Max's thread. Talk about a small world ....

My baby VFR.
Posted: Wed Nov 01, 2006 5:31 pm
by WobblyLegs
Just read your post on Mad Max's thread. Talk about a small world ....
My baby VFR.
She's sweet, she is... SWMBO want's to get one of them... I'm after a VTR (1000cc V twin) at the mo' but she's not so keen - can't sit on the back...
I've got over 50k miles on my viffer, and still going really well (some slight mods...)!
Is there a trend here? Max? Baba?
Posted: Wed Nov 01, 2006 6:23 pm
by chrisobee
Hmmm.... boat building and an interest in Motorcycles. Here is mine at least its one just like mine.

Posted: Thu Nov 02, 2006 12:48 am
by Super Spook
Not to further derail, but here's mine. Mine has silver wheels though.

Posted: Thu Nov 02, 2006 1:44 am
by maxgsx
This is one of mine

Posted: Thu Nov 02, 2006 6:42 am
by Knottybuoyz
Those 2 wheel scooters will never float no matter how much 2-part foam ya pour into 'em!
I never had much luck with scooters, inherited a '71 Norton 650 Commando Fastback a long time ago. Had it restored to original and auctioned off in the late '90's. Kinda wish I had kept it now, probably worth 'nuff to build my TW28 and then some.
Nice job on the boat Wobb. Following all your tips and tricks is fun. I'm keeping a list of them all! What size is that rotary cutter you use on the fiberglass? Would a bigger cutting wheel be better? Do you have to change the blades often?
Keep up the good work.
Rick
Posted: Thu Nov 02, 2006 7:00 am
by WobblyLegs
Hooligans, the lot of you!!!
What size is that rotary cutter you use on the fiberglass? Would a bigger cutting wheel be better? Do you have to change the blades often?
Rick
Thanks Rick,
The cutter is small (about 1" diameter blade or so). I've only changed the blade once, and that was 'cos I rolled it over some cured epoxy that took the edge off it. I've been using plywood as a base to cut on. Does really well.
Bigger might be better, but she won't let me use hers (for sewing) on glass, so I don't really know...
Tim.
Posted: Thu Nov 02, 2006 10:49 pm
by jghall
Couldn't resist, love bike almost as much as boats... Here's mine, 76 KZ900

Posted: Fri Nov 03, 2006 11:53 am
by Daniel Huckleberry
Classic tin....
Very cool!
Tried to post mine, but I always have trouble getting it to link.
Oh well,
http://gallery.bateau2.comdisplayimage. ... at=0&pos=0
Posted: Fri Nov 03, 2006 12:10 pm
by baba101
And last year when I joined this website...I thought I was out here to discover a brave new world...only to find the same old bunch working under cover...
7 years ago when I bought my Bandit 1200...I told my son...this is my last bike...and its going with me to my grave...but now I am thinking Madmax will make a better coffin...
Posted: Sat Nov 04, 2006 1:04 pm
by WobblyLegs
OK, so this is the pic that I put on Baba's thread and started this all off (in case you missed it
)
 But, now back to the boat building thing...
It's taken a week or so, but frame "E" is finally glued in...
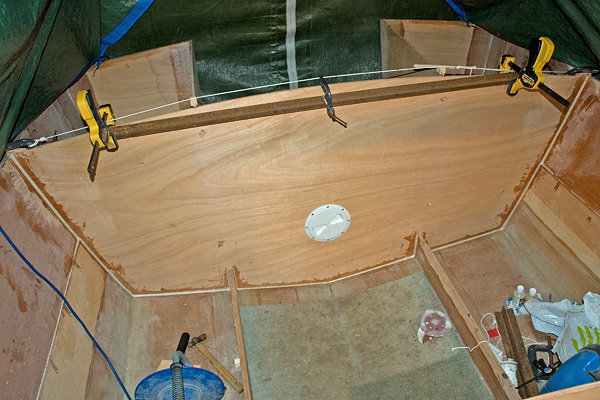
Also, note, the first bit of "hardware" in place. Not permanently, but as good as anywhere to store (I lose things easily...).
The next pic might explain that...
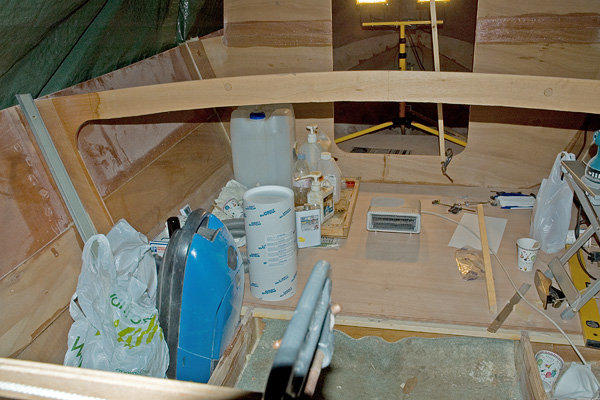
The (SA Navy) expression is
"dit lyk soos 'n hoer's se handsak" (polite term for this is that it looks like a [working girl's] handbag...)
Too true.
Tomorrow I'll tape the forward part of frame "E" and then hopefully put the rest of the cockpit under-sole cleats in over the next week or so.
So, the motorwell surround is now complete, the cockpit frame work is also now complete, and I'm starting to think that this little vessel might actually float one day...
_______________________________________
My (after roll-over) album:
HERE.
My album list:
and HERE.
Build on...
Wobb.
Posted: Sat Nov 04, 2006 1:13 pm
by WobblyLegs
Classic tin....
Very cool!
Tried to post mine, but I always have trouble getting it to link.
Oh well,
Daniel, that link is always going to show the last uploaded picture (from anyone).
What you need to do is go to your picture, right click (I think, I'm a Mac user) to show image in new window, copy that address from the browser, then when typing your message click the "img" button above, past the address you've just copied, and press the "img" button again.
Hope this helps.
Also, when you read this, try quoting my message and you'll see what I changed to show your pic...
Tim.
Posted: Sun Nov 05, 2006 1:41 pm
by WobblyLegs
Done.
Frame "E" is now part of the boat...
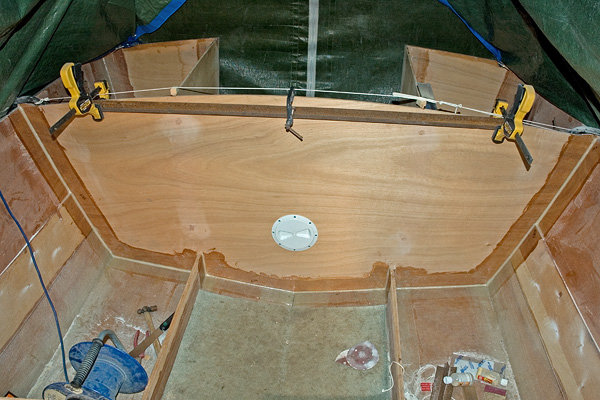
That finishes off all the cockpit framework - only some cleats to do, then sit around bored for the winter waiting for warmer weather to do the foam.
Mmm, hang on, I still have two more frames to put in: "A" and "B!" There is hope for sanity
!
Posted: Sun Nov 12, 2006 1:42 pm
by WobblyLegs
Spent the evenings this week cutting wood for the cleats under the aft section of the cockpit sole and shearclamps for the cockpit sides...
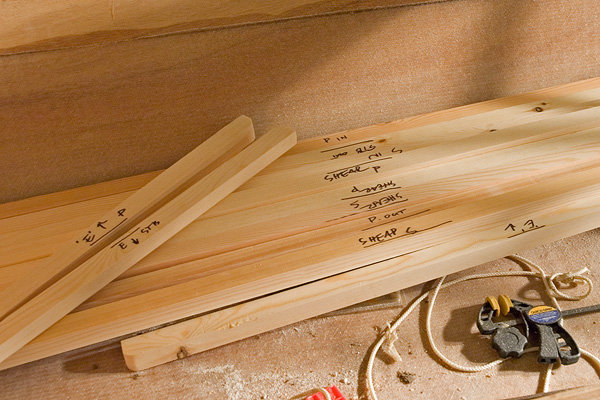
Yesterday I finished gluing the cleats for the cockpit sole...
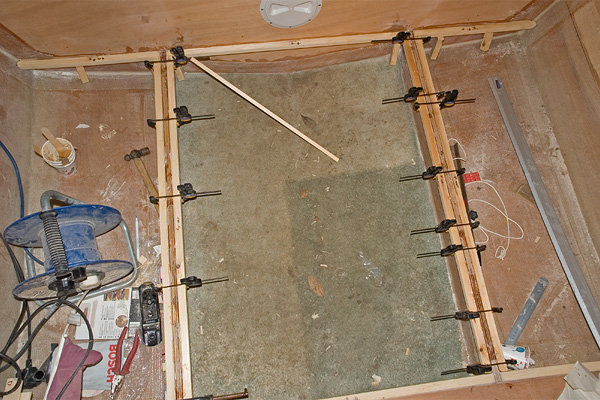
Hopefully I will be able to do the shearclamps during the week, after which I will be heading towards the cabin area.
Now, you might find this a bit hard to believe (especially since cats are supposed to be colour-blind) but I have a cat that is obsessed with the colour blue. As a result, ever since I put the inner tent up (which is a tarpaulin that is blue one side and green the other) this cat has been doing it's damnedest to climb onto the top of the inner tent to sleep.
So, I spent the best part of today turning it inside-out.
Well, actually, I need to re-hang it anyway as it wasn't really secure enough.
So, we are now green outside...
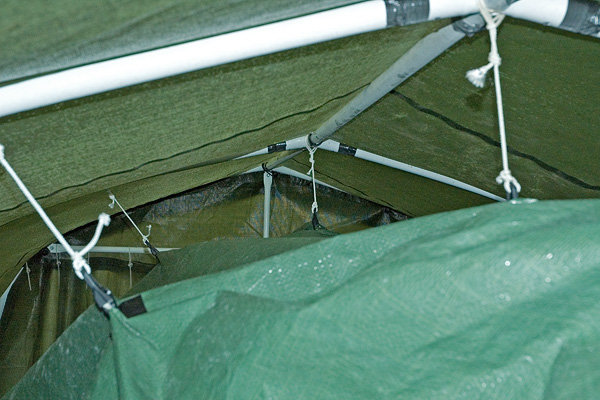
...and blue inside:
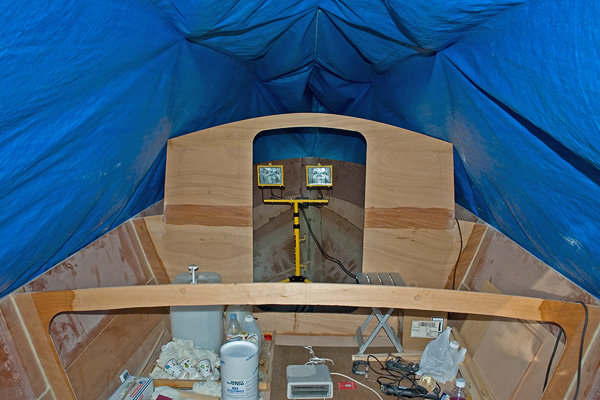
I'll let you know if it makes a difference...
Oh, and just to show how the boat's doing so far...
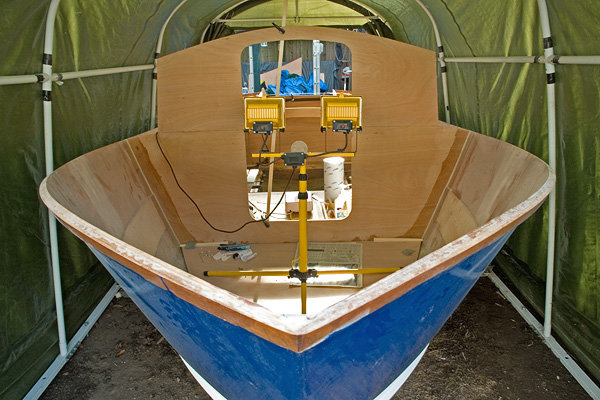
_______________________________________
My (after roll-over) album:
HERE.
My album list:
and HERE.
Build on...
Wobb.
Posted: Mon Nov 13, 2006 11:17 am
by Lucky_Louis
Looking good Tim, that's a real interesting shelter. I'm on the road again, down in Arizona for the week. Grand Canyon yesterday, Flagstaff today, off to Yuma tonite. Anybody know a good place to buy epoxy in Phoenix?
Posted: Mon Nov 13, 2006 1:08 pm
by ArizonaBuilder
Anybody know a good place to buy epoxy in Phoenix?
Jacques, still has the best price in town, you just have to wait for delivery.
Posted: Sun Nov 19, 2006 4:42 pm
by WobblyLegs
Well, the middle of November, and still going!
Installed the shearclamps in the cockpit during the week:
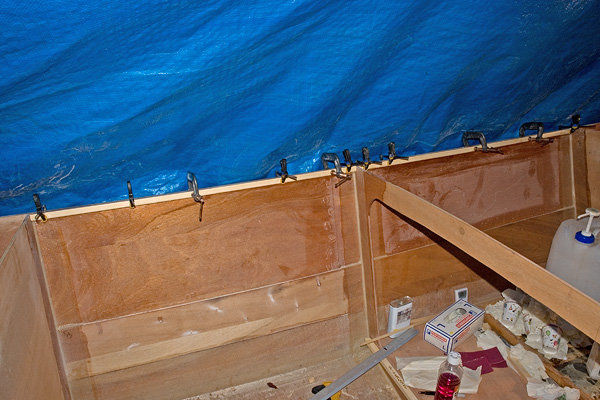
And, started installing frame "B" today:
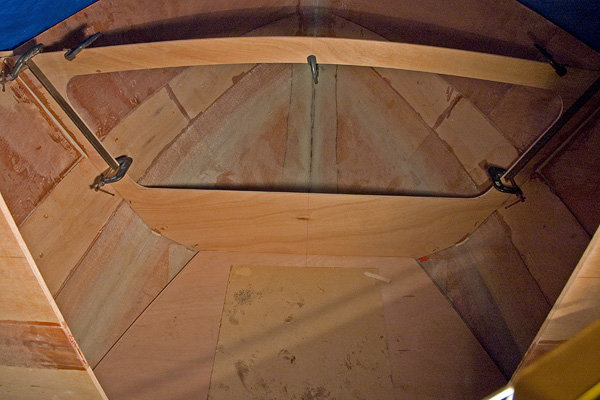
Most of this weekend was spent getting frame "B" ready to stick in, and about 3 hours today was spent adjusting the cradle under the boat to get it all exactly level, which it now is!
_______________________________________
My (after roll-over) album:
HERE.
My album list:
and HERE.
Build on...
Wobb.
Posted: Mon Nov 20, 2006 1:50 am
by maxgsx
Looking good Wobbs !!!
Crack on while you can
Posted: Mon Nov 20, 2006 2:00 am
by kiwi
I'm still amazed at what a clean job you are doing in those conditions! We are going to have to give you a special prize for this at some point.
Tony
Posted: Mon Nov 20, 2006 9:24 am
by WobblyLegs
Posted: Mon Nov 20, 2006 9:48 am
by kiwi
I guess this isn't the right place to do a very bad joke about backyard green tents...
Tony
Posted: Sun Nov 26, 2006 4:03 pm
by WobblyLegs
I guess this isn't the right place to do a very bad joke about backyard green tents...
Tony
Something to do with herbs? I'm wondering how long it will take until a thermal-imaging police helicopter flies over, and wants to know why I have 18ºC in my tent with 5ºC outside.
"Well, officer, it's like this..."
Next thing he's going to ask is if I have planning permission... Cynical? Me? Moi??
Oh, and for a prize, can I have a ride on your 28 footer?
Anyway, on with the building:
So, one month until Christmas...
A couple of weeks ago I made up a list of every piece of wood that I could think of that still needed to go into the boat - it came up to 95. I might have missed some, but anyway, it is something to work to.
Since then I have managed to cross 22 pieces off that list.
Going well so far!
Oh, and that barrel of resin is now empty. I said I was going to stop when I used that up. I lied. I am onto another (smaller) bottle of resin now.
A couple of pics here to show frame "B" going in...
Fillets done and ground smooth in anticipation of tape (waiting eagerly above):
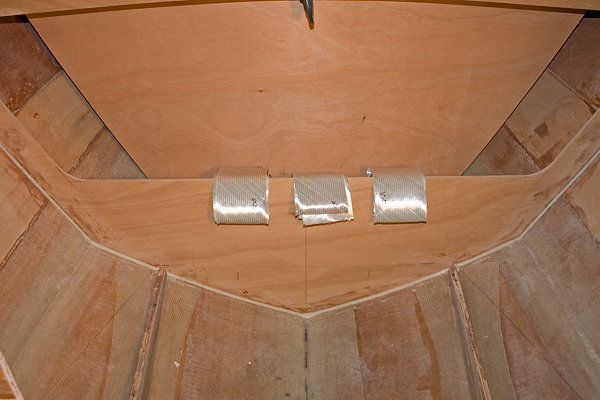
Tape done:
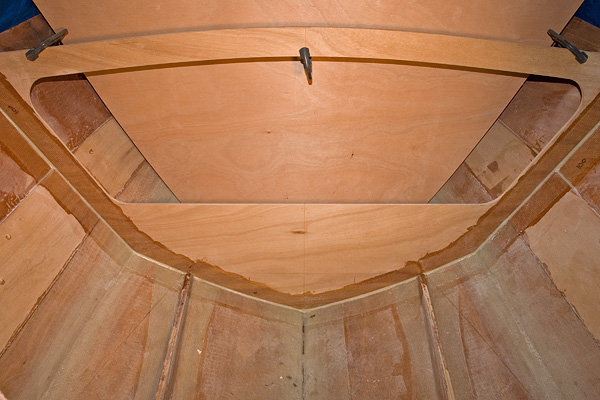
Followed by inboard cleats while the tape was still sticky:
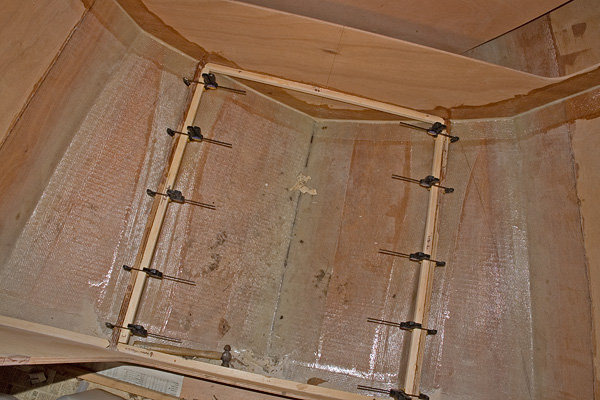
Outboard cabin cleats also done since then.
Next, the shearclamps between frame "B" and "C" proved to be a bit more work than expected. I tried clamping the wood to the hull for a day or so to see if it would get a curve. Nope. What it did do though is pull the sides of the hull in, creating a bit of a kink at frame "C." Can't have that!!
So, I soaked the wood in a hot bath for a couple of hours, then used a sash clamp to clamp it to a radiator to dry for a couple of days:
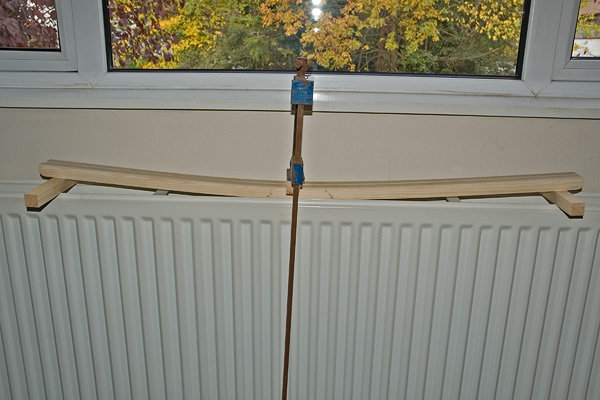
After drying:
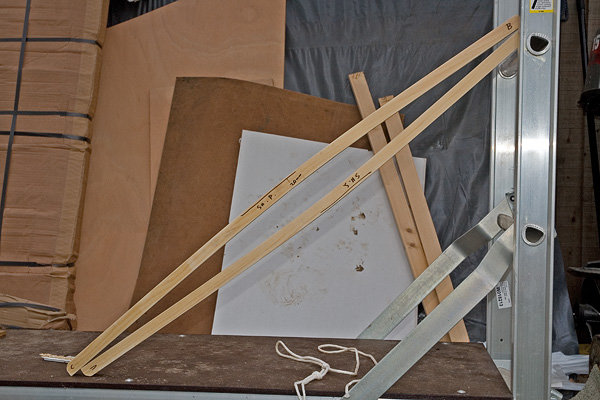
They got glued in today, along with the cleats for the deck on frame "C":
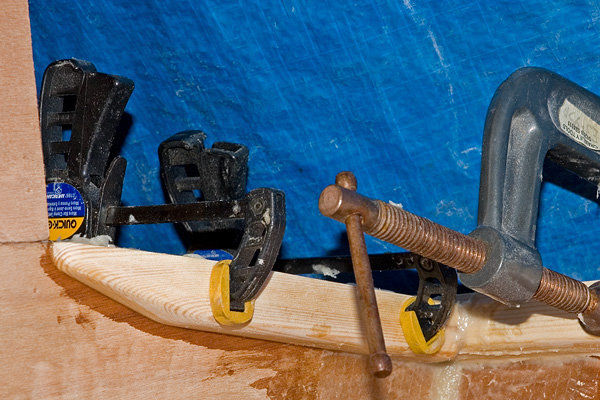
Also, painted the front "quarters" (port and starboard) hull under the cabin sole with another layer of epoxy in preparation for foam.
I'm going to experiment a bit with the foamy stuff to see how much of a difference it makes mixing in a warm environment compared to the cold outside. If the difference is small, then foam is next. If I can't do foam, then I'll start working on frame "A" - but once that is in I am stuck. Foam needs to go in!!!!
_______________________________________
My (after roll-over) album:
HERE.
My album list:
and HERE.
Build on...
Wobb.
Posted: Mon Nov 27, 2006 10:25 am
by Lucky_Louis
Great progress Tim, I really liked your wood bending technique
If your mild winter keeps up, you'll catch me by spring. we're at -5C with blowing snow
Posted: Mon Nov 27, 2006 5:22 pm
by WobblyLegs
Great progress Tim, I really liked your wood bending technique
If your mild winter keeps up, you'll catch me by spring. we're at -5C with blowing snow
We're still in double figures here (ºC) so am happy. Mmmm, who's going to lanch first?
I did some test with foam that you migh find interesting (it's fun stuff!!):
OK, so quite few people suggest doing two-part foam on a warm day, but I'm at a stage where to do that means waiting until next summer, which just does not suit my plans!!
So, I did a little test with foam.
I measured two cups each of part "A" and "B," then put one set on top of a radiator and one set in a fridge, then mixed and poured to see what the difference would be.
I'm guessing that I mixed about 40-50 grammes of the stuff (each).
The mix off the radiator expanded very quickly to fill the cup, while the mix from the fridge took about 5 times as long to expand, but still reached a similar volume.
On weighing them, the "cool" mix was 4 grammes less than the warm mix (about 8-10%), so in effect it looks like the temperature doesn't really make much difference in volume, only time to get there.
Some pics...
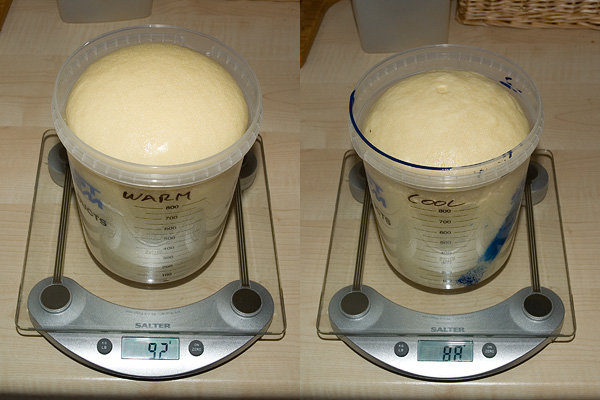

From my point of view, the difference (if any) isn't worth waiting another 6 months to go ahead with it, so, guess what I'm doing this week!!??
Should I put this info in "Anything Else" or "Tips and Tricks" as well? Answers on a postcard please....
_______________________________________
My (after roll-over) album:
HERE.
My album list:
and HERE.
Build on...
Wobb.
Posted: Mon Nov 27, 2006 6:28 pm
by chrisobee
This makes perfect sense. The cure process is a chemical reaction. Just as in ordinary epoxy the heat accellerates the cure but it doesn't really effect it so long as it stays within reasonable parameters.
Posted: Tue Nov 28, 2006 12:04 am
by robbiro
Thanks for the testing on the flotation foam. I have had the same thought and you got to the test quicker than I did. This tells me what I will be doing in the next couple of days... should get me to where I can enclose the bow compartment of my GF-16 and go on th other things before spring. Our temps are higher than yours, but below what was given on the packaging for proper chemical curing. I am amazed at your progress and how neat your work area stays
Keep on Buildin'
Robbie
Posted: Tue Nov 28, 2006 8:00 am
by kiwi
I would warm the two parts inside then take them outside and pour them. You could also warm the surface of the wood with a hot air gun to help the mix kick.
Cheers
Tony
Posted: Tue Nov 28, 2006 8:16 am
by WobblyLegs
I would warm the two parts inside then take them outside and pour them. You could also warm the surface of the wood with a hot air gun to help the mix kick.
Cheers
Tony
You read my mind - the tent is actually really warm inside with a fan heater going (whenever I go in there I leave the down jacket hanging outside, climb in and take the fleece off and work in t-shirt!). The two 300W flood lights help as well!
Before pouring foam I plan to aim the lights at the area to be done for an hour or so. It will warm up.
Question - do I need to sand the epoxy for key, or will the foam stick to it as is (bearing in mind I have 'painted' a layer of epoxy over the weave of the glass to 'double-seal')?
Regards,
Tim.
Posted: Tue Nov 28, 2006 8:19 am
by timoub007
No sanding is needed. That foam will stick to anything and everything!!!
Don't get it on anything you don't want it on.
The boat looks great, and your attention to detail is spectacular.
Tim
Posted: Tue Nov 28, 2006 11:00 am
by Jerry-rigged
Kiwi wrote:
I would warm the two parts inside then take them outside and pour them. You could also warm the surface of the wood with a hot air gun to help the mix kick.
Cheers
Tony
I have a question from someone that dosent know any better...
Seems I read that one of the biggest issued in working with the foam is that it kicks off so quick you don't hardly have time to think about what you are doing. (Mind you, I have never used the stuff). It seems Wob has come up with an easy way to give you working time that is reasonable. Why is this a bad thing? (I am assuming you think it is bad because you are telling him not to do it).
Wob:
Do both of you foam samples have the same hardness / crush resistance?
cluless in Texas,
Jerry
Posted: Tue Nov 28, 2006 11:12 am
by WobblyLegs
="Jerry-rigged" I have a question from someone that dosent know any better...
Seems I read that one of the biggest issued in working with the foam is that it kicks off so quick you don't hardly have time to think about what you are doing. (Mind you, I have never used the stuff). It seems Wob has come up with an easy way to give you working time that is reasonable. Why is this a bad thing? (I am assuming you think it is bad because you are telling him not to do it).
Wob:
Do both of you foam samples have the same hardness / crush resistance?
cluless in Texas,
Jerry
The thing with the cold mix is that it sat in the bottom of the plastic cup for quite a while (15, 20 seconds longer than the warm mix) before doing anything, then started rising slowly, then faster and faster as it heated up from the reaction.
I don't think it really gives you more working time 'cos all you can do really is pour it and leave it to puff up - you need to know where it's going before mixing and pouring.
I'll let you know about crushing them later this evening - I was planning on standing on my two samples when I get home anyway.
The appearance of the two foams is slightly different - the warm mix produced fewer but bigger bubbles than the cold mix. I have no idea if it makes a difference
Anyway, it's all just "kitchen science" to check that I wouldn't end up with a heavy solid lump of PU in the bottom of my boat.
Posted: Tue Nov 28, 2006 11:41 am
by mecreature
I assume there is not a problem by using small amounts of foam but several batches to fill an area.. As not to waste the foam or make a bigger mess then necessary..
Posted: Wed Nov 29, 2006 4:36 pm
by WobblyLegs
"Jerry-rigged" Wob: Do both of you foam samples have the same hardness / crush resistance?
Well, they are both very strong - I stood on them, squeezed them (well, tried to), hit them with a hammer (which resulted in dents) but no difference between the two that I could see!
"mecreature" I assume there is not a problem by using small amounts of foam but several batches to fill an area.. As not to waste the foam or make a bigger mess then necessary..
That's exactly what I'm doing (see following pics...).
This stuff is fun!
Some pics of the last two evening's progress...
I poured a very, note, VERY, thin line of mixed PU along the curve where the sole will meet the hull, as that was going to be my reference point as to how much foam to put in:
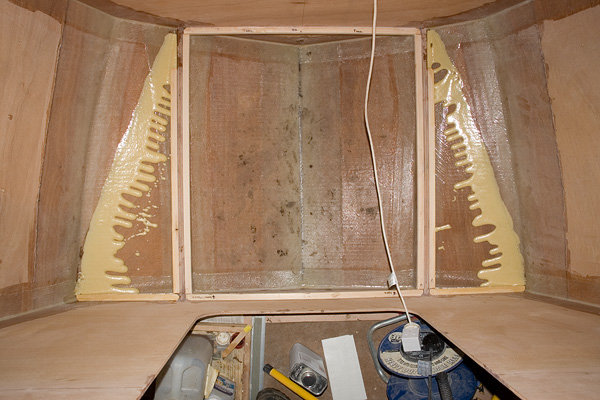
Followed by pouring a line of mix in the corners where the stringers meet the hull:
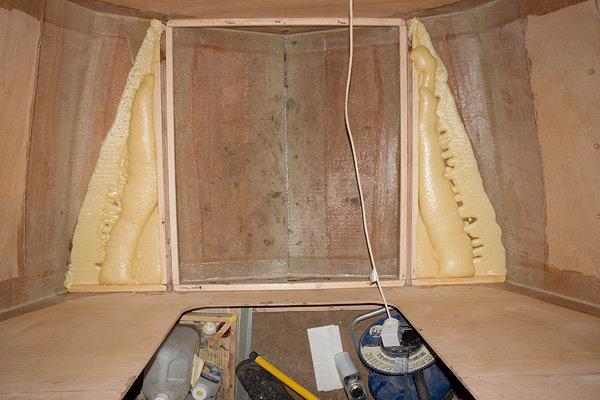
And left it there last night as it was getting a bit late. I finished off tonight by pouring in all the gaps left over (both sides) with my first mix (one each side) and then "levelling off" by filling little pockets here and there with a second mix (one each side) and a third mix (one for both sides) that sorted out the dips and bumps left over. Each mix was approx. 150 grammes for both parts:

Next, to cut it down and sand it level before filling between the stringers.
I hope everyone else is enjoying their build as much as I am!!!
_______________________________________
My (after roll-over) album:
HERE.
My album list:
and HERE.
Build on...
Wobb.
Posted: Wed Nov 29, 2006 5:31 pm
by AdamG
Dunno what others used, but a cheap, finely serrated 12 inch pointed breadknife (like a ginsu knife), and a random orbit sander with 60 grit pads worked great. You can cut off the bigger chunks of surplus foam to use as filler for other foamed areas, and then sand anything sticking up to "deck" level with the sander, and then vaccuum up the "dust". You will need a mask for the foam, because the foam dust floats easily and it is a little sticky as well, plus it seems to have a static cling effect also. The orb sander makes short work of getting the foam to a nice level surface.
The foam was probably the most fun I had working on the boat, so far as it was entertaining to use as long as it went where you wanted it to go.
Posted: Wed Nov 29, 2006 7:31 pm
by MadRus
I hope everyone else is enjoying their build as much as I am!!!
You're doing unbelievable, clean, beautiful work, so it's no wonder- you should be enjoying it! I wish I had the money right now, I'd be building another boat today. If I were a rich man, I'd always be building one.
But I am enjoying watching your build.
-Dave
Posted: Wed Nov 29, 2006 8:01 pm
by timoub007
Pouring the foam was the fun part. As Adam noted, cutting, sanding, and shaping it was about as fun as sanding for final fair.
Take note his suggestion to save whatever you cut off. The freshly poured foam around those pieces will make it so it is one. Another thing some builders do is fill in with empty soda bottles.
T
Posted: Thu Nov 30, 2006 1:22 pm
by mecreature
timoub007 wrote:Pouring the foam was the fun part. As Adam noted, cutting, sanding, and shaping it was about as fun as sanding for final fair.
Take note his suggestion to save whatever you cut off. The freshly poured foam around those pieces will make it so it is one. Another thing some builders do is fill in with empty soda bottles.
T
I assume you mean plastic 2 liter bottles..
if so. would empty milk jugs work too. that would save a ton of foam.
Posted: Thu Nov 30, 2006 2:11 pm
by Lucky_Louis
Anything that floats that will work for flotation.. sort of. Most of us use the foam to provide positive flotation in the event of a swamping or potential sinking. The idea is to keep you afloat long enough to be rescued, towed to safety, or correct the situation that put water on the wrong side of your boat. My concern with loose 'cells' like bottles would be if my boat got broke in half (or worse) resulting from a collision with another boat or rocks. If something rips the side or bottom out of a boat using empty soda bottles for flotation, many of those bottles will fall out and do you no good at all. Nice side benefits of the poured in place foam is a real increase in bottom stiffness, insulation from cold water, and some sound deadening. Of course, this is just my $.25
Posted: Thu Nov 30, 2006 2:52 pm
by AdamG
Good point. If the foam plays a structural role, like stiffening under the sole, you probably want 100% foam. If it is just occupying space..then containerized fillers like liter bottles are fine I would think...just realize if you puncture them, the whole thing can fill with water so you lose that bouyancy volume. What are the odds that a bunch of bottles all get punctured at once? Very low, I would think. That foam is so sticky, I wouldn't think the bottles would come loose from within it. Basically, unless someone machine gunned your boat all over, in most puncture or hull failure instances with bottles for some of the floation, it should float. Just don't use a few very large bottles and put all your flotation eggs in one basket, and don't use bottles where structural stiffening is required from the foam, right?
It would probably be wise to make sure those bottles are sealed with contact cement or something, just so they don't fill with water over time if you somehow soak the foam, which shouldn't happen anyways with closed cell foam.
Posted: Thu Nov 30, 2006 3:38 pm
by mecreature
thanks guys.. good info there to consider.
Posted: Mon Dec 04, 2006 5:30 pm
by WobblyLegs
So, December now and still going. Wow.
Lifted from "DesertDiver's" thread:
"stickystuff" What amazes me is all the different cradle designs the builders come up with. Some are cool and some are crude. What ever works. The most important thing is to keep the hull flat and level. One real simple way to make sure your hull is true and level with no twist is to take a string line and go from the bow to the port corner and then another from the bow to starboard corner. The strings where they cross should just be touching each other. If not touching then lift one side or the other in the stern area so the lines just barely touch each other. If hitting to hard then decrease one side or the other. This will guarantee that there is no hull twist when you glass it up. Very important.Good luck on your PH. I love mine.
OK, so my cradle supports the boat under the stringers and keel, and is level, etc., etc. But, the front of the boat where I am working at the moment is supported only under the keel, and had a slight twist, so thanks for that method Ken, much appreciated.
I needed to bring the starboard side down a bit, so used a couple of long tent pegs at 90º to each other as a ground anchor and some rope wrapped around frame "B" to pull the side down:
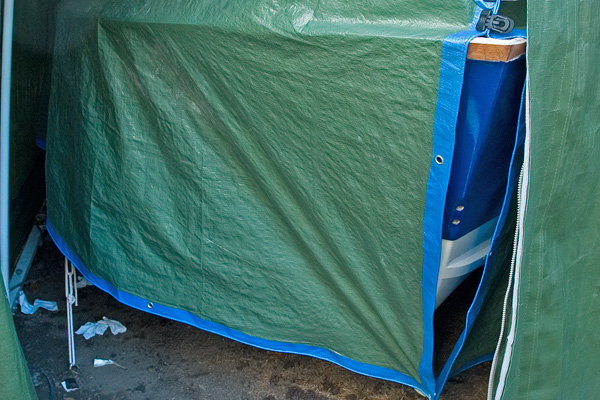
And got the string to touch (which corresponded nicely with a spirit level across the stringers):

And the continued with foam...
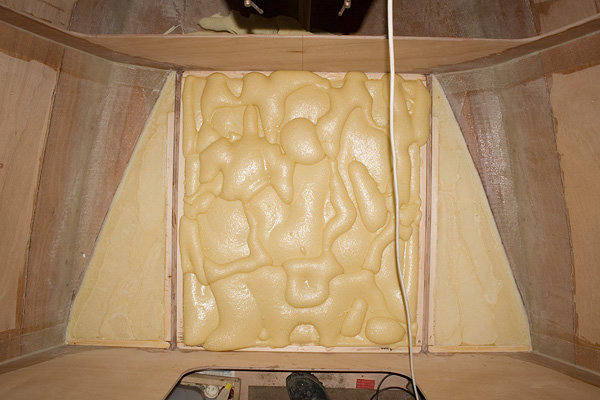
Now, I'm not too sure if this is boat building or "abstract art" but it looks funny!
As you can see, I have sanded the side bits level before filling the middle. I have a dusty evening ahead tomorrow, and then plan on gluing the cabin sole down.
Louis, a couple of questions: How much foam went into your boat (kg) (a guess will do)? And, how much did you mix at a time (I'm cautious to mix too much at once)?
T
_______________________________________
My (after roll-over) album:
HERE.
My album list:
and HERE.
Build on...
Wobb.
Posted: Mon Dec 04, 2006 7:24 pm
by Daddy
Not sue but think I see a nativity scene in there somewhere.
Daddy
Posted: Mon Dec 04, 2006 7:35 pm
by chrisobee
cowboy riding a dog.
Posted: Tue Dec 05, 2006 10:34 am
by Lucky_Louis
Tim, I went through 2 kits of 4 litres each = 8 litres. That gave me a solid bow (filled under anchor lazarette), sole under casting deck (like your photo), stern quarter compartments under the sole, and about 50% of the sub sole under the main deck. For that area I used a mix of solid foam slabs anchored in place with the pour-in-place foam. My hands were so sticky,
I couldn't grab my camera and take any photos. The foam slabs came from the building supply, used for insulating house exteriors. Very rigid, small, closed cells and about 35-40mm thick.
Posted: Tue Dec 05, 2006 11:20 am
by tech_support
I see the Virgin Mary
Posted: Tue Dec 05, 2006 11:26 am
by Knottybuoyz
Looks like a Mosh Pit at a Black Sabbath concert!
Nice job Wobbly! Looking forward to seeing more progress.
Rick
Posted: Tue Dec 05, 2006 4:36 pm
by mecreature
WobblyLegs wrote:So, December now and still going. Wow.
Lifted from "DesertDiver's" thread:
"stickystuff" What amazes me is all the different cradle designs the builders come up with. Some are cool and some are crude. What ever works. The most important thing is to keep the hull flat and level. One real simple way to make sure your hull is true and level with no twist is to take a string line and go from the bow to the port corner and then another from the bow to starboard corner. The strings where they cross should just be touching each other. If not touching then lift one side or the other in the stern area so the lines just barely touch each other. If hitting to hard then decrease one side or the other. This will guarantee that there is no hull twist when you glass it up. Very important.Good luck on your PH. I love mine.
OK, so my cradle supports the boat under the stringers and keel, and is level, etc., etc. But, the front of the boat where I am working at the moment is supported only under the keel, and had a slight twist, so thanks for that method Ken, much appreciated.
I needed to bring the starboard side down a bit, so used a couple of long tent pegs at 90º to each other as a ground anchor and some rope wrapped around frame "B" to pull the side down:
And got the string to touch (which corresponded nicely with a spirit level across the stringers):
I am curious where you would attatch those strings. It seems to me as long as they are even at the bow should be good..
Am I missing something? I have been wondering How I am going to keep an eye on level.
Posted: Wed Dec 06, 2006 7:06 am
by WobblyLegs
"mecreature" I am curious where you would attatch those strings. It seems to me as long as they are even at the bow should be good..
Am I missing something? I have been wondering How I am going to keep an eye on level.
They run from port frame "C" to starboard frame "B" and from starboard frame "C" to port frame "B," crossing each other more or less over the middle of the cabin floor (slightly forward as the boat is narrower at "B" than "C").
As described by Ken (StickyStuff) these will show any twist within that "box-section" of the boat.
Tim.
Posted: Wed Dec 06, 2006 8:52 am
by mecreature
thanks Tim.. that should help wonders I would think.
good tip..
Posted: Thu Dec 07, 2006 6:56 pm
by gk108
Hey Wobbly,
What the heck is going on over there? Tornadoes in London!!! Hope all is OK.
Posted: Fri Dec 08, 2006 5:08 am
by WobblyLegs
"gk108"
Hey Wobbly,
What the heck is going on over there? Tornadoes in London!!! Hope all is OK.
Yeah, the weather over the past week or so has been pretty rough. That tornado hit NW London (I'm SW of the City).

Gale force winds on the coast - 34 yachts on hard standings blown over last Sunday in one marina alone (Plymouth, I think).

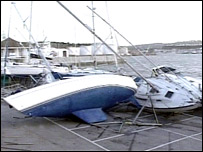
One of my boundary fences has been blown flat, and if it carries on raining like this my boat is going to float away.
Posted: Fri Dec 08, 2006 6:46 am
by DrBones
A tornado in London??? - That's crazy, never even heard that you folks get tornados over there.
Posted: Fri Dec 08, 2006 6:50 am
by WobblyLegs
"DrBones"
A tornado in London??? - That's crazy, never even heard that you folks get tornados over there.
Well, they're not
real tornadoes - just little ones that touch down for a few metres or so, then dissappear; not like the ones you get over there that travel across counties.
Still fairly destructive though - usually get two or three a year somewhere in the country.
Posted: Sun Dec 10, 2006 11:19 am
by kiwi
When we rant on about global warming and the weakening Gulf Stream etc it is because we are witnessing more and more "freak weather" over this side. In fact "freak" is becoming "normal". We just had what very much looked like a tropical storm again.
Tony
Posted: Mon Dec 11, 2006 7:01 am
by WobblyLegs
"kiwi"
When we rant on about global warming and the weakening Gulf Stream etc it is because we are witnessing more and more "freak weather" over this side. In fact "freak" is becoming "normal". We just had what very much looked like a tropical storm again.
Tony
It has been a really strange autumn, hasn't it?
But, for the moment...
...Rain is my friend...
'cos when it rains, it's warm. Saturday (clear) the temp dipped below freezing overnight, and I was a bit worried that I wouldn't be able to work on Sunday.
But then the cloud and the rain came (and eventually the wind again), and the temp shot up to 10ºC by late afternoon.
So, out with the sticky stuff, final clean of the foam and I now have a permanent floor in the cabin.
It was actually so warm in the tent while doing this, that I was working shirtless. In winter?
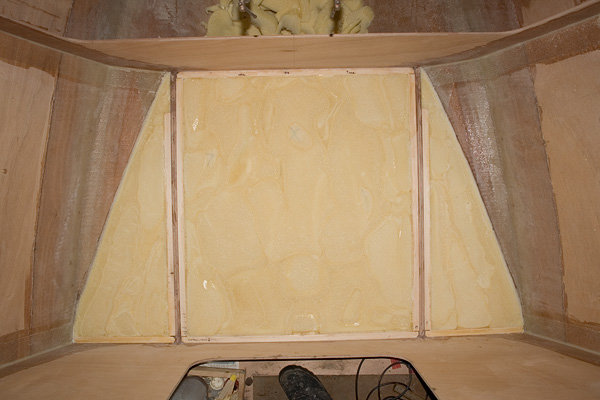

I knew I'd find a use for those weights one day...
So now I need some ideas: The floor is measured/cut correctly, but where it meets the sides of the boat (bottom panels actually) I now have a HUGE gap to fill (the panels slope away from the sole at about 20-30 degrees or so, so while I have about 12mm to fill upwards, the gap is about 30 - 40mm between the top of the sole and the side of the boat. Anyway, this "groove" is nearly a metre long. That's going to take a LOT of epoxy mix to fill, and seems like a real waste.
So, I'm thinking that to save some epoxy, I might get some 10mm dowelling to drop into that groove, and pour an epoxy mix around this to fill it up before putting biax tape over it. Does this sound like a reasonable idea? Or will the dowel weaken the fillet?
Any thoughts?
If I were to do this again, I would cut the wood at about 45º outwards from the measured line. Save some epoxy.
Tim.
Posted: Mon Dec 11, 2006 7:42 am
by kiwi
WobblyLegs wrote:
So, I'm thinking that to save some epoxy, I might get some 10mm dowelling to drop into that groove, and pour an epoxy mix around this to fill it up before putting biax tape over it. Does this sound like a reasonable idea? Or will the dowel weaken the fillet?
Been there, done that. Don't worry about strength there especially if there is biax tape over the filet. And I see we have the same supplyer of weights for holding stuff down!
Cheers
Tony
(back inside after a freezing walk to primary school after lunch - there is sno on the mountains!)
Posted: Mon Dec 11, 2006 8:48 am
by Daddy
There is a product called backer rod that is used to fill gaps in masonry that might work better to fill your gaps as it is flexible, made of closed cell foam and comes in a variety of widths. Probably available at your local brick dealer or even home depot.
Daddy
Posted: Mon Dec 11, 2006 2:36 pm
by maxgsx
Wobbs,
I would think you could use almost anything to fill the gap. I like Daddy's idea ( mainly because I have some of that in my workshop !! )
You could also just run some thin rips of ply off at about the right width with about the right angle on them. Glue them in and then fillet.
I hate this time of year for the reasons you stated. It's either nice and dry but bloody freezing or mild and pissing it down. I need to change jobs I think
Your build is cracking on. I only hope when I build my boat I can get anywhere near your standards.
I had hoped to have started by now but haven't had the time yet. Rebuilding my enduro bike at the moment; got three races over the next six weeks.
Posted: Mon Dec 11, 2006 2:45 pm
by cornish pasty
Wobbly
Just a thought but could you roll up some offcuts of glass and fill with epoxy?
Colin
Posted: Mon Dec 11, 2006 4:35 pm
by ks8
Just a thought but could you roll up some offcuts of glass and fill with epoxy?
If you consider the ratio of *Labor intensiveness* to *likelihood of a large air gap void forming in rolled up glass cloth cutoffs*, I'd think of some other way. Though the idea of putting something structural in there and utilizing scrap glass is a great idea. I just don't know how easily you could get such *fillet fill material* to be air/void free with a certainty in the process of forming and bonding it in.
Posted: Tue Dec 12, 2006 11:36 am
by Dimitris
I would use solid wood, bedded and epoxy, and then I would glass the joints. Aren't there any cleats at the sides of the floor?
Posted: Tue Dec 12, 2006 5:06 pm
by Lucky_Louis
Tim, I had the same situation on the same place in my OB17. I used a batch of epoxy, woodflour, and sawdust. 3oz of epoxy probably gave me 8oz of filler, you'd be surprised how far that goes. It was a b!%ch to mix but squeegeed well and you can do wet on wet with the tape right away. I used a pinch of lacquer thinner just to loosen the mix a bit. Up to 10% is OK for non structural work.
Posted: Tue Dec 12, 2006 5:30 pm
by AdamG
I had to make similar fills when placing the sole in my OB15, and it is 8 feet long (both sides)! Dowel rods worked fine. If you have to deal with curves, just break them into pieces. You might glue them down in place first with a little putty mix, and let that set, and then go in and fill in the leftover gaps with more putty and smooth over. You want to glue the dowel sections down, because they are not very dense with most dowel wood like poplar or pine, and they want to float to the top of the putty unless the mix is very thick. It worked fine for me.
I had to do the same thing to make the "filled" chines on my OB15 too. I put a LOT of dowels in the chine, sunk them into thin fillet mix, and discovered the "floating" problem after the first section filled. After that, I glued them down with a thin pouring of thinned mix, and then went back and smoothed it over later like with the sole edges. I think the volume of epoxy I ended up saving was on the order of half a gallon volume, maybe more. It took a lot to fill the chine gaps. Good news is they cause no problems whatsoever, and the boat is plenty stiff.
Best thing is, pieces of scrap and/or dowels are cheap.
Posted: Wed Dec 13, 2006 9:52 am
by WobblyLegs
Thanks for the reponses.
Well, I've done the dowel thing.
Stuck them down. Left them for a while. poured a thin(ish) fibre-epoxy mix over and around them. Guess what - they floated up! No worry, I managed to uses the weights with some plastic (so they didn't stick) and spacers to hold them down. Next night (yesterday) spread thicker mix over that level with the top of the sole. Done.
"Dimitris"
Aren't there any cleats at the sides of the floor?
Hi Dimitris,
No, there are no cleats on the sides of the hull in my plans, so have not put any in. The soles are 1/2" thick, so plenty of surface area to glue them directly to the sides, plus they will be taped to the sides later. Plenty strong enough methinks...
(Waiting for someone to correct me...)
T
Posted: Wed Dec 13, 2006 10:12 am
by MadRus
No, there are no cleats on the sides of the hull in my plans, so have not put any in. The soles are 1/2" thick, so plenty of surface area to glue them directly to the sides, plus they will be taped to the sides later. Plenty strong enough methinks...
Hmm... that's a good question. I put cleats around all the edges of my sole. You may want to ask this question of Jacques.
Posted: Wed Dec 13, 2006 10:23 am
by WobblyLegs
"MadRus"
Hmm... that's a good question. I put cleats around all the edges of my sole. You may want to ask this question of Jacques.
Done!
Posted: Sun Dec 17, 2006 1:41 pm
by WobblyLegs
So, after that last question to Jacques, I have now gone with cleats on the hull sides.
It's too late to do anything about it in the cabin (that's now well and truely glued down); but there is now a huge wedge of fillet mixture there between the sole and the hull. I might do two layers of overlapping bi-ax tape to compensate. No loss. It seems really strong as is.
Apart from installing cleats on the sides, the two side compartments between frames "C" and "D" are now filled with foam.
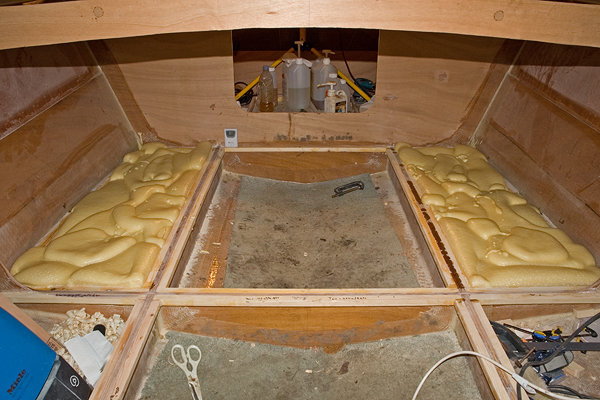
And (I might have mentioned this before) the local supermarket is getting worried that every day is my birthday....

Next, cutting and sanding, then fill the middle section.
T
_______________________________________
My (after roll-over) album:
HERE.
My album list:
and HERE.
Build on...
Wobb.
Posted: Sun Dec 17, 2006 2:28 pm
by kiwi
When you build boats every day _IS_ your birthday!
Tony
Posted: Fri Dec 22, 2006 3:55 pm
by WobblyLegs
Right, by this time on a Friday evening you should all be out the office (and therefore not surfing boat-builder sites on company time) and preparing for what ever festivities you have planned this weekend.
You should be helping your partners with all that they need help with (we know this is a busy time, says me typing while the other half is packing for a weekend away) and not checking your e-mail every five minutes (moi??) for other builders' updates and not checking the forum for new builders and builds and not checking VFR sites (moi???) for ride-outs and (you get the idea)...
So, in light of this, you should definitely not be reading this until next week when you are back in the office surfing boat building sites on company time...
So, to all of you out there, thank you for your encouragement, advice, comments, ideas, reminders, suggestions, wit and companionship this last year that is making this boat a much more enjoyable project that feels almost like a team effort rather than a builder alone in his back yard...
...all I can say is...
HAVE A GREAT CHRISTMAS
Thanks,
Tim.
Posted: Fri Dec 22, 2006 4:24 pm
by maxgsx
Right back at you Tim. HAPPY CHRISTMAS TO ALL
I won't really be doing the Christmas thing.
My wife is working all weekend and next week.
I have the suspension on my DRZ to rebuild and I've got some welding to do at my factory.
Going to have a play on a motocross track next week; let off some steam and shake my bike down; got two races in January.
Posted: Sun Dec 24, 2006 9:20 am
by nort
I guess this is also the unofficial motorcycle thread. I just bought this one on ebay, 1983 Honda Ft500 Ascot. I almost bought one when they were new, but being a newly wed with a small salary I thought better of it. Now that I am older I can indulge myself some. It is also much cheaper than that 70 1/2 Z-28 I alsways wanted.
"Img
http://gallery.bateau2.comdisplayimage.php?pos=-10474 img"
Posted: Sun Dec 24, 2006 9:37 am
by chrisobee
Posted: Sun Dec 24, 2006 5:16 pm
by ks8

This baby flies!
(baseball cards clothespinned to the front wheel... optional)
Front fender was repaired underneath by 5200'ing in a glass and epoxy molded support. Can't even tell, eh?
Posted: Sun Dec 31, 2006 4:51 pm
by WobblyLegs
I know, it's New Year's eve, I should be out, but I'd rather be building!
The mid-section of the sole is now foamed...
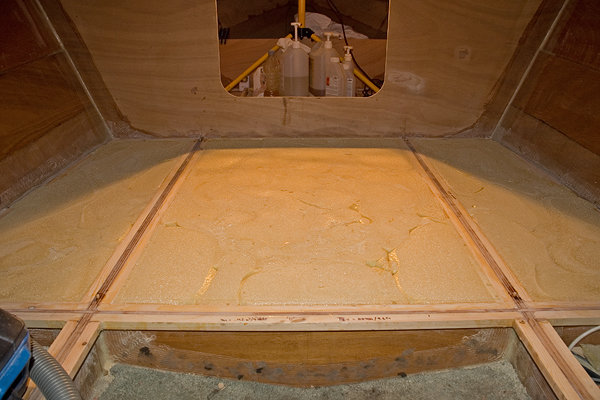
...and the sole is glued!
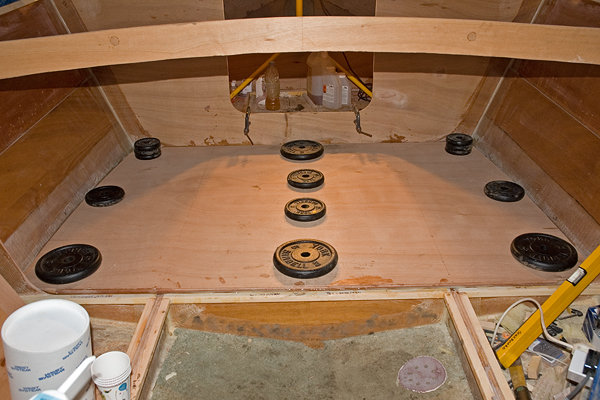
That was last night. Tonight I filled the gaps between the sole and the hull (with cleats) with a fillet mixture.
It's quite amazing how solid the whole boat is starting to feel now.
Anyway, I'll be cleaning up tomorrow in preparation for that last section... 'till then...
HAPPY NEW YEAR!
_______________________________________
My (after roll-over) album:
HERE.
My album list:
and HERE.
Build on...
Wobb.
Posted: Sun Dec 31, 2006 5:01 pm
by robbiro
Wobb,
She's looking quite good. I wish that I was as neat as you seem to be, but that is just not my nature, I guess
Great Health and Continued Joy in the New Year to you and yours.
Robbie
Posted: Mon Jan 01, 2007 11:04 am
by Lucky_Louis
Happy New Year to you and yours Tim!
Still way too bloody cold here to do any outside building. You'll be caught up
or pass me in another month.
what kind of paint
Posted: Mon Jan 01, 2007 11:34 am
by JTBear67
Hey wobbly awsome job on the painting !!!!! I was wondering on what brand did you use ??
BillTwo a down cut blade for the jig saw will produce a clean cut/with a lot of teeth..
sometimes a 1/8 or 1/4 sheet of junk ply under the area where your going to cut will stop the splinters.
PRACTICE... PRACTICE..let the machine do the cutting, don't force it
Re: what kind of paint
Posted: Mon Jan 01, 2007 2:58 pm
by WobblyLegs
JTBear67
I was wondering on what brand did you use ??
Hi Jeff,
The paint is International Perfection two part polyurethane, Royal Blue for the sides and Mediterranean White for the bottom - roll-and-tip method. Wait for a continuous week of dry weather forecast before using it - it doesn't like moisture or dew!
Regards,
Tim.
Posted: Mon Jan 01, 2007 9:56 pm
by JTBear67
I have used that two part perfection paint before, here in the us it's Interlux... Now i know why it came out so good..
Thanks for the info
HAPPY NEW YEAR !!!
Posted: Fri Jan 12, 2007 7:17 am
by WobblyLegs
So, when I went inside and told the First Mate that my boat now has a sole, she asked whether it had a heart...
So, does my boat have a soul? Does yours?
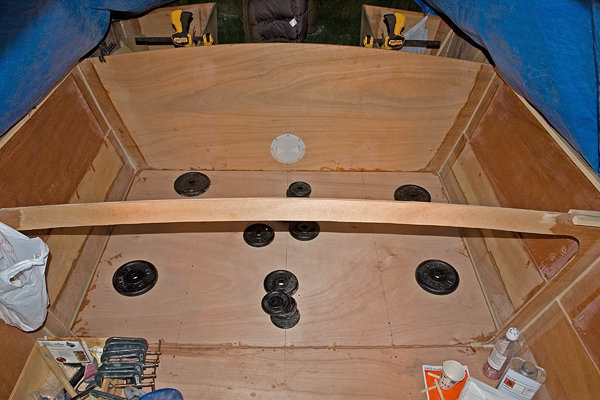
Some notes on the process -
Pouring the foam was pretty easy, but the same can't be said for levelling it off - I used a very flexible pull-saw to cut the large lumps off, and the RO sander (40-grit) to sand it down - a noisy, messy process, with bits of foam-dust sticking to everything. Hint: wear cotton clothing when doing this - polyester (like fleece) is a magnet to PU foam dust, and it's scratchy.
Still, much quicker than fairing.
Getting the sole sections down single-handedly was another headache solved by a little "Ikea" type construction: All sections have a centreline marked, so I dry-fitted each piece as and when it's turn came along, centred it, then marked the top along the centre of the stringers. Then, drilled and screwed down the sole into the centre of it's stringer section, drilled more holes for more screws, and finally a larger (6mm) hole near the end of the stringer section, for a short dowel to fit into. Lifted the sole, used 5-minute epoxy to glue the dowels (4) into the stringers (about 5mm protruding) and let set.
Mmm... I might post a piccie later when I get home to show this better.
The reason - once I got all stickey'd up with sealing the underside of the sole, laying glue on the stringers and cleats, spreading (notched) glue again on the underside (all while this is standing vertically against the cabin wall over the work area), the last thing I wanted to fiddle with was aligning the sole once laid. Hence the dowels - pull sole down from vertical, letting it lay on top of the dowels, nudge it in the right direction and it drops straight down over them, perfectly positioned. Screw down and let cure (with additional weights as you can see).
I'm guessing that I used about 30 to 35kg of foam to fill a volume of (rough calculation) around 1.3 cubic metres. According to one supplier of foam, they estimated 70kg to fill, so I reckon I did OK there.
Only the spaces under the motorwell soles to fill, then no more foam. Done.
It seems (to me) that this is the last of what I call "large tasks" to be done, i.e.
lots of epoxy to spread/brush/glue/laminte etc. to be done, large area, once you've started no stopping 'til you're done type jobs. Like glassing the hull. I'm glad it's over.
Tim.
________________________________
P H O T O - G A L L E R Y
Posted: Fri Jan 12, 2007 1:35 pm
by WobblyLegs
A couple of pics showing the alignment dowel and fastening of the sole. Red dots are dowels and green dots are screws.
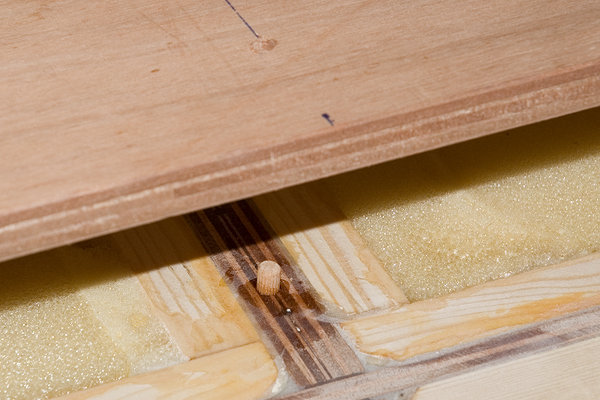
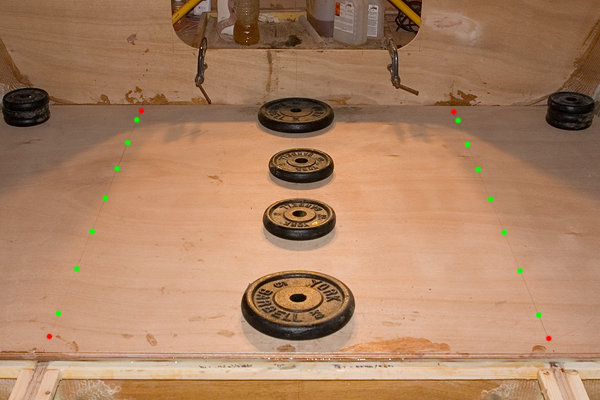
The screws will come out one day, and the holes will be drilled and filled with epoxy.
Later,
T
________________________________
P H O T O - G A L L E R Y
Posted: Fri Jan 12, 2007 3:40 pm
by baba101
What a great job Tim....thanks for sharing the Dowel idea....Its brilliant...
Posted: Fri Jan 12, 2007 3:54 pm
by Lucky_Louis
Clever git....
Posted: Fri Jan 12, 2007 4:03 pm
by Cracker Larry
So, does my boat have a soul? Does yours?
Every good boat has a soul.
That's why they're called "she" or sometimes "he", but never "it".
Posted: Mon Jan 15, 2007 7:47 am
by WobblyLegs
Another milestone (or should that be 'waypoint'?) reached - yesterday I cut my last three remaining sheets of plywood. No more. All gone. These were for the berths, fore-deck, and cabin roof. So, now I have use of the deck (garden) again, which is where it's all been stored for so long.
There are two halves of the berths here (they were clamped together for cutting/sanding the edges):
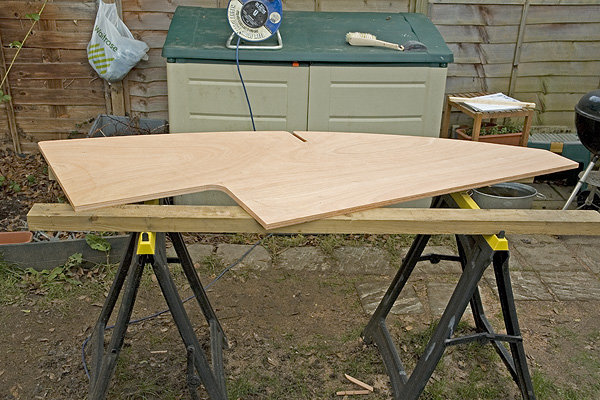
Most of Saturday afternoon was spent getting frame "A" into the right position - it kept wanting to slide down into the hull, so I eventually managed to get some strips of wood of the correct length to stay in one place and brace frame "A" against the hull, spaced from the hull with ice-cream sticks and about 10kg of weights holding it down. I finished gluing it last night:
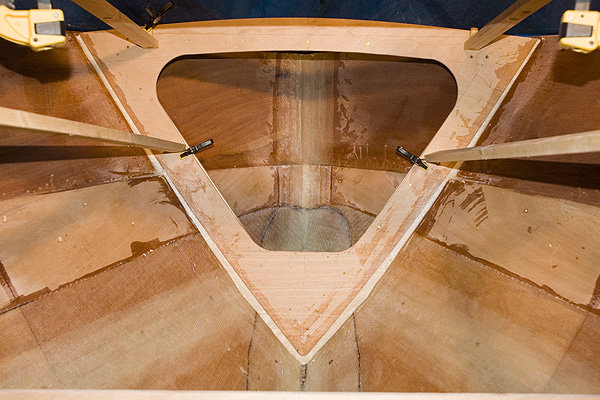
And, a view of all frames now in place:
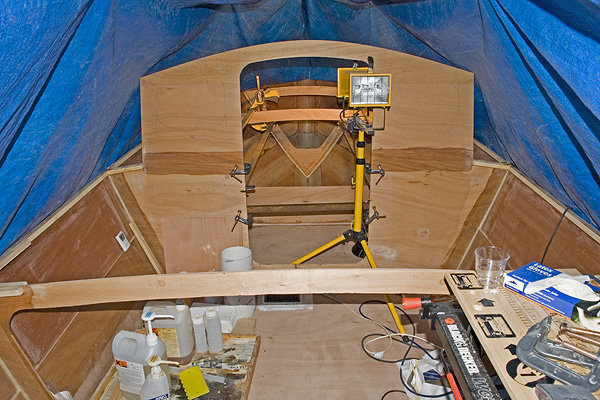
I originally started with one more sheet of 9mm than called for in the nesting, so now I have plenty of large offcuts left over for things like the sides of the berths (not included in supplied nesting) and consoles (also not included in supplied nesting). Hopefully I'll have enough.
I'm really annoyed about the fore-deck ply - I was going to try and keep the deck of the boat bright, but the
one sheet of wood that is going to show has two joins in the veneer on one side. That means that when the wood is flipped to be joined to the other half, I have one 'clean' side, and one with two different laminates. Grrr.
I'm really tempted to order another sheet...
I've got time to think about it...
Well, it's definitely a boat now and not just a hull.
Later,
Tim.
________________________________
P H O T O - G A L L E R Y
Posted: Mon Jan 15, 2007 9:25 am
by ks8
That thermometer looks familiar!
What channel is it set to? Maybe I can read it here... during some meteor scatter propagation... or bouncing off the aurora curtain...
I turned off my lights for a week while I was down in NC, and when I got back I had puddles on the floor from dew dripping off the cathedral ceiling. It was wet, drops hanging there in plain sight at noon from the night before. The tarp holds in the dry, or the wet, when the lights are off, and check the floor occasionally, if you seal it up for a week or so. Having been around England a bit, I know you are in risk of the same over the winter if you douse the lights for any length of time. So I suggest you leave one or two on as the season expresses itself. Doesn't need to be those nice worklights... just a simple regular bulb or two should keep the dew at bay.
She's looking great!
Posted: Mon Jan 15, 2007 3:04 pm
by WobblyLegs
"ks8"
What channel is it set to?
Channel 1, currrently 19.6ºC, 52% RH in the tent; 9.4ºC, 75% RH in the garden (channel 2) and 20.4ºC, 47% RH in the house (base station).
Channnel 3 is unused, only 'cos I can't think of anywhere to put another remote...
I originally got the system when I used the bike to commute (year-round) and needed to know, before venturing outside, how many layers of clothes to put on. Anything below -4ºC and half an hour on the bike rendered me practically useless for using a keyboard at work for about an hour - I couldn't move my frozen thumbs. Getting heated grips for the bike helped though...
Posted: Mon Jan 15, 2007 3:12 pm
by ks8
Don't trust the RH on those unless you cross calibrate by putting them all next to each other for a few days and make corrective charts. The temps are accurate, but the RH is terribly off, especially (so it seems) if they get dust in them. I wonder how that could happen...
Posted: Tue Jan 16, 2007 1:51 am
by kiwi
Very warm for London at this time of year. Just a thought : by the time you have finished this summer, the ice caps may have melted so you could just float it out of the garden
Tony
Posted: Thu Jan 18, 2007 5:37 am
by WobblyLegs
Anyone watch NCIS? One of the First Mate's favourites.
Character the other night says: "Gibbs, don't you ever go to movies?"
Gibbs (deadpan): "No, I'm building a boat."
I laughed so much the 1st M didn't catch the next few minutes of the show - I nearly got kicked out the room.
Posted: Thu Jan 18, 2007 7:30 am
by chrisobee
Anyone watch NCIS? One of the First Mate's favourites.
Character the other night says: "Gibbs, don't you ever go to movies?"
Gibbs (deadpan): "No, I'm building a boat."
I laughed so much the 1st M didn't catch the next few minutes of the show - I nearly got kicked out the room.
I read a story about the builder that constructed the partially built boat that they use as a set in the show. You see it occaisionally on the show. I don't recall the builders name just now.... I had heard of him prior to reading the story.
Posted: Thu Jan 18, 2007 7:41 am
by Knottybuoyz
Scroll down till you see the title: "A Frame Kit for Television"
http://www.glen-l.com/weblettr/weblette ... ter49.html
Photos of the construction are linked at the end of the article.
Posted: Sun Jan 21, 2007 3:52 pm
by WobblyLegs
OK, so I had a bit of an "oops" while clambering through the boat to take this pic (to illustrate the "close quarters" of my "work shop"); I stepped on the camera strap.
The workshop (showing the berth panels):
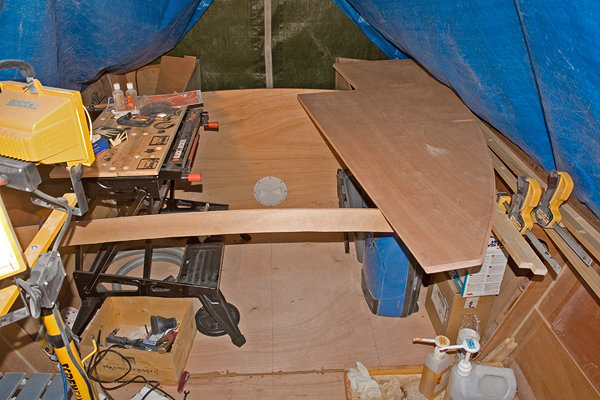
And the camera:
Well, in spite of that, that camera is still working, and I'm still building.
The cabin locker sides (under the berths) are now glued in:
(note - curves are lens distortion, not 'builder' distortion!!!!!)
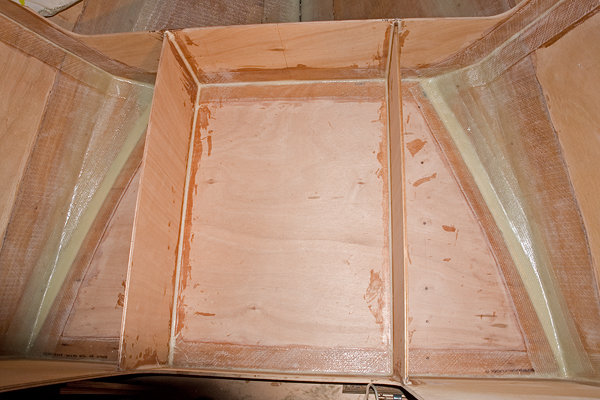
And a dry-fit of the berths:
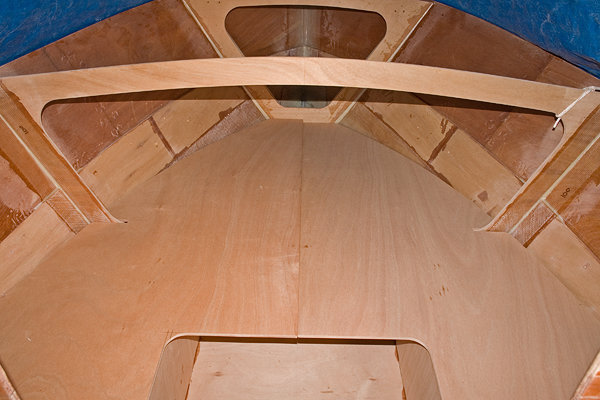
A bit saggy on the stb. side, but I probably have a week or two of cleats and tape and stuff to do before they go down which will fix that...
Later,
Tim.
________________________________
P H O T O - G A L L E R Y
Posted: Sun Feb 04, 2007 3:28 pm
by WobblyLegs
I couldn't figure out a way of joining the two halves of the berth and still managing to work with them inside the tent, so I cut them in half again! Cross-wise though. This way, I can concentrate on doing the main cabin area and then later do the fore-cabin are as a separate "project".
These are the quarters of the berths:
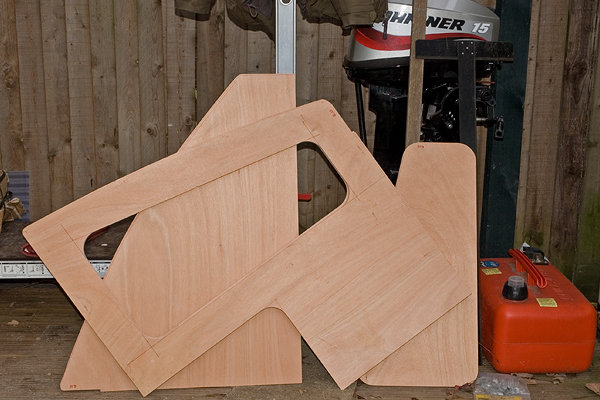
Since then I've been gluing more cleats in:
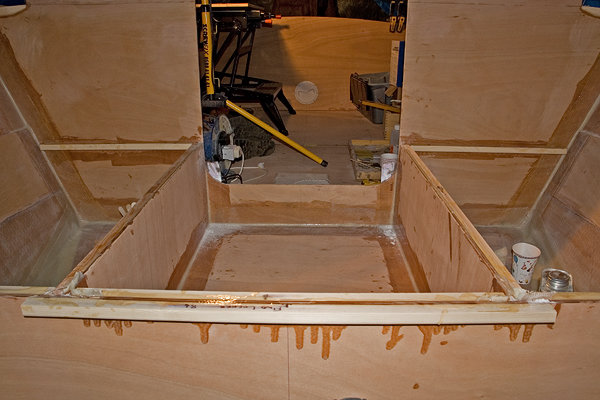
…and using my "shark fins" (thanks Yoda) to hold the hull-side cleats in place while gluing:
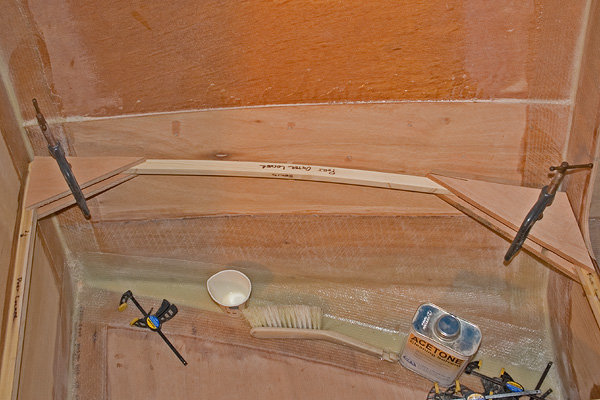
This weekend was spent playing with a jigsaw (must get a new one - this one cuts skew) and a router (never used one before - I borrowed one - now I want one!!!) preparing all the different parts of the berths and lockers:
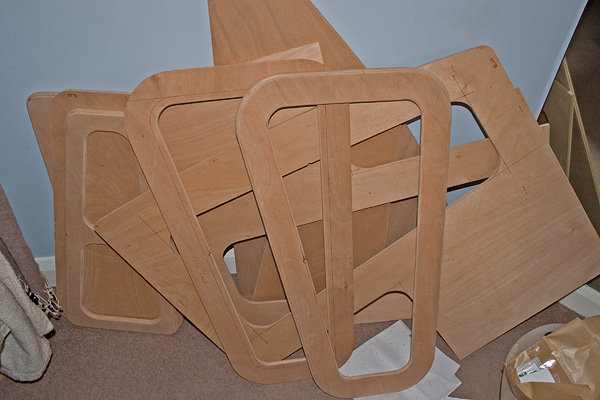
And this is how some of them fit together (looking at the undersides):
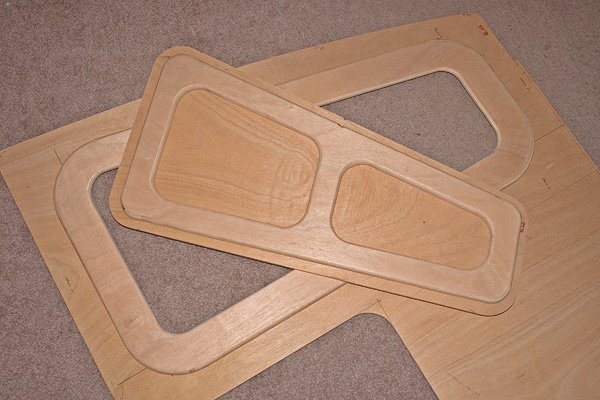
…and looking from above:

It's probably overkill with the edges to the lockers, but the way I see it, those are also benches; so when it's raining that's where the weight of us sitting is going to be. It's also where we will be sleeping, so a bit of extra support can only be good. Besides, I had nothing else planned for that wood!
I'm hoping to join the two main cabin berth halves together this week, and maybe even the cut-outs that the hatches rest on, but that depends on the weather - it's got too cold to use epoxy (it seems we had a three-month-long Indian summer here, and it's over). If not, oh well...
Anyway, only another four nights' work available before a holiday (leaving for California on Friday morning), then hopefully back to warmer weather after that and start building a bit faster. Gotta get this afloat this year.
Are there any builders in the Santa Cruz/Capitola/Monterey areas? Los Altos? Big Sur? (I won't ask about San Francisco, I usually get lost there).
I might put some more pics up before the hol's, but not likely an update. Next major work starts in march. So does BST and longer evenings of power tools to annoy the neighbours...
Later,
Keep on building,
Tim
________________________________
P H O T O - G A L L E R Y
Posted: Sun Feb 04, 2007 3:57 pm
by WobblyLegs
Oh, and a question:
I've been mulling over hinges for the locker hatches; stainless steel, brass, bronze (if you can get it) or chrome plated brass (most common, but I don't really like the idea)…
Then I thought of not having hinges at all. What's wrong with having the hatches just resting in their holes? If I'm hitting waves big enough to dislodge them (under matresses) then I have other things to worry about, right?
Your thoughts?
Tim.
Posted: Sun Feb 04, 2007 10:10 pm
by Daddy
Tim, everything you have done so far appears to be topnotch, just beautiful. I am sure we will all miss your watching your progress .....until March then. Safe journey.
Daddy
Posted: Mon Feb 05, 2007 4:21 am
by kiwi
You shouldn't need hinges. If you want to hold the tops down you can use elastic cord.
Tony
Posted: Mon Feb 05, 2007 8:20 am
by MadRus
Tim,
I just wanted to say... again... what beautiful work you're doing. It's a wonderful thing, the Internet, when we can watch work like yours (and others) from a great distance and find some inspiration and ideas. Nice job!
Are you sure you're not a carpenter by trade? Accountant? Quantity Surveyor?
Posted: Mon Feb 05, 2007 9:31 am
by kiwi
artist, master craftsman...
Tony
Posted: Mon Feb 05, 2007 12:56 pm
by ks8
Routers are grand. Makes you want to start routing everything in sight. Beautiful clean job.
Posted: Mon Feb 05, 2007 3:38 pm
by Daddy
A little caution for first time router users, take the time to get to know your machine. They can do irreparable damage to a fine piece of wood or worse in the hands of the inexperienced. Take some time to practice on scrap, read the manual and enjoy.
Daddy
Posted: Mon Feb 05, 2007 8:10 pm
by ks8
... and eye protection if no vacuum system. Those wood slivers fly everywhere!
Posted: Mon Feb 05, 2007 9:34 pm
by gk108
Those locker lids look really nice. I agree with Tony, the hinges are not necessary and might be a bit awkward when opening the lid with a cushion on it. If you feel the need to secure the lids you could laminate a third layer of plywood on the bottom outside edge that would go under the ring along that side. To open it you would have to lift the opposite side of the lid first and it could be locked down with a lift and turn latch on that side. Sort of like this lid works:

I got an old used router years ago and rounded the corners on everything in sight. After that, I started building boats so that I could round more corners with my router. Several months ago it started making a noise that is best described as a death rattle. I found a nice old Craftsman router at the pawn shop for $20. As usual, I'm looking forward to rounding the next corner...
Posted: Tue Feb 06, 2007 4:39 pm
by WobblyLegs
Hi guys,
Thanks for the compliments.
MadRus/kiwi: As to what I do, well nothing special - I take designers' artwork (all fancy colours etc.) and "fix" it so that it is actually possible for it to be printed on paper. You'd be amazed how little designers know about the limitations of print. Of course, a lot of this is for packaging (like slipcases for DVDs, perfume boxes etc. which involve creases and cutting dies) so measurement is critical - so I'm used to dealing with the numbers. On a computer, it's just a matter of typing numbers - on wood it's more a case of cutting to the line that is a challenge, rather than the measuring.
Probably my most useful "accessory" when cutting is earplugs - it means that the noise doesn't bother me so much and I can cut slower and with less effort, therefore more accurately (I'm sure you can appreciate what I mean by this "noise fatigue"). So far the neighbours haven't complained. My cutting has definitely improved since I started this project. I've gotten used to the one or two degree angle of error on the jigsaw, so finally I can cut a straight line...
In my next life I think I'd like to be a carpenter/cabinet maker. That will be in about two years' time (more about that much later).
Daddy/ks: As far as using the router - I did do a couple (barely) of practice runs before going on to the plywood. I guess I was lucky. There were a few grooves on the top of the wood, but nothing too deep that couldn't be sanded out by hand. Technical question: do you move the router so that the bit is cutting into the wood (ahead) or "rolling" with the machine (I can't think of a better way of describing it...)? And yes, I now want to round off everything in sight
The last two nights have been below freezing, so it looks like taking a holiday now has been a good idea (Feb is usually the coldest month of the year here).
gk: I like the idea of the "hooked" hatches, but for now I think I will leave them loose - I can always add the extra wood later. I think that's probably the best thing about building for yourself - when you have a case of "do I, don't I?" mosy of the time you can go with the "don't" 'cos you know you can "do" at a later stage!!
Anyway, I'm pretty much out of boat building mode for the next three weeks - probably a good thing as well! Looking forward to getting back into it though.
Keep well, and keep dreaming of your next boat!
Tim.
Posted: Tue Feb 06, 2007 6:45 pm
by Lon
"do you move the router so that the bit is cutting into the wood (ahead) or "rolling" with the machine"
Ahead, ahead. The force you exert on the router must be IN TO the wood you are cutting. Do it the other way and the router pulls. Keep it up and it will eventually grab, jump and eat the world.
Posted: Tue Feb 06, 2007 7:34 pm
by Daddy
Right, the bit should not pull you along, cut end grain first if it is lumber you are working on, never put the bit in up to the shoulder, hold it about a 1/16 away from the collett or it might work loose. Weird but true. The bits have a tiny shoulder and if the collett grabs there you cant really tighten it properly. Dont force it go slow, does a nicer job.
Daddy
Posted: Wed Feb 07, 2007 11:07 am
by ks8
Slow and even maintaining downward and inward pressure to keep all even. Too slow and you may burn wood. It will be obvious! Like anything, with technique comes confidence and faster motions. With some woods, too fast and the cut isn't as smooth, even with a brand new bit. Looks like you're doing fine! I route with the roll also, but you've got to keep that even downward and inward pressure so nothing roams. I found cheap plywood gets a better cut with the roll. But I don't do this often, so virtually no router experience compared to some of you other folks.
Posted: Fri Mar 09, 2007 10:57 am
by ks8
Encouraging any warmer weather with any further progress?
Posted: Fri Mar 09, 2007 5:03 pm
by WobblyLegs
"ks8"
Encouraging any warmer weather with any further progress?
Getting warmer. But, came back from my vac and it had apparently been really cold while I was away and my resin had crystallised, so tried warming it by putting it in front of one of the spotlights (not warm enough) and eventually decided to bring it inside and rest it on a radiator for a night and a day. All is well now!
Berth hatches and berth hatch supports were glued tonight - busy curing now. I'll go out in about an hour to scape off dribbles and stuff and also see if I can join the two (aft) berth halves together. All is prepared for it, and if I can do that tonight, it means that I can make some real progress over the weekend...
Posted: Fri Mar 09, 2007 5:16 pm
by ks8
What temps can you achieve in the tent in these winter months?
Posted: Fri Mar 09, 2007 6:46 pm
by WobblyLegs
With a fan heater on, about 10ºC above outside temp. Tonight was good, 8º outside, 19º inside.
Also, managed to join the berth halves together. Bed time!
Posted: Sat Mar 10, 2007 12:42 pm
by WobblyLegs
OK, so back on it now.
The aft section of the berths have been put together and are (nearly) ready to install. But, before I do that, some opinions are needed:
Looking at the photo, should I put this section in as is (with a bit of a support under the rear edge of the berth to stop it bending when sitting on it) or should I put a sheet of ply in to create another locker here (red shaded bits)?
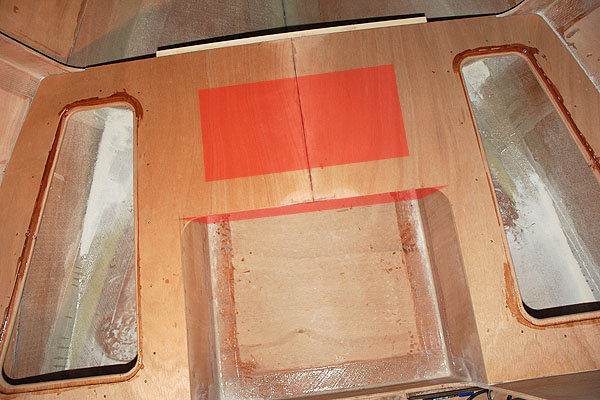
All ideas appreciated...
Tim.
Posted: Sat Mar 10, 2007 4:03 pm
by Norbas
Tim,
The boat is looking great, hope you keep up the pace!
I've looked at the study plans for the C17, I like the look of the boat a lot. I'm just wondering how you plan to use it once you're finished?
I like the idea of having a C17 for offshore fishing in the UK, but my only concern is that the roof doesn't appear to offer much protection for the pilot whilst underway. Considering the likelyhood of it randomly lashing it down here I was wondering if you plan to have a canopy or the like?
Cheers,
Dave
Posted: Sun Mar 11, 2007 12:37 am
by maxgsx
Wobbly, Re the berths.
I think I would leave that space open and accessible. You may want to just slide a box under there without having to lift cushions. If the edge is at shin height, I would thicken it up a bit and put a rad on it.
Posted: Sun Mar 11, 2007 5:26 am
by Dimitris
I would cut a hatch on top, exaclty the size of the red square. It is usefull storage space. I prefer top-loading. If you slide something under, you would have to tie it down even for the smallest trip, or it will slide out when you get on plane.
Keep up the good work. We missed you during your holidays
Posted: Sun Mar 11, 2007 3:54 pm
by gk108
Isn't that space normally used for a porta-potti that slides out for use? If not, then maybe keep it simple and put a 10 cm high plywood dam across the sole where you show the vertical panel and stuff it full of whatever. No need to cut on the top.
My 2¢.
Posted: Mon Mar 12, 2007 11:47 am
by WobblyLegs
"gk108"
Isn't that space normally used for a porta-potti that slides out for use?
Ideally that's what I'd like to use it for, but I can't seem to find one locally that will fit under there...
I drew up a hatch yesterday, and leaving a similar space around it to the side hatches doesn't allow for a very big hole...
Dave (Norbas), I'm planning to have a folding windshield/sprayhood fitted as well as a sort of bimini thingy with sides to enclose the whole cockpit for overnighting on the boat.
Posted: Mon Mar 26, 2007 7:48 pm
by ks8
Isn't that space normally used for a porta-potti that slides out for use?
Ideally that's what I'd like to use it for, but I can't seem to find one locally that will fit under there...
Make one.
But not until the boat is finished and launched.
Posted: Mon Apr 02, 2007 9:23 am
by WobblyLegs
Well, the weather is finally starting to sort itself out (the last couple of weeks has been warm and dry during the week, but cold over the weekends!)...
So I managed a bit of building this last weekend.
I have decided to make the middle area of the cabin a locker instead of leaving it open. If I need to take a porta-loo on the boat, I'll stow it in one of the side benches in the cockpit.
So, a couple more pic's of progress:
Lockers sealed with epoxy:
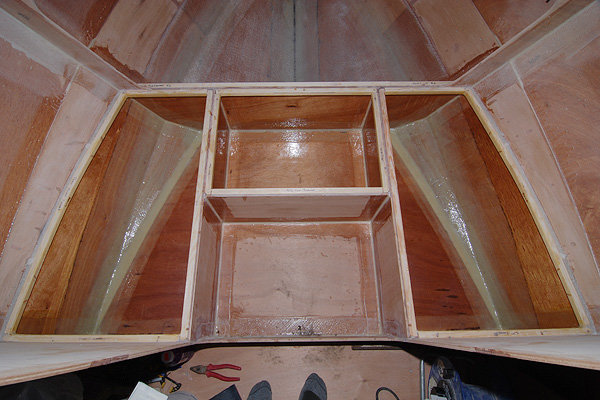
The aft section of the berths, showing the under-side, with edges and stiffening panels. They fit together nicely:
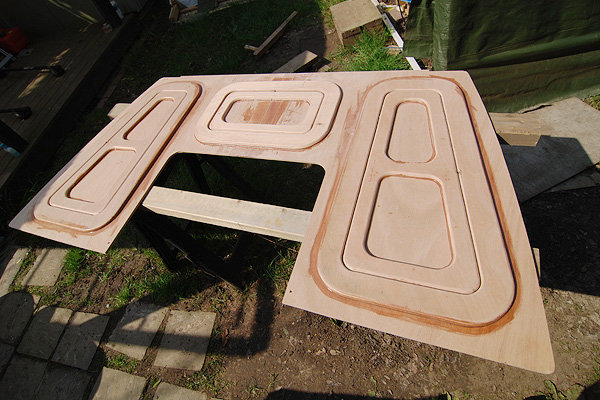
I think the cabin should be wide enough
:
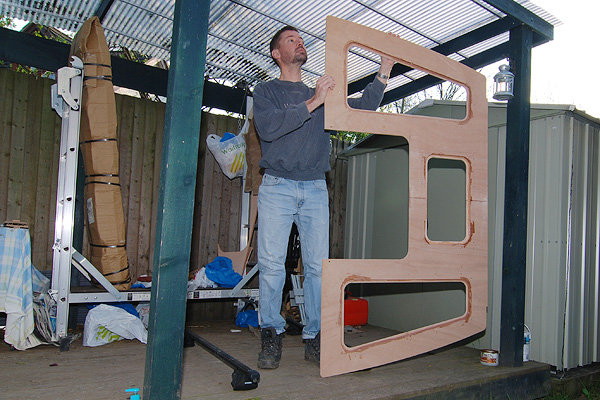
And, the berth sections glued in place:
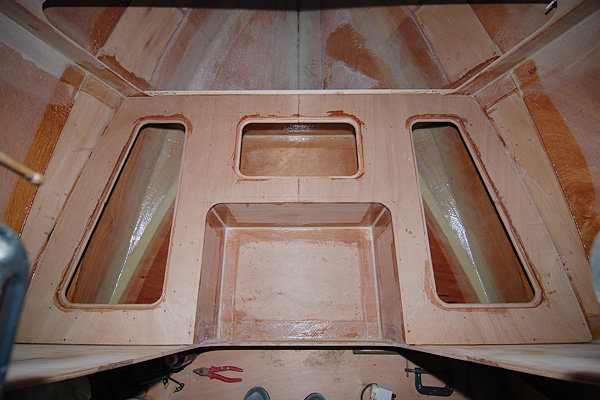
Easter this coming weekend, so if the weather is good I will have four straight days to work on the boat!!!
I'll be changing the outer tent cover. It's been leaking, but the manufacturer has sent me a new one - they said they had a bad batch. Also, I think it might be time to take out the inner tent - it seems that spring is now officially here! It will be nice to be able to work in there and stand up straight!
I'll see if I can get a pic of the whole boat from above at the time.
Later,
Tim.
________________________________
P H O T O - G A L L E R Y
Posted: Mon Apr 02, 2007 9:48 am
by gk108
That picture of the underside shows some great craftsmanship. Too bad it's all going to be hidden.
Posted: Mon Apr 02, 2007 10:06 am
by MadRus
Excellent work as usual Tim. Will it be on the water this year?
Posted: Mon Apr 02, 2007 11:26 am
by Lucky_Louis
MadRus said it - your standard of work looks great Tim. You must be getting excited that it's all coming together.
Joy of joy, it bloody snowed here yesterday. I should be mowing lawns and mixing epoxy by now. Global warming, my a$$...
Aft lockers and bilges painted on my OB17, bought the fuel tank, anchor gear, and hopefully my last gallon of epoxy on the weekend.
What size fuel tank you going to put in and where?
Posted: Mon Apr 02, 2007 4:37 pm
by WobblyLegs
Thanks for the positive comments guys...
Louis, this is basically what I'm thinking of doing (I hope Jacques doesn't mind me using his pic):
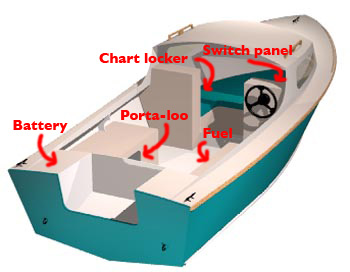
I'm going to make the benches, then find the largest portable fuel tank I can get to fit into it (or find the tank and make the benches to fit)...
Which ever is best...
Reason being, there are some (unpopular) safety cert's that are required to use boats on certain waterways here, and by having a removable tank I hope to avoid that issue. Same goes for not putting a door to the cabin - that makes it an "enclosed space" which again requires a BSS (Boat Safety Scheme) cert.
Funnily enough (or not) this only applies to the tranquil rivers; on the tidal Thames and coastal waters, anything goes...
Posted: Mon Apr 02, 2007 5:03 pm
by WobblyLegs
"MadRus"
Will it be on the water this year?
You know the expression "Come hell or high water"?
Well, that's the first mate's view of things: "Come hell or high water, this thing had better be out of my garden before the end of summer!"
High water is good.
She's joking really (I think), but I'm pretty sure there's no reason not to launch this summer. June would be good, as her father is visiting and has shown so much interest in the build that it would be good to do it when he is here.
Regards,
Tim.
Posted: Mon Apr 02, 2007 5:07 pm
by TomW
Good old government regs eh, Tim! We have several Marine supply groups that sell above deck tanks, some to 30 Gal/113 litre don't know if that would satisfy your inspectors.
Posted: Tue Apr 03, 2007 11:53 am
by Yoda
Porta-Loo......
Wobb, would you please speak English !
Posted: Tue Apr 03, 2007 4:01 pm
by WobblyLegs
Yoda - Porta-loo = porta potty = bucket = somewhere for her to pee!
How's that for a translation? For me, as long as it's downwind, I don't need one...
BTW, the first mate has been in contact with friends and family, quite literally all over the world, and has collected together a fund to buy me a new trailer for the boat for my (40th) birthday, which is today!
Good on her!
Tim.
Posted: Tue Apr 03, 2007 4:21 pm
by MadRus
Happy Birthday Tim! And a free trailer, that's a good b-day!
Posted: Tue Apr 03, 2007 4:44 pm
by TomW
Happy Birthday Tim have enjoyed watghing the build(at least since I joined the forum) and looking at previous pics. May your sailings be good and the red skys at night sailors delight.
Tom
Posted: Tue Apr 03, 2007 5:00 pm
by robbiro
Tim,
Congratulations on the build and the Birthday. I am amazed at the quality of the workmanship on your boat and I know that I have said that before, but I said it again
You are definitely looking at a Summer to remember with the new ride. Keep up the good work, and enjoy the long weekend (Here in the U.S. the state employees in Mississippi , of which I am one, are not allowed any "Easter" holidays. Something to do with the separation of church and state, which is only so much hogwash. )
Keep on Buildin'
Robbie
Posted: Tue Apr 03, 2007 5:04 pm
by AD16 The Opportunist
Happy birthday Tim!!!
Posted: Tue Apr 03, 2007 5:05 pm
by WobblyLegs
Hey,
Thanks for all that!
I really feel that this forum is a bit of an extended family!
Going to bed now (a 'couple' of beers later).
Keep well fellow builders (brothers...).
Tim.
Posted: Tue Apr 03, 2007 6:19 pm
by MadRus
Going to bed now (a 'couple' of beers later).
Wait a minute... am I just putting this together... "wobblylegs"? Duh!
Posted: Tue Apr 03, 2007 11:24 pm
by Yoda
WobblyLegs wrote:Yoda - Porta-loo = porta potty = bucket = somewhere for her to pee!
How's that for a translation? For me, as long as it's downwind, I don't need one...
BTW, the first mate has been in contact with friends and family, quite literally all over the world, and has collected together a fund to buy me a new trailer for the boat for my (40th) birthday, which is today!
Good on her!
Tim.
Happy birthday Tim. Fourty was a good age as I remember......
Posted: Wed Apr 04, 2007 3:49 am
by WobblyLegs
"MadRus"
Am I just putting this together... "wobblylegs"? Duh!
Naah, the user name was something that came to mind after a particularly hairy motorcycle commute through London when I joined a motorcycle forum, and that was how I was feeling that day when I got off the bike.
When you commute by bike, you just KNOW that car drivers are out to get you! Well, here in London anyway!
Posted: Wed Apr 04, 2007 6:39 am
by Dimitris
When you commute by bike, you just KNOW that car drivers are out to get you! Well, here in London anyway!
The same in Athens.
I commute either by bike or car and I have got
and been got
) Fortunately, no harm suffered.
Posted: Wed Apr 04, 2007 11:13 am
by Lucky_Louis
Happy b'day Tim. May you wobble for another 40 in good health.
Have you broken the news to Mrs. Wobbly that you're planning a TW35 for the garden next?
Posted: Fri Apr 06, 2007 2:23 am
by maxgsx
Appy Burfday Tim,
The weather is going to be great for a few days so crack on.
Looks like my boat is on hold for a bit. My house is falling down around my ears and as I run a builing company, it's not a great advert.
My wife supports me in all I do but I know that if I don't do some work on the house, her attitude will change.
I need to tell her about my bike trip to watch the Dakar next year but will need to do some DIY first.
Posted: Fri Apr 06, 2007 3:35 pm
by WobblyLegs
Louis, Ive had to get a whole new garden for the next boat. Not even on the same continent either!
Max, If you do a bike trip to watch Dakar, then you have to ride as fast as them to keep up, right? Why not enter it?
Anyway... I took the old leaky tent cover off today, so took the opportunity to show progress scince roll-over until now...
Before:
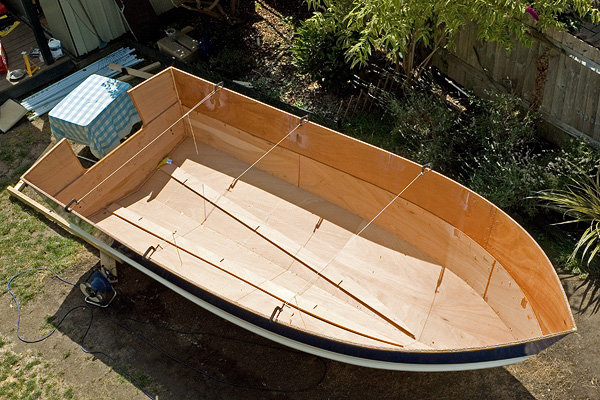
After (a fairly productive winter):
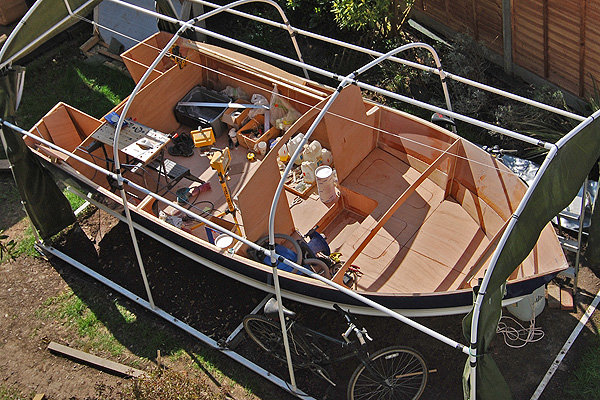
And the for'ard part of the berths dry-fit:
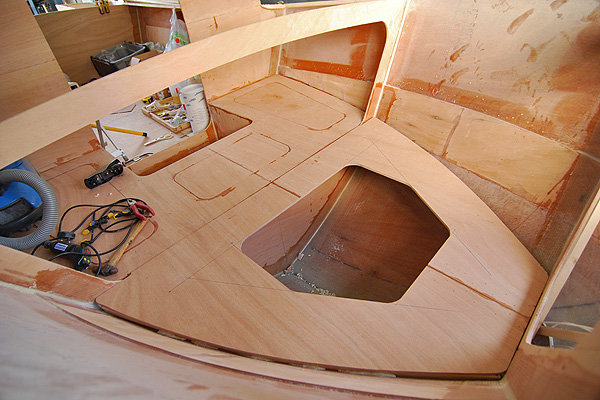
Well, that was day one of a four day weekend, hopefully much will be happening soon!
T
________________________________
P H O T O - G A L L E R Y
Posted: Sat Apr 07, 2007 12:53 am
by maxgsx
Tim,
That's looking really sweet, well done.
Regarding entering the Dakar, if you can stand me the £60,000 I would need then I'll get the forms filled in tomorrow
The trip to watch will run to about £2k and follows some of the route and meets up with the circus a couple of times.
Posted: Sat Apr 07, 2007 9:20 am
by ks8
Daylight! Looking good!
Posted: Tue Apr 10, 2007 7:44 am
by WobblyLegs
Not a bad weekend at all, although not as far along as I'd have liked...
But, the forward cabin locker is finished, with it's appropriate under-support:
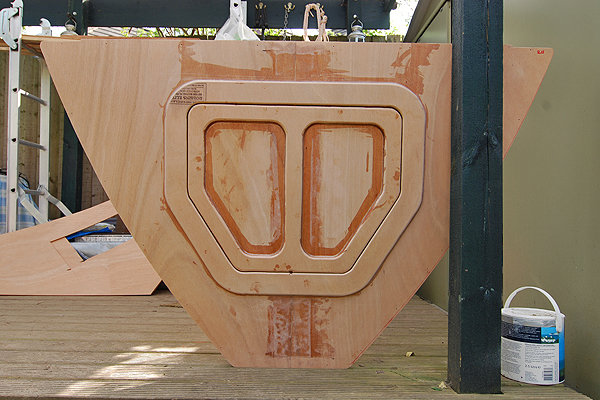
A few comments have been made about my efforts in keeping the hatch supports clean and curved and forever hidden away - there is a reason (that makes sense to me anyway) in that there will often be soft stuff thrown into those lockers like life jackets, duffel bags, sleeping bags etc., and I don't want any sharp corners inside for anything to get hooked on or to tear stuff.
And the berths are now complete, bar some filling and taping of the sides.
With hatches in place:
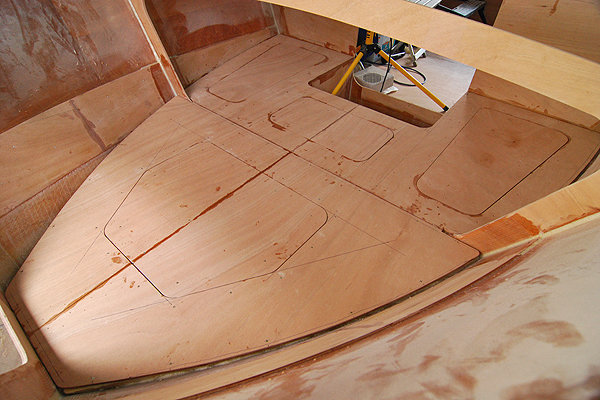
And the lockers underneath:
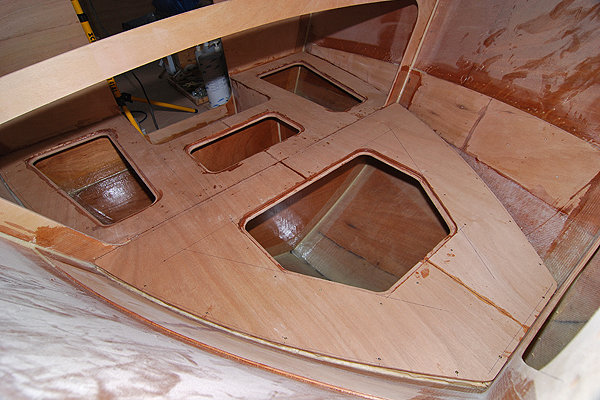
Now that the berths are glued in place the change in rigidity to the whole boat is amazing. It feels like a solid single item now, with no more flexibility from bow to stern. Even with only the forward section of the berth missing I was able to push sideways against frame "A" and get the boat to flex a bit. Not any more!
So, that's it - the interior of the cabin is now basically assembled. I'll be moving forward (again) and start sorting out the anchor locker soon.
I had hoped to get the side decks on, but had forgotten that there were still two more cleats to glue on either side before they could go on. Oh well, they are there now (glued yesterday) so now some (more) sanding and grinding to prepare for them, and hopefully next weekend I start with the deck.
I did get to cut and join the pieces that make up the side decks, so at least they are nearly ready to become part of the boat.
I think it's about time I started researching window frames and windows... I'm keen on the idea of having aluminium frames made to shape, but have yet to find someone to do it. Anyone (in the UK) know?
Later,
Tim.
________________________________
P H O T O - G A L L E R Y
Posted: Tue Apr 10, 2007 10:38 am
by Lucky_Louis
Great progress Tim, spring must have arrived for you. Thanks for always finding great angles to shoot from, I know it's not that easy.
I spent my Easter weekend re-doing my forward locker for the fuel tank. Now that I have my tank in hand, it quickly became apparent that a 36.5" object will not fit into a 36.0" space. You can add my voice to the chorus of "epoxy is stronger than wood". Thank the gods for 30 grit sanding disks....
Do your hatches just rest there by gravity or are you adding latches?
Posted: Tue Apr 10, 2007 2:11 pm
by WobblyLegs
"Lucky_Louis"
Do your hatches just rest there by gravity or are you adding latches?
Hey Louis,
For now, they will just rest there. I can always add latches, hinges, bungees, what-ever later. The joys of a self-build; you can always fix it later, knowing how it all went together.
I was thinking of you today when I did the post, wondering if I should put
"C17 in the home stretch..." at the end of it, but decided not to. These things always take longer than planned
.
Posted: Sun Apr 29, 2007 4:24 pm
by WobblyLegs
OK, things are going slowly at the moment, but they are surely going...
The berths are now fully glued in (but not taped yet) and all my tools and stuff have been moved into the cabin area to, uh, clear the decks, so to speak...
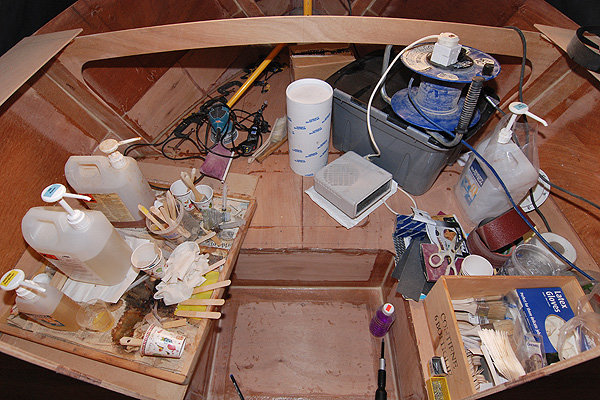
A bit cluttered in there.
And, while I'm still trying to think of a way to resolve my
air under the sole problem I've carried on with other stuff...
Sole taped to the hull now:
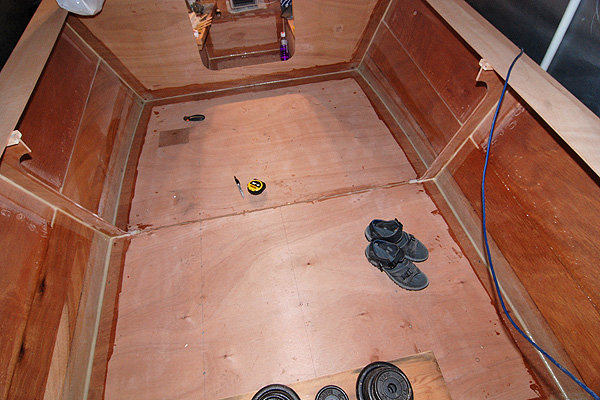
And I now have a deck too (well two side decks):
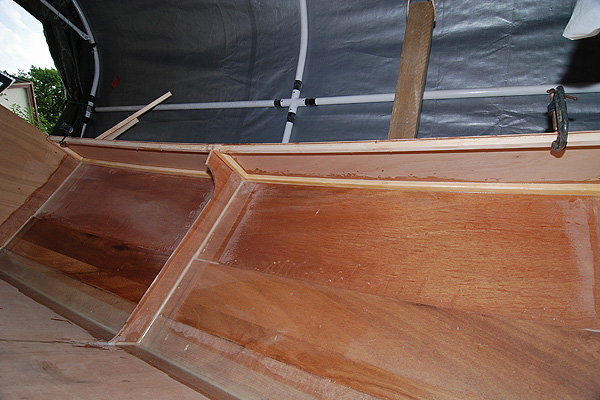
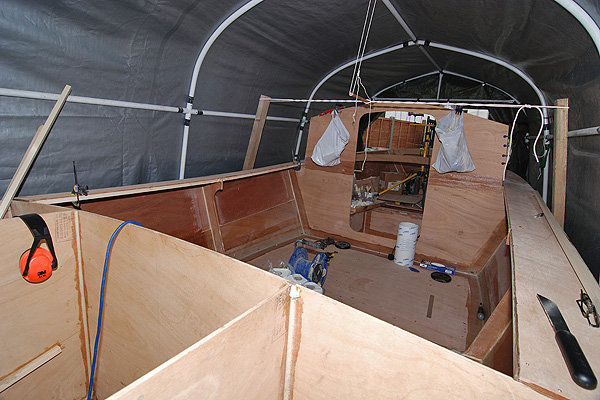
Oh, and have also added cleats to go under the fore-deck:
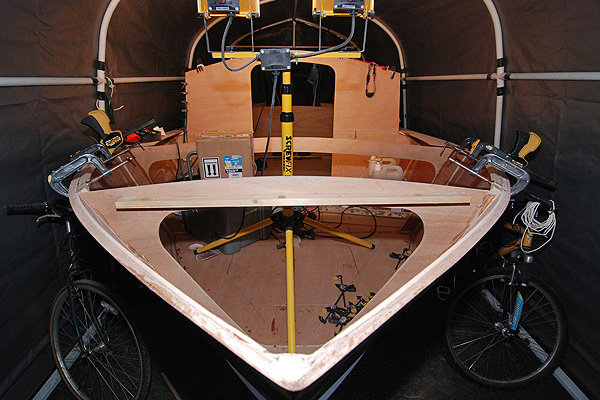
really enjoying playing with my new really-wide angle lens here!
Oh, and the bicycles live in the tent now 'cos there's no space in the shed. Prolly somat to do with the shed being full of pieces of boat!
T
________________________________
P H O T O - G A L L E R Y
Posted: Sun Apr 29, 2007 4:49 pm
by Dougster
Great pictures and impressive work. You're making it look easy! I know better of course. That's gonna be a lovely boat for sure.
He sure does know better Dougster
Posted: Mon Apr 30, 2007 12:36 pm
by Lucky_Louis
Looking great Tim. Amazing how once the weather turns to spring, our building energy levels go way up too. Does your design switch from 6" biax tape to 4" weave above the sole?
Posted: Mon Apr 30, 2007 1:17 pm
by ks8
We need a picture of you in there, for a sense of scale in your roomy beautiful 17 footer!
Posted: Mon Apr 30, 2007 3:04 pm
by WobblyLegs
Lucky_Louis wrote:Looking great Tim. Amazing how once the weather turns to spring, our building energy levels go way up too.
Yah, but since my holiday (first proper holiday in a few years) I've been struggling with motivation - I know I want to finish, but I keep finding myself procrastinating, although I've been getting better that last few days...
Lucky_Louis wrote:Does your design switch from 6" biax tape to 4" weave above the sole?
For most of it, yes - I have used biax to tape the sole to the sides, but the berths and cabin are weave. Also, it seems the decks are only glued to the cleats, but I might put some light tape there...
ks8 wrote:We need a picture of you in there, for a sense of scale in your roomy beautiful 17 footer!
Have another look here in about an hour's time!
Posted: Mon Apr 30, 2007 3:41 pm
by WobblyLegs
ks8 wrote:We need a picture of you in there, for a sense of scale in your roomy beautiful 17 footer!
Here you go...
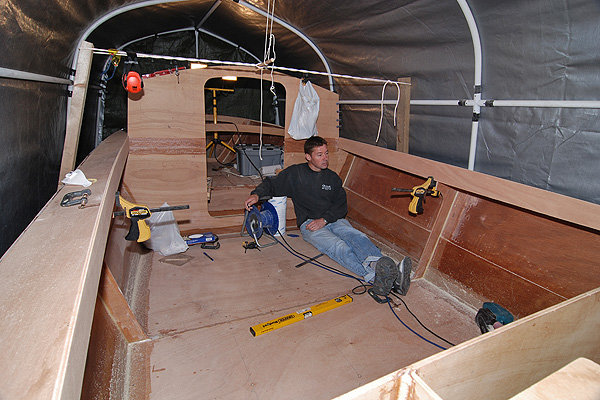
That twisted rope above me is my form of a very long clamp to pull the sides in a bit as they were bulging out a little.
And, no, I don't know why I was staring at a clamp when the self-timer decided to go!
T.
Posted: Mon Apr 30, 2007 3:59 pm
by robbiro
Just being
. T the boat is looking great and I am still impressed with the quality of work. She is a BEAUTY
Robbie
Posted: Mon Apr 30, 2007 7:18 pm
by ks8
I was going to say that *watched epoxy never cures*, but when you want a slow cure, it usually goes off too fast if you are staring at it!
Posted: Tue May 01, 2007 2:44 am
by fmiles
picture looks good, boat look HUGE!
I still cant get over how neat and fair everything looks. Either you're in the trade and do this for a living, or one skilled lucky bugga!
You gonna be on the water this year?
Posted: Tue May 01, 2007 2:56 am
by maxgsx
Tim,
That is a bloody big 17ft boat and you are indeed doing a splendid job !!
Did you manage to source some decent ply locally ??
Laters
Posted: Tue May 01, 2007 3:46 am
by kiwi
Here I am in the land of ply or so I thought. I inquired locally about marine grade okoume and the price here is 3X the price paid up north
I am going to buy a trailor and go and get it myself at the factory. The price difference on two sheets covers the cost of petrol.
Tony
Posted: Tue May 01, 2007 8:36 am
by gerry
Hi Tim,
Your boat is pretty awesome, it is going to look great on the water
Gerry
Posted: Wed May 02, 2007 10:28 am
by WobblyLegs
Thanks for the comments.
fmiles:No, not in the trade; just slow - I probably spend more time staring at the boat, putting stuff together in my mind several times before mixing epoxy than I do actually building it. I would never make a profit at the rate I work!!
The First Mate is forever saying "just do it" and says (jokingly, I hope) that I'm being anal.
All the fillets get left for a day or two and then ground smooth and sanded before taping - it's usually quite a mess before the RO sander comes along and tidies it up a bit. The two most used tools are my RO sander and Dremel!
maxgsx: No luck on local ply - I guess it's Robbins again. It looks like I need a minimum of two more sheets of 9mm to finish benches and console. I'm busay doing drawings of everything left to do so that I don't have to make any further orders.
Cockpit side coamings were dry-fitted last night - to be glued tonight.
Tim.
Posted: Wed May 02, 2007 4:21 pm
by WobblyLegs
fmiles wrote:You gonna be on the water this year?
Absolutely!
btw, you're not a Mitsi Pajero/Shogun owner are you? Saw a post by the same username today on their forum (post not made today)...
And, the cockpit coamings are now glued in...
Posted: Wed May 02, 2007 5:03 pm
by WobblyLegs
WobblyLegs wrote:And, the cockpit coamings are now glued in...
With pic's...
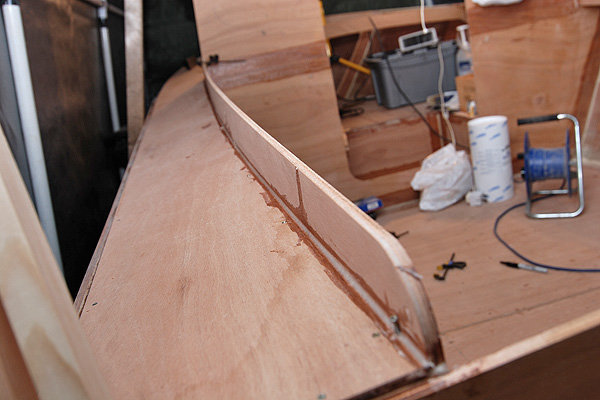
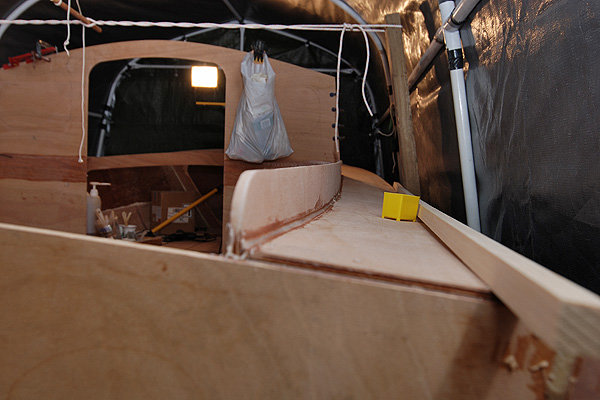
Posted: Thu May 03, 2007 2:16 am
by fmiles
You got me, one and the same. Pajero rules!
Posted: Thu May 03, 2007 4:06 am
by molaine
Tim, looking good as always...and big, even considering the wide angle lens
. I can still only judge the size of my future boat squatting on the inverted bottom.
Have you decided on a motor yet (sorry if I missed that in the thread)? The bottom V is quite moderate on the C17, I'm thinking I might do with less than the recommended 50hp.
Really waiting to see your boat float!
Posted: Thu May 03, 2007 6:28 am
by WobblyLegs
fmiles wrote:You got me, one and the same. Pajero rules!
I've only got a little one - just traded a 1.8 MPI Pinin for a 2.0 GDI lwb Pinin and I was reading up about valve coking, wondering if I did the right thing. Time will tell...
Even the number plate was right (bought used, this was the plate that came with it!!!)

molaine wrote:Have you decided on a motor yet (sorry if I missed that in the thread)? The bottom V is quite moderate on the C17, I'm thinking I might do with less than the recommended 50hp.
I've been thinking about it quite a bit, reading reviews etc ever since I started building, and keep coming back the the Evinrude E-Tec, and will probably go with the recomended 50hp. The 40/50/60 all use the same mechanicals, and it seems a bit heavy for 40, nice for 60, good compromise for 50...
Posted: Thu May 03, 2007 9:37 pm
by Dougster
You know I've been wondering about the E-Tec 40 for my LB22, but have thought it seems a bit heavy. It's early times for me still so I need to read some more, but they do seem appealing. Your build just looks terrific. Gotta be exciting to see/feel it come to life for you.
Likin' that boat Dougster
Posted: Thu May 10, 2007 8:23 am
by WobblyLegs
Moving along steadily at the moment, working one area while another cures, a little bit here, a little bit there, and by the end of another week a whole lot seems to have been done.
So, a few more pics for you all out there...
Sometimes clamps are a bit difficult to use, or don't suit the task, such as the cockpit coaming where the curve of the wood didn't quite follow the curve of the deck. Almost, but not quite. So, screws it is, start at one end, screw in so that the bottom of the coaming is flush with the bottom of the cleat, move to next screw, make flush (sometimes pushing the deck down slightly, sometimes lifting it slightly) until all screws are in. Mostly it was pushing down as the cleats under the deck were trying to force the deck to "flatten out" between the frames. With the screws I was able to correct this and get a nice continuous curve. all along the cockpit.
The only problems is that they leave holes, which when they are horizontal are a bit difficult to fill...
So, drill 'em (6mm), fill 'em (squirt ketchup with syringe) an' plug 'em (dowels)...
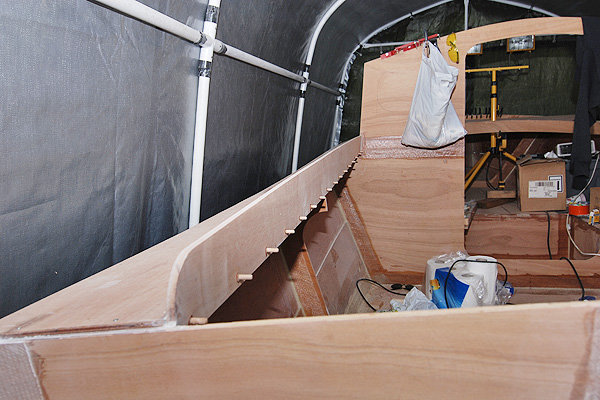
After that, cut and sand them...
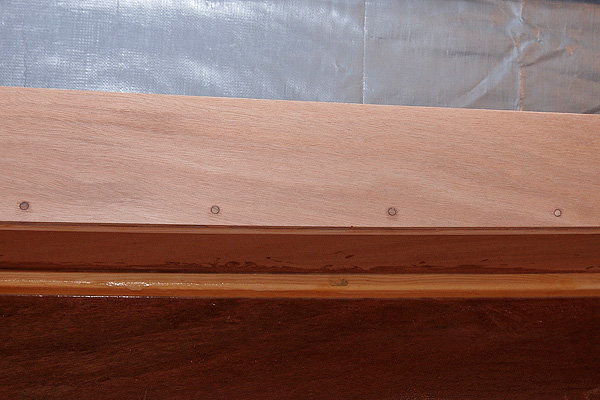
Other places progressing are at the bow, where all taping has now been done, and all the cleats on the hull are done...
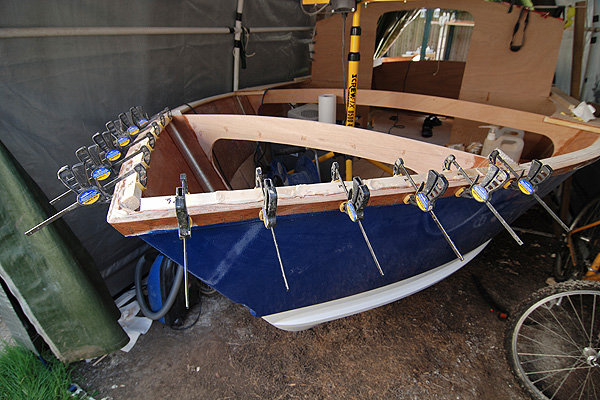
...and the stern, where the motorwell lockers have been taped and cleated (cleats on the transom went in last night)...
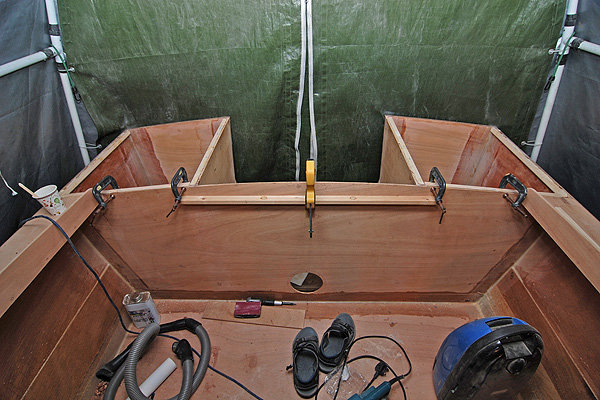
...and all has passed inspection...
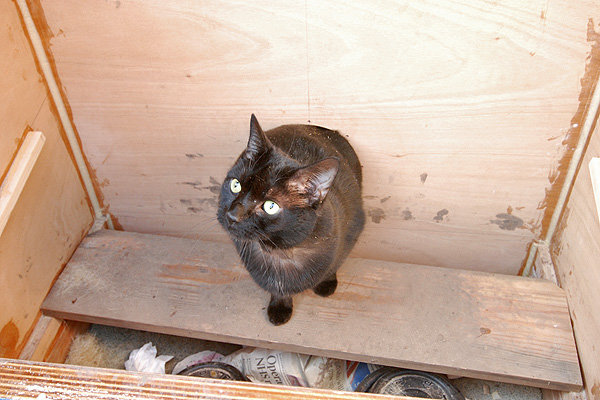
Frame "B" has it's last cleat (frame to deck) in place. Only frame "A" to go. I have to finish a base to the anchor locker and backing plates for the bow eye and then I can start looking at putting the fore deck in place...
In the meantime, I have two more (my last?) sheets of 9mm ply arriving (Max, Robbins only charged me twenty quid delivery this time) tomorrow, so I'm also going to be able to start on the benches and a console soon. I think it's getting to that time where I need to start sourcing some "proper" hardware, such as a steering system, so that I can make sure everything fits and bends and move smoothly etc. Mmmm.
The one difficulty I'm having at the moment are the windows - I wanted aluminium frames, but every factory I've contacted want to send me a cutting template. When I tell them that I wanted it to fit my holes (not the other way around) with curved edges, I never hear from them again. So, no frames. I don't want to screw windows flat against the outside of the cabin 'cos it looks ugly, so my next thought is maybe to use rubber seals like on (old) car windscreens... Any thoughts anyone?
There's a few more pic's in the gallery...
Building season is most definitely here!
Tim.
________________________________
P H O T O - G A L L E R Y
Posted: Thu May 10, 2007 9:12 am
by fmiles
having the same problem, mine is a bit more complex. Trying to fabricate a windsheild, want it done properly, so having to go down the commissioned Stainless route..
anyhow, This might help your cause
http://www.technix-rubber.com/windowrubber.htm
Posted: Thu May 10, 2007 6:35 pm
by Salty Dog
http://www.motionwindows.com/marine-windows.php
Perhaps they have a UK affiliate that they could refer you to.
Gem of a project, you've done a wonderful job, getting close.
Cheers,
S.D.-
Posted: Thu May 10, 2007 8:06 pm
by robbiro
Tim,
Glad to see that I am not the only one that has a black (or black and white) cat inspect my work, He is finicky, but does not help in any way except when I leave the sander plugged up and he decides to work after midnight. The build is really coming on, Keep Up the Good WORK.
Robbie
Posted: Thu May 10, 2007 8:27 pm
by ks8
I have my shop vac plugged into a surge strip in the boat so I can easily turn it on and off. I forgot to pull the plug on the surge one night, and woke up at 3am hearing it whining away to wake the dead. Some *inspector* probably stepped on the switch in there. I have had several evening guests already. The birds leave a mess. The chipmunks are easy to clean up after. The cats and squirrels like to *play* and knock stuff about.
The boat is looking great Wob. Nice way to tweak the curve using those screws. I reapplied the caprail masking 4 times until I got a nice fair curve.
Posted: Thu May 10, 2007 9:33 pm
by Cracker Larry
Love the cat
Beautiful work
Posted: Wed May 23, 2007 11:05 am
by WobblyLegs
Motorwell locker decks are in place, but only screwed down - it seems the best place to store them and gives me a raised "work surface" to store my epoxy "mixing station" on while I work up front...
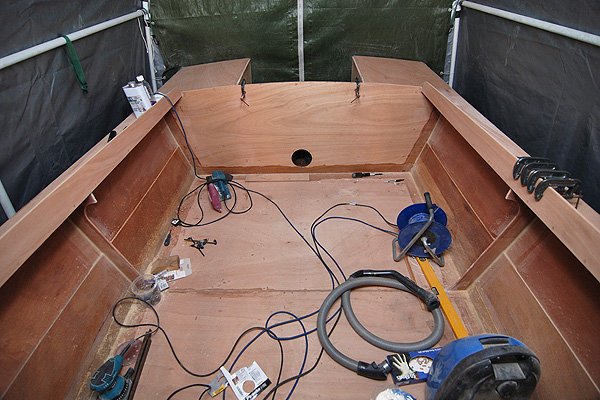
I don't know what the rest of you do with power cables, but they really get in the way sometimes, and it's a hassle to roll them up every time I put one tool down to pick up another. Not tripped over one yet though.
Backing plates for the bow-eye are in, with two overlapping layers of tape sealing/protecting them...
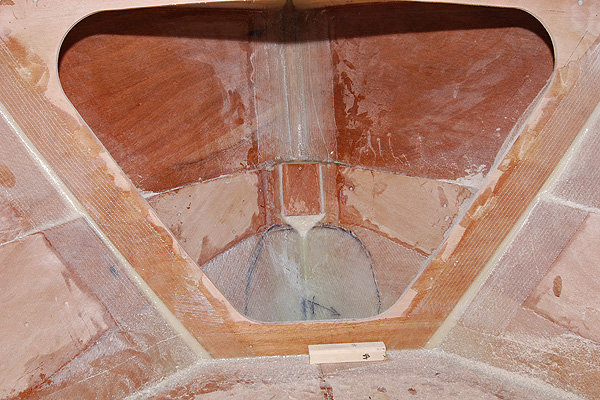

Looking at the two pictures above, you should be able to see that I have added a piece of ply into the lower cut-out part of frame "A". Top pic without, bottom pic with new piece. Reason being, in order to put a drainage hole in the hull as per plans, the base of the anchor locker would force this hole to be drilled right through my spray rail. I didn't want to do that! So, to move the base up a bit, I had to add to the frame to let me put a cleat on it, as well as to give a decent lip so that nothing comes falling out when I open the hatch that is going there.
Make sense?
So, that's the building of the anchor locker is pretty much done now, covered with bi-ax. If you look at the next picture closely (lower right hand side) you might be able to see the glue-line where I added the section into the frame.
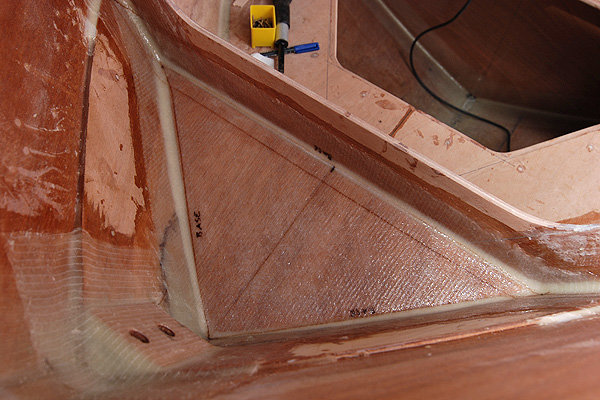
It's getting really hot in my tent at the moment - yesterday I got home to find that it had peaked just over 37ºC/98ºF in there yesterday (25/77 outside), and any epoxy work done the previous evening was really hard. I'm starting to think of it as a "post-cure" oven. Pretty much ideal working conditions right now. I'm enjoying it while it lasts.
As an aside, I splashed out on a new jigsaw last week to replace my skew-non-vertical-cutting Black and Decker. A top of the range Bosch. Wow! I wish I had bought one ages ago - it's (relatively) quiet, more powerful and an absolute dream to use. I always thought it was the blade that did the work, but this thing cuts so fast I might even dump my circular saw. Not worth the hassle of unwinding another cable.
And no, don't tell me to get cordless - the only thing I've had that needs charging was always flat when needed. I eventually threw that cordless screwdriver away...
Also, spent quite a bit of last weekend drilling and plugging screw-holes in the berths and berth hatches and cutting the plug-ends off. Just over a hundred of the things!
And, I cut out the back part of the console (as per plan dimensions) to find that it don't fit. Oops. Double check. No, it's right. If I lay it up against the back of the cabin it extends from the edge of the doorway across to the side of the hull. But, if I move it back about 200mm (as per plans and space needed for steering) the hull has "moved out" about 20mm by that point. It looks to me that the console drawing is taken from a section from frame "C" and doesn't take into account the fact that the hull is still getting wider at this point. No worries, easy to fix, but only by moving the whole console toward the side (no longer flush with the door) if I'm to use that piece of wood. Thinking about that, it might be better this way, giving a lip around the doorway that I can use for hinges if/when I decide to hang a door there.
Well, that's about it for now. Another couple of hours and I'll be playing with my saw again
I'm guessing now that when I get home, my tent will have peaked over 40º today - very warm and sunny out today!
Keep on building,
Tim.
________________________________
P H O T O - G A L L E R Y
Posted: Wed May 23, 2007 11:40 am
by Lucky_Louis
Bravo Tim, thanks for the great update. Your work continues to be exemplary.
Sounds warm over there, still coolish here at 12-18C days. With my corded tools, I try dropping power from the overhead to keep cords off the deck. Works for most part.
Where does your anchor locker drain to? I didn't see any drains listed on my OB17 plans or building notes (not saying they're not there). I figured I could drill a hole to drain through the stem just below the bow eye. My locker is accessed through the top so even if the compartment floods, there would be less than 50 liters trapped in there
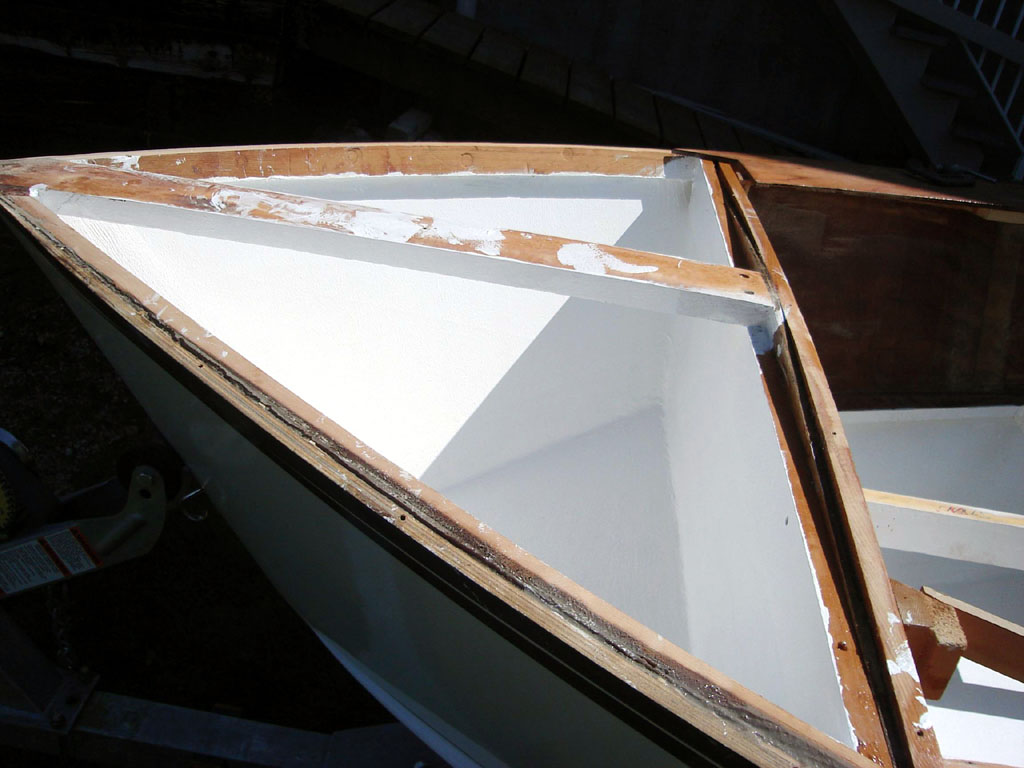
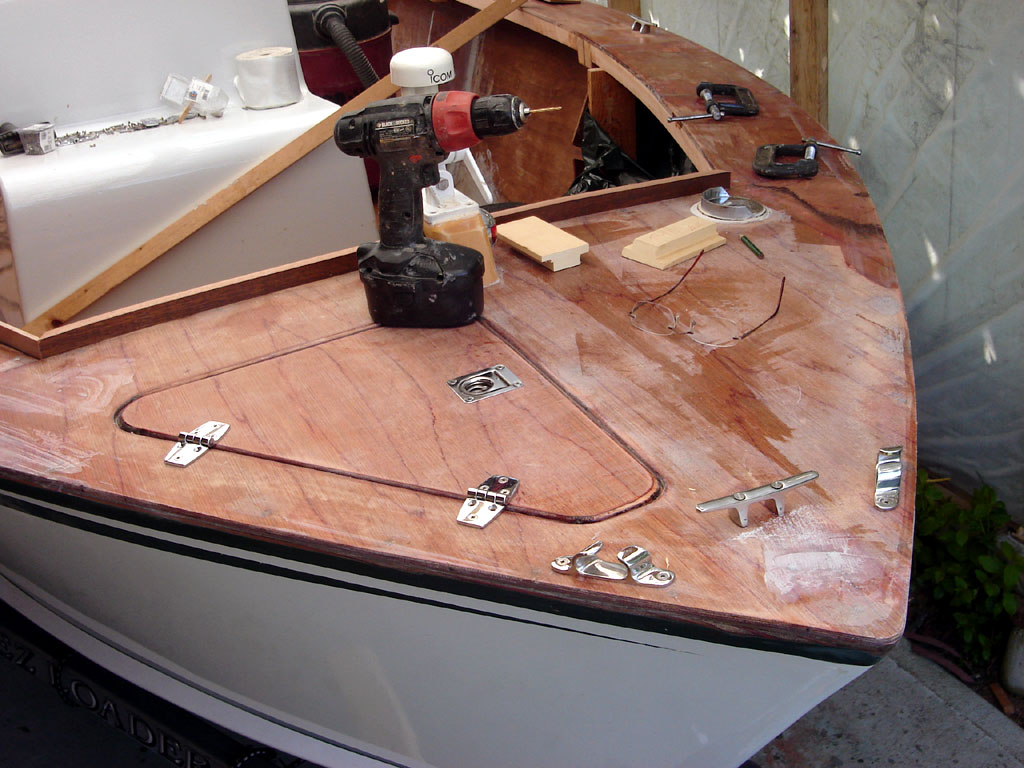
Posted: Wed May 23, 2007 4:46 pm
by WobblyLegs
Thanks Louis,
Lucky_Louis wrote:Where does your anchor locker drain to?
I'm going to drill a hole in the side, near the front, for drainage - where the red dot is (explains why I moved the base of the locker up too!)...
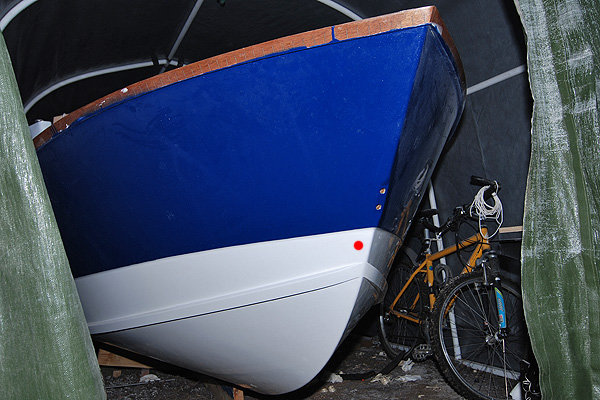
...and then put one of these over it, 45º downwards and backwards, so that if (when) I punch through some waves, it will stop most of the water going into the hole:

I was right in my earlier prediction - it hit just over 40ºC/104ºF in the tent this afternoon. Baking!
And, cut out the bench sides this evening too. Me? Happy?
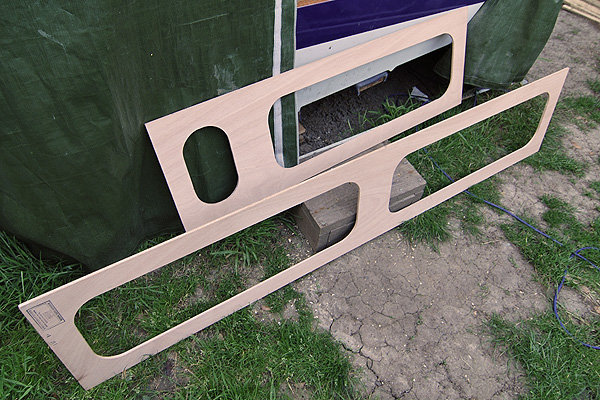
Your fore-deck is looking very, very nice!!!
Regards,
Tim.
Posted: Wed May 23, 2007 5:50 pm
by Lucky_Louis
Thanks Tim. I never would have thought of mini-clamshell vent. Makes more sense than what I was gonna do. I wanted the option to stuff a garden hose in there when we get home to rinse the salt, mud, sand and little critters out of there without having to bail ot the locker everytime.
Posted: Thu May 24, 2007 2:26 am
by kiwi
WobblyLegs wrote:
...and then put one of these over it, 45º downwards and backwards, so that if (when) I punch through some waves, it will stop most of the water going into the hole
I would also look at some kind of plug for rough weather when you might not be moving at speed in choppy water.
Please tell us which model saw you got. Your cutouts have us all drooling now.
Tony
Posted: Thu May 24, 2007 4:38 am
by Dimitris
I think that for safety and cosmetic reasons you should completely separate the anchor locker from the cabin. In a rough sea, if your anchor hatch at bow ever fails, or opens accidentally, the cabin would flood very fast.
Posted: Thu May 24, 2007 4:42 am
by WobblyLegs
kiwi wrote:Please tell us which model saw you got.
Hi Tony,
It's the "GST 135 BCE Professional" - I'll try to link it
here.
Tim.
Posted: Thu May 24, 2007 4:48 am
by WobblyLegs
Dimitris wrote:I think that for safety and cosmetic reasons you should completely separate the anchor locker from the cabin. In a rough sea, if your anchor hatch at bow ever fails, or opens accidentally, the cabin would flood very fast.
Good point. And easy to do.
T
Posted: Thu May 24, 2007 9:47 am
by Daniel Huckleberry
Hey Tim
I am planning on doing the same drains on my sled in the bow lockers . One thought, unless you've already drilled the hole. You might want to move the drain to the aft end of the locker as this end (in theory) will be lower than the bow when the boat is moving.
Just a thought.
Huck
Posted: Thu May 24, 2007 10:19 am
by WobblyLegs
Hi Huck,
Not drilled yet, but the base of the locker slopes down forward quite sharply - I'd be falling off the back of the boat before it becomes level.
The plans show it at about 90º to the stem of the boat - mine's not quite there, but it'll do.
Tim.
Posted: Thu May 24, 2007 11:12 am
by Daniel Huckleberry
Should have known you'd worked it all out, just didn't want to let you overlook that one as sometimes the simplest ideas become lost in the complexity of a project (or run-or sentence).
Huck
Posted: Thu May 31, 2007 7:14 pm
by BillTwo
WobblyLegs wrote:Moving along steadily at the moment, working one area while another cures, a little bit here, a little bit there, and by the end of another week a whole lot seems to have been done.
Hi Wobbly,
This is Billtwo and back in business (or soon will be).
I'm now playing "catch-up" by looking at both Lucky's OB17 (which I am building) and your C17. Both of you are building your boats as if you do this for a living. I know there's been a lot of time lost since I last touched my boat, but I'm back into it now. I know that I want catch up to you Guys, but the quality of work along with you all's progress has inspired me enough to stay motivated until I complete my boat. I have not created nor want to create a schedule - I just want to get my boat built with the same quality and workmanship.
Wobbly, I hope you don't mind me asking questions on past tasks that you've completed. I need to play catch up and between you and Lucky, I'm hoping to get the information that I need to continue my build.
Question:
1. Do you remember what you used for your "peanut butter" mixture for fairing your Hull and did you do the complete hull with peanut butter?
Thanks
Billtwo
Posted: Fri Jun 01, 2007 4:28 am
by WobblyLegs
BillTwo wrote:1. Do you remember what you used for your "peanut butter" mixture for fairing your Hull and did you do the complete hull with peanut butter?
Thanks
Billtwo
Hi Bill, welcome back.
I saw your post on Louis' thread - good luck with the new career!
All the stuff I'm using is West (I know, some will ask why, but it's the easiest most consistent supply I can get here) and the fairing mixture is epoxy mixed with their "Low Density Filler 407." It's hard stuff to mix, and for fairing I ended up with a pretty reliable ratio of four tablespoons (plastic disposable) of filler to one pump each of resin/hardener. Test it though.
Also, mixing sticks won't be strong enough - you'll need to make your own. I used scraps of 6mm ply, long enough that my hands were clear of the mixing tub when stirring. My wrists ached after each mix.
It's easy to spread though...
Anyway, glad to hear that you're getting back to your build. Good luck and enjoy.
Tim.
Posted: Fri Jun 01, 2007 8:16 pm
by BillTwo
WobblyLegs wrote:
Hi Bill, welcome back.
I saw your post on Louis' thread - good luck with the new career!
All the stuff I'm using is West (I know, some will ask why, but it's the easiest most consistent supply I can get here) and the fairing mixture is epoxy mixed with their "Low Density Filler 407." It's hard stuff to mix, and for fairing I ended up with a pretty reliable ratio of four tablespoons (plastic disposable) of filler to one pump each of resin/hardener. Test it though.
Also, mixing sticks won't be strong enough - you'll need to make your own. I used scraps of 6mm ply, long enough that my hands were clear of the mixing tub when stirring. My wrists ached after each mix.
It's easy to spread though...
Thanks for wishing me well in my new career. Its just now taking out more money than I'm bring in at this time, but it should pay off in the long run.
Well I have some pre-blended Phenolic Microballon & Silica Thickener that can be used for fillets and fairing compound. Before I use it on my Hull, I'll make a small sample batch first to see how it works on a scrap piece of plywood. I'll glue 2 paint stirring sticks together and that should be strong enough without breaking (I guess)
Wobbly, it does me good to be able to go back into the Builder's Gallery and look at your pictures on the progress of your C17 and Lucky_Lou's OB17. It an inspiration to anyone who is considering building their own boat. Not to slight any of the other builders on this forum - its just I've connect with the 2 of you.
Regards,
Billtwo
Posted: Mon Jun 04, 2007 5:52 pm
by WobblyLegs
BillTwo wrote:Before I use it on my Hull, I'll make a small sample batch first to see how it works on a scrap piece of plywood.
Yeah, I always test a new mix somewhere and leave it for a couple of days before trying it on the boat - you should see my wooden fence - it's got patches of epoxy, fairing, fillet, you name it. All in the interests of making a stronger fence of course!!
Quick update...
All the woodwork in the anchor locker is finished. Dimitris - I've thought about your suggestion about keeping it sealed, but for now I'm going to have a hatch there, and none on the deck; that may change after using the boat. Isn't that the greatest part of building your own boat - knowing how it goes together and what can be modified later?
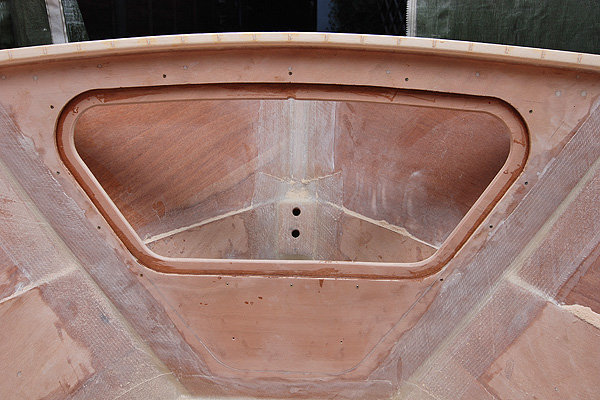
Also, started building the console - horizontal on the top (for GPS mount), 45º "dashboard" for the instruments, vertical face for the wheel and finally a 60º face to allow legroom underneath - I might revisit my short bench and extend it a bit - again, the joys of building/modifying!
With an access panel from inside the cabin...
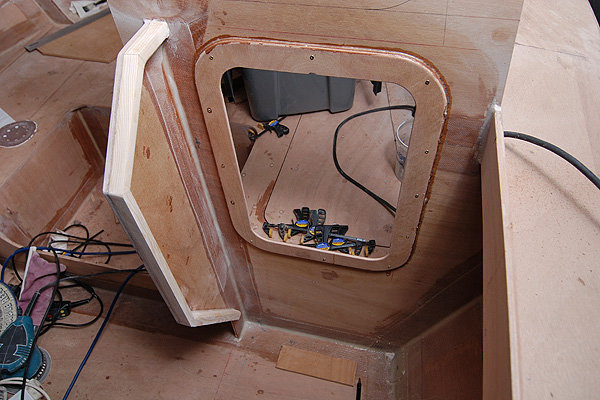
Foredeck has been finished and dry fit...
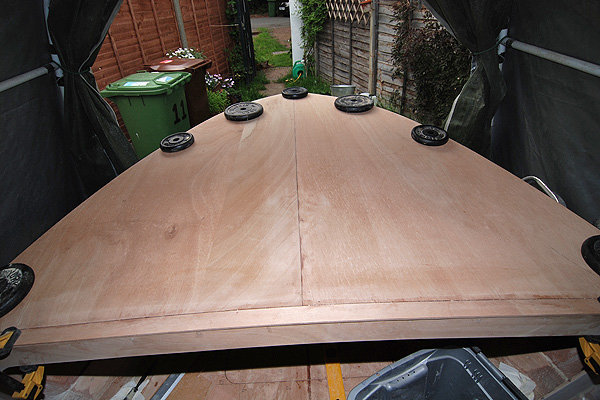
And a bit of a dry fit of myself! The pic is deceiving - I had to bend my legs so I could peer around the door to look at the camera, but I can lie flat on the berth, with my boots on, with a couple of inches to spare and without encroaching on the other half of the berth. Enough for me and my first mate! (I'm about 5'10" and the boots probably add another inch or so.)
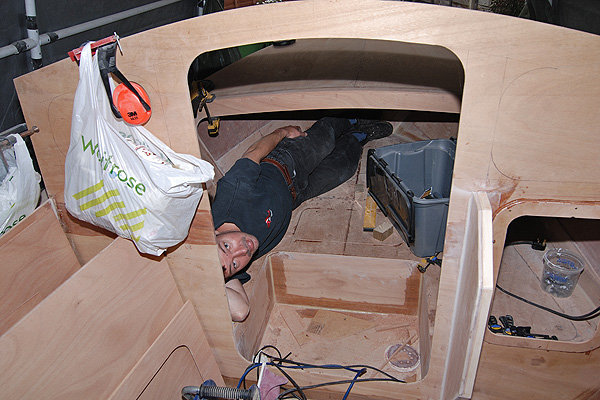
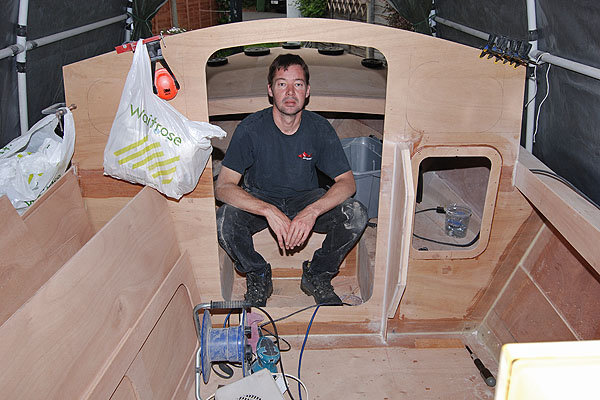
Enjoying this lark...
Tim
PS, more pics in the gallery
________________________________
P H O T O - G A L L E R Y
Posted: Mon Jun 04, 2007 6:30 pm
by MadRus
Very
Posted: Mon Jun 04, 2007 6:47 pm
by TomW
Admiring your woodwork Tim very nice on the hatches.
Tom
Posted: Wed Jun 06, 2007 4:53 pm
by BillTwo
WobblyLegs wrote: Quick update...
All the woodwork in the anchor locker is finished. Dimitris - I've thought about your suggestion about keeping it sealed, but for now I'm going to have a hatch there, and none on the deck; that may change after using the boat. Isn't that the greatest part of building your own boat - knowing how it goes together and what can be modified later?
Just a thought Wobbly, in your anchor locker, did you allow for drainage into you bilge? Or was the drain hole drilled from the starboard side of the Bow only - I don't remember? (I've been watching too much of "
Pirates of the Caribbean" -
Ya Ho!!
I noticed on your foredeck deck edge (over your anchor locker), some evenly space markings on its edge that look like they were notched-in and filleted. If yes, were these put there on purpose? Was this done to help in the forming of the curvature for the fore deck?
As usual your quality of workmanship is excellant. As I've said before, "If I can turn out 1/2 the quality that you are doing, I'd be a
'Happy Camper'"
Well I will be using some scrap wood to practice my peanut butter on before tackling my Hull. One other question, did you use a finishing coat of epoxy on your Hull prior to "
Peanut Buttering" (as your first mate calls it)?
Regards,
Billtwo
Posted: Wed Jun 06, 2007 6:21 pm
by WobblyLegs
Hi Bill,
There is no drainage from the anchor locker into the boat, only to the outside. In fact, I only made the hole tonight...
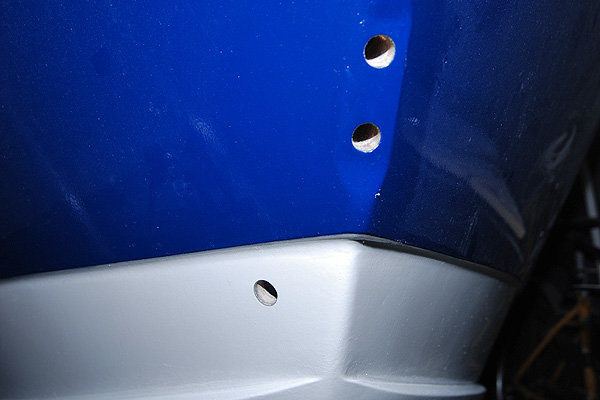
Then I made a "wedge" so that all surfaces in the locker slope downward to that hole:
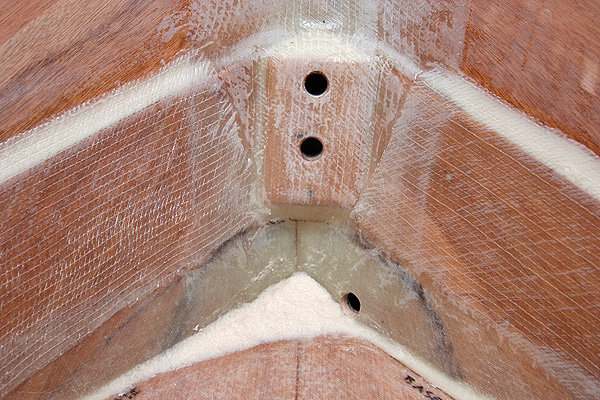
As to the foredeck, what you're looking at in that picture is the cleat on frame "A" that the deck will glue to (There's another one on the other side), and yes, the notches were cut to help the bend. To within about 1/4" of the bottom, bend, glue to frame, fill outside edges with fillet (next day), then syringe to fill grooves from above later. I hope that makes sense.
Regards,
Tim.
Posted: Wed Jun 06, 2007 6:36 pm
by Lucky_Louis
Awesome progress Tim! Good plan on giving generous access to the back of your instrument panel, the final hookups inside my console have been a real bear. A shrink ray would have been handy!
I would think your hatch to the anchor locker should be more than adequate. If water enters through the clamshells, it will have drained back out before it ever gets that high (to the bottom lip of your hatch).
BillTwo - look at the bottom of page 29, this thread for your answer
Posted: Wed Jun 06, 2007 6:50 pm
by WobblyLegs
BillTwo wrote:One other question, did you use a finishing coat of epoxy on your Hull prior to "Peanut Buttering"
Sorry, forgot to answer that one: after glassing the hull, all I did was sand it to get the roughness off and create a key, clean it with acetone, then spread the fairing mixture with a rubber squeegee.
Don't make the fairing mixture too thick. You can see when you spread it how the sanded glass goes clear underneath. I'm not sure how to explain it, but I think when you start, you will see what I mean.
Louis, I'm really enjoying this stage of the build - as they say, something about tunnel, light, end of?
Posted: Wed Jun 06, 2007 7:05 pm
by Cracker Larry
Will you put a plug in that anchor locker hole? I was planning the same arrangement on my OD.
Nice work, BTW
Posted: Wed Jun 06, 2007 7:15 pm
by Lucky_Louis
I would say no. The little mini-clamshell vent prevents spray from entering, allows drainage because it's at the low point of the locker and will allow some air flow to help dry things out. A quart of water in there isn't going to harm anything, actually it will help clean muck off the anchor rode and anchor.
I'm picking up my little vent on the way home from work tonite.
And drilling the hole tonite.
And trying to explain to SWMBO why I'm drilling another hole in a perfectly good boat.
Posted: Thu Jun 07, 2007 2:21 am
by kiwi
WobblyLegs wrote:
Enjoying this lark...
You can tell that by the happy expression in the photo
Tony
Posted: Thu Jun 07, 2007 4:17 am
by WobblyLegs
Lucky_Louis wrote:And trying to explain to SWMBO why I'm drilling another hole in a perfecly good boat.
Larry, Louis answered the question. Also, the hole is quite high above the waterline, so no plug.
T.
Posted: Thu Jun 07, 2007 6:29 am
by WobblyLegs
kiwi wrote:You can tell that by the happy expression in the photo
Tony
Sanding fatigue...
Posted: Thu Jun 07, 2007 12:05 pm
by gerry
It is worth it though! you will have the largest grin ear to ear when that boat touches the water, that is some of the nicest woodwork I have seen in a long time
Posted: Thu Jun 07, 2007 1:41 pm
by Daddy
Amen
Daddy
Posted: Thu Jun 07, 2007 4:42 pm
by WobblyLegs
Thanks again guys for the comments...
Epoxy sealed the anchor locker tonight:
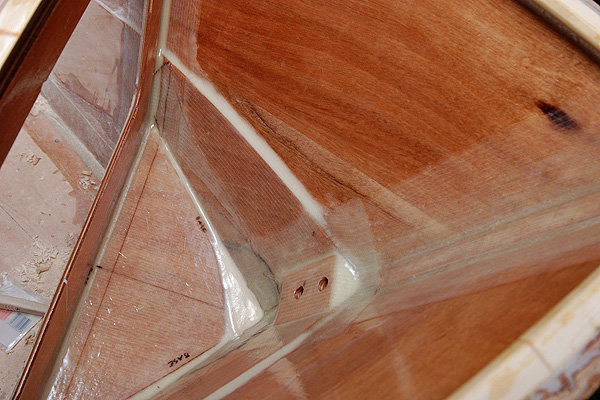
And, some nice shiney stuff arrived at the office earlier:
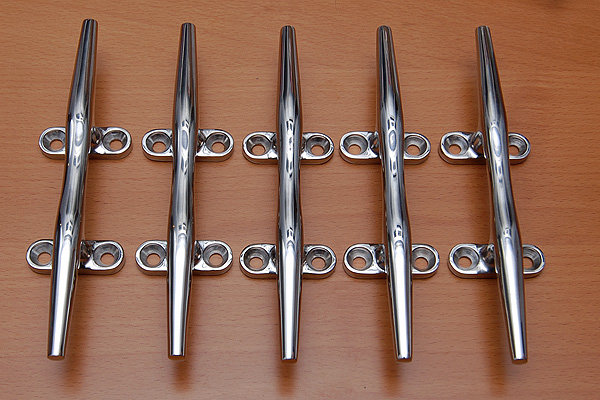
One of the guys thought they were door handles. S'pose they could be...
T.
Posted: Thu Jun 07, 2007 5:56 pm
by BillTwo
WobblyLegs wrote:Hi Bill,
There is no drainage from the anchor locker into the boat, only to the outside. In fact, I only made the hole tonight...
Then I made a "wedge" so that all surfaces in the locker slope downward to that hole:
As to the foredeck, what you're looking at in that picture is the cleat on frame "A" that the deck will glue to (There's another one on the other side), and yes, the notches were cut to help the bend. To within about 1/4" of the bottom, bend, glue to frame, fill outside edges with fillet (next day), then syringe to fill grooves from above later. I hope that makes sense.
Thanks for the input Wobbly,
I am clear on how you notched the cleats to get the bend that was needed to conform to the foredeck shape. I now see how you drilled your weep hole in your anchor locker that allows an acceptable drainage.
As Lucky explained, it's sort of a "
self-cleaning" anchor locker with a "
mini-clamshell" cover to prevent incoming water.
Finally, on the Peanut Butter issue, I'll take my time in making sure that I get it right the first time and not run into another setback as before. I'll do it myself to make sure that I make the right mixture of epoxy and microballoon materials to get the correct thickness and flow.
Thanks Wobbly and to you also Lucky. Its Guys like you that make this forum work for those who need help.
Billtwo
Posted: Thu Jun 07, 2007 6:04 pm
by TomW
Tim, my Dad had a guy that wanted his whole family room nautically designed, big custom built house. 20' by 30' family room. Anyway used those and other nautical items for hardware. Had to do a lot of research for that job. I know he ended up with a wooden wheel for a coffee table. Can't remember everything else as it was 20 years ago when he was still doing custom builds. He's 84 now.
Tom
Posted: Fri Jun 08, 2007 11:15 am
by AdamG
I'm just curious about the decision to not place a ball valve in the locker drain. When I take my boat out in rough conditions, I can have waves jam water in at the bow almost up to the rubrail at times. I suppose the clamshell would deflect most of it, and only let some seep in for each wave, and theoretically, it would drain out between waves...
Posted: Fri Jun 08, 2007 11:29 am
by WobblyLegs
Hi Adam.
Anchor locker drains certain seem to have got everyone's attention today...
See here....
Funny thing is, I have a hole drilled almost exactly where it shows I should have one on the plans...
I think things like ball-valves and other useful boat fittings are easier to source over your side - I certainly have trouble finding stuff locally that I see on numerous US based web sites...
T
Posted: Mon Jun 11, 2007 5:34 pm
by WobblyLegs
A couple more pic's and a question...
Pic's first!
I fitted the first pieces of hardware, the bow eye and anchor locker drain clamshell...
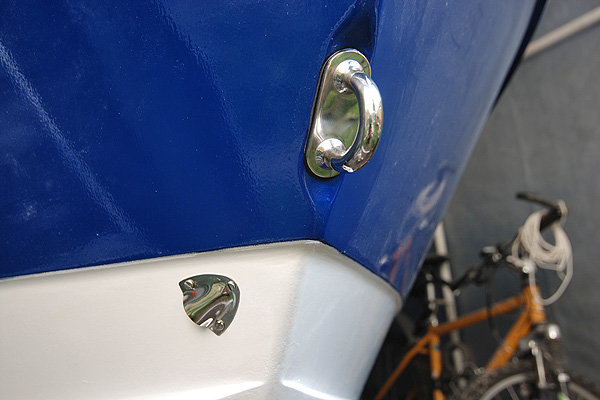
Also did a proper dry fit of the deck...
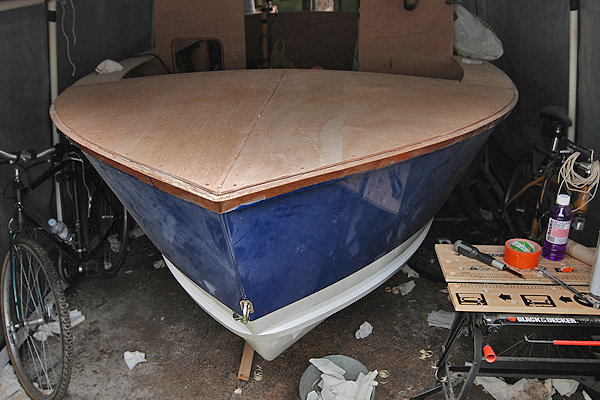
Then spent most of the rest of the weekend sanding. Again. But the berths (not the hatches though) are ready to be epoxy-sealed...
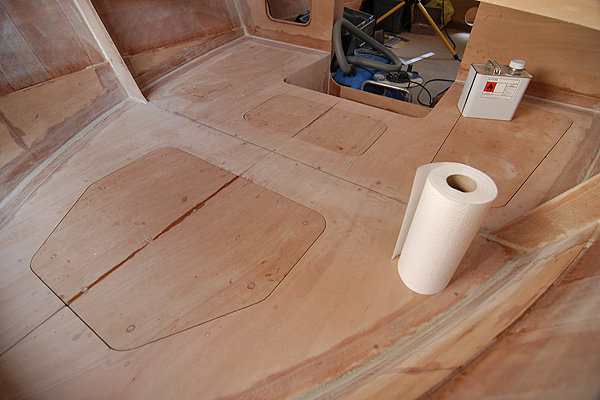
Tonight I mixed up some icing (peanut butter) and did some fairing where the upper and lower side panels join inside the cabin...
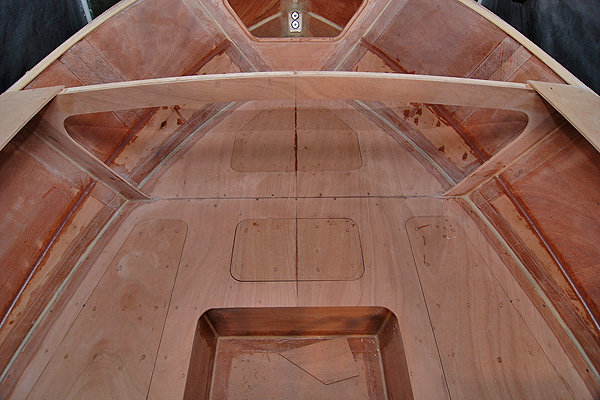
Getting closer to installing that deck! This is good! But, there is still so much to do, like fitting the hatch in frame "A" as it's easier to do before the deck goes on, and sealing the entire inside cabin, and, most likely, more sanding!
The following pic relates to the question I have:
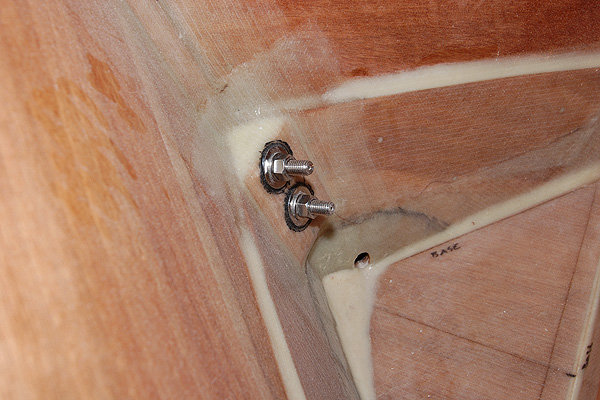
When fitting the bow eye, I bedded the outside on Sikaflex, then tightened the nuts inside, finger-tight plus about 1/8th of a turn with a spanner (if that) on Friday. Then Saturday I bedded the big penny washers inside, again finger tight plus a teeny bit, and am happy that all is well sealed.
So, two questions: 1 - should I use some thread locker (Loctite) on those nuts (A4/316 stainless steel) and 2 - how tight do I make them? They are big nuts, and with my big spanner I could easily crush the wood underneath, which I don't want to do. Anyone have some advice here?
Thanks,
Tim.
________________________________
P H O T O - G A L L E R Y
Posted: Mon Jun 11, 2007 5:49 pm
by Lucky_Louis
I'll jump in Tim. Tension, hmm... I wouldn't go any more than 10-20 foot pounds for just the reason that you mention. Threadlocker, absolutely. There's no reason to have tension on those nuts so why risk damage?
As usual, your work looks great. Might I suggest that you also paint your locker before sealing the deck? I would even paint the underside of the deck except along the glue area. That way, the only awkward bits to paint will be the seams instead of the whole locker.
Posted: Mon Jun 11, 2007 6:14 pm
by TomW
Tim, My rule of thumb when tightening down a nut on wood is finger tight and then no more than a 1/4-1/2 turn, it depends on the wood and the size of the backing plate/washer. With the Loctite you should get by with a 1/4 turn on the plywood.
I really like the way you are going about everything it really looks good.
As a thought you might want to paint your anchor locker with garage floor epoxy paint. It will probably stand up better the chain and anchor that other paints. I am going to do mine that way.
Tom
Posted: Mon Jun 11, 2007 6:16 pm
by TomW
Tim, My rule of thumb when tightening down a nut on wood is finger tight and then no more than a 1/4-1/2 turn, it depends on the wood and the size of the backing plate/washer. With the Loctite you should get by with a 1/4 turn on the plywood.
I really like the way you are going about everything it really looks good.
As a thought you might want to paint your anchor locker with garage floor epoxy paint. It will probably stand up better to the chain and anchor than other paints. I am going to do mine that way.
Tom
Posted: Mon Jun 11, 2007 6:20 pm
by WobblyLegs
Lucky_Louis wrote:Might I suggest that you also paint your locker before sealing the deck?
Thanks for the advice about the bow-eye.
As regards paint, I have thought about it, but keep coming back to... why?
Resons to paint: Looks nice, and protects from UV.
Reasons not to: It's dark in there (no UV) and I can keep an eye on the condition of the wood over the years - change in colour = moisture absorbtion? Also, I put and extra couple of pieces of glass in there to protect the wood from damage from sharp objects, like an anchor
Your (and other's) thoughts always appreciated... (I see Tom has popped up with the same suggestion while I was typing...)
T.
Posted: Mon Jun 11, 2007 6:39 pm
by Lucky_Louis
You make a valid point
I guess I could have said "
IF you are going to paint your anchor locker, then before securing the deck would be a good idea.."
I guess I painted mine because that's just the way I've always seen them done. Never really thought about it. I do like the way the paint tiddles everything up and also it makes it easier to spot mould, dirt, and even cracks. If my work looked as good as yours, I might not want to cover it up with paint either
Posted: Tue Jun 12, 2007 12:25 am
by TomW
Tim, Lucky the other reason I paint is I use a light colored paint that reflects good and put a small light in the locker so if I'm out at night I can see what the heck is going on in there.
Tom
Posted: Tue Jun 12, 2007 11:57 am
by Cooper
It looks great! Have you thought about using nylock nuts instead of regular nuts? And have you thought about painting before installing the hardware?
Posted: Thu Jun 28, 2007 11:46 pm
by TomW
Hey Tim how you doing haven't seen any news in a couple of weeks, you on holiday. Or have you launched and making a trip around the islands without letting us know.
Hope you are fine and the boat is coming along.
Tom
Posted: Fri Jun 29, 2007 8:13 am
by WobblyLegs
Hi Tom,
Still here, been quietly building benches in the cockpit (well, one of them anyway).
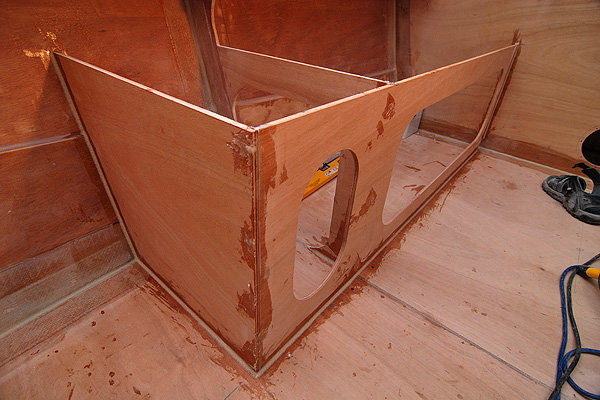
Things are slow at the moment - the weather has been a bit on the damp side (half the country appears to be under water), and I've been unable to seal my fore-deck in preparation for laying it, as the only place I have big enough to work on it is outside the tent. So, doing little bits inside - benches, hatches, hinges, sealing cabin area etc.
There are two things guaranteed to bring rain in the UK - Glastonbury music festival (last weekend's mud-fest) and Wimbledon tennis tournament (this week and next week). They have not let us down this year!
Later,
Tim.
Posted: Fri Jun 29, 2007 10:40 am
by JimW
Tim,
I wish I could keep things as clean as you do. Man, ... that thing looks great.
Posted: Fri Jun 29, 2007 10:47 am
by tech_support
Tim, the master of clean fillets
Posted: Fri Jun 29, 2007 1:51 pm
by TomW
Tim as pretty as always, have only been in England once and then in January it was as damp and cold as our New England weather was when I lived there.
Tom
Posted: Fri Jun 29, 2007 3:07 pm
by ks8
Looking great Tim!
I painted the cuddy for several reasons...
1- practice
2- protect the epoxy that protects the wood
3- As Tom pointed out, makes it very easy to see in there at night with even a small LED stick on push dome light.
In an anchor locker, any minor microscopic bubble craters in the epoxy seal can suck in water with temperature differentials. Primer rolled on should seal them, and if not, the LPU topcoat. Just a thought, since it is basically a *wet* locker.
As to threads on boweye, I always prefer having to tighten a nut on a lockwasher periodically to the alternative of not being able to get a nut loosened in a hurry for whatever the reason. Many people sampled, many views.
Keep up the beautiful work! Do you plan to tape those bench fillets?
Posted: Sat Jun 30, 2007 10:47 pm
by Lucky_Louis
Looking great as usual Tim, I feel your weather pain. The same story here, very unsettled, still cold, thundershowers. Before you know it, we'll be b!t@hing about the heat
Your anchor locker drain design works great! Took four guests plus myself for a trip yesterday around some local islands. We weren't out 30 minutes when a squall hit and next thing I know we're bashing about in 3' seas and 25 gusting 35 knot winds
Then the skies opened up and we got an inch of rain in 20 minutes. We buried the bow a few times before I got the crew moved aft and the bow up. The boat rode great, very stable and predictable in head and following seas. Today I had all the lockers open to dry out and checked the anchor locker. It looked and felt bone dry. I couldn't believe that no water had come in through the drain seeing as how we'ed dunked it a few times. I felt the rode and it was soaked and salty. So the plan worked, water comes in, water goes out
.
Posted: Sun Jul 01, 2007 10:29 am
by Cracker Larry
So, two questions: 1 - should I use some thread locker (Loctite) on those nuts (A4/316 stainless steel) and 2 - how tight do I make them? They are big nuts, and with my big spanner I could easily crush the wood underneath, which I don't want to do. Anyone have some advice here?
Two good options, 1. Use nuts with a nylon locking insert, readily available in stainless, or 2. Use 2 nuts instead of 1. Then you run the first nut up to the desired torque, hold it in place and run the second nut up tight to it. This will jam it in position. Easy to remove, but it won't vibrate loose.
Posted: Sun Jul 01, 2007 5:12 pm
by WobblyLegs
Well, since you all like my fillets so much - another pic: the port bench sides are now in and filleted:
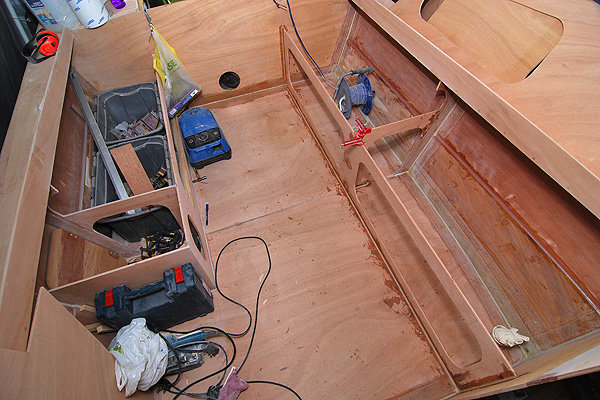
I have cut a little quarter-circle at the back of each bench for drainage to the (still to be designed) scuppers:
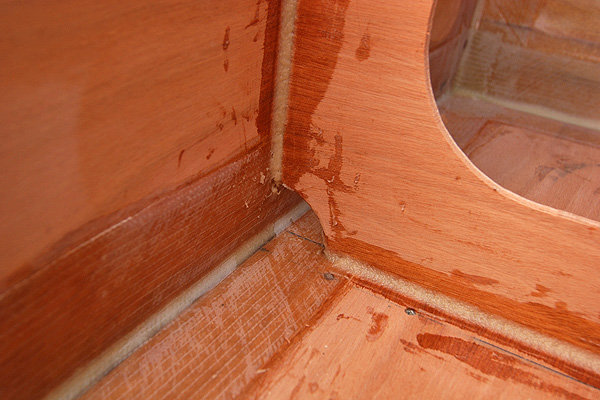 ks8:
ks8: The benches are going to get woven tape on them. Still not sure about painting - I really prefer the idea of having some wood visible, just to keep an eye on it...
Tom: January is the second worst month to be here, after February!!!
Louis: Glad the clamshell works - I'd feel pretty bad if you'd all drowned out there! If your rode was wet, where was the water coming from? Through the hatch, or through the drainage hole?
Not bad for a wet weekend, I think!
Keep building (or start fishing, Louis!!!)!
Tim.
Posted: Sun Jul 01, 2007 10:46 pm
by Lucky_Louis
The water in the anchor locker could have come through the topside hatch and/or the drain. We buried both several times
All I know is that the drain works perfectly. If the rode wasn't wet (and salty tasting
) I never would have known the locker had been wet at all. I did route out a channel for installing a seal on the hatch but haven't got around to sticking it in yet.
I did install my floor drains today. There are now 2 x 2½" drains from the sole into the bilge where I have my 1100 gph pump and a manual pump as backup. I still plan to install scuppers at some point but they must be sealable.
You're making great progress Tim! Weather looks to be picking up soon too.
Posted: Mon Jul 02, 2007 7:17 am
by WobblyLegs
Cracker Larry wrote:Use 2 nuts instead of 1.
Hi Larry,
That's what I think I'll do, but with a slight variation - you'll see later...
Tim.
Posted: Mon Jul 02, 2007 2:35 pm
by gk108
You probably should leave a few bright finished accents. If you put paint over all of that nice work no one will believe that it is not a factory boat.
Posted: Mon Jul 02, 2007 3:33 pm
by WobblyLegs
gk108 wrote:You probably should leave a few bright finished accents. If you put paint over all of that nice work no one will believe that it is not a factory boat.
That is the plan - I wanted to do the decks bright, but the ply I have for this area is not a clean laminate, so there's a join line in it that I can't hide.
Also, bright decks are high maintenance, or so I hear...
However, there's going to be a bit of white here and there, and more than enough bright work to make this look like the traditional RN type "gentleman's launch".
It shouldn't be too long until we all get to see, me being the most impatient right now - if only this damn rain would stop!!!
Finished sanding the port side benches this evening, so they are almost ready for tape - I just have to route out the holes in the sides, and it's a bit late in the evening to do that now. Trying to stay friends with the neighbours...
T.
Posted: Mon Jul 02, 2007 4:15 pm
by TomW
Hang in there Tim, Wimbedon will be over soon the Royalty can go home and things will return to normal!
Tom
Posted: Tue Jul 03, 2007 5:49 pm
by WobblyLegs
Well, not a bad evening's work...
Sides of benches routed out (only 3mm, using the Dremel).
Eighteen pieces of woven tape measured and cut:
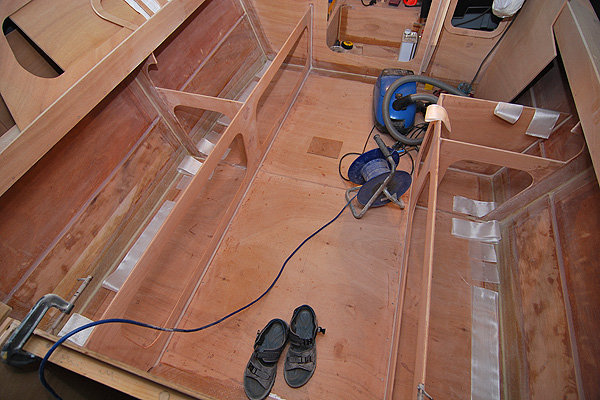
And eighteen pieces of tape permanently stuck in:

That's the inside of the benches done. Next step is gluing the cleats (which are already cut and ready to go) that will support the bench tops...
Still raining cats 'n' dogs here - the garden has about 2 inches of standing water. I'm starting to wonder about the neighbour's ongoing jokes about building an ark!!!
At this rate I'll be able to float it out the garden.
Noah (Tim).
________________________________
P H O T O - G A L L E R Y
Posted: Wed Jul 04, 2007 10:26 am
by msujmccorm
Nice clean work. I don't see how you keep you patience
I have been trying to watch Wimbledon and there are some matches that took 5 1/2 days to complete because of all the rain. It's not that bad all year is it?
Posted: Wed Jul 04, 2007 1:31 pm
by steve292
Posted: Mon Jul 09, 2007 3:28 pm
by WobblyLegs
Aaaaaaaaaarrggghh!
Acetone. Tent. Boat. Match!
BOOM!
Tempting...
(...but I won't...)
Posted: Mon Jul 09, 2007 3:35 pm
by Lucky_Louis
Whoa big, fella, whoa, easy now, that's a good shipwright.
So many brain cells, so little time. Look at the bright side, summer just made it to this side of the pond so "jolly olde" can't be far behind.
At least your boat is new, mine's already used... another 65 km yesterday, about 400 total since we splashed on Father's Day. Still a lot of wind/chop so definitive performance numbers are to get, but fuel consumption is a pleasant surprise.
Posted: Mon Jul 09, 2007 3:43 pm
by TomW
No, no, no Tim. Not all that beautiful work. The time will come. I am sitting here in one of my gray T-shirts I told Pastor Bob about soaked it moisture in my lovely mountains when it is only supposed to be 83 and it is 90. Rain just came and went making it even more humid than is normal at 60%.
HAPPY SUMMER TO EVERYONE AND TO ALL GOOD WORK AND GOOD FISHING TO THOSE THAT LAUNCH!
Tom
Posted: Fri Jul 13, 2007 8:34 am
by WobblyLegs
OK, I'm a pic-a-holic!
It's official. I seem to have used up my allowed quota of Bateau disk space, as the server won't allow me to upload any more.
My toy-flinging episode is over, a build-up of a new batch of epoxy that I bought last week being crystallised, and losing Saturday's planned epoxy-work as a result of having to warm it all up (takes time), combined with several hours worth of routing, fitting, sealing, drilling, filling, more drilling, more filling etc., etc., to make frame "A's" hatch fit, only to find on Monday evening that it didn't!
It turned out that the two hinges were slightly different sizes and I'd got them swapped around. After thinking about it for a while, I swapped them back and the hatch fits perfectly.
Also, after several attempts at finding a way to SECURELY close that hatch, I finally came up with a method that seems to work perfectly - screw it down!
And, the benches are now covered (although not glued yet) which gives me tool storage underneath and a workbench in the boat. The tops need to come off again for routing steering cables, fuel lines etc., hence not gluing them yet.
Last night the final cleats on the hull went in - supports for the outside edge of the console, so I am ready to stick the lower and middle faces of the console in tonight.
I could show you, but I need to see if I can find somewhere to upload pics to link - I'm a bit hesitant to delete pics from my albums 'cos I don't know which are linked to threads and which aren't.
I know I've said this before, but I really, really want to get that foredeck down. Soon!
Maybe this weekend. The weather's definitely improving.
Keep building.
Tim.
Posted: Fri Jul 13, 2007 10:51 am
by Lucky_Louis
See, told you your weather would improve
soon.
Give Flickr.com a look, they offer pretty good features and you can direct link to your photos from anywhere.
Is the bateau.com limit based on number of images or total disk space?
If it's disk space, then maybe downsize some of your older pics but give them the same name, that way links will be preserved and you should have enough space to carry you through splashing.
Posted: Fri Jul 13, 2007 11:14 am
by WobblyLegs
Disk space, it seems. I thought about downsizing (lower level JPEG). I wonder if there is anyway of accessing the folder where the images are. That way I won't have to re-upload through the gallery section. I'll ask the question in the "Anything Else" section...
Posted: Mon Jul 23, 2007 2:36 pm
by Lucky_Louis
Howz it going old chum? You've pretty quiet for the last week..
You're not still pouting over the pictures 'thing', are you?
From what we're seeing on the news here, having a boat in England isn't that bad an idea this past week. Hope everything is well with you and yours.
We watched the Open over the weekend, what a finish!
Posted: Mon Jul 23, 2007 4:55 pm
by MadRus
Anybody got a tissue? I just checked out your latest round of photos. That's a sweet, sweet boat. You're craftsmanship is exceptional as always. Nice job Tim!
Posted: Mon Jul 23, 2007 5:13 pm
by WobblyLegs
Louis (caught any fish lately?), I was wondering when someone was going to ask (I figured it might be TomW - but you beat him to it!!!)
No, I'm not "pouting" 'bout the pics at all, just been busy... (see end of post).
The weather here is damp, to put it mildly - some areas have apparently had twice the average July rainfall on Friday, in ONE HOUR!
One of the worst affected areas is Gloucestershire, the source of the River Thames, and that water is on it's way down to us. The Thames is expected to peak in London sometime tomorrow. Of course, that may change as it's been raining again all evening.
In the meantime, I've been been busy...
My solution to making hatch "A" secure was to make some holes near the top (hatch and frame) filled with an epoxy mix, then a thread tapped into it to hold some screws, which then hold the hatch closed with some butterfly nuts - it ain't coming loose unless I say so!
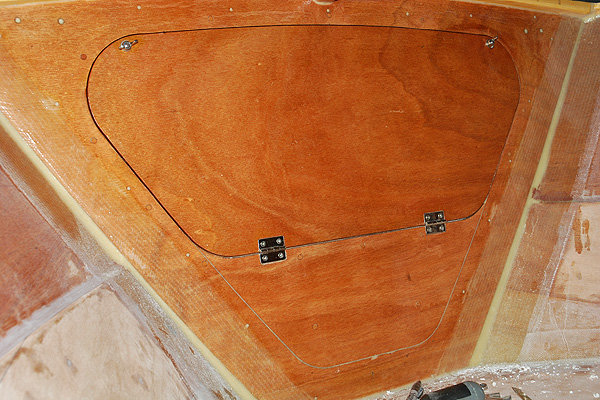
Last week Thursday the weather-gods were shining, so I took the opportunity to glue down the fore-deck (and Louis, you're right, it is a bit of a 'watershed' moment) as I can now work on the boat regardless of the weather, which is nice...
Foredeck down and cabin stitched:
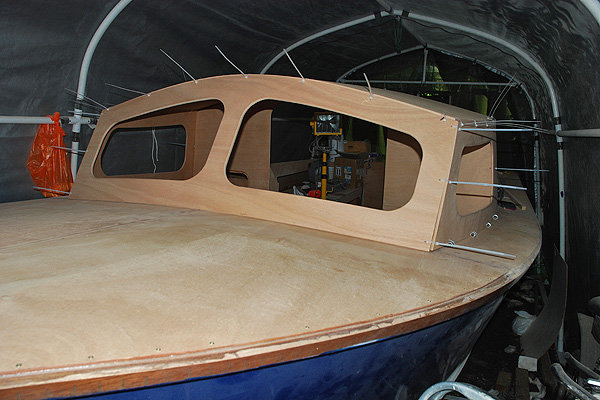
Console mostly made up, also showing interior of cabin:
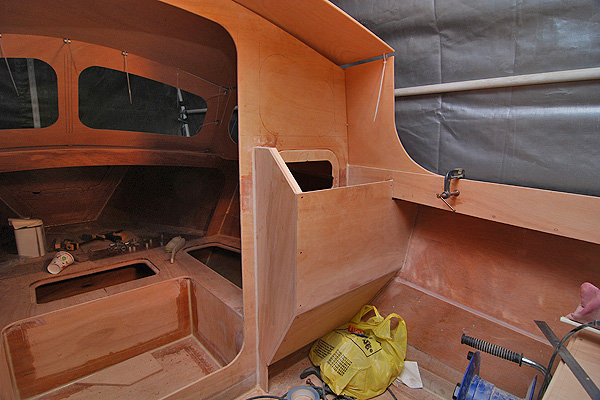
And finally (for tonight), the cabin roof stitched:
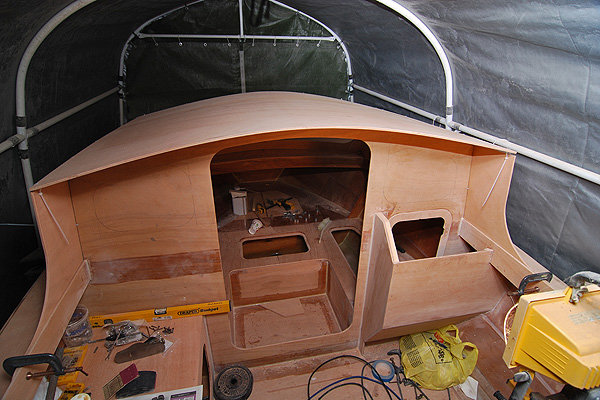
The roof seems to be at an ideal height, I can lean my arm on it comfortably while standing (and not stooping), and hold onto the steering wheel without stretching. If there was a wheel to hold, of course...
If you look at some of the pic's you should be able to see that the forward half of the cabin (inside) is now totally sealed with epoxy - I'm going to wait for the aft half 'cos I'm sure that there will be some drips coming down that need cleaning and sanding.
The REALLY good news is that ALL the wood on the plans has now been cut and fitted (though some are dry) and the only cutting I have left are backing plates, console top and a couple of cleats.
And maybe a hatch or two. Or three. We'll see.
As to more pictures, "bwm" (Bateau Web Master) assures me that he is working on a solution - we just need to be patient (and I thank him for that!).
I deleted some other pics that I'd uploaded so that these could be shown - far more interesting than what I dumped!!!
Anyway, I've got to go tighten some cable-ties now...
Later,
Tim.
PS, MadRus, you posted while I was typing!!!
Thanks for your comments - yours (and everyone else's) are great encouragement.
Posted: Mon Jul 23, 2007 5:19 pm
by Lucky_Louis
Whew! Glad to hear from you Tim. That is turning into one salty looking little ship! Did it make you feel nostalgic doing up stitches?
I remember when I hit that point of 'no more pieces of wood to cut'. It was a good feeling, that meant the end truly was in sight. Cheers, Lou
Posted: Mon Jul 23, 2007 6:20 pm
by ks8
One day I'll build a boat with good plywood...
Beautiful as always Tim.
Posted: Mon Jul 23, 2007 6:27 pm
by TomW
Outsanding as always Tim, keep up the good work, at least you can throw out the anchor and float if you keep getting more rain.
Tom
Posted: Mon Jul 23, 2007 8:10 pm
by fishingdan
I have to say that I wasn't a fan of the C17 design when Jacques released it. To me, it seemed like an odd configuration for a boat.
With the wonderful work that you have been doing and sharing, the design is growing on me. That is going to be a beautiful and very functional boat.
Keep up the great work!
Posted: Mon Jul 23, 2007 8:59 pm
by Cracker Larry
Beautiful, Tim
I keep saying that, and you just keep improving
Every picture takes it up a notch.
One suggestion, if I may, since you are as good as you are, maybe some nice little knurled knobs to replace those wing nuts on the hatch
Posted: Tue Jul 24, 2007 12:47 am
by TomW
Tim saw pictures of the flooding over there this evening and all I can say is a prayer for all. I hope that is not affecting you that badly. As I recall where you are is a good little ways from the Thames, so hopefully you won't feel it's affects.
Good luck and God bless!
Tom
Posted: Tue Jul 24, 2007 12:56 am
by maxgsx
Tim,
Boat looking great.
You shouldn't have a problem with the water because they manage it all up-stream before it gets to you.
By manage I mean wake my folks in rural Oxfordshire at 2 am to tell them that they have closed some sluices just down river of them and that they have about an hour before the water is going to be 2 foot deep in their front room
"oh and by the way, if you hop into this little boat, we will dump you in a school hall for a few days"
They are both in their 70's but seem to cope ok with such things. Dad is Mad-as-a-fish anyway so he won't know what's going on
Can't wait to see your boat finished and in the water.
Posted: Tue Jul 24, 2007 5:09 am
by WobblyLegs
maxgsx wrote:By manage I mean wake my folks in rural Oxfordshire at 2 am to tell them that they have closed some sluices just down river of them and that they have about an hour before the water is going to be 2 foot deep in their front room
"oh and by the way, if you hop into this little boat, we will dump you in a school hall for a few days"
Yeah, that sounds about right for the Environment Agency.
No need for concern (for me anyway) - I'm quite far from the river, and on relatively high ground, so no flooding.
Other people, obviously, are not so lucky.
I'm going to Richmond tonight for dinner (10th anniversary) so will take a look at the river then, and maybe get some pics. There are quite a few old boats on moorings there that might be taking a bit of a battering.
The EA has issued a warning "advising" all boats to moor up, and stop all navigation on the river.
Posted: Tue Jul 24, 2007 9:43 am
by msujmccorm
That is some great workmanship.
No need for concern (for me anyway) - I'm quite far from the river, and on relatively high ground, so no flooding.
Many people thought that here the night before Katrina.
Posted: Tue Jul 24, 2007 11:54 am
by Daniel Huckleberry
The new pics are great! I really like the look of that little cabin. It's going to be great to see her out in the open to get a good picture of the whole package.
Remember, it's only rain and we were all born wet.
Huck
Posted: Tue Jul 24, 2007 12:15 pm
by mecreature
You make it look so easy...
Posted: Wed Aug 01, 2007 4:59 pm
by WobblyLegs
mecreature wrote:You make it look so easy...
It's not difficult, but can be time consuming...
As in, I have stitched the cabin together (and un-stitched it all) three times now, then glued the sides and windshield in place, then stitched and un-stitched the roof three or four times before gluing...
Just finished sanding the cabin tonight - all glued in place and ready for tape:
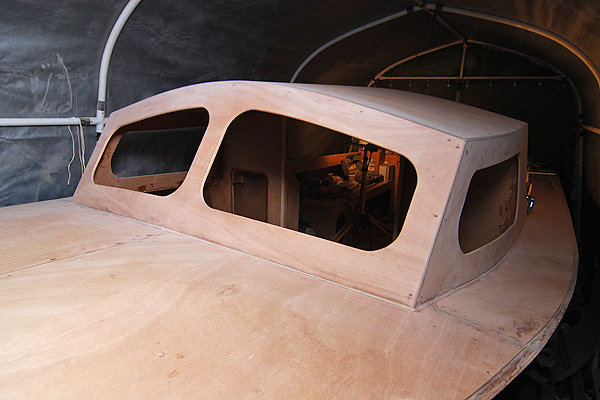
The whole thing (boat, that is) now feels as solid as a rock. No flex at all. I feel like I've built a boat at this stage, even though there is a lot of work left to do!!!
Tim.
Posted: Wed Aug 01, 2007 5:26 pm
by Knottybuoyz
Just when you think you're half done, you're actually half way to half way done! Keep at it Tim. Looking good!
Posted: Wed Aug 01, 2007 5:35 pm
by Lucky_Louis
That's great Tim! Congrats on your patience, I would have reached the "close enough" phase a long time ago
So it sounds like things have dried out a bit over there? You must be just about done the 'woodworking' phase now, and getting ready to move into the 'coating', 'filleting', 'taping', and 'painting' phase. And somewhere in there, the dreaded 'S' word too... And finally, the rigging. You'll know you're rigging when you stop at the marine chandler's on your way home from work every day and drop another 50 quid...
Posted: Thu Aug 02, 2007 3:39 am
by fmiles
Hi Tim
Looking very neat. You will be the best looking craft on the Thames!
Have you thought about your windows? I went down this road as well, not sure what to do exactly. Will you use polycarb?
Posted: Thu Aug 02, 2007 4:28 am
by WobblyLegs
fmiles wrote:Have you thought about your windows? I went down this road as well, not sure what to do exactly. Will you use polycarb?
Yeah, a lot of thoughts about windows.
I marked out the windows on paper before putting the cabin together, so I have some paper templates...
The best thing I can come up with so far is to have the windows oversize, and held in place (on the inside of the cabin walls) with interscrews. I can't find anyone willing to make me some aluminium frames to an "odd" shape, which would have been ideal. Ho hum. Nothing new there.
As to polycarbonate or acrylic, I guess it comes down to whatever is available.
Tim.
Posted: Thu Aug 02, 2007 6:30 am
by Yoda
Tim, it's looking great. You're going to have a lot easier time getting ready to paint. The sanding and fairing should take you no time at all.
I'm using acrylic winshield. Cut oversize, and and laid over closed cell foam tape. I will drill oversize holes in acrylic to fit rubber bushings. That takes stress away from acrylic. Snap-caps ( I buy those in boat shops here ) will cover machine screw heads. They are used in some production boat windshield's, i.e. my bass boat. They stay together at 65-70 mph. I'll bet my labor was equal to yours, and half of mine was wasted time. Still doesn't look as clean. Really looking forward to your finished boat.
Lou
For Snap-Caps
http://www.pro-dec.com/
Posted: Thu Aug 02, 2007 8:06 am
by fmiles
Tim, I am looking here for inspiration.
http://www.technix-rubber.com/products.htm
They are local to me, but can ship.
Specifically, the windscreen rubber solutions are just about perfect for you..
http://technix-rubber.com/catalog/produ ... 4722711989
Posted: Thu Aug 02, 2007 11:18 am
by gk108
Tim, that looks great. You have just about formed the entire boat now. A little paint and some hardware and you're done.
The window gaskets look like a good solution for the front windows, but you might consider sliding windows for the sides. Motor home and camper builders get their windows custom made by fabricating shops. Have you checked for anything like that in the UK?
Posted: Thu Aug 09, 2007 4:56 pm
by WobblyLegs
I have built a cabin.
Like this:
Stitch it all together.
Unstitch.
Reposition.
Restitch.
Bang with hammer (nudge into place).
Glue sides.
Unstitch roof.
Restitch.
Unstitch.
Restitch.
Bang into place with hammer again.
Glue.
Fillet.
Grind.
Sand.
Tape.
Fillet somewhere else.
Grind.
Sand.
Tape.
(repeat a few times over several days...).
I now have a cabin!!!!
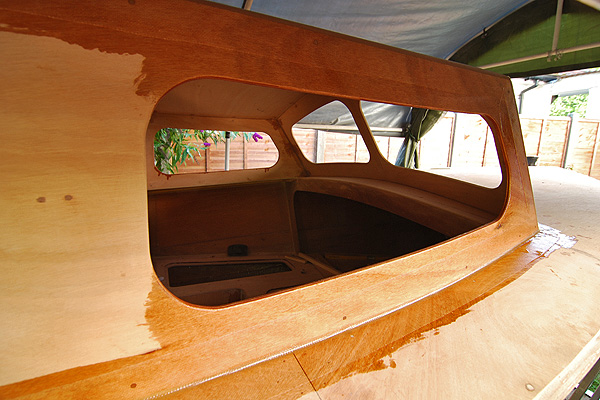
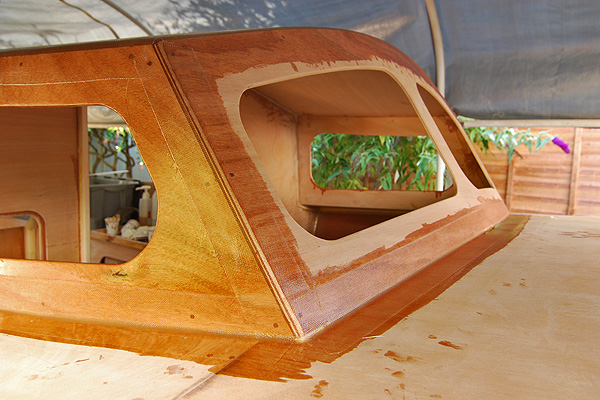
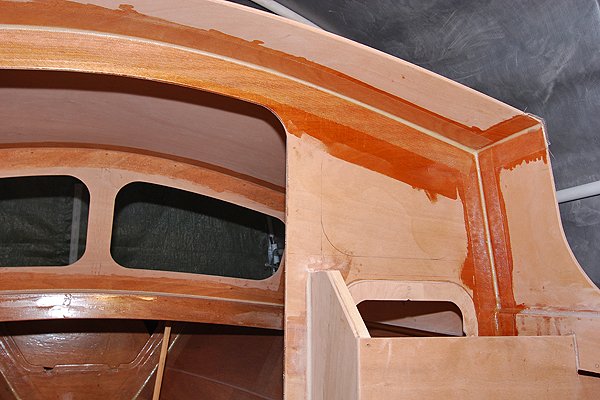
(Pics are hosted elsewhere temporarily until they can go into the album).
Posted: Thu Aug 09, 2007 5:07 pm
by MadRus
You sure can build a boat! I'd like to see you tackle a something in the 30' range someday.
Posted: Mon Aug 13, 2007 5:19 pm
by WobblyLegs
MadRus wrote:You sure can build a boat! I'd like to see you tackle a something in the 30' range someday.
MadRus; I think the next long-term build will probably be the MT24 - I've liked that design since it came out. Unfortunately it will be a couple of years before I can start another 'big' boat, as there are plans to move house (and country) in the pipeline.
To keep myself busy 'til then, I'm going to play with canoes, and see if I can build one in a weekend. Next year.
fmiles, thanks for the link, but their rubber doesn't bend enough... Back to plan "B."
Not a good weekend (somehow I seem to get more done in the week-evenings than over a weekend!).
But, taped the inside of the fore-deck to the hull on Sunday:
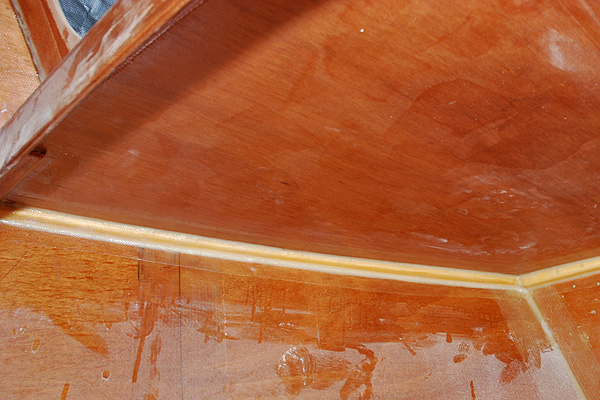
I know this is not called for in the plans (glue is enough) but it gives me peace-of-mind
knowing that the shearclamps are sealed under glass, adds a bit of strength with minimal added weight, and makes it all a bit tidier!
And tonight, basically finished the console:
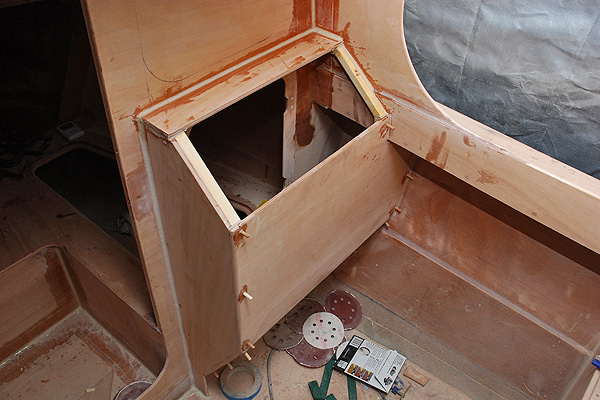
The only bit left to go on there is where the instruments go, so I'm leaving that until I have them in hand to make sure they fit properly...
Next step is to get some steering gear: Teleflex or Ultraflex? Any guidance from anyone? I'm partial to the Ultraflex gear mechanism, but am a bit clueless as to the quality of each. Any advice appreciated...
That's it for now...
Tim.
Posted: Mon Aug 13, 2007 9:08 pm
by ks8
Great looking cabin. Waiting to see how you trim it out. Excellent fillets and taping as usual. Build on!
Posted: Mon Aug 13, 2007 9:48 pm
by Daddy
I have had great luck with Teleflex on several projects. Recently tried their rack for the first time and liked it better, easier assembly and solid feel. Did you leave a space in your console for the cable to pass out and under the gunnels?
Daddy
Posted: Tue Aug 14, 2007 10:46 am
by Lucky_Louis
Looking great as usual Tim! How's the epoxy supply holding up? Did I read you might moving out of country? Where to? Lots of H2O I hope...
I used the Teleflex NFB (NoFeedBack) system in the OB17 and am very happy with it. It's a little more steering effort than standard rotary or rack but being able to take your hand off the wheel at 30 knots and track straight is more than enough compensation. Doesn't take up much room and allows pretty tight radius bends. I don't know if a rack system would even fit in your console. Isn't it great to be worrying about the finishing stuff? That means the end is in sight.
Posted: Tue Aug 14, 2007 11:33 am
by steve292
Splash the cash & give it the hydraulic steering system it deserves.......................go on you know you want to
Posted: Tue Aug 14, 2007 11:37 am
by WobblyLegs
Louis,
Running out of epoxy - I'm going to need one more 6kg pack, and think I'll have some left over from that. Mmm, moving - nothing definite yet, but far, far south. With two oceans to choose from virtually on my doorstep.
To quote the movie: "I'm going to need a bigger boat!"
Over the weekend I noticed the boat wobbled a bit, and seemed to have a list to starboard. Had a look underneath, and some critters have dug a hole under some of the cradle's supporting bricks. Could be foxes or badgers (I'm told there are badgers in the area, though I've never seen one. We have a family of foxes nearby). Thankfully all fitting that needs a spirit level is done, as is all the structural work, so as long as it doesn't fall over, then it's OK.
Yeah, finishing stuff is good, but from now on it's going to be a bit costly until it's on the water. Motor. Trailer. Tow hook for the car. License for the boat.
Still, not too long now. Starting to get a bit impatient. Also, with so many 'little' things to do, it's difficult trying to figure which to do next...
I see you caught a little fish. Must try harder...
Later,
Tim.
Posted: Tue Aug 14, 2007 11:45 am
by WobblyLegs
Daddy wrote:Did you leave a space in your console for the cable to pass out and under the gunnels?
Daddy
There's a gap under the side deck for electrical cabling - for the steering I will cut a hole in the console near the hull side. How high above the sole will be decided when I have the cable so I can get best fit.
Steve - hydraulic is nice, but very expensive!
NFB, whichever system I use, I think will be essential.
Tim.
Posted: Wed Aug 15, 2007 10:57 am
by Lucky_Louis
Probably all the rain is driving the critters closer to the surface... I'm jealous of your move, I could use a break from the cold, wet, "global warming" we're experiencing.
To add insult to injury, that's not me or my fish
that's an old chum from Victoria. Seems that since I splashed the boat, I have a lot more "old chums" than I used to have
If GB is anything like Canada, you should be able to score a good deal on your engine in the fall. The dealers know that there's along dry spell coming and they're usually willing to offer deep discounts.
Posted: Fri Aug 17, 2007 6:14 pm
by WobblyLegs
Lucky_Louis wrote:I could use a break from the cold, wet, "global warming"...
I've noticed that the 'politico's' aren't calling it 'global warming' over her anymore. It's the coldest, wettest 'summer' I've ever experienced. They now call it 'Climate Change'.
Go figure...
Posted: Sat Aug 18, 2007 3:50 am
by kiwi
Global warming induced climate change would be a better term. By raising the overall average temperature 2°C the high that is usualy over the Azores has gone south (after being north from the end of winter till beginning of spring - you had your good building weather). This morning it was 9°C here in the south-west of France, 10°C lower than normal summer temperature.
To all concerned: all the best for the 2007 hurricane season! Saw pictures of Dean going through Martinique last night on the news. Not good for boats...
Tony
Posted: Sat Aug 18, 2007 6:45 am
by Yoda
WobblyLegs wrote:Louis,
Running out of epoxy - I'm going to need one more 6kg pack, and think I'll have some left over from that. Mmm, moving - nothing definite yet, but far, far south. With two oceans to choose from virtually on my doorstep.
To quote the movie: "I'm going to need a bigger boat!"
Over the weekend I noticed the boat wobbled a bit, and seemed to have a list to starboard. Had a look underneath, and some critters have dug a hole under some of the cradle's supporting bricks. Could be foxes or badgers (I'm told there are badgers in the area, though I've never seen one. We have a family of foxes nearby). Thankfully all fitting that needs a spirit level is done, as is all the structural work, so as long as it doesn't fall over, then it's OK.
Yeah, finishing stuff is good, but from now on it's going to be a bit costly until it's on the water. Motor. Trailer. Tow hook for the car. License for the boat.
Still, not too long now. Starting to get a bit impatient. Also, with so many 'little' things to do, it's difficult trying to figure which to do next...
I see you caught a little fish. Must try harder...
Later,
Tim.
Tim, you need to find a Dachshund breeder and have him bring a few over for you to sit.
Posted: Sat Aug 18, 2007 9:11 am
by fishingdan
WobblyLegs wrote:Louis,
..... Starting to get a bit impatient. Also, with so many 'little' things to do, it's difficult trying to figure which to do next...
Warning sign! Being impatient is common at this stage. Been there and done that. There are many things to do at this stage. Some require skill to complete and some don't. Don't fall into the trap of rushing tasks just to complete the boat. If that occurs, that is work that you will re-do correctly 6 months later.
Stop and layout a plan for the completion of the boat. Of course, some steps are related to each other and some are not. Time spent planning at this stage is time well time spent. It is amazing how many little tasks there are in the last 20% of the build.
Keep up the great work. You are doing a great job!
Dan
Posted: Sat Aug 18, 2007 11:15 am
by Lucky_Louis
Heed the Mighty Dan
He's absolutely bang on with his comments. The frustration of thinking you're almost done and watching the precious boatbuilding hours dissolve with seemingly little or no progress can be wearing
. I set a deadline for myself only because my kids needed to make travel plans in advance. In retrospect, I probably should have taken more time and care in the final fit and finish. After all, when we use our boats we are inside them, and that's what we spend our time looking at. One piece of advice, take the time to make up a list of everything that still needs doing and/or buying. That way you'll have a much better idea of how much time you really need and how much cash you'll need to get approved by Mrs. Wobbly. I don't know how time and fuel I wasted in repeated trips to the chandlers or auto supply store to buy that "one more" fitting/part/pack of sanding discs/litre of epoxy/etc.
I still need to coat my brightwork with varnish but everytime the weather has been nice enough to varnish, it's been nice enough to go boating!
Posted: Sat Aug 18, 2007 11:49 am
by TomW
Wobbly, Lucky and Dan have it right on. I don't know how many times when I was finishing a project I ended up running to the store for something cause I hadn't planned ahead. Since I now Live an hour from any store of any size you can be sure I plan ahead.
Good luck on your final finishing up.
Tom
Posted: Sun Aug 19, 2007 6:21 am
by WobblyLegs
All good advice, thanks...
To be honest, it's not possible to rush right now - it's raining again (still?). That gentle, soft, misty, long lasting kind of rain that just soaks absolutely everything. It even feels damp inside the house now. Nearly turned on the central heating last night...
Starting to think that it might not actually get on the water this year. I need a good two-week 'Indian Summer' to get the last sealing and possible painting done. It doesn't look good so far.
But you're all right - and I
would like to get it done properly, rather than just launched...
Tim.
Posted: Sun Aug 19, 2007 6:38 am
by TomW
Hey Tim send Cracker and I some of that rain. I haven't seen any in a couple of weeks and it is dry as a bone around here. With record heat it hasn't been a fun summer.
Well hang in there the rain has to end sometime and you'll get her painted before fall. Work on what you can when you can, you are doing such a great job on her.
Tom
Posted: Fri Aug 31, 2007 5:32 pm
by WobblyLegs
So, the past few weeks have been a bit miserable (again).
Apparently we are on target for the wettest summer ever recorded, and the wood is showing it by softening and swelling. That was, up until last weekend.
Since then, it's been a bit dryer - so here's what I've been up to...
The last pieces of the sole (to the sides of the motorwell) have been foamed, glued and taped:
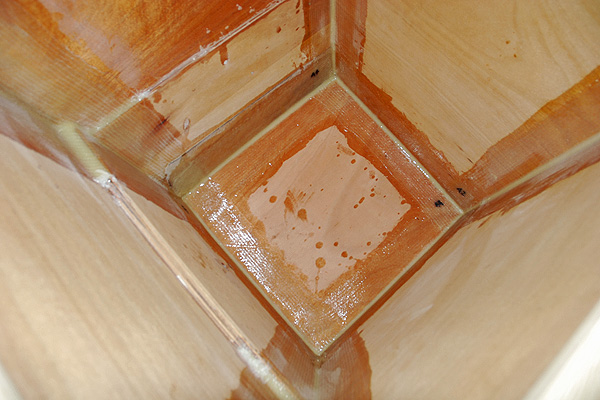
The area under the benches prepared for sealing with a layer of glass (I don't know what's going to be thrown in there, so a bit of protection is good!):
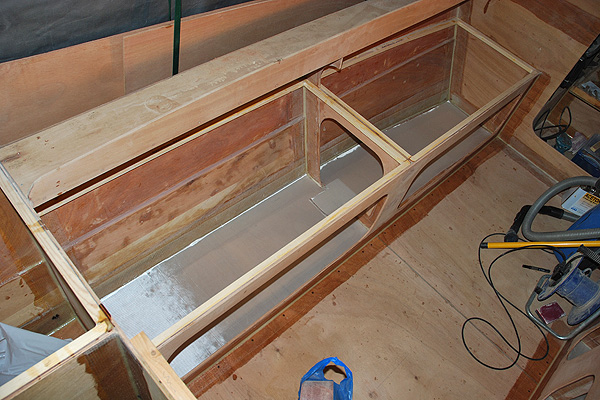
And wet out:
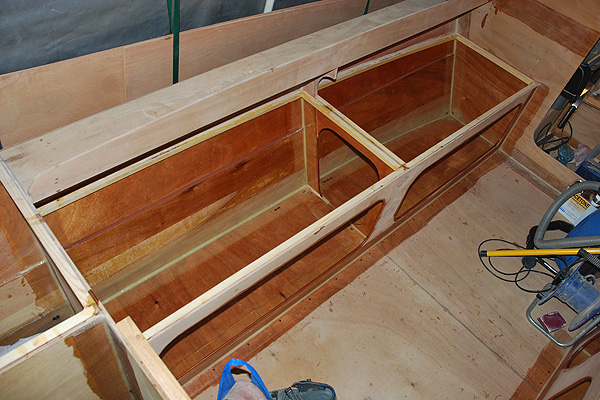
And, after much thought about how to sort out the deck/side transition, I decided to put in a bit of a toe-rail. Mainly to finish it off nicely, and to give a bit of security for slipping feet on the deck. Two sections at the bow going on first:
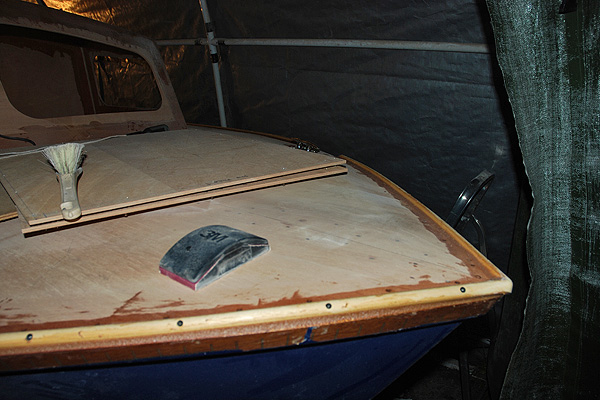
Then a second section (this is starboard):

And, a gap between the bits of wood - two reasons; 1) allows drainage of any water on the deck and 2) I'll be putting a fillet of hard wearing mix in there, right where ropes will hang when using fenders, or when mooring, so they don't rub against the top of the toe-rail.

I've also installed backing plates for all six cleats going on the deck, but they don't make for interesting pic's.
And, the postman delivered all my steering gear (except the wheel) two days ago, so can now start routing the cable and bolting stuff to the console. Hey - getting there!!!
BTW, I went for the UltraFlex system - I'm not going against recommendations, but after a search on here the word "ultraflex" doesn't appear (so no negatives there) - and I like their design, and I'm happy to be guinea-pig!! I'll let you know how it works.
Mmm, two more days of dry weather predicted for the weekend!
Later,
Tim.
Posted: Fri Aug 31, 2007 7:22 pm
by Knottybuoyz
Nice work Tim.
That's gotta be a milestone installing the first hardware!!!
Have you thought about something like this for your mooring lines off of the fwd cleats?

A little bit more chrome won't hurt!! (well maybe the Mrs's Mastercard).
Nice work.
Rick
Posted: Fri Aug 31, 2007 10:16 pm
by Dougster
I like those toe rails! Are those screws permanent or temp? What wood? How you gonna finish 'em? It's a nice touch, visual and kinda tactile.
Tryin' to learn stuff Dougster
Posted: Sat Sep 01, 2007 4:21 am
by WobblyLegs
Rick,
I probably will put fairleads there one day, but for the moment they can wait.
Dougster,
The screws are temporary, as always. I drill out the holes, then plug them with 5mm dowels glued in, then sanded smooth.
I have no idea what kind of wood it is - the label says "hardwood," they are light and flexible, easy to bend around the curved deck.
I still haven't decided on a final finish for them, or indeed the whole boat. Part of the plan is to decide when the time comes...
Tim.
Posted: Tue Sep 04, 2007 6:10 pm
by WobblyLegs
Easy as one-two three...
1) Sand the sole, vacuum, clean with acetone...

2) Lay the cloth...
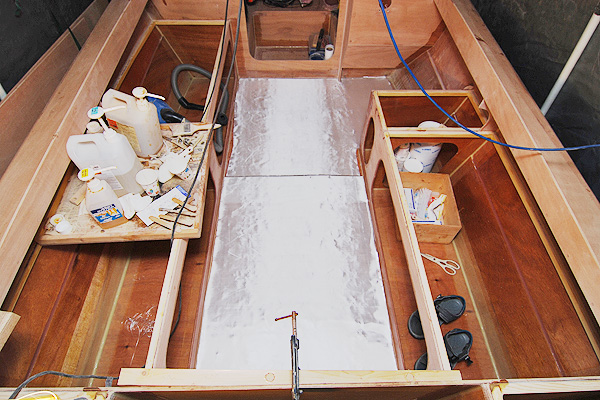
3) Wet it with epoxy...
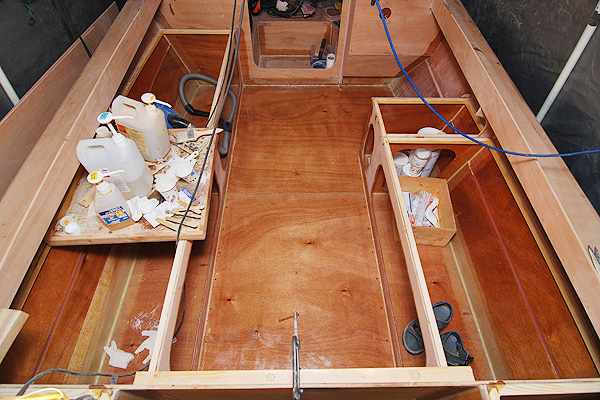
My sole is now sealed!!!
One step closer!!!
Tim.
Posted: Tue Sep 04, 2007 6:25 pm
by TomW
Alright Tim
You may get her in the water this year yet. Have you picked a motor. I know Honda's and Yammi's are really popular over there.
Tom
Posted: Tue Sep 04, 2007 6:40 pm
by WobblyLegs
TomW wrote:Have you picked a motor.
Tom,
Still partial to the E-TEC lump, but I'll be going to the Southampton boat show in two weeks time, and will see what deals are around.
Personal preferences at the moment are the Evinrude or Yamaha four stroke - we can't get two strokes here any more... (apart from E-TEC).
Tim.
Posted: Wed Sep 05, 2007 4:44 pm
by ks8
Yep... she's certainly a boat!
Your neat work and photos are, as always, an inspiration!
Posted: Mon Sep 10, 2007 4:55 pm
by WobblyLegs
A few more tasks completed...
Mounting holes for all the cleats drilled out, ready for filling with sticky goo:
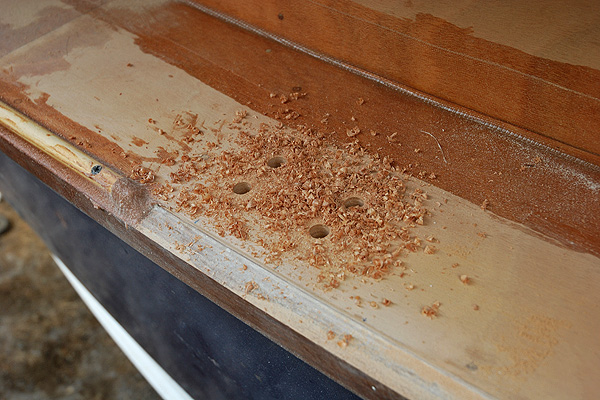
Holes for the steering cable cut. Only to find out the cable I ordered is TOO LONG!!! By half a metre, so too long to take up slack anywhere. Oh, well, phone them tomorrow to see if I can change it! You can also see the steering box loosely mounted in the console.

The underside of the motorwell base is glassed. And the next pair of toe-rails went on, starboard side visible in picture.
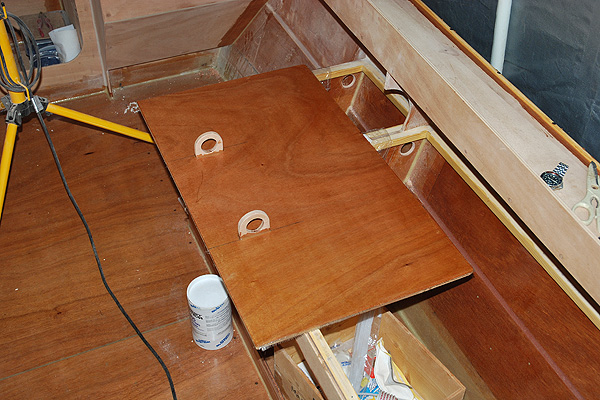
Those loops there are for running cables though, so they hang from the underside of the motorwell. There are matching holes in a similar location in the motorwell sides. This is for future use, when I get around to putting lighting on the boat, and will want to run with a second battery (one on either side of the motorwell).
Tim.
Posted: Mon Sep 10, 2007 5:26 pm
by TomW
Tim, partial to the E-Tech myself. Have a dealer only 20 minutes from the house. Any other dealer is an 1-1 1/2 hours away. Actually stopped in there last week.
Good luck on your selection.
Tom
Posted: Wed Sep 19, 2007 1:33 pm
by WobblyLegs
Some more little stuff keeping me occupied. Not much change to the boat, but it still needs to be done...
Been playing with my (newish) jigsaw a bit more, cutting out little brackets for the battery box tie-down straps (the little plastic ones supplied with the box would break going over a ripple!):
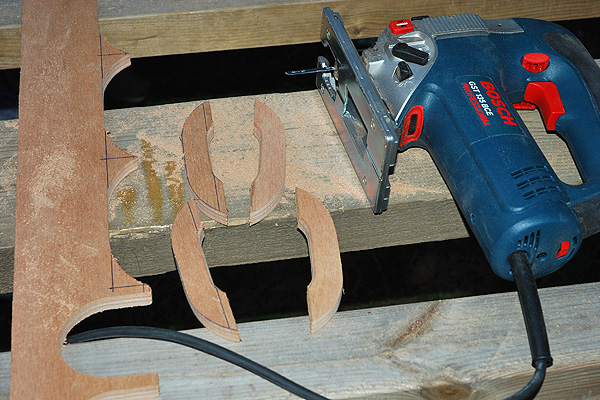
Finished off smoothly:
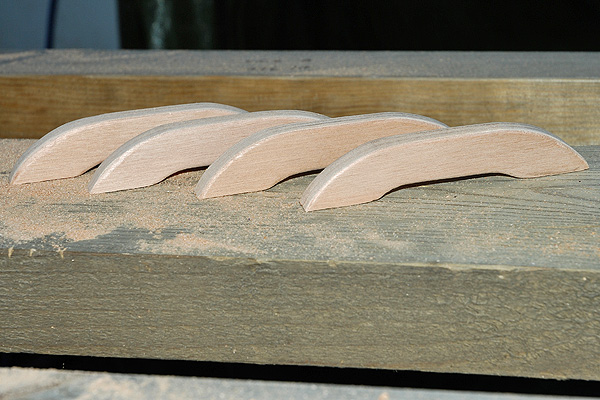
Backing plates for the towing eyes have been glued in (extending to the sole, only 'cos they could rest there while gluing). They were held in place while curing with a piece of scrap ply braced against frame "E":
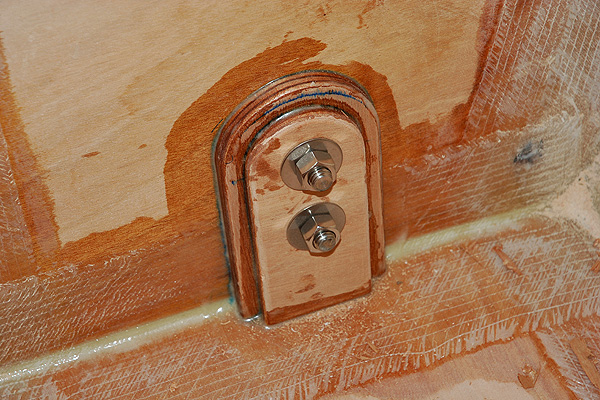
Backing plates for all six cleats glued in place, with a layer of glass on the bottom; for two reasons - a bit of load spreading, and also so I could pour an epoxy/fibre mix in the holes above without it dribbling out (it gets real messy here, working upside-down in a small space!):
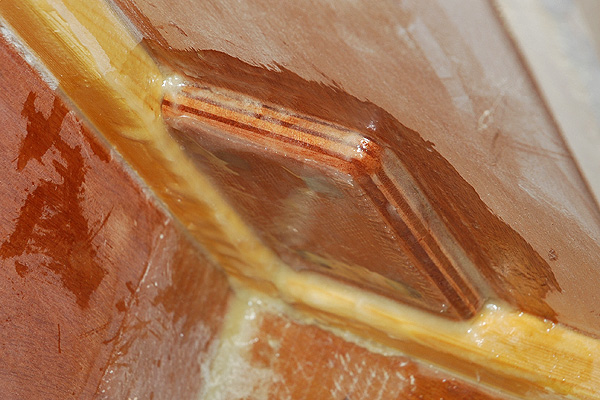
The cleat mounting points from above, filled, not yet sanded and drilled:
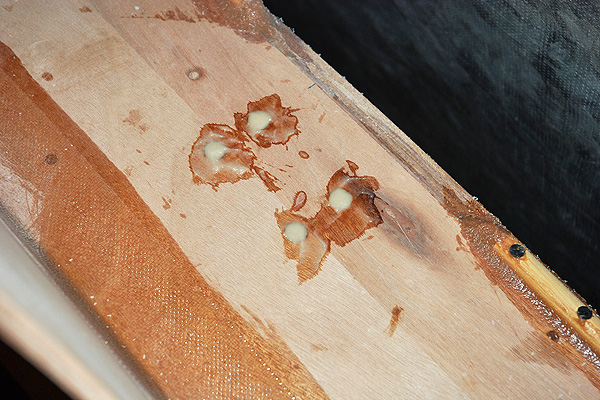
A few more holes - bottom little one for steering cable (I managed to change the 4.5m one for a 4m long cable at the boat show). Top little one for wiring and control cables. Top big one for battery switch:
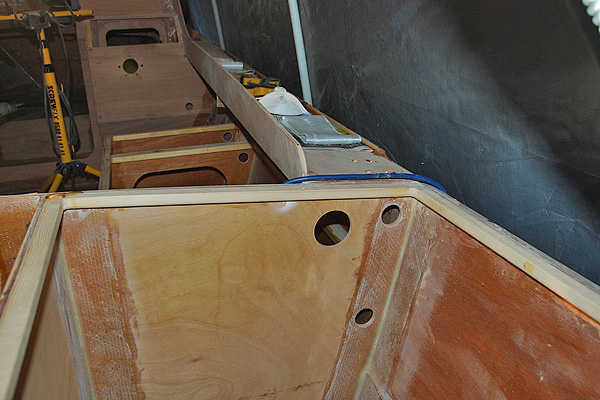
And, one less piece of wood to glue in, the motorwell bottom:
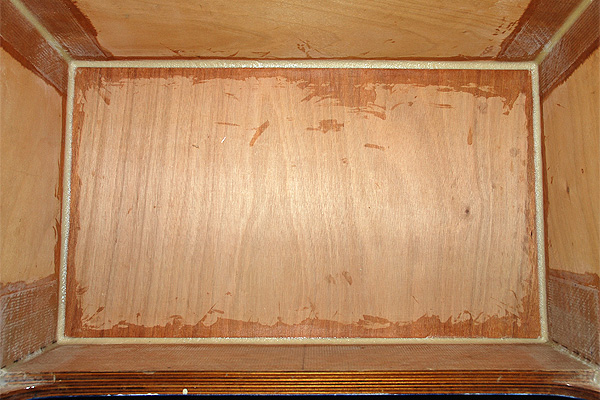
Maybe, just maybe...
...I might still launch this year!
Tim.
Posted: Wed Sep 19, 2007 2:12 pm
by mecreature
All that little stuff adds up.. But it sure does take some time..
looks nice..
Posted: Mon Sep 24, 2007 9:46 am
by WobblyLegs
Windows, revisited...
Several ideas have been going through my mind as to how to mount these - using rubber weatherstrip has been ruled out as anything that can bend to a 76mm (3") radius will have grooves too thin to fit the 9mm cabin panels.
So, mount the windows with screws? Sure, but laying flat against the outside of the cabin looks ugly (imo) and makes them look too big for the cabin (as they would be about 25mm/1" bigger than the aperture). So, the most recent thought (until now) was to screw them onto the inside of the cabin.
That's what I was going to do, but this little niggle of "why haven't I
ever seen a boat with windows mounted inside before?" Been bugging me for a few weeks. Anyway, I now reckon it's a safety issue - a wave hitting an outside-mounted window is just going to press it against the cabin. Hitting a inside-mounted window is a completely different kettle of fish - it would probably blow the window straight into the cabin, along with gallons of water. After all, it's only screw-heads holding it in place...
Oops. So, scrap that idea.
Next?
A bit more work needed, but this is the best I can come up with...
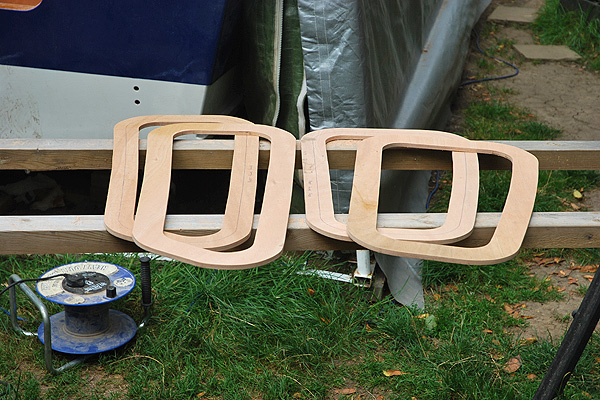
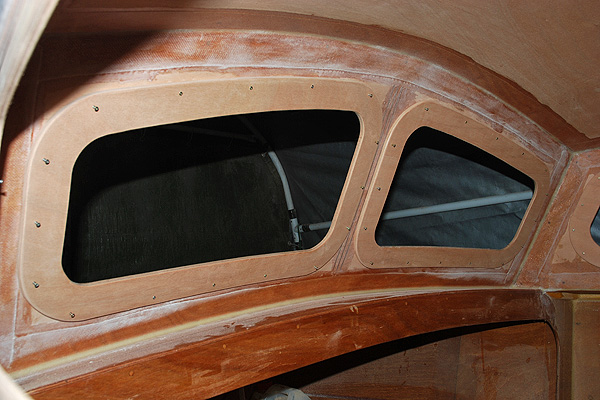

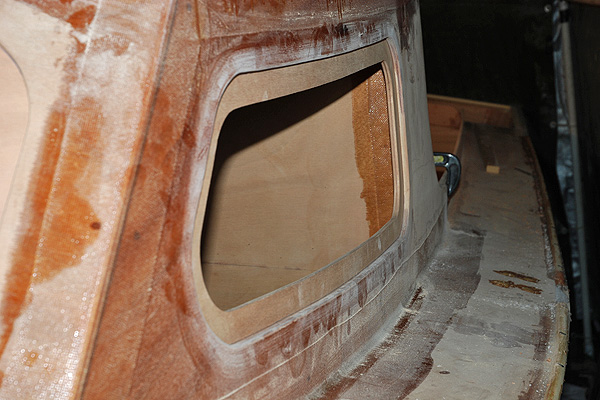
And how they will mount...
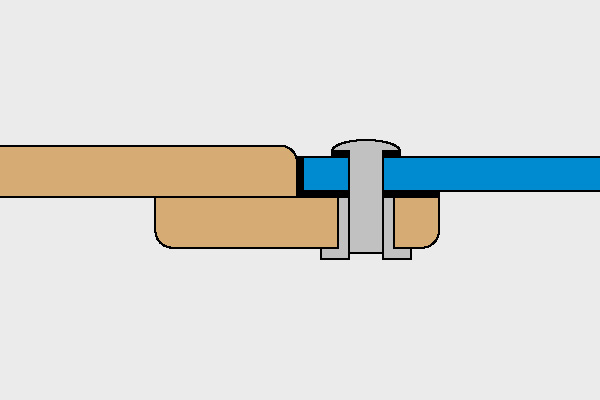
The backing frame is cut out of 9mm ply, same as the cabin panels, with 25mm of glue area to the cabin, and 25mm of window-mount area, which should be plenty. I was a bit worried that they might make the windows too small, but viewing the frames in place from a distance, I think it actually looks better having slightly smaller see-through areas...
And a bit more woodwork done - a section of coaming across the back of the cockpit - hopefully to keep us dry, and in future I see a canvas cockpit-enclosure being mounted and tied down to clips on the outside of the coaming, all around...
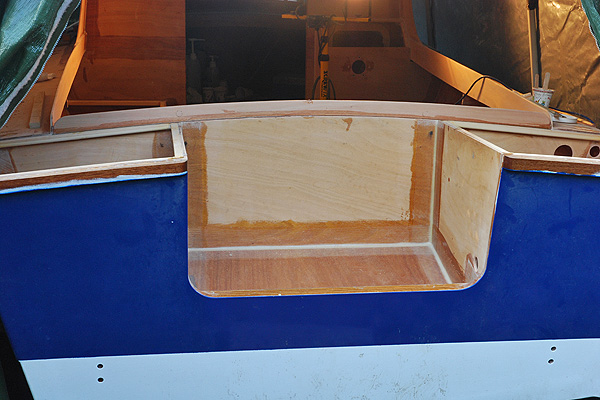
Also visible there is the completed and glassed motorwell.
Posted: Mon Sep 24, 2007 10:13 am
by gk108
Looks good to me. Will your windows be clear or dark tinted? With tinted windows you could paint the frame black on the outside part and they would be practically invisible from the outside.
Posted: Mon Sep 24, 2007 11:29 am
by Cracker Larry
Tim, you sure do beautiful work
Posted: Mon Sep 24, 2007 11:46 am
by WobblyLegs
gk, Larry, thanks for the comments.
I think tinted will look good, and it might keep the interior a bit cooler. It will also give a bit of privacy, as the window apertures are still quite large - I can still climb through the front windows, even after adding the frames!
I think some black sealing tape on the frames before putting the windows in will give it sufficient 'trim.' It's going to look a bit 'industrial' when all the screws go in though.
Posted: Mon Sep 24, 2007 10:15 pm
by gk108
WobblyLegs wrote:It's going to look a bit 'industrial' when all the screws go in though.
Just use bronze screws and folks will think it looks salty.
Posted: Tue Sep 25, 2007 11:42 am
by Lucky_Louis
Looking Great! as usual Tim
We've been on vacation and then I've been down a week with the flu
so haven't been following the board much. Your window solution is quite elegant.
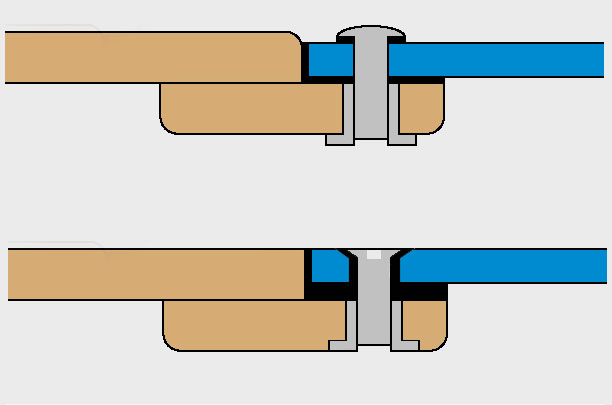
May I offer the following tweaks?
Enlarge the holes and go to a taper head, Allen or Torx drive drive SS screw. The polycarbonate or Lexan won't expand and contract the same amount as your wood so we have to allow room to move. If we don't then the surface of the glass will flex and create a funky, distorted view like a lens. Thicken the primary seal between the glass and the frame to come flush with frame to make cleaning easier and shedding water smoother. Finally, I would recess the nutserts on the inside frames just to keep that surface smooth too.
Or not
Posted: Tue Sep 25, 2007 4:57 pm
by WobblyLegs
Louis,
OK, I missed out the bit about an oversize hole through the window as your drawing shows, but that will be done...
Two things about changing from my idea - 1) the cabin panels have already been routed at about 3mm on the outside (and I like the idea of a slight recess) and more importantly 2) every book/tech sheet/instruction I have read about screw mounting a window stresses NOT to countersink, i.e. the 'glass' has to be able to move underneath the screw head, and a countersunk screw will also exert an angled pressure against the sides of the angled part of the hole which is likely to cause cracks...
...according to the literature...
...Sometimes I think I take this too seriously...
gk, bronze is nice, but all my metal so far is stainless, so I'm keeping with that look. Besides, the screw heads shouldn't be
that big. I hope.
But, again, comments are always appreciated - they help us all build our boats!!!
Louis, where on earth would you go on holiday to from where you live? I go on holiday to get away from cities etc. to places like where you are!
Lucky_Louis wrote: Finally, I would recess the nutserts on the inside frames just to keep that surface smooth too.
Yeah, and I'll get afloat in 2009 if I start doing things like that - do it once, and all other mountings will have to change...
Best regards,
Tim.
Posted: Tue Sep 25, 2007 5:19 pm
by Knottybuoyz
You plan for the windows looks good Tim. Have you considered bedding them on a butyl tape? (Often referred to as "Gorilla Snot") That's the stuff they bed car windows with. It'll stretch and move with the expansion and contraction of the windows/wood and will never dry out. I'm going to tinker some deck hatches together this winter and try that out. It sticks like crazy and so far as I know won't need fasteners to hold the acrylic windows in place.
Something else to research huh?
Posted: Tue Sep 25, 2007 5:26 pm
by Lucky_Louis
OK, abandon the holes altogether and bed the glass in polysulphide bedding compond - no holes, no nutserts, even stresses (think automobile windshield, no screws there). In my version of your sketch, I should have said
"and zero torque on the screws. The heads never touch the plastic, they're bedded and the screws Loctited"
The holiday: We wanted different country and some heat so off to Yellowstone National Park for a few days, then down to SE Utah into the desert for a week out of Moab. Came home through Northern California, to the Oregon and Washington Coasts. 6000km in 12 days
Posted: Tue Sep 25, 2007 5:27 pm
by Lucky_Louis
Dang, that Canuck is FAST!
Posted: Tue Sep 25, 2007 5:29 pm
by WobblyLegs
Knotty, Louis, thanks for that - I'll look into it. Gluing the windows sounds neat! Will it be strong enough to hold the curve of windows - none of them are flat?
Louis, that's LOT of driving!!!!
Tim.
Posted: Tue Sep 25, 2007 5:53 pm
by Lucky_Louis
Strong enough? Hell yes! The windshield in a modern vehicle is actually a part of the structure now. As to the curve: If left alone, the plastic will eventually conform to shape all by itself over time. You can help nature with a hair dryer or gentle use of a heat gun. A few temporary clips around the perimeter to hold the glass in place should work well. What's a few more holes to fill at this point? Or... you could get Mrs. Wobbly to hold them in place while you heat the surface (she gets to wear oven mitts).
Posted: Tue Sep 25, 2007 6:27 pm
by Knottybuoyz
Sorry Louis, slow day at work!
I saw a buddy bed lexan windows in his sailboat that way. He taped a poly sheet over the window, inflated it and let the sun provide the heat. Just like a mini greenhouse. Got Sun there Wobbly? *lol*
Posted: Wed Sep 26, 2007 5:06 pm
by ks8
WobblyLegs wrote:Lucky_Louis wrote: Finally, I would recess the nutserts on the inside frames just to keep that surface smooth too.
Yeah, and I'll get afloat in 2009 if I start doing things like that - do it once, and all other mountings will have to change...
You're not kidding on that one!
Consistency can have its appeal if there's enough time to plan. Else, just get it together and out on the water (or so I keep trying to tell myself).
Posted: Wed Sep 26, 2007 5:44 pm
by Lucky_Louis


KS8 said:
Consistency can have its appeal if there's enough time to plan. Else, just get it together and out on the water
Err... Tim, while KS8 is undoubtably one of the finest craftsmen on this site, I the majority of us will agree he's not in the running for Commodore of the "Get 'Er Done" club.
A Forstner bit in a second drill would add 5-10 seconds per fastener. That's 16 minutes for 100 fasteners. What I was considering is that the windscreen in your (and my) climate will fog up with condensation. When you wipe it with the towel you will keep on board for that purpose, the fibres, water, and dirt will catch on those raised little discs and can wick underneath them. They also will sweat because that metal will pull cold from outside the screen to the warmer inside. Before long, they'll look pretty grody.
Of course, all sealant, no fasteners would take care of all that
Posted: Wed Sep 26, 2007 6:02 pm
by ks8
Man, do I feel that one!
Maybe that's why I've gotten more done in the last year than the three previous!
Great point about the wipe down and all. Please to excuse my hasty words. I have to keep telling myself every day, *Get it done now... no more changes... keep going... almost there... almost...*.
Tim... with the job you've done so far, on that beautiful boat, I withdraw my previous thought. Definitely take your time with those final details. I can't stand it when a rag hangs up on fasteners like that. Even if you need another thickness of frame to make that recessing easier and stronger, it may be well worth it to make wipe downs easier, but it certainly isn't mandatory. THose little things make life more pleasant while underway. Its one of the reasons I finished my seat compartments (easier to wipe clean or sponge out), and why it is now six years later...
, but I like the idea of an easy wipe down of the window in front of you, particularly if needed while underway. Let us know what you do (I'm sure you will). Either way, I'm sure you'll do a super job.
Posted: Thu Sep 27, 2007 10:49 am
by kiwi
WARNING - THREAD HIJACK!
Tim wrote us a nice Southampton boat show report with tons of photos.
Tony
(PS I see you can upload photos to the bateau gallery once more)
Posted: Thu Sep 27, 2007 3:11 pm
by ks8
An official hijack with no link to the report???
Posted: Thu Sep 27, 2007 3:23 pm
by kiwi
Link in my signature
Tony
Posted: Thu Sep 27, 2007 4:57 pm
by WobblyLegs
Window frames are now glued!
After the last pic (where the frames are dry fitted, screwed in place), I drilled holes middle top and middle bottom of each frame, right through the cabin walls, shoved a dowel in there, and dabbed some epoxy on the outside, then took the frames off...
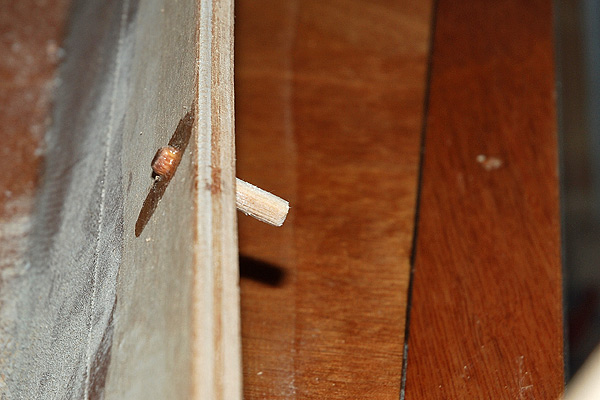
Applied sticky stuff, and replaced in place!!
After gooey cleanup of "outsqueeze":
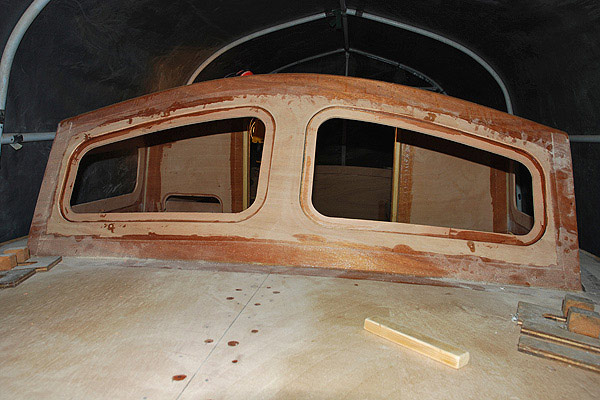
It's getting cold here again, but the fan heater still works and I've had it around 17ºC all evening in the tent!!!!
There is hope!!!
Keep building,
Tim.
Posted: Fri Sep 28, 2007 4:30 am
by Yoda
Amazing what with the windscreen.
And my daughter, her husband, and the 2 boys are enjoying London for a few days. Then they're going to Germany.
She loves London.
Posted: Fri Sep 28, 2007 8:11 am
by Daddy
Tim, I noticed in your report on the Boatshow that you wold like to know how to apply a rope rubrail. I put one on my tender by installing a wood rubrail first that had a convex radius, applied a generous bead of 5200 then fitted one inch mylon rope along the sheer and terminating on the transom with a coil of rope about 4 inches in diameter. The 5200 grabbed immediatly and three years later and lots of abuse it still holds together and looks good.
Daddy
Posted: Fri Sep 28, 2007 8:43 am
by JimW
Tim,
You are loosing your touch for clean work. I see a few drips there.
I'm just teasing. Your boat is by far the cleanest construction site I've ever seen. Looks great!
Posted: Fri Sep 28, 2007 8:51 am
by steve292
Looks great Tim, how are you going to finish the topsides?
what have you decided on for power?
You never know ...........a mild autumn & you might,just might get there yet..........
Posted: Fri Sep 28, 2007 1:28 pm
by ks8
*Outsqueeze*... must be added to the nautical and boat building glossary.
Posted: Fri Sep 28, 2007 2:49 pm
by WobblyLegs
Yoda wrote:...enjoying London for a few days. Then they're going to Germany...
Holiday? I hope they like rain... Germany's nice, been to Hamburg a few times and Munich. Its a different world to here. Lovely old architecture (Munich, that is - Hamburg ended up as a practice run for Dresden a little while back, and it's haunting to walk around there!).
Daddy wrote:I put one on my tender by installing a wood rubrail first that had a convex radius, applied a generous bead of 5200 then fitted one inch mylon rope along the sheer and terminating on the transom with a coil of rope about 4 inches in diameter. The 5200 grabbed immediatly and three years later and lots of abuse it still holds together and looks good.
I'll look into that idea, but it's for much later...
JimW wrote:You are loosing your touch for clean work. I see a few drips there.
Naah, losing my touch as to when to take photo's!
I know I mentioned it before somewhere, but it is much, much easier and quicker (and cheaper) to spend a few minutes scraping off dribbles and
outsqueeze than it is to go back later and sand it off!!!!
steve292 wrote:Looks great Tim, how are you going to finish the topsides?
what have you decided on for power?
You never know ...........a mild autumn & you might,just might get there yet..........
Topsides are going to stay bright until after launch. Not too worried about UV on the epoxy, not much sun lately anyway. I will probably paint next year, but haven't decided where and what colours... I like bright, but not when it shows messy joints in the wood.
Motor, still Evinrude, 50 or 60. Depends on budget. 60 may only be used WOT fairly scarcely (on nice flat fast water...), but it will be nice to know it's there when needed.
Mild autumn? That would be good.
ks8 wrote:*Outsqueeze*... must be added to the nautical and boat building glossary.
I couldn't think of anything else to call it! But it's costly - I did two sets of mixes, one for the side frames (then installed), one for the front frames (then installed). Later in the evening I went out to scrape off the
outsqueeze and ended up with an equivalent amount of goo as one mix! I guess its better than too little...
This weekend, hopefully, is one of sealing as much of the boat as possible.
Later,
Tim
Posted: Fri Sep 28, 2007 2:57 pm
by ks8
Go have at it!
Posted: Tue Oct 02, 2007 7:51 am
by WobblyLegs
Sealing has started...
Starting inside the cabin (after removing all the dowel plugs that filled the screw holes):
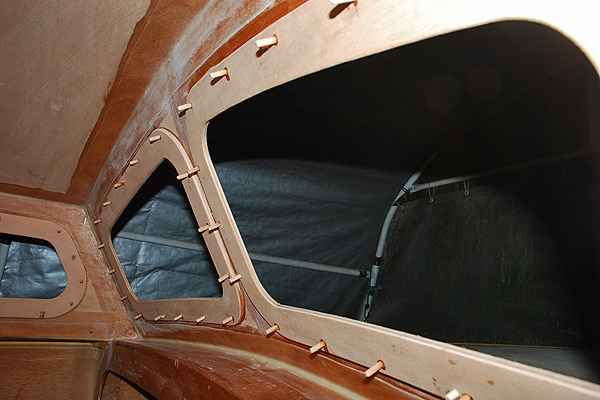
And the first layer of epoxy, cabin sides and windscreen inner now done, along with the 'dashboard':
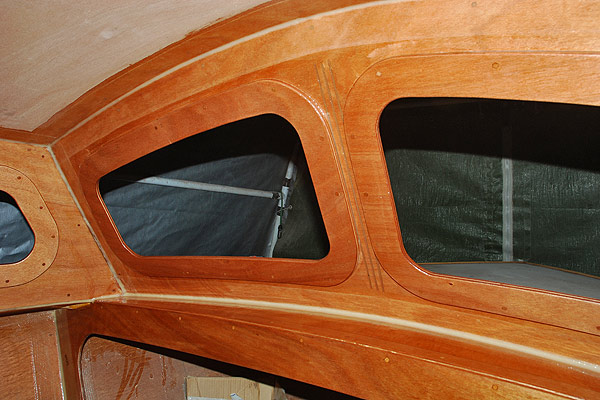
The motorwell side lockers are also sealed and awaiting battery strap bracket and towing eyes to be fitted, then those two deck parts can go on.
Autumn seems to have arrived, so I am no longer trying to beat the season, however I shall just keep plugging along until it floats. At this stage, I dare not say when - y'all will know 'bout the same time as I do.
Keep building,
Tim.
Posted: Tue Oct 02, 2007 10:25 am
by Lucky_Louis
Looks like you're finally get the knack for filleting Tim
Looking great as usual. Keep 'plugging' away and all of sudden when you least expect it, you'll find that you're done.
Posted: Tue Oct 02, 2007 10:42 am
by ks8
What? No cup holders on the dash?
Posted: Thu Oct 04, 2007 3:43 am
by Betowess
Tim, I'm fairly new to the board, so now having just found this thread all I can say is: WOW, really impressed with your work. I just spent the better part of an hour going through some of your thread. Beautiful boat. I love the C17 and would love to build one some day.
WobblyLegs wrote:
Also, mixing sticks won't be strong enough - you'll need to make your own. I used scraps of 6mm ply, long enough that my hands were clear of the mixing tub when stirring. My wrists ached after each mix.
You probably have tried this. I had to mix up some heavy non skid for a deck and bought a little $2.00 paint stirrer that is used in a battery powered drill motor. Works like a charm for mixing epoxy and woodflour and heavy stuff. No tired fingers!
Anyhow, hats off to your inspirational work there. If its any consulation, we've had an absolutely wet as hell September, fairly wet summer and its still raining in the Pacific NW cats and dogs today.
bob
Posted: Mon Oct 15, 2007 5:08 pm
by WobblyLegs
Betowess wrote: I just spent the better part of an hour going through some of your thread. Beautiful boat. I love the C17 and would love to build one some day.
Thanks for the comments Bob - I think the C17 is an incredibly practical design - the more time I spend in it, the more impressed I am with the space available!
An update, and some more pics...
Construction-wise, it seems I am nearly finished!
My benches are now complete, starting with laying a sheet of glass on the underside of each bench top:
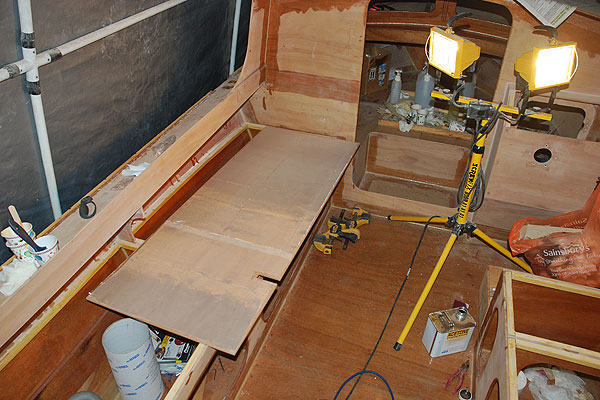
And nicely sealed...

And then glued, screwed and weighted into place (starboard)...
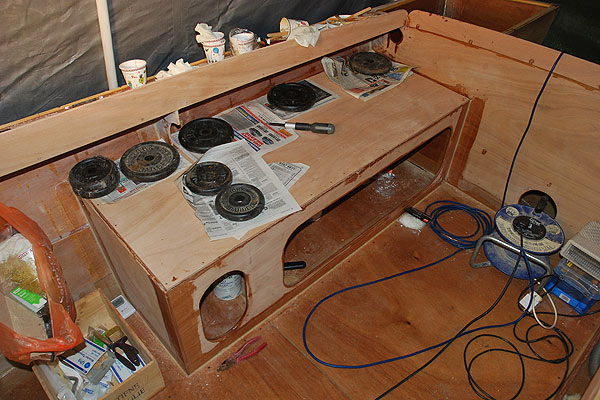
...and port...
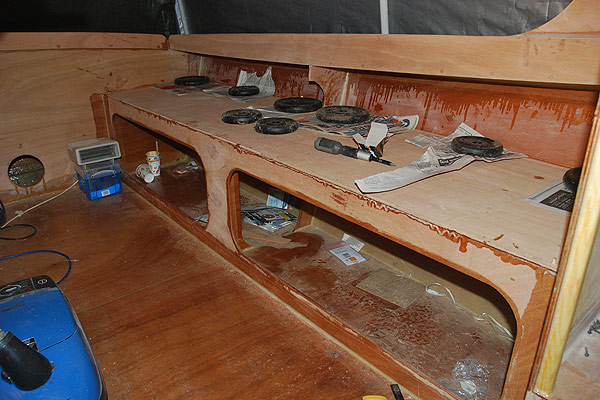
That one's especially for JimW - see the runs?
As with the deck, and any area where there is likely to be slippery surfaces, I've added a little edging, just for a bit of extra security to stop peep's slipping off surfaces when climbing around. In this case, hopefully there is enough of a lip to hole some cushions in place too. They are quite thin pieces of half-round wood (hence the light weights), but enough I think...
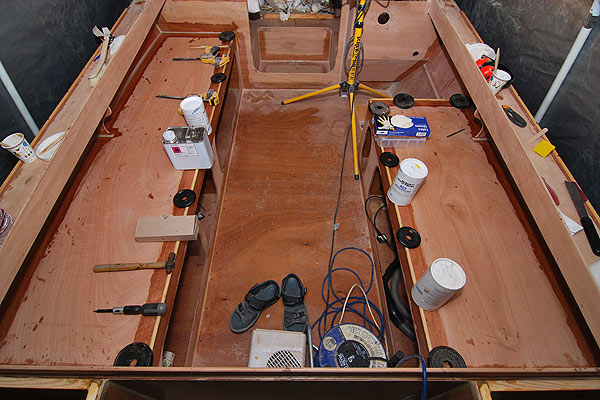
On to the motorwell lockers - all sealed, al holes cut, and then another coat of epoxy. The holes in the motorwell are for: bottom right - steering cable, top left - electrical and throttle/gear cables (decided following
this discussion). Corresponding holes in frame "E" - bottom for steering (cable runs under the bench), and top (near hull side) for control (elec/throttle). The big top one in that frame is for the battery switch. You can also see where mounting holes have been drilled 'n' filled with epoxy for future screws:
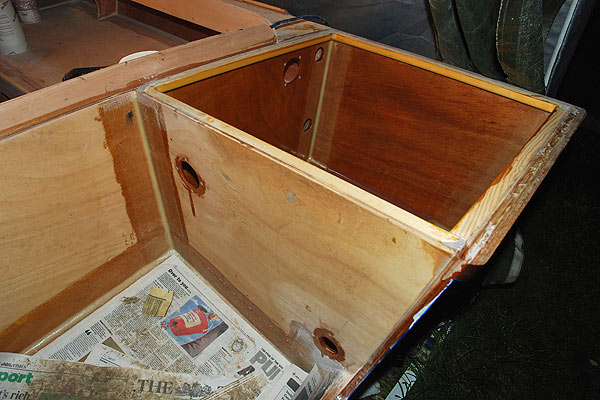
More in the boxes - I made some "C" shaped loops that straps for the battery boxes can run under to hold down the boxes - a pair each, port and starboard. There is a gap of about 3mm under those 12mm ply loops...
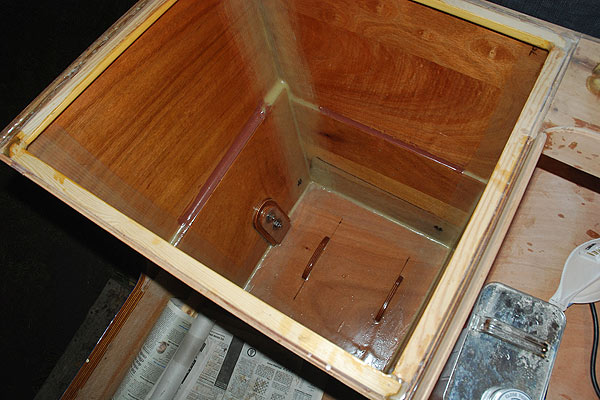
In the above pic, nuts are holding the towing eye in place, they were glued in tonight using Sikaflex on the outside faces, nuts tightened gently by finger to squeeze the glue/goo outside, and will be left 'til tomorrow - then I take the nuts off, goo under the penny-washers, and finger tighten again. Spanner tighten much later, after goo has become non-goo!
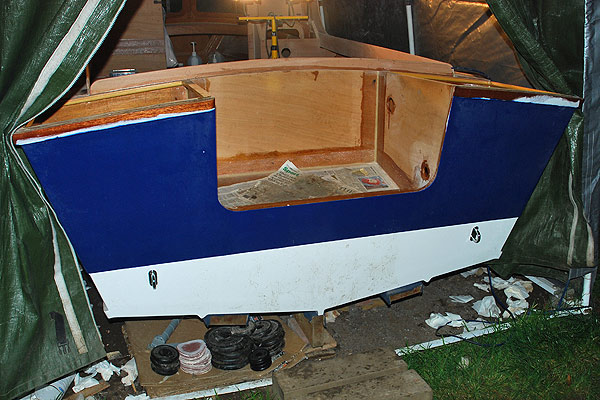
So, that's where we are for now.
Louis, yeah, I'm finally getting the hang of fillets...
ks8, cup holders? Naah, not there - need to be closer to the drivers seat. Besides, There's going to be a whole FRIDGE in there somewhere, maybe, one day...
Have a good week peeps.
Tim.
Posted: Mon Oct 15, 2007 5:42 pm
by steve292
Nice work Tim,your getting closer.I am envious of your work,bueatifully done.
steve
Posted: Mon Oct 15, 2007 5:44 pm
by Norbas
Looking really good Tim, I'm wondering how you plan to use the boat when you're done?
Since the TW28 I was building has been postponed for a few years, it seems, I was looking at designs which would be good for a bit of sea fishing off the Lancashire/North Wales coast. Can't help but wonder, looking at how well your boat is coming together, whether the C17 is a suitable candidate.
Too many boats to choose from and not enough knowledge to make an educated choice
Sure is fun browsing the bateau site all day pondering though!
Dave
Posted: Mon Oct 15, 2007 5:53 pm
by WobblyLegs
Norbas wrote:I'm wondering how you plan to use the boat when you're done?
Dave, when I was looking for a boat I wanted something smallish, trailerable, somewhere to sleep, something that could fit in my garden to build, could go at a good speed when wanted, shelter from the weather, and reasonably light.
Oh, and wanted outside in-the-sun relaxing space.
That's the C17.
We are used to hiking and camping, so this boat is just right for the two of us to do a week or two cruising coastal (harbour-hopping) and inland waterways.
I looked at the HM range, and I like them, but they just didn't quite fit the 'compact' that I wanted.
Regards,
Tim.
Posted: Mon Oct 15, 2007 7:17 pm
by Cracker Larry
In the above pic, nuts are holding the towing eye in place,
Tim, your work is outstanding and an inspiration to us all. Beautiful
But I've just got to ask, no offense meant,...why are your stern eyes so low
Maybe you do things differently in England, but around here, those eyes have about 4 purposes.
1. They are called lifting rings. A lot of our marinas have hoists, with chain and hooks, to lift your boat off the trailer and into the water. You are responsible for unhooking it on launch, and hooking it up on retrieval, while the hoist operator pushes the buttons. Some times a 20' lift. You have to be able to easily reach them. I would not want to have to lean over that far, or put my arms into cold water. You also want to minimize chain exposure to the topsides, for obvious reasons.
2. Pulling nets. Here I rig a bridle with a float. I must be able to reach them, preferably without getting wet. If the Game Warden is coming I need to reach them quick sometimes and pop the shackles
They've got to be high enough to watch the lines and keep them out of the prop.
3. Pulling skiers, knee boards, whatever. Again I use a bridle with a float. I need to be able to snap it on, snap it off, and keep lines clear of the prop. Skiers generally like their tow line above water.
4. Towing other boats. Again a bridle rig. They must be accessable to rig, and accessable to cut loose. Easy to watch, clear of the prop. Without getting wet or risk falling out the boat.
In the last 3 cases, I want my tow line well above the water line. That's the only way to monitor it.
So, I ask, why'd you do that
Posted: Tue Oct 16, 2007 5:14 am
by WobblyLegs
Cracker Larry wrote:So, I ask, why'd you do that
Larry, I'm going to have to get back to you later on that - I drilled those holes a long time ago while the boat was still upside-down, and I recall looking through a lot of paper-work (plans) to find the locations of the eyes.
I'll have a look when I get home tonight, see if I can find the info again.
Your points about location make perfect sense. It is, of course, entirely possible that I just plain screwed up...
Tim.
Posted: Tue Oct 16, 2007 5:40 am
by Knottybuoyz
Our current and previous boat had 4 eyes on the stern. Two about where Tim's are and two above the swim platform. The two below the swim platform are for the ratchet straps that hold it down on the trailer and the two above for all the reasons that Larry stated. I also use the eyes above the swim platform to tie the boat closer to the dock by looping the mooring line through it and back to the dock cleat. Just add two more Tim!
Posted: Tue Oct 16, 2007 6:33 am
by steve292
A question ,Tim,if I may.
Where are you sourcing your deck/hull hardware from?
steve
Posted: Tue Oct 16, 2007 6:38 am
by WobblyLegs
Steve,
All if it come from
SeaScrew.
Reasonable prices, quick delivery.
Tim.
Posted: Tue Oct 16, 2007 8:37 am
by JimW
Whew! I see the runs. HE IS HUMAN! I feel better now. I'l get my sureform tool ready.
Posted: Tue Oct 16, 2007 10:34 am
by fmiles
Tim, didya check out
http://www.a2a4.co.uk ?
Posted: Wed Oct 17, 2007 12:52 am
by Betowess
You could always put some velcro on seat cushions and seat benches, like they do on new couches. Looking great, and I imagine the lower eyes might work well to help tie down the outboard or the boat more securely to the trailer.
Posted: Wed Oct 17, 2007 10:17 am
by WobblyLegs
WobblyLegs wrote:Cracker Larry wrote:So, I ask, why'd you do that
...It is, of course, entirely possible that I just plain screwed up...
Tim.
Larry, the only dimensions on the plans showed how far from the side the eyes were to be positioned. There were no actual measurements for distance above baseline, so I must have estimated from the drawing... or maybe just measured 3" (which the bottom hole is) like everything else seems to be
They are perhaps only an inch lower than the drawing (only screwed up a l-i-t-t-l-e bit). An inch higher, and I don't think it would have solved your concerns. It may be that I might have to put more in to meet those requirements, if needed.
Easily done later, when building your own boat!!!
A little photo-montage for you:
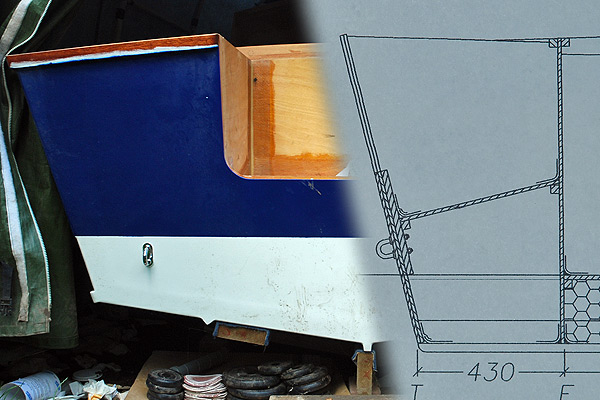
Regards,
Tim.
Posted: Wed Oct 17, 2007 4:19 pm
by WobblyLegs
Well, I have now finished building (according to the plans)!
Everything from now on is sanding, sealing and making it look nice.
Oh, and some wiring, cabling and stuff.
And a couple of dowels here and there...
But really, that last piece of wood in the plans has been glued in place...
Aft decks done:

Last night I sealed the inside of the eyes with Sikaflex, finger tight, and they will need to be tightened down more later, but as they are now under the aft decks, I thought I'd leave myself a little reminder for when I cut the hatches... Just in case...
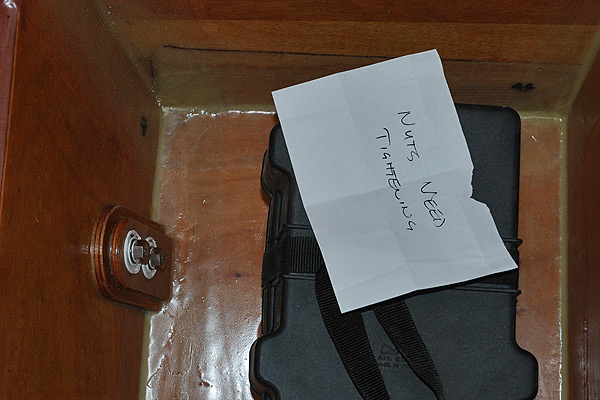
Feeling good!
Tim.
Posted: Wed Oct 17, 2007 4:28 pm
by steve292
Congratulations Tim!!!
Posted: Wed Oct 17, 2007 4:30 pm
by Norbas
I think you missed a spot...
Nice one Tim, when do you think you'll launch?
Edit: That is, ready to launch of course
Posted: Wed Oct 17, 2007 7:00 pm
by Cracker Larry
Tim, nice photo montage
The last piece of wood isn't glued in place yet, though. The last piece(s) should be the backing blocks for those higher stern eyes you're going to install
You have really done a beautiful job on that boat. Hey, I had to look real hard to find something to pick at
Posted: Fri Oct 19, 2007 3:53 pm
by ks8
Yes... I see the *run* also!
Last piece glued in... great feeling at that milestone, isn't it!
Posted: Fri Oct 19, 2007 4:05 pm
by WobblyLegs
ks8 wrote:Yes... I see the *run* also!
Last piece glued in... great feeling at that milestone, isn't it!
Yeah, but as Larry said, not
really the last piece. However, it is the last from the plans, which is good. Just in time too - last night went down to 2ºC, the night before (when I glued) was 3ºC but went up to 25ºC in the tent the following day and the epoxy feels right.
Sunlight predicted this weekend, so will be doing some trim work and tidying.
I think it's going to be a COLD winter.
How's the OB performing?
Tim.
Posted: Sat Oct 20, 2007 4:36 pm
by Lucky_Louis
Congrats on completing another phase of the build Tim. Not to be a party poop but the items you describe ...
Everything from now on is sanding, sealing and making it look nice.
Oh, and some wiring, cabling and stuff.
And a couple of dowels here and there...
... will naturally take you waaay longer than you think it will. Drying and curing time on the various finishes is what kills you. Got a chum with a heated garage or shop you can borrow? I may have missed it, but have you purchased or settled on an engine yet?
Posted: Sun Oct 21, 2007 1:35 am
by TomW
Way to go Tim. have a pint to celebrate.
Tom
Posted: Sun Oct 21, 2007 3:22 pm
by WobblyLegs
Lucky_Louis wrote:I may have missed it, but have you purchased or settled on an engine yet?
No, you haven't missed anything...
Trailer first, then motor. Or is that motor first, then trailer. I don't know...
Still more-or-less decided on the E-tec 60, but then again?
No, I don't struggle with decisions.
Or do I?
hehe
Now struggling with condensation in the tent again, time for the inner tent to go back in. Damn, and I had so hoped it would not spend another winter in the garden.
Tim.
Posted: Sun Nov 11, 2007 7:22 pm
by Daddy
Wobb, havent heard from you lately, hope all is well. The reason for my mail is that I am jealous of your fine looking fillets and wonder what is your recipe? Mine have been a bit saggy and I am not happy with the results. I have been using equal parts of colloidal silica, blended filler and wood flour in a peanut butter consistancy. When I used West System I only mixed in silica and got great fillets but am now using marinepoxy. Great for laminating but I need help wit the fillets.
Daddy
Posted: Sun Nov 11, 2007 7:55 pm
by Cracker Larry
Daddy, you're making it more complicated and expensive than it needs to be. Fillets are structural. Silica is brittle, blended filler is soft and expensive
, it's for fairing.
Just use wood flour with the Marinepoxy. If it sags it is too thin, add more wood flour. After the fillets start to stiffen up just a little, brush on some epoxy and it will smooth out nicely.
Posted: Sun Nov 11, 2007 9:58 pm
by Daddy
I guess I have not been adding enough wood flour, I noticed that Tims fillets were white and assumed he was using silica. I have mixed some pretty stiff fillets just using wood flour only to watch them sag away from the joint. Frustrating as heck. I am stubborn though, gonna get it right. Marinepoxy must have a different formula than what I was used to using on my other boats so this sagging is a new a irritating esperience. No body wants to sag.
Daddy
Posted: Mon Nov 12, 2007 2:00 am
by kiwi
I think he is using cotton (microfibres). That is what I use on all filets that will be painted. A little bit of silice to stop sagging too.
Tony
Posted: Mon Nov 12, 2007 4:49 am
by WobblyLegs
Hi guys,
Yeah, still around. Working slowly as its getting colder here. Frost this morning.
My fillets are epoxy and "micro-fibres" (as Kiwi says, cotton fibres). No silica. I did get a bit of sagging (I didn't want to mix it too dry), but then all the fillets were ground and sanded before tape went on. There were only a couple of places where I filleted and taped before fillets cured, and those were the joins between the gunwale/foredeck undersides and the hull.
I suppose I could have added a bit of silica to stop the sagging, but I don't think it would have made that much difference. The only place I have used silica, is when creating the shape of the 'stem' at the bow - where it is quite a thick mix, ladled on and then sanded down to shape. You can see here (the white bits are silica-mix) where it has been filed down for the bow-eye...
As an update, all the "toe-rails" are in place now, all screws removed, all holes plugged with dowels, and all dowel ends now cut off. I just need to smooth off the dowel stubs, and then its back to sanding and shaping of various lumps of filler and epoxy around the edges, mounting holes etc.
Keep building,
Tim.
Posted: Mon Nov 12, 2007 4:56 am
by kiwi
Everything back to normal - colder in the north, warmer in the south... You can imagine me watching the weather on the BBC seeing you have 11°C the morning and us -1°C Tim... 10°C here this morning.
Cheers
Tony
Posted: Fri Nov 23, 2007 8:25 pm
by TomW
Hi Tim hope all is well and it's not to cold over there. Finally hit our Mounain temps of around -3-5C today. Anyway what I want to ask is how far above the water line are your scuppers. I now hve 5 boats with an 8" DWL that I am considering and sole height above DWL is imporatant.
Tom
Posted: Sat Nov 24, 2007 5:08 am
by WobblyLegs
Hi Tom,
All's well, though winter is definitely on its way here, -2ºC last night! It looks like everything is on hold now for the next few months...
I'm afraid I can't answer your question, as I haven't done scuppers yet. My sole is laid exactly according to plan, making it about 210-215mm (8 1/4 - 8 1/2") above the keel (excl. skeg) taking into account the thickness of the hull. DWL is 8" according to the plans.
So, I want to put something in the sides, right at the back of the cockpit as close to the sole as possible, but it needs to be a valve-type fitting so as not to let water in during normal use.
If you have any ideas what to use, I'd love to hear about it...
I know that quite a few on here have (or are planning to) raised the sole, but I only started noticing those discussions after mine was laid. Also, I figure if it's according to the plans, it should be okay.
I think I might wait until the boats been on the water before fitting scuppers, to see where the waterline is.
Regards,
Tim
Posted: Sat Nov 24, 2007 11:33 am
by TomW
Thanks Tim that answered my question. Happy holidays if I don't talk to you before then.
Tom
Posted: Sat Nov 24, 2007 11:34 am
by steve292
WobblyLegs wrote:Hi Tom,
So, I want to put something in the sides, right at the back of the cockpit as close to the sole as possible, but it needs to be a valve-type fitting so as not to let water in during normal use.
If you have any ideas what to use, I'd love to hear about it..
I think I might wait until the boats been on the water before fitting scuppers, to see where the waterline is.
Regards,
Tim
You & me both Tim, I can't find any suitable commercially available valved scuppers in th U.K as yet. I am starting to think seriously about this now as I want the peace of mind of self -bailing.
Posted: Sat Nov 24, 2007 5:17 pm
by TomW
Steve, Tim look up T-H Marine I don't know if they have a site on your side of the pond but they say they are world wide. If they are there they should be able to give you UK distributers. For both of you I would try to run the scuppers out the transom. Tim your sole is very close to the waterline and running them out the transom will give you 20" before the water backs up. Steve I don't know about your sole to waterline height, but I always prefer to run them out the transom on general purposes, 2" pipe does the job very nicely, although I hate pipe and prefer the larger 2x5 scuppers and build a box of that size between the last frame and the transom. There is a post right now on this subject.
Tim if you want to go with the side scuppers I would build an angled corner so the scuppers set straight. T-H makes some nice 2x5 scuppers that would serve you well. I am going to cut a 2x5 hole in the front of my box(Frame E) then frame an internal box of 1/4" epoxy and glass to the transom and put the T-H 2x5 flapped scupper on the transom. Since you are so far along don't know if you can do this. I really hate side scuppers, think about it.
This is always a sticky subject, I like to have the sole 2-3" above the waterline, but it is not always possible. I then look for boats that have a 2000 displacement or one I can calculate for. I can then adjust the sole for that displacement. The reason I shoot for 2000 lbs is hull wt 700, people 550, engine and controls 400, fuel 30 gal.180, misc 250. Total 2080. You can get around some of the numbers a little bit and get down to 1700 or 1600 but to be realistic that is about as low as you can go.
Tim even at 1600 lbs you are at the minimum for your boat so be careful what scuppers you put in. I would not put them in the sides.
Steve I'm not as familiar with your boat but you can do the same calculations and figure out if you want to raise your sole and how to run your scuppers.
Tom
Posted: Wed Mar 05, 2008 12:51 pm
by Lucky_Louis

Three years next month my friend! The crocus are out, the daffs aren't far behind. Time to dust this thread off and get at 'er Tim!
Posted: Wed Mar 05, 2008 2:19 pm
by WobblyLegs
Ah, Louis, old salt, how goes it?
Well, our crocuses (croci?) have been and gone, and the daff's are out in full force.
However, the next stage is basically lots of sanding of bare wood (decks, benches etc.) and I'm waiting for it all to dry out properly, 'cos I've got a lot of sealing to do.
I'm away for a couple of weeks starting next weekend, returning on the last day of the month, and then things will start happening, hopefully very quickly. I don't want to anticipate a launch date (you know how it goes) but there is a mini-cruise being organised around the Isle of Wight in July for small boats that I aim to participate in. So, a goal, if not a deadline.
Wishing you bigger fish for the summer of '08,
Tim.
Posted: Wed Mar 05, 2008 6:48 pm
by Lucky_Louis
Excellent! Good to hear from you
FWIW, I wouldn't spend a lot of time sanding any wood that you're not finishing bright. Modern 2 part primers can easily cover a multitude of sins and save hours if not days of sanding. You may also want to consider using a 2 to 4 oz finishing glass cloth. I used 'crowsfoot' weave. It's very quick and elimates all wood sanding. If you're careful (and we all know you are), you'll have little or no sanding even on the bright finish areas, it's 100% clear when wetted out and adds an extra layer of moisture proofing. I know how much you love sanding
but you may want to give it a go.
Posted: Wed Mar 05, 2008 7:17 pm
by bushmaster
Hey Wobbly
You sure looking good. What kept you so long to reveal your beauty? Keep the pictures coming.
Bushmaster
Posted: Wed Mar 05, 2008 7:51 pm
by Daddy
Wobb, quite a few posts ago you mention grinding down your fillets before taping, curious as to how or what you used to do that bit of magic? I have been using wood flour, very stiff mix and get great fillets but sometimes leave some "grungle" along the edges which I scrape off the next day with my trusty Red Devil paint scraper. Just curious about your method.
Daddy
Posted: Fri Mar 07, 2008 12:54 am
by Betowess
I'm really looking forward to seeing this boat in the water! I don't think there are any finished C17 pictures on the site yet, right? So this is going to be great.
Posted: Fri Mar 07, 2008 10:10 am
by WobblyLegs
Well, it look like my thread has come to life again, after lying dormant for about three months...
Lucky_Louis wrote:You may also want to consider using a 2 to 4 oz finishing glass cloth. I used 'crowsfoot' weave.
Louis, thanks for that - If I understand 'crowsfoot' correctly, it's a 3-over 1-under weave? Been looking online here this morning and can't seem to find it. I have found a 2-over 1-under weave. Maybe I'll give it a try. I've been debating covering the deck with glass, and if I can find a suitable (i.e. easy-to-shape) cloth then I think I will, extending it over the toe-rails and on top of the rub-rails for some extra durability.
bushmaster wrote:What kept you so long to reveal your beauty?
Thanks Bushmaster. Not hiding, I just dropped off the page for a few months, getting bored with winter and waiting for spring to get on with it. Nearly there!
Daddy wrote:Wobb, quite a few posts ago you mention grinding down your fillets before taping
Daddy, I used a Dremel, with a grinding cylinder (Dremel calls it a 'sanding band'), mostly with a 90º attachment. Set it at about 12000rpm and it makes short work of it.
Betowess wrote:I'm really looking forward to seeing this boat in the water! I don't think there are any finished C17 pictures on the site yet, right?
Not nearly as much as I am. I'm actually close enough to the end that a sense of anticipation is starting to build. Also a sense of poverty, as I look forward to buying a trailer and motor
ivke's OC17 is the same hull as mine, but designed to be open. He added a cabin, which in his pictures (link in his thread) looks a bit shorter and higher than mine, but it gives an idea of what the boat will look like. I don't know of any C17s afloat, though I know of a few builds that started before mine, and a few after...
Tim.
Posted: Fri Mar 07, 2008 11:12 am
by Daddy
Thanks Wobb, guess I will invest in a Dremel, sounds like a handy tool..
Daddy
Posted: Fri Mar 07, 2008 12:38 pm
by Lucky_Louis
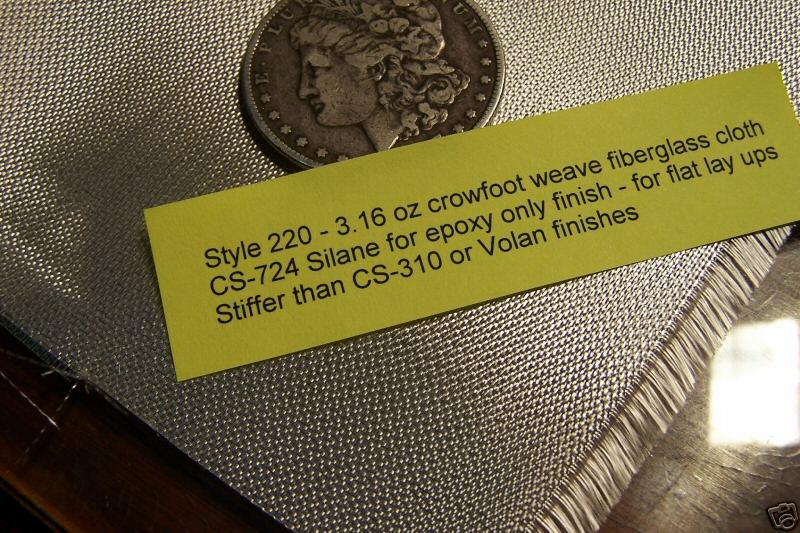
Don't know the technical speak for cloth but this the stuff I used. Very delicate, doesn't use much epoxy but must be handled gently to avoid bunching up. Foam roller worked better than squeegee for this stuff. I just searched EBay for "crowsfoot fiberglass". Very inexpensive, I probably saved more on sandpaper than I spent on the glass
Posted: Fri Mar 07, 2008 12:56 pm
by donk
Wobbly, I have been watching your build, almost from day one, you are doing a mighty fine job. Great attention to detail. Can't wait to see it float.
If I ever get this boatbuilding thing figured out I'd love to build something a little bigger than the FS-14 I'm presently butchering. I suffer, as you do, for a lack of covered space. My garage is just to small for anything much bigger than the 14.
Keep up the good work.
don
Posted: Fri Mar 07, 2008 2:15 pm
by Daddy
LL, that glas that you showed is interesting and would make a good cover for the heavier weave cloth that requires a lot of filler to fill the weave. A layer of the lighter closer weave on top would make for an easy finish wet on wet, might be a bear to handle though.
Daddy
Posted: Fri Mar 07, 2008 2:26 pm
by Lucky_Louis
Sorry for the size of picture but you can see how clear it wets out. The light glass is on the sides of the console, haven't done the front yet.
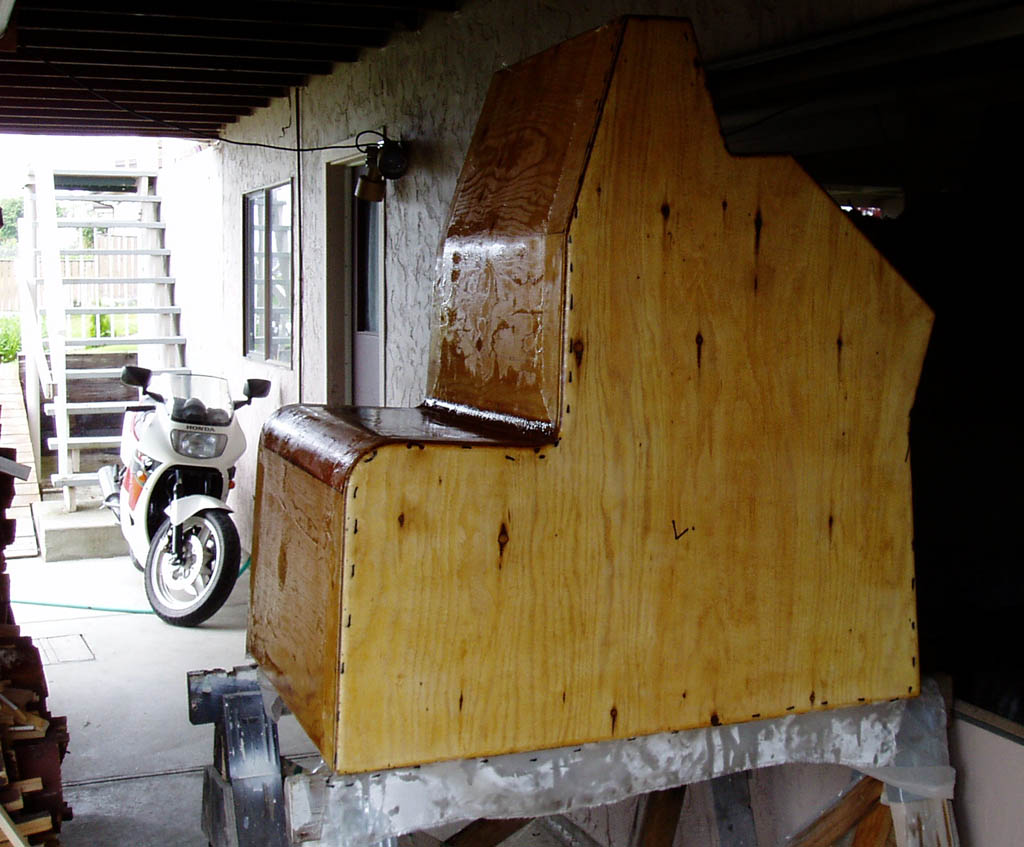
This stuff makes any 3D wood grain invisible and results in a very even, delicately textured surface ready for paint or clear finish. I didn't sand it at all, a bit of scraping to knock down a few runs and drips and a dulling with some 3M scrubbing pads. I went on to use it on top of decks and the front of the motor well.
Posted: Fri Mar 07, 2008 4:29 pm
by Daddy
Nice
Posted: Wed Apr 02, 2008 6:03 am
by WobblyLegs
Spring is here!
Just returned from a grand Europe tour (8 countries in two weeks!) with family, and meeting up with a fellow forumite/builder, and now raring to go.
Wobb (left), his Wob-mobile (and no, that's not a 'vanity plate' - the car came with it!), and Kiwi in SW France (thanks for the gizzard):

Work has begun again! Pity its a bit of de-construction rather than the other way around, but this bit has been bugging me since I looked in the tent about month ago!
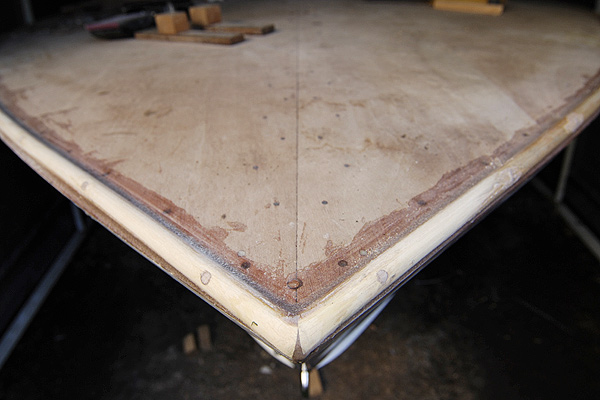
The toe rail on the stb side had a slight concave bend to it ("what bend?" says the First Mate!) but I see it, and will always see it, and it has to come out.
So, a bit of chisel:
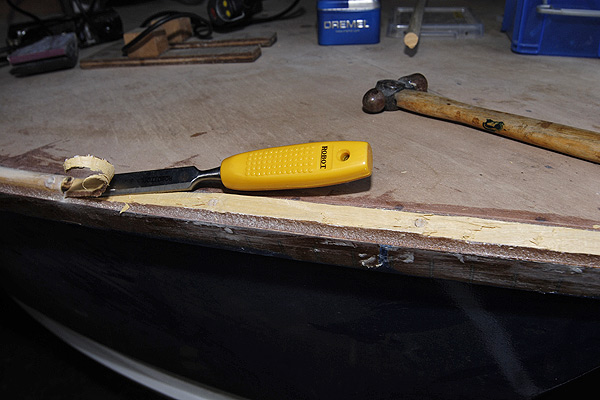
And a bit of Dremel:
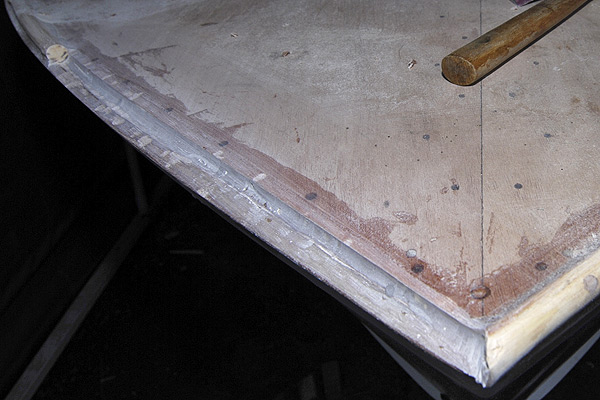
...and we're ready to put a new section in.
After chiselling and grinding that out, its obvious that it was never going to fall off by itself!
The building season has started again, and I can't express how much I'm looking forward to getting going and getting this on the water.
So, all the best for the summer of '08 to everyone reading!
Tim.
Posted: Wed Apr 02, 2008 6:26 am
by kiwi
Just in case you were wondering the menu was:
- apéritif (Pousse Rapière)
- Duck gizzards, duck crackling, feta cheese, dried tomato and lardons on rocket salad with walnut oil dressing
- Magret of duck with potatoes sarladaises (cooked in duck fat)
- red wine from just down the road (lots)
- did we do desert?
- Armagnac for the men and Baileys for SWMBO
Tony
Posted: Wed Apr 02, 2008 10:26 am
by TomW
Tony your making my mouth water. WOW what a meal
Tom
Posted: Wed Apr 02, 2008 4:54 pm
by Daddy
Really Tom?
I didn't know what the heck he was talking about but, I'm just a woodchuck from Vermont. I did see crackling in there though, suppose that is anything like pork rinds?
I understood the boat though.
Daddy
Posted: Wed Apr 02, 2008 5:02 pm
by WobblyLegs
Tom, it was indeed a good meal, but I don't really recall if we had dessert - that's probably the fault of the Armagnac. Good stuff that!
Daddy, mostly dead duck parts and fancy French alcohol! And the crackling is nothing like pork rinds - I'll let Tony describe in detail...
I got a chance to look at Tony's TW28 plans, and at the risk of repetition, I really like that boat.
Still, I have other stuff to build before that, including some canoes, rowing boats, small power boats, and half a house. Nothing too daunting, really...
Oh, and a 40' x 15' shed to build all the above in (except the half-a-house)!!!
Regards,
Tim.
Posted: Wed Apr 02, 2008 5:52 pm
by WobblyLegs
OK, I really, really don't understand what's going on under my sole - I've just been in the tent, pulling down the inner tent, and the sole has expanded again, bulging upwards by about a 1/4 inch. That's a 1/2 piece of ply with glass on top!!
Why?
Surely there can't STILL be gas coming from the foam - it was poured over a year ago!!!
I haven't had a chance to see if the hull has deformed underneath yet - will do that tomorrow evening.
Posted: Wed Apr 02, 2008 6:00 pm
by PaulMcClure
Tim,
Probably a stupid question, but the ply for the sole was epoxy coated on both sides right?
Apologies if I'm teaching a granny to suck eggs
Paul.
Posted: Wed Apr 02, 2008 6:18 pm
by Aripeka Angler
Tim, I have been viewing your build from time to time. The boat looks great. I am thinking that if you have not sealed the bottom of the sole it would not bow upward but cup on top. IMHO I don't think that is the problem. If anything the wood may have had some moisture in it prior to glassing that is causing a bit of warp. I am wondering if some drilled holes with some injected epoxy about the framing and a few well placed stainless screws will take care of the issue. I kind of doubt the foam is still expanding after a year. Good luck.
Richard
Posted: Wed Apr 02, 2008 6:29 pm
by Lucky_Louis
Hey Tim, have you tried pushing the bulge with your finger
The reason I ask is that I had some BS6566 meranti that delaminated on me - there was a patch about a foot square that bulged up. I cut it out and found that the area was glue starved in between the plywood veneers. It was an easy fix but still has left me wondering how many other areas in my boat have the same issue. Then I have another beer and don't worry any more
Posted: Wed Apr 02, 2008 7:48 pm
by Daddy
Wobb,, wow, that shed should be a big improvement over your tarp, is the size dictated by available space or?
Daddy
Posted: Thu Apr 03, 2008 2:51 am
by kiwi
WobblyLegs wrote:Daddy, mostly dead duck parts and fancy French alcohol! And the crackling is nothing like pork rinds - I'll let Tony describe in detail...
I live in the heart of foie gras land so we have ready access to fat duck breasts. I cut the skin off the duck breasts and into 1/2" squares. Simmer in a dry non stick pan until golden then cool on paper towel. The duck fat that has sweated out can be used to fry potatoes. I couldn't convince Tim and Mrs to eat foie gras but it is produced in a humaine way here not like the way seen in the videos shown by the animal hugging, we don't like farmers, city born and bred do gooder squad...
WobblyLegs wrote:I got a chance to look at Tony's TW28 plans, and at the risk of repetition, I really like that boat.
The FL26 plans arrived 2 days after Tim had left, he would have loved them too. But the TW28 is ideally suited to his future cruising grounds. Now that I have finished drawing the house I may have some time for boat business...
Tony
Posted: Thu Apr 03, 2008 5:52 am
by PaulMcClure
Fois Gras...mmmmmmm
[/Homer]
Posted: Thu Apr 03, 2008 8:41 am
by Daddy
We need and emotion for drooling if you are going to quote Home (Simpson I presume).
Daddy
BTW that duck skin sounds a lot like cracklings we made from pig skin back when I was feeding all seven of my kids, the fat rendered from that process was good for frying potatoes too, but these days your way sounds a bit healthier.
Posted: Thu Apr 03, 2008 8:45 am
by chicagoross
Tim, I'm not familiar with C17 plans, assume the sole's bonded to stringers and frames, is it bulging between where you know it's bonded or is it pulling away from the bonds?
Posted: Thu Apr 03, 2008 8:47 am
by chicagoross
If it was really outgassing from the foam 1 small drilled hole would let the pressure out. Cheap thing to try anyhow...
Posted: Fri Apr 04, 2008 9:31 am
by WobblyLegs
Just a quick reply from the office...
The bulge on the sole is the same as when it happened last spring as the weather started warming up, and pressure was released by drilling a hole, which I then filled and sealed a couple of months later (in warm weather). So I'll be drilling again, and maybe will go with Louis' suggestion made last year of adding a breather hole somehow. I'd avoided doing that hoping to have the under-sole area sealed thereby having no way for any moisture to make its way in. I guess not.
It's properly bonded to the stringers and frames, the bulge is only in one section as far as I can tell, between the stringers and between frames "D" and "E". I haven't had a chance to check between frames "C" and "D" yet (similar volume). All other places are much lower volume, and appear to be flat. I'll be checking everything when I get home this afternoon.
Maybe next time I will foam the sides and have inspection hatches for the middle section.
All the sole pieces were sealed with epoxy on the undersides before laying.
Daddy, the size of the new shed is a guesstimate on what I will be using it for - it could be bigger if I want, but the First Mate has claimed garden area for herself, so can't be too much bigger.
Have a good weekend,
Tim.
Posted: Fri Apr 04, 2008 10:18 am
by TomW
Tim, I know those are big areas over a meter long by 1/2 a meter wide. I just wonder if some how you got a mix wrong in one of the foam pours and this might be causing the problem. I just can't see the foam causing problems this long after the pour. I'm sorry you are having troubles again.
Well let us know what you find. I'm extremely interested as I'm getting ready to build one also.
Tom
Posted: Fri Apr 04, 2008 10:33 am
by kiwi
Even with foam I would always have breather holes and a vent up high. No airtight compartments especially if they are going to be exposed to the sun. I learned this with my catamaran - the only time the inspection hatches are screwed shut is when on the water. I have seen lots of the same model of cat open along the glue lines
Tony
Posted: Fri Apr 04, 2008 11:10 am
by Cracker Larry
I'm also very interested and concerned about this, I've got 12 foam filled and sealed compartments under the sole and I'm sure it gets warmer here than in London. Going to be getting hot real soon, so I guess we'll find out.
It's hard to believe the foam could still be gassing. Also hard to believe a temperature change would cause enough pressure to make a bubble, or to split a seam.
I know that pressure rise in an inflatable boat, or a tire, or a fender or a basketball is based on a constant of about .03 PSI increase per degree of temperature rise. A 100 degree change results in only 3 PSI. I just can't believe that 3 PSI would damage these boats
But I've been wrong before, so keep us informed and good luck.
Fois Gras...mmmmmmm
I think I'd rather eat possum
Posted: Fri Apr 04, 2008 1:09 pm
by jgroves
Wobbly,
Sorry to hear about the sole bump. I too have several air tight compartments so I'm obviously intrested in what the problem is. I am going to ask a couple of friends tonight if they have ever had a problem with these issues. I have a feeling that venting the compartment will eliminate environmental fluctuations.... then it could only be bad ply (which is unlikely).
However I wanted to say nice to see you at it again! Your build is the first I seen... it sold me on building.
Jeremy Groves
Posted: Fri Apr 04, 2008 2:07 pm
by WobblyLegs
OK, I just drilled (another) hole in my boat ('tween frame "D" & "E")- lots of air came out, with a faint foamy/chemical smell to it. Nothing noticeable came from 'tween "C" & "D".
I think I'm going to make a vent somewhere - possibly in frame "E" under the motorwell, with all compartments through-vented under the sole (yeah, Tony, I know you said to do that about a year ago
).
So, we live and learn and make more work for ourselves...
Posted: Fri Apr 04, 2008 4:00 pm
by TomW
Anybody have any ideas out there to keep this from happening. These are fairly big compartments covered with 1/2" ply. Dimensions are 44 1/4" x 30". Would it hurt to put a sub-frame in the center and reduce the area by half.
Don't want this happening once I start my build.
Tom
Posted: Fri Apr 04, 2008 4:22 pm
by fmiles
Perhaps identify exactly where your compartment sections are, then drill down into them, breaching the barrier between compartments. If you do this right, you may end up breaching to a vent space somewhere in the boat. Little damage, and easily covered up.
Posted: Fri Apr 04, 2008 5:29 pm
by Cracker Larry
It seems odd that it's only one compartment with a problem. There are other similar compartments without problem I assume?
Something is wrong about this. I'd be tempted to cut the whole top off of that section and see if you left your Alka-Seltzer in there in something. Vinegar and soda maybe
Cut out all the foam and re-pour it. Maybe Tom was right about a bad foam mix.
I studied mine carefully this afternoon. It's 85 degrees today and I don't have the slightest hint if a bubbled sole (Thank the Lord!) with 12 sealed compartments. The sun is shining directly on it and the surface temp is over 100 F. Something must be amiss inside your compartment.
If this was a normal thing, we'd be hearing and seeing a lot more of it, I think.
I really would not want to vent them as it would let in moisture and trap it.
Posted: Fri Apr 04, 2008 7:01 pm
by Doug
Pretty bizarre, What kind of foam did you use? Possibly the wrong ratio when mixing, not mixed enough?
Posted: Fri Apr 04, 2008 9:56 pm
by Daddy
I agree with Larry, I would want to cut her open (sorry) and see what's going on.
Daddy
Posted: Sat Apr 05, 2008 2:35 am
by scrinch
A 100 degree change results in only 3 PSI. I just can't believe that 3 PSI would damage these boats.
If the section of sole is, say, 30" x 20" or 600 sq inches, then a change of 3psi is equivalent to a weight of 1800 lbs on that panel (pushing upwards). Could 1800 lbs bow that section of the sole? Of course, this doesn't answer the question of why it is only one panel where this is happening.
Posted: Sat Apr 05, 2008 5:43 am
by WobblyLegs
Hi guys,
When I sanded the foam down before laying the sole, the section with the problem received a bit more sanding than it should have, and so ended up with a little air space between the foam and the sole. About 1/4 inch or so.
The other sole sections were much more snug. This is why, I believe, this section is more affected than the others. Also, I'm convinced it's the air space that is expanding, not the foam - that was rigid enough to walk on when I poured it.
Anyway, I'm going to allow it to breath (for now), and take it from there.
Later,
Tim.
Posted: Sat Apr 05, 2008 10:08 am
by Daddy
Tim, hard to imagine that 1/4 inch of airspace could cause that much expansion even in the most extreme conditions. I wonder what will happen to my GT22 with 35 separate air tight chambers of 3,800 cu. in.(min.) , no foam........ I will be walking on a balloon.
Daddy
Posted: Sat Apr 05, 2008 11:11 am
by Cracker Larry
OK, let me ask this. Have you looked at the bottom of the boat, under that same compartment, and is the corrosponding bottom panel bulging also?
Posted: Sat Apr 05, 2008 11:15 am
by Cracker Larry
then a change of 3psi is equivalent to a weight of 1800 lbs on that panel (pushing upwards).
Not quite true. It is pushing in every direction equally. Against the frames, the bulkheads, the bottom and the top. Which is why I asked if the bottom was bulging too.
Posted: Sat Apr 05, 2008 12:54 pm
by WobblyLegs
Larry, the bottom isn't bulging. Remember though that being a "V" it probably doesn't have the same flexibility as the flat sole.
Has anyone else out there foamed and TOTALLY sealed their under-sole areas?
It's puzzling, but solvable, Im sure.
Anyway, cold and wet today, so no building has happened. Typical, yesterday was warm and dry. That's British weekends for you!!
Later,
Tim.
Posted: Sat Apr 05, 2008 9:41 pm
by Daddy
Tim, see my psot above
" I wonder what will happen to my GT22 with 35 separate air tight chambers of 3,800 cu. in.(min.) , no foam........ I will be walking on a balloon."
The area under my sole is completely sealed, no foam, just air. So far so good.
Daddy
Posted: Sun Apr 06, 2008 10:07 am
by JIM M
Wobbly wrote
The bulge on the sole is the same as when it happened last spring as the weather started warming up, and pressure was released by drilling a hole, which I then filled and sealed a couple of months later (in warm weather).
If air temp. is lower now than when you sealed it wouldn't any trapped air be at a lower pressure now ?
I think it would be a problem with the foam or something else.
Jim
Posted: Sun Apr 06, 2008 10:09 pm
by Daniel Huckleberry
I don't think it's the air space. I only filled my space about 2/3 full and there is no issue's.
Good luck to you
Huck
Posted: Mon Apr 07, 2008 12:52 am
by TomW
Huck, I agree as I said earlier I think he has a bad batch of foam or maybe Tim buried his wife in there.
To puch up 1/2"(12mm) ply as much as he says 3/8" it is takes a lot of pressure over less than a yard(meter).
Tim I know this is not a laughing matter to you it just needs some levity. I think as a temporary fix a valve should work fine.
Cheers,
Tom
Posted: Mon Apr 07, 2008 10:55 am
by Lucky_Louis
Tim, have you thought about putting in a few flush fit air-tight plugs? Less cumbersome than a valve, fairly inexpensive solution.
 Found them here
 You could cut off the tube part.
Posted: Mon Apr 07, 2008 2:53 pm
by WobblyLegs
Louis, I think I will use something like that.
Huck/Tom, if it was a bad mix, though I can't see how, then I am sure it will settle over time. I can't, at this stage, cut the sole out, as it would add too much time to the build, and I have a deadline (I know I'm not supposed to say that) that cannot be missed, but I can go back to it next year if needs be.
Daddy, I did see your previous post which makes me think foam is part of the problem - which is why I'm wondering about foam filled hulls.
Tom, I saw the First Mate this morning, so that's not it - I also counted the cats, and there are still three. It might be the hedgehog tho'
Anyway, time to move on, if I can (weather permitting) - I spoke too early about spring as we had a couple of inches of snow over the weekend. I really don't do cabin fever very well at all!!!
Later,
Tim.
Posted: Mon Apr 07, 2008 3:26 pm
by Daddy
Tim, i actually misread your post so my post was off the mark. It is interesting though. I considered foam and then looked at the 35 odd soon to be sealed "air tight chambers" and wondered why I needed it. Of course now I am wondering when that air I trapped so neatly below decks will expand and blow the sole off. Some how I don't think it will. The air is compressable (up to a point) and I guess I'll just have to wait and see.
Daddy
Posted: Tue Apr 29, 2008 2:59 pm
by WobblyLegs
Right, I spoke to soon about spring being here (I seem to curse myself, weather-wise, with predictions on this forum, so now I look forward to a month of rain!
)
But, I have managed a bit of building, firstly with a replacement of the offending toe rail on the starboard bow (much better, and matches the port now). You can see the gap where the the previous one was, about 4mm. In the pic its filleted on the outside, and since then the inside has had a channel ground out and filled/fileted:
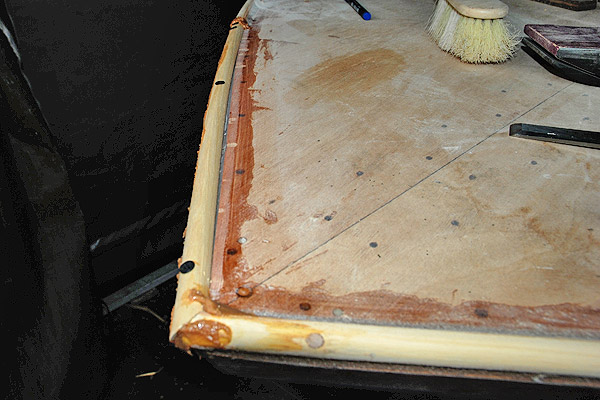
Also, a new bit of wood added in the motorwell, across the back of frame "E", which was quite flexible and is now very firm and stiff. Its only 6mm ply (x50mm) but provides more than enough strength for someone to lean against the frame without it bending:
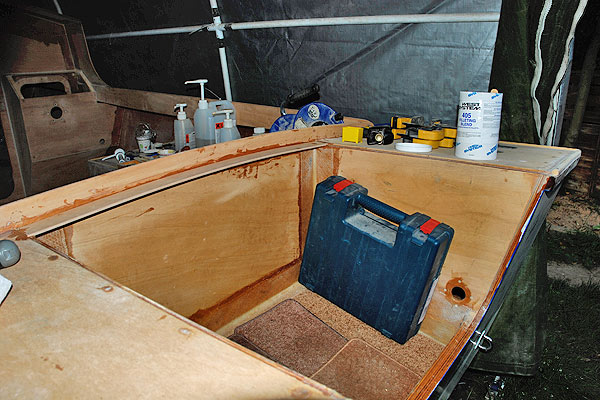
Then on to my mooring line gaps; left between strips of toe rail so that lines don't run over the rail and wear them. This is before filling:
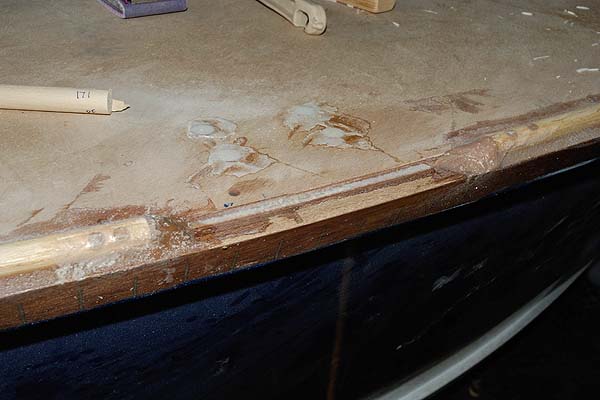
And after filling (you can see where I have drilled-n-filled in preparation for mounting cleats, six in total, but for some reason one has gone AWOL and I can only find five!! I will be smoothing and rounding these, hopefully making a low-wear areas for ropes to hang off the boat when using fenders and mooring:
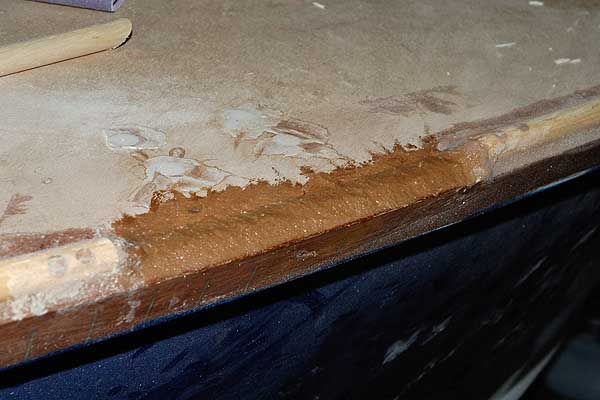
Finally, starting to tidy up (meaning sanding) all the rough bits, in preparation for sealing the decks. At the end of each toe rail I have a blob of 'poxy, to make them a bit more durable:
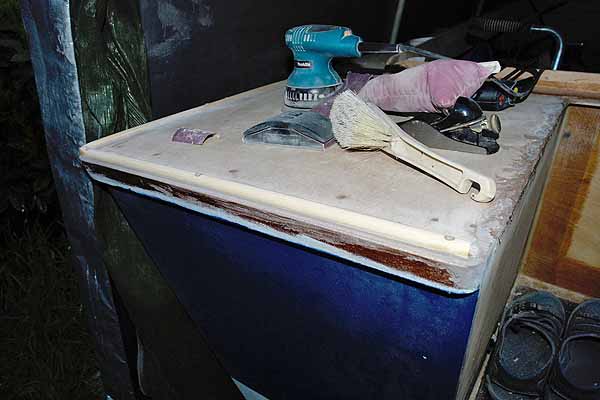
I'm thinking of running a strip of tape from the outside of the rub rail, over the toe rail and onto the decks, thereby strengthening the hull-deck joint, but more importantly, preventing wear on the toe rail from muddy feet. Any thoughts?
And that's it for now - there's a long weekend coming up, but no doubt knowing Brit weather, it will be, uh, damp!
Later,
Tim.
Posted: Tue Apr 29, 2008 3:35 pm
by Oceola
Tim,
Good to see you back at it...Looking good.
As for the missing cleat...a while back you posted a picture of the cleat...could you have left it where you were taking the pic?...just a thought. (Those "Herreshoff" cleats are the best)
Frank
Posted: Tue Apr 29, 2008 4:00 pm
by TomW
Welcome back Tim. Was thinking of you yesterday that we hadn't heard from you in a while. Good pictures and explanations as usual. You are getting closer and closer.
Well cheers and hopefully good weather there. I may hit 32F or for you 0C here tonight. Dang cold just won't go away.
Tom
Posted: Tue Apr 29, 2008 4:40 pm
by gk108
WobblyLegs wrote:I'm thinking of running a strip of tape from the outside of the rub rail, over the toe rail and onto the decks, thereby strengthening the hull-deck joint, but more importantly, preventing wear on the toe rail from muddy feet. Any thoughts?
I'd do it.
Posted: Thu May 01, 2008 3:33 pm
by WobblyLegs
gk108 wrote:I'd do it.
Yeah, I will. I guess it wasn't
really a question...
Screws removed from toe rail replacement section tonight, drilled, epoxy poured in holes, and plugged with dowels:
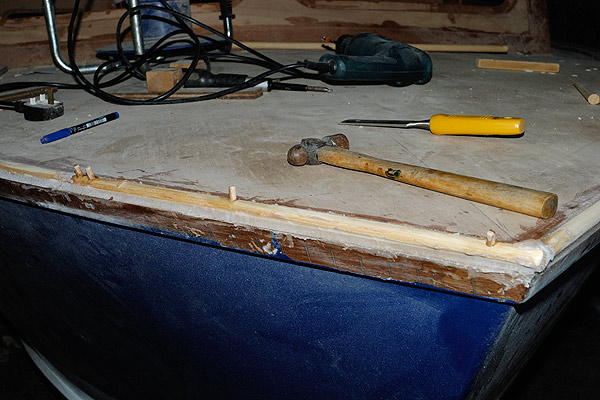
I know the pic above looks messy, but its really only on the outside - its what's underneath that counts, right? Well, we'll see after all the crud has been ground off and smoothed down.
And, I wonder, is this (below) the last fillet on the boat? A view underneath the motorwell front bracket. Frame "E" is still a little (tiny bit) flexible, so I might put some tape across there, underneath, to stiffen it up a bit more.
Maybe...
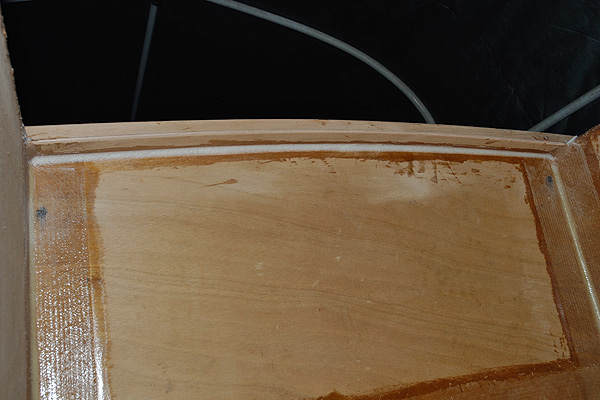
Plan for tomorrow evening is to empty out the boat of all tools, clean up, and prepare for a weekend of grinding, shaping and s*nding. And, its a three-day weekend here!!!!!!!
Later,
Tim.
Posted: Thu May 01, 2008 10:22 pm
by gk108
Yeah, I will. I guess it wasn't really a question...
That wasn't much of an answer, either.
Let me add some more.
When you wrap that stuff, be very generous with the filler and fairing compound over that radius. I have a few areas that have telegraphed the weave on my rubrail. It took a few months for it to appear. Probably one or two more coats would have prevented it.
Posted: Thu May 01, 2008 11:23 pm
by ks8
I think it a good idea to tape the stiffner.
With the tape over the opening in the toerail, not only would I lay on lots of fairing, but I would try to get as smooth a layer of wood flour/silica in the weave first, as the first fill the weave layer, and then standard fairing blend over that. If things wear right through one day unexpectedly, in a rough anchorage, that wood flour/silica I think will hold up better than std fairing microballoons, if you should forget some chaff guard and rip right through your paint system in no time.
So was that really your last fillet?!
Ready with the sander? Let's have at it! Crack on! Make some serious dust, right up the vacuum...
btw, I decided to add a minor shoe on the forefoot also Tim. That picture will be up this w/e. Blends into the CB slot foil shoe.
Posted: Fri May 02, 2008 4:17 am
by WobblyLegs
gk108 wrote:That wasn't much of an answer, either.
Sorry - what I meant was that I had more or less decided to do it, even though it's not in the plans... but it's always good to get confirmation and extra advice, like yours and ks8's in this case.
Have a good weekend.
Tim.
Posted: Fri May 02, 2008 10:51 am
by ks8
A hanging fender would not present the same risk of chaff as a mooring line. A mooring can present the same loads and movement (stretch, etc) as the anchor rode. So, for a mooring, it seems like that line should go through a metal chock, bow chock? But I'm not sure how long you plan to be moored or in what conditions. Will there be a bow chock(s) for the anchor rode? Or do you like that minimal metal look, with no chocks at all?
As I am almost done, I'm struggling with the bow chock issue myself. I have them, and I've marked their locations. They don't look bad, but they don't look *right* either on my bow transom. I tried several designs. I'm going with two, but it wasn't easy. It will be a final issue in the next month or so.
But are you skipping them altogether?
Posted: Fri May 02, 2008 11:03 am
by WobblyLegs
Chocks = fairleads?
If so, I'm still debating, though I will probably need one on the bow at least.
The gaps between the toe rails are as much for running rope as they are for allowing water to run off the deck. I plan to shape the the epoxy filler that I stuck there flat on top so that if I want/need to place fairleads there, I have a suitable surface already on which to do it.
The only problem is I can't through-bolt there - they would have to be screwed down.
Later,
Tim.
Posted: Fri May 02, 2008 11:20 am
by Lucky_Louis
Chocks. This is what I used. I mounted as far outboard as I could.

and here's what another builder used when his paint was damaged by mooring line.. Looks like aluminum so I betting his lines will turn black after a while.

Posted: Fri May 02, 2008 11:24 am
by WobblyLegs
Yup, same thing, we call 'em fairleads this side of the pond...
Posted: Fri May 02, 2008 11:25 am
by ks8
I can't thru bolt either. I'll be drilling an oversize hole about about 3 cm deep, coating the threads with PVA, and then embedding in epoxy filler blend. Back out when cured, then a dab of 4200. I'm hoping it holds alright, but it still doesn't look right.
I was thinking of a SS strip for awhile, but I need to hold the line in place over the bow because of the pedestal nav light. I had cleats at the sides too for a layout like yours, but it was way too busy. Now I have only the two in the middle of the deck, the second one being to ease lashing down a doused jib, or other stuff, while at anchor. So I am somewhat forced to use chocks.
Yours is looking fine, and maybe a simple SS strip will solve it all? You'll certainly know after one season of use.
Posted: Fri May 02, 2008 11:31 am
by WobblyLegs
ks8 wrote:I can't thru bolt either. I'll be drilling an oversize hole about about 3 cm deep, coating the threads with PVA, and then embedding in epoxy filler blend. Back out when cured, then a dab of 4200. I'm hoping it holds alright, but it still doesn't look right. Yours is looking fine.
Thanks,
For surface mounting I've thought of drilling (like you) but wide enough to put a nut down in the hole, so there's a metal thread down in the epoxy to hold it all down. It's just potential rust that holds me back.
Posted: Fri May 02, 2008 11:38 am
by ks8
WobblyLegs wrote:For surface mounting I've thought of drilling (like you) but wide enough to put a nut down in the hole, so there's a metal thread down in the epoxy to hold it all down. It's just potential rust that holds me back.
That is why I used silicon bronze on the embedded mast step nuts. But if you did that on your deck, you would then have to make everything bronze to avoid galvanic corrosion, fairleads, nuts, and bolts. Have fun thinking it out! I'm hoping the epoxy filler alone will hold, and though I was going to use bolts first, I may use screws now since the threads will be a deeper bite. And another thought... if the strain is that great, I'd rather lose a chock, with a screw pulling out, than rip the top of my hull open. But such loads aren't there, ....
Posted: Fri May 02, 2008 10:55 pm
by Betowess
So when are you shooting for a splash. July or earlier? Can't wait to see it. I am still seriously thinking of building this boat, if I can get a shop up this summer.
Posted: Sat May 03, 2008 5:11 pm
by WobblyLegs
Betowess wrote:So when are you shooting for a splash.
That, unfortunately, I can't answer...
But it will be this summer some time!
Tim (covered with dust).
Posted: Sat May 03, 2008 5:54 pm
by ks8
How's that stbd bow area looking? Got it all smooth and purdy yet?
ks8 (covered with dust, and back to glassin'...)
Posted: Sat May 03, 2008 8:13 pm
by PaulMcClure
Tim, are you still thinking of taking the boat to Scotland? Let me know if so...
Posted: Sun May 04, 2008 1:50 pm
by WobblyLegs
ks8 wrote:How's that stbd bow area looking? Got it all smooth and purdy yet?
ks8 (covered with dust, and back to glassin'...)
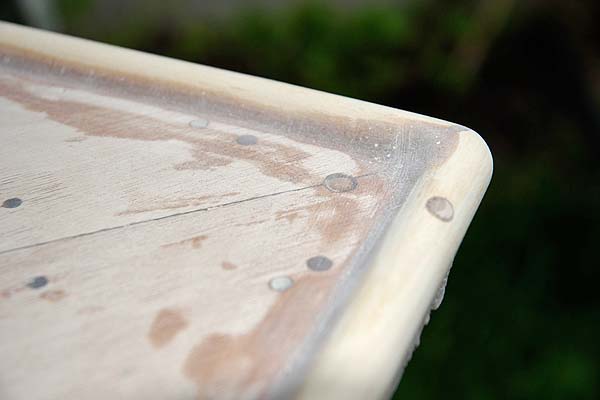
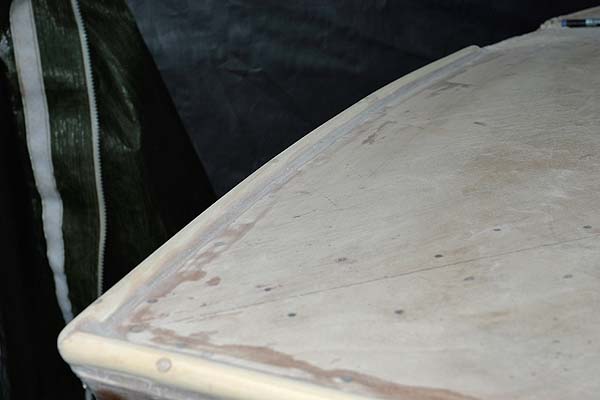
PaulMcClure wrote:Tim, are you still thinking of taking the boat to Scotland? Let me know if so...
Paul, I'm still hoping to do a week or so on Loch Lomond - when the time comes, I'll let you know... When it happens (there might be an 'if' here due to changing plans), maybe a bit of guided salt water would be fun too, if you're willing to be the guide...
Tim
Posted: Sun May 04, 2008 6:32 pm
by PaulMcClure
Tim,
No problem. There's some good sailing around here, some of the best in the country I think. The scenery is great, you just get a bit used to it and it sometimes takes a new pair of eyes to appreciate it fully. The C17 would be a good boat to take through the Kyles off Bute and a bit of beach hopping.
Paul.
Posted: Mon May 05, 2008 1:39 pm
by WobblyLegs
Dust again, I hope the neighbours don't complain!!
Been smoothing out the toe rails today, RO sander, Dremel, and lots by hand, but now it's ready for tape.
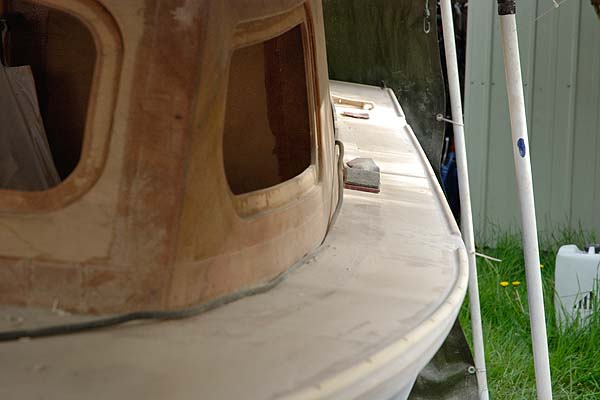
Earlier I put some fillet mix in the gap where the cleats will go, and I'm quite pleased with the end result:
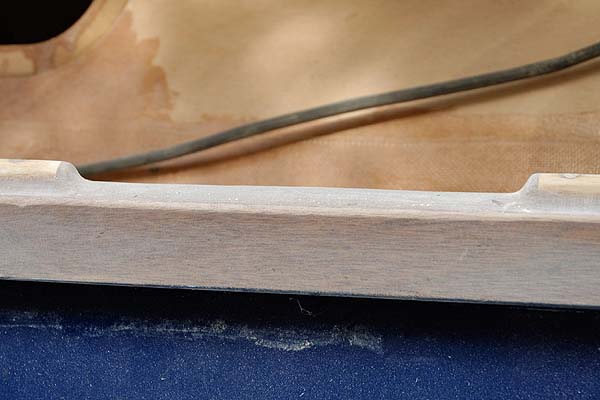
So, progress. It's good to be back in it, though this afternoon it still looked like quite a daunting task to get it all finished. Well, one step at a time!
Later.
Tim
Posted: Mon May 05, 2008 5:00 pm
by chicagoross
Nice work on recessing the cabin windows! Is that per plan or your own idea?
Posted: Mon May 05, 2008 10:03 pm
by Betowess
Your gunnels look stout. Looks like plenty of toe room to swing around to heave an anchor. You're going to be a happy camper soon!
Posted: Mon May 05, 2008 10:11 pm
by gk108
That first pic above really looks cool. What is it, 30 or 40cm wide decks beside the cabin? That makes the foredeck a whole lot more useful when you can actually get to it without any acrobatics.
Posted: Tue May 06, 2008 6:51 am
by WobblyLegs
chicagoross wrote: Is that per plan or your own idea?
The windows are cut out according to the plans, but the frames on the inside is my addition. Click
here to jump back a few pages for some pics and my reasoning...
Betowess wrote:Your gunnels look stout.
They are, I've been walking (well, more like crawling inside the tent) all over them, and can't feel any flex - the coaming stiffens it up a lot.
gk108 wrote:What is it, 30 or 40cm wide decks beside the cabin?
Less, 20cm/8" but enough to walk around the cabin without tripping and easy to step up to from the benches inside the cockpit.
T.
Posted: Tue May 06, 2008 7:27 am
by Knottybuoyz
Nice work Tim. Looking really good. Can we get a wide angle shot of the whole boat as it is now? I get the feeling the boat looks a lot bigger now eh?
Posted: Tue May 06, 2008 7:53 am
by chicagoross
Tim, thanks for the directions back to the window discussion. Don't know how I missed it before, must have been too early in my build to be thinking about the cabin
. I really like the look on the recessed windows, haven't yet decided what would be right for mine.
Posted: Tue May 06, 2008 9:38 am
by mecreature
very cool watching this thing go together..
sure makes me think...
Posted: Tue May 06, 2008 10:27 am
by donk
Tim, you sure do nice work!! Your build has made me look closer to the C-17 and I really like it.
To many nice plans, not enough time.
don
Posted: Thu May 08, 2008 11:11 am
by Betowess
Tim, I missed that reply showing the other guy's OC17, but just came upon it last night. Thanks for sharing that. That hull looks great on the water. Can't wait to see yours too.
Posted: Thu May 08, 2008 4:38 pm
by WobblyLegs
Sorry no wide angle shot yet...
Betowess, you get the impression its really light on the water? I do.
So, while I wait for tape to be delivered (hopefully tomorrow) I've been sanding, grinding, sanding and finally started SEALING! This is a step forward for me!
Starting with the bench tops:
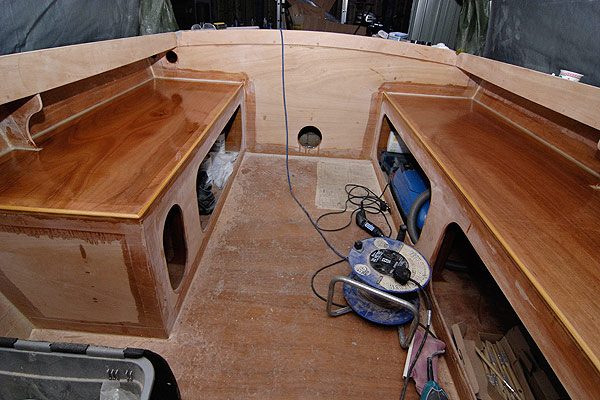
I really like the way epoxy brings out the colour of the wood. Pity its going to be painted
So, now looking forward to another dusty and sticky weekend coming up
Later,
Tim.
Posted: Thu May 08, 2008 6:08 pm
by Betowess
WobblyLegs wrote:
Betowess, you get the impression its really light on the water? I do.
Definately. After looking at those pictures it confirmed for me either a classic 17 (cuddy) or possibly the 19 will be my next build. I really like the high freeboard of this design, which will make me feel better when the weather turns nasty. But I'm leaning toward the 17 because of fuel economy, Thus my interest in your terrific build. .
I always hated painting over epoxy sealed Okoume too.
Posted: Thu May 08, 2008 8:17 pm
by robbiro
You could finish it with three coats of clear coat S3 and have a bright finish, or at least part of it bright. I agree that the wood is too pretty to cover and all the clean work that you have put in on that would really look good. Just sticking my nose in where it probably does not belong, but just MHO.
Keep on Buildin'
Robbie
Posted: Thu May 08, 2008 9:02 pm
by bushmaster
Hey Tim
You are looking beautiful. I love that cruise ship finish on the seats.
Keep up the good work.
Bushmaster
Posted: Thu May 08, 2008 10:39 pm
by jgroves
The seat tops are great! If you don't mind me asking... what epoxy are you using? Looks very smooooooth
Posted: Fri May 09, 2008 7:22 am
by WobblyLegs
Thanks for the comments.
robbiro wrote:You could finish it with three coats of clear coat S3 and have a bright finish, or at least part of it bright.
Robbie, some of the trimming will be bright, but large surfaces like that get hot in the sun, so the plan is to paint all horizontal surfaces; deck, roof etc., and leave most vertical surfaces bright, and varnished over epoxy.
jgroves wrote:... what epoxy are you using?
Jeremy, I'm using WEST System, been doing it in the evenings (cooler temp's), using slow hardener so that it has time to soak into the wood, and it flows out quite well.
It's been really hot inside the tent the past few days, just under 40ºC, so the epoxy has been curing nicely.
Later,
Tim.
Posted: Fri May 09, 2008 9:38 am
by jdjwright
Tim,
I'm a UK builder (well nearly) and just received my first set of plans, a Hiawatha Canoe 16. I was very interested in the Fast Skiff 17 but thought I should start smaller!
I've recently been looking at the Classic 17 instead of the FS17, I like the high freeboard (as someone else has mentioned), the cabin option, and the fact it only needs a 50hp outboard.
I assume you have sourced your wood and epoxy from Robbins? Did you look at alternative epoxies/suppliers?
Your boat looks fantastic and has given me the enthusiasm to try it for myself.
Keep up the great work.
Regards,
Joss
Posted: Fri May 09, 2008 9:55 am
by WobblyLegs
jdjwright wrote:I assume you have sourced your wood and epoxy from Robbins? Did you look at alternative epoxies/suppliers?
Hi Joss, welcome to the forum.
I got all my wood from Robbins, and get most of my epoxy/glass from CFS...
http://www.cfsnet.co.uk/
Enjoy building the canoe, it will get you hooked. Heard of BBV yet? You will! If you're ever SW of London, you're welcome to pop in and have look (that applies to anyone else on the forum too!). I always have a spare sheet of sandpaper for visitors
Have a good weekend.
Tim.
Posted: Fri May 09, 2008 10:15 am
by jdjwright
Tim,
Thanks for the info.... I did find CFS on one search of the internet but will have another look at them.
I didn't know what BBV was but after a quick search of the forums I now do! I think I'm already showing signs of Stage 1 BBV
Would love to come and have a look sometime. Although I live near Peterborough I work in central London so it wouldn't be far out of my way.
Thanks,
Joss
PS: Looks like the weekend will be nice.
PPS: My wife and daughter are away this weekend so trying to decide whether to go sea fishing or start the project... it's a difficult decision
Posted: Fri May 09, 2008 5:44 pm
by chicagoross
You should be getting a commision from Bateau on completion of this build - I predict that C17 plans sales are going to go way up when you get the finished pics out! Beautiful work and attention to detail, WobblyLegs!
Posted: Sat May 10, 2008 2:15 am
by Betowess
Tim, I've been going through your album pics and now through the whole thread, but 2.5 years of great detail and documentation is taking some (enjoyable) time. Your cabin, woodwork, and lockers & hatches show impeccable work. I haven't ordered plans yet so still trying to figure a few things out.
I've been wondering where your fuel is going to be, then I saw that design layout in the technical album... So are you putting fuel under the starboard bench aft? If so, how big of tank for a 50 or 60 HP outboard? I always figured one usually puts fuel midships, but I'm sure you have the weights figured out.
Next day EDIT: I just saw your post on page 26? about the Boat Safety Scheme Cert. so that explains the location. I'm guessing you are going to want at least an ~ +20 gallon tank though?
TIA bob
Posted: Mon May 12, 2008 8:25 am
by WobblyLegs
Hi Bob,
Yep, you spotted one of the reasons that the tank is going to be portable. Another reason was to keep everything - lines, cables etc. accessible - so there is nothing running under the sole. As far as positioning, weight distribution etc., - I haven't a clue. I'll wait until its on the water before making a final decision. I'm probably going to get two tanks, about 30 litres each, so they can easily be carried to the boat, or garage for filling.
Regards,
Tim.
Posted: Mon May 12, 2008 8:34 am
by WobblyLegs
BRAIN FAILURE
Well, a busy weekend, though not as much time spent on the boat as I would have liked. No worries - still moving ahead, starting with some woodwork on Saturday; a step-by-step how I made hand rails, and a lesson in concentration...
Two half-inch boards laminated overnight on Friday:
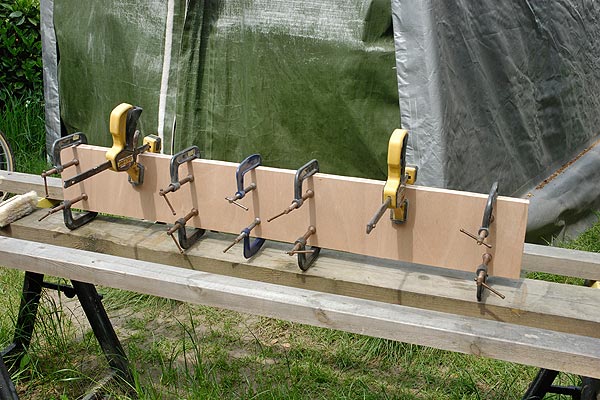
After measuring and drawing, the hole-cutting starts:
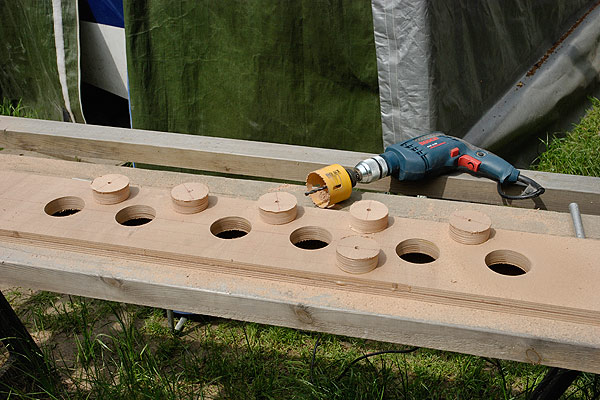
Followed by a bit of jig saw work:
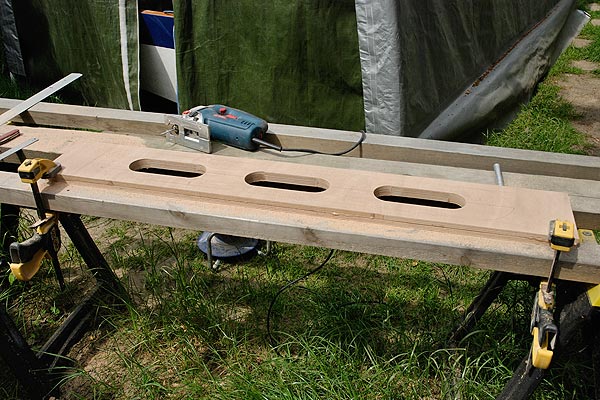
And a little routing to round off the edges:
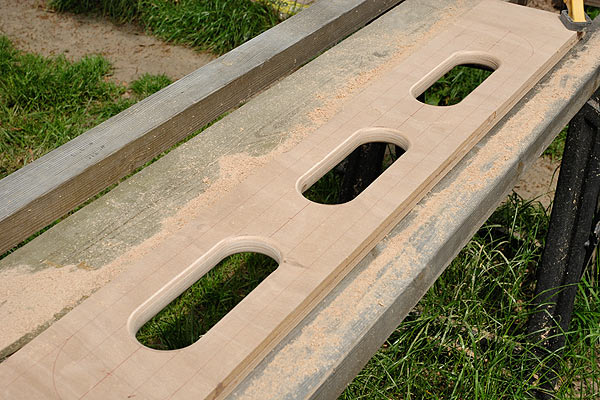
Then some more jigsaw work. I know I have mentioned this before, but this saw is SO DARNED GOOD, that it just inspires confidence. All these cuts were done with one side of the blade touching the line drawn, with the barest minimum of hand sanding for finishing the straight edges. In fact, this picture was taken before the outsides were sanded:
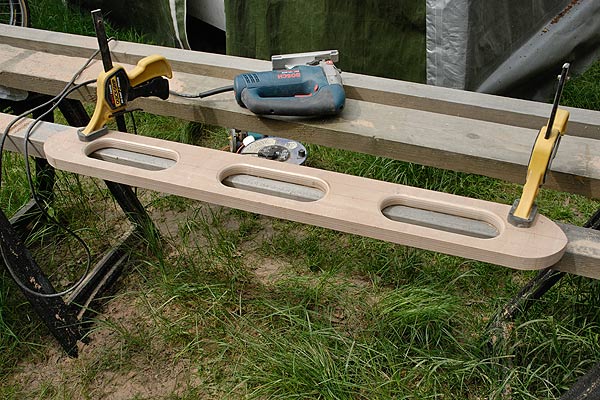
Then some more router work on the outside, followed by a bit of hand sanding:
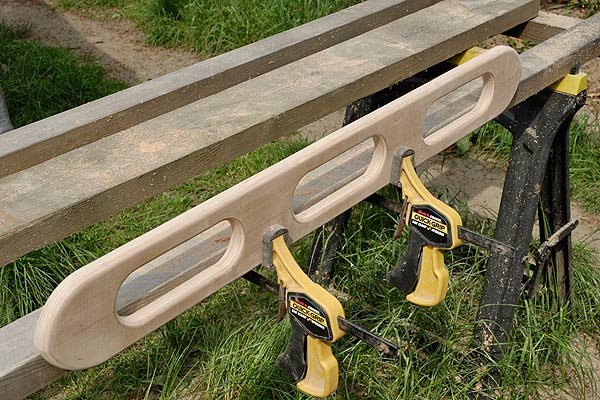
Cut in half, this time with the line in the middle of the blade:
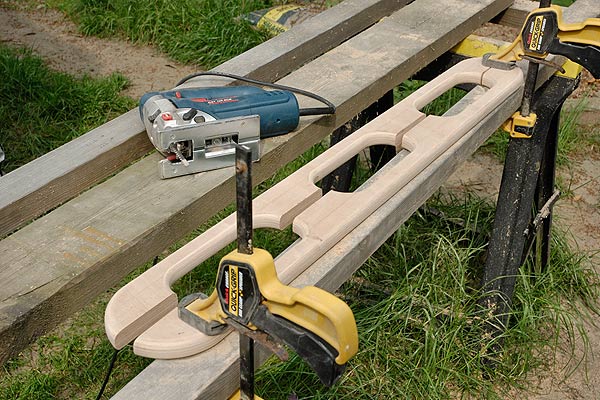
And there we have two sturdy one inch thick hand rails for the roof of the cabin. Nice, aren't they?
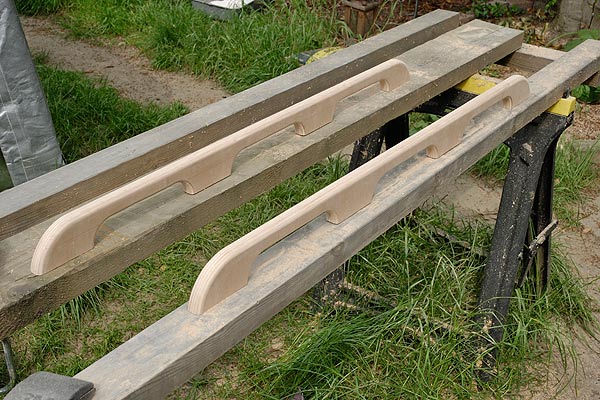
But
they are too flippin' long!! Doh! Right at the beginning, my brain was still in bed. I measured the roof where the rails are going, then started marking out the wood
without subtracting 3" from each end for the length I really wanted!:
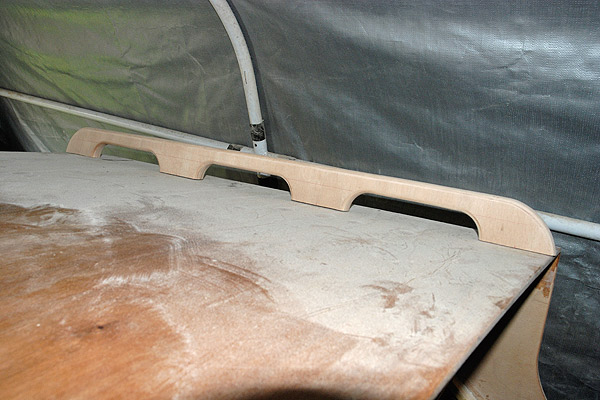
So, after counting to a hundred or so (counting to ten wasn't long enough to calm down) the only thing I could do was cut one section off, leaving me with a two-hoop rail instead of three - with an odd shaped piece of wood that I just couldn't throw away. Later, I had the idea to use them to make grab-handles outside the cabin bulkhead. Problem solved:
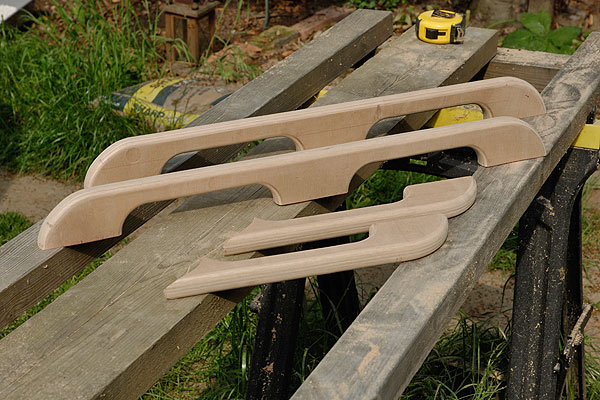
And, I think the size is better suited than what I originally planned, as it leaves space for a spray-hood that is eventually going to find its way to the roof:
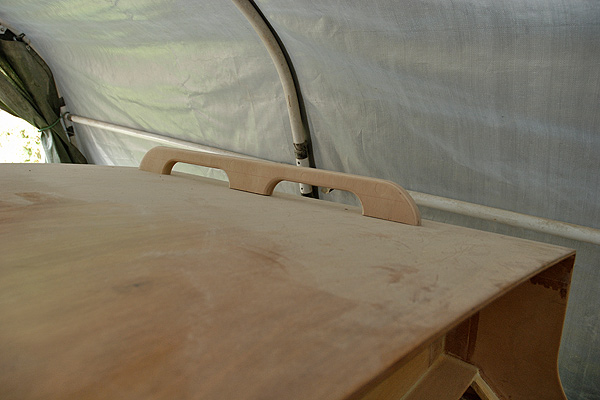
Followed by a Sunday of mostly sanding and grinding, and a bit more epoxy, with frame "E" and the cockpit coamings now sealed. You can see the fillet on the coaming, using brown filler instead of white to suit a bit of bright-work:
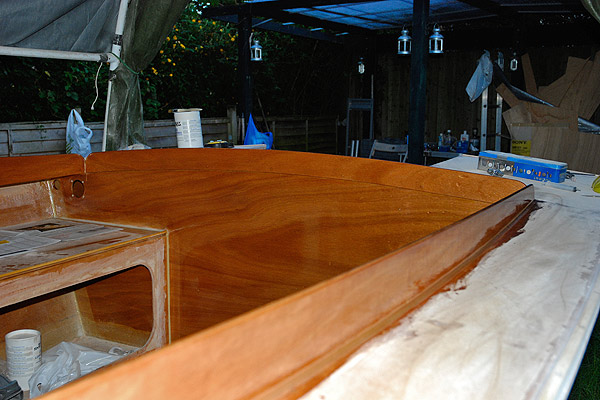
And that was my weekend. I'm contemplating ordering that trailer soon. Very soon!
Later,
Tim.
Posted: Mon May 12, 2008 8:44 am
by Cracker Larry
Nice work on the handrails, Wob. They look better as 2 holers anyway
Coaming looks good. How thick is it? Plywood or solid?
Posted: Mon May 12, 2008 9:28 am
by WobblyLegs
Cracker Larry wrote:They look better as 2 holers anyway
?
Thanks Larry - at least they were rescuable
Coaming is 9mm ply, same as all the frames.
Posted: Mon May 12, 2008 9:34 am
by Cracker Larry
That's the same thing I'm planning on using
Are you going to tape them to the deck?
Posted: Mon May 12, 2008 9:38 am
by gk108
I like the shorter version, too. Plus, the matching grab handles elsewhere will make it look like you planned it like that.
Posted: Mon May 12, 2008 9:49 am
by WobblyLegs
Cracker Larry wrote:That's the same thing I'm planning on using
Are you going to tape them to the deck?
No, there are cleats under under the gunwales supporting them. Plenty of surface area for glue.
And where the coaming was screwed to the cleats (screw holes plugged with dowels):
You can see how far below the level of the deck the coaming extends, bottom edge is flush with the bottom of the cleat.
Posted: Mon May 12, 2008 10:00 am
by Cracker Larry
Thanks for the pics and explanation
Very nice work! That should keep the water out. How high above the decks are they, 4 inches or so?
Sorry for all the questions
Posted: Mon May 12, 2008 10:12 am
by WobblyLegs
Cracker Larry wrote:How high above the decks are they, 4 inches or so?
Sorry for all the questions
No worries...
That magic number: 3 inches. Actually, between 3 and 4.5", higher in the middle as the deck is curved down in the middle and the top of the coaming is straight. That's the height of the wood, a bit more than 1" (1" cleat plus 6mm deck - mixing measurements here) is below the top surface of the deck.
Tim.
Posted: Mon May 12, 2008 10:32 am
by Cracker Larry
Thanks.
I think I'm going to extend mine a few inches below the deck line. Speaking of which, Sam says it's time to go to work. I appreciate your input!
Posted: Mon May 12, 2008 10:35 am
by Lucky_Louis
Looking GREAT as usual Tim. Pretty soon now when you buy more epoxy, you can tell Mrs. Wobbly that it's the LAST gallon and mean it this time. You're getting close.
Posted: Mon May 12, 2008 10:44 am
by WobblyLegs
Lucky_Louis wrote:...you can tell Mrs. Wobbly that it's the LAST gallon and mean it this time....
Thanks Louis. Has it warmed up where you are? Nearly 30º outside this weekend!
Uh, you mean the last gallon on
this boat, don't you? She has her eye on the TW28
T.
Posted: Mon May 12, 2008 11:08 am
by Knottybuoyz
WobblyLegs wrote:Lucky_Louis wrote:...you can tell Mrs. Wobbly that it's the LAST gallon and mean it this time....
Uh, you mean the last gallon on
this boat, don't you? She has her eye on the TW28
You'll not need any gallons if you build a 28 Tim! You'll measure it in buckets and barrels!
Nice work on the boat by the way. Looking forward to seeing it on a trailer and then in the water!
Posted: Mon May 12, 2008 11:19 am
by Lucky_Louis
My bad! I have already braced SWMBO that when I build the TW34 that we'll be buying epoxy in 45 gallon drums....
Yes, the weather here is finally picking up too. Forecast for wed-thu-fri is temps up to 30°C. The challenge this year has been wind. Every time the sun comes out, the wind kicks up to 15-25kn making it less than perfect for open boats. I've had the OB17 running in the backyard a few times just to check the systems out. It wintered very well with no mildew or other problems. The GPS, Sounder, VHF radio, and SmartCraft displays all fogged up (so much for 'waterproof') but cleared quickly when left out in the sun for a couple hours. Next winter they come off the boat and inside I guess.
Posted: Mon May 12, 2008 12:03 pm
by colonialc19
Thanks for sharing those hand rails with us, they sure is purdy
D
Posted: Mon May 12, 2008 1:30 pm
by WobblyLegs
Lucky_Louis wrote:I have already braced SWMBO that when I build the TW34 that we'll be buying epoxy in 45 gallon drums....
Louis, I just looked at the BOM for the TW28 (39Gals) so if you're careful maybe two 45 drums would do the job on the 34...
BTW, 15 gallons (60 litres) according to the BOM for my little tub. I've used just over 60 which I think is OK. I've wasted, uh, well, lets just say 'a bit' - so there isn't 60 litres of epoxy ON the boat.
Posted: Mon May 12, 2008 4:00 pm
by WobblyLegs
ks8 wrote:I think it a good idea to tape the stiffner.
Done tonight
Posted: Mon May 12, 2008 5:22 pm
by WobblyLegs
gk108 wrote:...will make it look like you planned it like that.
Yeah, I think we'll stick with that version...
Posted: Wed May 14, 2008 5:15 pm
by WobblyLegs
Lots more sanding tonight - routed the finger holes in the berth hatches, followed by lots of hand sanding, followed by epoxy:
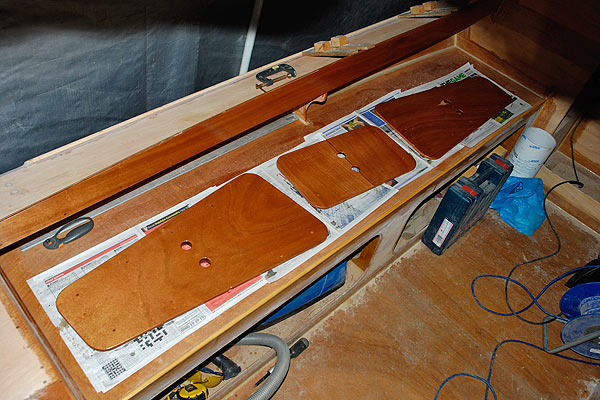
The tape arrived on Tuesday for the toe rails, so that will happen on the weekend, but in the meantime its sealing, sealing and more sealing...
I can almost taste the spray coming off the bow!
Later,
Tim.
Posted: Thu May 22, 2008 4:58 pm
by WobblyLegs
Working again, started glassing the toe rails, bow sections yesterday, and then finished the starboard side today. The glass tape runs from the bottom edge of the rub rail, over the toe rail, and about 30mm onto the deck. There will be another bit of glass stuck into the gap between the rails:
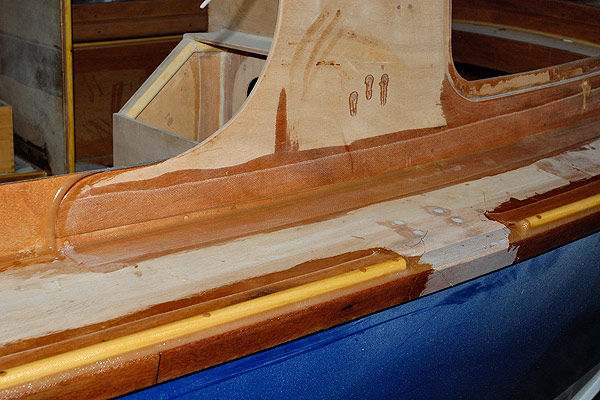
And we also have what seems to be referred to as 'love-bugs' here:
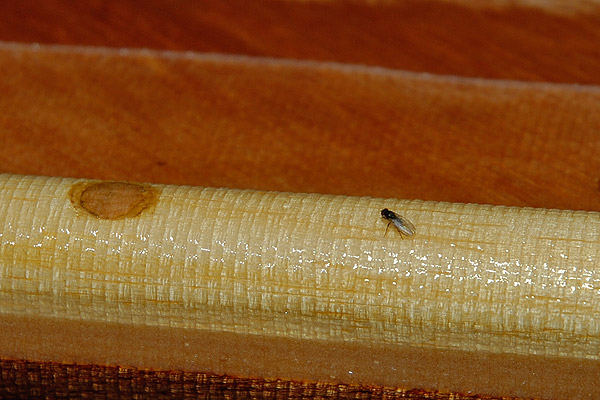
But, the big news is, yesterday I went to talk to a man about making me a trailer, so the order for that is going to go through tomorrow - four to six weeks for it to be built!
Getting there!
Tim
Posted: Fri May 23, 2008 8:07 pm
by Betowess
So maybe a July Splash?! Those are tough toerails. I'm not surprised you are glassing them, but do the plans call for that? I'm about to order my C17 plans, after one last question to JM. Keep on building Tim!
Posted: Tue May 27, 2008 5:55 am
by WobblyLegs
Hi Bob,
The glass (and toe rails) aren't in the plans. According to the plans the decks are glued to inwales. I've put light cloth now inside and out - lot's of peace-of-mind for relatively little extra work and weight.
I read your "pilot-house" question - I'm planning on having a spray-hood fitted, combined with a collapsible 'tent' over the entire cockpit. The spray hood will be high enough for me to stand under, and go back just enough to keep me dry in the rain.
Been a miserable wet long weekend here (Monday was a holiday, typical) so not much progress.
However, the trailer has now been ordered. Four weeks to build, but they will keep it in their yard until I am ready for it...
The famous last gallon of epoxy and last glass cloth (for the decks) has arrived.
Later,
Tim.
Posted: Tue May 27, 2008 10:24 am
by Lucky_Louis
Posted: Tue May 27, 2008 11:07 am
by ks8
WobblyLegs wrote: The famous last gallon of epoxy and last glass cloth (for the decks) has arrived.
Is that the first last gallon or the final last gallon? I will hope with you that it is the final...
Posted: Tue May 27, 2008 11:12 am
by WobblyLegs
It's the final last gallon. My last gallon was my previous last gallon. I don't think I thought of the one before that as being the last gallon, so I'm not doing too badly here...
Posted: Tue May 27, 2008 11:17 am
by gk108
I'm starting to think about what I'll do with my next gallon.
Posted: Tue May 27, 2008 1:59 pm
by Betowess
WobblyLegs wrote:
I read your "pilot-house" question - I'm planning on having a spray-hood fitted, combined with a collapsible 'tent' over the entire cockpit. The spray hood will be high enough for me to stand under, and go back just enough to keep me dry in the rain.
Tim.
I am definitely curious to see your design. Are you going with clear vinyl area to see through, or put some small windshield on top the cabin and snap to that? Not just a bimini, right?
Posted: Tue May 27, 2008 4:36 pm
by WobblyLegs
The idea is to have a collapsible windshield with a roof over my head, vinyl windows on the front, zipping to a bimini-type roof that covers the cockpit, with drop-down sides that clip to the outside of the coaming, sides and back.
I spoke to
these guys a couple of years ago, and they said they can make it up for me. When you click the link, there's a picture on the left that is similar to what I'm thinking about for the spray hood. A sample I saw had an aluminium channel across the top of the roof of the cabin which a corded edge of the hood slotted into.
Explore their web site - you'll probably see something that works...
Regards,
Tim.
Posted: Tue May 27, 2008 7:28 pm
by Betowess
Yeah, that will look sharp and be light in weight. My only qualm is looking through vinyl, which is funky. I've thought of having a small area in the vinyl where you could zip it open - like a peep hole, and not much water would get to your face, but visibility would be decent. Then you could zip it back up when you're not running. Just an idea, but I've never seen one done like that.
Thanks for sharing! bob
Posted: Wed May 28, 2008 12:22 am
by gk108
And we also have what seems to be referred to as 'love-bugs' here:
Sorry, not quite. Biker B.O.B. had a run in with
some love bugs.
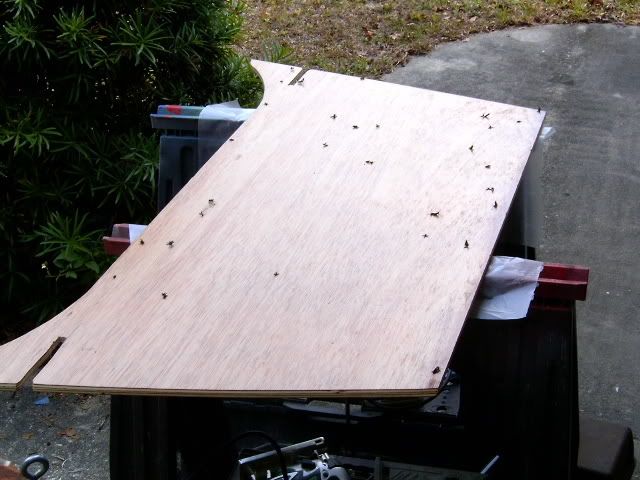
You will never see just a single bug. Notice that most are already mated, enjoying conjugal bliss to the end. They will generally mate up and flutter around until they find an epoxy project or windshield to hurl themselves on.
The spray hood you referenced looks good. Is the clear material standard flexible vinyl or something more rigid like thin lexan?
Posted: Wed May 28, 2008 6:45 am
by WobblyLegs
Ah, in comparison, my little bugs aren't even close. They land on the epoxy, by morning are dead and when I wipe them off all that's left behind a six tiny and hardly visible feet stuck to the boat. Your bugs look like they can mess up an otherwise smooth epoxy job. Glad I don't have them.
The spray-hood I'm looking at has flexible vinyl windows.
Bob, if the windows are mucked up with spray/water, then I'll just look around the side of it if I need to.
Later,
Tim.
Posted: Sun Jun 01, 2008 4:51 pm
by WobblyLegs
Been grinding tape on the toe-rails yesterday and today, though the weather (as usual) was damp. Late this afternoon things dried out, so off I went...
Sanded foredeck:
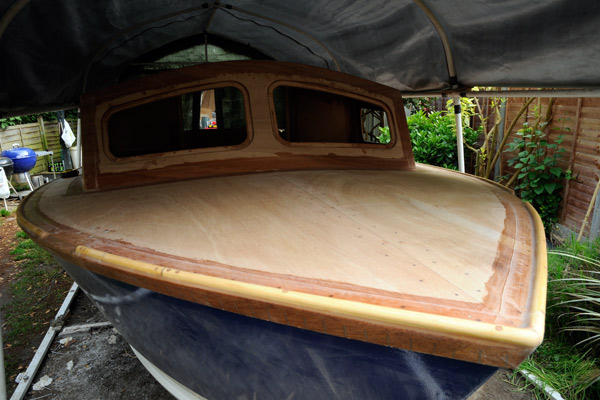
Laid the glass (light stuff):
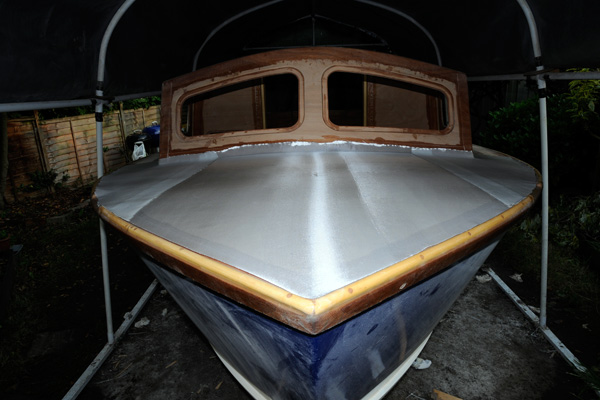
And epoxied it:
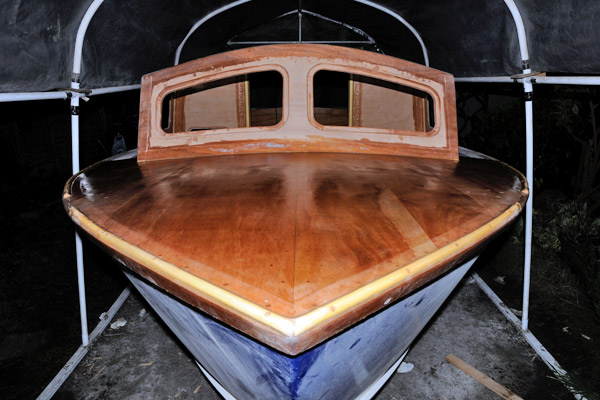
That's it for this weekend. Forecast is rain until Wednesday, plus a day to dry out, so more glass on Thursday.
Oh, well, my sig. lives up to it.
Still, making progress.
Getting there...
Tim.
Posted: Mon Jun 02, 2008 12:06 am
by Daniel Huckleberry
She looks so ready, Tim. This boat is very classy and I can't wait to see you in the water.
Huck
Posted: Mon Jun 02, 2008 2:55 am
by chicagoross
Almost, Tim! Have you got a motor yet?
Posted: Mon Jun 02, 2008 2:27 pm
by WobblyLegs
Ross, no motor yet, trailer first - the plan is to take the boat to the motor dealer, get them to drill for the lump, bring home and seal their holes properly (what makes you think I lack trust) and take it back to them to mount, cable, etc. They (apparently) need to fit it for PDI/warranty reasons.
As far as the "can't wait": you and me both, Huck... you and me both...
Me more though, I am sure of that!
Tim.
Posted: Mon Jun 02, 2008 5:10 pm
by Daddy
Tim, I have enjoyed your build and admire your attention to detail. Have you thought of a name yet? I must admit though that looking at the last few pictures you have posted remind me of some kind of bird. That photo angle from dead ahead and I see a bird; large beak and two large eyes peering out at me, just cant think of what kind of bird. Hope this is not insulting, just couldn't help noticing. Charming really.
Daddy
Posted: Mon Jun 02, 2008 5:19 pm
by rcihard
Pelican?
Great work Tim, your thread is one of my regular morning reads (better than the newspaper!)
Richard
Posted: Mon Jun 02, 2008 5:22 pm
by topwater
Rcihard youre reading my mind
Posted: Mon Jun 02, 2008 9:39 pm
by Daddy
Yes, Pelican, what do you think Tim?
Daddy
Posted: Tue Jun 03, 2008 4:32 am
by WobblyLegs
I was doing a bit of Google picture surfing last night after your bird comment, and it seems to have a resemblance to the "Spy vs. Spy" crows...
[edit] Daddy, I'm hoping to name it "3 summers" and as summer doesn't officially start until sometime in July, and last summer was such a washout, I think I should get away with not having to re-name it "4 summers"
T.
Posted: Tue Jun 03, 2008 7:19 am
by Daddy
Tim, that's it, Spy v.Spy! I knew I had seen it before. Three Summers, sounds like a great name for a beautiful boat. I am hoping to launch my GT 22 this summer. I have paid for a slip at one of the local marina's so that helped build a fire under me.
Daddy
Posted: Tue Jun 03, 2008 10:35 am
by Betowess
Spy vs. Spy. Wow, that was a long time ago and that is exactly what she looks like with that wide angle lens. Toast one for 3 Summers! I really like the name.
I ordered the C17 plans - for which your build get the kudos. Cheers, bob
Posted: Tue Jun 03, 2008 11:40 am
by jgroves
The boat looks great! It really does! Are you finishing any of the wood "bright"? I know it's a little late now, but you could have left the entire boat bright to show off your attention to detail
. Did you say you had a trailor? If not you could do like me and just get it in the water to save money (assuming it's cheaper to keep it in the water). For me I have enough isolated creeks to keep it in the water and out of the way
Posted: Tue Jun 03, 2008 11:43 am
by jgroves
Just noticed the size and shape of your boat reminds me of the Orkney Vanguard boats! They have a 17' too! I am considering a lot of boats for future builds but your build keeps me considering another 17' boat.
Posted: Wed Jun 04, 2008 9:38 am
by WobblyLegs
Betowess wrote: I ordered the C17 plans
Good for you Bob! You'll like it. I like it more and more as it grows. I think its very versatile and adaptable to different tasks. But then, it hasn't been used yet...
jgroves wrote:Did you say you had a trailor? If not you could do like me and just get it in the water to save money (assuming it's cheaper to keep it in the water).
Trailer ordered but not built yet. It's much cheaper here to store dry at a marina than wet. Maintenance should be less on a dry boat too. I think.
jgroves wrote:Just noticed the size and shape of your boat reminds me of the Orkney Vanguard boats! They have a 17' too! I am considering a lot of boats for future builds but your build keeps me considering another 17' boat.
Orkney's have a good reputation as solid work boats here. I went aboard one at the Southampton boat show last year, and it was very, very well made and clean. The Vanguards came out after I started this build, and I only discovered them as a result of searching for production boats similar to the C17. They are the closest I've found so far.
Anyone want to see?
http://www.orkneyboatsltd.co.uk/vanguard170.html
Note the weight on their web site: 475kg. The C17 design weight according to Bateau is 285kg for a very similar boat. The C17 has more inside space, and benches can be tailored to give similar cockpit standing room to the Vanguard 170.
Later,
Tim.
Posted: Wed Jun 04, 2008 4:40 pm
by WobblyLegs
More sanding this evening, this time the side decks, then six (three each side) pieces of 1m x 20cm pieces of fabric cut:
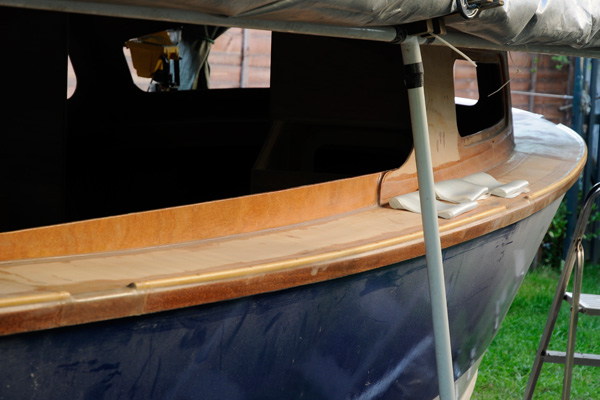
And laid:
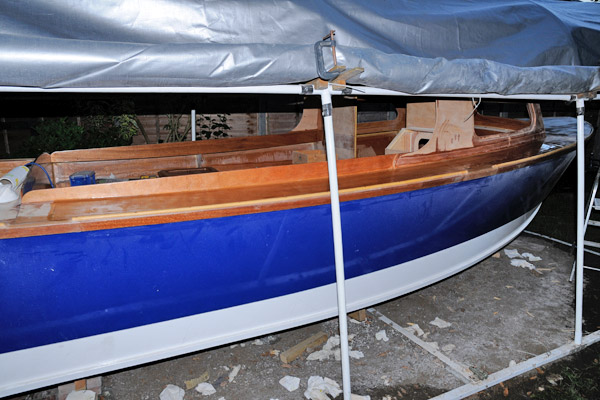
The side decks are now sealed, leaving only the motorwell side decks still to be done. If the weather holds for another day.............
Tim.
Posted: Wed Jun 04, 2008 4:51 pm
by ks8
Getting closer!
I'm putting the last piece of glass on in about an hour. I hope you know that joy soon also.
Posted: Wed Jun 04, 2008 5:58 pm
by Lucky_Louis
Looking absolutely fantastic Tim!
How's that 'last' gallon of epoxy holding up?
Posted: Thu Jun 05, 2008 4:17 am
by WobblyLegs
Lucky_Louis wrote:Looking absolutely fantastic Tim!
How's that 'last' gallon of epoxy holding up?
Thanks, I'm pleased with this week's progress so far.
Still have a few ml's left in my present batch of epoxy, haven't opened the
last gallon yet
Tim.
Posted: Thu Jun 05, 2008 9:35 am
by gerry
Looking great Tim, it always keeps me motivated during winter watching your progess. I like how you have done the edges of your deck.
Gerry
Posted: Thu Jun 05, 2008 9:50 am
by Cracker Larry
Beautiful Tim
Did you wrap the glass up the coaming or just cover the decks?
Posted: Thu Jun 05, 2008 10:23 am
by WobblyLegs
Gerry: Is it really winter there already? Summer's still reluctant to arrive here... (though its warm today).
Larry: the glass is only on the decks. There for walking on. When/if you put coaming on your gunwales (which I've just been admiring a few minutes ago) and fillet the corners, you'll see that the wood is likely to break before any of those glued surfaces give way.
Thanks for the comments.
Tim.
(1.5 hours left in the office, then home to glass!!!!)
Posted: Thu Jun 05, 2008 4:18 pm
by WobblyLegs
And the same tonight, this time the motorwell side decks.
Measured out and drawn on the back of a RO sanding disc pack:
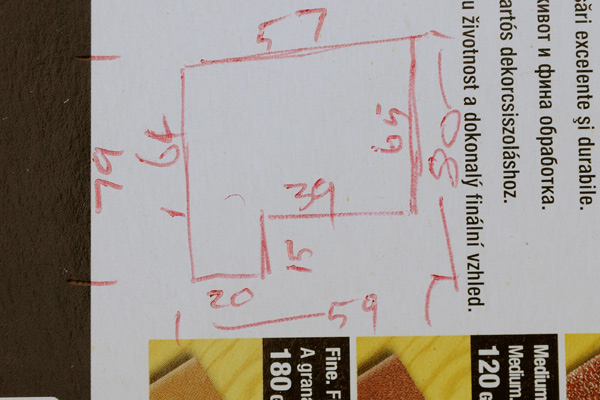
And it fits:
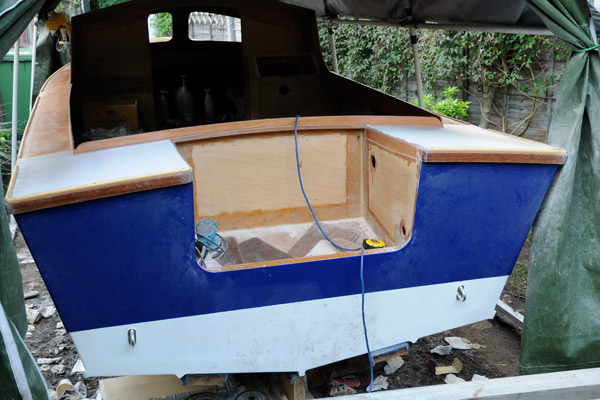
And now the entire deck is sealed:
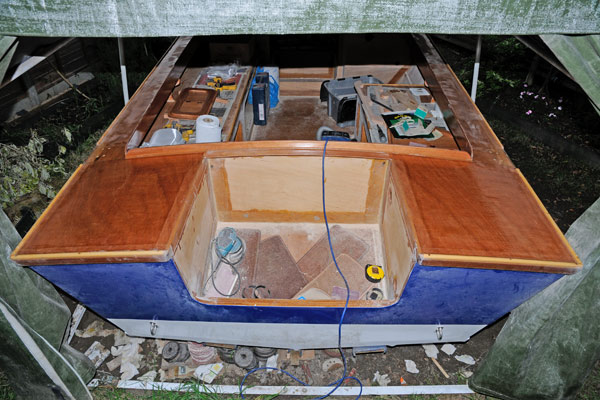
I guess its time to tackle the motorwell now... Still haven't opened the last gallon
Am I posting too many pics?
Tim.
Posted: Thu Jun 05, 2008 4:49 pm
by Cracker Larry
Am I posting too many pics?
Not for me
I've got about a gallon of epoxy left myself. I don't think it's going to make it thru
Posted: Thu Jun 05, 2008 4:49 pm
by Betowess
WobblyLegs wrote:
Am I posting too many pics?
Tim.
You gotta be kidding. We want MORE of your pics, at least I do. Looking fantastic !
Posted: Thu Jun 05, 2008 5:13 pm
by Lucky_Louis
Looking great Tim, glad to hear about that last gallon of epoxy
Don't forget to pop a drain hole or two through your transom to drain the well. I did a single 38mm hole off to portside, I think Larry did 2. I used a Forstner bit to minimize the damage to the topsides paint. Then I just did 3 coats of thickened epoxy to seal the sides of the drain hole (added some cabosil to end of batches used elsewhere and coated it over a week or so). What's your transom height? Looks like you're set up for a short shaft O/B?
Posted: Thu Jun 05, 2008 5:15 pm
by steve292
You keep posing them Tim.I enjoy watching how everyone goes about it in a slightly different way,but to the same end as everyone else.
It always amazes me how clean you work as well,whats the secret?
Steve
Posted: Thu Jun 05, 2008 5:33 pm
by WobblyLegs
OK, I'll keep the pic's coming as I go along...
Lucky_Louis wrote: What's your transom height? Looks like you're set up for a short shaft O/B?
Louis, the transom is set for standard (20") shaft - remember that the sheer on this boat is quite a bit more than the OB17... maybe that's why it looks lower compared to your boat?
steve292 wrote:It always amazes me how clean you work as well,whats the secret?
Steve, its a s-l-o-w process - I get runs, as does everybody, I spend a lot of time grinding fillets (with the Dremel) and sanding off drips and runs etc, and a *lot* of hand sanding before the next coat of epoxy - its actually much easier and smoother to sand the wood by hand than using the RO, though it is more of a work out...
Also, if the epoxy has cured properly, it gets easier to sand, with less clogging of the paper.
Oh, and you haven't seen how many pairs of jeans I have that can no longer be seen in public, due to odd looking epoxy dribbles....
Tim.
Posted: Thu Jun 05, 2008 5:39 pm
by Lucky_Louis
It's this photo that throws me. The cutout appears to be close to half the full depth of the transom. If the transom is cut to accept a 20" leg then the depth of the boat is close to 40" which probably isn't correct, is it?
Posted: Thu Jun 05, 2008 5:56 pm
by chicagoross
Oh yeah Tim, keep 'em coming. Love the detail shots, lots of good ideas to think about for my own small cabin boat! Kind of borrowed your window recess treatment already!
Posted: Thu Jun 05, 2008 6:00 pm
by gk108
Looks about like that to me, Louis. The U-bolts in that picture give a bit of an idea of scale. They span a little over 2" and it looks like it would take about 10 to make the distance from the cutout to the bottom. I guess that makes those compartments more like small cabins.
Posted: Thu Jun 05, 2008 8:15 pm
by Cracker Larry
Oh, and you haven't seen how many pairs of jeans I have that can no longer be seen in public, due to odd looking epoxy dribbles....
I've got some jeans and shirts that could stand up in public, without me in them
Posted: Thu Jun 05, 2008 8:29 pm
by TomW
Larry nah your not that messy.
Tom
Posted: Fri Jun 06, 2008 7:31 am
by WobblyLegs
To answer the question about transom size...

This was measuerd with the tape flat against the transom, not vertically, so, with the angle of the transom, that gets about 20" vertical from the top of the clamping board.
Louis, you're not far wrong with the 40" guess.
GK, you're right, those side lockers are very deep - down to the sole.
Later,
Tim.
Posted: Fri Jun 06, 2008 12:36 pm
by Lucky_Louis
Wow
Thanks Tim. That really is quite different from my OB17, hadn't realized how much. The C17 was the boat I wanted to build (in CC form) but the plans weren't available or even being discussed when I started my build. You will certainly be very well defended against following seas. Another big bonus will be engine noise reduction. With that deep a well, it should be much quieter from the cockpit.
Posted: Fri Jun 06, 2008 12:38 pm
by Tommy D
Tim,
I am watching your build very closely and with great anticipation for new photos. It looks great. I ordered the C 17 plans - but have been bogged down redoing the floor on my OD 18 - and have now been toying with the idea of the C19. Yours looks like a "big boat" - does it feel like that to you? I am worried about building it and then wishing I had done the 19 footer! Aghhh decisions again!
Great work - keep the pics coming!
Posted: Sun Jun 08, 2008 12:51 pm
by Betowess
Hi Tim,
I seem to remember that you are putting the battery in the port motorwell locker, right? Did you put a hatch in below a cockpit seat, or do you plan to cut through the top?
thanks, bob
Posted: Sun Jun 08, 2008 4:51 pm
by TomW
Tim, are you still on course to launch in July. I am anxious for you to get her launched so I can get some performance numbers. Also have you decided what motor you are going with we discussed it before but that seems like eons ago.
With any luck I'll start in Mid-July.
Tom
Posted: Sun Jun 08, 2008 5:30 pm
by WobblyLegs
Tommy D wrote:Yours looks like a "big boat" - does it feel like that to you?
It's kinda big, for a 17-footer - I think 'cos it's quite wide. But to give you an idea, I measured the cockpit today at 5'7" wide and 6'7" (excluding the 6" or so under the cabin roof that extends over the cockpit) long. Don't forget, there's enough space in the cabin for two to sleep, or three to sit.
Betowess wrote: I seem to remember that you are putting the battery in the port motorwell locker, right? Did you put a hatch in below a cockpit seat, or do you plan to cut through the top?
Plan is to have the battery in the motorwell locker, port or starboard - I have made tie-down loops both sides. I will cut holes for hatches in those decks.
Tom, you know better than to ask for a launch date
But July is possible at this stage - bear in mind the tennis starts soon, and brings the rain with it...
Ross, you're more than welcome to copy my windows - I'm sure its not an original idea on my part...
A couple more pics of this weekend's work...
Lots of sanding done, as usual, then some sealing...
The motorwell:
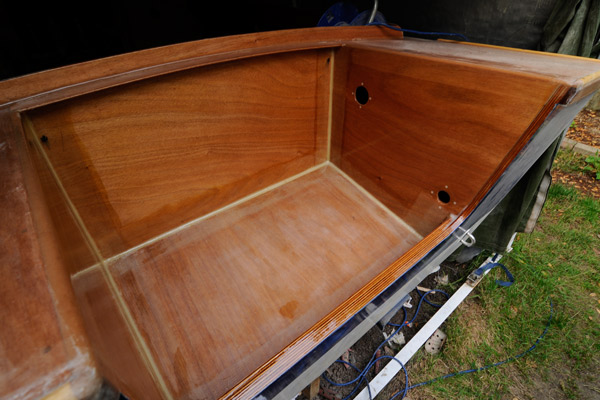
And the cabin:
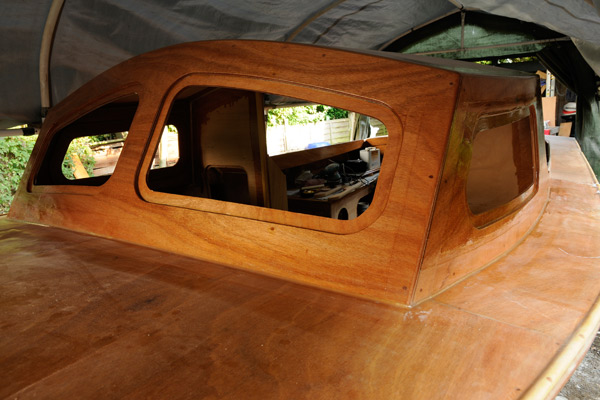
And that's it, the whole outside of the boat is now sealed, though not finished. More sanding to come, and a second coat of epoxy after that. Next weekend. This coming week I'm planning on working inside.
Later,
Tim.
Posted: Sun Jun 08, 2008 10:53 pm
by ks8
Sealed is good...
Posted: Mon Jun 09, 2008 7:45 pm
by TomW
Ah Tim I know better than to ask for a launch date for your beautiful boat. However, now if you move the way your going I may finish first.
And I won' won't start till next month. I have some 200 year old Amercian Walnut from my wifes farm that I want to incorporate into the boat.
Best wishes
Tom
Posted: Fri Jun 13, 2008 3:54 pm
by WobblyLegs
This week...
Sanded and sealed the handrails:
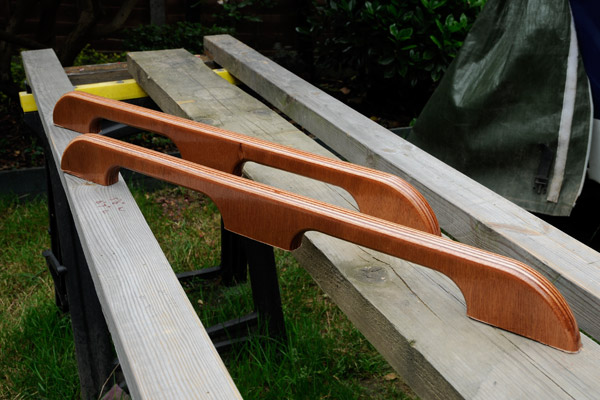
Then sanded and sealed the inside of the console:
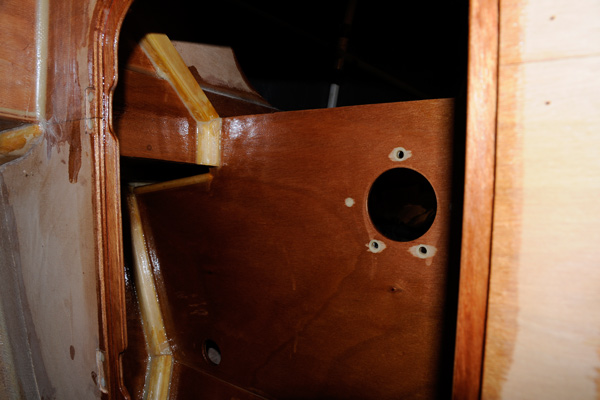
And, as usual, take photo's, check on screen, and discover dry spots:
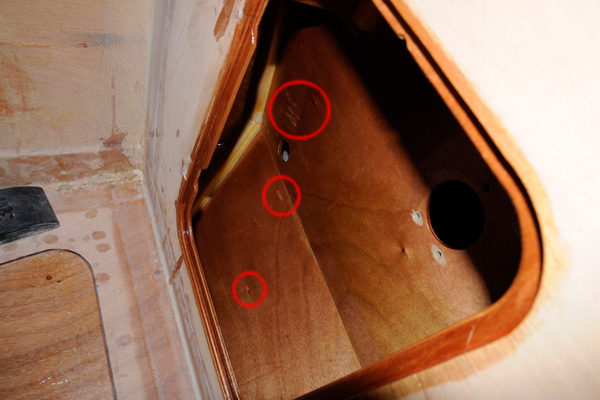
No worries, there was a bit of epoxy left to go back and cover them. All sorted.
Then, today, finally got up the guts to drill two more holes in the hull, for drainage for the motorwell:
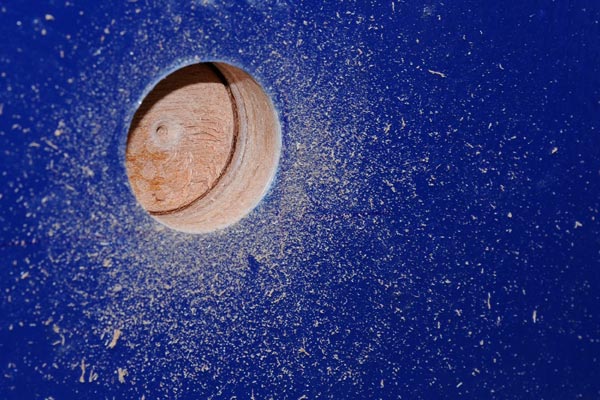
Thanks L_Louis for the advice on the Forstner bit - worked perfectly
!
Then sealed (first coat):

And from the other side:
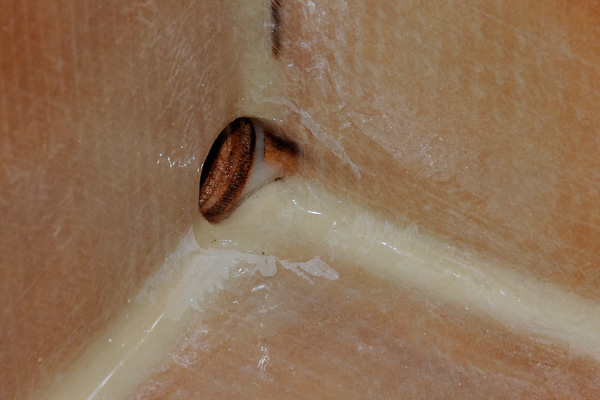
And their location:
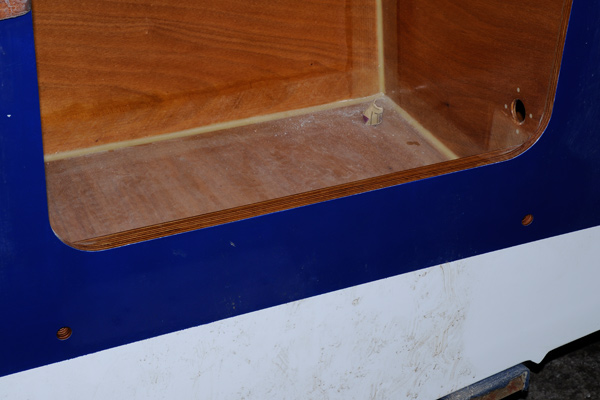
After which I glued the instrument panel to the console:
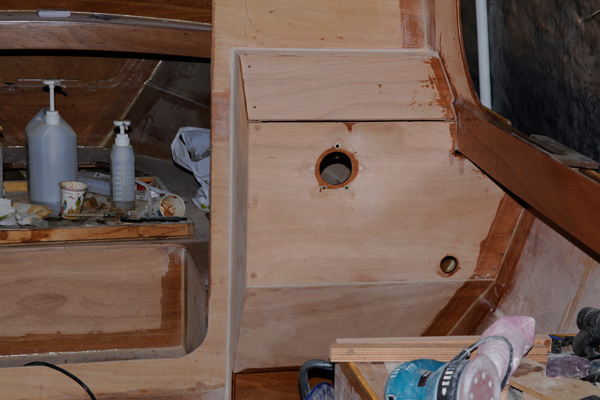
The gaps above and below to be filleted later.
Oh, and I have a solution to the mounting of the handrails (question was in the other section). More to follow on that.
Looking forward to the weekend now
Tim.
Posted: Fri Jun 13, 2008 4:40 pm
by TomW
Tim it's looking great. I have gone back through the total build now and can't believe how well it has really gone for you. You have done some beautiful work. Cheers!
Tom
Posted: Fri Jun 13, 2008 5:50 pm
by steve292
You do some fine work Tim.
I get a bit of a nervous twitch sometimes, when I see everyone doing stuff so well & then have to try to keep up the standard myself
Regards,
Steve
Posted: Sat Jun 14, 2008 12:34 am
by ks8
more sealed is more gooderer...
Posted: Sat Jun 14, 2008 2:07 am
by Betowess
Looking great Tim and looks like you've been hard at it. I am wondering do you have plans for putting in a depth sounder/GPS. Also was wondering what your console layout will be and what the small hole at the bottom is for? Is that for the steering cable? Are you putting in a tach or speedometer? Jeez, sounds like 20 questions.
Posted: Mon Jun 16, 2008 7:26 am
by WobblyLegs
Betowess wrote:I am wondering do you have plans for putting in a depth sounder/GPS. Also was wondering what your console layout will be and what the small hole at the bottom is for? Is that for the steering cable?
I am thinking of a depth sounder, but later.I have a hand-held GPS (Garmin GPS-Map 60Csx) that takes NMEA input from a depth sounder, so will be using that on the boat. As to the instrument layout, whatever comes with the motor, for now. I won't cut holes until I have them, and the remote control, so I can get best positioning.
You guessed right about the smaller hole. It might need some adjustment to take the curve of the cable, but that will wait until the helm is mounted.
Regards,
Tim.
Posted: Mon Jun 16, 2008 7:33 am
by WobblyLegs
Well, the hand rails are now on. Took me longer than expected, mostly in preparation rather than mounting. After posing
this question I was happy to hear Jacques confirmation that the glue was strong enough, but also there were a few comments about through-bolting which I wanted to avoid - so had to come up with a satisfactory solution, which I think I have.
So the idea is to have hardwood pegs embedded into the handrails, going through the roof, and so adding some structure to the joint as well as increasing the glued area right through the plywood instead of only on the surface of the roof.
Started with 18mm diameter hardwood dowels (I don't know what wood it is, but its pretty strong), which were planed flat on four sides. The idea is to make space for the glue to make a solid join between the rails and the pegs.
18mm holes (about 25mm deep) drilled and pegs dry fitted (Forstner bit again - gives a nice square end to the hole):
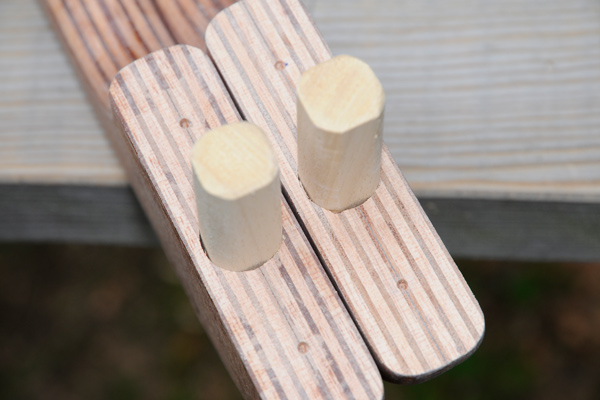
The glue was brushed around the holes, the ends of the pegs pre-coated, and about 5 to 6mm of glue poured into the holes. Pegs inserted, and tapped down into the hole until the glue started oozing out the flattened sides. This was mixed using quick hardener, and left for most of the afternoon to cure, with occasional tapping to keep the glue oozing out the sides, and also eliminate all the air bubbles from the mix. The two holes either side of the peg are for guidance when fitting to the roof:
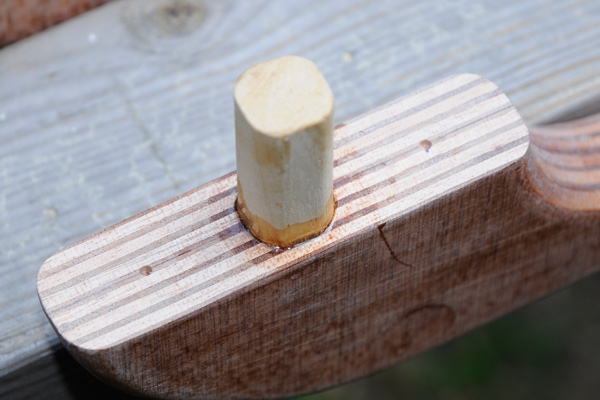
Rails with pegs in place (sanded in preparation for more sealing later):
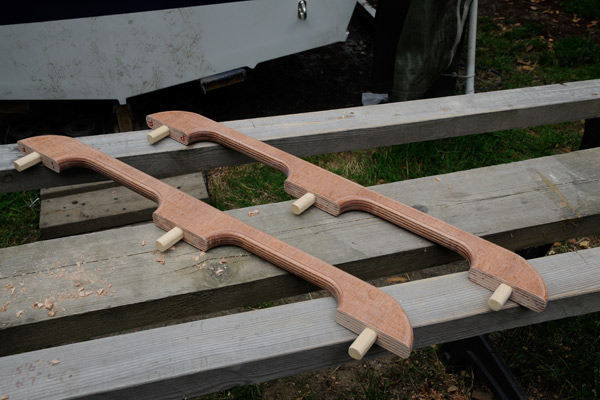
And the bit that took longest - measuring, marking location and drilling holes in the roof. Measure. Measure again. And again. Get ready to drill. No, lets just measure that one more time...
Eventually I drilled the holes:
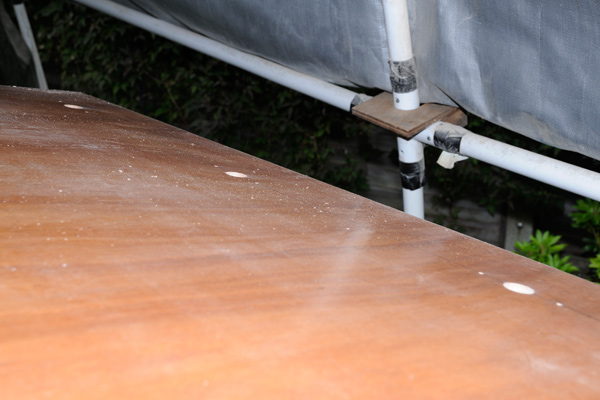
Screws from inside which are intended to match up with the pilot holes on the rails. Also, gluing area of roof thoroughly sanded and cleaned with acetone (dust blown away after pic):
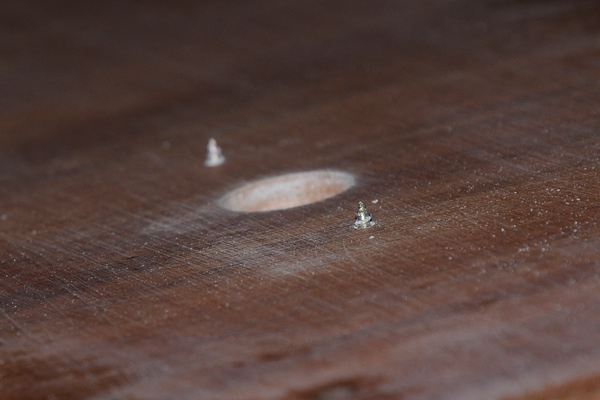
Then it was mixing time, so no pics. Mixed up a batch of glue, applied generously to bottom of (precoated) rails, especially around the pegs, so that when drawing the rail down with the screws from inside, the glue oozes down between the peg (18mm) and the hole (20mm). All went well, and pleased that all the screws matched the pilot holes on the rails perfectly, keeping a consistent gap between peg and roof in all six holes. Phew!
A view from inside, with glue cleaned up a little around the pegs:
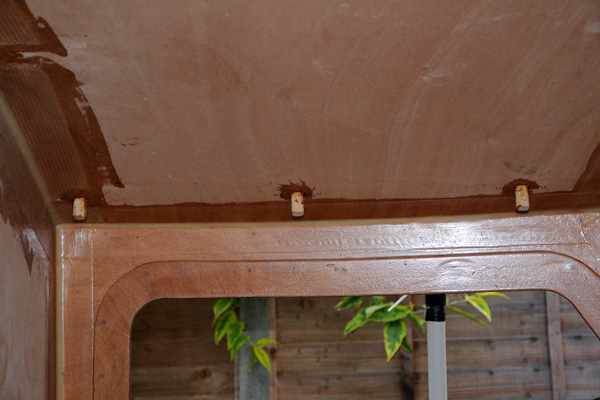
I'm going to put some plywood rings over those pegs up against the roof, giving another half-inch of peg-to-ply glue.
And from outside:
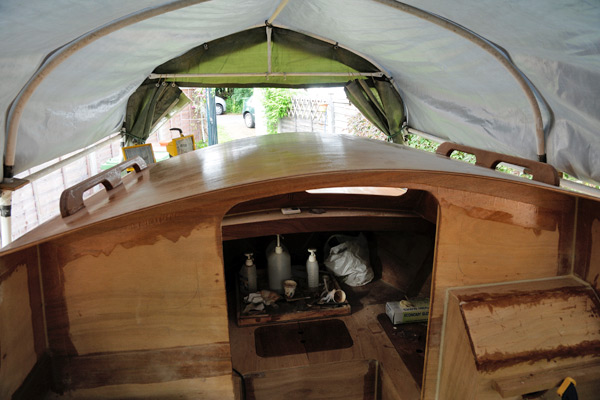
I think they will be strong enough...
The First Mate calls them "Bunny Ears"...
Oh, and ignore the messy console, it will look better soon.
Later,
Tim.
Posted: Mon Jun 16, 2008 8:38 am
by Cracker Larry
That will certainly work, Tim. Beautiful solution, good
No fear of that ever coming off
Posted: Mon Jun 16, 2008 8:51 am
by Dougster
Gosh that is clever, you through bolted with wood and epoxy! I don't quite get the screws though, are they temporary, just for a consistent glue gap or will you drive them in and leave them?
Learning as he goes Dougster
Posted: Mon Jun 16, 2008 1:02 pm
by WobblyLegs
Thanks again for the comments - Larry, glad to hear you think it will be strong enough.
Watching you build, if it's good enough for you, its more than good enough for everyone else...
Dougster, mmm, through-bolted with wood - I guess so. Whenever I have a problem to solve, I don't usually try and think of a solution too much - I just get on with something else until a solution comes. Let the subconscious work on it.
The screws are there for three reasons. For guidance; when the rails were epoxied I couldn't see where to place them, so a bit of shuffling until they 'fell' onto the screws with the little holes. To keep the gap around the peg. And to draw the rail down onto the roof, in place of clamps. I use screws instead of clamps a lot. The screws will come out, holes drilled, and dowels plugged in. Lot's of dowels in my boat.
ks8, more sealing to come. Getting betterer and betterer every day. I am really starting to believe that a July launch is possible.
Anyway, must go - epoxy joints on the console to sand now...
Tim.
Posted: Mon Jun 16, 2008 2:30 pm
by Dougster
Ah, I get it. Must have been tough to get all those holes positioned just right. Sure did pay off. I'm early times learning about Quick Fair. So far, seems like a great product. I look forward to fooling with the topsides and cabin and sure will scroll back through your thread for tips and inspiration.
Gonna be fairing a while Dougster
Posted: Mon Jun 16, 2008 5:54 pm
by gk108
I like that! If there was anything you might want to fasten to the top on the inside like lights, you could make a plywood strip with 3 holes instead of donuts around the dowels.
Posted: Mon Jun 16, 2008 6:15 pm
by chicagoross
Innovative! I'm sure that will be strong enough to hang on. Beautiful work as usual!
Posted: Tue Jun 17, 2008 5:09 am
by WobblyLegs
gk108 wrote:...you might want to fasten to the top on the inside like lights, you could make a plywood strip with 3 holes instead of donuts around the dowels.
Good thinking! I like the idea. Funny you called them "donuts" - that's what I typed, then backspaced and typed "rings"...
Posted: Tue Jun 17, 2008 4:42 pm
by WobblyLegs
A bit more tonight
Finished the console, with a nice marble effect from using white micro-fibres to start that didn't quite fill the gap, followed by ply sawdust (leftover from mounting the handrails) to fill it out a bit for sanding, which was done this evening. Dowels again to fill holes where screws held the wood in place while gluing:
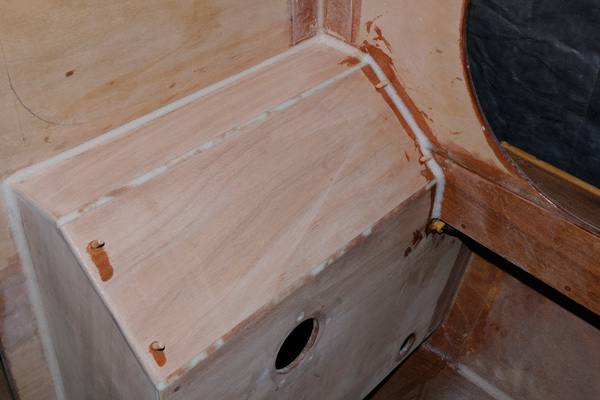
I added a half-round section of wood to the outer part of the console, under the side deck, where the control cables are going to come out. The idea being to put a bit of split hose over there to help prevent chafing. There is a matching piece of wood inside:
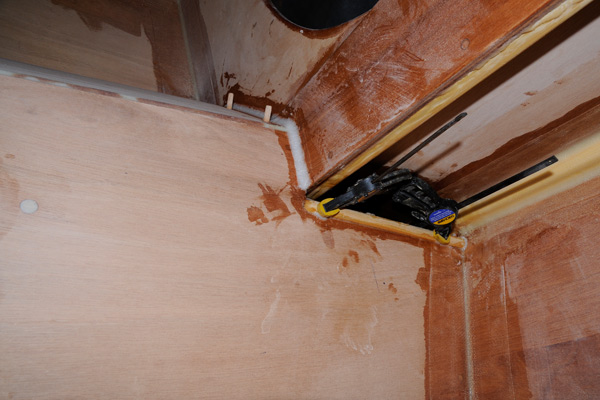
A question about the first pic: Does it need to be taped to the side of the coaming/cabin wall? And all the corners taped? I know some will say yes, but I'm inclined to think this is an unstressed area, and there are cleats under all the panels used to make up the console. All answers, as usual, much appreciated.
Regards,
Tim.
Posted: Tue Jun 17, 2008 5:25 pm
by Lucky_Louis
I wouldn't bother with taping the joints Tim, like you said,, it's a low stress area and there's cleats behind. I would use some finishing glass over the whole area though. It'll mask the wood grain and provide a very smooth, lightly textured base for subsequent coats of paint and save tons of sanding and fairing.
Posted: Tue Jun 17, 2008 9:18 pm
by Betowess
I agree with Louis, but would just seal and paint it, as I'm sure its more than strong enough and you want to smell some salt pretty soon. Maybe a piece of glass on the bottom (not in pic) where your feet might kick it. BTW, that is a nice design with the concave area for the feet.
Posted: Wed Jun 18, 2008 10:10 am
by Cracker Larry
Larry, glad to hear you think it will be strong enough. Watching you build, if it's good enough for you, its more than good enough for everyone else...
I don't know about all that, I just wanted to see it strong enough for your wife to cling to for dear life . Tell her I was thinking about her
Posted: Wed Jun 18, 2008 4:32 pm
by WobblyLegs
And some more...
Thanks for the comments and advice, decided no taping, and sealing only. Louis, you mention glassing to cover grain on the wood - I'm not sure what wood you used, but on the stuff I have every time I coat it it comes out pretty smooth. Besides, it all gets sanded again for a second coat, and ends up really, really smooth.
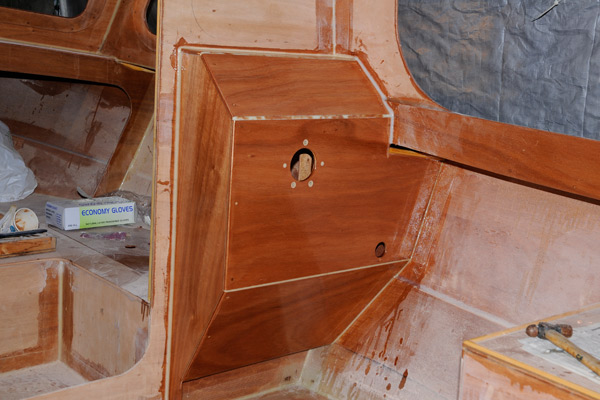
Bob, you're spot on with your observation there - the lower part of the console was made to stay away from my clumsy feet.
Anyway, all those bits of bare wood that you see in the pic need sealing, and I doubt anyone is interested in seeing that process in detail, so I'll hold off with the pic's until something exciting comes along - maybe in a couple of week's time...
Larry, I'll tell her that you are thinking of her... How's Costa Rica btw?
Later,
Tim.
Posted: Mon Jun 23, 2008 3:11 pm
by WobblyLegs
Ok, all right, yeah, I know I said no more for a while, but I needed to do some other stuff before sealing, so more pic's...
Yesterday I glued on a couple of grab-handles to the cabin bulkhead. These are the cut-offs from my handrails that were too long.
Between the First Mate and I we tried various different positions, and finally settled on perpendicular to the roof, rather than vertical. After playing around, we both found that the angle is better suited to holding on to, and looks better in relation to the 'bunny-ear' handrails (no jokes about playing around with the missus and trying different positions please, I'm trying to build a boat here
):
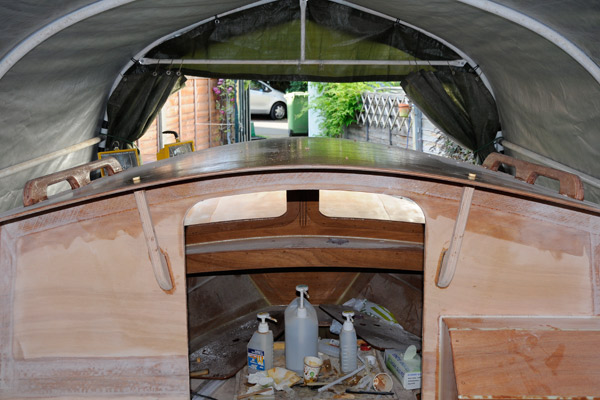
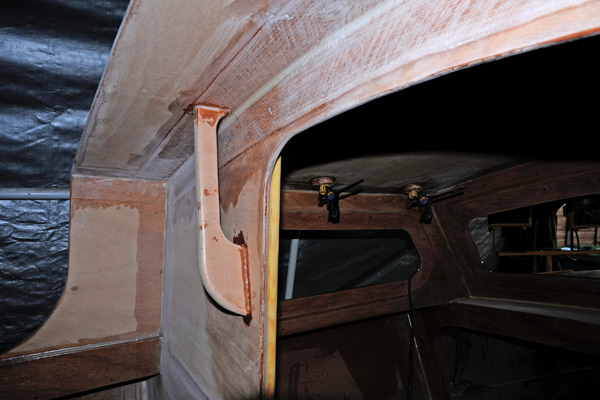
You can see the clamps holding the handrail doughnuts in place in the second pic...
As with the handrails, a bit of reinforcement (without fastenings) was added. So, today, drilled a core into the top of the handle. This hole goes about 10-12mm into the handle, only really there for sheer strength:
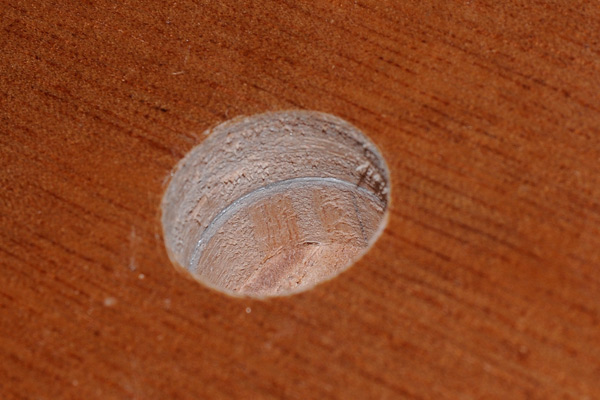
Neat epoxy poured in, left to soak for a while, and a peg inserted, and tapped down until epoxy oozes out:
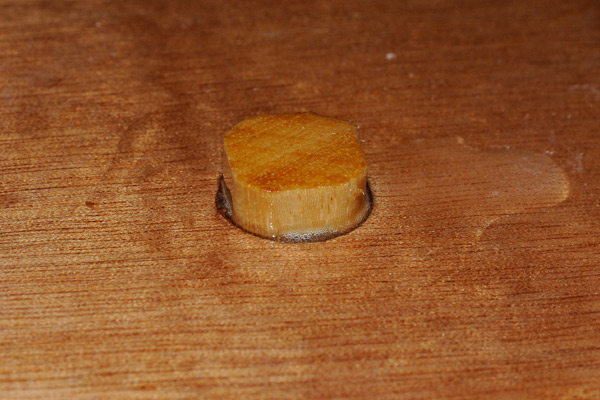
Did the same where the handle joins the bulkhead, but this time the hole is about 30mm into the handle to give as much glue surface as possible:
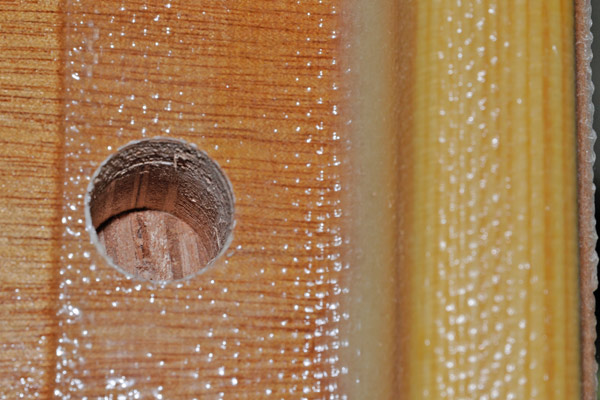
A bit of a different gluing sequence here - pre-coated with neat epoxy (peg, doughnut and hole) then a glue mixture added to the end of the peg, the tapped into place until oozing out from the flats of the peg. Followed by a doughnut:
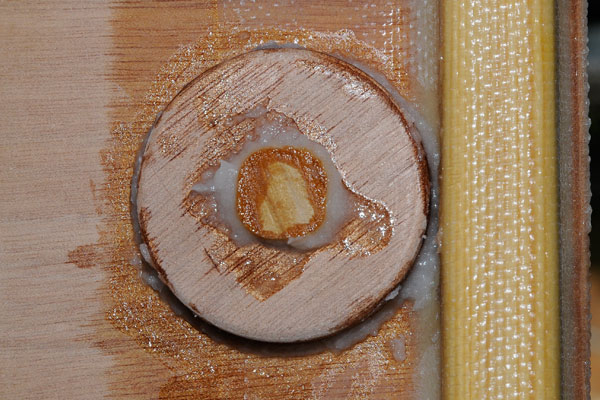
And general view of the port side of the cabin - showing the doughnut I put in this evening (L) and the three doughnuts I put on yesterday, backing the handrail on the roof.
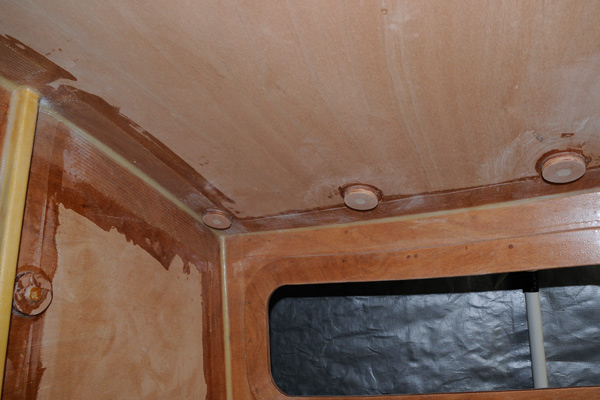
Yup, I know GK's idea of a strip is good, but after consideration I went this route 'cos 1) it's easier and 2) if I mount any lights etc. in the cabin I think the bulkhead is a better place to do it - that way I can drill-fill-drill and through-bolt. Ja?
A bit of touch-up filleting to do tomorrow, then some sanding the day after, then the sealing will continue.
I think.
Maybe.
Tim.
OK, so it was only 7 pic's
Posted: Mon Jun 23, 2008 3:21 pm
by Lucky_Louis
[quote="Tim "Wobbly Legs""]the First Mate and I we tried various different positions....[/quote]
Your build sounds a LOT more interesting than mine was...
Looking great Tim, you must be into your 'last ' gallon by now?
Posted: Mon Jun 23, 2008 3:30 pm
by kiwi
Lucky_Louis wrote:[quote="Tim "Wobbly Legs""]the First Mate and I we tried various different positions....
Your build sounds a LOT more interesting than mine was...[/quote]
For my next boat there will be a berth so trying positions will be a must. Tim next time you sleep in the couch!
Tony
Posted: Mon Jun 23, 2008 3:31 pm
by WobblyLegs
Lucky_Louis wrote:...you must be into your 'last ' gallon by now?
Nope. Still in the box at the bottom of the stairs. The previous last gallon is low enough to decant into the LAST gallon now.
I'm having fun at the moment with the build. Weather's good, trailer's due soon, and motor soon to come. S-o-o close!!!
I hear from my friend in Vancouver that summer has arrived?
Best regards,
Tim.
Posted: Mon Jun 23, 2008 3:34 pm
by Lucky_Louis
You bet! The sun is finally back out on the sunshine coast. Cold though. Last night broke an all time record for an overnight low on June 22 in Vancouver at 7° C.
So we're still just fishin' as opposed to catchin' but the boat is still great.
Posted: Mon Jun 23, 2008 3:35 pm
by WobblyLegs
kiwi wrote:Tim next time you sleep in the couch!
Why? We didn't misbehave!! Apart from drinking all your alcohol!!
Posted: Mon Jun 23, 2008 9:48 pm
by Betowess
WobblyLegs wrote: After playing around, we both found that the angle is better suited to holding on to, and looks better in relation to the 'bunny-ear' handrails (no jokes about playing around with the missus and trying different positions please, I'm trying to build a boat here
):
That's a great angle for holding onto ... I hadn't thought of it till I saw the pics.
ps - I shared this with missus beto who got a kick reading it.
Posted: Wed Jun 25, 2008 4:29 pm
by WobblyLegs
Sorry, couldn't resist a couple more pic's...
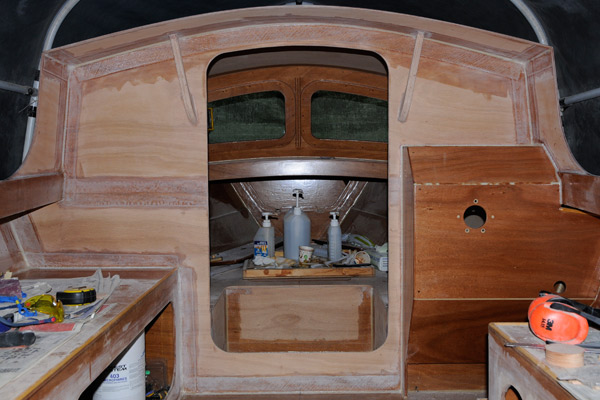
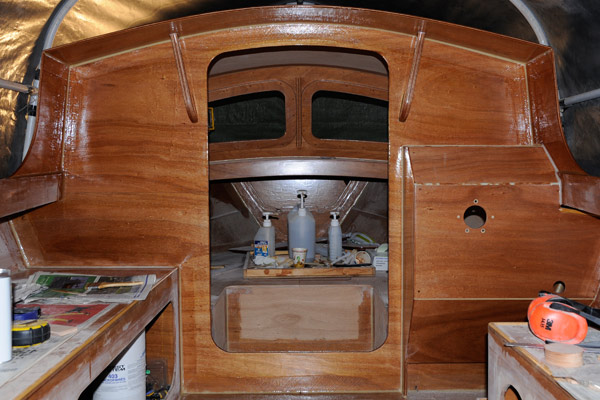
First Mate not involved in this process
Tim.
Posted: Wed Jun 25, 2008 6:31 pm
by Lucky_Louis
Not sure if you posted before Tim, but is the access to your console through a hatch or an opening in the bulkhead from inside? Pretty slick setup. Have you figured out cable pathways for electrical, controls etc.? I didn't see any chase tubes.
Posted: Thu Jun 26, 2008 12:34 am
by Betowess
Louis, he has a very nice large access from inside the cabin. I'm pretty sure its in the album too.
Tim, have you decided on a color for the exterior cabin and cockpit? I'm guessing it will be white. Can't wait to see your crane setting it on the new trailer.
I've been pulling a couple fair sized stumps out of the ground prepping to build a new workshop for my C-17 build. My neighbor broke his Kobatsu backhoe's hydrolic shaft digging one of my tree stumps out... and I didn't want to fork a grand to rent an excavator for just two remaining stumps. So I'm digging/undermining them out by hand (with an ax and a shovel). Slow going, but one is out and one is half way out. Sorry for the hijack, but I'm determined to build one too, And bro, you have set the bar WAY high.
Posted: Thu Jun 26, 2008 3:33 am
by chicagoross
"bro, you have set the bar WAY high" - Amen!
Keep 'em coming, Tim, love the detail work, planning etc. taking place on a good practical hull plan to begin with!
Posted: Thu Jun 26, 2008 7:35 am
by TomW
"bro, you have set the bar WAY to high" - Amen again! I have throughly enjoyed watching a craftsman at work. You totaly inspire me Tim to do my best on my C17 when I start in the next month or so.
Keep the pics coming and let's get that thing launched.
Tom
Posted: Thu Jun 26, 2008 4:32 pm
by WobblyLegs
Setting the bar? Nope! Lots of runs there, and lots of sanding to do to smooth it off for a second coat. Still, it's sealed, and the second coat and paint will be happening later, after I've started using it...
Cockpit will probably be white (satin finish to hide bumps). Also later...
Access to console is from inside the cabin, big doorway, about 50x30cm - enough to stick my head in to look around...
The hole near the bottom of the console is for the steering cable. What you can't see is a one-inch high gap between the console and the side deck (underneath) which is where all the throttle/electrical stuff will come through.
Holes are already cut in the frames for these - steering cable running just under the benches, all other wires and stuff running under the side deck. I'm not planning on putting tubes there just yet, probably will just hold it in place with cable-ties...
Been struggling with my under-sole air-pressure issues tonight, but more about that later if what I'm doing is successful.
Later, and thanks again for the interest - it's good motivation (sometimes I need it!!!).
Tim.
Posted: Thu Jun 26, 2008 4:49 pm
by michaelk
Hi Tim,
I wanted to say thank you for the ongoing progress reports. It's been a good inspiration over the last few years. I'm building a C-17 as well and started about the same time you did. I was making really good progress on my own, until about 3 years ago when my daughter was born, then any free time that I had was instantly gone.
She's turning 3 in August, and I finally have a bit of time on my hands (albeit only a little) and reading through your post has given me the kick that I need to get back to my build.
I do have a question about some of your latest pictures. I see that you've installed a lip for the windows. How are you planning on installing the actual panes? and what material are you planning on installing ? glass/plexiglass/lexan?
Thanks,
Mike
Posted: Fri Jun 27, 2008 9:45 am
by WobblyLegs
michaelk wrote:I do have a question about some of your latest pictures. I see that you've installed a lip for the windows. How are you planning on installing the actual panes? and what material are you planning on installing ? glass/plexiglass/lexan?
Hi Mike,
Windows will be polycarbonate (Lexan?), there's a supplier here that I can get hard-coated stuff from for scratch resistance.
For the story of the lips, look at my post here:
http://forums.bateau2.com/forum/viewtop ... &start=548
And what I did it like this.
Is 3 old enough to sand?
Regards,
Tim
Posted: Fri Jun 27, 2008 10:18 am
by michaelk
3 is definately old enough to sand. Not quite ready for Mr. Beltsander, but she's got great technique with the sanding blocks. One problem, though... She doesn't stay focused on her work. She likes to sand the garage floor and THE CAR!!!!
With my windows, I was thinking of using a thicker ply and routing a channel into the window openings, but I like your method better. I see now that there's a slight curve to tose panels and thicker ply would be a bit overkill.
Have you decided to stay with the SS screws for mounting? or did the glue arguement win you over yet?
-Mike
Posted: Fri Jun 27, 2008 10:24 am
by WobblyLegs
michaelk wrote:She likes to sand the garage floor and THE CAR!!!!
michaelk wrote:Have you decided to stay with the SS screws for mounting? or did the glue arguement win you over yet?
I'm going to go with the screws. Trying to keep things simple at the moment and that's the simplest I can think of. Also, I'm more likely to mess up with glue.
T.
Posted: Fri Jun 27, 2008 10:46 am
by michaelk
I like the idea of the having cleaner lines with the glue. Automotive Windshields have a black strip made of some sort of ceramic material around the edges to cover up the glue bead, but I'm not sure how to replicate it.
I'll have to put a bit more thought into it. I'll be rough-cutting all the panels for the cabin and interior parts sometime in the next 2-3 weeks, so I'm just putting the gameplan together now.
One of these days I'll start posting a few pics of my own build. I've been hesitant, because I'm using cheap ply from the local big-box store. (I didn't know any better 3 years ago when I started). Basically, the ply is ugly and covering everything in glass is adding a lot of time and some weight.
-Mike
Posted: Fri Jun 27, 2008 12:37 pm
by Daddy
Wobb, I have the exact same situation as you with the windows, here is what I decided to do, I am going to paint that inner panel black and the edge where it meets the cabin side too. Then I am going to get 3M polyurethane windshield setting compound (black) that comes in a caulking tube, run a bead all around the inner panel, set the plexi in place and in 24 hours it will be set up and cured. It will not come out, no fasteners needed. I got this from a windshield guy, been setting auto glass for years and he swears that it will do the job. Your windows with the slight curve might need something temporary to hold it in place but after 24 hrs. she will be good to go. I plan to be doing it in a few days and will try to submit a report.
Daddy
Posted: Tue Jul 01, 2008 4:33 pm
by WobblyLegs
Daddy, the only problem I have with that is I can't figure a way to hold the windows in place without drilling more holes...
Quick update...
Been sanding and sealing - both sides of the cabin bulkhead are now sealed, only the underside of the roof and rear sections of the berths to go...
Motorwell bottom got a second coat, over fibreglass that was laid last year.
Unfortunately, during the night it ran through the drainage holes. Over the paint! If anyone has any ideas on how to remove it, I'm all ears... (Oh, it's cured, btw):
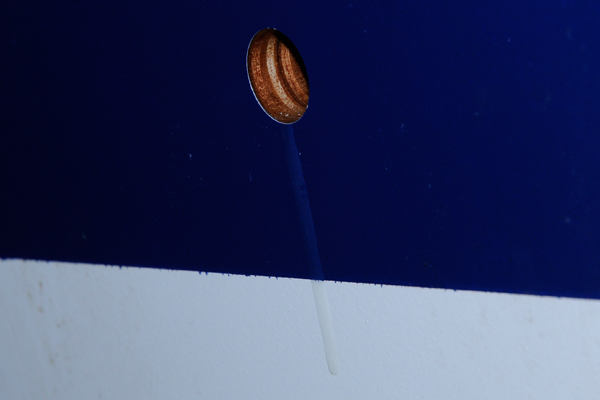
And then, cut some
more holes in the boat for the motorwell hatches:
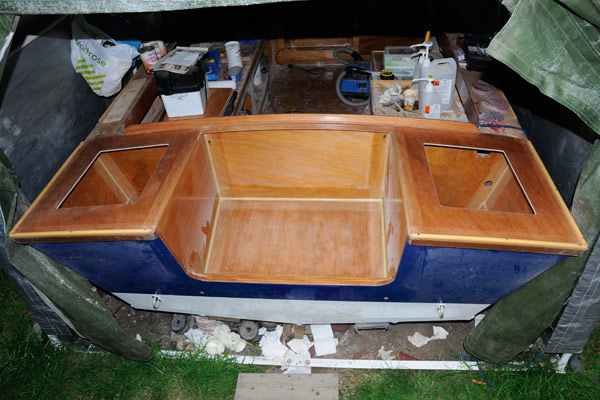
Getting there!
Tim.
Posted: Tue Jul 01, 2008 4:42 pm
by TomW
Oh, Tim bummer, try a scraper, don't really know of anything else. Noticed no rain during Wimbledon this year, what gives. It always rains.
Tom
Posted: Tue Jul 01, 2008 4:46 pm
by michaelk
I would just scrape it slowly and carefully with a new razor blade held 90 degrees to the finish. If you're careful you should be able to take it down to the paint without much damage to the finish. You will need to sand lightly and buff it afterwards. Maybe a light topcoat or clearcoat to restore the gloss.
-Mike
Posted: Tue Jul 01, 2008 6:00 pm
by ks8
Since the previous finish had not been sanded, the drips may not have enough bite to adhere to well. You may be able to very carefully use a single edge razor and work it off. Whatever you do, if something works well, let us know.
Posted: Tue Jul 01, 2008 6:46 pm
by Spokaloo
Id put a fresh edge on a square cabinet scraper, flex the crap out of it when you are cutting, and be VERY careful. You will be able to pull it down to the paint, but cut small increments at a time.
E
Posted: Tue Jul 01, 2008 8:57 pm
by Aripeka Angler
Tim I encountered a run on the stern of my boat similiar to yours due to epoxy dripping out of a motor mount hole. The drip was over finished paint.
I taped both sides of the epoxy run with blue 3m tape out several inches. I then sanded down the run with my Mirka air sander outfitted with a super fine 320 grit abranet disk. I stopped just of the finished paint and concluded the cleanup with a 600 grit sponge. Worked slick as a whistle.
AA
Posted: Tue Jul 01, 2008 9:45 pm
by michaelk
I taped both sides of the epoxy run with blue 3m tape out several inches. I then sanded down the run with my Mirka air sander outfitted with a super fine 320 grit abranet disk. I stopped just of the finished paint and concluded the cleanup with a 600 grit sponge. Worked slick as a whistle.
I like this idea better. should give better results than scraping.
Posted: Wed Jul 02, 2008 3:02 am
by fmiles
What happens if you try warming it first with a cloth doused in boiling water? This might encourage it to peel off faster. failing, that, see here ____^
Posted: Wed Jul 02, 2008 10:44 am
by TomW
This can also be a learning exercise for new builders, Tim. Coat the motor well top before installing it.
Something good always comes from our little misadventures.
Tom
Posted: Wed Jul 02, 2008 11:02 am
by gk108
And on the bright side, you can put to sea with confidence that your drain hole will drain.
I also like Richard's idea with the tape.
Posted: Wed Jul 02, 2008 2:06 pm
by Lucky_Louis
Alcohol. Soak a rag with some Methyl Hydrate, wipe down the run. It should soften up in a few minutes (green epoxy softens faster than the old stuff). Then use a soft wood or plastic scraper to remove the softened epoxy. The paint should be alright as long as you don't soak it overnight. Let us know what you ended up doing and how it worked. I did this on the anchor locker drain and the motorwell drain too.
Posted: Thu Jul 03, 2008 4:29 pm
by WobblyLegs
Thanks for all the advice there. Louis, I tried the alcohol last night, no success. I'm not too worried, and will leave it as is for now. It doesn't show from a distance.
In the meantime, I glued some plywood to the top of the aft hatch cut-outs last night - 9mm ply, 20mm wide. Then tonight glued some underneath the cut-outs, also 9mm ply, but 40mm wide. This should stiffen up those areas quite nicely...
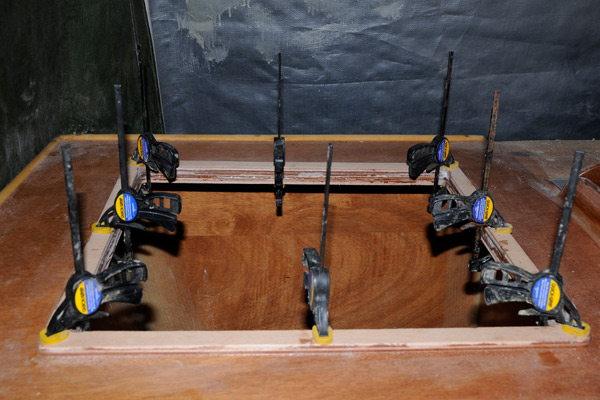
Got a call today - the trailer is ready! I'm hoping to go pick it up next week sometime, and maybe even lift the boat out next week!
Here's hoping.
Later,
Tim.
PS, in spite of the tennis, the weather's been good to me this year!
Posted: Thu Jul 03, 2008 4:33 pm
by kiwi
WobblyLegs wrote:in spite of the tennis, the weather's been god to me this year!
A kiwi farmer would have said the wether has been good
OK go look it up in a dictionary
tony
Posted: Thu Jul 03, 2008 4:47 pm
by WobblyLegs
kiwi wrote:the wether
Cheeky git!
Posted: Thu Jul 03, 2008 5:03 pm
by WobblyLegs
OK, I did look it up.
Ouch.
And I'm an Aries...
Posted: Thu Jul 03, 2008 5:14 pm
by kiwi
Shut up Tim they are wondering what we are on about. Bed for me after much bubbly wine and Pousse Rapière
tony
Posted: Thu Jul 03, 2008 7:21 pm
by robbiro
OUCH!! Indeed....
Tim, I am continually impressed with your build, keep after it and I look forward to seeing her on her first flying mission over sunny England.
Keep on Buildin'
Robbie
Posted: Fri Jul 04, 2008 9:07 pm
by peter-curacao
Lucky_Louis wrote:Alcohol. Soak a rag with some Methyl Hydrate, wipe down the run. It should soften up in a few minutes (green epoxy softens faster than the old stuff). Then use a soft wood or plastic scraper to remove the softened epoxy. The paint should be alright as long as you don't soak it overnight. Let us know what you ended up doing and how it worked. I did this on the anchor locker drain and the motorwell drain too.
Is this really about removing some epoxy or do I really read to much between the line's
Posted: Mon Jul 07, 2008 12:51 am
by Betowess
Tim, No one will ever see that drip, especially when running. Do you have the outboard yet - and what did you get the 50 hp or more? Looking forward to seeing it on that trailer too!
Posted: Wed Jul 09, 2008 7:09 am
by WobblyLegs
Betowess wrote:Do you have the outboard yet - and what did you get the 50 hp or more? Looking forward to seeing it on that trailer too!
No motor yet. The budget, having been closely scrutinised, allows a 60!!
The trailer was ready on Monday, went to pick it up, found a crack in the galvanising - so they are fixing that and will deliver it when done, so at least I don't have to make the 100-mile round trip again!!!
Since my last post about good weather, typically, it's been raining like a monsoon. I'm a week behind my schedule now.
Oh well.
It will happen.
Sometime.
Tim.
Posted: Thu Jul 10, 2008 3:44 pm
by WobblyLegs
So, carrying on...
In spite of the rain, have managed to build two hatch covers to go over the the motorwell hatches...
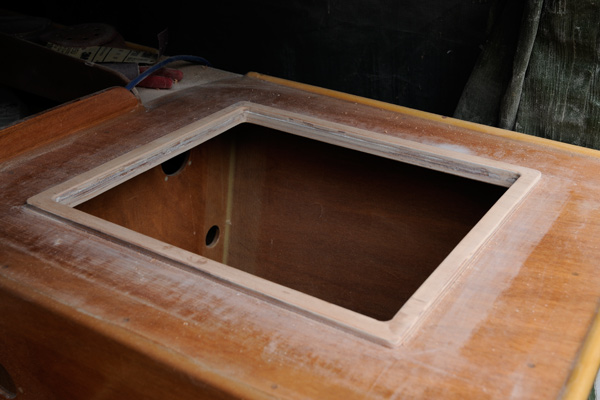

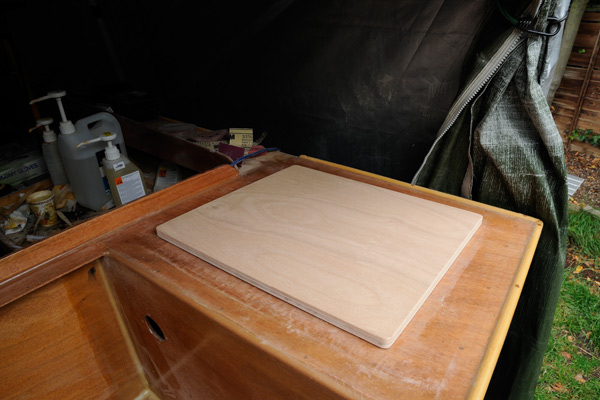
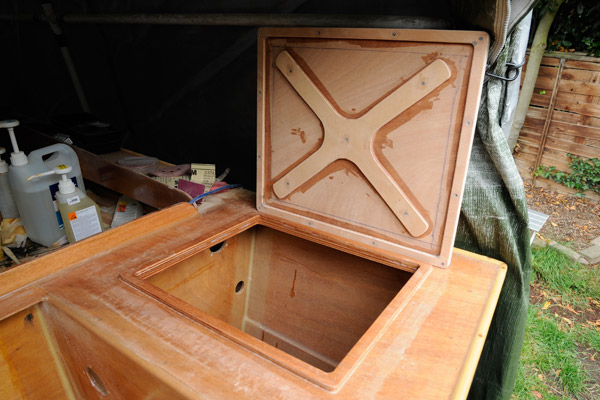
The tops of the hatches have been sealed tonight, as has the inside of the cabin roof.
Priority at the moment is to find a crane to lift the boat out the garden - the bloke I spoke to before I started building (yeah, yeah, no problem) has chickened out. Spit!
No worries - I'm sure I can find someone before next weekend (being really really optimistic here...)
Tim.
Posted: Thu Jul 10, 2008 3:54 pm
by tech_support
very nice work on those hatches.
Posted: Thu Jul 10, 2008 4:00 pm
by jgroves
L
kin' good.
Best of luck with the crane. What are you going to have to do lift the boat up over the fence? I know you will come up with something good
Posted: Thu Jul 10, 2008 4:15 pm
by peter-curacao
Wow man that looks awesome, especially the underside of the hatch I really like that
Posted: Thu Jul 10, 2008 4:21 pm
by michaelk
it shouldn't be that difficult to find a crane to do it. it's not exactly a heavy lift. Did you try offering the guy an additional 12-pack in payment??
-Mike
Posted: Thu Jul 10, 2008 6:29 pm
by daydrmr999
Thank god, new pics of your build, I was starting to have withdrawels from not having new pics of your build the last few days.
Seriously though, I look forward to seeing pics of your build. I know when I finally get to start my boat I'm going to be stealing a lot of ideas from you...
Mike S.
Posted: Thu Jul 10, 2008 10:28 pm
by Betowess
Hi Tim, Did you ever see the pics on Spokaloo's blog of the big fancy fiberglass ski boat that got stuck on a sandbar on the lake by his house - right before winter (in cold E. Washington state). The owner hired a heavy duty helicopter to pull it out with two straps. It was pretty interesting seeing the video clip...
Now I'm not suggesting you hire a helicopter, unless you're pals with the Prince.
regards, bob
Posted: Fri Jul 11, 2008 7:34 am
by WobblyLegs
Bob, I did see that post. And the fact that it wasn't needed if they had the patience to wait a couple of days...
Funnily enough my neighbour sent me a
video link of an RAF Chinook lifting a Sea King - but as I said to him, I don't think our roof tiles would survive the experience!
Anyway, looking at the boat last night with the First Mate, would could not think of a single piece of wood that still needs gluing.
None.
All done.
Only a bit of sealing (you've heard that one before!) to do, and then some hardware...
Tim.
PS, unless I'd seen it, I wouldn't have believed a Chinook could lift a Sea King. Impressive.
Posted: Sat Jul 12, 2008 9:11 am
by WobblyLegs
It's all coming together now kinda rapidly!
Just got home from the local dealer - Evinrude E-Tec 60 (white, 'Salt Water' edition) has now been ordered, deposit paid, and a work plan arranged for mounting, which is:
I take boat to them, they measure, drill mounting holes, together we decide layout of controls, instruments etc.
I bring boat home, cut and drill and seal etc. and mount instruments and controls.
Take boat back to them, mount and connect motor.
Job done. Maybe next week, maybe the week after. Depends how quickly the crane man can do his job - he's coming for a site inspection on Wednesday. Reassuringly, the people I just bought a motor from recommended the same crane company.
So, now off for some more sanding.
Tim.
Posted: Sat Jul 12, 2008 9:46 am
by Cracker Larry
That is really good workmanship, Tim
I wussed out with my store bought hatches
If I had to build 10 like yours it would add another year to the project. Super nice job on those
So, now off for some more sanding.
Yep, me too.
Posted: Sat Jul 12, 2008 10:58 am
by TomW
Tim super job on the hatches. Mind if I incorporate your ideas with mine.
Tom
Posted: Sat Jul 12, 2008 11:08 am
by michaelk
I love the hatches too. However, I'm just wondering how they're going to be secured. Looks like you'll be able to get a good water-tight seal on them. Are they going to be on hinges?
-Mike
Posted: Mon Jul 14, 2008 1:52 am
by Betowess
That is got to be reassuring to have that referral for the crane.
Your BBC link of the Chinook was pretty amazing to see. Hate to think how many gallons/hr those birds use.
Glad to hear you are so close now. The hatch looks fantastic.
Posted: Mon Jul 14, 2008 4:40 pm
by WobblyLegs
Hi guys,
Thanks for all the comments on the hatches - I enjoyed making them. The "jerry-can" cross-piece might be overkill, but I want them to be strong enough for people to sit on without bending too much. I haven't tested that yet, but I think they will be OK.
For the curious, this is the layout of the pieces that make up the hatch and cover:
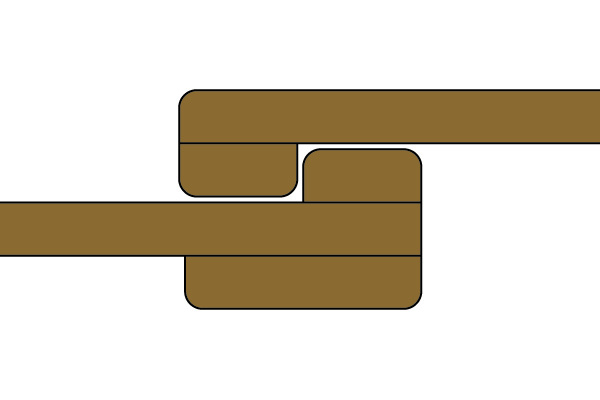
Then, on Saturday (after ordering the motor!!!!) the berths were sanded...
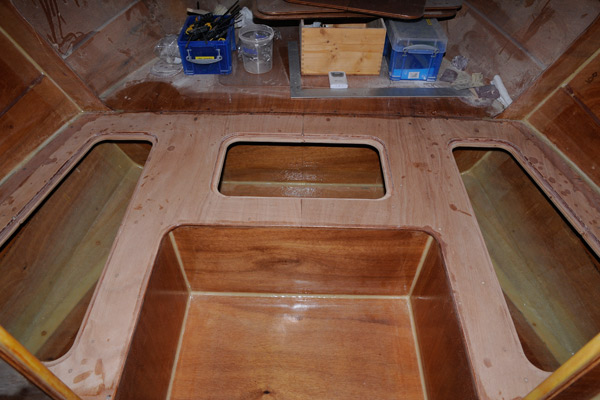
And sealed:
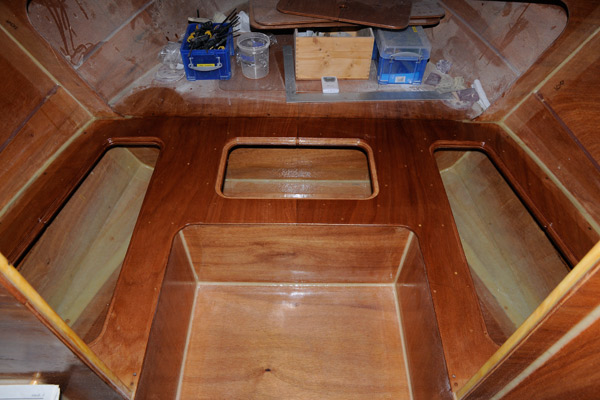
Sunday was spent tidying up - it took most of the afternoon to remove all the crap that had accumulated in the boat over the past few months, then finding somewhere else for the stuff to live. It makes for quite a storage shed, moving stuff around to make space for where I want to work.
Today was time to seal the benches.
Sanded and cleaned:

And sealed:
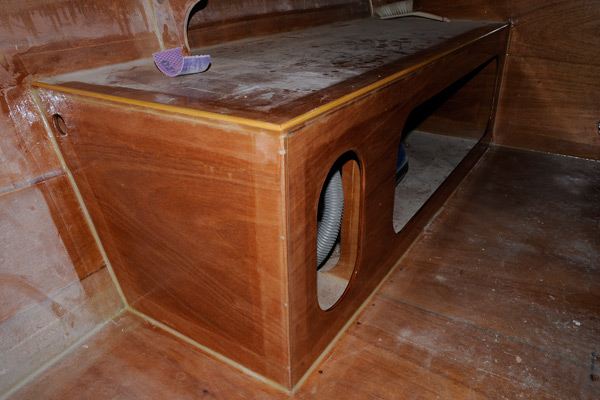
The plan now is to coat the cabin roof and hand rails (second coat) tomorrow evening, then on Wednesday the tent comes down (YAY!).
Only two more areas to seal after that, the inside of the hull in the cockpit (second coat, but some bare wood showing after sanding) and the underside of the side decks.
I'm actually starting to feel a bit nervous about everything now. Trailer, crane, motor, wiring, launch!!!!!!!!!!!!
But, I think I can now say I've built a boat!
I would start a count-down to launch, but these things are never guaranteed. However, I will say that I am hoping to do it on July 27th! There, said it. Now to achieve it!!!
Later,
Tim.
Posted: Mon Jul 14, 2008 4:50 pm
by chicagoross
"Sunday was spent tidying up - it took most of the afternoon to remove all the crap that had accumulated in the boat over the past few months, then finding somewhere else for the stuff to live."
I did the same thing Sunday, finished the last few holes and nothing more to glue, so only lots of serious sanding left...
So anyhow, had to pick up all the small tools, cut-off trim pieces, etc.etc.etc. that was now filling the boat; remove all the hatches and test-fitted pieces of hardware. Now boxes everywhere - where to put them?
need another shed to store them for a few weeks as my storeroom is already full of boat bits!
Posted: Mon Jul 14, 2008 5:03 pm
by Daddy
Looks great Tim, have you had any more "swelling" of the sole?
Daddy
Posted: Mon Jul 14, 2008 5:15 pm
by WobblyLegs
Daddy wrote:Looks great Tim, have you had any more "swelling" of the sole?
Daddy
Thanks!
I have, but I have now linked all the under-sole areas together (brass tubes embedded in epoxy) and am planning to put a breather somewhere. Not sure where yet, but I'll figure it out. In the meantime, I will seal them on a hot day (if that happens in an English summer
) and take it from there. I don't have much time to finish the boat right now, as the next life is rapidly catching up.
As I've mentioned before, I will elaborate more on that when the time comes.
Posted: Tue Jul 15, 2008 8:31 am
by jgroves
Looks great! I bet you don't come off the water for a week once you get this beauty done.
Posted: Tue Jul 15, 2008 10:32 am
by donk
Tim, the hatches are just a continuation of an excellent build. Your attention to detail never ceases to amase me.
Like Cracker Larry, I'll probably go with store bought hatches but I have thought about building my own. I bought an extra sheet of 1/4 inch ply when I ordered my ply. I could double up and copy your's. We'll see.
Looking forward to seeing it on the water.
don
Posted: Tue Jul 15, 2008 10:35 pm
by Betowess
WobblyLegs wrote:. I don't have much time to finish the boat right now, as the next life is rapidly catching up.
As I've mentioned before, I will elaborate more on that when the time comes.
Now that sounds mysterious. Me wonders if there is a jr Wobbly on the horizon?
Posted: Wed Jul 16, 2008 1:47 am
by TomW
Tim, great news on the Evinrude. That is the one dealer near me. Anyone else is and 1 1/2 hour drive one way. Well I'll have at least a year for you to get it broken in and up to snuff, properly pitched and all that there technical talk. I have really been leaning towards a Mercury 4stroke due to the gph so will be real interested in seeing what your getting after you get that pretty boat on the water a while.
I know you hinted of a possible move much earlier, if so may it be positive and may it take you so your future years are enjoyable.
Tom
Posted: Wed Jul 16, 2008 3:21 pm
by Lucky_Louis
Looking absolutely great Tim, I've been "off the grid" for a while on a forced holiday so I haven't been following the forum. Congrats on the E-Tec, they, by all accounts, are a super engine. Love the hatches.
We've been enjoying our finest summer in years, every day sunny 20-25, light breezes - just perfect. I can't seem to catch a salmon to save my soul but the boat is still great, holding up very well considering the pounding I've been give her in the choppy seas.
I too am interested in seeing how you hinge your hatches.
Posted: Wed Jul 16, 2008 4:45 pm
by WobblyLegs
Lucky_Louis wrote:We've been enjoying our finest summer in years, every day sunny 20-25, light breezes - just perfect.
Yeah, rub it in! Wet here mostly!
Actually, not too bad, and I've managed to make major progress....
All sealed now!
Finished sanding and sealing the undersides of the gunwales and the inside of the hull.
Second coat went on the roof, as well as the hand-rails:
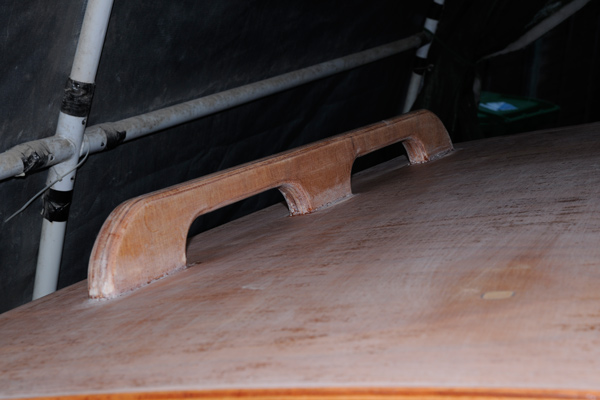
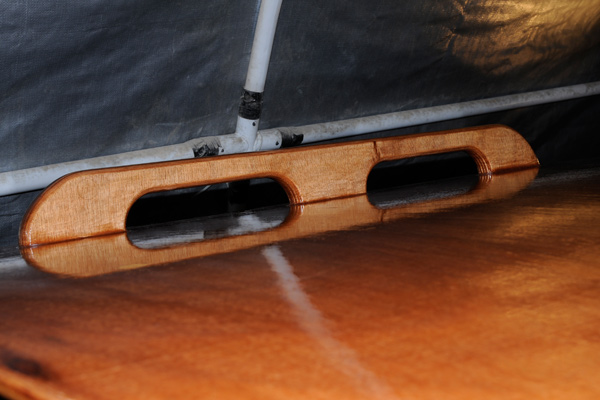
Also, my birthday present from last year arrived this morning (tow car in the background):
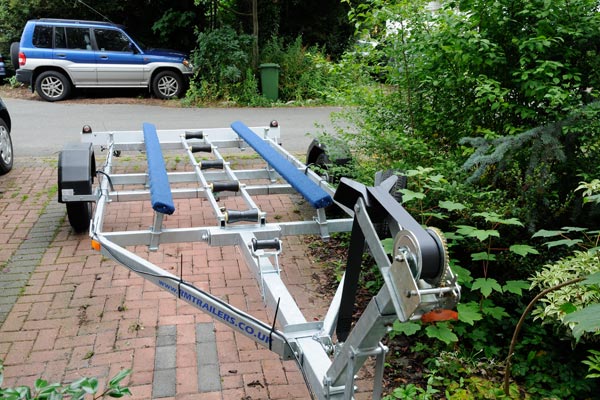
The crane man came to visit too! We might be able to lift out on Friday, which means a launch next weekend is possible.
Maybe!
Tim.
Posted: Wed Jul 16, 2008 5:39 pm
by fmiles
Its at this stage in the project that it gets REALLY exciting. I was impossible, so my other half says; nipping out after dinner till 10pm, skipping lunch to do just that little bit more, up early on a sunday morning to lay the first of many coats of paint that day, you know how it is!
keep up the good work, I for one really look forward to the excellent pictures you post (hmm, wonder if thats really a hobby or a profession!)
Posted: Thu Jul 17, 2008 12:38 am
by TomW
Tim, nice trailer and car. Should do you well. You must be getting excited as you are approaching the end now.
Tom
Posted: Fri Jul 18, 2008 5:33 am
by WobblyLegs
The tent is down, and I'm sitting here waiting for the crane to arrive - about two hours from now.
I am nervous as hell!
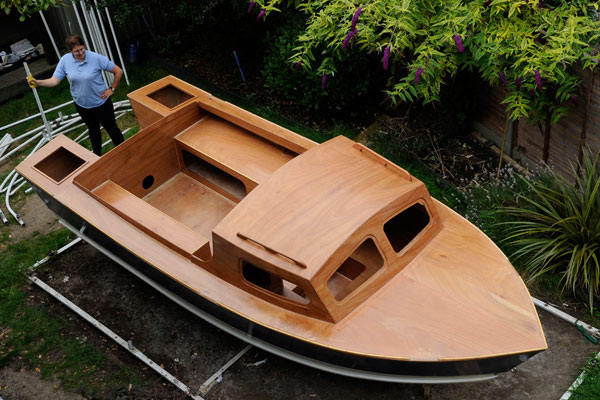
Wish me luck.
Boat is booked for motor-mount drilling at 9 am tomorrow. Hoping to miss the traffic.
Tim.
PS, the first mate is looking forward to having her garden back.
Posted: Fri Jul 18, 2008 5:45 am
by Knottybuoyz
Good luck with the lift Tim! We're all waiting anxiously as well. Post some pics of the "flyin' boat" when you get a chance!
Posted: Fri Jul 18, 2008 9:05 am
by jgroves
Wow brother, serriously wow. That boat already looks so dang good! You have certainly done some high quality work. Amazing.
I'm sure everything will go fine.
Posted: Fri Jul 18, 2008 9:14 am
by TomW
Tim, sure everything will go fine. Get some pics of your flying boat for us. Best wishes anyway just in case.
Tom
Posted: Fri Jul 18, 2008 9:19 am
by michaelk
I hope that you're leaving the topsides bright. It would be a shame to cover that beautiful work with anything but clearcoat.
-Mike
Posted: Fri Jul 18, 2008 9:57 am
by donk
Tim,
You've done a spendid job on your boat. Now that it's "done" it looks wonderful. I really like the looks of that boat
don
Posted: Fri Jul 18, 2008 11:56 am
by WobblyLegs
Thanks for the comments and support. It's now done.
And I'm knackered, even though it wasn't hard work. Just panic and nerves I guess
This is the first time I have ever seen the whole boat without obstruction, even though I've been working on it for so long. Looks just like the little one I made, what feels like so many years ago:
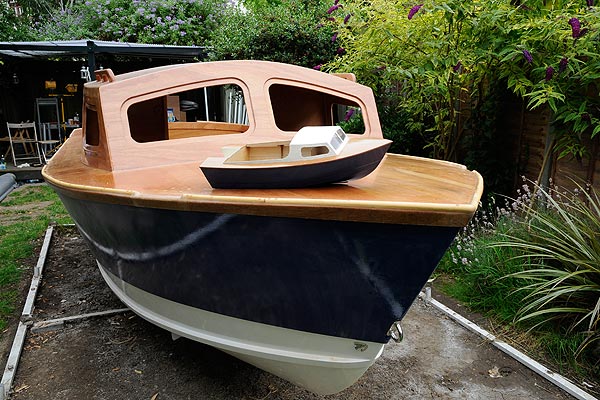
Lift-off:
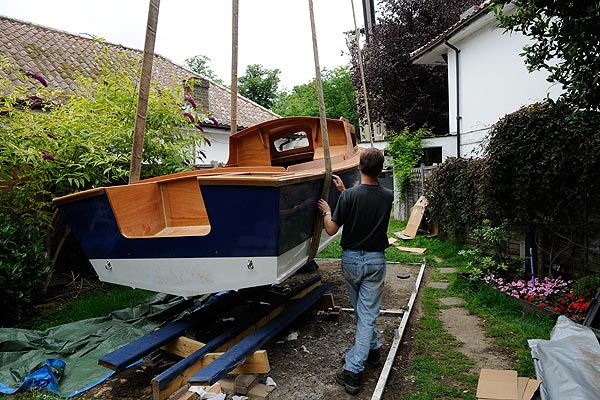
Orbit:
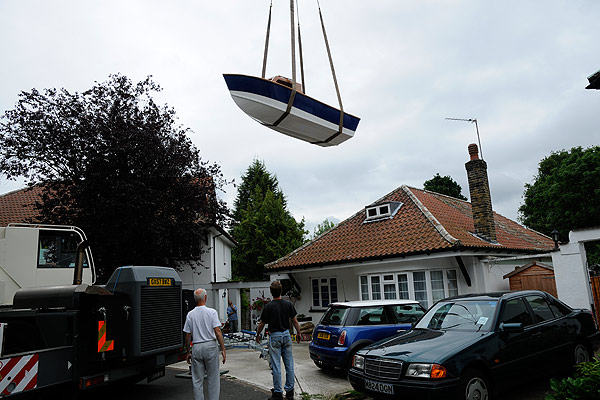
Re-entry:
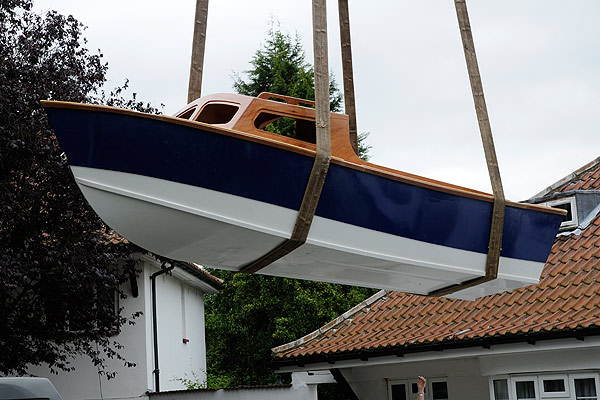
Final approach (Fortunately the neighbour that owns the Mini is away on holiday, otherwise she might have been panicking just a little bit
):
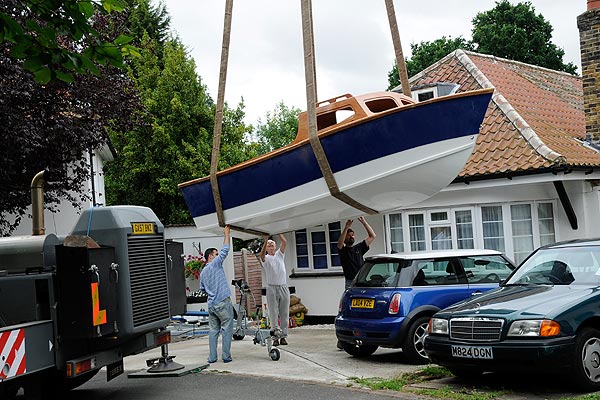
Me, feeling very relieved....(and for scale):
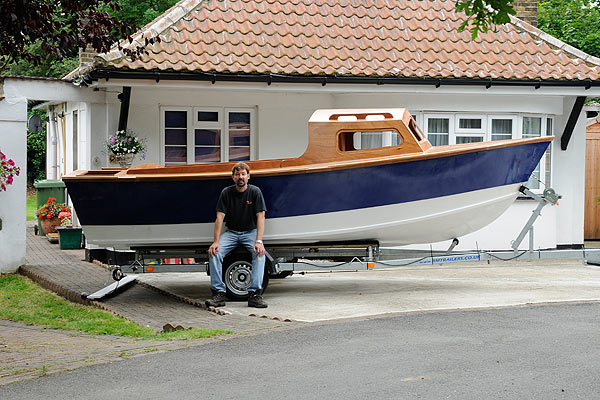
And my baby:

The First Mate can have her garden back now, though I do have a little tidying up to do, I guess:
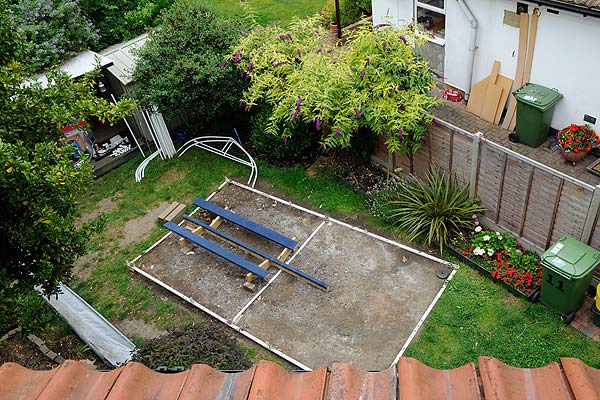
Off for a beer now. No more work today.
Tim.
Posted: Fri Jul 18, 2008 12:00 pm
by Jerry-rigged
Posted: Fri Jul 18, 2008 12:05 pm
by michaelk
Simply Awesome. Now I'm jealous. My C-17 isn't done yet, but I'm pretty sure that it will never fly.
-Mike
Posted: Fri Jul 18, 2008 12:21 pm
by RR
A very beautiful boat
Congratulations
Posted: Fri Jul 18, 2008 12:36 pm
by tech_support
Its only fitting that towards the end of such an epic build, they boat takes to flight...
great work, as always
Posted: Fri Jul 18, 2008 12:39 pm
by jgroves
Posted: Fri Jul 18, 2008 3:11 pm
by Hope2float
I have been watching your build all winter, spring and summer long. The work is outstanding and so are the results. I will be using some of your techniques on my own build P-21. Also cracker Larry has had some great solutions as well and I admire his work as well. There is much to be learned from him. The boat looks beautiful, great lines.
Dave
Posted: Fri Jul 18, 2008 3:46 pm
by TomW
Tim, it I'm so glad everything went well. You definately deserved the trip to the Pub. After seeing yours, I am so glad I have chosen the C17 to work with for my boat. JOB WELL DONE, SIR!
It seems it will be a while longer till I start, went to the Doc this week and he is not happy with me and how I am treating my rotator cuff. Oh, well. I just want to get the Mirror done.
Tom
Posted: Fri Jul 18, 2008 3:53 pm
by D2Maine
nm
Posted: Fri Jul 18, 2008 4:51 pm
by circlehook
Hi Tim, I have been following your build from the start and I just wanted to say that the boat looks incredible. Great job and cant wait to see pics of her on the water
Paul
Posted: Fri Jul 18, 2008 5:09 pm
by chicagoross
Congradulations, Tim! Beautiful documentation of a beautiful boat, as always! The "flying boat" certainly added a bit of drama to the conclusion of the build! I can imagine you were a bit nervous seeing your years of hard work suspended up in the sky!
Posted: Fri Jul 18, 2008 5:29 pm
by msujmccorm
The only word is awesome. Beautiful job!!!!!!!!
Posted: Fri Jul 18, 2008 5:35 pm
by AD16 The Opportunist
Posted: Fri Jul 18, 2008 8:01 pm
by robbiro
Posted: Fri Jul 18, 2008 8:18 pm
by Knottybuoyz
Well done Wobb! Yet 'nuther milestone! Now lets get her fitted out and floatin!
Posted: Fri Jul 18, 2008 8:29 pm
by peter-curacao
beautiful boat you already have a name for her?
Posted: Fri Jul 18, 2008 10:55 pm
by gk108
Whew!
I hope all her landings will be that soft.
Posted: Sat Jul 19, 2008 7:05 am
by WobblyLegs
Hi guys,
Thanks for all the wonderful comments. I was a nervous wreck yesterday morning, and even now I still feel a sense of relief. I can't stop grinning.
I honestly don't think I would have reached this point without the support, encouragement and camaraderie of this forum.
Joel and Jacques have managed to achieve something quite special with Bateau.
I took the boat for a ride this morning, only 16 miles, and all on the road. The holes for the motor are now drilled. I have the instruments - tacho and trim/tilt indicator - and the control box/cables so I can now start fitting them. The shop says they are busy next Saturday, but are still happy for me to go there and get the motor mounted and hooked up.
Especially when I suggested that I'm happy to do all the work, using their hoist, and will just bug them when I need help. What more can I ask?
So, if everything goes to plan, I think a short ride on the river is due. I know just the pub to go to! It has it's own moorings.
Again, thanks for everything.
Tim (just a little more to go).
Posted: Sat Jul 19, 2008 7:28 am
by PaulMcClure
Tim,
Well done, the boat looks great. I agree with what the other guys are saying, it would look great if you clear coated the brightwork. Your work is so clean it's a shame to paint over it.
Paul.
Posted: Sat Jul 19, 2008 10:22 am
by steve292
That is one fine looking boat Tim.
So, are you going to paint the topsides or bright finish?
Bueatiful job, I am envious
Steve
Posted: Sat Jul 19, 2008 2:22 pm
by Rick
Beautiful job, Tim. Congratulations!
What's the next boat?
Posted: Sat Jul 19, 2008 3:13 pm
by WobblyLegs
OK, my neighbour's a right b'stard...
He filmed the whole thing, and just sent me a link!!!! (and didn't tell me when I saw him this afternoon)
You-toob
I will pour (cheap) beer over his head!
Posted: Sat Jul 19, 2008 4:09 pm
by MadRus
Nice!
Posted: Sat Jul 19, 2008 4:28 pm
by WobblyLegs
I've been going through the 140 odd photo's that Cait (the First Mate) took yesterday and came across one more that I'd like to show.
All the other pic's show a boat that looks good for a cruise up the river, nice and relaxed, gentlemanly-like. You know, "
A" to "
B" in comfort......
This pic, as far as my limited knowledge of boat design goes, suggests that she'd like to get to "
B" rather quickly!!!
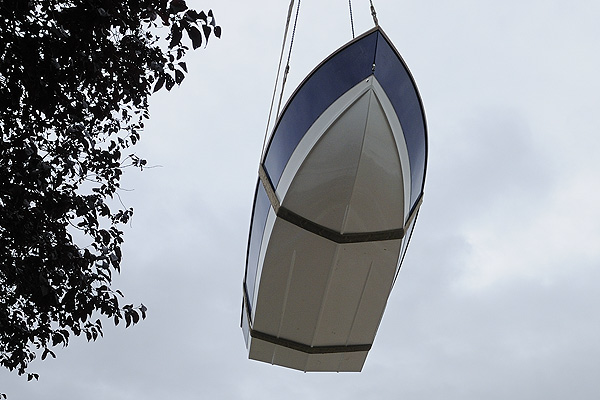
Yeah?
Unfortunately I will be launching on a speed-limited river, but am hoping to take her down to the coast next month for a real try-out.
Later,
Tim.
Posted: Sat Jul 19, 2008 4:36 pm
by WobblyLegs
MadRus wrote:Nice!
Thanks...
Where you been? Another little Mad Russian in the family keeping you away?
Posted: Sat Jul 19, 2008 4:40 pm
by topwater
Congrat's......awsome job cant wait to see her done
Posted: Sat Jul 19, 2008 5:22 pm
by robbiro
Tim,
The video is way COOL
. Thanks for sharing with us.
Robbie
Posted: Sat Jul 19, 2008 9:26 pm
by MadRus
Oohhh... I like the one of the boat in the air, it shows how crisp your work is. Great job as usual Wob. I've been around, but haven't had much to say for a long time. Been busy with the kids and life, you know. I can't wait to see some shots or movies from the launch.
Congratulations on reaching the final stages!
-Dave
Posted: Sun Jul 20, 2008 12:33 am
by TomW
Beautifulllllllllllll shot Tim
Shows the high quality of your work perfectly.
Tom
Posted: Sun Jul 20, 2008 8:22 am
by saltponder
Fine job, beautiful boat and a great solution to getting the ship out of the bottle!
Gil
Posted: Sun Jul 20, 2008 8:27 pm
by stevet
Hi Tim,
Congratulations on a beautiful job and thanks for that underside shot of the "flying" C17. It does make her look a bit more high performance than some of the other shots I have seen to date.
You need to start a paypal account or something so those of us on the other side of the world can buy you a congratulatory beer.
Cheers -Steve
Posted: Mon Jul 21, 2008 9:19 am
by jgroves
The video, the pictures... there all great! I'm so happy for you!
Posted: Wed Jul 23, 2008 11:10 am
by Betowess
First rate Tim! Been backpacking with my son and missed all your fun. I really like the shot with you sitting on the trailer in front - to be able to see her size . Beautiful boat and what a dramatic first light. Can't wait to see her on the water too. cheers, bob
Posted: Wed Jul 23, 2008 11:27 am
by Lower
WOW! Awesome move and a beatiful boat!
Posted: Wed Jul 23, 2008 12:25 pm
by Lucky_Louis
Congrats on the safe move Tim, she looks just wonderful. That's got to be one worry behind you.
Posted: Wed Jul 23, 2008 12:43 pm
by kdog
Wow she's a beaut thats for sure. Congrats on the move and can't wait to see her in the water.
I thought I was nervous when I had my OB17 hanging from the rafters of my garage waiting to put the trailer under her! I don't think I could have been around for that type of move .
For some reason Apocalypse Now comes to mind
Posted: Thu Jul 24, 2008 4:38 pm
by WobblyLegs
Thanks again for all the comments!!
Been fitting steering and control gear, nearly done, and nearly ready for a motor. Only the instruments to do!
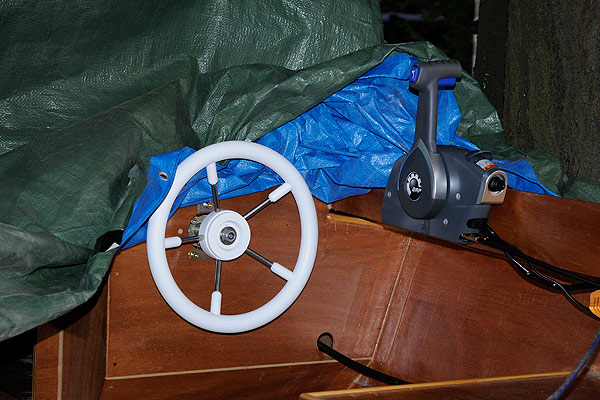
And, she now has a name:

Tim.
Posted: Thu Jul 24, 2008 4:42 pm
by michaelk
wow. looks sharp. can't wait to see the launch.
at the rate that I'm going, I'll need to name mine "Four Summers". If I get a move on, I could possibly launch her as "Three Summers Too".
-Mike
Posted: Thu Jul 24, 2008 5:07 pm
by Cracker Larry
Tim, she looks fantastic
You have really done a sweet job
Posted: Thu Jul 24, 2008 5:21 pm
by cape man
As other's have said...Always someone raising the bar. Beautiful workmanship. Anyone would be proud to call her his.
Posted: Thu Jul 24, 2008 5:28 pm
by Knottybuoyz
WobblyLegs wrote:And, she now has a name:
Ok, I'll bite! Lemme guess, hmmmm? Your last name is Summer(s) and there's you, the mommy and a lil' one! OR, hmmm? It took you Three Summers to build the boat? Do I win a prize Tim?
Oh yeah, nice work, looks good, atta boy! Keep the pics comin'!
Cheers!
Posted: Thu Jul 24, 2008 5:38 pm
by TomW
Tim the name looks as sharp as the rest of the boat. You as I have mentioned before are a super craftsman and I hope I can live up to your standards when I start mine. CLarry and others have also set some pretty high standards on this side of the pond. Can't leave them out.
Cheers for a great launch soon!
Tom
PS what did you end up doing for a petrol tank and where did you end up putting it. How many liters/gallons? I know at one time it was going under the right bench seat.
Posted: Fri Jul 25, 2008 5:25 pm
by WobblyLegs
Knottybuoyz wrote:...hmmm? It took you Three Summers to build the boat? Do I win a prize Tim?
A virtual beer to you! However, if we ever meet, I'll make it a real one...
Posted: Fri Jul 25, 2008 7:06 pm
by topwater
She looks great wobbly nice name too.
Posted: Fri Jul 25, 2008 7:07 pm
by michaelk
If I were a bettin man, I would say that he really wants to launch and may have opted for a portable tank. at least temporarily.
With my build, I'm going to build in a few straps under those benches to hold a portable tank or three. I've got a goal of september to have mine launched, so the built-in tank will need to wait. After it gets too cold to be on the water, I'll put her back in the garage for some detail work over the winter.
-Mike
P.S. anyone know any good web site to actually send a virtual beer?
Posted: Sat Jul 26, 2008 5:24 pm
by WobblyLegs
michaelk wrote:...I would say that he really wants to launch and may have opted for a portable tank...
Nail, head, hit, on!
Motor is now mounted, less than 12 hours to go!
(Weather permitting, of course!)...
Posted: Sat Jul 26, 2008 5:30 pm
by Daddy
Tim, a great feeling when she gets her feet wet for the first time
Daddy
Posted: Sat Jul 26, 2008 7:47 pm
by michaelk
Nail, head, hit, on!
Hey. I finally got something right...
I, for one, and going to pick-up a six pack for myself and have it on ice ready for pictures of the launch. I can't ship it over to ya, but we'll have a toast to your launch anyway.
I was out pre-treating some panels of ply tonight and found a stamp with a date one one piece. it's dated 2005. After doing the math, I will need to name mine "Four Summers". Although, someone mentioned on another post, I think "Mistress of the Garage". Both names fit.
I heard someone once say that it's good luck, if it rains on your wedding day. I wonder if there are any sayings for launch day?
Congrats. and good luck with the launch. After three years of work, you deserve everything to be perfect.
-Mike
Posted: Sun Jul 27, 2008 12:47 am
by TomW
Tim, good luck with the launch, may blue skys be in your forecast.
Tom
Posted: Wed Jul 30, 2008 11:53 am
by Betowess
I 'm thinking someone might get a speeding ticket on some British river this week.
Posted: Wed Jul 30, 2008 2:51 pm
by WobblyLegs
Betowess wrote:I 'm thinking someone might get a speeding ticket on some British river this week.
Methinks not!
If I go down-river about five miles from where we launched on Sunday (I assume you saw that thread) as long as you behave yourself you can go as fast as you want! For now. The PLA (Port of London Authority) want to change it to a 12 knot limit, mainly 'cos commercial operators keep crashing into bridges and such like.
Gotta get there before then!
T.
Posted: Wed Jul 30, 2008 4:17 pm
by Cracker Larry
I wonder if there are any sayings for launch day?
Yes, plenty of them. I'll try to remember a few
Never launch or lay a keel on a Friday.
Step on the boat right foot first.
No flowers allowed during launch.
The wine bottle must break but not ring. The wine must be red. It signifies blood used to grease the skids in the old days. They were rough in the old days
A boat name should never end with an "a".
That's all I can remember right now, but there's more
Once you've got the basics squared away, then you need to make a significant presentation of your boat to the sea, with much pomp and pizzaz, for instance...
(Plagarized)
"For thousands of years, we have gone to sea. We have crafted vessels to carry us and we have called them by name. These ships will nurture and care for us through perilous seas, and so we affectionately call them "she." To them we toast, and ask to celebrate (the name of your boat)." Then everybody raises their plastic glass filled with champagne or your favorite non-alcoholic beverage and shouts, "TO THE SAILORS OF OLD…TO (the name of your boat)." Everybody takes a sip.
Lord Burton continues. "The moods of the sea are many, from tranquil to violent. We ask that this ship be given the strength to carry on. The keel is strong and she keeps out the pressures of the sea." Again the glasses are raised, and the assemblage shouts, "TO THE SEA...TO THE SAILORS OF OLD...TO THE SEA!" Everybody takes another sip.
Continue. "Today we come to name this lady (name of your boat), and send her to sea to be cared for, and to care for the (name of your family) family. We ask the sailors of old and the mood of God that is the sea to accept (your boat's name) as her name, to help her through her passages, and allow her to return with her crew safely. " Again, with the raising of the glasses, "TO THE SEA...TO THE SAILORS BEFORE US...TO (the name of your boat)." A last, long sip by all.
Now pour champagne over the bow to appease King Neptune, and lay a branch of green leaves on the deck to ensure safe returns. (Breaking the bottle across her prow is optional for a recreational vessel, and should be done only if all safety precautions have been taken, and after the bottle has been properly scored for a clean break.)
Or you could just launch the thing and bring the wrath of the sea gods down on your vessel for ever more.
Posted: Wed Jul 30, 2008 5:14 pm
by saltponder
Unless your boat is owned by Dole or Chiquita, it should never under any circumstance have a banana onboard at anytime, especially if it is a fishing boat.
Gil
Posted: Wed Jul 30, 2008 5:51 pm
by Cracker Larry
Yep, no pork and no whistling either.
Posted: Wed Jul 30, 2008 7:11 pm
by ks8
Cracker Larry wrote:Yep, no pork and no whistling either.
So I guess that rules out bringing aboard my pet whistling pig, Bernie, who loves bananas.
Posted: Thu Jul 31, 2008 3:53 pm
by tobolamr
Cracker Larry wrote:Yep, no pork and no whistling either.
What!?
What about my Pig 'N 'Jig I use in my bass tournaments!
Ks8 - Funny! I like it!
Posted: Sun Aug 10, 2008 12:58 pm
by fishinshallow
Congratulations Wobblylegs on a job well done! I have watched your progress off and on since day one and was pleased to find a happy ending to your project. I wanted to wait until after you had installed your engine and bought your trailer before I asked you to estimate how much money you figure you have invested in your boat. Being a family man I have to take the economics of the project into account and run it past the admiral when making a decision on whether to build a boat or not. I don't need a precise figure, just a broad approximation in pounds sterling would be much appreciated. Thanks in advance and good luck on the move south.
Doug in Florida
Posted: Sun Aug 10, 2008 2:16 pm
by WobblyLegs
Hey Doug,
I haven't added it up, and we're half packed to move so it's a bit difficult to get it all together, but at a rough guess, I'd say £3500-4500 for the boat. Motor and trailer are extra. A production boat similar to this here would cost around 12-16k (from what I've looked at)...
Apart from wood, glass and epoxy, the single biggest on-going expense is RO sandpaper. By far. If you're going to do it, buy something like 500 80-grit sanding disks in bulk to save money - you'll use them!
Thanks and regards,
Tim.
Posted: Sun Aug 10, 2008 6:10 pm
by Daddy
60 grit
Posted: Mon Aug 11, 2008 1:24 pm
by fishinshallow
Wobblylegs,
Thanks for your prompt reply. I know what you mean about the cost of sanding disks. I have both a disc sander and a belt sander and I find that if I do most of my rough sanding with the hand held belt sander and just use the disc sander for finish work that the job goes faster and I use less product.
Considering the cost both in dollars and in time, I am leaning towards finding a boat in need of restoration. Even with the cost in time and materials for repair and refinishing I think it will probably end up being a lot less expensive and less time consuming. Of course I won't have the satisfaction of having built a boat from scratch like you did. I built a two seater airplane when I was younger and flew the hell out of it for years and I still feel a sense of accomplishment and pride in the achievement. I would like to commend you once again for a job well done. You will get compliments and questions everywhere you go.
Warmest regards,
Doug in Florida
nm
Posted: Wed Mar 25, 2009 10:57 am
by D2Maine
nm
Re: C17 (Classic 17) in London
Posted: Wed Jul 07, 2010 6:06 pm
by Murry
Hey Tim,
What did you end up doing with you foam expansion problem. I'm having a similar issue with mine.
Thanks,
Daniel
Re: C17 (Classic 17) in London
Posted: Sun Jul 11, 2010 5:28 am
by WobblyLegs
Murry wrote:What did you end up doing with you foam expansion problem. I'm having a similar issue with mine.
Hi Daniel,
In the end, nothing really - I had a screw through the sole for the last two seasons (the compartments under the sole are interconnected with a 'breathing tube'). At the end of this summer, maybe two months ago or so, I took the screw out on a hot afternoon which let out a load of air, drilled out the screw hole, sealed it with epoxy and a dowel and that's how it stands now.
It's done this whole summer without me taking that screw out (therefore keeping the pressure in), and I don't foresee any problems - in this time the temperature has ranged from just above freezing to over 40ºC (≈105ºF) and that sole gets HOT in the sun.
Good luck.
Tim.
Re: C17 (Classic 17) in London
Posted: Tue Jul 13, 2010 8:59 pm
by Murry
Tim,
False alarm with mine. There ended up not being any air in my compartment.
Glad to hear yours is doing fine as well.
Thanks,
Daniel
Re: C17 (Classic 17) in London, now in Africa
Posted: Wed Sep 15, 2010 8:14 am
by WobblyLegs
And so we continue...
It's been nearly two years since moving here, and I've not touched the boat. Other than to use it, of course. So, now the dust has settled, I'm able to get back to it and start finishing...
I know I have two threads running about Three Summers in this section, so I'm going to keep them separate - this thread will still be updated with building notes, while the
other thread (link to latest post) will be about using/maintaining/fine tuning and/or fixing any
collision damage.
Anyway - I bought a depth sounder in the UK before leaving, and it was time to get it fitted. Between here and the beach are so many sand bars and channels that its a nightmare trying to find a route from the river to the lagoon. It's a Garmin Fishfinder 90 - the most basic of their range. All I want to know is how deep the water is.
Day one: Drill pilot holes and put backing plates inside the hull. Plates are needed as the self taping screws supplied with the unit require 1" (25mm) pilot holes and at that location the transom is 18mm of ply and a few layers of biax. So, not wanting the screws THOUGH the hull, more depth was needed.
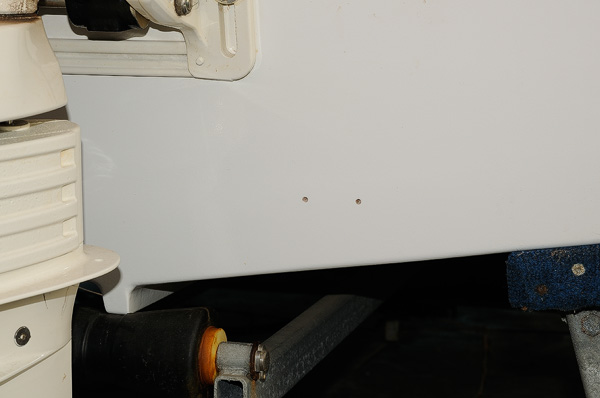
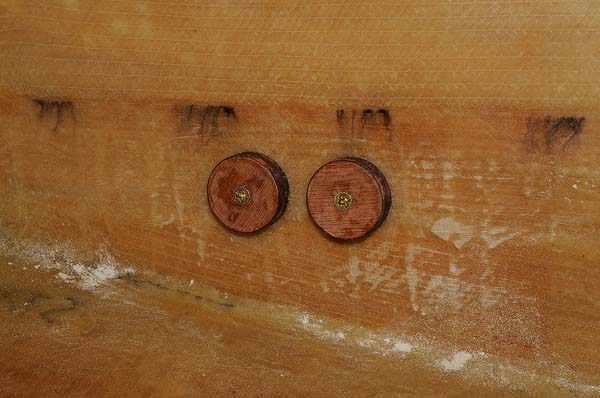
Day two: Enlarge holes, seal holes and fill holes. I drilled the pilot holes out with a 12mm bit right through the hull and backing plates, then sealed and filled with an epoxy mix.
Tip for anyone who wants it: I wanted to be sure that the mix completely plugged the hole, and pushing it in with a tongue depressor wasn't going to do it without making a mess and knowing that there weren't any air spaces or untouched wood - I jammed a plastic-covered block of wood onto the inside of the transom over the holes to save cleaning up (no space to move). Then filled from outside with a syringe. Cut the end off the syringe (as big as could fit in the hole) so that it's basically an open tube, pushed syringe all the way into the hole, then squeeze plunger. This forced the syringe/tube out of the hole as the hole filled with mix, under pressure. Nice - one movement, filled hole, minimal mess.
Day three: Drill pilot holes again...
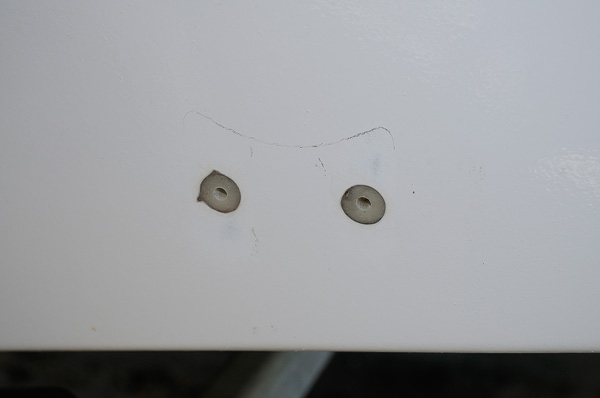
...a bit of Sikaflex on the screws, and mount transducer.
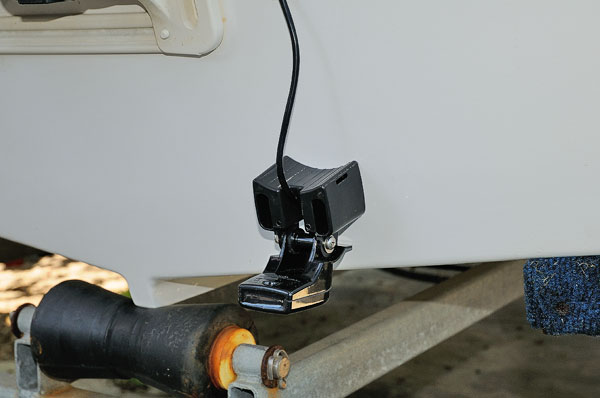
It may seem (and is) a long process, but I've worked on three "professionally" built boats since moving here, and all three had rotten or wet transoms. Not really the builders' fault as they all had holes drilled for various attachments that were simply screwed in with little or no sealant. Where sealant was used it was usually silicone and totally ineffective. The other cause, I guess, is the materials. Polyester just doesn't stick to wood like epoxy does - I was ably to peel the glass/polyester layer off the deck of one of them, and all the boats had the polyester cracked and peeling off the transom tops too.
And the next step:
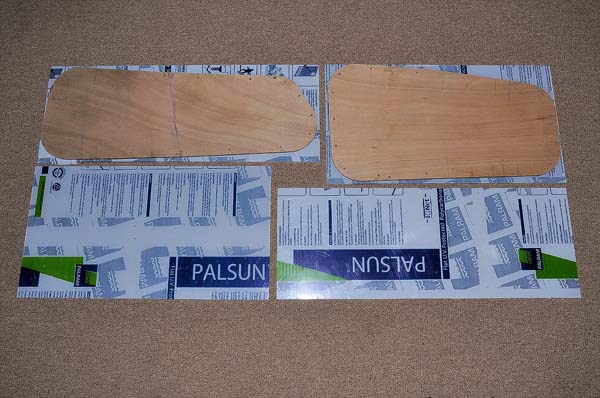
Yup, finally got windows from a yacht-building friend. Nice 6mm UV protected polycarbonate. All I need to do is, oh, cut drill, fill, drill again, and mount. Later. I have another boat to get on the water first!
Have fun.
Tim.
Re: C17 (Classic 17) in London
Posted: Wed Sep 15, 2010 11:08 am
by Lucky_Louis
Re: C17 (Classic 17) in London
Posted: Wed Sep 15, 2010 5:02 pm
by ks8
ditto on the
Re: C17 (Classic 17) in London
Posted: Wed Sep 15, 2010 6:36 pm
by TomW
That's great Tim!
Tom
Re: C17 (Classic 17) in London
Posted: Sat Oct 30, 2010 10:49 am
by TomD
Hi Tim,
I followed your C17 build carefully and was very impressed with it - I live in Kenya and built an OD 18. I have plans for the C17 and C19 and can't decide which size fits my bill. I notice that you are now in Walkers Bay - is that near Hermanus? I am visiting my folks in Simon's Town and was wondering whether it would be possible to come see your boat?!
Re: C17 (Classic 17) in London
Posted: Wed Apr 06, 2011 3:52 am
by WobblyLegs
Time to resurrect this thread
After three summers (and a bit) of building up north,
Three Summers has now spent three summers down south living outside under a tarpaulin. Not so any more - after a windy day last week, the cover got a bit ripped up, and I decided it was now time to try and get the boat indoors, and get it properly finished.
After spending Saturday morning clearing space in the garage, I finally managed to get the boat inside, but only by letting the tyres of the trailer down to almost totally flat so that the cabin roof could clear the garage door:
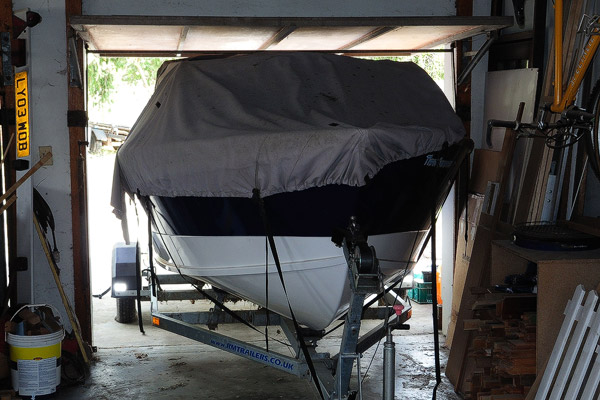
And the remains of the tarpaulin:
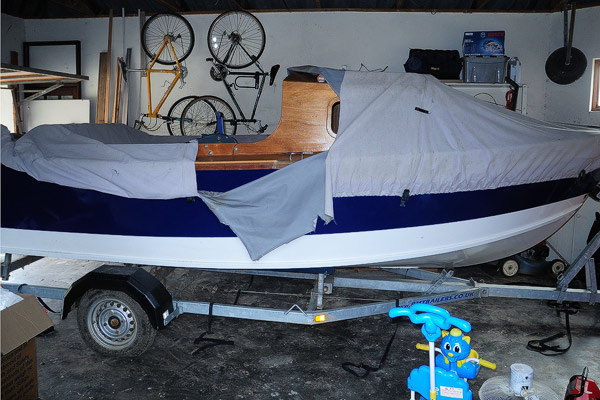
I've decided the best thing to do is to work top down, so once I have the window mounting holes drilled, filled and drilled, I will start at the roof, re-sealing and painting/varnishing as I work towards the bottom. The plan is to have all horizontal surfaces painted white, and most of the vertical surfaces bright. So, roof, deck, seat tops and sole painted. Possibly also the inner hull sides. Cabin sides, seat supports, coaming etc. to be bright, along with hatch covers etc.
I also need to cut a new hatch at the bow for the anchor locker, which I think is full of spiders at the moment (I haven't opened the internal hatch to the locker since we moved, but I've seen spiders poking out of the drainage hole in the hull side).
Anyway, I've now started on the windows, using the original cut-outs for a template, drilling pilot holes, then removing the template and drilling holes to fill with epoxy for the screws to hold the windows in place.
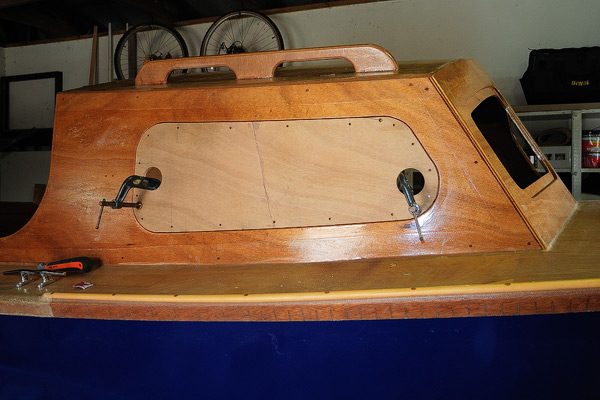
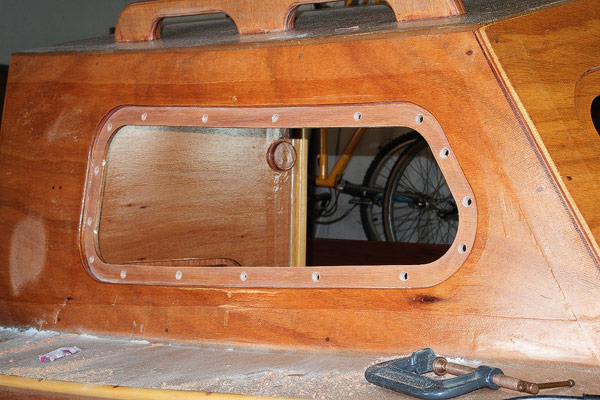
I won't be fitting the windows until everything else is done, but hopefully it will all be done in time for next spring (around September)...
I have two problems to solve still - one is how to fix up the damaged skeg under the hull, and the other is how to get some drainage for the cockpit - when the boat is loaded it looks like the sole is below the waterline, and I've yet to find scuppers that seal properly. The boat can't be licensed without being self-draining
.
Later,
Tim.
Re: C17 (Classic 17) in London
Posted: Wed Apr 13, 2011 1:19 pm
by WobblyLegs
Sanding.
Grit in my mouth.
More sanding.
Making progress on the window frames...
Re: C17 (Classic 17) in London
Posted: Thu Apr 14, 2011 12:19 am
by gstanfield
Cool, glad to see you're back at it
Re: C17 (Classic 17) in London
Posted: Fri Apr 15, 2011 9:49 am
by JohnC
Hey Tim,
Good to see you again! I see Three Summers must like tight spots, the garage door was just big enough. Happy sanding
, can't wait to see the windows.
John
Re: C17 (Classic 17) in London
Posted: Fri Apr 15, 2011 7:31 pm
by wegcagle
Good to see you back at her Tim. Are you gonna make her fly over another house this time
That was one of my favorite videos
See looks just as good as I remember.
Will
Re: C17 (Classic 17) in London
Posted: Fri Jul 15, 2011 4:42 pm
by michaelk
Hey Tim,
Good to see you back. I'm actually back myself after finally getting a bit more free time allocated from SWMBO. I've Decided that my own C17 is going to be named "Seven Summers". It's got a nice ring to it, I just hope that it doesn't sretch out to eight summers, or even nine. I really need to push to get this thing done and in the water.
I thought that you had actually mentioned this before, but I was wondering what size Etec you wound up using. I couldn't find any reference to it in your posts.
Thanks,
Mike
Re: C17 (Classic 17) in London
Posted: Fri Nov 18, 2011 6:39 pm
by JohnC
Hey Tim,
It seems like you have another thread on this but I couldn't find it
, how are the windows coming along?
John
Re: C17 (Classic 17) in London
Posted: Mon Nov 21, 2011 10:15 am
by WobblyLegs
JohnC wrote:Hey Tim,
It seems like you have another thread on this but I couldn't find it
, how are the windows coming along?
John
Hey John,
I wish I could say I've made progress, but unfortunately not much - some drilling and filling, and some sanding done, but my time now seems to be going towards looking after the little 'un (First Mate has opened a shop so needs to be there a lot), and running one of the other boats (
http://www.platanna.com).
Locals seem to have discovered that I can work with boats, so I now have three boat repairs/modifications going at the moment - since we're going into summer now that takes priority (income, for me and the boat owners...)!
I'll get there one day, and I miss using Three Summers, but one must do what one must do...
Regards,
Tim.
Re: C17 (Classic 17) in London
Posted: Tue Jun 19, 2012 1:46 pm
by WobblyLegs
Okay, at it again - three years of no progress on the boat (moving country, having baby, starting business etc...) and I'm building again (though, I have managed to put 50 hours on the motor, and another 2000 or so hours on the other boat!!).
One thing I've found out using the other boat, is that an anchor is a must-have where I am - all the river bank is privately owned.
So, before windows, before paint, before varnish, today I started with the anchor hatch:
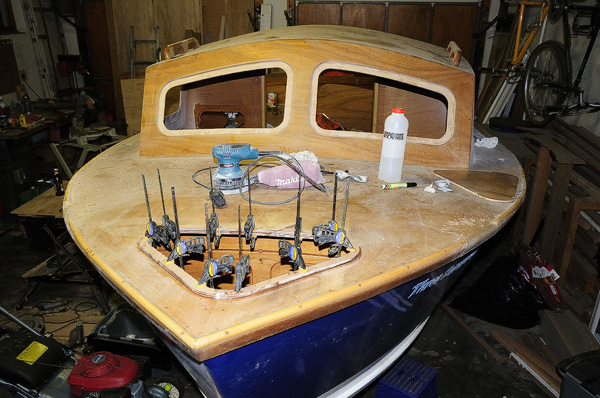
I'm in two minds as to whether to leave it open, or build a hatch cover? It would need to be curved to fit the deck. I'm not sure how to do that...
Later,
Tim.
Re: C17 (Classic 17) in London
Posted: Tue Jun 19, 2012 1:57 pm
by Lucky_Louis
Great to hear you're alive and well Tim!
First, in my opinion, you have to either secure the anchor in the locker or have a hatch. Having that anchor bounce out when you hit some unexpected chop or wake could have nasty consequences...
Easiest way to get the curve may be to cut a piece of 1/8" door skin which is very bendy, fit to the opening and lightly staple around the perimeter. Laminate a layer or two of biax cloth on top. Pop it out, clip the staples and laminate another layer or two on the back side with maybe a cross rib or two for stiffness and beef up where the hinges and latch are going.
We're still planning on dropping in on you for visit in a few years so stay put
Re: C17 (Classic 17) in London
Posted: Tue Jun 19, 2012 8:36 pm
by ks8
Re: C17 (Classic 17) in London
Posted: Wed Jun 20, 2012 6:30 pm
by Hope2float
Tim
Good to see you back at it. I know we will all enjoy the product.
Dave
Re: C17 (Classic 17) in London
Posted: Thu Jun 21, 2012 9:59 am
by WobblyLegs
So, another hole cut - this is for the fish-finder, though I don't fish... I bought the cheapest I could find (Garmin FF90) purely 'cos I wanted to know how much water was under the boat. It works well too!
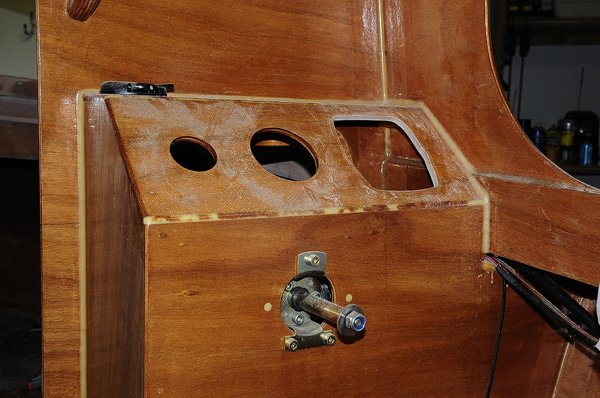
The holes in the console are (L-R) trim indicator, tachometer, fish finder. The little black thing on top of the console is the clamp for my GPS - I was thinking of making a permanent mount for that, but I tend to upgrade them every now and then, so I'll keep using it as is.
Another thing I'm going to change, having used the boat a bit, is the helm - it's too low and I have to bend down too much to steer. So that's going to change to an angled mount as well as moving it up a bit.
Tomorrow, take the clamps off the anchor hatch and tidy it up (more dust!).
Later,
Tim.
PS, The reason for this renewed activity is that I have another boat repair job coming in the summer, and need to free up some space in the garage. F.i.L asked how much it would cost to finish, and basically turned around and said, 'let's do it, here's the cash!!"
Thanks Dad!
Re: C17 (Classic 17) in London
Posted: Mon Jun 25, 2012 2:42 pm
by WobblyLegs
Lucky_Louis wrote:Easiest way to get the curve may be to cut a piece of 1/8" door skin which is very bendy, fit to the opening and lightly staple around the perimeter. Laminate a layer or two of biax cloth on top. Pop it out, clip the staples and laminate another layer or two on the back side with maybe a cross rib or two for stiffness and beef up where the hinges and latch are going.
We're still planning on dropping in on you for visit in a few years so stay put
Thanks, doing well, little 'un is growing up quickly and wants to help build boats...
The hatch - I've taken a bit of 9mm ply (imported from the UK along with the boat), made 7mm deep scarfs, bent to the dimensions and poured neat epoxy in the grooves (about 5 minutes ago). I think it will work fine...
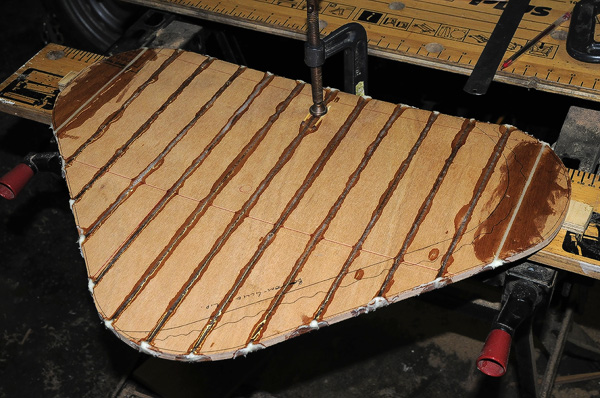
See you here sometime...
Tim.
Re: C17 (Classic 17) in London
Posted: Mon Jun 25, 2012 5:43 pm
by robbiro
Tim,
Glad to see that you are still after it!! I now believe that you never truly finish a boat. I like the idea of the front hatch and the way to get the curve in it. I have enjoyed the blog that you keep going and have really enjoyed the photo's of the waterways that you use.
Little ones do grow up. My oldest just got her drivers permit. I can just see the insurance rates going up now
Keep on Buildin'
Robbie
Re: C17 (Classic 17) in London
Posted: Mon Jun 25, 2012 7:33 pm
by Lucky_Louis
elegant solution! should work very well.
Re: C17 (Classic 17) in London
Posted: Thu Jun 28, 2012 8:56 am
by WobblyLegs
Okay, hatch cover mostly done, just some tidying up and smoothing off to do:
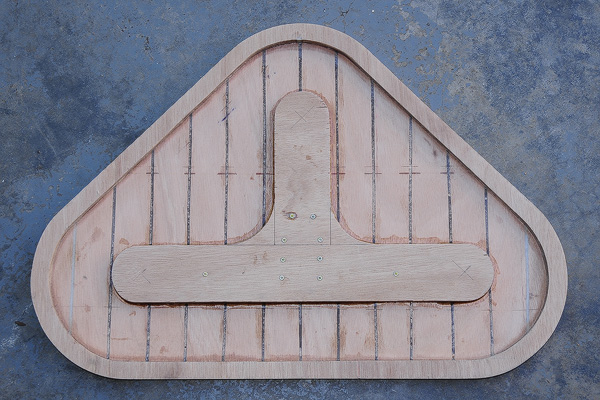
The gusset, brace (whatever you call it) serves two purposes - one, I want to be able to stand on it (probably not needed, but hey!) and the other reason is that the curve was a little to much - this flattens it out just the right amount (and yes, it bugs me a little that I got it slightly off-centre, but I can live with that
):
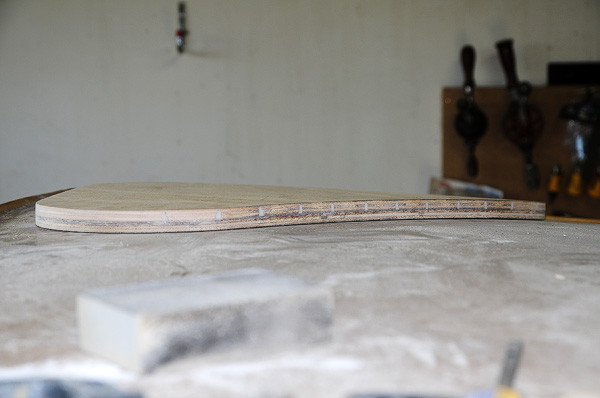
That's it for this week - off to Cape Town tomorrow morning for the weekend with a shopping list of paints, varnishes, hardware, screws etc. to finish off. It's a 400km round trip, so I want to make sure I get everything I need!
Oh, and taking the little one to the aquarium to find Nemo....
Later,
Tim.
Re: C17 (Classic 17) in London
Posted: Thu Jun 28, 2012 10:59 am
by ks8
Enjoy the aquarium trip. What will you do if you find Nemo?
Re: C17 (Classic 17) in London
Posted: Thu Jun 28, 2012 11:13 am
by WobblyLegs
ks8 wrote:
Enjoy the aquarium trip. What will you do if you find Nemo?
Not sure, but she seems to be more interested in finding Bruce! We have a lot of them around here! I did a trip with a friend around a year ago, and saw four different great whites following our boat
Re: C17 (Classic 17) in London
Posted: Sat Jul 07, 2012 10:27 am
by WobblyLegs
Okay, the anchor hatch is made, but not sealed or mounted (later), now to changing the height and angle of the wheel. After visiting a few boat supply places in Cape Town, I've found out that Ultraflex parts aren't available here (I have an Ultraflex no-feedback helm on the boat). So, I could get a Teleflex, and drill holes in the bezel kit to make it fit, or I could change the console for 'free' since I have the wood and epoxy.
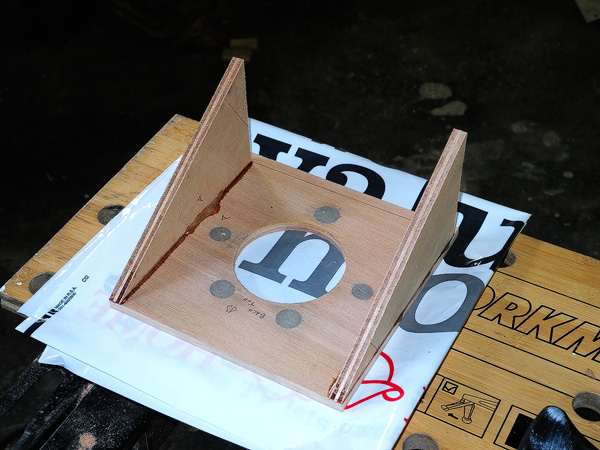
It's a start, and will take a bit of jiggling to get everything right, but at least it is a way of getting my wheel where I want it...
Later,
Tim.
Re: C17 (Classic 17) in London
Posted: Mon Jul 09, 2012 10:33 pm
by Fonda@kauai
You do top notch work Tim! Looks great
Re: C17 (Classic 17) in London
Posted: Wed Jul 11, 2012 5:53 am
by WobblyLegs
Fonda@kauai wrote:You do top notch work Tim! Looks great
Thanks, and Aloha to you too...
New steering position.
Below is a pic of the wheel in it old and new position - the gain I've made is an extra 5cm (2") at the top of the wheel, and an extra 6cm (2.4") at the bottom (approx).
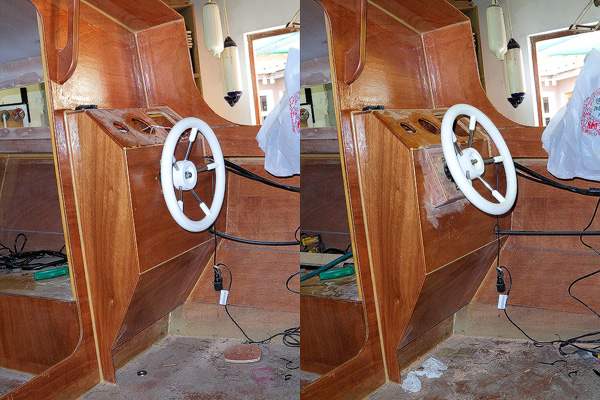
It's not a whole lot, but I think it will make enough of a difference to be worth the effort. You can see below that it just wasn't high enough - it still might not be, but it's as high as I can get it without rebuilding the entire console.
I had originally made the new 'box' 30º, but test fitting the bezel kit and helm mechanism showed there was no way it was going to fit. Cut it down to 20º, and it slots right in
.

That pic was taken when the first crew member was 14 months old, not her first boat trip, but her first one on this boat.
I've also moved the steering a couple of inches inboard for a little bit of space to the right - one, I'm planning on putting a switch panel there, and two, I want to move the control box forward. It's just a little too far back, and awkward for me to have one hand on the wheel and one on the throttle.
Tim.
Re: C17 (Classic 17) in London
Posted: Wed Jul 11, 2012 10:49 am
by Lucky_Louis
Top notch Tim. As usual your engineering and execution are great. Thanks for sharing! It may be time to start a new thread ... "C17 in Africa" or something like that
I hope the mods fit well.
Re: C17 (Classic 17) in London
Posted: Thu Jul 19, 2012 8:35 am
by WobblyLegs
Lucky_Louis wrote:As usual your engineering and execution are great.
Louis, you make me giggle - both my older brothers, and my younger sister have degrees in engineering - I'm the only one without! But I'm fairly okay with geometry...
Back to the foredeck hatch - 'cos it's curved, and hinges don't like curves, it's taken me a couple of days to figure a way of creating a 'flat spot' for each hinge to fit. For me, I like leaving the problem alone until a solution appears out of nowhere - it's done me well on this boat:
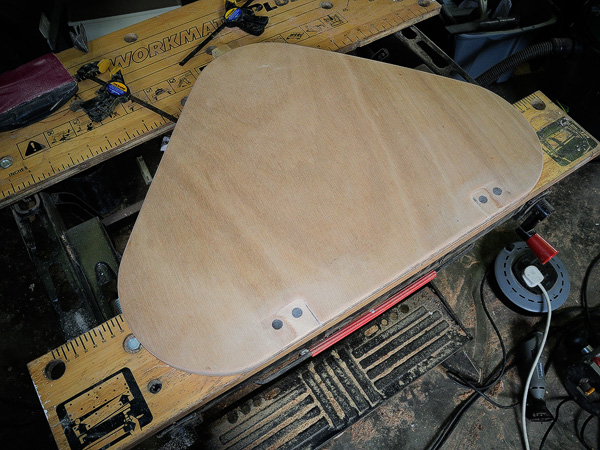
You can see where two recesses have been routed out, towards the middle going through the top veneer, but it took me a while to come up with this:
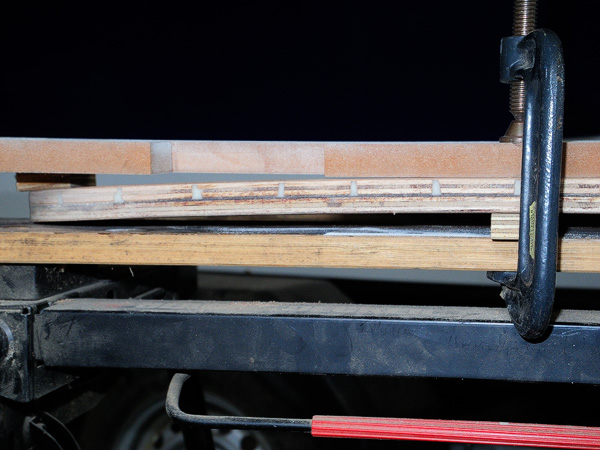
Basically, a flat board on top of the hatch, with two cut-outs for the router bit (only one side shown), then all clamped in place and very slowly I shaved the wood away.
Worked for me...
Later,
Tim.
PS, middle of winter here, and today we've hit 24ºC!!
Re: C17 (Classic 17) in London
Posted: Thu Aug 09, 2012 2:09 pm
by WobblyLegs
Bugger!!
Fitting a hatch on the side of the motorwell, after spending ages measuring, routing, measuring, routing etc., and it looks okay:
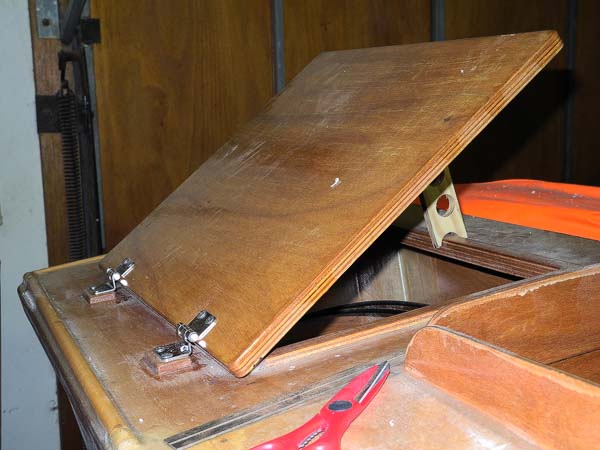
Only thing is...
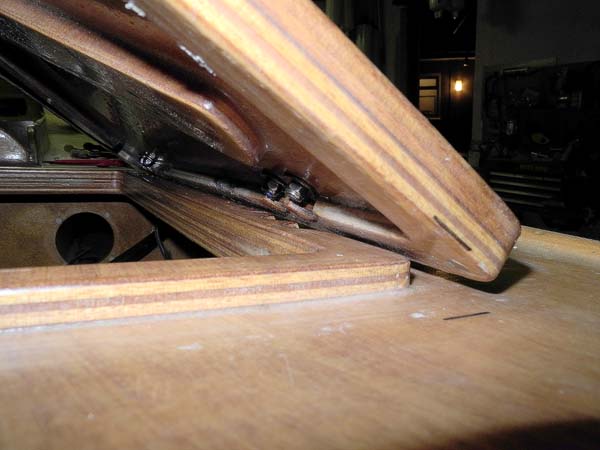
...it doesn't close due to the interference of the edges!!
More routing to come...
Always something to spoil a (bright?) idea, isn't there?
Regards,
Tim.
Re: C17 (Classic 17) in London
Posted: Thu Aug 09, 2012 5:00 pm
by Lucky_Louis
I'm sure you'll come with an elegant solution Tim, you always do
If you could have located the plane of the hinge pivot point at the same height as the edge(s), it would have cleared.
Re: C17 (Classic 17) in London
Posted: Fri Aug 10, 2012 2:16 am
by WobblyLegs
Lucky_Louis wrote:If you could have located the plane of the hinge pivot point at the same height as the edge(s), it would have cleared.
I thought about that, but then the hatch would only be able to open 90º - with the step hinges the can open 180º.
I was unable to find step hinges with enough clearance, which is why those not-so-nice blocks are there
. Still, when it's painted it should look better.
All I need to do is rout off the edges on the opening and the hatch cover by a few millimetres.
Did my final shopping this week, lots of screws, washers nuts etc. for hatches, cleats, fairleads and windows, as well as varnish and paint for final finishing. Apart from fitting things, I think I'm pretty much finished with cutting and gluing wood!!
Tim.
Re: C17 (Classic 17) in London
Posted: Fri Aug 10, 2012 8:50 am
by Mad Dog
How about some T-nuts in place of the nylox? Here are some from Hamilton Marine
http://store.hamiltonmarine.com/browse. ... 20323.html

MD
Re: C17 (Classic 17) in London
Posted: Mon Aug 20, 2012 3:21 pm
by johnc_UK
Hi Tim & all,
Just ordered plans for C17 - this thread has been a big part in deciding to go for it! It' s really useful to 'read ahead' and think through all the techniques you've developed as you've progressed, obstacles overcome and all.
I'm in Linconshire, so your list of suppliers has been useful too.
Still finding it difficult to believe you did it outdooors in England.
Desperate for the plans to arrive now, so I think I'll start clearing a space at the back of my factory unit.
John
Re: C17 (Classic 17) in London
Posted: Sun Sep 02, 2012 12:01 pm
by WobblyLegs
johnc_UK wrote:Hi Tim & all,
Just ordered plans for C17 - this thread has been a big part in deciding to go for it! It' s really useful to 'read ahead' and think through all the techniques you've developed as you've progressed, obstacles overcome and all.
I'm in Linconshire, so your list of suppliers has been useful too.
Still finding it difficult to believe you did it outdooors in England.
Desperate for the plans to arrive now, so I think I'll start clearing a space at the back of my factory unit.
John
Hi John,
Good luck with it - it's been fun and I'm still at it (delays since we moved and bought another boat, commercial).
I finally got the three deck hatches sorted:
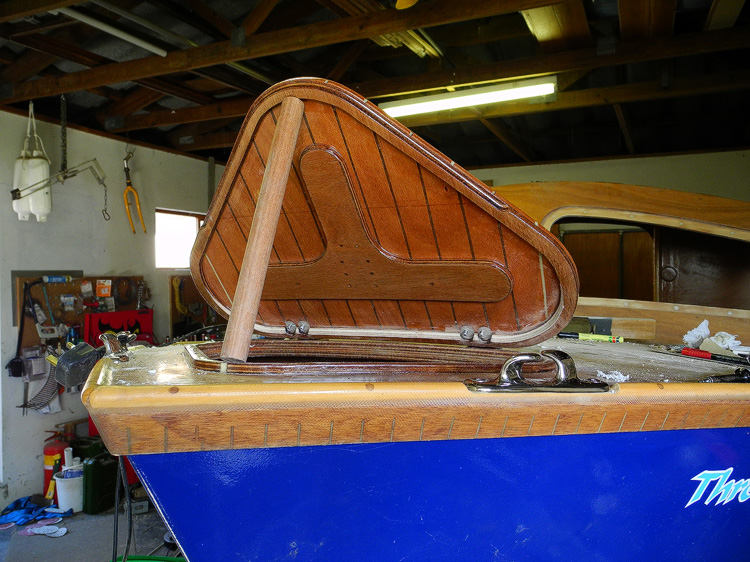
The process...
Drill
Fill
Drill
Fit
Doesn't fit
Drill again
Grind out to make hole bigger
Fill
Clamp hinges
Drill with countersink to get centre
Drill with 4mm bit
Tap with 5mm
Screw hinges directly into tapped epoxy
Job done!!!
Nuts will be fitted underneath, and all will be well.
Man, theses hatches have been driving me mad!!
And that's it - no more building (apart from windows) - now for some sanding and painting - the target for re-launch is the end of this month, but I'm not too fussed if it doesn't happen.
The original idea of this boat was to use it on the waterways of the UK, rivers, canals, Loch Lomond, coastal, etc., but it might be some time before we actually get to do that (though not in the UK any more) - little one is a bit too little to camp on a boat, and a month ago we confirmed that there is another little one on the way...
So, another few years before we get to cruise-camp...
Regards,
Tim.
Re: C17 (Classic 17) in London
Posted: Sun Sep 02, 2012 1:11 pm
by peter-curacao
very nicely done!
Re: C17 (Classic 17) in London
Posted: Sun Sep 02, 2012 2:52 pm
by ks8
... and a month ago we confirmed that there is another little one on the way...
Congratulations! A good reason to need a bigger boat...
Re: C17 (Classic 17) in London
Posted: Sat Sep 22, 2012 9:40 am
by WobblyLegs
Painting.
I'm using International Toplac (Ivory) - and have done three coats over the last three days doing the under-side lip and edges of my three hatches...

You can see the edge I've routed as a finger groove to open the hatch.
Tomorrow I'll turn them over and start painting the top of the hatches (for another three days...
) at this rate, painting the whole boat is going to be a l-o-n-g process.
In the meantime, the season has started and I've already done two trips on the other boat with paying passengers, with a third tomorrow morning at 08:00 - this is the earliest in the season I've had bookings for three seasons... Yeah!!
Tim.
Re: C17 (Classic 17) in London
Posted: Sat Sep 22, 2012 4:46 pm
by ks8
Nice!
If you get many profitable bookings so that the boat can't be painted until next year... worse things could happen...
Re: C17 (Classic 17) in London
Posted: Tue Sep 25, 2012 12:27 pm
by WobblyLegs
ks8 wrote:Nice!
If you get many profitable bookings so that the boat can't be painted until next year... worse things could happen...
KS, below is my commercial boat "Platanna" - I bought it just over two years ago (though I'd been driving it for a year before that.
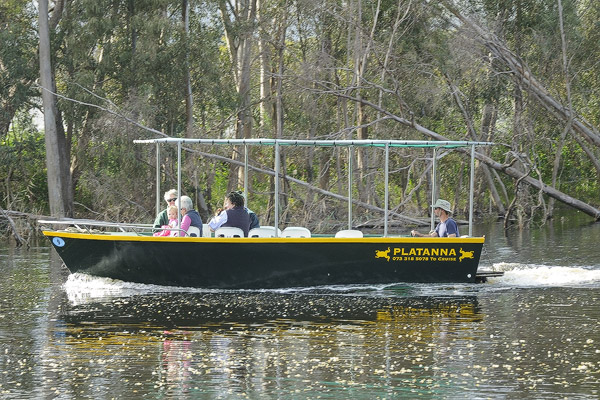
It's an old sea fishing boat, deep V, driven by a Toyota 1.9 litre diesel attached to a Hamilton waterjet - makes for great manoeuvrability!! Not good for efficiency though... Still, I go slow - most pax are bird-watchers - and use little fuel.
A few months ago we did a trip up to the Chobe National Park in Botswana, and spent a couple of nights on this boat:
Five star hotel, floating!
Reason I mention it is that they had this (which I got to drive) for game viewing:
Aluminium hull, welded together, tough as nails - and good for game and birds - above the tarpaulin is a platform that can take two pax safely (see ladders on the sides). Below that platform, but above seated pax, is a storage box for life jackets, flares etc, and there's seating for up to eighteen people - my guess is the boat is 22' or so.
I want one!!
Platanna is 20', and I'm licensed for 10 pax.
As to the game viewing, photo below is straight from camera, no editing....

As we say here, "Another crap day in Africa!"
Regards,
Tim.
Re: C17 (Classic 17) in London
Posted: Tue Sep 25, 2012 12:31 pm
by Cracker Larry
Wow, that's a beautiful picture Tim. Cool job you have
I've always wanted to see Africa.
Re: C17 (Classic 17) in London
Posted: Tue Sep 25, 2012 10:11 pm
by ks8
Nice!
Have you guided anyone to the end of the rainbow yet? Care to volunteer a report on what one finds there.
Are you going to learn aluminum welding now?
Re: C17 (Classic 17) in London
Posted: Wed Sep 26, 2012 11:44 am
by WobblyLegs
Cracker Larry wrote:Wow, that's a beautiful picture Tim. Cool job you have
I've always wanted to see Africa.
Larry - put it on your to-do list. I can post a few pictures if you, or anyone else, want... Being thirty feet away from a full grown bull African Elephant in an open vehicle can be, uh, a bit daunting!!!
I'll offer accommodation where we are too! Have a look at
http://www.platanna.com/ - there's a map somewhere in there - my boat, and where we are... Winter's the best time to visit, especially if you like 'weather'
Late winter is when the whales come to calve! Sometimes hundreds of them...
ks8 wrote:Have you guided anyone to the end of the rainbow yet?
The rainbow pic is in Botswana, not where I am. Our river is a little bit smaller than that
When we were up there it was near the end of the rain season, and we stayed near the confluence of the Chobe and Zambezi rivers. At times the flow is so strong on the Zambezi, that it floods the Chobe, causing the Chobe to flow backwards.
The river I cruise is called the Klein Rivier (afrikaans for Small River) and it only flows regularly during winter, our rainfall season.
During summer it's an extension of the lagoon, so basically sea level and brackish - we have a few seals as regular visitors in the village - 7.5km of lagoon plus 7.5km of navigable river away from the sea (Can't take a boat into the lagoon - the water is ankle deep for about 600m between the river and the lagoon).
Later,
Tim.
Re: C17 (Classic 17) in London
Posted: Tue Nov 06, 2012 7:16 am
by WobblyLegs
Okay, long time no update (or work), but I'm getting there
I've finished cutting bits of wood out of the boat, the last being the console:
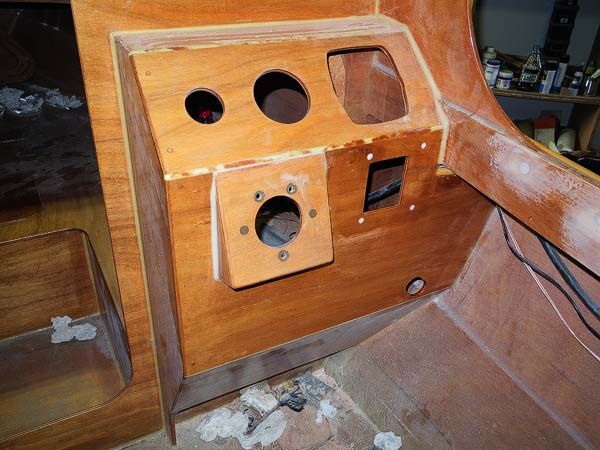
Then check that everything fits as it's supposed to (which it does):
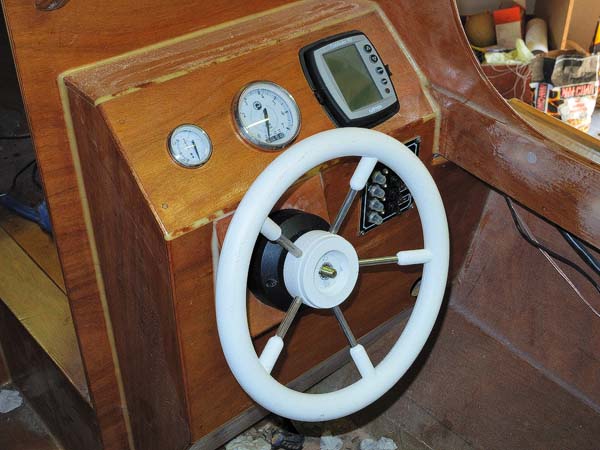
On the console - l-r: trim gauge, tachometer, fish-finder (I don't fish, but I do like to know how much wet stuff is under my boat). Below fish-finder, a 4-switch panel for electrics. The panel was given to me, so I figured put it in now, and as I add stuff later, use it. There will be nav lights, interior lights etc. added sometime in the future...
And, at last, window frames are complete, drilled, filled, sealed with two coats of epoxy, waiting for varnish, then drill again and fit the polycarbonate...
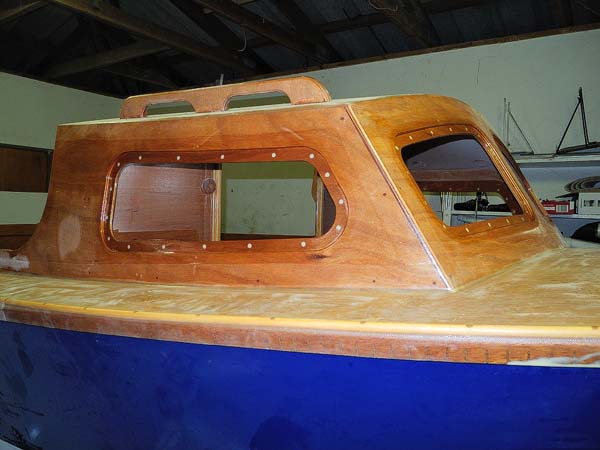
I have a deadline of the end of this month to get the boat out the garage - two more builds will be starting then, both canoes (HC16's) side by side. The boating business is getting busy, the tourists are coming and the canoes will be part of that as rentals alongside the other river boat.
The deadline is okay - I'm now left with only sanding and painting. Nearly done.
Later,
Tim.
Re: C17 (Classic 17) in London
Posted: Wed Nov 07, 2012 11:44 am
by ks8
Nice. Every time I get ready to finish painting my seats, something comes up. In that regard, you are doing better than me!
Now I'm in the middle of a move to Florida, right on the gulf... lots more wet stuff all around... 8 minute walk before my hat floats... incentive to catch up to you.
Enjoy getting things just right, and building those twins.
Re: C17 (Classic 17) in London
Posted: Wed Aug 28, 2013 9:05 am
by WobblyLegs
This pic is for Lucky-Louis...
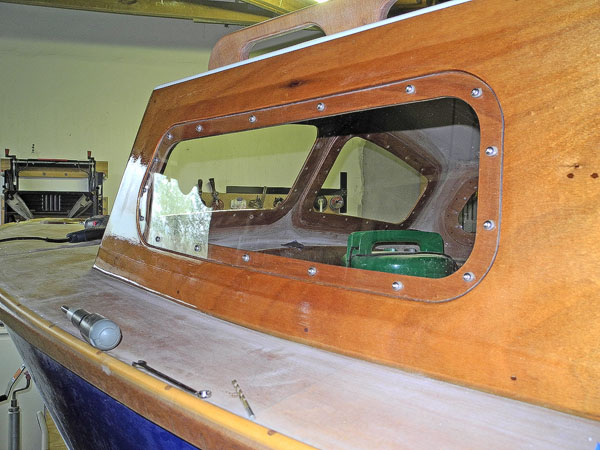
I can't believe it's so long since my last post, but things like having a second little girl arrive a few months ago tend to get in the way... Oh, as well as 'work!' Since I gave up 9-5 type working hours five years ago, I seem to have much less time for myself than ever before - oh well.
So, side windows fitted, front still to be cut. Console painted and re-fitted, cabin sides and coamings varnished.
Still to do: varnish handrails, fit front windows, paint deck, fit hatches and hardware and that's it - out the garage and into the water.
Regards,
Tim.
Re: C17 (Classic 17) in London
Posted: Wed Aug 28, 2013 2:40 pm
by ks8
Re: C17 (Classic 17) in London
Posted: Thu Oct 17, 2013 2:42 pm
by WobblyLegs
Okay, long time no post (again) - been busy on the other boat, having babies (not me, the First Mate) and other things, but have managed to get the boat ready for a re-launch. Maybe next weekend if weather permits.
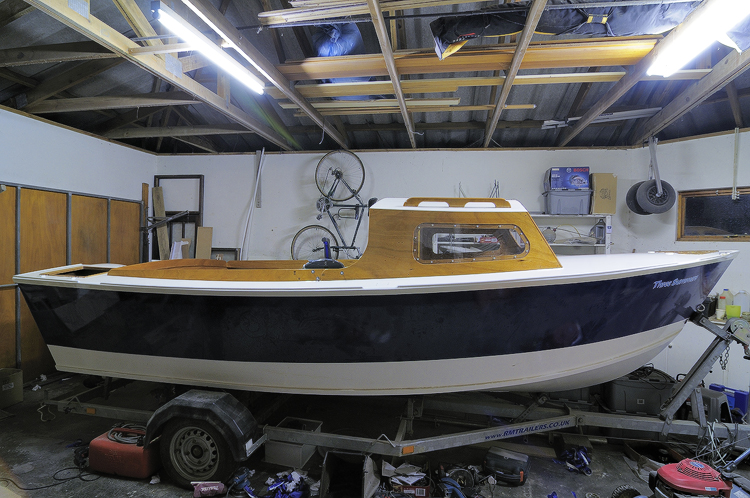
Windows done. New console painted and fitted out. Decks painted. Cabin varnished. The interior can wait until next winter.
All I need to do is re-fit the deck hardware and hatches, connect battery and try and start that motor that has been sitting for nearly two years (that's scary!!!)...
I'll let you know how it goes.
Regards,
Tim.
Re: C17 (Classic 17) in London
Posted: Thu Oct 17, 2013 5:24 pm
by ks8
Re: C17 (Classic 17) in London
Posted: Sat Nov 02, 2013 1:59 pm
by WobblyLegs
Okay, ready to get wet again - this has taken way to long, but I'm there now - test motor at home tomorrow morning and then off to the river...
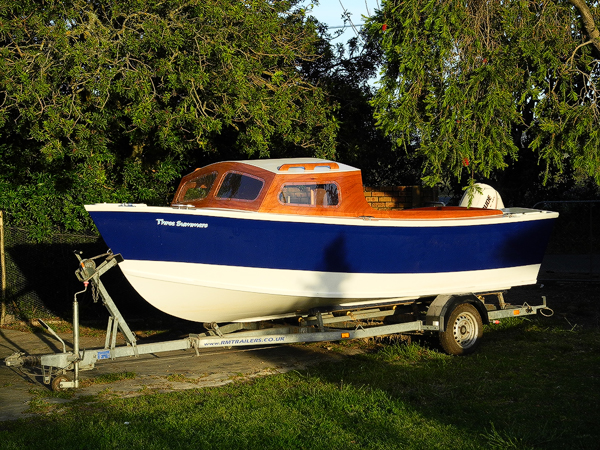
Regards,
Tim.
Re: C17 (Classic 17) in London
Posted: Sun Nov 03, 2013 1:49 pm
by WobblyLegs
What a day... 30ºC, light wind and a fast boat - what more can one ask?
Tried starting the motor at home, but the battery wasn't having it - one hour charge and maybe four turns of the crank and she's burbling. Maybe six or seven starts on the river this afternoon, all instant. Happy.
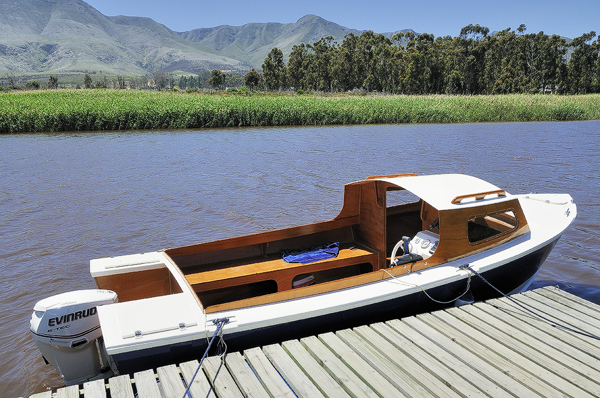
Nearly two years since I last used this boat and wow, I missed it!!!
Still more to do, but minor, like nav lights, cushions, interior lights etc, but now it's time to start building some canoes...
Later,
Tim.
Re: C17 (Classic 17) in London
Posted: Wed Nov 06, 2013 4:08 am
by ks8
Re: C17 (Classic 17) in London
Posted: Wed Nov 06, 2013 7:14 am
by Walkers Run
What a cool boat! More pictures please.
Re: C17 (Classic 17) in London
Posted: Wed Nov 06, 2013 8:46 am
by WobblyLegs
ks8 wrote:
ks8, a man of many words...
Re: C17 (Classic 17) in London
Posted: Wed Nov 06, 2013 2:28 pm
by ks8
Sometimes less is more.
Did I just say that?
Re: C17 (Classic 17) in London
Posted: Thu Nov 14, 2013 7:36 am
by WobblyLegs
Walkers Run wrote:More pictures please.
Okay:
First pic was taken last weekend, playing with trim to see what I could get out of her (58.7 km/h = 36.5 mph or 31.7 knots). I just can't quite get her to do 60 km/h, but hey, I'm happy with what I have.
The other 3 pics are from messing about on the water this morning,

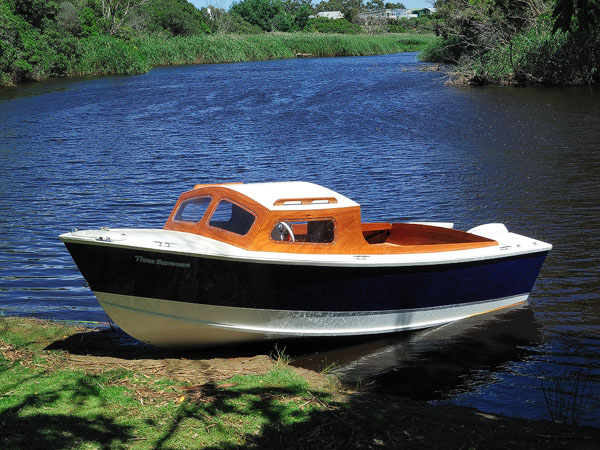
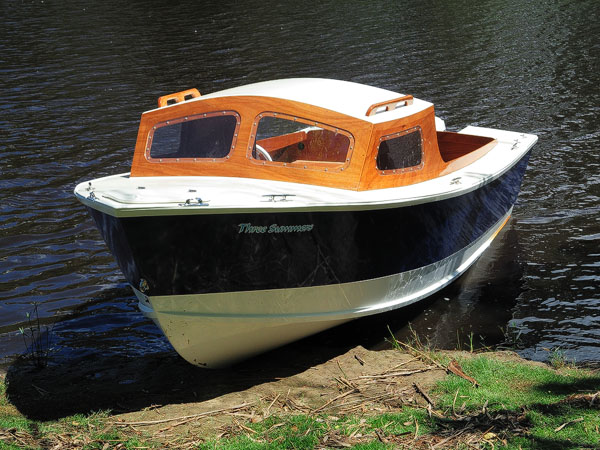
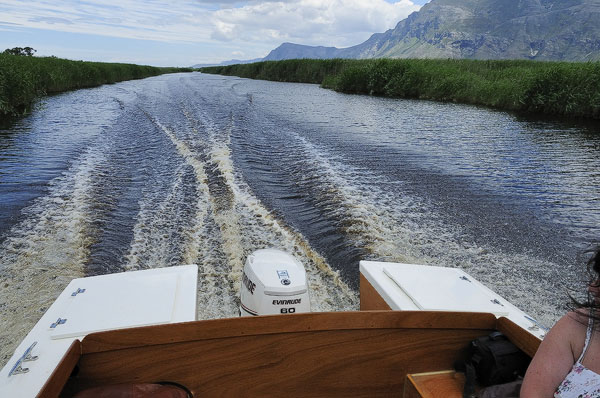
Regards,
Tim.
Re: C17 (Classic 17) in London
Posted: Thu Nov 14, 2013 3:22 pm
by Joe H
SWEEEEEET!!!!!!!!!!!
Love the pics, I wanna be there.
Joe H
Re: C17 (Classic 17) in London
Posted: Thu Nov 14, 2013 3:35 pm
by peter-curacao
Re: C17 (Classic 17) in London
Posted: Thu Nov 14, 2013 4:18 pm
by ks8
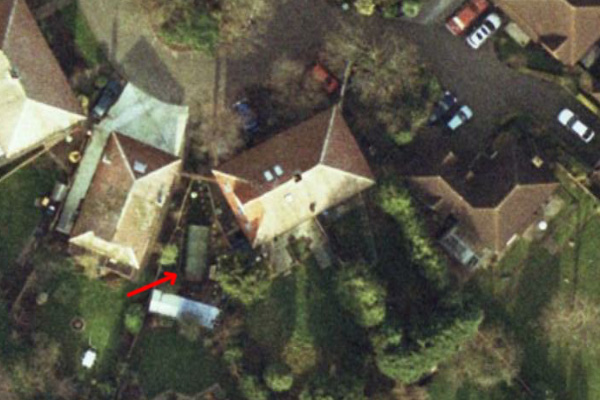

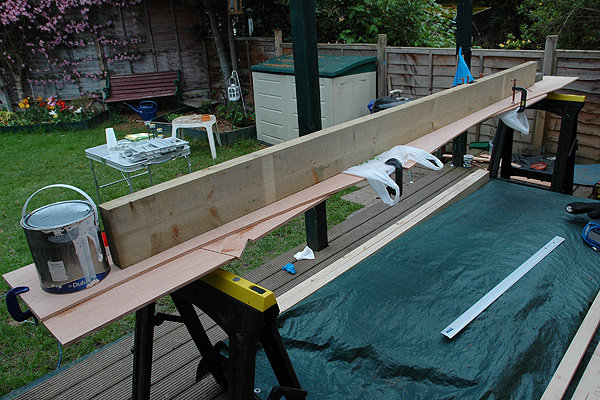