Page 1 of 1
Finally getting started on my GF-16
Posted: Wed Jun 22, 2005 8:44 pm
by timoub007
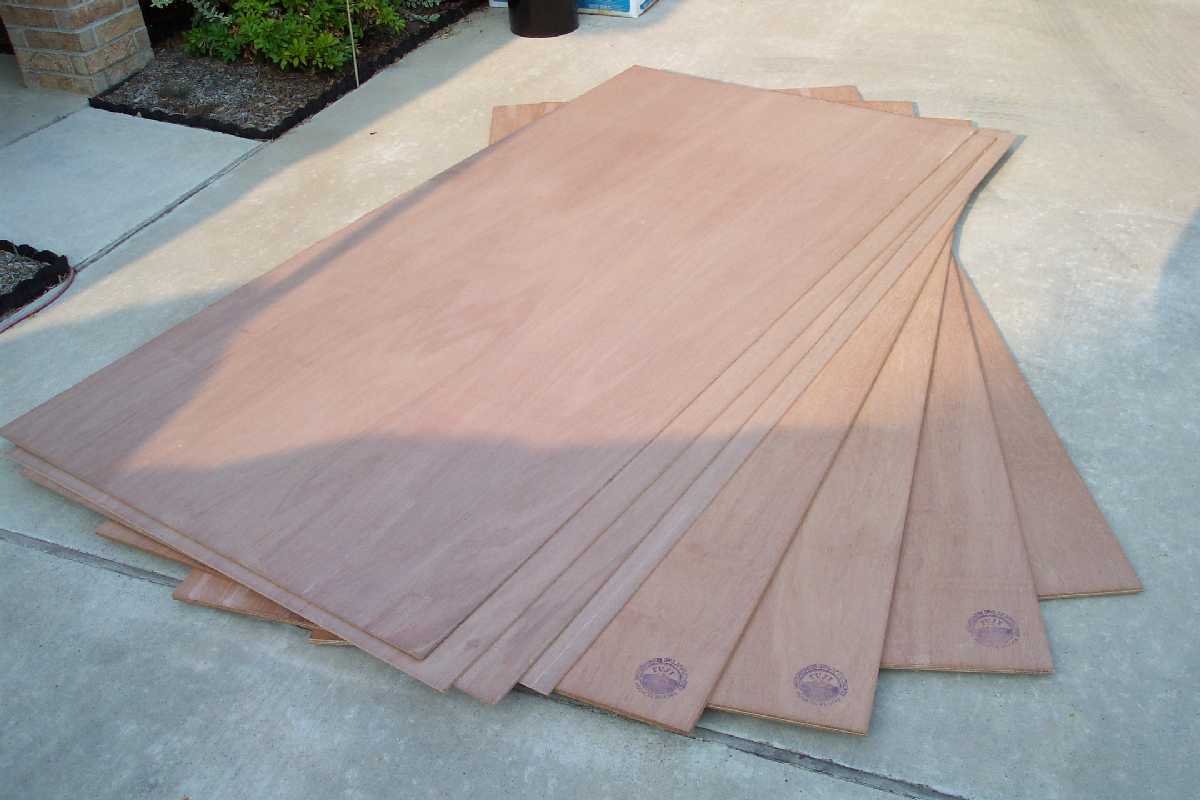
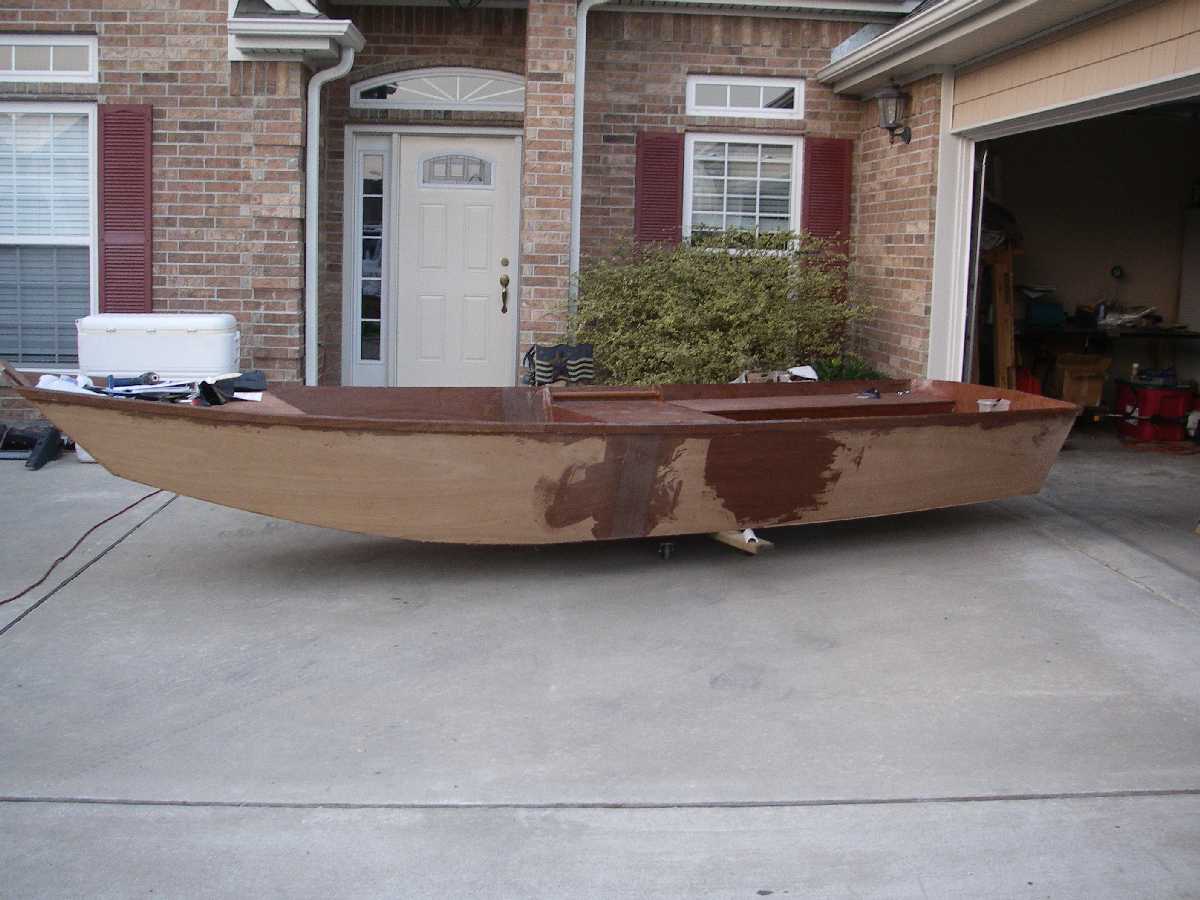
After having the plans for over a year now, I finally went and bought my plywood today. I have weekend duty this weekend so I'll have to stick around the house and figured it would be a good opportunity to get started. I have not ordered the glass & epoxy kit yet but will be able to get the panels marked and cut.
Anyway, I just wanted to start my thread. I'm going to try to chronicle my build like some others have. I started by snapping a few pics of my "boat" in a pile today.
Tim
Posted: Wed Jun 22, 2005 9:36 pm
by alball
Hi Tim,
Good luck with your build. Where will you be building your boat? Garage? Shop?
al
Posted: Wed Jun 22, 2005 10:27 pm
by timoub007
Al,
Thanks for the well wishes and reply about the bulkheads in your thread.
I am going to be building in my garage. It is 20' deep by 24' wide and we only park my wife's Explorer in there. It should provide enough room, but I will probably get yelled at for all the dust I've read about. I'll probably have to figure out a way to wheel the boat outside to do any major sanding.
This will be my new duck boat and I am adding a few things to the typical layout for my personal needs. It will get a 25 hp tiller Johnson that I already own and be used in very skinny, mud bottomed marshes.
Thanks again,
Tim
Posted: Thu Jun 23, 2005 1:22 am
by Doug N
For dust handling, I use a sander that I have connected to a shop vac. It is an old sander that had a dust bag at one time. Duct tape is an important part of the connection... The shop vac has a bag in it to catch the fine dust. Works quite well. 5 minutes hand sanding will create more dust than several hours with the sander/shop vac combo. The shop vac hooked up to the sander seems to keep the sand paper from clogging quite as fast which is a nice bonus.
Good luck with your boat.
Doug
Posted: Wed Jul 06, 2005 10:14 am
by timoub007
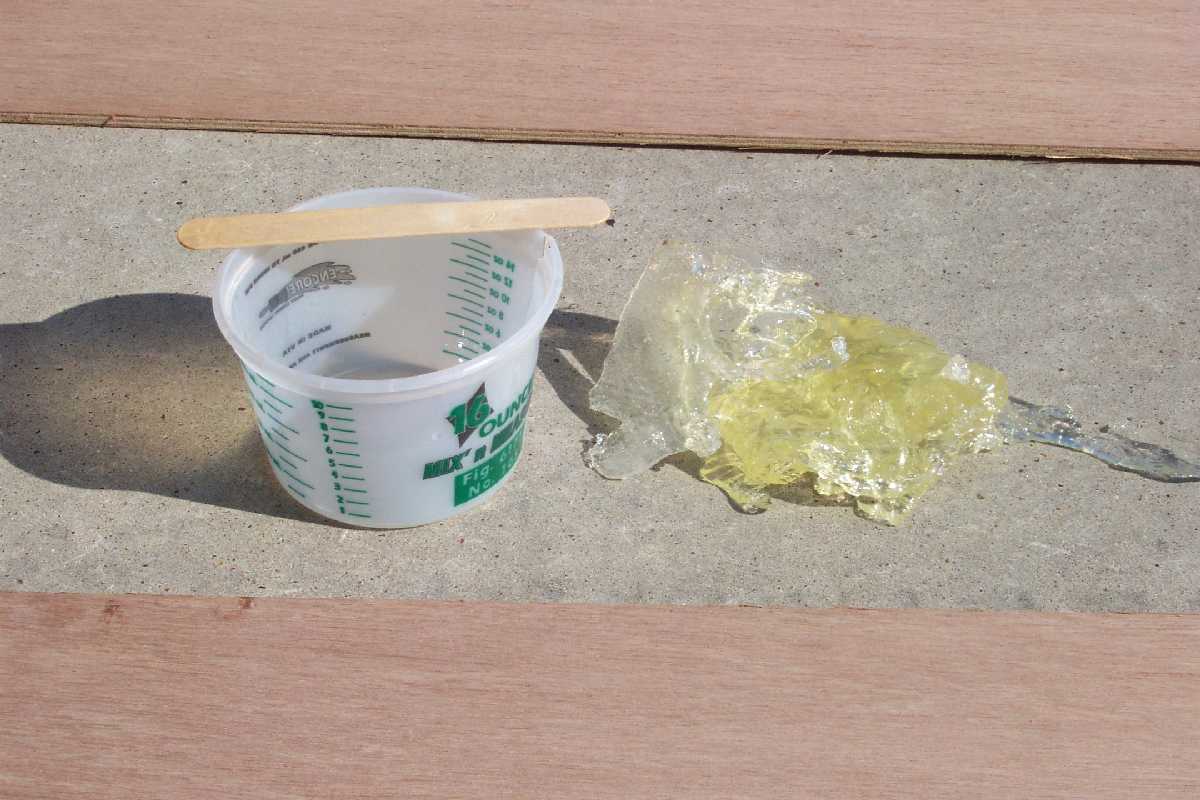
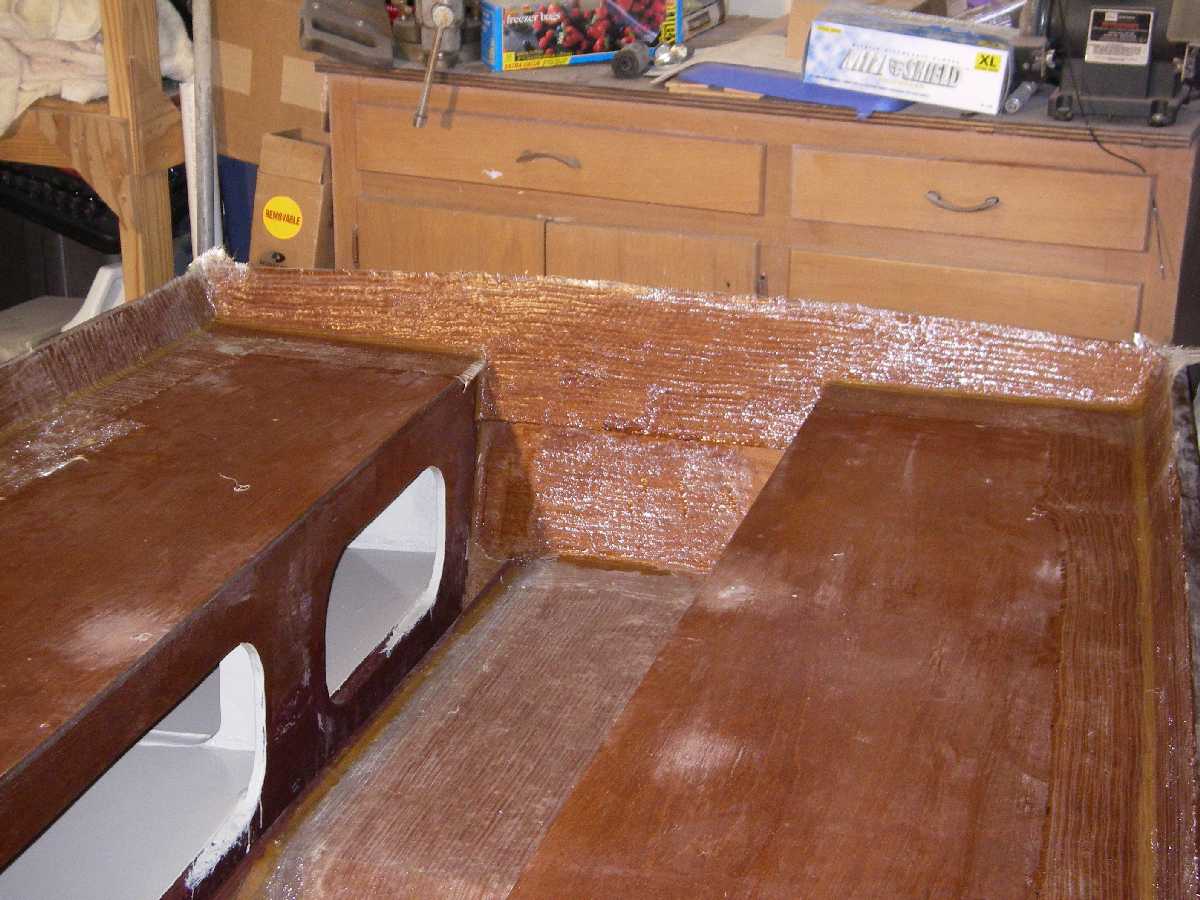
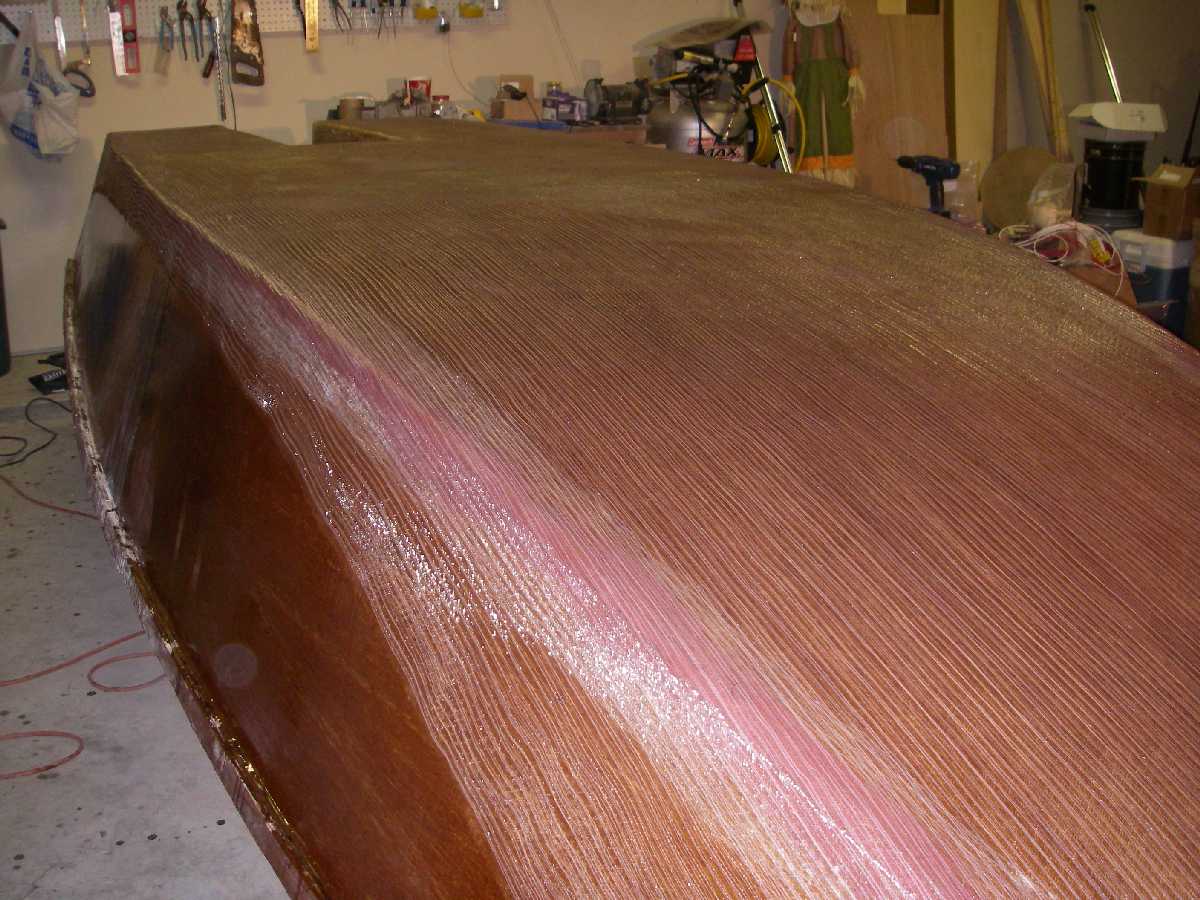
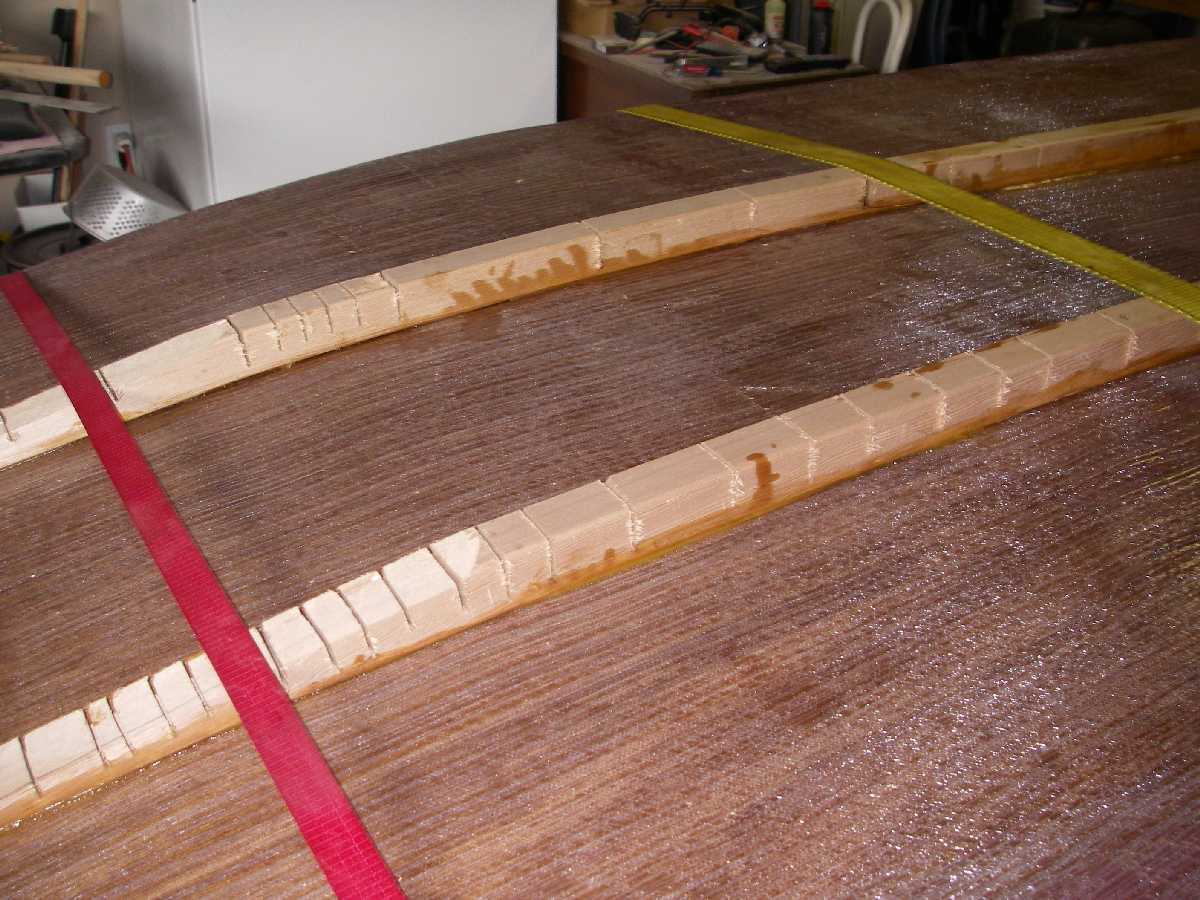
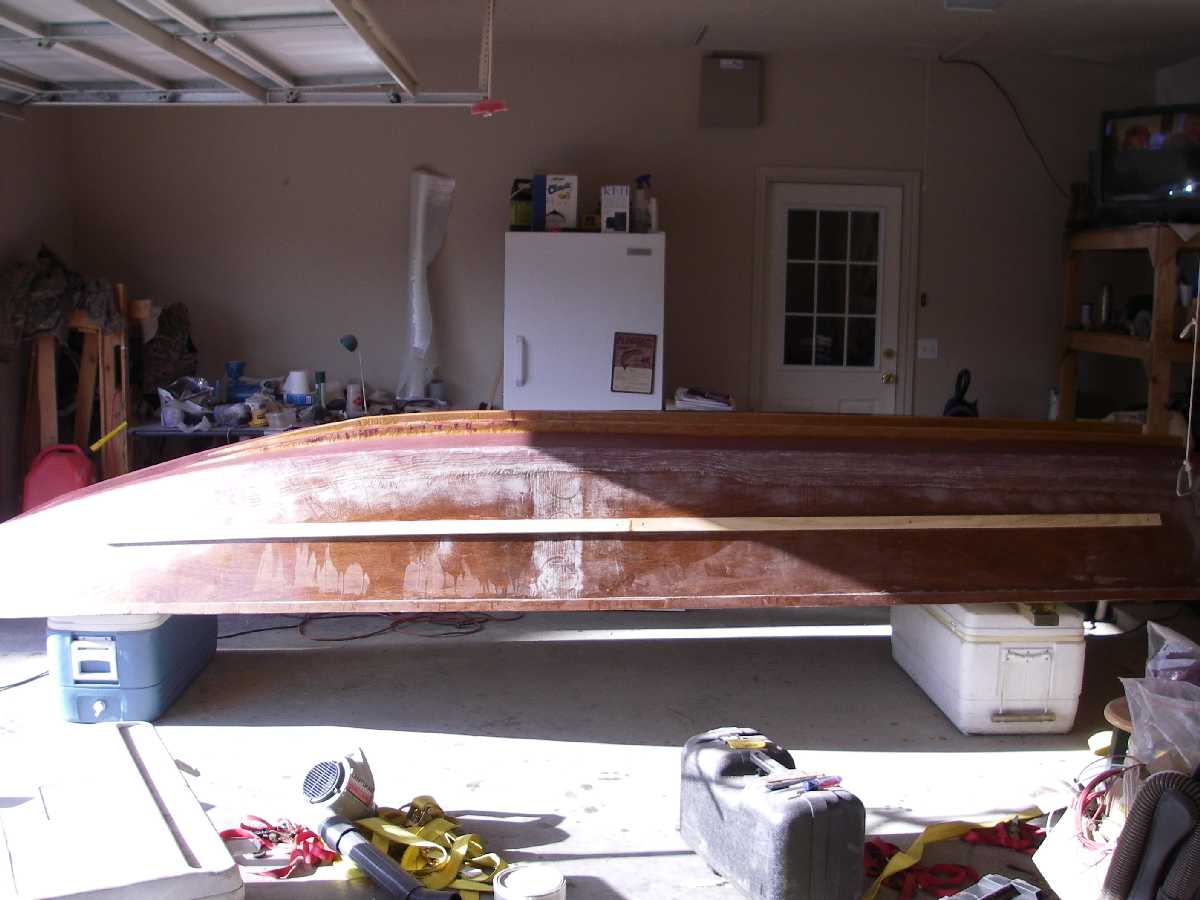
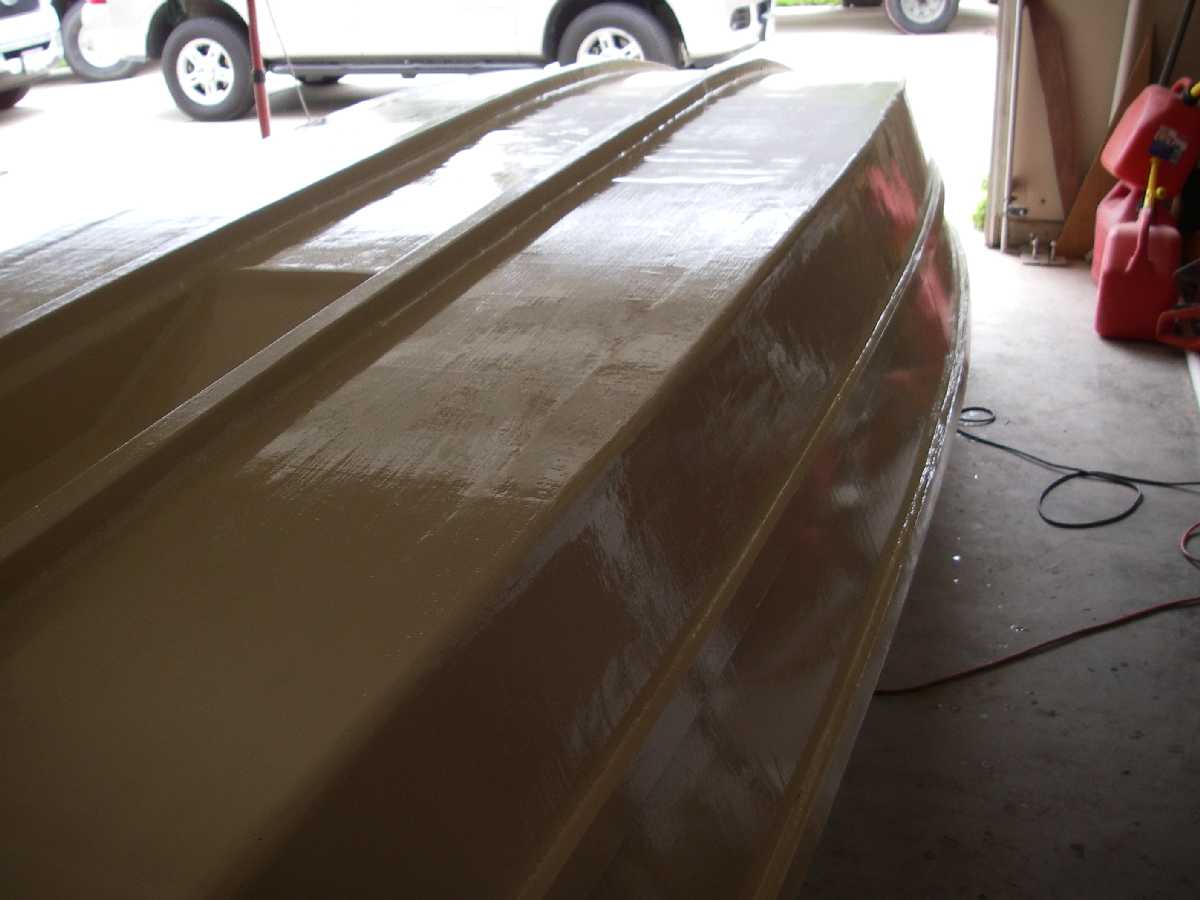
Well, I got the long panels spliced on July 4th.
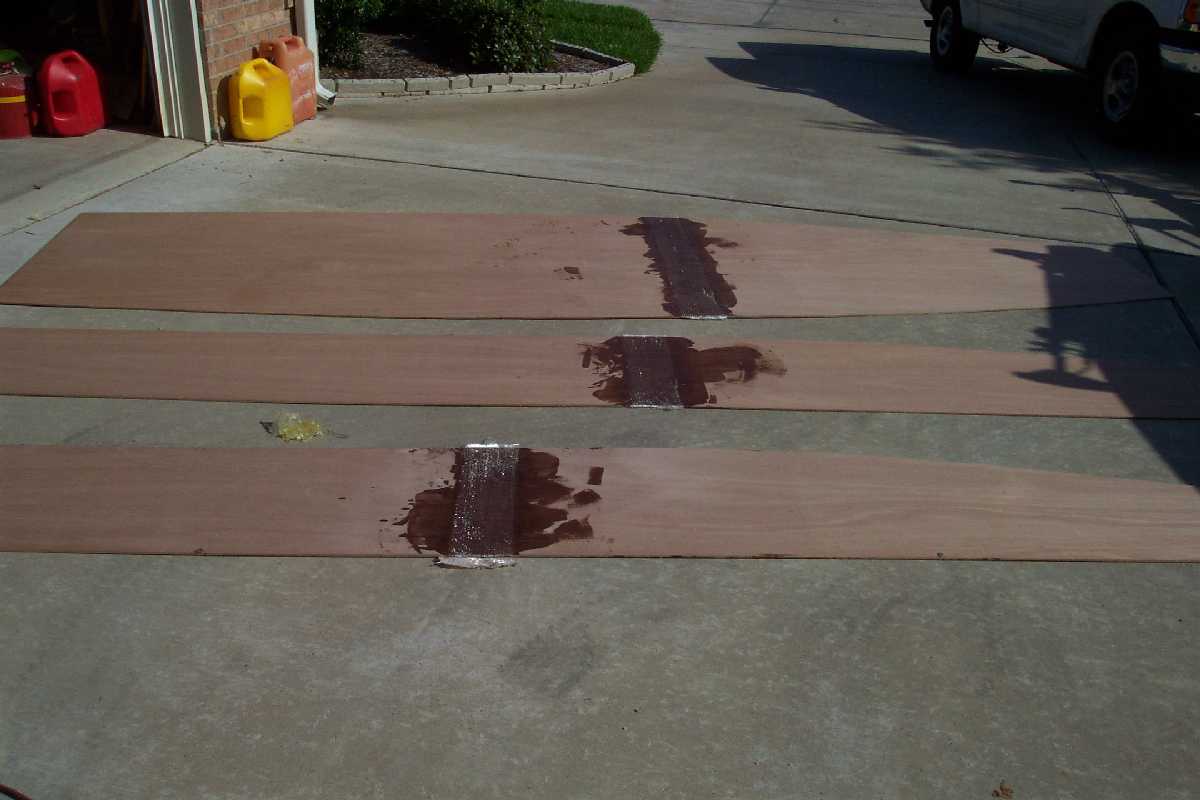
I started out using the epoxy that came in my trial kit, but that didn't last long. Not because I did not have enough left, but because it came with medium hardener. It was 95+ degrees outside and while wetting out my first splice, the cup of mixed epoxy melted on a couple of my other panels. I had to scrap and sand the panels as I did not know how much of the coating was epoxy and how much was plastic. Here is what is left of my trial kit.
I got the hull dry fit last night, securing each frame with 2 screws each side per the plans. This thing is bigger than I thought it was going to be. I'll post a few pictures of that later this week as I forgot to glue my clamping boards to the transom. Got those curing right now.
Tim
Posted: Wed Jul 06, 2005 10:33 am
by tech_support
The trial kits come with medium. We would not give you all medium in a GF16 in the summer

I think we mention that in the directions.
Even with SLOW, I would not mix batches that large unless you apply very quickly. Try keeping the resin in the house (to keep it cool) or put it in the fridge for 20 minutes before you take it out into your oven, or...uh, I mean garage

This will give you more time.
Joel
Posted: Wed Jul 06, 2005 10:50 am
by timoub007
Joel, thanks for the tips. And yes, you did say that we need slow in the directions (which are great by the way). I have the bottles out in the "oven" right next to the "boat", so I will move them in to the house.
I was wondering, with the slow hardener if I mix more than I can use in one session can I put the extra in the freezer? Would it be usable or is that just a waste of time?
Did you get my email on Monday about the blended filler bag being torn in my kit? Let me know if you need me to resend it.
Thanks to all for the encouragement,
Tim
Posted: Wed Jul 06, 2005 12:03 pm
by Rich_L
Tim:
http://gallery.bateau2.com/displayimage.php?pos=-4553
Are there butt blocks under those fiberglass splices?
Good luck and enjoy your build.
Rich
Posted: Wed Jul 06, 2005 12:46 pm
by tech_support
timoub007 wrote:Joel, thanks for the tips. And yes, you did say that we need slow in the directions (which are great by the way). I have the bottles out in the "oven" right next to the "boat", so I will move them in to the house.
I was wondering, with the slow hardener if I mix more than I can use in one session can I put the extra in the freezer? Would it be usable or is that just a waste of time?
Did you get my email on Monday about the blended filler bag being torn in my kit? Let me know if you need me to resend it.
Thanks to all for the encouragement,
Tim
Once its mixed, you have to use it.
Yep, we sent out another full bag of blended filler already.
Joel
Posted: Wed Jul 06, 2005 2:05 pm
by timoub007
Rich_L,
No, there are no butt blocks in the GF-16. As I understand it, that is the main difference between the GF-14 and GF-16 construction. Without the butt blocks, there is enough wood to extend the boat another 2 feet. The fiberglass splices provide enough strength to hold the panels together.
Thanks Joel. I'll keep that in mind when starting to glue things together. I'm only worried about not being able to use the smallest amount mixable (3 oz.) before it kicks in the measuring cup. When setting the transoms and frames in between the side panels I'm not sure how fast I'll be able to work and how far 3 oz. will go.
Correct me if I'm wrong, but the blended filler will be used for mixing my own fairing compound.
Tim
Posted: Sun Jul 24, 2005 11:16 pm
by timoub007
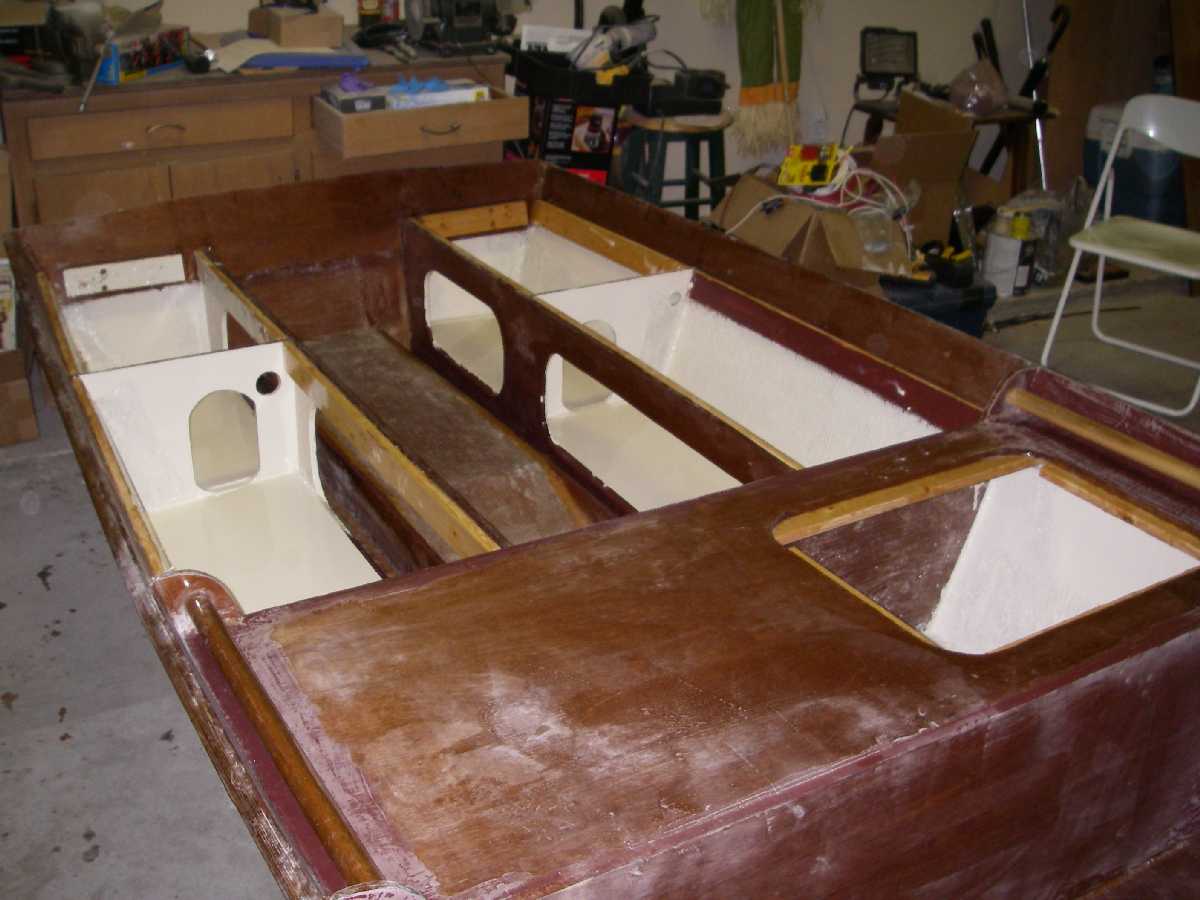
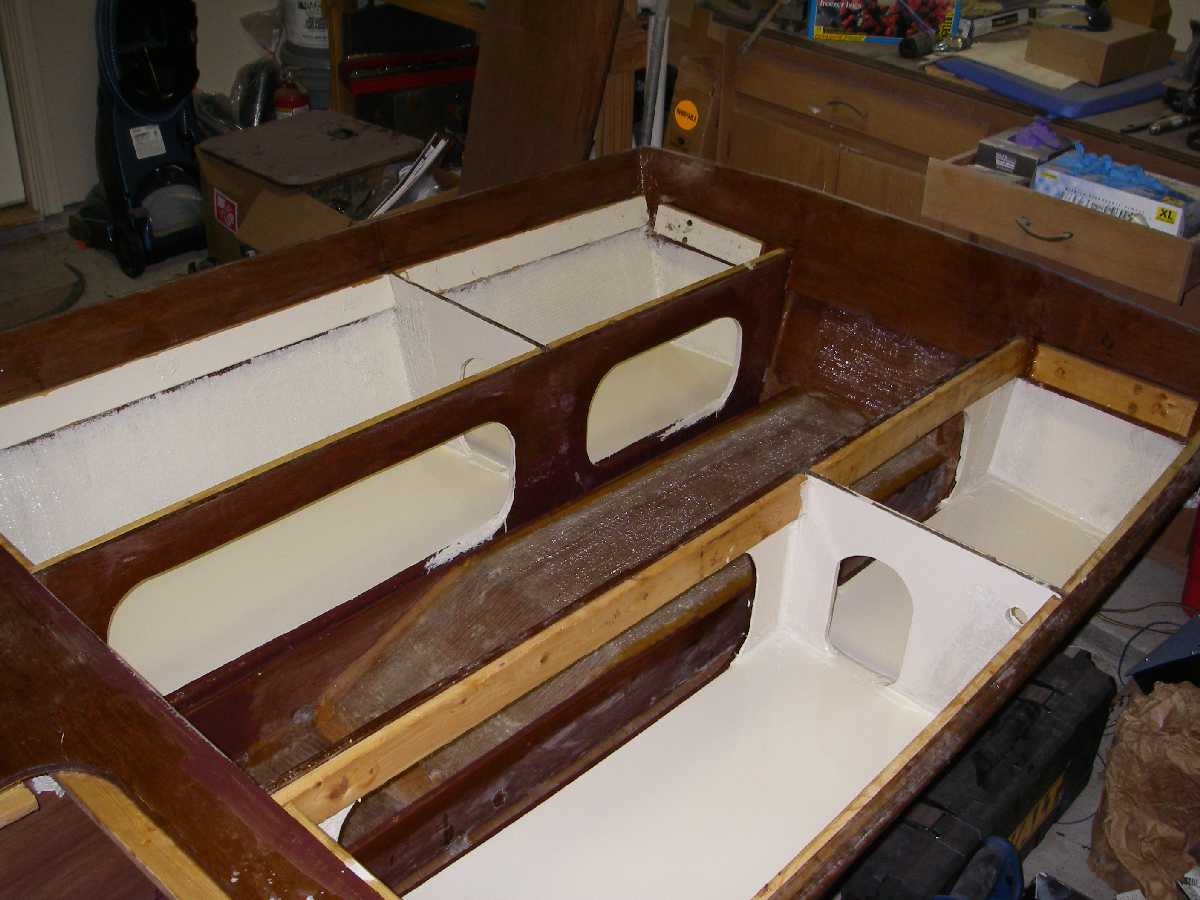
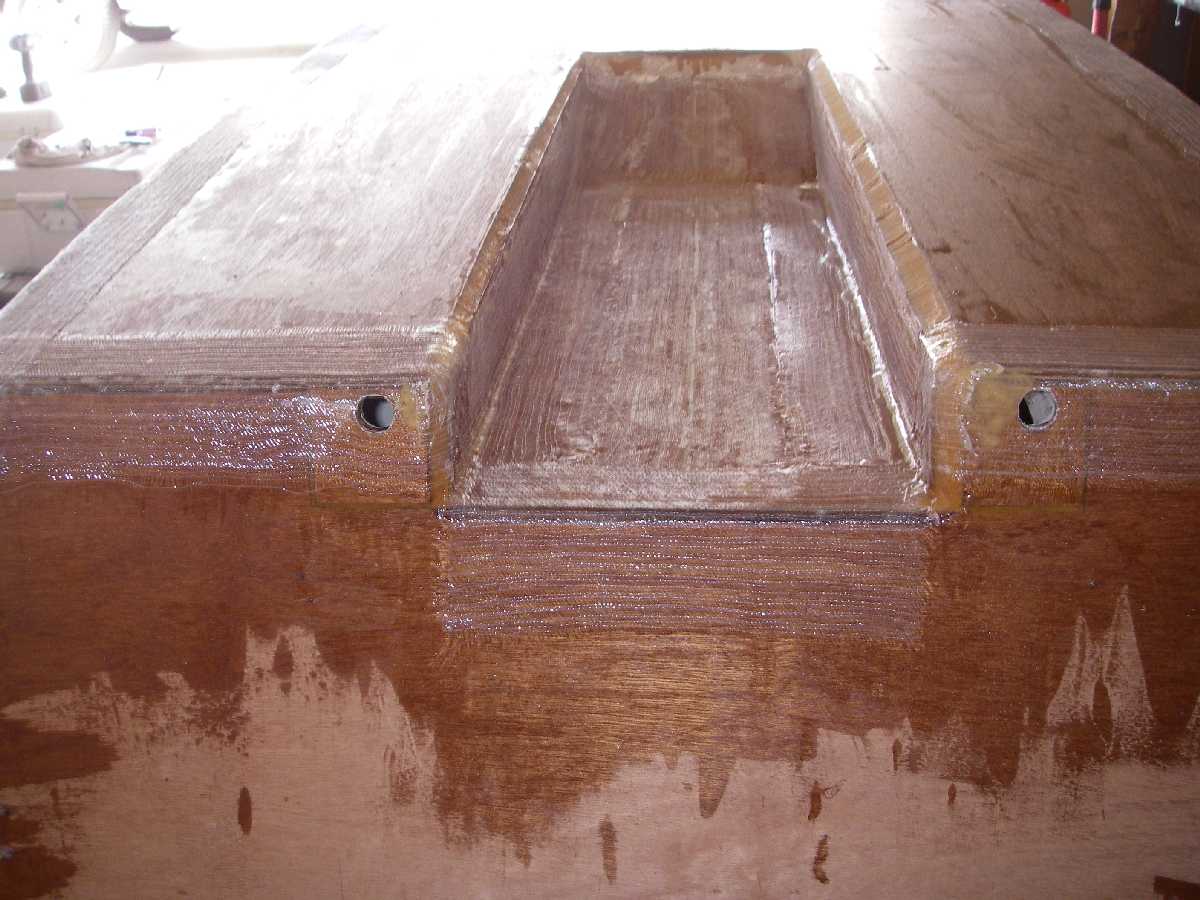
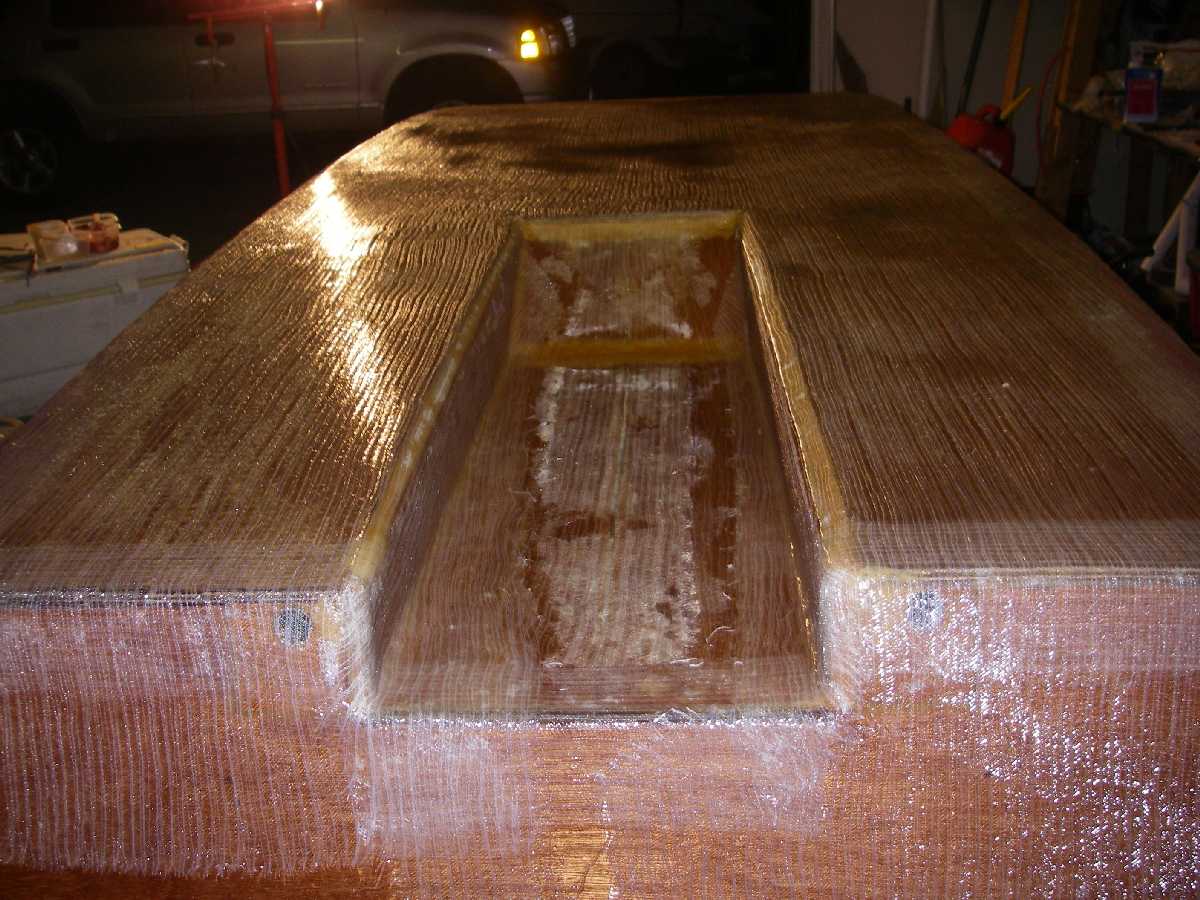
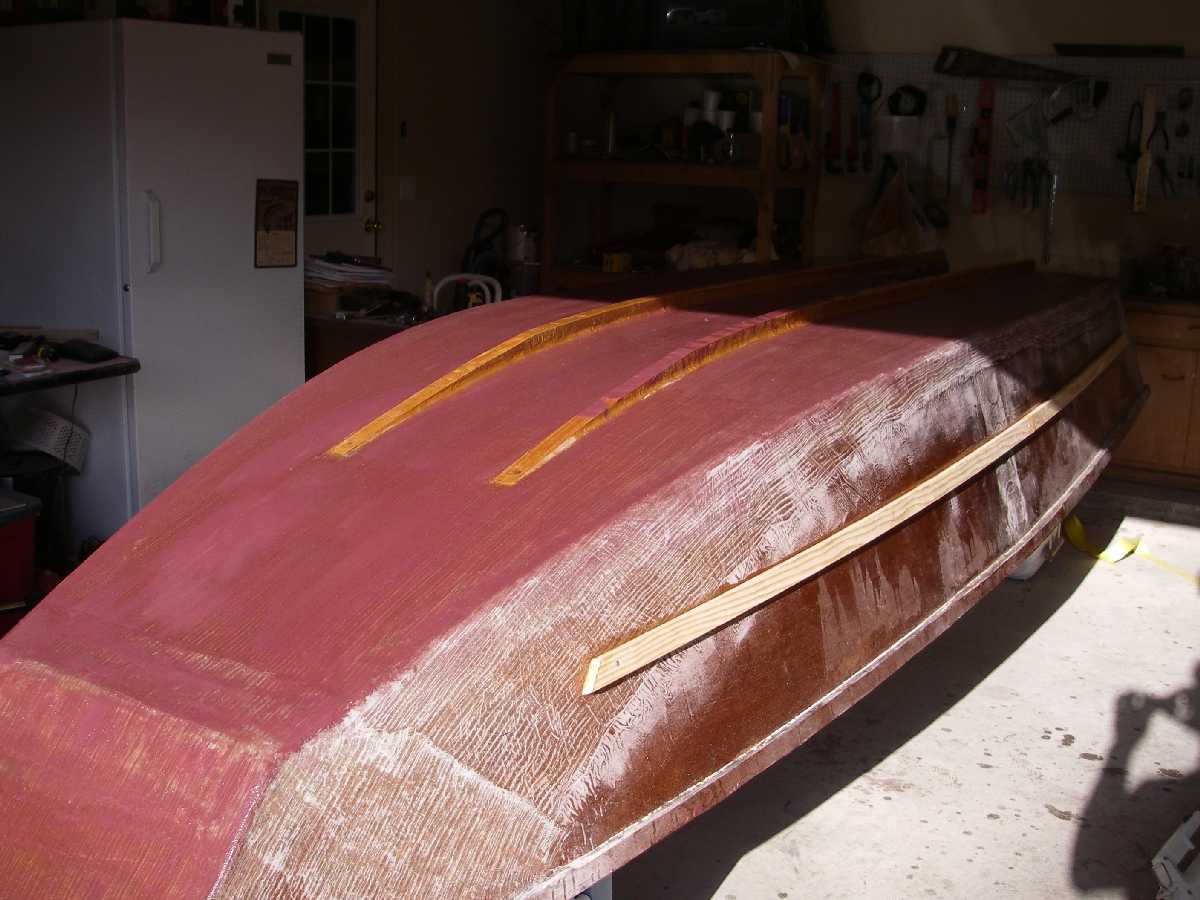
My pile of wood is starting to look like a boat!
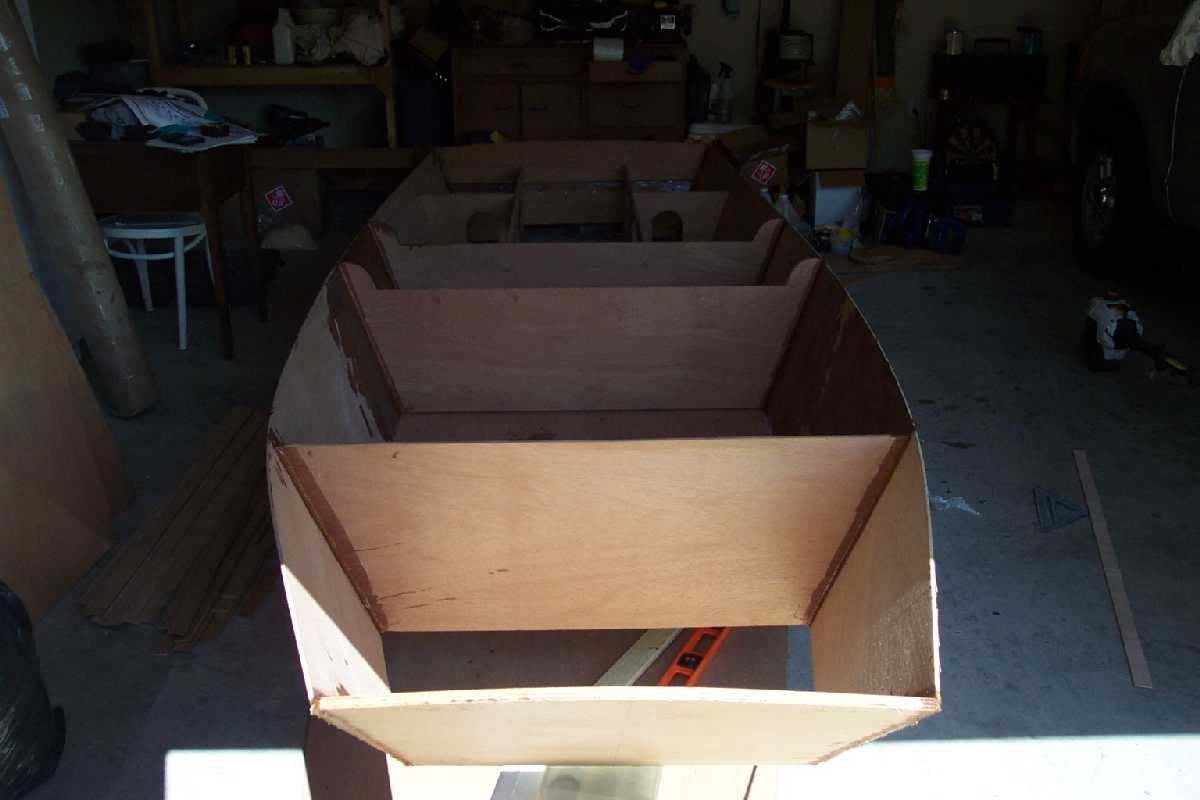
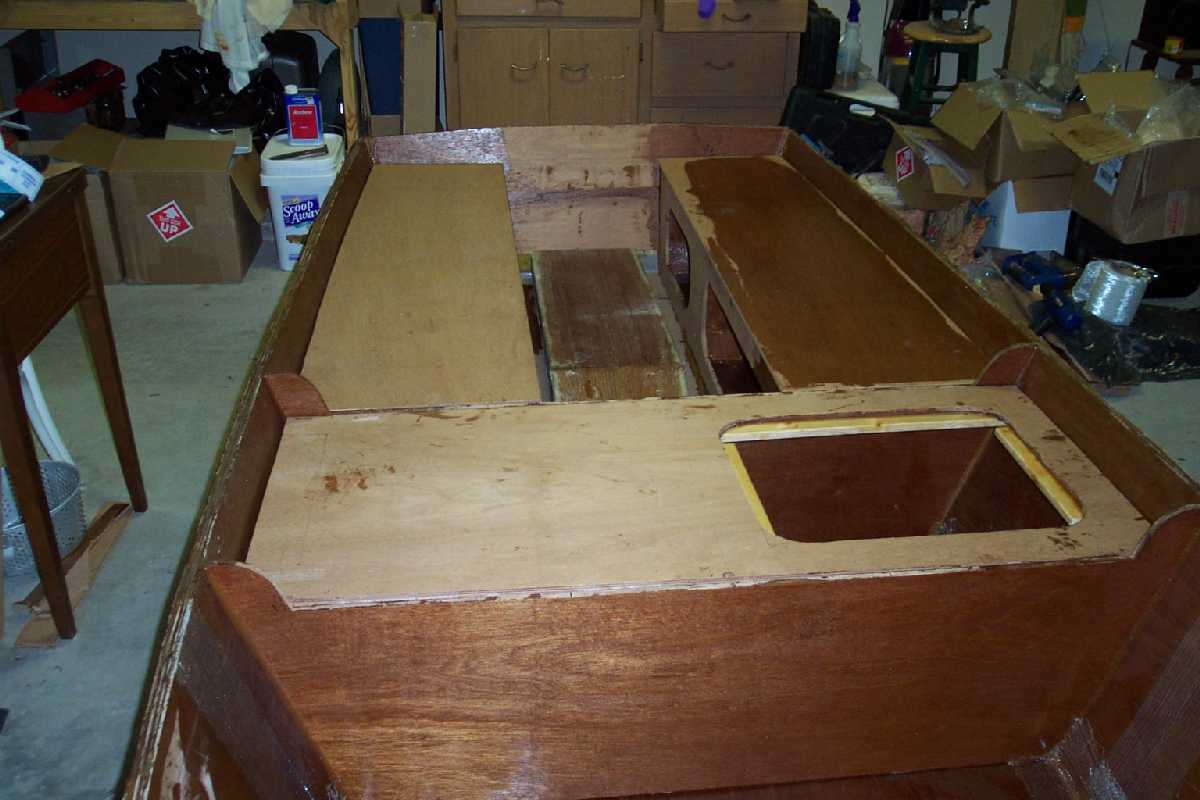
I finally got my changes figured out. After measuring a lot more than twice, I cut my extra seat frames. I took the cockpit layout of the D-15 and put that in my GF-16.
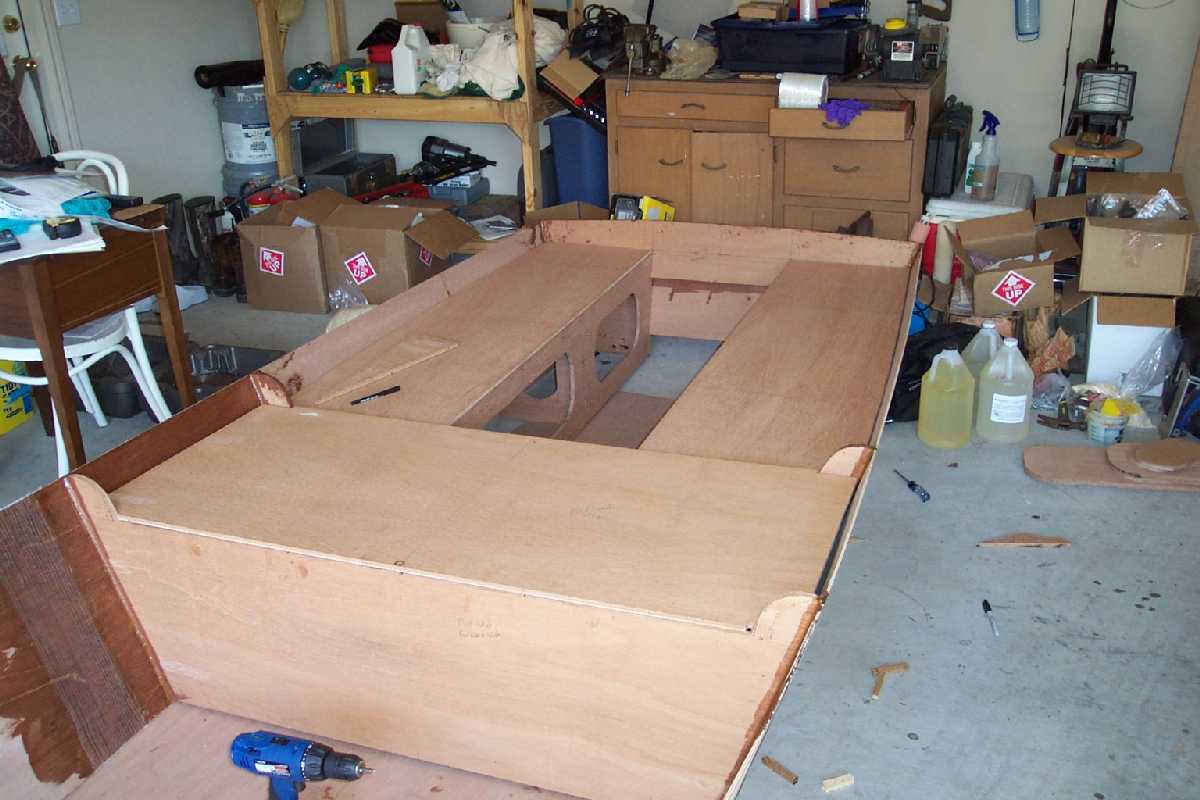
I think it looks great! I'll be able to move around a bit more fore-to-aft to adjust the boat's center of gravity depending on the load.
Here is a view without the seat tops.
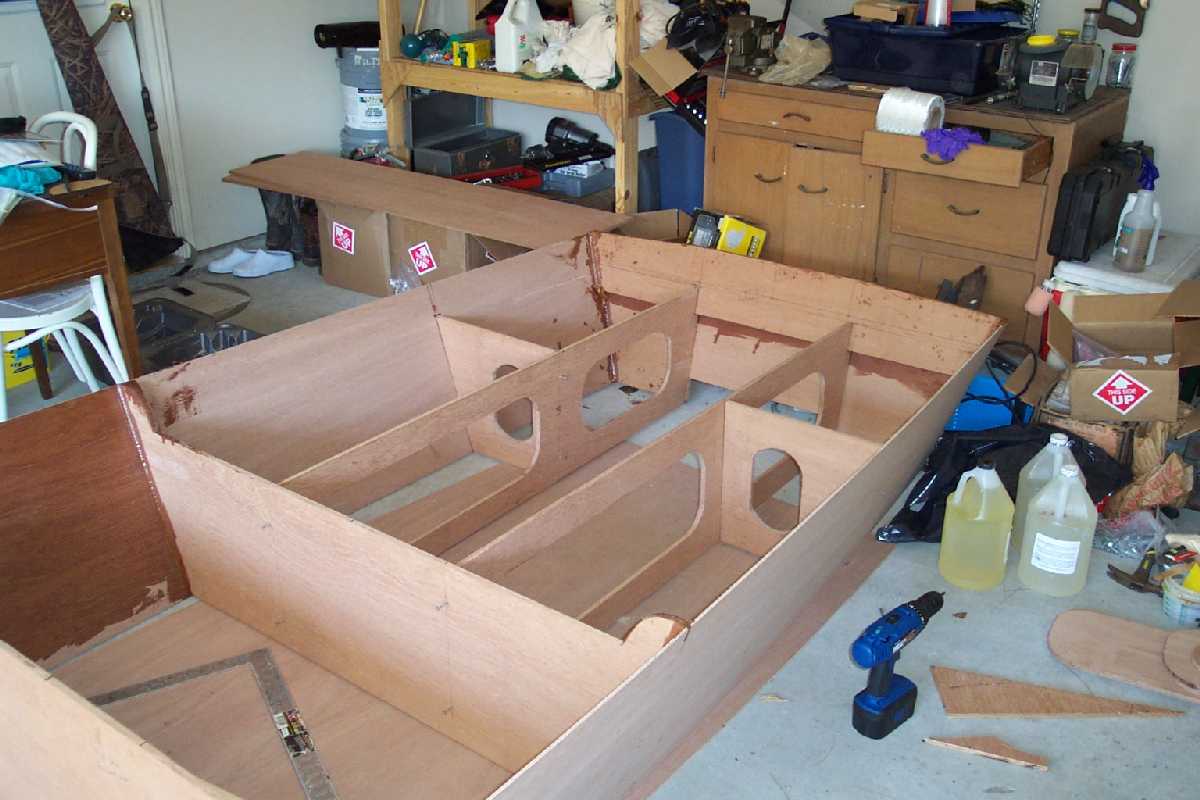
Making these frames without plans took some thought. I did not want to ruin any more plywood than I had too. It turns out that I was pretty close on my first try and was able to trim that one to fit. I purchased one extra sheet of 1/2" Meranti to use for my extras.
I hope to get the cleats mounted all around the boat early this week and then start on my rub rail. I'm hoping to get it flipped in the first week of August to attach the bottom panel.
Tim
Posted: Mon Jul 25, 2005 5:39 pm
by Cracker Larry
Tim, that looks great! I sorta wish I had thought about that layout when I built mine. Excellent thought for weight distribution, plenty of storage. Good idea I think

Posted: Mon Jul 25, 2005 5:45 pm
by Cracker Larry
Forgot to add, that layout would solve some peoples problem of using a short shaft engine. No need to cut the rear seat when cutting down the transom to 15".
Posted: Mon Jul 25, 2005 9:56 pm
by timoub007
Thanks Larry. I've been looking at your gallery just about every day, hoping that my boat will get done quicker that way.
I like your idea of the dowels between the seat frame ears, and will probably incorporate that myself. There will be times when I'll have to pull my boat over rollers and those would help tremendously. I'm going to try to figure out some bow and transom handles too. Any ideas there?
Also, could you give me some dimensions on the hatch you cut in your middle seat top? I think that will be the best access to this storage. I plan on putting my battery as well as life jackets in there. I feel this could never be dry storage, so I'll probably cut some drain holes in the bottom of the frames as well.
I've got a few other changes planned that you might enjoy as well. All to make this bateau a little more marsh friendly and hopefully ducky.
Tim
Posted: Tue Jul 26, 2005 6:29 pm
by Cracker Larry
Tim, I was lucky and got most of the drudge work finished before the hot weather moved in. It would be slower now for certain! My best advice is to try and get one thing done every day, even if it's just a little something, and it will add up to having a boat. Stick with it, it's just like eating an elephant. One bite at a time
Notice my handles also extend from the rear seat frame to the transom, to act as transom handles. They are recessed 1" into the transom and epoxied in place. They are solid, do not roll. The boat balances perfect at the center seat and can be carried by 2 people, one on each side. On the bow I first glued on a backing plate then bolted on a large 8" open base stainless cleat. The cleat is large enough to serve as a handle.
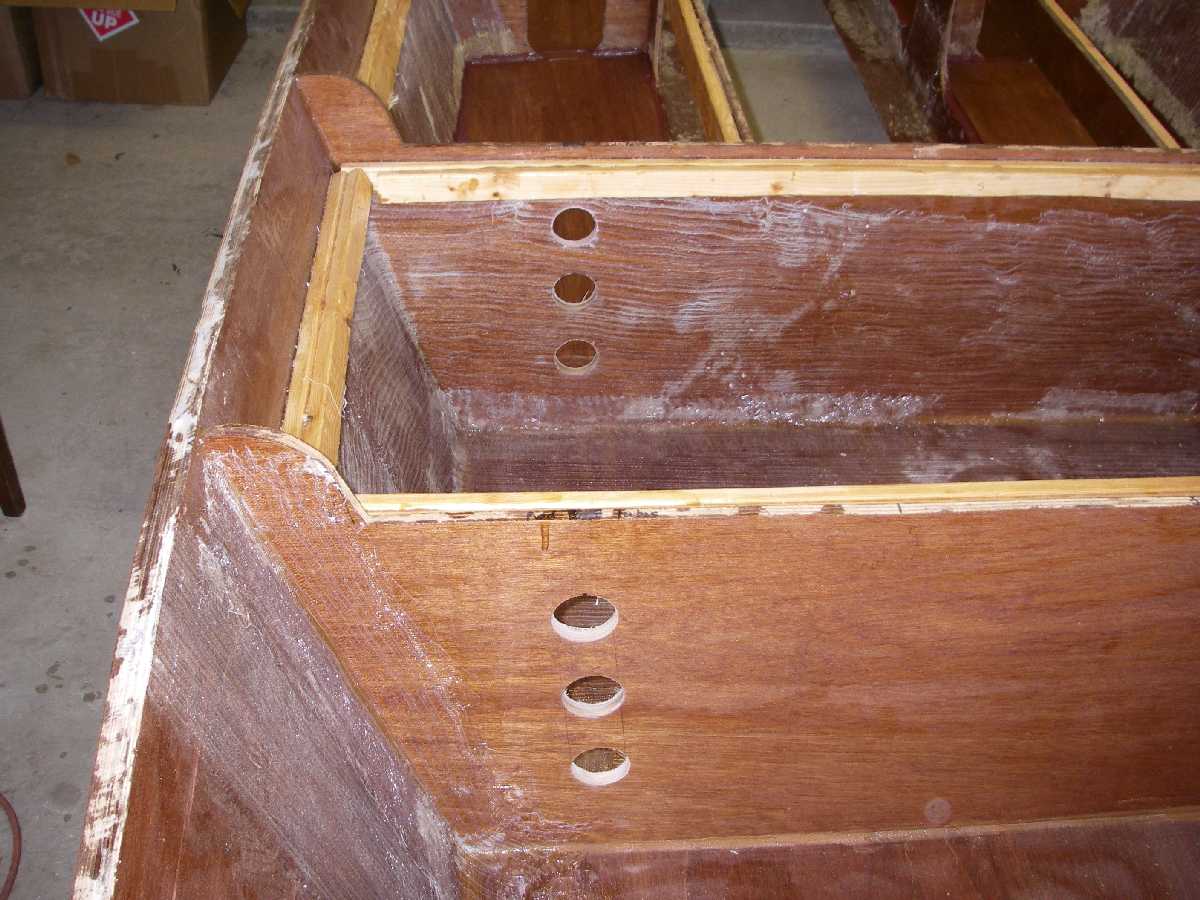
The center hatch is 19" X 16". I cut limber holes in the frame (all the frames) before glueing and glassing them in place. Used a 2 1/2" hole saw centered on the bottom edges. Water has to drain to the rear so you can pull the plug and drain it out.
Keep me posted and let me know if I can help.
Posted: Tue Jul 26, 2005 9:09 pm
by timoub007
Thanks for the tips Larry.
I did notice the dowel handles over the rear seat, but with my cockpit design I don't have the rear seat frame ears to work with. I'll have to look for the SS cleat you described. If I can find them, I'll put one through the bow transom and two on the rear corners. Post up a picture to your gallery if you don't mind. I only saw the bow eye in what is there now.
I appreciate the dimensions of your hatch. I realized after I glued in my frames that I screwed up on the limber holes. I guess I'll have to cut them when I've got the boat flipped over, prior to installing the bottom panel. Did you just put one in the center of each frame or two, one towards each side? I know I'll need two for my center seat, but might get away with one on the bow frame.
Thanks for all the tips.
Tim
Posted: Fri Jul 29, 2005 7:12 pm
by Cracker Larry
Tim, I'll post a couple more pictures this weekend.
I cut 2 limber holes in each frame, one about 3" from each side. My reasoning being a flat bottom boat is never floating flat, but leaning one way or the other. But, then I decided to foam under the seats and didn't want the foam in the center of the compartment because it would interfere with useable storage and require 2 hatches per seat. I put the foam under the port side of the center seat and under the starboard side of the rear seat, and since I didn't want water in my foam, I plugged and glassed the holes where the foam was going to be. So it ended up with 2 limber holes in the forward frame, one hole on both of the center seat frames starboard side, and one hole on the rear frame, port side.
The limber holes are twice the diameter of the transom drain and they move water just fine. Not because of good planning on my part but it worked out OK.
Posted: Sun Jul 31, 2005 11:02 am
by Cracker Larry
OK Tim, I just posted the pics you wanted to see in my gallery.
Posted: Mon Aug 01, 2005 9:27 pm
by timoub007
Thank you Larry. Got a manufacturer and part number for that thing? I think I'll get three if I can find them and put two on the rear corners (inside).
I've got about all of the cleats glued on and am about to start on the rubrail lamination. The only ones left are the small side ones for the bow deck. I can't seem to find the right location for them w/o screwing up the deck fit. I think I'll just screw the deck down and fit them (with screws) when I get the hull flipped. I'll be able to see it from the underside and put them right where they need to go prior to stitching the bottom panel on.
Tim
Posted: Mon Aug 01, 2005 10:07 pm
by Cracker Larry
Tim, the bow cleat came from Boat US and made by Wilcox Crittendon, about $28.00 ea. I'm going to get 2 more for the stern. Still need to get oarlocks too.
Those cleats under the bow seat are tricky. I used a thin wooden batten bent from the forward frame to bow transom to draw a reference line on the sides. Your way will work too.
I'm working on rod racks now, gun racks next. Build on

Posted: Thu Aug 11, 2005 3:24 pm
by timoub007
Made some more progress. I've got the seat tops screwed down and have 2 of the 3 rubrail laminations complete. I'm hoping to get the last one on this afternoon before I leave town for the weekend.

Early next week I should get to have a flipping party....woohoo!!!
Still trying to figure out some of the details, but I'm impressed with the boat so far. I still can not believe how big it is.
Tim
Posted: Tue Aug 30, 2005 9:51 pm
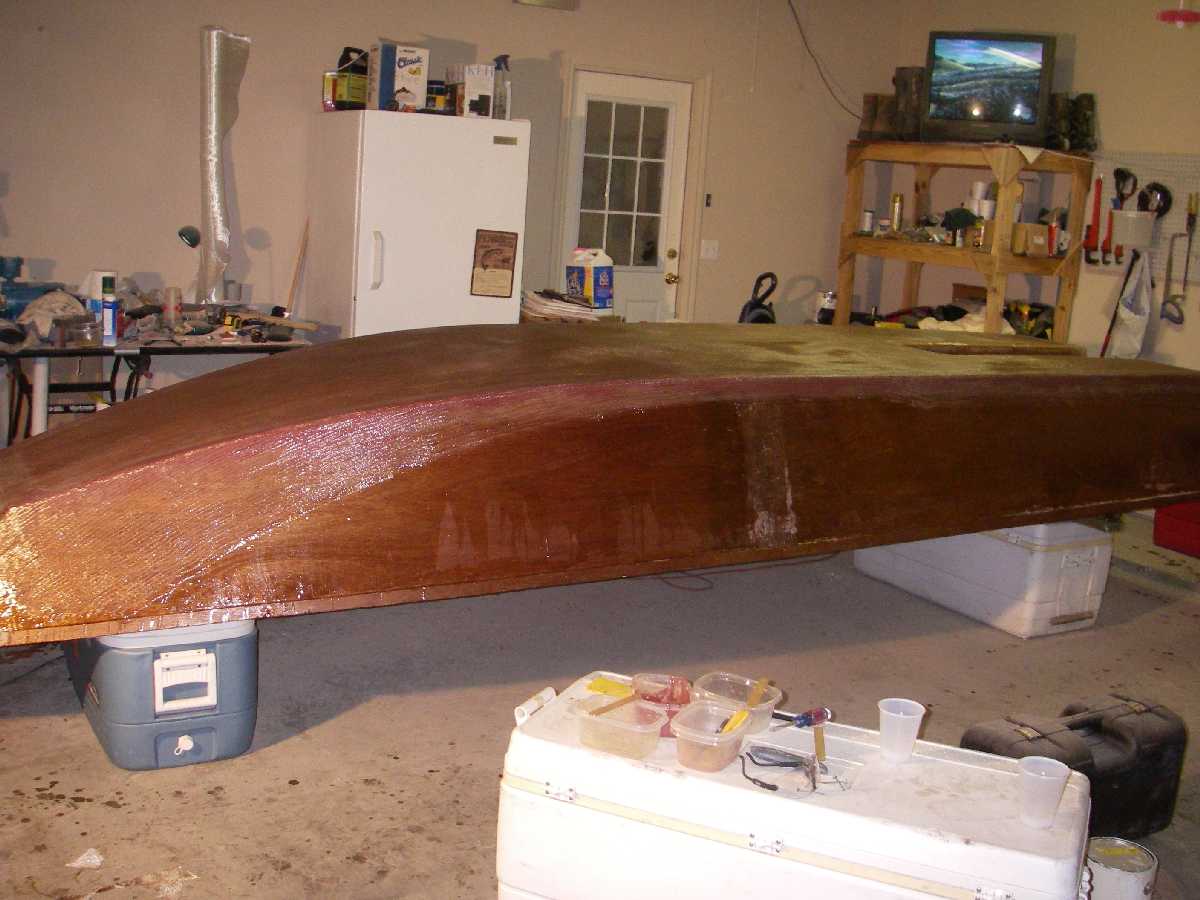
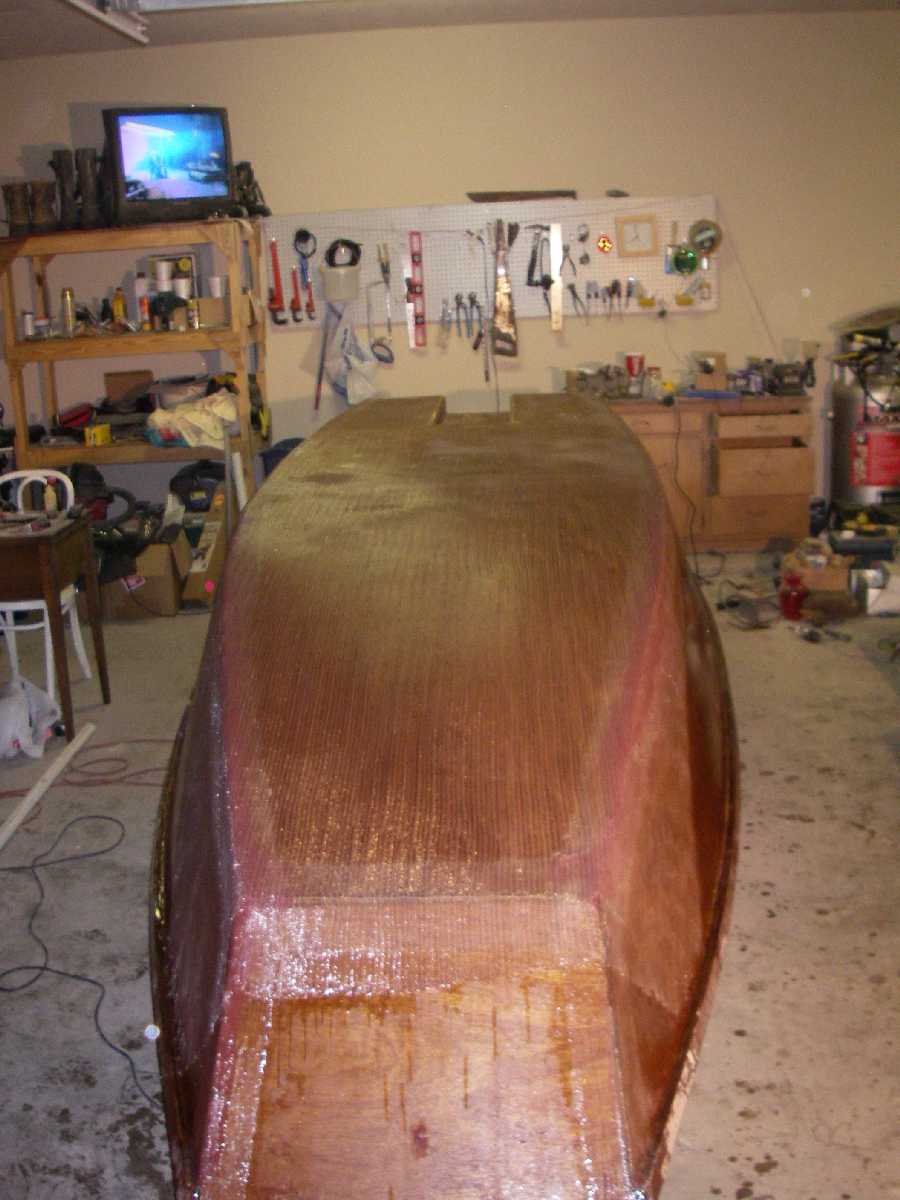
by timoub007
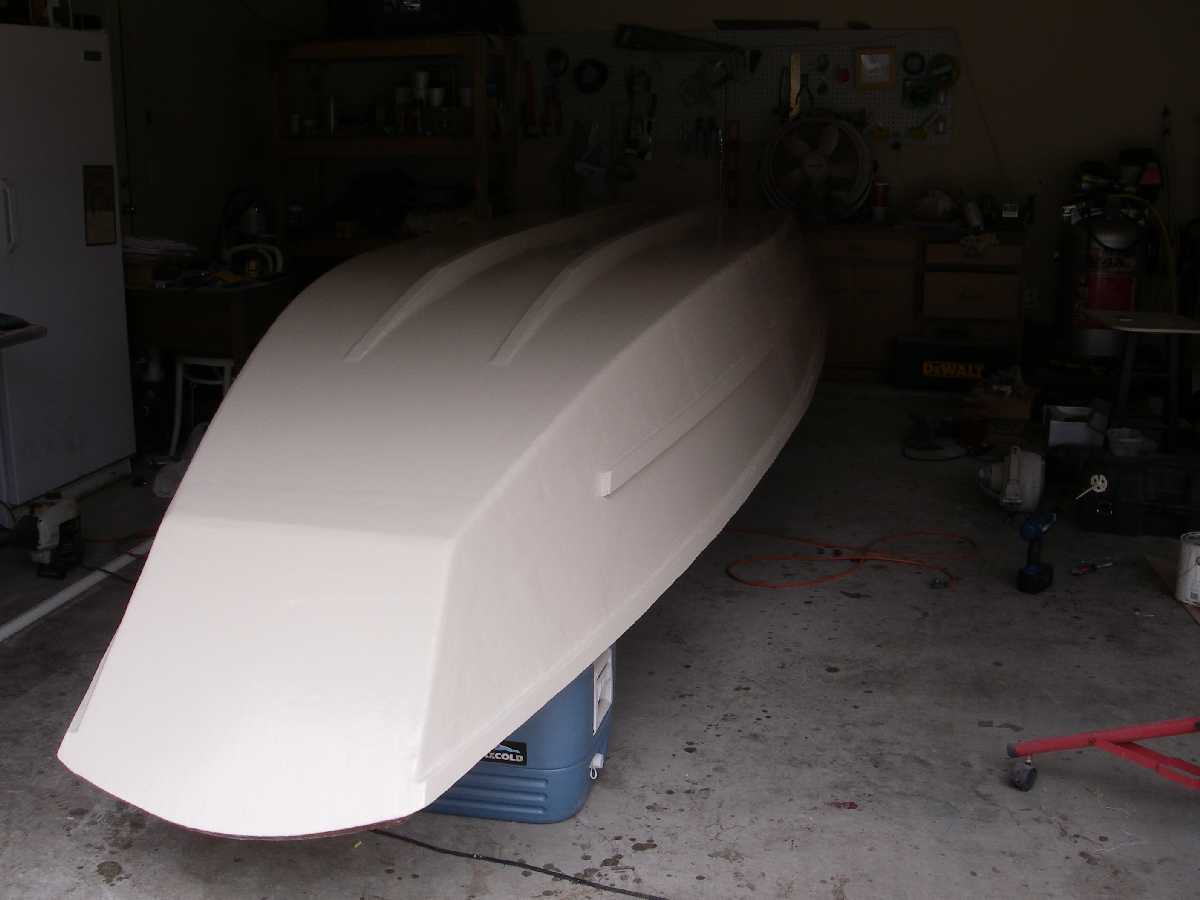
Well, after a long period of inactivity I've completed some more. I got the rub rails complete and screwed down all of the seat tops and bow deck. Had a friend come over and flipping was easy with just the two of us. I'm excited about how light the hull is.
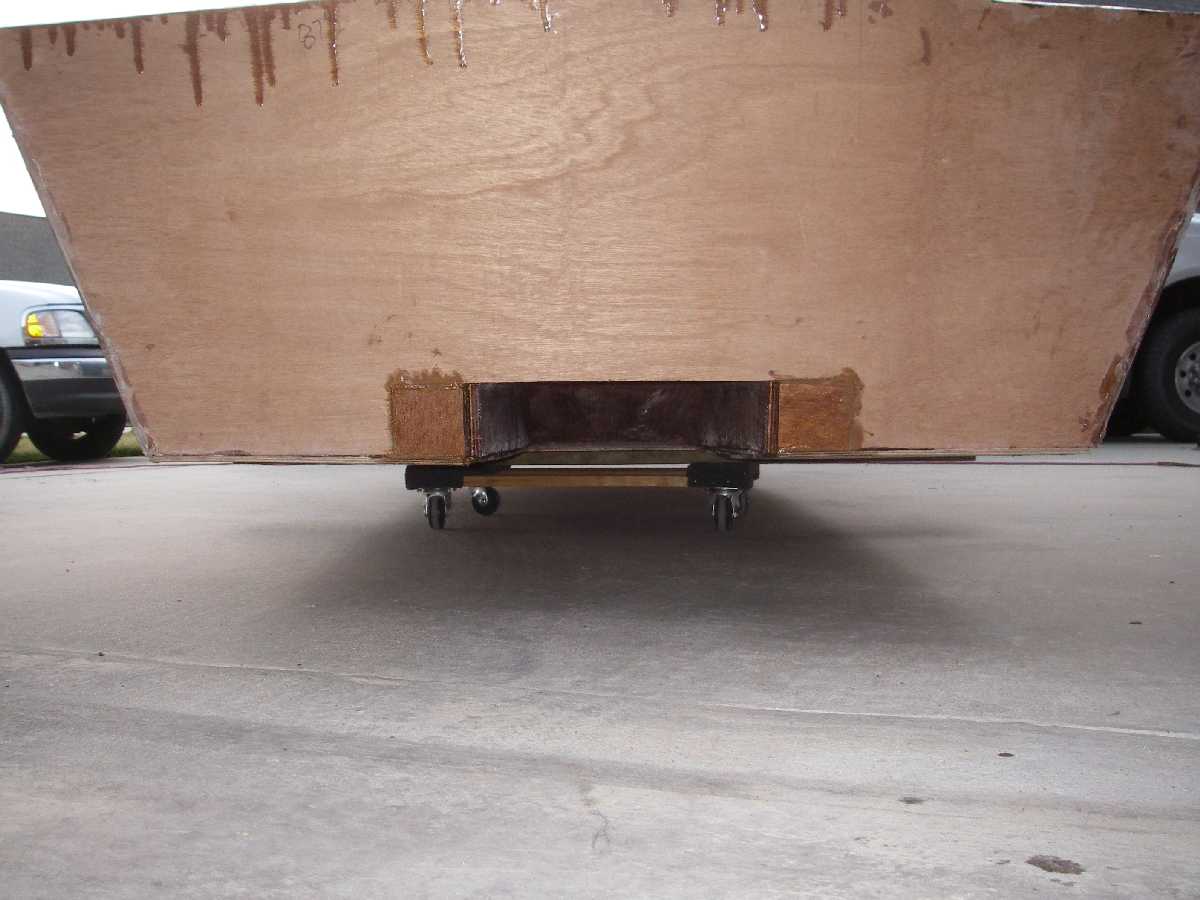
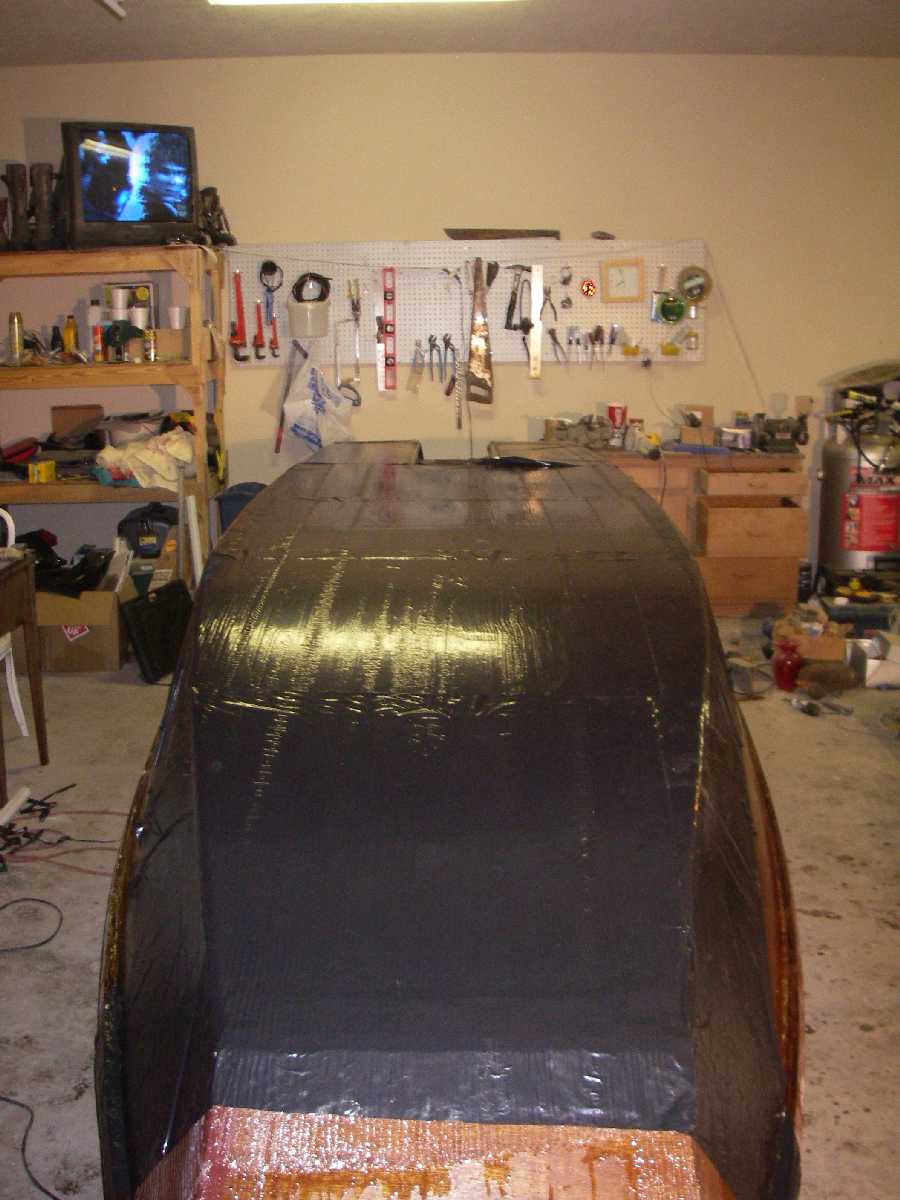
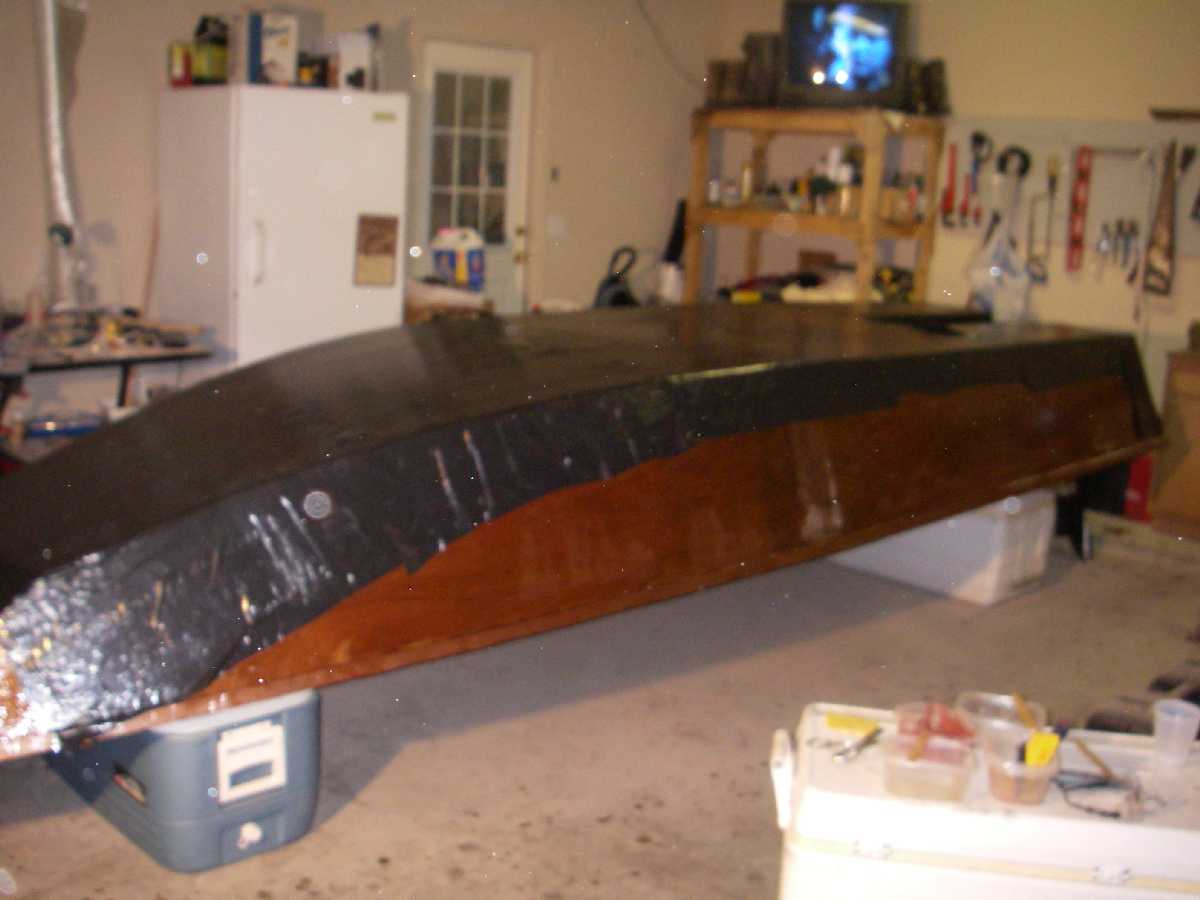
This evening I wheeled it out of the gargage and dropped the bottom panel in place.
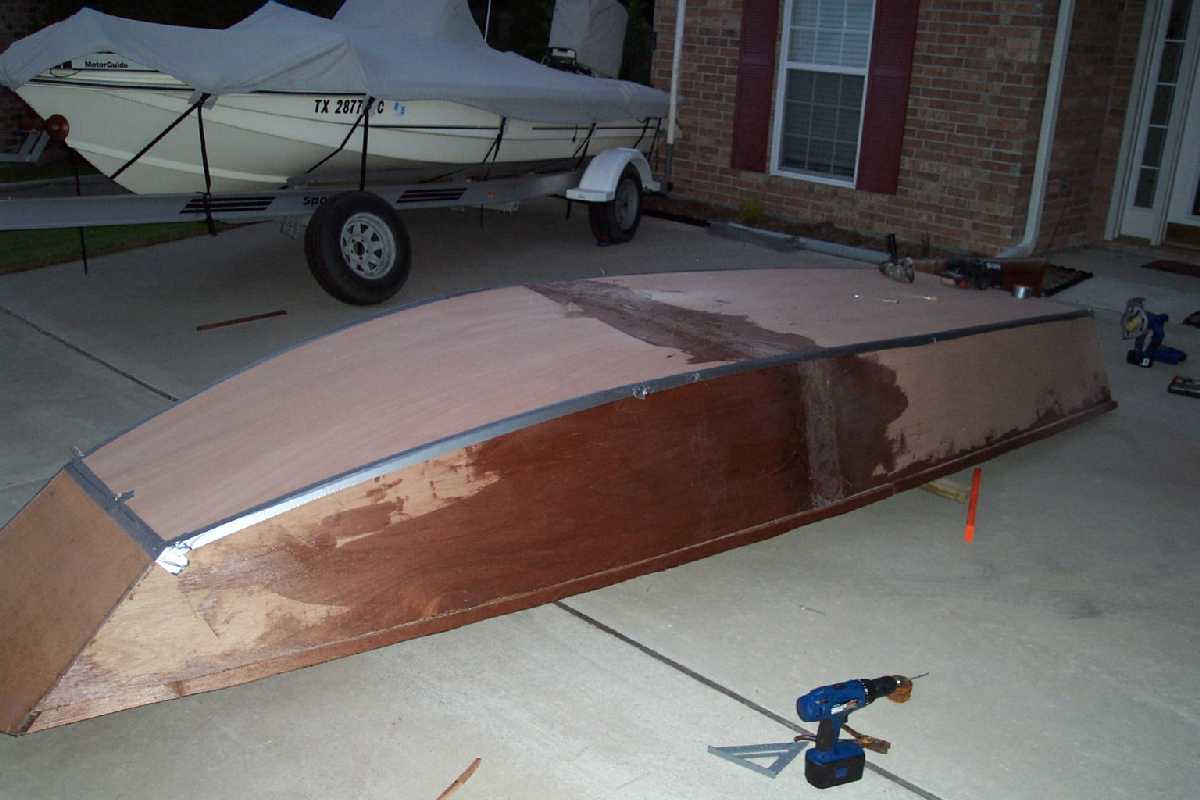
It took a few stitches on each end, and just a couple between the bow frame and mid-seat frame for things to come together. Quite a few feet of duck tape later and I'm where you see me. I hope to flip it back over tomorrow and start filleting and taping the side to bottom seams.
Any tips or tricks that I should know at this point?
Thanks guys,
Tim
Posted: Wed Aug 31, 2005 12:59 pm
by Lackofdistinction
Watch the toes
I have a old stump knocker lack boat about 14 foot fiber glass.
jacked it up got it off the trailer and set it on some concrete blocks in order to work on my trailer.
Some how or another during the process the boat relieved it self of two of the concrete blocks and rested on my toe. (ouch doesn't even describe)
Good luck....

Posted: Sat Sep 03, 2005 10:55 pm
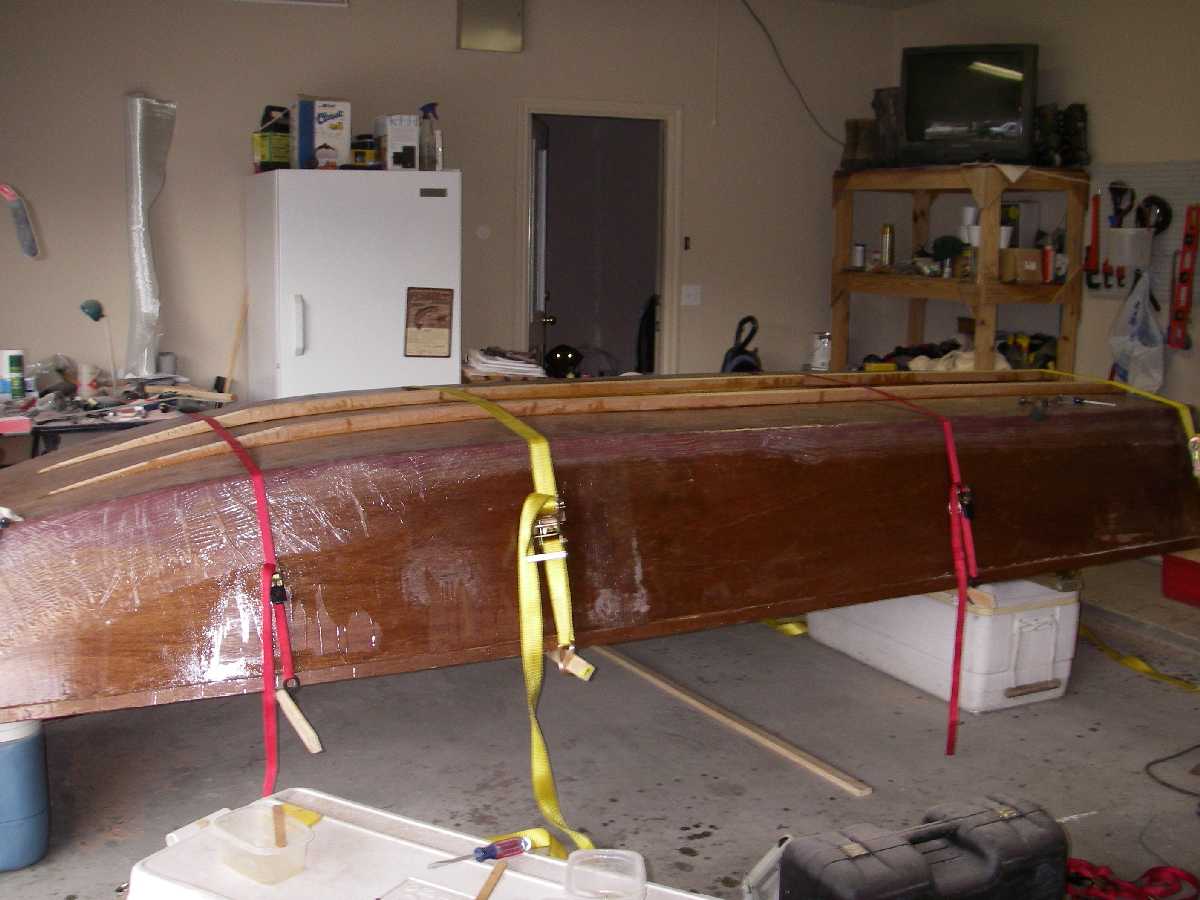
by timoub007
Well, I have not dropped it on my toes, but the coated rub rails are sharp. I've cut my legs and knees on it several times.

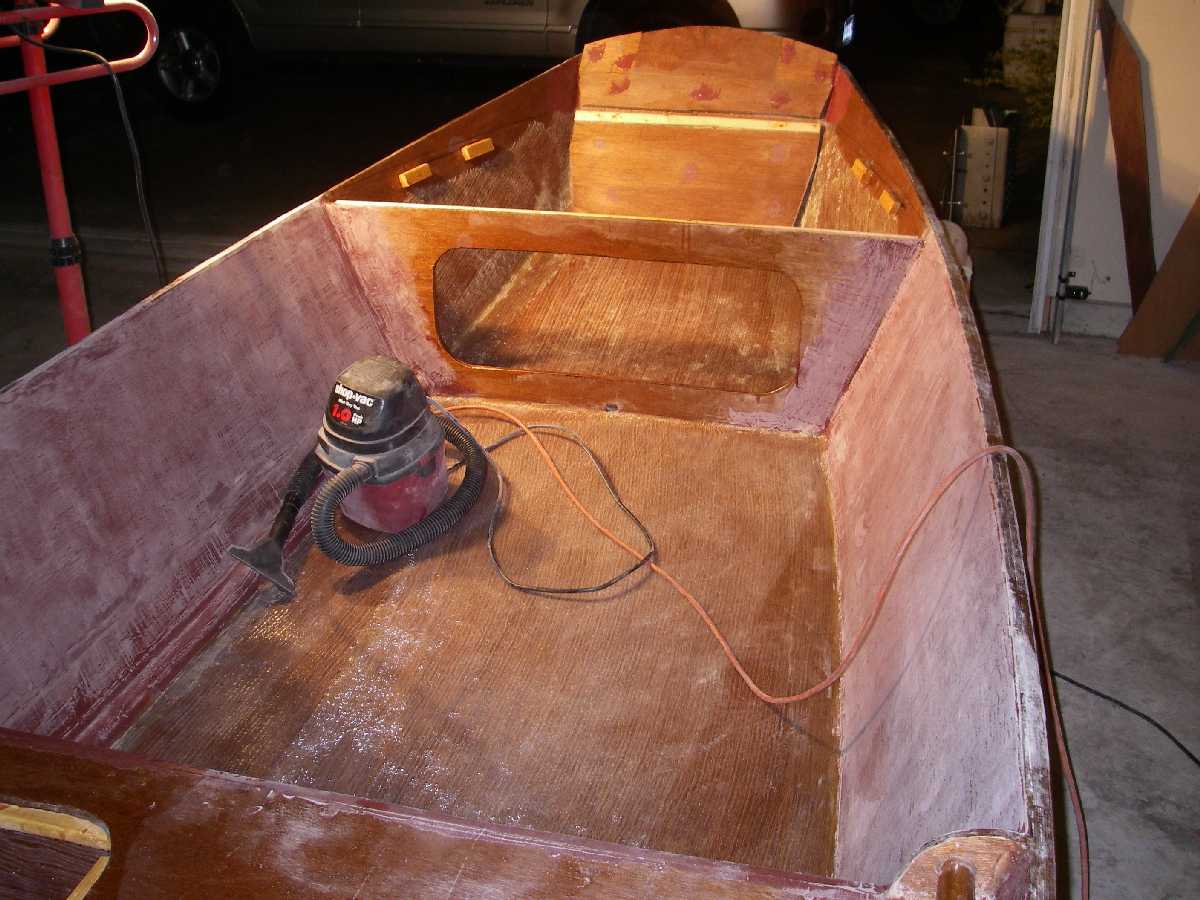
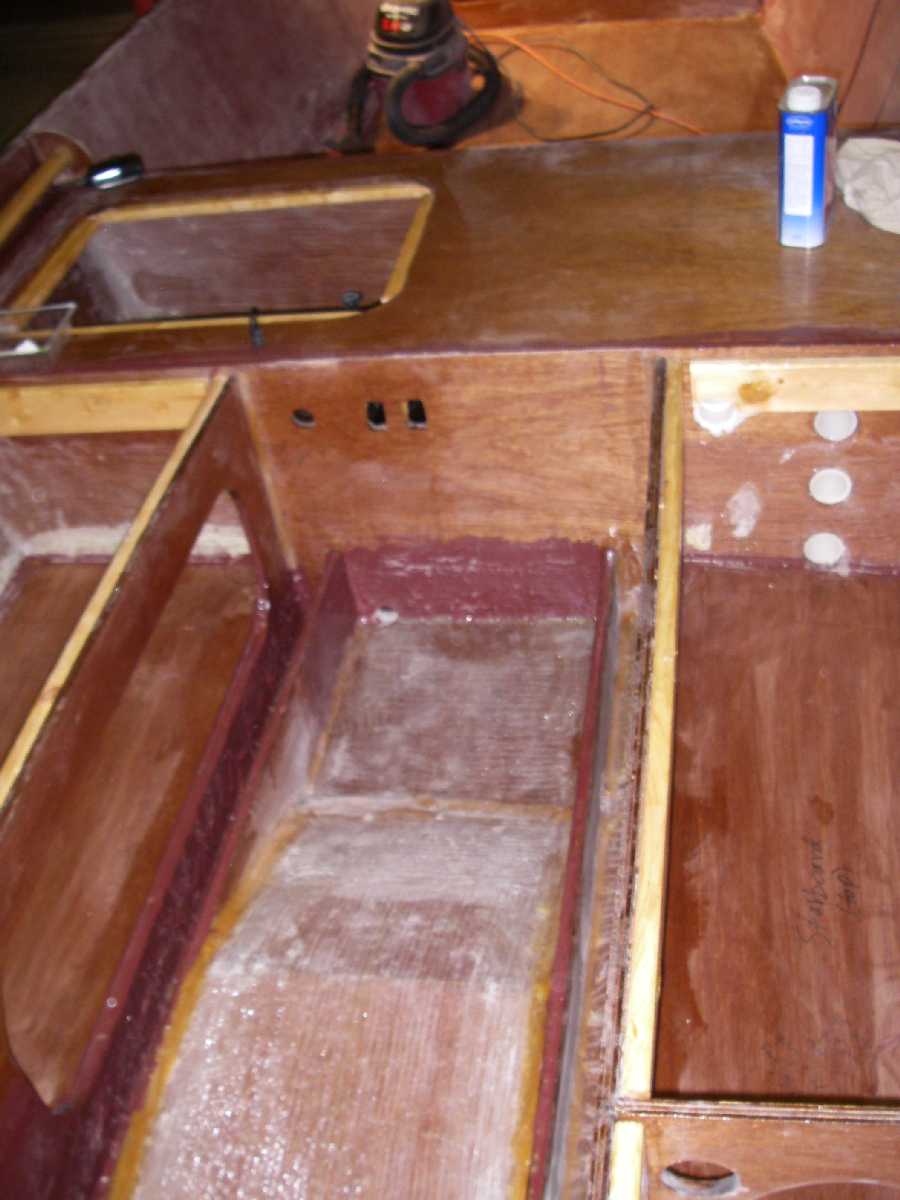
I have about half of the inside seams built thus far. These are the bottom to side panel fillets and tape. The ones under the bow deck are done as well as the ones between the bow frame and mid-seat.
I hope to get the rest of them done this weekend.

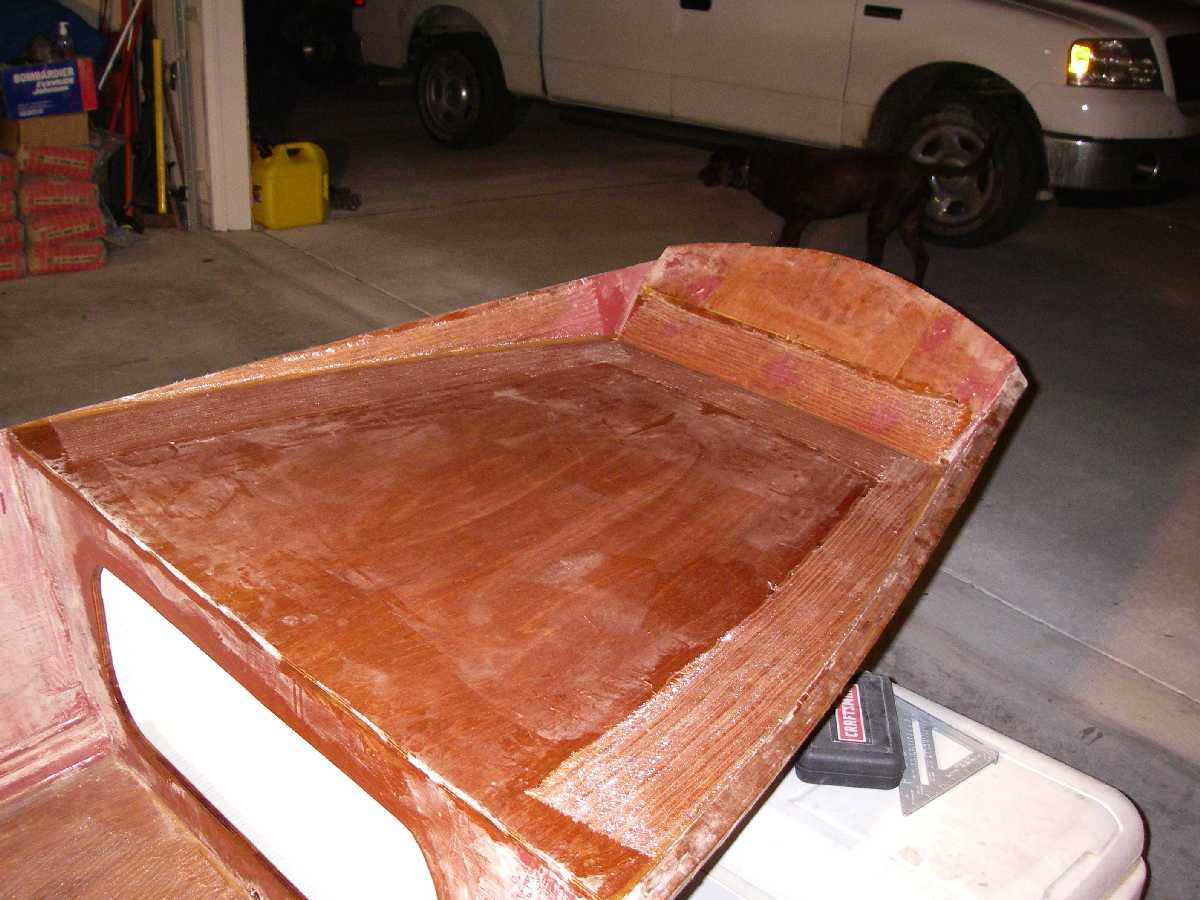
I need to order some paint now. I want to paint inside the compartments prior to gluing on the seats and bow deck. Good thing is that the way I set up my boat, none of these areas need to be faired.

Posted: Tue Sep 06, 2005 9:40 pm
by timoub007
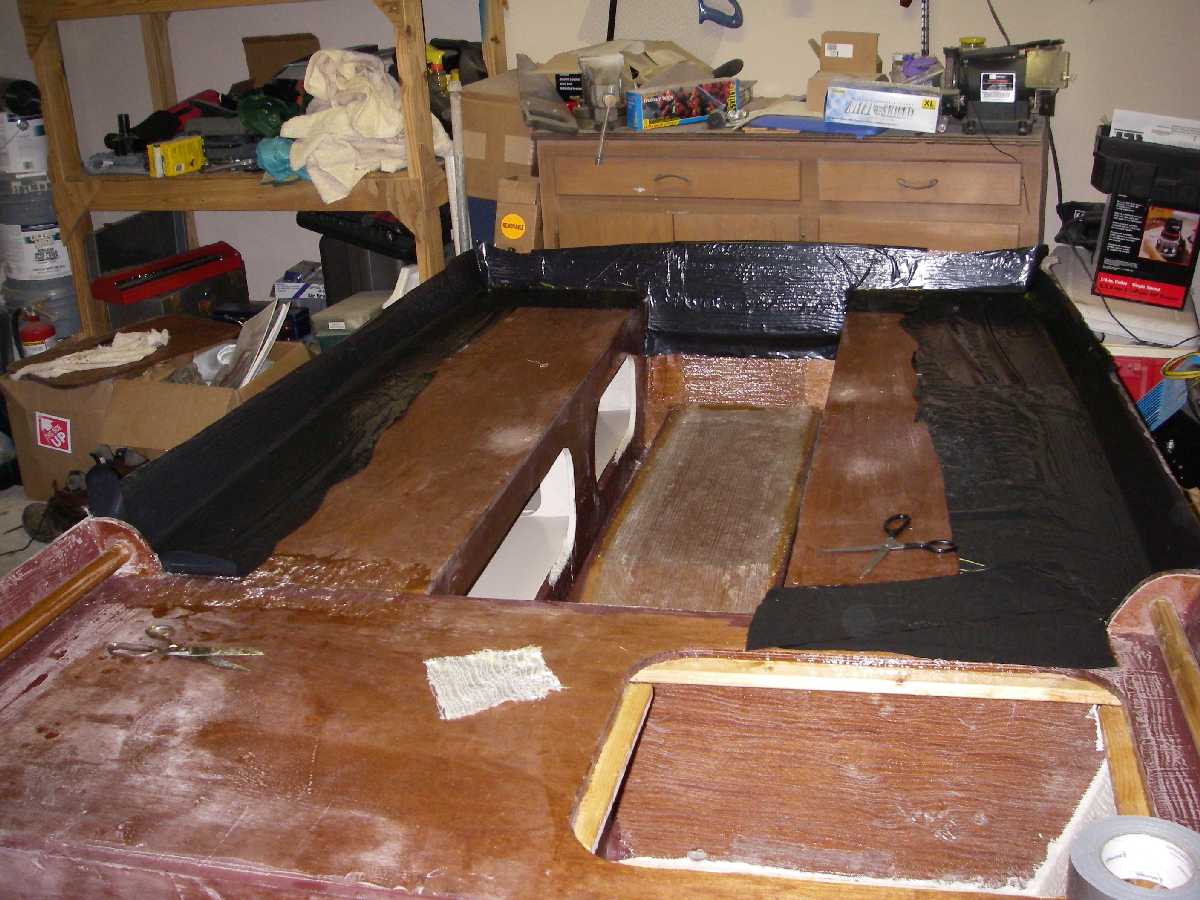
Completed building all the inside chine seams.
About to start covering inside the "boxes". What is the best way to wet out the mat prior to laying it on the bottom of the boat? I've been putting the tape in a plastic lunch meat container (4"x6") to wet it out. Would love it if there was a way to do this on a larger scale.
Need to figure how to attach my tunnel. Reading over the PH-15 plans I've got, I'll likely follow the directions in those building notes.
Thanks for all of your help and support. Especially Larry.
Tim
Posted: Wed Sep 07, 2005 11:54 pm
by timoub007
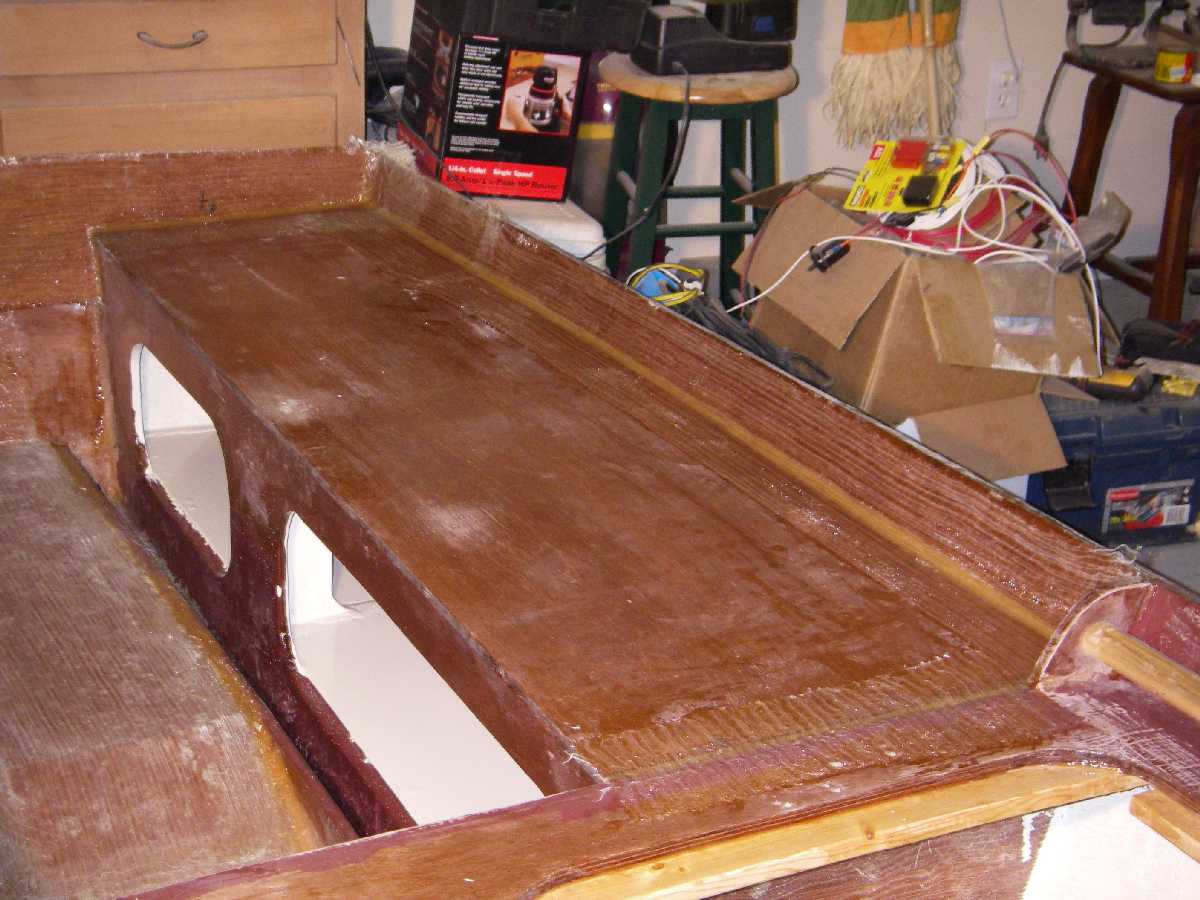
Well, since I've started talking about my tunnel I suppose I'll post a picture of it.

I used the tunnel design for the PH15, but only made it 12 inches wide instead of 19. It is about 40 inches long.
I know that Jacques and others disagree with a tunnel on this rig, but it is what I need. We will see how it works and fill it in if I'm not happy.
Here is a shot showing from the mid-seat back:
The spaces between the tunnel sides and my "stringers" will be filled with laminated 1/2" plywood. This will make the tunnel fit snug between the "stringers".
So fire away with criticism and questions, I can take it.
I appreciate all of your help Larry and I'm sure I'll have other questions as my build progresses.
Tim
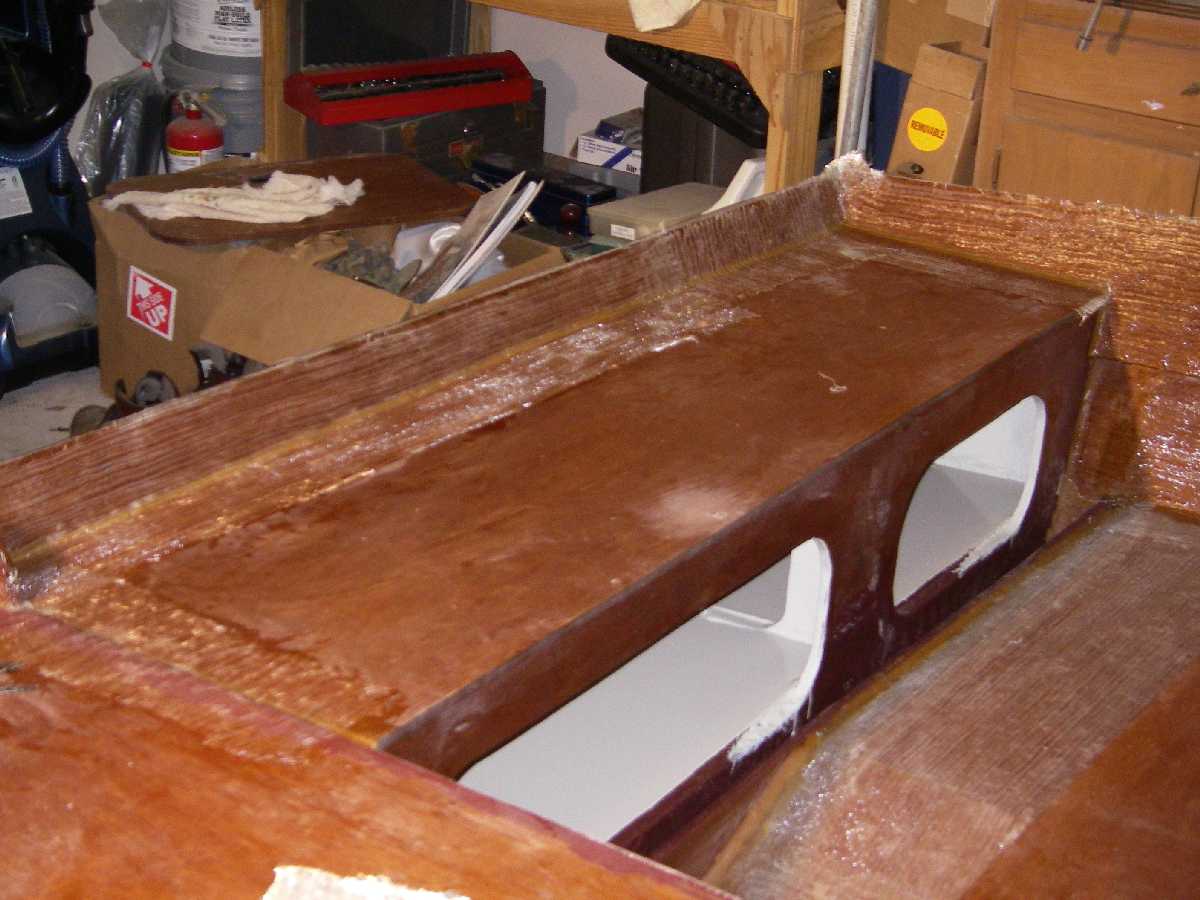
Posted: Sun Sep 11, 2005 9:17 pm
by timoub007
Got all inside chine seams and frame-to-side seams fillet &/or taped. Every frame got tape on one side in addition to the fillet called for in the plans. On the extra frames under my rear seats (what would be the sides of the rear seat front frame) I put tape on both sides where it meets the hull side panel. Don't know if I need it, but figured it would add strength to my changes.
Should get the inside hull bottom glassed this week and will paint the inside (at least inside boxes) next weekend.
Tim
Pics wouldn't really show anything different at this point.
Posted: Mon Sep 12, 2005 6:19 pm
by Cracker Larry
Need to figure how to attach my tunnel.
That's what I was wondering
Then wondering how you were going to fill it back in

Just messin' with ya and wishin ya the best
Posted: Mon Sep 12, 2005 9:16 pm
by timoub007
I think I've got it figured out, but cutting a 12" x 40" hole in the bottom of my boat this weekend was a bit scary. I saved that piece of 1/4" ply just in case I need it.
Was on the road all day today, so no more progress.
Tim
Posted: Mon Sep 12, 2005 9:27 pm
by BluffBuilder
Tim, you've got some nice mods there. Will be interesting to see that tunnel in action...anything to keep the lower unit from hitting is good LOL.
Posted: Mon Sep 12, 2005 9:34 pm
by timoub007
Thanks Bluff. In reference to my modifications, there are a few doubters, but we'll see.
I'll be interested to hear what kind of speed you get out of your hull too. Larry is about flying at 43 MPH with a new 25 Merc 2 stroke. What engine are you planning on hanging?
Tim
Posted: Mon Sep 12, 2005 9:51 pm
by Cracker Larry
Bluff's going shrimping with me this weekend and get a first hand impression of the 25 Merc:lol:
Posted: Tue Sep 20, 2005 11:32 pm
by timoub007
Well Bluff & Larry, how was the shrimpin'? Did Bluff confirm you super speeds?
I've been busy, but pictures wouldn't show much until this evening. I've got all the interior glass layed with the exception of the large piece between the mid-seat and bow frame. I've saved the largest/hardest for last.
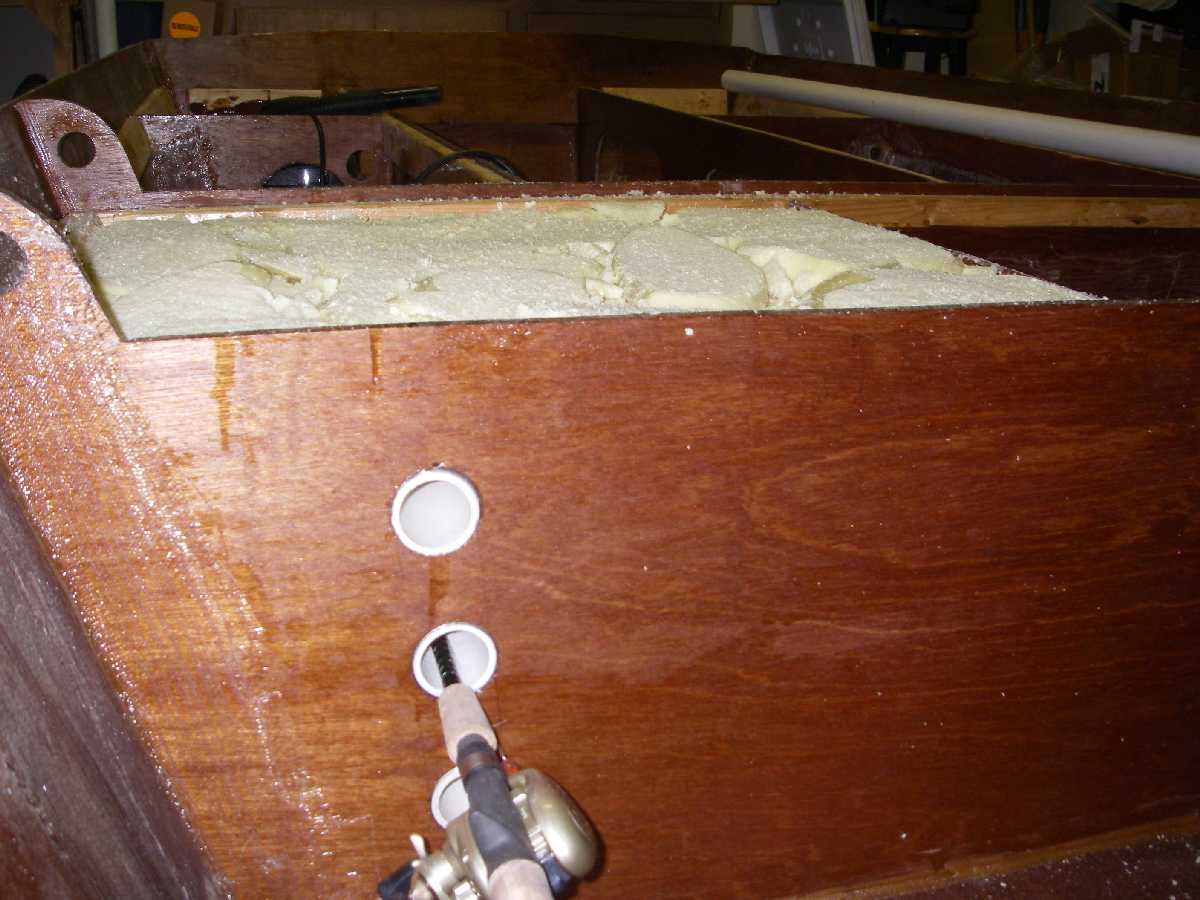
This evening a buddy of mine brought me some foam and we had some fun. I let him do the mixing as he's done this before and we got a little too much in.
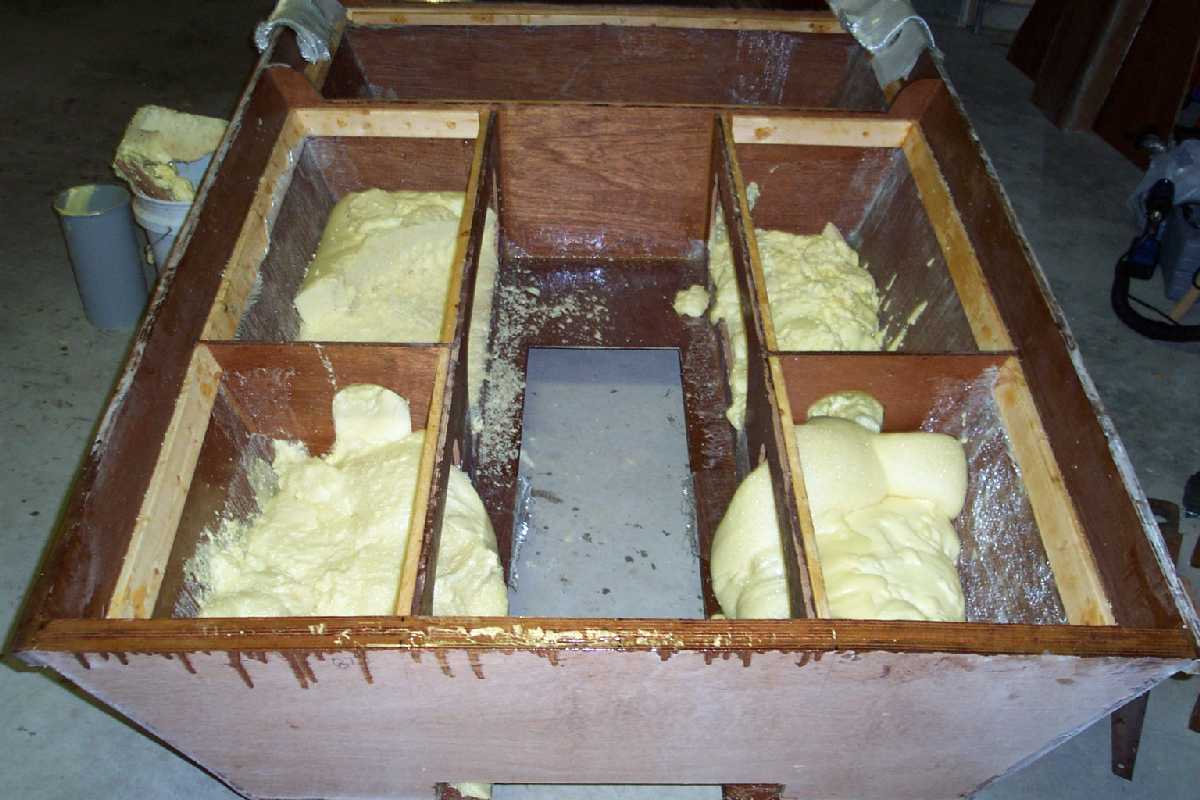
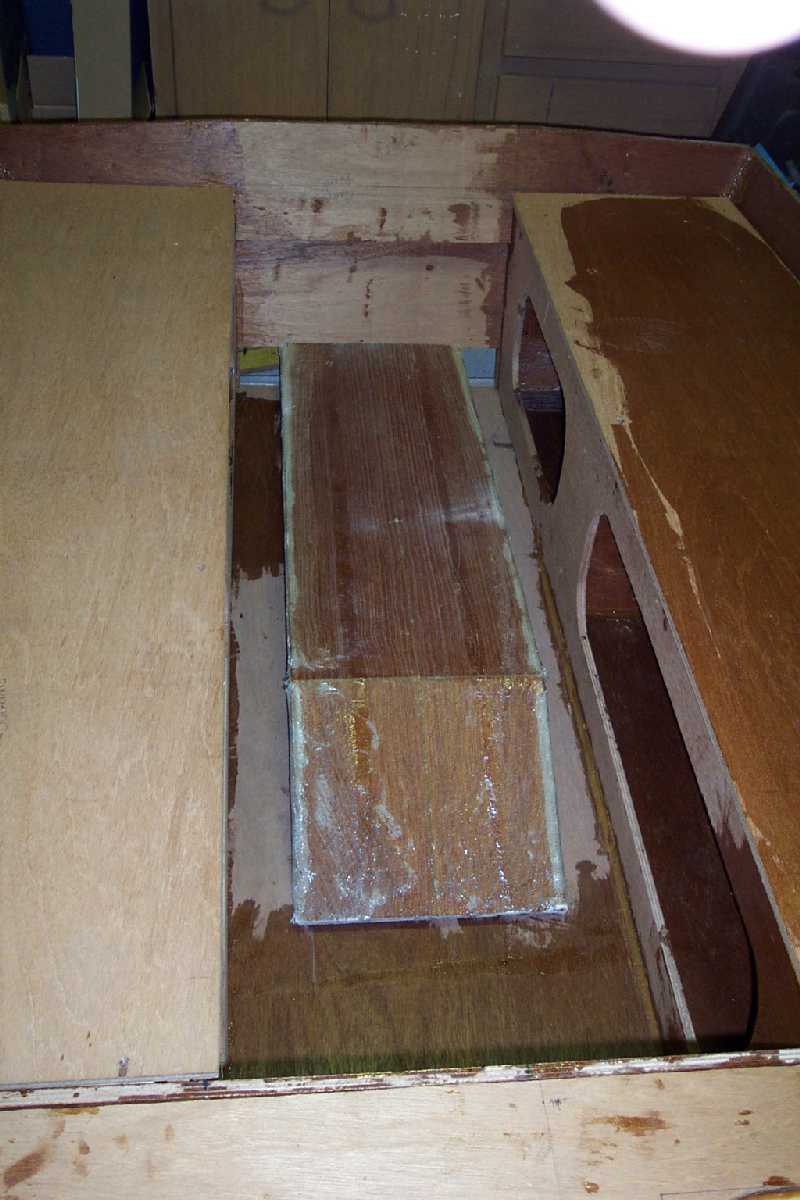
I'll trim it so that there is about 3" left in the bottom of the 4 compartments. I don't know how much this will be, but probably not enough for completely positive floatation. This was basically the only "dead" area in my design. I've got some up in the bow compartment too that I might section out for more foam, undecided now though.
Looks like I'll be working through Rita this weekend. Hope 100% humidity won't hurt me any more than the 99% w/ 95-100 degree heat we've had lately.
Tim
Posted: Wed Sep 21, 2005 10:39 am
by Cracker Larry
Well Bluff & Larry, how was the shrimpin'? Did Bluff confirm you super speeds?
Shrimping started good, we were both casting from the GF 16 at the same time and found it to be very stable. Neither of us fell out the boat.
We caught about half a limit and a big thunderstorm rolled in. Heavy rain and wind for an hour or so. The freshwater in the creek made the shrimp run for saltier water. We kept at it through the storm but didn't catch many more. Drank a few beers.
I don't call 40 super speed, but I'll let Matt speak for himself as to performance.
Your boat looks good, but you need to do something about that hole in the bottom
Posted: Wed Sep 21, 2005 10:59 pm
by timoub007
Sounds like you guys had a good trip. What is a limit on shrimp in your area?
Yeah, that big hole won't help this sucker float, will it? I don't think I'll get it filled this weekend, but I am steadily plugging away at it.
I'll keep you all posted...
Rita, go away!
Tim
Posted: Thu Sep 22, 2005 2:25 pm
by Lackofdistinction
There is no limit. Thats until you run into "The Man"
Right Cracker Larry?
P.s. Do you do much Deep Water Casting?
I always thought it was to much work I love easing up a creek, never no whether it will be a net full of Mullet or Scrimps!
Posted: Thu Sep 22, 2005 4:19 pm
by tech_support
I miss Fall in the Low Country

That is, of course, until I catch a snook
Posted: Thu Sep 22, 2005 5:10 pm
by Cracker Larry
Shine, you're right, nothing like fall in the low country
Once it becomes winter I'm heading back to Belize for a few months. We didn't get a snook (of course) but Matt did catch a big ugly toothy alligator gar. He wasn't mean though. And a bunch of mullet.
If you're coming up to HHI anytime soon, let me know and I'll get your feet back in the mud
Might get you to bring me some plywood, too.
LOD, running across the man has become a lot more frequent than it used to be. You can still catch a big mess on a cold, foggy, rainy Monday night. But on a warm Sunday afternoon best to stick with the limits. And we mostly cast in the shallows until cold weather.
Tim, 48 quarts with heads or 29 quarts headed, in South Carolina.
Posted: Fri Sep 23, 2005 8:10 am
by Lackofdistinction
I do most of my fishing and shrimping around McIntosh County.
Things are pretty lax down there, except during a major holiday.
JULY 4th, labor day Forget it!
Posted: Fri Sep 23, 2005 9:21 am
by BluffBuilder
Hey Tim,
I haven't been following the board lately..."Trying" to paint. We've got a 1996 Evinrude 15" shaft 15 Hp to use that's just laying around. It should top out around 25mph according to the plans. Larry's boat turned out great. No gps #s but it runs nicely and the 25 is a good match. It can get up shallow in any creek you want. Larry's Merc is nice because it has shifting in the grip so you could use an extension if needed for weight distribution. I've got my boat set up to run gas or battery in front or midsection. I'll try to get some pics up soon...
I'm going shrimp baiting with my neighbor tonight. "The Man" is all over the place here in stealth mode. They run straight at you full speed like a lunatic and stop at the last second. Kinda scary actually. No room for error in quantity considering the fines. We can fill up the freezer regardless. Just more quality time on the water.
Posted: Wed Sep 28, 2005 10:15 pm
by timoub007
Well, I'm finally back online after Rita, but not home. They won't be letting us get back to our houses for about 4 weeks. I hope that it is sooner, but we won't know for a while. I've heard positive reports about my house, but haven't been there first hand yet. I'm currently staying in the Houston area and checking on my parents at my camp on Toledo Bend.
I don't know how my boat faired, but feel like it is okay. I hope to get into town on Thursday or Friday. I'll post up to let anyone interested know. Anyone in Houston that wants to show me their boat? I've got nothing else to do...
Take care,
Tim
Posted: Thu Sep 29, 2005 6:20 pm
by Cracker Larry
Damn Tim, that's terrible
Is there anything I can do from GA to help? Need a place to stay? Anything?
Posted: Thu Sep 29, 2005 10:36 pm
by timoub007
Thank you so much for the offer Larry. It means a lot that you'd open up your home to someone you haven't even met before. Right now we are okay at my in-laws house. It isn't costing us anything, at least monitarily. My parents are stocked up on water and food, and get ice, water, and food from the FEMA/Red Cross daily at the fire dept. near my camp. I came to Houston on Sunday and got a generator. I took that back up to them on Monday and hooked it up to the whole house. It will run everything but the A/C. The phone is working up there, and I got the satellite TV aimed correctly again. They feel like they are comfortable and don't want to leave. I'm going to check on them every few days and call them daily.
I was able to get in to Port Neches today and feel very blessed. We lost our privacy fence, but as far as I can tell not even one shingle is missing off the house. It was like the storm had no effect. Again, my wife and I feel very fortunate and hope that many others find the same when they get to return home.
I had to leave after cleaning out the fridges and freezer as there are still no utilities in town. They estimate it will be 3-4 weeks before residents can return to stay.
My boat appeared to be untouched though. It seemed that no water got in the garage or house. The only thing that might have touched it was leakage from the garage fridge or the deep freeze. I did loose a lot of fish, crabs, shrimp, ducks, geese, fish, and venison. Those things can be replaced, but they sure stink when not cold for 5 days.
Thank you all for your well wishes and prayers. It will still be a few weeks before I can get back to work on my GF-16 though. Looks like she won't be ready for opening day of duck season (Nov. 5) like I had hoped. Oh well, the season is ~2 1/2 months long so hope to get it bloody before the end of Janurary.
Tim
Posted: Fri Sep 30, 2005 11:33 am
by Cracker Larry
Tim, glad your family, home and boat are safe. Let me know if I can help in any way.
I live in hurricane alley,too. It could be us next. We haven't had a good one since Hugo.
Back to building...finally
Posted: Wed Nov 09, 2005 11:21 pm
by timoub007
Well, after nearly 8 weeks without working on the boat I mixed up a batch of epoxy tonight. I made a few fillets and put some more tape on the inside seams of the tunnel. Hoping to get the radii faired into the seams in the next few days. I think this is going to be more of an art than a skill.
I'll post a pic when I'm done with the tunnel.
As for the hull, not much progress. Just before hurricane Rita came to town I had poured foam under my rear/side seats. I got it trimmed level and need to cut some ply to seal over the foam. Not sure if I put a pic of that up yet, but will in the next few days.
Felt good to get the latex gloves back on and mix some "goo."
Tim
Posted: Fri Nov 11, 2005 9:28 am
by Cracker Larry
Welcome back, Tim
Glad you've recovered from the hurricanes. The East coast was lucky this year.
Looking forward to reports on your GF 16 Tunnel. Build on.......
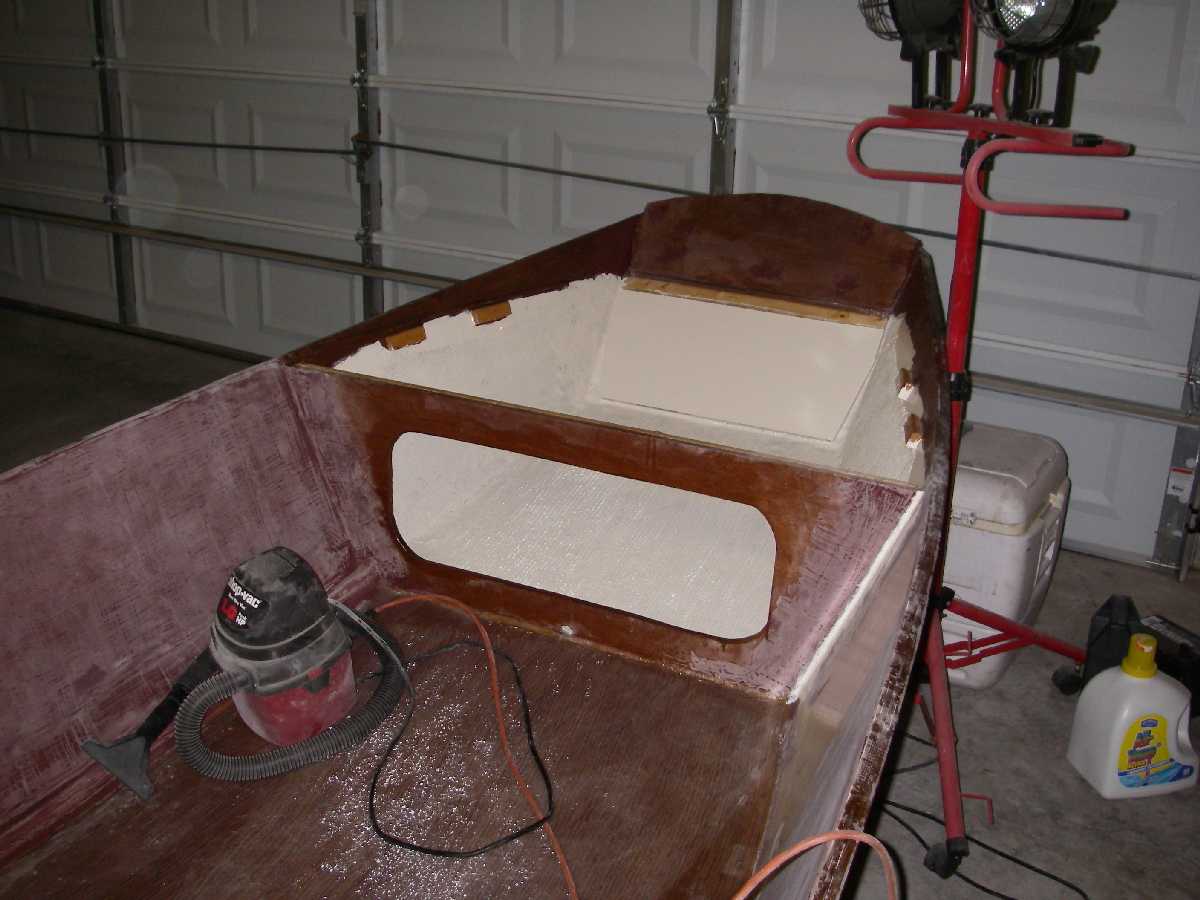
Posted: Sun Jan 15, 2006 9:21 pm
by timoub007
It takes a while to figure out the details of the interior of a custom boat. I've been cutting holes on my boat for the last week or so. I've still got that big hole in the bottom where my tunnel will go too.
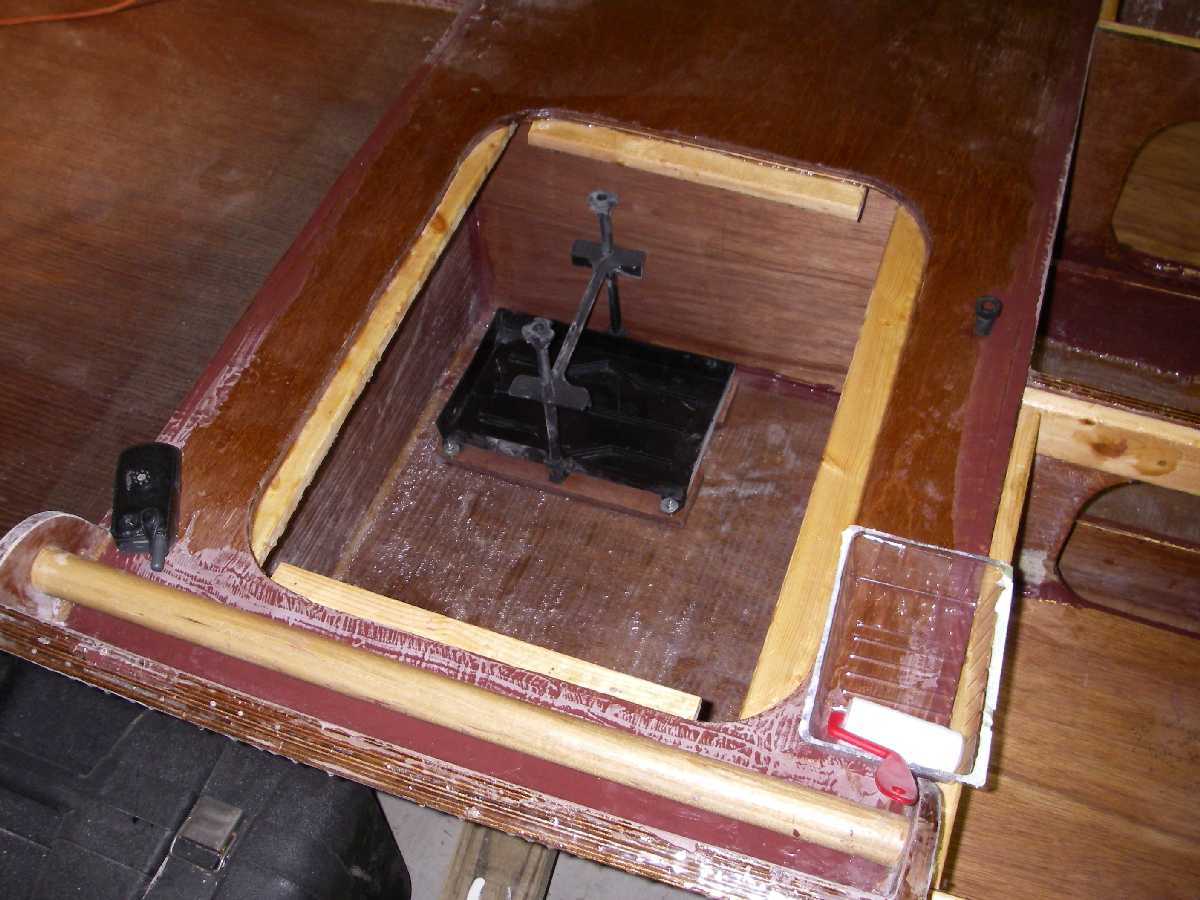
The biggest holes I've cut are for my rod tubes.
This is how it will look with the rods stowed.
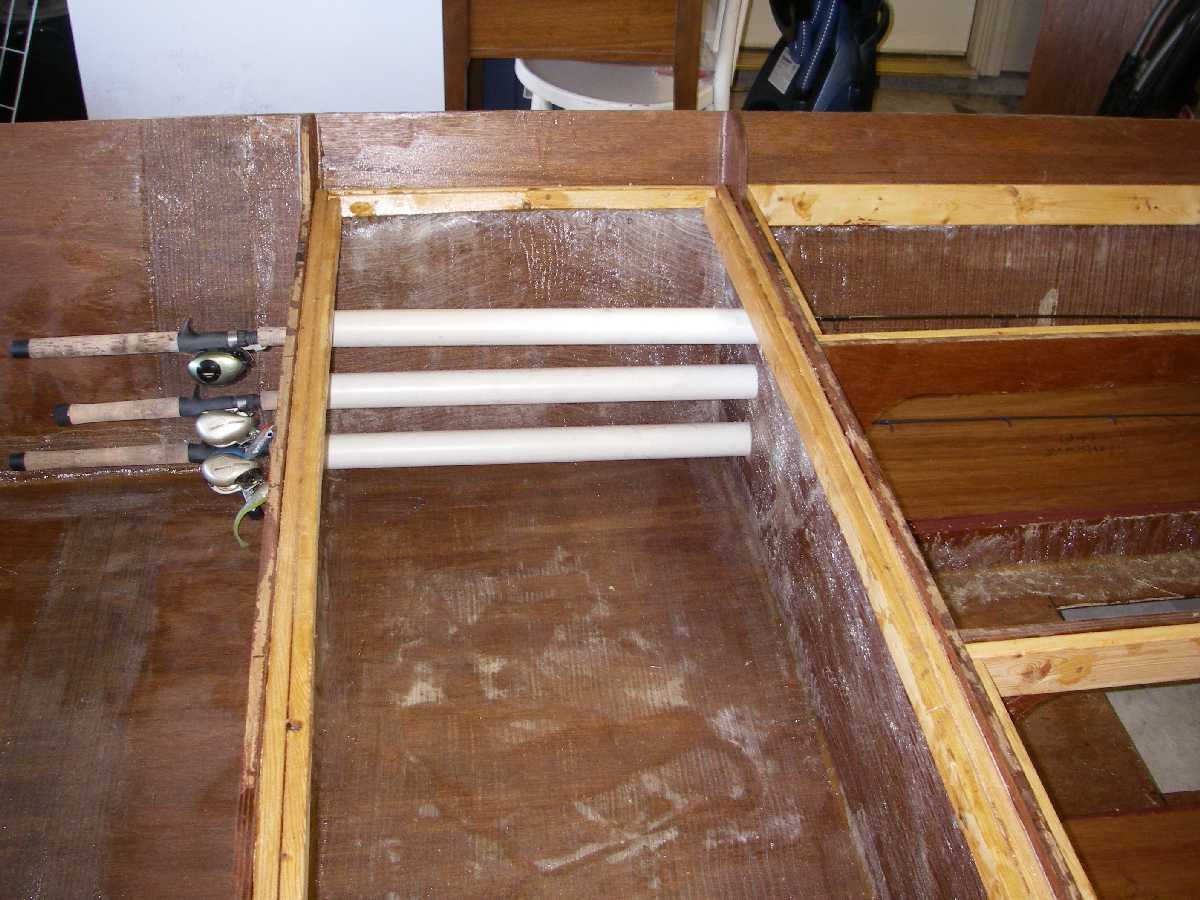
I'm working on a custom piece that will support the rod butts too. It will be mounted to the hull wall and will be hinged. When I'm fishing it will be deployed and when it is not needed it will fold against the hull.
Here is another shot of the center seat compartment.
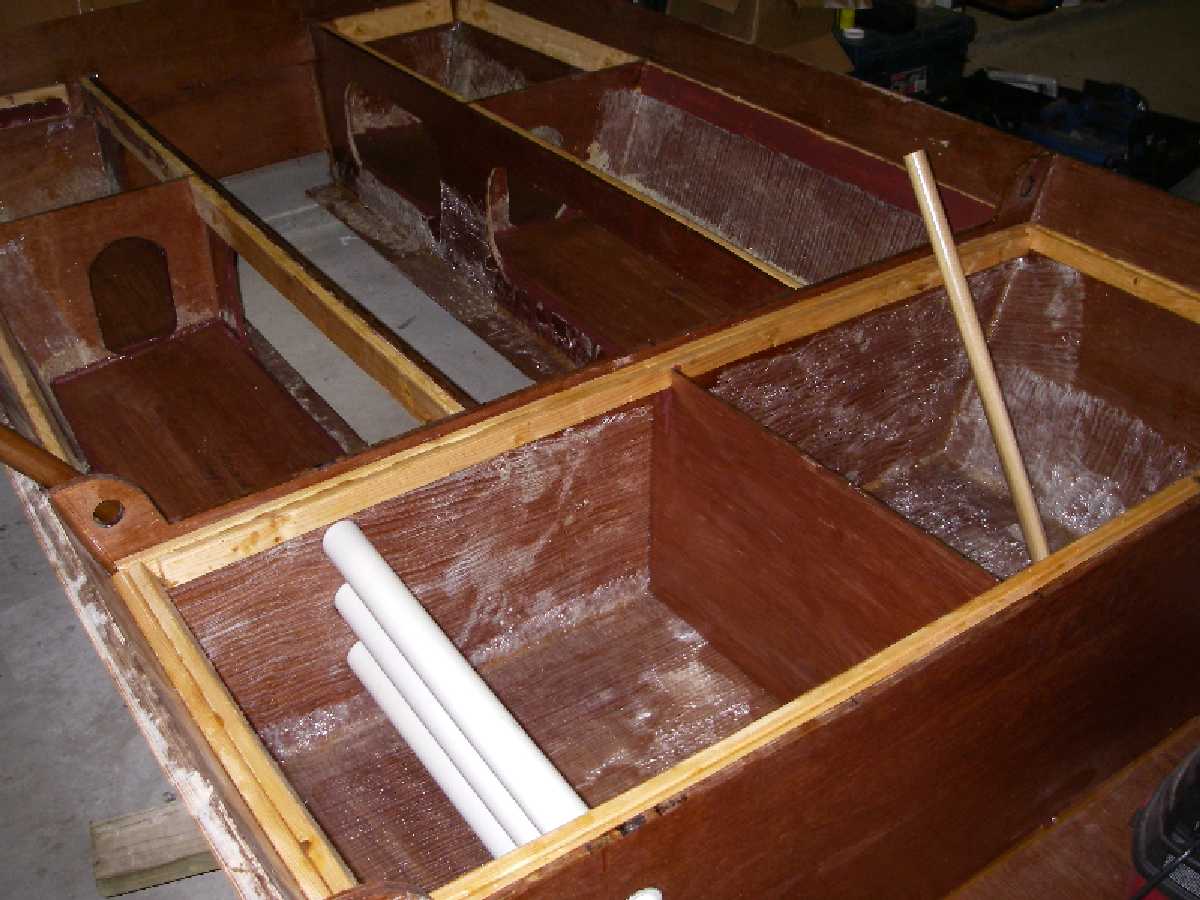
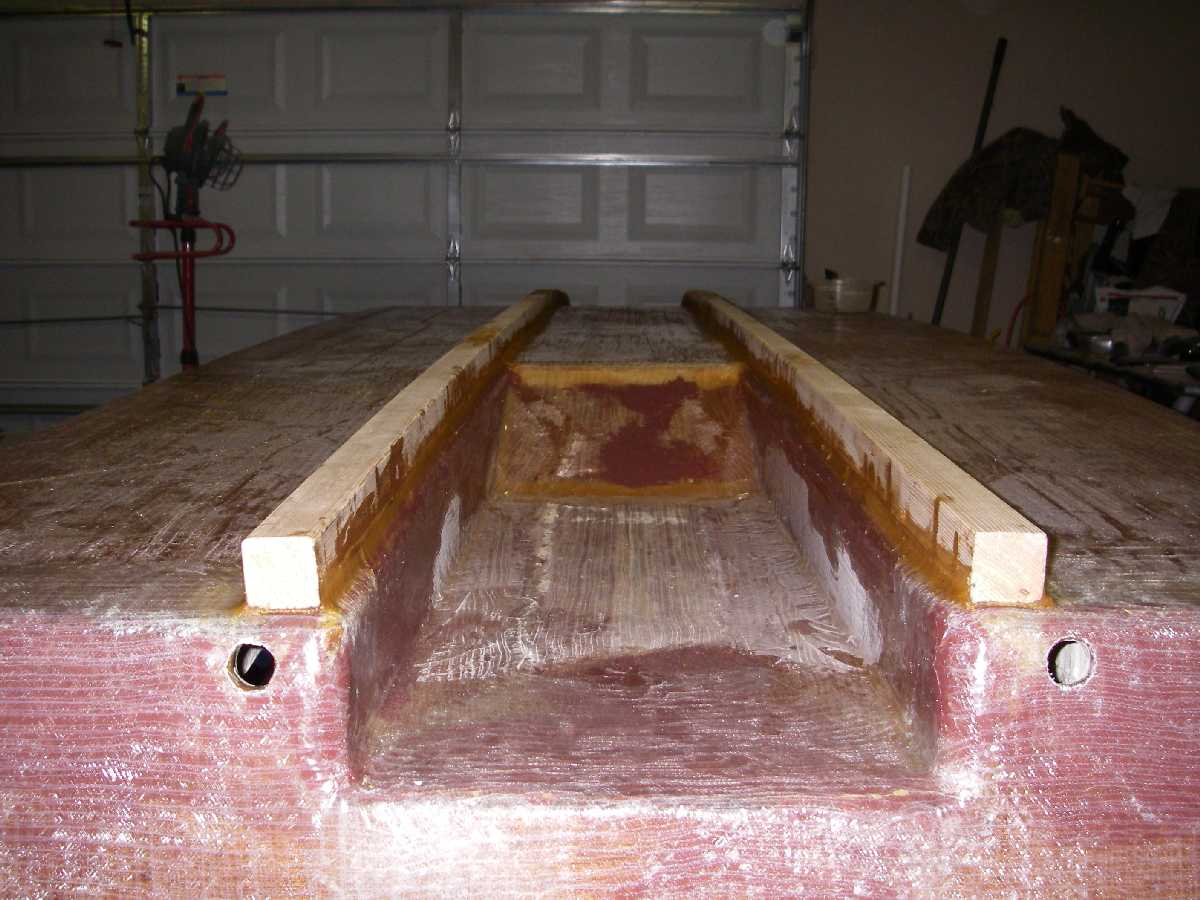
You can also see the floors have been added on top of the foam under the saddle seats. The dowel rods visible are for my Cracker Larry carry handles. You can see one hole drilled in the seat frame ear where these will go.
I have added the center divider to this compartment. The side with the rod tubes will be filled with 2-part foam. This "box" should provide about 300 pounds of floatation by my calcs. With the foam in the 4 compartments under my rear saddle seats, I've got a total of about 450 pounds of floatation. Should be enough for the hull, motor, and gear.
As I said, this detail work takes a lot of time and planning. I'm just trying to figure it all out so I will have to re-do as little as possible in the future.
One of the details I'm working on now is how to get the fuel line and nav light wires from the bow to the center seat cleanly. Larry has given me an idea about using 1/2 of a 1 1/2" PVC tube fiberglassed to the floor. So far that is my leading plan, but am looking for other suggestions.
I've been working on my tunnel, but am thinking about changing it up some. I'll fill in more details when I figure out what I am actually going to do.
Take care, and "build on dude!"
Tim
Posted: Mon Feb 20, 2006 12:15 pm
by britt
Have you been able to work on your boat? I am very interested to hear how she handles and how the tunnel works.
Thanks,
Britt
Posted: Mon Feb 20, 2006 11:17 pm
by timoub007
britt,
I'm getting a little closer. The cold weather in our area has hampered my desire to mix any epoxy. Unfortunately, I have also been busy with the paying job for the last 5 weeks or so. It is beginning to let up some though, so this week I should get back out in the garage.
I see you are rather close by. If you would like to stop by and see it first hand you're more than welcome. Just drop me an email at
timoub007@netzero.net if you're heading West. I come through your town 3-4 times a week, so when you get going I'd be happy to lend a hand.
Stay tuned, updates will pick up as the temperature does.
Tim
Posted: Fri Feb 24, 2006 12:19 am
by timoub007
I've been doing some more detail work this week. I installed my electrical chase tube to get power to the stern from the center seat. I also cut some holes in the frames to get wires and gas line both to the bow and stern. (The 6 gallon portable gas tank will be in the bow, under the deck.)
Here are some pics of the last of my foam (I think.) Overall, I was pretty happy with this pour. It went much better than my first "foaming."
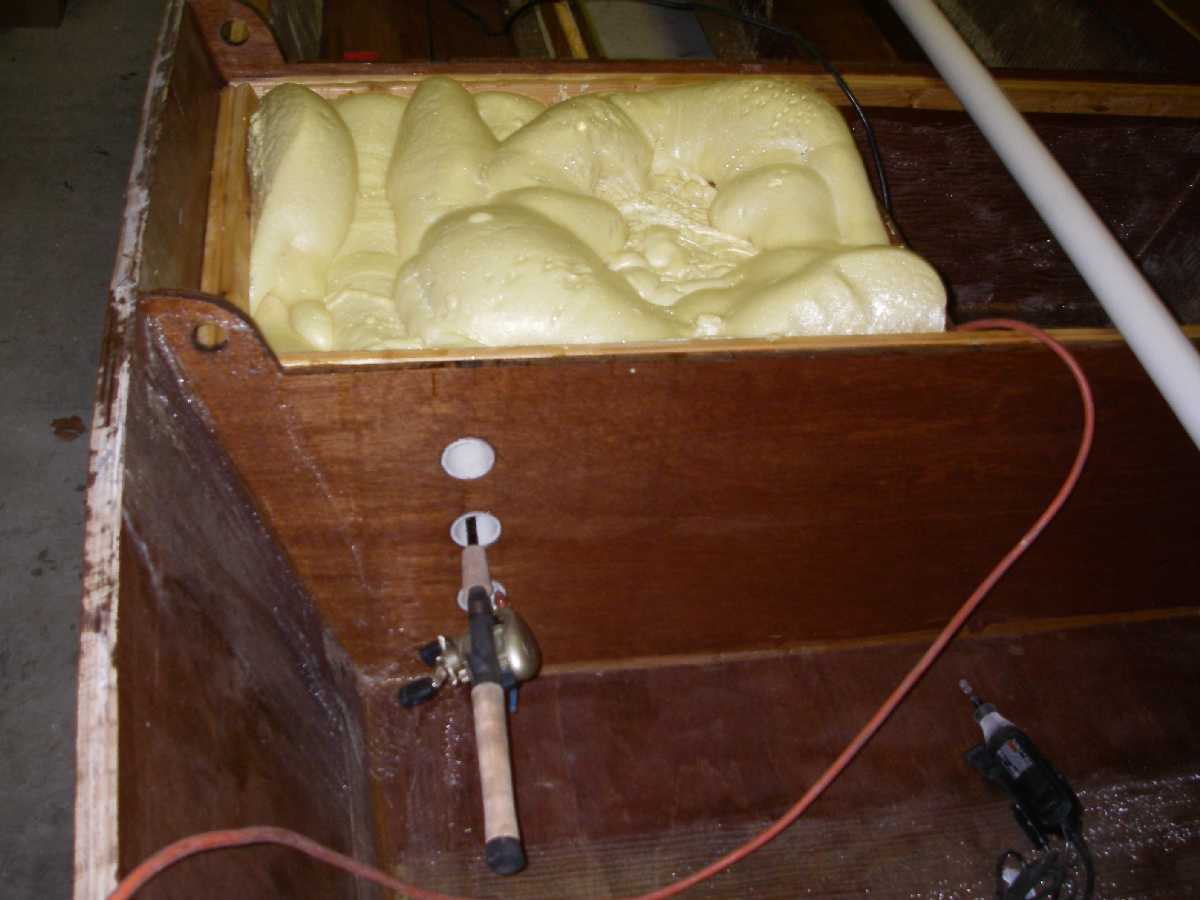
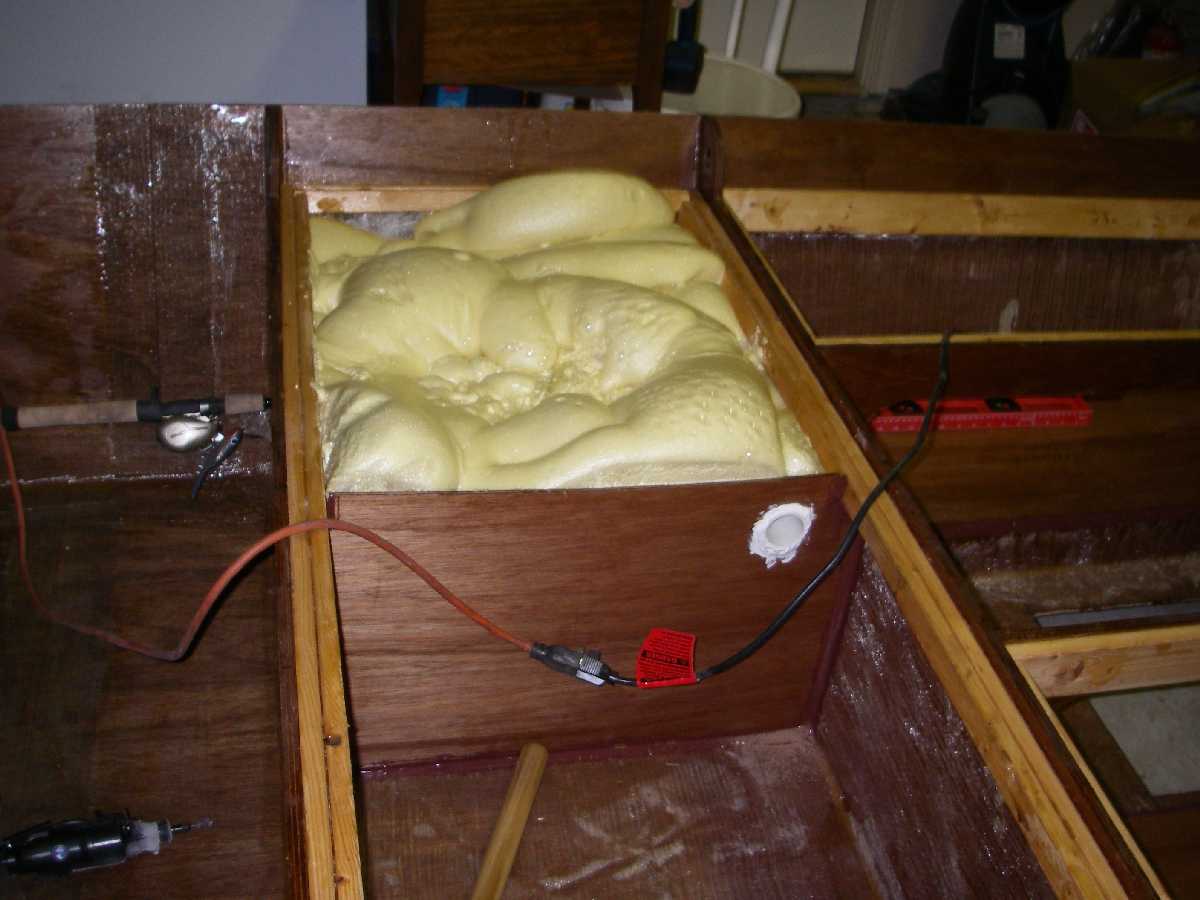
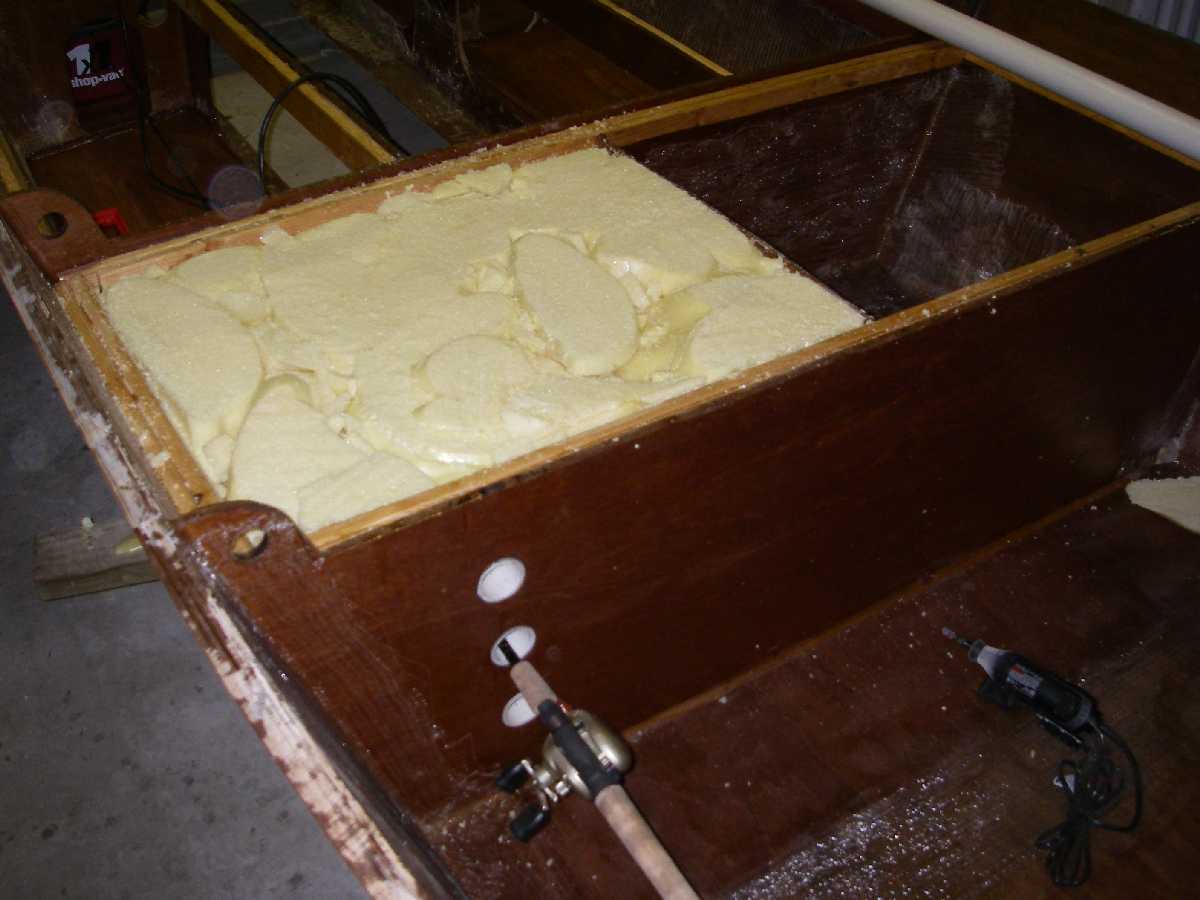
I'm going to get the center seat top glued down tonight or tomorrow too. I've still got to get the large piece of glass laid down between the center seat and bow deck. I should get some work done tomorrow and Saturday morning too.
Tim
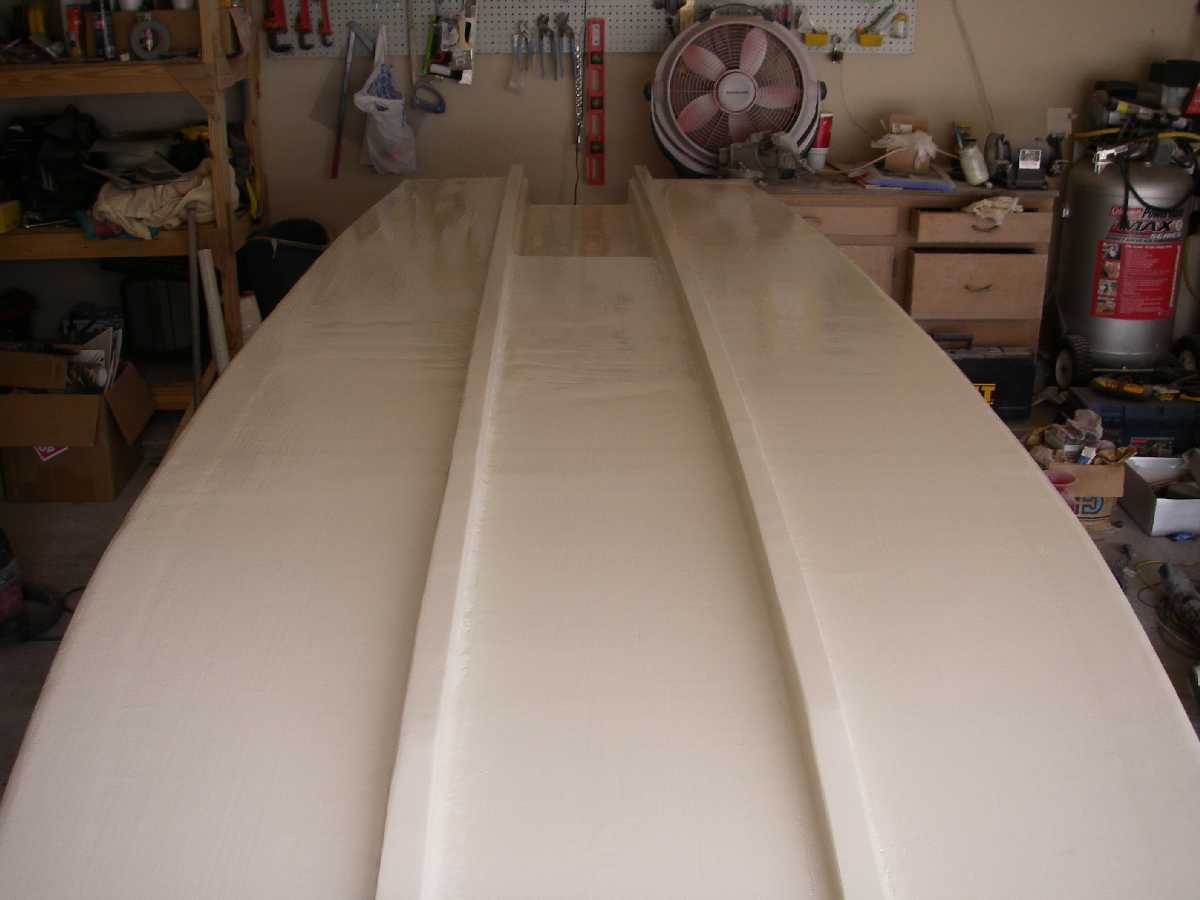
Posted: Sun Mar 05, 2006 9:22 pm
by timoub007
I've been working on details the last week. The biggest of those was filling in that "hole" in the floor at the rear of the boat. So, Larry, it might actually float one of these days.
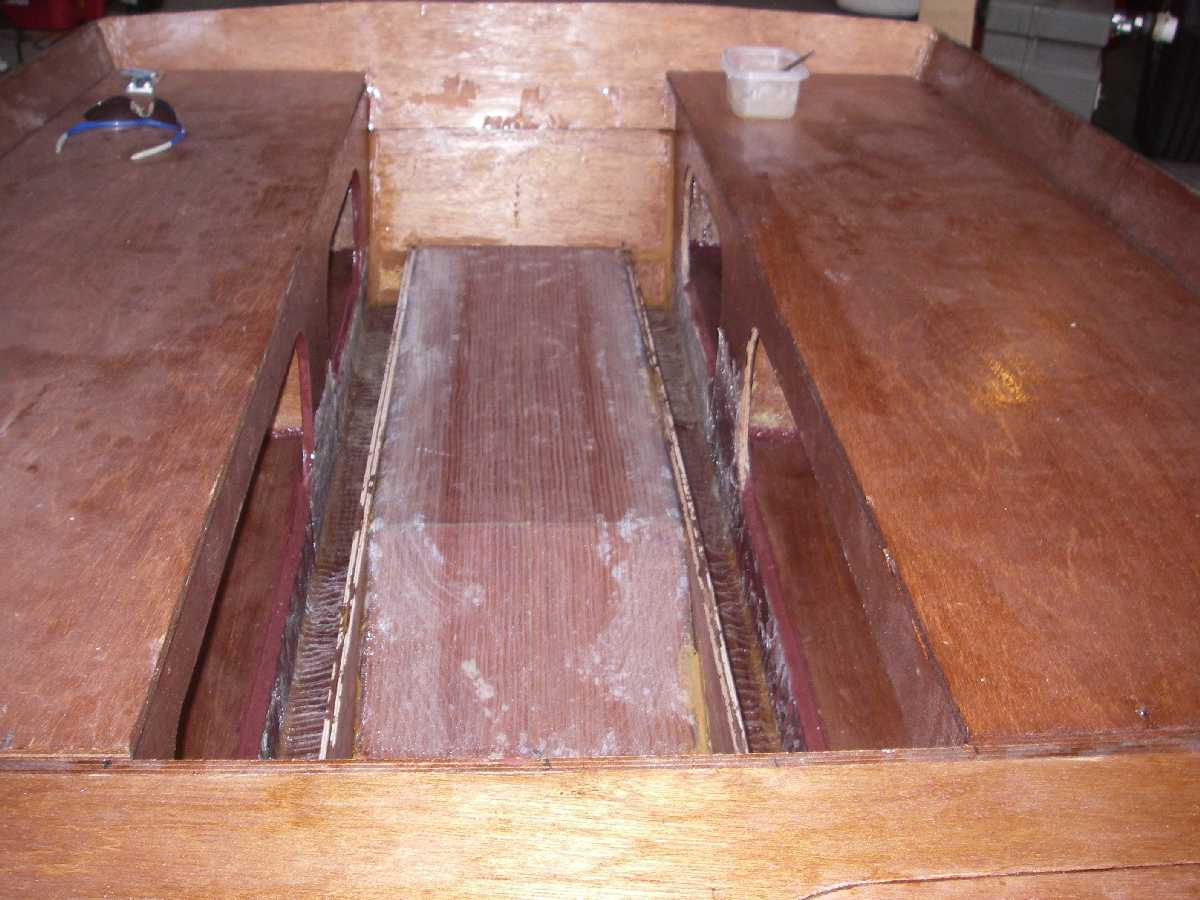
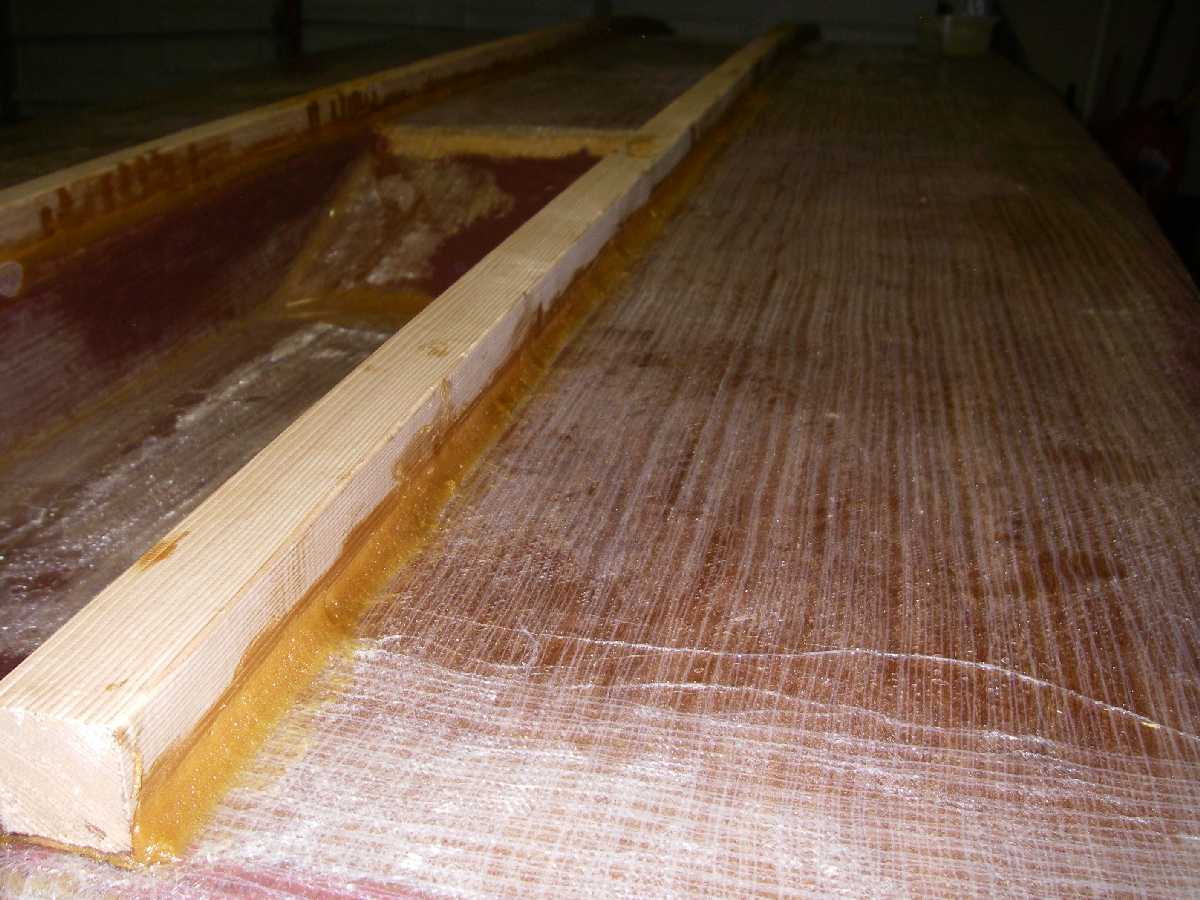
After trimming the foam in the center seat, as shown above, I epoxy glued that seat top on and the Cracker Larry handles. Most nights this week I was laminating layers inside and outside of the tunnel. Then I figured out how I was going to properly attach it to the hull. I decided to create a couple of stringers that would tie into the the center seat rear frame and the transom. These would be epoxy glued to the tunnel and then that assembly would be dropped into place. I didn't have a long enough piece of 1/2" left so I had to laminate up a couple of pieces of 1/4" to make these 2 stringers. This took a couple of nights and finally last night I got the 2 stringers glued to the tunnel.
This afternoon I filled in the transom where I'd cut too much out for the tunnel. (This was due to following the plans for the PH15 tunnel. It is 19 or so inches wide and I decided that it would be just too big for this boat. The PH15 is a much wider boat and would have enough planing surface remaining to handle the wider tunnel. Oh, and it was designed for that boat. I cut the center out of the tunnel and made mine 12 or so inches wide.) So I cut a couple of squares of 1/2" ply and glued those in place. After letting them cure for a couple of hours I decided it was time to fill in that hole. I dropped the tunnel/stringer assembly in place and tabbed it in. It is still curing now. I'll go back and run some good filets along the entire bottom and against both the transom and seat frame. I'll also glass in the stringers at each end.
Anyway, the pics below show this week's progress. It sure looks like a bigger boat when I wheel it out of the garage.
Tim
Posted: Mon Mar 06, 2006 7:41 pm
by Cracker Larry
Looks great, Tim
Posted: Wed Mar 29, 2006 3:09 am
by timoub007
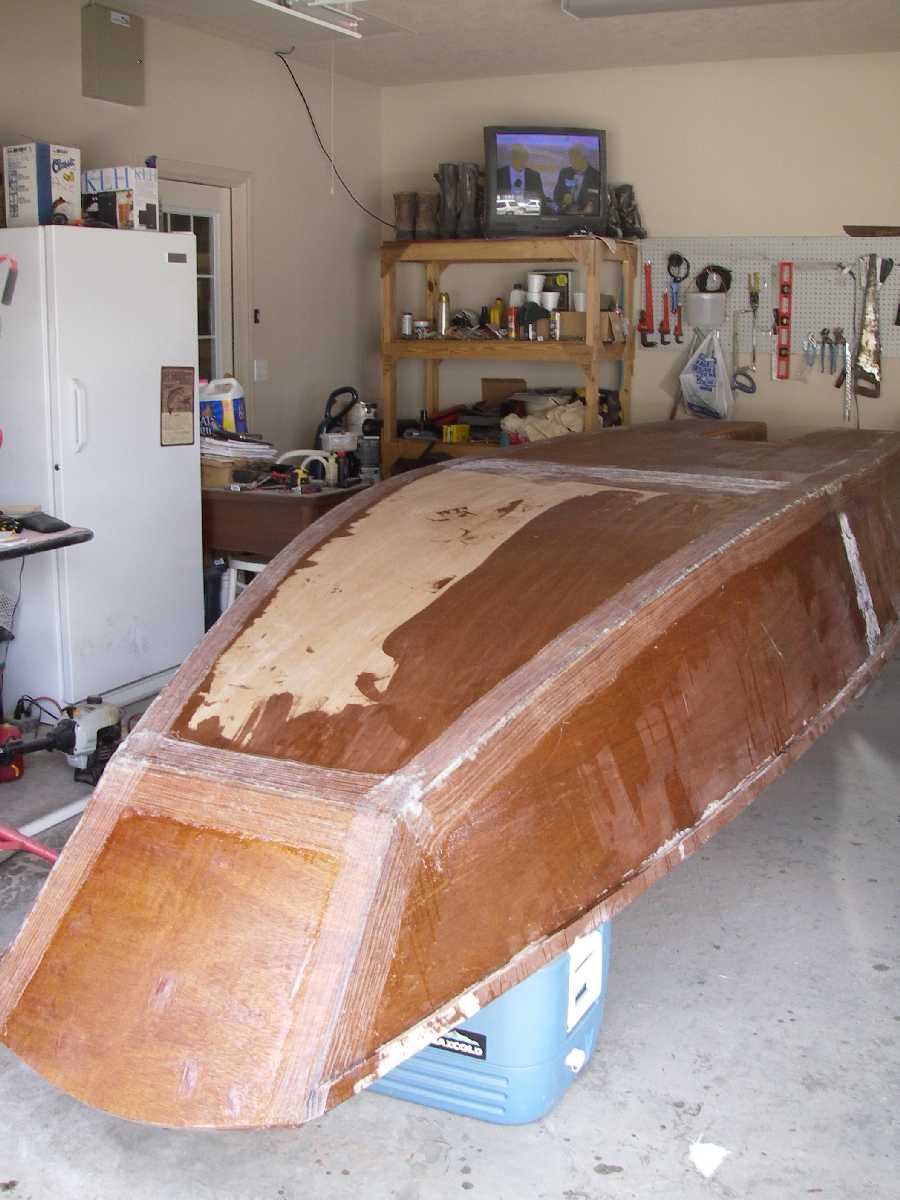
Finally ready to put some paint on this thing!
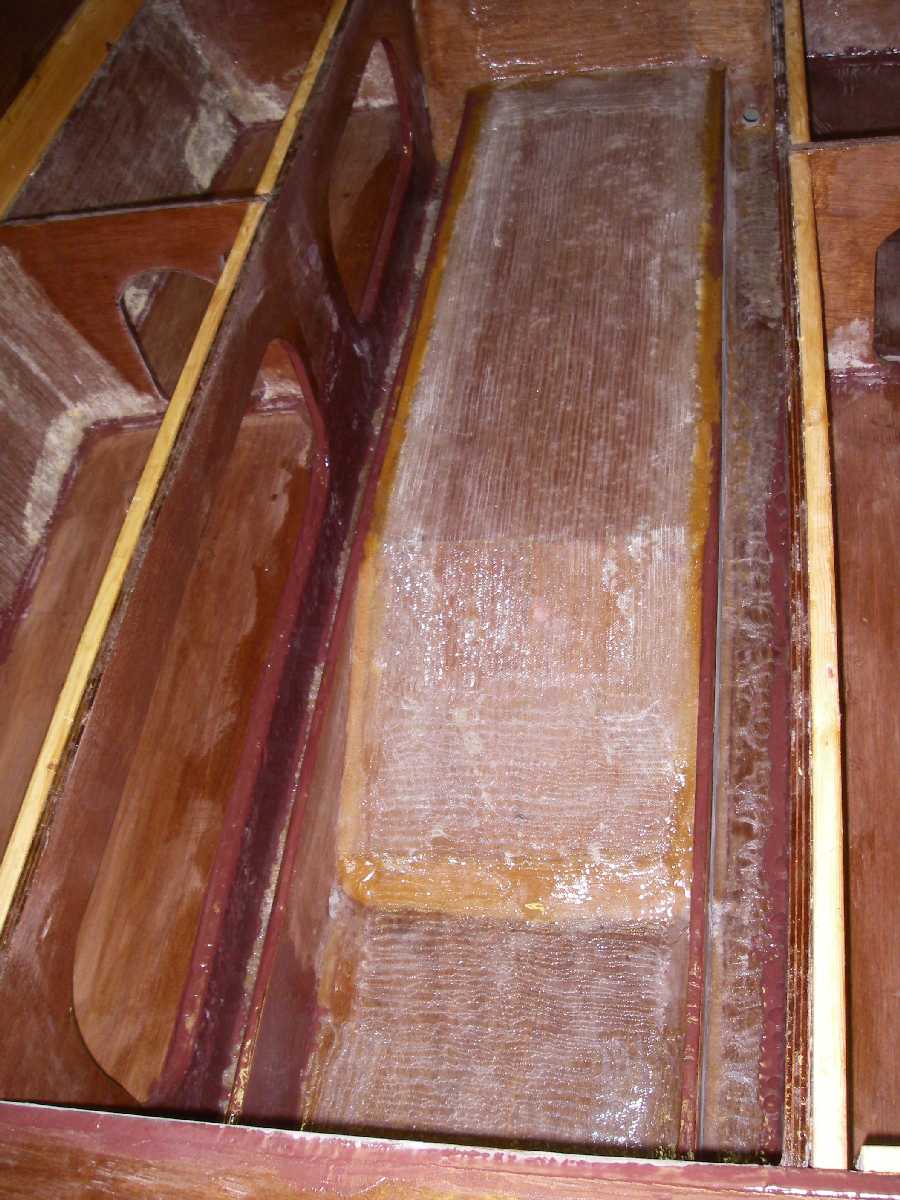
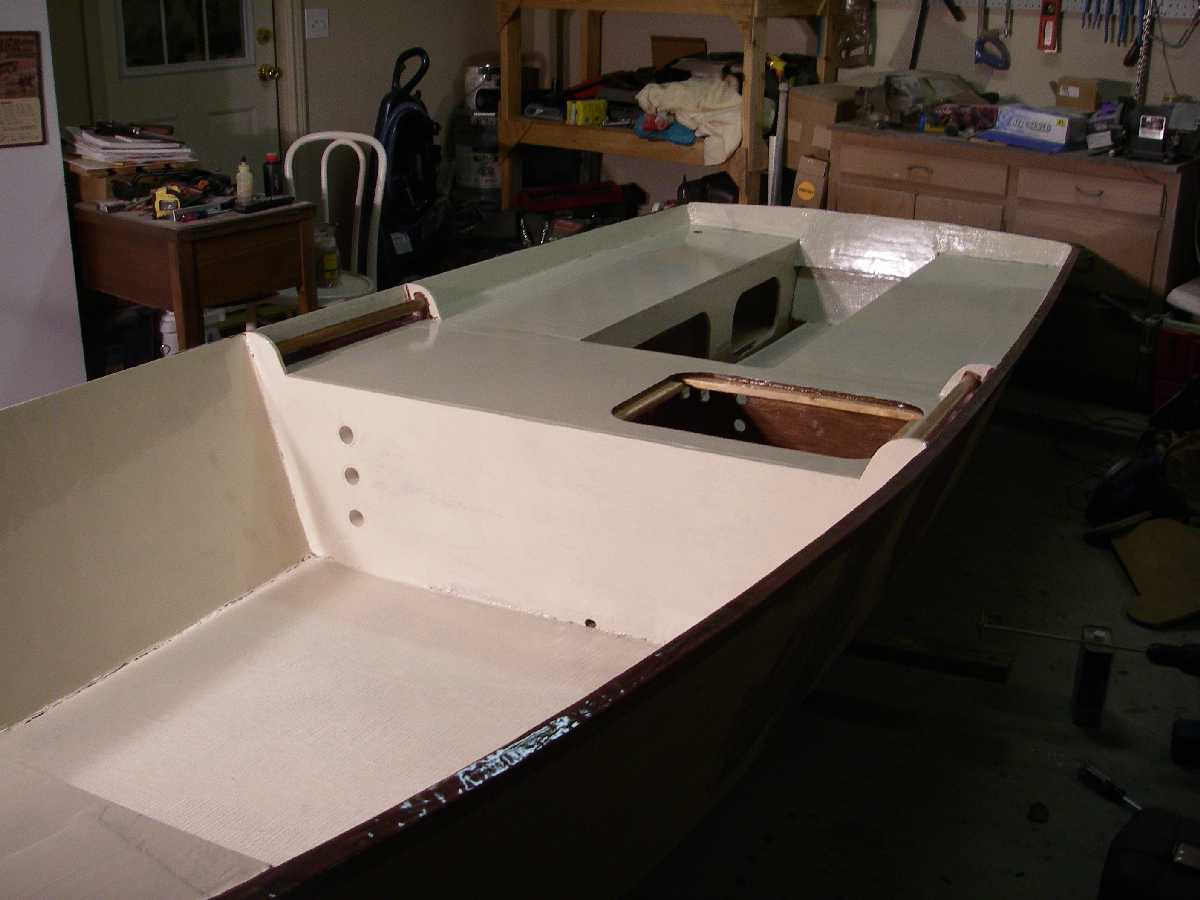
I got the last of the interior glass laid about 2 weeks ago with the help of a good friend. I glassed completely up the sides to the shear in the area between the mid-seat and bow frame. The pieces of glass then flow on the floor and overlap. The overlap gives double coverage for just about the entire floor in this area. Since then it has been fairing and sanding on the sides. I am leaving the floor throughout the boat unfaired for slip resistance.
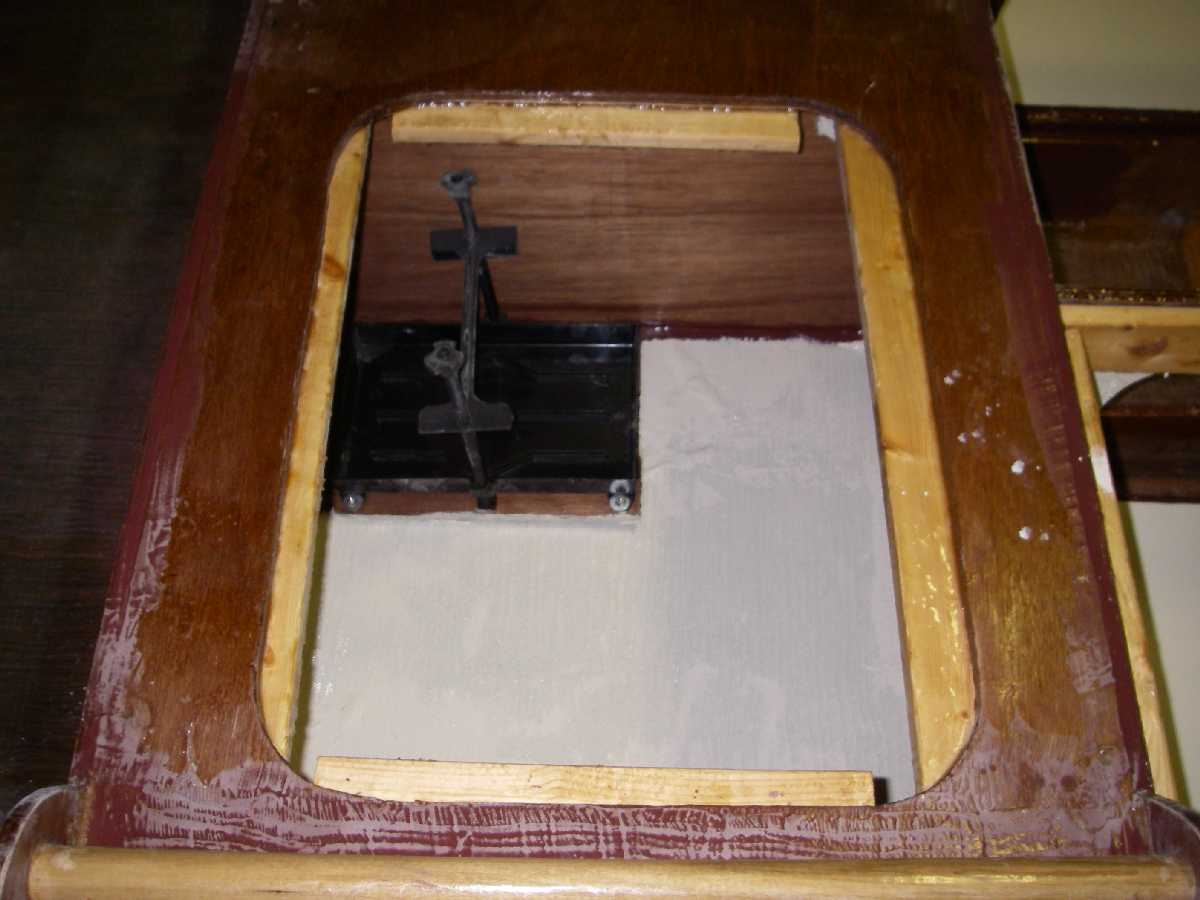
I also got the battery tray mounted in the center seat compartment. It is mounted on two pieces of 1/2" plywood and then these were glued to the floor. There is open space between the pieces so that water should be able to flow under it and out the rear limber hole in the compartment.
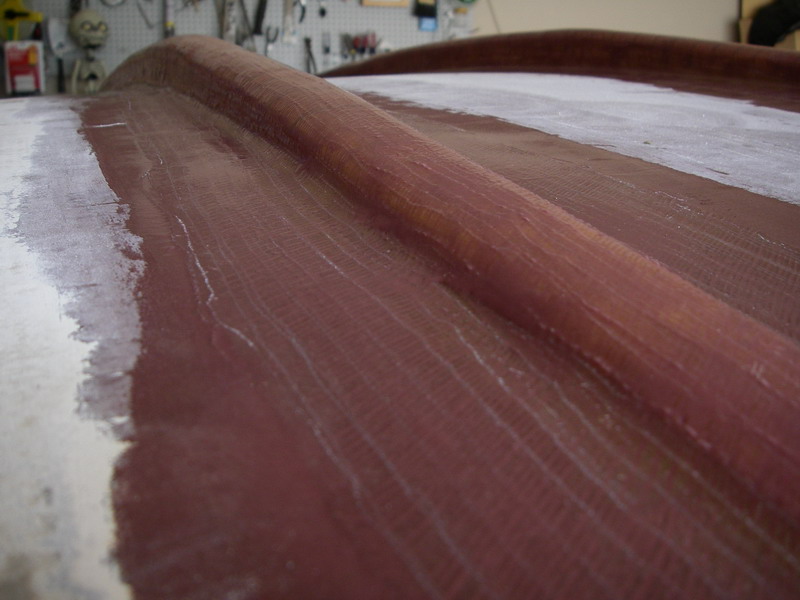
Lastly here are a couple of new pics of the tunnel. It is glassed to the floor and transom. Also the tunnel stringers are glassed to the floor and mid-seat rear frame. The verticle glass has been faired (roughly) but as mentioned above, the floor glass will remain unfaired for a nonskid affect.
After taking these pics, I put down a first coat of paint inside all the compartments. After this dries and I recoat where needed and then I will glue on the remaining seat tops and bow deck. Then comes more fairing and sanding before painting the rest of the interior.
Posted: Wed Mar 29, 2006 3:13 am
by timoub007
Well, the inside of the compartments now have paint on them. I put down the second coat tonight (3/30).
I'm heading out of town this weekend, but might get the seat tops glued down before hitting the road. The fish are calling this weekend though.
Tim
I hope that mine does this well.
Posted: Sat Apr 01, 2006 7:12 pm
by robbiro
I have been following your build and the resultant strings on the message boards between you and Larry. I see many great ideas and hope to use some of them in my build that will start in the next few weeks. I am going over the plans and seeing what is possible and impossible. Did you extend the front deck any or is it to specs?
Posted: Sun Apr 02, 2006 7:25 pm
by timoub007
Robbie,
Thank you for the kind words.
The front deck in my boat is per the plans. I built the boat primarily for duck hunting so I wasn't concentrating on maximizing deck space. I would guess that it is a little small if you plan on doing a lot of casting from up there. Now Larry throws a cast net from his, or at least I assume he gets up on the deck to shrimp.
I can place something up there that you could relate to the size of and take a pic if you'd like.
Another option would be to cut out the deck from poster board and see what you think. The issue there is that if you're standing on the ground on top of that "pattern" you might not get a good feel for how large or small it really is.
Posted: Mon Apr 03, 2006 9:52 am
by Cracker Larry
Yes, we cast shrimp nets from the bow deck. I built mine as designed and it is plenty large enough.
front deck
Posted: Mon Apr 03, 2006 9:38 pm
by robbiro
Thanks for the input on the deck, it will stay as per plan. I look forward to seeing the end product Tim. Larry, if you can cast a net off of it, I should be able to try and catch a bass off of it. Thanks again !
Robbie
Posted: Tue Apr 04, 2006 1:55 pm
by Cracker Larry
No problem catching a bass off that deck. Or even a gator!
Next week mine will begin chasing Cobia in the Broad River (SC). Hopefully I can post some pictures of 80lb. fish
Posted: Tue Apr 04, 2006 11:26 pm
by timoub007
Now we're getting somewhere!
As far as I can tell, I'm done glassing until I get her flipped over. I spent last night and tonight building the last of my filets and taping the final seams. Everywhere that a horizontal surface meets the hull it is taped.
I also put a full piece of glass across the transom. I cut this so that it lays out on top of the rear seats. There is also tape where the rear seats meet the center seat. All this means that the transom is effectively tied into the center seat. And it is actually tied in two other times with the rear seat frames, and the tunnel stringers.
Here is my latest attempt at poor man's peel ply. I have found that the garbage bags work well. I know there are some wrinkles here and there, but it will still save a lot of fairing.
What has
not worked well is zip-loc (or knock off) brand bags. In one or two cases when trying to remove the plastic it has torn. It left small pieces behind that were very hard to remove. I basically had to sand them off. So y'all have been warned. LOL
A bit of faring and a lot of sanding the rest of the week and I might get some more paint on this thing this weekend. Looking forward to that flip.
Tim
Posted: Tue Apr 04, 2006 11:46 pm
by FLYonWALL9
She sure looks good Tim!
Posted: Sat Apr 08, 2006 3:04 pm
by Yorkshire-Dry
Looking good Tim,
I got all my outside glassing done last night, what a job it is to the cloth over the hull. I was alone and it took me 3 1/2 hours non stop as I guess once you start you have to finish

Going to fair it up and then get the runners on then flip and start fairing the inside.
Got one thing to share with you when you get to that stage if you are planning to take fabric all the way up the sides: Consider filleting the underside junction of the rub rail to the hull. This way wou won't have to cut the fabric untill the initial cure. I wish I had done this it would have saved me alot of future sanding/fairing.
Cant fing that Petitpoxy in Canada.
Ice off the lakes here last week going to throw a fly tomorrow. Got to wait to get afull cure anyway
YD
Posted: Sat Apr 08, 2006 3:05 pm
by Yorkshire-Dry
computer lagg double post
Posted: Sat Apr 08, 2006 3:07 pm
by Yorkshire-Dry
computer lagg triple post
Posted: Sat Apr 08, 2006 4:55 pm
by timoub007
YD,
Thanks for the kind words. You're smoking on your build! I guess you really hear the fish calling, huh?
I was going to do something with the underside of the rubrail while the hull was upside down. I cut my strips with a circular saw so none of them meet up perfectly. Nothing a little grinding and fairing can't fix.
I'm not sure I understand your comment about cutting the fabric though. I will not be overlaying the rubrails, just running the glass up to the bottom edge.
I'm not sure about shipping, but here is a link to the paint I'm using:
http://www.iboats.com/mall/index.cgi?ca ... w_id=21522
Tim
Posted: Sat Apr 08, 2006 8:50 pm
by Yorkshire-Dry
Tim,
what I was meaning was that if you put a fillet in and then run your cloth a little over width you would be able to trim easily whilst still green. Rather than the way I did it which was to cut the fabric to the bottom of the rub rail. This was fine until I started working in the resin, as it became a "thready" mess and will result in additional work to sand and fair.
YD
Paint baby
Posted: Wed Apr 12, 2006 2:03 am
by timoub007
Well, it looks like progress. I got the first coat of interior paint rolled on her tonight. I still need to go back and hit the corners and other tight spots with a brush. This is "sandstone" colored Petit EasyPoxy. It was recommended to me by Larry and goes on very easy (as the name implies.) I'll roll (or maybe spray) another coat of this color on before I camo over this with a grass pattern.
Well, enough typing here are the pics:

There's a couple of more in my gallery too.
Tim
Posted: Sat Apr 15, 2006 11:36 am
by Cracker Larry
Tim, is that a wire chase along the forward port chine?
Posted: Sat Apr 15, 2006 1:53 pm
by gk108
Cracker Larry wrote:Tim, is that a wire chase along the forward port chine?
Funny that you should ask...
We were just discussing that chase tube here:
http://gallery.bateau2.com/forum/viewto ... 6&start=15
It seems that great minds always run along the same channels.
Posted: Sat Apr 15, 2006 10:06 pm
by timoub007
Thanks GK, and yes Larry that is 1 1/2" PVC split and glassed in. I got the idea from you in another post I made. It was really the only way that I could get my gas line and nav light wires up to the bow neatly.
I put another coat plus on the interior. I say "plus" because I put sand in the last coat and then hit it again with the paint roller. Overall I'm very happy with how the inside turned out. I'll add camo later.
I've got the boat flipped now and am taping the outside seams tonight. I'll get some pics up later.
Hoping to lay the glass to the outside tomorrow after the family obligations. We'll see....
Tim
Posted: Sat Apr 15, 2006 11:12 pm
by robbiro
Tim
Great looking work topside. One quick question, What size PVC did you use for the rod tubes?
Robbie
Posted: Sun Apr 16, 2006 2:05 pm
by timoub007
Thanks Robbie. The camera hides a lot and so does the sand I put in the final paint. Of course, this is a duck boat so I wasn't looking for showroom shine. I'm very happy with the results so far.
The rod tubes are 1 1/2 inch internal diameter schedule 40 PVC. That makes them about 1 7/8 inch outside diameter. I glued and sealed them in with Marine GOOP, just because I had it. I prefer 3M 5200, but had this GOOP that is clear. And then, as you saw, I poured foam around them so they won't be going anywhere.
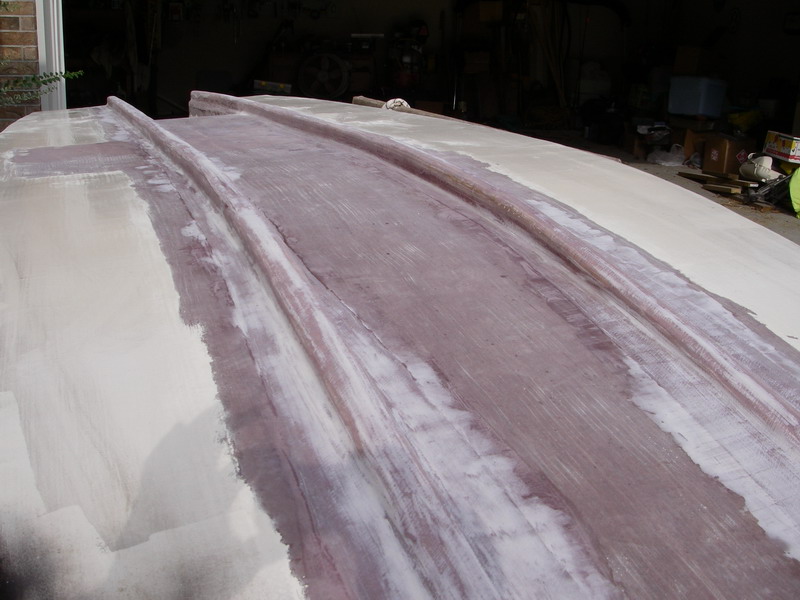
I got all the outside seams taped last night. Here is a quick pic:
I was going to push through and get the outside glass laid tonight, but it might get delayed a day or two. I see a few spots that need to be cleaned up and may not have time. I'll tell you though, the outside sure is easier than all the details of the inside. Its nice to be working on large, flat surfaces.
Tim
Posted: Sun Apr 16, 2006 6:53 pm
by Yorkshire-Dry
Looking good Tim,
I agree, cant beat the outside for satisfaction. I will be turning mine tomorrow to finish off the inside.
YD
PS. why does't this thread populate to the top of theemain board everytime a post is added

Posted: Sun Apr 16, 2006 6:55 pm
by Yorkshire-Dry
OK, just to make a liar out of me it did that time
YD
just figured it out!! its on a different forum
Posted: Mon Apr 17, 2006 12:37 am
by timoub007
YD, thanks. Your right, looking at the bottom sure feels good. And knowing that all I've got left on the inside is my camo job means I'm getting close.
Easter was a productive day around these parts. After a nice post dinner nap, I had a buddy come over and help lay out the bottom glass. It took in the neighborhood of 3 hours to do some prep work (sanding and minimal fairing), pre-coat, wet out, and peal ply. I was very happy with the results and feel like I can see the end of the tunnel. (Pun intended!)
One note, I was unable to glass all the way up to the rubrails as I had planned. When I rolled out the fabric to cut the two 15+ foot long pieces, I ran out. After the first one, I only had about 6 feet of fabric left on the roll. I guess I just used too much on the inside. Oh well. I'm debating on whether or not I will piece in the sides or just go with it as is (per the plans). I'll look tomorrow and see how much I've got left in pieces from poor cutting attempts. I still have to glass the bow and stern transoms though.
And now for the pics:
Happy Easter to all.
Tim
Posted: Mon Apr 17, 2006 11:25 pm
by Cracker Larry
Looks great. I'm interested to see how that tunnel works out.
GK, your build is looking great.
Glad to see some of my ideas come to fruition
I wish I had put my gas under the bow, too.
Posted: Fri Apr 21, 2006 12:22 pm
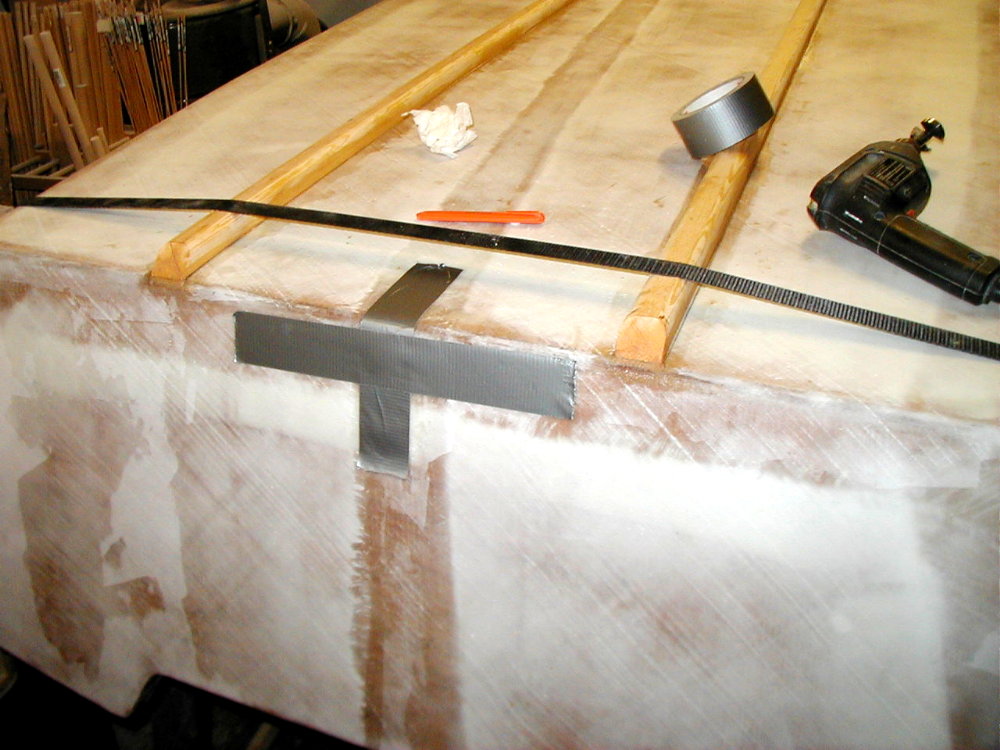
by timoub007
Well, I finally found some 12 foot long 2x2's yesterday. I could make mine bend with enough pressure, but they bowed up away from the hull in the middle if I pulled them down in the front and back. So I decided to kerf mine.
I'll pull the straps off today and filet out the rest.
I still need to figure out how to attach the spray rails without screwing through my finished interior. If I would have thought ahead, I would have waited on all that fairing and painting. Oh well, you know what they say about hindsight... LASIK fixed my literal vision, but can't help my foresight. LOL
Tim
Posted: Sat Apr 22, 2006 1:47 am
by timoub007
This afternoon I filled in all the kerfs with wood flour and epoxy mix. This evening I put filets down the entire length of each runner.
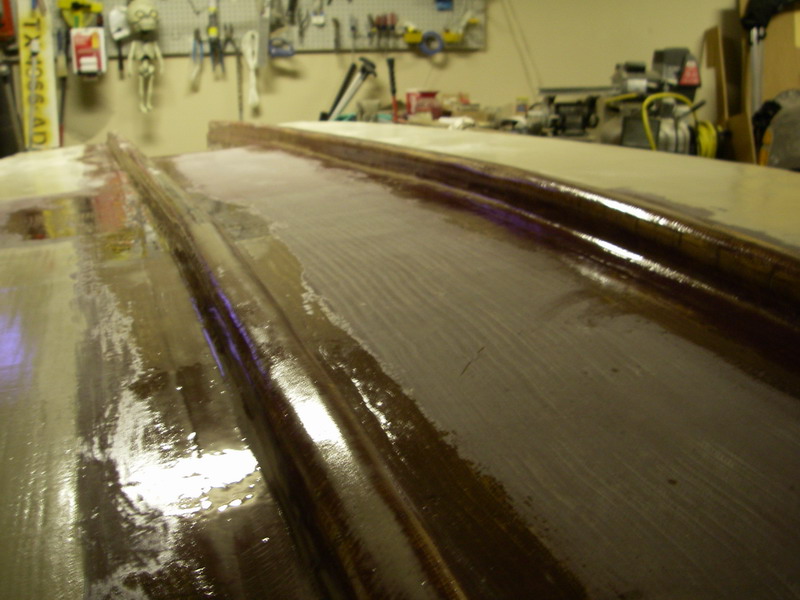
This shot shows how the runners add an extra 1 1/2 inch of depth to the tunnel. I also feel that they will help "channel" the water up in to the tunnel. It may help, it may not. Either way, these 12 foot long 1 1/2 x 1 1/2 (nominal 2x2) should stiffen up the bottom considerably.
I hope to get the fairing mix on the bottom tomorrow morning. Then I'll work on getting the spray rails mounted.
Take care,
Tim
Posted: Sat Apr 22, 2006 11:36 am
by Yorkshire-Dry
Tim,
I put a 45 degree angle to the rear of my runners, as you can see in the shot below I know you want to enhance the effect of your tunnel but don't you think that the 90 degree end will take alot of damage
Just a thought,
YD
Posted: Sat Apr 22, 2006 11:40 am
by Cracker Larry
I did mine just like YD.
Posted: Sun Apr 23, 2006 8:21 pm
by timoub007
The spray rails are screwed and glued!
I made these from nominal 1 x 2 inch #1 pine boards. I cut the front and rear to match the corresponding transom angles. The boards are joined with 45 degree cuts, epoxy glued. The screws will come out tomorrow after the glue cures.
This is how the bottom is coming along:
I have put down three (3) thin layers of epoxy fairing mix. I have not sanded any, and plan on putting down some more mix before I do. I also have not done any fairing on the sides. I decided today that I'm going to glass between the chine and spray rail. I have more than enough glass left to do this and think it will add to the durability with the use I have planned.
I think I'll leave the runners as is. I sanded the square edges off, but don't plan on cutting a 45 in the stern end.
Take care,
Tim
Posted: Sun Apr 23, 2006 8:50 pm
by ks8
Spray rails look good with the angles matching the transom(s).
Posted: Sun Apr 23, 2006 11:05 pm
by MadRus
Tim, nice work, the bottom is looking good. Fairing is one of my favorite stages- can't say why. I really like the tapered runners too, and it looks like everythings going to come together nicely. Can't wait to see it painted.
Posted: Mon Apr 24, 2006 12:50 am
by timoub007
Thanks for the compliments guys. I put down some really thick fairing mix this evening. I'll sand on it tomorrow and find out where I still have some work to do.
Rus, I too like the fairing process. Like most though, I'm not too keen on the sanding that follows.
I hope to be painting after next weekend.
Take care,
Tim
Posted: Tue Apr 25, 2006 10:53 pm
by timoub007
Well I used the orange and yellow tools this afternoon that you can see in the pic below.
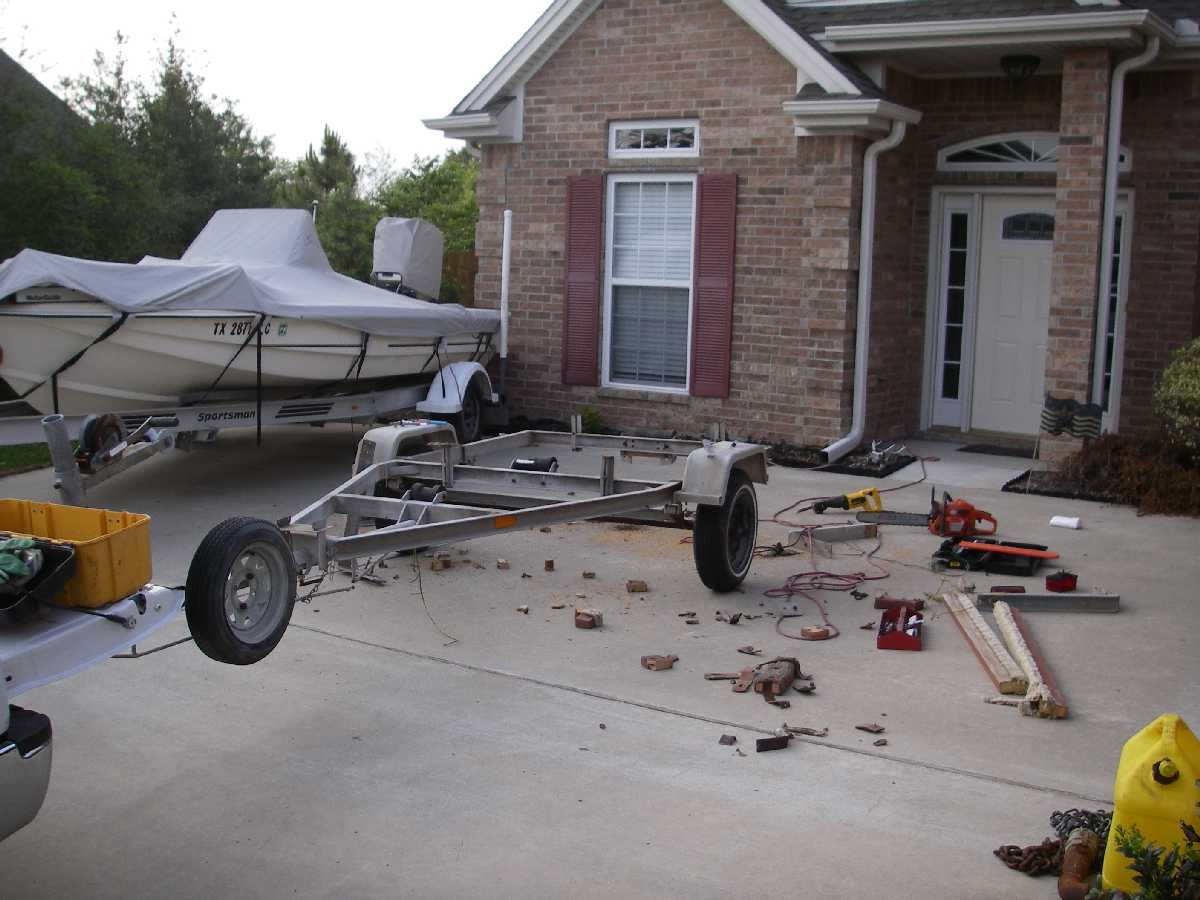
I picked up this trailer for about $200 and just need to modify it for the GF-16. I've got a good friend that is handy with a welder so he'll be fixing me up. A couple of 2x6 runners and 2x4 side boards and it will be a great fit.
I put some more fairing mix on the hull this morning. Waiting for all of that to cure and then I'll start with the sanding again. I can see the light...
Take care,
Tim
Posted: Wed Apr 26, 2006 1:16 pm
by Cracker Larry
With a chainsaw
Posted: Wed Apr 26, 2006 8:33 pm
by timoub007
LOL
It is much faster to rip off the old wood with a 18" chainsaw than with the circular or recip saws. It also tends to be more fun. Also, there were "walk planks" on this trailer that were some kind of hard.
Mostly, it is the thrill of getting out the power tools...as many as possible.
I guess it might have to do with being a bit farther South than you. LOL
A little more fairing to do before I hop on a plane tomorrow.
Take care,
Tim
Posted: Wed Apr 26, 2006 10:30 pm
by Cracker Larry
I guess it might have to do with being a bit farther South than you. LOL
Only geographically. I tell ya a chain saw story. Not meaning to steal your thread.
An old country neighbor had been cutting firewood for 50 years with a crosscut saw. He'd cut 3 or 4 cords a year for his fireplace and stove. A couple years ago he decided to go buy one of those fancy chain saws he'd been hearing about so he wouldn't have to work so hard. So he goes down and gets a nice Stihl. Takes it home and saws all week with it. He was disappointed with the results and took it back to the hardware store. He tells the man, no matter how hard I try, I can't cut as much wood as with the crosscut saw. Iwant my money back. The manager says, let me check it out. He cranks it up.....VROOOOM....VROOM........VROOOM....
WHAT IN HELL IS THAT
exclaims the neighbor.
That's the kind of South I live in.
Posted: Wed Apr 26, 2006 11:12 pm
by timoub007
No thread stealing, I enjoy good stories.
Well, if that story is true then only geographically is correct!
I knew that you were in the deep South too, but didn't realize you were also in the backwoods. LOL
Take care,
Tim
Posted: Wed Apr 26, 2006 11:56 pm
by Cracker Larry
It's true, and I do live in the backwoods. 10 miles to the closest town and it's not much of a town, Clyo, GA. I'm 40 miles from Savannah, a real town. For fun do a google search on Tiger Ridge Georgia. That's where I live.
Posted: Sat Apr 29, 2006 7:06 pm
by Yorkshire-Dry
My God Larry,
I did theat search, are you good with a banjo
YD
Posted: Sun Apr 30, 2006 12:46 pm
by Cracker Larry
Posted: Fri May 05, 2006 11:49 pm
by Yorkshire-Dry
Hey Tim,
where have you been? are you away as I've seen no activity on your build. I'm running ahead of ya, don't like that as I'll make the mistakes first
YD
Posted: Sun May 07, 2006 11:33 pm
by timoub007
I'm still here YD. I was up in Missouri last weekend playing with the hillbillies and not working on my boat, but I'm back at it.
I spent all week sanding and touching up the fairing. There wasn't much to post about or show. I thought I had everything pretty good yesterday, so I put on the first coat of paint. The second went on this morning. Here are a few pics after the second coat.

It is probably a 30-40 foot finish, and I probably could have done better.

I thought it all looked pretty good until that first coat of paint amplified every little imperfection. In hindsight it would have been a lot better if I had used a high-build primer. I can't wait to get the ultra-flat camo paints on there to hide things again.
That should go on this week. I've got a buddy welding on my trailer and then it'll get new lights.
I hope to get it all together by Thursday, my birthday. What a present for myself.
Take care,
Tim
Posted: Mon May 08, 2006 11:48 pm
by Yorkshire-Dry
Did you spray or roll and tip Tim?
I think it looks good, your photos taken from the dark to the light do tend to amplifyall the dips and doozies, I think your cammo will hide a multitude of sins
.
I will start painting my outside tomorrow.
I think I will be wetting her within 2 weeks.
all the best
YD
Posted: Tue May 09, 2006 12:58 am
by timoub007
Yep YD, the camo did the duty in hiding my laziness. Here is a shot of one side with the camo on. It looks okay, but not as good as I'd hoped. Of course, I figured it wouldn't come out like the photo I posted.
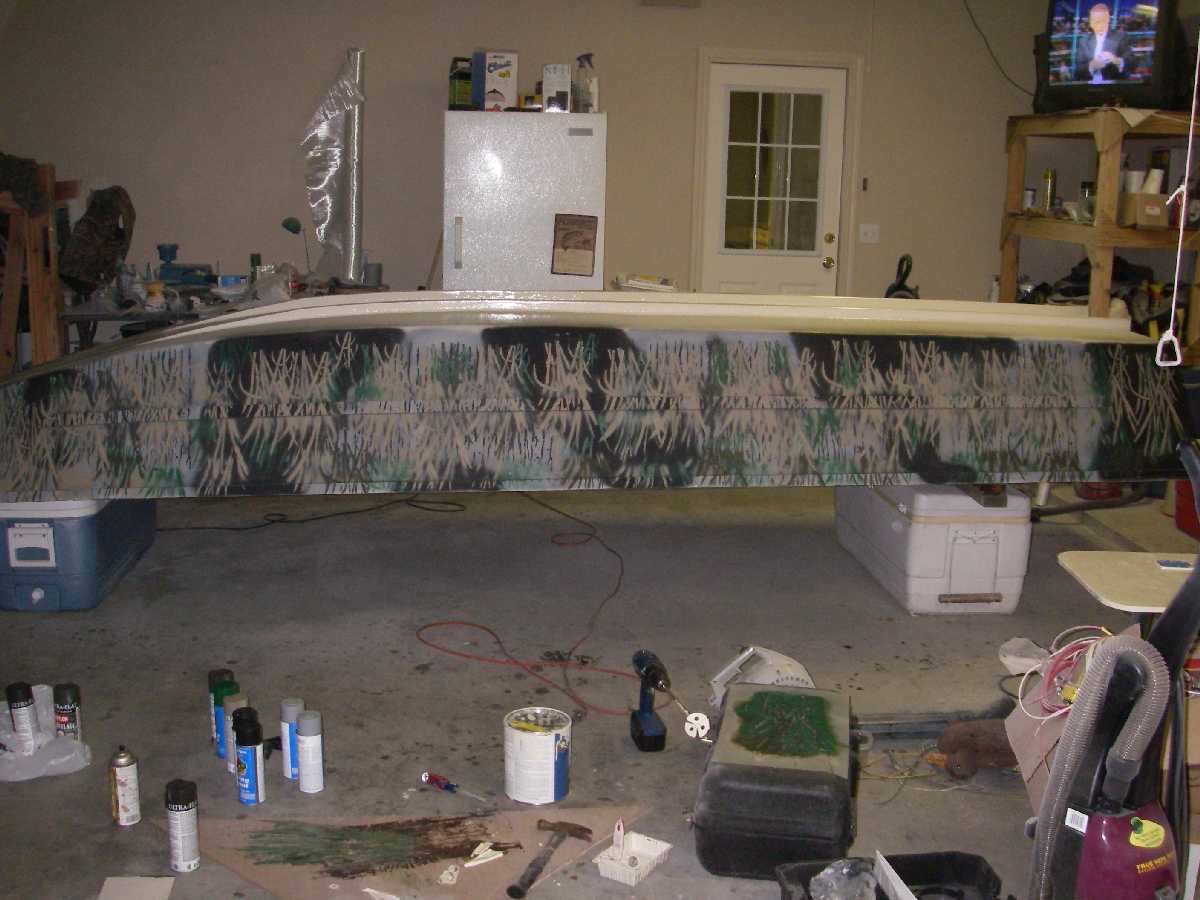
I had to touch up a few spots that bubbled up with the application of the flat black and grey on the other side. I'm not sure why it did that, but I guess it was a surface prep thing. I'm just glad that it only did it in a few places, totalling less than one square foot. I just wiped it clean with acetone and brushed on two more layers of the EasyPoxy.
Oh and YD, all of my EasyPoxy was rolled on. I did not follow behind tipping with a brush as it laid/flowed out nicely and didn't show any streaks or bubbles after a few seconds. I only used the brush to hit all the nooks and crannies. I was very pleased with the EasyPoxy and still have about 2/3 of a quart in the bottom of the gallon can. I just wish I'd used a high-build primer first. Oh well, live and learn.
Trailer should be welded up tomorrow and I'm probably going to take Wednesday off work to complete all the rigging.
The only thing I'm going to be waiting on is my jackplate. I have decided to build my own custom, all electric jackplate. It will cost less and weigh less than any commercially available unit on the market. It will have 6 inches of setback and 6 inches of vertical travel. It will be made from 1/4 inch thick aluminum angle.
But I plan on dropping it in the water without waiting on the jackplate if all else is done.
Getting close!
Posted: Tue May 09, 2006 9:26 am
by tech_support
Looks like you were up late last night - I think see Letterman on TV
Nice job on the cammo pattern
Posted: Tue May 09, 2006 10:06 am
by timoub007
Thanks Joel. Yeah, I get most of my work done in the evening and that is ol' Dave.
Does the camo really look good? I keep seeing too much of the black and grey under pattern coming through, but it just might be my eyes focusing on that. This will be used in a grassy marsh and I really want it to blend as best as possible.
Honest critisism of the camo from the crowd please. I'm not against painting over it and trying again.
Thanks,
Tim
Posted: Tue May 09, 2006 10:40 am
by gk108
Posted: Wed May 10, 2006 12:41 am
by timoub007
GK, thanks for the compliment but it wasn't good enough.
I couldn't get my eyes to stop focusing on the grey and black pattern under the grass and bark. It just didn't look like 'shadow grass' should and I feel I can do better. So after dinner tonight I rolled on another coat of EasyPoxy 'sandstone'. It doesn't look as good as it did after the second coat (a day ago) but it will do until I attempt to camo it again.
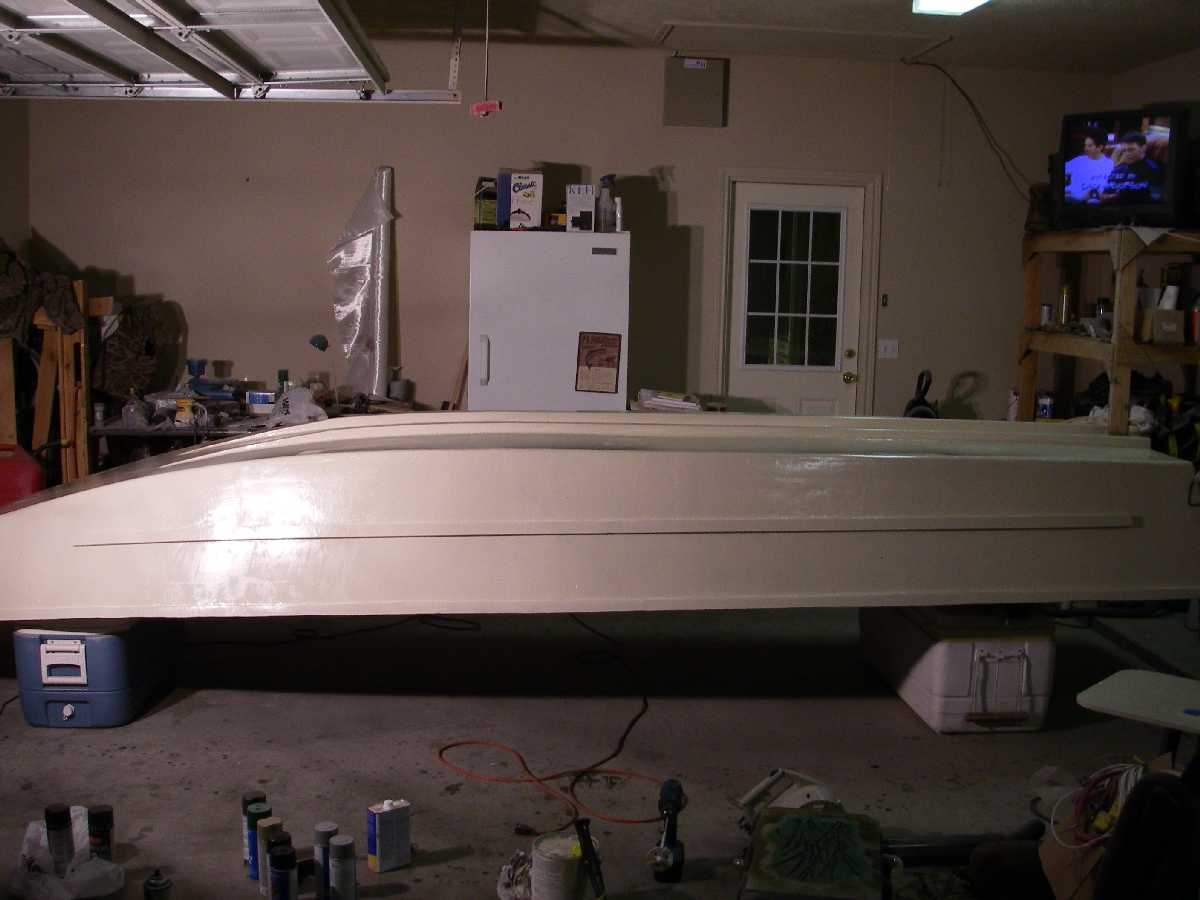
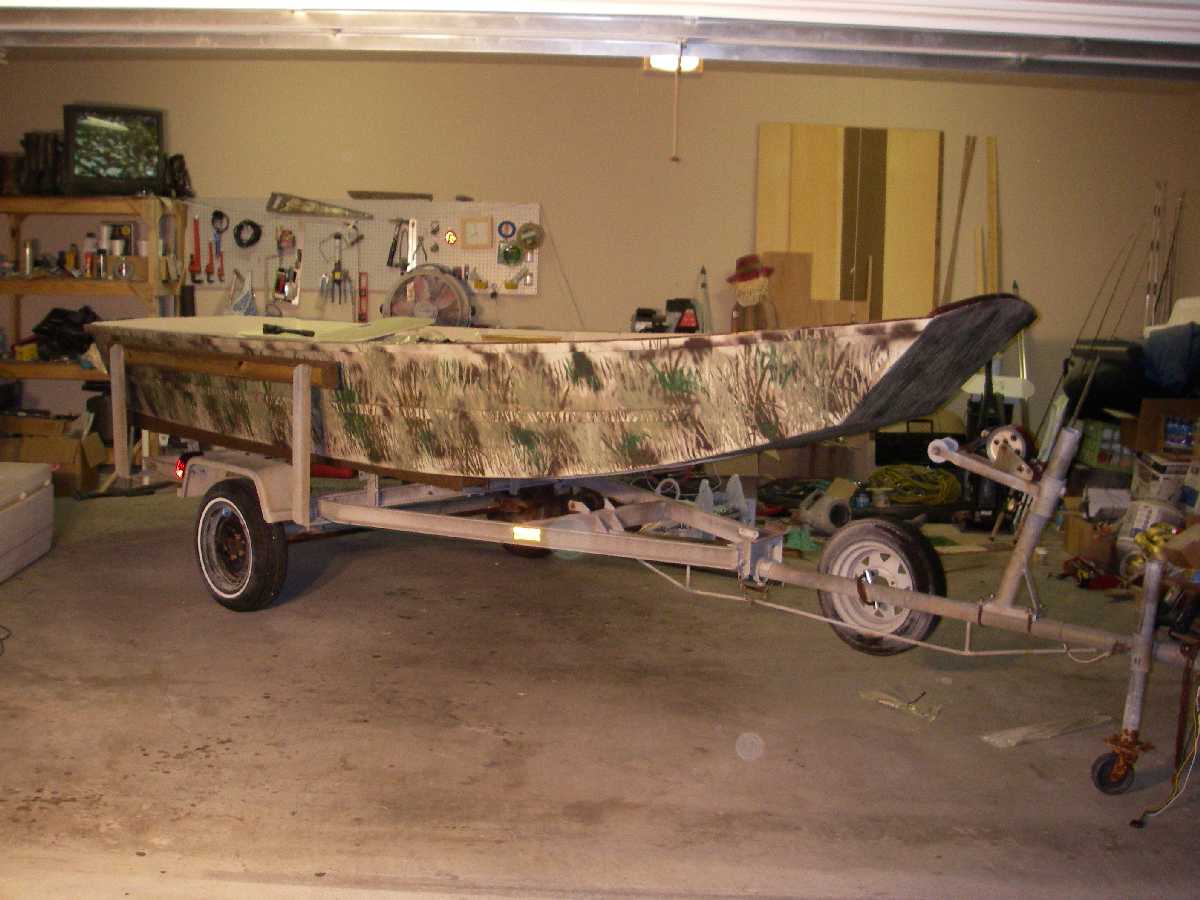
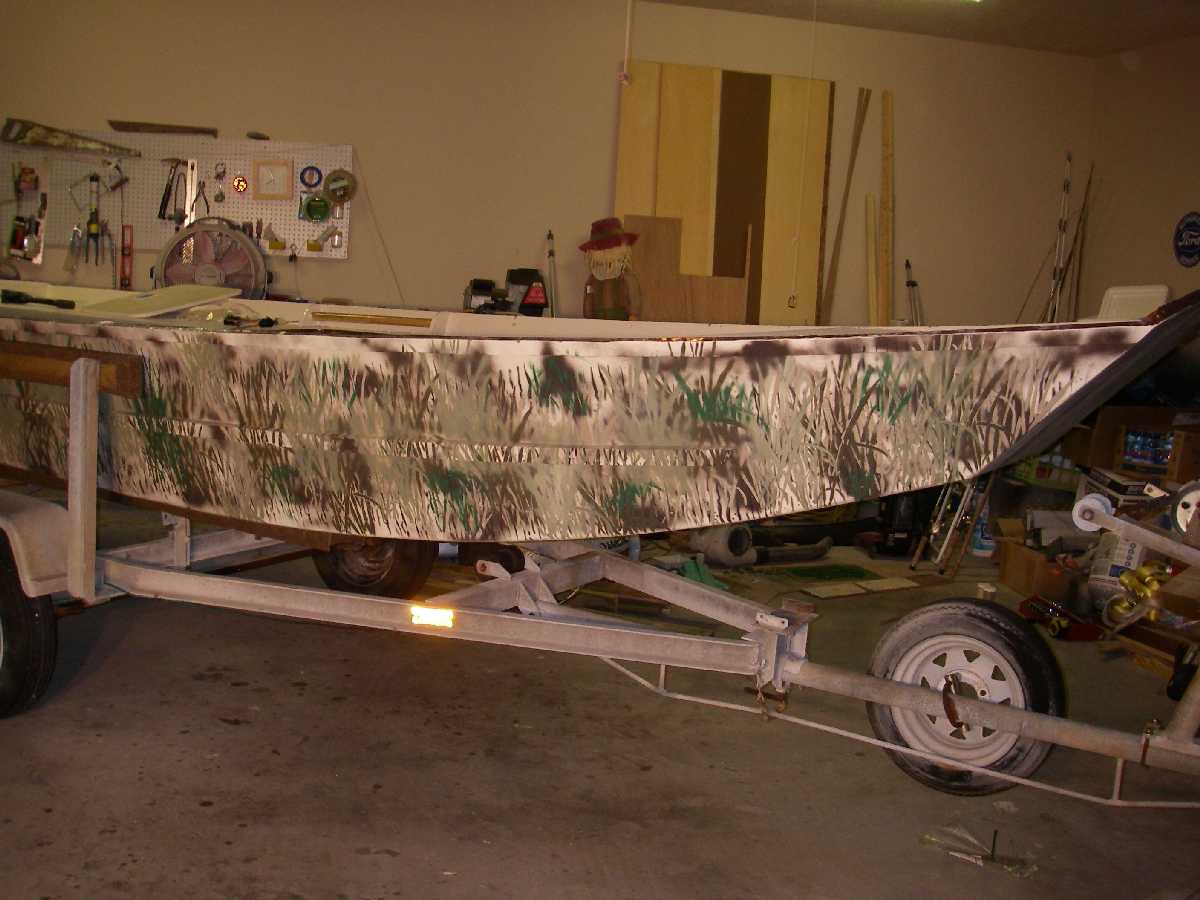
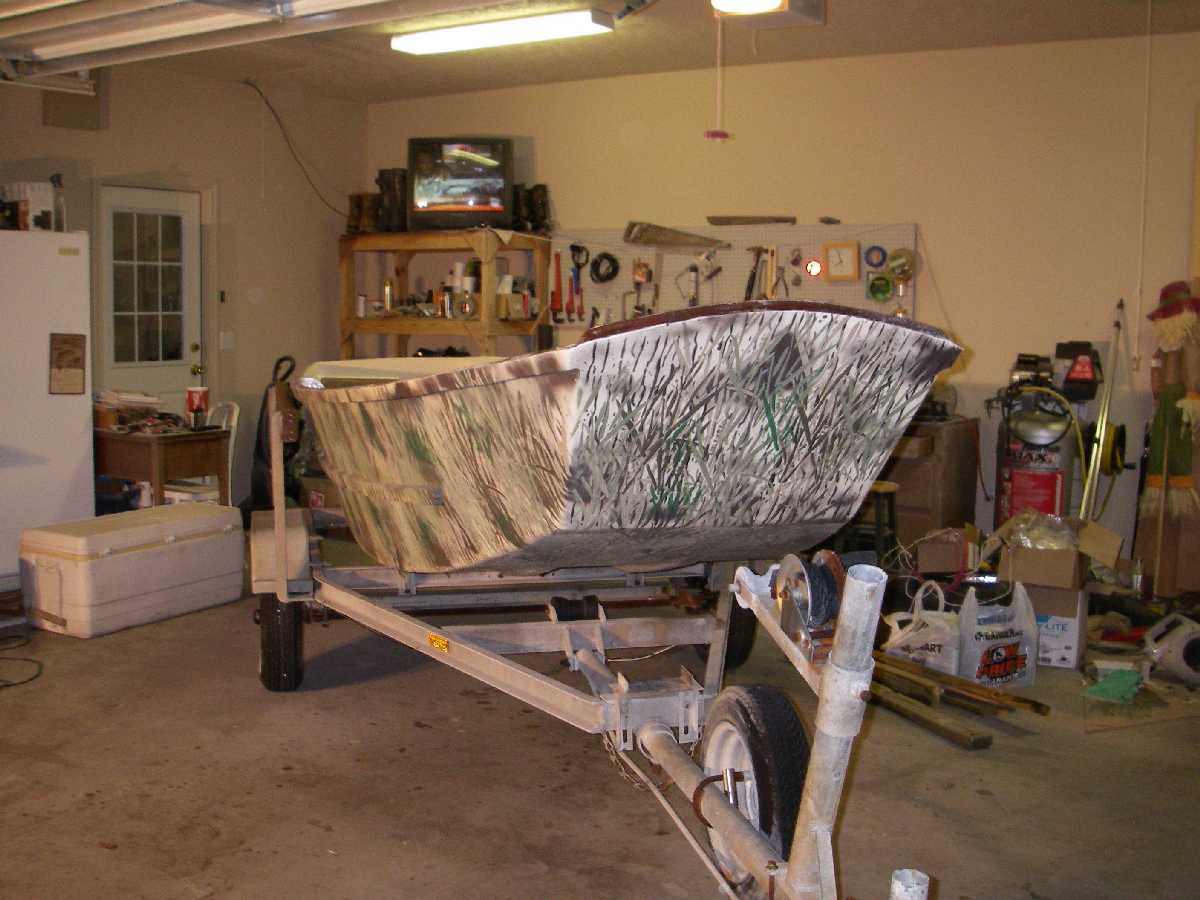
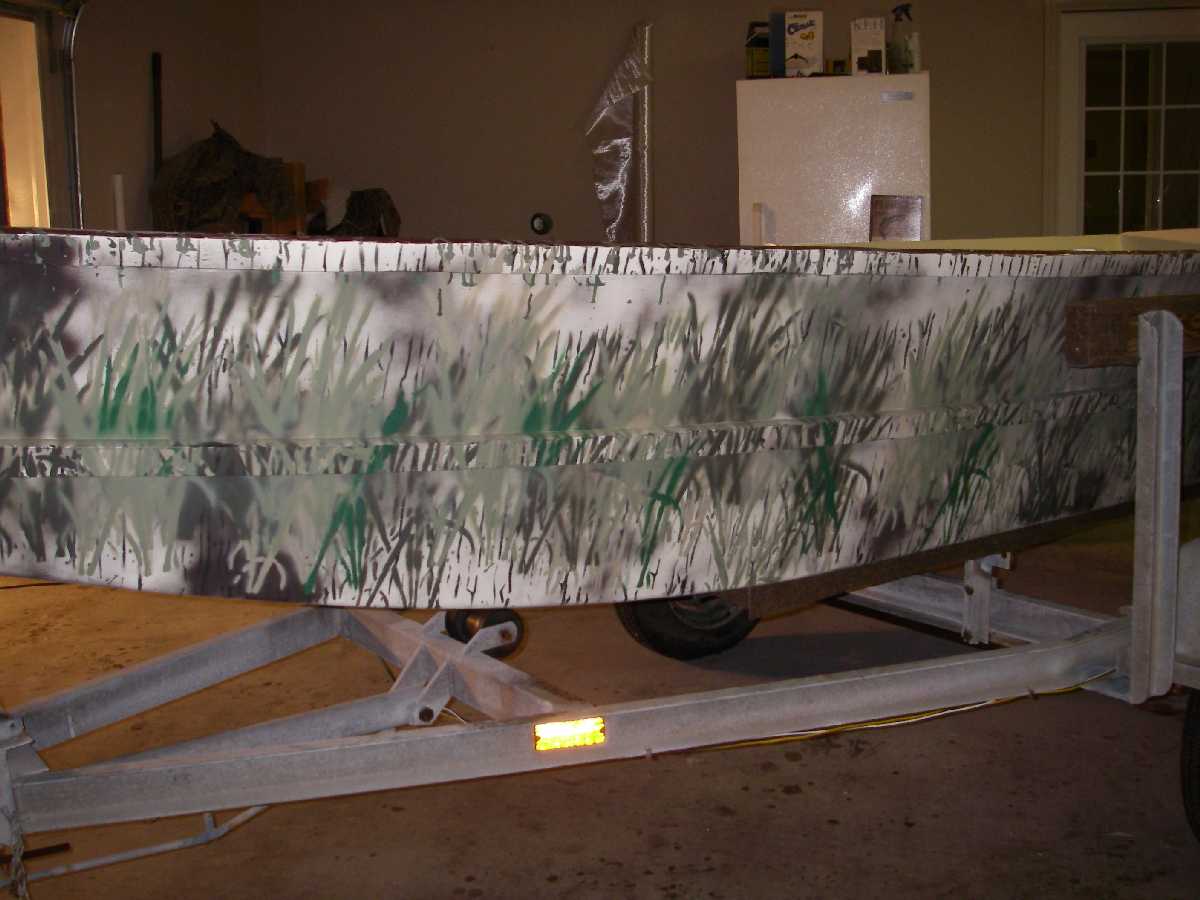
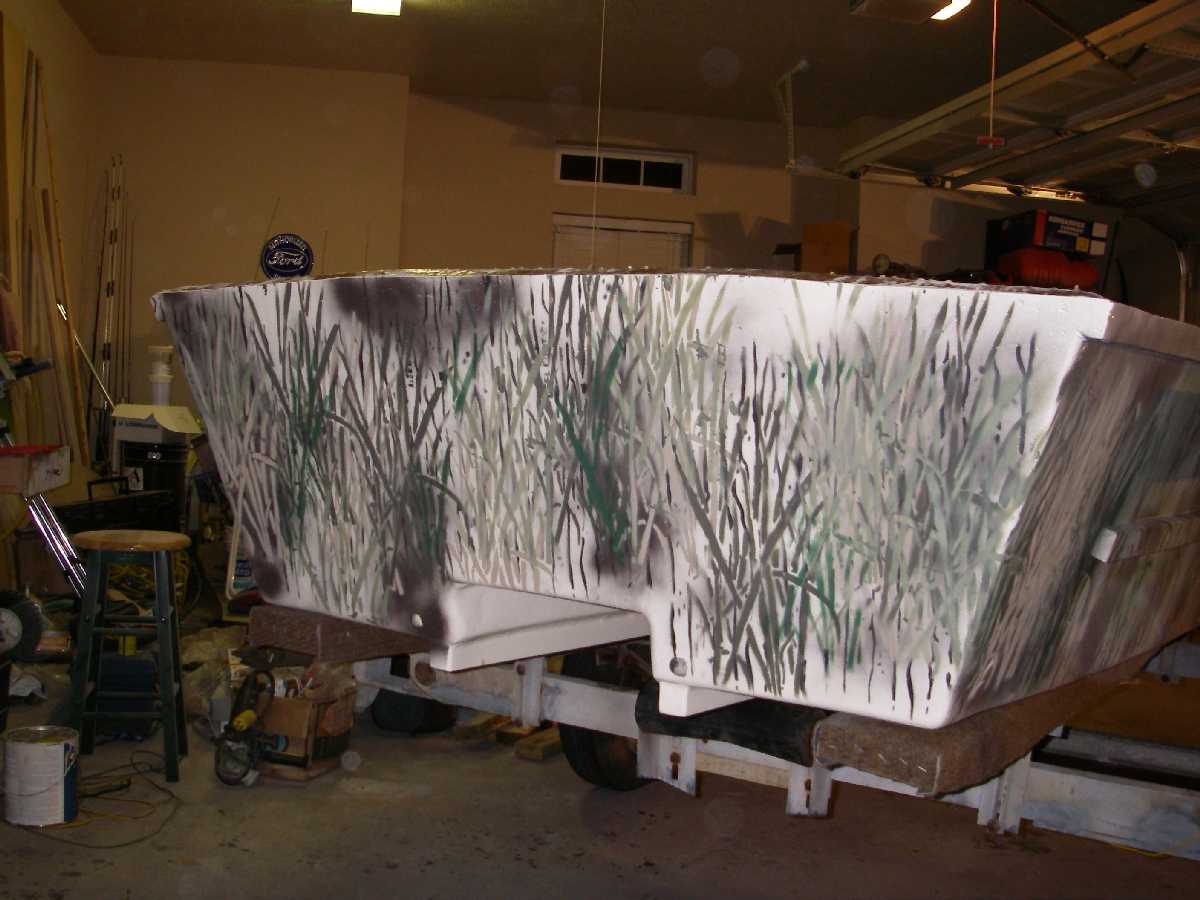
For the next attempt I will only use browns for the under pattern. The bark pattern will be sprayed with black this time. I think that will better mimic the 'shadow grass' pattern. This is the pattern I'm trying for, just a lot more random as I tiled one image 9 times to make this pic:

We'll try again in the morning. I'm taking the day off tomorrow to try and wrap this thing up.
Tim
Posted: Wed May 10, 2006 1:01 am
by robbiro
Tim,
A steady hand and a beautiful boat, wow. Good luck with the final touches (second time around).. Will continue to watch and learn.
Robbie
Posted: Thu May 11, 2006 2:01 am
by timoub007
Thanks for the compliments Robbie.
How do you like these?
I was able to work on the trailer this afternoon and get the new boards put on. My wife helped me with the carpeting job as well.
I also got the camo pattern laid on with a much better result. I studied my various hunting items that are 'shadow grass' to find out what each layer really looks like. I then used that to apply the layers to the boat. I think it turned out much more appealing. It only lacks the golden color of the 'shadow grass', but that is okay by me.
The boat looks even larger sitting on the trailer. I'm very pleased with how it has turned out. Here's hoping to get her wet before the weekend is up.
Tim
Posted: Thu May 11, 2006 12:01 pm
by gk108
Hey, I like that Tim. The camo looks good when the boat is right side up and the light is overhead like the first two pics. I guess the next step is to take it out and see what the ducks think about it.
Posted: Thu May 11, 2006 12:06 pm
by tech_support
looks better
Posted: Thu May 11, 2006 7:46 pm
by robbiro
YEAH!!!
Robbie
Posted: Thu May 11, 2006 8:18 pm
by Cracker Larry
Oh yeah
Much better. Nice job, Tim!
Posted: Thu May 11, 2006 9:14 pm
by Yorkshire-Dry
Quack quack, my dumb springer would run straight into that one if he heard a duck on the other side
Looks great, well done.
YD
Posted: Mon May 15, 2006 8:50 pm
by britt
Tim, it looks great. Let us know how that tunnel works.
Congratulations,
Britt
Posted: Mon May 15, 2006 11:38 pm
by timoub007
Splish, Splash...
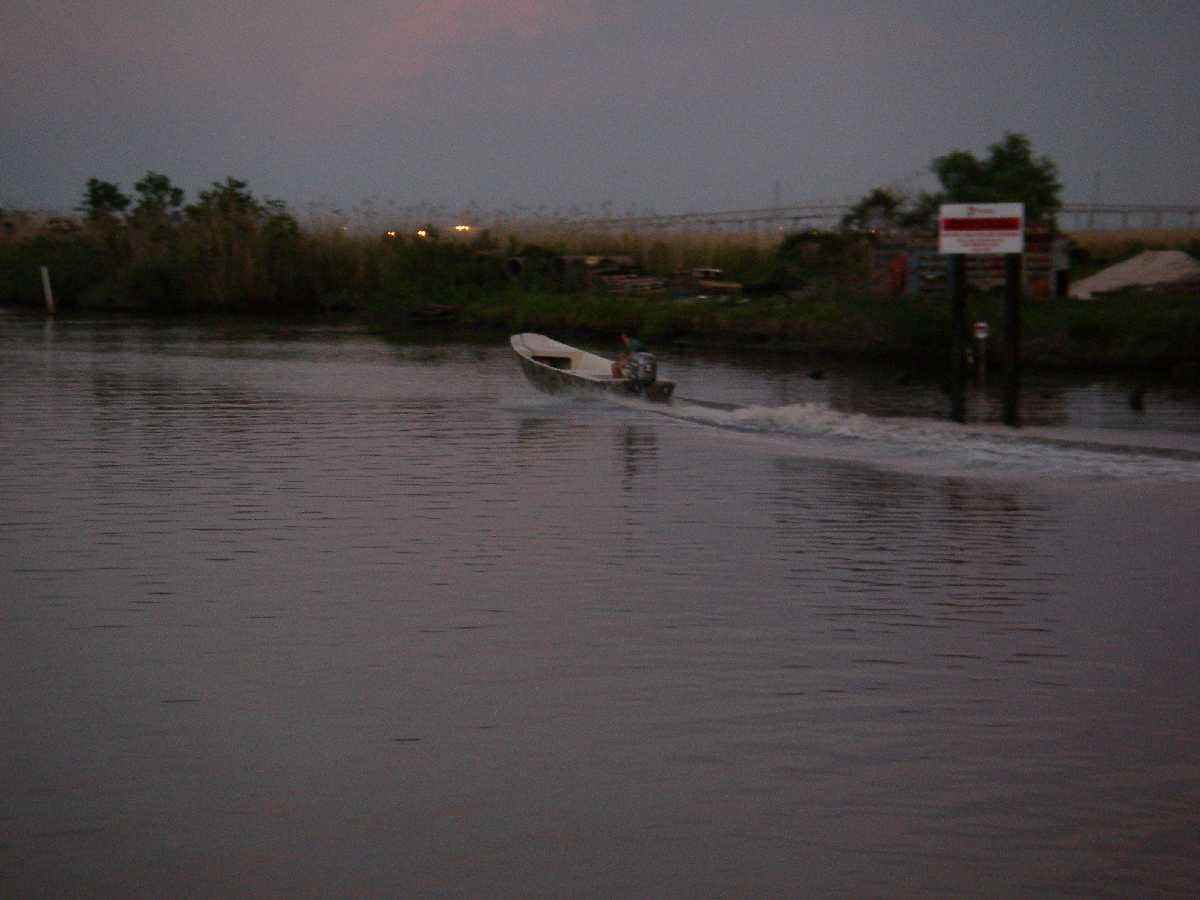
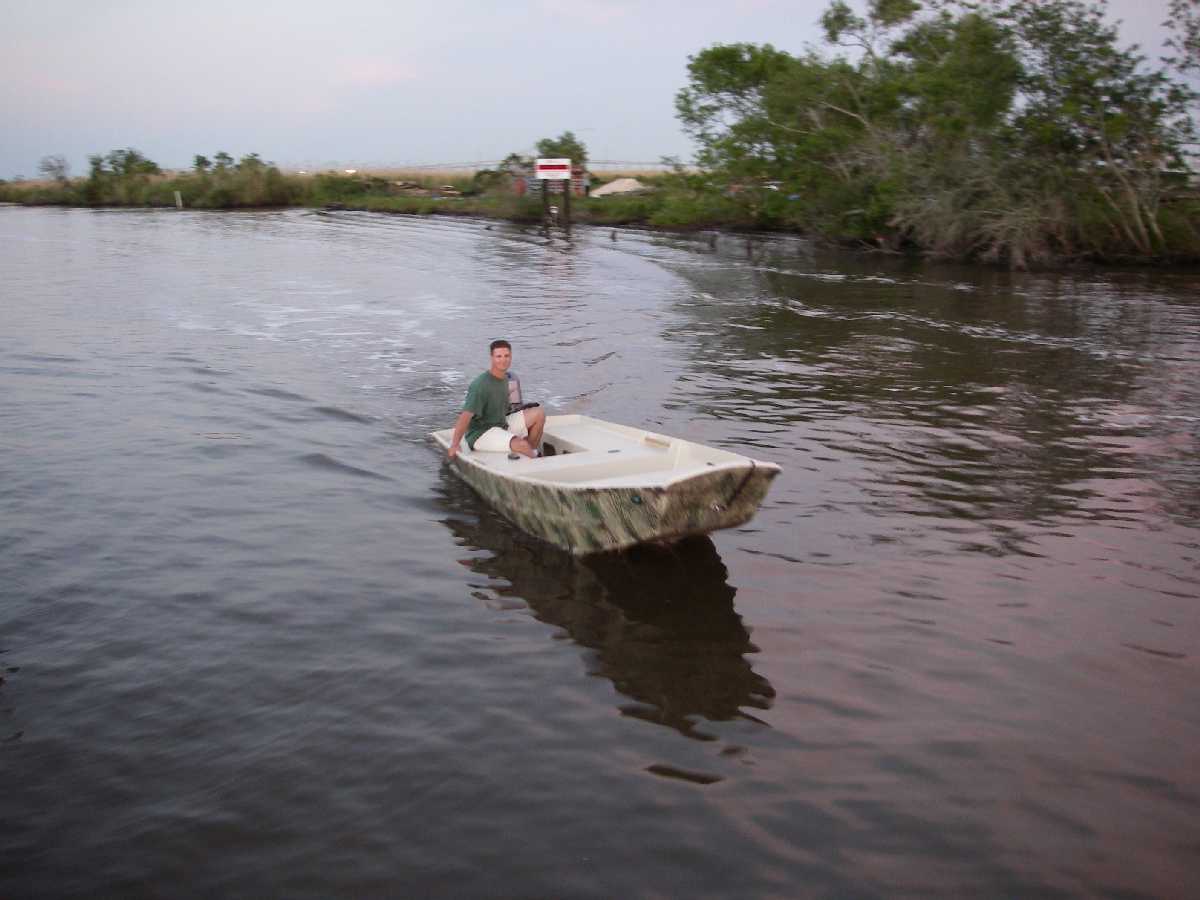
The weather cooperated much better today. After work I did the final rigging on the gas lines and electrical. Then I dropped the motor on the transom and got it clamped down temporarily. I called up my bud that helped me with the large glassing jobs and asked if he'd accompany me on the maden voyage. We met up at the ramp around 6 with just a couple of hours of daylight left.


I need to get my jackplate built ASAP. That motor needs to be jacked up at least 3 inches, probably 4. The motor was being bogged down by all the water it was buried in. Speed was not too good today due to this, but I know that the motor rigging is way off. In time I will get it right.
Overall I am so pleased with the boat. It handled great and took waves very well. Of course not getting up to full speed and having the bow a bit high helps that too. I was able to float in less than 6 inches (didn't measure accurately) with me on the mid-seat and my skinny buddy on the bow deck. Almost got the boat fishy on this trip too as he hooked and lost two good reds on the flat. That would have been the icing on the cake, but it didn't ruin my day.
More pics and reports will follow as the rigging is worked out.
Take care,
Tim
Posted: Mon May 15, 2006 11:51 pm
by DrBones
Congratulations! Great looking boat!
...I know how you feel...
Posted: Tue May 16, 2006 12:00 am
by timoub007
Oh, and one other thing...her name is Bessie Hunter. I'm going to have these decals made up for each side of the transom:

Tim
Posted: Tue May 16, 2006 12:41 am
by robbiro
Congrats, Tim. She really looks good out there under way. Keep up the good work.
Robbie
Posted: Tue May 16, 2006 12:56 am
by Yorkshire-Dry
I'm soooo jealous, I just can't wait, that damned paint just won't dry quick enough
That camo really looks good on the water.
YD
Posted: Tue May 16, 2006 1:40 am
by Newt
Tim
What do you have to with TPWD to license a homebuilt?
Posted: Wed May 17, 2006 12:36 am
by timoub007
Newt,
I called up TPWD and they do homebuilt inspections on Thursdays from 9-12 at the office here in Beaumont. Officially, my launch was on private waters as I will be getting it inspected this coming Thursday. I was told that I'll have to sign an affidavid stating I paid taxes on all the materials and maybe one other form. All the paper work will be provided for me at the field office. I am just expected to bring my checkbook. It shouldn't cost too much though....I hope.
Tim
Posted: Thu Oct 19, 2006 10:33 pm
by timoub007
Lots of updates from the last 5 months of use.
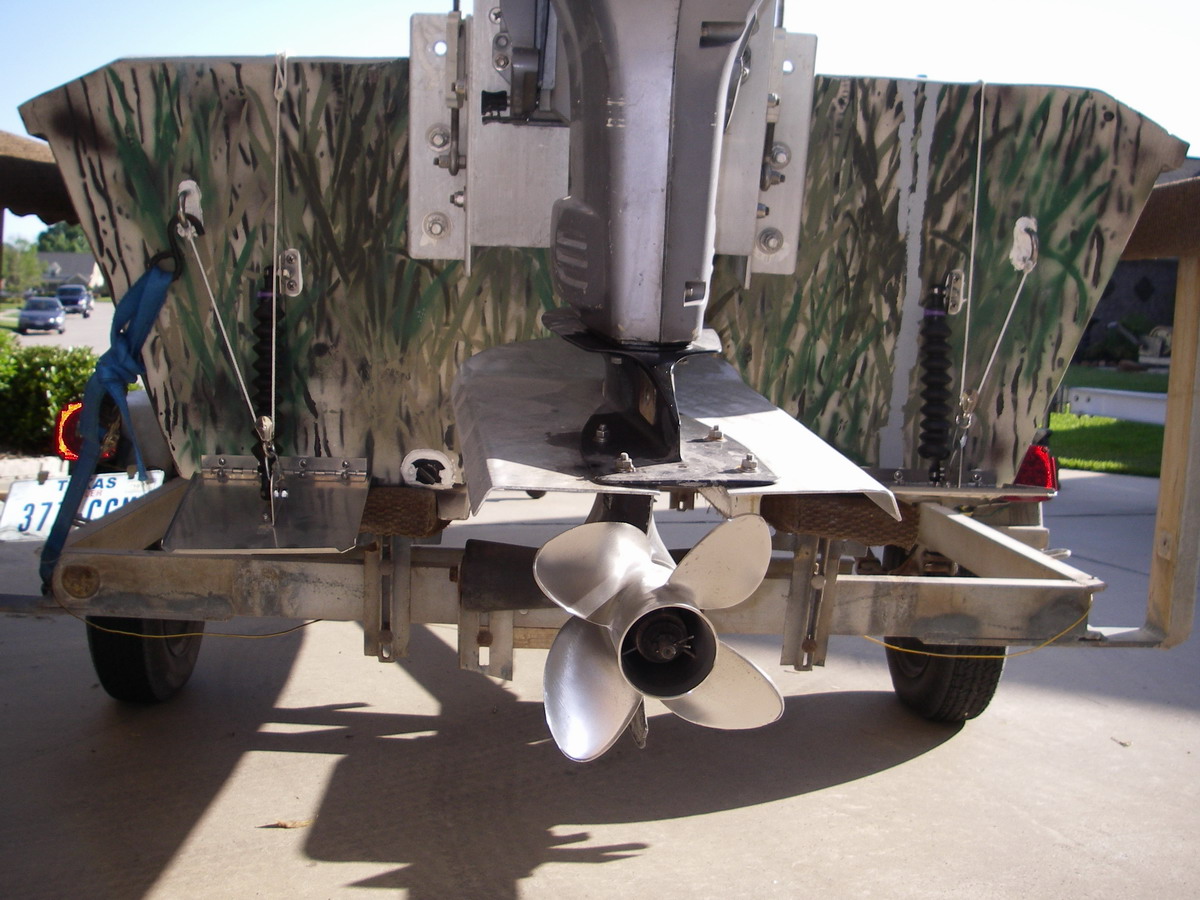
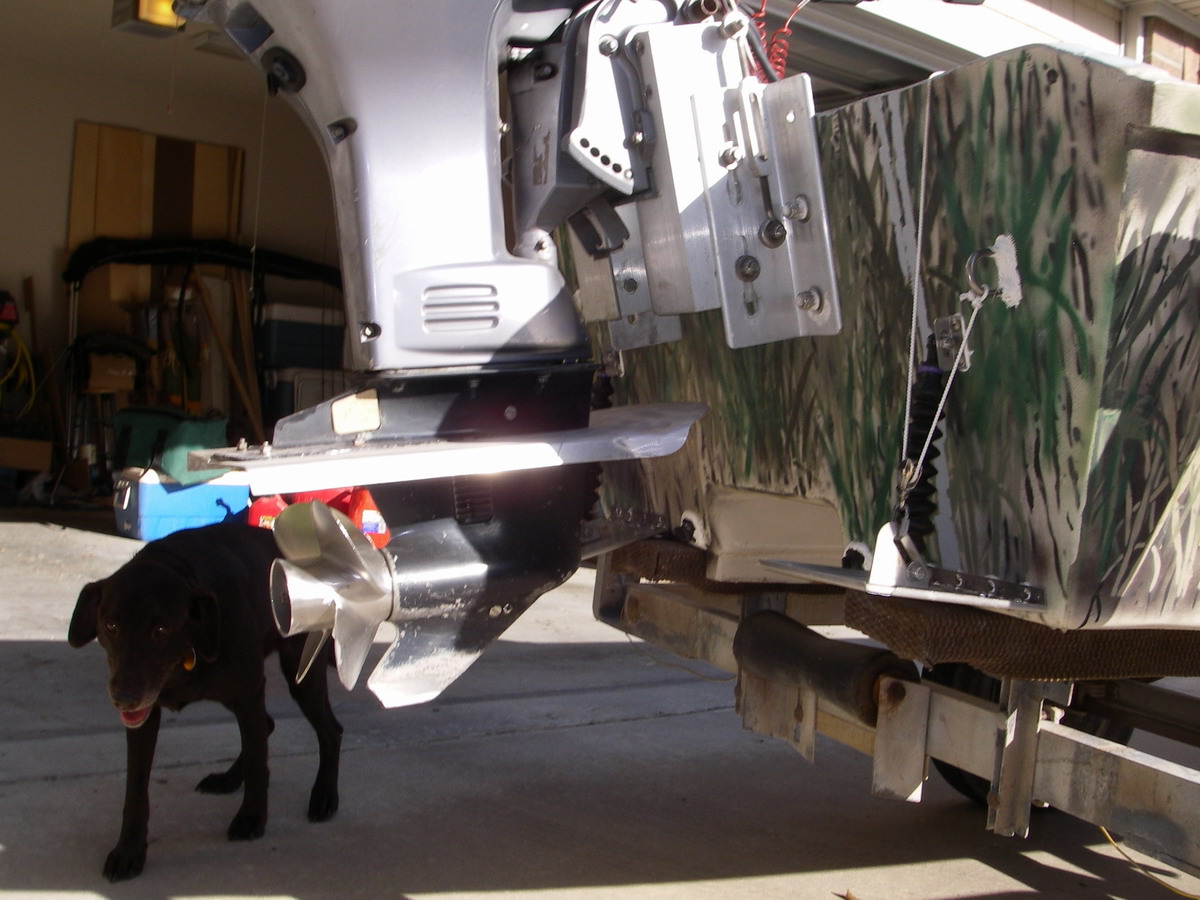
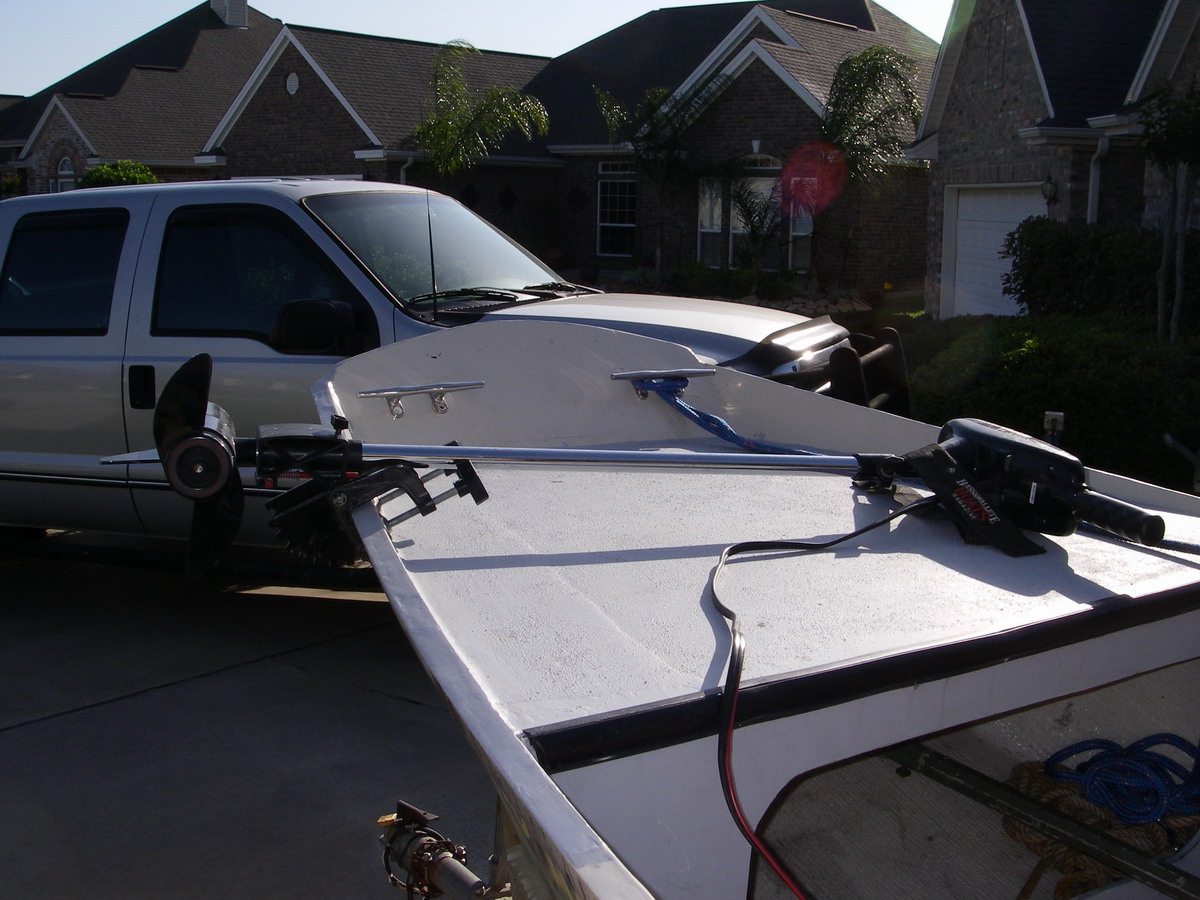
I spent the summer working on motor height and prop type/size.
I installed a CMC PT-35 power tilt and trim unit. This has an integrated setback and manual jackplate as well. It is built to raise the motor 2 inches from the get go, and I drilled several extra sets of holes in it so I could adjust the motor height even more, manually. It sets the motor off the transom about 6 inches. I will probably be selling this though as I have not been able to utilize the trim much. I can only trim it about an inch or so before the boat starts porpoising and it doesn't increase the speed much if at any. I'll replace it with a regular, manual jackplate.
As it turns out, I really missed the math on my transom measurement. The combination of the tunnel and my 15 inch shaft motor proved too much for me and I cut too much off where I probably should have added some on top of the standard measurement. I have cut new pieces to laminate on top of the transom and raise it about 6 inches. I will get these all glued together and prepped for installation but won't tear the boat apart until after duck season. Pics will follow later.
Also after duck season I plan on re-doing the tunnel. While this design allows me to raise the motor A TON, I feel it is adding too much drag to the bottom. Currently I have the motor raised so much that only the skeg is below the bottom of the boat. That is about 5-6 inches of prop and motor below the hull. So the tunnel does what it was intended to as Larry measured 13 inches of motor below the bottom of his hull!!! But as I said it is a large built in hook in the bottom of the hull that is slowing me down. I am currently only running about 22 mph loaded (but in 5 inches over a hard bottom, less over mud) and that is not good enough for me. Most of the aluminum boats around here with tunnels in them do at least that good, but a lot of them are doing better. Since these are heavier and less efficient I've got to do something about it. I have a different tunnel design that I plan on using. It has been proven on boats (aluminum) around here and seems to put a lot less drag on the boat. These boats tend to run very shallow and with good speed. I will get in to more detail on that later, with pics.
I've tried props of all shapes, sizes, and types. I figured I would wind up with a high pitch prop since the boat is so light, but that was a nother miscalculation. I actually couldn't turn my 15 or my 13 pitch 3 blade props enough RPM's. That was part of my initial speed problem, only hitting 4900 or so RPM. I had my prop guy order me a custom made PowerTech 4 blade stainless prop. It is an 11 pitch with lots of cup turning about 5300 RPM. It really bites hard and holds well in turns. I'm hoping to get more RPM and speed with the new tunnel after duck season.
So that's where I've been the last few months in case anyone was wondering.
Keep on building folks,
Tim
Posted: Sun Oct 29, 2006 9:46 pm
by timoub007
You know the one thing I forgot to do when I stole the cockpit seat arrangement from the D15 was to put the radius curves in the seat tops where they meet the transom. When I was finished cutting the seat tops I looked back and said, "Oh crap, I was supposed to radius those." I didn't think much more of it and figured I had enough structure otherwise. Well, on Friday while scouting for ducks I found out that it really is important. I cracked my seat-to-transom joint where there was only an epoxy/glue filet. First of all, I should have put the 3" radius on the seat tops. Secondly, I should have put some glass in that corner.
It cracked when I was trying to "jump" a small finger of marsh, about 3 feet across. I was in one ditch and wanted in another one. Mental note, the tunnel doesn't mean that I can run in zero water. LOL
Well, I spent yesterday grinding out the crack. One side was just the epoxy/glue that cracked. On the other side the glue bound to the wood so well that the top layer of ply wood was separating for about 6 inches. I have everything sanded and prepped for the repair. I'm going to put in a piece that spans the entire gap between the seats at the transom that obviously has the radius corners on it. It will stick out from the transom about 6 inches to allow a good bond with the biaxial cloth.
At the same time that I do this repair I'm going to raise the transom height. When I was mod'ing things out, I miscalculated the transom height that I needed. The plans are written for a 20 inch shaft and no tunnel. With my short, 15 inch motor and the tunnel I screwed up the math. My transom ended up being about 6 inches too short, but I made that up with the CMC t/n/t. The pieces that I'm laminating up for this repair will raise the motor mounting height by 6 inches. I will try everything without the CMC unit when I get it put back together. I didn't have enough 1/2 inch left to do this so I'm using 4 layers of 3/8. It should come out to the same as 3 layers of 1/2 in the end. I will also be covering the rear of the transom with another full piece of 12 ounce biaxial cloth and the front side will tie into the seat tops and that piece I talked about above. In all, it should be nice and strong by the end of the week.
I'll tackle the new/different tunnel come February or March.
Tim
Posted: Mon Oct 30, 2006 8:30 am
by tech_support
The tunnel produces suction on the bottom of the hull, slowing you down. The GF16 does not have the planing area of a GF18 or XF20. Changing the tunnel might help in reducing the suction, which would make the boat run faster.
Posted: Mon Oct 30, 2006 10:42 am
by Super Spook
Tim,
If you are still thinking about selling the trim and tilt unit in the future, please post on here first. I'm considering that same model for use on the new Glades boat Jaques is designing, but will have to recover from the initial material investment before I can start thinking about rigging items. Were you happy with its performance? It sounds like it just might not be what you need for your particular boat. It can be tough to manually tilt a motor when it's tucked back up underneath a poling platform, so I need to start surveying my options. Thanks.
Elie
Posted: Mon Oct 30, 2006 5:28 pm
by timoub007
Thanks for confirming what I was thinking Joel. I'll try a different design in the spring and report if it helps or not.
Elie,
I was very satisfied with the performance of the CMC unit. It does what it was designed to do quite well. I'll keep you in mind when I decide what I'm going to do.
Tim
Posted: Thu Jan 11, 2007 9:39 pm
by timoub007
UPDATES
I had some issues getting on plane in 4-5 inches of water this duck season. While I could float fine and idle, the motor just wouldn't bite enough prior to blowing out to get up on plane. Even spinning up wouldn't work.
I searched the site and questioned the membership most of who thought I was crazy to think I could get on plane in that small amount of water, but this is with some mud underneath the few inches of water. It seemed that I had a couple of options, float boxes (sponsons) or trim tabs. I couldn't see spending more on hydraulic or electric tabs as I did on all of the materials for the entire boat. I didn't want to waste time building float boxes that I wasn't sure would help me. Then I found Smart Tabs and started asking questions about them. I could find nothing negative about them and they only cost slightly over $100. Knowing Christmas was coming up I decided the in-laws would be able to help me out.
I got the Smart Tabs on the boat before Christmas 2006, but immediately experienced motor issues. It took some time to figure out the motor issues, and I do not know how it fixed itself (I hate it when that happens), but it is running correctly again as of today.
These tabs are the real deal!!! There was as near to zero bow rise on take off as one can get. This should correspond to zero stern squat as well which is what I was looking for. I was short on time and the tide was high anyway, so I just stayed out in the river for the 5 minutes I had it in the water. I did notice about 1 mph loss in top end (WOT) speed for now though. I need to reduce the starting downward angle some to see if I can get the speed increase they claim is possible. I would be happy if I could just get back the 1 mph or so that was gone this afternoon. Even if I don't, these will be staying on my transom.
There was still noticeable pressure from the tabs pushing the bow down when at WOT. The front of the hull was not as clear from the water as prior to the tabs. This is not a huge issue on a flat bottom as it won't bow steer, but it was causing a lot of extra spray. In the stiff 20+ mph winds I did get a little wet from cross spray. I didn't have this problem before.
So with a little adjustment I expect for things to get even better gains from this new addition to the GF-16T.
I'll update again when I get her out again.
Tim
Posted: Thu Jan 11, 2007 10:17 pm
by Tod
Sounds like your getting all the fine tuning done Tim. That flying liver better beware next season.
Question. How do you think those Smart tabs would work on your other boat or mine? Worth the investment?
Posted: Thu Jan 11, 2007 11:04 pm
by timoub007
Tod, after what I saw today...hell yeah. They are simple and don't add another set of buttons to mess with when underway. I don't think I could push the trim, jackplate, and trim tab buttons all at the same time when jumping up in a shallow back lake in my big boat.
I'll shoot you a PM on the other site with more.
Tim
Posted: Tue Jan 23, 2007 12:04 am
by Jpatburke
HEY!!!
timoub007 joined the site in 1969!!!
How the hell'd you do that?
-JB
Posted: Tue Jan 23, 2007 12:24 am
by Jpatburke
HEY!!!
timoub007 joined the site in 1969!!!
How the hell'd you do that?
-JB
Posted: Tue Jan 23, 2007 8:49 am
by timoub007
What's more amazing is that I was born in 1977.
So I guess I was destined to build a boat!!!
But wait, Al Gore didn't invent the internet until the late 80's right?
Posted: Tue Jan 23, 2007 10:23 pm
by Cracker Larry
But how do they work in reverse?
Posted: Tue Jan 23, 2007 10:31 pm
by timoub007
Haven't been back out Larry. I just finished up deer season this past weekend with a few more deer for the freezers. Duck season has been pitful to say the least. And have you checked a national radar lately? We've been getting pretty much non-stop rain for the last 10 days. Couple that with 40 degree temps and no ducks and I'm not going out in a boat.
I'm on call this weekend so I probably won't even get to hunt the last weekend of duck season. If I get some warmer weather and a free hour I'll run the boat for you. I need to rig up the pulleys to "retract" them too.
Patience my friend. I don't have any so I understand. :p
Tim
Posted: Fri Jan 26, 2007 5:08 pm
by Cracker Larry
Last weekend was the end of deer season here, also. We've still got some more time for duck. Shot a few Woodies last weekend.
I've been working on Daufuskie Island this week, traveling back and forth in the GF 16 about 40 miles a day. No bridge to Daufuskie. It was 28 this morning when I left the dock, but at least the sun was shining. First time it's been out all week. For my Cracker butt, it's been a very cold week for open boating
.
We've got plenty of ducks this year, for some reason? I saw thousands this morning in the Savannah National Wildlife Refuge. No gators all week, too cold, but lots of ducks.
Posted: Fri Jan 26, 2007 9:01 pm
by bug_power
Looking good! Sounds like those smart tabs are just the ticket. Now I've got to convince my GF that's what I REALLY wanted for my BD last wednesday!
Posted: Sat Jan 27, 2007 4:47 pm
by PastorBob
Larry I just realized where you are. My in laws are from Claxton, GA (fruitcakes)
they have a cottage at pine harbor on sapelo sound i'll try to look you up next time im down there (I have lots of spare time on those trips!)
Posted: Sat Jan 27, 2007 6:52 pm
by timoub007
Here is the website for the guy I got my Smart Tabs from. It was the best deal I could find (for my in-laws.)
http://stores.ebay.com/eMarineWorld-Inc ... idZ2QQtZkm
Tim
Posted: Sun Jan 28, 2007 9:28 am
by Cracker Larry
Pastor Bob, look me up. We'll go fishing (when it gets warmer).
Those fruitcakes are nasty! I've got some friends that own the Claxton Poultry company. I do some hunting and fishing with them.
Tim, what model Smart Tab did you get?
Posted: Sun Jan 28, 2007 5:50 pm
by timoub007
Larry, I went with the 980-30's. I wanted the larger plane size of the 980 series to impart the most lift possible. I read that if I need actuators with a lighter poundage they will swap them out for me. I still haven't made another run as I've had to work on the few days it hasn't been raining here. I did find some nice, cheap, small pulleys at Blowe's to rig up for backing and beaching.
I'm hoping to get out one afternoon this week to give you a report on reverse.
Tim
Posted: Thu Apr 12, 2007 8:00 pm
by timoub007
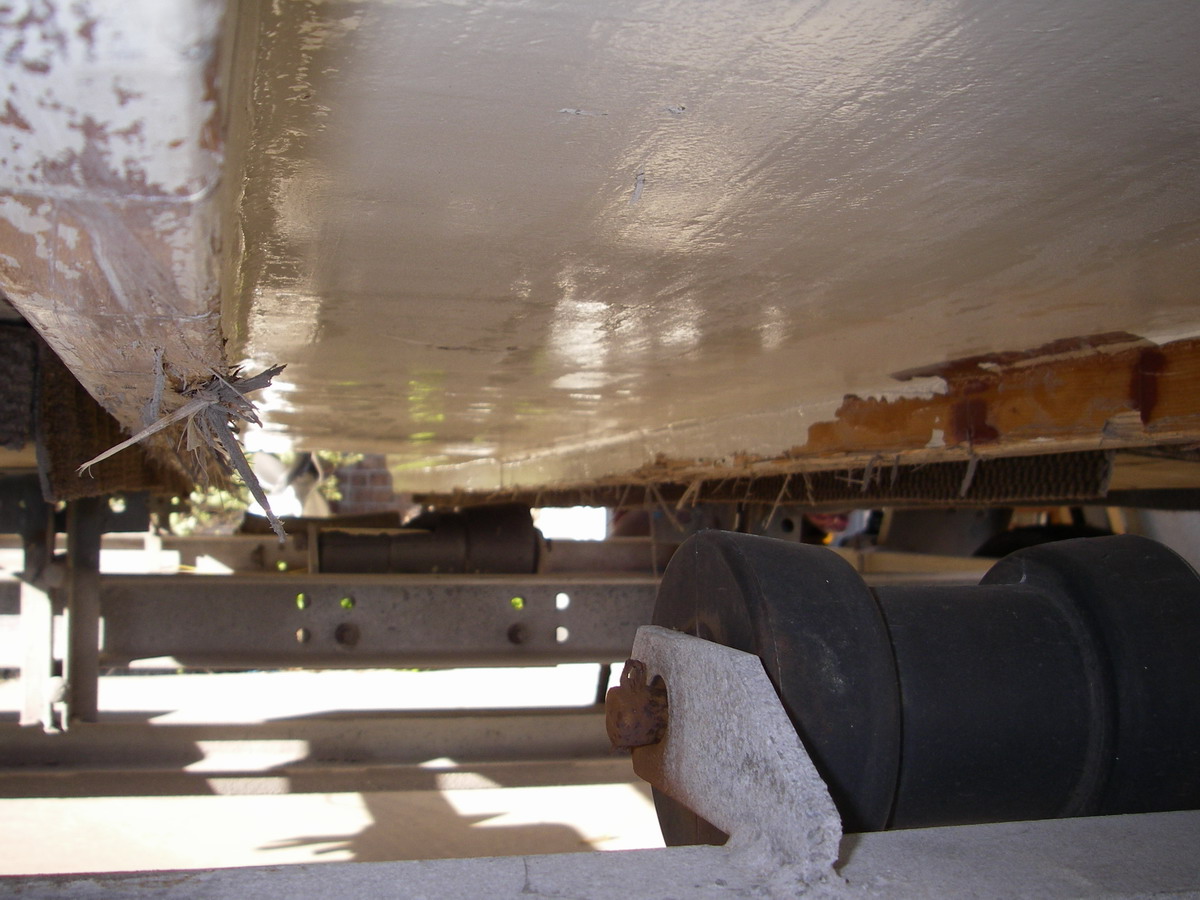
Well, after a full duck season and a few fishing trips to a bass club I'm on I need some help with the runners on the bottom of my boat. Here is a picture of what they look like after pulling over rollers maybe a half dozen times.
I am going to redo the tunnel some time this summer and will address this issue at the same time (since I'll have the hull upside down). At that time I'm going to put the CMC tilt and trim unit back on instead of this simple jackplate. With the new tabs, I think I can benefit more from the tnt.
Now should I:
1. Use a router and sander to smooth the edges then seal with a coat of epoxy and graphite, or
2. Use a method to knock them down about 1/2 the height and then affix some of those teflon-like strips that you mount to your trailer bunks so that your boat will launch/load easier, or
3. Some other suggestion from the forum or designers?
I appreciate all input.
Also, here are a few other pictures that I owed some of you:
Gun storage in use:

Smart tabs:
How I pull them up to allow slightly better reverse. The tunnel still hampers the ability to reverse well. The reverse is really no worse since adding the tabs.
Trolling motor:
Tim
Posted: Thu Apr 12, 2007 9:24 pm
by steve292
see, if I read this right, thats impact damage not abrasion.If so I would plane them down to remove the damaged area, & fix on either some sacrifical wood strips & replace them every season. Or go nuclear & use stainless flat bar or teflon flat bar fixed with stainless screws.
Just my opinion mind you, & I have been known to be wrong before.
Posted: Thu Apr 12, 2007 10:54 pm
by timoub007
Well, I'd say it is abrasion as I was using a winch to pull the boat over some very poor rollers to get it over a levee. I was only moving the boat at about 20 feet per minute, a total of 100 feet (plus or minus). I did not hit the levee at any speed.
Tim
Posted: Fri Apr 13, 2007 6:45 am
by Cracker Larry
Wow Tim, you really did build a boat! Nice.
With that kind of bottom abuse, I think I'd go with strips of stainless steel flatbar.
Posted: Fri Apr 13, 2007 3:04 pm
by steve292
When I said impact damage,I meant damage cause by gouging into stone(or indeed dud rollers) & such,as opposed to my understanding of abrasion which I take to mean wear caused by sand or grit, gradually removing material.I did'nt mean to imply that you would smash your boat into the bank. Reading my last post I can see how it can be read as that,& I apologise if I offended you.
Posted: Sun Apr 15, 2007 5:00 pm
by timoub007
No offense taken Steve. I just wanted to get some more input and let folks know that I wasn't intentionally banging into things at speed. I'll have to post up another message on one of the top sections to see if Jacques or Joel will reply.
Larry, were you doubting me? LOL
Thanks,
Tim
Posted: Mon Apr 16, 2007 11:01 am
by PastorBob
Tim, One question is do you anticipate the same abuse on the bottom of the boat in the future? If no then wood could be replaced with wood. however if you plan to use these rollers again I see not other option than Stainless Steel runners, or else you will be going through extensive repairs annually.
Posted: Mon Apr 16, 2007 11:20 am
by Doug
They did the job in that they were certainly "sacrificed" . I'd put HDPE strips on top of them if you are going to keep going over the levee.
Posted: Mon Apr 16, 2007 2:11 pm
by timoub007
Thank you for the opinions. Yes, the runners did what they were designed to do. Also, yes I will be using the rollers as long as the boat floats - forever hopefully.
I don't think I want to go with SS, thinking cost here but I will price it out and see. I think I'm going to give the plastic runners a shot when I get a chance.
Other opinions are still welcome/wanted.
Tim
Posted: Mon Apr 16, 2007 2:34 pm
by Cracker Larry
Tim, I think stainless flat bar is less expensive than you think and probably less than FG, resin and more wood. Something about 3/4 X 1/8 would work fine.
Posted: Mon Apr 16, 2007 3:14 pm
by TomW
Tim, I have a source for UHMW if you need it. A 4" x 3/4" x 4' pc is $32. That will give you an eight foot by 2" runner. Just something to let you compare to stainless steel. They have 1/2" and 1/4" also.
Tom
Posted: Mon Apr 16, 2007 5:55 pm
by timoub007
Thanks Larry and Tom. I'll search around town for some SS flat bar. For comparison, these are the slicks that I'm considering (kit #4):
(link removed)
I'll let you all know what I end up with.
Tim
Posted: Mon Apr 16, 2007 6:11 pm
by TomW
Tim, Cabela's looks OK but be cautious of Polypropylene there are various hardnesses of it so if you go that way check it before you mount it.
It may be fine for sliding a boat but not for what you want.
I think you will find stainless not to far off from this or the UHMW.
Tom
Posted: Mon Apr 16, 2007 6:29 pm
by gk108
Here's what Taco has for SS strips.
http://www.tacomarine.com/cat--Stainles ... _back.html
They may be a little pricey, but, if the rollers that you are having trouble with are made of metal, it's best to fight fire with fire.
Posted: Mon Apr 16, 2007 9:29 pm
by timoub007
Tom, I didn't look into the density/hardness of the Cabela's brand strips. That is definitely something I'll have to look into. You're probably correct in the UHMW stuff may be better.
WOW GK, that is some nice stuff, but it would cost about 1/2 as much as I have in the whole project right now. I'm sure I could find it a bit cheaper somewhere, and maybe more expensive elsewhere, but here it is $465 for 20 feet, plus over $100 for shipping. YIKES!
(link removed)
I'm going to do some searching around town at local metal shops. What about 1/4 inch thick aluminum strips? I know that I (and just about everyone else) have dragged aluminum boats over these same rollers w/o punching a hole in their bottoms. These boats usually hit the rollers on their running strakes, basically a crease in the aluminum hull.
Posted: Mon Apr 16, 2007 11:28 pm
by TomW
Tim, I don't know why I didn't think of aluminum strips, I worked for a big aluminum company for 10 years.
I would get a hard alloy 1/4" by what ever width you want. A local machine shop should have both it and stainless steel. If you are anywhere close to oil country you should be able to find either pretty easily. I am not sure where Pt Neches is I have only been in and around Corpus. The one thing with the aluminum also is if you have a table saw you can cut the aluminum to size if they don't have the size you need.
Tom
Posted: Mon Apr 16, 2007 11:30 pm
by timoub007
Hey Tom, do you have an alloy number that I could ask for? I don't know my metal numbers.
Thanks,
Tim
Posted: Mon Apr 16, 2007 11:48 pm
by gk108

Geez. Those strips must have a high platinum content to them.
Aluminum would probably be fine, then. As long as you countersink the screw heads. Maybe bed them with a thin layer of 5200 to keep everything supported evenly. Try to find some anodized aluminum if you can. It will be tougher to bend, so you will be less likely to end up with some scalloped strips after a few trips over the rollers.
Posted: Tue Apr 17, 2007 1:33 am
by TomW
Tim, I have been away from it for 15 years and was never really on that side of the business. I will try to find you some numbers but I think your best bet would be to look up Aluminum in the phone book and talk to the local dealer about what you want.
Let him know you want a hard alloy that will not get scraped or dented easily. You do not need to worry about anodization because the first scrape will ruin that, it is just a surface coating.
Tim I went to my old companies site and found what I was looking for and what you need. Get either 1st choice 5086, if not availabe, 6061.
Also found a web site you can e-mail
www.adimetal.com
Tom
Posted: Tue Apr 17, 2007 3:40 am
by gk108
Here's a metal company that I've dealt with before. I've ordered aluminum bar and tube from their JAX location in the past and they were easy to deal with. Priced by the pound and they delivered on their truck.
http://www.ryerson.com/index.asp
They carry aluminum and stainless and have a location in Houston. My guess is that their SS flat stock could be had for a fraction of the Taco stuff, you just have to drill it yourself.
3530 South Loop East
Houston, TX 77021
713-747-1110
800-392-4501
713-741-6702 Fax
Posted: Tue Apr 17, 2007 9:23 am
by anonymous
If you use aluminum, look for tempered or hardened state material. Commonly available types are tempered 2024 and 6061. 2024-T3 is very common from metal companies that supply aerospace and racing industry. There are several other alloys, though not as common at machine shops and local metal companies. Avoid alloys with a "-0" suffix. That indicates a normalized or annealed (soft) composition and wouldn't be very suitable for what you are trying to do.
Gordon
Posted: Tue Apr 17, 2007 10:54 am
by TomW
Tim, Ryerson is a good company. What I did not say in my last as it was late is that 5086 is specifically for Marine use. 6061 is hardened and used in buildings and can be used in a marine environment. I would be careful with others as they may have copper in them that would play h*** with your motor. I would try to stick with 5086 for just that reason.
Tom
Posted: Tue Apr 17, 2007 12:28 pm
by anonymous
Tim . . since your only making skid-plates, and not "welding up" a hull, almost any grade of aluminum will work. A stiffer alloy would be preferrable, and stainless a primary choice, but if your metal is thick enough and bedded well, as previously stated, then you'll have a better wear surface than wood/epoxy can give you. The alloy type is often marked on the material, and you should have no problem finding something that will work locally. Most machine shops can shear and bend even thick stock (1/4" or more) for very little charge.
Posted: Tue Apr 17, 2007 7:12 pm
by TomW
Tim do not use just any grade of aluminum, some will pit and deteriorate like mad if you get them near salt water, others are to soft and won't wear well.
Tom
Posted: Wed Apr 18, 2007 7:51 pm
by timoub007
Thanks guys. I appreciate all the help. I will try to source some 5086, 6061, or Stainless Steel locally.
I have heard that epoxy will not adhear well to aluminum due to the surface oxidation that forms quickly, even on cleaned aluminum. I was thinking I could just use SS screws with 5200 on the screws every 6-8 inches to fasten the strips to my runners. Do I need to do something else?
Tim
Posted: Wed Apr 18, 2007 10:46 pm
by TomW
Tim, some fine sand paper will get rid of any surface oxidation that may be there and you will be fine to epoxy for a day or so. I would also use screws with either the stainless or the aluminum.
Tom
Posted: Wed Apr 18, 2007 10:57 pm
by jeremy
If those strips are to be somewhat sacrificial, 5200 may not be the best idea. Maybe 4200? I'm no expert, though.
Posted: Sat Apr 21, 2007 9:16 pm
by timoub007
I got a price on SS 1/4" by 1.5" flat bar yesterday. Was told $92 for 12 feet, which is about $7.50 per foot. Yikes! I'll need somewhere in the 24-30 foot range so this would make as much as $300. No thanks.
Looking for some aluminum, probably channel.
Tim
Posted: Sun Jun 24, 2007 11:25 am
by timoub007
Okay, after much debating and a lot more procrastinating I started on my bottom repairs. Of course after I got the motor and jackplate off I realized that there was one other test I wanted to run before changing the tunnel, so I'll fix the runners first and then remount the motor prior to cutting the tunnel out.
So having the boat flipped over yesterday I set out on the daunting task of repairing the runners. I've decided on my course of action, and that is to cover them with 12 oz. biaxial tape and then several coats of graphite/epoxy.
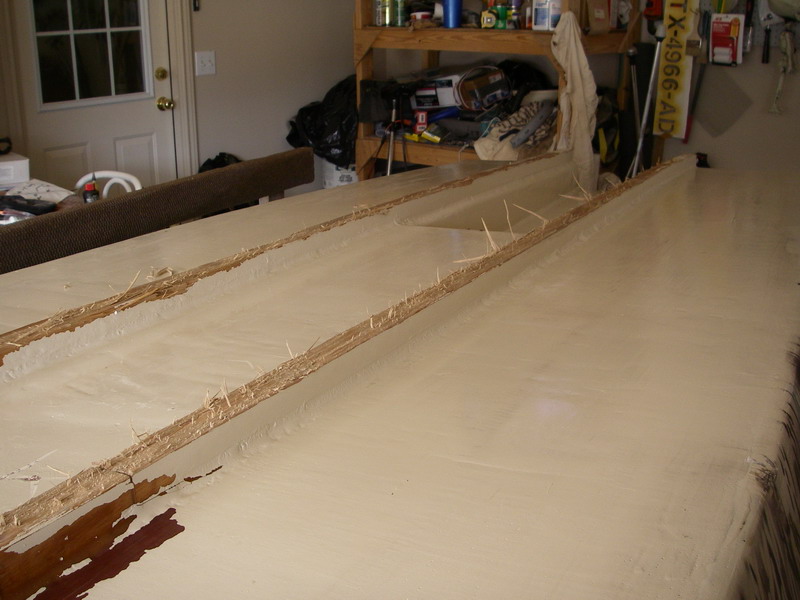
The first pass was with a 1/2" quarter round router bit. I was surprised that some of the gouges were deeper than 1/2" and the router didn't even touch those splintered areas. Then I hit the flat portion of the runners and the hull next to them with a belt sander to remove any paint that was still on the bottom. Last was a lot of time spent with the RO sander to get where the belt couldn't. I think it took me over 4 hours to get to this point. Boy I sure don't miss this portion of boat building.

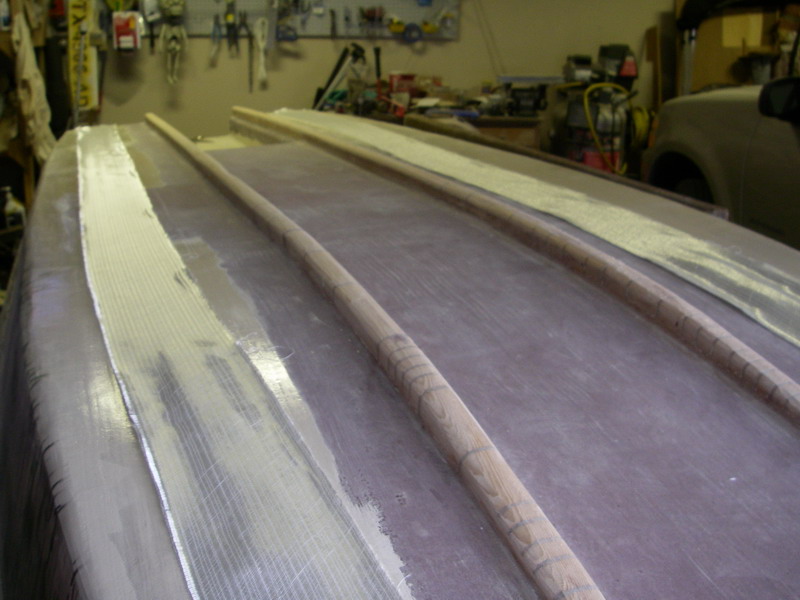
This morning I hit it early in hopes of hitting it again this evening. 3 oz of epoxy coated all the bare wood. Another 16.5 oz was used to wet out the two 12 foot long strips of 12 oz biaxial tape. Here's hoping this will be tough.
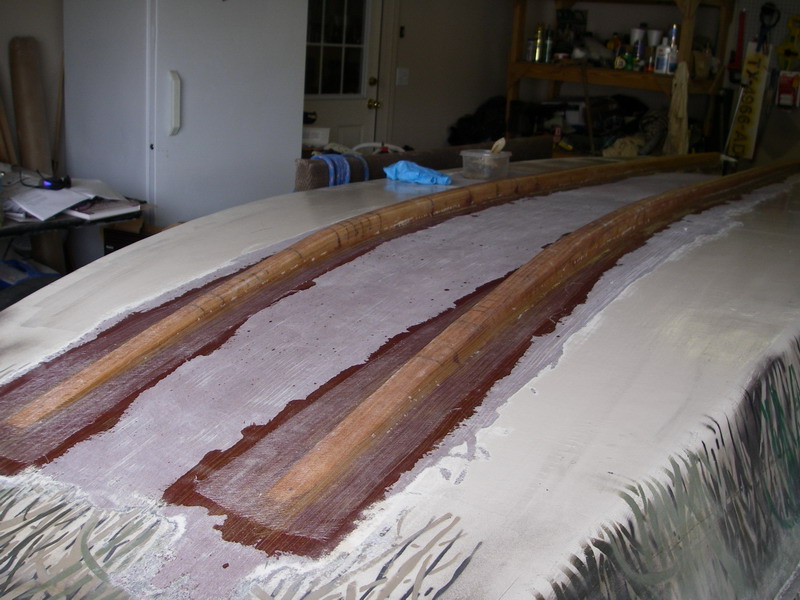
Posted: Sun Jun 24, 2007 11:36 am
by Cracker Larry
That's exactly how I did mine. So far so good.
Posted: Sun Jun 24, 2007 12:32 pm
by TomW
Man Tim those runners were nasty no wonder you were thinking metal earlier. Hopefully the Graphite and biax will be the thing after all the work.
Get that boat back in the water there are fish to catch.
Tom
Posted: Sun Jun 24, 2007 12:36 pm
by Dougster
I'm thinkin' maybe I should do that on the skeg of my LB 22, with the graphite/poxy as well. I look forward to the next pictures with the graphite.
Learning as he goes Dougstser
Posted: Sun Jun 24, 2007 12:51 pm
by timoub007
Yeah Tom, they were pretty bad.
Doug, I'm probably just going to fair them and then relaunch before doing the graphite. I have a hunch that my last tunnel test won't provide me the final fix, but want to try before I cut this one out. Given that its likely I'm going to cut it out I don't want to waste the graphite. I'll put up the pics when I get there you can count on it.
Thanks for the comments guys.
Tim
Posted: Sun Jun 24, 2007 1:35 pm
by robbiro
Tim,
I also look forward to the ideas of what to do with the runners. I like the tack that you are taking and since I have not put an on mine yet, I will "watch and LEARN"
. The graphite also sopunds like a good idea, but I have not gotten to that paint yet either, but it might work well in the stump filled waters that I fish also. Will you do the entire bottom, the runners, or the areas that you have added biax to this time
Keep on Buildiin'
Robbie
(Photos have been shot, but I have not had time to download them to the gallery yet. Daughter had her 10th birthday sleepover this weekend and they took over the room where that computer is and that was one place I did not want to be ( I might learn more than I should about how the younger generation thainks about their parents, etc...)
Posted: Sun Jun 24, 2007 3:24 pm
by timoub007
Robbie,
LOL, I hope that everyone survived the party.
I would recommend to everyone to glass over their runners now. It is not that difficult and didn't take that much more material or time to do. After having to flip the boat back over to fix them, it is a no brainer.
On the graphite, I'm going to cover most of the bottom. From the point where the runners end near the bow to the transom, and from chine to chine will get graphite. The front of the runners aren't really in the water unless I'm fishing solo and standing on the bow deck. That is also why I put the camo pattern on the underside for the first few feet.
Looking foward to seeing some pics. We'll really get to catch up on your build once you post up all the pics you've been holding back.
Posted: Sun Jun 24, 2007 11:26 pm
by timoub007
Okay, one coat of fairing mix on. 6 fl. oz. of epoxy and about 4 fl. oz. of blended filler made a fairly thin mix. I'll have to hit is with a light sanding tomorrow afternoon and then put on another coat. Next time I won't mix all 6 oz. of epoxy at once. I had to work hard and fast. I forgot how quickly it can kick in the pot in this heat. Oh well, I got it all dobbed on top of the runners prior to it heating up too much and then just had to spread it out nice and thin.
Pics tomorrow along with one of my custom fairing tool.
Posted: Tue Jun 26, 2007 10:55 pm
by timoub007
Posted: Wed Jun 27, 2007 10:53 am
by gk108
That sure looks better. The rounded profile may help clean up the flow into the tunnel.
Posted: Wed Jun 27, 2007 11:05 am
by tech_support
These pictures brought something to mind. I do not think I ever saw the bottom of your boat before....
Those runners may be the cause of a lot or all your tunnel issues. The tunnel needs a clean source of water to "suck up". Having runners on each side may be keeping you from getting a clean flow into the tunnel.
None of the boats (our designs) that are designed for a tunnel have any runners/skeg/strakes that close to the tunnel.
Posted: Wed Jun 27, 2007 6:14 pm
by Cracker Larry
Now you tell him
Posted: Wed Jun 27, 2007 10:54 pm
by timoub007
LOL, yeah Larry.
Joel, you may be correct. I need them that close to make it over the rollers that tore them up. I think my runners are on 16 inch centers +/- and some of the rollers that I pull over are only 16-18 inches wide. Part of the reason the runners were so shredded was from hitting the edge of some rollers (and the brackets that hold them) and maybe even falling off some of them.
I also thought that putting them along side the tunnel would help channel the water, kind of like GK mentioned. It also makes the bottom look somewhat like a catamaran. And what Jacques has written about that type of hull would go along with your comments about the runners.
I know that there is a whole lot more beam and bottom to work with on an XF 20 but how far apart are the runners on that hull? And how far outside of the tunnel are they? Do they extend all the way to the stern?
I got it flipped back over this afternoon and plan on putting the CMC tilt and trim unit and motor back on soon.
Tim
Posted: Thu Jun 28, 2007 12:13 am
by TomW
Tim, maybe I'm being my dumb self here but if the runners are falling off the rollers could you not do away with them and graphite the hull and just pull the boat over the rollers. The obvious question is do the rollers stick up enough above there frames to let you do that.
I am not familiar enough with the roller system down there to be intelligent on this.
Tom
Posted: Thu Jun 28, 2007 1:03 am
by timoub007
No Tom, there are no dumb questions.
I do think that some of the roller frames would present a potential gouging problem. These things are out in the middle of the marsh and get virtually no maintenance. Picture the rollers running down the center of a trailer but wider.
I had briefly thought of going w/o runners but am afraid that the boat wouldn't track well in turns. Also, Jacques thinks that this boat is too narrow for a tunnel and it could induce chine tripping which I feel that the runners help prevent some. Lastly, the runners are part of the plans and are structural stiffeners for the bottom. I don't know how much flex the bottom would have w/o them.
Next time I'm out there, I'll try to remember to take a picture of several of the rollers we use.
Thanks for the ideas though, keep them coming.
Tim
Posted: Thu Jun 28, 2007 9:28 am
by Dougster
Could you carry an old piece of ply/particle board/whatever to lie on top of the rollers between them and the hull, then leave it laying there to use on the way back?
Can't really visualize it Dougster
Posted: Thu Jul 05, 2007 11:13 pm
by timoub007
Okay, so who would have thought that cutting another hole in the bottom of the boat would have helped my perceived problem?
I'll tell you who, my local tunnel resource. He told me that I needed to vent the tunnel, no matter the design. I should have listened last year and not waited so long.
The rains finally let up for an hour or so this afternoon and allowed my buddy and I to get on the water. The trip was brief, as the rains returned, but the results were surprising. With the new vent installed in the tunnel I saw a dramatic performance increase. We had a moderate load and with the vent open we could reach over 24 mph, almost 25. When I put my hand over the vent to block it off, the speed fell to 21.5 mph w/o changing anything else. Also the RPM's increased as the prop started to slip in the turbulent water. As I removed my hand the RPM's would slowly drop and the prop started biting again as the speed picked up. There was a lot of suction at the top of the vent when my hand was next to it. With my leg next to it, the suction was pulling my leg hair into the tube. Hard to judge vacuum, but it was substantial!
The vent is simply a 1 1/2 inch conduit threaded collar and a long sweep ell. I cut a 2 inch hole in the front of the tunnel and sealed the collar in with 5200. I will attempt to design something more permanent and less obtrusive. I have to be careful not to make it too restrictive though.
Here are a couple of pics:
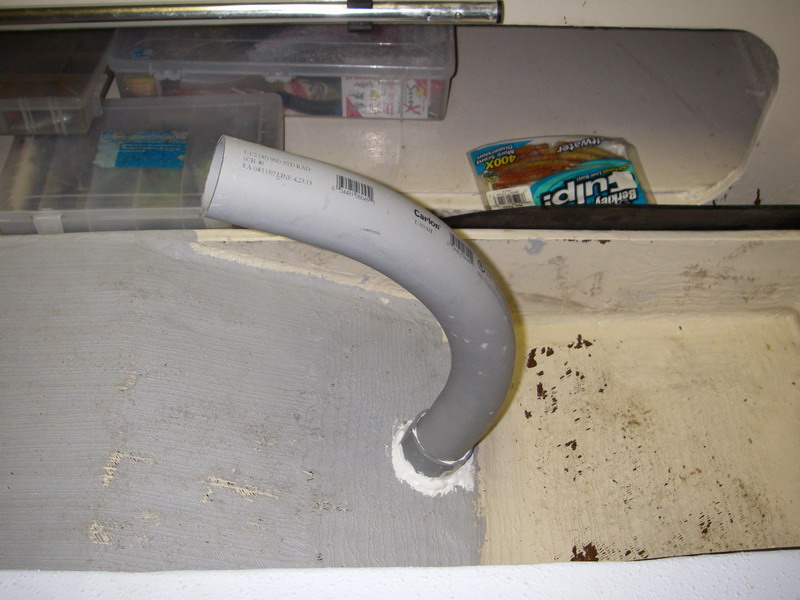
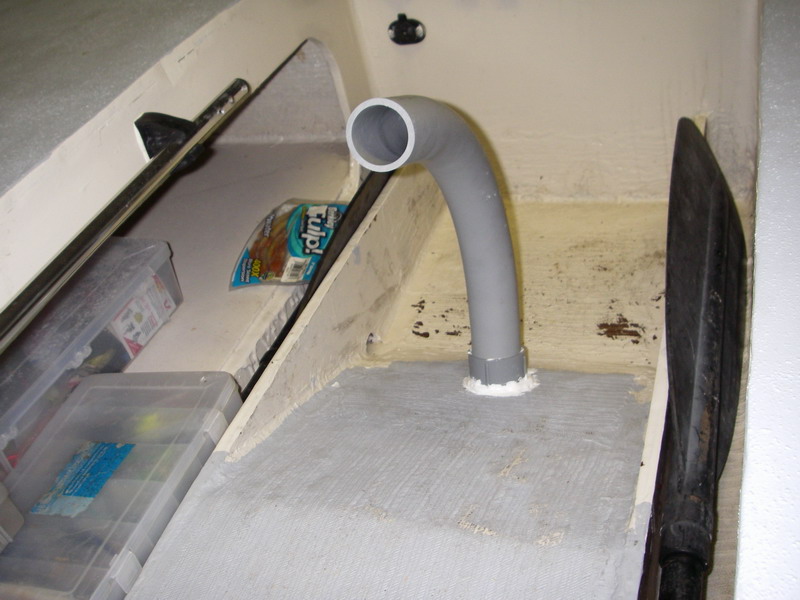
I am going to make a few more test runs when the rain stops again. I think I can raise the motor up another 3/4" too now that the prop is biting better.
Trial and error...lots and lots of error.
Tim
Posted: Thu Jul 05, 2007 11:39 pm
by gk108
That's wild. I was wondering what you had up your sleeve. R&D pays off.
Posted: Thu Aug 02, 2007 10:33 pm
by timoub007
So here is what I plan on doing to/with my tunnel. I plan on building a new tunnel on the bench and then installing it in the boat in place of the existing one. Below are two pictures of the cardboard model I made of the new tunnel. It is about 14 1/2 inches wide at the throat. It is one inch deep here and will have a baffle on the bottom for the first 6 inches. In the first 6 inches, under this baffle, is where the vent will go. It will have a constant taper to a depth of 4 inches where it exits at the transom. Where it meets the transom the tunnel will be 6 inches across the top and 9 inches across the bottom. Pics:
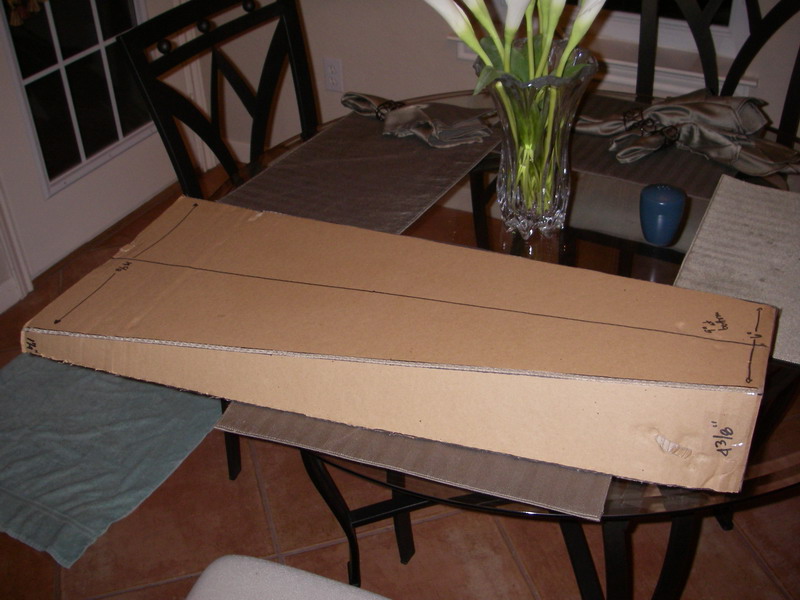
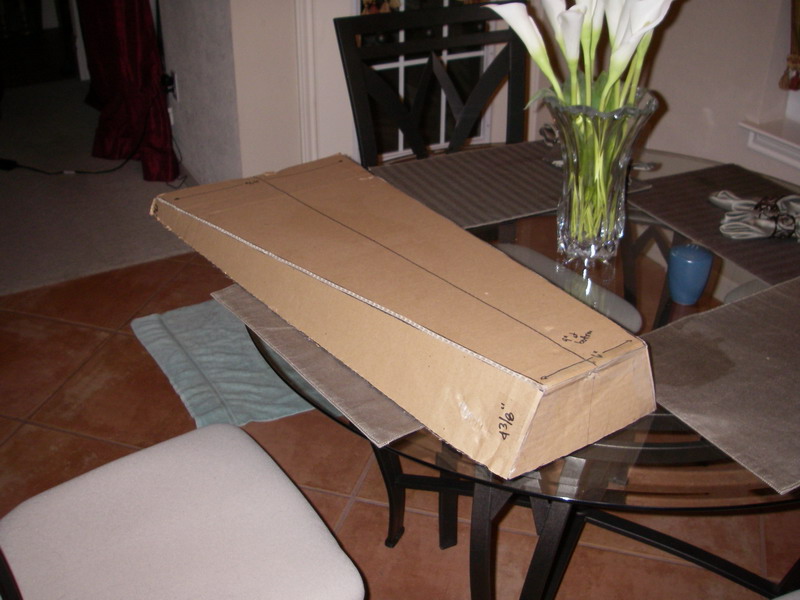
The purpose of the baffle is to help supress the tunnel "puking" when I drop off plane. It will spit water back out at me and get my legs all wet as it is now.
Also, the throat of the tunnel is only slightly wider than the existing one. However, with the exit being only 9 inches across the bottom of the hull I will actually regain a bit of the bouyancy I lost from putting the tunnel in. Probably not a measurable amount.
The purpose of the tunnel changing width from the front to the back is to reduce drag. The tunnel is being used to redirect water and I am trying to limit the amount of turbulence induced into the water. The existing tunnel seems to compress the water with its design, as Jacques mentions it will do in the XF-20 study plans. This creates the vacuum that I relieved by putting in the vent (venturi effect). I am attempting to redirect the water w/o compressing it by allowing a greater volume of water in the throat with the wider mouth. I calculated the volume at the throat and at the exit. While I was not willing to give up enough planing area at the front to make these volumes equal, I am closer than the original design.
A local aluminum fabricator with much experience and success with tunnel design on this size & style of boat recommended this design. He has built one similar with great results.
Lots of things going on, but plan on getting started with the bench top build in the next few days.
Tim
Posted: Fri Aug 03, 2007 9:33 am
by Jerry-rigged
Hey tim - What is the reason behind the 1" step at the front of the tunnel? I would think you would want a smooth transition to the tunnel. But I assume you are going on the advise of your tunnel guru. Who is it? anyone I would know?
Jerry
Posted: Fri Aug 03, 2007 11:08 am
by timoub007
Jerry,
The main reason is to allow an air space for the vent. I could run the taper all the way out, but I think that might be harder to build. I don't know, it may end up getting run all the way out.
The fella's name is Jay Dore'. I graduated high school with him and he does "mobile fabrication" for a living. He's a good guy, just a bit rough if you know what I mean. I've got contact info for him if anyone wants to talk to him.
Thanks,
Tim
Posted: Wed Aug 15, 2007 11:36 pm
by timoub007
It's been slow working between all of this heat (like others have mentioned) and taking time out to go fishing.
I have been working on the tunnel a little here and there though. This afternoon I completed the inside glassing. It got one layer of 12 oz. biaxial tape in each seam and then a complete covering with 12 oz. biaxial cloth. When I glass it to the hull it will get another overlap in a lot of places.
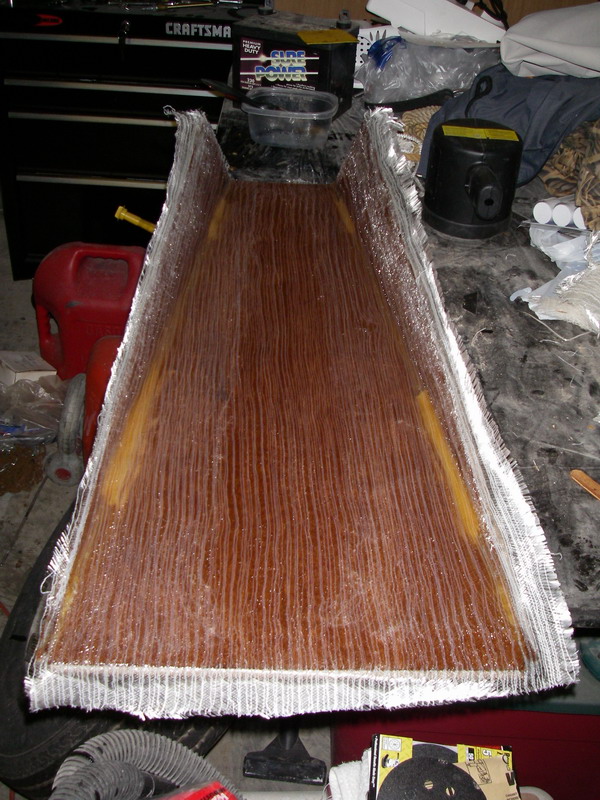
And here it is after trimming up the edges with a razor blade.
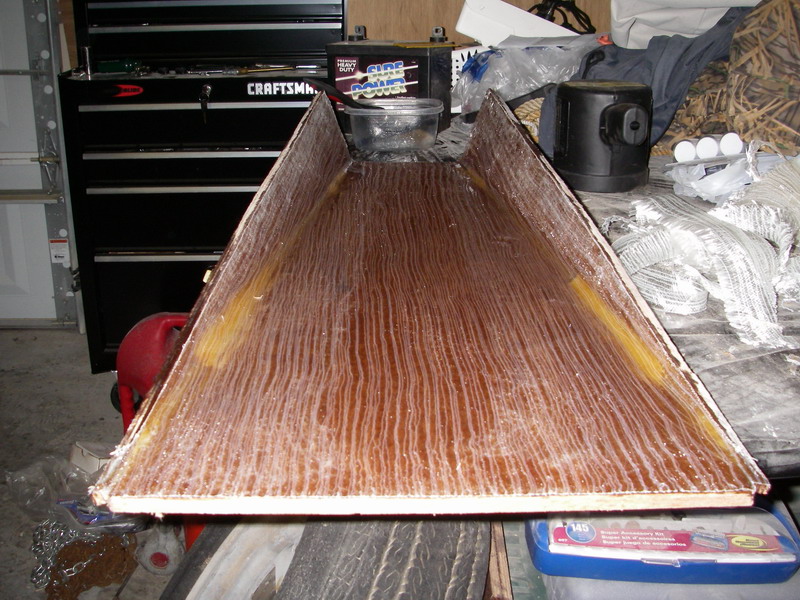
Now to work on the outside. It will get the same lamination schedule after rounding over the corners with a grinder. Hope to get some of that done tomorrow before skipping town for the weekend.
Tim
Posted: Tue Aug 21, 2007 11:23 pm
by timoub007
Okay, the other side of the new tunnel has been taped and glassed but that doesn't deserve a new picture.
However, I do hope that I put enough floatation in when I built the boat.
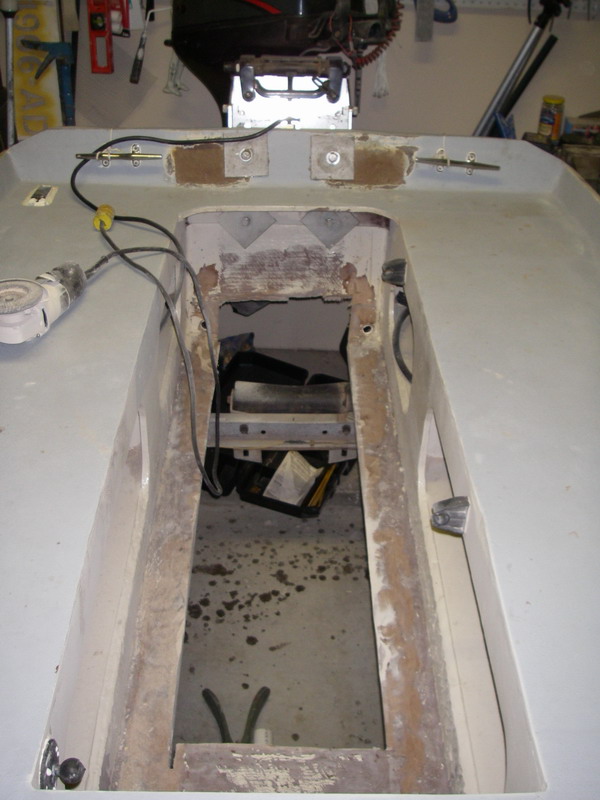
Don't ever let anyone tell you that these boats are not tough. I think it took me over an hour to get the tunnel cut out. I started with the reciprocating saw, moved to the circular saw, and finally had to break out the chainsaw. I know that I completely dulled the chain and the bar was literally smoking when I got through with one of the long cuts. It might have been easier to cut out from the bottom, but I hope I never have to try that again.
I used the trusty grinder to remove all of the remaining parts and pieces of plywood, epoxy, glass, and paint. I was completely covered in dust and couldn't have done it without a
respirator and goggles.. I've got some more clean up to do in the corners and on the sides but it looks pretty good.
I'll take sanding any day compared to what I did today!!!
Tim
Posted: Wed Aug 22, 2007 12:12 am
by robbiro
Lookin Good Tim. Glad that some of us are holding up. I am going to have a cyst taken off of my left thumb Thursday, so I will be down for a short while. Will be following your thread and I will post some photos this week on my gallery of where I am on my build.
Keep On Buildin'
Robbie
Posted: Wed Aug 22, 2007 1:04 am
by TomW
Tim what a thing to do to a boat, a chain saw.
It's looking good you did a really good job, look forward to the next step, though no more chain saws.
Looks like you'll have it ready for the fall fishing season when this dang hot weather gives us a break and the fish move back in and feel more like eating.
Tom
Posted: Tue Sep 04, 2007 11:03 pm
by timoub007
Some progress and now there is no longer that big hole in the floor.
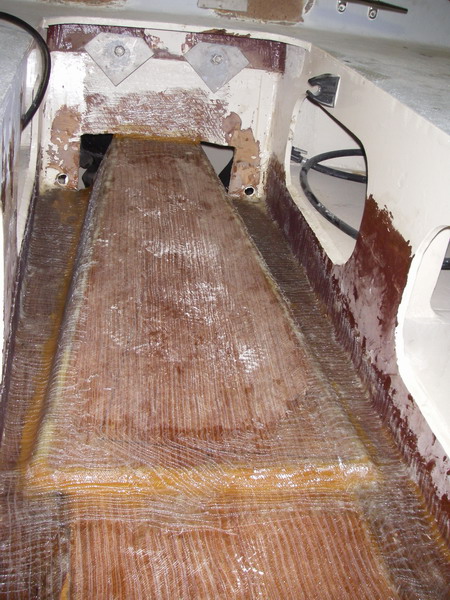
It has been glassed all around with 12 ounce biax so it ain't going nowhere. Just like it's predicessor, it will take a lot of power tools to rip this new tunnel from the hull.
Almost ready to de-rig the motor and jackplate to get her flipped back over. The only other thing I want to do from the inside before that is to put a through-hull fitting in the front of the tunnel for a vent. I think it will be the cleanest and easiest way to accomplish my goal. It needs to be done prior to flipping as I'll be putting a baffle over the area that the vent will be in.
Here is a shot of how it looks at the transom.
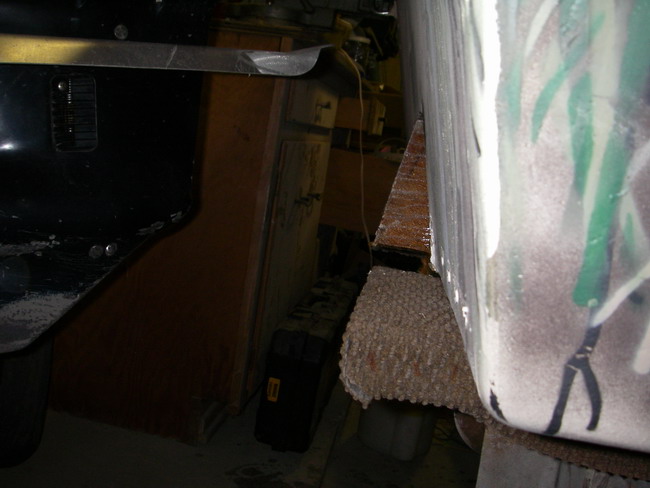
I've let the tunnel run long about two inches at the bottom to help channel the water a little more to the prop. A lot of aluminum tunnel boats do it that way, and I like the look. I also plan on squaring up the transom to bottom joint when I have it flipped over to get a cleaner break of the water coming off the hull. So said this should increase efficiency slightly. No better time to do it than when I've got her flipped again.
T
Posted: Wed Sep 05, 2007 12:56 am
by TomW
Looks good Tim. Lets see Tunnel in bottom and runners fixed. Cool weather coming. Fish ready to bite. GO GET EM
Well maybe in a couple more weeks.
Tom
Posted: Tue Sep 11, 2007 10:37 pm
by timoub007
I was able to get the motor and jackplate de-rigged from the boat this weekend. And then I talked my neighbor into helping me flip it upside down again. Either I'm getting old, or this thing keeps getting heavier.
Since there were two football games on back-to-back last night I took the opportunity to work until midnight. I started off by trimming all the excess glass and wood that I had put on from the topside. I didn't have to break out the chainsaw this time, only the reciprocating saw.
Then I had to sand the runners since when I covered them in glass earlier this summer I had faired them nicely. A bit of scratching with 60 grit got it all roughed up. I was surprised by the amount of glass I had to cut to cover/recover everything in the last 4 feet of the center of the hull. I think it took about 24 ounces of epoxy, including about 3 ounces of glue to fill in and fillet with.
So enough typing, here are the pics of it in place.
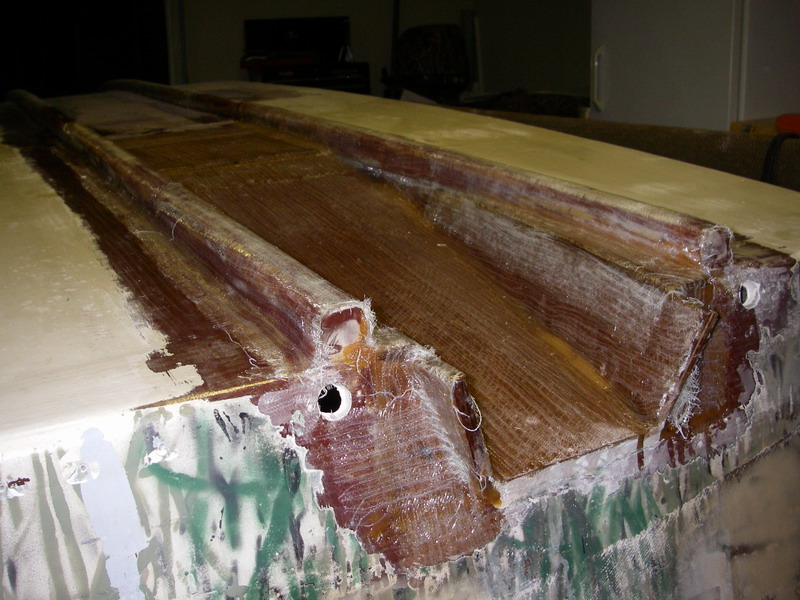
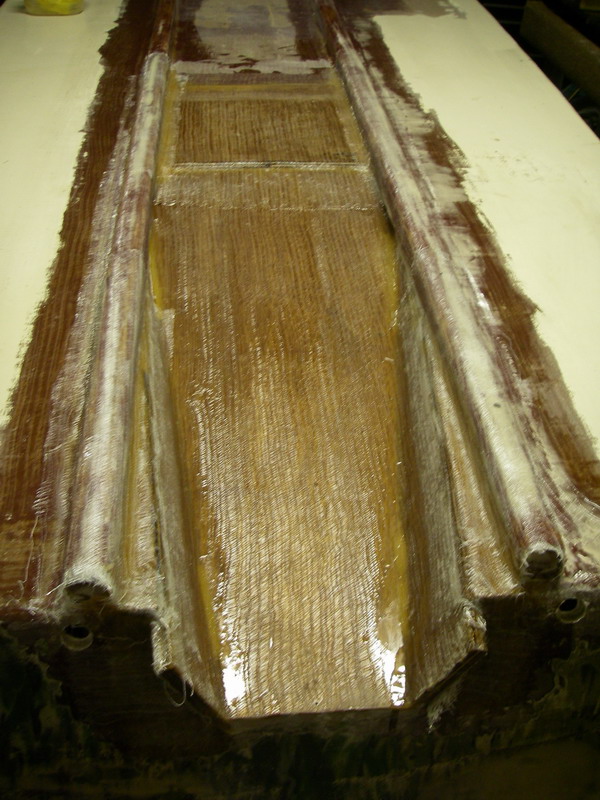
I won't be able to work on it again for a week or so, but I'm getting closer every time I touch it.
T
Posted: Mon Feb 04, 2008 10:02 pm
by timoub007
Well, a lot has happened in my life since my last post on this thread. Between all that has been going on I was not able to get the boat put back together to use at all during this duck season. Heck, I only made about 8 duck hunts all season long as it was.
I have finally been able to make a few minutes here and there to get a little done though.
The graphite was a bear for me, simply because I had a roller (actually two) come apart on me. I got two nice coats on the bottom, but when putting on the third, what I thought was going to be the final, the cheap little roller that I was using left pieces behind. It looked like one inch curley hairs left in the nice shiney black finish. Way too many to pick out. I waivered back and forth on whether or not to sand after hearing about Larry's experience. I just couldn't take it and had to fix it. I used a razor blade to scrape/cut out the raised spots and then hand sanded the bottom with 50 grit to minimize the mess and dust. It took a few sessions and I rubbed off some of my fingerprints, but I got it done.
To eliminate the risk of ruining the finish again, I stopped by West Marine and bought a roller that they had labeled as "best" for epoxy compatibility. Low and behold if it didn't do the same thing as the cheapie I was using before. So here I was with 4 coats of epoxy on the bottom, and back in the same boat; weighing my options again. I decided to live with it knowing that I'm going to scratch it up right quick like.
I will sand the transom and recoat it though. That is mainly cosmetic since it is so visible.
After making the decision I had a couple of neighbors help me flip it back over on the trailer this afternoon.
Here you can see the finished bottom, tunnel, and baffle covering the vent.
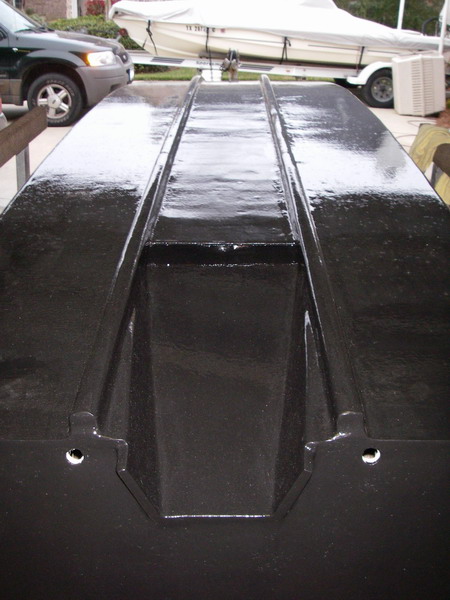
Here is a shot showing the transom detail.
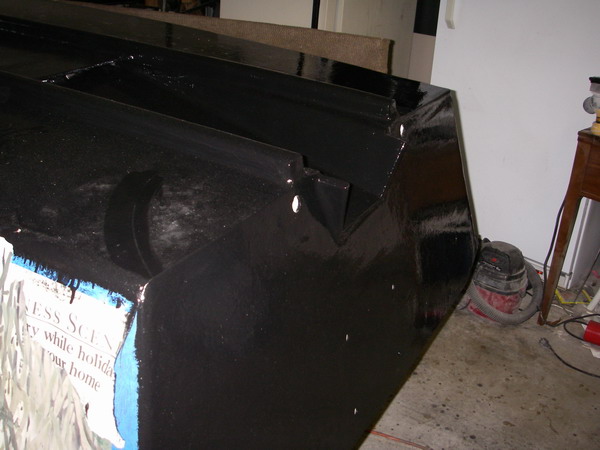
Here is a pic from the inside showing the finish work I need to complete on the top of the new tunnel.
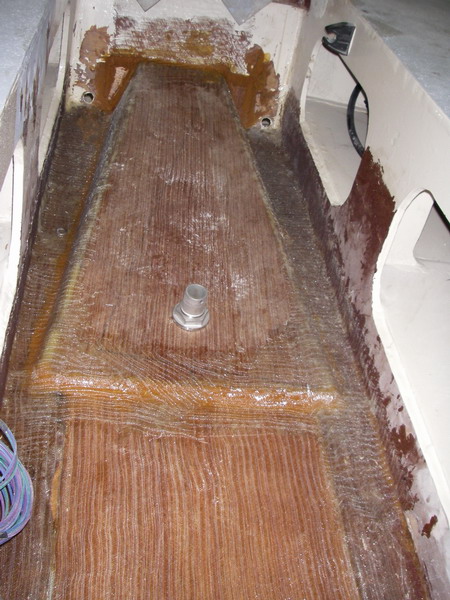
And lastly, here is where I patched the bottom that also shows how much shorter my new tunnel is than the original. Vent is a 1 1/4 inch through hull.
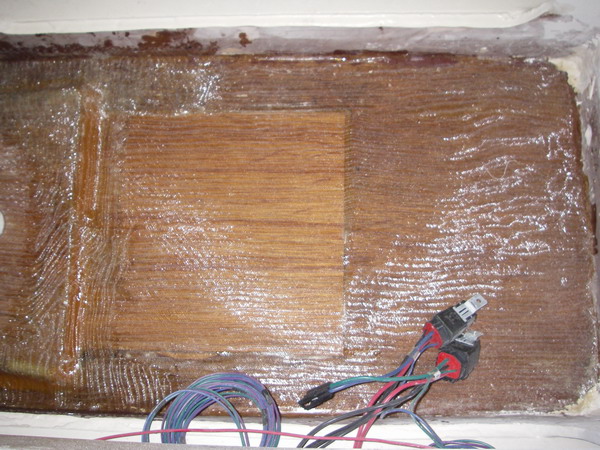
More to come...
Posted: Mon Jan 19, 2009 1:02 pm
by B.Lee
Any news on the updated tunnel design? Have you test run it yet?
I'm researching tunnel designs and shapes now, I'm very interested in how the new shape improved the tunnel.
Posted: Tue Jan 20, 2009 12:50 am
by timoub007
I have tested it and am happy with the redo. As I alluded to in my last post, life has gotten in the way of boat building. The last 13 months has brought me twins, the deaths of two very close family members, another hurricane direct hit, and all the normal responsibilities of life.
Okay, off my soap box. Back to the boat and tunnel.
I didn't do a very good job of recording numbers after getting the boat back in the water. I've had a couple of coils go out on my motor and truthfully haven't been on the water enough to dial everything back in perfectly.
From memory, I am now running about 26 or so when alone in the boat. With a passenger and a fishing load we were racing along at 24-25 at WOT. So the new design appears to be slightly more efficient than the original design. If you want to see this design in person (or at least very, very similar) find a G3 aluminum boat dealer that stocks tunnel hulls. I was at the Houston boat show a couple of weeks ago and it looks like they copied my tunnel exactly. I don't recall if it had a vent, but don't think it did. (I'm almost 100% certain it was a G3, if not the only other boat brand popping in my head is Lowe.)
Oh, and I haven't had the boat in the water since about June. When I get it wet again I'll confirm the numbers and post back here. Incidentally, I didn't get to hunt ducks one time this season.
Hope this helps,
Tim
Posted: Tue Jan 20, 2009 9:29 am
by Cracker Larry
Tim, good to hear from you. It sounds like you had a year similar to mine.
Hoping things get better.
Posted: Thu Jan 22, 2009 9:54 pm
by robbiro
Hey Tim,
I hope that you are doing better after all of the LIFE that has jumped on you this year. I have thought about you several times, but just too lazy to post and when I don't have anything to say but junk, had just rather not say it.
That said: I hope that the family is doing well and that watching the twins grow up is as interesting as watching my two, mine are not twins, but watching them interact, is just totally interesting most days. My daughter is 11 going on about 19 and my son is 8 and just a laid back kid that likes sports, etc. They do enjoy each other, but it can get interesting.
I lost my last blood Uncle this year, I have no other Aunts or Uncles living now. He was just a week short of 93. He had gone to work as a house painter every day until he was about 83. Heat gentleman who loved the outdoors and hunted and fished every time he got the chance. He took me to Toledo Bend not long after they impounded it and we had a great time catching bluegills on crickets, them were the days.
I know, I am rattling on and on, Do well my friend and keep on posting
Keep on Buildin'
Robbie
Posted: Mon Feb 02, 2009 10:47 am
by TomW
Tim I apologize for missing your post earlier. I hope things have settled down for you and yours and that your family is getting through the greiving that comes with the loss of there loved ones. It is hard and takes time. God bless.
Enjoy getting back to the boat and look forward to seening here in action.
Tom
Re: Finally getting started on my GF-16
Posted: Sun Jun 19, 2011 7:00 pm
by timoub007
I realized I don't have any of the final performance numbers in my thread, and for that I apologize. Since the last update, wow over two years ago, I've made a couple of other tweaks.
I had a couple of 3 cylinder 25 hp JohnnyRudes that were getting older (1996 & 2000) and starting to have miscellaneous electrical gremlins. So I went all in last summer and bought a brand new 25 hp ETEC. Awesome little engine and the smoothest 2 cylinder I've ever run. I wanted to get an electric start with tilt and trim, but to do this only came in a 20 inch shaft. I hemmed and hawed about about the longer shaft length, but went ahead with the fully optioned model around July 1st 2010. The midsection is like that of the 40-75 hp 2 cylinders and the bolt mounting pattern of this model is the same as all of the full sized motors so I couldn't even put it on my CMC t/n/t unit to bring it home from the dealership.
To make a long story short, I added 5-6 inches to my transom and filled all of the old mounting holes.
I found a brand new Panther Marine electric (fully enclosed) jackplate for a great price on eBay, less than $600 if I recall correctly. This is a full sized unit too designed for up to 300 hp motors. A little heavy, but a nice piece.
I mounted everything up in time for duck season last year and couldn't be more pleased.
This 2 cylinder 25 ETEC is stronger than either of the 3 cylinder JohnnyRudes I was running before. It has the same lower unit so I just put my 4 blade PowerTech prop on and hit the water. The hole shot is the same or better. With the Smart Tabs there is little to no bow rise and I can get up in less than 6 inches. Usually if the boat is floating I can get up. If I have a really heavy load, like 4 guys and my dog plus all of our duck hunting gear, it is a bit of a struggle but that's a lot of load for a 16 footer and a 25. Even loaded down heavy like that though I can reach about 18 mph if memory serves. I don't think I broke 20, but had no problem staying on plane and running the narrow ditches.
Top end while running solo and light is still not attainable. With the heavier engine and 50 pound jackplate I've got too much weight on the transom and not enough forward. Once I break 26 or 27 mph the boat starts to porpoise a little. I can't trim it out very much either kind of defeating the extra expense of the tilt and trim. When loaded it is usable though and is a joy to have when wanting to raise the motor to pull over a levee or pole out of a shallow flat. As is the jackplate.
I can easily make a turning start if need be, even with the jackplate up 6 inches. Most times though I don't have to spin up.
I built a 40 x 60 shop to house my toys too, so I don't have the boat at the house any more. I'll try to get some pictures of my final modifications and post them up.
Thanks for those following this saga, but I think I'm done with this build finally.
Now what next.....
Re: Finally getting started on my GF-16
Posted: Mon Jun 27, 2011 3:15 pm
by bernd1
Hi Tim,
a nice report - I'm interested how the ETEC 25 works and how much weight it has. What about the fuel consumption? Like a 4 stroke engine or more? If you have time just create a little movie to see how the GF with the ETEC runs - you would do me a wish.
Enjoy the boat!
Bye
Bernd
Re: Finally getting started on my GF-16
Posted: Mon Jun 27, 2011 5:11 pm
by Cracker Larry
Great report Tim
Love those GF16s.
Re: Finally getting started on my GF-16
Posted: Tue Jun 28, 2011 12:40 pm
by Uncle D
timoub007 wrote:Now what next.....
The POC builders meet. And bring that boat.