Page 1 of 1
OB15 REBUILD
Posted: Mon Dec 12, 2005 5:12 pm
by FLYonWALL9
Posted: Tue Dec 13, 2005 3:32 pm
by OzzyC
I like it... nice work.
Posted: Wed Jan 18, 2006 7:48 pm
by FLYonWALL9
Ok dumb move but 2 days ago cabin fever set in from my opperation. I had to get out and do something any thing. Whelp I did and I screwed this thing up royal!
Decided to scrap the whole thing and just put a leaning post back rest in and something to sit on. While fishing I can just take out the back rest an thow it in a storage box.
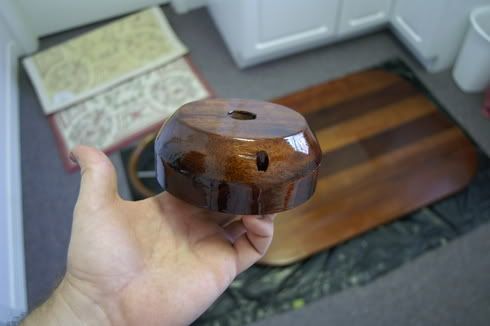
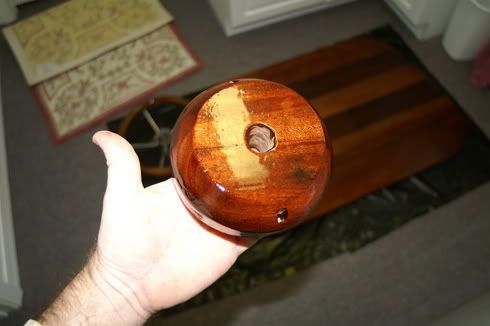
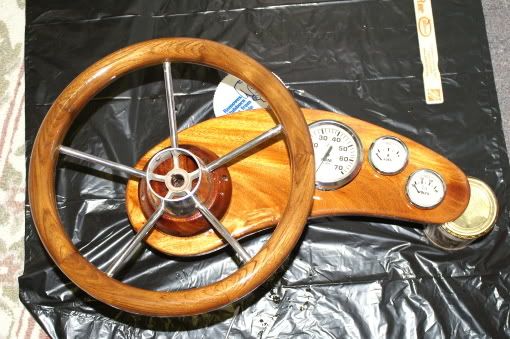
Good news is my mahogany flag pole/light came in unfinished so I started on the varnish coats. Have 4 on it now.
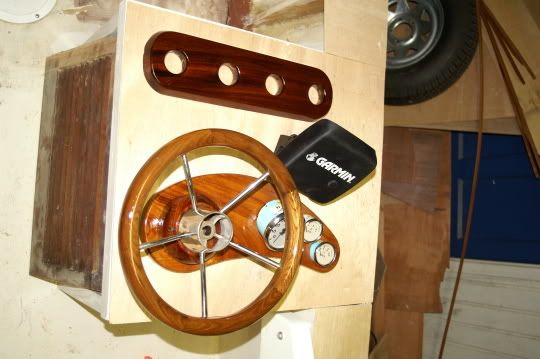
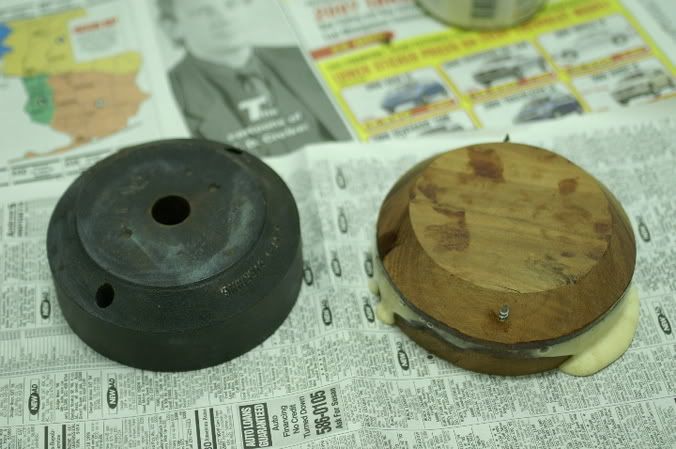
Started refinishing my teak wheel from last years dings, dints, and scratches.
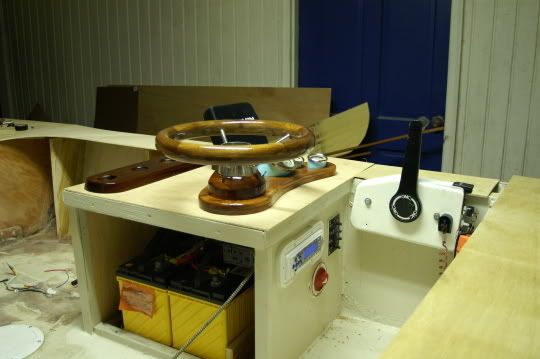
While trying to figure out what to do with my screwed up seat I came up with making the bezel for my stearing (ugly old black plastic thing) out of the back of my old seat. MAN how cool this thing is. It puts my bow hook part to shame. Should be to the point of pictures of all this by the weekend. Til then this was all a tease!

Posted: Thu Jan 19, 2006 8:51 pm
by whitehawk
Since the OB15 is the boat I think I am going to build, I'm curious about your reasons for the re-build. Were there significant problems??
Posted: Thu Jan 19, 2006 11:24 pm
by ks8
whitehawk wrote:Since the OB15 is the boat I think I am going to build, I'm curious about your reasons for the re-build. Were there significant problems??
yea... he's got *the disease*...

Posted: Fri Jan 20, 2006 12:04 am
by FLYonWALL9
Easy now KS
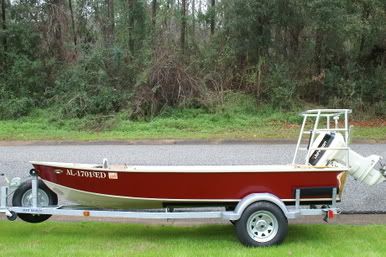
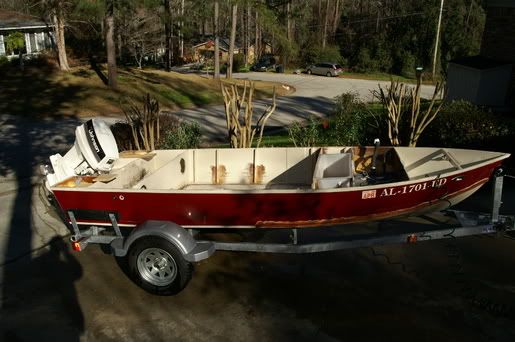
I finished the boat with "mods" not in the plans, these mods lead to a boat that wasn't easy to fish. Hard to get from front to back. Don't get me wong that boat is great. As KS says I have a disease..
I took out the center console and adding a side steer, and wanted to deck it in mahogany hardwood also add a poling platform.
Bottom line build it you will surely like it, that boat has a real following.
Posted: Fri Jan 20, 2006 5:10 pm
by FLYonWALL9
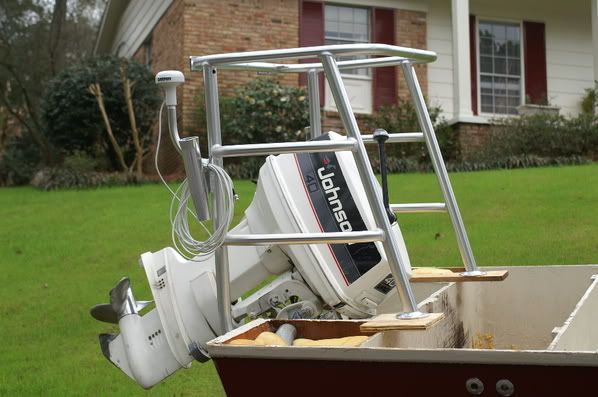
Finished my flag pole/stern light. Purchased it unfinished and in kit form, pretty neat deal...

Was told today I wont have the boat back from the tower shop until Wed next week. I have no other projects to hold me over until it gets back here. So, I suppose my Oscars are going to be the first fish that test my new Penn 420ssg
with spinner baits and plastic worms
Posted: Fri Jan 20, 2006 5:21 pm
by jacquesmm
whitehawk wrote:Since the OB15 is the boat I think I am going to build, I'm curious about your reasons for the re-build. Were there significant problems??
Part of the fun is doing it your way, changing things, then changing them again.
FlyonWall9 clearly enjoys the process of building as much as using the boat.

Posted: Fri Jan 27, 2006 6:43 pm
by FLYonWALL9
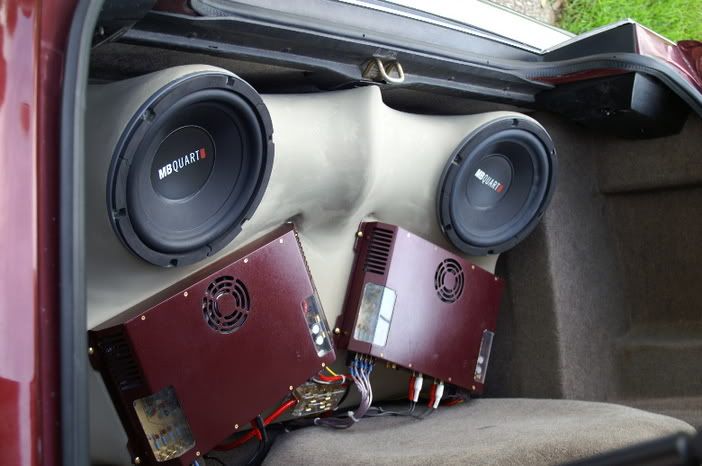
Rather slow not having the boat I have ran out of things to do to it while its at the tower shop having the platform built. So, I decided it would be a good time to install my newphews car audio. Think the fiberglass molding came out pretty well. Could have used some more fairning but he was too anxious to have it playing. KIDS!
WILL HAVE THE OB BACK HOME ON MONDAY!
Posted: Fri Jan 27, 2006 6:56 pm
by Mike Adams
Scott,
Good job on the fibreglass moulding! It's interesting to see how the skills we are developing with S&G boats can be useful elsewhere! I fixed a broken hat rack this week - the wood was badly splintered, so I sandwiched the join between two layers of fibreglass. I reckon the repaired piece is a lot stronger than the original!
Looking forward to seeing your boat back on the water.
Mike
Posted: Sun Jan 29, 2006 12:22 am
by FLYonWALL9
Mike,
I had been working with Polyester glass for years due to cost and application in car and home audio. I like being able to make unlimited shapes with the stuff and its really cool how you can make any shape you wish.
Picked up the OB from the shop today with a brand new shiny poling platform. It is TOOOOO COOL, and turned out really good. Being late and I just got back from the Senior Bowl I cant take pictures tonight. Will post some tomorrow.
Posted: Sun Jan 29, 2006 1:24 pm
by FLYonWALL9
Posted: Sun Jan 29, 2006 5:07 pm
by tech_support
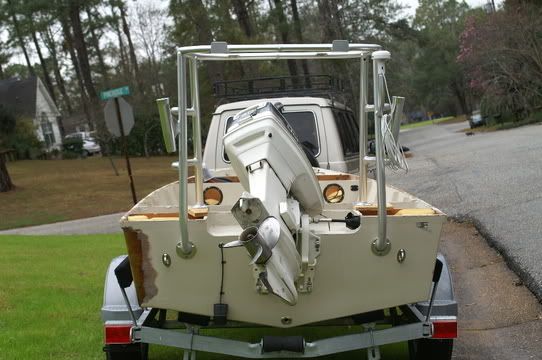
I have the same engine on my ph16
The cowling says 48, but its a 40

Posted: Sun Jan 29, 2006 5:45 pm
by FLYonWALL9
Joel, yeah I recall us talking before about speeds of your boat and the OB's with the same motor when I was trying to figure out prop size. I really like the motor. Just got new power packs this week from a fellah in south Florida off ebay.
What size wheel does your 40 have on it, what rpm can you turn up and speed on gps or fishfinder have you seen from it?
I haven't run the boat with this stainless wheel but she will get her chance in March if all goes well.
Posted: Sun Jan 29, 2006 7:23 pm
by tech_support
Scott, I do not have a tach or a fishfinder - its rigged pretty simple. The prop is a 17 aluminum. I run between 25 and 30 mph. Sorry I cant be more informative

Posted: Sun Jan 29, 2006 7:43 pm
by tech_support
I do have an over heat alarm
Posted: Mon Jan 30, 2006 2:09 am
by FLYonWALL9
Does your motor over heat at idle speed in gear, like through a long no wake zone? I have a freind with a 48, I didn't know they were the same motor or is yours a true 40 that someone just stuck that hood on?
Posted: Mon Jan 30, 2006 10:22 am
by tech_support
Its really a 40 with a 48 cover. It remains very cool even at idle - the water pump is new and really puts a lot of volume through the engine.
Posted: Wed Feb 01, 2006 8:49 pm
by FLYonWALL9
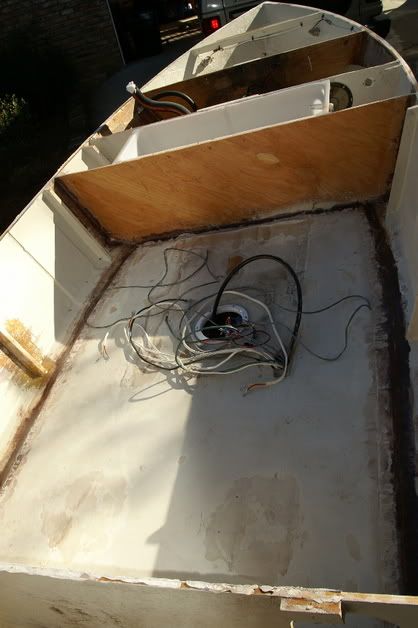
Had a pretty productive day today. Cut my livewell bulkhead, built my fillets and fiberglass taped the seam to hold it in place. Should be dry enough to sand tomorrow.
Cut and planed my mahogany top for my poling platform and started shaping them to match the ring on the platform will finish shaping tomorrow. Once that is shaped I'll take it apart and glue them up and add battens under to support the center. Drilled and wired my GPS antenna and running light wire.
Posted: Fri Feb 03, 2006 1:46 am
by FLYonWALL9
Pretty good day today.
Plugged old holes and screw holes in the sole and glassed them in cut it down to 70" in length. Epoxy coated the underside, sanded the hull, cut new knees 10" for the gunwale. Installed new livewell in forward cockpit bulkhead. Put new cleats on bulkheads for the new deck.
Tomorrow, I'll finish sanding the hull inside for the sole and cut a hole in for the drain. Glass in all new knees. Frame in new console and cut ply.
Will post pictures soon.
Posted: Fri Feb 03, 2006 9:53 pm
by FLYonWALL9
ANOTHER GOOD DAY!
Got my livewell trimmed in braced up and tested the drain. My other livewell didn't drain properly.
Put the first of two layers of my sprayrail on the hull after sanding down to raw glass.
Installed two sole braces, filleted and taped.
Tomorrow I'll epoxy the sole down, glue and tape. Fillets on front and rear cockpit bulkheads. If that dries in time I'll mock up my console. Put on final layer of rubrail.
Posted: Sun Feb 05, 2006 5:36 pm
by FLYonWALL9
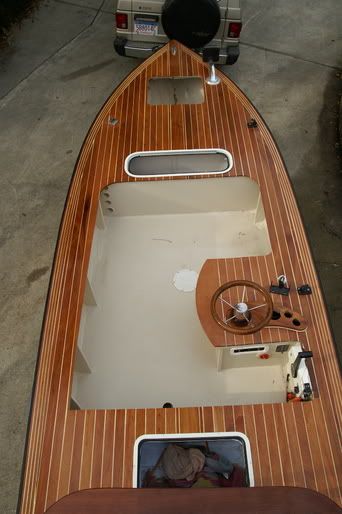
Sole installed and old 5200, and nonskid sanded off. I know my fillets aren't pretty like some but I'm surely not trying to make them. I'm ready to fish! The deck is rock solid. I used my old deck so thats why you see the inspection plate.
All the livewell is finished up, new hoses and clamps, cleats hold it up at the tops of the bulkheads.
First of two 1/4" layers of my sprayrail are done. When I glue down my frames for my console I'll add my second layer on the rails. They came out with a pretty fair bow, quite pleased.
Well see how close I get to my target look and layout like this boat.
Posted: Mon Feb 06, 2006 9:43 am
by cbrman
Looking good
I can't wait to see the side console mocked up. Is that a livewell I see or just a fishbox? I was thinking about putting a small livewell up in the bow of the boat.
What type of pump setup would you go with for recirculating the water?
Posted: Mon Feb 06, 2006 2:59 pm
by FLYonWALL9
Yeah thats my livewell. I don't live bait fish much so it will be a catch all unless I have some shrimp. I used a scupper with a seacock and a Rule pump atop of that. the drain is a sump drain with an overflow pipe. Pull the pipe out and the whole thing drains out.
Posted: Mon Feb 06, 2006 9:41 pm
by FLYonWALL9
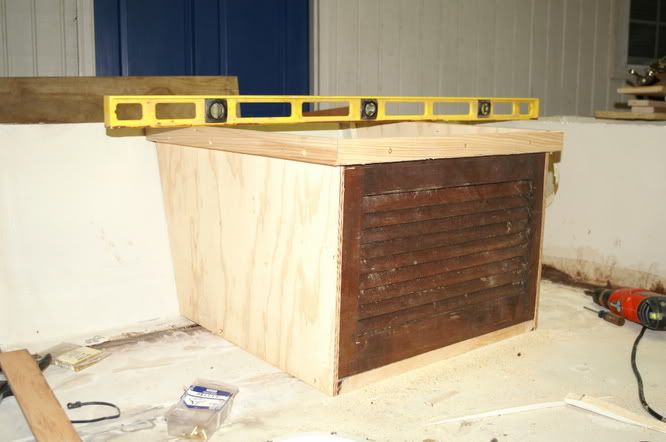
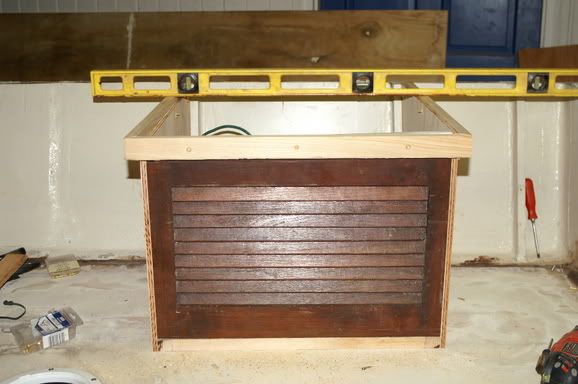
Started on my console today. Geez the thing is big! I didn't think it would end up that large but thats good. Now I can put charts and misc crap in, along with my two batteries. My father gave me what he thought was a mahogany hatch but it ended up being teak:D .... I'll frame in the door tomorrow and do some sanding.
After looking at the pictures and trying to figure out what all would fit in the it. I was going to put my vertical on front of the console, now I'm thinking I will put rod tubes through it which will drain into the bilge if water gets in them. I'll cap the top with some form of shaped mahogany rack.
Posted: Mon Feb 06, 2006 10:18 pm
by Johnshan
Sweet! I cant wait to see more, cant wait to start my own side console too! Hope to have my floor installed this weekend, keep posting pics!
Posted: Thu Feb 09, 2006 9:25 pm
by FLYonWALL9
Had some really good much needed help today from a buddy of mine.
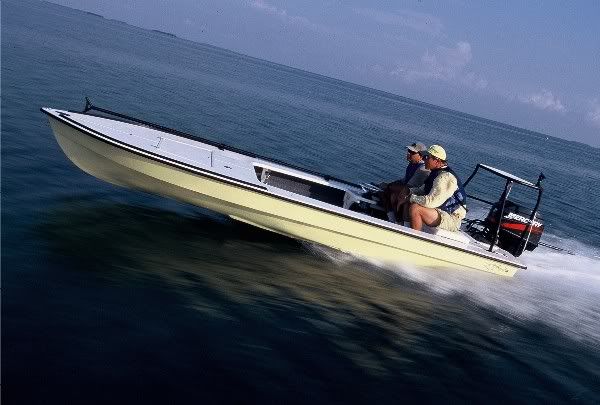
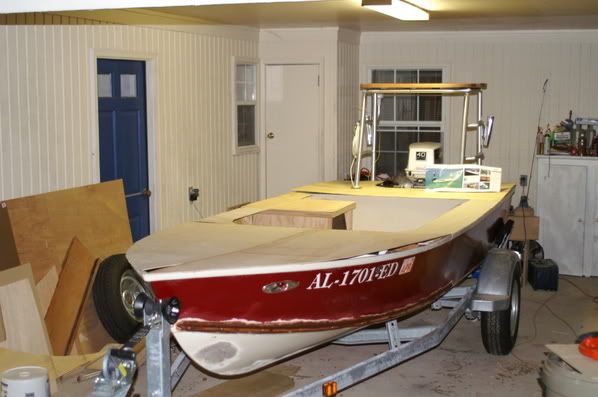
We were able to install my knees (glassed in) for my side deck/gunwale supports and cut out all my templates for the deck mock up. This thing looks so close to a Hells Bay I may get in trouble
I love all the deck space for the casting decks and I can still put a 72 and 102qt ice chest in the sole, if I am to go camping. For good measures we slapped on the poling platform to get scale and see how its going to turn out. VERY HAPPY DAY!

Posted: Thu Feb 09, 2006 9:44 pm
by cbrman
That looks awesome, keep up the good work and keep the pictures coming!
Your giving me a lot of ideas for when it comes time to finish off my boat

Nice Work!
Posted: Thu Feb 09, 2006 9:49 pm
by FLYonWALL9
Thanks CBR,
Keep in mind you can have more sole area if your gunwales aren't this wide. I wanted to be able to walk all he way around mine like the PH boats. Those are 10" and taper to the rear. Front deck is 6ft10 i think and rear is the same as it always was at 3ft. I AM LOVIN THIS BOAT more than I did last year already!
Posted: Thu Feb 09, 2006 11:10 pm
by MadRus
That's looking great Scott. I've been watching and wondering what was coming next. I love the small side console. That's a pretty adaptable design aye!
Posted: Fri Feb 10, 2006 5:32 pm
by Davef
Scott,
That's looking real good.
Posted: Fri Feb 10, 2006 6:13 pm
by FLYonWALL9
Thanks Dave,
I consider myself at best a Padawan learner behind your guidance when I was building mine!
Posted: Sat Feb 11, 2006 1:31 am
by FLYonWALL9
Fearing the weekend COLD BLAST, I thought today was the day to get lots done.
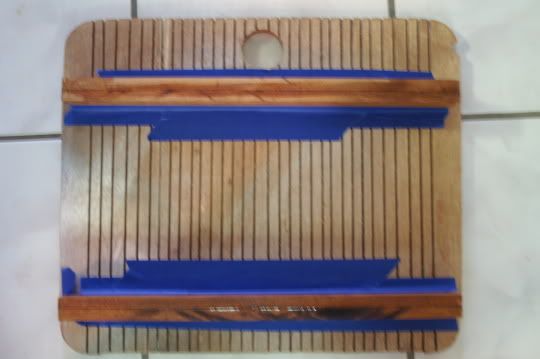
I faired the cockpit, well good enough for me anyway. My decks were roughed in yesterday so I sanded them down to the rubrail today. Hardest part was trying to figure out how plank my platform and glue it up so the planks are level with one another. So if anyone reads this here is how you have to do it.
Cut your planks and shape them to what your after. Then you have to make a backing plate your backing plate should be smaller than the deck so once its on the poling platfrom the backing plate will be on the inside of the platform and the decking will over hang the ring of the platform. I thought I would be able to gap evenly with putting screws as my plank devider but that doesn't fly. The screw will grap the plank and turn it into the rotation of the screw driver. So, you have to put the backing plate on the platform, spread out your glue, then lay on your planks. From under the platfrom screw into each plank. What this will do is draw up your planks to the backing plate and make the boards level to one another. To give you gap put finder washers between the planks. I will post pictures tomorrow when I can get around that platform with my camera. To messy at present.
Posted: Sun Feb 12, 2006 4:52 pm
by FLYonWALL9
Due to the cold weather very few projects could be done. So, I finished up some shaping and started on some varnishing.
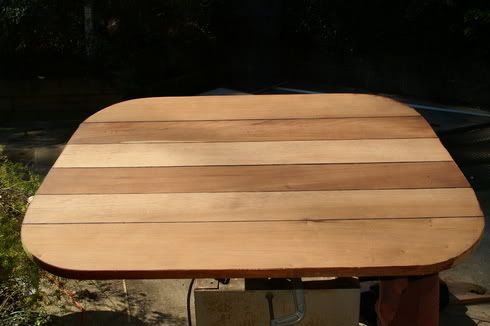
Put the first coat on my platform, doesn't really matter if trash gets into its finish it will have nonskid on the last two coats.
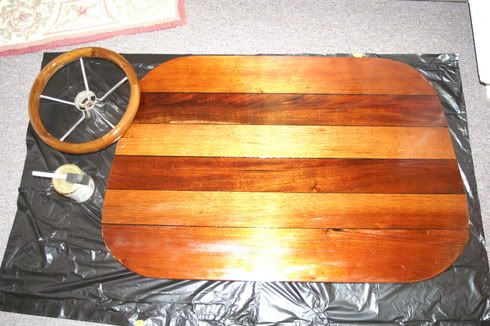
also my 3rd coat on my wheel.
finshed shaping my bezel and put its first coat of varnish.
Posted: Wed Feb 15, 2006 4:40 pm
by FLYonWALL9
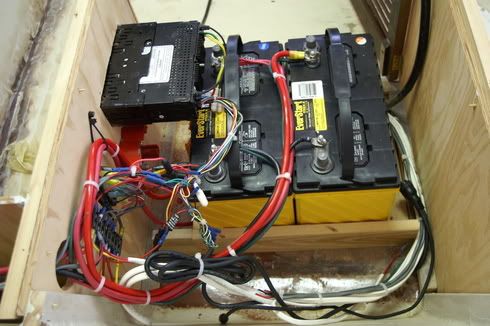
Weather has been so cold here 28 at night and mid 40s in the day that my calking hasn't dried so no painting for me. I have been able to finish up my wiring and think it came out pretty clean. Not as clean as the last time because I'm dealing with a much smaller console but still pretty nice. My Father got me a switch panel from a boat maker that was going out of biz that was wired with water proof switches and fuse holders for like 2 bucks.
IF ANY OF THE BATEAU STAFF READS THIS:
You guys should really look into making up some plastic blanks from a trophy shop or something for a switch panel saying BATEAU BOATS or DESIGNS just something. Some of us wouldn't want to put a big ole honkin sticker but a switch panel would be a really clean touch.
Posted: Wed Feb 15, 2006 9:19 pm
by Johnshan
Looking great scott, as an electrician I give you a thumbs up

Talk about cold, last weekend even with the heat on in my portable car garage my epoxy wouldnt cure worth a darn, -10 out I think it was, with the wind howling, I keep saying I need a real garage if im ever going to build again!!
Posted: Wed Feb 15, 2006 9:35 pm
by FLYonWALL9
-10deg good lord JOHN!
Yeah man if I had a bit more room I would use the stick up wire tie holders and route these things like a production boat, like I used to rewire.
Posted: Thu Feb 16, 2006 7:59 pm
by FLYonWALL9
Movin right along.
Smeared on some paint on the console last night and my back bulkhead and parts of the sole. So, I would have something to do today. So, I installed all my toys in the console, am/fm/cd, battery switch, switch panel, speakers in the rear bulkhead (THEY ROCK!). Ran all my wires, cables and hoses to my engine. Broke the stinkin warm up lever on the control box :evil: but was still able to test fire ole Nelly! Tellin ya that ole girl fired with less than 1/4 turn of the flywheel. Old OMC's Johnsons may smoke like Scott Paper but they sure are reliable.
So, everything is ready to go say for the warm up lever. Without I'm kinda at a stand still to do my decks. I'll finish up my platform top while I wait
Posted: Fri Feb 17, 2006 3:22 pm
by FLYonWALL9
Delays, rain, cold weather crap crap crap!
So I can scratch off one thing on my long build list. My platform is ready for its new home atop of the OB! Wired and ready to go with a fancy vintage stern light (I had to put something pretty on it)..
My last coats of varnish are drying now, with my nonskid in it. I think it came out really well.

Posted: Fri Feb 17, 2006 4:13 pm
by fishingdan
Beautiful work. Will the darker color platform get hot in the sun?
Posted: Fri Feb 17, 2006 4:15 pm
by FLYonWALL9
Not sure Dan, I have left it out in the sun before putting on any finish coats and it didn't get any hotter than my old painted deck. The pictures make it look lots darker than it is. Doubt it will ever get to the point of even warm to the touch.
Posted: Sun Feb 19, 2006 4:14 pm
by FLYonWALL9
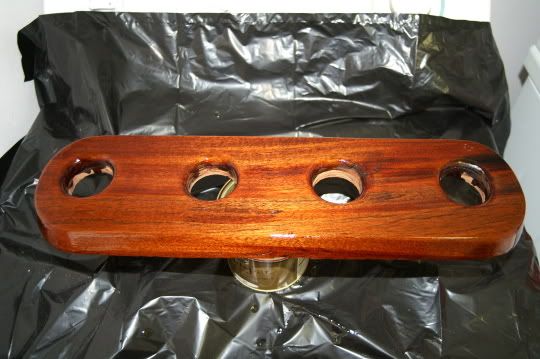
Slipped late Friday eve and busted my big ole arse gettin out of the boat. Felt a few things pull and pop been kinda taken it easy this weekend. Weather wasn't the best for doing much yesterday so today (sunday) I finished molding my gauge panel, routed, sanded, filled, stained, and varnished first coat. I'm not crazy about how it looks but It will work out nicely. I'll post pictures when its dry enough and post them.
Hope everyone is having a good weekend.

Posted: Thu Feb 23, 2006 12:34 am
by FLYonWALL9
Well I had some stain, varnish problems with my gauge panel so I had to sand/scrape/ and reshape a tad to get all the old crap off. I have never seen varnish do what it did. So, this go round I just varnished with no stain and like the outcome. Ended up with 4 coats and one of them had some small freckles. Tired of messing with this one part so I am pressing on.
Oh by the way the decks will end up being the same color as the gauge panel, a honey teak color. Odd for mahogany to end up like this unless I suppose its not a real old growth tree.
Posted: Thu Feb 23, 2006 1:52 am
by timoub007
Very beautiful piece Scott. Can't wait to see what she looks like complete.
You're doing great, keep the pics coming.
Tim
Posted: Thu Feb 23, 2006 4:18 pm
by FLYonWALL9
Running out of projects to do until my throttle control gets in(sighs i shouldve got one from stink). I figured I needed to tackle my rod holder that is going in the port gunwale top. The underside will have pvc tubes to hold the butts in place and a cord will hold the rods to the holder. Not much thought was put into it just had some scrap mahogany and needed to hold 4 more rods.
Posted: Thu Feb 23, 2006 7:30 pm
by ks8
Very nice.
And I like the idea of a blank for electrical panel or such, that reads something like,
Custom Built from a Bateau Design
If you recommend and sell a particular panel, the blank would make more sense, or, offer a service to customize one for a particular set of dimensions or model of panel, or, it doesn't even have to fit a switch panel.... just a plastic or engraved metal plate of some sort, charge for it, but brand the company with it so it can be displayed on the boat. If you really want to look official, you could assign serially generated design license numbers, and include that on the plaque. Just ideas, since we can tend to be proud of the designs we've labored to bring to life in wood and glass...

ks
Posted: Thu Feb 23, 2006 10:00 pm
by FLYonWALL9
I think that suggestions like these aren't over looked but I know they take time to put into the line up. Along with hats, tshirt, license plate frames. They will happen in due time, until then I'll just have mine made put pictures of it up so the guys will see the interest. After all we got hooked on these boats from a snow ball rollin and likewise it goes.
But don't look for me to have them made, I don't feel its my place ethically or legally.
Posted: Fri Feb 24, 2006 10:24 pm
by FLYonWALL9
Posted: Sat Feb 25, 2006 6:12 pm
by FLYonWALL9
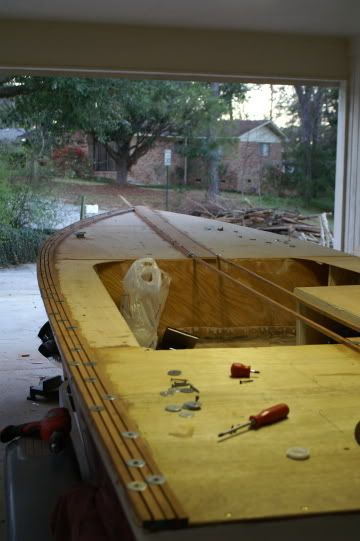
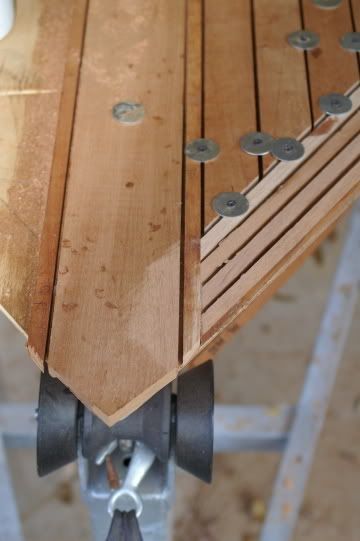
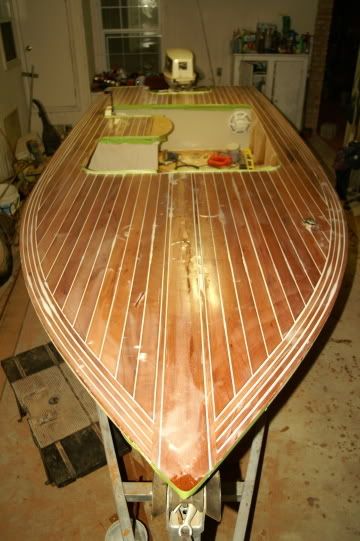
Started laying my edge planks today and cut my king plank. The edge planks are (4) 1/2x1/2 and the king plank is 4" x 1/2. Once I have all this glued down I'll be able to start doing my decking. It should go pretty fast with the hardest part cutting the edges to line up with the curve of the bow of the edge decking that you see in these pics. I forgot I had to cut a hole in the subfloor so I would know where my wires will run for my gps and running light.
Posted: Sat Feb 25, 2006 6:30 pm
by fishingdan
That looks like a pretty cool deck layout for an ob15. I now see what you were describing for your layout. Looking forward to the finished product.
One question about your engine control. Are you able to push to WOT without hitting your knuckles on the console?
Posted: Sat Feb 25, 2006 7:31 pm
by FLYonWALL9
On the WOT.
Yeah you can and yeah if you wrap your hand all the way around it you will hit your knuckles. I just ease it forward open handed and have never run the boat WOT and haven't ever run it with the current prop so I really don't know what it is going to do. As long as I can get her to run at 30mph I'm good but with the correct prop based on DaveF's numbers of what his does I should be close to 40 at WOT I suppose.
I see you sold your little boat plans to build something else?
Oh and with decks like this it gives this boat a completely different look, I really like it and cant wait to have the decks done.
Posted: Sun Feb 26, 2006 3:50 pm
by nort
Fly, a little off topic post. I live in Hattiesburg. My wife and I are missing our trips to the coast to go fishing. All the piers we fished off of are gone. Are there any places near Mobile you can recommend for fishing without a boat? Thanks for any help you can give me.
Posted: Sun Feb 26, 2006 5:31 pm
by FLYonWALL9
Nort Dauphinh Island Pier is open, also I think Pensacola Pier is and know the 3 mile bridge is in Pcola.
From a pier thats where I would try. If from shore and you can wait til the water warms you can wade fish at Fort Morgan, both beach and bay side. Dauphin Island wade fish when warm enough around the fort and air port.
When you get closer to making your tip shoot me an email and I'll tell you whats biting where. I am a member of ACFA (alabama coastal fisherman association). We keep up with that kind of thing in our club.
Trout are just starting to pick up near the flats but haven't moved up to the flats as yet. Next month will be great for sheephead around DI pier, and Alabama Point bridge.
Posted: Sun Feb 26, 2006 8:25 pm
by FLYonWALL9
Glued down my king plank and stip plank next to it and the edge planking. If anyone is thinking of doing this it is a two man job! I did manage alone but barely. The trick is the edge board isn't held tight until the second most inner board is in place. That will level out the finder washer and pull the first and second board tight against the sub floor. I sure hope it holds when I remove my screws
Posted: Mon Feb 27, 2006 8:25 pm
by FLYonWALL9
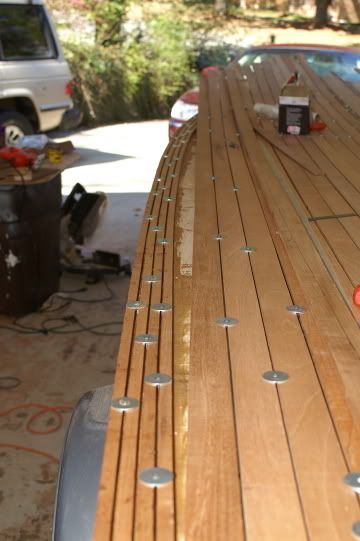
Today was another one of those good days. Got the whole port side planks cut, fit, and glued. Screws will come out tomorrow and the starboard side will get laid. It ended up harder than I thought with a little stip that had to be cut and hand sanded to shape. It didn't end up perfect but it will fly. I started to redo it and decided not to screw up another piece of wood.
PIX
Posted: Mon Feb 27, 2006 8:35 pm
by timoub007
Scott,
That thing is looking sweet!
I wasn't sure what you were calling a "king plank" but didn't want to slow you down by asking. I knew you'd be along in a day or two to answer that question. I can't wait to see it complete and shined up. You'll have to get up on the poling platform to get a good overhead shot.
Keep pluggin' along. I'm getting a bit done on mine this week too.
Later,
Tim
Posted: Mon Feb 27, 2006 8:42 pm
by FLYonWALL9
Thanks Tim,
I have been told it was called a king plank but I could be very well wrong. Its the center plank runs from bow to stern. The rest of the planks are laid off of it except for the edge planks. It really shows you how unsquare your boat is
......
I had no idea it would be as hard as it is single handed when you get to the small parts. The other side is going to be a nightmare.
Posted: Mon Feb 27, 2006 9:11 pm
by fishingdan
FLYonWALL9 wrote:
I see you sold your little boat plans to build something else?
I actually sold my boat. Too small for what I now like to do. When I was building it, I was mostly a freshwater fishing guy. After the last two seasons, I have fallen in love with the ocean fishing in New England and then I got that dreaded disease known as "I-NEED-a-bigger-boat-itus". I would like to build the OP21 or something like that, but I don't have the energy or time for that at this time. In the interim, I have picked up a 20' 1978 Penn Yan Explorer that I will start to restore in the spring. It is an outboard powered boat (not a tunnel hull like most Penn Yans) with a cockpit layout very similar to the OP21. I will probably start a new build next winter.
That deck is looking awesome Scott!
Posted: Mon Feb 27, 2006 10:06 pm
by Douglas
Scott,I love what you are doing to that huge deck! The design is beautiful. Maybe I missed something, but what are you going to fill the gap's with? Also, what kind of wood are you using? Thanks,Douglas
Posted: Mon Feb 27, 2006 10:41 pm
by FLYonWALL9
Thanks Douglas!
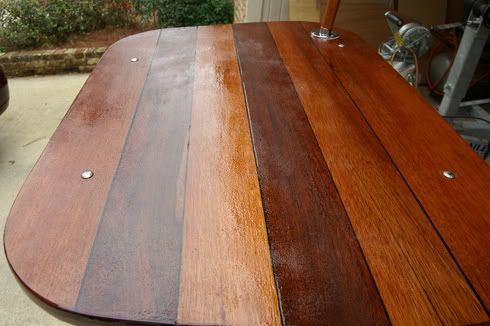
I may not have said in this thread what the wood is, mahogany. I purchased it before Katrina from Hogan Hardwoods in New Orleans (so I hope I have enough). I got it in board form not like the planks you see. I rough planed one side and finish planed the topsides. Thay are milled to 1/2" with the sub deck at 1/4 inch which is also a mahogany. I used epoxy/wood four to make my glue, applied with a 1/8" trowel like you would for tile or wood home flooring.
The gaps will get filled with cab-o-sil, its a white very very fine powder to thicken the epoxy to a marshmellow color. Once the gaps are filled the decks will be planed even then sealed with epoxy and varnish. It should have a honey color like my gauge panel. Also in my last two coats of varnish I'll add some nonskid so I don't bust my head
Posted: Tue Feb 28, 2006 3:49 am
by Mike Adams
Love that deck, Scott - nice work!
Posted: Tue Feb 28, 2006 6:27 pm
by Davef
Scott, that decking sure does look good. You want to come down and do mine when your done?
Posted: Thu Mar 02, 2006 3:05 pm
by FLYonWALL9
Thanks DAVE! Hey man may as well I have all the 220 screws and finder washers it takes to do it now.
Oh thats per side

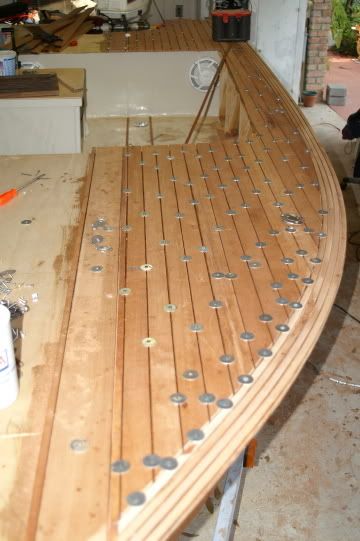
All my glue has dried to the point where I could remove the screws. I shaped an end cap piece for my console so it wouldn't just look like a box. Radius corners on the front of the cockpit, and console, just going to use right angle straight cuts on the back of the cockpit. I'll finish shaping up the cockpit edges and clean out my gaps in the planks and get them ready for filling. Shape up my rubrails and do around my engine well. That would be a good day if I can get all that done...

Posted: Thu Mar 02, 2006 4:05 pm
by MadRus
I was gonna reserve my WOW until the finished product was revealed, but damn... I mean WOW!
Posted: Thu Mar 02, 2006 4:48 pm
by tech_support
very pretty
Posted: Thu Mar 02, 2006 5:04 pm
by cbrman
That looks awesome, Very nice work!!!
Posted: Fri Mar 03, 2006 8:54 pm
by FLYonWALL9
GOOD LORD WHAT A LONG DAY!
Started off with walking out and finding about 30% of my epoxy seeped throught the little dry wall screw holes in my deck. Don't let any epoxy maker tell you "oh you make it thick enough and it wont sag" BS!
So, I sanded the decks AGAIN. Went and got MORE epoxy, milled fiber, and white color pigment. Took masking tape made little bitty balls and pushed them into the holes in the subdeck. I figure I had 220 screws and washers the deck was fitted twice some screws made it into the same holes some didn't so thats about 360 holes I had to fill PER SIDE! DAMNIT MAN!
Mixed me up some MORE sticky goop and went to spreading. Did some glueing on the console, and sealed the deck with clear epoxy.
Posted: Fri Mar 03, 2006 11:59 pm
by LBrewer
Man! I'll bet that was really frustrating. But that is gonna be a sharp looking deck. I love the contrasting white in there. Great idea.
Posted: Sat Mar 04, 2006 12:06 am
by FLYonWALL9
Thanks LB, I couldn't tell you how many mahogany planked and teak planked decks I have looked at over the past 8 months trying to figure out what to do. I chose this color because of heat and my hatch frames are white or will be anyway. The holes that I cut for those will be the hatch doors, thats the reason why I haven't cut them as yet.
How is the canoe going?
Posted: Sat Mar 04, 2006 6:49 pm
by squid
Scott,
Awsome. what more can I say. You have really done your OB-15 Proud.
Squid.
Posted: Sat Mar 04, 2006 8:23 pm
by Toni V
That's starting to look sweet
Btw. How did you get the white-pigmented-epoxy to the gaps only?
Posted: Sun Mar 05, 2006 1:31 am
by ks8
Hey... isn't it great to see what was in your head, now in front of your eyes? Nice work!
ks
Posted: Sun Mar 05, 2006 5:02 pm
by FLYonWALL9
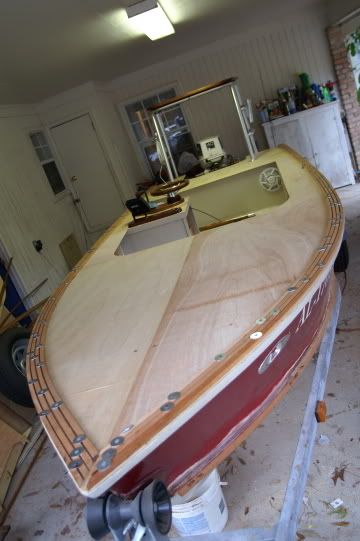
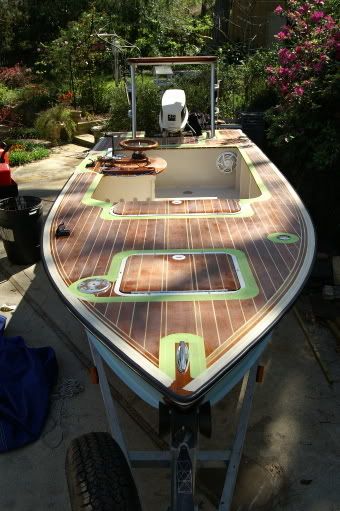
Unable to do much today (sunday) because of having to go to a party. I decided I would cut my hatches, and mount EVERYTHING in a test fit and placement. The layout is just like I pictured it to be and just the amount of room I expected to have.
I was able to finish filling my gaps in my planks and get those ready for the first sand and varnish. Installed the second board of my 1" spray rail.
Mounted:
Push pole holder
cleat
trolling motor bracket
steering and guages
rod holder
poling platform
hatches
Now the white you see in the hatches will get filled with the blanks I cut out for the holes once I have them trimmed to fit and planed to 1/2" like the plastic hatches you see here.
I can really see what I have now. I was crammed into the carport and could only step back a few feet. VERY PLEASED!

Posted: Sun Mar 05, 2006 5:10 pm
by timoub007
Scott,
That thing is really sweet looking. Congrats!
Any chance we can get bigger, higher res pics of those you have outside?
Tim
Waiting on some glue to dry on mine right now.
Posted: Sun Mar 05, 2006 5:40 pm
by FLYonWALL9
Posted: Sun Mar 05, 2006 6:10 pm
by timoub007
You're going to have to wear driving gloves to steer that sucker. The super fine wheel you've got looks like it will be slick/slippery with wet hands.
You are really showing us some good stuff!
Tim
The next step
Posted: Sun Mar 05, 2006 7:19 pm
by Douglas
Scott,
Alabama is'nt that far away from Wisconsin ,is it? I'm ready to start another strip built, custom design Rangeley Lake boat. From the looks of it ,you know your way around strips, so when will you be available?
Douglas
All kidding aside, what you have done look's beautiful!!!
Posted: Mon Mar 06, 2006 12:31 am
by timoub007
Here are Scott's pictures full sized.
Tim


Posted: Mon Mar 06, 2006 10:37 am
by FLYonWALL9
Thanks Tim
Posted: Mon Mar 06, 2006 11:11 am
by ks8
Of course we'll need the picture of her in the water with you at the helm. Nice job!
Posted: Tue Mar 07, 2006 6:25 pm
by FLYonWALL9
These are the days that seem to go so slow.
The hull was sanded again, this time with 220, topsides with 220 and cockpit with 80. By far my cockpit at best is workboat finish. I suppose that will give me a winter project and will be easy enough to slick out.
The spray rails were sanded, bottom was sanded and painted. I think the spray rails came out nice I hope they do the job they were intended to do. The transom was also sanded and painted. Last to paint will be my rubrail.
http://gallery.bateau2.comdisplayimage. ... fullsize=1
http://gallery.bateau2.comdisplayimage. ... fullsize=1
http://gallery.bateau2.comdisplayimage. ... fullsize=1
Posted: Wed Mar 08, 2006 9:36 pm
by FLYonWALL9
No new pictures, nothing left to show.
Installed steering (some how it was/is bent)
Gauge panel
poling platform mounted
trolling motor bracket
cleats
push pole holder
transducer
gps/fish finder head
Painted rubrail
painted cockpit (2nd coat)
painted transom (2nd coat)
painted hatch rings to match the motor
Look for pictures on Sunday or Monday after I spray it. God I hope we have good weather on Sunday.
Posted: Wed Mar 08, 2006 11:47 pm
by timoub007
Sounds like a winner Scott.
Shoot me the pics if you can't get them posted up a decent size and I'll throw them up for you.
Tim
Posted: Thu Mar 09, 2006 9:29 am
by Yoda
Hey Scott, you can now forget convincing the fellows at the dock that you built your boat.
Posted: Thu Mar 09, 2006 5:34 pm
by FLYonWALL9
Ok so someone requested a picture of the deck looking down from the platfrom. My hatches are still drying so they are MIA. Some how my steering shaft at the wheel got bent
so the wheel sits cockeyed. Kinda sucks but I'm not going to get a new one for a minor problem like this. Everything on the boat is finished except for the hull side paint.
Strips
Posted: Thu Mar 09, 2006 7:54 pm
by Douglas
O.K., So you may not be ready for the tedium of strips yet, but that is the best looking O.B.15 I've seen yet!!! Douglas
P.S. 250 holes per side? How about 1800 per side?
Posted: Thu Mar 09, 2006 8:26 pm
by FLYonWALL9
Douglas,
Naw man, I cant deal with that many screws. Not unless someone invents a screw gun that weighs about 10oz with self loading screws.
And thanks for the compliments! People here that appreciate what it takes to do something like this and know what it takes makes it worth while. Well, more so than just a Joe on the street.
Don't worry, I'm going to do a barrel back before I die!
Posted: Thu Mar 09, 2006 9:53 pm
by Davef
man that's nice!
Posted: Fri Mar 10, 2006 11:26 am
by Cracker Larry
That's beautiful! Nice job

Posted: Fri Mar 10, 2006 4:27 pm
by FLYonWALL9
I talked with a chemist at the factory where my paint was made today (Mobile BLP Paints) about coverage, flow, and dry time in our current weater pattern. He then tells me I needed min. 3 coats. With a deadline of next Tuesday having to take the boat to a Sportsmans convention as an exhibit. I decided to roll and tip the first couple of coats. I am going to try something different this time and sand with 320 between coats and thin as much as possible on the last coat to flow really smooth. Best thing I can come up with.
I wanted a really contrasting color and fighting lady yellow has been done to death up here. So, this color came to me. Its not as blue as the picture makes it out to be and has quite a bit of green in it. Kinda sea foam really. Anyway, this is the first of 3 coats.
HiRes
http://gallery.bateau2.comdisplayimage. ... fullsize=1
Posted: Sat Mar 11, 2006 1:48 am
by LBrewer
Man....that was a good choice. It really sets off the deck.
Larry
Posted: Sat Mar 11, 2006 5:55 pm
by FLYonWALL9
BIG FRIGGIN MESS!
Got up today headed out to do some wet sanding. Sanded the first side I painted and it was perfect, well perfect for roll and tip. I get to the other side and the crap didn't dry or cure all the way. So, I had to strip all that off with thinner and wet sand with thinner.
Painted both sides again with the port side looking REALLY sweet, not sure if I will put another coat on it or not.
Was going to finish up my hatches but my white epoxy ran to one side of the board so that had to be recoated. All thats left to do to those is sand and varnish a couple times.
Sanded and painted the ole motor. She is looking good again and got her runnin like a top.
Posted: Sun Mar 12, 2006 10:26 am
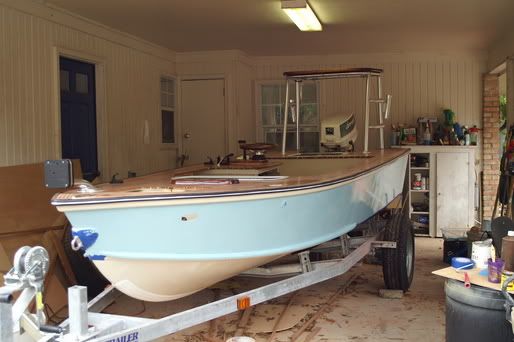
by FLYonWALL9
Well, I had to pull the boat out of the car port. I think that low air movement had something to do with not drying. So here she is sitting int he front yard.
http://gallery.bateau2.comdisplayimage. ... fullsize=1
Posted: Sun Mar 12, 2006 4:10 pm
by FLYonWALL9
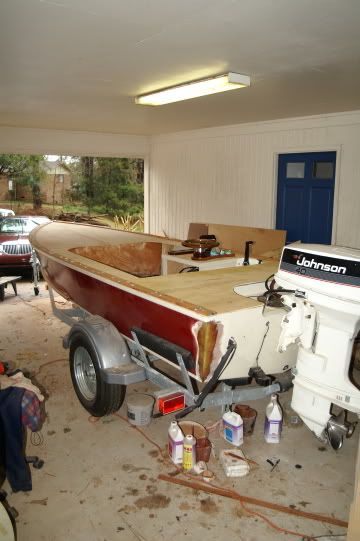
One of the last few things that I had left to do was all the dash or console pieces. I had to work the fishing rod holder in and drain tubes for it. What I did was cut 1 1/4" pvc from the holder to a 90deg elbow and out the front of the console. That way if water got in the tube it wouldn't drain in the console. I didn't want to mount the holder on the front of the console sticking. I had to refit the console teak door (gift from ole dad). Its not perfect but will keep water out. My helm pump was hitting it and also the drain tubes for the rod holder thanks some of my keen engineering skills
.... I also had to strip God only knows how much varnish off of it and apply some good teak oil.
Install the cd player and guages, they are just resting in place for the moment.


Posted: Sun Mar 12, 2006 5:20 pm
by FLYonWALL9
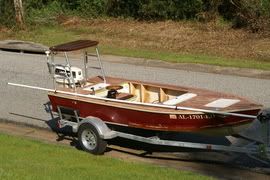
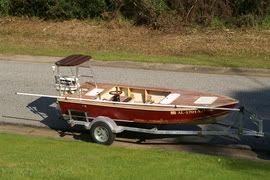
Whelp gang aside from putting in my nav lights and screwing down the hatches I'M DONE!
THANKS ONE AND ALL FOR PUTTING UP WITH THIS LONG THREAD, it has surely been fun.
http://gallery.bateau2.comdisplayimage. ... fullsize=1
http://gallery.bateau2.comdisplayimage. ... fullsize=1
Posted: Sun Mar 12, 2006 6:05 pm
by Mike Adams
Congratulations on the rebuild, Scott- she looks real nice. Looking forward to seing some pics of her in the water.
Mike
Posted: Sun Mar 12, 2006 6:46 pm
by timoub007
Wow Scott! That thing looks great.
Now get some fenders on that trailer so you won't mess up the sides on the first trip to the ramp.
Congrats and thanks for sharing as you went along.
Tim
Posted: Mon Mar 13, 2006 9:13 am
by cbrman
The finished product looks awesome, I can only hope my OB15 turns out looking HALF as good as yours does. Great Job!!!
So whats the next project (boat) going to be???
Let us know how she catches fish!
Posted: Mon Mar 13, 2006 6:28 pm
by FLYonWALL9
Posted: Tue Mar 14, 2006 12:11 am
by LBrewer
Using the hatch cutouts for the hatch lids looks great. I was waiting for that pic to see how it turned out. Great job Scott
Posted: Tue Mar 14, 2006 11:22 am
by kiwi
You mean you are going to let fish bleed all over that wood!
Nice job
Tony
Posted: Tue Mar 14, 2006 6:15 pm
by FLYonWALL9
Tony,
ABSOLUTELY, then again you may see me hanging them over the side until I walk back to the fish box
.... Naaaah I'm not worried about it, I built it for fun and I'm going to use it for fun. However no work boots allowed, only boat shoes or no shoes.....
Posted: Wed Mar 15, 2006 8:34 pm
by FLYonWALL9
A buddy of mine that I used to work with called and told me he was going to be running a set of certified scales accurate to 20lbs. I hooked up and pulled the boat to Saraland put her in the water and run my truck across the scales went back to get the boat. Couldn't stand it so I took off up river for a could hundred yards. She runs GOOOOOOD, has quite a bit of a lean to starboard which I figured due to my fat arse and two huge batteries. But once on plane she is true and level couldn't wish for better. I didn't have a GPS or tach to see what my speed was.
ANYWHO the boat weighs 800lbs with a half tank of fuel aprox 6gal. I may play around with it tomorrow and see how she does in open water.
by the way the motor weighs 228 if I recall correctly. and keep in mind the scale rounds to the nearest 20
Posted: Wed Mar 15, 2006 10:27 pm
by glcost
Fly,
I was just looking at your photos. The boat looks great. What a transform. She's so pretty, I'd be afraid to get fish guts on her deck.
Your wood steering wheel looks very familar too. Did you get it from ebay early this winter?
George
Posted: Wed Mar 15, 2006 10:41 pm
by FLYonWALL9
No, I've had the wheel for about 2 years. Earlier this winter I did post a link to an ad on ebay for one that was close to mine.
Posted: Thu Mar 16, 2006 2:40 pm
by glcost
I couldn't remember who posted that link, but I did purchase that wheel. Well, it took 2 trys. Someone out bid me in the twlight hours, but the guy placed another on ebay a few weeks later.
It's a very nice wheel. Thank you for the posting the link!
George
Posted: Wed Mar 22, 2006 8:01 pm
by FLYonWALL9
Back in the car port the boat went

after a good sand with some 220 prep work for the nonskid.

After a bit of trial and wondering what I wanted my nonskid pattern to look like I masked it all off.
Rolled on some varnish, took the salt out of the salt shaker and put in my non-skid. Shook it on (man wind sucks when you are doing this) and rolled the boat into the carport. Its going to take off some of the glare from the varnish that wasn't too bad to start with. I used a product called sharkskin its really fine and should work well. I will roll on two top coats after the first dries and I pull off my masking.
Posted: Thu Mar 23, 2006 4:19 pm
by FLYonWALL9
NOW
maybe I can enjoy it without busting my arse. The pattern was cut out of masking tape. Rolled varnish and shook on non-skid. Pulled masking tape off while still semi wet, let dry for 3 hours. Rolled two top coats tipping the bubbles out of the area's that didn't have non-skid applied. At drastic angles you can tell its got texture from a far and straight on it looks clear.
hi-res
http://gallery.bateau2.comdisplayimage. ... fullsize=1
Posted: Thu Mar 23, 2006 6:54 pm
by Cracker Larry
That's fantastic, Scott
Something to really be proud of. You may have a hard time ever going fishing again, because every time you take that beauty out in public, people will be stopping you and wanting to talk about it. Forget pulling into a gas station, you'll never get out. Fill up indescretely at home and move quickly by dark
Beautiful job.
Posted: Thu Mar 23, 2006 7:10 pm
by Jimmiller
That is a nice looking boat.I like your wood work.
Now go fishing. The fish will jump in for a ride
JIM PH18
Posted: Thu Mar 30, 2006 12:33 pm
by otterbanx
Hey Fly, boat really looks nice!!!
something I noticed in your boat is the cockpit floor appear to be level the full width of the boat. Is this the case? If so, I would like to know the specs. That is a mod I would like to make in my OB plans.
If I missed this in another post I apologize as I haven't gotten to the point of installing the Cockit sole in my OB15 yet.
Thanks,
Taylor
Posted: Thu Mar 30, 2006 12:44 pm
by FLYonWALL9
Taylor,
Its a standard 4x8 sheet nothing cut off the sides, the lenght surely depends on the length of the cockpit. Just put some support at chine level on front and rear bulkhead. Under the sole you can run stringers like a normal boat on top of your planned stringers. Or run them from chine to chine, make fillets and tape down. Use a level to get the floor sq and level and then fillet and tape to the hull inside.
Posted: Thu Mar 30, 2006 4:53 pm
by FLYonWALL9
Some of you may or may not know I was having a problem with my hatches warping upward on the edges. Something I just couldn't live with. So with idea's from many people in my fishing club and some of you I came up with a combination of a couple of things.
Battens to hold the board flat, and kerfs to limber up the panel so it would relax back to being flat. Now all the kerfs are cut battens are being glued down with fillets. Once dry I will fill the kerfs with thickened epoxy sand and paint. Thanks all!
Posted: Thu Mar 30, 2006 6:49 pm
by ks8
The battens seem to be the best way to go. But for any who do not or cannot go that route for one reason or another... if you glass a hatch instead, be sure to glass both sides to make it a more stable composite panel. Thin plywood does funny things when temperatures vary on either side, or somehow moisture finds a way in, if not stabilzed somehow.
Thanks for the picture.
It looks like they'll stay flat now!
Posted: Fri Mar 31, 2006 1:53 am
by maxgsx
This is a very prevalent problem in my industry.
The rule is; anything you do to one side of a panel you must do something similar to the other.
When laminating with veneers or plastics you always use a counter laminate on the reverse.
The same is true with paints, same number of coats both sides or you my get a warp.
We cut kerfs on the reverse of hardwood decking to try to stop cupping. It doesn't always work but I am sure it must help.
Posted: Mon Apr 03, 2006 10:21 pm
by FLYonWALL9
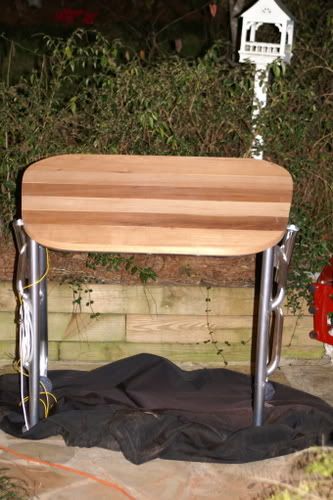
Posted: Tue Apr 04, 2006 1:59 pm
by ks8
Looks fantastic!
Of course you will test the varnish over the hobby paint on a piece of scrap first?

I'm curious of the weight of that piece of mahoghany. I bet it will look outstanding with the varnish!
ks
Posted: Tue Apr 04, 2006 3:16 pm
by FLYonWALL9
Heck no I didn't test it
that takes too much time!
I put some bar/table top epoxy on it frist then when that dries I will sand and then put my varnish.
Weight of the wood? At best I would say 3lbs if that. I can try and stick it on some scales when its dry if you wish?
Posted: Tue Apr 04, 2006 4:02 pm
by ks8
three pounds is light considering mahoghany! I'm glad the paint didn't run under the epoxy. I've had epoxy cut into some underlying paint in the past. It will sure look fine mounted.
ks
Posted: Sun Apr 09, 2006 5:33 pm
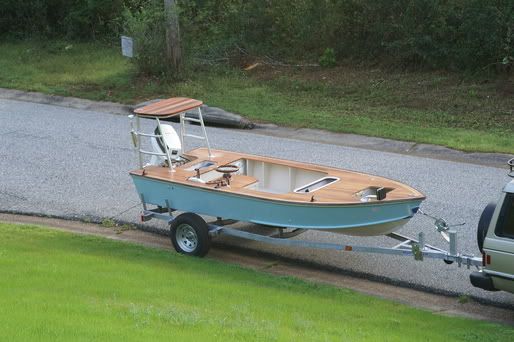
by FLYonWALL9
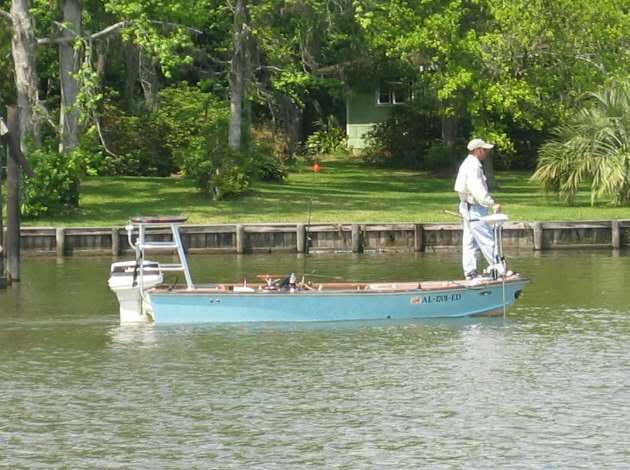
Out fishing yesterday in a club tourney had one of our members shoot this thought I would share. Not very high res but best he has I suppose.
Posted: Sun Apr 09, 2006 9:48 pm
by Davef
Scott,
That really looks good!
Posted: Sun Apr 09, 2006 11:25 pm
by ks8
All your photos of her look good, but there is something about her in the water. It's where she belongs! Nice!
I don't know if the Bateau calendar project will ever get revived by anyone. I don't think you can rate pictures anymore in the gallery.
But, that aside, I bet it felt good standing up there on her bow in the tourney...
Posted: Mon Apr 10, 2006 1:06 pm
by FLYonWALL9
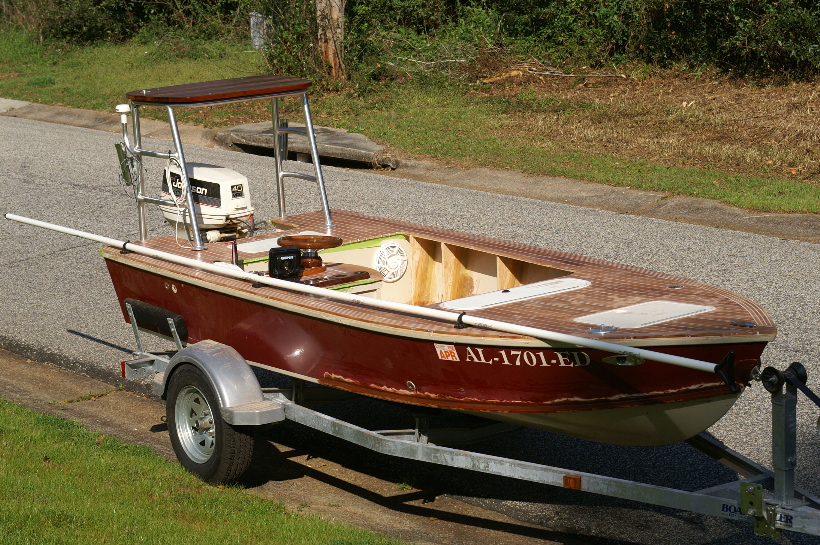
After weeks of waiting its HERE! No more butt busting for this guy....
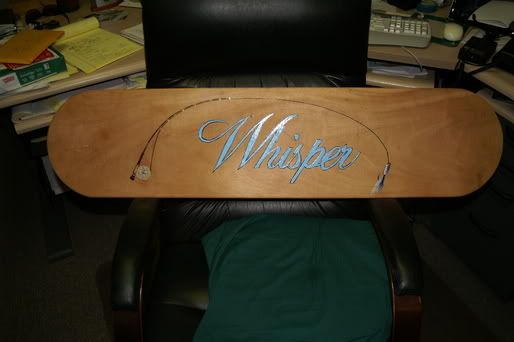
Made of Sunbrella and sewn with UV thread I hope it lasts for years. The back rest is done also and I mated the two today. Sure looks at home with her name. Glad this part is done. Now for the grated floor
http://gallery.bateau2.com/displayimage ... fullsize=1
http://gallery.bateau2.com/displayimage ... fullsize=1